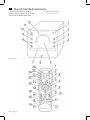
1
D
NL
F
E
I
GB
Musik-Center mit DAB+/Bluetooth
Muziekcenter met DAB+/Bluetooth
Chaîne stéréo compacte avec DAB+/Bluetooth
Centro musical con DAB+/Bluetooth
Centro musicale con DAB+/Bluetooth
Music Center with DAB+/Bluetooth
MUSIK-CENTER MIT
DAB+/BLUETOOTH
MC 4457 DAB+/BLUETOOTH
Bedienungsanleitung/Garantie
Gebruiksaanwijzing
Mode d’emploi
Instrucciones de servicio
Istruzioni per l’uso
Instruction Manual
04
15
24
33
42
51
2
Inhalt
Deutsch
Español
Inhalt
Contenidos
Übersicht der Bedienelemente........................................ Seite 3
Menü Übersicht................................................................... Seite 4
Bedienungsanleitung......................................................... Seite 4
Technische Daten................................................................ Seite 13
Garantie................................................................................. Seite 13
Entsorgung........................................................................... Seite 14
Indicación de los elementos demanejo......................Página 3
Resumen del menú..........................................................Página 4
Manual del usuario..........................................................Página 33
Especificaciones técnicas...............................................Página 41
Eliminación........................................................................Página 41
Nederlands
Italiano
Inhoud
Contenuto
Overzicht van de bedieningselementen............................ Blz 3
Menuoverzicht......................................................................... Blz 4
Gebruiksaanwijzing................................................................. Blz 15
Technische specificaties......................................................... Blz 23
Verwijdering ............................................................................ Blz 23
Elementi di comando......................................................Pagina 3
Panoramica menu............................................................Pagina 4
Manuale dell’utente.........................................................Pagina 42
Specifiche tecniche..........................................................Pagina 50
Smaltimento......................................................................Pagina 50
Français
English
Sommaire
Contents
Liste des différents éléments de commande................Page 3
Aperçu du menu.................................................................Page 4
Mode d’emploi....................................................................Page 24
Données techniques..........................................................Page 32
Élimination............................................................................Page 32
Location of Controls...........................................................Page 3
Menu Overview...................................................................Page 4
User manual.........................................................................Page 51
Technical Specifications.....................................................Page 59
Disposal.................................................................................Page 59
3
Übersicht der Bedienelemente
Overzicht van de bedieningselementen
Liste des différents éléments de commande
Indicación de los elementos demanejo
Abb. 1 / Fig. 1
Abb. 2 / Fig. 2
Elementi di comando
Location of Controls
4
Menü Übersicht
Menuoverzicht
Aperçu du menu
Resumen del menú
Panoramica menu
Menu Overview
DAB
Autoscan
Manual tune
DRC
DRC off
DRC high
DRC low
Prune
Prune?
<No> Yes
FM
Scan setting Strong stations only
All stations
DAB + FM
System
Factory reset
Factory Reset?
<No> Yes
SW version
Bedienungsanleitung
Vielen Dank, dass Sie sich für unser Produkt entschieden
haben. Wir wünschen Ihnen viel Freude mit dem Gerät.
Symbole in dieser Bedienungsanleitung
WARNUNG:
Warnt vor Gefahren für Ihre Gesundheit und zeigt mögliche
Verletzungsrisiken auf.
ACHTUNG:
Weist auf mögliche Gefährdungen für das Gerät oder
andere Gegenstände hin.
HINWEIS:
Hebt Tipps und Informationen für Sie hervor.
Allgemeine Sicherheitshinweise
Lesen Sie vor Inbetriebnahme dieses Gerätes die Bedienungsanleitung sehr sorgfältig durch und bewahren Sie diese
inkl. Garantieschein, Kassenbon und nach Möglichkeit den
Karton mit Innenverpackung gut auf. Falls Sie das Gerät an
Dritte weitergeben, geben Sie auch die Bedienungsanleitung
mit.
• Um das Risiko von Feuer oder einem elektrischen Schlag
zu vermeiden, sollten Sie das Gerät nicht Regen oder
Feuchtigkeit aussetzen. Das Gerät nicht in unmittelbarer
Nähe von Wasser betreiben (z.B. Badezimmer, Schwimmbecken, feuchte Keller).
• Das Gerät nicht an extrem heißen, kalten, staubigen oder
feuchten Orten verwenden.
• Benutzen Sie das Gerät ausschließlich für den privaten
und den dafür vorgesehenen Zweck. Dieses Gerät ist
nicht für den gewerblichen Gebrauch bestimmt.
• Achten Sie darauf, dass das Stromkabel nicht geknickt,
eingeklemmt oder mit Hitzequellen in Berührung kommt.
• Achten Sie darauf, dass das Stromkabel keine Stolperfalle
darstellt.
• Berühren Sie den Netzstecker oder das Kabel niemals
mit nassen Händen.
• Das Gerät ausschließlich an eine vorschriftsmäßig installierte Steckdose anschließen. Achten Sie darauf, dass die
angegebene Spannung mit der Spannung der Steckdose übereinstimmt.
• Der Netzstecker muss immer gut zu erreichen sein.
• Batterien stets richtig herum einlegen.
• Das Gerät so aufstellen, dass vorhandene Lüftungsöffnungen nicht verdeckt werden.
• Verdecken Sie keine Lüftungsöffnungen mit Gegenständen, wie z.B. Zeitschriften, Tischdecken, Vorhängen usw.
• Setzen Sie das Gerät keinem Tropf- oder Spritzwasser aus
und stellen Sie keine mit Flüssigkeiten gefüllten Gefäße,
wie z.B. Blumenvasen auf das Gerät.
• Offenen Brandquellen, wie z.B. brennende Kerzen dürfen
nicht auf das Gerät gestellt werden.
• Niemals das Gehäuse des Gerätes öffnen. Durch unsachgemäße Reparaturen können erhebliche Gefahren für
den Benutzer entstehen. Bei Beschädigung des Gerätes,
insbesondere des Netzkabels, das Gerät nicht mehr in
Deutsch
Betrieb nehmen, sondern von einem Fachmann reparieren lassen. Netzkabel regelmäßig auf Beschädigungen
prüfen.
• Ein defektes Netzkabel darf nur vom Hersteller, unserem
Kundendienst oder einer ähnlich qualifizierten Person
durch ein gleichwertiges Kabel ersetzt werden, um Gefährdungen zu vermeiden.
• Benutzen Sie das Gerät längere Zeit nicht, ziehen Sie den
Netzstecker aus der Steckdose, bzw. entnehmen Sie die
Batterien.
Diese Symbole können sich ggf. auf dem Gerät befinden
und sollen Sie auf folgendes hinweisen:
Das Blitz-Symbol soll den Benutzer auf Teile
im Inneren des Gerätes hinweisen, die gefährlich hohe Spannungen führen.
Das Symbol mit Ausrufezeichen soll den
Benutzer auf wichtige Bedienungs- oder
Wartungs-Hinweise in den Begleitpapieren
hinweisen.
Geräte mit diesem Symbol arbeiten mit einem „Klasse 1-Laser“ zur Abtastung der CD.
Die eingebauten Sicherheitsschalter sollen
verhindern, dass der Benutzer gefährlichem,
für das menschliche Auge nicht sichtbarem
Laserlicht ausgesetzt wird, wenn das CD-Fach
geöffnet ist.
Diese Sicherheitsschalter sollten auf keinen Fall überbrückt
oder manipuliert werden, sonst besteht die Gefahr, dass Sie
sich dem Laser-Licht aussetzen.
Kinder und gebrechliche Personen
• Zur Sicherheit Ihrer Kinder lassen Sie keine Verpackungsteile (Plastikbeutel, Karton, Styropor etc.) erreichbar
liegen.
WARNUNG!
Lassen Sie kleine Kinder nicht mit Folie spielen. Es
besteht Erstickungsgefahr!
• Dieses Gerät ist nicht dafür bestimmt, durch Personen
(einschließlich Kinder) mit eingeschränkten physischen,
sensorischen oder geistigen Fähigkeiten oder mangels
Erfahrung und/oder mangels Wissen benutzt zu werden,
es sei denn, sie werden durch eine für ihre Sicherheit
zuständige Person beaufsichtigt oder erhielten von ihr
Anweisungen, wie das Gerät zu benutzen ist.
• Kinder sollten beaufsichtigt werden, um sicherzustellen,
dass sie nicht mit dem Gerät spielen.
Spezielle Sicherheitshinweise
Dieses Gerät arbeitet mit einem
Laser der Klasse 1.
Übersicht der Bedienelemente
Vorderseite (Abb. 1)
1 IR – Sensor für die Fernbedienung
2
EJECT Taste (CD-Fach aus-/einfahren)
PLAY/PAUSE Taste (Wiedergabe/Pause)
3
4 STOP Taste (Stopp)
5 VOLUME Lautstärkeregler
6 USB Anschluss
7 CD-Fach
8
NEXT Taste (Nächstes Musikstück)
PREV Taste (Vorheriges Musikstück)
9
INPUT Taste (Eingang)
10 STANDBY Taste (Ein-/Betriebsbereitschaft)
11 Bluetooth-Kontrollleuchte
12 LCD Display
Rückseite (ohne Abbildung)
FM ANT – Wurfantenne
AUDIO INPUT Buchsen (2x RCA)
Netzanschlussbuchse
SPEAKERS – Lautsprecheranschlüsse
Fernbedienung (Abb. 2)
1
EJECT Taste (CD-Fach aus-/einfahren)
2 Zifferntasten
3 CLOCK Taste
4 ALARM Taste (Weckfunktion)
5 SLEEP Taste
6 Richtungstasten
7 CONNECT Taste (Verbinden)
8
Taste (Wiedergabe/Pause)
/ Tasten (Nächstes/Vorheriges Musikstück)
9
10 MUTE Taste (Stumm)
11 VOL+/VOL- Tasten (Lautstärke)
12 TONE Taste (Toneinstellung)
13 DSP Taste (Equalizer)
14 SHUFFLE Taste (Zufallswiedergabe)
15 PROGRAM Taste (Speicher)
16 REPEAT Taste (Wiederholen)
17 Taste (Stopp)
18 / Tasten (Musiksuchlauf)
19 ENTER Taste (Bestätigen)
20 MENU Taste
21 INFO Taste
22 AUX IN Taste
23 BT Taste (Bluetooth)
24 FM/DAB Taste
25 CD/USB Taste
26 STANDBY Taste (Ein-/Betriebsbereitschaft)
5
6
Deutsch
Inbetriebnahme des Gerätes
• Lesen Sie vor der Inbetriebnahme die Bedienungsanleitung sorgfältig durch!
• Wählen Sie einen geeigneten Standort für das Gerät.
Geeignet wäre eine trockene, ebene, rutschfeste Fläche,
auf der Sie das Gerät gut bedienen können.
• Achten Sie darauf, dass das Gerät ausreichend belüftet
wird!
• Schließen Sie die Lautsprecher an die Anschlüsse
„SPEAKERS“ auf der Rückseite des Gerätes an. Achten
Sie dabei auf die richtige Polarität (Schwarz an Schwarz).
• Entfernen Sie, falls vorhanden, die Schutzfolie vom Display.
Stromversorgung
• Stecken Sie den Netzstecker in eine vorschriftsmäßig
installierte Schutzkontakt Steckdose 230 V, 50 Hz.
• Achten Sie darauf, dass die Netzspannung mit den Angaben auf dem Typenschild übereinstimmt.
HINWEIS:
Wird das Gerät längere Zeit nicht benutzt, so ist der Netzstecker aus der Steckdose zu ziehen.
Batterien der Fernbedienung einlegen/austauschen
(Batterien nicht im Lieferumfang enthalten)
• Öffnen Sie das Batteriefach an der Unterseite der Fernbedienung.
• Legen Sie 2 Batterien des Typs R03 „AAA“ 1,5V ein.
Achten Sie auf die richtige Polarität (siehe Batteriefach).
• Schließen Sie das Batteriefach.
Wird die Fernbedienung längere Zeit nicht benutzt, entnehmen Sie bitte die Batterien , um ein „Auslaufen“ von
Batteriesäure zu vermeiden.
WARNUNG:
Setzen Sie Batterien keiner hohen Wärme, wie z.B. Sonnenschein, Feuer oder ähnlichem aus. Es besteht Explosionsgefahr!
ACHTUNG:
• Ungleiche Batterietypen oder neue und gebrauchte
Batterien dürfen nicht zusammen verwendet werden.
• Batterien gehören nicht in den Hausmüll. Bitte geben
Sie verbrauchte Batterien bei zuständigen Sammelstellen oder beim Händler ab.
Erstinbetriebnahme
1. Richten Sie die Wurfantenne vertikal aus.
2. Schalten Sie das Gerät mit der STANDBY Taste (10/26)
ein. Das Gerät sucht automatisch nach DAB Sendern.
SCANNING… und ein Fortschrittsbalken erscheint im
Display. Die Zahl rechts im Display zeigt die Anzahl der
gefundenen Radiosender an. Anschließend wird der
erste alphanumerische DAB Sender abgespielt.
Beim Abspielen eines Radiosenders wird die Uhrzeit
und das Datum von der Sendeanstalt übernommen.
Empfängt das Gerät an Ihrem Standort keine DAB Sender, stellen Sie die Uhrzeit manuell ein, wie im Abschnitt
„Allgemeine Bedienung“ beschrieben.
Allgemeine Bedienung
HINWEIS:
Die Bedienung des Gerätes wird hauptsächlich mit der
Fernbedienung vorgenommen. Daher bezieht sich die
Beschreibung mit den Tasten auf die Fernbedienung. Einige Tasten finden Sie dennoch am Gerät. Gleichlautende
Tasten bewirken die gleiche Funktion.
STANDBY (26/10)
Schalten Sie das Gerät mit der STANDBY/ON Taste in den
Standby-Betrieb (die Uhrzeitanzeige erscheint). Drücken Sie
diese Taste erneut, schaltet sich das Gerät wieder ein.
HINWEIS:
Das Gerät merkt sich den letzten Modus und die Lautstärke
vor dem Ausschalten. Nach erneutem Einschalten startet
das Gerät in diesem Modus und dieser Lautstärke.
FM/DAB Taste (24)
Zum Wechseln zwischen DAB und FM Modus.
CD/USB Taste (25)
Zum Wechseln zwischen CD und USB Modus.
INPUT Taste (9 am Gerät)
Drücken Sie diese Taste mehrfach, um die verschiedenen
Modi auszuwählen.
VOL+/VOL- Lautstärke (11/5)
Zum Einstellen der individuellen Lautstärke.
MUTE (10)
Dient zum schnellen Abstellen der Lautstärke. Beim Aktivieren der Funktion erscheint kurz die Anzeige „MUTE ON“ im
Display. Drücken Sie diese Taste erneut, um die Funktion zu
deaktivieren. Im Display wird kurz „MUTE OFF“ angezeigt.
HINWEIS:
Die aktivierte Funktion kann aus technischen Gründen nicht
dauerhaft im Display angezeigt werden.
TONE Taste (12)
Drücken Sie wiederholt diese Taste, um die Gesamtlautstärke (MASTER VOLUME), die Bässe (BASS) und die Höhen
Deutsch
(TREBLE) einzustellen. Verändern Sie die Einstellungen mit
den VOL+/VOL- Tasten (11).
HINWEIS:
Die Einstellungen gehen verloren, wenn Sie eine der voreingestellten Equalizer Modi auswählen.
DSP Taste (13)
(Voreingestellte Equalizer-Funktion). Es stehen verschiedene
Sound Modi zur Verfügung (JAZZ, ROCK, CLASSICS, POP,
LIVE, DANCE, OFF (Aus)).
Infrarot-Fernbedienung
Zur kabellosen Bedienung aus einer Entfernung von bis zu 5
Metern. Lässt diese Reichweite nach, müssen die Batterien
ausgetauscht werden. Achten Sie bei der Bedienung auf freie
Sicht zwischen Fernbedienung und dem Sensor am Gerät.
Verzögertes Ausschalten (SLEEP)
Das Gerät schaltet sich beim Erreichen der gewählten Zeit
automatisch aus.
• Durch wiederholtes Drücken der SLEEP Taste (5) wählen
Sie die Zeit aus, nachdem sich das Gerät ausschaltet. Zur
Auswahl stehen: 10, 20, 30, 45, 60, 90 und 120 Minuten.
• Die Einstellung SLEEP OFF deaktiviert diese Funktion.
Manuelle Zeiteinstellung (im Standby)
Die Einstellungen nehmen Sie mit den Richtungstasten
/ vor. Um zur nächsten Ziffer zu wechseln, drücken Sie die
Richtungstaste .
1. Drücken Sie im Standby die Taste CLOCK (3). Im Display
erscheint [SETTING CLOCK] und die linke Ziffer blinkt.
2. Nachdem Sie die Uhrzeit eingestellt haben, drücken Sie
die CLOCK Taste, um zur Datumseingabe zu wechseln.
Im Display erscheint [SETTING DATE] und die linke Ziffer
blinkt.
HINWEIS:
Wird innerhalb von 5 Sekunden keine Taste betätigt,
wechselt die Anzeige zur normalen Anzeige zurück. Die
Einstellungen werden automatisch gespeichert.
Radio hören
FM Sender suchen
1. Drücken Sie die FM/DAB Taste (24) so oft, bis im Display
„FM“ erscheint.
2. Sie haben zwei Möglichkeiten einen Sender abzustimmen:
- Drücken Sie die / Tasten (6). Sie verändern die
Frequenz in 0,05 MHz Schritten.
- Drücken Sie / Tasten (6). Das Gerät sucht bis zum
nächsten bzw. vorherigen Radiosender.
7
3. Ist der Empfang zu schwach und rauscht der empfangene Sender, versuchen Sie durch Drehen und ab- bzw.
aufwickeln der Antenne den Empfang zu verbessern.
FM Informationen anzeigen
Durch Drücken der INFO Taste (21) können Sie sich die
folgenden Informationen anzeigen lassen, sofern vom Radiosender ausgestrahlt.
• Standardmäßig wird der Radio Text im Display angezeigt.
Wenn keine Informationen vorliegen erscheint im Display
[No RadioText].
• Hier wird Ihnen die Sparten-Zugehörigkeit (PTY) des Senders angezeigt (z.B. Pop-Musik, Nachrichten etc.). Wird
keine PTY Information empfangen, erscheint im Display
[No PTY].
• Anzeige des Sendernamens. Wird kein Name empfangen, erscheint im Display [No Name].
• Der aktuelle Audiomodus wird angezeigt. STEREO oder
MONO.
DAB Sender suchen
Digital Audio Broadcasting (DAB) ist ein digitaler Übertragungsstandard für terrestrischen Empfang von Digital Radio.
Eine Liste der in Deutschland zu empfangenden Radiosender
ist im Internet unter www.digitalradio.de verfügbar.
HINWEIS:
In Deutschland werden ca. 70% der Bundesfläche mit der
digitalen Radioübertragung abgedeckt. (Stand Nov. 2011)
In den einzelnen Gebieten sind die Abdeckung und die
Versorgung jedoch sehr unterschiedlich. Sollten die DAB
Sender in Ihrer Region standortabhängig eventuell nicht
oder nur mit Störungen zu empfangen sein, können Sie in
diesem Fall auf FM Betrieb umschalten, um diese Sender
zu empfangen. Dies ist jedoch nur möglich, wenn diese
Sender über UKW ausgestrahlt werden. Informieren Sie
sich hierzu auf der Internetseite des Radiosenders.
1. Drücken Sie die FM/DAB Taste (24) so oft, bis im Display
„DAB“ erscheint.
2. Mit den / Tasten (6) können Sie den nächsten bzw.
vorherigen Sender anwählen.
3. Ist der Empfang zu schwach und „blubbert“ der empfangene Sender, versuchen Sie durch Positionsänderung der
Antenne den Empfang zu verbessern.
HINWEIS:
• Für einen optimalen DAB Empfang empfehlen wir die
Wurfantenne vertikal auszurichten.
• Ein Umschalten zwischen Mono und Stereo ist bei DAB
nicht möglich.
• Um eine DAB Frequenz manuell einzustellen, gehen
Sie vor wie im Abschnitt „Einstellungsmenü“ beschrieben.
8
Deutsch
DAB Zusatzinformationen anzeigen
Im DAB Modus können Sie sich die folgenden Zusatzinformationen anzeigen lassen, sofern vom Radiosender ausgestrahlt. Drücken Sie dazu die INFO Taste (21).
Standardmäßig wird der DLS Text im Display angezeigt.
• DLS: kurz für Dynamic Label Segment. Hierbei handelt es
sich um digitale Begleitdaten. Diese Inhalte können z.B.
Informationen zum Sender oder der gerade gespielte
Musiktitel und Interpret sein.
• Anzeige der empfangenen Signalstärke.
• Hier wird Ihnen die Sparten-Zugehörigkeit des Senders
angezeigt (z.B. Pop-Musik, Nachrichten etc.).
• Anzeige des Namens der Sendergruppen (z.B. DR
Deutschland).
• Frequenz des aktuellen Radiosenders.
• Die Anzeige „SIGNAL ERROR“ zeigt die Signalqualität
an. Umso niedriger die nebenstehende Zahl, umso
besser die Qualität.
• Anzeige der digitalen Audio Bit Rate. / ÜbertragungsStandard.
Sender abspeichern
Halten Sie die gewünschte Zifferntaste (0-9) gedrückt, auf
dem Sie den Sender abspeichern wollen. Im Display wird
kurz „PRESET STORED“ angezeigt.
Gespeicherte Sender anwählen
Drücken Sie die entsprechende Zifferntaste auf der Fernbedienung.
Einstellungsmenü
Zahlreiche Einstellungen werden über das Einstellungsmenü
vorgenommen (siehe Seite 4).
Im Einstellungsmenü finden Sie ein Hauptmenü und die
zugehörigen Untermenüs mit den einzelnen Optionen.
Um das Menü aufzurufen, drücken Sie im Betrieb die MENU
Taste (20).
• Im Menü navigieren Sie mit den / Tasten (6).
• Mit der ENTER Taste (19) wählen Sie ein Untermenü aus,
bzw. bestätigen eine Einstellung.
• Um das Menü zu verlassen, drücken Sie erneut die
MENU Taste.
HINWEIS:
• Drücken Sie innerhalb von 10 Sekunden keine Taste,
wird das Menü ausgeblendet.
• Die aktuell eingestellte Option ist mit „*“ markiert.
Sowohl im DAB Modus, als auch im FM Modus finden Sie
ein Einstellungsmenü. Nachfolgend finden Sie Erläuterungen zum DAB und FM Menü als auch zum gemeinsamen
SYSTEM Menü.
DAB Menü
Das DAB Menü ist aufgeteilt in die Menüs: Autoscan, Manual
tune, DRC und Prune.
• Autoscan: Startet den Sendersuchlauf. Das DAB Frequenzband wird nach Sendern durchsucht.
• Manual tune: Hierbei ist es nötig die Senderfrequenz
zu kennen. Diese erfahren Sie auf der Internetseite der
Sendeanstalt. Wählen Sie die einzelnen Frequenzen mit
den / Tasten (6) an.
• DRC: kurz für Digital Range Control (Dynamikumfang).
Mit dem Begriff DRC wird das Verhältnis vom leisesten
zum lautesten Ton beschrieben. Ist der Dynamikumfang
sehr groß, so gibt es sowohl sehr leise als auch sehr laute
Töne. Unter Umständen stellt dies ein Wiedergabeproblem dar. Angenommen, Sie hören einen Radiosender in
relativ lauter Umgebung. Durch Anhebung der Lautstärke
können Sie die leisen Passagen lauter wiedergeben. Dies
hat allerdings den Nachteil, dass die lauten Passagen
unangenehm laut werden. Sinnvoll ist es hier, den
Dynamikumfang zu reduzieren. Wählen Sie zwischen den
Optionen:
- DRC off: Der Dynamikumfang wird nicht reduziert.
- DRC high: Der Dynamikumfang wird stark reduziert.
- DRC low: Der Dynamikumfang wird schwach reduziert.
• Prune: Es kann vorkommen, dass nach einem Sendersuchlauf bzw. Ortswechsel einige Sender nicht mehr
empfangen werden können. Mit dieser Funktion können
Sie diese Sender aus der Empfangsliste löschen. Wählen
Sie „YES“ und bestätigen mit der ENTER Taste.
FM Menü
• Scan setting: Wählen Sie hier die gewünschte Option
aus, die für einen automatischen Sendersuchlauf ausgeführt werden soll.
- Strong stations only: Es wird nur nach starken Radiosendern gesucht.
- All stations: Nach allen empfangbaren Radiosendern suchen. Hierbei hält der Suchlauf auch bei
schwachen Sendern an.
DAB + FM Menü (SYSTEM)
Im SYSTEM Menü finden Sie die folgenden Untermenüs.
• Factory reset: Wählen Sie den Befehl „YES“, wenn Sie
das Gerät wieder auf die werkseitigen Voreinstellungen
zurücksetzen möchten. Alle Einstellungen, die von Ihnen
vorgenommen wurden, gehen dabei verloren.
• SW version: Hier können Sie sich die Software Version
des Gerätes anzeigen lassen.
AUDIO IN Buchsen (Geräterückseite)
Zum Anschluss von analogen Wiedergabegeräten. Über
diese Buchse können Sie auch den Ton anderer Wiedergabe-
Deutsch
geräte wie MP3-Player, CD-Player usw. über die Lautsprecher
hören.
1. Schließen Sie das externe Gerät mit einem Cinchkabel
(2x RCA) an die AUDIO IN Buchsen auf der Rückseite des
Gerätes an. Verwenden Sie ggf. einen entsprechenden
Adapter (nicht im Lieferumfang enthalten).
2. Drücken Sie die AUX IN Taste (22). Im Display wird die
Anzeige „AUX“ angezeigt. Sie können den AUX Modus
auch durch wiederholtes Drücken der INPUT Taste (9 am
Gerät) auswählen.
3. Starten Sie die Wiedergabe an Ihrer Audioquelle. Über
die Lautsprecher hören Sie die Tonwiedergabe. Mit den
VOL+/VOL- Tasten (11/5) können Sie die Lautstärke
verändern.
4. Die weitere Vorgehensweise entnehmen Sie bitte der
Bedienungsanleitung der externen Tonquelle.
HINWEIS:
Stellen Sie, falls möglich, die Lautstärke des externen Gerätes auf eine hörgerechte Lautstärke.
Musik via Bluetooth wiedergeben
Bei Bluetooth handelt es sich um eine Technologie zur drahtlosen Funkverbindung von Geräten über eine kurze Distanz.
Geräte mit Bluetooth Standard senden im ISM-Band (Industrial, Scientific and Medical) zwischen 2,402 und 2,480 GHz.
Störungen können aber z.B. durch WLAN-Netzwerke, DABRadios, Schnurlostelefone oder Mikrowellenherde verursacht
werden, die im gleichen Frequenzband arbeiten.
Dieses Gerät bietet Ihnen die Möglichkeit ein Bluetoothfähiges Gerät zu verwenden. Der Funktionsradius beschränkt
sich dabei in Abhängigkeit der räumlichen Gegebenheiten
und des verwendeten Gerätes auf ca. 15 Meter.
Wenn Ihr Abspielgerät das A2DP Profil (Advanced Audio
Distribution Profile) unterstützt und eine MusikplayerFunktion aufweist, können Sie auch drahtlos Musik zum
Gerät übertragen. Beim A2DP Profil handelt es sich um ein
herstellerübergreifendes Bluetooth-Profil. Per Streaming
werden Stereo-Audio-Signale zwischen Abspielgerät (Quelle)
und Empfängergerät kabellos übertragen. Um die Quelle
fernsteuern zu können, muss das Abspielgerät das AVRCP
Profil (Audio Video Remote Control Profile) unterstützen.
Aufgrund der unterschiedlichen Gerätehersteller, Modelle
und Softwareversionen kann eine volle Funktionalität nicht
gewährleistet werden.
Geräte anmelden (Pairing)
Bevor Sie über das Gerät Musik hören können, müssen Sie
die Geräte untereinander anmelden.
1. Stellen Sie sicher, dass die Bluetooth-Funktion in Ihrem
Abspielgerät (z.B. Mobiltelefon) aktiviert ist. Beachten Sie
hierfür die Bedienungsanleitung Ihres Abspielgerätes.
9
2. Drücken Sie die BT Taste (23). Die Kontrollleuchte (11)
blinkt schnell.
3. Wählen Sie in Ihrem Abspielgeräte das Bluetooth Menü
und melden Sie das Gerät in Ihrem Abspielgerät an.
Beachten Sie hierfür die Bedienungsanleitung Ihres
Abspielgerätes. Als Auswahl erscheint das Gerät „AEG
MC 4457“ in Ihrem Abspielgerät.
HINWEIS:
Es kann immer nur ein Abspielgerät mit dem MusikCenter verbunden werden. Ist das Musik-Center bereits
mit einem anderen Abspielgerät verbunden, erscheint
das Musik-Center nicht im BT Auswahl-Menü. Drücken
Sie die CONNECT Taste (7), um die bereits verbundenen Geräte zu trennen. Nun können Sie das MusikCenter mit einem anderen Abspielgerät, wie oben
beschrieben, verbinden.
4. Je nach Gerätehersteller, Modelle und Softwareversionen
geben Sie nun das Passwort „0000“ in Ihrem Abspielgerät ein.
Wurde die Anmeldung erfolgreich durchgeführt, leuchtet die
Kontrollleuchte (11).
Die weitere Vorgehensweise entnehmen Sie bitte der Bedienungsanleitung des Abspielgerätes. Stellen Sie, falls möglich,
die Lautstärke des Abspielgerätes auf eine hörgerechte
Lautstärke.
HINWEIS:
• Je nach Gerätehersteller müssen Sie die Anmeldung
(PAIRING) erneut durchführen, um die Geräte zu verbinden.
• Die Bluetooth-Kompatibilität kann nicht für zukünftig erscheinende Abspielgeräte (z.B. Mobiltelefone)
gewährleistet werden.
• Um eine optimale Verbindung zu gewährleisten, achten
Sie darauf dass der Akku Ihres Abspielgerätes vollständig geladen ist.
• Einige Mobiltelefonmarken verfügen über einen Energiesparmodus. Deaktivieren Sie den Energiesparmodus, da es ansonsten zu Problemen bei der Datenübertragung über Bluetooth kommen kann.
• Um Audiodaten übertragen zu können, muss Bluetooth
in Ihrem Abspielgerät aktiviert bleiben. Beachten Sie
die Bedienungsanleitung Ihres Abspielgerätes.
• Verwenden Sie zur Musikwiedergabe ein Mobiltelefon,
bei dem ein Telefonat eingeht, wird die Wiedergabe
unterbrochen. Der Ton wird abhängig vom Mobiltelefon von den Lautsprechern wiedergegeben. Um
das Gespräch zu Ihrem Mobiltelefon zu übertragen,
beachten Sie die Einblendung im Display des Mobiltelefons. Nachdem Sie das Telefonat beendet haben,
werden die Geräte wieder miteinander verbunden. Die
Wiedergabe müssen Sie ggf. erneut starten.
10
Deutsch
Kontrollleuchte (11 am Gerät)
Die Kontrollleuchte blinkt oder leuchtet je nach Funktion des
Gerätes.
Kontrollleuchte Funktion des Gerätes
Blinkt schnell
CONNECT Modus. Eine Verbindung
mit einer neuen Audioquelle kann jetzt
hergestellt werden.
Blinkt langsam PARING Modus. Eine Verbindung zu einer
bereits zuvor angemeldeten Audioquelle
kann wieder hergestellt werden.
Leuchtet
Bluetooth-Verbindung zur Audioquelle ist
hergestellt.
USB Anschluss (6)
Dieses Gerät ist nach dem letzten Stand der technischen
Entwicklungen im USB Bereich entwickelt worden. Die große
Anzahl von verschiedenen USB Speichermedien jeglicher
Art die heute angeboten werden, erlauben es leider nicht,
eine volle Kompatibilität mit allen USB Speichermedien zu
gewährleisten. Aus diesem Grund kann es in seltenen Fällen
zu Problemen bei der Wiedergabe von USB Speichermedien
kommen. Dies ist keine Fehlfunktion des Gerätes.
1. Drücken Sie wiederholt die CD/USB Taste (25), bis im
Display „SOURCE [USB]“ angezeigt wird.
2. Schließen Sie ein USB Speichermedium direkt an. Nach
einigen Sekunden erschient kurz die Meldung „USB
CHECKING…“. Anschließend beginnt die Wiedergabe.
Im Display wird das Symbol „ “, „MP3“, der aktuelle
Titel und dessen abgelaufene Spielzeit, sowie die Gesamtanzahl der Titel angezeigt.
Für die Bedienung richten Sie sich bitte nach dem Abschnitt
„Beschreibung der Bedientasten“.
HINWEIS:
• Schließen Sie ein USB Speichermedium immer direkt
an den USB Anschluss an, um etwaige Betriebsstörungen vorzubeugen.
• Der USB Anschluss ist nicht zum Aufladen von externen
Geräten geeignet.
• Wird das USB Speichermedium nicht erkannt, erscheint
im Display die Meldung „NOT FIND USB“.
ACHTUNG:
Bevor Sie das USB Speichermedium entfernen, schalten
Sie das Gerät mit der INPUT Taste (9 am Gerät) in einen
anderen Modus.
CDs/MP3 CD abspielen
1. Drücken Sie die CD/USB Taste (25). Im Display wird die
Anzeige „CD“ angezeigt.
2. Drücken Sie die EJECT Taste (1/2), um das CD-Fach (7)
zu öffnen.
3. Legen Sie eine CD mit dem Aufdruck nach oben auf
den CD-Fach-Schlitten. Drücken Sie erneut die EJECT
Taste, um das CD-Fach wieder zu schließen.
4. Im Display erscheint die Meldung „LOADING DISC“.
Anschließend beginnt die Wiedergabe. Im Display wird
das Symbol „ “, der CD Typ (CDDA = Audio CD oder
MP3 = MP3 CD), der aktuelle Titel und dessen abgelaufene Spielzeit, sowie die Gesamtanzahl der Titel angezeigt.
Für die Bedienung richten Sie sich bitte nach dem Abschnitt
„Beschreibung der Bedientasten“. Halten Sie das CD-Fach
stets geschlossen.
HINWEIS:
• Wenn eine Disk falsch herum eingelegt wird, bzw. keine
Disk eingelegt ist, erscheint „NO DISC“ (keine Disk) auf
dem Display.
• Die Wiedergabe anwenderseitig erstellter CDs kann
durch die Vielzahl der verfügbaren Software und CDMedien nicht garantiert werden.
Beschreibung der Bedientasten
PLAY/PAUSE (8/3)
Sie können die Wiedergabe kurz unterbrechen und wieder
starten. Im Display erscheint das Symbol . Nochmaliges Drücken der Taste setzt die Wiedergabe an derselben Stelle fort.
NEXT /PREV (9/8)
• Mit der Taste NEXT können Sie zum nächsten bzw.
übernächsten Titel springen usw.
• Die PREV Taste können Sie wie folgt bedienen:
1x drücken = Springt zum vorherigen Titel.
2x drücken = Spielt ein Lied davor usw.
/ (18)
Ein Musiksuchlauf wird gestartet. Im Display erscheint das
Symbol „ “ bzw. „ “. Drücken Sie die
PLAY/PAUSE
Taste, um zur normalen Wiedergabe zurückzukehren.
STOP (9/11)
Die Wiedergabe wird angehalten.
REPEAT (16)
1x drücken = „REP: One“ erscheint kurz im Display. Das
aktuelle Lied wird ständig wiederholt.
2x drücken = „REP: All“ erscheint kurz im Display. Alle
Lieder werden ständig wiederholt.
3x drücken = „REP: Off“ erscheint kurz im Display. Alle
Funktionen sind aufgehoben. Der normale
Abspielbetrieb wird fortgesetzt.
HINWEIS:
Die aktivierte Funktion kann aus technischen Gründen nicht
dauerhaft im Display angezeigt werden.
Deutsch
SHUFFLE (14)
1x drücken = Alle Titel der Audio CD werden in zufälliger
Reihenfolge wiedergegeben. Die Wiedergabe stoppt nachdem alle Titel wiedergegeben
wurden.
2x drücken = Alle Titel der Audio CD werden wiederholt in
zufälliger Reihenfolge wiedergegeben.
HINWEIS:
• Diese Funktion steht nur für Audio CDs (CDDA) zur
Verfügung.
• Die aktivierte Funktion kann aus technischen Gründen
nicht dauerhaft im Display angezeigt werden.
Zifferntasten (2)
Um einen Titel direkt anzuwählen, geben Sie die gewünschte
Titelnummer ein. Drücken Sie die Taste ENTER (19), um den
Titel wiederzugeben.
Programmierte Wiedergabe
Lässt die Programmierung einer beliebigen Titelfolge zu. Nur
für Audio CDs (CDDA).
1. Drücken Sie die STOP Taste (17/4).
2. Drücken Sie die PROGRAM Taste (15). Auf dem Display
erscheint die Anzeige:
PROGRAM INPUT
01[00] 02[00]
3. Geben Sie die gewünschte Reihenfolge der Titel mit den
Zifferntasten ein. Mit den Richtungstasten / bewegen
Sie den Cursor in der Anzeige. Um die nächsten beiden
Speicherplätze anzuzeigen, drücken Sie die Richtungstaste .
HINWEIS:
• Es müssen mindestens zwei Titel programmiert
werden, um die Wiedergabe starten zu können.
• Es können maximal 20 Musiktitel programmiert
werden. Derselbe Titel kann mehrfach in der Liste
vorkommen.
4. Wiederholen Sie den Vorgang, bis Sie alle Titel ausgewählt haben.
5. Nachdem Sie alle Titel programmiert haben, wählen Sie
mit den Richtungstasten das Symbol „ “ aus. Drücken
Sie zum Bestätigen die ENTER Taste. Die Wiedergabe wird
gestartet. Im Display wird das Symbol „ “, „CDDA“,
„P“, der aktuelle Titel und dessen abgelaufene Spielzeit,
sowie die Gesamtanzahl der Titel angezeigt.
6. Drücken Sie einmal die Taste (17/4), wird die Wiedergabe gestoppt, das aktuelle Programm wird gelöscht. Die
Anzeige „P“ erlischt.
Das Gerät stoppt automatisch, nachdem alle programmierten Titel wiedergegeben wurden. Die Anzeige „P“ erlischt
und die programmierte Reihenfolge wird aus dem Speicher
gelöscht.
11
Wiedergabe von Musik im MP3 Format
Sie haben die Möglichkeit mit diesem Gerät Musikstücke im
MP3 Format wiederzugeben. Das Gerät unterstützt außerdem die gängigen CD Typen: CD, CD-RW, CD-R.
Sie können mit Ihrem Gerät MP3 CDs abspielen. Auf diesen
CDs können bis zu 200 Titel verdichtet abgespeichert werden. Ihr Gerät erkennt eine MP3 CD automatisch (im Display
erscheint die Gesamtzahl der Titel und MP3). Zum Abspielen
dieser CDs gehen Sie bitte vor, wie unter CDs/MP3 abspielen
beschrieben.
Bitte beachten Sie:
Es gibt eine Vielzahl von Brenn- und Komprimierungsverfahren, sowie Qualitätsunterschiede bei CDs und gebrannten
CDs.
Des Weiteren hält die Musikindustrie keine festen Standards
ein (Kopierschutz).
Aus diesen Gründen kann es in seltenen Fällen zu Problemen
bei der Wiedergabe von CDs und MP3 CDs kommen. Dies
ist keine Fehlfunktion des Gerätes.
Weckfunktion
Sie können das Gerät so einstellen, dass es zu einer bestimmten Zeit einschaltet.
• Um eine Option auszuwählen drücken Sie die / Tasten
(6).
• Die Einstellungen von Ziffern nehmen Sie mit den Richtungstasten / vor. Um zur nächsten Ziffer zu wechseln,
drücken Sie die Richtungstaste .
• Mit der ALARM Taste (4) wählen Sie eine Option aus.
HINWEIS:
Wird innerhalb von 5 Sekunden keine Taste betätigt,
wechselt die Anzeige zur normalen Anzeige zurück. Die
Einstellungen werden automatisch gespeichert.
Einstellen der Weckzeit
1. Drücken Sie im Standby-Betrieb die ALARM Taste. Im
Display wird „SETTING ALARM 1“ angezeigt.
2. Wählen Sie den Zeitpunkt aus, wann die Weckzeit
aktiviert sein soll. Zur Auswahl stehen: ALL DAYS (täglich),
ONCE (einmal), WEEKENDS (Wochenende), WEEKDAYS
(Werktags). Die Einstellung ALARM OFF (Alarm aus)
deaktiviert die Funktion.
3. Stellen Sie nun die Weckzeit ein.
4. SOURCE: Wählen Sie hier die Quelle aus, mit der Sie
geweckt werden wollen. Zur Auswahl stehen: DAB, FM,
CD, USB, AUX, B.T.
12
Deutsch
HINWEIS:
• Bei der Auswahl von DAB oder FM, wird der zuletzt
eingestellte Radiosender ausgewählt.
• Bei der Auswahl von CD oder USB muss ein Medium
eingelegt bzw. angeschlossen sein.
• Bei der Auswahl von AUX muss die angeschlossene
Audioquelle ebenfalls auf den Zeitpunkt programmiert
sein.
• Bei der Auswahl von B.T. muss beim Abspielgerät die
Bluetooth-Funktion eingeschaltet sein und zuletzt mit
dem Gerät verbunden gewesen sein. Die Funktionalität
des Weckens über Bluetooth ist abhängig von Ihrem
Abspielgerät.
5. Abschließend wählen Sie die Lautstärke aus, mit der Sie
geweckt werden wollen.
6. Nachdem Sie die Einstellungen für die erste Weckzeit
eingestellt haben, gelangen Sie zur Eingabe einer
zweiten Weckzeit. Im Display wird „SETTING ALARM 2“
angezeigt. Zum Einstellen der zweiten Weckzeit, gehen
Sie vor wie oben beschrieben (Punkt 2-5).
Fehler
Störungen
beim DAB
Radioempfang
Kein Ton
Schlechte
Tonqualität
Kein Audiosignal bei
BluetoothVerbindung
Reinigung und Pflege
• Ziehen Sie vor der Reinigung den Netzstecker.
• Äußere Flecken können Sie mit einem leicht feuchten
Tuch, ohne Zusatzmittel, abwischen.
Störungsbehebung
Fehler
Ursache
Gerät lässt sich Gerät blockiert
nicht bedienen „hängt fest“
Lösung
Ziehen Sie für ca.
5 Sek. den Netzstecker.
Schalten Sie das Gerät
anschließend wieder
ein
Stellen Sie das Gerät
auf die Werkseinstellungen zurück. siehe
„Einstellungsmenü“
Kein DAB
Wurfantenne nicht Richten Sie die WurfanRadioempfang richtig ausgerichtet tenne vertikal aus
In Ihrem Gebiet
wird kein Digital
Radio empfangen
Gerät ist nicht an
der Audioquelle
angemeldet.
Lautstärke zu
gering
Die aktivierte Weckfunktion wird im Display mit dem Symbol
„ “ angezeigt. Haben Sie beide Weckzeiten eingestellt,
werden zwei Symbole angezeigt.
Weckfunktion deaktivieren
Wählen Sie die Option „ALARM OFF“, im Abschnitt „Einstellen der Weckzeit“ (Punkt 2).
Ursache
Standortbedingt
können einige
Sender in Ihrer
Region eventuell
nicht oder nur mit
Störungen empfangen werden.
siehe auch Hinweis
auf Seite 7
Lautstärke ist runter
geregelt
Radiosignal zu
schwach
BluetoothVerbindung
lässt sich nicht
herstellen
Gerät befindet sich
nicht im CONNECT Modus.
Die LED (11) blinkt
langsam.
Anmeldung funktioniert nicht
Audioquelle ist
ausgeschaltet
Bluetooth ist an
der Audioquelle
ausgeschaltet.
Bluetooth-Version
wird nicht unterstützt.
Lösung
Schalten Sie auf FM
Betrieb, um diese
Sender zu empfangen.
Sofern diese Sender
über UKW ausgestrahlt
werden. Informieren
Sie sich hierzu auf
der Internetseite des
Radiosenders.
Erhöhen Sie die Lautstärke
Versuchen Sie eine
Veränderung der
Antennenposition.
Überprüfen Sie, ob die
Verbindung besteht.
Melden Sie ggf. das
Gerät erneut an der
Audioquelle an.
Erhöhen Sie die Lautstärke am Gerät.
Erhöhen Sie die Lautstärke an der
Audioquelle.
Drücken Sie die
CONNECT Taste (7 an
der FB). Die LED blinkt
schnell. Versuchen Sie
erneut die Geräte miteinander zu verbinden.
Überprüfen Sie, ob die
Audioquelle das A2DP
Protokoll unterstürzt.
Schalten Sie die Audioquelle ein
Schalten Sie die Bluetooth Funktion in der
Audioquelle ein
Verwenden Sie ein
anderes Abspielgerät.
Deutsch
Technische Daten
Modell:.............................................................. MC 4457 DAB+/BT
Spannungsversorgung:....................................220 - 240 V~ 50 Hz
Leistungsaufnahme:..................................................................40 W
Schutzklasse:......................................................................................II
Nettogewicht:.........................................................................2,63 kg
Radioteil:
Frequenzbereiche:.....................UKW/FM 87,5 ~ 108,0 MHz
....................DAB/DAB+ 174 ~ 240 MHz
Bluetooth
Bluetooth Unterstützung:.............................................V2.1 + EDR
Reichweite:................................................................... .ca. 15 Meter
Sendefrequenz:..........................................................2,4 - 2,48 GHz
Protokolle:....................................................................A2DP/AVRCP
Technische und gestalterische Änderungen im Zuge stetiger
Produktentwicklungen vorbehalten.
Hinweis zur Richtlinienkonformität
Hiermit erklärt die Firma ETV – Elektro-Technische Vertriebsgesellschaft mbH, dass sich das Gerät MC 4457 DAB+/
BLUETOOTH in Übereinstimmung mit den grundlegenden
Anforderungen und den anderen relevanten Vorschriften der
R&TTE Richtlinie (1999/5/EG), der europäischen Richtlinie für
elektromagnetische Verträglichkeit (2004/108/EG) befindet.
Geprüft für den Betrieb in Deutschland.
Garantie
Garantiebedingungen
1. Gegenüber Verbrauchern gewähren wir bei privater
Nutzung des Geräts eine Garantie von 24 Monaten ab
Kaufdatum.
Ist das Gerät zur gewerblichen Nutzung geeignet, gewähren wir beim Kauf durch Unternehmer für das Gerät
eine Garantie von 12 Monaten.
Die Garantiezeit für Verbraucher reduziert sich auf 12 Monate, sofern sie ein zur gewerblichen Nutzung geeignetes
Gerät – auch teilweise – gewerblich nutzen.
13
3. Mängel müssen innerhalb von 14 Tagen nach Erkennbarkeit uns gegenüber schriftlich angezeigt werden.
Besteht der Garantieanspruch zu Recht, entscheiden wir,
auf welche Art der Schaden/Mangel behoben werden
soll, ob durch Reparatur oder durch Austausch eines
gleichwertigen Geräts.
4. Garantieleistungen werden nicht für Mängel erbracht, die
auf der Nichtbeachtung der Gebrauchsanweisung, unsachgemäßer Behandlung oder normaler Abnutzung des
Geräts beruhen. Garantieansprüche sind ferner ausgeschlossen für leicht zerbrechliche Teile, wie zum Beispiel
Glas oder Kunststoff. Schließlich sind Garantieansprüche
ausgeschlossen, wenn nicht von uns autorisierte Stellen
Arbeiten an dem Gerät vornehmen.
5. Durch Garantieleistungen wird die Garantiezeit nicht
verlängert. Es besteht auch kein Anspruch auf neue
Garantieleistungen. Diese Garantieerklärung ist eine
freiwillige Leistung von uns als Hersteller des Geräts.
Die gesetzlichen Gewährleistungsrechte (Nacherfüllung,
Rücktritt, Schadensersatz und Minderung) werden durch
diese Garantie nicht berührt.
Stand 06 2012
Garantieabwicklung
24 Stunden am Tag, 7 Tage in der Woche
Sollte Ihr Gerät innerhalb der Garantiezeit einen Mangel
aufweisen, steht Ihnen die schnellste und komfortabelste
Möglichkeit der Reklamationsanmeldung über unser SLI Internet-Serviceportal zur Verfügung.
www.sli24.de
Bitte melden Sie direkt den Servicevorgang auf unserem
Online Serviceportal www.sli24.de an. Sie erhalten wenige
Sekunden nach Abschluss der Anmeldung ein kostenloses
Versandticket per E-Mail übermittelt. Zusätzlich erhalten Sie
weitere Informationen zur Abwicklung Ihrer Reklamation.
Mit Ihren persönlichen Zugangsdaten, die direkt nach Ihrer
Anmeldung per E-Mail an Sie übermittelt werden, können
Sie den Status Ihres Vorgangs auf unserem Serviceportal
www.sli24.de online verfolgen.
2. Voraussetzung für unsere Garantieleistungen sind der
Kauf des Geräts in Deutschland bei einem unserer
Vertragshändler sowie die Übersendung einer Kopie des
Kaufbelegs und dieses Garantiescheins an uns.
Sie brauchen das kostenlose Versandticket nur noch auf die
Verpackung Ihres gut verpackten Gerätes zu kleben und das
Paket bei der nächsten Annahmestelle der Deutschen Post
/ DHL abzugeben. Der Versand erfolgt für Sie kostenlos an
unser Servicecenter bzw. Servicepartner.
So einfach kann Service sein!
1. Anmelden
2. Einpacken
3. Ab zur Post damit
Fertig, so einfach geht es!
Befindet sich das Gerät zum Zeitpunkt des Garantiefalls
im Ausland, muss es auf Kosten des Käufers uns zur
Erbringung der Garantieleistungen zur Verfügung gestellt
werden.
14
Deutsch
Bitte vergessen Sie nicht, dem Gerät eine Kopie Ihres Kaufbeleges (Kassenbon, Rechnung, Lieferschein) als Garantienachweis beizulegen, da wir sonst keine kostenlosen Garantieleistungen erbringen können.
Unser Serviceportal www.sli24.de bietet Ihnen weitere
Leistungen an:
•
•
•
•
•
Downloadbereich für Bedienungsanleitungen
Downloadbereich für Firmwareupdates
FAQ‘s die Ihnen Problemlösungen anbieten
Kontaktformular
Zugang zu unseren Zubehör- und Ersatzteile-Webshops
Auch nach der Garantie sind wir für Sie da! – Kostengünstige Reparaturen zum Festpreis!
Bitte nehmen Sie in keinem Fall eine unfreie Einsendung
Ihres Gerätes vor. Unfreie Lieferungen werden von uns nicht
angenommen. Es entstehen Ihnen damit erhebliche Kosten.
Stand 06 2012
Entsorgung
Bedeutung des Symbols „Mülltonne“
Schonen Sie unsere Umwelt, Elektrogeräte gehören nicht in
den Hausmüll.
Nutzen Sie die für die Entsorgung von Elektrogeräten vorgesehenen Sammelstellen und geben dort Ihre Elektrogeräte
ab, die Sie nicht mehr benutzen werden.
Sie helfen damit die potenziellen Auswirkungen, durch
falsche Entsorgung, auf die Umwelt und die menschliche
Gesundheit zu vermeiden.
Sie leisten damit Ihren Beitrag zur Wiederverwertung, zum
Recycling und zu anderen Formen der Verwertung von Elektro- und Elektronik-Altgeräten.
Informationen, wo die Geräte zu entsorgen sind, erhalten Sie
über Ihre Kommunen oder die Gemeindeverwaltungen.
Nederlands
Gebruiksaanwijzing
Dank u voor uw keuze van dit product. We hopen dat u er
veel plezier van beleeft.
Symbolen in deze gebruiksaanwijzing
WAARSCHUWING:
Waarschuwt voor gezondheidsrisico’s en duidt op potentiaal verwondingsgevaar.
LET OP:
Duidt op potentiaal gevaar voor het apparaat of voor
andere voorwerpen.
OPMERKING:
Duidt op tips en informatie voor u.
Algemene veiligheidsrichtlijnen
Lees deze gebruiksaanwijzing zorgvuldig door voordat u dit
apparaat in gebruik neemt, en bewaar hem samen met het
Garantiecertiicaat, het aankoopbewijs en, indien mogelijk,
de originele verpakking inclusief het materiaal in de doos. Als
u het apparaat doorgeeft aan een derde persoon, geef de
gebruiksaanwijzing dan ook door.
• Stel het apparaat niet bloot aan regen of vocht, om het
risico op brand of elektrische schokken te vermijden.
Gebruik het apparaat niet in de buurt van water (bv.
badkamer, zwembad, vochtige kelders).
• Gebruik dit apparaat niet in extreem warme of koude,
stoffige of vochtige plaatsen.
• Dit apparaat is alleen bedoeld voor privégebruik, en mag
alleen gebruikt worden voor het beoogde doel. Dit apparaat is niet bedoeld voor commercieel gebruik.
• Voorkom dat het netsnoer wordt geknikt, bekneld raakt
of met warmtebronnen in contact komt.
• Voorkom dat mensen over het netsnoer kunnen struikelen.
• Hanteer nooit de stekker of het netsnoer met natte
handen.
• Sluit het apparaat altijd aan op een correct geïnstalleerde
stopcontact. Controleer dat het spanningsniveau van het
apparaat overeenkomt met de netspanning.
• De stekker moet altijd gemakkelijk toegankelijk zijn.
• Let altijd op de polariteit bij het plaatsen van de batterijen.
• Bedek de ventilatieopeningen van het apparaat niet.
• Dek nooit de luchtgaten af met objecten, zoals tijdschriften, tafelkleden, gordijnen enz.
• Bescherm het apparaat tegen druip- of spatwater en
plaats geen vazen gevuld met water, zoals bloemenvazen
op het apparaat.
15
• Open vuurbronnen, zoals brandende kaarsen mogen
niet op het apparaat worden geplaatst.
• Open de behuizing van het apparaat nooit. Verkeerde
reparaties kunnen ernstig gevaar voor de gebruiker
opleveren. Als het apparaat of vooral het elektriciteitssnoer beschadigd is, gebruik het apparaat dan niet meer
en laat het repareren door een gekwaliiceerd specialist.
Controleer het elektriciteitssnoer regelmatig op beschadigingen.
• Om gevaar te voorkomen mag het elektriciteitssnoer
alleen vervangen worden met hetzelfde soort snoer door
de producent, de klantenservice van de producent, of
een vergelijkbaar gekwaliiceerd persoon.
• Als u het apparaat langere tijd niet gebruikt, haal de stekker dan uit het stopcontact en verwijder de batterijen.
Deze symbolen kunnen op het apparaat aangetroffen worden en zijn bedoeld als waarschuwingen:
De bliksemschicht dient ervoor om de
gebruiker te wijzen op de aanwezigheid van
gevaarlijke spanning in het apparaat.
Het uitroepteken dient ervoor om de gebruiker te wijzen op belangrijke aanwijzingen over
de bediening of het onderhoud die horen bij
dit apparaat.
Apparaten die dit symbool dragen, werken
met een “klasse 1 laser” voor het lezen van de
CD. De ingebouwde veiligheidsschakelaars
moeten voorkomen dat de gebruiker aan
gevaarlijk laserlicht wordt blootgesteld, dat
onzichtbaar voor het menselijk oog is, wanneer het CD-compartiment wordt geopend.
In geen geval moeten deze veiligheidsschakelaars worden
omzeild of gemanipuleerd, omdat dit in een gevaar van
blootstelling aan het laserlicht kan resulteren.
Kinderen en gehandicapten
• Houd voor de veiligheid van uw kinderen het verpakkingsmateriaal (plastic zakken, karton, piepschuim enz.)
buiten hun bereik.
WAARSCHUWING!
Laat kleine kinderen niet met verpakkingsmateriaal
spelen i.v.m. verstikkingsgevaar!
• Dit apparaat is niet bedoeld voor gebruik door personen
(inclusief kinderen) met verminderde lichamelijke, zintuiglijke of mentale capaciteiten, of gebrek aan ervaring en/of
kennis tenzij zij onder toezicht staan of instructies hebben
gekregen betreffende het gebruik van het apparaat door
een persoon verantwoordelijk voor hun veiligheid.
• Houd kinderen onder toezicht om er voor te zorgen dat
zij niet met het apparaat gaan spelen.
16
Nederlands
Speciale veiligheidsvoorschriften
Dit apparaat werkt met een klasse
1 laser.
Overzicht van de bedieningselementen
Voorzijde (Fig. 1)
1 IR-sensor voor de afstandsbediening
2
EJECT-toets (uit- en inschuiven van de CD-lade)
3
PLAY/PAUSE-toets (Afspelen/Pauze)
4 STOP-toets (stoppen)
5 VOLUME-regelaar
6 USB-aansluiting
7 CD-lade
8
NEXT-toets (volgend muzieknummer)
PREV-toets (vorig muzieknummer)
INPUT-toets (ingang)
9
10 STANDBY-toets (aan/bediening gereed)
11 Bluetooth controlelampje
12 LCD-display
Achteraanzicht (zonder afbeelding)
FM ANT - Dipool antenna
AUDIO INPUT-aansluitingen (2x RCA)
Voedingsconnector
SPEAKERS - Luidsprekeraansluitklemmen
Afstandsbediening (Fig. 2)
1
EJECT-toets (uit- en inschuiven van de CD-lade)
2 Cijfertoetsen
3 CLOCK-toets
4 ALARM-toets (alarmfunctie)
5 SLEEP-toets
6 Richtingtoetsen
7 CONNECT-toets (verbinden)
8
-toets (afspelen/pauze)
9
/ -toetsen (Volgende/Vorige titel)
10 MUTE-toets (dempen)
11 “VOL+/VOL-”-toetsen (volume)
12 TONE-toets (geluidsinstelling)
13 DSP-toets (equalizer)
14 SHUFFLE-toets (willekeurig afspelen)
15 PROGRAM-toets (geheugen)
16 REPEAT-toets (herhalen)
17 -toets (stoppen)
18 / -toetsen (muziek zoeken)
19 ENTER-toets (bevestigen)
20 MENU-toets
21 INFO-toets
22 AUX IN-toets
23 BT-toets (Bluetooth)
24 FM/DAB-toets
25 CD/USB-toets
26 STANDBY-toets (aan/bediening gereed)
Installatie
• Lees deze gebruiksaanwijzing aandachtig door voordat u
het apparaat in gebruik neemt!
• Bepaald een geschikte plek voor het apparaat. De ondergrond waarop u het apparaat plaatst dient droog, vlak en
niet glad te zijn, voor een gemakkelijke bediening.
• Zorg dat het apparaat voldoende geventileerd wordt!
• Sluit de luidsprekers aan op de “SPEAKERS”-aansluitingen op de achterzijde van het apparaat. Terwijl dat te
doen, besteed aandacht aan de juiste polariteit (zwart
naar zwart).
• Verwijder indien nodig het beschermende plastic van het
scherm.
Voeding
• Steek de netstekker in een goed geïnstalleerd stopcontact met drie gaten en een stroomvoorziening van 230 V,
50 Hz.
• Zorg dat de spanning in overeenstemming is met die op
het indicatieplaatje.
OPMERKING:
Haal de stekker uit het stopcontact wanneer voor langere
tijd niet gebruikt.
Batterij in de Afstandsbediening Plaatsen/Vervangen
(Batterijen niet bij de levering inbegrepen)
• Open het batterijvakje aan de onderkant van de afstandsbediening.
• Plaats 2 batterijen van het type R03 “AAA” 1,5 V. Controleer of de polariteit correct is (zie batterijhouder).
• Sluit het batterijvakje weer.
Als de afstandsbediening lange tijd niet gebruikt wordt, verwijder dan de batterij om “lekkage” van de batterijvloeistof
te voorkomen.
WAARSCHUWING:
Stel de batterijen niet bloot aan intense warmte, zoals
direct zonlicht, vuur en dergelijke. Ontploingsgevaar!
LET OP:
• Verschillende soorten batterijen of nieuwe en gebruikte
batterijen mogen nooit samen gebruikt worden.
• Gooi de batterijen niet weg bij het huishoudafval.
Breng gebruikte batterijen naar erkende inzamelpunten of breng ze terug naar de verkoper.
Nederlands
Installatie
1 Richt de dipool antenne verticaal uit.
2 Schakel het apparaat met de “ STANDBY”-toets (10/26)
in. Het apparaat zoekt automatisch naar DAB-stations.
SCANNING… en een voortgangsbalk verschijnt op de
display. Het getal aan de rechterkant van de display toont
het aantal gevonden radiozenders. Het eerste alfanumerieke DAB-station wordt afgespeeld.
Tijdens het afspelen van een radiostation, wordt de tijd
en datum van de omroep overgenomen. Als het apparaat op uw locatie geen DAB stations ontvangt, kunt u de
tijd handmatig instellen, zoals omschreven in “Algemene
bediening”.
Algemene bediening
OPMERKING:
Dit toestel wordt voornamelijk met de afstandsbediening
bediend. De aanwijzigen gelden dus voor de toetsen op
de afstandsbediening. Sommige toetsen zijn ook aanwezig op het toestel. Toetsen met dezelfde naam hebben
dezelfde functie.
STANDBY (26/10)
Schakel het apparaat naar de standby-modus met de
“ STANDBY/ON”-toets (de tijdweergave wordt weergegeven). Als u nogmaals op de toets drukt, zal het apparaat weer
inschakelen.
OPMERKING:
Het apparaat bewaart vóór het uitschakelen de laatste
modus en het volume. Na het opnieuw inschakelen start
het apparaat in deze modus en op dit volume.
17
OPMERKING:
De geactiveerde functie wordt om technische redenen niet
permanent op de display getoond.
TONE-toets (12)
Druk herhaaldelijk op deze toets om het totale volume (MASTER VOLUME), de bassen (BASS) en de hoge tonen (TREBLE)
aan te passen. Wijzig de instellingen met de “VOL+/ VOL-“toetsen (11).
OPMERKING:
De instellingen gaan verloren als u één van de eerder
ingestelde equalizer-modi selecteert.
DSP-toets (13)
(Vooraf ingestelde equalizer-functie). Verschillende geluidsmodi zijn beschikbaar (JAZZ, ROCK, CLASSICS, POP, LIVE,
DANCE, OFF (uit)).
Infrarood-afstandsbediening
Voor draadloze bediening binnen een afstand van 5 m. Als
de bedieningsafstand afneemt moeten de batterijen vervangen worden. Voor een goede werking moet de afstand
tussen de afstandsbediening en de sensor op het apparaat
vrij zijn van andere voorwerpen.
Vertraagde uitschakeling (SLEEP)
Het apparaat schakelt automatisch uit als de gewenste tijd
bereikt is.
• Selecteer de tijd door herhaaldelijk op de “SLEEP”-toets
(5) te drukken, waarna het apparaat uitschakelt. Selecteer
uit: 10, 20, 30, 45, 60, 90 en 120 minuten.
• De “SLEEP OFF”-instelling deactiveert deze functie.
FM/DAB-toets (24)
Voor het schakelen tussen de DAB- en FM-modus.
Handmatige tijdinstelling (in stand-by)
Pas de instellingen met de “ / ”-richtingtoetsen aan. Druk
op de “ ”-richtingtoets om naar het volgende cijfer te gaan.
CD/USB-toets (25)
Voor het schakelen tussen de CD- en USB-modus.
1. Tijdens stand-by, druk op de “CLOCK”-toets (3). [SETTING CLOCK] zal op de display verschijnen en het linker
cijfer zal knipperen.
2. Nadat u de tijd hebt ingesteld, druk op de “CLOCK”toets om de invoer van de datum te wijzigen. [SETTING
DATE] zal op de display verschijnen en het linker cijfer zal
knipperen.
INPUT-toets (9 op het apparaat)
Druk meerdere keren op deze toets om de verschillende
modi te kiezen.
VOL+/VOL- Volume (11/5)
Instellen van het gewenste volume.
MUTE (10)
Dient voor het snel uitschakelen van het geluid. Bij het activeren van de functie, zal de melding “MUTE ON” voor een
korte tijd worden weergegeven. Druk opnieuw op deze toets
om de functie te deactiveren. “MUTE OFF” wordt voor een
korte tijd weergegeven.
OPMERKING:
Als binnen 5 seconden geen toets wordt ingedrukt, zal de
display terug naar de normale weergave veranderen. De
instellingen worden automatisch opgeslagen.
18
Nederlands
Radio luisteren
FM stations scannen
1. Druk herhaaldelijk de FM/DAB-toets (24) totdat het
scherm “FM”.
2. U heeft twee opties voor het afstemmen van een station:
- Druk op de “ / “ toetsen (6). U wijzigt de frequentie
in 0,05 MHz stappen.
- Druk op de “ / ”-toetsen (6). Het apparaat zal naar
het volgende of vorige radiostation zoeken.
3. Als de ontvangst te zwak is en er ruis op het ontvangen
station is, probeer de ontvangst te verbeteren door de
antenne te draaien, af te rollen of op te rollen.
Toon FM-informatie
Druk op de “INFO”-toets (21) om de volgende informatie te
tonen, als door een radiostation wordt uitgezonden.
• Radiotekst wordt standaard op de display weergegeven.
Als er geen informatie beschikbaar is, wordt [No RadioText] op de display weergegeven.
• Het programmatype (PTY) van het station wordt weergegeven (bijvoorbeeld popmuziek, nieuws enz.). Als er
geen PTY wordt ontvangen, verschijnt [No PTY] op de
display.
• Toon de naam van het station. Als er geen naam wordt
ontvangen, verschijnt [No Name] op de display.
• De ingestelde audio-modus wordt weergegeven. STEREO van MONO.
DAB stations scannen
Digital Audio Broadcasting (DAB) is een digitale radioomroep standaard voor de digitale terrestrische radioontvangst. Er is een lijst van radiostations, die in Duitsland
kunnen worden ontvangen, beschikbaar op het internet op
www.digitalradio.de.
OPMERKING:
In Duitsland wordt ca. 70% van het land door digitale radiouitzendingen gedekt (vanaf november 2011). Echter, in de
afzonderlijke gebieden varieert de dekking en beschikbaarheid sterk. Als de DAB-stations afhankelijk van de locatie in
uw regio niet of alleen met storingen kunnen worden ontvangen, kunt in dit geval u overschakelen naar de FM-band
om dit station te ontvangen. Dit is echter alleen mogelijk
als deze stations via UKW worden uitgezonden. Lees meer
op de internetsite van het radiostation.
1. Druk herhaaldelijk op de FM/DAB toets (24) totdat er
“DAB” op het scherm verschijnt.
2. U kunt het volgende of vorige station selecteren door
gebruik te maken van de / toetsen (6).
3. Als de ontvangst te zwak is en het ontvangen station
stoort, kunt u de ontvangst proberen te verbeteren door
de positie van de antenne te wijzigen.
OPMERKING:
• Voor een optimale ontvangst van DAB, is het aan te
raden dat de dipool antenne verticaal wordt uitgericht.
• U kunt tijdens de DAB ontvangst niet tussen Mono en
Stereo schakelen.
• Om handmatig een DAB-frequentie in te stellen, ga
verder zoals beschreven in de sectie “Instellingenmenu”.
Geef aanvullende DAB informatie weer
In de DAB modus kunt u de volgende aanvullende informatie
weergegeven, indien verzonden door het radiostation. Druk
hiervoor op de INFO toets (21).
De DLS-tekst wordt standaard op de display weergegeven.
• DLS: Afkorting voor Dynamic Label Segment. Dit betreft
aanvullende gegevens. Dit omvat bijv. informatie over
het station of de titel van het nummer en de naam van de
artiest.
• Geeft de sterkte aan van het ontvangen signaal.
• Hiermee wordt de categorie van het station aangegeven
(bijv. Popmuziek, Nieuws, enz.).
• Geeft de naam van het station of de omroep weer (bijv.
DR Deutschland).
• Frequentie van het huidige radiostation.
• De “SIGNAL ERROR” display toont de signaalkwaliteit.
Hoe lager het aangrenzende getal, hoe beter de kwaliteit.
• Geeft de digitale audio-bitsnelheid weer. / Transmissienorm.
Station opslaan
Druk op en houd de gewenste cijfertoets (0-9) ingedrukt
waaronder u het station wilt opslaan. “PRESET STORED”
wordt voor een korte periode op de display weergegeven.
Een voorkeuzestation selecteren
Druk op de respectievelijke cijfertoets op de afstandsbediening.
Instellingenmenu
Talrijke instellingen worden via het instellingenmenu gemaakt
(zie pagina 4).
In het instellingenmenu kunt u het hoofdmenu en de verwante submenu’s met de afzonderlijke opties vinden.
Om het menu op te roepen, druk tijdens de werking op de
“MENU”-toets (20).
• Gebruik de “ / ”-toetsen (6) om in het menu te navigeren.
• Gebruik de “ENTER”-toets (19) om een submenu te
selecteren of een instelling te bevestigen.
• Druk nogmaals op de “MENU”-toets om het menu te
verlaten.
Nederlands
OPMERKING:
• Als u binnen 10 seconden geen knop indrukt, wordt het
menu verborgen.
• De momenteel ingestelde optie wordt door “*” gemarkeerd.
Een instellingenmenu vindt u in de DAB-modus, evenals in
de FM-modus. Het DAB- en FM-menu worden samen met
het algemene “SYSTEM”-menu hieronder uitgelegd.
DAB-menu
Het DAB-menu is onderverdeeld in menu’s: Autoscan, handmatig afstemmen, DRC en knippen.
• Autoscan: Start het scannen van het station. De DAB
frequentieband wordt gescand voor stations.
• Manual tune: Om dit te doen moet u de frequentie
weten. Dit kan op de internetsite van de omroep worden
gevonden. Selecteer individuele frequenties met behulp
van de “ / ”-toetsen (6).
• DRC: afkorting van Digital Range Control (dynamisch
bereik). De term DRC beschrijft de verhouding van het
stilste en hardste geluid. Als het dynamisch bereik zeer
hoog is, zijn er heel zachte geluiden en ook erg luide
geluiden. Onder bepaalde omstandigheden kan dit een
probleem met afspelen geven. Laten we aannemen dat
u naar een radiostation luistert in een relatief luidruchtige omgeving. Door het volume te verhogen kunt u de
rustige secties luider afspelen. Dit heeft echter als nadeel
dat de luide secties onaangenaam luid worden. Het is
zinvol om hier het dynamisch bereik te verminderen.
Selecteer tussen de opties.
- DRC off: Het dynamisch bereik wordt niet verminderd.
- DRC high: Het dynamisch bereik wordt sterk verminderd.
- DRC low: Het dynamisch bereik wordt enigszins
verminderd.
• Prune: het kan zijn dat u na een scan naar stations of verandering van locatie sommige stations niet langer kunt
ontvangen. Met deze functie kunt u deze stations uit de
ontvangstlijst verwijderen. Selecteer “YES” en bevestig
met de “ENTER”-toets.
FM-menu
• Scan setting: Selecteer de gewenste optie om een
automatische scan naar stations uit te voeren.
- Strong stations only: Alleen sterke radiozenders
zoeken.
- All stations: Zoeken naar alle radiostations die te
ontvangen zijn. Daarbij pauzeert de scan ook op
zwakke stations.
DAB + FM-menu (SYSTEM)
De volgende submenu’s kunnen in het “SYSTEM”-menu
worden gevonden.
19
• Factory reset: Selecteer de “YES” optie, als u het apparaat naar de standaard fabrieksinstellingen wilt herstellen. Alle instellingen die u hebt gemaakt, gaan hierbij
verloren.
• SW version: Hier kunt u de huidige softwareversie van
het apparaat weergeven.
AUDIO IN-aansluitingen (achterkant van
het apparaat)
Voor het aansluiten van analoge afspeelapparaten via deze
aansluiting, kunt u ook het geluid van andere afspeelapparaten zoals MP3-spelers, CD-spelers enz., via de luidsprekers
horen.
1. Sluit het externe apparaat met een tulpstekkerkabel (2x
RCA) aan op de AUDIO-IN-aansluitingen op de achterzijde van het apparaat. Gebruik indien nodig een geschikte
adapter (niet meegeleverd).
2. Druk op de “AUX IN”-toets (22). De melding “AUX”
wordt op de display weergegeven. U kunt ook de AUXmodus selecteren door herhaaldelijk op de “INPUT”toets (9 op het apparaat) te drukken.
3. Start het afspelen van uw audiobron. Luister naar het
afspelen van geluid via de luidspreker. U kunt het volume
met behulp van de VOL+/VOL- toetsen (11/5) aanpassen.
4. Raadpleeg de gebruikershandleiding van de externe
audiobron voor de verdere procedure.
OPMERKING:
Pas het volume van het externe apparaat naar een aangenaam niveau aan.
Voor het afspelen van muziek
via Bluetooth
Bluetooth is een technologie voor een draadloze radioverbinding tussen apparaten over een korte afstand. Apparaten
die Bluetooth ondersteunen zenden uit tussen 2,402 en
2,480 GHz op de ISM band (Industrial, Scientific en Medical).
Storing kan bijvoorbeeld worden veroorzaakt door WLANnetwerken, DAB radio’s, draadloze telefoons of magnetrons
die op dezelfde frequentieband werken.
Dit apparaat ondersteunt verbindingen met apparaten die
Bluetooth ondersteunen. Het bereik is beperkt tot ongeveer
15 meter, afhankelijk van de omgeving waarin het apparaat
gebruikt wordt.
Als uw afspeelapparaat het A2DP profiel ondersteunt (Advanced Audio Distribution Profile) en muziek kan afspelen,
dan kunt u ook draadloos muziek naar het apparaat sturen.
Het A2DP profiel wordt door meerdere fabrikanten van Bluetooth apparatuur ondersteunt. Door middel van streaming
worden stereo geluidssignalen draadloos verstuurd tussen
het afspeelapparaat (bron) en het ontvangende apparaat.
Om de bron op afstand te kunnen bedienen, moet het
20
Nederlands
afspeelapparaat het AVRCP-profiel (Audio Video Remote
Control Profile) ondersteunen.
Doordat er meerdere fabrikanten, modellen en softwareversies bestaan kan volledige functionaliteit niet worden
gegarandeerd.
Op apparaten inloggen (Pairing)
Voordat u via het apparaat naar muziek kunt luisteren dient u
de luidsprekers te pairen.
1. Zorg ervoor dat de Bluetooth-functie is geactiveerd in
uw speler (bijv. mobiele telefoon). Raadpleeg hiervoor de
handleiding van uw speler.
2. Druk op de “BT”-toets (23). Het controlelampje (11) knippert snel.
3. Kies het Bluetooth menu op uw speler en registreer het
apparaat op uw speler. Gebruik hiervoor de gebruiksaanwijzing van uw speler. Het apparaat “AEG MC 4457”
wordt op uw speler als keuze weergegeven.
OPMERKING:
Slechts één afspeelapparaat tegelijk kan met de
muziekcenter zijn verbonden. Als de muziekcenter al
met een ander afspeelapparaat is verbonden, wordt de
muziekcenter niet in het “BT”-keuzemenu weergegeven. Druk op de “CONNECT”-toets (7) om de reeds
aangesloten apparaten te ontkoppelen. Nu kunt u de
muziekcenter met een ander afspeelapparaat verbinden zoals hierboven beschreven.
4. Geef nu het wachtwoord “0000” in op uw speler, hoe, is
afhankelijk van de fabrikant, het model en de softwareversie van het apparaat.
Als de toepassing met succes werd uitgevoerd, zal het controlelampje (11) branden.
Raadpleeg de gebruikershandleiding van het afspeelapparaat voor de verdere procedure. Pas het volume van het
externe apparaat naar een aangenaam niveau aan.
OPMERKING:
• Afhankelijk van de fabrikant van het apparaat dient u
de registratie (PAIRING) tussen de apparaten opnieuw
uit te voeren.
• Bluetooth ondersteuning kan niet worden gegarandeerd voor apparaten (bijv. mobiele telefoons) die in
de toekomst op de markt komen.
• Om een optimale verbinding te garanderen dient u
ervoor te zorgen dat de batterij van uw speler volledig
is opgeladen.
• Sommige merken van mobiele telefoons hebben een
energie spaarstand. Schakel de energie spaarstand
uit, dit kan namelijk voor problemen zorgen tijdens de
gegevensoverdracht via Bluetooth.
• Om audiogegevens te kunnen sturen, dient Bluetooth
ingeschakeld te blijven op uw speler. Bestudeer de
gebruiksaanwijzing van uw speler.
OPMERKING:
• Als een mobiele telefoon van waaraf u muziek afspeelt
een gesprek ontvangt wordt de muziek onderbroken.
Het geluid wordt afhankelijk van de mobiele telefoon,
via de luidsprekers afgespeeld. Om het gesprek naar
uw mobiele telefoon over te zetten, houd het langzaam
op de display van de mobiele telefoon verschijnende
bericht in de gaten. Nadat u uw telefoongesprek hebt
afgerond, worden de apparaten opnieuw met elkaar
verbonden. U moet wellicht het afspelen opnieuw
starten.
Controlelampje (11 op het apparaat)
Het controlelampje knippert of brandt afhankelijk van de
functie van het apparaat.
Controlelampje Functie van het apparaat
Knippert snel
CONNECT-modus. Een verbinding kan
nu met een nieuwe audiobron worden
gemaakt.
Knippert lang- PAIRING-modus. Een verbinding naar
zaam
een al eerder geregistreerde audiobron
kan worden hersteld.
Brandt
Bluetooth-verbinding met de audiobron
is gemaakt.
USB-poort (6)
Dit apparaat is ontwikkeld in overeenstemming met de
nieuwste technische ontwikkelingen op het gebied van USB.
Het brede scala aan verschillende USB-opslagapparaten
van alle soorten die momenteel op de markt te vinden zijn,
kunnen we helaas geen volledige compatibiliteit met alle
USB-opslagapparaten garanderen. Om deze reden kunnen in zeldzame gevallen problemen met het afspelen van
bestanden vanaf USB-opslagapparaten bestaan. Dit is geen
defect van het apparaat.
1. Druk herhaaldelijk op de CD/USB toets (25) totdat
“SOURCE [USB]” op de display wordt getoond.
2. Sluit een USB-opslagapparaat aan. Het bericht “USB
CHECKING…” verschijnt na een paar seconden voor
een korte tijd. Vervolgens zal het afspelen starten. Het
“ ”-symbool, “MP3”, de huidige titel en de verstreken
speelduur, evenals het totale aantal titels worden op de
display weergegeven.
Voor de bediening, verwijzen wij u naar de sectie “Beschrijving van de bedieningsknoppen”.
OPMERKING:
• Een USB-apparaat altijd rechtstreeks op de USB-poort
aansluiting om storingen te voorkomen.
• De USB-poort is niet ontworpen voor het opladen van
externe apparaten.
• Als de USB-opslagmedia niet wordt herkend, zal het
bericht “NOT FIND USB” op de display verschijnen.
Nederlands
LET OP:
Voordat u het USB-opslagapparaat verwijdert, schakel het
apparaat met de INPUT toets (9 op het apparaat).
Afspelen van CD’s/MP3-CD
1. Druk op de “CD/USB”-toets (25). De melding “CD”
wordt op de display weergegeven.
2. Druk op de “ EJECT”-toets (1/2), om de CD-lade (7) te
openen.
3. Plaats een CD met de bedrukte zijde omhoog op de CDlade. Druk nogmaals op de “ EJECT”-toets om het CDcompartiment te sluiten.
4. Het bericht “LOADING DISC” verschijnt op de display.
Het afspelen start vervolgens. Het “ ”-symbool, het CDtype (CDDA = Audio CD of MP3 = MP3 CD), de huidige
titel en de verstreken speelduur, evenals het totale aantal
titels worden op de display weergegeven.
Raadpleeg de sectie “Beschrijving van de bedieningsknoppen” voor de bediening. Houd altijd de CD-lade gesloten.
OPMERKING:
• Als u een disc ondersteboven wordt geplaatst, dan wel
geen disk is geplaatst, zal “NO DISC” (geen disk) op
de display verschijnen.
• Het afspelen van CD’s die door de gebruiker zijn gemaakt, kan door de grote hoeveelheid aan beschikbare
software en CD-media niet worden gegarandeerd.
Beschrijving van de bedieningsknoppen
PLAY/PAUSE (8/3)
U kunt met behulp van deze toets het afspelen kort onderbreken en hervatten. De display geeft het “ ”-symbool weer.
Nogmaals drukken hervat het afspelen.
NEXT /PREV (9/8)
• Met de “NEXT ”-toets kunt u naar de volgende of de
daarop volgende titel springen.
• U kunt de “PREV ”-toets als volgt gebruiken:
Druk 1x =
Naar de vorige titel springen.
Druk 2x =
Speelt een nummer daarvoor af, enz.
/ (18)
Een muziek-zoeksessie wordt gestart. Het “ ”- of “ ”
-symbool verschijnt op de display. Druk op de “ PLAY/
PAUSE”-toets om naar de normale weergave terug te keren.
STOP (9/11)
Het afspelen wordt gestopt.
21
REPEAT (16)
Druk 1x =
“REP: One” verschijnt voor een korte tijd
op de display. Het huidige nummer wordt
voortdurend herhaald.
Druk 2x =
“REP: All” verschijnt voor een korte tijd op de
display. Alle nummers worden voortdurend
herhaald.
Druk 3x =
“REP: Off” verschijnt voor een korte tijd op
de display. Alle functies worden gestopt. Het
normaal afspelen wordt voortgezet.
OPMERKING:
De geactiveerde functie wordt om technische redenen niet
permanent op de display getoond.
SHUFFLE (14)
Druk 1x =
Alle titels van de audio-CD worden in willekeurige volgorde afgespeeld. Het afspelen
stopt nadat al de titels zijn afgespeeld.
Druk 2x =
Alle titels van de audio-CD worden herhaaldelijk in willekeurige volgorde afgespeeld.
OPMERKING:
• Deze functie is alleen voor audio-CD’s beschikbaar
(CDDA).
• De geactiveerde functie wordt om technische redenen
niet permanent op de display getoond.
Cijfertoetsen (2)
Om de titel direct te selecteren, voer het nummer van de
gewenste titel in. Druk op de “ENTER”-toets (19) om de titel
af te spelen.
Geprogrammeerd afspelen
Dit kan worden gebruikt om een gewenste volgorde van
nummers te programmeren. Alleen voor audio-CD’s (CDDA).
1. Druk op de “ STOP”-toets (17/4).
2. Druk op de “PROGRAM”-toets (15). De display toont:
PROGRAM INPUT
01[00] 02[00]
3. Voer met de cijfertoetsen de gewenste volgorde van
titels in. U verplaats de cursor op de display met de
“ / ”-richtingtoetsen. Om de volgende twee geheugenlocaties weer te geven, druk op de “ ”-richtingtoets.
OPMERKING:
• Ten minste twee titels moeten worden geprogrammeerd om het afspelen te kunnen starten.
• Tot maximaal 20 titels kunnen worden geprogrammeerd. Dezelfde titel kan meer dan eens in de lijst
worden weergegeven.
4. Herhaal de procedure totdat alle gewenste nummers zijn
geselecteerd.
22
Nederlands
5. Nadat u alle titels hebt geprogrammeerd, selecteert u
het “ ”-symbool met de richtingtoetsen. Druk op de
“ENTER”-toets om te bevestigen. Het afspelen start. Het
“ ”-symbool, “CDDA”, “P”, de huidige titel en de verstreken speelduur, evenals het totale aantal titels worden
op de display weergegeven.
6. Wanneer u één keer op de “ ”-toets (17/4) drukt, wordt
het afspelen gestopt en het huidige programma wordt
gewist. Het “P”-indicator gaat uit.
Het apparaat stopt automatisch zodra de gehele reeks van
geprogrammeerde nummers is voltooid. De “P”-indicator
gaat uit en de geprogrammeerde volgorde van de nummers
wordt uit het geheugen verwijderd.
Afspelen van muziek in MP3-formaat
Met dit apparaat is het mogelijk om muziekstukken in MP3formaat af te spelen. Het apparaat ondersteunt ook alle
standaard CD-typen: CD, CD-RW, CD-R.
Dit apparaat is in staat om MP3 CD’s af te spelen. Maximaal
200 nummers kunnen op deze CD’s worden gecomprimeerd
en opgeslagen. Uw apparaat detecteert automatisch een
MP3-CD (op de display verschijnt het totale aantal nummers
en MP3’s). Als u één van deze CD’s zou willen afspelen, gaat u
verder zoals beschreven onder “Afspelen CD’s/MP3”.
Merk op:
Er zijn een aantal verschillende opname- en compressiemethoden, evenals kwaliteitsverschillen tussen CD’s en zelf
opgenomen CD’s.
Bovendien, voldoet de muziekindustrie niet aan vastgestelde
normen (kopieerbeveiliging).
2. Selecteer het tijdstip waarop de alarm moet worden
geactiveerd. Selecteer uit: ALL DAYS (alle dagen), ONCE
(eens), WEEKENDS (weekenden), WEEKDAYS (weekdagen). De instelling “ALARM OFF” (Alarm uit) deactiveert
de functie.
3. Stel nu de alarmtijd in.
4. SOURCE: Selecteer een bron waar u via gewekt wilt
worden. Selecteer uit: DAB, FM, CD, USB, AUX, B.T.
OPMERKING:
• Bij het kiezen van DAB of FM, zal het laatst ingestelde
radiostation worden geselecteerd.
• Bij het kiezen van CD of USB, moet een medium worden geplaatst of worden aangesloten.
• Bij het kiezen van AUX, moet de aangesloten audiobron ook op hetzelfde tijdstip worden geprogrammeerd.
• Bij het kiezen van B.T., moet de Bluetooth-functie op
het apparaat zijn ingeschakeld en moet het eerder met
het apparaat zijn verbonden geweest. De functionaliteit van het alarm via Bluetooth is afhankelijk van uw
afspeelapparaat.
5. Selecteer tot slot het volume waarop u wilt worden
gewekt.
6. Nadat u de instellingen voor de eerste alarmtijd hebben
aangepast, komt u bij de instellingen van een tweede
alarmtijd terecht. “SETTING ALARM 2” zal op de display
worden weergegeven. Om de tweede alarmtijd in te stellen, ga verder zoals hierboven (punt 2-5) beschreven.
De geactiveerde alarmfunctie wordt door het “ ” -symbool
in de display weergegeven. Als u beide alarmtijden hebt
ingesteld, zullen twee symbolen worden weergegeven.
Om deze redenen is het mogelijk dat in zeldzame gevallen er
problemen met het afspelen van CD’s en MP3-CD’s zijn. Dit is
geen defect van het apparaat.
Alarmfunctie deactiveren
Selecteer de optie “ALARM OFF” in het hoofdstuk “De
alarmtijd instellen” (punt 2).
Alarmfunctie
Reiniging en onderhoud
U kunt het apparaat zodanig instellen zodat het op een
bepaald tijdstip inschakelt.
• Haal de stekker uit het stopcontact voor het reinigen.
• U kunt vlekken op de buitenzijde afvegen met een vochtige doek zonder toevoegingen.
• Om een optie te selecteren, druk op de “ / ”-toetsen (6).
• Voer de instelling van de cijfers met de “ / ”-richtingtoetsen uit. Druk op de “ ”-richtingtoets om het
volgende cijfer te wijzigen.
• Selecteer een optie met de “ALARM”-toets (4).
OPMERKING:
Als binnen 5 seconden geen toets wordt ingedrukt, zal de
display terug naar de normale weergave veranderen. De
instellingen worden automatisch opgeslagen.
De alarmtijd instellen
1. Druk op de “ALARM”-toets tijdens de standby-modus.
“SETTING ALARM 1” wordt op de display weergegeven.
Probleemoplossing
Probleem
Het apparaat
kan niet worden gebruikt
Oorzaak
Het apparaat is
geblokeerd en
“hangt”
Oplossing
Trek de stekker uit het
stopcontact en wacht
minstends 5 seconden.
Zet daarna het apparaat weer aan
Reset het apparaat
naar de fabrieksinstellingen. zie “Instellingenmenu”
Nederlands
Probleem
Oorzaak
Geen DAB ra- De dipool-antenne
dio ontvangst is niet correct
uitgericht
Er kan geen Digitale Radio worden
ontvangen op uw
locatie
Problemen met Afhankelijk van de
DAB radiolocatie in uw regio,
kunt u mogelijk
ontvangst
sommige stations
helemaal niet
of met storing
ontvangen. zie
ook opmerking op
pagina 18
Geen geluid Het volume is te
laag
Slechte kwa- Het radiosignaal is
liteit van het
te zwak
geluid
Geen audio- Het apparaat is
signaal tijdens niet met de audioBluetoothbron geregistreerd.
verbinding
Oplossing
Richt de dipool antenne verticaal uit
Schakel over naar de
FM-modus om deze
stations te ontvangen.
Indien deze stations via
UKW worden uitgezonden. Lees meer op
de internetsite van het
radiostation.
Verhoog het volume
Probeer om de positie
van de antenne te
wijzigen.
Controleer of er een
verbinding is. Registreer het apparaat
opnieuw met de audiobron, indien nodig.
Te laag volume
Verhoog het volume
op het apparaat.
Verhoog het volume
op het audio-apparaat.
Druk op de
BluetoothHet apparaat is
verbinding kan niet in de CON“CONNECT”-toets
niet worden
NECT-modus. De (knop 7 op de afLED (11) knippert standsbediening). Het
gemaakt
LED zal snel knipperen.
langzaam.
Probeer opnieuw de
apparaten met elkaar
te verbinden.
Registratie werkt Controleer of de
niet
audiobron het A2DPprotocol ondersteunt.
De audiobron is
Schakel de audiobron
uitgeschakeld
in
Bluetooth is op de Zet de Bluetooth-funcaudiobron uitge- tie op de audiobron
schakeld.
aan.
De Bluetooth
Gebruik een ander
versie wordt niet afspeelapparaat.
ondersteund.
23
Technische specificaties
Model:............................................................... MC 4457 DAB+/BT
Voeding :.............................................................220 - 240 V~ 50 Hz
Opgenomen vermogen:..........................................................40 W
Beschermingsklasse:........................................................................II
Netto gewicht:........................................................................2,63 kg
Radio:
Frequentiebereiken:................. UKW/FM 87,5 ~ 108,0 MHz
....................DAB/DAB+ 174 ~ 240 MHz
Bluetooth
Bluetooth-ondersteuning:............................................V2.1 + EDR
Bereik:........................................................................ . ong. 15 meter
Zendfrequentie:..........................................................2,4 - 2,48 GHz
Protocollen:.................................................................A2DP/AVRCP
Het recht om technische en ontwerpaanpassingen te maken
in de loop van voortdurende productontwikkeling blijft voorbehouden.
Dit apparaat voldoet aan alle huidige CE-richtlijnen, zoals de
richtlijn elektromagnetische compatibiliteit en de laagspanningsrichtlijn, en is gefabriceerd volgens de meest recente
veiligheidsvoorschriften.
Verwijdering
Betekenis van het “vuilnisbak”-symbool
Houd rekening met het milieu, gooi elektrische apparaten
niet weg bij het huishoudafval.
Breng overbodige of defecte elektrische apparaten naar
gemeentelijke inzamelpunten.
Help potentiële milieu- en gezondheidsgevaren door onverantwoordelijk wegwerpen te voorkomen.
Draag bij aan hergebruik en ander opnieuw gebruik van
oude elektrische en elektronische apparaten.
Uw gemeente kan u informatie geven over inzamelingspunten.
24
Français
Mode d’emploi
Merci d’avoir choisi notre produit. Nous espérons que vous
saurez profiter votre appareil.
Symboles de ce mode d’emploi
AVERTISSEMENT :
Avertit contre les dangers pour la santé et indique les
risques potentiels de blessure.
ATTENTION :
Indique de potentiels dangers pour l’appareil ou d’autres
objets.
NOTE :
Souligne les conseils et informations donnés à l’utilisateur.
Indications générales de sécurité
Avant d’utiliser cet appareil, lire attentivement ce manuel et le
conserver avec le Certificat de Garantie, la facture et, si possible, l’emballage d’origine, y compris l’emballage interne. Si
cet appareil est donné à une tierce personne, transmettre le
manuel avec.
• Afin d’éviter tout risque d’incendie ou d’électrocution, ne
pas exposer l’appareil à la pluie ni à l’humidité. Ne pas
utiliser l’appareil à proximité d’eau (par ex salle de bain,
piscine, cave humide).
• N’utilisez pas l’appareil dans des endroits très humides,
poussiéreux, froids ou chauds.
• Cet appareil est conçu uniquement pour l’utilisation
privée et dans la limite de ce pour quoi il a été conçu. Cet
appareil n’est pas destiné à l’utilisation commerciale.
• Veillez à ce que le câble électrique ne soit pas courbé,
serré ou n’entre en contact avec des sources de chaleur.
• Veillez à ce que le câble électrique ne présente pas un
risque de trébuchement.
• Ne touchez jamais la fiche ou le cordon électrique avec
les mains humides.
• Branchez toujours l’appareil à une prise correctement
montée. S’assurer que la tension de l’appareil correspond
à l’alimentation de secteur.
• Le fiche électrique doit toujours être facilement accessible.
• Installez toujours les piles dans le bon sens.
• Eviter de couvrir les ouvertures de ventilation de l’appareil.
• Ne couvrez pas les orifices de ventilation avec des objets
tels qu’un magazine, une nappe, un rideau, etc.
• N’exposez pas l’appareil aux éclaboussures ou aux
gouttes d’eau et ne placez aucun récipient rempli d’eau
tel que, p.ex. des vases remplis de fleurs, sur l’appareil.
• Des sources de feu nues telles que des bougies allumées
ne doivent pas être placées sur l’appareil.
• Ne jamais ouvrir le coffrage de l’appareil. Une réparation
inadéquate peut entraîner un réel danger pour l’utilisa-
teur. Si l’appareil, en particulier le cordon électrique, est
endommagé, cesser de l’utiliser et le faire réparer par un
technicien qualifié. Vérifier régulièrement que le cordon
électrique n’est pas endommagé.
• Afin d’éviter tout danger, un cordon électrique endommagé doit être remplacé uniquement par le fabriquant,
ses services clientèle ou une personne semblablement
qualifiée, par un cordon identique.
• Si l’appareil ne doit pas être utilisé pendant une période
assez longue, débrancher le cordon électrique et retirer
les piles.
Ces symboles peuvent se trouver sur l’appareil à titre d’avertissements :
Le symbole en forme d’éclaire est destiné
à prévenir l’utilisateur de la présence d’une
tension dangereuse à l’intérieur de l’appareil.
Le point d’exclamation est destiné à prévenir
l’utilisateur de la présence d’instructions d’utilisation importantes accompagnant l’appareil.
Les appareils dotés de ce symbole fonctionnent avec un “laser de la classe 1“ pour
la lecture des disques CD. Les boutons de
sécurité intégrés sont chargés d’éviter qu’à
l’ouverture du compartiment à CD l’utilisateur
entre en contact avec la lumière laser qui est
dangereuse et invisible à l’oeil humain.
Il est absolument interdit de court-circuiter ou manipuler ces
boutons de sécurité, ce qui risquerait sinon de mettre l’utilisateur en contact avec la lumière laser.
Enfants et personnes invalides
• Pour la sécurité de vos enfants, garder hors de leur portée tous les emballages (sachets en plastique, pièces de
cloisonnement, polystyrène etc.).
AVERTISSEMENT !
Ne pas laisser de jeunes enfants jouer avec les emballages danger d’étouffement !
• Cet appareil n’est pas destiné à être utilisé par des personnes (y compris des enfants) aux capacités physiques,
sensorielles ou mentales réduites ou ne disposant pas
de l’expérience et/ou des connaissances nécessaires à
moins qu’elles ne soient supervisées ou reçoivent d’une
personne responsable de leur sécurité des instructions
concernant l’utilisation de l’appareil.
• Surveillez les enfants et assurez-vous qu’ils ne jouent pas
avec l’appareil.
Consignes de sécurité spéciales
Cet appareil fonctionne avec un
laser classe 1.
Français
Liste des différents éléments de commande
Vue avant (Fig. 1)
1 IR – Capteur pour la télécommande
2 Bouton EJECT (entre et éjecte le plateau CD)
3 Bouton
PLAY/PAUSE (lire/mettre en pause)
4 Bouton STOP (arrêter)
5 Bouton de contrôle VOLUME
6 Connexion USB
7 Plateau CD
8 Bouton NEXT (titre suivant)
Bouton PREV (titre précédent)
9 Bouton
INPUT (entrée)
10 Bouton STANDBY (on/capacité opérationnelle)
11 Voyant de contrôle Bluetooth
12 Écran LCD
Vue Arrière (sans illustration)
FM ANT – Antenne dipôle
Connecteurs AUDIO INPUT (2x RCA)
Connecteur d’alimentation électrique
SPEAKERS – Bornes pour haut-parleurs
Télécommande (Fig. 2)
1 Bouton EJECT (entre et éjecte le plateau CD)
2 Boutons numérotés
3 Bouton CLOCK
4 Bouton ALARM (fonction d’alarme)
5 Bouton SLEEP
6 Touches directionnelles
7 Bouton CONNECT (connecter)
8 Bouton
(lire/mettre en pause)
9 Boutons / (titre suivant/précédent)
10 Bouton MUTE (couper le son)
11 Boutons VOL+/VOL- (volume)
12 Bouton TONE (réglage du son)
13 Bouton DSP (égaliseur)
14 Bouton SHUFFLE (lecture aléatoire)
15 Bouton PROGRAM (mémoire)
16 Bouton REPEAT (répéter)
17 Bouton (arrêter)
18 Boutons / (recherche musicale)
19 Bouton ENTER (confirmer)
20 Bouton MENU
21 Bouton INFO
22 Bouton AUX IN
23 Bouton BT (Bluetooth)
24 Bouton FM/DAB
25 Bouton CD/USB
26 Bouton STANDBY (on/capacité opérationnelle)
Installation
• Lisez l’ensemble du manuel avec d’utiliser l’appareil !
25
• Choisissez un endroit qui convient à l‘appareil. Les
endroits adaptés sont secs et disposent de surfaces antidérapantes sur lesquelles vous pouvez utiliser l’appareil
sans difficultés.
• Assurez-vous que l’appareil dispose d’une ventilation
adaptée !
• Raccordez les haut-parleurs aux connexions “SPEAKERS”
à l’arrière de l’appareil. En faisant cela, respectez la bonne
polarité (noir vers noir).
• Retirez si nécessaire le film de protection qui recouvre
l’écran.
Alimentation électrique
• Insérezr la prise électrique dans une prise trois points de
230 V, 50 Hz, correctement installée.
• S’assurer que la tension correspond aux indications de
l’étiquette de la prise.
NOTE :
Débranchez l’appareil du secteur si vous prévoyez de ne
pas l’utiliser pendant une longue période.
Installation/remplacement de la pile de la télécommande
(Les piles ne sont pas incluses dans la livraison)
• Ouvrir le boîtier à pile en dessous de la télécommande.
• Insérez 2 piles de type R03 “AAA” 1,5 V. Vérifiez que la
polarité est correcte (voir le compartiment des piles).
• Fermer le boîtier à pile.
Lorsque la télécommande ne doit pas être utilisée pendant
longtemps, retirer la pile afin que l’acide ne “coule” pas.
AVERTISSEMENT :
N’exposez pas les piles à une source intense de chaleur
telle que le soleil, le feu ou toute autre source similaire.
Danger d’explosion !
ATTENTION :
• Des piles de types différents ou des piles neuves et
usagées ne doivent pas être utilisées ensemble.
• Les piles ne doivent pas être jetées avec les ordures
ménagères. Les déposer dans un centre de récupération compétent ou les rendre au vendeur.
Installation
1 Alignez l’antenne dipôle verticalement.
2 Allumez l’appareil à l’aide du bouton STANDBY (10/26).
L’appareil recherche automatiquement les stations DAB.
SCANNING… et une barre de progrès apparaît à l’écran.
Le chiffre à droite de l’écran indique le nombre de stations radio trouvées. La première station alphanumérique
DAB est lue.
26
Français
Lorsque vous écoutez une station radio, le service de
radiodiffusion donne l’heure et la date. Si l’appareil ne
reçoit pas de stations DAB dans votre région, réglez manuellement l’heure comme décrit dans “Fonctionnement
général”.
Fonctionnement général
NOTE :
L’appareil fonctionne premièrement avec la télécommande. Ainsi, les descriptions se référent aux boutons de la
télécommande. Des boutons sont également sur l’appareil. Les boutons qui portent le même nom ont la même
fonction.
STANDBY (26/10)
Mettez l’appareil en veille à l’aide du bouton STANDBY/
ON (l’affichage de l’heure apparaît). Si vous appuyez à nouveau sur le bouton, l’appareil reviendra en arrière.
NOTE :
L’appareil garde en mémoire le dernier mode et le volume
utilisé avant extinction. Une fois rallumé, l’appareil reprend
ce mode et ce volume.
Bouton FM/DAB (24)
Sert à basculer entre les modes DAB et FM.
Bouton CD/USB (25)
Permet de basculer entre les modes CD et USB.
Bouton INPUT (9 sur l’appareil)
Appuyez plusieurs fois sur ce bouton pour sélectionner les
différents modes.
VOL+/VOL- Volume (11/5)
Ajustez le volume au niveau de votre choix.
MUTE (10)
Permet de désactiver rapidement le son. Lorsque vous
activez la fonction, la notification “MUTE ON” s’affichera
brièvement. Appuyez à nouveau sur ce bouton pour désactiver la fonction. “MUTE OFF” s’affichera brièvement.
NOTE :
La fonction activée ne s’affiche pas en continu pour des
raisons techniques.
Bouton TONE (12)
Appuyez plusieurs fois sur ce bouton pour régler tout le
volume (MASTER VOLUME), les graves (BASS) et les aigus
(TREBLE). Effectuez des changements à l’aide des boutons
VOL+/VOL (11).
NOTE :
Vous perdez les paramètres si vous sélectionnez l’un des
modes de l’égalisateur précédemment définis.
Bouton DSP (13)
(Permet de prérégler la fonction d’égalisateur). Différents modes de son sont disponibles (JAZZ, ROCK, CLASSICS, POP,
LIVE, DANCE, OFF (Off)).
Télécommande infrarouge
Pour une commande à distance de 5m. Si la portée de la
télécommande diminue, les piles doivent être changées.
Garder libre l’espace entre la télécommande et le capteur de
l’appareil afin d’assurer un fonctionnement correct.
Arrêt différé (SLEEP)
L’appareil s’éteint automatiquement lorsque l’heure sélectionnée est atteinte.
• Sélectionnez l’heure en appuyant plusieurs fois sur le
bouton SLEEP (5), heure après laquelle l’appareil s’éteint.
Sélectionnez entre : 10, 20, 30, 45, 60, 90 et 120 minutes.
• Le paramètre SLEEP OFF désactive cette fonction.
Réglage manuel de l’heure (en veille)
Réglez les paramètres à l’aide des touches directionnelles
/ . Pour accéder au numéro suivant, appuyez sur la touche
directionnelle .
1. En mode veille, appuyez sur le bouton CLOCK (3).
[SETTING CLOCK] s’affichera et les chiffres de gauche
clignoteront.
2. Après avoir réglé l’heure, appuyez sur le bouton CLOCK
pour modifier la date saisie. [SETTING DATE] s’affichera
et les chiffres de gauche clignoteront.
NOTE :
Si vous n’appuyez sur aucun bouton au bout de 5 secondes, l’écran redeviendra normal. Les paramètres s’enregistrent automatiquement.
Ecouter la radio
Balayer les stations FM
1. Appuyez plusieurs fois sur la touche FM/DAB (24) jusqu’à
ce que l’écran indique “FM”.
2. Vous avez deux options pour régler une station :
- Appuyez sur les boutons / (6). Vous modifiez les
fréquences par tranches de 0,05 MHz.
- Appuyez sur les boutons / (6). L’appareil cherchera
la station de radio suivante ou précédente.
3. En cas de récéption faible et de bruit sur la station reçue,
essayez d’améliorer la récéption en tournant et roulant
ou déroulant l’antenne.
Français
Afficher les informations FM
Appuyez sur le bouton INFO (21) pour afficher les informations suivantes, si elles sont diffusées par une station radio.
• Le radiotexte s’affiche par défaut. Si aucune information
n’est disponible, [No RadioText] apparaît à l’écran.
• Le type de programme (PTY) de la station s’affiche (p. ex.
Pop music, actualités, etc.). Si aucun PTY n’est reçu, [No
PTY] apparaît à l’écran.
• Affichage du nom de la station. Si aucun nom n’est reçu,
[No Name] apparaît à l’écran.
• Le mode audio en cours s’affiche. STEREO ou MONO.
Balayer les stations DAB
Digital Audio Broadcasting (DAB) est un système de radiodiffusion numérique standardisé pour la réception terrestre
de la radio numérique. Une liste répertoriant les stations de
radio qui peuvent être reçues en Allemagne est disponible
sur le site Internet : www.digitalradio.de.
NOTE :
En Allemagne, environ 70% de la surface du pays sont
couverts par les émissions de radio numériques (à partir
de nov. 2011). Cependant, dans les régions individuelles,
la couverture et la mise à disposition varient beaucoup. Si,
dans votre région, vous ne pouvez pas recevoir les stations
DAB ou que vous les recevez avec des interférences en
fonction du lieu, dans ces cas, vous pouvez régler sur la
bande FM pour recevoir cette station. Cependant, cela n’est
possible que si ces stations sont diffusées via UKW. Trouvez
plus d’informations sur le site Internet de la station radio.
1. Appuyez plusieurs fois sur le bouton FM/DAB (24) jusqu’à
ce que “DAB”apparaisse sur l’écran.
2. Vous pouvez sélectionner la station suivante ou précédente à l’aide des boutons / (6).
3. Si la réception est trop faible et que la station reçue est
“fragile”, essayez d’améliorer la réception en modifiant la
position de l’antenne.
NOTE :
• Pour une récéption DAB optimale, nous conseillons
d‘aligner l’antenne dipôle verticalement.
• Vous ne pouvez pas permuter entre Mono et Stéréo
pendant la réception DAB.
• Pour régler manuellement une fréquence DAB, suivez
les instructions de la partie “Menu Paramètres”.
Afficher des informations DAB supplémentaires
En mode DAB, vous pouvez afficher les informations supplémentaires suivantes si elles sont diffusées par la station de
radio. Pour cela, appuyez sur le bouton INFO (21).
Le texte DLS s’afiche par défaut.
• DLS : Abréviation de Dynamic Label Segment. Ce paramètre affiche des données complémentaires. Il contient
•
•
•
•
•
•
27
p.ex. des informations sur la station ou le titre et l’artiste
de la chanson en cours de lecture.
Affiche la puissance du signal reçue.
Indique la catégorie de la station (p.ex. Pop-Music, News
etc.).
Affiche le nom du groupe de la station (e.g. DR Deutschland).
Fréquence de la station de radio en cours.
L’affichage “SIGNAL ERROR” indique la qualité du signal.
Plus le chiffre adjacent est bas, plus la qualité est bonne.
Affiche le débit binaire audio numérique. /Niveau de
transmission.
Sauvegarder une station
Maintenez le bouton numéroté souhaité (0-9) sur lequel vous
souhaitez enregistrer la station. “PRESET STORED” s’affiche
brièvement.
Sélectionner une station préréglée
Appuyez sur le bouton numéroté respectif de la télécommande.
Menu Paramètres
De nombreux paramètres peuvent être réglés via le menu
Paramètres (voir page 4).
Dans le menu Paramètres, vous pouvez trouver le menu
principal et les sous-menus correspondants avec les options
individuelles.
Pour afficher le menu, appuyez sur le bouton MENU (20)
pendant le fonctionnement.
• Utilisez les boutons / (6) pour naviguer dans le menu.
• Utilisez le bouton ENTER (19) pour sélectionner un sousmenu ou confirmer un paramètre.
• Pour quitter le menu, appuyez sur le bouton MENU une
nouvelle fois.
NOTE :
• Si vous n’appuyez sur aucun bouton dans les 10 secondes, le menu est caché.
• L’option actuellement réglée est éclairée par “*“ .
Vous pouvez trouver un menu Paramètres en modes DAB et
FM. Les menus DAB et FM sont expliqués ci-dessous avec le
menu général SYSTEM.
Menu DAB
Le menu DAB est divisé en plusieurs menus : Balayage auto,
Réglage manuel, DRC et Prune.
• Autoscan : Lance le balayage des stations. La bande des
fréquences DAB balaient les stations.
• Manual tune : Pour cela, vous devez connaître la
fréquence de la station, que vous pouvez trouver sur le
site Internet du service de radiodiffusion. Sélectionnez les
fréquences individuelles à l’aide des boutons / (6) .
28
Français
• DRC : Abréviation pour Digital Range Control (contrôle
de la gamme dynamique). Le terme DRC décrit le
rapport entre le son le plus fort et le son le plus faible. Si
la gamme dynamique est très haute, il y a des sons très
doux et des sons très forts. Dans certaines circonstances,
cela peut poser un problème de lecture. Supposons que
vous écoutez une station radio dans un environnement
relativement bruyant. En augmentant le volume, vous
pouvez écouter les sections silencieuses à un volume plus
élevé. Cependant, l’inconvénient est que les sections les
plus fortes deviendront gênantes à l’ouïe. Il serait judicieux de diminuer la gamme dynamique. Sélectionnez
entre les options suivantes :
- DRC off : La gamme dynamique n’est pas réduite.
- DRC high : La gamme dynamique est fortement
réduite.
- DRC low : La gamme dynamique est légèrement
réduite.
• Prune : Il se peut que vous ne puissiez plus recevoir des
stations après un balayage automatique ou un changement de lieu. Cette fonction vous permet de supprimer
ces stations de la liste de réception. Sélectionnez “YES”
et confirmez à l’aide du bouton ENTER.
2. Appuyez sur le bouton AUX IN (22). La notification “AUX”
s’affichera. Vous pouvez également sélectionner le mode
AUX en appuyant plusieurs fois sur le bouton INPUT (9
sur l’appareil).
3. Démarrez la lecture de votre source audio. Ecoutez le son
via le haut-parleur. Vous pouvez régler le volume à l’aide
des boutons VOL+/VOL- (11/5).
4. Dans la suite de la procédure, référez-vous au mode
d’emploi de la source audio externe.
Menu FM
• Scan setting : Sélectionnez l’option souhaitée afin d’effectuer un balayage automatique des stations.
- Strong stations only : Recherche uniquement les
stations radio fortes.
- All stations : Recherche toutes les stations radio que
vous pouvez recevoir. Ainsi, le balayage interrompt
également les stations faibles.
Ce dispositif vous offre la possibilité d’utiliser un appareil
compatible Bluetooth. Le rayon de fonctionnement est limité
à environ 15 selon l’environnement et l’appareil utilisé.
Menu DAB + FM (SYSTEM)
Vous pouvez trouver les sous-menus suivants dans le menu
SYSTEM.
• Factory reset : Sélectionnez la commande “YES” si vous
souhaitez rétablir les paramètres d’usine de l’appareil.
Tous les paramètres que vous avez effectués seront
perdus.
• SW Version : Vous pouvez ici afficher la version du logiciel de l’appareil.
Connecteurs AUDIO IN (à l’arrière de
l’appareil)
Grâce au branchement de lecteurs analogiques via cette
prise, vous pouvez également entendre le son à partir d’autres
lecteurs tels que des lecteurs MP3, CD, etc., via les hautparleurs.
1. Branchez l’appareil externe aux connecteurs AUDIO IN
situés à l’arrière de l’appareil à l’aide d’un câble RCA (2x
RCA). Si besoin est, utilisez un adaptateur approprié (non
fourni).
NOTE :
Si possible, réglez le volume de l’appareil externe à un
niveau confortable.
Lire la musique via Bluetooth
La technologie Bluetooth permet une connexion radio sans
fil des appareils sur une distance courte. Les appareils avec
la norme Bluetooth reçoivent une transmission entre 2,402
et 2,480 GHz dans la bande ISM (Industrial, Scientific et Medical). Des interférences peuvent être causées par exemple,
par les réseaux WLAN, les radios DAB, les téléphones sans
fil ou les microondes qui fonctionnent sur la même bande de
fréquences.
Si votre lecteur prend en charge le profil A2DP (Advanced
Audio Distribution Profile) et a une fonction de lecture de
musique, vous pouvez alors transférer sans câble de la musique sur l’appareil. Le profil A2DP implique un profil Bluetooth
de divers opérateurs. Pour la la diffusion en flux, les signaux
audio-stéréo sont transférés sans câble entre le lecteur
(source) et l’appareil de réception. Pour pouvoir contrôler la
source à distance, le lecteur doit prendre en charge le profil
AVRCP (Audio Video Remote Control Profile).
En raison d’une multitude de fabricants d’appareils, de
modèles et de versions de logiciel, une entière compatibilité
ne peut être garantie.
Se connecter aux appareils (Pairage)
Avant d’écouter de la musique avec l’appareil, vous devez
appairer les appareils.
1. N‘oubliez pas d’activer la fonction Bluetooth de votre
lecteur (p. ex. téléphone portable). Pour cela, consultez le
mode d’emploi de votre lecteur.
2. Appuyez sur le bouton BT (23). Le voyant de contrôle (11)
clignotera rapidement.
3. Sélectionnez le menu Bluetooth de votre lecteur et enregistrez l’appareil dans votre lecteur. Pour cela, consultez
le mode d’emploi de votre lecteur. L’appareil “AEG MC
4457” sera affiché sur votre lecteur comme sélection.
Français
NOTE :
Uniquement un lecteur à la fois peut se connecter à la
chaîne stéréo compacte. Si la chaîne stéréo compacte
est déjà branchée à un lecteur différent, elle n’appararaîtra pas dans le menu de sélection BT. Appuyez sur le
bouton CONNECT (7) pour séparer les appareils déjà
connectés. Vous pouvez maintenant brancher la chaîne
stéréo compacte à un autre lecteur comme décrit cidessus.
4. Saisissez maintenant le mot de passe “0000” dans votre
lecteur selon le fabricant de l’appareil, le modèle et la
version du logiciel.
Si l’application a bien été executée, le voyant de contrôle (11)
s’allumera.
Dans la suite de la procédure, référez-vous au mode d’emploi
du lecteur. Si possible, réglez le volume de l’appareil externe
à un niveau confortable.
NOTE :
• En fonction du fabricant de l’appareil, vous devez
effectuer à nouveau l’enregistrement (PAIRING) pour
brancher les appareils.
• La compatibilité Bluetooth ne peut pas être assurée
pour les appareils (p. ex. téléphones portables) mis sur
le marché dans un futur proche.
• Pour garantir une connexion optimale, assurez-vous
que la batterie de votre lecteur est entièrement chargée.
• Certaines marques de téléphones portables ont un
mode d’économie d’énergie. Désactivez-le car, sinon,
cela peut créer des problèmes pendant le transfert de
données via Bluetooth.
• Pour pouvoir transférer des données audio, le système
Bluetooth doit rester activé sur votre lecteur. Respectez
le mode d’emploi de votre lecteur.
• Si un téléphone portable sur lequel vous jouez de la
musique reçoit un appel, la musique sera interrompue.
Le son vient des haut-parleurs qui dépendent du téléphone portable. Pour transférer la conversation sur votre téléphone portable, vérifiez le message superposé
sur l’écran du téléphone portable. Après avoir terminé
votre appel, les appareils se reconnectent. Vous devrez
peut-être redémarrer la lecture.
Voyant de contrôle (11 sur l’appareil)
Le voyant de contrôle clignote ou s’allume selon la fonction
de l’appareil.
Voyant de
Fonction de l’appareil
contrôle
Clignote rapide- Mode CONNECT. Une connexion à une
ment
nouvelle source audio peut maintenant
être créée.
Voyant de
contrôle
Clignote lentement
S’allume
29
Fonction de l’appareil
Mode PAIRING. Une connexion à une
source audio déjà précédemment enregistrée peut être rétablie.
Une connexion Bluetooth à la source
audio a été réalisée.
Port USB (6)
Cet appareil a été conçu selon les dernières avancées
technologiques dans le domaine USB. En raison de la large
gamme de différents appareils de stockage USB de tous types actuellement sur le marché, nous ne sommes malheureusement pas en mesure d’assurer une compatibilité complète
avec tous les appareils de stockage USB. Pour cette raison, il
peut y avoir dans de rares cas des problèmes de lecture de
fichiers sur de appareils de stockage USB. Ceci n’est pas une
défaillance de l’appareil.
1. Appuyez plusieurs fois sur le bouton CD/USB (25) jusqu’à
ce que “SOURCE [USB]” s’affiche.
2. Branchez un appareil de stockage. Le message “USB
CHECKING …” s’affichera brièvement au bout de quelques secondes. Puis, le lecteur démarrera. Le symbole
” “, “MP3”, le titre en cours, son temps de lecture
écoulé, ainsi que le nombre total de titres s’afficheront.
Pour l’utilisation, reportez-vous à la section “Description des
commandes”.
NOTE :
• Pour éviter les dysfonctionnements, branches toujours
directement le dispositive de stockage USB au port
USB.
• Le port USB n’est pas conçu pour mettre les appareils
externes en charge.
• Si le dispositif de stockage USB n’est pas reconnu, le
message “NOT FIND USB” s’affichera.
ATTENTION :
Avant d’enlever le dispositif de stockage USB, mettez
l’appareil sur un autre mode à l’aide du bouton INPUT
(9 sur l’appareil).
Lire des CDs/MP3 CD
1. Appuyez sur le bouton CD/USB (25). La notification “CD”
s’affichera.
2. Appuyez sur le bouton EJECT (1/2) pour ouvrir le
plateau CD (7).
3. Placez un CD avec l’étiquette orientée vers le haut sur
le plateau CD. Appuyez sur le bouton EJECT une
nouvelle fois pour fermer le compartiment CD.
30
Français
4. Le message “LOADING DISC” s’affiche. La lecture commence alors. Le symbole “ “, le type de CD
(CDDA = CD audio ou MP3 = CD MP3), le titre en cours,
son temps de lecture écoulé ainsi que le nombre total de
titres s’afficheront.
Pour le fonctionnement, consultez la section “Description
des commandes”. Gardez toujours le plateau CD fermé.
NOTE :
• Si un disque est mal inséré ou si aucun disque n’est
inséré, “NO DISC” (aucun disque) s’affichera.
• La lecture du CD créé par l’utilisateur peut ne pas être
garantie en raison de la multitude de logiciel et support
média disponibles.
Description des commandes
PLAY/PAUSE (8/3)
Vous pouvez interrompre la lecture pour un court instant.
L’écran affiche le symbolel . Si vous enfoncez la touche à
nouveau, la lecture reprend.
NEXT /PREV (9/8)
• À l’aide du bouton NEXT , vous pouvez passer au titre
suivant ou au second titre suivant, etc.
• Vous pouvez utiliser le bouton PREV comme suit :
Appuyer 1x = Passe au titre précédent.
Appuyer 2x = Lit la seconde chanson précédente, etc.
/ (18)
Une recherche musicale est lancée. Le symbole ” “ ou
PLAY/PAUSE pour
“ “s’affiche. Appuyez sur le bouton
revenir à une lecture normale.
STOP (9/11)
La lecture s’arrête.
REPEAT (16)
Appuyer 1 x = “REP : One” s’affiche brièvement. La chanson
en cours est répétée en permanence.
Appuyer 2 x = “REP : All” s’affiche brièvement. Toutes les
chansons sont répétées en permanence.
Appuyer 3 x = “REP : Off” s’affiche brièvement. Toutes les
fonctions sont arrêtées. La lecture reprend
normalement.
NOTE :
La fonction activée peut ne pas s’afficher en permanence
pour des raisons techniques.
SHUFFLE (14)
Appuyer 1 x = Tous les titres du CD audio sont lus dans un
ordre aléatoire. La lecture s’arrête une fois
tous les titres lus.
Appuyer 2 x = Tous les titres du CD audio sont lus de manière répétée et dans un ordre aléatoire.
NOTE :
• Cette fonction n’est disponible que pour les CD audio
(CDDA).
• La fonction activée peut ne pas s’afficher en permanence pour des raisons techniques.
Boutons numérotés (2)
Pour sélectionner directement un titre, saisissez le numéro du
titre demandé. Appuyez sur le bouton ENTER (19) pour lire le
titre.
Programmation de la lecture
Permet de programmer les titres dans l’ordre choisi. Uniquement pour les CD audio (CDDA).
1. Enfoncez la touche STOP (17/4).
2. Enfoncez la touche PROGRAM (15). L’écran affiche :
PROGRAM INPUT
01[00] 02[00]
3. Saisissez l’ordre demandé des titres à l’aide des boutons numérotés. Déplacez le curseur sur l’écran à l’aide
des touches directionnelles / Pour afficher les deux
prochains emplacements de mémoire, appuyez sur la
touche directionnelle .
NOTE :
• Deux titres au moins doivent être programmés
pour pouvoir lancer la lecture.
• 20 pistes peuvent être programmées. La même
piste peut apparaitre plus d’une fois sur la liste.
4. Procédez de la façon suivante jusqu’à ce que vous ayez
sélectionné tous les titres désirés.
5. Après avoir programmé tous les titres, sélectionnez
le symbole “ “ à l’aide des touches directionnelles.
Appuyez sur le bouton ENTER pour confirmer. La lecture
commence. Le symbole ” “, “CDDA”, “P”, le titre en
cours, son temps de lecture écoulé ainsi que le nombre
total de titres s’afficheront.
6. Lorsque vous appuyez sur le bouton (17/4) une fois,
la lecture est interrompue et le programme actuel est
effacé. Le témoin lumineux “P” s’éteint.
L’appareil s’arrête automatiquement après la lecture du
dernier titre. L’affichage “P” s’éteint et la programmation est
effacée.
Lecture de musique en format MP3
Vous pouvez, avec cet appareil, lire de la musique en format
MP3. L’appareil est également compatible avec les types
usuels de disques : CD, CD-RW, CD-R.
Vous pouvez avec votre appareil lire des CD MP3. Vous
Français
pouvez enregistrer sur ces CD jusqu’à 200 titres en les comprimant. Votre appareil reconnaît automatiquement un CD
MP3 (L’écran affiche le nombre total des titres et MP3). Pour
lire ces CD, procédez comme il est décrit au point lecture de
CD/MP3.
Attention :
Il y a différents modes de gravage et de compression ainsi
que différentes qualités de disques compacts et disques
gravés.
De plus l’industrie de la musique n’utilise pas de standards
définis (protection contre la copie).
Des problèmes peuvent donc exister, dans certains cas limités, lors de la lecture de disques compacts et MP3. Cela n’est
pas dû à un dysfonctionnement de l’appareil.
Fonction Alarme
Vous pouvez régler l’appareil de manière à ce qu’il s’allume à
une heure précise.
• Pour sélectionner une option, appuyez sur les boutons
/ (6).
• Réglez les chiffres à l’aide des touches directionnelles
/ . Pour modifier le chiffre suivant, appuyez sur la
touche directionnelle .
• Sélectionnez une option à l’aide du bouton ALARM (4).
NOTE :
Si vous n’appuyez sur aucun bouton au bout de 5 secondes, l’écran redeviendra normal. Les paramètres s’enregistrent automatiquement.
Régler l’heure de l’alarme
1. Appuyez sur le bouton ALARM en mode veille. “SETTING
ALARM 1” s’affiche..
2. Sélectionnez l’heure à laquelle l’heure de l’alarme doit
être activée. Sélectionnez entre ALL DAYS (quotidienne),
ONCE (une fois), WEEKENDS (week-end), WEEKDAYS
(semaine). Le paramètre ALARM OFF (Alarme désactivée) désactive la fonction.
3. Réglez maintenant l’heure de l’alarme.
4. SOURCE : Sélectionnez la source de votre réveil. Sélectionnez entre : DAB, FM, CD, USB, AUX, B.T.
NOTE :
• Si vous choisissez DAB ou FM, la dernière station de
radio réglée sera sélectionnée.
• Si vous choisissez CD ou USB, un support doit être
inséré ou connecté.
• Si vous choisissez AUX, la source audio connectée doit
également être programmée dans le même temps.
• Si vous choisissez B.T, la fonction Bluetooth doit être
activée sur l’appareil et déjà connectée à l’appareil. La
fonctionnalité de l’alarme via Bluetooth dépend de
votre lecteur.
31
5. Puis, sélectionnez le volume de votre réveil.
6 Après avoir réglé les paramètres de la première heure
d’alarme, vous devrez régler une deuxième heure
d’alarme. “SETTING ALARM 2” s’affichera. Pour définir la
deuxième heure d’alarme, suivez les consignes ci-dessus
(points 2-5).
La fonction d’alarme activée s’affiche avec le symbole ” “.
Si vous avez défini les deux heures d’alarme, deux symboles
s’afficheront.
Désactiver la fonction d’alarme
Sélectionnez l’option “ALARM OFF” dans la section “Régler
l’heure d’alarme” (point 2).
Nettoyage et entretien
• Débranchez la prise d’alimentation sur secteur avant de
procéder au nettoyage.
• Vous pouvez nettoyer les salissures externes à l’aide d’un
chiffon légèrement humidifié, sans aucun additif.
Dépannage
Problème
Cause
L’appareil ne L’appareil est blofonctionne pas qué et “ne répond
plus”
Aucune récep- L’antenne dipôle
tion radio DAB n’est pas alignée
correctement
Aucune radio
numérique ne peut
être reçue dans
votre région
Problèmes
En fonction du
avec la récep- lieu, vous pouvez
tion radio DAB ne pas recevoir
de stations ou les
recevoir avec des
interférences dans
votre région. voir
également la note
de la page 27
Aucun son
Le volume est trop
bas
Solution
Retirez la fiche électrique
pendant 5 secondes
environ. Puis, rebanchez
l’appareil.
Rétablissez les
paramètres d’usine
de l’appareil. voir
“Menu Paramètres”
Alignez l’antenne
dipôle verticalement
Mettez en mode FM
pour recevoir ces
stations, si ces stations
sont transmises via
UKW. Trouvez plus
d’informations sur
le site Internet de la
station radio.
Augmentez le volume
32
Français
Problème
Mauvaise
qualité du son
Aucun signal
audio pendant
la connexion
Bluetooth
Impossible
d’établir une
connexion
Bluetooth
Cause
Le signal radio est
trop faible
L’appareil n’a pas
été enregistré sur
la source audio.
Solution
Essayez de régler la
position de l’antenne.
Vérifiez la presence
d’une connexion.
Enregistrez à nouveau
l’appareil sur la source
audio, si besoin est.
Volume trop bas Augmentez le volume
sur l’appareil.
Augmentez le volume
sur la source audio.
L’appareil n’est
Appuyez sur le bouton
pas en mode
CONNECT (bouton 7
CONNECT. Le
sur la télécommande).
voyant LED (11) cli- Le voyant LED clignote lentement. gnotera rapidement.
Essayez de brancher à
nouveau les appareils
ensemble.
L’enregistrement Vérifiez si la source
ne fonctionne pas audio prend en charge
le protocole A2DP.
La source audio est Allumez la source
éteinte
audio.
La fonction Blue- Activez la fonction
tooth est désacti- Bluetooth de la source
vée sur la source audio.
audio
La version BlueUtilisez un autre lecteur.
tooth n’est pas
prise en charge.
Données techniques
Modèle :............................................................ MC 4457 DAB+/BT
Alimentation :.....................................................220 - 240 V~ 50 Hz
Consommation électrique :.....................................................40 W
Classe de protection :......................................................................II
Poids net :................................................................................2,63 kg
Radio :
Gamme de fréquences :.............VHF/FM 87,5 ~ 108,0 MHz
....................DAB/DAB+ 174 ~ 240 MHz
Bluetooth
Prise en charge Bluetooth :..........................................V2,1 + EDR
Portée :................................................................. 15 mètres environ
Fréquences de transmission :..................................2,4 - 2,48 GHz
Protocoles :..................................................................A2DP/AVRCP
Nous nous réservons le droit d’apporter des modifications
techniques ainsi que des modifications de conception dans
le cadre du développement continu de nos produits.
Cet appareil est conforme à toutes les directives CE en
vigueur, telles que les directives sur la compatibilité électromagnétique et les faibles tensions et a été fabriqué selon les
derniers règlements de sécurité.
Élimination
Signification du symbole de “Poubelle à roulettes“
Prendre soin de l’environnement, ne pas jeter des appareils
électriques avec les ordures ménagères.
Porter les appareils électriques obsolètes ou défectueux dans
les centres de récupération municipaux.
Aider à éviter les impacts potentiels sur l’environnement et la
santé en luttant contre les déchets sauvages.
Vous contribuerez ainsi au recyclage et autres formes de
réutilisation des appareils électriques usagés.
Votre municipalité vous fournira les informations nécessaires
sur les centres de collecte.
Español
Manual del usuario
Le agradecemos la confianza depositada en este producto y
esperamos que disfrute de su uso.
Símbolos en este manual del usuario
AVISO:
Advierte de riesgos para su salud, e indica riesgo potencial
de heridas.
ATENCIÓN:
Indica peligros potenciales para el dispositivo u otros objetos.
NOTA:
Indica recomendaciones e información para usted.
Normas generales de seguridad
Antes de usar este dispositivo, lea cuidadosamente este
manual del usuario y consérvelo junto con el certificado de
garantía, el recibo de compra y, si es posible, el embalaje
original, incluyendo el embalaje interno. Si entrega el dispositivo a terceros, incluya también el manual del usuario.
• Para reducir el riesgo de incendio o electrocución, no
exponga este dispositivo a la lluvia o la humedad. No use
el dispositivo cerca del agua (por ejemplo, en el baño, la
piscina o en sótanos húmedos).
• No use la unidad en lugares con extremos de calor, frío,
polvo o humedad.
• Esta unidad está destinada exclusivamente a su uso
privado y la aplicación específica para la que ha sido
diseñada. Esta unidad no ha sido diseñada para fines
comerciales.
• Asegúrese de que el cable de alimentación no esté doblado, enganchado ni en contacto con fuentes de calor.
• Asegúrese de que el cable de alimentación no represente riesgo de tropiezos.
• No toque nunca el enchufe ni el cable con las manos
mojadas.
• Conecte el dispositivo siempre a una toma de corriente
correctamente instalada. Asegúrese de que la tensión del
dispositivo se corresponda con la tensión de la red.
• El enchufe debe estar siempre accesible.
• Instale siempre las baterías en la dirección correcta.
• Evite tapar las ranuras de ventilación del dispositivo.
• No cubra nunca las ranuras de ventilación con objetos
como revistas, manteles, cortinas, etc.
• No exponga la unidad a goteo ni salpicaduras de agua,
ni coloque objetos llenos de agua, como jarrones, sobre
la unidad.
• Las fuentes de llama abierta, como las velas encendidas,
no deben colocarse sobre la unidad.
33
• No abra nunca el chasis del dispositivo. Una reparación
inadecuada puede provocar graves riesgos para el
usuario. Si el dispositivo, o especialmente el cable de
alimentación, está dañado, no siga usando el dispositivo y hágalo reparar por un especialista cualificado.
Compruebe regularmente si hay daños en el cable de
alimentación.
• Para evitar peligros, un cable de alimentación dañado
sólo debe ser reemplazado por el fabricante, su servicio
de atención al cliente o una persona similarmente cualificada por un cable equivalente.
• Si el dispositivo no va a usarse durante un periodo prolongado de tiempo, desconecte el cable de alimentación
y saque las baterías.
Estos símbolos pueden encontrarse en el dispositivo y están
pensados como advertencias:
El símbolo del rayo pretende avisar al usuario
de la presencia de tensión peligrosa dentro
del dispositivo.
El símbolo de exclamación pretende alertar
al usuario de la presencia de instrucciones
importantes de uso y mantenimiento que
acompañan a este dispositivo.
Aparatos que llevan puesto este símbolo
operan con un “Lector Clase 1” para explorar
el CD. Los interruptores de seguridad incorporados sirven para impedir que el usuario
esté expuesto a luz láser invisible peligrosa
para la vista del usuario cuando está abierto
el compartimiento del CD.
Bajo ningún concepto se ha de hacer un puenteado sobre
estos interruptores de seguridad ni deben ser manipulados.
De hacerlo, existe el peligro de que Vd. esté expuesto a la
luz láser.
Niños y personas discapacitadas
• Para la seguridad de sus hijos, mantenga las piezas de
embalaje (bolsas de plástico, cartones,porexpan,etc.)
fuera de su alcance.
¡AVISO!
¡No deje que los niños pequeños jueguen con los
plásticos, debido al riesgo de asfixia!
• Este dispositivo no está pensado para ser usado por
personas (incluyendo niños) con capacidades físicas, sensoriales o mentales reducidas, o con falta de experiencia
y/o conocimientos, a menos que tengan supervisión
o sean instruidas sobre el uso del dispositivo por una persona responsable por su seguridad.
• Vigile a los niños para garantizar que no jueguen con el
dispositivo.
34
Español
Advertencias de seguridad especiales
Este aparato trabaja con un láser de
la clase 1.
23
24
25
26
Botón BT (bluetooth)
Botón FM/DAB
Botón CD/USB
Botón STANDBY (encendido / preparado para funcionar)
Instalación
Indicación de los elementos demanejo
Front (Fig. 1)
1 IR – Sensor para el mando a distancia
2 Botón EJECT (extender y retraer la bandeja del CD)
3 Botón
PLAY/PAUSE (reproducer/pausa)
4 Botón STOP (detener)
5 Control VOLUME
6 Conexión USB
7 Bandeja de CD
8 Botón NEXT (siguiente pieza musical)
Botón PREV (anterior pieza musical)
INPUT (entrada)
9 Botón
10 Botón STANDBY (encendido / preparado para funcionar)
11 Testigo de control bluetooth
12 Pantalla LCD
Vista trasera (sin ilustración)
FM ANT – Antena dipolo
Conectores AUDIO INPUT (2xRCA)
Conector de alimentación
SPEAKERS – Terminales de altavoz
Mando a distancia (Fig. 2)
1 Botón EJECT (extender y retraer la bandeja del CD)
2 Botones numéricos
3 Botón CLOCK
4 Botón ALARM (función de alarma)
5 Botón SLEEP
6 Botones de dirección
7 Botón CONNECT (conectar)
8 Botón
(reproducir/pausa)
9 Botones / (título siguiente/anterior)
10 Botón MUTE (silencio)
11 Botones VOL+/VOL- (volumen)
12 Botón TONE (configuración de sonido)
13 Botón DSP (ecualizador)
14 Botón SHUFFLE (reproducción aleatoria)
15 Botón PROGRAM (memoria)
16 Botón REPEAT (repetir)
17 Botón STOP (detener)
18 Botones / (buscar música)
19 Botón ENTER (confirmar)
20 Botón MENU
21 Botón INFO
22 Botón AUX IN
• Lea por completo el manual antes de usar el dispositivo.
• Seleccione una ubicación adecuada para el dispositivo. Las ubicaciones adecuadas son superficies secas,
uniformes y antideslizantes sobre las que pueda usar con
facilidad el dispositivo.
• Asegúrese de que exista una ventilación adecuada para
el dispositivo.
• Conecte los altavoces a las conexiones “SPEAKERS”
de la parte posterior del dispositivo. Al hacerlo, preste
atención a la polaridad correcta (negro a negro).
• Retire, si es necesario, la hoja protectora de la pantalla.
Alimentación
• Introduzca el enchufe de corriente en una toma adecuada de 230 V, 50 Hz.
• Asegúrese de que la tensión de la corriente coincida con
los valores de la etiqueta identificadora.
NOTA:
Desenchufe el dispositivo de la toma de corriente durante
largos periodos de inactividad.
Colocación y sustitución de las pilas del mando a distancia
(Baterías no incluidas en la entrega)
• Abra el compartimento de la batería, situado en la parte
inferior del control remoto.
• Introduzca 2 baterías de tipo R03 “AAA” de 1,5 V. Compruebe que la polaridad es la correcta (vea las marcas en
el compartimento para pilas).
• Cierre el compartimento de la batería.
Si el control remoto va a estar en desuso durante un largo
periodo de tiempo, extraiga la batería para evitar que se
produzcan fugas de ácido de la misma.
AVISO:
No exponga las baterías a calor intenso, como la luz del
sol, el fuego o similares. ¡Peligro de explosión!
ATENCIÓN:
• No deben usarse distintos tipos de baterías ni baterías
nuevas con usadas.
• Las baterías no se deben desechar en la basura. Lleve
las baterías usadas a centros de recolección específicos
o devuélvalas al vendedor.
Español
Instalación
1 Alinee verticalmente la antena dipolo.
2 Encienda el dispositivo con el botón STANDBY (10/26).
El dispositivo buscará automáticamente emisoras DAB.
Aparecerá SCANNING… y una barra de progreso en la
pantalla. La figura a la derecha de la pantalla muestra el
número de emisoras de radio encontradas. Se reproducirá la primera emisora DAB alfanumérica.
Cuando reproduzca una emisora de radio, la fecha y hora
se toman del servicio de emisión. Si el dispositivo no
recibe emisoras DAB en su ubicación, establezca la hora
manualmente como se describe en “Funcionamiento
general”.
Funcionamiento general
NOTA:
El dispositivo se usa fundamentalmente con el mando a
distancia. Por lo tanto, las descripciones se refieren a los
botones del mando a distancia. Algunos botones también
están en el dispositivo. Los botones con el misma nombre
tienen la misma función.
STANDBY (26/10)
Ponga el dispositivo en espera con el botón STANDBY/
ON (aparecerá la indicación de hora). Si pulsa de nuevo el
botón se volverá a encender el dispositivo.
NOTA:
El dispositivo registra el último modo y el volumen antes de
apagar. Tras volver a encenderlo, el dispositivo comienza
en este modo y volumen.
Botón FM/DAB (24)
Cambia entre modo DAB y FM.
Botón CD/USB (25)
Cambia entre modo CD y USB.
Botón INPUT (9 en el dispositivo)
Pulse este botón múltiples veces para seleccionar los distintos modos.
VOL+/VOL- Volumen (11/5)
Ajústelo al nivel deseado de volumen.
MUTE (10)
Sirve para apagar rápidamente el sonido. Al activar la
function, se mostrará la notificación “MUTE ON” brevemente. Pulse este botón de nuevo para desactivar la función. Se
mostrará “MUTE OFF” brevemente.
35
NOTA:
La función activada no puede mostrarse permanentemente en pantalla por motivos técnicos.
Botón TONE (12)
Pulse repetidamente este botón para ajustar el volumen
global (MASTER VOLUME), los graves (BASS) y los agudos
(TREBLE). Cambie la configuración con los botones VOL+/
VOL (11).
NOTA:
La configuración se perderá si selecciona uno de los modos de ecualizador preestablecidos.
Botón DSP (13)
(función de ecualizador preestablecido). Dispone de diversos
modos de sonido (JAZZ, ROCK, CLASSICS, POP, LIVE, DANCE, OFF (Apagado)).
Mando a distancia infrarrojo
Para control inalámbrico a una distancia de menos de 5 m. Si
la distancia disminuye, debería cambiar las baterías. Para un
uso adecuado, tenga siempre una clara línea de visión entre
el mando a distancia y el sensor del dispositivo.
Apagado con retraso (SLEEP)
La unidad se apaga automáticamente cuando se llega al
tiempo seleccionado.
• Seleccione el tiempo pulsando repetidamente el botón
SLEEP (5), pasado el cual el dispositivo se apagará. Puede
seleccionar entre: 10, 20, 30, 45, 60, 90 y 120 minutos.
• La posición SLEEP OFF desactiva esta función.
Configuración manual de hora (en espera)
Ajuste la configuración con los botones de dirección / .
Para cambiar al número siguiente, pulse el botón de dirección .
1. Cuando esté en espera, pulse el botón CLOCK (3). Aparecerá [SETTING CLOCK] en la pantalla y parpadeará el
dígito izquierdo.
2. Cuando haya establecido la hora, pulse el botón CLOCK
para cambiar la entrada de fecha. Aparecerá [SETTING
DATE] en la pantalla y parpadeará el dígito izquierdo.
NOTA:
Si no se pulsa ningún botón durante 5 segundos, la
pantalla volverá a la indicación normal. La configuración se
guardará automáticamente.
36
Español
Escuchar la radio
Explorar emisoras FM
1. Pulse repetidamente el botón FM/DAB (24) hasta que la
pantalla muestre “FM”.
2. Tiene dos opciones para sintonizar una emisora:
- Pulse los botones / (6). Cambiará la frecuencia en
pasos de 0,05 MHz.
- Pulse los botones / (6). El dispositivo buscará la
emisora de radio siguiente o anterior.
3. Si la recepción es muy débil y la emisora tiene interferencias, pruebe a mejorar la recepción girando y desenrollando o enrollando la antena.
Mostrar información FM
Pulse el botón INFO (21) para mostrar la información siguiente, si la emite una emisora de radio.
• El texto de la radio se mostrará por defecto en la pantalla. Si no hay información disponible aparecerá [No
RadioText] en pantalla.
• El tipo de programa (PTY) de la emisora se mostrará (p.
ej., música Pop, noticias, etc.). Si no se recibe PTY aparecerá [No PTY] en pantalla.
• Mostrará el nombre de la emisora. Si no se recibe ningún
nombre, aparecerá [No Name] en pantalla.
• Se mostrará el modo de audio actual. STEREO o MONO.
Scan DAB stations
Digital Audio Broadcasting (DAB) is a digital broad casing
standard for terrestrial reception of digital radio. A list of radio
stations which can be received in Germany is available on the
Internet at www.digitalradio.de.
NOTA:
El Alemania aproximadamente el 70% del país está cubierto por emisiones de radio digital (datos en Nov. 2011). En
zonas específicas, sin embargo, la cobertura y la provisión
varían en gran medida. Si las emisoras DAB de su región
no pueden recibirse o se reciben con interferencias según
la ubicación, puede cambiar a la banda FM para recibir la
emisora. Solamente es posible si las emisoras se emiten
mediante UKW. Puede encontrar más en el sitio web de la
emisora de radio.
1. Pulse el botón FM/DAB (24) repetidamente hasta que se
muestre “DAB” en pantalla.
2. Puede seleccionar la emisora siguiente o anterior usando
los botones / (6) .
3. Si la recepción es muy débil y la emisora tiene “saltos”,
pruebe a mejorar la recepción cambiando la posición de
la antena.
NOTA:
• Para una recepción óptima de DAB, recomendamos
alinear verticalmente la antena dipolo.
• Durante la recepción DAB no puede cambiar entre
Mono y Estéreo.
• Para establecer manualmente una frecuencia DAB,
proceda como se describe en la sección “Menú de
configuración”.
Mostrar información DAB adicional
En modo DAB puede mostrar la siguiente información
adicional si la emite la emisora. Para hacerlo, pulse el botón
INFO (21).
El texto DLS se mostrará por defecto en la pantalla.
• DLS: abreviatura de Dynamic Label Segment. Incluye
datos complementarios. Este contenido puede ser, por
ejemplo, información sobre la emisora o el título y artista
de la música que se escucha.
• Muestra la potencia de señal recibida.
• Indica la categoría de la emisora (como Música Pop,
Noticias, etc.).
• Muestra el nombre del grupo de la emisora (por ejemplo,
DR Deutschland).
• Frecuencia de la emisora de radio actual.
• La indicación “SIGNAL ERROR” muestra la calidad de la
señal. Cuanto menor sea el valor adyacente, mejor es la
calidad.
• Muestra la tasa de bits de audio digital. / Estándar de
transmisión.
Guardar emisora
Mantenga pulsado el botón numérico deseado (0-9) en el
que quiera guardar la emisora. Se mostrará “PRESET STORED” en pantalla brevemente.
Seleccionar una emisora preestablecida
Pulse el botón numérico correspondiente en el mando a
distancia.
Menú de configuración
Puede realizar numerosas configuraciones mediante el menú
Configuración (ver página 4).
En el menú Configuración puede encontrar el menú principal
y los submenús correspondientes con las opciones específicas.
Para mostrar el menú, pulse el botón MENU (20) durante el
funcionamiento.
• Use los botones / (6) para moverse por el menú.
• Use el botón ENTER (19) para seleccionar un submenú, o
confirmar una configuración.
• Para abandonar el menú, pulse el botón MENU otra vez.
Español
NOTA:
• Si no pulsa ningún botón en 10 segundos se ocultará el
menú.
• La opción actual se marca con “*“.
Puede encontrar un menú de configuración en modo DAB y
en modo FM. El menú DAB y FM se explican a continuación
junto con el menú SYSTEM general.
Menú DAB
El menú se divide en los menús: Exploración automática,
Sintonización manual, DRC y Prune.
• Autoscan: Inicia la exploración de emisoras. La banda de
frecuencia DAB se explora en busca de emisoras.
• Manual tune: Para hacerla necesita conocer la frecuencia de la emisora. Puede encontrarla en el sitio web del
servicio de emisión. Seleccione frecuencias específicas
usando los botones / (6).
• DRC: Abreviatura de Control de Rango Digital (rango
dinámico). El término DRC describe la relación entre el
sonido más bajo y el más alto. Si el rango dinámico es
muy alto existen sonidos muy suaves y muy elevados. En
algunas circunstancias puede implicar un problema de la
reproducción. Asumamos que escucha una emisora de
radio en un entorno relativamente ruidoso. Aumentando
el volumen puede reproducir más altas las secciones
suaves. Sin embargo, esto tiene la desventaja de que las
secciones más altas pueden volverse incómodas. Aquí
tiene sentido reducir el rango dinámico. Seleccione entre
las opciones:
- DRC off: El rango dinámico no se reduce.
- DRC high: El rango dinámico se reduce notablemente.
- DRC low: El rango dinámico se reduce ligeramente.
• Prune: Puede que deje de recibir algunas emisoras tras
una exploración o cambio de ubicación. Con esta función puede borrar las emisoras de la lista de recepción.
Seleccione “YES” y confirme con el botón ENTER.
Menú FM
• Scan setting: Seleccione la opción deseada para realizar
una exploración automática de emisoras.
- Strong stations only: Buscar solamente emisoras
con señal potente.
- All stations: Buscar todas las emisoras de radio que
se reciban. Al hacerlo, la exploración también se
pausa en emisoras débiles.
Menú DAB + FM (SYSTEM)
En el menú SYSTEM pueden encontrarse los submenús
siguientes.
• Factory reset: Seleccione el comando “YES” si quiere
reiniciar el dispositivo con los valores de fábrica. Todas las
configuraciones que haya realizado se perderán.
• SW version: Aquí puede mostrar la versión de software
del dispositivo.
37
Tomas AUDIO IN (parte posterior del
dispositivo)
Conectando dispositivos de reproducción analógicos mediante esta toma, podrá escuchar también el sonido de otros
dispositivos de reproducción, como reproductores MP3,
reproductores de CD, etc. por los altavoces.
1. Conecte el dispositivo externo a las tomas AUDIO IN de
la parte posterior del dispositivo con un cable de cincha
(2x RCA). Si fuera necesario, emplee un adaptador apropiado (no incluido con el producto).
2. Pulse el botón AUX IN (22). Se mostrará la notificación
“AUX” en pantalla. También puede seleccionar el modo
AUX pulsando repetidamente el botón INPUT (9 en el
dispositivo).
3. Inicie la reproducción en la fuente de audio. Escuche la
reproducción por el altavoz. Puede ajustar el volumen
usando los botones VOL+/VOL- (11/5).
4. Para otras operaciones, consulte el manual del usuario
de la fuente de audio externa.
NOTA:
Ponga el volumen del dispositivo externo a un nivel cómodo en la medida de lo posible.
Reproducir música por Bluetooth
Bluetooth es una tecnología de conexión de radio inalámbrica de dispositivos en distancias cortas. Los dispositivos con el
estándar Bluetooth transmiten entre 2,402 y 2,480 GHz eb la
banda ISM (Industrial, Scientific y Medical). Pueden producirse interferencias causadas por redes WLAN, radios DAB,
teléfonos inalámbricos u hornos microondas que funcionen
en la misma banda de frecuencia.
Este dispositivo le ofrece la posibilidad de usar un dispositivo
con Bluetooth habilitado. El radio de operación está limitado
a aproximadamente 15 metros, dependiendo del entorno y
de la unidad utilizada.
Si su dispositivo de reproducción soporta el perfil A2DP
(Advanced Audio Distribution Profil) y tiene función de reproductor de música, también puede transferir música de forma
inalámbrica al dispositivo. El perfil A2DP implica un perfil
Bluetooth multimarca. Al transmitir, se transfieren señales de
audio estéreo inalámbricas entre el dispositivo reproductor
(fuente) y el dispositivo receptor. Para controlar la fuente de
forma remota, la unidad de reproducción debe soportar el
perfil AVRCP (Audio Video Remote Control Profile).
Debido a los diversos fabricantes de dispositivos, modelos
y versiones de software, no puede garantizarse una total
funcionalidad.
38
Español
Registro en dispositivos (Emparejamiento)
Antes de escuchar música a través de la unidad, deberá
emparejar los dispositivo.
Testigo de control (11 en el dispositivo)
El testigo de control parpadea o se enciende según la función del dispositivo.
1. Asegúrese de que la función Bluetooth esté activada en
su reproductor (p.ej. teléfono móvil). Para hacerlo, consulte el manual de su reproductor.
2. Pulse el botón BT (23). El testigo de control (11) parpadeará rápidamente.
3. Elija el menú Bluetooth de su reproductor y registre el
dispositivo. Para hacerlo, consulte el manual de su reproductor. El dispositivo “AEG MC 4457” se mostrará en el
reproductor como selección.
Testigo de
Función del dispositivo
control
Parpadeo rápido Modo CONNECT. Se puede crear una
conexión con una nueva fuente de audio.
Parpadeo lento Modo PAIRING. Puede restablecerse
una conexión con una fuente de audio
previamente registrada.
Encendido
Se ha creado la conexión bluetooth con
la fuente de audio.
NOTA:
Solamente puede conectarse un dispositivo de reproducción con el centro de música cada vez. Si el centro
de música ya está conectado con otro dispositivo de
reproducción, el centro no aparecerá en el menú de selección BT. Pulse el botón CONNECT (7) para separar
los dispositivos ya conectados. Ahora puede conectar
el centro de música con otro dispositivo de reproducción del modo descrito anteriormente.
4. Introduzca la clave “0000” en su reproductor, según
el fabricante del dispositivo, el modelo y la versión de
software.
Si la aplicación se ha ejecutado correctamente se encenderá
el testigo de control (11).
Para otros procedimientos, consulte el manual del usuario de
la unidad de reproducción. Ponga el volumen del dispositivo
externo a un nivel cómodo en la medida de lo posible.
NOTA:
• Según el fabricante del dispositivo, deberá realizar el
registro (PAIRING) de nuevo para conectar los dispositivos.
• La compatibilidad Bluetooth no puede garantizarse
para dispositivos (como teléfonos móviles) futuros.
• Para garantizar una conexión óptima, asegúrese de
que la batería del reproductor esté totalmente cargada.
• Algunas marcas de teléfonos móviles tienen un modo
de ahorro de energía. Desactive el modo de ahorro
de energía, podría resultar en problemas durante la
transferencia de datos por Bluetooth.
• Para poder transferir datos de audio, el Bluetooth debe
estar activado en su reproductor. Consulte el manual
del reproductor.
• Si el teléfono móvil en el que está reproduciendo
música recibe una llamada, la música se interrumpirá.
El sonido se reproduce por los altavoces, según el teléfono móvil. Para transferir la conversación a su teléfono
móvil, observe la entrada en la pantalla del teléfono
móvil. Cuando haya finalizado la llamada telefónica,
los dispositivos se volverán a conectar entre si. Puede
tener que reiniciar la reproducción.
Puerto USB (6)
Este dispositivo se ha desarrollado según los últimos avances
técnicos en USB. La amplia variedad de dispositivos de almacenamiento USB de todo tipo que existen actualmente en el
mercado, por degracia, no nos permiten garantizar una total
compatibilidad con todos los dispositivos de almacenamiento USB. Por este motivo, en casos particulares se pueden
producir problemas al reproducir archivos de dispositivos de
almacenamiento USB. No es una avería del dispositivo.
1. Pulse el botón CD/USB (25) repetidamente hasta que se
muestre “SOURCE [USB]” en pantalla.
2. Conecte un dispositivo de almacenamiento USB.
Aparecerá el mensaje “USB CHECKING…” brevemente
pasados unos segundos. Comenzará la reproducción. Se
mostrará el símbolo “ “, “MP3”, el título actual y el tiempo de reproducción transcurrido, junto con el número
total de títulos, en pantalla.
Para el funcionamiento, consulte la sección “Descripción de
controles”.
NOTA:
• Conecte siempre un medio de almacenamiento USB
directamente al puerto USB para evitar averías.
• El puerto USB no está diseñado para cargar dispositivos externos.
• Si no se reconoce el medio de almacenamiento USB,
se mostrará el mensaje “NOT FIND USB” en pantalla.
ATENCIÓN:
Antes de extraer el dispositivo de almacenamiento USB,
pase el dispositivo a otro modo usando el botón INPUT (9
en el dispositivo).
Reproducción de CDs/MP3 CD
1. Pulse el botón CD/USB (25). Se mostrará la notificación
“CD” en pantalla.
2. Pulse el botón EJECT (1/2), para abrir la bandeja del
CD (7).
Español
3. Ponga un CD con el lado de la etiqueta hacia arriba en la
bandeja del CD. Pulse el botón EJECT de nuevo para
cerrar el compartimiento de CD.
4. Aparecerá el mensaje “LOADING DISC” en pantalla.
Comenzará la reproducción. Se mostrará el símbolo
“ “, el tipo de CD (CDDA = CD audio o MP3 = CD
MP3), el título actual y el tiempo de reproducción transcurrido, junto con el número total de títulos, en pantalla.
Para el uso, consulte la sección “Descripción de controles”.
Mantenga siempre cerrada la bandeja del CD.
NOTA:
• Si se introduce un disco en posición incorrecta, o no se
introduce ningún disco, se mostrará “NO DISC” (sin
disco) en pantalla.
• La reproducción de CD creados por el usuario no puede garantizarse debido a la gran cantidad de software
y medios de CD disponibles.
Descripción de controles
PLAY / PAUSE (8/3)
Puede interrumpir brevemente la reproducción y reiniciarla.
La pantalla mostrará el símbolo . Al presionar de nuevo,
continuará la reproducción.
NEXT /PREV (9/8)
• Con el botón NEXT puede saltar al título siguiente, el
posterior, etc.
• Puede usar el botón PREV del modo siguiente:
Pulsar 1x =
Saltar al título anterior.
Pulsar 2x =
Reproducir la cancióna anterior, etc.
/ (18)
Se inicia una búsqueda de música. Aparecerá el símbolo
” “ o “ “en pantalla. Pulse el botón
PLAY/PAUSE
para volver a la reproducción normal.
STOP (9/11)
La reproducción se detiene.
REPEAT (16)
Pulsar 1 x =
Pulsar 2 x =
Pulsar 3 x =
“REP: One” aparecerá en pantalla brevemente. Se reproducirá continuamente la canción
actual.
“REP: All” aparecerá en pantalla brevemente.
Se repetirán continuamente todas las canciones.
“REP: Off” aparecerá en pantalla brevemente. Se detienen todas las funciones. Continuará el funcionamiento normal de reproducción.
NOTA:
La función activada no puede mostrarse permanentemente en pantalla por motivos técnicos.
39
SHUFFLE (14)
Pulsar 1 x =
Pulsar 2 x =
Se reproducen todos los títulos del CD
audio en orden aleatorio. La reproducción se
detiene cuando se han reproducido todos los
títulos.
Se reproducen todos los títulos del CD audio
repetidamente en orden aleatorio.
NOTA:
• Esta función solamente está disponible para CD audio
(CDDA).
• La función activada no puede mostrarse permanentemente en pantalla por motivos técnicos.
Botones numéricos (2)
Para seleccionar directamente un título, introduzca el número
del título. Pulse el botón ENTER (19) para reproducir el título.
Reproducción programada
Permite la programación de una sucesión de títulos al azar.
Solamente para CD audio (CDDA).
1. Presione el botón STOP (17/4).
2. Presione el botón PROGRAM (15). La pantalla mostrará:
PROGRAM INPUT
01[00] 02[00]
3. Introduzca el orden deseado de títulos con los botones
numéricos. Mueva el cursor en la pantalla con los botones de dirección / . Para mostrar las siguientes dos
ubicaciones de memoria, pulse el botón de dirección .
NOTA:
• Deben programarse al menos dos títulos para
poder iniciar la reproducción.
• Puede programar hasta 20 títulos. Puede poner
más de una vez el mismo título en la lista.
4. Repita el procedimiento hasta que haya elegido todos
los títulos.
5. Cuando haya programado todos los títulos, seleccione
el símbolo ” “ con los botones de dirección. Pulse el
botón ENTER para confirmar. Se inicia la reproducción.
Se mostrará el símbolo “ “, “CDDA”, “P”, el título
actual y el tiempo de reproducción transcurrido, junto
con el número total de títulos, en pantalla.
6. Cuando pulse el botón (17/4) una vez se detiene la
reproducción y se borra el programa actual. La lámpara
de control “P” se apaga.
El aparato para automáticamente después de la reproducción de todos los títulos programados. Se apagará la indicación “P” y el orden programado se borrará de la memoria.
40
Español
Reproducción de música en formato MP3
Con este aparato tiene la posibilidad de reproducir piezas de
música en formato MP3. El aparato soporta además los tipos
de discos compactos corrientes: CD, CD-RW, CD-R.
Es posible reproducir discos compactos MP3 en su aparato.
En estos discos compactos pueden almacenarse hasta 200
títulos en forma comprimida. Su aparato reconocerá automáticamente un disco compacto MP3 (en el display aparece el
número total de títulos y MP3). Para reproducir estos discos
compactos proceda tal como se describe bajo reproducción
de CDs/MP3.
Por favor tenga en cuenta:
Existe una multitud de métodos de copia y de compresión,
así como diferencias de calidad en CDs y CDs copiados.
La industria de la música además no sigue ningunos estándares fijos (Protección contra copia).
Por estos motivos hay casos en los cuales puede haber
problemas al reproducir CDs y CDs MP3. Esto no es ninguna
función de error del aparato.
Función de alarma
Puede configurar el dispositivo de forma que se encienda a
una hora concreta.
• Para seleccionar una opción, pulse los botones / (6).
• Realice la configuración de los dígitos con los botones
de dirección / . Para cambiar al dígito siguiente, pulse
el botón de dirección .
• Seleccione una opción con el botón ALARM (4).
NOTA:
Si no se pulsa ningún botón durante 5 segundos, la
pantalla volverá a la indicación normal. La configuración se
guardará automáticamente.
Configuración de hora de alarma
1. Pulse el botón ALARM durante el funcionamiento en
espera. Se mostrará “SETTING ALARM 1” en pantalla.
2. Seleccione el momento en el que debe activarse la alarma. Puede seleccionar entre: ALL DAYS (todos los días),
ONCE (una vez), WEEKENDS (fin de semana), WEEKDAYS (día de la semana). La posición ALARM OFF (alarma
apagada) desactiva esta función.
3. Establezca la hora de alarma.
4. SOURCE: Seleccione la fuente con la que quiera despertar. Puede seleccionar entre: DAB, FM, CD, USB, AUX, B.T.
NOTA:
• Cuando elija DAB o FM, se seelccionará la última
emisora sintonizada.
• Cuando elija CD o USB, debe introducir un medio o
conectarlo.
• Cuando elija AUX, la fuente de audio conectada también debe programarse al mismo momento.
• Cuando elija BT, la función bluetooth debe activarse en
el dispositivo y debe haberse conectado previamente
con el dispositivo. La funcionalidad de la alarma por
bluetooth depende de su dispositivo de reproducción.
5. Para terminar seleccione el volumen con el que quiera
despertar.
6 Cuando haya ajustado la configuración para la primera
hora de alarma, accederá a la configuración de la segunda hora de alarma. Se mostrará “SETTING ALARM 2”
en pantalla. Para establecer la segunda hora de alarma,
proceda del modo descrito anteriormente (punto 2-5).
La función de alarma activada se muestra en la pantalla con
el símbolo “ “. Si ha establecido ambas horas de alarma, se
mostrarán dos símbolos.
Apagar la señal de alarma
Seleccione la opción “ALARM OFF” en la sección “Configuración de la hora de alarma” (punto 2).
Limpieza y mantenimiento
• Desconecte el enchufe de corriente antes de limpiar.
• Puede limpiar las manchas externas usando un trapo
ligeramente húmedo sin aditivos.
Resolución de problemas
Problema
La unidad no
funciona
No se recibe
radio DAB
Causa
La unidad está
bloqueada y “se
congela”
Solución
Retire el enchufe de
la toma de corriente
durante aproximadamente 5 segundos y a
continuación vuelva a
enchufar
Reinicie el dispositivo
con los valores de
fábrica consulte
“Menú de configuración”
Antena dipolo
Alinee verticalmente la
alineada incorrec- antena dipolo.
tamente
No se puede
recibir radio digital
en su zona
Español
Problema
Problemas con
recepción de
radio DAB
Causa
Según la ubicación, puede que
no reciba algunas
emisoras o las
reciba con interferencias consulte
también la nota en
la página 36
Sin sonido
Volumen demasiado bajo
Mala calidad Señal de radio
de sonido
demasiado débil
Sin señal
El dispositivo no se
audio durante ha registrado con
la conexión
la fuente de audio.
Bluetooth
Volumen demasiado bajo
No se puede
establecer
la conexión
bluetooth
El dispositivo no
está en modo
CONNECT. El
LED (11) parpadea
lentamente.
El registro no
funciona
Fuente de audio
apagada
Bluetooth apagado en la fuente de
audio.
Versión de Bluetooth no soportada.
Solución
Cambie a modo FM
para recibir estas
emisoras. Si estas emisoras se transmiten por
UKW, puede encontrar
más información en el
sitio web de la emisora
de radio.
Aumente el volumen.
Pruebe a ajustar la
posición de la antena
Compruebe si existe
una conexión. Vuelva a
registrar el dispositivo
con la fuente de audio
de nuevo si es necesario.
Aumente el volumen
en el dispositivo
Aumente el volumen
en la fuente de audio.
Pulse el botón
CONNECT (botón 7
del mando). El LED
parpadeará rápidamente. Pruebe a volver
a conectar los dispositivos entre si.
Compruebe que la
fuente de audio soporte el protocolo A2DP.
Active la fuente de
audio
Active la función Bluetooth de la fuente de
audio.
Use otra unidad de
reproducción.
41
Especificaciones técnicas
Modelo:............................................................. MC 4457 DAB+/BT
Alimentación:................................................... .220 – 240 V~ 50 Hz
Consumo:....................................................................................40 W
Clase de protección:.........................................................................II
Peso neto:................................................................................2,63 kg
Radio:
Rangos de frecuencia:................... UKW/FM 87, ~ 108, MHz
....................DAB/DAB+ 174 ~ 240 MHz
Bluetooth
Soporte Bluetooth:........................................................V2.1 + EDR
Alcance:.................................................................. aprox. 15 metros
Frecuencia de transmisión:.....................................2,4 – 2,48 GHz
Protocolos:...................................................................A2DP/AVRCP
El derecho de realizar modificaciones técnicas y de diseño en
el curso del desarrollo continuo del producto está reservado.
Este dispositivo cumple con todas las directrices CE actuales,
como la directriz de compatibilidad electromagnética y de
bajo voltaje, y está fabricada según las últimas normas de
seguridad.
Eliminación
Significado del símbolo “cubo de basura”
Cuide del medio ambiente, no deseche aparatos eléctricos
con los residuos domésticos.
Deseche los aparatos eléctricos obsoletos o defectuosos en
los puntos de recolección municipales.
Ayude a evitar potenciales impactos medioambientales y en
la salud por una eliminación de residuos inadecuada.
Contribuye al reciclaje y otros modos de uso de aparatos
eléctricos y electrónicos viejos.
Su municipalidad le proporcionará información sobre los
puntos de recolección.
42
Italiano
Manuale dell’utente
Grazie per aver scelto il nostro prodotto. Vi auguriamo un
buon utilizzo del dispositivo.
Simboli per questo manuale di istruzioni per’uso
AVVISO:
Avvertimenti di pericoli alla salute e indica rischi potenziali
di lesioni.
ATTENZIONE:
Indica pericoli potenziali per il dispositivo e altri oggetti.
NOTA:
Sottolinea consigli e informazioni.
Linee guida generali sulla sicurezza
Prima di usare questo dispositivo, leggere attentamente
il manuale dell’utente e conservarlo con il Certificato di
Garanzia, lo scontrino e, se possibile, la confezione originale.
Se il dispositivo viene consegnato a terzi, consegnare anche il
manuale dell’utente.
• Per evitare il rischio di scosse elettriche o incendi, non
esporre il dispositivo a pioggia o umidità. Non utilizzare
il dispositivo vicino ad acqua (ad es. bagni, piscine, ambienti umidi).
• Non usare l’unità in ambienti estremamente caldi, freddi,
impolverati o umidi.
• L’unità è progettata esclusivamente per uso privato e per
lo scopo previsto. Questa unità non è idonea ad utilizzo
commerciale.
• Accertarsi che il cavo di rete non sia piegato, schiacciato
o in contatto con fonti di calore.
• Accertarsi che il cavo non determini pericoli.
• Non toccare mai la spina o il cavo con mani bagnate.
• Collegare sempre l’unità ad una presa correttamente
installata. Assicurarsi che il voltaggio del dispositivo corrisponda al voltaggio della rete.
• La spina di corrente deve essere sempre facilmente
accessibile.
• Installare sempre le batteria nella direzione corretta.
• Non coprire le ventole di ariazione del dispositivo.
• Non coprire mai i fori di ventilazione con oggetti come
giornali, strofinacci, tende, ecc.
• Non esporre l’unità a perdite o schizzi d’acqua e non
mettere recipiente contenenti acqua, come vasi con fiori,
sull’unità.
• Fonti di fuoco aperte, come candele che bruciano non
devono essere messe sull’unità.
• Non aprire mai l’alloggiamento del dispositivo. Riparazioni non corrette potrebbero determinare pericoli per
l’utente. Se il dispositivo o il cavo risultano danneggiati,
non utilizzare più il dispositivo e farlo riparare da un
tecnico professionista. Controllare regolarmente la spina
e il cavo in caso di guasti.
• Per evitare guasti, un cavo danneggiato deve essere
sostituito dal produttore, servizio assistenza o persona
simile con un cavo dello stesso tipo.
• Se il dispositivo non viene utilizzato per un lungo periodo,
scollegare la presa e rimuovere le pile.
I presenti simboli sono riportati sull’apparecchio e devono
essere considerati come avvertenze:
La spia intermittente ha lo scopo di avvertire
l’utente della presenza di tensione pericolosa
nell’apparecchio.
Il punto esclamativo ha lo scopo di avvertire
l’utente della presenza di importanti istruzioni
di funzionamento e manutenzione fornite con
l’apparecchio.
Gli apparecchi dotati di questo simbolo lavorano con un “Laser classe 1” per riprodurre i
CD. Gli interruttori di sicurezza integrati hanno
lo scopo di impedire che l’utente venga esposto alla luce non visibile del laser, pericolosa
per l’occhio umano, aprendo lo scomparto
per i CD.
Questi interruttori di sicurezza non devono mai essere cavallottati né manipolati perché altrimenti sussiste il rischio di
esposizione alla luce del laser.
Bambini e persone disabili
• Per ragioni di sicurezza tenere qualsiasi parte dell’imballaggio (sacchetti di plastica, cartilagine, spugne ecc.) fuori
dalla portata dei bambini.
AVVISO!
Non lasciare che i bambini giochino con le pellicole in
quanto c’è pericolo di soffocamento!
• L’apparecchio non deve essere utilizzato da individui
(compresi bambini) con ridotte abilità fisiche, sensoriali
oppure mentali o con esperienza/conoscenza insufficiente dell’apparecchio, se non dietro supervisione oppure
istruzioni sull’uso dell’apparecchio da parte del personale
responsabile della loro sicurezza.
• Controllare che i bambini non giochino con l’apparecchio.
Avvertenze speciali per la sicurezza
Questo apparecchio funzione con
un laser della classe 1.
Italiano
43
Elementi di comando
Installazione
Lato anteriore (Fig. 1)
1 IR – Sensore per il telecomando
2 Tasto EJECT (allungare e aprire il vassoio CD)
3 Tasto
PLAY/PAUSE (Riproduzione/Pausa)
4 Tasto STOP (arresto)
5 Controllo VOLUME
6 Connessione USB
7 Vassoio CD
8 Tasto NEXT (brano musicale successivo)
Tasto PREV (brano musicale precedente)
9 Tasto
INPUT (immissione)
10 Tasto STANDBY (accensione/pronto all’uso)
11 Spia di controllo Bluetooth
12 Display LCD
• Leggere attentamente il manuale prima di mettere in
funzione l’apparecchio!
• Scegliere un luogo idoneo al dispositivo. I luoghi adatti
sono asciutti e non scivolosi, non ché facilmente accessibili per consentire di azionare l’apparecchio facilmente.
• Assicurare una ventilazione adeguata!
• Appendere gli altoparlanti alle connessioni “SPEAKERS”
sul retro del dispositivo. Durante questa fase far attenzione alla corretta polarità (a nero a nero).
• All’occorrenza, rimuovere la pellicola protettiva dal
display.
Vista posteriore (senza immagine)
FM ANT – Antenna dipolo
Connettori AUDIO INPUT (2x RCA)
Connettore di alimentazione
SPEAKERS – Terminali altoparlanti
Telecomando (Fig. 2)
1 Tasto EJECT (allungare e aprire il vassoio CD)
2 Tasti numerici
3 Tasto CLOCK
4 Tasto ALARM (funzione allarme)
5 Tasto SLEEP
6 Tasti direzione
7 Tasto CONNECT (connessione)
8 Tasto
(riproduzione/pausa)
9 Tasti / (brano successivo/precedente)
10 Tasto MUTE (silenzioso)
11 Tasti VOL+/VOL- (volume)
12 Tasto TONE (impostazione audio)
13 Tasto DSP (equalizzatore)
14 Tasto SHUFFLE (riproduzione casuale)
15 Tasto PROGRAM (memoria)
16 Tasto REPEAT (ripeti)
17 Tasto (arresto)
18 Tasti / (ricerca musicale)
19 Tasto ENTER (conferma)
20 Tasto MENU
21 Tasto INFO
22 Tasto AUX IN
23 Tasto BT (Bluetooth)
24 Tasto FM/DAB
25 Tasto CD/USB
26 Tasto STANDBY (accensione/pronto all’uso)
Alimentazione
• Inserire la spina di rete in una presa a tre spine correttamente installata con 230 V, 50 Hz.
• Accertarsi che il voltaggio di rete corrisponda con le cifre
presenti sulla targhetta del dispositivo.
NOTA:
Scollegare l’apparecchio dall’alimentazione quando non si
utilizza l’apparecchio per periodi prolungati.
Inserimento/Sostituzione della batteria nel telecomando
(Batterie non incluse nella confezione)
• Aprire lo scomparto della batteria sotto al telecomando.
• Inserire 2 batterie di tipo R03 “AAA” 1,5 V. Controllare
che la polarità sia corretta (vedere il vano batterie).
• Chiudere lo scomparto della batteria.
Se il telecomando non è utilizzato per lungo tempo, rimuovere la batteria per evitare eventuali perdite dell’acido.
AVVISO:
Non esporre le batterie a calore intense, come luce solare,
fuoco o simili. Pericolo di esplosione!
ATTENZIONE:
• Diversi tipi di batterie o batterie nuove o usate non
possono essere utilizzate assieme.
• Le pile non devono essere smaltite nei rifi uti. Consegnare le pile usate presso centri di raccolta competenti
o al rivenditore stesso.
Installazione
1 Allineare l’antenna verticalmente.
2 Accendere il dispositivo con il tasto STANDBY (10/26).
L’apparecchio ricerca automaticamente le stazioni DAB. Il
display visualizza SCANNING… e una barra di progressione. La figura sulla parte destra del display mostra
il numero di stazioni radio trovate. Viene riprodotta la
prima stazione alfanumerica DAB.
44
Italiano
Quando viene riprodotta una stazione radio, orario e
data vengono rilevate dalla stazione di trasmissione. Se il
dispositivo non riceve stazioni DAB nel luogo, impostare
l’ora manualmente come descritto in “Funzionamento
generale”.
Funzionamento generale
NOTA:
Il dispositivo funziona principalmente con il telecomando.
Quindi la descrizione fa riferimento ai tasti del telecomando. Alcuni tasti sono anche presenti sul dispositivo. I tasti
con lo stesso nome hanno la stessa funzione.
STANDBY (26/10)
Regolare il dispositivo in funzionamento standby con il tasto
STANDBY/ON (compare la visualizzazione dell’ora). Se si
preme di nuovo il tasto, il dispositivo si accenderà di nuovo.
NOTA:
L’apparecchio prende nota degli ultimi modo e volume
prima dello spegnimento, Quando l’apparechio viene
riacceso, esso riprende le ultime impostazioni di modo e
volume.
Tasto FM/DAB (24)
Per la commutazione tra modo DAB e FM.
Tasto CD/USB (25)
Per selezionare la modalità CD e USB.
Tasto INPUT (9 sul dispositivo)
Premere questo tasto divere volte per selezionare le diverse
modalità.
VOL+/VOL- Volume (11/5)
Impostare il livello di volume preferito.
MUTE (10)
Serve per la disattivazione rapida dell’audio. Quando si attiva
questa funzione, la notifica “MUTE ON” comparirà per un
breve periodo. Premere questo tasto di nuovo per annullare
questa funzione. “MUTE OFF” comparirà di nuovo.
NOTA:
La funzione attivata non può essere visualizzata in modo
permanente per ragioni tecniche.
Tasto TONE (12)
Premere ripetutamente questo tasto per regolare il volume
totale (MASTER VOLUME), i bassi (BASS) e gli acuti (TREBLE).
Cambiare le impostazioni con i tasti VOL+/VOL (11).
NOTA:
Le impostazioni sono perse se si seleziona una delle modalità precedentemente impostate dell’equalizzatore.
Tasto DSP (13)
(Funzione di preimpostazione equalizzatore). Sono disponibili
diverse modalità audio (JAZZ, ROCK, CLASSICS, POP, LIVE,
DANCE, OFF (disattiva)).
Telecomando a raggi infrarossi
Per il controllo wireless entro una distanza di 5 m. Se la distanza diminuisce è necessario sostituire le pile. Per un corretto
funzionamento tener uno spazio vuoto tra il telecomando e il
sensore del dispositivo.
Spegnimento ritardato (SLEEP)
L’apparecchio si spegne automaticamente al raggiungimento dell’orario selezionato.
• Selezionare l’orario premendo il tasto SLEEP (5), dopodiché l’apparecchio si spegne. Selezionare tra 10, 20, 30,
45, 60, 90 e 120 minuti.
• L’impostazione SLEEP OFF disattiva questa funzione.
Impostazione manuale dell’orario (in standby)
Regolare le impostazioni con i tasti direzione / . Per cambiare il numero successivo, premere il tasto direzione .
1. In standby premere il tasto CLOCK (3). [SETTING CLOCK]
comparirà sul display e la cifra sinistra lampeggerà.
2. Dopo aver impostato l’ora, premere il tasto CLOCK
per cambiare l’immissione della data. [SETTING DATE]
comparirà sul display e la cifra sinistra lampeggerà.
NOTA:
Se non si preme alcun tasto entro 5 secondi, il display tornerà alla visualizzazione normale. Le impostazioni vengono
automaticamente memorizzate.
Ascolto radio
Scansione delle stazioni FM
1. Premere ripetutamente il tasto FM/DAB (24) il display non
mostra “FM”.
2. Si hanno due opzioni per sintonizzare una stazione:
- Premere i tasti / (6). È possibile cambiare la frequenza in passaggi di 0,05 MHz.
- Premere i tasti / (6). Il dispositivo cercherà la stazione successiva o precedente.
3. Se la ricezione è troppo debole e la stazione ricevuta è
disturbata, provare a migliorare la ricezione cambiando la
posizione dell’antenna.
Mostra informazioni FM
Premere il tasto INFO (21) per mostrare le informazioni
Italiano
seguenti, se trasmesse da una stazione radio.
• Il testo radio viene mostrato di default sul display. Se
non vi sono informazioni disponibili, il display mostra [No
RadioText].
• Viene visualizzato il tipo di programma (PTY) della
stazione (ad es. musica pop, notiziario ecc.). Se non viene
ricevuto alcun PTY, il display mostra [No PTY].
• Mostra il nome della stazione. Se non viene ricevuto
alcun nome, il display mostra [No Name].
• La modalità audio corrente è mostrata. STEREO o
MONO.
Ricerca di stazioni DAB
Digital Audio Broadcasting (DAB) è uno standard di trasmissione digitale per la ricezione terrestre di radio digitale. Un
elenco delle stazioni radio che possono essere ricevute in
Germania è disponibile su Internet a www.digitalradio.de.
NOTA:
In Germania circa il. 70% del Paese è coperta dalla trasmissione radio digitale ( nov. 2011). In alcune aree tuttavia, la
copertura e il numero di stazioni disponibili possono variare
ampiamente. Se le stazioni DAB non possono essere
ricevute nella vostra regione oppure se la ricezione è molto
disturbata, è possibile passare alla banda FM per ricevere
questa stazione. Ciò è possibile soltanto se queste stazioni
vengono trasmesse via UKW. Maggiori informazioni sono
disponibili al sito internet della stazione radio.
1. Premere il tasto FM/DAB (24) ripetutamente finché “DAB”
non compare sul display.
2. È possibile selezionare la stazione successiva o precedente usando i tasti / (6).
3. Se la ricezione è troppo debole e la stazione ricevuta
“motorboats”, provare a migliorare la ricezione cambiando la posizione dell’antenna.
NOTA:
• Per un’ottima ricezione DAB, si consiglia di allungare
verticalmente l’antenna dipolo.
• Non è possibile selezionare Mono e Stereo durante la
ricezione DAB.
• Per impostare manualmente una frequenza DAB, procedere come descritto nella sezione “Menu impostazioni”.
Visualizzazione di alte informazioni DAB
In modalità DAB, è possibile visualizzare le seguenti informazioni se la trasmissione avviene dalla stazione radio. Per
effettuare ciò, premere il tasto INFO (21).
Il testo DLS viene visualizzato sul display per default.
• DLS: Abbreviazione per Dynamic Label Segment. Questo comporta dati complementari. Questo contenuto
può essere ad esempio informazioni sulla stazione o sulla
traccia musicale e l’artista riprodotto.
45
• Visualizza la potenza del segnale ricevuto.
• Questo indica la categoria della stazione (ad es. musica
pop, notizie, ecc.).
• Visualizza il nome del gruppo di stazioni (ad es. DR
Deutschland).
• Frequenza della stazione radio corrente.
• Il display “SIGNAL ERROR” mostra la qualità del segnale.
Più bassa è la figura adiacente, migliore la qualità.
• Visualizza la velocità dei bit audio. / Trasmissione standard.
Salva stazione
Tenere premuto il tasto numerico desiderato (0-9) sul quale si
desidera salvare la stazione. “PRESET STORED” compare sul
display per un breve periodo.
Selezione di una stazione preimpostata
Premere il tasto numerico rispettivo sul telecomando.
Menu impostazioni
Numerose impostazioni vengono effettuate con il menu
Impostazioni (vedere pag. 4) .
Nel menu Impostazioni è possibile trovare il menu principale
e i relativi submenu con le opzioni singole.
Per richiamare il menu, premere il tasto MENU (20) durante il
funzionamento.
• Utilizzare i tasti / (6) per navigare nel menu.
• Utilizzare il tasto ENTER (19) per selezionare un sub menu
o confermare un’impostazione.
• Per uscire dal menu, premere una volta il tasto MENU.
NOTA:
• Se non si preme alcun tasto entro 10 secondi, il menu
viene nascosto.
• L’impostazione attualmente selezionata viene evidenziata con “*“.
Un menu impostazioni si trova tanto nel modo DAB che in
quello FM. I menu DAB e FM menu vengono spiegati di
seguito insieme al menu generale SYSTEM .
Menu DAB
Il menu DAB si divide nei menu: scansione automatica, sintonizzazione manuale, DRC e Prune.
• Autoscan: avvia la scansione delle stazioni. La banda di
frequenza DAB viene sottoposta a scansione per trovare
le relative stazioni.
• Manual tune: per procedure in questo modo, è necessario conoscere la frequenza della stazione. Essa può essere
trovata sul sito internet della stazione di trasmissione.
Selezionare le frequenze individuali con i tasti / (6).
• DRC: abbreviazione di Digital Range Control (Comando Range Digitale) (gamma dinamica). Il termine DRC
descrive la radio dal suono più basso a quello più alto. Se
46
Italiano
la gamma dinamica è molto alto, vi sono suoni molto delicati e suoni molto forti. In alcune circostanze può essere
presente un problema di riproduzione. Per es., se si sta
ascoltando una stazione radio in ambiente relativamente
rumoroso, aumentando il volume è possibile riprodurre
le sezioni più basse a un volume maggiore. Tuttavia, in
questo modo le sezioni a volume più alto risultano più
alte e sgradevoli. In questo caso si consiglia di ridurre la
gamma dinamica. Effettuare la selezione tra le opzioni:
- DRC off: la gamma dinamica non viene ridotta.
- DRC high: la gamma dinamica viene fortemente
ridotta.
- DRC low: la gamma dinamica viene lievemente
ridotta.
• Prune: se no si ricevono più alcune stazione dopo aver
effettuato la scansione stazioni o la modifica locazione,
con questa funzione è possibile cancellare queste stazioni
dall’elenco delle stazioni ricevute. Selezionare “YES” e
confermare con il tasto ENTER .
Menu FM
• Scan setting: seleziona l’opzione desiderata per effettuare una scansione automatica delle stazioni.
- Strong stations only: ricerca soltanto le stazioni radio
“forti”.
- All stations: ricerca tutte le stazioni radio ricevibili.
Durante quest’azione, la scansione effettua pause
quando incontra stazioni “deboli”.
Menu DAB + FM (SYSTEM)
Nel menu SYSTEM possono essere ritrovati I seguenti submenu.
• Factory reset: selezionare il comando “YES” se si desidera resettare nuovamente l’apparecchio ai valori di fabbrica,
tutte le impostazioni effettuate verranno perdute.
• SW version: qui è possibile visualizzare la versione software dell’apparecchio.
Jack AUDIO IN (lato posteriore del dispositivo)
Per la connessione di dispositivi di riproduzione analogici
tramite questa spina, è anche possibile ascoltare l’audio da
altri dispositivi di riproduzione come lettori MP3, lettori CD,
ecc., tramite gli altoparlanti.
1. Collegare il dispositivo esterno ai jack AUDIO IN sul retro
del dispositivo con un cavo cinch (2x RCA). All’occorrenza, utilizzare un adattatore adatto (non incluso).
2. Premere il tasto AUX IN (22). La notifica “AUX” comparirà
sul display. È anche possibile selezionare la modalità AUX
premendo ripetutamente il tasto INPUT (9 sul dispositivo).
3. Avviare la riproduzione della fonte audio. Ascoltare la
riproduzione audio tramite l’altoparlante. Potete regolare
il volume usando i tasti VOL+/VOL- (11/5).
4. Per la procedura fate riferimento al manual dell’utente
della fonte audio esterna.
NOTA:
Se possibile, regolare il volume dell’unità esterna ad un
livello comodo.
Riprodurre musica tramite Bluetooth
Bluetooth utilizza una tecnologia per il collegamento radio
wireless di apparecchi a breve distanza. Gli apparecchi con
Bluetooth standard trasmettono tra 2,402 e 2,480 GHz nella
banda ISM (Industrial, Scientific and Medical) (Industriale,
Scientifica e medica). L’interferenza può essere causata ad
esempio dalle reti WLAN, radio DAB, telefoni cordless o forni
a microonde che funzionano sulla stessa banda di frequenza.
Questo apparecchio permette di utilizzare un dispositivo
Bluetooth. Il raggio funzionale è limitato a circa 15 metri,
secondo l’ambiente e l’apparecchio utilizzato.
Se il dispositivo di riproduzione supporta il profilo A2DP
(Advanced Audio Distribution Profile) (Profilo Distribuzione
Audio Avanzato), è possibile trasferire senza fili la musica al
dispositivo. Il profilo A2DP comprende un profilo Bluetooth
multi-vendor. Grazie allo streaming, i segnali audio stereo
vengono trasferiti senza fili tra il distributivo di riproduzione
(dorgente) e il dispositivo ricevente. Per poter controllare
in remoto la sorgente, il dispositivo di riproduzione deve
supportare il profilo AVRCP (Audio Video Remote Control
Profile).
Grazie alle differenze realizzate dai diversi produttori e ai diversi software, non è possibile garantire la piena funzionalità.
Logging su dispositivi (Accoppiamento)
Prima di poter ascoltare la musica tramite l’apparecchio, è
necessario accoppiare gli apparecchi.
1. Controllare che la funzione Bluetooth sia attivata nel
lettore (per es. il telefono cellulare). A questo scopo,
fare riferimento al manuale istruzioni del dispositivo di
riproduzione.
2. Premere il tasto BT (23). La spia di controllo (11) lampeggerà rapidamente.
3. Selezionare il menu Bluetooth nel lettore e registrare l’apparecchio nel lettore. A questo scopo, fare riferimento
al manuale istruzioni del lettore. Il dispositivo “AEG MC
4457” viene visualizzato nel lettore come selezionato.
NOTA:
È possibile collegare solo un dispositivo di riproduzione
alla volta ad un centro musicale. Se il centro musicale è
già connesso ad un diverso dispositivo di riproduzione,
il centro musicale non comparirà nel menu di selezione
BT. Premere il tasto CONNECT (7) per separare i dispositivi già connessi. Ora è possibile collegare il centro
musicale con un altro dispositivo di riproduzione come
descritto sopra.
Italiano
47
4. Inserire la password “0000” nel lettore a seconda dei
produttori dell’apparecchio, del modello e della versione
software.
Se l’applicazione è stata eseguita con successo, la spia di
controllo (11) si accenderà.
Per la procedura fate riferimento al manuale dell’utente
dell’unità di riproduzione. Se possibile, regolate il volume
dell’unità esterna ad un livello comodo.
1. Premere il tasto CD/USB (25) ripetutamente finché
“SOURCE [USB]” non compare sul display.
2. Collegare un dispositivo di memorizzazione USB. Il
messaggio “USB CHECKING…” comparirà per un breve
tempo dopo qualche secondo. Poi riprenderà la riproduzione. Il simbolo “ “, “MP3”, il titolo corrente e il tempo
di riproduzione trascorso, nonché il numero totale delle
tracce sarà mostrato sul display.
NOTA:
• A seconda dei produttori, è necessario effettuare nuovamente la registrazione (PAIRING) prima di collegare
gli apparecchi.
• La compatibilità Bluetooth non può essere garantita
per apparecchi (ad es. telefoni cellulari) messi in commercio in futuro.
• Per garantire un collegamento ottimale, controllare che
la batteria del lettore sia completamente carica.
• Alcune marche di telefoni cellulati presentano il modo
risparmio energetico, disattivare il modo risparmio
energetico per evitare eventuali problemi durante il
trasferimento di dati tramite Bluetooth.
• Per trasferire i dati audio, Bluetooth deve rimanere attivato sul lettore. Fare riferimento al manuale istruzioni
del lettore.
• Se un telefono cellulare sul quale si sta riproducendo musica riceve una chiamata, la musica viene interrotta. L’audio
è riprodotto da altoparlanti in base al telefono cellulare.
Per trasferire la conversazione al telefono cellulare, osservare la dissolvenza sul display del telefono cellulare. Al
termine della telefonata, i dispositivi sono riconnessi l’uno
con l’altro. Sarà poi possibile riavviare la riproduzione.
Per il funzionamento, fare riferimento alla sezione “Descrizione dei controlli”.
Spia di esercizio (11 sul dispositivo)
La spia di controllo lampeggia o si accende in base alla
funzione del dispositivo.
Spia di controllo Funzione del dispositivo
Lampeggia
Modalità CONNECT. Una connessione
rapidamente
con una nuova fonte audio può essere
creata.
Lampeggia
Modalità PAIRING. Una connessione ad
lentamente
una fonte audio registrata precedentemente può essere ristabilita.
Si accende
La connessione Bluetooth ad una fonte
audio è stata creata.
Porta USB (6)
Questo apparecchio è stato realizzato secondo la più moderna tecnologia nel campo USB. L’ampia gamma di diversi
dispositivi di memorizzazone USB di tutti i tipi attualmente sul
mercatoile non permette di garantire la piena compatibilità di
tuttii i dispositivi di memorizzazione USB. Per questo mootivo,
in rari casi possono insorgere problemi nella riproduzione di
file da dispositivi USB. Non si tratta di anomalia.
NOTA:
• Collegare sempre un supporto di memoria USB direttamente alla porta USB per evitare eventuali malfunzionamenti.
• La porta USB non è progettata per caricare dispositivi
esterni.
• Se il supporto di archiviazione USB non è riconosciuto,
il messaggio “NOT FIND USB” compare sul display.
ATTENZIONE:
Prima di rimuovere il dispositivo di archiviazione USB,
Regolare il dispositivo su un’altra modalità usando il tasto
INPUT (9 sul dispositivo).
Riproduzione di CDs/MP3 CD
1. Premere il tasto CD/ USB (25). La notifica “CD” comparirà
sul display.
2. Premere il tasto EJECT (1/2), per aprire il vassoio CD (7).
3. Mettere un CD con l’etichetta rivolta verso l’alto nel
vassoio CD. Premere il tasto EJECT ancora una volta
per chiudere il vano CD.
4. Il messaggio “LOADING DISC” compare sul display. La
riproduzione ha inizio. Il simbolo “ “, il tipo di CD
(CDDA = Audio CD o MP3 = MP3 CD), il titolo corrente
e il tempo di riproduzione trascorso, nonché il numero
totale di tracce saranno mostrate sul display.
Per il funzionamento far riferimento alla sezione “Descrizione
dei controlli”. Tenere sempre il vassoio CD chiuso.
NOTA:
• Se un disco è inserito nel modo sbagliato o se nessun
disco è inserito, “NO DISC” (nessun disco) comparirà
sul display.
• La riproduzione del CD creato dall’utente non è
garantita a causa di una serie di software disponibile e
supporti CD.
Descrizione dei controlli
PLAY/PAUSE (8/3)
Si può sospendere per qualche attimo la riproduzione e riavviarla. Il display mostra il simbolo . Premendo nuovamente si
continua la riproduzione.
48
Italiano
NEXT /PREV (9/8)
• Con il tasto NEXT è possibile passare al brano successivo, ecc.
• Utilizzare il tasto PREV come di seguito:
Premere 1 volta = Passa al brano precedente.
Premere 2 volte = Riproduce una canzone prima, ecc.
/ (18)
Viene avviata la ricerca di una canzone. Il simbolo “ “ o
PLAY/PAUSE
“ “compare sul display. Premere il tasto
per ritornare alla riproduzione normale.
STOP (9/11)
La riproduzione è interrotta.
REPEAT (16)
Premere 1 x = “REP: One” compare sul display per breve
tempo. La canzone corrente viene ripetuta
costantemente.
Premere 2 x = “REP: All” compare sul display per breve
tempo. Tutte le canzone sono ripetute costantemente.
Premere 3 x = “REP: Off” compare sul display per breve
tempo. Tutte le funzioni sono interrotte. La
riproduzione normale continua.
NOTA:
La funzione attivata non può essere visualizzata sul display
in modo permanente per ragioni tecniche.
SHUFFLE (14)
Premere 1 x = Tutti i brani del CD audio sono riprodotti in
ordine casuale. La riproduzione si interrompe
dopo che tutti i brani sono riprodotti.
Premere 2 x = Tutti i brani del CD audio sono riprodotti in
ordine casuale.
NOTA:
• Questa funzione è disponibile solo per CD audio
(CDDA).
• La funzione attivata non può essere visualizzata sul
display in modo permanente per ragioni tecniche.
Tasti numerici (2)
Per selezionare direttamente un brano, inserire il numero del
brano richiesto. Premere il tasto ENTER (19) per riprodurre il
brano.
Ripetizione programmata
Permette la programmazione di una sequenza di brani desiderata. Solo per CD audio (CDDA).
1. Premere il tasto STOP (17/4).
2. Premere il tasto PROGRAM (15). Il display mostra:
PROGRAM INPUT
01[00] 02[00]
3. Inserire l’ordine di brani richiesto con i tasti numerici.
Spostare il cursore nel display con i tasti direzionali / .
Per visualizzare le due posizioni di memoria successive,
premere il tasto .
NOTA:
• Devono essere programmati almeno due brano
per dare inizio alla riproduzione.
• Sono programmabili un massimo di 20 tracce.
Lo stesso titolo può comparire più di una volta
nell’elenco.
4. Ripetere la procedura finché avete selezionato tutti i
brani.
5. Dopo aver programmato tutti i brani, selezionare il simbolo “ “ con i tasti direzionali. Premere il tasto ENTER
per confermare. La riproduzione ha inizio Il simbolo “ “,
“CDDA”, “P”, il brano corrente e il tempo di riproduzione trascorso, nonché il numero totale di brani saranno
visualizzati sul display.
6. Quando si preme una volta il tasto (17/4), la riproduzione è interrotta e il programma corrente viene cancellato.
La spia di controllo “P” si spegne.
Quando tutti i brani programmati sono stati riprodotti
l’apparecchio si blocca automaticamente. L’ indicatore “P” si
spegne e si cancella anche l’ ordine programmato.
Riproduzione di musica in formato MP3
Con questo apparecchio è possibile riprodurre brani musicali
in formato MP3. L’apparecchio supporta inoltre i tipi di CD
correnti: CD, CD-RW, CD-R.
Con questo apparecchio si possono ascoltare CD MP3. Su
questi CD si possono compattare fino a 200 brani. L’apparecchio riconosce automaticamente un CD MP3 (inel display
appare il numero totale die brani e MP3). Per riprodurre
questi CD procedere come descritto in “Ascolto CD/MP3”. Si
può effettuare la programmazione di titoli come già descritto
in “Riproduzione programmata”.
Osservare:
Esistono diversi metodi di copiatura e di compressione, così
come esistono differenze nella qualità di CD e copie di CD.
Inoltre l’ industria della musica non fa uso di standard ben
definiti (protezione contro copie).
Per queste ragioni ci possono essere, in casi estremi, problemi con la riproduzione di CD e MP3. Questo fatto non è
dovuto ad un funzionamento scorretto dell’ apparecchio.
Funzione Allarme
È possibile impostare l’apparecchio in modo che si accenda
a un orario specifico.
Italiano
• Per selezionare un’opzione, premere i tasti / (6).
• Eseguire l’impostazione delle cifre con i tasti direzionali
/ . Per cambiare la cifra successiva, premere il tasto
direzione .
• Selezionare un’opzione con il tasto ALARM (4).
NOTA:
Se non si preme alcun tasto entro 5 secondi, il display tornerà alla visualizzazione normale. Le impostazioni vengono
automaticamente memorizzate.
Impostazione orario allarme
1. Premere il tasto ALARM durante il funzionamento standby. Il display visualizza “SETTING ALARM 1”.
2. Selezionare l’orario al quale deve essere attivato l’allarme.
Selezionare tra: ALL DAYS (tutti l giorni), ONCE (una volta), WEEKENDS (week-end), WEEKDAYS (giorni feriali).
L’impostazione ALARM OFF (sveglia disattiva) disattiva la
funzione.
3. Impostare quindi l’orario allarme.
4. SOURCE: Selezionare il modo con cui si desidera essere
svegliati. Selezionare tra: DAB, FM, CD, USB, AUX, B.T.
NOTA:
• Quando si seleziona DAB o FM, l’ultima stazione impostata sarà selezionata.
• Se si seleziona CD o USB, deve essere inserito un
supporto, rispettivamente connesso.
• Se si sceglie AUX, anche la fonte audio connessa deve
essere programmata allo stesso punto temporale.
• Se si sceglie B.T., la funzione Bluetooth deve essere
attivata sul dispositivo e deve essere connesso con il
dispositivo precedente. La funzionalità della sveglia tramite Bluetooth dipende dal dispositivo di riproduzione.
5. Selezionare infine il volume a cui si desidera essere svegliati.
6. Dopo aver regolato le impostazioni per il primo orario
della sveglia, si avranno le impostazioni del secondo orario della sveglia. “SETTING ALARM 2” sarà visualizzato
sul display. Per impostare il secondo allarme della sveglia,
procedere come descritto sopra (punto 2-5).
La funzione allarme attivata viene visualizzata sul display con
il simbolo “ “. Se sono stati impostati entrambi gli orari della
sveglia, saranno visualizzati due simboli.
Disattivazione del segnale allarme
Selezionare l’opzione “ALARM OFF” nella sezione “Impostazione orario allarme” (punto 2).
Pulizia e manutenzione
• Scollegare l’alimentazione prima di pulire l’apparecchio
• Rimuovere le macchie esterne con un panno leggermente umido, senza detergente.
49
Risoluzione di problemi
Problema
L’unità non
funziona
Nessuna
ricezione radio
DAB
Problemi con la
ricezione radio
DAB
Nessun suono
Cattiva qualità
del suono
Nessun segnale durante la
connessione
Bluetooth
Impossibile
stabilire la
connessione
Bluetooth
Causa
Soluzione
L’unità è bloccata e Tirare la presa principa“resta sospesa”
le per circa 5 secondi.
Poi collegare nuovamente l’unità
Resettare l’apparecchio alle ipostazioni
di fabbrica. vedere
“Menu Impostazioni”
Antenna dipolo
Allungare l’antenna
non allungata
verticalmente
correttamente
Nessuna radio
digitale può essere
ricevuta nell’area
A seconda del
Passare al modo FM
luogo, alcune sta- per ricevere queste stazioni non possono zioni se queste stazioni
essere ricevute
vengono trasmesse via
oppure sono molto via UKW. Per maggiori
disturbate. ve- informazioni, andare
dere anche la nota al sito internete della
a pag. 45
stazione radio.
Volume troppo
Aumentare il volume
basso
Segnale radio trop- Cercare di regolare la
po debole
posizionne dell’antenna.
Il dispositivo non è Controllare che vi
stato registrato con sia una connessione.
la fonte audio.
Registrare il dispositivo
con la fonte audio, se
necessario.
Volume troppo
Aumentare il volume
basso
del dispositivo.
Aumentare il volume
della fonte audio.
Il dispositivo non Premere il tasto
è in modalità
CONNECT (tasto 7
CONNECT. Il LED sul telecomando ).
(11) lampeggia
Il LED lampeggerà
lentamente.
rapidamente. Provare a
ricollegare i dispositivi
l’uno con l’altro.
La registrazione
Verificare se la fonte
non funziona
audio supporta il
protocollo A2DP.
50
Italiano
Problema
Impossibile
stabilire la
connessione
Bluetooth
Causa
La fonte audio è
disattivata
Il Bluetooth è disattivato sulla fonte
audio.
La versione
Bluetooth non è
supportata.
Soluzione
Attivare il dispositivo
audio
Attivare la funzione
Bluetooth sulla fonte
audio.
Usare un dispositivo di
riproduzione diverso.
Specifiche tecniche
Modello:............................................................ MC 4457 DAB+/BT
Alimentatore:.....................................................220 - 240 V~ 50 Hz
Consumo di potenza:................................................................40 W
Classe i protezione:...........................................................................II
Peso netto:...............................................................................2,63 kg
Radio:
Gamme di frequenza:...............UKW/FM 87,5 ~ 108,0 MHz
....................DAB/DAB+ 174 ~ 240 MHz
Bluetooth
Supporto Bluetooth:......................................................V2.1 + EDR
Gamma:...........................................................................ca. 15 metri
Frequenza di trasmissione:.......................................2,4 - 2,48 GHz
Protocolli:.....................................................................A2DP/AVRCP
Si riserva il diritto di apportare modifiche tecniche e di design
nel corso dello sviluppo del prodotto.
Questo dispositivo risponde a tutte le direttive della CE,
come la direttiva sulla compatibilità elettromagnetica e quella
sul basso voltaggio ed è prodotto secondo le più recenti
norme di sicurezza.
Smaltimento
Significato del simbolo “Cassonetto con ruote”
Rispettare l’ambiente, non smaltire dispositivi elettrici nei
rifiuti domestici.
Lo smaltimento di dispositivi obsoleti o difettosi deve avvenire tramite consegna presso punti di raccolta locali.
Aiutate ad evitare pericoli potenziali per l’ambiente e la
nostra salute tramite uno smaltimento non corretto.
Voi contribuite al riciclaggio e altro forme di utilizzo di dispositivi elettrici e elettronici.
Vostro comune è in grado di fornirvi informazioni sui punti di
raccolta.
English
User manual
Thank you for choosing our product. We hope you will enjoy
using the appliance.
Symbols in these Instructions for Use
WARNING:
Warns of dangers for your health and indicates potential
risks of injury.
CAUTION:
Indicates potential dangers for the device or other objects.
NOTE:
Highlights tips and information for you.
General Safety Guidelines
Before using this device, carefully read this user manual and
keep it together with the Warranty Certificate, cashier receipt
and if possible, the original package inclusive its interior packing. If you hand on the device to any third person, include the
user manual as well.
• To avoid the risk of fire or electric shock, you should not
expose the device to rain or humidity. Do not use the
device near water (e.g. bathroom, swimming pool, humid
cellars).
• Do not use the unit in extremely hot, cold, dusty, or damp
places.
• The unit is designed solely for private use and its intended purpose. This unit is not designed for commercial
use.
• Make sure that the power cable is not bent, pinched, or
comes into contact with heat sources.
• Make sure that the power cable is not a tripping hazard.
• Never touch the mains plug or the cord with wet hands.
• Always connect the unit to a properly installed plug
socket. Be sure the device voltage corresponds to the
grid voltage.
• The mains plug must always be easily accessible.
• Always install batteries in the correct direction.
• Avoid covering the device’s vent openings.
• Never cover the vent holes with objects, such as magazines, tablecloths, curtains etc.
• This appliance shall not be exposed to dripping or
splashing water and that no object filled with liquids such
as vases shall be placed on apparatus.
• Open sources of fire, such as e.g. burning candles may
not be placed onto the unit.
• Never open the device’s case. Improper repairs can cause
severe danger to the user. If the device or particularly the
51
power cord is damaged, don’t use the device any further
and have it repaired by a qualified specialist. Check the
power cord regularly for damages.
• To avoid any danger, a damaged power cord must be
replaced only by the producer, its customer service or a
similarly qualified person with an equal cord.
• If the device won’t be used over an extended period of
time, disconnect the power cord and remove the batteries.
These symbols may be found on the device and are intended
as warnings:
The lightning flash is intended to alert the
user to the presence of dangerous voltage
within the device.
User to the presence of important operating
and maintenance instruction accompanying
this device.
Devices bearing this symbol work with a
“class 1 laser” for tracing the CD. The built-in
safety switches should prevent the user being
exposed to dangerous laser light, which is
invisible to the human eye, when the CD
compartment is opened.
Under no circumstances should these safety switches be
bypassed or manipulated, as this could result in a danger of
exposure to the laser light.
Children and disabled persons
• For the safety of your children, keep any packing parts
(plastic bags, cartilage, Styrofoam etc.) out of their reach.
WARNUNG!
Don’t let small children play with foils for danger of
suffocation!
• This device is not intended for use by persons (including children) with reduced physical, sensory or mental
capabilities, or lack of experience and/or knowledge
unless they have been given supervision or instructions
concerning the use of the device by a person responsible
for their safety.
• Supervise children to ensure they do not play with the
device.
Special safety information
This device works with a class 1 laser.
52
English
Overview of the components
Installation
Front (Fig. 1)
1 IR – Sensor for the remote control
2
EJECT button (extend and retract CD tray)
3
PLAY/PAUSE button (Replay/Pause)
4 STOP button (stop)
5 VOLUME control
6 USB connection
7 CD tray
8
NEXT button (next music piece)
PREV button (previous music piece)
9
INPUT button (input)
10 STANDBY button (on/ operational readiness)
11 Bluetooth control lamp
12 LCD display
• Read the manual thoroughly before operating the device!
• Choose a suitable location for the device. Suitable locations are dry, even and antislip surfaces on which you may
operate the device easily.
• Make sure there is proper ventilation for the device!
• Hook-up the loudspeakers to the “SPEAKERS” connections on the rear of the device. While doing so, pay
attention to the correct polarity (black to black).
• Remove, if necessary, the protection sheet from the
display.
Rear view (without illustration)
FM ANT – Dipole antenna
AUDIO INPUT connectors (2x RCA)
Power supply connector
SPEAKERS – Loudspeaker terminals
Remote control (Fig. 2)
1
EJECT button (extend and retract CD tray)
2 Number buttons
3 CLOCK button
4 ALARM button (alarm function)
5 SLEEP button
6 Direction buttons
7 CONNECT button (connect)
8
button (playback/pause)
/ buttons (Next/ previous title)
9
10 MUTE button (mute)
11 VOL+/VOL- Buttons (volume)
12 TONE button (sound setting)
13 DSP button (equalizer)
14 SHUFFLE button (random playback)
15 PROGRAM button (memory)
16 REPEAT button (repeat)
17 button (stop)
18 / buttons (music search)
19 ENTER button (confirm)
20 MENU button
21 INFO button
22 AUX IN button
23 BT button (Bluetooth)
24 FM/DAB button
25 CD/USB button
26 STANDBY button (on/ operational readiness)
Power supply
• Insert the grid plug into a properly installed three prong
socket with 230 V, 50 Hz.
• Make sure the grid voltage corresponds to the figures on
the rating plate.
NOTE:
Disconnect from mains power supply during longer periods
of non-use.
Insert/Replace Battery in Remote Control
(Batteries not included in the scope of delivery)
• Open the battery compartment on the underside of the
remote.
• Insert 2 batteries of the type R03 “AAA” 1.5 V. Check that
the polarity is correct (see battery compartment).
• Close the battery compartment.
If the remote is not in use for a lengthy period of time, please
remove the battery to prevent the battery acid from “leaking”.
WARNING:
Do not expose the batteries to intense heat, such as
sunlight, fire or similar. Danger of explosion!
CAUTION:
• Different battery types or new and spent batteries may
not be used together.
• Batteries must not be disposed of in the garbage.
Please bring used batteries to competent collection
centers or back to the dealer.
Installation
1. Align the dipole antenna vertically.
2. Turn the device on with the STANDBY button (10/26).
The device automatically searches for DAB stations.
SCANNING… and a progress bar appears on the
display. The figure on the right of the display shows the
number of radio stations found. The first alphanumeric
DAB station is played.
English
When playing a radio station, the time and date is taken
from the broadcasting service. If the device does not receive DAB stations in your location, set the time manually
as described in “General operation”.
General operation
NOTE:
The device is operated primarily with the remote control.
Thus the descriptions refer to the buttons on the remote
control. Some buttons are also on the device. Buttons with
the same name have the same function.
STANDBY (26/10)
Switch the device to standby operation with the STANDBY/ON button (the time display will appear). If you press the
button again, the device will turn back on.
NOTE:
The device notes the last mode and the volume before
switching off. After switching on again the device starts in
this mode and this volume.
53
NOTE:
The settings are lost if you select one of the preset equalizer modes.
DSP button (13)
(Preset equalizer function). Different sound modes are available (JAZZ, ROCK, CLASSICS, POP, LIVE, DANCE, OFF (Off)).
Infrared Remote Control
For wireless control within a distance of 5 m. If the distance
decreases you should change the batteries. For proper
operation mind a clear view between the remote control and
the sensor on the device.
Delayed shut-off (SLEEP)
The device automatically switches off when the selected time
is reached.
• Select the time by repeatedly pressing the SLEEP button
(5), after which the device switches off. Select from: 10, 20,
30, 45, 60, 90 and 120 minutes.
• The SLEEP OFF setting deactivates this function.
FM/DAB button (24)
For switching between DAB and FM mode.
Manual time setting (in standby)
Adjust the settings with the direction buttons / . To change
to the next number, press the direction button .
CD/USB button (25)
For switching between CD and USB mode.
1. While in standby, press the CLOCK button (3). [SETTING
CLOCK] will appear in the display and the left digit will
blink.
2. After you have set the time, press the CLOCK button to
change the date entry. [SETTING DATE] will appear in
the display and the left digit will blink.
INPUT button (9 on the device)
Press this button multiple times to select the different modes.
VOL+/VOL- Volume (11/5)
Adjust to your preferred volume level.
MUTE (10)
Serves for the quick turning off of the sound. When activating
the function, the notification “MUTE ON” will be displayed
for a short time. Press this button again to deactivate the
function. “MUTE OFF” will be displayed for a short time.
NOTE:
The activated function cannot be permanently shown in the
display for technical reasons.
TONE button (12)
Press this button repeatedly to adjust the total volume (MASTER VOLUME), the basses (BASS) and the trebles (TREBLE).
Change the settings with the VOL+/VOL buttons (11).
NOTE:
If no button is pushed within 5 seconds, the display will
change back to the normal display. The settings are automatically stored.
Listening to the radio
Scan FM stations
1. Repeatedly press FM/DAB button (24) until the display
shows “FM”.
2. You have two options for tuning a station:
- Press the / buttons (6). You are changing the
frequency in 0.05 MHz steps.
- Press the / buttons (6). The device will search to
the next or the previous radio station.
3. If the reception is too weak and the received station has
noise, try to improve the reception by turning and by
uncoiling or coiling the antenna.
54
English
Show FM information
Press the INFO button (21) to show the following information,
if broadcasted by a radio station.
• Radio Text is shown by default on the display. If no
information is available, [No RadioText] appears on the
display.
• The program type (PTY) of the station is displayed (e.g.
Pop music, news etc.). If no PTY is received, [No PTY] appears on the display.
• Display the station name. If no name is received, [No
Name] appears on the display.
• The current audio mode is shown. Stereo or Mono.
Scan DAB stations
Digital Audio Broadcasting (DAB) is a digital broadcasting
standard for terrestrial reception of digital radio. A list of radio
stations which can be received in Germany is available on the
Internet at www.digitalradio.de.
NOTE:
In Germany approx. 70% of the country’s area is covered by
digital radio broadcasts (as of Nov. 2011). In the individual
areas however, coverage and provision vary greatly. If the
DAB stations in your region cannot be received or only with
interferences depending on location, in this case you can
switch to the FM band to receive this station. This is only
possible however if these stations are broadcast via UKW.
Find out more on the internet site of the radio station.
1. Press the FM/DAB button (24) repeatedly until “DAB”
appears on the display.
2. You can select the next or the previous station by using
the / buttons (6).
3. If the reception is too weak and the received station
“motorboats”, try to improve the reception by changing
the position of the antenna.
NOTE:
• For an optimal DAB reception, we recommend that the
dipole antenna be aligned vertically.
• You cannot toggle between Mono and Stereo during
DAB reception.
• To manually set a DAB frequency, proceed as described in the “Settings menu” section.
Display additional DAB information
In DAB mode, you can display the following additional information if broadcast by the radio station. To do so, press the
INFO button (21).
The DLS text is shown on the display by default.
• DLS: Short for Dynamic Label Segment. This involves
complementary data. This content may be e.g. information about the station or the music title and artist being
played.
• Displays the received signal strength.
• This indicates the station category (e.g. Pop-Music, News
etc.).
• Displays the name of the station group (e.g. DR
Deutschland).
Frequency of the current radio station.
• The “SIGNAL ERROR” display shows the signal quality.
The lower the adjacent figure, the better the quality.
• Displays the digital Audio Bit Rate. / Transmission Standard.
Save station
Keep the desired number button (0-9) on which you want to
store the station pressed. “PRESET STORED” is shown in the
display for a short period.
Select a preset station
Press the respective number button on the remote control.
Settings menu
Numerous settings are made via the Settings menu (see
page 4).
In the Settings menu you can find the main menu and the
related submenus with the individual options.
To call up the menu, press the MENU (20) button during
operation.
• Use the / buttons (6) to navigate in the menu.
• Use the ENTER button (19) to select a submenu, or confirm a setting.
• To leave the menu, press the MENU button once more.
NOTE:
• If you do not press any button within 10 seconds, the
menu is hidden.
• The currently set option is highlighted by “*”.
A Settings menu can be found in DAB mode, as well as in FM
mode. The DAB and FM menu is explained below along with
the general SYSTEM menu.
DAB Menu
The DAB menu is divided into menus: Autoscan, Manual
tune, DRC and Prune.
• Autoscan: Starts the station scan. The DAB frequency
band is scanned for stations.
• Manual tune: To do so you need to know the station
frequency. This can be found on the internet site of the
broadcasting service. Select individual frequencies using
the / buttons (6).
• DRC: short for Digital Range Control (dynamic range).
The term DRC describes the ratio between the quietest
and the loudest sound. If the dynamic range is very high
there are very soft sounds as well as very loud sounds.
Under some circumstances this may present a problem
English
with playback. Let us assume that you are listening to a
radio station in a relatively loud environment. By increasing the volume you can play the quiet sections louder.
This however has the disadvantage that the loud sections
become uncomfortably loud. It makes sense here to
reduce the dynamic range. Select between the options:
- DRC off: The dynamic range is not reduced.
- DRC high: The dynamic range is sharply reduced.
- DRC low: The dynamic range is slightly reduced.
• Prune: It may be that you can no longer receive some
stations after a station scan or change of location. With
this function you can delete these stations from the
reception list. Select “YES” and confirm with the ENTER
button.
FM Menu
• Scan setting: Select the desired option in order to perform an automatic station scan.
- Strong stations only: Only search for strong radio
stations.
- All stations: Search for all receivable radio stations. In
doing so, the scan also pauses on weak stations.
DAB + FM Menu (SYSTEM)
The following submenus can be found in the SYSTEM menu.
• Factory reset: Select the “YES” command if you want to
reset the device again to the factory defaults. All settings
which you have made will be lost.
• SW version: Here, you can display the Software Version
of the device.
AUDIO IN jacks (rear of the device)
For the connection of analog playback devices via this socket,
you may also hear the sound from other playback devices
such as MP3 players, CD players, etc., through the loudspeakers.
1. Connect the external device to the AUDIO IN jacks
on the rear of the device with a cinch cable (2x RCA). If
required, use a suitable adapter (not included).
2. Press the AUX IN button (22). The notification “AUX” will
be shown in the display. You may also select the AUX
mode by repeatedly pressing the INPUT button (9 on the
device).
3. Start the playback of your audio source. Listen to the
sound playback via the speaker. You can adjust the
volume using the VOL+/VOL- buttons (11/5).
4. For the further procedure, please refer to the user manual
of the external audio source.
NOTE:
If possible, adjust the volume of the external unit to a comfortable level.
55
To play back music via Bluetooth
Bluetooth involves a technology for wireless radio connection of devices over a short distance. Devices with Bluetooth
standard are transmitting between 2.402 and 2.480 GHz in
the ISM band (Industrial, Scientific and Medical). Interference
can be caused for example by WLAN-networks, DAB radios,
cordless phones, or microwave ovens which work on the
same frequency band.
This device offers you the possibility to use a Bluetoothenabled device. The functional radius is limited to approx.
15 metres depending on the surroundings and the unit used.
If your playing device supports the A2DP profile (Advanced
Audio Distribution Profile) and has a music-player function,
then you can also wirelessly transfer music to the device. The
A2DP profile involves a multi-vendor Bluetooth profile. By
streaming, stereo-audio signals are wirelessly transferred between the playing device (source) and the receiving device.
To be able to control the source remotely, the playback device must support the AVRCP profile (Audio Video Remote
Control Profile).
Due to the different device manufacturers, models, and
software versions, a full functionality cannot be guaranteed.
Logging on devices (Pairing)
Before you listen to music via the unit, you must pair the
devices.
1. Ensure, that the Bluetooth function is activated in your
player (e.g. mobile phone). For this, refer to the operation
manual of your player.
2. Press the BT button (23). The control lamp (11) will blink
rapidly.
3. Chose the Bluetooth menu in your player and register
the device in your player. For this, refer to the operation
manual of your player. The device “AEG MC 4457” will
show in your player as a selection.
NOTE:
Only one playback device may be connected with the
music center at one time. If the music center is already
connected with a different playback device, the music
center will not appear in the BT selection menu. Press
the CONNECT button (7) to separate the already
connected devices. Now you may connect the music
center with another playback device as described
above.
4. Now enter the password “0000” in your player, depending on the device manufacturers, model, and software
version.
If the application was executed successfully, the control lamp
(11) will light.
For the further procedure, please refer to the user manual
of the playback unit. If possible, adjust the volume of the
external unit to a comfortable level.
56
English
NOTE:
• Depending on the device manufacturer, you need to
perform the registration (PAIRING) again to connect the
devices.
• The Bluetooth compatibility cannot be ensured for
devices (e.g. mobile phones) getting released in the
future.
• To ensure an optimal connection, make sure that the
battery of your player is completely charged.
• Some of the mobile phone brands have an energysaving mode. Deactivate the energy-saving mode as
it can otherwise result in problems during the data
transfer through Bluetooth.
• To be able to transfer audio data, Bluetooth needs to
stay activated in your player Observe the operation
manual of your player.
• If a mobile phone on which you are playing music
receives a call, the music will be interrupted. The sound
is played back by the loudspeakers depending on the
mobile phone. To transfer the conversation to your mobile phone, observe the fading-in in the display of the
mobile phone. After you have completed your phone
call, the devices are reconnected with each other. You
may have to possibly restart the playback.
Control lamp (11 on the device)
The control lamp blinks or lights depending on the function
of the device.
Control lamp
Blinks rapidly
Blinks slowly
Lights up
Function of the device
CONNECT mode. A connection with a
new audio source can now be created.
PAIRING mode. A connection to an already previously registered audio source can
be reestablished.
Bluetooth connection to the audio source
has been created.
For operation, please refer to the section “Description of the
controls”.
NOTE:
• Always directly connect a USB storage medium to the
USB port to prevent any malfunctions.
• The USB port is not designed for charging external
devices.
• If the USB storage media is not recognized, the message “NOT FIND USB” will appear in the display.
CAUTION:
Before removing the USB storage device, switch the device
to another mode using the INPUT button (9 on the device).
Playback of CDs/MP3 CD
1. Press the CD/USB button (25). The notification “CD” will
be shown in the display.
2. Press the EJECT button (1/2), to open the CD tray (7).
3. Place a CD with the label side up onto the CD tray. Press
the EJECT button once more to close the CD compartment.
4. The message “LOADING DISC” appears in the display.
The playback then starts. The symbol “ ”, the CD type
(CDDA = Audio CD or MP3 = MP3 CD), the current title
and its elapsed playing time, as well as the total number
of titles will be shown in the display.
For the operation, please refer to the section “Description of
the controls”. Always keep the CD tray closed.
NOTE:
• If a disc is inserted the wrong way around, respectively
if no disc is inserted, “NO DISC” (no disc) will appear in
the display.
• The replay of CD’s created by the user may not be guaranteed due to the multitude of the available software
and CD media.
USB port (6)
Description of the controls
This device has been developed in line with the latest technical advances in the USB field. The wide range of different
USB storage devices of all types which are currently on the
market, unfortunately do not allow us to guarantee full compatibility with all USB storage devices. For this reason, in rare
cases there may be problems in playing back files from USB
storage devices. This is not a malfunction of the device.
PLAY/PAUSE (8/3)
You can briefly interrupt and resume playback using this button. The display shows the symbol . Pressing again continues playback.
1. Press the CD/USB button (25) repeatedly until “SOURCE
[USB]” is shown on the display.
2. Connect a USB storage device directly into the port. The
message “USB CHECKING…” will appear for a short
time after a few seconds. Then the playback will start.
The symbol “ ”, “MP3”, the current title and its elapsed
playing time, as well as the total number of titles will be
shown in the display.
NEXT /PREV (9/8)
• With the NEXT button you may jump to the next,
respectively to the next but one title, etc.
• You may operate the PREV button as follows:
Pressing 1x = Jumps to the previous title.
Pressing 2x = Plays a song before that, etc.
English
/ (18)
A music search run is started. The symbol “ ” respectively
PLAY/PAUSE but“ ” appears in the display. Press the
ton to return to normal playback.
STOP (9/11)
The playback is stopped.
REPEAT (16)
Pressing 1 x = “REP: One” appears in the display for a short
time. The current song is constantly repeated.
Pressing 2 x = “REP: All” appears in the display for a short
time. All songs are constantly repeated.
Pressing 3 x = “REP: Off” appears in the display for a short
time. All functions are stopped. The normal
playback operation is continued.
NOTE:
The activated function may not permanently be shown in
the display due to technical reasons.
SHUFFLE (14)
Pressing 1 x = All titles of the audio CD are played in random order. The playback stops after all the
titles were played.
Pressing 2 x = All titles of the audio CD are repeatedly
played in random order.
NOTE:
• This function is only available for audio CD’s (CDDA).
• The activated function may not permanently be shown
in the display due to technical reasons.
57
NOTE:
• At least two titles must be programmed to be able
to start the playback.
• Up to 20 titles can be programmed. The same title
can appear more than once in the list.
4. Repeat the procedure until all the desired tracks are
selected.
5. After you have programmed all the titles, select the
symbol “ ” with the direction buttons. Press the ENTER
button for confirmation. The playback starts. The symbol
“ ”, “CDDA”, “P”, the current title and its elapsed
playing time, as well as the total number of titles will be
shown in the display.
6. When you press the button (17/4) once, playback is
stopped and the current program is erased. The “P”
control lamp goes out.
The device stops automatically once the entire sequence of
programmed tracks is completed. The abbreviation “P” goes
off and the programmed order of tracks is deleted from the
memory.
Playing back Music in MP3 Format
With this device it is possible to play back pieces of music in
MP3 format. The device also supports all standard CD types:
CD, CD-RW, CD-R.
This machine of is able to play MP3 CDs. Up to 200 tracks
can be compressed and stored on these CDs. Your machine
detects an MP3 CD automatically (the total number of tracks
and MP3s appears in the display). If you would like to play
one of these CDs, proceed as described under “Playing CDs/
MP3”.
Number buttons (2)
To directly select a title, enter the requested title number.
Press the ENTER (19) button to play the title.
Please note:
There are a number of different recording and compression
methods, as well as quality differences between CDs and selfrecorded CDs.
Programmed Play
Furthermore, the music industry does not adhere to fixed
standards (copy protection).
This can be used to program any desired sequence of tracks.
Only for audio CDs (CDDA).
For these reasons it is possible that in rare cases there are
problems with the playback of CDs and MP3 CDs. This is not
a malfunction of the device.
1. Press the STOP button (17/4).
2. Press the PROGRAM button (15). The display shows:
PROGRAM INPUT
01[00] 02[00]
3. Enter the requested order of titles with the number buttons. You will be moving the cursor in the display with the
direction buttons / . To display the next two memory
locations, press the direction button .
Alarm function
You can set the device in such a way that it switches on at a
specific time.
• To select an option, press the / buttons (6).
• Perform the setting of the digits with the direction buttons / . To change to the next digit, press the direction
button .
• Select an option with the ALARM button (4).
58
English
NOTE:
If no button is pushed within 5 seconds, the display will
change back to the normal display. The settings are automatically stored.
Setting the alarm time
1. Press the ALARM button during standby operation.
“SETTING ALARM 1” is shown on the display.
2. Select the time at which the alarm time needs to be
activated. Select from: ALL DAYS, ONCE, WEEKENDS,
WEEKDAYS. The setting ALARM OFF deactivates the
function.
3. Now set the alarm time.
4. SOURCE: Select a source by which you want to be awakened. Select from: DAB, FM, CD, USB, AUX, B.T.
NOTE:
• When choosing DAB or FM, the last set radio station
will be selected.
• When choosing CD or USB, a medium must be inserted, respectively connected.
• When choosing AUX, the connected audio source
must also be programmed to the same point in time.
• When choosing B.T., the Bluetooth function must be
turned on at the device and must have been connected with the device previously. The functionality of
the alarm through Bluetooth is dependent on your
playback device.
5. Finally select the volume at which you want to be awakened.
6. After you have adjusted the settings for the first alarm
time, you will get to the settings of a second alarm time.
“SETTING ALARM 2” will be shown in the display. To set
the second alarm time, proceed as described above (point
2-5).
The activated alarm function is shown on the display by the
“ ” symbol. If you have set both alarm times, two symbols
will be displayed.
Deactivate alarm function
Select the option “ALARM OFF” in the section “Setting the
alarm time” (point 2).
Cleaning and maintenance
• Disconnect the mains plug before cleaning.
• You may wipe off external stains, using a slightly damp
cloth without any additives.
Troubleshooting
Problem
Cause
Solution
The unit cannot The unit is blocked Pull the mains plug
be operated and “hangs”
for approximately 5
seconds. Then connect
the unit again
Reset the device to the
factory defaults. see
“Settings menu”
No DAB Radio Dipole antenna not Align the dipole
reception
aligned correctly antenna vertically
No Digital Radio
can be received in
your area
Problems with Depending on
Switch to FM mode to
the location, you receive these stations.
DAB radio
reception
may not be able to If these stations are
receive some sta- transmitted via UKW.
tions at all or with Find out more on the
interference in your internet site of the
region. see also radio station.
note on page 54
No sound
Volume is too low Increase the volume
Poor sound
Radio signal too Try to adjust the anquality
weak
tenna position.
No audio
signal during
Bluetooth connection
Device has not
been registered
with the audio
source.
Check whether there
is a connection.
Reregister the device
with the audio source,
if necessary.
Volume too low
Increase the volume on
the device.
Increase the volume on
the audio source.
Bluetooth con- Device is not in
Press the CONNECT
nection cannot CONNECT mode. button (button 7 on the
be established The LED (11) blinks RC). The LED will blink
slowly.
rapidly. Try to reconnect the devices with
each other.
Registration
Check, whether the
doesn’t work
audio source supports
the A2DP protocol.
Audio source is
Turn the audio source
turned off
on
English
Problem
Bluetooth connection cannot
be established
Cause
Bluetooth is turned
off on the audio
source.
Bluetooth version
is not supported.
Solution
Turn on the Bluetooth
function on the audio
source.
Use a different playback device.
Technical Specifications
Model:............................................................... MC 4457 DAB+/BT
Power supply:.....................................................220 - 240 V~ 50 Hz
Power consumption:.................................................................40 W
Protection class:.................................................................................II
Net weight:..............................................................................2.63 kg
Radio:
Frequency ranges:...................... VHF/FM 87.5 ~ 108.0 MHz
....................DAB/DAB+ 174 ~ 240 MHz
Bluetooth
Bluetooth support:.........................................................V2.1 + EDR
Range:.................................................................... approx. 15 metre
Transmission frequency:............................................2.4 - 2.48 GHz
Protocols:.....................................................................A2DP/AVRCP
The right to make technical and design modifications in
the course of continuous product development remains
reserved.
This device has been tested according to all relevant current
CE guidelines, such as electromagnetic compatibility and low
voltage directives, and has been constructed in accordance
with the latest safety regulations.
59
Disposal
Meaning of the “Wheelie Bin” Symbol
Take care of our environment, do not dispose of electrical
applicances via the household waste.
Dispose of obsolete or defective electrical appliances via
municipal collection points.
Please help to avoid potential environmental and health
impacts through improper waste disposal.
You contribute to recycling and other forms of utilization of
old electric and electronic appliances.
Your municipality provides you with information about collecting points.
Stand 05/12
MC 4457 DAB+/BT
Elektro-technische Vertriebsges. mbH
www.etv.de