1
Oracle® Application Management Pack for Oracle
E-Business Suite
Guide
Release 12.1.0.2.0
Part No. E39873-01
November 2013
Oracle Application Management Pack for Oracle E-Business Suite Guide, Release 12.1.0.2.0
Part No. E39873-01
Copyright © 2007, 2013, Oracle and/or its affiliates. All rights reserved.
Primary Author: Biju Mohan, Mildred Wang
Contributing Author: Srikrishna Bandi, KrishnaKumar Nair, Angelo Rosado
Contributor: John Aedo, Max Arderius, Kenneth Baxter, Bhargava Chinthoju, Lauren Cohn, Rumeli Das,
Ivo Dujmovic, Nipun Goel, Clara Jaeckel, Ryan Landowski, Senthil Madhappan, Biplab Nayak,
Shravankumar Nethi, Vinitha Rajan, Vasu Rao, Traci Short, Mike Smith
Oracle and Java are registered trademarks of Oracle and/or its affiliates. Other names may be trademarks of
their respective owners.
Intel and Intel Xeon are trademarks or registered trademarks of Intel Corporation. All SPARC trademarks are
used under license and are trademarks or registered trademarks of SPARC International, Inc. AMD, Opteron,
the AMD logo, and the AMD Opteron logo are trademarks or registered trademarks of Advanced Micro
Devices. UNIX is a registered trademark of The Open Group.
This software and related documentation are provided under a license agreement containing restrictions on
use and disclosure and are protected by intellectual property laws. Except as expressly permitted in your
license agreement or allowed by law, you may not use, copy, reproduce, translate, broadcast, modify, license,
transmit, distribute, exhibit, perform, publish, or display any part, in any form, or by any means. Reverse
engineering, disassembly, or decompilation of this software, unless required by law for interoperability, is
prohibited.
The information contained herein is subject to change without notice and is not warranted to be error-free. If
you find any errors, please report them to us in writing.
If this is software or related documentation that is delivered to the U.S. Government or anyone licensing it on
behalf of the U.S. Government, the following notice is applicable:
U.S. GOVERNMENT END USERS: Oracle programs, including any operating system, integrated software,
any programs installed on the hardware, and/or documentation, delivered to U.S. Government end users are
"commercial computer software" pursuant to the applicable Federal Acquisition Regulation and
agency-specific supplemental regulations. As such, use, duplication, disclosure, modification, and adaptation
of the programs, including any operating system, integrated software, any programs installed on the
hardware, and/or documentation, shall be subject to license terms and license restrictions applicable to the
programs. No other rights are granted to the U.S. Government.
This software or hardware is developed for general use in a variety of information management applications.
It is not developed or intended for use in any inherently dangerous applications, including applications that
may create a risk of personal injury. If you use this software or hardware in dangerous applications, then you
shall be responsible to take all appropriate fail-safe, backup, redundancy, and other measures to ensure its
safe use. Oracle Corporation and its affiliates disclaim any liability for any damages caused by use of this
software or hardware in dangerous applications.
This software or hardware and documentation may provide access to or information on content, products,
and services from third parties. Oracle Corporation and its affiliates are not responsible for and expressly
disclaim all warranties of any kind with respect to third-party content, products, and services. Oracle
Corporation and its affiliates will not be responsible for any loss, costs, or damages incurred due to your
access to or use of third-party content, products, or services.
Contents
Send Us Your Comments
Preface
1 Introduction to the Oracle Application Management Pack for Oracle
E-Business Suite
Overview................................................................................................................................... 1-1
2 Installing the Oracle Application Management Pack for Oracle E-Business
Suite
Introduction to Installation....................................................................................................... 2-1
Installing the Oracle Application Management Pack for Oracle E-Business Suite................ 2-2
Upgrading the Oracle Application Management Pack for Oracle E-Business Suite ..............2-3
3 Getting Started with the Oracle Application Management Pack for Oracle
E-Business Suite
Getting Started ......................................................................................................................... 3-1
System Management Page........................................................................................................ 3-2
4
Discovering Oracle E-Business Suite with Cloud Control
Preparatory Steps for Discovery............................................................................................... 4-1
Discovery Wizard...................................................................................................................... 4-2
Additional Features of Discovery............................................................................................. 4-6
Command-Line Discovery for Oracle E-Business Suite Systems.......................................... 4-10
Rediscovering an Oracle E-Business Suite instance...............................................................4-16
Deleting an Oracle E-Business Suite Instance........................................................................4-16
iii
5
Credentials
Setting Named Credentials....................................................................................................... 5-1
Setting Oracle E-Business Suite Preferred Credentials............................................................5-8
Setting Preferred Credentials for Change Management........................................................ 5-11
6
Preferences
Setting Preferences.................................................................................................................... 6-1
7
Security
Privileges and Roles for Managing Oracle E-Business Suite...................................................7-1
Change Management Privileges............................................................................................... 7-5
Specific Privileges for Features................................................................................................. 7-7
8
Monitoring Oracle E-Business Suite
Navigation and Overview......................................................................................................... 8-1
Home Page of the Oracle E-Business Suite System..................................................................8-5
Administration of Oracle E-Business Suite............................................................................ 8-14
Monitoring Current Activity................................................................................................... 8-20
Monitoring User Sessions....................................................................................................... 8-21
Monitoring JVM Usage........................................................................................................... 8-24
Configuring Monitoring of HTTPS/SSL Targets................................................................... 8-26
Drilling Down to Oracle Applications Manager.................................................................... 8-30
Concurrent Processing Dashboard......................................................................................... 8-32
9
Monitoring Configuration
Configuring Monitoring of Oracle E-Business Suite............................................................... 9-1
10
Diagnosing Issues
Diagnosing Issues................................................................................................................... 10-1
Diagnostic Tests for Cloning.................................................................................................. 10-3
Diagnostic Tests for Patch Manager..................................................................................... 10-10
Diagnostic Tests for Customization Manager...................................................................... 10-12
Diagnostic Tests for User Monitoring.................................................................................. 10-15
11
Cloning an Oracle E-Business Suite System
Cloning an Oracle E-Business Suite System.......................................................................... 11-1
Running a Single Node to Single Node or Multi Node to Single Node Cloning Procedure for
Release 11i and 12.1.x.............................................................................................................. 11-8
iv
Running Scale-Up and Scale-Down Multi-Node Cloning Procedures................................11-19
Running Smart Clone for Oracle E-Business Suite Release 12.2......................................... 11-31
Adding Custom Steps to a Smart Clone Deployment Procedure........................................ 11-38
12
Introduction to Change Management
Introduction............................................................................................................................. 12-1
Change Management Dashboard........................................................................................... 12-2
Change Approval Framework and Change Management Privileges.................................... 12-2
Preferred Credentials for Change Management.....................................................................12-4
Notifications Setup ................................................................................................................. 12-4
Diagnostic Tests...................................................................................................................... 12-5
13
Patch Manager
Introduction............................................................................................................................. 13-1
Patch Manager Home.............................................................................................................. 13-2
Running a Patching Procedure (Release 12.1 and earlier)...................................................... 13-8
Creating Patch Deployment Procedures for Oracle E-Business Suite Release 12.2.............13-20
Copying a Patch Run............................................................................................................. 13-28
Extending Patch Manager Deployment................................................................................ 13-29
Logging, Health Checks, and Troubleshooting.................................................................... 13-30
14
Customization Manager
Introduction............................................................................................................................. 14-1
Major Features and Definitions.............................................................................................. 14-2
Applications Standards Validation........................................................................................ 14-4
Uploading Existing Custom Patches....................................................................................... 14-7
Automatic File Driver File Generation and Update............................................................... 14-7
Customization Manager Main Page........................................................................................14-9
File Source Mapping............................................................................................................. 14-11
Example of a File Source Mapping with Parameters............................................................14-15
E-Business Suite Mapping.................................................................................................... 14-17
Creating a Package................................................................................................................ 14-19
Updating a Package............................................................................................................... 14-27
Saving a Package................................................................................................................... 14-29
Searching for a Package ........................................................................................................ 14-29
Viewing Package Details...................................................................................................... 14-30
Package Reports..................................................................................................................... 14-35
Creating a Report .................................................................................................................. 14-36
Viewing a Report................................................................................................................... 14-39
Searching for a Report........................................................................................................... 14-41
v
Releasing and Sharing a Package......................................................................................... 14-41
Maintaining the File Metadata Repository........................................................................... 14-42
Managing Custom Applications........................................................................................... 14-44
A
Target Types
Target Types.............................................................................................................................. A-1
B
Pre-validation for Discovery
Prevalidation Checks for Discovery......................................................................................... B-1
C
Supported File Types in Customization Manager
Supported File Types................................................................................................................ C-1
Recommended Locations for Common File Types................................................................ C-12
Execution Sequence of SQL File Types..................................................................................C-14
D
Customization Manager Coding Standards
Customization Manager Coding Standards for Files.............................................................. D-1
Customization Manager Coding Standards for Database Objects....................................... D-10
E
Validation of Custom Applications: Examples
Validation of Custom Applications: Examples........................................................................ E-1
F
Known Product Limitations
Known Product Limitations...................................................................................................... F-1
G
Third-Party Product License Information
Third-Party Product License Information................................................................................ G-1
Apache Software Foundation................................................................................................... G-1
Index
vi
Send Us Your Comments
Oracle Application Management Pack for Oracle E-Business Suite Guide, Release 12.1.0.2.0
Part No. E39873-01
Oracle welcomes customers' comments and suggestions on the quality and usefulness of this document.
Your feedback is important, and helps us to best meet your needs as a user of our products. For example:
•
•
•
•
•
•
Are the implementation steps correct and complete?
Did you understand the context of the procedures?
Did you find any errors in the information?
Does the structure of the information help you with your tasks?
Do you need different information or graphics? If so, where, and in what format?
Are the examples correct? Do you need more examples?
If you find any errors or have any other suggestions for improvement, then please tell us your name, the
name of the company who has licensed our products, the title and part number of the documentation and
the chapter, section, and page number (if available).
Note: Before sending us your comments, you might like to check that you have the latest version of the
document and if any concerns are already addressed. To do this, access the new Oracle E-Business Suite
Release Online Documentation CD available on My Oracle Support and www.oracle.com. It contains the
most current Documentation Library plus all documents revised or released recently.
Send your comments to us using the electronic mail address: [email protected]
Please give your name, address, electronic mail address, and telephone number (optional).
If you need assistance with Oracle software, then please contact your support representative or Oracle
Support Services.
If you require training or instruction in using Oracle software, then please contact your Oracle local office
and inquire about our Oracle University offerings. A list of Oracle offices is available on our Web site at
www.oracle.com.
vii
Preface
Intended Audience
Welcome to Release 12.1.0.2.0 of the Oracle Application Management Pack for Oracle
E-Business Suite Guide.
This book is intended for database administrators and system administrators who are
responsible for performing the tasks associated with maintaining an Oracle E-Business
Suite system using the Oracle Application Management Pack for Oracle E-Business
Suite.
See Related Information Sources on page x for more Oracle E-Business Suite product
information.
Documentation Accessibility
For information about Oracle's commitment to accessibility, visit the Oracle
Accessibility Program website at
http://www.oracle.com/pls/topic/lookup?ctx=acc&id=docacc.
Access to Oracle Support
Oracle customers have access to electronic support through My Oracle Support. For
information, visit http://www.oracle.com/pls/topic/lookup?ctx=acc&id=info or visit
http://www.oracle.com/pls/topic/lookup?ctx=acc&id=trs if you are hearing impaired.
Structure
1 Introduction to the Oracle Application Management Pack for Oracle E-Business Suite
2 Installing the Oracle Application Management Pack for Oracle E-Business Suite
3 Getting Started with the Oracle Application Management Pack for Oracle E-Business
Suite
4 Discovering Oracle E-Business Suite with Cloud Control
ix
5 Credentials
6 Preferences
7 Security
8 Monitoring Oracle E-Business Suite
9 Monitoring Configuration
10 Diagnosing Issues
11 Cloning an Oracle E-Business Suite System
12 Introduction to Change Management
13 Patch Manager
14 Customization Manager
A Target Types
B Pre-validation for Discovery
C Supported File Types in Customization Manager
D Customization Manager Coding Standards
E Validation of Custom Applications: Examples
F Known Product Limitations
G Third-Party Product License Information
Related Information Sources
Oracle E-Business Suite System Administrator's Guide Documentation Set
For Oracle E-Business Suite Releases 11i and 12, this documentation set provides
planning and reference information for the Oracle E-Business Suite System
Administrator. Oracle E-Business Suite System Administrator's Guide - Configuration
contains information on system configuration steps, including defining concurrent
programs and managers, enabling Oracle Applications Manager features, and setting
up printers and online help. Oracle E-Business Suite System Administrator's Guide Maintenance provides information for frequent tasks such as monitoring your system
with Oracle Applications Manager, managing concurrent managers and reports, using
diagnostic utilities, managing profile options, and using alerts. Oracle E-Business Suite
System Administrator's Guide - Security describes User Management, data security,
function security, auditing, and security configurations.
For Oracle E-Business Suite Release 12.2, refer to the Oracle E-Business Suite Setup Guide,
Oracle E-Business Suite Maintenance Guide, and Oracle E-Business Suite Security Guide.
Oracle Enterprise Manager Cloud Control Introduction
This manual introduces Oracle Enterprise Manager. It provides a brief overview of the
system architecture and describes the key features of the product. The manual also
details new features in this release.
Oracle Enterprise Manager Cloud Control Basic Installation Guide
This guide enables you to begin the installation of a new Enterprise Manager system.
Oracle Enterprise Manager Cloud Control Advanced Installation and Configuration
Guide
Oracle Enterprise Manager Cloud Control Advanced Installation and Configuration Guide is
an extension to Oracle Enterprise Manager Cloud Control Basic Installation Guide. While the
x
Oracle Enterprise Manager Cloud Control Basic Installation Guide covers basic installation
procedures that help you get started with Enterprise Manager Cloud Control, the Oracle
Enterprise Manager Cloud Control Advanced Installation and Configuration Guide covers
advanced installation procedures that help you install and configure the Enterprise
Manager Cloud Control components in more complex environments.
Oracle Enterprise Manager Cloud Control Upgrade Guide
This guide describes how you can upgrade an existing Enterprise Manager 10g Grid
Control Release 5 (10.2.0.5.0) or Enterprise Manager 11g Grid Control Release 1
(11.1.0.1.0) to Enterprise Manager Cloud Control.
Oracle Enterprise Manager Cloud Control Administrator's Guide
This guide describes how to set up a Private Cloud, manage and deploy virtualization
targets with Oracle Enterprise Manager 12c.
Oracle Enterprise Manager Cloud Administration Guide
This guide describes how to set up a Private Cloud, manage and deploy virtualization
targets with Oracle Enterprise Manager 12c.
Oracle Enterprise Manager Lifecycle Management Administrator's Guide
The Lifecycle Management Guide introduces you to the lifecycle management solutions
offered by Oracle Enterprise Manager Cloud Control (Cloud Control), and describes in
detail how you can use the discovery, provisioning, patching, and configuration and
compliance management features to manage your data center.
Do Not Use Database Tools to Modify Oracle E-Business Suite Data
Oracle STRONGLY RECOMMENDS that you never use SQL*Plus, Oracle Data
Browser, database triggers, or any other tool to modify Oracle E-Business Suite data
unless otherwise instructed.
Oracle provides powerful tools you can use to create, store, change, retrieve, and
maintain information in an Oracle database. But if you use Oracle tools such as
SQL*Plus to modify Oracle E-Business Suite data, you risk destroying the integrity of
your data and you lose the ability to audit changes to your data.
Because Oracle E-Business Suite tables are interrelated, any change you make using an
Oracle E-Business Suite form can update many tables at once. But when you modify
Oracle E-Business Suite data using anything other than Oracle E-Business Suite, you
may change a row in one table without making corresponding changes in related tables.
If your tables get out of synchronization with each other, you risk retrieving erroneous
information and you risk unpredictable results throughout Oracle E-Business Suite.
When you use Oracle E-Business Suite to modify your data, Oracle E-Business Suite
automatically checks that your changes are valid. Oracle E-Business Suite also keeps
track of who changes information. If you enter information into database tables using
database tools, you may store invalid information. You also lose the ability to track who
has changed your information because SQL*Plus and other database tools do not keep a
xi
record of changes.
xii
1
Introduction to the Oracle Application
Management Pack for Oracle E-Business
Suite
Overview
The Oracle Application Management Pack for Oracle E-Business Suite extends Oracle
Enterprise Manager 12c Cloud Control to help monitor and manage Oracle E-Business
Suite systems more effectively. The pack integrates Oracle Applications Manager with
Cloud Control to provide a consolidated, end-to-end Oracle E-Business Suite
management solution. The pack can be used to manage both Oracle E-Business Suite
Release 11i systems and Release 12 systems.
This document describes the features and usage of this new pack for Cloud Control.
Oracle Enterprise Manager Cloud Control provides a complete view of your enterprise
so that you can manage all of your Oracle E-Business Suite systems from a single
console. This pack provides new pages within Cloud Control that help you to monitor
the performance, availability and configuration changes of your Oracle E-Business Suite
system and also help you to provision your Oracle E-Business Suite applications. You
can take advantage of advanced Cloud Control features such as the provisioning
framework.
Introduction to the Oracle Application Management Pack for Oracle E-Business Suite 1-1
Enterprise Manager itself allows you to monitor multiple Oracle E-Business systems
(both Release 11i and Release 12) from the outside.
The Oracle Application Management Pack for Oracle E-Business Suite provides
advanced features to monitor and manage Oracle E-Business Suite Release 12 systems
as well as Release 11i systems that meet a standard interoperability patch level. These
advanced features include Oracle E-Business Suite provisioning, Application Service
Level Management, extended performance metrics, and links from Cloud Control to
Oracle Applications Manager.
Note: Please refer to My Oracle Support Knowledge Document
1532970.1 for additional patches required for your system.
Information about the Oracle Application Management Pack for Oracle E-Business Suite
Deployment
To find out information about the deployment of Oracle Application Management Pack
for Oracle E-Business Suite on your system, navigate to Setup menu > Extensibility >
Plug-ins. Under the Applications section, click on the Oracle E-Business Suite plug-in.
Note: The "About Oracle E-Business Suite Management Pack" feature in
Release 4.0 of this pack has been replaced by the above native
Enterprise Manager functionality.
1-2 Oracle Application Management Pack for Oracle E-Business Suite Guide
2
Installing the Oracle Application
Management Pack for Oracle E-Business
Suite
Introduction to Installation
Oracle Application Management Pack for Oracle E-Business Suite (AMP) extends
Enterprise Manager (EM) 12c Cloud Control to help monitor and manage an Oracle
E-Business Suite system more effectively.
This pack can be used to manage both Oracle E-Business Suite Release 12 and Release
11i systems.
This pack is available for fresh installations; that is, you do not need to have a version of
the pack installed before installing this version.
For customers considering upgrades from versions of Oracle Application Management
Pack for Oracle E-Business Suite already installed (possibly with Oracle Change
Application Management Pack for Oracle E-Business Suite, or ACP), upgrade paths are
provided from the following:
•
Enterprise Manager Grid Control 10.2.0.5 with AMP-ACP 3.1 installed
•
Enterprise Manager Grid Control 11gR1 with AMP-ACP 4.0 installed
•
Enterprise Manager Cloud Control 12c with AMP 12.1.0.1.0 installed
This release of Oracle Application Management Pack for Oracle E-Business Suite
requires Oracle Enterprise Manager Cloud Control Release 12c 12.1.0.3 (also known as
PS2).
This chapter describes the system requirements and installation of this new pack for
Cloud Control.
Installing the Oracle Application Management Pack for Oracle E-Business Suite 2-1
Important: Uninstalling Oracle Application Management Pack for
Oracle E-Business Suite is not supported. Please back up the Enterprise
Manager repository before applying this management pack. Please
contact Enterprise Manager Support if you need more clarification on
the backup procedure.
System Requirements
Ensure that the following requirement has been met:
•
OS/User Group Requirement: It is recommended that the Oracle E-Business Suite
OS user and the Enterprise Manager Agent OS user is the same. If they are
different, then they must belong to the same OS group.
Before continuing with the installation as outlined below, please read and become familiar with
the known limitations as described later in this manual. These limitations are typically minor to
most Oracle E-Business Suite Release 12 and Release 11i administrators; however, they might be
of concern to longtime users of Oracle Enterprise Manager who are new to using the Oracle
Application Management Pack for Oracle E-Business Suite.
Installing the Oracle Application Management Pack for Oracle E-Business
Suite
The following are prerequisites for installation:
1.
Install Enterprise Manager Cloud Control.
2.
Discover the Oracle E-Business Suite host.
3.
Set up Software Library in Enterprise Manager. For more information on
configuring Software Library, refer to: Oracle Enterprise Manager Cloud Control
Administrator's Guide.
4.
Apply any additional prerequisite patches as described in "Getting Started with
Oracle Application Management Pack for Oracle E-Business Suite, Release
12.1.0.2.0", My Oracle Support Knowledge Document 1532970.1.
Important: The database plug-in must be deployed on the application
nodes that have been configured to run the Applications listener so that
metric collection can occur. The Applications listener target type is part
of the database plug-in, so the database plug-in must be deployed on
the same node(s).
2-2 Oracle Application Management Pack for Oracle E-Business Suite Guide
Note: Unlike in a previous release, you do not need to install the Fusion
Middleware plug-in on the agent. Installation will occur in the
background during discovery.
Installing and Deploying the Oracle Application Management Pack for Oracle E-Business
Suite
For details on deploying the Oracle Application Management Pack for Oracle
E-Business Suite on the Oracle Management Server (OMS) and the platform agents, see
Oracle Enterprise Manager Cloud Control Administrator's Guide.
Note: Enterprise Manager 12c introduces a new tool and methodology
to deliver and install plug-ins, called the Enterprise Manager Store (EM
Store). Updated plug-ins are made available through the Enterprise
Manager Store, an external site that is periodically checked by
Enterprise Manager Cloud Control to obtain information about updates
ready for download. The Self Update feature allows customers to
expand Enterprise Manager's capabilities by updating Enterprise
Manager components whenever new or updated features become
available. For more details on the EM Store, and the Self Update
feature, see Oracle Enterprise Manager Cloud Control Administrator's
Guide,
Unlike in a previous release, you do not need to install the Oracle E-Business Suite
plug-in on the agent. Installation will occur in the background during discovery.
However, you must manually deploy the Oracle E-Business Suite plug-in on the agent
that is used to check out files for Customization Manager.
Upgrading the Oracle Application Management Pack for Oracle E-Business
Suite
To upgrade the Oracle Application Management Pack for Oracle E-Business Suite, use
the generic procedure described in Oracle Enterprise Manager Cloud Control Upgrade
Guide. This procedure applies to upgrading from Release 3.1, 4.0, or 12.1.0.1.0.
The software is available from Oracle Technology Network at
http://www.oracle.com/technetwork/oem/grid-control/downloads/oem-upgrade-consol
e-502238.html under the section "Download Plug-ins".
Note: Please ensure that in the upgrade process you change the
software file type to ".opar" if it is ".zip".
Note that if you had installed the plug-in on an agent without a discovered Oracle
Installing the Oracle Application Management Pack for Oracle E-Business Suite 2-3
E-Business Suite target, the plug-in will not be upgraded on that agent. For example,
say in Release 3.1 you had installed the plug-in on an agent exclusively for performing
check-in and check-out from source control for Customization Manager. There is no
Oracle E-Business Suite target that is being monitored by this agent. During an upgrade
to Release 12.1.0.2.0, this agent will not be upgraded to this latest release. You will have
to upgrade this agent manually from the Oracle Management Service user interface.
Considerations for Cloning and Upgrades
Only Smart Clone procedures are supported in this release. As a prerequisite to running
a Smart Clone procedure, the target Oracle E-Business Suite database must be cloned
and discovered in the Enterprise Manager.
Clone transaction data created in previous releases will not be usable in this release.
After you upgrade from an earlier release, the old cloning transactions will not be
available.
Considerations for Patch Manager and Upgrades
Before upgrading from a prior release, you should ensure that all patching runs have
completed or are in a state in which they are no longer being used. After the upgrade to
Release 12.1.0.2.0, these old patch runs will no longer be visible in Patch Manager. For
example, say you have a patch run in a "Pending Approval" or "Approved" state in
Release 4.0. After you upgrade, you will not be able to use this patch run.
Considerations for Upgrading from Release 3.1 or 4.0
Note the following considerations and limitations for upgrades.
Deleting an Instance
If you are deleting an Oracle E-Business Suite instance after an upgrade, Oracle
recommends you delete the retired targets associated with the instance. Delete these
retired targets manually from the All Targets page before running discovery again later.
The target types are:
•
Oracle E-Business Suite System
•
Oracle Applications Infrastructure Service
Note: You must delete these manually in the current release. In a future
release this deletion will be handled automatically.
Oracle also recommends that you delete the report associated with Oracle Applications
Infrastructure Service. To do this, perform the following steps:
1.
From the Enterprise menu, select Reports/Information Publisher Reports.
2-4 Oracle Application Management Pack for Oracle E-Business Suite Guide
2.
Search using the search term Target Type "Oracle Applications Infrastructure
Service".
3.
From under Oracle Applications Dashboards/Oracle Applications Service
Dashboards, select <Oracle E-Business Suite instance name>-Oracle Applications
Infrastructure Service Dashboard and click the Delete button.
Properties in amp.properties file replaced by Preferences
The amp.properties file is obsolete with this release of the Oracle Application
Management Pack for Oracle E-Business Suite.
The following properties are obsolete:
•
ebs_acp_packAccessEnabled
•
enableRoleBasedSecurity
•
enableApproval_CM
•
enableApproval_AZ
•
enableApproval_PM
•
targetLevelPrivilegeForApproval
The following properties must be set manually in the Preferences page after the
upgrade:
•
stageDir (Stage Directory) - This property/preference is used by Customization
Manager and specifies the OMS stage directory for package creation.
•
ampCloneApplTopParallelThreads (Number of threads to be used while zipping,
transferring, and unzipping the files under APPL_TOP of Apps Tier. Max value 16)
•
ampCloneToolsParallelThreads (Number of threads to be used while zipping,
transferring, and unzipping the files under Tools home of Apps Tier. Max value 8)
•
ampCloneWebParallelThreads (Number of threads to be used while zipping,
transferring, and unzipping the files under Web home of Apps Tier. Max value 4)
•
ampCloneCommonTopParallelThreads (Number of threads to be used while
zipping, transferring, and unzipping the files under COMMON_TOP of Apps Tier.
Max value 4)
•
um_dashboard_no_of_rows (Number of Rows in tables of User Monitoring)
•
um_session_sampling_interval (Sampling Interval for User Monitoring)
Installing the Oracle Application Management Pack for Oracle E-Business Suite 2-5
•
omsPatchStageDir (OMS Stage Directory Location)
•
MOSEnabled/metalinkEnabled (Connect to My Oracle Support for Patches)
Security using Enterprise Manager Privileges and Roles
Oracle Application Management Pack for Oracle E-Business Suite now uses the native
Enterprise Manager privileges and roles. As noted above, the amp.properties file is
obsolete, so its security-related properties are no longer used. See Privileges and Roles
for Managing Oracle E-Business Suite, page 7-1 for more information on managing
security.
2-6 Oracle Application Management Pack for Oracle E-Business Suite Guide
3
Getting Started with the Oracle Application
Management Pack for Oracle E-Business
Suite
Getting Started
Once the management pack, or plug-in, has successful deployed on the OMS, you can
go to the landing page (called as System Management Page henceforth) of the plug-in
by selecting Oracle E-Business Suite from the Targets menu.
Getting Started with the Oracle Application Management Pack for Oracle E-Business Suite 3-1
System Management Page
The System Management page gives you a bird's eye view of all the Oracle E-Business
Suite instances that are being monitored. This view includes status, incidents,
compliance, and so on. The page has the following sections:
Status of Oracle E-Business Suite Targets
This section shows the status summary of Oracle E-Business Suite targets being
monitored. The pie charts show how many are up, down, or in unknown status.
Incidents and Problems
This section has the summary of incidents reported from all the Oracle E-Business Suite
targets being monitored. The incidents are grouped based on category and severity.
Oracle E-Business Suite Instances
This section lists the Oracle E-Business Suite instances that are already discovered. The
status column tells you if the instance is up, down of partially up. You can perform the
following actions:
•
Go to the home page of an Oracle E-Business Suite instance by clicking on the name
of the instance.
•
Discover a new Oracle E-Business Suite instance by clicking Add.
•
Delete an Oracle E-Business Suite instance which is already discovered by clicking
Delete.
•
Configure how an Oracle E-Business Suite instance is being monitored by clicking
Configure.
Compliance Summary
This sections list the compliance standards that are shipped by the Oracle E-Business
Suite plug-in along with the evaluations performed and violations reported. The
Average Compliance score is an indication on how much compliant all the Oracle
E-Business Suite instances are to each specific standard. This score will be discussed in
detail later.
Least Compliant Targets
This section lists the Oracle E-Business Suite targets that are least compliant across all
standards. The Average Compliance score is an indicator of how compliant the specific
3-2 Oracle Application Management Pack for Oracle E-Business Suite Guide
Oracle E-Business Suite instances are to standards.
Navigating from System Management Page
You can navigate to the following pages from the system management page through the
Administer menu.
•
Change Management
•
Preferences
•
Discovery Wizard
•
Pack Diagnostics
•
Cloning
Getting Started with the Oracle Application Management Pack for Oracle E-Business Suite 3-3
4
Discovering Oracle E-Business Suite with
Cloud Control
Preparatory Steps for Discovery
Privileges needed to do discovery
To discover an Oracle E-Business Suite, users must have the Add any Target target type
privilege.
Prerequisites to do discovery
•
The Oracle E-Business Suite database must be discovered in Enterprise Manager
Cloud Control.
•
The hosts on which the Oracle E-Business Suite is deployed must be discovered in
Enterprise Manager Cloud Control.
•
AutoConfig must be enabled and updated on all nodes in order for Oracle
E-Business Suite systems to be properly recognized by Oracle Application
Management Pack for Oracle E-Business Suite. Refer to the applicable
documentation:
•
My Oracle Support Knowledge Document 165195.1, "Using AutoConfig to
Manage System Configurations with Oracle Applications 11i"
•
My Oracle Support Knowledge Document 387859.1, "Using AutoConfig to
Manage System Configurations in Oracle E-Business Suite Release 12"
•
Oracle E-Business Suite Setup Guide for Release 12.2, Technical Configuration
chapter
Discovering Oracle E-Business Suite with Cloud Control 4-1
Note: For an AutoConfig-enabled Release 11i instance, running
AutoConfig on the database tier adds the following lines to sqlnet.ora
automatically:
tcp.validnode_checking = yes
tcp.invited_nodes=(11i_HOST)
In this case, database discovery or application discovery through
Oracle Enterprise Manager will fail because the Oracle E-Business Suite
instance database tier listener will reject any connection requests other
than from itself. To prevent this failure, add the Oracle Enterprise
Manager Cloud Control server to sqlnet_ifile.ora as listed below and
bounce the database listener before discovery via Oracle Enterprise
Manager.
tcp.invited_nodes=(11i_HOST, EMGC_HOST)
Discovery Wizard
An Oracle E-Business Suite instance is discovered using Discovery Wizard. It allows
you to validate, track, plan, log, and customize Oracle E-Business Suite discovery
processes. To access Discovery Wizard, select Discovery Wizard from the Administer
menu in the System Management page.
4-2 Oracle Application Management Pack for Oracle E-Business Suite Guide
Adding an Oracle E-Business Suite database:
1.
Navigate to Discovery Wizard.
2.
Click on the Add Databases button.
3.
Select the Oracle E-Business Suite database target.
4.
Once added, the database target shows up in the Discovery Wizard. You can now
proceed to discover the Oracle E-Business Suite instance.
Prevalidating Discovery:
Prevalidation allows you to analyze the Oracle E-Business Suite instance and Enterprise
Manager Cloud Control to ensure successful discovery. Validation checks include
verifying the following:
•
Context files
•
Context variables
•
Agent installation
•
OS user privileges
Discovering Oracle E-Business Suite with Cloud Control 4-3
•
Versions of target metadata
For more information on these checks, see: Prevalidation Checks for Discovery, page B1.
1.
To prevalidate discovery, go to Discovery Wizard.
2.
Select the Oracle E-Business Suite database target and click on Prevalidate.
3.
Enter the monitoring schema credentials for the database.
4.
Click Prevalidate Discovery.
5.
A job will be submitted to prevalidate the discovery.
The Diagnostics Status column in the Discovery Wizard shows the status of
prevalidation as a link. You can drill down to get the details. A detailed report will
be generated that can be used to resolve any issues. Only one Oracle E-Business
Suite instance can be prevalidated at a time.
Discovering Oracle E-Business Suite Release 11i, 12.0, or 12.1:
1.
Navigate to Discovery Wizard.
4-4 Oracle Application Management Pack for Oracle E-Business Suite Guide
2.
Select the Oracle E-Business Suite database target and click on Discover.
3.
Enter the monitoring schema credentials for the database.
4.
Click Start Discovery.
5.
A job will be submitted to do the discovery. The Diagnostics Status column in the
Discovery Wizard will show the status of discovery as a link. You can drill down to
get the details.
Discovering Oracle E-Business Suite Release 12.2:
1.
Set the Normal Host preferred credential where the WebLogic Administration
Server is running. See: Setting Oracle E-Business Suite Preferred Credentials, page
5-8.
2.
Navigate to Discovery Wizard.
3.
Select the Oracle E-Business Suite database target and click on Discover.
Discovering Oracle E-Business Suite with Cloud Control 4-5
4.
Enter the monitoring schema credentials for the database.
5.
Enter the username and password for the WebLogic Administration Server.
6.
Click Start Discovery.
7.
A job will be submitted to do the discovery. The Diagnostics Status column in the
Discovery Wizard will show the status of discovery as a link. You can drill down to
get the details.
Additional Features of Discovery
Discovering multiple Oracle E-Business Suite targets
Discovery Wizard allows you to discovery multiple Oracle E-Business Suite targets.
Select all the needed Oracle E-Business Suite database instances and click on Discover.
You must enter the Monitoring Schema username and password for all of them in the
next page. For Release 12.2 targets, you must also enter the WebLogic Admin username
and password.
4-6 Oracle Application Management Pack for Oracle E-Business Suite Guide
Discovering Oracle E-Business Suite as EM_MONITOR user (Recommended)
Oracle E-Business Suite can be discovered and monitored using an EM_MONITOR user
which has read-only access to Oracle E-Business Suite tables required for monitoring.
By default the EM_MONITOR user is locked so a user would have to unlock it explicitly
to use it.
Discovering Oracle E-Business Suite by assigning EM_OAM_MONITOR_ROLE to
database user (such as DBSNMP)
Oracle E-Business Suite can be discovered and monitored using any database user; for
example, the provided DBSNMP user has been granted EM_OAM_MONITOR_ROLE.
This role is been provided with read-only access to Oracle E-Business Suite tables
required for monitoring.
Troubleshooting discovery
In case if anything goes wrong with the discovery, you must check the discovery log to
troubleshoot. It is available at:
$<MIDDLEWARE_HOME>/oms/sysman/log/ebsDiscovery_<DBSID>_oracle_database.l
og
Restrictions for discovery
•
If you are using Oracle's E-Business Suite Online Patching feature and you have an
active patching cycle in progress, you must wait until it completes before
attempting to discover an Oracle E-Business Suite instance.
•
You cannot discover two Oracle E-Business Suite instances with the same name.
Customizing discovery
It is possible to customize the discovery. You can exclude the discovery of certain
targets and services. To customize the discovery of an Oracle E-Business Suite instance,
click on the link available in the Configure column in Discovery Wizard. You will be
prompted to enter the monitoring schema credentials for the database.
Customization at instance level
The following table explains the different options available for you.
Discovering Oracle E-Business Suite with Cloud Control 4-7
Options for Customizing Discovery
Parameter
Description
Applicable Oracle
E-Business Suite
Releases
Customer Group
Name
All targets discovered for this instance will be
grouped under this group. This group will be
added to Group: Customer Group Name.
All Releases
Customer Instance
Group Name
If the Customer Instance Group Name is provided,
then all the targets discovered for this instance and
the Customer Instance Group Name will be added
to this group.
All Releases
Discover
Discoverer
Disable/Enable discovery of the Discoverer
component.
Release 11i only
Discover Workflow
Disable/Enable discovery of the Oracle Workflow
components.
All Releases
Discover Workflow
Service
Disable/Enable creation of the Oracle Workflow
service. If you do not discover workflow targets,
then the workflow service will not be discovered.
Release 12 and
Above
Discover Forms
Service
Disable/Enable creation of the Oracle Forms
service.
Release 12 and
above
Discover SSA
Service
Disable/Enable creation of the Self-Service
Applications (SSA) Service.
Release 12 and
above
Discover Patching
Information
Disable/Enable discovery of the Patching
Information Object. This target is essential for any
Oracle E-Business Suite patching application and
should be enabled if any patching applications are
used with this instance.
Release 12 and
above
Discover Custom
Objects
Disable/Enable discovery of custom objects
configuration.
Release 12 and
above
4-8 Oracle Application Management Pack for Oracle E-Business Suite Guide
Parameter
Description
Applicable Oracle
E-Business Suite
Releases
Delete Removed
Targets
Whether to delete an Oracle E-Business Suite
member target from OMS which was originally
discovered and later detached from the Oracle
E-Business Suite target hierarchy with a
rediscovery.
All Releases
For example, say you have discovered an Oracle
E-Business Suite instance with five nodes. Later
you customize the discovery and exclude two
nodes. When you perform rediscovery, the two
excluded nodes become orphan nodes. If this
option is set to Yes, then the orphan targets will be
deleted during rediscovery.
Excluding nodes from getting discovered
The Configure Discovery page lists all the nodes. You can exclude a node from being
discovered. Uncheck the check box corresponding to the node in the Enable column. At
least one applications node must be selected for successful discovery. Discovery can
happen even if you do not select any database node.
For Oracle E-Business Suite Release 12.2, you cannot exclude a node if the WebLogic
Administration Server is running on that node.
Customization at the node level
You can also configure the targets that get discovered in each node. Click on the
Discovering Oracle E-Business Suite with Cloud Control 4-9
Configure column corresponding to each node.
Customization at apps node level
You can exclude Forms and the Apps JVM from being discovered in Release 12.
Mapping Aliased Host
A host which is uniquely identified by an IP Address can have different alias names in
the network. It is possible that the Oracle E-Business Suite context file has one host
name while it has been discovered in Cloud Control with a different alias name. In such
case you must map the host name available in the context file to the corresponding host
name with which it has been discovered. This can be done by configuring the discovery
for each node. The section Map Aliased Host serves this purpose. Select the radio
button Select overriding hostname. A list of values is shown from which you can select
the appropriate host which can be mapped to the host in which this node is running.
Resetting the customization
From the Configure Discovery page you can reset your customization to default or you
can reset it to the last configuration with which discovery was done successfully.
Command-Line Discovery for Oracle E-Business Suite Systems
The Oracle Application Management Pack for Oracle E-Business Suite provides a
command-line interface for the batch discovery of multiple Oracle E-Business Suite
systems. Command-line discovery is executed using the script ebsdiscovery.sh which is
located under $PLUGIN_HOME/scripts/cli.
4-10 Oracle Application Management Pack for Oracle E-Business Suite Guide
Prerequisites
The operating system user who runs command-line discovery must have the full
permissions on the OMS ORACLE_HOME. Before running command-line discovery,
set the following environment variables:
•
ORACLE_HOME: This environment variable must be set to OMS Home.
•
JAVA_HOME: This environment variable must be set to a valid JDK directory. The
OMS ORACLE_HOME ships with one under $ORACLE_HOME/jdk. Once the
OMS ORACLE_HOME is set, JAVA_HOME may be set simply by reference to the
ORACLE_HOME variable:
export JAVA_HOME=$ORACLE_HOME/jdk
•
PLUGIN_HOME: This environment variable must point to the folder returned by
the query "select plugin_home from GC$CURRENT_DEPLOYED_PLUGIN
where plugin_id='oracle.apps.ebs' and destination_type='OMS'".
Before running discovery for multiple instances, it is highly recommended that you first
try discovering a single Oracle E-Business Suite system.
Discovery
The ebsdiscovery.sh script can be run with the following parameters:
•
inputfile=<ebslist>
This option, when passed to the ebsdiscovery.sh script, will allow for the use of an
input file which may contain details for the discovery of several Release 11i or
Release 12 Oracle E-Business Suite systems (Oracle Applications environments).
See: The ebsList.txt file, page 4-12 for more information.
How this option works: Information will be taken from the file specified as <ebslist>
and submitted as separate Enterprise Manager jobs for discovering each Oracle
E-Business Suite system described in the file. If this "inputfile" option is not
provided, then the default value is ebsList.txt. Please see ebsList.txt under
$OMS_HOME/sysman/admin/scripts/ebs/cli/amp/disc/ for a sample input file.
•
omscred=<oms credentials file>
OMS Credentials will be taken from this file. This file is machine-generated and
should not be edited. If this file does not exist, the ebsdiscovery.sh script will create
it after prompting for the necessary input values. If this "omscred" option is not
provided, then the default value is omscred.conf.
•
logdir=<log directory>
This option determines the location where the log files will be written.
An example of running the command is:
Discovering Oracle E-Business Suite with Cloud Control 4-11
./ebsdiscovery.sh inputfile=ebsList.txt omscred=omscred.conf logdir=/tmp
After the discovery job is started, you can view its status on the Oracle Management
Server. From the Oracle Enterprise Manager console, navigate to Enterprise (menu) >
Job > Activity. The status of the job is shown in the Status field. Click on the job name
link to drill down to details on the discovered Oracle E-Business Suite instance.
The ebsList.txt file
The ebsList.txt file contains parameters and values for the discovery process.
The ebsList.txt file
The format for the ebsList.txt file is:
DBTARGET=>[[
DBTARGET=><DBTARGET>;
DBTYPE=><oracle_database | rac_database>;
APPS_USER=><apps db user>;
APPS_PASSWORD=><apps password>;
]]
Extra parameters can be provided as <key>=><value> pairs delimited by a semi-colon
4-12 Oracle Application Management Pack for Oracle E-Business Suite Guide
(;).
For ENCRYPTED_PASSWORD=><encrypted apps password>, the encrypted password
will be used to decrypt the password on successive usage of the ebsList.txt file. To
override the old password, change the input and add APPS_PASSWORD key value
pair again with the new, changed password.
ebsList.txt Parameters
The following table describes the ebsList.txt parameters and their valid values.
Key
Supported
Release
Valid Values
Description
Default
DB_TARGET
All
DB Target Name
Database Target
name of the
Apps you want
to discover
N/A
DB_TYPE
All
oracle_database
or rac_database
Database type
oracle_database
APPS_USER
All
Apps username
apps
APPS_PASSWD
All
Apps password
This will be
replaced by
ENCRYPTED_A
PPS_PASSWD
apps
APPS_MONITO
RING_USER
12.0 or higher
Apps
Monitoring
username
This is used for
out-of-box
service
monitoring
APPS_MONITO
RING_PASSWO
RD
12.0 or higher
Apps
Monitoring
password
This will be
replaced by
ENCRYPTED_A
PPS_MONITORI
NG_PASSWOR
D
DISCOVER_WO
RKFLOW
All
Y or N
Whether to
Discover
Workflow
targets
Y
Discovering Oracle E-Business Suite with Cloud Control 4-13
Key
Supported
Release
Valid Values
Description
Default
DISCOVER_WO
RKFLOW_SERV
ICE
12.0 or higher
Y or N
Whether to
Discover
Workflow
Service if
DISCOVER_WO
RKFLOW is Y
Y
DISCOVER_FOR
MS
12.0 or higher
Y or N
Whether to
Discover Forms
or not
Y
DISCOVER_FOR
MS_SERVICE
12.0 or higher
Y or N
Whether to
Discover Forms
Service if
DISCOVER_FOR
M is Y
Y
DISCOVER_SSA
12.0 or higher
Y or N
Whether to
discover SSA
Service or not
Y
DISCOVER_CUS
TOM_OBJECTS
12.0 or higher
Y or N
Whether to
Discover Custom
Objects or not
Y
DISCOVER_PAT
CHING
12.0 or higher
Y or N
Whether to
discover
Patching
Configuration
target
Y
PROTOCOL
11i
http or https
Whether to have
http or https
http
4-14 Oracle Application Management Pack for Oracle E-Business Suite Guide
Key
Supported
Release
Valid Values
Description
Default
SRVLT_URL_FR
OM_CTXFILE
11i
Y or N
Whether to take
Servlet URL
from Context file
or Not. If this
value is N, Value
for Servlet url
will be
"/servlet/oracle.f
orms.servlet.List
enerServlet"
Y
ADD_CUSTOM
ER_GROUP
12.0 or higher
Y or N
Shall Add
Customer Group
N
CUSTOMER_IN
ST_GRP_NAME
12.0 or higher
Text
Customer
Instance Group
Name
N/A
CUSTOMER_GR
P_NAME
12.0 or higher
Text
Customer Group
Name
N/A
DELETE_REMO
VED_TARGETS
All
Y or N
Whether or not
to delete
removed targets.
Default is N
N
DISCOVER_DIS
COVERER
11i
Y or N
Whether or not
discover
discoverer
Y
FORMS_SRVLT_
PROTOCOL
11i
http or https
Whether to have
http or https for
forms servlet
mode
http
DISCOVER_JVM
_USAGE
12.0 or higher
Y or N
Whether or not
to discover JVM
usage target
A
WLS_ADMIN_U
SER
12.2 or higher
Username of the
WLS admin
N/A
Discovering Oracle E-Business Suite with Cloud Control 4-15
Key
WLS_ADMIN_P
WD
Supported
Release
Valid Values
12.2 or higher
Description
Password for the
WLS admin user
Default
N/A
Customer Groups Created by Discovery
Groups are an optional feature in Enterprise Manager that allows the logical
organization of targets in accordance to user preference. Command line discovery
allows the definition of target groups and placement of Oracle E-Business Suite systems
in these groups at time of discovery. Groups can also be created using the normal
discovery process available in the management console, as well as after discovery.
To view these groups, navigate within the Enterprise Manager console to Targets
(menu) > Groups.
Rediscovering an Oracle E-Business Suite instance
If the Oracle E-Business Suite configuration has changed after discovery, then you must
rediscover the Oracle E-Business Suite instance so that such changes are reflected in
Enterprise Manager. Examples of changes to the configuration are:
•
A new node has been added
•
A service, such as a concurrent processing service, has been enabled in a node
The steps for rediscovery are the same:
1.
Navigate to Discovery Wizard.
2.
Select the Oracle E-Business Suite database.
3.
Click Discover.
Deleting an Oracle E-Business Suite Instance
If you no longer want to monitor and manage a Oracle E-Business Suite instance, you
can delete it. The steps are:
1.
Go to the System Management page.
2.
Select the Oracle E-Business Suite instance from the section Oracle E-Business Suite
instances.
4-16 Oracle Application Management Pack for Oracle E-Business Suite Guide
3.
Click Delete.
By default, the system deletes application server targets (like the HTTP server,
OC4J, and so on) when deleting the parent Oracle E-Business Suite target. If you do
not want all the application server targets deleted, change the preference. For
information on updating preferences, see: Setting Preferences, page 6-1.
Discovering Oracle E-Business Suite with Cloud Control 4-17
5
Credentials
Setting Named Credentials
In Enterprise Manager, as part of the target type definition, you can define the types of
credentials specific to the plug-in target type. Examples could be the user name and
password required by the plug-in to connect to a target instance to collect metric data,
or to invoke a specific Enterprise Manager job.
A named credential is a users' authentication information on a system. A named
credential can be a user name/password, a public key-private key pair, or an X509v3
certificate. An Enterprise Manager administrator can store these credentials as named
entities in Enterprise Manager to use when performing operations like running jobs,
patching, and other system management tasks. For example, you can store the user
name and password that you want to use for patching as MyPatchingCreds. You can
then later submit a patching job that uses MyPatchingCreds to patch the production
databases. Named credentials ensure an additional layer of security passwords because
an operator would use the selected named credential, which is saved and stored by an
administrator, and not know the actual user name and password associated with it.
To define Named Credentials, navigate to: Setup menu > Security > Named Credentials.
For details on Named Credentials, see the Oracle Enterprise Manager Cloud Control
Administrator's Guide.
For the Oracle Application Management Pack for Oracle E-Business Suite, you must
create named credentials for the Oracle E-Business Suite or Oracle E-Business Suite
Node based on the management activity you are performing. Create all of the named
credentials listed below if you plan on using all of the features of the management pack:
•
A credential to access the Oracle E-Business Suite (applications login)
•
Credentials to access the Oracle E-Business Suite Database
•
A credential to monitor the Oracle E-Business Suite Database
Credentials 5-1
Creating a Named Credential for Oracle E-Business Suite Applications Login
Follow these steps in defining this credential:
1.
Specify a name and description for your credential.
2.
Select 'Oracle E-Business Suite' as the Authenticating Target Type.
3.
Select 'E-Business Suite Application Login Credentials' as the Credential Type.
4.
The parameter Scope determines if this named credential is applicable for all
instances of Oracle E-Business Suite or to a specific instance. So if you choose Target
for the scope, you need to select Oracle E-Business Suite as target type and provide
the name of the Oracle E-Business Suite for which this named credential is
applicable.
5.
If necessary based on the previous step, select 'Oracle E-Business Suite' as the
Target Type and choose your Target Name.
6.
Define your Credential Properties.
5-2 Oracle Application Management Pack for Oracle E-Business Suite Guide
Creating Named Credentials to Access the Database
Follow these steps to create a named credential to access the Oracle E-Business Suite
database:
1.
Specify a name and description for your credential.
2.
Select 'Oracle E-Business Suite' as the Authenticating Target Type.
3.
Select 'E-Business Suite Database Credentials' as the Credential Type.
4.
The parameter Scope determines if this named credential is applicable for all
instances of Oracle E-Business Suite or to a specific instance. So if you choose Target
for the scope, you need to select Oracle E-Business Suite as target type and provide
the name of the Oracle E-Business Suite for which this named credential is
applicable.
5.
Define your Credential Properties.
Credentials 5-3
The following examples illustrate creating named credentials for database access.
Example: Creating a Named Credential for the Oracle E-Business Suite Database APPS Schema
1.
Specify a name and description for your credential.
2.
Select 'Oracle E-Business Suite' as the Authenticating Target Type.
3.
Select 'E-Business Suite Database Credentials' as the Credential Type.
4.
The parameter Scope determines if this named credential is applicable for all
instances of Oracle E-Business Suite or to a specific instance. So if you choose Target
for the scope, you need to select Oracle E-Business Suite as target type and provide
the name of the Oracle E-Business Suite for which this named credential is
applicable.
5.
Define your Credential Properties. Specify the username and password for your
APPS schema.
5-4 Oracle Application Management Pack for Oracle E-Business Suite Guide
Example: Creating a Named Credential for the Oracle E-Business Suite Database APPLSYS Schema
Use the following steps to create a credential to access the APPLSYS schema:
1.
Specify a name and description for your credential.
2.
Select 'Oracle E-Business Suite' as the Authenticating Target Type.
3.
Select 'E-Business Suite Database Credentials' as the Credential Type.
4.
The parameter Scope determines if this named credential is applicable for all
instances of Oracle E-Business Suite or to a specific instance. So if you choose Target
for the scope, you need to select Oracle E-Business Suite Node as the target type
and provide the name of the Oracle E-Business Suite target for which this named
credential is applicable.
Credentials 5-5
5.
Define your Credential Properties. Specify the username and password for your
APPLSYS schema.
Example: Creating a Named Credential for the Oracle E-Business Suite Database System Schema
Use the following steps to create the Oracle E-Business Suite Database System Schema
credential:
1.
Specify a name and description for your credential.
2.
Select 'Oracle E-Business Suite' as the Authenticating Target Type.
3.
Select 'E-Business Suite Database Credentials' as the Credential Type.
4.
The parameter Scope determines if this named credential is applicable for all
5-6 Oracle Application Management Pack for Oracle E-Business Suite Guide
instances of Oracle E-Business Suite or to a specific instance. So if you choose Target
for the scope, you need to select Oracle E-Business Suite Node as the target type
and provide the name of the Oracle E-Business Suite target for which this named
credential is applicable.
5.
Define your Credential Properties. Specify the username and password for your
SYSTEM schema.
Creating a Named Credential to Monitor the Oracle E-Business Suite Database
Create this credential using the following steps:
1.
Specify a name and description for your credential.
Credentials 5-7
2.
Select 'Host' as the Authenticating Target Type.
3.
Select 'Host Credentials' as the Credential Type.
4.
The parameter Scope determines if this named credential is applicable for all
instances of Oracle E-Business Suite or to a specific instance. So if you choose Target
for the scope, you need to select Oracle E-Business Suite Node as the target type
and provide the name of the Oracle E-Business Suite target for which this named
credential is applicable.
5.
Specify the APPL_TOP context.
6.
Define your Credential Properties.
Setting Oracle E-Business Suite Preferred Credentials
Oracle E-Business Suite administration uses Preferred Credentials for connecting to the
system and executing various commands. Before managing an Oracle E-Business Suite
instance from the Administration Dashboard, the preferred credentials must be set for
the specific Oracle E-Business Suite target and Oracle E-Business Suite Node target of
the specific node. Applications Schema Credentials need to be set for only those targets
whose administration requires Applications Schema Credentials. You can set default
preferred credentials, which are applicable for all instances, or preferred credentials for
5-8 Oracle Application Management Pack for Oracle E-Business Suite Guide
just a particular instance.
To set these credentials, navigate to Setup (menu) > Security > Preferred Credentials in
Enterprise Manager.
Note: If you wish to perform bulk setup of preferred credentials refer to
the section "Setting Preferred Credentials Using EMCLI" in the Oracle
Enterprise Manager Cloud Control Upgrade Guide.
Setting the Preferred Credentials for the Oracle E-Business Suite Target Type
The following table lists the credential sets that are used by the management pack. You
must set all of these if you plan to use all the features of the management pack.
Name
Description
AppsDBCredsSet
To access the APPS schema
AppsSysDBCredsSet
To access the SYSTEM schema
ApplsysDBCredsSet
To access the APPLSYS schema
AppsUserCredsSet
To log in to the application
Credentials 5-9
To set these credentials, navigate to Setup (menu) > Security > Preferred Credentials in
Enterprise Manager. Select Oracle E-Business Suite from the list of target types and click
on Manage Preferred Credentials.
You either set the default preferred credentials or set them for a specific target instance.
Select the appropriate credential set and click on Set. Here you can choose from an
existing named credential or create a new credential and set it.
Set the preferred credentials for each of the credential sets in the table above.
Setting the Preferred Credential Set for Oracle E-Business Suite Node
To set this credential set, navigate to Setup (menu) > Security > Preferred Credentials in
Enterprise Manager. Select Oracle E-Business Suite Node from the list of target types
and click on Manage Preferred Credentials.
Select OS Credentials and click Set. Here you can choose from existing named
credentials or create new credentials and set them.
If Named Credentials are not already set for Oracle E-Business Suite Node, you will get
the message "Either there are no credential types or required configuration is missing."
5-10 Oracle Application Management Pack for Oracle E-Business Suite Guide
Note: In Release 12.1.0.1.0, these credentials were named "Oracle
E-Business Suite Infrastructure".
Setting Preferred Credentials for Change Management
When using Change Management features, you will need to access Oracle E-Business
Suite instances. You can set up credentials for these instances for every user as a
one-time setup step instead of entering them every time you need to access an instance.
Please note that preferred credentials are not shared across users.
To set up credentials:
1.
Within Oracle Enterprise Manager, navigate to Setup > Security > Preferred
Credentials.
2.
Highlight the desired target type, then click Manage Preferred Credentials.
•
For Patch Manager, choose these target types:
•
Oracle E-Business Suite - Set the following credential sets:
AppsDBCredsSet, AppsSysDBCredsSet,AppsUserCredsSet. Please refer to
section Setting Oracle E-Business Suite Preferred Credentials, page 5-8 for
more information on these credential sets.
Named Credentials must be created prior to setting up Preferred
Credentials. Review the section Creating Named Credentials for Oracle
E-Business Suite, page 5-1 for information on creating named credentials as
well as reusing the same named credentials across the target instances and
sharing them across administrators.
•
Oracle E-Business Suite Node - Set the "OS Credentials" credential set.
Please refer to section Setting the Preferred Credential Set for Oracle
E-Business Suite Node, page 5-10 for information on this credential set.
Named Credentials must be created prior to setting up Preferred
Credentials. Review the section Creating Named Credentials for Oracle
E-Business Suite, page 5-1 for information on creating named credentials as
well as reusing the same named credentials across the target instances and
sharing them across administrators.
Set this credential for both APPL_TOP Context and Database Context.
•
For Customization Manager, choose the following target types:
•
Host - You must set the "Normal Username" and "Normal Password" for
the host from where files will be checked out. This host is referenced within
Credentials 5-11
File Source Mapping.
•
Oracle E-Business Suite Node - Set the "OS Credentials" credential set.
Please refer to section Setting the Preferred Credential Set for Oracle
E-Business Suite Node, page 5-10 for information on this credential set.
Named Credentials must be created prior to setting up Preferred
Credentials. Review the section Creating Named Credentials for Oracle
E-Business Suite, page 5-1 for information on creating named credentials as
well as reusing the same named credentials across the target instances and
sharing them across administrators.
Set this credential for the APPL_TOP Context.
•
Oracle E-Business Suite - Set the following credential set: AppsDBCredsSet.
You must set the credentials for Oracle E-Business Suite Node for every
instance that is used for building Java patches or reports. Both the Applications
and the Database context credentials for each Oracle E-Business instance must
be set.
For Customization Manager, it is also required to set the APPLSYS schema
credentials, APPS schema credentials and SYSTEM schema credentials for
using the custom applications registration and validation functionality for the
given Oracle E-Business Suite instance. You can do this by setting the following
credential sets: AppsDBCredsSet, AppsSysDBCredsSet, ApplsysDBCredsSet.
Please refer to section Setting Oracle E-Business Suite Preferred Credentials,
page 5-8 for more information on these credential sets.
Named Credentials must be created prior to setting up Preferred Credentials.
Review the section Creating Named Credentials for Oracle E-Business Suite,
page 5-1 for information on creating named credentials as well as reusing the
same named credentials across the target instances and sharing them across
administrators.
5-12 Oracle Application Management Pack for Oracle E-Business Suite Guide
6
Preferences
Setting Preferences
Use Preferences in Enterprise Manager to configure some of the features in the
management pack.
Navigate to the Preferences page from the System Management page through the
Administer menu.
Set the following:
•
Maximum Number of Email Addresses for User (required)
•
Stage Directory (required)
This preference, used by Customization Manager, specifies the OMS stage directory
for package creation.
•
OMS Stage Directory Location (required)
This preference, used by Patch Manager, specifies the patch stage directory location.
This preference is used in conjunction with the preference "MOS Enabled". If "MOS
Enabled" is unchecked, then Patch Manager will use the "OMS Stage Directory
Location" in searching for patches.
•
Delete Application Server targets while deleting EBS Target - By default, the system
deletes application server targets (like the HTTP server, OC4J, and so on) when
deleting the parent Oracle E-Business Suite target. If you do not want all the
application server targets deleted, deselect this check box.
Set the following for the User Monitoring feature:
•
Sampling Interval for User Monitoring (required)
•
Number of Rows in Tables of User Monitoring (required)
Preferences 6-1
Set the following for Patch Manager:
•
Default Hotpatch in Patch Manager
•
Default Blackout Minutes in Patch Manager
•
Default Blackout Hours in Patch Manager
•
Target Patch Directory Location
•
Target Stage Directory Location.
•
Connect to My Oracle Support for Patches
For Upgrades from Release 3.1 or 4.0: Properties in amp.properties file replaced by
Preferences
The amp.properties file used in Release 3.1 and 4.0 is obsolete in this release of the
Oracle Application Management Pack for Oracle E-Business Suite. Therefore, please
note the following
The following properties are obsolete. They were used in the security model in the
previous release; in the current release, the management pack uses the native Enterprise
Manager Privileges feature.
•
ebs_acp_packAccessEnabled
•
enableRoleBasedSecurity
•
enableApproval_CM
•
enableApproval_AZ
•
enableApproval_PM
•
targetLevelPrivilegeForApproval
The following properties must be set manually in the Preferences page after the
upgrade. The property name is given with the name under Preferences in parentheses
().
•
stageDir (Stage Directory)
•
ampCloneApplTopParallelThreads
•
ampCloneToolsParallelThreads
•
ampCloneWebParallelThreads
6-2 Oracle Application Management Pack for Oracle E-Business Suite Guide
•
ampCloneCommonTopParallelThreads
•
um_dashboard_no_of_rows (Number of Rows in tables of User Monitoring)
•
um_session_sampling_interval (Sampling Interval for User Monitoring)
•
omsPatchStageDir (OMS Stage Directory Location)
•
MOSEnabled/metalinkEnabled (Connect to My Oracle Support for Patches)
Preferences 6-3
7
Security
Privileges and Roles for Managing Oracle E-Business Suite
Oracle Application Management Pack for Oracle E-Business Suite uses the native
Enterprise Manager functionality of privileges and roles for security.
Note: In Releases 3.1 and 4.0, security was managed through the
amp.properties file and disabled by default. In this release, the
amp.properties file is no longer used, and security through privileges
and roles is enabled by default.
User privileges provide a basic level of security in Enterprise Manager. They are
designed to control user access to data and to limit the kinds of SQL statements that
users can execute. When creating a user, you grant privileges to enable the user to
connect to the database, to run queries and make updates, to create schema objects, and
more.
A role is a collection of Enterprise Manager resource privileges, or target privileges, or
both, which you can grant to administrators or to other roles. Resource privileges allow
a user to perform operations against specific types of resources. Target privileges allow
an administrator to perform operations on a target. This management pack includes
target-instance level privileges, which are for a particular target instance, and
target-type level privileges, which are for all target instances of that type. An example
of a resource privilege is the "Edit Global Preferences" resource privilege, which enables
a user to edit global preferences for Oracle Application Management Pack for Oracle
E-Business Suite. An example of a target-instance level privilege is the "Start and Stop
Services" which enables a user to start and stop services using the Administration
Dashboard for a given instance.
Privileges and roles are managed through the functions available from Setup menu >
Security in the Cloud Control console. For more information, see the Oracle Enterprise
Manager Cloud Control Administrator's Guide.
Ready-to-use privileges shipped with the management pack are listed in the tables
Security 7-1
below. Please note the following in regard to privileges:
•
The user SYSMAN has all the listed privileges by default.
•
The use of privileges on a system is enabled by default, which means that a user
will not be able to perform an action unless the appropriate privilege(s) are granted
to that user.
•
All target privileges are given against the target "Oracle E-Business Suite".
For privileges used by the features in Change Management (Patch Manager and
Customization Manager), see the section Change Management Approval Framework
and Privileges, page 12-2.
The following table lists ready-to-use resource privileges in Oracle Application
Management Pack for Oracle E-Business Suite:
Privileges applicable to all targets
Name
Included Privilege
Description
Create release package
request
(none)
To create a request to release
a package
Approve release package
request
Create release package
request
To approve the release of a
package
Edit global preferences
(none)
To edit global preferences of
the Oracle Application
Management Pack for Oracle
E-Business Suite
The following table lists ready-to-use target instance level privileges. With these
privileges, a user can perform the specified action against only the given target.
7-2 Oracle Application Management Pack for Oracle E-Business Suite Guide
Target Privileges
Name
Included Privileges
Description
Create splice request
(none)
•
To create a request to register
a new custom application
•
To create a request to validate
an existing custom
application
•
To create a request to
auto-correct an existing
invalid custom application
•
To approve a request to splice
an application
•
To hide and unhide custom
applications
Approve splice
request
Create splice request
Create Patch
Manager request
(none)
To create a Patch Manager request
Approve Patch
Manager request
Create Patch Manager request
To approve a Patch Manager
request
Start and Stop
Services
(none)
To start and stop services using
the Administration Dashboard
The following table lists ready-to-use target type level privileges. With these privileges,
a user can perform the described action against any eligible target.
Security 7-3
Target Type Level Privileges
Name
Included Privileges
Description
Create splice request
(none)
•
To create a request to register
a new custom application
•
To create a request to validate
an existing custom
application
•
To create a request to
auto-correct an existing
invalid custom application
•
To approve a request to splice
an application
•
To hide and unhide custom
applications
Approve splice
request
Create splice request
Create Patch
Manager request
(none)
To create a Patch Manager request
Approve Patch
Manager request
Create Patch Manager request
To approve a Patch Manager
request
Start and Stop
Services
(none)
To start and stop services using
the Administration Dashboard
The following table lists ready-to-use roles:
Roles
Code Name Included
Privileges Description EBS_SUPER_USER
Oracle E-Business
Suite Super User
All target type
privileges, all
resource privileges,
and
CREATE_TARGET
Role with unrestricted access
to all management activities
for Oracle E-Business Suite
7-4 Oracle Application Management Pack for Oracle E-Business Suite Guide
Code Name Included
Privileges Description EBS_ACP_SUPER_
USER
Change
Management
Super User
•
Resource
privilege
"Approve
release
package
request"
Role with privileges to create
as well as approve all Change
Management requests.
•
Target type
level privilege
"Approve
splice request"
•
Target type
level privilege
"Approve
Patch
Manager
request"
Recommendations
•
Assign the database role "em_oam_monitor_role" for the database you would like
to use, OR use the "em_monitor" database user for discovery and monitoring.
•
Ready-to-use roles for Oracle Application Management Pack for Oracle E-Business
Suite would need to be assigned to only trusted Enterprise Manager users.
Change Management Privileges
Change Management for Oracle E-Business Suite provides a centralized view to
monitor and orchestrate changes (both functional and technical) across multiple Oracle
E-Business Suite systems. Change Management offers the capabilities to manage
changes introduced by customizations, patches and functional setups during
implementation or maintenance activities. For more information, see: Introduction to
Change Management, page 12-1.
The Change Approval Framework helps ensure that all changes done using any of the
products in Change Management go through a change approval mechanism. This
change control mechanism entails one level of approval for any change that results in a
configuration or code change of an Oracle E-Business Suite instance. The Change
Approval Framework uses privileges and roles to enforce the approval process.
Security 7-5
Required Privileges and Roles
Specific privileges are required to access the relevant containers in the Change
Management tab. These are:
For rendering this container...
Logged-in user must have these privileges
Patch Manager
Create Patch Manager request
Customization Manager
Create release package request
If the user has ANY of the above privileges, the Change Management home page will
be rendered.
The seeded "Change Management Super User" role (code EBS_ACP_SUPER_USER) has
privileges to submit and approve all Change Management requests.
For more information on these privileges, see: Privileges and Roles for Managing Oracle
E-Business Suite, page 7-1.
A user must have the "Operator any Target" privilege in order to submit a patch run in
Patch Manager or create a package in Customization Manager. This privilege is
described as:
•
Name - Operator any Target
•
Description - Ability to perform administrative operations on all managed targets
•
Included Privileges - View any Target
•
Applicable Target Types - All Target Types
In addition to the above Target Type privilege, a user must have the "Job System"
resource privilege, as described below:
•
Name - Job System
•
Description - Job is a schedulable unit of work that administrator defines to
automate the commonly run tasks
•
Privilege Grants Applicable to all Resources - Create
Note: You must also assign Resource Type Privilege of "Create" to the user using
the "Manage Privilege Grants" feature, available from Setup menu > Security >
Administrators. For more information on managing privilege grants, see the
Enterprise Manager Cloud Control documentation.
7-6 Oracle Application Management Pack for Oracle E-Business Suite Guide
Specific Privileges for Features
The default roles EBS_SUPER_USER, EBS_ACP_SUPER_USER provide privileges on all
targets. If these roles are provided to a particular user, there is no need of providing any
specific privileges to that user. If you want to provide specific privileges to a user,
follow the instructions in this section, which describes specific privileges for Cloning,
Patch Manager, and Customization Manager.
There are two types of required privileges: Target Privileges and Resource Privileges.
Target Privileges
1.
Common Privileges
•
•
2.
Module: Customization Manager/Patch Manager
•
View any Target
•
Execute Command Anywhere
•
Execute Command as any Agent
Module: Cloning
•
View any Target
•
Execute Command Anywhere
•
Execute Command as any Agent
•
Operator any Target
•
Add any Target
Application Change Management (ACMP) Specific Privileges
•
•
Module: Customization Manager
•
Requestor: Create splice request
•
Approver: Approve splice request
•
Super User: Both
Module: Patch Manager
•
Requestor: Create Patch Manager request
Security 7-7
•
Approver: Approve Patch Manager request
•
Super User: Both
All above privileges can be provided either as "Common to All Targets" or "Specific to
Target" by adding a target at the bottom of the Target Privilege screen and editing the
target-specific privilege.
Note: The following privileges are not present as part of Target Specific
Privileges but they are included under "Operator":
•
View Any Target
•
Execute Command Anywhere
•
Execute Command as any Agent
•
Operator any Target
Resource Privileges
To grant Resource Privileges, click Edit for each Resource Privilege and select the
sub-privileges.
1.
Common Privileges
•
2.
Module: ALL
•
Job System
•
Deployment Procedure
•
Oracle E-Business Suite Plug-in
ACMP-Specific Privileges
There is only one ACMP-specific privilege based on user role.
•
Module: Customization Manager
•
Oracle E-Business Suite Plug-in
•
Requestor: Create release package request
•
Approver: Approve release package request
•
Super User: All
7-8 Oracle Application Management Pack for Oracle E-Business Suite Guide
All above privileges can be provided either "Common to All Targets" or "Specific to
Target" by adding a target in Resource Privilege page and selecting the applicable
targets.
Security 7-9
8
Monitoring Oracle E-Business Suite
Navigation and Overview
Once discovered, an Oracle E-Business Suite instance will appear in the Oracle
E-Business Suite Instances section in the System Management page. You can click on the
name of the instance to go to the home page of that instance.
Oracle E-Business Suite System
Oracle E-Business Suite is discovered as a system. The members of the system include
all the nodes and the targets that run on each node. To see the members select
Members/Show All from the target menu.
Monitoring Oracle E-Business Suite 8-1
Topology of the Oracle E-Business Suite
The Configuration Topology Viewer provides a visual layout of Oracle E-Business Suite
with its child targets. To access the Configuration Topology Viewer, select
Members/Topology from the target menu.
8-2 Oracle Application Management Pack for Oracle E-Business Suite Guide
Upon service failure, the potential causes of failure, as identified by root cause analysis,
are highlighted in the topology view. You can view dependent relationships between
services and systems from the Topology tab.
Using the viewer, you can:
•
Determine the source of a target's health problems
•
Analyze the impact of a target on other targets
•
Determine the system's structure by viewing the members of a system and their
interrelationships
Metrics
Once discovered, metrics are collected for Oracle E-Business Suite System as well as its
individual members. To see the metrics collected for any target, select Monitoring > All
Metrics from the Target menu.
Monitoring Oracle E-Business Suite 8-3
Setting Thresholds for Metrics
Metrics collected can be compared to predefined values to check if they are exceeding a
critical threshold or a warning threshold. Incidents are generated once the threshold is
exceeded. To see the thresholds defined for metrics of any target, select
Monitoring/Metric and Collection Settings from the Target menu. Here you can set the
Critical/Warning thresholds used to generate incidents. You can also change the
collection schedule of the metrics here.
For more information on incidents, see: Incidents for an Oracle E-Business Suite Target,
page 8-18.
8-4 Oracle Application Management Pack for Oracle E-Business Suite Guide
Home Page of the Oracle E-Business Suite System
General Section
The general section gives the following basic details of the Oracle E-Business Suite
instance.
Status
The status of the Oracle E-Business Suite system, calculated based on the availability of
its member targets that contribute to its availability computation. For more information,
see: Changing the Availability Computation, page 9-2.
Configured Components
The count of member targets that fall into the status categories of Up, Down, or Other.
You can drill down on a status category to view the targets that currently fall into that
category.
Monitoring Oracle E-Business Suite 8-5
System Name
The name of the Oracle E-Business Suite instance.
Version
The version of the Oracle E-Business Suite instance.
Products Installed
The number of products installed in the Oracle E-Business Suite system. You can drill
down into Oracle Applications Manager to see the details.
New Internal System Alerts
The number of new System Alerts generated in the Oracle E-Business Suite instance.
You can drill down on this number to view the details in Oracle Applications Manager.
Note that these System Alerts originate from the alerting infrastructure of Oracle
E-Business Suite. These are complementary to the Oracle Enterprise Manager incidents.
Patches Applied
The number of patches applied to the system in the last 24 hours. You can drill down to
view the patches in Oracle Applications Manager.
Site Level Profile Options Changed
The number of site level profile options that have changed on the system in the last 24
hours. You can drill down to view the site level profile options in Oracle Applications
Manager.
Context Files Edited
The number of AutoConfig context files that was changed on the system in the last 24
hours. You can drill down to view the context files in Oracle Applications Manager.
Monitoring Host
The host of the agent which is monitoring the Oracle E-Business Suite system. This will
be the host where the database is running.
Note: The New Internal System Alerts, Patches Applied, Site Level
Profile Options Changed, and Context Files Edited metrics are based on
information periodically summarized in the Oracle E-Business Suite
database by the Oracle Applications Manager Dashboard Collection
concurrent program. This program is controlled through the
Preferences global link in Oracle Applications Manager. If this program
8-6 Oracle Application Management Pack for Oracle E-Business Suite Guide
has been disabled in the Oracle E-Business Suite system for any reason,
then these metrics will not be updated.
Availability Status Charts
This section has three charts:
•
Status of the Configured Components
•
Historic information about the status of the Oracle E-Business Suite instance. You
can choose day, week, or month.
•
Status of the services.
Services
Oracle E-Business Suite and its member targets provide four major services to its
customers. They are:
•
Concurrent processing
•
Forms
•
Self-service pages
•
Workflow
All these services are registered with Cloud Control once the successful discovery of the
Oracle E-Business Suite target is completed . The services section in the home page of
the Oracle E-Business Suite instance has the details of services. Each service has a set of
critical components without which the service cannot be provided. The following table
lists the critical component of each service.
Monitoring Oracle E-Business Suite 8-7
Critical Components of Services
Service
Critical components
Concurrent Processing
•
Internal Concurrent Manager
•
Concurrent Manager
•
Database
•
Apps Listener
•
Concurrent Processing Service
•
Oracle Workflow Background Engine
•
Oracle Workflow Agent Listener
•
Oracle Workflow Notification Mailer
•
Forms server (OC4J/WLS)
•
HTTP Server
•
Database
•
OACORE Server (OC4J/WLS)
•
HTTP Server
•
Database
Workflow Service
Forms Applications Service
Self Service Applications Service
Performance of Services
The metrics collected from a service's critical components are used to evaluate the
performance of each service. The following table lists the performance metrics for each
service.
8-8 Oracle Application Management Pack for Oracle E-Business Suite Guide
Performance Metrics for Services
Service
Metric
Description
Concurrent
Processing
Service
Concurrent
Requests Success
Rate
Successfully completed requests per hour
Concurrent
Processing
Service
Concurrent
Requests Error Rate
Failed requests per hour
Forms Service
Forms Response
Time
Average response time of forms in milliseconds
Forms Service
Forms Requests per
Second
Average of number of requests processed by the
Forms server per second
Forms Service
HTTP Server
Request
Throughput
Average of number of requests processed by the
HTTP server per second
Workflow
Service
Pending Agent
Listener Events
Count of pending agent listener events
Workflow
Service
Pending Mailer
Notification Events
Count of pending mailer notification events
Workflow
Service
Pending Mailer
Notifications
Count of pending mailer notifications
Self Service
Applications
Service
OACore requests
per second
Average of number of requests processed by the
oacore server per second
Self Service
Applications
Service
HTTP Server
Request
Throughput
Average of number of requests processed by the
HTTP server per second
Usage by Services
The metrics collected from a service's critical components are used to evaluate the
resources used by each service. The following table lists the the usage metrics for each
service.
Monitoring Oracle E-Business Suite 8-9
Usage Metrics for Services
Service
Metric
Description
Concurrent
Processing Service
Running Requests
per Hour
Number of requests running per hour
Concurrent
Processing Service
Active Service
Processes
Number of active services running per hour
Forms Service
Forms server CPU
usage
Percentage of CPU used by the Forms server
Forms Service
HTTP server CPU
usage
Percentage of CPU used by the HTTP server
Forms Service
(Socket Mode)
Total Memory
Utilization
Percentage of the total memory used by the
Forms process
Forms Service
(Socket Mode)
Total CPU
Utilization
Percentage of CPU used by the Forms process
Forms Service
(Socket Mode)
Number of Forms
Processes
Total number of Forms processes that are
running
Workflow Service
Background Engine
Deferred Items
Number of items deferred by the background
engine yet to be processed
Self Service
Applications Service
OACore CPU usage
Percentage of CPU used by the oacore server
Self Service
Applications Service
HTTP server CPU
usage
Percentage of CPU used by the HTTP server
Charts for services
You can see charts based on the above performance and usage metrics. Go to the home
page of each service and click on the tab Charts.
8-10 Oracle Application Management Pack for Oracle E-Business Suite Guide
Incidents for Services
You can set thresholds for tracking the performance and usage of services. Incidents are
generated once the metrics exceeds the threshold. To set the threshold, go to the home
page of the service and click on the tab Monitoring Configuration. Click on the link
Performance Metrics or Usage Metrics. You can set the warning and critical threshold
for performance and usage metrics in the respective pages.
The services section in the Oracle E-Business Suite home page shows the details
described in the following table:
Monitoring Oracle E-Business Suite 8-11
Service Status Information on the Home Page
Status
Whether the status is up or down
System
The Oracle E-Business Suite system whose members are
providing this service.
Performance Incidents
Number of performance incidents which are Critical or
Warning. You can drill down from here to get the details
of the incident.
Usage Incidents
Number of performance incidents which are Critical or
Warning. You can drill down from here to get the details
of the incident.
Key Components Status
The status of the key components. The service will be
down if any of the key components is down. You can drill
down from here.
Key Components Incidents
Incidents (Critical and Warning) raised against key
components of the service. You can drill down from here.
Services Dashboard
Extending the service dashboard feature provided by Cloud Control, Oracle E-Business
Suite also has a service dashboard which provides a brief summary of all service-related
information. You can access it by selecting Service Level Reports > Oracle Application
Services from the target menu.
8-12 Oracle Application Management Pack for Oracle E-Business Suite Guide
Targets Running on Nodes
This section shows the targets running on each node in which the Oracle E-Business
Suite is deployed. The data is shown in a hierarchical way with the host as the topmost
parent. The nodes running on that host appear as the immediate children. The
individual targets running on each node will appear as the child of each node. If the
Oracle E-Business Suite instance features Online Patching, only run edition targets will
be shown.
Monitoring Oracle E-Business Suite 8-13
Administration of Oracle E-Business Suite
Starting and Stopping Services
You can start and stop the components running on each node using the Administration
menu. Select Administration > Start and Stop Services from the target menu. All the
application nodes will be shown with the targets running in them. You can select
individual target or a node (which means you are selecting all targets running on that
node) and start or stop it. ICM does not show up under a specific node because we can
start and stop it from any node where it is enabled. If the Oracle E-Business Suite
instance features Online Patching, only run editions targets will be shown.
Jobs will be submitted to start and stop services. The details and status of these jobs can
be tracked through standard Enterprise Manager Job screens.
8-14 Oracle Application Management Pack for Oracle E-Business Suite Guide
Privileges need to start and stop services
An administrator must have the EM_ALL_ADMINISTRATOR role to run the jobs to
start and stop components. In addition, an administrator must have the "Start and Stop
Services" privilege to start and stop services.
For more information on privileges and roles, see: link : Privileges and Roles for
Managing Oracle E-Business Suite, page 7-1.
Credentials that must be set to start and stop services
•
The preferred credential must be set for Oracle E-Business Suite node for the
credential set OS Credentials.
•
The preferred credential must be set for Oracle E-Business Suite for the credential
set AppsDBCredsSet.
For more information on preferred credentials, see: Setting Oracle E-Business Suite
Preferred Credentials, page 5-8.
Monitoring Oracle E-Business Suite 8-15
Configuration of Oracle E-Business Suite
You can get the details of how the Oracle E-Business Suite instance is configured by
looking at the configuration metrics collected for the Oracle E-Business Suite target.
Select Configuration > Last Collected from the target menu.
Configuration of all members
To see the configuration of each member target of Oracle E-Business Suite you would
have to go to the home page of each target and follow the navigation path mentioned
above. As this would be inconvenient, the Configuration of all members page
simplifies this task. You will get link to see configuration of all members in one place.
Select Configuration of all members from the Oracle E-Business Suite target menu.
8-16 Oracle Application Management Pack for Oracle E-Business Suite Guide
Here you can see the links to see the last collected configuration of all member targets
grouped as nodes, host, services etc. You can search for any context variable by clicking
the Search Context Variable button. You can also search for patches applied and patch
set information.
Comparing Configurations
Comparing configurations is very important while managing Oracle E-Business Suite
targets. Benefits include:
•
Find out why two Oracle E-Business Suite instances with the same configuration is
exhibiting different behavior.
•
Same Oracle E-Business Suite instance showing different behavior in two different
occasions.
•
You can use an Oracle E-Business Suite instance as golden copy to bench mark
other instances.
You can compare the configuration of one Oracle E-Business Suite instance with
another or the configuration of the same Oracle E-Business Suite instance collected at
Monitoring Oracle E-Business Suite 8-17
different times. The same applies to any member target of Oracle E-Business Suite as
well. To compare configurations select Configuration > Compare from the target menu.
Incidents for an Oracle E-Business Suite Target
Incidents will be raised if any member of the Oracle E-Business Suite system is down or
if any metric exceeded its threshold. The incidents region in the Oracle E-Business Suite
instance home page gives an overview of the incidents raised for that instance. You can
get the number of incidents grouped by severity. In addition, you can filter incidents
based on the type of the incident, such as availability, performance, security, and so on.
You can drill down to the details of each incident by clicking on the summary column
which takes you to the Incident Manager. Here you can see more details of the event.
You can also track and mange the incident from here.
8-18 Oracle Application Management Pack for Oracle E-Business Suite Guide
Compliance Standards for Oracle E-Business Suite
The Oracle Enterprise Manager Compliance Management solution provides the
capability to define, customize, and manage Compliance Frameworks and Compliance
Standards. It also provides tools to evaluate targets and systems for compliance with
business best practices in terms of configuration, security, storage, and so on.
Compliance evaluation generates a score for a target which indicates how much the
target is compliant with the standard. Violation of a standard can be classified as
critical, warning or minor warning.
The management pack includes a set of compliance standards for Oracle E-Business
Suite security which will be associated to every Oracle E-Business Suite instance once it
is discovered. Evaluation will happen periodically which will ensure that the Oracle
E-Business Suite is configured in a secure way.
The following table lists details of the compliance standards shipped along with the
compliance rules associated with them.
Compliance Standards
Compliance Standard
Rules mapped to the standard
Severity
Profile Settings
Check if all critical profiles are set correctly.
Critical
Profile Settings
Check if other profiles are set correctly.
Warning
Profile Settings
Check if no profile is missing.
Critical
Change Default Passwords
Checks if any database user with a default
password exists.
Critical
Change Default Passwords
Checks if any application user with a default
password exists.
Critical
Secure APPLSYSPUB
Checks if there is any unwanted privilege in
the APPLSYSPUB account.
Warning
Use Secure Flag on DBC File
Checks if server security is on.
Warning
Migrate to Password Hash
Checks if the setting for hashed passwords
are on.
Warning
Enable Application Tier Secure
Socket Layer (SSL)
Checks if Oracle E-Business Suite is
configured for HTTPS.
Warning
Monitoring Oracle E-Business Suite 8-19
Compliance Standard
Rules mapped to the standard
Severity
Turn on ModSecurity
Checks if mod security is on.
Warning
Encrypt Credit Card Data
Checks for the encryption of credit card data.
Warning
Encrypt Credit Card Data
Checks if supplemental credit card data is
encrypted or not.
Warning
Encrypt Credit Card Data
Checks if enhanced hashing is on or not.
Warning
The compliance standards region in the home page of the Oracle E-Business Suite
instance has the details of the evaluations performed on that instance and how many
violations are there. You can click on each standard which will give further details of
evaluations per rule. Each standard comes with a recommendation on how to fix the
violations for that standard.
Note: Compliance standards will not be set for Oracle E-Business Suite
instances discovered using the previous releases of the management
pack. You must rediscover an instance to attach compliance standards
to it.
Monitoring Current Activity
Activity metrics are collected for the Oracle E-Business Suite target. These metrics
provide details of current activities going on the Oracle E-Business Suite instance. Select
Monitoring/All Metrics from the target menu. Expand the metric named Activity. You
can see the trends for service processes, concurrent processing, and Forms.
8-20 Oracle Application Management Pack for Oracle E-Business Suite Guide
Monitoring User Sessions
When a user logs in to Oracle E-Business Suite, the system creates sessions in the
database identified by a unique session ID, or SID. All of these user sessions are created
using the APPS schema credential. Each database session is associated with an Oracle
E-Business Suite application user. This feature enables linking the database session with
the corresponding application user for monitoring and troubleshooting purposes. You
will be able to pinpoint how the Oracle E-Business Suite user opened a database session
and whether it is with a concurrent processing, Forms, or Self-Service application.
For information on diagnostic tests for this feature, see: Diagnostic Tests for User
Monitoring, page 10-15.
Mandatory Settings
The following settings are mandatory:
Settings in the OMS
Set the preferred credentials of the "Oracle E-Business Suite" target type for the
credential set AppsUserCredsSet. You must provide the Oracle E-Business Suite user
login credentials.
For information on setting preferred credentials, see: Setting Oracle E-Business Suite
Preferred Credentials, page 5-8.
Settings on the Oracle E-Business Suite
•
For the above Oracle E-Business Suite user, assign "LCM_EM_CLIENT"
responsibility.
Monitoring Oracle E-Business Suite 8-21
•
Form sessions can be monitored only when the site-level profile Sign-On:Audit
Level is set to 'FORM'. The internal name for this profile is
'SIGNONAUDIT:LEVEL'.
Top Sessions
This page will show four bar charts of database sessions triggered by APPS database
user.
•
Top waiting sessions: sessions waiting for a database event to trigger to proceed
further.
•
Top running SQL statements.
•
Top CPU consuming sessions.
•
Top memory intense sessions.
The level of detail shown in the bar graphs is controlled by properties set in the
Preferences page. See: Setting Preferences, page 6-1.
•
Sampling Interval for User Monitoring. By default it is 15 minutes and can be
increased up to 60 minutes.
•
Number of Rows in tables of User Monitoring.
You can drill down from the legend to see the details of the session. If the Oracle
E-Business Suite user information is available, the Oracle E-Business Suite session
details is shown with further drilling down available to the database session details. If
the Oracle E-Business Suite user information is not available (that is, the database
sessions was triggered by a background process and not by a user), you can drill down
to the database session details directly.
To navigate to the Top Sessions page, select User Monitoring > Top Sessions from the
target menu of the Oracle E-Business Suite target.
8-22 Oracle Application Management Pack for Oracle E-Business Suite Guide
Searching for User Sessions
You can search for Oracle E-Business Suite user sessions using
Database Session ID - Provide the database session ID and if a match is found with a
concurrent program, form or Oracle Application Framework page, the details will be
shown with a drilldown facility to the database session details.
Oracle E-Business Suite user name - This search shows all the active concurrent
programs, Forms, and Oracle Application Framework pages accessed by the user. It will
also show the associated database session ID with drilldown capability.
To navigate to user sessions search, select User Monitoring > Search E-Business Suite
User from the target menu of the Oracle E-Business Suite target.
Monitoring Oracle E-Business Suite 8-23
Monitoring JVM Usage
Note: This feature is not supported for Oracle E-Business Suite Release
12.2 in this release.
You can monitor JVM usage parameters which are specific for Oracle E-Business Suite.
You can review the following parameters for each of the oacore J2EE containers in
which a given Oracle E-Business Suite instance is deployed.
•
Application Module pool - Provides information about all active and leaked
application modules.
•
Locked AOLJ Connections - Provides information about all locked and leaked
AOL/J connections utilized by applications.
•
Cache Components - Provides information about the cache component utilization
by Oracle Application Framework.
8-24 Oracle Application Management Pack for Oracle E-Business Suite Guide
Setup Steps
For Release 12 systems, ensure that you have set up the monitoring configuration for
each "oacore" OC4J target as follows:
1.
In the section Targets Running on Nodes in the Oracle E-Business Suite instance
home page, click on the "oacore" OC4J target. This will take you to the home page of
the target.
2.
On the home page of the oacore OC4J target, Select Target Setup > Monitoring
Configuration in the target menu.
3.
Enter the OC4J administrator username and password for the "oacore" OC4J in the
"Username for Basic authorization" and the "Password for Basic authorization"
fields, respectively.
Note: The OC4J administrator username by default is "oc4jadmin"
and is specified in the system-jazn-data.xml file under the
$INST_TOP/ora/10.1.3/j2ee/oacore/config directory. The oc4jadmin
password by default is set to a randomized value during
installation and will need to be reset as in the following example:
In the
$INST_TOP/ora/10.1.3/j2ee/oacore/config/system-jazn-data.xml file,
set the value of the "credentials" element for oc4jadmin user to your
chosen password preceded by a ! character. For example:
<user>
<name>oc4jadmin</name>
<display-name>OC4J Administrator</display-name>
<description>OC4J Administrator</description>
<credentials>[new password]</credentials>
</user>
After saving system-jazn-data.xml, restart the oacore OC4J. This
step encrypts the updated password in system-jazn-data.xml.
4.
Click OK to save the information.
For both Release 11i and Release 12, ensure that the Application Server passwords are
set as well, because Oracle Enterprise Manager expects these passwords to be set for
metrics collection for the JVM targets.
Note: If you do not set up monitoring for JVM usage after discovery,
then metric collection errors will be reported for the target type
'oracle_apps_jvm'. You should either set up monitoring as described
above, or disable the metric collection if you do not want to monitor
Applications JVM Usage.
Monitoring Oracle E-Business Suite 8-25
To disable the metric collection, run the following commands:
emcli modify_collection_schedule
-targetType="oracle_apps_jvm"
-targetNames="<targetName1>,<targetName2>"
-collectionName="LockedAOLJConn"
-collectionStatus="Disabled" -preview=N
emcli modify_collection_schedule
-targetType="oracle_apps_jvm"
-targetNames="<targetName1>,<targetName2>"
-collectionName="AMPoolCount"
-collectionStatus="Disabled" -preview=N
emcli modify_collection_schedule
-targetType="oracle_apps_jvm"
-targetNames="<targetName1>,<targetName2>"
-collectionName="CachedObjects"
-collectionStatus="Disabled" -preview=N
To find out the oracle_apps_jvm target names associated with an
Oracle E-Business Suite instance, go to the All Targets page and search
for <ebs_instance_name>%oacore_jvm_1_apps
In case if you want to enable it back, run the following commands:
./emcli modify_collection_schedule -force
-targetType="oracle_apps_jvm"
-targetNames="<targetName1>,<targetName2>"
-collectionName="LockedAOLJConn"
-collectionStatus="Enabled" -preview=N -freqType="Minute"
-freqValue="1"
./emcli modify_collection_schedule -force
-targetType="oracle_apps_jvm"
-targetNames="<targetName1>,<targetName2>"
-collectionName="AMPoolCount"
-collectionStatus="Enabled" -preview=N -freqType="Minute"
-freqValue="1"
./emcli modify_collection_schedule -force
-targetType="oracle_apps_jvm"
-targetNames="<targetName1>,<targetName2>"
-collectionName="CachedObjects"
-collectionStatus="Enabled" -preview=N -freqType="Minute"
-freqValue="1"
Configuring Monitoring of HTTPS/SSL Targets
To configure Cloud Control to monitor Oracle E-Business Suite middle tiers that are
running in SSL, each Management Agent must be able to authenticate the middle tier's
SSL certificate against its Certificate Authority (CA).
Assumed Prerequisites
The HTTP Server that ships with Oracle E-Business Suite is already configured and
verified to be running in SSL mode.
Basic knowledge of SSL certificates and their configuration.
8-26 Oracle Application Management Pack for Oracle E-Business Suite Guide
Obtaining the CA certificate(s)
1.
In Microsoft Internet Explorer, connect to the HTTPS URL of the Web site you are
attempting to monitor.
2.
Double-click the lock icon at the bottom of the browser screen which indicates that
you have connected to a secure Web site. The browser displays the Certificate
dialog box, which describes the certificate used for this Web site. Other browsers
offer a similar mechanism to view the certificate details of a Web site.
3.
Click the Certificate Path tab and select the first entry in the list of certificates.
4.
Click View Certificate to display a second Certificate dialog box.
5.
Click the Details tab on the Certificate window.
6.
Click Copy to File to display the Certificate Manager Export wizard.
7.
In the Certificate Manager Export wizard, select Base64 encoded X.509 (.CER) as the
format you want to export and save the certificate to a text file with an easily
identifiable name, such as beacon_certificate.cer.
8.
Open the certificate file using a text editor.
Add the Certificate to the Management Agent(s)
Each Management Agent that monitors an Oracle E-Business Suite middle-tier must
have the CA certificate added to it as follows:
1.
Locate the b64InternetCertificate.txt file in the following directory of Agent Home
of the Beacon host: $AGENT_ORACLE_HOME/sysman/config (This file contains a
list of Base64 Certificates).
2.
Edit the b64InternetCertificate.txt file and add the contents of the certificate file you
just exported to the end of the file, taking care to include all the Base64 text of the
certificate including the BEGIN and END lines.
3.
Repeat for each Management Agent.
Restart Each Management Agent
Each Management Agent should be restarted:
> $AGENT_ORACLE_HOME/bin/emctl stop agent
> $AGENT_ORACLE_HOME/bin/emctl start agent
Cloud Control may not immediately pick up the change. You may want to give it a few
minutes for the agent to run a metrics collection and upload them to the Oracle
Monitoring Oracle E-Business Suite 8-27
Management Server (OMS). You can click on the Refresh icon in the upper right of the
Oracle E-Business Suite home page (by the Page Refreshed time stamp) in the Cloud
Control console to get updated information.
Importing an Oracle E-Business Suite SSL Certificate to the OMS
Oracle Application Management Pack for Oracle E-Business Suite invokes REST
services deployed on Oracle E-Business Suite using java.net.HttpURLConnection.
The User Monitoring and Diagnostics features use REST services. If the Oracle
E-Business Suite instance is SSL-enabled, the SSL certificate must be exported from
Oracle E-Business Suite and imported to the trust keystore of the Oracle WebLogic
Server (WLS) that runs the OMS. Below are the steps to do this action:
1.
Find out the trust keystore of WebLogic Server.
2.
Open the WebLogic Server Administration Console by using the following steps.
1.
Go to the All Targets page of Enterprise Manager Grid Control
2.
Select the target type Oracle WebLogic Server.
3.
Select the WebLogic Server instance that runs the OMS.
4.
The target home page will contain the link to open the Administration Console.
3.
From the Administration Console, select Servers.
4.
Select the server that runs the OMS.
5.
Click on the subtab Keystores under Configuration.
6.
Look for the Java Standard Trust Keystore which points to the location of the
keystore.
7.
Run the command to import the certificate using the keytool utility. Use the JDK
that comes with WebLogic Server.
JDK_HOME/bin/keytool -importcert -alias oracle_ebs_<ebs instance
name> -trustcacerts -file <location of EBS SSL certificate>
-keystore <location of key store>
Refer to the Java SE documentation on the command keytool for information on
passwords.
8.
Restart the OMS.
For more information on configuring identity and trust for WebLogic Server, see the
Oracle Fusion Middleware manual Securing Oracle WebLogic Server.
8-28 Oracle Application Management Pack for Oracle E-Business Suite Guide
A Note on Oracle Forms 6i
Even though your Oracle Forms configuration may be running in SSL, Cloud Control
does not require any additional configuration to monitor Forms. The reason for this is
that it uses a different method for determining the Forms Server status which does not
require SSL communications with the server.
Re-Configuring SSL for Oracle E-Business Suite
If you have implemented SSL or deactivated SSL after the initial discovery of that
Oracle E-Business Suite instance in Cloud Control, you will have to re-configure Cloud
Control to monitor the new URL with the new protocol. There are two ways to do this:
•
The Easy Way: If you don't care about the metrics data that has been collected for
the instance, you can simply remove the instance from Cloud Control and
rediscover it.
•
The Hard Way: If metrics history is important, then each HTTP Server Target has to
be re-configured to point to the new URL, port, and protocol.
Re-configuring Release 11i Apache Targets
1.
Select the Release 11i instance in the Oracle Applications targets tab.
2.
Under Applications Nodes Status, expand the Context link that corresponds with
your SSL middle tier.
3.
Select the Apache target (description: "HTTP Server for Oracle Applications 11i").
4.
From the Target menu, select Target Setup, then select Monitoring Configuration.
5.
Edit the Protocol and Port as appropriate.
6.
Click OK.
Re-configuring Release 12 Application Servers
1.
Select the Release 12 instance in the Oracle Applications targets tab.
2.
Under Applications Nodes Status, expand the Context link that corresponds with
your SSL middle tier.
3.
Select the target described as "Oracle Application Server".
4.
Navigate to the Target menu (labeled "Application Server"), and select Change
Application URL.
Monitoring Oracle E-Business Suite 8-29
5.
Edit the "URL to measure application response" as appropriate.
6.
Click OK.
•
My Oracle Support (formerly OracleMetaLink) Knowledge Document 123718.1 - A
Guide to Understanding and Implementing SSL with Oracle Applications Release
11i
•
My Oracle Support Knowledge Document 376700.1 - Enabling SSL in Oracle
Applications Release 12
•
My Oracle Support Knowledge Document 391652.1 - Problem: Accessing Web
application gives sun.security.validator.ValidatorException: No trusted certificate
•
Oracle Enterprise Manager Cloud Control Administrator's Guide
References
Drilling Down to Oracle Applications Manager
You can drill down to the Oracle Application Manager of each Oracle E-Business Suite
instance from Oracle E-Business Suite plug-in. Select Oracle Applications Manager from
the target menu.
8-30 Oracle Application Management Pack for Oracle E-Business Suite Guide
You can go to the following sections and its subsections in Oracle Applications
Manager:
•
Database
•
Concurrent Processing
•
Forms
•
Workflow
•
Configurations of all hosts
•
Configurations of all nodes
•
Applications Usage
•
Others
Monitoring Oracle E-Business Suite 8-31
Concurrent Processing Dashboard
The Concurrent Processing Dashboard provides you with details in concurrent
processing in your Oracle E-Business Suite system. The dashboard gives you a complete
picture of concurrent processing on your system, both current activities as well as usage
statistics.
To navigate to the Concurrent Processing Dashboard, select E-Business Dashboard > CP
Dashboard from the target menu of the Oracle E-Business Suite target.
You can add a user-defined concurrent program as a target to the Oracle E-Business
Suite composite target. You can then monitor related activities of the registered
individual concurrent programs for your own specified thresholds.
You can also add a user-defined concurrent manager as a target to the Oracle
E-Business Suite composite target. You can then monitor related activities of the
registered individual concurrent managers for your own specified thresholds.
8-32 Oracle Application Management Pack for Oracle E-Business Suite Guide
Overview Tab
The General region lists the status of the Concurrent Processing Service
•
Status - The status is linked to the Concurrent Processing Service home page.
•
Active Service Processes - Number of active service processes.
•
User-defined Concurrent Program Targets - Defining these targets is described in a
later section.
•
Configured Concurrent Managers - The number of configured concurrent
managers.
The Hourly Completed Requests region shows a pie chart for requests by status
(Successful, Warning, and Errored).
The Activity Summary graph illustrates active requests in the following statuses
•
Pending Normal
•
Pending Standby
•
Running
The Components region lists components of the Concurrent Processing service. The
table shows the following for each component:
•
Name
Monitoring Oracle E-Business Suite 8-33
•
Type
•
Status
•
Incidents
•
Host
The Incidents region lists any incidents that were triggered recently, with the following
information for each:
•
Severity
•
Metric
•
Target Name
•
Target Type
•
Incident Triggered
•
Last Value
•
Last Checked
At the bottom of the dashboard are Related Links:
The first three links provide metrics on requests and processes:
•
Hourly Completed Requests
•
Processes and Requests per Concurrent Manager
•
Active Concurrent Requests by Application
The last three links take you to Oracle Applications Manager pages for the Oracle
E-Business Suite instance:
•
Concurrent Request Runaways
•
Concurrent Processing Reports
•
Concurrent Processing Charts
8-34 Oracle Application Management Pack for Oracle E-Business Suite Guide
Current Activity Tab
The Concurrent Requests by Status region lists the number of requests for each status:
•
Pending Normal
•
Pending (Standby)
•
Scheduled
•
Inactive (No Manager)
•
On Hold
•
Running
Click on the number for a status to find out more about the metric trend.
The Hourly Completed Requests region lists statistics for requests that have completed
in the past hour, including:
•
Successful
•
Warning
•
Error
•
Successful Requests Rate (%)
Monitoring Oracle E-Business Suite 8-35
•
Requests Warning Rate (%)
•
Requests Error Rate (%)
Click on the number for each statistic to find out more details.
The Concurrent Managers by Requests lists all concurrent managers, in order of the
number of requests it has in the specified status, either Running or Pending.
With "Running" selected, the following is shown for each concurrent manager:
•
Service Name
•
Service Short Name
•
Application Name
•
Status
•
Running Requests
•
Service Handle
•
Service Target Processes
•
Service Actual Processes
With "Pending" selected, the following is shown for each concurrent manager:
•
Service Name
•
Service Short Name
•
Application Name
•
Status
•
Normal Pending Requests
•
Standby Pending Requests
•
Service Handle
•
Service Target Processes
•
Service Actual Processes
The Top Concurrent Requests region shows the top ten (10) requests for the specified
status of Running, Pending, or Scheduled.
•
Running - These are sorted by running time in descending order.
8-36 Oracle Application Management Pack for Oracle E-Business Suite Guide
•
Pending - These are sorted by running time in descending order.
•
Scheduled - These are sorted by their scheduled start time.
The Top Applications region lists the top ten (10) applications for running requests or
pending requests, as specified.
The Top Users region lists the top ten (10) users by number of running or pending
requests, as specified.
Usage Tab
This tab provides a summary of how the concurrent programs and managers have been
utilized over a period of time.
The top ten (10) concurrent requests for the following categories are listed:
•
Number of executions - For this category, the total number of executions, the
percentage (%) of successful executions, and the percentage (%) of errored
executions are shown.
•
Number of failed executions - The number of executions, percentage (%) of failed
executions, and percentage (%) of errored executions are shown.
•
Average run time in minutes - The number of executions, average running time
(minutes), and total running time (minutes) are shown.
•
Total run time in minutes - The top ten (10) programs with the highest maximum
Monitoring Oracle E-Business Suite 8-37
running time are shown. For each program listed, the number of executions, total
running time (minutes) and percentage (%) of successful executions are shown.
The top ten (10) applications for the following categories are listed:
•
Number of executions
•
Number of failed executions
The top ten (10) users by total number of requests are also listed, in descending order of
number of requests.
8-38 Oracle Application Management Pack for Oracle E-Business Suite Guide
User-Defined Targets Tab
You can add concurrent managers and programs as targets to monitor. Use this tab to
get details about these targets as well as add more custom targets.
Concurrent Programs
For custom concurrent program targets, the following columns are shown:
•
Name
•
Concurrent Program Short Name
•
Incidents
•
Host
Click on "Show" in the Details column to see the following metrics for the given
concurrent program target. (More details can be seen from the Target home page > All
Metrics):
•
Number of Concurrent Requests by Status
•
Number of Hourly Completed Requests
•
Requests Completed with Error
Monitoring Oracle E-Business Suite 8-39
•
Long-Pending Requests
•
Long-Running Requests
Use the Add button under Concurrent Programs to add a new program target.
Concurrent Managers
For concurrent manager targets, the following columns are shown:
•
Name
•
Concurrent Manager Short Name
•
Incidents
•
Host
Click on "Show" in the Details column to see the following for the given concurrent
manager target:
•
Active Processes
•
Running Requests
•
Pending Requests
Use the Add button under Concurrent Managers to add a new manager target.
Adding a Concurrent Program Target
You can add a concurrent program custom target so that the system will collect metrics
on activity and usage for the concurrent program.
Note: You cannot add a custom concurrent program target using
Internet Explorer 8. Please use a different version, or different browser
such as Mozilla Firefox.
1.
To add a concurrent program custom target, navigate to the Concurrent Processing
Dashboard, User Defined Targets tab, and click Add under Concurrent Programs.
8-40 Oracle Application Management Pack for Oracle E-Business Suite Guide
2.
For your new target, define the following:
•
Target Name Prefix - This value is determined by the system based on the
instance name and cannot be updated.
•
Target Name - Enter in a target name "suffix". The actual target name will be
composed of the Target Name Prefix (above) and the value of this field.
•
Target Type - The system automatically provides the value "Custom Oracle
Concurrent Program".
•
Concurrent Program Short Name - Use the LOV icon to search for and select the
program short name. In searching for the program name you can search by
concurrent program short name, concurrent program name, or application.
•
Monitoring Host
For the Basic Properties region, values for the following should default in. These
values are used as credentials by the target for metrics collection:
•
SID
•
Machine
•
Port
•
(Database) User name
Monitoring Oracle E-Business Suite 8-41
3.
•
(Database) Password
•
ConnectString
For metrics collection, you need to define the thresholds for several metrics. Define
instance parameters that will be used to categorize requests for the following:
A request will be termed Long Pending if it is in Pending status for longer than the
"Long Pending Request Threshold In Minutes".
A request will be considered Long Running if it runs for longer than the "Long
Running Request Threshold In Minutes" and (1+0.1*"Long Running Tolerance
Percentage")*Average Running Time of the Concurrent Program.
4.
When you are done, click Add to add the target.
Custom Concurrent Program Target Metrics
Once you have added a custom concurrent program target, you can monitor it. It
should be listed on the User Defined Targets tab. Click on its name link to view details.
Click on the Show link under Details for links to drill down on the following:
•
Number of Concurrent Requests by Status
•
Number of Hourly Completed Requests
•
Requests Completed with Error
•
Long Pending Requests
•
Long Running Requests
From here, you can access the metrics collected for this target by navigating to Target
menu > Monitoring > All Metrics. The collected metrics are listed below.
8-42 Oracle Application Management Pack for Oracle E-Business Suite Guide
Metrics Collected
The following metrics are collected:
Basic Information
This page lists metrics for the following:
•
Requests Completed Successfully
•
Requests Completed with Warnings
•
Requests Completed with Errors
•
Minimum Run Time
•
Maximum Run Time
•
Average Run Time
Concurrent Requests by Status
The numbers for requests in each status below are listed.
•
Concurrent Requests Pending (Normal)
•
Concurrent Requests Pending (Standby)
•
Concurrent Requests Scheduled
•
Concurrent Requests Inactive (No Manager)
•
Concurrent Requests Inactive (On Hold)
•
Concurrent Requests Running
Hourly Completed Requests
•
Concurrent Requests Completed Successfully
•
Concurrent Requests Completed With Warning
•
Concurrent Requests With Error
•
Concurrent Requests Successful Requests Rate (%)
•
Concurrent Requests Warning Rate (%)
•
Concurrent Requests Error Rate (%)
Monitoring Oracle E-Business Suite 8-43
Long Pending Requests
•
Request ID
•
Concurrent Program Short Name
•
Concurrent Program Name
•
Request Start Date
•
Username
•
Phase
•
Status
•
Pending Time
•
Concurrent Manager
Long Running Requests
•
Request ID
•
Concurrent Program Short Name
•
Concurrent Program Name
•
Request Start Date
•
Username
•
Phase
•
Status
•
Running Time
•
Concurrent Manager
•
Request ID
•
Concurrent Program Short Name
•
Concurrent Program Name
Pending Requests
8-44 Oracle Application Management Pack for Oracle E-Business Suite Guide
•
Request Start Date
•
Username
•
Phase
•
Status
•
Pending Time
•
Concurrent Manager
Requests Completed with Error
•
Request ID
•
Concurrent Program Short Name
•
Concurrent Program Name
•
Request Start Date
•
Username
•
Phase
•
Status
•
Execution Time
Requests Completed with Warning
•
Request ID
•
Concurrent Program Short Name
•
Concurrent Program Name
•
Request Start Date
•
Username
•
Phase
•
Status
•
Execution Time
Monitoring Oracle E-Business Suite 8-45
Running Requests
•
Request ID
•
Concurrent Program Short Name
•
Concurrent Program Name
•
Request Start Date
•
Username
•
Phase
•
Status
•
Running Time
•
Concurrent Manager
Adding a Concurrent Manager Target
You can add a concurrent manager custom target so that the system will collect metrics
on activity and usage for requests run by the concurrent manager.
1.
To add a concurrent manager custom target, navigate to the Concurrent Processing
Dashboard > User Defined Targets tab, and click Add under Concurrent Manager.
8-46 Oracle Application Management Pack for Oracle E-Business Suite Guide
2.
For your new target, define the following:
•
Target Name Prefix - This value is determined by the system based on the
instance name and cannot be updated.
•
Target Name - Enter in a target name "suffix". The actual target name will be
composed of the Target Name Prefix (above) and the value of this field.
•
Target Type - The system automatically provides the value "Custom Oracle
Concurrent Manager".
•
Concurrent Manager Short Name - Use the LOV icon to search for and select
the concurrent manager short name. In searching for the manager name you
can search by concurrent manager short name, concurrent manager name, or
application.
•
Monitoring Host
For the Basic Properties region, values for the following should default in. These
values are used as credentials by the target for metrics collection:
•
SID
•
Machine
•
Port
•
(Database) User name
Monitoring Oracle E-Business Suite 8-47
3.
•
(Database) Password
•
ConnectString
For metrics collection, you need to specify values for three Instance Properties that
will be used to categorize requests for the following:
A request will be termed Long Pending if it is in Pending status for longer than the
"Long Pending Request Threshold In Minutes".
A request will be considered Long Running if it runs for longer than the "Long
Running Request Threshold In Minutes" and (1+0.1*"Long Running Tolerance
Percentage")*Average Running Time of the Concurrent Program.
You can also change these properties by clicking the "Monitoring Configuration"
link on the Target Home page.
4.
When you are done, click Add to add the target.
Monitoring a Custom Concurrent Manager Target
Once you have added a custom concurrent manager target, you can monitor for it. It
should be listed on the User Defined Targets tab. Click on its name link to view details.
From here, you can also monitor the metrics for this target by navigating to Target
menu > Monitoring > All Metrics.
Active Processes
•
Target Node
•
OS Process ID
•
Session ID
8-48 Oracle Application Management Pack for Oracle E-Business Suite Guide
•
Process Status
Pending Requests
•
Request ID
•
Concurrent Program Short Name
•
Concurrent Program Name
•
Request Start Date
•
Username
•
Phase
•
Status
•
Pending Time
Running Requests
•
Request ID
•
Concurrent Program Short Name
•
Concurrent Program Name
•
Request Start Date
•
Username
•
Phase
•
Status
•
Running Time
Monitoring Oracle E-Business Suite 8-49
Concurrent Processing Metrics
This section lists the concurrent processing metrics available from the All Metrics page.
Navigate to the All Metrics page by selecting Target menu > Monitoring > All Metrics.
For each type of metric below, the details listed for each record are shown.
Active Concurrent Requests by Application
•
Application Short Name
•
Application Name
•
Non-Repeating Pending Requests (Normal and Standby)
•
Repeating Pending Requests (Normal and Standby)
•
Non-Repeating Running Requests
•
Repeating Running Requests
Applications by Errored Executions
•
Application Short Name
•
Application Name
8-50 Oracle Application Management Pack for Oracle E-Business Suite Guide
•
Total Executions
•
Errored Executions
•
Errored Executions (%)
Applications by Executions
•
Application Short Name
•
Application Name
•
Total Executions
•
Successful Executions (%)
•
Errored Executions (%)
Applications by Pending Requests
•
Application Short Name
•
Application Name
•
Number of Pending Requests
Applications by Running Requests
•
Application Short Name
•
Application Name
•
Number of Running Requests
Programs by Average Running Time
•
Concurrent Program Name
•
User Concurrent Program Name
•
Total Executions
•
Average Running Time
•
Maximum Running Time
Monitoring Oracle E-Business Suite 8-51
Programs by Errored Executions
•
Concurrent Program Name
•
User Concurrent Program Name
•
Total Executions
•
Total Executions (Errored)
•
Executions Errored (%)
Programs by Executions
•
Concurrent Program Name
•
User Concurrent Program Name
•
Total Executions
•
Successful Executions (%)
•
Errored Executions (%)
Programs by Total Running Time
•
Concurrent Program Name
•
User Concurrent Program Name
•
Total Executions
•
Total Running Time
•
Successful Executions (%)
Top Pending Requests
•
Request ID
•
Program Name
•
Program Short Name
•
Request Start Date
•
Pending Time
8-52 Oracle Application Management Pack for Oracle E-Business Suite Guide
•
User Name
•
Manager Name
•
Phase
•
Status
Top Running Requests
•
Request ID
•
Program Name
•
Program Short Name
•
Request Start Date
•
Running Time
•
User Name
•
Manager Name
•
Phase
•
Status
Top Scheduled Requests
•
Request ID
•
Program Name
•
Program Short Name
•
Request Start Date
•
Scheduled to Run In (Minutes)
•
User Name
•
Manager Name
•
Phase
•
Status
Monitoring Oracle E-Business Suite 8-53
Top Users (Requests Submitted)
•
User Name
•
Number of Requests
Users by Pending Requests
•
User Name
•
Number of Pending Requests
Users by Running Requests
•
User Name
•
Number of Running Requests
Setting Long Running and Long Pending Requests Parameters for Metrics and Incidents
Oracle Application Management Pack for Oracle E-Business Suite allows you to define
parameters for long running and long pending requests. Follow the procedure below to
do so.
1.
From the Concurrent Processing Dashboard, add a custom concurrent program or
concurrent manager target.
2.
For the custom target, enter in values for these fields:
•
Long Pending Request Threshold in Minutes
•
Long Running Request Threshold in Minutes
•
Long Running Tolerance Percentage
The three parameters above are instance parameters for categorizing a request as
long running or long pending.
A request will be considered long pending if it is pending for more than the "Long
Pending Threshold in Minutes" value.
A request will be considered long running if it runs for more than the "Long
Running Request Threshold in Minutes" value AND for longer than (1 + 0.01*[Long
Running Tolerance Percentage]*[Average Running Time of the Concurrent
Program]).
3.
After you have set these parameters, you can go to the All Metrics page to see these
categories listed. Navigate to the All Metrics page by navigating to the Target
8-54 Oracle Application Management Pack for Oracle E-Business Suite Guide
Menu, selecting Monitoring, then selecting All Metrics.
For Long Pending Requests, the following details are available through drilling
down:
•
Request ID
•
Concurrent Program Short Name
•
Concurrent Program Name
•
Request Start Date
•
Username
•
Phase
•
Status
•
Pending Time
•
Concurrent Manager
For Long Running Requests, the following are available through drilling down:
•
Request ID
•
Concurrent Program Short Name
•
Concurrent Program Name
•
Request Start Date
•
Username
•
Phase
•
Status
•
Running Time
•
Concurrent Manager
For Long Running and Long Pending Requests, you can drill down to get a count
for each.
4.
On the same All Metrics page, click on Metric and Policy Settings to edit the
incident threshold for long pending and long running requests. Choose to view "All
Metrics" from the View dropdown list and set the incidents count for Long Pending
Requests and Long Running Requests.
Monitoring Oracle E-Business Suite 8-55
9
Monitoring Configuration
Configuring Monitoring of Oracle E-Business Suite
You can change the configuration with which each Oracle E-Business Suite instance is
monitored. You can do two things
•
Change monitoring schema
•
Change the availability definition of the Oracle E-Business Suite instance
To configure monitoring, go the System Management page and select the Oracle
E-Business Suite instance and click Configure.
Changing the monitoring schema
After clicking the Configure button, you can change the details of the monitoring
Monitoring Configuration 9-1
schema. You can either change the user name or password here and click Next or
directly proceed to change the availability computation by clicking Next.
Changing the availability computation
The status of the Oracle E-Business Suite target is determined by the status of its
member targets. The availability of the Oracle E-Business Suite system is calculated as
described in the following table:
Availability Computation
Selected Targets' Status
Oracle E-Business Suite System Status
All Up
Up
One or More Up
Partially Up
All Down
Down
Customers can change this configuration by adding more targets or removing existing
targets. Note that this will not change the members of the Oracle E-Business Suite
target. This configuration is solely used in the Oracle E-Business Suite instance home
page to show the availability of the instance.
9-2 Oracle Application Management Pack for Oracle E-Business Suite Guide
The Available Targets section allows you to search for targets and add them to the
availability computation list. You can select target type from the drop down before
clicking Go.
The Selected Targets section shows the targets which are already in the availability
computation list. By default the availability computation list contains all the members
of the Oracle E-Business Suite instance.
If the Oracle E-Business Suite instance features online patching, you must add targets
from both file editions. At runtime the patch edition targets will be ignored while
computing the status of the Oracle E-Business Suite instance.
Click Next once you are done with availability computation list.
Review the configurations
The last step in changing the monitoring of the Oracle E-Business Suite configuration is
the page where you can review the entire configuration and submit the changes
Monitoring Configuration 9-3
10
Diagnosing Issues
Diagnosing Issues
Pack Diagnostics
Oracle Application Management Pack for Oracle E-Business Suite includes a diagnostics
feature which can be used to troubleshoot issues by running diagnostic tests. The tests
are grouped into the modules listed below.
•
Cloning
•
Patch Manager
•
Customization Manager
•
User Monitoring
To navigate to the diagnostics module, select Pack Diagnostics from the Administer
menu in the System Management page.
Diagnosing Issues 10-1
How to run a diagnostic test
To execute a diagnostic test, click on the Create button. This will take you the page
where you must provide the details to do the diagnosis. You must enter the following
details:
Diagnostic Test Details
Field
Description
Name
A unique name to identify this instance of execution. This name can be
later used to search for this instance of execution.
Module
You can select a specific module or all modules. When you select a
module, all tests for that module will be run.
10-2 Oracle Application Management Pack for Oracle E-Business Suite Guide
Field
Description
Show Details
You can select the extent of detail you want in the final report.
Category
Description
•
All - This option logs all information regardless of whether the
diagnostic test completes with success or error.
•
Error - This option only logs details for those tests that error out.
•
Generic - Select this option to perform a health check of a specific
module.
•
User Specific - Select this option to diagnose issues faced by the
current logged-in user in a specific module.
Optional description for this instance of the execution.
You must add the Oracle E-Business Suite instance against which the diagnostic test
will be executed. You can add multiple Oracle E-Business Suite instances. Click on the
Add button in the Targets section. A list of values will pop up with the list of all the
Oracle E-Business Suite instances discovered, and you can select the needed Oracle
E-Business Suite instances. Once you are done with the selection, click the Submit
button.
A job to run the tests is submitted, and the status column in the Requests table will
show the status of the execution. You can refresh the page to get the latest status. You
can click on the Status column to drill down further to see a detailed report of the
execution. Expand the hierarchical table by clicking Expand All. There will be Tasks
and Steps. Click on the status column of each step to get the detailed report for that
step.
Search for a test execution
The pack diagnostics page by default list the name and other details of recent
executions. You can search for any execution by its name.
Executing a test again
You can rerun an instance of execution without entering the details again. Search for
that instance. Select it and click on theRetest button.
Diagnostic Tests for Cloning
You should run diagnostic tests on your system in preparation for the cloning
procedures to ensure your system is set up properly. These tests can be accessed from
Diagnosing Issues 10-3
the Diagnostics dashboard, available from the Pack Diagnostics link on the Oracle
Applications page. For more information on running diagnostic tests, see: Running
Pack Diagnostics Tests, page 10-1.
The following tables list tests related to cloning.
Generic Diagnostics Tests for Cloning
Step
Severi
ty
Test
Description
Notes/Expected
Results/Corrective
Measures
EBS
Warni
ng
Check if EBS has
Shared File
System
Check if the Oracle
E-Business Suite is a
multi-node applications
tier with a shared file
system configured.
Expected results: Yes/No.
This is an informational
message. If the shared file
system is enabled and the
result is No, please check
's_atname' to find out if all
the nodes are consistent.
Name of Command:
CheckIfSFS
EBS
Critica
l
Check if
AutoConfig is run
on Database Tier
Verify if AutoConfig has
been run on the database
tier.
For cloning to work, it is
mandatory that AutoConfig
was successfully run on the
source database tier.
Name of Command:
CheckIfAutoConfigIsRun
EBS
Critica
l
Check If
AutoConfig Is
Run on
Applications Tier
Verify if AutoConfig has
been run on the
applications tier.
For Cloning to work, it is
mandatory that AutoConfig
was successfully run on the
source applications tier.
Name of Command:
CheckIfAutoConfigIsRun
10-4 Oracle Application Management Pack for Oracle E-Business Suite Guide
Step
Severi
ty
Test
Description
Notes/Expected
Results/Corrective
Measures
EBS
Warni
ng
Get the Database
Tier Operating
System User
Name
Get the O/S User Name for
the database tier.
It is useful to know with
which operating system user
name the source database
nodes have been created, as
there could be file
permissions issues in
cloning.
Corrective action:
AutoConfig needs to be run
in the Database Context to
get t this value populated in
the configuration. The
configuration variable
's_dbuser' stores this
information.
Name of Command:
GetDBOSUserInfo
EBS
Warni
ng
Get Agent Perl
Version
Verify Agent Perl utility
version.
Cloning using the
management pack requires
the agent Perl utilities to be
at a certain version level for
certain cloning flows to
function properly. Please
make sure that the Perl
version inside the Agent is
compatible with that in the
Oracle E-Business Suite
instance (see the related
diagnostic test for the Oracle
E-Business Suite Perl
Version)
Name of Command:
GetAgentPerlVersion
Diagnosing Issues 10-5
Step
Severi
ty
Test
Description
Notes/Expected
Results/Corrective
Measures
EBS
Warni
ng
Get key
environment
variables for
Database Context
Obtain key environment
variables for Database
Context, including:
Certain database context
variables of the source
Oracle E-Business Suite
instance need to be
definitively set with
non-null values for the
cloning job to proceed
successfully. If this
diagnostic test fails, run
AutoConfig on the database
tier so that the correct
environment file is
generated again. The values
in the environment file are
used in this command.
PATH
LD_LIBRARY_PATH
LIBPATH
SHLIB_PATH
ORACLE_HOME
ORACLE_SID
PERL5LIB
TNS_ADMIN
Name of Command:
GetEnvironmentVariableVal
ues
EBS
Warni
ng
Get the APPS tier
Operating System
User Name
Get the O/S User Name for
the applications tier.
If this diagnostic test fails,
rerun AutoConfig on the
applications tier.
AutoConfig should populate
the 's_appsuser' variable in
the applications tier context
file correctly.
Name of Command:
GetAppsOSUserInfo
10-6 Oracle Application Management Pack for Oracle E-Business Suite Guide
Step
Severi
ty
Test
Description
Notes/Expected
Results/Corrective
Measures
EBS
Warni
ng
Get key
information
required for Apps
Context
Configvariables
Obtain key environment
variables for the
applications context,
including:
Certain applications context
variables of the source
Oracle E-Business Suite
instance need to be
definitively set with
non-null values for the clone
job to proceed successfully.
If this diagnostic test fails,
run AutoConfig on the
applications tier so that the
correct environment file is
generated again. The values
in the environment file are
used in this command.
s_base
s_dbuser
s_dbgroup s_appsuser
s_appsgroup
s_dbport
s_port_pool
s_config_home
s_atName
s_hostname
Name of Command:
GetAPPSConfigVariables
EBS
Critica
l
CheckIOPatches
for <Oracle
E-Business Suite
Release Name>
Verify that certain patches
have been applied on the
Oracle E-Business Suite
target.
Certain I/O patches need to
be definitively run on the
Oracle E-Business Suite
instance for some of the
clone flows to work
successfully. Note that this
step may change –
depending on the Oracle
E-Business Suite release (for
example, 11i, 12.0, and so
on). The list of patches is
contained in an XML file
that might be modified to
include or exclude
recommended patches.
Name of Command:
CheckEBSPatches
Diagnosing Issues 10-7
Step
Severi
ty
Test
Description
Notes/Expected
Results/Corrective
Measures
EBS
Critica
l
Get EBS Perl
Version
Check Oracle E-Business
Suite Perl utility version.
Cloning using the
management pack requires
Oracle E-Business Suite Perl
utilities to be at a certain
version level for certain
cloning flows to function
properly. Please make sure
that the Perl version on the
Oracle E-Business Suite
instance is compatible with
that in the Agent (see related
diagnostic test for the Agent
Perl Version).
Name of Command:
CheckEBSPerlVersion
EBS
Critica
l
Check if
AutoConfig is run
on Applications
Tier
Verify if AutoConfig has
been run on the
applications tier.
It is mandatory that
AutoConfig completed
successfully on the source
applications tier for cloning
to work.
Name of Command:
CheckIfAutoConfigIsRun
EBS
Warni
ng
Get information
for key Database
Context Config
variable
Obtain key database
context variables that are
required for non-"Smart
Clone" cloning procedures,
including:
s_base
s_dbuser
s_dbgroup s_appsuser
s_appsgroup
s_dbport
s_port_pool
s_hostname
10-8 Oracle Application Management Pack for Oracle E-Business Suite Guide
Certain database context
variables of the source
Oracle E-Business Suite
instance need to be set with
non-null values for the clone
jobs to finish successfully. If
this diagnostic test fails,
rerun AutoConfig on the
database tier.
Name of Command:
GetDBConfigVariables
Step
Severi
ty
Test
Description
Notes/Expected
Results/Corrective
Measures
EBS
Warni
ng
Get key
environment
variables for
Application
Context
Obtain key environment
variables for the
applications context,
including:
If this diagnostic test fails,
rerun AutoConfig on the
applications tier.
Checks if Oracle
E-Business Suite
AD Snapshot is
valid
Verify if the Oracle
E-Business Suite AD
snapshot is valid.
EBS
Warni
ng
PATH
LD_LIBRARY_PATH
LIBPATH
SHLIB_PATH
ORACLE_HOME
ORACLE_SID
PERL5LIB
TNS_ADMIN
Name of Command:
GetEnvironmentVariableVal
ues
In order to perform a
"scale-down clone" process
(that is, a multi-node source
applications tier instance
which has non-shared
APPL_TOPs to a unified
APPL_TOP in the target),
AMP needs to ensure that
the snapshots for the source
APPL_TOPs have been
updated properly. Make
sure the Maintain "Update
Current View Snapshots"
option in adadmin is run at
least once after the Oracle
E-Business Suite creation.
Name of Command:
CheckIfADSnapshotIsValid
EBS
Summary:
A summary of all of the
diagnostic tests that have
been executed, in the
following groups:
Successful, Failed, With
Warning, Aborted, and
Total.
Diagnosing Issues 10-9
User-Specific Tests for Cloning
Ste
p
Severi
ty
Test
Description
Notes/Expected
Results/Corrective
Measures
EBS
Warni
ng
Check Host
Credential for
Smart Clone
flows
Check if the EM User has
required preferred
credential set for "Operating
System Username" and
"Operating System
Password" in "Oracle
E-Business Suite Node"
target type for the
applications context for
Smart Clone flows.
If this diagnostic test fails, set
the applications context
operating system credentials
in the "Oracle E-Business
Suite Node" target type in the
preferred credential store.
Name of Command:
CheckAppsContextCredential
Existence
EBS
Check Database
schema
credentials for
Smart clone
flows
Check if the EM User has
the required preferred
credential set for the APPS
schema users in "Oracle
E-Business Suite" target type
for Smart Clone flows.
The database APPS schema
credentials must be entered
manually with Smart Clone
flows.
EBS
Summary
A summary of all of the
diagnostic tests that have
been executed, in the
following groups:
Successful, Failed, With
Warning, Aborted, and
Total.
Diagnostic Tests for Patch Manager
You should run diagnostic tests on your system in preparation for running Patch
Manager procedures to ensure your system is set up correctly. These tests can be
accessed from the Diagnostics dashboard, available from the Pack Diagnostics link on
the Oracle Applications page. For more information on running diagnostic tests, see:
Running Pack Diagnostics Tests, page 10-1.
The following tables list tests related to Patch Manager:
10-10 Oracle Application Management Pack for Oracle E-Business Suite Guide
Generic Diagnostic Tests for Patch Manager
Ste
p
Test Group
Description
Notes/Expected Results/Corrective
Measures
EM
GC
Check
permissions
for OMS
Stage
directory
Determine if a stage directory
is defined on the OMS.
Determine if the owner has
read/write permissions to that
directory.
Expected results are: the OMS Stage
Directory Location, with the OMS user
with read/write permissions.
EM
GC
Check Patch
Manager
Stage
directories
Verify if the properties set in
the Preferences page have
proper definitions for Patch
Manager Stage directories
Refer to Running a Patching
Procedure, page 13-8 for instructions
on completing this step.
EM
GC
Summary
A summary of all of the
diagnostic tests that have been
executed, in the following
groups: Successful, Failed,
With Warning, Aborted, and
Total.
EBS
Check if EBS
Snapshot in
OMS
Repository is
valid
Verify if the Oracle E-Business
Suite snapshot in OMS
Repository is valid.
A snapshot shows data about a system
for a point in time. If the snapshot is
invalid, navigate to the Targets menu
> Oracle E-Business Suite and click on
the instance name. Then navigate to
the Oracle E-Business Suite menu (in
the top left corner) > Configuration >
Last Collected > Actions > Refresh.
EBS
Check for
EBS CPU
Count
Verify that the target Oracle
E-Business Suite system's CPU
Count is greater than zero (0).
If there is not a valid snapshot, contact
Oracle Support.
EBS
Summary
A summary of all of the
diagnostic tests that have been
executed, in the following
groups: Successful, Failed,
With Warning, Aborted, and
Total.
Diagnosing Issues 10-11
User-Specific Diagnostic Tests for Patch Manager
Ste
p
Test Group
Description
Notes/Expected
Results/Corrective Measures
EM
GC
CheckMetali
nkCredential
s
Verify if username/password
credentials are entered for My
Oracle Support.
Refer to the Oracle Enterprise
Manager documentation for
instructions on completing this step.
EM
GC
CheckPrivile
ge
Check if the user currently logged
in has authority to patch any
instances.
EM
GC
Summary
A summary of all of the
diagnostic tests that have been
executed, in the following groups:
Successful, Failed, With Warning,
Aborted, and Total.
EBS
Check if
Preferred
Credentials
exist
Check if the EM User has the
required Preferred Credential set
for APPS and SYSTEM schema
users in "Oracle E-Business Suite"
target type. Check if that user has
the required Preferred Credentials
for "Oracle E-Business Suite
Node" target type for Database
Context and for APPL_TOP
Context.
EBS
Summary
A summary of all of the
diagnostic tests that have been
executed, in the following groups:
Successful, Failed, With Warning,
Aborted, and Total.
Diagnostic Tests for Customization Manager
You should run diagnostic tests on your system in preparation for using Customization
Manager to ensure your system is set up correctly. These tests can be accessed from the
Diagnostics dashboard, available from the Pack Diagnostics link on the Oracle
Applications page. For more information on running diagnostic tests, see: Running
Pack Diagnostics Tests, page 10-1.
The following tables list tests related to Customization Manager:
10-12 Oracle Application Management Pack for Oracle E-Business Suite Guide
Generic Diagnostic Tests for Customization Manager
Ste
p
Test Group
Description
Notes/Expected
Results/Corrective Measures
EM
GC
CheckOMSSta
ge
Determine if a stage directory is
defined on the OMS. Determine
if the owner of the directory has
read/write permissions to that
directory.
Expected results are: the OMS
Stage Directory Location and the
OMS user with read/write
permissions.
EM
GC
Summary
A summary of all of the
diagnostic tests that have been
executed, in the following
groups: Successful, Failed, With
Warning, Aborted, and Total.
EBS
CheckEBSHo
me
Verify permissions for
APPL_TOP.
Verify that the user running the
diagnostic test has the correct
permissions for the APPL_TOP
directory structure.
If the test fails, provide the correct
Preferred Credentials information
in "E-Business Suite" or "E-Business
Suite Infrastructure". See: Setting
Up Credentials, page 5-11.
EBS
CheckAgentH
ome
Verify permissions within the
Agent home directory.
Verify that the user running the
Diagnostic test has the correct
permissions for the
$AGENT_HOME directory
structure.
If the test fails, provide the correct
Preferred Credentials information
in "E-Business Suite" or "E-Business
Suite Infrastructure". See: Setting
Up Credentials, page 5-11.
Diagnosing Issues 10-13
Ste
p
Test Group
Description
Notes/Expected
Results/Corrective Measures
EBS
Check
Customizatio
n Manager
related AD
Patches for 11i
Release
Verify that certain AD patches
have been applied on the Oracle
E-Business Suite target.
The set of required interoperability
patches will vary for the different
Oracle E-Business Suite releases
(that is, Release 11i , Release 12, and
so on). The list of patches is
contained in an XML file that might
be modified to include or exclude
recommended patches.
The file is located at:
<OMS_HOME>\sysman\admin\e
mdrep\ebs\testsuites\CMTestSuit
e.xml
EBS
Check
Customizatio
n Manager
Patches for 11i
Release
Verify that certain
Customization Manager patches
have been applied on the Oracle
E-Business Suite target.
The set of required interoperability
patches will vary for the different
EBS releases (that is, Release 11i ,
Release 12, and so on). The list of
patches is contained in an XML file
that might be modified to include
or exclude recommended patches.
The file is located at:
<OMS_HOME>\sysman\admin\e
mdrep\ebs\testsuites\CMTestSuit
e.xml
EBS
CheckAmpAc
p
Verify that the Agent is patched
with the latest Oracle E-Business
Suite management pack release.
The Application Management
Pack and the Application
Change Management Pack
patches are required on both the
OMS and Agents.
If the Agent is not at the
appropriate release, then it will
need to be installed or upgraded
through Oracle Universal Installer.
EBS
GetAPPSConf
igVariables
Check if the context property
JDBC_URL is available.
The context variable JDBC_URL
needs to be set with non-null
values for the Customization
Manager jobs to proceed
successfully. If the test fails, wait
until the metric collection occurs, or
force evaluation of the metric
collection explicitly
10-14 Oracle Application Management Pack for Oracle E-Business Suite Guide
Ste
p
Test Group
Description
Notes/Expected
Results/Corrective Measures
EM
GC
Summary
A summary of all of the
diagnostic tests that have been
executed, in these groups:
Successful, Failed, With
Warning, Aborted, and Total.
User-Specific Diagnostic Tests for Customization Manager
Ste
p
Test Group
Description
Notes/Expected
Results/Corrective Measures
EBS
CheckEBSGlob
alCred
Check Oracle E-Business Suite
Preferred Credentials. This test
verifies if the "Applsys Schema",
"Apps Schema", and "System
Schema" username/password
exist; and, if so, if they are valid
for a particular instance.
Verify the validity of the
credentials supplied for the
"Applsys Schema", "Apps Schema",
and "System Schema"
username/password for the
"E-Business Suite" target type in
Preferred Credentials.
If the test fails, provide the correct
credentials for the user in question.
See: Setting Up Credentials, page
5-11.
EBS
Summary
A summary of all of the
diagnostic tests that have been
executed, in these groups:
Successful, Failed, With
Warning, Aborted, and Total.
Diagnostic Tests for User Monitoring
The following table has details for generic tests for user monitoring.
Diagnosing Issues 10-15
Generic Tests for User Monitoring
Test
Description
Corrective Actions
CheckIOPatch
es
Checks whether the mandatory
interoperability patches needed for
user monitoring are applied in this
Oracle E-Business Suite instance.
Apply the mandatory interoperability
patches in the Oracle E-Business Suite
instance.
CheckRESTH
ealth
User monitoring uses REST services
deployed on the Oracle E-Business
Suite instance. This test checks if the
REST services are accessible or not.
Check the error message in the report.
Refer to the emoms.log for additional
information.
CheckEBSProf
ile
Checks if the site-level profile
Sign-On:Audit Level is set to 'FORM'
in this Oracle E-Business Suite
instance.
Set the the site-level profile
Sign-On:Audit Level to 'FORM'.
The following table lists user-specific tests for user monitoring.
User-Specific Tests for User Monitoring
Test
Description
Corrective Actions
CheckEBSGlobal
Cred
Checks if the preferred credential is set for
AppsUserCredSet for this Oracle E-Business
Suite instance.
Set the preferred credential.
CheckEBSRole
Checks if the Oracle E-Business Suite user,
whose credential is set as the preferred
credential for AppsUserCredsSet, has the
LCM_EM_CLIENT responsibility in this
Oracle E-Business Suite instance
Assign the
LCM_EM_CLIENT
responsibility to the Oracle
E-Business Suite user.
10-16 Oracle Application Management Pack for Oracle E-Business Suite Guide
11
Cloning an Oracle E-Business Suite System
Cloning an Oracle E-Business Suite System
One of the key features of the Oracle Application Management Pack for Oracle
E-Business Suite is the ability to clone an Oracle E-Business Suite system automatically
using the Smart Clone procedure.
The key highlights of the cloning process include:
•
The Oracle Application Management Pack for Oracle E-Business Suite allows
Oracle E-Business Suite systems to be cloned using the Cloud Control provisioning
framework.
•
Cloud Control automates the creation of clone systems and executes any required
application-specific actions.
•
Cloning of systems deployed on Oracle Real Application Clusters (RAC) is possible.
For more information, see the My Oracle Support Knowledge Documents listed
later in this section.
Smart Clone
Smart Clone expects, as a prerequisite, the target Oracle E-Business Suite database to be
cloned and discovered in the Enterprise Manager. In doing so, customers can choose
their own options in creating the target Oracle E-Business Suite database by cloning
from the source Oracle E-Business Suite database using the Database Plug-in
Provisioning Pack, RMAN, a storage system solution, or so on; whichever suits their
needs the best. Smart Clone starts with taking the discovered target database as a input
to configure a database target and then clones the applications tier of the source
instance. It then applies that to the target Oracle E-Business Suite system.
Smart Clone supports the following scenarios for Release 11i and Release 12.x:
•
Configuring single instance databases
Cloning an Oracle E-Business Suite System 11-1
•
Configuring RAC databases
•
Customizing the listener names is supported if you have the required Oracle
E-Business Suite patches applied.
•
Configuring listeners with SCAN IPs is supported if both the database version
and the cluster version are greater than 11.2.0.2
The following table lists the details of use cases and their supported releases:
Use
Case
Source Oracle E-Business
Suite Instance
Target Oracle E-Business Suite
Instance
Releases
Supporte
d
1A
Single Apps Node configured with Single Instance DB or
RAC DB
Single Apps Node configured with
Single Instance DB or RAC DB
11i, 12.0,
12.1, 12.2
1B
Single Apps Node
configured with Single Instance
DB or RAC DB
Multi Apps Node (with or without
Shared File System) configured with
Single Instance DB or RAC DB
12.0, 12.1
2A
Multi Apps Node (with or
without Shared File System)
configured with Single Instance
DB or RAC DB
Single Apps Node configured with
Single instance DB or RAC DB
11i, 12.0,
12.1, 12.2
2B
Multi Apps Node (with or
without Shared File System)
configured with Single Instance
DB or RAC DB
Multi Apps Node (with or without
Shared File System) configured with
Single Instance DB or RAC DB
12.0, 12.1
In addition to the above features, the following scenarios are supported:
•
As soon as Oracle E-Business Suite announces the certification on any database
version with Oracle E-Business Suite, then the Oracle Application Management
Pack for Oracle E-Business Suite (Release 12.1.0.2.0) customers should be able to use
the Smart Clone deployment procedure immediately for Oracle E-Business Suite
cloning.
•
Any specific needs like data masking, data compression, and so on can be
performed before running Smart Clone.
•
Smart Clone supports cloning of systems with different OS users for the database
tier and the applications tier.
11-2 Oracle Application Management Pack for Oracle E-Business Suite Guide
Terms
The following table lists some cloning terms used in this document.
Term
Meaning
Source
Oracle E-Business Suite system being cloned.
Target
Oracle E-Business Suite system being created as a copy of the source
system.
Smart Clone
The cloning utility in Oracle Application Management Pack for Oracle
E-Business Suite. Smart Clone allows you to use a database target cloned
using an external solution as an input to its cloning procedures.
Requirements and Setup Steps
•
Cloning using Oracle Application Management Pack for Oracle E-Business suite
requires Perl 5.005 or higher on the Oracle Enterprise Manager agent. The user who
starts the agent processes must set the PERL5LIB environment variable pointing to
Perl 5.005 (or higher) libraries. Also, the Perl executable 5.005 must be used.
•
While upgrading the database from 9i to 10g (or 11g) with and Oracle E-Business
Suite Release 11i instance, you need to ensure that the source instance perl.exe is
pointed to the database 10g (11g) ORACLE_HOME of the Oracle E-Business Suite.
•
All the virtual internet protocol (VIP) addresses configured in the Oracle Cluster
Ready Services (CRS) of the targets nodes identified for the created RAC instance
must be up and running.
•
With Release 11i, for a clone job from Single Node - Single User to Single Node Multiple User, ensure that you have write permissions for user IDs to the target
base directory. Give 770 permissions to the directories from/to the target base
directory with the following command:
$ chmod -R 770 <target base directory>
•
If for a cloning process the target is multi-node and the database node domain and
the applications node domain are different, perform the following step:
1.
Include the target database node server name in the /etc/hosts file of the target
applications node so that the applications node will be able to resolve the
database node without the domain name. The modification should be like the
following (this entry is for Linux x86; change as appropriate for your platform):
Cloning an Oracle E-Business Suite System 11-3
<ip-address> <Machine name with domain name> <Machine Name>
For example:
140.87.205.217 adc60002demo.us.oracle.com adc60002demo
2.
For Release 12 only: In addition to the above entry in the /etc/hosts file, the
applications node context file needs to be changed.
Change the s_dbdomain entry in the
<STAGE_LOC>/appsTier/context/apps/<SID>_<SERVER_NAME>.xml file to the
correct domain name of the database tier.
For example, if the database node domain name is idc.oracle.com, and the
applications node domain name is us.oracle.com, then the context file
/d1/QA/stage/PMS29/080522035852/PMS29_adc60010demo.xml
should be changed to
<domain oa_var="s_dbdomain">idc.oracle.com</domain>
•
The OS utilities make, ld, cc, and ar must be in the environment PATH variable in
all the host targets. If not, please update the PATH variable accordingly and restart
the agent in the same terminal.
Prerequisites
The following are prerequisites to running an individual Smart Clone procedure:
1.
The target database must have already been cloned from the source Oracle
E-Business Suite database.
To do this, you can:
•
Use the Enterprise Manager 12c Database Plug-in to perform the required
database cloning procedures OR
•
Use any other technology which suits your database cloning needs.
Once the Target Database is cloned, discover it in Enterprise Manager 12c.
2.
The Oracle E-Business Suite Agent Plug-in must be deployed on all the target
database hosts and applications hosts.
3.
The Enterprise Manager user running the Smart Clone procedure must have the
appropriate privileges.
The following privilege setup instructions can be ignored if the user is a "Super
Administrator".
In order to execute the Smart Clone deployment procedure, a non-Super
Administrator user must have certain target-level privileges and the resource
11-4 Oracle Application Management Pack for Oracle E-Business Suite Guide
privileges.
The privileges listed below could be granted in many ways depending on the
desired level of granularity of privileges to be granted to the user. For more details
on granting privileges, please refer to the section "Configuring Security" in the
manual Oracle Enterprise Manager Cloud Control Administrator's Guide 12c Release 1.
The following outlines one of the ways of granting the required privileges for
executing the Smart clone procedure.
Target Privileges
•
Add any Target
•
Privileges applicable to all targets
•
•
Name: Add any Target (Description: Add any target in Enterprise
Manager)
Operator any Target
•
Privileges applicable to all targets
•
Name: Operator any Target (Description - Ability to perform
administrative operations on all managed targets)
•
Included Privileges - View any Target
•
Applicable Target Types - All Target Types
Resource Privileges
1.
2.
Job System resource:
•
Name - Job System
•
Description - Job is a schedulable unit of work that administrator defines to
automate the commonly run tasks
•
Resource Type Privilege - Create
Deployment Procedure:
•
Name - Deployment Procedure
•
Description - Deployment procedures are customizable orchestration
routines for various Provisioning and Patching tasks
•
Resource Type Privilege - Create
Cloning an Oracle E-Business Suite System 11-5
4.
The following Named Credentials must be defined:
•
•
Host target type
•
Authentication Target Type: "Host"
•
Credential Type: "Host Credentials"
Oracle E-Business Suite target type
Please refer to the section Creating Named Credentials for Oracle E-Business
Suite, page 5-1 for instructions on creating the Oracle E-Business Suite Database
Credentials.
Cloning with RAC Instances
With Smart Clone, if the target Oracle E-Business Suite instance database is of type
"RAC" and if you want to configure Parallel Concurrent Processing after the clone is
completed, then it is recommended that you follow instructions described in the
following My Oracle Support Knowledge Documents, depending on your RDBMS
version:
•
Document 312731.1, "Configuring Oracle Applications Release 11i with 10g RAC
and 10g ASM"
•
Document 757980.1, "Using Oracle 11g Release 1 Real Application Clusters and
Automatic Storage Management with Oracle E-Business Suite Release 11i (11.1.0.6)"
•
Document 455398.1, "Using Oracle Real Application Clusters and Automatic
Storage Management with Oracle E-Business Suite Release 11i and Oracle Database
11g"
•
Document 783188.1, "Certified RAC Scenarios for E-Business Suite Cloning" for
more information on cloning of systems deployed on Oracle Real Application
Clusters (RAC) is possible.
•
Document 559518.1, "Cloning Oracle E-Business Suite Release 12 RAC-Enabled
Systems with Rapid Clone" for information on cloning a Release 12 system on a
RAC database
Preferences
For Oracle E-Business Release 12.1 and earlier, the following properties are set in the
Preferences page. Navigate to the Preferences page by navigating to Targets > Oracle
E-Business Suite > Administer > Preferences. These preferences are not applicable to
cloning with Oracle E-Business Suite Release 12.2. For Release 12.2, default values are
used.
11-6 Oracle Application Management Pack for Oracle E-Business Suite Guide
•
•
•
•
Number of parallel threads/processes that will be used while zipping, transferring
and unzipping the files under APPL_TOP directory of the applications tier.
•
Minimum value: 1
•
Maximum value: 16
•
If the value is empty OR less than 1 OR greater than 16, then the default value
of 8 is used.
Number of parallel threads/processes that will be used while zipping, transferring
and unzipping the files under Tools Oracle Home directory of the applications tier.
•
Minimum value: 1
•
Maximum value: 8
•
If the value is empty OR less than 1 OR greater than 8, then the default value of
4 is used.
Number of parallel threads/processes that will be used while zipping, transferring
and unzipping the files under Tools Oracle Home directory of the applications tier.
•
Minimum value: 1
•
Maximum value: 4
•
If the value is empty OR less than 1 OR greater than 4, then the default value of
2 is used.
Number of parallel threads/processes that will be used while zipping, transferring
and unzipping the files under COMMON_TOP directory of the applications tier.
•
Minimum value: 1
•
Maximum value: 4
•
If the value is empty OR less than 1 OR greater than 16, then the default value
of 2 is used.
Considerations for Cloning with Oracle E-Business Suite Release 12.2
Oracle E-Business Suite Release 12.2 is deployed on Oracle WebLogic Server. As a
result, most of the technology stack scripts used in cloning (such as adpreclone, adclone,
adstrtall, adstpall, and so on) require the WebLogic Admin password. Therefore, the
WebLogic Admin password is required in the cloning procedure interview for Release
12.2 systems.
Cloning an Oracle E-Business Suite System 11-7
Also, note the following regarding zipping of files during the cloning process:
•
<COMMON_TOP>/clone/FMW/FMW_Home.jar will be very large (2.7 GB).
•
The WebLogic Server home directory (FMW_Home) will NOT be zipped or
transferred.
Diagnostic Tests
For information on diagnostic tests for this feature, see: Diagnostic Tests for Cloning,
page 10-3.
Running a Single Node to Single Node or Multi Node to Single Node
Cloning Procedure for Release 11i and 12.1.x
This section describes running the Single Node to Single Node and Multi Node to
Single Node Smart Clone procedure. These procedure can be used for Release 11i and
Release 12.1.x.
At a high level, a Smart Clone procedure performs the following
1.
Configures the target database.
2.
Clones and configures the applications tier from the source Oracle E-Business Suite
system.
These two steps result in creating a target Oracle E-Business Suite system which is
ready to use.
To run a single-node cloning procedure:
1.
Navigate to the Cloning home page by selecting Targets > Oracle E-Business Suite >
Administer > Cloning.
2.
Select "Smart Clone" from the dropdown list and click Go.
11-8 Oracle Application Management Pack for Oracle E-Business Suite Guide
3.
Enter general information for the cloning process. This step captures information
related to the target database already cloned and discovered in Enterprise Manager.
Provide a transaction name for the Clone Name.
Choose the source Oracle E-Business Suite you would like to clone from the LOV.
Specify the target database which is to be cloned from the source Oracle E-Business
Suite's database.
Based on the type of database chosen (that is, a single instance database or a RAC
database), the Target Database Details region is dynamically rendered.
For a single instance database, provide the following:
•
Target Database
•
Apps Schema Username
•
Apps Schema Password
•
System Schema Password
•
TNS admin directory
You can click on Validate Database button or you can leave it to the Next button to
perform the same action.
Cloning an Oracle E-Business Suite System 11-9
If the target database is a RAC database, the Target Database Details region is
rendered differently, as shown in the following figure. Specify whether SCAN is
configured in the target database.
11-10 Oracle Application Management Pack for Oracle E-Business Suite Guide
4.
Enter RAC Target database details, if applicable.
This step only applies if the target database is a RAC database. This step is skipped
if the target database has the type Single Instance.
If the source Oracle E-Business Suite technology stack has the required patches
applied for configuring customized names for listeners, then this page will
automatically render in such a way that you provide names for the target database
listeners by providing the required names in the column "New Listener Name".
If the source Oracle E-Business Suite technology stack does not have the required
patches, then Smart Clone will provide default names for the listeners using the
naming convention "LISTENER_<hostname>".
If the source Oracle E-Business Suite technology stack has the required patches
applied for configuring the target database with "SCAN Listeners", then the
"Custom SCAN Details" section is rendered with the "SCAN Name" and "SCAN
Port" fields populated automatically. It is highly recommended not to change these
values if it automatically populated. If for some reason the SCAN Name and SCAN
Cloning an Oracle E-Business Suite System 11-11
Port fields are not populated (for example, if the cluster target instance discovered
in Enterprise Manager has not populated these values yet as properties), then you
must enter the correct values for these fields.
Optionally, check the box "Use Custom SCAN Name and Port" if you want to get
the target database configured with the SCAN listener. If you do not check the box
"Use Custom SCAN Name and Port" box, then Smart Clone will clone the target
database with virtual host names.
If the source Oracle E-Business Suite technology stack does not have the required
patches, then the "Custom SCAN Details" section will not be rendered, and the
target database will be configured with virtual host names.
If the target instance is already configured with scan listeners, then by default the
"Use Custom SCAN Name and Port" box will be checked.
5.
Enter source and target information.
In this step, Smart Clone captures information related to the source and target.
•
All application tier information of the source Oracle E-Business Suite system is
displayed.
•
You enter details for the target Oracle E-Business Suite system.
If the source Oracle E-Business Suite system is deployed on a single applications
tier, the Source regions appear as shown in the following figure. Information is
shown for the following services: Admin, CP (Concurrent Processing), Forms, and
Web.
11-12 Oracle Application Management Pack for Oracle E-Business Suite Guide
In the Available Target System Nodes region, choose the source host that can be
used as a reference while cloning the target applications tier. Specify the target host
from the LOV where Smart Clone should create the target applications tier.
If the source Oracle E-Business Suite system is deployed on a multi-node
applications tier, then the Source regions appear as shown below.
The Source System Nodes region shows the details of the source Oracle E-Business
Suite applications tier in terms of
•
Number of nodes the applications tier is deployed on.
•
Details of the services on the nodes.
For a Release 11i multi-node applications tier system, you will need to choose the
nodes for the services which are to be used as references for creating the Release 11i
single node applications tiers. Do this in the "Select Source Nodes for Each Service"
region.
For Release 12, selecting the service in this section is unnecessary because the
reference source host will be selected only from the "Available Target System
Nodes" region.
6.
In the Available Target System Nodes region, choose "Single-Node Target". This is
Cloning an Oracle E-Business Suite System 11-13
the default option.
Then choose the source host that can be used as a reference while cloning the target
applications tier. Specify the target host from the LOV where Smart Clone should
create the target applications tier.
For the target system node, click the Specify Details icon to update its properties in
the Target Node Summary page.
7.
The Target Node Summary page is shown below.
The port pool and individual port values are updated from the source instance.
If there is an invalid value in the port pool from the source instance, the following
error is shown: "NOTE: Source Apps portpool context variable
(s_port_pool) is invalid: <value>. Setting to default value
'0'. Please update as needed!"
8.
In the Copy Parameters step, enter information on how the copying process should
be done.
11-14 Oracle Application Management Pack for Oracle E-Business Suite Guide
9.
Enter Credentials.
Smart Clone uses named credentials. You can select and test the named credentials
on this page.
Named credentials can be created by navigating to the Setup menu, then Security >
Named Credentials, and clicking Create.
Smart Clone requires the following credentials to be created:
•
•
Application Node OS Credentials and Database Node OS Credentials.
•
Authentication Target Type - Host
•
Credential Type - Host Credentials
Database Schema Credentials
Please refer to the section Creating Named Credentials for Oracle E-Business
Suite, page 5-1 for information on creating the Oracle E-Business Suite Database
Credentials.
Cloning an Oracle E-Business Suite System 11-15
Note: Database schema credentials appear only when the
source applications system is on Release 11i and using a
non-shared file system.
The Credentials page for a Smart Clone procedure where the source applications
system is multi-node and the target database is non-RAC is shown in the figure
below. This page allows you to enter in and test all required credentials for the
nodes.
11-16 Oracle Application Management Pack for Oracle E-Business Suite Guide
The Credentials page for a Smart Clone procedure where the source applications
system is single node and the target database is RAC is shown in the figure below.
On this page you can enter and test the required credentials for all the nodes.
10. Enter values for custom parameters. These would be used in any directive steps you
have created.
You can create directive steps to be integrated into a deployment procedure. For
more information on deployment procedures, see the Oracle Enterprise Manager
Cloud Control Administrator's Guide. For a description on how to create a directive
step and insert it into a procedure created using the "Create Like" feature and a
Cloning an Oracle E-Business Suite System 11-17
shipped Smart Clone procedure, see: Adding Custom Steps to a Smart Clone
Deployment Procedure, page 11-38.
11. Schedule the deployment.
12. Review your Smart Clone deployment procedure and click Finish.
11-18 Oracle Application Management Pack for Oracle E-Business Suite Guide
Running Scale-Up and Scale-Down Multi-Node Cloning Procedures
This section describes using Smart Clone for scale-down and scale-up cloning of Oracle
E-Business Suite application nodes.
This type of procedure is supported for Oracle E-Business Suite Releases 12.0 and 12.1.
This procedure is similar to the single-node Smart Clone procedure; the main difference
is in specifying the source and target in the "Source/Target" step in the interview
process.
The following steps provide a high-level description of a Smart Clone procedure:
1.
Smart Clone configures the target database.
2.
Smart Clone clones and configures the applications tier from the source Oracle
E-Business Suite system.
These steps result in creating a target Oracle E-Business Suite system which is ready to
use.
To run a multi-node cloning procedure:
1.
Navigate to the Cloning home page by using the following path: Targets menu >
Oracle E-Business Suite > Administer > Cloning. Choose "Smart Clone" from the
Cloning an Oracle E-Business Suite System 11-19
"Start a Clone" list.
2.
Enter general information for the cloning process. This step captures information
related to the target database already cloned and discovered in Enterprise Manager.
Provide a transaction name for the Clone Name.
Choose the source Oracle E-Business Suite you would like to clone from the LOV.
Select the target database which is cloned from the source Oracle E-Business Suite's
database.
Based on the type of database (that is, a single instance database versus a RAC
database), the rendering of the Target Database Details region will dynamically
change. The figure below shows the rendering of the region for a single instance
database.
Provide the following for the target database:
•
Apps Schema Username
•
Apps Schema Password
•
System Schema Password
•
TNS admin directory
You can click on Validate Database button or you can leave it to the Next button to
perform the same action.
11-20 Oracle Application Management Pack for Oracle E-Business Suite Guide
If the target database is a RAC database, the Target Database Details is rendered
differently, as shown in the following figure.
Cloning an Oracle E-Business Suite System 11-21
Provide the following for the target database:
•
Apps Schema Username
•
Apps Schema Password
•
System Schema Password
Specify whether SCAN is configured in the target database.
You can click on Validate Database button or you can leave it to the Next button to
perform the same action.
3.
Enter RAC Target database details, if applicable.
This step only applies if the target database is a RAC database. This step is skipped
if the target database is a single instance database.
If the source Oracle E-Business Suite technology stack has the required patches
applied for configuring customized names for listeners, then this page would
11-22 Oracle Application Management Pack for Oracle E-Business Suite Guide
automatically render so that you provide names for the target database listeners in
the required field "New Listener Name".
If the source Oracle E-Business Suite technology stack does not have the required
patches, then Smart Clone will give default names to the listeners using the naming
convention "LISTENER_<hostname>".
If the source Oracle E-Business Suite technology stack has the required patches
applied for configuring the target database with "SCAN Listeners", then the
"Custom SCAN Details" region is rendered with the "SCAN Name" and "SCAN
Port" fields populated automatically. It is highly recommended not to change these
values if it automatically populated. If for some reason the SCAN Name and SCAN
Port fields are not populated (for example, if the cluster target instance discovered
in Enterprise Manager has not populated these values yet as properties), then you
must enter correct values into these fields.
Optionally, check the box "Use Custom SCAN Name and Port" if you want to get
the target database configured with the SCAN listener. If you do not check the box
"Use Custom SCAN Name and Port", then Smart Clone will clone the target
database with virtual host names.
If the source Oracle E-Business Suite technology stack does not have the required
patches, then the "Custom SCAN Details" region will not be rendered and the target
database will be configured with virtual host names.
If the target instance is already configured with SCAN listeners, then by default the
"Use Custom SCAN Name and Port" box will be checked.
4.
Enter source information in the Source/Target step.
The "Source System Nodes" region shows the details of the source Oracle
E-Business Suite applications tier including:
•
Number of nodes on which the applications tier is deployed
Cloning an Oracle E-Business Suite System 11-23
•
5.
Details of the services on the nodes
Enter target information on the Source/Target step.
Choose the type of target. For multi-node cloning, the options are:
•
Multi-node target with a non-shared file system
•
Multi-node target with a shared file system
Note that when the target has a shared file system that:
•
The first node in the admin service list is considered the primary service.
•
The Target location has "Override Defaults" selected as a provision to update
the shared directory location for APPL_TOP, COMN_TOP, and so on.
If you choose either of the multi-node choices, a new set of options is shown:
6.
Add a node to each service by clicking on the Add button for the service and
choosing the node from the LOV.
11-24 Oracle Application Management Pack for Oracle E-Business Suite Guide
If you want to delete a node from a service, select the node to be deleted and click
the Delete button.
7.
After you add the lists of nodes, you can navigate to the "Common Properties"
page.
In this page you specify properties such as port data and the applications base
directory location.
Common Properties for Non-Shared APPL_TOP
Cloning an Oracle E-Business Suite System 11-25
Common Properties for Shared APPL_TOP
When you click the Check Availability button, the port availability on all selected
nodes will be checked. This verification is also done when you click OK for the
page itself.
The port pool and individual port values are updated from the source instance.
If there is an invalid value in the port pool from the source instance: following error
will be shown: "NOTE: Source Apps portpool context variable
(s_port_pool) is invalid: <value>. Setting to default value
'0'. Please update as needed!"
Click Next to proceed to the next step. After you click Next, the system checks to
confirm all the services are enabled on the target node.
Note: Dependent services are automatically added to the nodes.
8.
In the Copy Parameters step, choose options for how your copying will be done.
11-26 Oracle Application Management Pack for Oracle E-Business Suite Guide
9.
Enter Credentials.
Smart Clone uses Named Credentials. You can select and test the named credentials
on this page.
Named credentials can be created by navigating to the Setup menu, then Security >
Named Credentials, and clicking Create.
Smart Clone requires the following credentials to be created:
•
•
Application Node OS Credentials and Database Node OS Credentials.
•
Authentication Target Type - Host
•
Credential Type - Host Credentials
Database Schema Credentials
Please refer to the section Creating Named Credentials for Oracle E-Business
Suite, page 5-1 for information on creating the Oracle E-Business Suite Database
Credentials.
Cloning an Oracle E-Business Suite System 11-27
Note: Database schema credentials appear only when the
source applications system is on Release 11i and using a
non-shared file system.
The Credentials page for a Smart Clone procedure where the source applications
system is multi-node and the target database is non-RAC is shown below. This page
allows you to enter and test all required credentials.
11-28 Oracle Application Management Pack for Oracle E-Business Suite Guide
The Credentials page for a Smart Clone procedure where the source applications
system is single node and the target database is RAC is shown below. This page
allows you to enter and test the required credentials.
10. Enter values for custom parameters.
You can create directive steps to be integrated into a deployment procedure. For
more information on deployment procedures, see the Oracle Enterprise Manager
Cloud Control Administrator's Guide. For a description on how to create a directive
step and insert it into a procedure created using the "Create Like" feature and a
shipped Smart Clone procedure, see: Adding Custom Steps to a Smart Clone
Cloning an Oracle E-Business Suite System 11-29
Deployment Procedure, page 11-38.
11. Schedule the deployment.
12. Review your Smart Clone deployment procedure and click Finish.
11-30 Oracle Application Management Pack for Oracle E-Business Suite Guide
What's Next
When a multi-node to multi-node applications tier cloning procedure is submitted,
then, irrespective of whether it is a "scale-up" or "scale-down" procedure, the admin
node is configured first with the given services enabled. Then each node will be
configured one after the other, depending on the node details specified in the cloning
interview.
After all the nodes are configured, the URLs used in accessing Oracle E-Business Suite
are redirected to the node on which AutoConfig was last run. Therefore, after all nodes
are configured, you should run AutoConfig again on the node in which the web service
is enabled.
Note: For more information, see My Oracle Support Knowledge
Document 1349509.1, "All the URLs Accessing Oracle E-Business Suite
Are Getting Redirected to the Web Node Where AutoConfig Last Ran."
Running Smart Clone for Oracle E-Business Suite Release 12.2
1.
Navigate to the Cloning home page by selecting Targets > Oracle E-Business Suite >
Administer > Cloning. Select "Smart Clone for Oracle E-Business Suite 12.2.x" and
click Go.
Cloning an Oracle E-Business Suite System 11-31
2.
Enter basic information for your cloning procedure, including Clone Name,
Description, and target and source information.
Also enter the source WebLogic Admin Password and the target database APPS
credentials.
In the case of single-node target database cloning, you will be prompted the
TNS_ADMIN of target database.
If the target database is a RAC database, a new region of prompts appears to
capture RAC-specific information, as shown below.
11-32 Oracle Application Management Pack for Oracle E-Business Suite Guide
For the RAC Target DB Node Specific Details:
•
Virtual Host Name - The virtual host name. Note that the domain name must
NOT be appended.
•
Current Listener Name- The value with which the database instance can be
connected.
•
New Listener Name - If you want to change the existing listener name, enter the
new name here. If you want to retain the existing listener name, then enter the
current listener name in this field.
•
TNS Admin Directory - The TNS_ADMIN value with which the database
instance can be connected.
For the RAC Target DB Custom SCAN Details section: If the target database is
already SCAN-configured, then select "Yes" for "Does the Target DB already has
SCAN Configured" In this case, enter the Local Database port. Also in this case,
"Enable SCAN Configuration in the Target DB" will automatically become "Yes".
If you wish to configure SCAN on the target database, then select "Yes" for "Enable
SCAN Configuration in the Target DB". You will then be prompted for the SCAN
name and port.
The SCAN name and SCAN port will be populated from the cluster target.
3.
Enter target application details.
Select the host on which the target applications system is intended to be cloned and
the base directory. Once the base directory is provided, other directories details are
automatically populated. Please note that these auto-populated values are
read-only.
Cloning an Oracle E-Business Suite System 11-33
You can choose the port pool for run file system and patch file system. You can
validate the ports individually for the run file system and the patch file system. In
case of port unavailability, an error will list the invalid port information.
4.
In the Stage Directories step, enter stage location information.
The source stage location is where the source application file system is staged. The
target stage is the location where the staged application files are copied.
Note: Ensure that these directories have write permissions.
Specify your copy options:
No Copy - Select this if the source and target applications file systems are in the
same host. This is applicable to Single-Node to Single-Node applications cloning.
Make sure both source and target stage locations are same.
11-34 Oracle Application Management Pack for Oracle E-Business Suite Guide
If you choose Copy, select the Copy Method:
•
Shared File Copy Option - Choose this option if the stage location is shared
across the source and target.
Note: Because of a known limitation in Smart Clone for Release
12.2.x, please do not use the 'Shared File Copy' option
currently. Instead use 'No Copy' method as they are
functionally same.
5.
•
Remote File Transfer Option - Choose this if the source and target applications
file systems are in different hosts.
•
Manual Copy Option - If this option is chosen, you will have to manually copy
the source file system to target file system. The clone procedure will be halted
and will wait for user confirmation.
Provide Host Credential Details in the next page.
You can validate a credential using the Test button.
In the case of a RAC database, all the target database node information must be
entered.
Cloning an Oracle E-Business Suite System 11-35
6.
Enter the Schedule information.
You can select "Immediate" to submit the Smart Clone run immediately, or you can
schedule the Smart Clone run for a future date.
7.
Review the information you have entered.
11-36 Oracle Application Management Pack for Oracle E-Business Suite Guide
In the case of a RAC target database, specific information pertaining to RAC is also
displayed.
Note on manual steps if the source is a multi-node application tier
instance:
In the Smart Clone Deployment Procedure for Release 12.2.x , if the source is
multi-node application tier instance, then there will be manual steps involved. The
Cloning an Oracle E-Business Suite System 11-37
figure below illustrates these steps.
1.
In the first manual step, a manual step is needed after the RUN File system is
configured and started. You must manually login to WebLogic console of the RUN
file system and remove the redundant source node entries as described in the
manual step information.
Then you must confirm your changes in the EM Console.
2.
As AutoConfig on the database tier will update the sqlnet.ora file; there will be a
manual step just before the target Oracle E-Business Suite discovery step for
updating iFile to enable the OMS host(s) to connect to the target Oracle E-Business
Suite database.
Adding Custom Steps to a Smart Clone Deployment Procedure
This section describes creating custom steps and adding them to a Smart Clone
deployment procedure. For more information generic information on how to create a
11-38 Oracle Application Management Pack for Oracle E-Business Suite Guide
directive step and add it to a copy of an out-of-the-box deployment procedure, refer to
the Oracle Enterprise Manager Cloud Control Administrator's Guide.
Create a directive step:
1.
From the Enterprise menu, select Provisioning and Patching, then select Software
Library.
2.
Create a new directive. From the Actions menu, select Create Entity, then select
Directives.
Cloning an Oracle E-Business Suite System 11-39
3.
Specify a name and other attributes for the directive.
11-40 Oracle Application Management Pack for Oracle E-Business Suite Guide
4.
Add parameters for the directive.
Cloning an Oracle E-Business Suite System 11-41
5.
Select the "Software Library" location and the script to be executed. In the example
below, a Perl script is used.
6.
Click Next and Save and Upload.
Create a copy of the out-of-box Smart Clone deployment procedure:
1.
From the Enterprise menu, select Provisioning and Patching, then select Procedure
Library.
11-42 Oracle Application Management Pack for Oracle E-Business Suite Guide
2.
Select "Smart Clone" and click "Create Like".
3.
Enter a name and other general information.
Cloning an Oracle E-Business Suite System 11-43
4.
On the Procedure Steps tab, select the step before, inside, or after which you want to
add the custom step, and click Insert.
11-44 Oracle Application Management Pack for Oracle E-Business Suite Guide
5.
Give the new step a name and enter additional information for the step.
Cloning an Oracle E-Business Suite System 11-45
6.
Search for the directive and click Next.
7.
Map the parameters as required in the Map Properties step.
In our example, a text box will be provisioned in the Smart Clone procedure
interview to provide the value for "Parameter 2".
Note: The option 'Ask User during Procedure Interview' is NOT
11-46 Oracle Application Management Pack for Oracle E-Business Suite Guide
supported in Smart Clone for Release 12.2.x.
8.
Save the custom step and then save the procedure.
Cloning an Oracle E-Business Suite System 11-47
9.
You can now submit the newly-created deployment procedure.
11-48 Oracle Application Management Pack for Oracle E-Business Suite Guide
12
Introduction to Change Management
Introduction
Change Management for Oracle E-Business Suite (formerly delivered in the product
"Oracle Application Change Management Pack for Oracle E-Business Suite" and
abbreviated as "ACP" or "ACMP") provides a centralized view to monitor and
orchestrate changes (both functional and technical) across multiple Oracle E-Business
Suite systems. Change Management offers the capabilities to manage changes
introduced by customizations, patches and functional setups during implementation or
maintenance activities.
Change Management for Oracle E-Business Suite consists of two main components:
•
Patch Manager allows you to deploy patches across Oracle E-Business Suite
instances from a single console. Patch Manager integrates with My Oracle Support
and can automatically download and deploy patches across multiple (single or
multi-node) Oracle E-Business Suite instances. Both Oracle E-Business Suite patches
and patchsets, as well as patches created with Customization Manager, are
supported.
•
Customization Manager automates the process of packaging, releasing, deploying,
and migrating customizations for a single Oracle E-Business Suite instance or
multiple Oracle E-Business Suite instances. It provides capabilities to integrate with
third-party source control repositories to access customizations that need to be
packaged. Before packaging the updates, Customization Manager validates the
customization against software coding best practices. These custom packages can
then be patched to Oracle E-Business Suite instances like any other Oracle Patch
either using the Oracle Applications DBA (AD) utilities or using Patch Manager.
These components can be accessed from the central Change Management page, or
dashboard, available from Targets > Oracle E-Business Suite > Administer > Change
Management.
Introduction to Change Management 12-1
Major Benefits
•
Simplifies the mechanism of orchestrating changes across multiple Oracle
E-Business Suite systems.
•
Improves user productivity by automating the deployment of changes.
•
Reduces human errors by providing a standards-based change deployment
framework.
•
Provides notifications to specified users of updates to the Oracle E-Business Suite
systems.
Change Management thus helps to lower the total cost of ownership by providing these
benefits from the central Oracle Enterprise Manager console which allows you to
manage the entire application environment.
Change Management Dashboard
The Change Management Dashboard gives you quick access to commonly-used
functions, as well as summaries of recent activity.
The Change Approval Requests region is available to users with the required roles. This
Change Approval section shows the summary of recent change approval requests that
have been updated. You can also search for a specific change approval request or
navigate to the complete list by clicking the "Home" link.
For Patch Manager, recent patching activity is listed. The summary lists patch runs that
have completed, that are in progress, or that are scheduled. You can click on the patch
names to drill down to more information. You can also search for patches, go to the
Patch Dashboard, or start/schedule a new patch application.
For Customization Manager, the most recently updated packages, for both Release 11i
and Release 12, are shown. Recent activity regarding packages including their statuses
is also shown. You can click on the package names to drill down for more information.
You can search for packages, create new packages, set up your File Source and Oracle
E-Business Suite mappings, or access reports. Also, you can manage custom
applications and track requests pertaining to custom application registration/validation
on one or more instances.
Change Approval Framework and Change Management Privileges
The Change Approval Framework helps ensure that all changes done using any of the
products in Change Management go through a change approval mechanism. This
change control mechanism entails one level of approval for any change that results in a
configuration or code change of an Oracle E-Business Suite instance. The Change
Approval Framework provides tracking and auditing with respect to the change control
12-2 Oracle Application Management Pack for Oracle E-Business Suite Guide
requests and historical data. A common change control tracking dashboard is provided
for tracking all change requests within Change Management. Auto-approvals are
possible if the requestor is a Super Administrator or has the respective approver role
with approval target access.
All critical changes within Patch Manager and Customization Manager would need to
go through the change control mechanism.
The main Change Management tab lists recent activity for change approval requests.
See the section Privileges for Change Management, page 7-5 for information on
required privileges.
The Change Approval Dashboard
Click on the Home link under Change Approval Requests on the Change Management
to access the Change Approval Dashboard.
Introduction to Change Management 12-3
The Change Approval Dashboard allows users with the proper privileges to perform
the following:
•
Search for requests as per role access.
•
Approve or reject a given change control request after viewing details.
•
Track heuristic data with respect to change control requests for auditing purposes
using "Related History".
Preferred Credentials for Change Management
When using Change Management features, you will need to access Oracle E-Business
Suite instances. You can set up credentials for these instances for every user as a
one-time setup step instead of entering them every time you need to access an instance.
Note that preferred credentials are not shared across users. See the section Setting
Preferred Credentials for Change Management, page 5-11 for more information.
Notifications Setup
You have the option of sending e-mail notifications to users regarding updates to the
Oracle E-Business Suite systems. To have these notifications sent successfully, you must
have the system set up properly:
•
Ensure that the agent on the Oracle Management Server is up and running.
•
Ensure that the command parDeploy has been run as part of the setup of Oracle
Enterprise Manager Cloud Control 12c.
12-4 Oracle Application Management Pack for Oracle E-Business Suite Guide
•
Enter the SMTP information as described below.
To set the SMTP information in Oracle Enterprise Manager:
The Outgoing SMTP Server information must be entered in Oracle Enterprise Manager.
Note: If the SMTP information is not set correctly, notifications will not
be sent.
1.
Within Oracle Enterprise Manager, navigate to Setup > Notifications > Notification
Methods.
2.
Set the Outgoing Mail (SMTP) Server value.
3.
Enter additional information as needed.
Diagnostic Tests
Oracle Application Management Pack for Oracle E-Business Suite includes diagnostic
tests that should be run to ensure your system is set up correctly to use the pack's
features. These tests are run using the Pack Diagnostics link under Related Links on the
Oracle E-Business Suite Instances page. For more information on using the Pack
Diagnostics link, see: Running Pack Diagnostics Tests, page 10-1.
Introduction to Change Management 12-5
13
Patch Manager
Introduction
Patch Manager allows you to deploy patches across Oracle E-Business Suite instances
from a single console. You can create a patch run definition and run it multiple times on
multiple instances and you can copy a patch procedure and modify it to suit your
business needs. Also, you can easily access details on patch runs, correct errors if
necessary, and continue the patch runs.
Key Features
Patch Manager
•
Automates the deployment patches across multiple Oracle E-Business Suite
instances.
•
Utilizes most common Oracle E-Business Suite Applications DBA (AD) Utilities.
•
Utilizes patching best practices and reduces downtime.
•
Integrates with Customization Manager to deploy custom packages.
•
Supports downloading patches directly from My Oracle Support for deployment.
•
Supports deployment of patches that were previously downloaded to a central
location on the Oracle Management Server.
•
Supports National Language Support (NLS) patches.
•
Provides a complete history of all patch deployments.
•
Provides a customizable patch deployment procedure.
Patch Manager 13-1
•
Leverages Oracle Enterprise Manager infrastructure for distributed processing.
With Patch Manager, you can
•
View the readme of a patch with just one click.
•
Schedule deployments based on the target's time zone.
•
Schedule deployments of patches immediately or in the future.
•
Perform a complete series of pre/post health checks when deploying patches.
•
Track and monitor all patching deployments "Running", "Scheduled", "Saved" and
"Succeeded" from a centralized console.
•
Send and receive notifications for patch failures and completion.
For information on diagnostic tests for this feature, see: Diagnostic Tests for Patch
Manager, page 10-10.
Patch Manager Home
The Patch Manager home page provides an overview of the patch deployment
procedures. This page contains one region for patch runs for Oracle E-Business Suite
Release 12.1 and earlier, and other regions related to patch deployment procedures for
Release 12.2. You can personalize the page using the Personalize Page icon, to hide,
show, or reorder the regions on the page. For example, if you are patching Release 12.2
targets primarily, you can personalize the page to display the Online Patching region
first and display the Abort Runs and Cutover Runs regions as well.
The shipped page has the following regions displayed by default:
•
Patch Runs - used for targets on releases 12.1 and earlier
•
Online Patching - used for Release 12.2 targets
•
Patch Logs - used to access patching log files
Two other regions are available, but are hidden by default. Both of these pertain to
Release 12.2 deployment procedures:
•
Abort Runs
•
Cutover Runs
13-2 Oracle Application Management Pack for Oracle E-Business Suite Guide
Patch Runs
The Patch Runs region of the Patch Manager Home lists the patch runs and their
statuses for Oracle E-Business Suite Release 12.1 and earlier.
You can perform various actions on a patch run depending on its status:
•
Review - Review details of the patch run.
•
Create Like - Copy an existing patch run, in order to change any aspect of the patch
run or to run an identical run due to changes in the patch or target.
•
Edit - If a patch run is in Saved status, you can edit it.
•
Submit - If a patch run has been approved through the approval management
system, it can be submitted from here.
To start a new patch run for Oracle E-Business Suite Release 12.1 and earlier, select
"New Run". If a user has used the "Create Like"feature for the shipped "Patch Oracle
E-Business Suite" deployment procedure then clicking "New Run" will prompt tthe user
which deployment procedure they would like to use. Otherwise, clicking "New Run"
will begin the patch run interview.
By default, all records are displayed in the table. To filter the records by status, use the "
Show" list. You can also use the "Search" button to apply additional filters to control
which records are displayed.
Online Patching
The Online Patching region displays patch deployments against Release 12.2 targets.
Patch Manager 13-3
Note that with Release 12.2, the adop patching process in Patch Manager is broken
down into two deployment procedures. The first deployment procedure runs the
prepare, apply, finalize, and potentially actualize_all phases. The second deployment
procedure executes the cutover, cleanup, and potentially fs_clone phases.
You can click the New Deployment to begin a new online patching interview. As with
the "Patch Runs" region, if a user has used the "Create Like" feature on the deployment
procedure, you will be prompted to specify which deployment procedure you want to
use.
In this region you can filter by "Latest" or "All". These choices will show only the latest
adop session or all of them.
The records in this region are displayed in a tree format with a parent - child grandchild relationship. The parent is the target, the child is the adop session, and the
grandchildren are the patch deployments. Patch Manager supports multiple patch
deployments in a single adop session. If the deployment procedure has not started or
has not run through the "prepare" phase then the deployment records will fall under "
ADOP Pending Sessions".
Columns in the region are:
•
Phase - The adop phase the deployment procedure is currently running or ran last.
•
Apply Status - The status of the "Apply" deployment procedure.
•
Cutover Status - The status of the "Cutover" deployment procedure.
•
Review - Link to the review page displaying all interview information.
•
Create Like - Allows for duplication of an interview.
•
Edit - Allows for editing a saved interview.
•
Remove - Allows for removal of a deployment record. Note that the record is not
deleted, just removed from the display. The status of the record must be "Saved" or
"Stopped" for this icon to be available.
•
Submit - Allows for submission of a deployment procedure after the interview has
been approved in the approval management system.
•
ADOP Details - This icon opens a window showing the adop phases, applied
patches, database editions, and file system details.
•
Abort - Clicking this icon submits a deployment procedure that runs "adop
phase=abort" on all nodes. Before the submission occurs there is a check to ensure
the target Oracle E-Business Suite system is in a state that allows for abort (such as,
the prepare phase has been run). The check also verifies that the session for which
you are running abort is the latest adop session; this step is to ensure that the
correct session is to be aborted.
13-4 Oracle Application Management Pack for Oracle E-Business Suite Guide
•
Cutover - This icon submits the cutover deployment procedure. It opens a window
in which you can schedule the cutover. This feature also ensures the adop session
for which you are running is actually the latest.
•
Requestor - This is the user who requested the patch be applied.
•
Created By - This is the user who created the interview.
•
Last Updated - Timestamp indicating when the deployment procedure was last
updated.
Patch Logs
The Patch Logs region allows you to access patching log files across all hosts of an
Oracle E-Business Suite system.
To access log files:
1.
First select an Oracle E-Business Suite target to which you have been granted access
in Enterprise Manager.
2.
After you choose a target, a list of hosts is displayed in a separate window along
with the log file directory for each host.
3.
From this window you can choose the log file(s) you want to view online or
download to your computer as a ZIP file.
Patch Manager 13-5
Prerequisites for viewing Patch Manager logs
To access the Patch Manager Log Viewer, you must have your preferred credentials set
for the Oracle E-Business Suite Node target(s) of all middle tier hosts. To set these, the
navigation in Enterprise Manager is Setup > Security > Preferred Credentials > Oracle
E-Business Suite Node. These credentials are required in addition to the credentials
needed to use Patch Manager.
In addition, you must have been granted the privilege to raise a Patch Manager request.
For more information, see: Setting Preferred Credentials for Change Management, page
5-11 and Privileges for Change Management, page 7-5.
13-6 Oracle Application Management Pack for Oracle E-Business Suite Guide
Abort Deployments
This region shows all of the executions of the "Abort an Oracle E-Business Suite Online
Patch Cycle" deployment procedure.
You can submit a request to run an Abort operation using the Submit Abort icon. This
action submits an Abort request like that in the Online Patching region. This action does
not compare the adop session ID on the target EBS system against the adop session ID
of any patch deployments from EM.
This region is hidden by default. To have this region appear on the Patch Manager
home page, use the Personalize Page icon on the home page.
Cutover Deployments
This region displays all executions of the "Cutover Oracle E-Business Suite" deployment
procedure. This region is hidden by default. To have this region appear on the Patch
Manager home page, use the Personalize Page icon on the home page.
You can submit a request to perform the cutover operation using the Submit Cutover
Patch Manager 13-7
icon.
Records can be filtered by status using the "Show" list. The "Pending Patches" button
displays all patches that have been applied but not cutover.
Running a Patching Procedure (Release 12.1 and earlier)
Oracle provides you with patching procedures that are best practices for patching
Oracle E-Business Suite. Procedures created by Oracle cannot be edited, but they can be
copied using the "Create Like" feature so that you can customize the procedure to fit
your environment.
To run a patching procedure, or create a patch run, you can do one of the following:
•
From the Change Management Page, choose "Patch Oracle E-Business Suite" or
your customized patching procedure from the "Start a Patch" list and click the Go
button.
•
From the Patch Manager home page, select "New Run" in the Patch Runs region.
Note that you can also copy an existing patch run. From the Home page, select the
patch run you wish to copy and click the Create Like icon.
Note: In the Patch Run interview you can use the Back button to go
back to a previous step; however, entered values on the current page
will be lost.
Prerequisites
The following are prerequisites to running a patching procedure:
1.
To download an Oracle patch directly from My Oracle Support, the following
property must be set in the Preferences page.
•
2.
Connect to My Oracle Support for Patches - This box should be checked.
Patches are downloaded to the OMS when they are applied. Set the property OMS
Stage Directory Location to the directory to which the patch should be
downloaded.
Note: If a patch has already been downloaded to the OMS, it will
not be downloaded again.
After a patch is on the OMS, it will then be moved to the target
Oracle E-Business Suite system. The exception to this step is the
case in which the system detects that an Oracle patch is already on
the target; the system will not move the patch from the OMS to the
13-8 Oracle Application Management Pack for Oracle E-Business Suite Guide
target again. Custom patches, described in the next chapter, will
always be moved from the OMS to the target because a developer
can change the patch.
3.
The following preferences are set to directories under the APPL_TOP by default. In
general, you should leave these set to the default locations. You can override the
default locations, but ensure that the Target Patch Directory Location is not shared
amongst multiple Oracle E-Business Suite instances. The Target Stage Directory
Location can be shared if all users accessing it have read/write permissions for all
files.
•
Target Stage Directory Location - The directory to which zipped patches are
downloaded.
•
Target Patch Directory Location - The directory to which patches are unzipped
and from where the patches are applied.
For more information, see: Setting Preferences, page 6-1.
4.
As part of a queueing mechanism for patch runs, set the property Minutes Patch
Manager should wait for a down target.
If a patch run is executing and detects that a target(s) that it is supposed to patch is
in a blackout state, the patch run will wait this specified time before failing. Patch
Manager will check every minute to see if the target has come out of the blackout
state; if it has, Patch Manager will continue with the patch run. This property
specifies in minutes the maximum length of time Patch Manager will wait before
the patch run fails.
5.
Patch Manager uses Preferred Credentials. These must be set prior to running a
patch procedure. Navigate to Setup > Security > Preferred Credentials to set these.
The Preferred Credentials that might be required are:
•
Oracle E-Business Suite Node credentials must be set to the applmgr account
for middle tiers and Oracle account for database tiers.
•
Oracle E-Business Suite must have the "AppsDBCredSet" (the APPS schema)
and "AppsSysDBCredSet" (the SYSTEM schema) set.
For more information, see: Setting Preferred Credentials for Change Management,
page 5-11.
To create a Patch Run:
1.
On the Patch Run Details page, enter the details below.
Patch Manager 13-9
2.
•
Patch Run Name - Enter a user-friendly name for the patch run. You can search
on this name later on.
•
Description
•
Justification
•
Requester - The default value is the user name with which you are signed in.
You can change this to another name.
•
Notification E-mail(s)- Enter the e-mail addresses of users who should be
notified of the patch run request. These users could review and approve the
request, as appropriate.
On the Target List page, enter the target system(s) to which the patch(es) will be
applied.
To search for available targets, click the Add button under "Applications Systems".
The List of Values (LOV) window displays the target names and their release levels.
Select the desired targets from this window. Note: All targets selected must be at
13-10 Oracle Application Management Pack for Oracle E-Business Suite Guide
the same release level.
Once selected, the system name will appear in the Target List with the following:
•
Applications System Name - The name of the system.
•
Status - The status of the system (Up or Down).
•
Applications Release - The release level of the applications system.
•
Workers - The number of workers available on the system. Note that you can
change this value.
•
Database Version - The release level of the database for the applications system.
•
Languages - The languages installed on this system. Note: Newly installed
languages may not show up yet if collections haven't run.
•
Select Patch Nodes - Choose which nodes adpatch will run on.
Note: This option is to be used if your installation has a mix of
shared and no-shared APPL_TOPs; for example, if you have
ten middle tiers with eight of them sharing one APPL_TOP and
the remaining two with their own file system.
•
Remove - Click this icon to remove this applications system from the Target
List.
You can click the Remove All button to remove all applications systems from the
Target List.
Click the Test Credentials button to test the Preferred Credentials for the
applications system.
3.
In the Patch Details page, select the details for the patch(es) to be applied.
Patch Manager 13-11
The following are shown on the Patch Details page: These are set in the Preferences
page.
•
Target Stage Directory Location - The directory to which zipped patches are
downloaded.
•
Target Patch Directory Location - The directory to which patches are unzipped,
and from where the patches are applied.
•
OMS Stage Directory Location
Important: You must have at least 'view' target privilege on the
agent(s) of the target hosts. For example, say you are patching an
Oracle E-Business Suite system that contains 3 middle tiers. You
must have the 'view' privilege (or greater) on the agents of these 3
middle tiers.
Enter the Software Updates you wish to apply. Use the Add Oracle Patch to add a
patch from Oracle, and use Add Custom Patch to add a custom patch created
through Customization Manager.
Important: Before you deploy a custom patch in Patch Manager,
you should run the Instance Comparison Report to compare the
technology stack properties of the package with those of the
instance to which the package is being deployed. Patch Manager
does not stop the deployment of a patch if the technology stack
properties are not compatible, so you should make your best
judgement based on the Instance Comparison Reports.
To add an Oracle patch:
1.
Select Add Oracle Patch.
13-12 Oracle Application Management Pack for Oracle E-Business Suite Guide
2.
In the Search and Select window, Patch Oracle E-Business Suite, if you are
downloading a patch or patches from My Oracle Support, you can search based
on the following criteria:
•
Patch Number
•
Platform - "Any" returns patches for all platforms, or Generic if patch is not
port-specific.
If you are searching for a patch for a specific platform, your search results
will return a Generic-platform patch if no platform-specific patch exists.
•
Language - "All installed languages" will return the base (Generic or
platform-specific) patch plus any language patches (if they exist) for every
language installed on the selected targets. Choosing a specific language
from the drop-down list will return its language patch if it exists plus the
base patch.
You can also select Simple Search to search simply on the Patch Number.
The search results will include the following for each patch found:
•
Patch Number
•
Platform
•
Version
•
Language
•
Description
•
Included or Replaced By
If you plan to deploy patches from an OMS location, the Search window will
provide a List of Values based on the patches located in the directory specified
for OMS Stage Directory Location in the Preferences page.
Choose the desired patches and click Select to return to main window.
Note: You must retrieve the desired patch through the Search and
Select: Add Oracle Patch window even if you have already
downloaded the patch to the stage location (the process will not
re-download the patch, however).
To add a custom patch:
1.
Select Add Custom Patch.
Patch Manager 13-13
2.
In the Search and Select window, you can search based on the following
criteria:
•
Patch Number
•
Patch Name
•
Description
•
Created By
•
Version
•
Language
The search results will include the following for each patch found:
•
Patch Number
•
Patch Name
•
Version
•
Language
•
Description
•
Created By
Choose the desired patches and click Select to return to main window. A listing
of patches is given.
A Merge Patches check box appears at the top of the table if more than one patch
has been selected.
Note: You should merge AD patches separately from non-AD
patches.
The following appears for each patch in the table.
•
Patch ID - The patch number.
•
Product - The short name of the owning product.
•
Platform - The platform for the patch.
•
Version - The version to which the patch is valid.
13-14 Oracle Application Management Pack for Oracle E-Business Suite Guide
•
Description - The description of the patch.
•
Files - The files to be downloaded for the patch.
•
Order - The order the patches should be applied. Will only be displayed when
you have more then one patch selected and don't have merge patches check box
checked.
•
Can Be Re-applied - You can check this box if the patch can be re-applied with
no ill effects. In the case of testing, it might be necessary to apply the same
patch repeatedly, in which case this box should be checked.
•
Pause After Patching - Check this box if you will need to perform post-patching
steps (such as running a script) immediately after this patch is applied. This
option does not appear when the Merge Patches check box is checked.
Note that this option causes the Deployment Procedure job to halt with the
status of "Failure" so that the job is paused for post-patching steps. Once you
have performed your required tasks, select the Retry button within the EM
Console.
•
README - Click on this icon to review the README file for the patch.
Note: The README column is only available if "Connect to My
Oracle Support for Patches" ("MOSEnabled") is enabled in the
Preferences page. Because the README files are retrieved from
My Oracle Support, the system must first be connected to My
Oracle Support. Navigate to Preferences using the path Targets
> Oracle E-Business Suite > Administer > Preferences.
•
Techstack Report - Only applicable to custom patches. This report is described
in the section on Instance Comparison Reports in Creating a Report, page 14-36
.
•
Remove - If you want to remove this patch from the list, click this icon.
Note: For a controlled-release patch, a password is necessary for
downloading the patch. A column appears in which a password
can be entered. Passwords expire after a set duration, so for
scheduled deployments further in the future, make sure you have
already downloaded the patch and staged it.
Finally, you can check for prerequisites for your patches using the Check
Prerequisites button.
Patch Manager 13-15
4.
Specify Patch Options.
Specify details for how the patch should be applied.
For more information on many of these options, see: Oracle E-Business Suite Patching
Procedures and Oracle E-Business Suite Maintenance Utilities.
Patching Procedure Options include the following:
•
Create Target Backup Before Patching - Adds a pause after system is prepared
for backup allowing for a manual backup.
•
Create Target Backup After Patching - Adds a pause after patch is applied and
database is brought back down to allow for a manual backup.
•
Enable HotPatch Mode - Patch will be applied without shutting down the
applications or database, disabling archive mode, or enabling maintenance
mode.
In HotPatch mode, AutoPatch applies a patch regardless of whether the Oracle
E-Business Suite system is in maintenance mode. Maintenance mode controls
the system downtime period by managing user login sessions.
Note: In HotPatch mode, if the patch application fails, the
process will still perform/execute the blackout steps in the
"Patch Oracle E-Business Suite" procedure. The blackout
13-16 Oracle Application Management Pack for Oracle E-Business Suite Guide
notifies other Enterprise Manager administrators that a
maintenance procedure is being performed on the
environment.
•
Disable Archive Mode - Issues an 'alter database noarchivelog' command.
•
Pause Before AutoPatch Steps - Adds a pause before AutoPatch (adpatch) is run
to allow for any necessary manual preparation.
AutoPatch (adpatch) is the Oracle Applications DBA (AD) tool that applies
patches to an Oracle E-Business Suite system.
•
Pause After AutoPatch Steps - Adds a pause immediately after patch is applied
to allow for any necessary manual activities.
Note: This option is not the same as the "Pause After Patching"
option in the Patch Details page (Step 3). The "Pause after
Patching" step, performed at the individual patch level, causes
the Deployment Procedure job to halt so that manual steps can
be done immediately after that patch is applied. The "Pause
After AutoPatch Steps" option introduces a manual step into
the Deployment Procedure which causes the Deployment
Procedure to pause. This manual step can be used to do manual
work or it can be modified in a custom procedure to run an
automated script.
•
Run AutoConfig - Run AutoConfig, the AD tool that manages configuration
changes in an Oracle E-Business Suite system.
•
Pause After AutoConfig Test Mode Step - Adds a pause after AutoConfig is run
in test mode to allow for validation of changes.
AutoPatch Options include the following:
•
Enable Prerequisite Patch Checking - Prevents you from applying a patch
without first applying all required prerequisite patches.
•
Disable JSP Compilation - Tells adpatch not to automatically compile
out-of-date JSP files (nocompilejsp command).
•
Disable Invalid Objects Compilation - Tells adpatch not to compile invalid
objects (nocompiledb command).
•
Enable Schema Validation - Tells adpatch to connect to all registered Oracle
E-Business Suite schemas at the start of the patching process.
Patch Manager 13-17
•
Disable File Generation - Tells adpatch not to run commands normally found in
generate driver (nogenerateportion command).
AD Administration Options are listed below. These tasks are done to manage
database objects (database objects or data in the database related to Oracle
E-Business Suite). For example, a patch might add new menu entries or change the
setup of a flexfield.
•
Generate Message Files - Creates new message files after the messages have
been loaded into the database. The README should instruct you when this is
necessary.
•
Compile APPS Schema - Compiles the APPS schema.
•
Compile Menu Information - Compiles menus.
•
Compile Flexfields - Compiles flexfields.
•
Recreate Grants and Synonyms for APPS Schema - Recreates grants and
synonyms for the APPS schema.
•
Relink Application Programs
•
Generate Product JAR Files
•
Generate Reports Files
•
Generate Form Files
For the Notifications region, specify the statuses for which you would like to be
notified.
5.
Specify the Schedule for the patch application.
13-18 Oracle Application Management Pack for Oracle E-Business Suite Guide
You can choose to apply the patches immediately or at a later date.
If you choose Immediately as the schedule type to have the patches applied
immediately.
If you choose Later, you can specify the time and date you wish to have the patches
applied. Provide the Time Zone, Date and Time.
You can specify a Grace Period as well. If you choose an Indefinite Grace Period,
then if for some reason the patches cannot be applied at the immediate time, the
system will try to apply them as soon as possible, and will keep trying indefinitely.
If you provide a defined Grace Period by specifying the system to end the Grace
Period after your given hours and minutes, the system will not try to apply the
patches after that amount of time.
The Blackout Length indicates the amount of time the target system will have a
blackout status in Enterprise Manager. Set this length to a higher value for large
patch runs.
6.
Review your patch run.
Patch Manager 13-19
The Review Page lets you review your patch run details, target list, patch details,
patching options, and schedule.
Creating Patch Deployment Procedures for Oracle E-Business Suite
Release 12.2
To create a Patch Deployment:
1.
On the Deployment Details page, enter the details below.
•
Patch Deployment Name - Enter a user-friendly name for the deployment
procedure. You can search on this name later on.
•
Target System Name
•
Verify Credentials - Click this button to check your credentials. This feature
ensures that valid preferred credentials are set for you. For information on
preferred credentials, see: Setting Preferred Credentials for Change
Management, page 5-11.
•
Oracle E-Business Suite Node credentials (all middle tiers, no database tier
credentials are required)
•
System schema credentials
•
APPS schema credentials
13-20 Oracle Application Management Pack for Oracle E-Business Suite Guide
•
WLS domain credentials
•
Description
•
Justification - Enter a justification that can be used by an approver deciding to
approve or reject this request for patching.
•
Requester - The default value is the user name with which you are signed in.
You can change this to another name.
•
Notification Email(s) - Any users listed here will be notified when the patching
deployment request is sent to approval management.
Note: These notifications are different from notifications sent
regarding the status of a submitted deployment procedure.
2.
In the Patch Details page, search for the patch to be applied.
Patch Manager 13-21
You can search for a patch based on the following criteria:
•
Patch Number
•
Language
•
Created By
•
Platform
Note: You must retrieve the desired patch through the Search
region even if you have already downloaded the patch to the stage
location (the process will not re-download the patch, however).
The act of searching will search:
•
Custom patches if a patch number greater than 11 characters has been entered
or no patch number has been entered.
•
Oracle patches if the patch number is less than 12 characters and the "Connect
to My Oracle Support for Patches" preference is checked in the Preferences
page. Since the target has already been chosen at this point in the interview
process, the search will examine the target and search for only patches that are
relevant with respect to languages and platform.
•
Downloaded patches if the patch number is less than 12 characters and the
"Connect to My Oracle Support for Patches" preference is unchecked in the
13-22 Oracle Application Management Pack for Oracle E-Business Suite Guide
Preferences page.
Selecting the "Merge Patches" option will merge the patches when running adop
later.
Selecting the "Check Prerequisites" option will connect to My Oracle Support
(MOS), check the prerequisites for all the selected patches, and then check the target
system to see if those patches have been applied. You must have "Connect to My
Oracle Support for Patches" enabled in the Preferences page to use this option.
The patch application order can be modified by clicking the "Move Up" and "Move
Down" arrows.
Note that this page does not require any patches be selected. With Release 12.2, an "
empty" patching cycle is supported in Patch Manager where only prepare, finalize,
cutover, and cleanup are run.
The following appears for each patch in the Patch Search Results Table:
•
Add icon
•
Patch Number - The patch number.
•
Platform - The platform for the patch.
•
Language
•
Description
•
Created By
•
Replaced By
•
Patch Name
•
Product - The short name of the owning product.
•
Release
Click on the Add icon to add a patch to your patch deployment. It will appear in
the Selected Patches table.
The following appears for each patch in the table.
•
Remove - If you want to remove this patch from the list, click this icon.
•
Order - The order the patches should be applied. Use the Up and Down icons to
change the order of the patches.
•
Patch Number- The patch number.
Patch Manager 13-23
Note: For a controlled-release patch, a lock icon appears next to
the patch number. Click on the icon to enter a password.
Passwords expire after a set duration, so for scheduled
deployments further in the future, make sure you have already
downloaded the patch and staged it.
3.
•
Platform - The platform for the patch.
•
Language
•
Description
•
Readme
•
Created By
•
Replaced By
•
Patch Name
•
Product - The short name of the owning product.
•
Release
•
Files - The files to be downloaded for the patch.
Specify Patch Options.
13-24 Oracle Application Management Pack for Oracle E-Business Suite Guide
With Oracle E-Business Suite Release 12.2 the adop patching process required two
deployment procedures. The first deployment procedure runs the prepare, apply,
finalize, and potentially actualize_all phases. The second deployment procedure
executes cutover, cleanup, and potentially fs_clone.
On the options page you determine when each of these deployment procedures are
executed. The first deployment procedure (that runs adop prepare, apply, finalize,
and possibly actualize_all) can be started immediately upon submission or
scheduled. If the "Schedule" option is selected, a date field is dynamically
displayed. The grace period is the amount of time Enterprise Manager should wait
if the Enterprise Manager job system cannot start the deployment procedure at the
intended time.
Specify details for how the patch should be applied.
Patch Application Deployment Procedure
Specify the Start Options:
•
Start Immediately
Patch Manager 13-25
•
Schedule
•
Indefinite Grace Period
For the Prepare phase, specify Pause After Prepare. This option will stop execution
of the deployment procedure after the adop prepare phase has been run. A user
would then need to manually acknowledge the pause for Enterprise Manager to
continue with the next step.
For the Apply phase, specify Pause After Apply. This option will stop execution of
the deployment procedure after the adop apply phase has been run. A user would
then need to manually acknowledge the pause for Enterprise Manager to continue.
For the Apply phase, specify Actualize All Objects. This option will run the adop
actualize_all phase. If this option is chosen then the cleanup mode is switched to
"full".
For the Apply phase, specify Hotpatch. This option will disable all other adop
phases and run adop in hotpatch mode. This option is not supported unless
specifically stated in the patch readme. A warning message is also displayed in
Patch Manager when this option is chosen.
For the Finalize phase, specify the Finalize Mode. This option runs adop finalize
phase in either Quick or Full mode.
Specify Pause After Finalize. This option stops the execution of the deployment
procedure after the adop finalize phase has been run. A user would then need to
manually acknowledge the pause for Enterprise Manager to continue.
Cutover Deployment Procedure
Specify the Cutover Options.
The Cutover deployment procedure has three options for execution:
•
Start Immediately
•
Schedule
•
No Cutover
It can start immediately or be scheduled as above. In this case an immediate start
means immediately after the "apply" deployment procedure executes. If a user
schedules this deployment procedure and the apply deployment procedure is still
running after the schedule date the apply deployment procedure will fail when it
attempts to submit cutover. The cutover deployment procedure can also be skipped
entirely with the "No Cutover" option. "No Cutover" may be useful on a
development environment where ten developers are patching a single target and
they only want to bounce the instance at midnight. Another example may be when
a prerequisite patch was missed. In this situation a user could do a patch run
13-26 Oracle Application Management Pack for Oracle E-Business Suite Guide
through finalize with the missed prerequisite then restart the original failed
deployment procedure.
Check the Indefinite Cutover Grace Period box if you want Enterprise Manager to
wait an indefinite amount of time if the Enterprise Manager job system cannot start
the deployment procedure at the intended time.
For the Cutover phase, the Restart Middle Tier is selected by default. When
cutover is run, this option controls whether the middle tier is restarted.
The Pause After Cutover option stops the execution of the deployment procedure
after the adop cutover phase has been run. A user would then need to manually
acknowledge the pause for Enterprise Manager to continue.
For the Cleanup phase, choose whether you want the Cleanup Mode be run as
Quick or Full.
For FS Clone, specify if you want to run a full file system synchronization.
Notifications
For the Notifications region, specify for which statuses you want notifications to be
sent. Users will be notified of a given status if the box is checked and either of the
"Apply" or "Cutover" deployment procedures fall into that status.
Statuses for notifications are:
4.
•
Action Required
•
Problems
•
Succeeded
•
Running
•
Suspended
Review your deployment procedure.
Patch Manager 13-27
The Review Page lets you review your deployment procedure details.
Copying a Patch Run
You might want to copy an existing patch run to change some aspect of it or to rerun it
due to changes in the patch or target. To do this, select the patch run in the Patch
Manager Home page and click the Create Like icon.
The system will take you through the patch run creation pages as if you were creating a
new patch run, but with most values copied from the original patch run. Please note the
following:
•
The Patch Run Name defaults to the original name prefixed with "Copy of" and
appended with the date.
13-28 Oracle Application Management Pack for Oracle E-Business Suite Guide
•
The Requester field has a default value of the original requester's user name.
Change this value as appropriate.
•
The new patch run would be scheduled to run immediately by default, because the
original run may have been scheduled for a now past date and time.
Extending Patch Manager Deployment
You can extend Patch Manager procedures using the Deployment Procedure Manager
using the steps below. In these steps you create a copy of an existing procedure and
extend it in the Deployment Procedure Manager.
1.
Navigate to Enterprise menu > Provisioning and Patching > Procedure Library.
2.
Extensions are supported for the following two patching procedures for Oracle
E-Business Suite:
•
"Patch Oracle E-Business Suite" (for Release 12.1 and earlier)
•
"Patch Oracle E-Business Suite Online" (for Release 12.2)
Note: Extensions are not supported in the deployment procedures
for cutover and abort.
3.
Click the Create Like button.
4.
Rename the copy of the original procedure as desired. You can make other updates
here as well.
5.
Save your new procedure.
6.
Upon saving, the Deployment Procedure Manager Procedures tab appears. Your
new procedure is listed first. You can select this procedure and click Edit to add
steps, choose notifications, or make other changes. For example, you might want to
add steps to a copy of the shipped Patch Oracle E-Business Suite procedure to
automate the following steps: Pre-Patch Application Tier Backup, Post-Patch
Database Tier Backup, or Post-Patch Application Tier Backup.
For more information on the Deployment Procedure Manager and provisioning in
Enterprise Manager, refer to the Enterprise Manager documentation, including:
•
Oracle Enterprise Manager Lifecycle Management Administrator's Guide
•
Oracle Enterprise Manager online help
Patch Manager 13-29
Logging, Health Checks, and Troubleshooting
This section describes logging, health checks, and troubleshooting features within Patch
Manager.
How to Access Patch Logs
The primary way to access log files is using the log viewer in the Patch Logs region of
the Patch Manager Home page. See: Patch Logs, page 13-5.
Alternatively, you can drill down into the steps within an online patching deployment
procedure execution to see the logs.
How to Restart Failed Workers
For Oracle E-Business Suite Release 12.1 and earlier targets, use the following steps:
1.
Navigate to your patch run using any method in "View a Patch Run".
2.
Click on the Patch Run Name.
3.
Click on the adpatch step (Apply Patch).
4.
Select the check box for the failed target.
5.
Click Update and Retry.
6.
Change the parameter "restart_workers" to YES and click Retry.
Note: These steps are also listed in the AD Patch Log when you have a
failed worker.
For Oracle E-Business Suite Release 12.2 and later targets, use similar steps to those
above except navigate to your deployment and go to the adop apply phase step. Select
the check box for the failed target, click Update and change the parameter "restart" to
Yes and click Retry.
1.
Navigate to your deployment and select the it.
2.
Click on the adop apply phase.
3.
Select the check box for the failed target.
4.
Click Update and Retry.
5.
Change the parameter "restart" to YES and click Retry.
13-30 Oracle Application Management Pack for Oracle E-Business Suite Guide
How to Change the Patch Run Purge Policy
Enterprise Manager periodically purges Patch Manager deployment procedure
execution data. As a result, older patch runs may not be accessible in Patch Manager. To
change the purging frequency, run the following PL/SQL block connected to the
repository as SYSMAN:
BEGIN
MGMT_JOBS.drop_purge_policy('SYSPURGE_POLICY');
MGMT_JOBS.register_purge_policy('SYSPURGE_POLICY', <number of days>,
null);
END;
Troubleshooting Patch Manager Deployment Failures
Access the log files is using the log viewer in the Patch Logs region of the Patch
Manager Home page. See: Patch Logs, page 13-5.
To find errors using the Enterprise Manager Provisioning feature, do the following:
1.
Find your patch run or deployment on the Patch Manager Home page.
2.
Click on the status link for the patch run or deployment.
The Procedure Activity tab of the Deployment Procedure Manager in Provisioning
appears.
3.
For a patch run or deployment that failed, click on its Status link.
4.
A list of Procedure Steps in the patch run or deployment is shown. Use the
dropdown list to filter on the steps shown; for example, choose "Failed Steps" to see
the steps that failed. More information on these steps is shown.
Health Checks
Patch Manager validates these servers shutting down and starting up: listener, Forms
server, Apache web services, and Internal Concurrent Manager.
Patch Manager 13-31
14
Customization Manager
Introduction
Customization Manager automates the process of packaging, releasing and reporting
customizations for a single Oracle E-Business Suite instance or multiple Oracle
E-Business Suite instances. It provides capabilities to integrate with third-party source
control repositories to access customizations that need to be packaged. It also integrates
with Patch Manager for deployment of custom patches to one or more Oracle
E-Business Suite instances.
Customization Manager also provides a dashboard to manage custom applications
across Oracle E-Business Suite instances. It provides capabilities to not only register and
validate custom applications across instances, but also a drill down to the custom
objects associated with any registered custom application on a given instance.
Registration and validation of the custom application ensures that custom packages
associated with the custom application can be deployed on the given Oracle E-Business
Suite instance.
Key Benefits
•
Automates creation of customization packages that are deployable with Patch
Manager or standard Oracle E-Business Suite Applications DBA (AD) Utilities
•
Provides repository to manage/catalog customizations.
•
Validates custom code against software coding best practices using a standards
checker.
•
Integrates with most source control systems.
•
Supports National Language Support (NLS) patches.
•
Generates reports on customization packages or manifests in these formats: rich text
Customization Manager 14-1
format (RTF) for Microsoft Word, PDF, or Microsoft Excel.
•
Leverages Oracle Enterprise Manager infrastructure for distributed processing.
•
Provides an interface to manage custom applications across the enterprise.
File Types
Customization Manager allows you to package custom files of a variety of file types,
including the following:
•
Oracle Application Object Library (FND) objects - menus, responsibility, concurrent
programs, and so on
•
Forms
•
Reports
•
Database objects - views, tables, triggers, packages, and so on
•
Oracle Application Framework components
For more information on file types, see the appendix.
For more information on making customizations, see the Oracle E-Business Suite
Developer's Guide and the Oracle Application Framework Developer's Guide.
Setup Steps for Customization Manager
•
Ensure that the Preferred Credentials are set for each user as described in the
section Setting Preferred Credentials for Change Management, page 5-11.
•
Ensure that the Stage Directory is specified in the Preferences page. This property
specifies the OMS stage directory for package creation. To set this, navigate to
Targets > Oracle E-Business Suite > Administer > Preferences. For more information,
see: Setting Preferences, page 6-1.
Major Features and Definitions
Package
A package is a fundamental unit of work of Customization Manager. A package
consists of all the relevant objects that constitute a customization along with all the
necessary metadata relevant for the given customization. A customization package can
have one or more custom patches associated which can be deployed to promote
customizations.
14-2 Oracle Application Management Pack for Oracle E-Business Suite Guide
File Manifest
The file manifest contains a list of files to be included in a package.
File Metadata Repository
The File Metadata Repository stores metadata information of custom files used to create
customization packages. This information can be used to manage and catalog
customizations within the system.
Technology Stack Details
The Technology Stack Details for a package is a snapshot of the technology stack
properties for the Oracle E-Business Suite instance where the package was compiled.
Reporting
Customization Manager provides several methods for generating reports on packages:
•
Generate a Standard report on a single package.
•
Compare two packages using a Comparison report.
•
The Instance Comparison report can be used to compare a given package against an
instance with respect to technology stack, files with versions, missing entries for file
driver file, custom products involved, and so on. It can be used to assess the likely
impact before actually applying the custom patch on the given instance
Reports can be generated in RTF for Microsoft Word, PDF, and Microsoft Excel.
Releasing a Package
Once a customization package is created and tested successfully, it might need to be
shared with other users. This is possible by updating the package metadata and setting
the package status as "Released".
Obsoleting a Package
For scenarios where the given customization is no longer valid, the customization
package may be retired by updating the package metadata and setting the package
status to "Obsoleted".
Diagnostic Tests
For information on diagnostic tests for this feature, see: Diagnostic Tests for
Customization Manager, page 10-12.
Customization Manager 14-3
Applications Standards Validation
Customization Manager has a standards checker to check that the files included in a
custom package meet certain coding standards. This checker tests all code for standards
compliance and cannot be turned on or off.
Some standards are mandatory and will result in failure when Customization Manager
attempts to build the package. Other standards are recommended, and the standards
checker will give a warning but the package will be built.
For example, Customization Manager mandates that each file included within a
customization package has an Oracle-compliant source header present within the file. If
a file in a package is missing this header, the package cannot be built.
Oracle-compliant Source Header
Each file included within a customization package is recommended to have an
Oracle-compliant source header present within the file.
The following is an example of an Oracle-compliant header:
$Header: sample.txt 10.1 2012/04/06 09:38 lmathur ship $
The header contains the following elements:
•
Filename
•
Revision ID - This needs to be incremented every time a file is checked in
•
Date and time of checkin
•
Author
•
Shipment state - ship/noship. For custom files, use the value ship.
Automatic Header Update and Insertion
This option can be enabled while defining or updating the "File Source Mapping" used
for package creation. When the "Automatic header update" option is selected,
Customization Manager takes care of querying the source control repository to derive
the revision number and updates the Oracle-compliant header present within the file
with the same, during the process of package creation.
It is important to ascertain that the correct "Version command" is provided to
lookup/query the revision number from the given source control repository, except
when using CVS or File System. This feature is not supported when the source
repository is 'File System'. Also, for CVS there is no need to specify the version
command as the header is always looked up from the $Header string present within the
file.
14-4 Oracle Application Management Pack for Oracle E-Business Suite Guide
Important: When using the automatic header update feature with CVS,
you must have a $Header placeholder within each source file. The
placeholder header must be embedded in the source file before the file
is checked in into CVS.
Also ensure that you change the file name with the correct case within
the $Header before embedding the header in the file.
Important: When using Subversion, it is required to use Subversion
client version 1.2 or above for automatic header update.
Automatic header update is supported for all file types. For binary files like forms,
reports, and so on, you must provide a dummy placeholder for the header with enough
appropriate offset (space). It is recommended to leave at least 40% extra offset (space) to
accommodate incrementing revision numbers. During the process of package creation,
the system uses this as a placeholder and updates it with the correct header. Again, the
automatic header update option should be enabled and the correct version command
should be specified within the file source mapping. The header is calculated based on
the release and the version in the source control. For example, if you are building a
package for Release 12 and the version of the file in the subversion repository is 29, then
the header version calculated would be 120.29.
Automatic header insertion is supported only for selected file types when using
Subversion as the source control system. In this case, Customization Manager inserts a
valid Oracle compliant header into the source file during the process of package
creation, even when there is no $Header present in the file. The following file types are
supported for automatic header insertion in case the file does not contain a proper
$Header:
•
.css
•
.drvx
•
.htm
•
.html
•
.ildt
•
.java
•
.jlt
•
.jsp
•
.ldt
Customization Manager 14-5
•
.msg
•
.odf
•
.pdt
•
.pkb
•
.pkh
•
.pks
•
.pl
•
.plb
•
.pls
•
.sh
•
.slt
•
.sql
•
.tpl
•
.wft
•
.wfx
•
.xdf
Adding a Header to Custom RTF Files
You can add a header to a custom RTF file by adding it to the file's "Comments"
property. For example, in Microsoft Word, navigate to the File menu, select Properties,
and enter the header in the Comments field as shown in the figure below.
14-6 Oracle Application Management Pack for Oracle E-Business Suite Guide
Uploading Existing Custom Patches
You can upload a custom patch to Customization Manager repository:
The upload option is provided to upload existing custom patches created in the
Customization Manager repository. On upload, a package with status "Succeeded" is
created. The status can move to status "Released" or "Obsoleted" as other customization
packages. One or more NLS patches can be uploaded for a given package. Once
uploaded, the patches can be deployed using Patch Manager. Also, attachments can be
added for the uploaded packages.
Note: Reporting and update capabilities are not available for the
uploaded packages.
Automatic File Driver File Generation and Update
A file driver file is a master file for adpatch to identify valid Oracle E-Business Suite
files for a given product (including a custom product). It is required to have an entry
Customization Manager 14-7
within the file driver file for selected file types like forms, reports, and so on. If not, then
the following error is thrown during patching: "File in patch is not a known Oracle
Applications file".
Customization Manager takes care of this file driver file requirement automatically.
Customization Manager implicitly generates a file driver file for the relevant files in a
package. During deployment with Patch Manager, these entries are automatically
added to the custom product master file driver file. In case a user applies a patch
manually with adpatch, he or she can run updateFileDriver.pl within the
<package>/meta-inf folder before invoking adpatch.
Note that if you get the error "File in patch is not a known Oracle Applications file"
while applying a custom patch built with Customization Manager, then it could be due
to a missing entry in file driver file for the custom product for one or more custom files.
The file driver file for a custom product is located under:
$<custom_product_top>/admin/driver/<custom_product_short_name>file.drv
For example, if XXCO is the custom product, then you can find the file driver file under
$XXCO_TOP/admin/driver/xxcofile.drv
All custom files would require an entry in the respective file driver file depending on
the custom product they belong, EXCEPT files which have destination path beginning
with any of the following:
•
admin
•
sql
•
mds
•
lib
•
patch
•
help
•
def
as well as any java file under destination path beginning with "java".
The usual format for an entry into the file driver file is:
<product>
<subdirectory>
<filename>
Sample entries are as below:
xxco
admin/sql XXCONLADD.sql
xxco
forms/<LANG> XXCOFORM.fmb
14-8 Oracle Application Management Pack for Oracle E-Business Suite Guide
Customization Manager Main Page
The main page for Customization Manager lists packages that are registered in the
system. For each package, the following is given:
•
Name - The name of the package.
•
ID - The ID of the package. This is always unique across packages.
•
Release - The Oracle E-Business Suite release level for the package.
•
Product - The owning product or custom application.
•
Type - The type of package. Valid values include AOL, FORMS, PL/SQL, XML
Publisher, OAF, and Others. This is purely for classification purposes and has no
bearing on the functionality of the package.
•
Status - The status of the package. Valid values include Saved, In Progress, Failed,
Succeeded, Released, Pending Approval, and Obsoleted. Note that some actions are
restricted based on the status of a package.
•
Owner - The owner of the package. Note that some actions are restricted based on
the owner of a package.
•
Last Updated - The date and time the package was last updated.
•
Update - Use this icon to update a package.
•
Delete - Use this icon to delete a package.
You can search for a package based on its name or ID, or click the "Advanced Search"
link to perform a search on other criteria.
Customization Manager 14-9
The following functions are available for a given package (depending on its status and
ownership):
•
Using the procedure specified, deploy the package as a patch job in Patch Manager
using the Deploy button. Packages with statuses "Succeeded" or "Released" can be
deployed.
•
Update the package metadata using the Update Metadata button. Packages with
the statuses Succeeded or Released only can be updated for metadata changes,
provided they are owned by the user currently logged in.
•
Run a report on the package using the Report button. Packages with statuses
Succeeded, Released or Obsoleted can be used for reports.
•
Create a copy of a package using the Create Like button.
You can also create a new package using the Create button or upload an existing
package using the Upload button.
Use the Related Links at the bottom of the page to access the following features:
•
File Source Mapping
•
E-Business Suite Mapping
•
Package Report
•
File Metadata Repository
•
Custom Applications
•
Custom Application Requests
14-10 Oracle Application Management Pack for Oracle E-Business Suite Guide
File Source Mapping
File Source Mapping captures all the required metadata for retrieving custom files from
a source control or file system repository. Creating a File Source Mapping is usually
performed once as a setup step. You may create one or more File Source mappings, if
required.
The main File Source Mapping page allows you to search for a File Source Mapping by
name. The table lists each mapping with the following:
•
Name - The name given to the mapping. Click on the link to go to the Update File
Source Mapping page.
•
Host Name - The name of the host from where the source control or file system is
accessible.
•
Source Type - The type of the source control system. Valid values are: SubVersion,
CVS, File System, or Others.
•
Owner - The user who created this File Source Mapping.
•
Last Updated - The date and time the mapping was last updated.
•
Enabled - Specifies if the mapping is enabled or disabled. You can enable/disable a
mapping in the Update File Source Mapping page.
•
Public - Whether the given mapping is public. If a mapping is public, all users can
view it, but only the owner and Super Administrators can edit it.
•
Delete - Use the icon provided to delete a mapping. You can delete a mapping only
Customization Manager 14-11
when no package is associated with it.
To create a File Source Mapping:
Perform the following steps to create your File Source Mapping. Note that for the
checkout command, you should follow the checkout command syntax provided on the
page.
1.
Enter the name for the file source mapping.
2.
Enter the host name of the file source mapping. You can select the host from the list
of values.
3.
Enter the stage path. This should be a folder on the given host with read/write
access which is used for temporary processing during checkout.
4.
Select the source control type. Possible values are:
•
SubVersion
•
CVS
•
File System
•
Others
The source control type is used to default the checkout command. However, the
checkout command can be modified based on your source control or file system
configuration. If your source control system is not among CVS, SubVersion or File
System, then you may choose "Others" and enter your checkout command.
5.
Enter the complete command, with required parameters, to be used to check out
files. The parameters that can be used to construct the checkout command are
mentioned under the "Checkout Command Syntax: section. Oracle strongly
recommends that you to test the checkout command by using the "Test Checkout
14-12 Oracle Application Management Pack for Oracle E-Business Suite Guide
Command" option. It is also important to ascertain that the user provided within
the "host" credentials has the correct permissions on the given host selected for
checkout.
6.
Optionally enter the environment script to be run before files are checked out, to set
any environment parameters ore preprocessing, if required.
7.
Enter a description for your reference.
8.
Mark the file source mapping as Public if desired.
If a file source mapping is marked as Public, any user can view it and use it to
create a package. However, only the owner and Super Administrators can edit the
file source mapping.
This feature is typically useful when you would want the system administrator to
create one mapping and enable all developers to use them, without having them
know the details of the source control system.
Note that a Super Administrator can see all transactions. A Super Administrator
can access all file source mappings, Oracle E-Business Suite mappings, reports, and
packages. A Super Administrator can also modify and delete them.
9.
The "Test Command" feature allows you to test the checkout command and the
version command provided on the remote checkout host. It is strongly
recommended that you test the checkout command and version command to help
prevent any failures during checkout while creating a package. Enter Test Checkout
Command information
Enter the following:
•
Product
•
Source Path
•
File Name
•
Version
Customization Manager 14-13
•
Language
•
Branch - If your source control system requires it and if %branch% token is
included within the checkout command.
•
Tag - If your source control system requires it and if %tag% token is included
within the checkout command.
•
User Name - If your source control system requires it and a %user_name%
token is included within the checkout command.
•
Password - If your source control system requires it and a %password% token
is included within the checkout command.
Use the Preview or Test button to preview or test the checkout command and
version command. The results will be shown in the Command Preview or Test
Results field.
To create a File Source Mapping using the "Create Like" option:
Select the "Create Like" button to create a file source mapping by copying the details
from an existing file source mapping. This procedure can be used typically to create a
mirror copy of the file source mapping or create another file source mapping with
minor modifications without having to enter all the relevant details about the file source
mapping.
To update a File Source Mapping:
You can update a File Source Mapping by clicking on its name listed in the main File
Source Mapping page. You can only update the fields described below. It is not possible
to update the host for a given file source mapping.
Note that you can check or uncheck the Enabled box to enable or disable a file source
mapping.
1.
2.
Enter the source control type. Possible values are:
•
SubVersion
•
CVS
•
File System
•
Others
Enter the complete command, with required parameters, to be used to check out
files.
14-14 Oracle Application Management Pack for Oracle E-Business Suite Guide
3.
Enter the stage path. The stage path is the location of the directory, with write
permissions, to where the files would be checked out.
4.
Optionally enter the environment script to be run before files are checked out, to set
environment parameters.
5.
Enter a description.
6.
Mark the file source mapping as Public if desired. If it is marked as Public, all users
can view the mapping. However, only the owner and Super Administrators can
edit it.
7.
The separate preview and test section is provided so that you can preview the
checkout command and test it on the remote checkout host. It is strongly
recommended that you test the checkout command before actually using it to create
a package.
Enter the following:
•
Product
•
Source Path
•
File Name
•
Version
•
Language
•
Branch
•
Tag
•
User Name
•
Password
Use the Preview or Test button to preview or test the checkout command. The
results will be shown in the Command Preview or Test Results field.
Example of a File Source Mapping with Parameters
The following table provides information on the file source mapping parameters and
sample values for each parameter.
Customization Manager 14-15
Name
Description
Related User
Interface Page
Sample Value
%product_cod
e%
Substitution variable for
the product code
Create/Update
Package - File Listing
xxco
%file_path%
Substitution variable for
source path
Create/Update
Package - File Listing
patch/115/import
%file_name%
Substitution variable for
file name
Create/Update
Package - File Listing
Custom_Responsibilities.l
dt
%version%
Substitution variable for
version
Create/Update
Package - File Listing
115.32
%lang_code%
Substitution variable for
language
Create/Update
Package - File Listing
US
%branch%
Substitution variable for
branch
Create/Update
Package - General
Prod13
%tag%
Substitution variable for
tag
Create/Update
Package - General
Release12c
%user_name%
Substitution variable for
username
Create/Update
Package - General
developer1
%password%
Substitution variable for
password
Create/Update
Package - General
welcome1
Here is the syntax of a checkout command with the parameters:
svn cat
file:///usr/local/svn/%product_code%/%file_path%/%lang_code%/%file_name%
--username %user_name% --password %password% > %file_name%
Here is the above checkout command with values substituted for the parameters:
svn cat
file:///usr/local/svn/xxco/patch/115/import/US/Custom_Responsibilities.l
dt --username developer1 --password <password> >
Custom_Responsibilities.ldt
14-16 Oracle Application Management Pack for Oracle E-Business Suite Guide
E-Business Suite Mapping
Creating an E-Business Suite Mapping is an optional setup step. This mapping is used if
Java or PLD file compilation is required. It is also used for report generation. The
E-Business Suite Mapping indicates the Oracle E-Business Suite instance which would
be used to compile Java or PLD files or used for report generation. Please note that all
operations on this instance are read-only and using an instance for E-Business Suite
mapping cannot cause any kind of change on the given instance via Customization
Manager.
The main E-Business Suite Mapping page allows you to search for an E-Business Suite
Mapping by name. The table lists each mapping with the following:
•
Name - The name given to the mapping. Click on the link to go to the Update
E-Business Suite Mapping page.
•
Instance Name - The name of the Oracle E-Business Suite instance.
•
Release - Release level of the Oracle E-Business Suite instance.
•
Owner - The user who created this mapping.
•
Last Updated - The date the mapping was last updated.
•
Enabled - Specifies if the mapping is enabled or disabled. You can enable/disable a
mapping in the Update E-Business Suite Mapping page.
•
Public - Whether this E-Business Suite Mapping is available for all users. If a
mapping is marked as Public, all users can view it, but only the owner and Super
Administrators can edit it.
•
Delete - Use the icon provided to delete a mapping. You can delete a mapping only
when there are no packages associated with it.
Customization Manager 14-17
Select the Create button to create a new mapping.
To create an E-Business Suite Mapping:
Use the following steps to create an E-Business Suite Mapping.
1.
Enter a name for the mapping.
2.
Enter the name of the reference Oracle E-Business Suite instance. Options for this
instance are automatically discovered by Oracle Application Management Pack for
Oracle E-Business Suite.
3.
Mark the mapping as Public, if desired.
If an E-Business Suite Mapping is marked as Public, any user can view it and use it
to create a package, but only the owner and Super Administrators can edit it.
This feature is typically useful when you would want the system administrator to
create one mapping and enable all developers to use them, without having them
know the details of the source control or Oracle E-Business Suite system.
Note that a Super Administrator can see all transactions, including E-Business Suite
mappings. A Super Administrator can access all file source mappings, E-Business
Suite mappings, reports, and packages. A Super Administrator can also modify and
delete them.
4.
Enter the stage path. The stage path is the location of the directory with write
permissions used for temporary processing during compilation and build process.
5.
Enter the prepend classpath. This field is valid only with Java files; this classpath is
prepended to these files when a package is built. This can be used to specify any
third party libraries if you custom java files have dependencies on them.
6.
Enter a description for the mapping.
14-18 Oracle Application Management Pack for Oracle E-Business Suite Guide
To create an E-Business Suite Mapping using the "Create Like" option:
Select the Create Like button to create an E-Business Suite Mapping by copying the
details from an existing E-Business Suite Mapping. This procedure can be used typically
to create a mirror copy of the E-Business Suite mapping or create another E-Business
Suite Mapping with minor modifications without having to enter all the relevant details
about the E-Business Suite Mapping.
To update an E-Business Suite Mapping:
To update an E-Business Suite Mapping, click on its name in the main E-Business Suite
Mapping page. Note that you cannot update the E-Business Suite Mapping name or the
instance mapping here.
1.
Check the Enabled box if you want the E-Business Suite Mapping to be active.
2.
Check or uncheck the "Public" box depending on whether the mapping should be
viewable by all users.
3.
Enter the stage path. The stage path is the location of the directory with write
permissions to where files would be compiled.
4.
Enter the prepend classpath. This field is valid only with Java files; this classpath is
prepended to the environment classpath during package compilation.
5.
Enter a description for the mapping.
Creating a Package
Use the following procedures to create packages:
To create a package:
1.
Enter general information for the package. The Package ID is an auto-generated
unique number.
Customization Manager 14-19
•
Package Name - Enter a user-friendly name for the package.
•
Product - Enter the owning product application. This product can be a custom
product created in Oracle E-Business Suite (not in Customization Manager).
•
Package Type - Enter the package type. This value is for your own classification
and convenience for searching and cataloging. No validation is performed on
this field.
•
Description - Enter a description for your reference. This description becomes
part of the package readme.
•
File Source Mapping - Enter the File Source Mapping for this package. Select
from the list of previously-defined mappings.
•
Branch - Enter the branch for the source control system, if required. The branch
will be substituted for the %branch% token within your checkout command.
•
Tag - Enter the tag for the source control system, if required. The tag will be
substituted for the %tag% token within your checkout command.
•
User Name - Enter the user name to connect to the source control system, if
required. The User Name will be substituted in the "%user_name%" parameter
of the checkout command.
•
Password - Enter the password for the above user name, if required. The
password entered here would be substituted for the %password% token within
your checkout command.
•
Upload Manifest - If you have a file manifest in a comma-separated value (CSV)
format on your computer, you can upload it here.
The following is an example of a file manifest:
14-20 Oracle Application Management Pack for Oracle E-Business Suite Guide
#Product,SourcePath,FileName,Version,Type,DestPath,LangCode
xxco,java\r12\reporter\cpserver,XXCOCustomCp.java,115.1,java,java
/r12/reporter/cpserver,Generic
xxco,patch\115\import,XXCOConcprog.ldt,115.9,software
ldt,patch/115/import,US
xxco,patch\115\import,XXCOMenu.ldt,,software
ldt,patch/115/import,US
xxco,patch\115\import,XXCOReqGroup.ldt,115.3,software
ldt,patch/115/import,US
xxco,patch\115\import,XXCOResp.ldt,115.7,software
ldt,patch/115/import,US
xxco,patch\115\import,XXCOUser.ldt,115.6,software
ldt,patch/115/import,US
xxco,forms,XXCOFRM.fmb,,fmb,forms,US
2.
Enter the file listing.
You may add or remove file entries manually from the File Listing page.
Alternatively, you may also include file entries from the File Metadata Repository
using the Include Files button.
For each file, enter the following:
•
Product - The owning product application. This product can be a custom
product created in Oracle E-Business Suite (not in Customization Manager).
This would be substituted in the "%product_code%" parameter in the checkout
command.
•
Source Path - The source directory for the file on the source control system or
file system. This would be substituted in the "%file_path%" parameter in the
checkout command.
Customization Manager 14-21
•
File Name - The name of the file. This would be substituted in the
"%file_name%" parameter in the checkout command.
•
Version - Optional. The version of the file. The version is only needed if the
checkout command will use the version information. This would be substituted
to the "%version%" parameter in the checkout command.
•
Type - The type of the file. Ensure that correct type is selected for the file entry.
The Oracle Applications DBA (AD) patch driver instructions are based on the
type selected. For details, please refer to the appendix describing the file types.
•
Destination Path - The destination path for the file in the Oracle E-Business
Suite instance excluding the language subdirectory relative to the product top.
For common file types, a default destination path is provided automatically but
this default value can be overridden.
The destination path must be an AD-compliant destination path according to
Oracle E-Business Suite standards.
The destination path in the patch driver is automatically suffixed with the
language code chosen with exception to "Generic".
Note: For "Generic" files, ensure that the destination path is
entered correctly: For example,
Product: XXCO
Source Path: forms/US
File Name: IDC.fmb
Destination Path: forms
Language: US
The final destination path is "forms/US" but the values are
entered separately.
•
Language - Optional. The language code for the file. Select the language code as
needed to generate the respective NLS patch.
•
Status - The status can be one of the following:
•
Valid - Indicates that the entry is valid.
•
Review - Indicates that the entry needs to be reviewed.
•
Duplicate - Indicates that the entry is duplicated.
•
Blank - Indicates that one of the required fields is blank.
14-22 Oracle Application Management Pack for Oracle E-Business Suite Guide
Important: Customization Manager strongly recommends that each
file included within a customization package has an
Oracle-compliant source header present within the file.
The following is a sample Oracle compliant header:
$Header: sample.txt 10.1 2012/04/06 09:38 lmathur
noship $
The header contains the following elements:
3.
•
Filename
•
Revision ID - This needs to be incremented every time a file is
checked in
•
Date and time of checkin
•
Author
•
Shipment state - ship/noship
Enter in additional information for your package.
Customization Manager 14-23
•
Enter the E-Business Suite information (Conditionally required). The E-Business
Suite mapping information is only required when the package contains at least
one Java or PLD file. You can select the Oracle E-Business Suite Mapping from
the list provided.
•
Enter the Package Metadata. You can enter the instructions for package
application here. These instructions will become part of the package readme.
•
Enter Comments. These comments will be recorded as part of the package
history for tracking changes made to the package.
•
Enter Prerequisite Information.
For Release 11i packages, you can enter one or more prerequisite patch
numbers that can be used for deployment validation with AD utilities.
For Release 12 (and higher) packages, enter in the prerequisite patch numbers
that will be used in validation when the package is deployed through Patch
14-24 Oracle Application Management Pack for Oracle E-Business Suite Guide
Manager. Note that this validation is done only if you use the Check
Prerequisites button in the Patch Details page when creating a patch run in
Patch Manager.
Note: Prerequisite information entered here for Release 12
packages is only used in deployment by Patch Manager.
•
Enter Mailing List information.
You can enter e-mail addresses for people who should be sent notifications
about the package's creation status on the event of success or failure. It is
recommended to have e-mail notifications set so that the appropriate users can
be notified about the package success or failure.
4.
Click Submit.
To create a package using the "Create Like" option:
Customization Manager allows you to create a package by copying the details from an
existing package. This procedure can be used typically to create a mirror copy of the
package or create another package with minor modifications without having to enter all
the relevant details about the package.
Note: If you are using a version of Mozilla Firefox higher than 5, the
Create Like page is not loaded automatically. To work around this
issue, click the Refresh button on the page.
Customization Manager 14-25
To create a package using the Upload option:
If you have any legacy custom patches, the same can be uploaded to the Customization
Manager repository in context to a new customization package. Click the Upload
button from the package search page to upload an existing custom patch. While
uploading a custom patch, the following information is required:
•
Package Name
•
The release to which the custom patch belongs to.
•
The custom product/application associated with the custom patch
•
Package type: only for classification purposes
•
Description for your reference
•
Any specific instructions for applying the custom patch
You can upload one or more custom patches (NLS patches) to this customization
package. However, it is important that all of them must be associated with the same
unique patch number. Clicking the Submit button creates a customization package with
the status "Succeeded". This customization package can now be deployed just like any
other customization package and can be "Released" or "Obsoleted", when required.
14-26 Oracle Application Management Pack for Oracle E-Business Suite Guide
Updating a Package
To update a package, find the package listing in the main Customization Manager page
and select the icon in the Update column.
To update a package's definition:
1.
2.
Enter general information for the package. The Package ID is an auto-generated
unique number and cannot be updated. The Package Name cannot be updated as
well.
•
Release - Choose the release for the package.
•
Product - Enter the owning product application. This product can be a custom
product created in Oracle E-Business Suite (not in Customization Manager).
•
Package Type - Enter the package type. This value is for your own classification
and convenience for searching and cataloging. No validation is performed on
this field.
•
Description - For your reference.
•
File Source Mapping - Enter the File Source Mapping for this package. Select
from the list of previously-defined mappings.
•
Branch - Enter the branch for the source control system, if required. The branch
will be substituted for the %branch% token within your checkout command.
•
Tag - Enter the tag for the source control system, if required. The tag will be
substituted for the %tag% token within your checkout command.
•
User Name - Enter the user name to connect to the source control system, if
required. The User Name and Password (below) will be substituted in the
"%user_name%" and "%password%" parameters of the checkout command.
•
Password - Enter the password for the above user name, if required.
•
Upload Manifest - If you have a file manifest as a comma-separated value (CSV)
format on your computer, you can upload it here.
You may add or remove file entries manually from the File Listing page.
Alternatively, you may also include file entries from the File Metadata Repository
using the Include Files button.
For each file, enter the following:
•
Product - The owning product application. This product can be a custom
Customization Manager 14-27
product created in Oracle E-Business Suite (not in Customization Manager).
3.
•
Source Path - The source directory for the file on the source control system or
file system. This would be substituted in the "%file_path%" parameter in the
checkout command.
•
File Name - The name of the file. This would be substituted in the
"%file_name%" parameter in the checkout command.
•
Version - Optional. The version of the file. The version is only needed if the
checkout command will use the version information. This would be substituted
in the "%version%" parameter in the checkout command.
•
Type - The type of the file. Ensure that correct type is selected for the file entry.
type. The Oracle Applications DBA (AD) patch driver instructions are based on
the type selected.
•
Destination Path - The destination path for the file in the Oracle E-Business
Suite instance excluding the language subdirectory. This must be an
AD-compliant destination path according to Oracle E-Business Suite standards.
The destination path in the patch driver is automatically suffixed with the
language code chosen with exception to "Generic". The destination path for a
file entry is defaulted to the source path, which may be modified if necessary.
•
Language - Optional. The language code for the file. Select the language code as
needed to generate the respective NLS patch.
Enter in additional information for the package.
•
Enter the E-Business Suite mapping information (Conditionally required). The
E-Business Suite mapping information is only required when the package
contains at least one Java or PLD file. You may select the E-Business Suite
Mapping from the list provided.
•
Enter the Package Metadata. You can enter the instructions for package
application here. These instructions will become part of the package readme.
•
Enter Comments. These comments will be recorded as part of the package
history for tracking changes made to the package. As a best practice, it is
recommended to add comments describing the changes done to the package
and other details. Any comments added are tracked with the package history
information.
•
Enter Prerequisite Information.
For Release 11i packages, you can enter one or more prerequisite patch
numbers that can be used for deployment validation with AD utilities.
14-28 Oracle Application Management Pack for Oracle E-Business Suite Guide
For Release 12 (and higher) packages, enter in the prerequisite patch numbers
that will be used in validation when the package is deployed through Patch
Manager. Note that this validation is done only if you use the Check
Prerequisites button in the Patch Details page when creating a patch run in
Patch Manager.
Note: Prerequisite information entered here for Release 12
packages is only used in deployment by Patch Manager.
•
4.
Enter in Mailing List information. You can enter e-mail addresses for people
who should be sent notifications about the package's update status on the event
of success or failure.
Click Submit.
Saving a Package
If, in the process of creating or updating a package definition, you want to save the
package definition before submitting a request to have Enterprise Manager actually
build the package, click the Save button on the File Listing page or the Submit page of
the Create/Update process. Your package definition will be saved and it will appear on
the main Customization Manager page with a status of Saved.
Searching for a Package
You can perform an Advanced Search for packages with the following criteria:
•
Name
•
ID
•
Product
•
Instruction Contains
•
Prerequisite Patch
•
Description Contains
•
Owner
•
Release
•
Package Type
Customization Manager 14-29
•
Standards Check Results
•
Status
•
Language
•
Public (Choose whether you want results with only Public packages, no Public
packages, or either)
•
Contains File
•
Contains File with Version (Used in conjunction with "Contains File")
•
Updated within (Days)
•
File Source Mapping Name
•
Branch
•
Tag
•
E-Business Suite Mapping Name
•
Last Updated By
Viewing Package Details
View package details by selecting its name in the search results table on the main
Customization Manager page.
Package Details
The following details are shown in this region:
•
Package ID
•
Release
•
Standard Checker Results - For detailed results, click on the link.
•
Created - The date and time the package was created.
•
Last Updated - The date and time the package was last updated.
•
Last Updated By - The user who last updated the package.
•
Status - The status of the package. Possible values are: In Progress, Succeeded,
14-30 Oracle Application Management Pack for Oracle E-Business Suite Guide
Saved, Failed, Released, and Obsoleted.
•
Product
•
Package Type
•
E-Business Suite Mapping Name – If applicable.
•
File Source Mapping Name
•
Owner
•
Uploaded: Whether this package was created as a result of a patch upload.
•
Public: Whether this package is shared across all users.
History Details (View Package History)
The package history provides a chronological view of all the important events in the
lifecycle of a package.
Select the History Details button to go to the View Package History page, which
provides high-level history tracking of the package, including the timestamp and
user-entered comments for the following events:
•
Creation of package
•
Update of package
•
Release of package
You can also drill down to the Oracle Enterprise job details for the package creation and
any updates.
Customization Manager 14-31
View Log
Use the View Log button to view the most recent Oracle Enterprise Manager job details
for the package.
Download Log
Use the Download Log button to download the consolidated log for the package
creation.
Description
Any description entered for the package is shown here.
Instructions
Instructions entered in the Package Metadata field are shown here.
Patch Downloads
For each patch generated, the following information is shown here:
•
File Name - Click on the patch file name link to download the patch.
•
Language - The language of the patch.
•
Size - The size of the patch.
•
Readme - Click on the icon to download the readme. The readme file is in HTML
format and includes the package description and package metadata.
Typically, each customization package could be associated with one or more language
patches.
Manifest
The file manifest is shown here. Details for each file include Product, Source Path, File
Name, Language, Destination Path, Version, and Last Updated timestamp.
Use the Download Manifest button to download the manifest as a comma-separated
values (CSV) file, viewable in Microsoft Excel.
You can search for a specific file by entering in the file name in the "Locate File" field
and clicking Go. Wildcard characters "%" and "*" are supported here.
14-32 Oracle Application Management Pack for Oracle E-Business Suite Guide
Technology Stack Details
The Technology Stack details for a package provide a snapshot of the technology stack
properties for the Oracle E-Business Suite instance where the package was compiled.
Patch Manager, when deploying the patch, checks the compatibility of the details
specified here with the environment to which the package is being deployed. You can
first check Technology Stack compatibility yourself by running "Instance Comparison"
reports.
Attachments
You may add or remove any associated documentation like project plan, design
documents, and so on. For each attachment, the following is listed:
•
File Name
•
Description
•
Last Updated timestamp
You can remove an attachment from the package using the Delete icon. If the package is
Released or Obsoleted, then the attachments cannot be deleted.
Prerequisite Information
Any prerequisite patches are listed here along with any comments.
Mailing List
View the e-mail addresses for people who should be sent notifications about the
package, on the event of success or failure.
Package History
View the history of the package by clicking the History Details button. The package
history captures a trail of all major actions upon the package with the comments
captured.
Customization Manager 14-33
Updating Package Metadata
Package metadata can be updated to change the status of the package or to push the file
entries metadata in the package to the File Metadata Repository. The "Update Package
Metadata" page enables you to do the following:
•
Change the status of the package. You can release or obsolete a package by
changing its status to "Released" or "Obsoleted". Once a package is updated to the
"Released" status, it can no longer be updated and becomes accessible to other
users. Once a package is updated to the "Obsoleted" status, it can no longer be
updated or deployed.
Note: With the Change Approval Framework, once an approver
approves a request to release/obsolete a customization package
from a user, the package is released/obsoleted. The user does not
need to release/obsolete the package explicitly after the approval.
Tip: Add comments for future reference when you release or
obsolete a package. For example, state the reason why you are
obsoleting a package.
•
Add file metadata entries to the File Metadata Repository.
•
If you are the owner of the package or super administrator, you can mark the
package as "Public" which entitles the package to be shared across all users for
view/update.
•
Add comments which are recorded in the package history for the above changes.
14-34 Oracle Application Management Pack for Oracle E-Business Suite Guide
Standards Checker Results
The results of the standards checker can be accessed by clicking on the standards
checker status.
The standard checker results can also be downloaded as a CSV format file by clicking
the Download Results button.
To view details about the standard checker validations for a given file, click on the
overall status against each file. The details about the standard checker validations
include the standard name, result and the message.
In case the standard checker completes with "Error", the package processing is aborted
and there are no patches generated.
Package Reports
Customization Manager offers powerful reporting capabilities to help you document,
compare and track your customizations. You can generate three types of reports on
packages:
•
A Standard report gives you details on a single package, including technology stack
requirements and the file manifest. You might use this to document customizations.
•
A Comparison report allows you to compare two packages. For example, you might
want to compare their technology stack snapshots or the versions of the files
included in the packages.
•
An Instance Comparison report allows you to compare the details of the package
with that of an actual Oracle E-Business Suite instance. The details which are
compared include custom application, file driver file entries, file manifest and
versions, and the technology stack snapshot of a package to the technology stack
properties of a given instance. By doing this comparison you can determine
possible compatibility issues of the package with the instance and assess the
possible impact/possible issues before actually applying the patch.
The technology stack compatibility information and the report is also available from the
Patch Manager interview process by clicking the "Technology Stack Report" icon on the
Patch Details page.
Important: Oracle strongly recommends that you generate an Instance
Comparison report for each custom package and the instance where it
is intended to be deployed to identify any technology stack
incompatibilities before actually applying the patch.
Reports can be accessed from the Reports link on the Change Management dashboard,
or from the Reports link under Related Links on the Package Search page.
Customization Manager 14-35
Creating a Report
To create a report, you can
•
Select a package from the Package Search results page and click Report
•
Click Report button on the View Package page, or
•
Click the Create button on the Package Report page.
To create a Standard Report:
A Standard report gives you details on a single package, including technology stack
requirements and the file manifest.
1.
Enter in a user-friendly name for your report.
2.
Choose Standard for the Report Type.
3.
Enter the package you want the report to be based on in the Package field. This
package must have the status of Succeeded, Released, or Obsoleted.
4.
Enter the Report Format. Options are:
5.
•
PDF (Portable Document Format)
•
RTF (Rich Text Format)
•
XLS (Microsoft Excel format)
Enter the Oracle E-Business Suite Mapping to be used for the report generation.
14-36 Oracle Application Management Pack for Oracle E-Business Suite Guide
6.
Click Submit.
To create a Comparison Report:
A Comparison report allows you to compare two packages. For example, you might
want to compare technology stack requirements or versions of the files included in the
packages.
1.
Enter in a user-friendly name for your report.
2.
Choose Comparison for the Report Type.
3.
Enter the package name in the Primary Package field. This package must have the
status of Succeeded, Released, or Obsoleted.
4.
Enter the package name in the Secondary Package field. This package must have the
status of Succeeded, Released, or Obsoleted.
5.
Enter the Report Format. Options are:
•
PDF (Portable Document Format)
•
RTF (Rich Text Format)
•
XLS (Microsoft Excel format)
6.
Enter the Oracle E-Business Suite Mapping to be used for the report generation.
Please note that this instance would be only used to publish the report using BI
Publisher.
7.
Click Submit.
Customization Manager 14-37
To create an Instance Comparison Report:
An Instance Comparison report allows you to compare the technology stack properties
of a package to the technology stack properties of a given instance. By doing this
comparison, you can tell if the package can be properly deployed on the instance.
In addition, the report lists any missing entries in the file driver file, and compares files
and versions within the package to those of the instance.
1.
Enter in a user-friendly name for your report.
2.
Choose Instance Comparison for the Report Type.
3.
Enter the package you want the report to be based on in the Package field. This
package must have the status of Succeeded, Released, or Obsoleted.
4.
Enter the Report Format. Options are:
5.
•
PDF (Portable Document Format)
•
RTF (Rich Text Format)
•
XLS (Microsoft Excel format)
Enter the Oracle E-Business Suite Mapping to be used for the report comparison.
The Oracle E-Business Suite instance referred by this mapping would be the one
which would be compared against the package. As a best practice, it is
recommended to generate an instance comparison report for every instance where
you intend to deploy the package, to identify any possible incompatibilities/issues
before actually applying the package.
14-38 Oracle Application Management Pack for Oracle E-Business Suite Guide
6.
Click Submit.
Viewing a Report
To access reports, navigate to the Change Management tab > Package Report, or to the
Customization Manager home page > Package Report (under Related Links).
In the Package Report search results table, the following is shown for each report:
•
Name - The name of the report.
•
Type - The type of the report; either Standard, Comparison, or Instance
Comparison.
•
Primary Package - The primary package on which the report is based.
•
Secondary Package (if any) - For Comparison reports, the second package used in
the comparison.
•
E-Business Suite Mapping - The E-Business Suite Mapping used in the report
generation or comparison.
•
Format - The format of the report; either PDF, RTF, or XLS.
•
Status - The status of the report.
•
Owner - The user who created the report.
•
Last Updated - The Last Updated timestamp for the report.
Customization Manager 14-39
•
Download - Click on the link provided to download a ZIP file containing the report.
•
Details - Click on the Details icon to view details on the report submission job. This
link takes you to the Oracle Enterprise Manager Deployments Status page for the
report submission.
•
Delete - Click on the Delete icon for the report to delete the report.
Standard Report Output File
The Standard Report output file has three sections:
•
Package Details - Information pertaining to the package's definition.
•
Technology Stack Information - Properties and values of the technology stack of the
instance mapped through the Oracle E-Business Suite Mapping for the package.
•
File Manifest - The listing of the files in the package, including their respective
product, source path, name, version, language, and type.
Comparison Report Output File
The Comparison Report output file has three sections:
•
Package Details - Information pertaining to the packages' definitions.
•
Technology Stack Information - This section shows a comparison of the values of
the two packages' technology stack details.
•
File Manifest - This section shows a comparison of the versions of each given file in
the two packages.
Instance Comparison Report Output File
The Instance Comparison Report output file has six sections:
•
Package Details - Information pertaining to the package's definition.
•
Oracle E-Business Suite Instance Information - Basic information for the instance
used in the report comparison. Information includes name, patch level for
Applications DBA (AD), patch level for Oracle Application Object Library (FND),
and the database release information.
•
Missing custom products/applications.
•
Missing entries in file driver file.
14-40 Oracle Application Management Pack for Oracle E-Business Suite Guide
•
File comparison to report missing files or version differences.
•
Technology Stack Details - For each given property, this table lists the value for the
package and the Oracle E-Business Suite instance, and how they compare to each
other.
Searching for a Report
You can search for a report by its name on the main Package Report page, or click the
Advanced Search link to search based on additional criteria, including:
E-Business Suite Mapping - The E-Business Suite mapping used for the report
generation or comparison.
•
Primary Package - The primary package for the report.
•
Secondary Package - The secondary package, if any. The secondary package would
be used in Comparison Reports.
•
Type - The type of report; either Standard, Comparison, or Instance Comparison.
•
Report Format - The format chosen for the report; either PDF, RTF, or XLS.
Releasing and Sharing a Package
After a package is released, it is implicitly shared with other users to deploy. Use the
Update Package Metadata page to release a package. See: Updating Package Metadata,
page 14-33.
Note: With the Change Approval Framework, once an approver
approves a request to release a customization package from a user, the
package is released. The user does not need to release the package
explicitly after the approval.
Before you deploy a custom package in Patch Manager, you should run the Instance
Comparison Report to compare the technology stack properties of the package with
those of the instance to which the package is being deployed. Patch Manager does not
stop the deployment of a patch if the technology stack properties are not compatible, so
you should make your best judgement based on the Instance Comparison Reports.
Customization Manager 14-41
Maintaining the File Metadata Repository
The File Metadata Repository stores metadata information on each file. It can be used as
a cataloging repository for all custom files within your enterprise.
The File Metadata Repository is also aware of the objects within the custom files. This
capability typically applies to SQL scripts and PL/SQL packages where the objects are
tables, indexes, sequences, views, and so on.
The system can parse and discover objects within custom files when added to the File
Metadata Repository. This can be initiated from the "Update Package metadata" screen
on clicking the box "Add file metadata to file repository".
Examples of custom objects include:
•
Tables
•
Views
•
Mviews and Mview logs
•
Triggers
•
PL/.SQL package names
•
Indexes
You can view and updates objects populated for a give file. You can also search for files
containing specified objects and include them during package creation or update.
Search capabilities are limited to:
14-42 Oracle Application Management Pack for Oracle E-Business Suite Guide
•
PL/SQL spec and body (all formats)
•
SQL files
•
Oracle Application Framework XML files
•
XDF
The information on a file can be uploaded to the repository in one of three ways:
•
By uploading a package's file manifest in CSV format to the repository.
•
By adding metadata for an individual file manually to the repository.
•
By updating the metadata for a file already in the repository.
You can add metadata to the repository using the "Add file metadata to file repository"
option in the Update Metadata page.
The File Metadata Repository can be accessed from its link on the Change Management
Dashboard under Customization Manager.
You can search for a file by entering the filename in the Search field on the main File
Metadata Repository page. Alternatively, use Advanced Search to search for its file
using one or more of the following: Filename, Product, Language, Source Path,
Destination Path, or Object Name.
Also, during the package create/update flow, you can search for files or files referring to
objects within the file metadata repository using the Include Files button.
To upload a file manifest:
1.
Select the Upload Manifest button from the main File Manifest Repository page.
2.
Select your file manifest file using the Browse button for the File Manifest field.
3.
Optionally add a description.
4.
Click Submit.
To upload an individual file:
1.
Enter the name of the file.
2.
Enter the product to which the file belongs.
3.
Enter its source path.
4.
Enter the destination path.
Customization Manager 14-43
5.
Enter the language for the file.
6.
Optionally enter a description.
7.
Click Submit.
To update the metadata for a file already in the File Metadata Repository:
1.
Select the Update icon for the file in the Search results table in the main File
Metadata Repository page.
2.
Update the file name, product, source path, destination path, language, and/or
description as desired.
3.
Click Submit.
You can associate one or more customization objects to a given file in the Related
Objects region. For instance, a PLS file might be associated with a PL/SQL
procedure name as one of the objects. You might update a given file entry to
associate one or more customization objects to it. This capability allows you to
catalog and later search for customization objects using the Advanced Search option
within the File Metadata Repository. However, there are currently no validation
checks built into the system that use this information during package creation or
deployment.
Managing Custom Applications
You can manage your custom applications via the dashboard. The common dashboard
allows you to:
•
View custom applications and instance associations
•
Hide and unhide the custom applications within Customization Manager
•
Register a new custom application
•
Validate an already registered custom application
•
If a validation request fails, run the Auto-Correct feature for the application
Navigation: The Custom Applications page is accessible from the Change Management
Dashboard > Customization Manager region > Custom Applications link.
14-44 Oracle Application Management Pack for Oracle E-Business Suite Guide
•
A custom application "definition" is de-coupled from registration.
Once an application is defined, it can be registered on one or more
instances.
•
A user must have the "Approve splice request" privilege to hide
and unhide custom applications. By default, hidden custom
applications will be invisible. A user can check "show hidden
custom applications" box to view the hidden custom applications.
To define a new custom application:
1.
Navigate to the Custom Applications page. Select "New Custom Application" from
the Add drop-down list and click Go. The Define Custom Applications page
appears.
Customization Manager 14-45
2.
Specify an Application Short Name for your application. Note that only
alphanumeric characters are allowed, and letters must be lowercase. The
application short name is recommended to be prefixed with "xx".
3.
Specify an Application Name for your application.
4.
Optionally provide a description.
5.
Click Submit to save your work.
Note that a custom application definition is not associated with any specific Oracle
E-Business Suite instance but can be used to register the given custom application on
one or more Oracle E-Business Suite instances.
To discover an existing custom application:
1.
Navigate to the Custom Applications page. Select "Existing Custom Application"
from the Add drop-down list and click Go. The Discover Custom Applications page
appears.
14-46 Oracle Application Management Pack for Oracle E-Business Suite Guide
2.
Select the custom application you wish to discover and click Submit. You can use
the Search feature to narrow down the results the table.
To validate a custom application:
Existing registered applications can be validated.
For more information on validation, see: Validation of Custom Applications: Examples,
page E-1.
1.
Navigate to the Custom Applications page. Click the "Custom Application
Requests" link under Related Links. The Custom Application Requests page
appears. Select a request, and click the Validate button. Alternatively, you can also
select the instance and click the Validate button from the custom application view
details screen.
Customization Manager 14-47
2.
Enter in the Application Short Name for the application. You can use the LOV
provided. Note that the Application Name defaults in.
3.
Enter in the Oracle E-Business Suite instance. You can use the LOV provided. Note
that the Preferred Credentials need to be set for this Oracle E-Business Suite
instance.
4.
Select "Generate Readiness Report for Online Patching" if desired. It reports
Edition-Based Redefinition (EBR) violations in the specified custom schema that
include objects not complying with the EBR rules about non-editioned objects (data
storage objects such as tables and materialized views), and referencing editioned
objects (code objects such as: packages, triggers, object types, and so on). This report
also lists several naming standard violations that must be fixed prior to applying
the online patching enablement patch for Release 12.2.
5.
Click Submit. A job to validate the custom application will be submitted.
Validation is based on certain standards and is provided by Oracle Applications
DBA (AD) utilities.
To run Auto-Correct on a custom application request
If your request to validate a custom application fails, you can use the Auto-Correct
feature to help you make the custom application conform to Oracle E-Business Suite
standards.
Note: This feature can only be used on failed validation requests.
The user who submits the auto-correction request must have the splice request
privilege.
The request must be approved for execution using Change Approval.
1.
Navigate to the Custom Applications page. Click the "Custom Application
Requests" link under Related Links. The Custom Application Requests page
appears. Select a request and click the Auto-Correct button.
Note: If you choose a request that did not fail in the Validation step,
you will receive the error "Only failed validation requests are
shown for auto-correction."
14-48 Oracle Application Management Pack for Oracle E-Business Suite Guide
2.
In the Auto-Correct Custom Application page, enter the following:
•
Custom Application's Schema Password. If you do not enter a value, the
application short name is used by default.
•
Email addresses for users to be notified regarding this request. (Optional)
•
Justification (Required)
3.
Click Submit.
4.
You can view your request in the Change Management dashboard, under Change
Approval Requests.
Customization Manager 14-49
5.
Click on the name of the request to view details.
6.
You can download the splice log if the corresponding job for your request has been
purged and no longer exists in the Enterprise Manager system.
14-50 Oracle Application Management Pack for Oracle E-Business Suite Guide
To register a custom application on an Oracle E-Business Suite instance:
1.
Navigate to the Custom Applications page. Click the "Custom Application
Requests" link at the bottom of the page. The Custom Application Requests page
appears. Select a request, and click the Register button. Alternatively, you can also
click the Register button on the Custom Application details page.
2.
Enter in the Application Short Name for the application. You can use the LOV
provided. Note that the Application Name defaults in.
3.
Enter in the Oracle E-Business Suite instance. You can use the LOV provided. Note
that the required APPLSYS schema, APPS schema and system schema Preferred
Credentials need to be set for this Oracle E-Business Suite instance.
4.
Enter in an Application ID. Oracle recommends you use an application ID greater
than 50000. Customization Manager automatically generates and defaults the
recommended application ID.
5.
Select "Run AutoConfig" if desired. AutoConfig execution is necessary for the
custom application to be available for patching. Please run AutoConfig manually if
you do not chose to run it during the custom application registration.
6.
When change approval is enabled, enter e-mail addresses for Notification E-mail(s).
In registering a custom application, you first submit a request to register the
application. This request must then be approved (either automatically or manually,
depending on your Change Approval Framework setup).
7.
Enter a justification.
8.
Click Submit. A request to register the custom application will be submitted.
Customization Manager 14-51
To view details of custom application:
View details of a custom application by navigating to Custom Applications, selecting
the application name, and clicking the View button. Details include:
•
List of instances where custom application is present with status validated/not
validated. If the status is not validated, it is recommended to use the Validate
button to launch a validation request. A valid status ensures that custom patches for
the given custom application can be applied on that instance.
•
Custom objects associated with the given custom application which are present on
the given instance can be viewed by clicking on the "View Objects" icon.
Customization Manager automatically discovers and relates the following objects
associated with a custom application:
•
•
Custom Forms
•
Profile Options
•
Request Sets
•
Custom Database Objects
•
Alerts
•
Audit Group Information
All files in the File Metadata Repository for the given custom application.
14-52 Oracle Application Management Pack for Oracle E-Business Suite Guide
•
List of packages that have been created for the custom application.
To track details of a custom application request:
A custom application request can be used to register or to validate a custom application
on a given instance.
1.
Navigate to the Custom Applications page. Click the "Custom Application
Requests" link at the bottom of the page. The Custom Application Requests page
appears. Select a custom application request from the table and click View.
2.
Details for the request will be shown.
Tip: To debug or view logs of a custom application request, click on
"Job Details" icon against the specific custom application request.
This would navigate to the EM job log associated with the custom
application request. Click and view details on the "DO_JOB" step to
view the detailed log of the given custom application request. In
case of a failure of a custom application request, a new request
should be submitted after rectifying the errors/failures listed in the
job details log.
Customization Manager 14-53
To execute a job to register or validate a custom application when the
change approval system is enabled:
1.
Confirm that the request to execute the job to register or validate the custom
application has been approved. To do this, navigate to the Custom Applications
page. Click the "Custom Application Requests" link at the bottom of the page. The
Custom Application Requests page appears. Approved requests will be listed with
the Status "Approved".
2.
Select an Approved custom application request from the table and click Execute.
3.
At the Execute Custom Application Request page, ensure that the displayed
information is correct and click Submit.
The system will attempt to execute a job to register or validate the custom
application. If the system cannot execute the job, details regarding the job will be
shown.
14-54 Oracle Application Management Pack for Oracle E-Business Suite Guide
A
Target Types
Target Types
The following table lists details of the individual target types shipped in the
management pack.
Target Types
Target Type
Applicable
Oracle
E-Business Suite
Release
Description
Oracle E-Business Suite
All releases
Target representing entire Oracle E-Business
Suite instance.
Oracle Applications
Service
All releases
Target representing all the services provided
by Oracle E-Business Suite.
Concurrent Processing
Service
All releases
Target representing the services provided by
the concurrent processing infrastructure.
Forms-Based
Applications Service
All releases
Target representing the services provided by
Oracle Forms.
Self-Service Applications
Service
All releases
Target representing the services provided by
self-service applications.
Workflow Service
All releases
Target representing the service provided by
the Oracle Workflow infrastructure.
Target Types A-1
Target Type
Applicable
Oracle
E-Business Suite
Release
Description
Oracle E-Business Suite
Node
All releases
Target representing an individual Oracle
E-Business Suite node.
Oracle Concurrent
Manager
All releases
Target representing the concurrent manager.
Internal Concurrent
Manager
All releases
Target representing the internal concurrent
manager.
Oracle E-Business Suite
Workflow
All releases
Target representing all the members of the
Oracle Workflow infrastructure.
Oracle Workflow Agent
Listener
All releases
Target representing the Oracle Workflow
agent listener.
Oracle Workflow
Background Engine
All releases
Target representing the Oracle Workflow
background engine.
Oracle Workflow
Notification Mailer
All releases
Target representing the Oracle Workflow
notification mailer.
Oracle Applications JVM
Usage
12.1.X
Target representing the JVM that runs the
oacore server. This is used to monitor
parameters specific to Oracle E-Business Suite
deployment.
Oracle E-Business Suite
Custom Objects
All releases
Target representing the customizations in an
Oracle E-Business Suite instance.
Oracle E-Business Suite
Patch Information
All releases
Target representing the patching activities in
an Oracle E-Business Suite instance.
HTTP Server for Oracle
E-Business Suite 11i
11i
Target representing the HTTP Server in an
Oracle E-Business Suite 11i instance.
JServ for Oracle
E-Business Suite 11i
11i
Target representing the j2eecontainer in which
the Oracle E-Business Suite 11i is deployed.
A-2 Oracle Application Management Pack for Oracle E-Business Suite Guide
Target Type
Applicable
Oracle
E-Business Suite
Release
Description
Forms Listener for Oracle
E-Business Suite 11i
11i
Target representing the Forms listener in an
Oracle E-Business Suite 11i instance that is
running in socket mode.
Forms Servlet for Oracle
E-Business Suite 11i
11i
Target representing the Forms listener in an
Oracle E-Business Suite instance that is
running in servlet mode.
Reports Server for Oracle
E-Business Suite 11i
11i
Target representing the Reports Server for
Oracle E-Business Suite 11i.
Discoverer for Oracle
E-Business Suite 11i
11i
Target representing Discoverer for Oracle
E-Business Suite 11i.
Target Types A-3
B
Pre-validation for Discovery
Prevalidation Checks for Discovery
The following table lists the checks used in the prevalidation step of discovery.
Category
Sub category
Description
Applicable
Releases of
Oracle
E-Business
Suite
Apps
Context
File
Number of
Context Files
A minimum of one (1) context file must be
there.
For 11i and
12.1.X
A minimum of two (2) context files must be
there.
12.2 and above
Context Name
Context name should not be empty.
All releases
Context name must be same for both run
and patch editions.
12.2 and above
Edition Name
Edition name must be same for all nodes
under an edition.
12.2 and above
Duplicate
Context Files
There should not be two context files for the
same applications node.
11i and 12.1.X
There should not be two context files for the
same node under an edition.
12.2 and above
Pre-validation for Discovery B-1
Category
Sub category
Description
Applicable
Releases of
Oracle
E-Business
Suite
Number of
nodes
Only one applications node per host.
11i and 12.1.X
Only two applications nodes per host: One
for the run edition and one for the patch
edition.
12.2 and above
EBS System
Name
Oracle E-Business Suite system name must
be the same in all context files.
For all releases
Context
variables
Mandatory context variables must be there.
All releases
WLS Admin
Server
Must be up for the run edition.
12.2 and above
DB
ContextFi
le
Duplicate
Context Files
There should not be two context files for the
same database node.
All releases
Context Name
Context name should not be empty.
All releases
No of nodes
Only one database node per host.
All releases
EBS System
Name
Oracle E-Business Suite system name must
be same in all context files.
All releases
Context
variables
Mandatory context variables must be there.
All releases
EMGC
Compone
nts
Agent
installation
EM Agents must be installed on all hosts.
All releases
Agent
Compatibility
Agent must be at the same release as OMS
or one release lower (n-1).
All releases
B-2 Oracle Application Management Pack for Oracle E-Business Suite Guide
Category
Sub category
Description
Applicable
Releases of
Oracle
E-Business
Suite
OS User
Agent OS user and Oracle E-Business Suite
OS user must be same or must be in the
same OS user group.
All releases
Preferred
credentials
Preferred credential must be set for the host
in which the run edition WLS admin server
is running.
12.2 and above
Pre-validation for Discovery B-3
C
Supported File Types in Customization
Manager
Supported File Types
The following table lists the supported file types in Customization Manager. You can
include files of only these types in your custom packages. The Object Action column
lists the action that AutoPatch performs on files of the given type.
File Type
Name
Source
Extension
Description
Object Action
fmb
fmb
Oracle Forms
copy and genform
prt
prt
Oracle Reports driver
copy
rdf
rdf
Oracle Reports
copy and genrep
pld (Forms)
pld
Forms Library
compile to pll; copy and
genfpll
pld (Reports)
pld
Reports Library
compile to pll; copy and
genrpll
pdf
pdf
document file (Portable
Document Format (PDF)
copy
pdf
pdf
XMLP PDF notrans
copy and load using
XDOLoader
Supported File Types in Customization Manager C-1
File Type
Name
Source
Extension
Description
Object Action
xls
xls
Microsoft Excel file
copy
mmb
mmb
menu file
copy
java
java
Java file
compile and deploy under
$JAVA_TOP
zip
zip
zipped file
copy
class
class
Java class file
copy
jpg
jpg
JPEG image file
copy
bmp
bmp
bitmap image file
copy
dbc
dbc
file used for database
connection
copy
doc
doc
Microsoft Word document file
copy
dot
dot
Microsoft Word template file
copy
drv
drv
driver file
copy
fmx
fmx
compiled form
copy
software htm
htm
Hypertext Markup Language
copy
html
html
Hypertext Markup Language
copy
odf
odf
object definition file
copy
pkh
pkh
package header
copy and execute as APPS
plb
plb
package body
copy
RTF File
rtf
rich text format
copy
XMLP RTF
notrans
rtf
C-2 Oracle Application Management Pack for Oracle E-Business Suite Guide
copy and load using
XDOLoader
File Type
Name
Source
Extension
Description
Object Action
sql
sql
SQL script
copy and execute as APPS
wft
wft
Workflow Text
copy and upload using
WFLOAD
XML
xml
Extensible Markup Language
file
copy
BC4J XML
xml
Oracle Application
Framework - BC4J XML file
customizations
compile and deploy under
$JAVA_TOP
dll
dll
dynamic link library
copy
mmx
mmx
a kind of menu file
copy
sym
sym
always accompanies a dll
copy
tif
tif
image file (Tagged Image File
Format)
copy
sh
sh
Bourne or Korn shell script
copy
jlt
jlt
Java Loader Text - used by
AKLOAD.java
copy
eex
eex
Oracle Discoverer
copy
dis
dis
Discoverer Export
copy
lct
lct
Application Object Library
Generic Loader control file
copy
software ldt
ldt
used in software patches
copy and upload using
FNDLOAD
force upload
ldt
used in software patches
copy and upload using
FNDLOAD with
CUSTOM_MODE=FORCE
option
Supported File Types in Customization Manager C-3
File Type
Name
Source
Extension
Description
Object Action
sqlj
sqlj
SQLJ file
copy
ini
ini
Java Parameter File
copy
xsl (non-dbdrv)
xsl
XML Style Sheets (not used in
database driver)
copy
create_view
sql
Create or Replace View Script
copy and execute as APPS
create_trigger
sql
Create or Replace Trigger
Script
copy and execute as APPS
create_type
sql
Create or Replace Type Script
copy and execute as APPS
create_index
sql
Create Index Script
copy and execute as APPS
seed_data
sql
Custom Seeded Data SQL
script
copy and execute as APPS
create_synony
m
sql
Create View Synonym Script
copy and execute as APPS
jsp
jsp
Java server page
copy
res
res
resource file to store WF
messages and used by WF
Resource Generator
copy
ps
ps
Postscript Pages
copy
properties
properties
Java Property Class
copy
pll (Forms)
pll
compiled Forms library
copy and run genfpll
pll (Reports)
pll
compiled Reports library
copy and run genrpll
ogd
ogd
Oracle Graphics
copy
env
env
environment file
copy
C-4 Oracle Application Management Pack for Oracle E-Business Suite Guide
File Type
Name
Source
Extension
Description
Object Action
js
js
Javascript file
copy
rpt
rpt
Oracle Reports file
copy
jar
jar
Java archive file
copy
Pls
pls
PL/SQL package specification
copy and execute as APPS
Pks
pks
PL/SQL package specification
copy and execute as APPS
so
so
UNIX shared library
copy
Jpx
jpx
BC4J Substitution
copy
vsd
vsd
source file for gif files used in
translations
copy
dtd
dtd
XML Document Type
Definition
copy
xss
xss
Extensible Style Sheet
definition
copy
wbmp
wbmp
bitmap file for wireless
devices
copy
xgm
xgm
XML Gateway Mapping file
copy
xgd
xgd
XML Gateway Data definition
file
copy
pl
pl
Perl Scripts
copy
pm
pm
Perl Modules
copy
drvx
drvx
database driver exception file
copy
pkb
pkb
package body
copy and execute as APPS
software css
css
used in software patches
copy
Supported File Types in Customization Manager C-5
File Type
Name
Source
Extension
Description
Object Action
mac
mac
copy
cfg
cfg
configuration file
copy
txt
txt
plain text file
copy
uix
uix
user interface XML
copy
hct
hct
HRMS fast formula loader
control file
copy
hdt
hdt
HRMS fast formula loader
data file
copy
pdt
pdt
HRMS legislative loader data
file
copy
wfx
wfx
Workflow XML loader files
copy
csv
csv
file from which user-needed
data is imported
copy
ear
ear
an EJB .jar archive with XML
contents in the META-INF
copy
xdf
xdf
XML files containing object
definitions
copy and execute using
FNDXDFCMP
JRAD/MDS File
xml
JRAD Files are xml extensions.
These extensions should be
used for Oracle Application
Framework objects under the
mds directory.
copy and load using
XMLImporter
xlf
xlf
XLF files are generated from
xml files
copy
document gif
gif
used in document patches;
image files
copy
C-6 Oracle Application Management Pack for Oracle E-Business Suite Guide
File Type
Name
Source
Extension
Description
Object Action
document htm
htm
used in document patches;
HTML files
copy
document ldt
ldt
used in document patches;
navigation library files
copy and upload using
FNDLOAD
document css
css
used in document patches;
cascading stylesheet file
copy and execute using
FNDGFU
tld
tld
tag library definition file
copy
xsd
xsd
XML Schema provides a
means for defining the
structure of XML documents
copy
XMLP XSL
notrans
xsl
XML Publisher (XDO)
non-translatable XSL
templates
copy
interface ldt
n
Interface Repository loader
file
copy
XMLP RTF
template
rtf
XML Publisher (XDO)
translatable templates
copy
XMLP xlf
xlf
xlf files generated from
translatable XMLP templates
copy
xdf(AW) xlf
xlf
Analytic Workspaces XML
files containing object
definitions
copy
pkh (no n)
pkh
package definition
copy
wsdl
wsdl
Web Services Description
Language File
copy
XMLP RTF
notrans
rtf
XML Publisher (XDO)
non-translatable RTF
templates (recommended)
copy
Supported File Types in Customization Manager C-7
File Type
Name
Source
Extension
Description
Object Action
XMLP PDF
notrans
pdf
XML Publisher (XDO) PDF
templates
copy
XMLP XML
notrans
xml
XML Publisher (XDO)
non-translatable XML
templates
copy
XMLP XSD
notrans
xsd
XML Publisher (XDO)
non-translatable XML
templates
copy
jspx
jspx
JSP document
copy
java_lib
jar
Java library (for compilation
only)
Use jar only for compiling; jar
is not included into the patch
package_spec
sql
package specification
copy and execute as APPS
package_body
sql
package body
copy and execute as APPS
create_table
sql
Create Table Script
copy and execute as APPS
alter_table
sql
Alter Table Script
copy and execute as APPS
create_sequenc
e
sql
Create Sequence Script
copy and execute as APPS
alter_sequence
sql
Alter Sequence Script
copy and execute as APPS
create_table_o
wner
sql
Create Table Schema Owner
Script
copy and execute as schema
owner
alter_table_ow
ner
sql
Alter Table Owner Script (run
as schema owner)
copy and execute as schema
owner
create_index_o
wner
sql
Create Index Owner Script
copy and execute as schema
owner
sql_owner
sql
Generic SQL Owner Script
(copy only)
copy and execute as schema
owner
C-8 Oracle Application Management Pack for Oracle E-Business Suite Guide
File Type
Name
Source
Extension
Description
Object Action
create_view_o
wner
sql
Create View Owner Script
copy and execute as schema
owner
create_synony
m_owner
sql
Create Synonym Owner Script
copy and execute as schema
owner
plx
plx
Oracle Forms library file
executable
copy
dat
dat
copy
ico
ico
icon file
copy
dmp
dmp
copy
exp
exp
copy
fdo
fdo
copy
frm
frm
copy
hlp
hlp
inc
inc
copy
inp
inp
copy
msb
msb
Message Dictionary file
copy
obd
obd
online help file
copy
cmd
cmd
NT Command File
copy
csh
csh
shell script file
copy
dbt
dbt
database text file
copy
def
def
copy
flt
flt
copy
help file
copy
Supported File Types in Customization Manager C-9
File Type
Name
Source
Extension
Description
Object Action
fmt
fmt
Oracle Forms form source text
file
copy
fpp
fpp
copy
fxp
fxp
copy
imp
imp
copy
mk
mk
make file
copy
mmt
mmt
menu text file
copy
pc
pc
Pro*C program
copy
Scr
scr
script file generated by the
Oracle Scripting Script
Builder" tool"
copy
MSI
xml
Manual Step File
copy
ttf
ttf
TrueType font definition file
copy
conf
conf
configuration file to be
released along the product
copy
mdl
mdl
text file created by Oracle
Warehouse Builder (OWB)
metadata loader file for data
import
copy
thtml
thtml
template toolkit for ISD
copy
uit
uit
custom renderer for the FWK
header component
copy
mif
mif
XML file that contains
schematic information about
graphical representation of the
structure (RMIM)
copy
C-10 Oracle Application Management Pack for Oracle E-Business Suite Guide
File Type
Name
Source
Extension
Description
Object Action
coremif
coremif
XML file that contains
schematic information about
graphical representation of the
structure (RMIM)
copy
xcfg
xcfg
ADF XML configuration file
copy
rts
rts
resource bundle file for java
related tool is Tecate
copy
x2h
x2h
X2h format file for ISD
copy
ppp
ppp
copy
tag
tag
copy
ora
ora
Net8 configuration files
(listener.ora, tnsnames.ora)
copy
inf
inf
used for applying updates to
windows registry
copy
app
app
used to configure the apache
single listener (modplsql)
copy
tcl
tcl
TCL scripts called by Oracle
Enterprise Manager's
Intelligent Agent for hosted
Exchange products
copy
fdi
fdi
clx
clx
spell-checking dictionary file
in compressed lexicon format
copy
tlx
tlx
spell-checking dictionary file
in text lexicon format
copy
Z
Z
Adaptive Lempel-Ziv
compressed file
copy
copy
Supported File Types in Customization Manager C-11
File Type
Name
Source
Extension
Description
Object Action
tpl
tpl
template files
copy
amx
amx
standard XML file
copy
ftg
ftg
copy
rlt
rlt
copy
ctl
ctl
SQL*Loader file
copy
rsp
rsp
Rapid Install response file
copy
prc
prc
Palm Pilot application file
copy
odb
odb
Oracle Lite database file
required from Mobile
Applications
copy
llt
llt
software gif
gif
image file (Graphics
Interchange Format)
copy
msg
msg
FND Message Loader Text
copy
OAF
Component
java
Oracle Application
Framework customizations
compile and deploy under
$JAVA_TOP
copy
Recommended Locations for Common File Types
The following table lists recommended locations for some commonly-used file types.
C-12 Oracle Application Management Pack for Oracle E-Business Suite Guide
File Types
Description
Recommended
destination path (relative
to product top)
sql, package_spec,package_body,
create_table, alter_table,
create_sequence,alter_sequence,crea
te_view,create_trigger, create_type
create_index,seed_data,create_syno
nym,pkh,plb,pls,pkb,
create_table_owner,alter_table_own
er,create_index_owner,
sql_owner,create_view_owner
,create_synonym_owner
SQL, PL/SQL files
patch/115/sql
software ldt
All Generic Loader
(FNDLOAD) files
patch/115/import/<LANG>;
for example,
'patch/115/import/US'
sh
Shell script
bin
xdf
XDF file
patch/115/xdf
pl
Perl script
bin
fmb
Forms
forms/<LANG>; for
example, forms/US
rdf
Report
reports/<LANG>; for
example, reports/US
html,xsl,xss,css
HTML and style sheets
html
jsp
JSP
html
XML Publisher templates
XML Publisher templates
patch/115/publisher/templa
tes
java
Java files
java/<package path>; for
example, java/test for the
file
oracle/apps/newprod/test/h
ello.java
Supported File Types in Customization Manager C-13
File Types
Description
Recommended
destination path (relative
to product top)
JRAD/MDS file
Oracle Application
Framework-related XML
files
mds/<path>
gif
Image files
media
pm
Perl module
perl/<path>
Execution Sequence of SQL File Types
The following table lists the execution sequence of SQL file types.
File Type
Description
Order Of Execution
create_sequence
Create sequence script
1
create_table
Create table script
2
create_table_owner
Create table in custom schema
2
alter_table
Alter table script
3
alter_sequence
Alter sequence script
3
alter_table_owner
Alter table in custom schema
3
create_type
Create or replace type script
4
package_spec
Package specification
5
create_view
Create or replace view script
6
create_synonym
Create view synonym script
6
create_view_owner
Create view in custom schema
6
create_synonym_owner
Create synonym in custom schema
6
C-14 Oracle Application Management Pack for Oracle E-Business Suite Guide
File Type
Description
Order Of Execution
package_body
Package body
7
seed_data
Custom seeded data SQL script
8
create_index
Create index script
9
create_index_owner
Create index in custom schema
9
create_trigger
Create or replace trigger script
10
sql
Generic
11
sql_owner
Run SQL in custom schema
11
For example, the type create_sequence will execute before the type create_table or
create_table_owner. The types create_table/create_table_owner will execute in parallel
before the types alter_table/alter_sequence/alter_table_owner.
Supported File Types in Customization Manager C-15
D
Customization Manager Coding Standards
Customization Manager Coding Standards for Files
Customization Manager has a standards checker to check the that the files included in a
custom package meet certain coding standards. This checker tests all code for standards
compliance.
Some standards are mandatory and will result in failure when Customization Manager
attempts to build the package. Other standards are recommended, and the standards
checker will give a warning but the package will be built.
Mandatory File Standards
The standards in the following table must be met. If a file does not meet these standards
then Customization Manager will not build the package containing it.
Standard Name
Description
Header Check
Each file must have an Oracle-compliant
source header present.
PLD File Location Standard
PLD files must be located somewhere under
one of following directories: resource, plsql,
graphs.
SQL using CONNECT Standard
SQL files using a "connect" statement must
have a valid dbdrv hint provided within the
file.
Java Destination Path Standard
For Java files within a package, the destination
path must start with "java".
Customization Manager Coding Standards D-1
Standard Name
Description
Java Package Path Standard
For Java files within a package, the destination
path for the Java file must match its package
structure.
Other File Standards
The following table lists standards that if not met, will result in a Warning but the
package will still be built.
Standard Name
Description
Java SOP Check
Java files must not use System.out.print
Java System.gc() Check
Java files must not use System.gc
SQL dual reference check
SQL files must not use System.dual, instead use dual
PERL module location
Perl module must be located anywhere under perl directory
PERL file location
Perl files must be located under one of following directories: bin,
patch/[release]/bin,admin/template,admin/template/*.
SQL comment standard
SQL file should not have -- as comment
SQL file (!) check
SQL file should not have ! character
PLS (!) check
PLS file should not have ! character
JRAD halign check
JRAD XML files should not contain hAlign
Java package name check
All Java classes must be in packages beginning with:
oracle.apps.[prod_name]
Java System.err Check
Standard
Java files must not use System.err
SQL file location check
SQL files must be located under one of following directories:
admin/sql,admin/template,admin/template/*,patch/ [some
dir]/sql,sql
D-2 Oracle Application Management Pack for Oracle E-Business Suite Guide
Standard Name
Description
Drvx file location check
Drvx files must be located under one of following directories:
patch/[some dir]/driver, admin/template,admin/template/*
Driver File Location
Standard
Driver files must be located under one of following directories:
admin/driver,patch/[some dir]/driver,
admin/template,admin/template/*
LCT File Location
Standard
LCT files must be located under one of following directories:
admin/import,patch/[some dir]/import,upgrade/[some
dir]/import,admin/template,admin/template/*
LDT File Location
Standard
LDT files must be located under one of following directories:
admin/import,patch/[some
dir]/import,help,,admin/template,admin/template/*
PKG File Location
Standard
Package files must be located under one of following directories:
admin/sql,patch/[some dir]/sql,admin/template,admin/template/*
RTF File Location
Standard
RTF files must be located under : patch/115/publisher/templates
XSS Location Standard
XSS files must be located under one of following directories:
html,admin/template,admin/template/*
HCT Location Standard
HCT files must be located under one of following directories:
patch/[some dir]/import,admin/template,admin/template/*
HDT Location Standard
HDT files must be located under one of following directories:
patch/[some dir]/import,admin/template,admin/template/*
PDT Location Standard
PDT files must be located under one of following directories:
patch/[some dir]/import,admin/template,admin/template/*
JavaScript Location
Standard
JavaScript files must be located under one of following directories:
html,patch/[some dir]/html,upgrade/[some
dir]/html,admin/template,admin/template/*
PrintStackTrace Check
Using printStackTrace is not recommended
Workflow Location
Standard
Workflow files must be located under one of following directories:
admin/import,patch/[some
dir]/import,admin/template,admin/template/*
Customization Manager Coding Standards D-3
Standard Name
Description
XDF Location Standard
XDF files must be located under one of following directories:
admin/xdf,patch/[some dir]/xdf,patch/[some dir]/xdf/aw/US
Absolute URL Check
Standard
Check for absolute URLs
Report Printer Def File
Report printer files must be located under one of following
directories: reports,admin/template,admin/template/*
Form Location Standard
Form files must be located under one of following directories:
forms,admin/template,admin/template/*
JAR Location Standard
Jar files must be located under one of following directories:
java/3rdparty,java/3rdparty/stdalone,admin/template,admin/templ
ate/,patch/115/jar/bpel
JSP Location Standard
JSP files must be located under one of following directories:
html,html/jsp/[PROD],html/jsp/[PROD]/[MOD],html/jsp/[PROD]/[
MOD]/[sub MOD],admin/template,admin/template/*
Dependency Files
Location Standard
Dependency files must be located under one of following
directories: java/make,admin/template,admin/template/*
Cmd file Location
Standard
CMD files must be located under one of following directories:
admin/template,admin/template/*,bin
XML Location Standard
XML files must be located under one of following directories:
html,java,mds,patch/115/publisher/defs,admin/template,admin/tem
plate/*,patch/115/manualsteps.
XGM Location Standard
XGM files must be located under one of following directories:
patch/[some dir]/xml/US,admin/template,admin/template/*
XSL Location Standard
XSL files must be located under one of following directories:
html,admin/xdf/xsl,patch/[some dir]/xdf/xsl,patch/[some
ForceViewCheck
One must use FORCE in CREATE statements in view creation
scripts
Show Error Check
SQL scripts must not contain the Show errors command
Absolute URL Check
Having absolute URLs is not recommended
D-4 Oracle Application Management Pack for Oracle E-Business Suite Guide
Standard Name
Description
Pkg Replace Check
Use CREATE OR REPLACE PACKAGE for package creation. Do
not omit OR REPLACE
Pkg Create IS Check
Package creation must not use IS. Instead should always use AS
Xml Parse Standard
XML files should be well-formed
Control M Standard
Text files should not have control M [^M] character
SQL NoLogging Check
Using NOLogging in SQL scripts is not recommended
SQL Serveroutput Check
Using set serveroutput on in SQL scripts is not recommended
Wfx File Naming
Standard
WFX filename must end in s, e, or a, ie. [s|e|a].wfx.
16.3 File Naming
Standard
Filename should adhere to the 16.3 naming standard
Set Scan Off Standard
Package creation scripts containing ampersand must have SET
SCAN OFF
Drop Table check
Drop table should not be used in SQL/PLSQL files as it can result in
loss of data
SQL Max Line
LengthStandard
No line in a SQL file should be longer than 255 characters
FNDSLOAD Check
Standard
FNDSLOAD is obsolete. No dbdrv: hints should refer to
FNDSLOAD
Drop Column check
Drop Column should not be used in SQL/PLSQL files
Long Raw check
LONG or LONG RAW columns should not be used
Insert Column check
INSERT SQL statements, should explicitly list the columns about to
insert
FNDLOAD/FNDLOADS
O syntax check
FNDLOAD/FNDLOADSO must have correct syntax
Customization Manager Coding Standards D-5
Standard Name
Description
Admin Dbdrv none
check
All files under [PROD_TOP]/admin must have only dbdrv: none
NLADD Sql Check
There should be no [PROD]NLADD.sql files in R12 patches
FNDLOAD ldt phase
dbdrv: FNDLOAD ldt files must have correct phase
Menu file location
Menu files must be located under one of following directories:
resource,admin/template,admin/template/*
WFX file location check
WFX files must be located under one of following directories:
patch/[some dir]/xml,admin/template,admin/template/*
Create single line check
In SQL files, CREATE command must occur on one line only.
SQL exit check
SQL files must end with exit
Package SpecBody Same
file
The package specification and body should be in different files
SQL Absolute path
Check
SQL files should not have absolute path in a @ or @@ statements
Calling SQL script check
Use start or @ when calling a SQL script within a SQL script. Do not
use @@.
Applsyspub Schema
Check
Custom scripts are not allowed to modify APPLSYSPUB schema
Custom File Naming
Standard
All files involved in the package must be for a product prefixed
with xx""
Pkg body creation
Standard
Package body creation scripts should not be in pkh files
Pkg spec creation
Standard
Package Spec creation scripts should not be in pkb and plb files
Mview Build deferred
Standard
Materialized Views must be created with BUILD DEFERRED
option
D-6 Oracle Application Management Pack for Oracle E-Business Suite Guide
Standard Name
Description
Mview Parallel Standard
Materialized Views should not be created with parallel command
Mview prebuilt Standard
Materialized Views must not be created with ON PREBUILT
TABLE option
Report Location
Standard
Report files must be located under one of following directories:
reports,admin/template,admin/template/*
Import stmt Check
Java import statements must reference fully qualified Class names
Language check in
destination path
The destination path for a file entry in the package creation process
should not have the language code as a suffix. The language should
be specified separately.
JRAD XML file type
During the package creation process, if an XML file is included
with the file type as 'JRAD XML' (File type ID is 1005), then the
destination path should start with 'mds'.
Control-M characters in
PLD files
If a PLD file contains a control-M character, then some issues may
arise while applying a patch containing this PLD file.
SQL whenever sqlerror
exit failure rollback
A SQL Script should contain "WHENEVER SQLERROR EXIT
FAILURE ROLLBACK;".
Java file empty catch
block
An empty catch Block finds instances where an exception is
caught, but nothing is done.
Avoid returning from a
finally block
In Java code, one should avoid returning from a finally block this can discard exceptions. There should be no return statement
from a finally block.
Avoid catching null
pointer exception
Java code should never catch a null pointer exception. A catch
block may hide the original error, resulting in other more subtle
errors.
Java throwing exception
in finally block
In Java, throwing exception in a finally block is confusing. It
may mask an exception or a defect in the code, and it can also make
code cleanup unstable.
Java catching throwable
In Java, one should avoid catching throwable. This action is
dangerous because such a catch can catch other things like
OutOfMemoryError.
Customization Manager Coding Standards D-7
Standard Name
Description
Java class should not
extend error
Errors are system exceptions. Classes should not extend them.
Java files must have
rcs_id
All Java files must have the following for source control ID:
Java class name check
All Java files should have a class with a name that is the same as
that of the file name.
Java empty if check
There should be no empty if statements in Java code. An empty
if statement finds instances where a condition is checked but
nothing is done about it.
Java empty while check
There should be no empty while statements in Java code.
Java empty finally block
There should be no empty finally blocks in Java code. Avoid
empty finally blocks; these can be deleted.
Java if without braces
In Java, if statements must use curly braces. Avoid using if
statements without curly braces.
Java while without
braces
In Java, while statements must use curly braces. Avoid using
while statements without using curly braces. Formats without
curly braces are error-prone.
Java switch must have
default label
In Java files, switch statements should have a default label.
Java empty synchronized
There should be no empty synchronized blocks.
Java empty static
initializer
There should be no empty static initializer blocks.
JRAD files language
must be US English
In a JRAD XML file, the language of the XML file should be US
English and specified as "xml:lang = 'en-US'"
Java Parameter (INI)
extension and location
standard
Java Parameter files should follow these standards:
public static final String RCS_ID = $Header$
-Identified by file extension: .ini
-Location standard:
1.$<PROD_TOP>/admin/template
2.$<PROD_TOP>/admin/template/*
D-8 Oracle Application Management Pack for Oracle E-Business Suite Guide
Standard Name
Description
JDBC TimeStamp
Compliance
The proper column bind type should be used when
sending/fetching DATE columns. Do not use Types.TIMESTAMP
or OracleTypes.TIMESTAMP.
Do not use ~FILE or
~PATH in .drvx files
~FILE and ~PATH cannot be used in a dbdrv: command in a .drvx
file, even within checkfile. A .drvx file is not loaded into the
database.
dbdrv: fdfcmp should
not be called
The database driver should not call fdfcmp.
Files with .drvx
extension must contain
'dbdrv: command'
For each driver exception ( .drvx ) file the line dbdrv: command
must exist. The command must be in all lowercase. The line
dbdrv: none commands fail also.
No drvx files should
contain XDOLoader
For all new patches containing Oracle XML Publisher files, the
dbdrv command should be added to the file directly instead of
using a separate drvx file.
No drvx files should
contain dbdrv: PYLOAD
PYLOAD should not be in any automatically generated database
driver.
dbdrv: FFXBCP must
have correct syntax
dbdrv: FFXBCP must have correct syntax:
dbdrv: FFXMLC must
have correct syntax
FFXMLC command must contain the following syntax:
dbdrv: FNDLIBR must
have correct syntax
FNDLIBR command must contain the following syntax:
dbdrv: java
htmlLoad.class must
have correct syntax
Java htmlLoad.class command must contain the following syntax:
exec ff bin FFXBCP bin &phase=last(+##) &ui_apps 0
Y( -S | -U | -SU | )
exec ff bin FFXMLC bin (&phase=dat(+##)) &ui_apps
0 [yY]
exec fnd bin FNDLIBR bin <phase> FND FNDCPBWV
&ui_apps
SYSADMIN 'System Administrator' SYSADMIN
exec java oracle/apps/per htmlLoad.class java
-username &un_apps -password
&pw_apps -database &jdbc_db_addr -file <.html
file>
Customization Manager Coding Standards D-9
Standard Name
Description
dbdrv: java
UnzipFile.class must
have correct syntax
Java UnzipFile.class command must contain the following syntax:
exec java oracle/apps/ad/jri UnzipFile.class java
The file must also have the .zip extension.
dbdrv: LoadMap.class
must have correct syntax
The syntax for LoadMap.class must be as follows:
JRAD XML files must
have file-version
attribute
JRAD XML files must have a file-version attribute to indicate the
version of the file. Following is a sample definition of file-version.
exec java oracle/apps/ecx/loader LoadMap.class
java &phase=dat &un_apps
&pw_apps &jdbc_db_addr &fullpath_prod_path_file
<page xmlns:jrad='http://xmlns.oracle.com/jrad'
xmlns:oa='http://xmlns.oracle.com/oa'
xmlns:ui='http://xmlns.oracle.com/uix/ui'
version='9.0.3.7.0_428' xml:lang='en-US'
file-version='$Header:
AkTestAttachLinkPG.xml 115.0 2003/02/10 18:18:10
tmak noship $'
xmlns='http://xmlns.oracle.com/jrad'>
Note that the file-version attribute must have the correct filename
and a version.
Translation standard for
JRAD files
In JRAD xml files the encoding should be UTF-8 and specified as:
"encoding = 'UTF-8'"
Do not end comments
with the '-' character
Do not end comments with the '-' character, as this is the default
Sql*Plus line continuation character. For lines with a series of '-',
end the line with a '+' sign.
Customization Manager Coding Standards for Database Objects
The following table lists the standards which are applicable only for Oracle E-Business
Suite Release 12.2 Online Patching.
Object Type Description File Types
Table
A column type should not be ROWID.
.xdf, .odf
Table
A column type must not be LONG.
.xdf, .odf
D-10 Oracle Application Management Pack for Oracle E-Business Suite Guide
Object Type Description File Types
Table
A column type must be a built-in type or a
user-defined type owned by a non-editioned user.
.xdf
Table
A base column name should be unique within the
table within the first 27 bytes.
.xdf, .odf
Table
A base column name may use the # character only to
distinguish the column versions; for example,
<col_name>#<version>.
.xdf, .odf
Table
A table must be owned by an Oracle E-Business Suite
product schema, not APPS.
.xdf
Table
A table name must not use the '#' character.
.xdf, .odf
Materialized
View (MV)
Create/alter Materialized View definition using XDF
.sql , .pkb, pkh
Constraint
Create/alter constraint definition using XDF or ODF
.sql, .pkb, .pkh, .pls
Index
Create/alter the index definition using ODF or XDF.
.sql, .pkb, .pkh, .pls
Table
Create/alter the table definition using ODF or XDF.
.sql, .pkb, .pkh, .pls
Table
Do not modify application-managed tables in an
online patch.
.xdf, .odf
Constraint
A constraint name must contain an underscore ('_').
.xdf
Index
An index name must contain an underscore ('_').
.xdf, .odf
Trigger
A table trigger must be created on editioning view,
not on the table.
.sql, .pkb, pls
Table
DML statements must access tables via a table
synonym or the editioning view.
All code
VPD
A VPD policy must be created on the editioning view
or table synonym, not on the table.
.sql Customization Manager Coding Standards D-11
Object Type Description File Types
Synonym
A table synonym must point to the editioning view,
not to the table.
.sql, .pkb, .pls
Synonym
Do not install synonyms in non-editioned schemas
.xdf, .odf
D-12 Oracle Application Management Pack for Oracle E-Business Suite Guide
E
Validation of Custom Applications:
Examples
Validation of Custom Applications: Examples
The following table lists examples of issues that might be discovered in validating a
custom application. Recommended solutions are also provided. These examples apply
only to Oracle E-Business Suite Release 11i.
Because the list of issues and its corresponding recommendations will vary for one
instance to another, please run requests to validate existing custom applications to
generate release-specific and instance-specific recommendations. See: Managing
Custom Applications, page 14-44.
The example custom application 'xxcust' used in this table corresponds to a
case-sensitive custom application shortname.
The example custom application ID '50001' used in this table corresponds to the custom
application ID.
Validation of Custom Applications: Examples E-1
Issue
Recommendation for Release 11i
The file
$APPL_TOP/admin/xxcus
tprod.txt does not exist.
Create or replace file $APPL_TOP/admin/xxcustprod.txt. The
contents should be :
The file
$APPL_TOP/admin/xxcus
tterr.txt does not exist.
Create or replace file $APPL_TOP/admin/xxcustterr.txt with file :
The entry for xxcust is
missing in
FND_APPLICATION_TL
Update FND_APPLICATION_TL with the following sql:
%%% Single-product product data file format
11.5.A
xxcust 50001
END_OF_PRODUCT_ABBREVIATIONS -999
50001 xxcust XXCUST APP
No No No No
Yes Yes
50001 XXCUST XXCUST
0
1.0.0 1.0.0
none
none
none
none
END_OF_PRODUCTS
Release 11.5.0
11.5.0
R115 R115_ additional-this-mpl
XXCUST 11.5.0
END_OF_RELEASE 0.0.0
%%% Single-product territory data file format
11.5.A
R115
0 usaeng US AMERICAN EN US American_English
appltape.txt appltape.txt WE8ISO8859P1
Yes Standard Data_Group
none
none
none
none
none
c xxcust xxcust
END_OF_PRODUCT_NAMES
END_OF_LANGUAGE_INFO
INSERT INTO FND_APPLICATION_TL (APPLICATION_ID,
LANGUAGE, APPLICATION_NAME,
CREATED_BY,CREATION_DATE,LAST_UPDATED_BY,LAST_UPD
ATE_DATE,LAST_UPDATE_LOGIN,
DESCRIPTION,SOURCE_LANG)
VALUES (50001, 'US', 'xxcust', 1000, sysdate,
1000, sysdate, 1000, 'xxcust', 'US');
E-2 Oracle Application Management Pack for Oracle E-Business Suite Guide
Issue
Recommendation for Release 11i
The entry for product
xxcust is missing from
FND_PRODUCT_INSTA
LLATIONS
Insert the information about product xxcust in
FND_PRODUCT_INSTALLATIONS with following SQL:
INSERT INTO
FND_PRODUCT_INSTALLATIONS(APPLICATION_ID,
ORACLE_ID,LAST_UPDATE_DATE,LAST_UPDATED_BY,CREATI
ON_DATE,CREATED_BY,
LAST_UPDATE_LOGIN,PRODUCT_VERSION,
STATUS,INDUSTRY,TABLESPACE,INDEX_TABLESPACE,TEMPO
RARY_TABLESPACE,SIZING_FACTOR,
INSTALL_GROUP_NUM,DB_STATUS,PATCH_LEVEL )
VALUES ( 50001, 50001, sysdate, 1000, sysdate,
1000, 1000,
'11.5.0', 'I', 'C', <tablespace>, <index
tablespace> ,<temporary tablespace>, 100, 0, 'I'
, NULL );
Please replace <tablespace>, <index tablespace> ,<temporary
tablespace> with appropriate values.
Validation of Custom Applications: Examples E-3
Issue
Recommendation for Release 11i
The database is missing
user xxcust
Create database user xxcust
Give appropriate grants to the user by running the necessary SQL
statements:
•
grant create session, alter session to xxcust
•
grant create type to xxcust
•
grant create database link to xxcust
•
grant create any outline, alter any outline, drop any outline to
xxcust
•
grant analyze any to xxcust
•
grant create sequence, create table to xxcust
•
grant create cluster to xxcust
•
grant CREATE TRIGGER to xxcust
•
grant create materialized view, query rewrite to xxcust
•
grant unlimited quota on all tablespaces with which user
xxcust is associated.
Please use APPS_TS_TX_DATA as the main tablespace for user
xxcust
Please use APPS_TS_TX_IDX as the index tablespace for user
xxcust
The entry for product
xxcust is missing from
FND_ORACLE_USERID
Insert entry for the product xxcust in FND_ORACLE_USERID
with the SQL:
INSERT INTO FND_ORACLE_USERID
(ORACLE_ID,ORACLE_USERNAME,LAST_UPDATE_DATE,
LAST_UPDATED_BY,CREATION_DATE,CREATED_BY,LAST_UPD
ATE_LOGIN,DESCRIPTION,
ENABLED_FLAG,READ_ONLY_FLAG,ENCRYPTED_ORACLE_PASS
WORD,
CONCURRENT_BATCH_QUEUE_ID,INSTALL_GROUP_NUM)
VALUES (50001, 'XXCUST', sysdate,
1000, sysdate, 1000, 1000, 'XXCUST Account' ,
'N', 'A', NULL, NULL, 0 );
E-4 Oracle Application Management Pack for Oracle E-Business Suite Guide
Issue
Recommendation for Release 11i
Entry for the product
xxcust in
$APPL_TOP/admin/topfil
e.txt does not exist
Edit $APPL_TOP/admin/topfile.txt to insert the given below entry
at the end:
xxcust <XXCUST_TOP>
Please replace <XXCUST_TOP> with appropriate value.
Environment variable
XXCUST_TOP not
defined
Run AutoConfig to generate the environment variable
XXCUST_TOP
Directory
$APPL_TOP/xxcust/11.5.0
does not exist.
Create directory $APPL_TOP/xxcust/11.5.0
Directory
$APPL_TOP/xxcust/11.5.0
/log does not exist.
Create directory $APPL_TOP/xxcust/11.5.0/log
Directory
$APPL_TOP/xxcust/11.5.0
/out does not exist.
Create directory $APPL_TOP/xxcust/11.5.0/out
Directory
$APPL_TOP/xxcust/11.5.0
/mesg does not exist.
Create directory $APPL_TOP/xxcust/11.5.0/mesg
Directory
$APPL_TOP/xxcust/11.5.0
/sql does not exist.
Create directory $APPL_TOP/xxcust/11.5.0/sql
Directory
$APPL_TOP/xxcust/11.5.0
/admin does not exist.
Create directory $APPL_TOP/xxcust/11.5.0/admin
Directory
$APPL_TOP/xxcust/11.5.0
/admin/driver does not
exist.
Create directory $APPL_TOP/xxcust/11.5.0/admin/driver
Directory
$APPL_TOP/xxcust/11.5.0
/admin/sql does not exist.
Create directory $APPL_TOP/xxcust/11.5.0/admin/sql
Validation of Custom Applications: Examples E-5
Issue
Recommendation for Release 11i
File
$APPL_TOP/xxcust/11.5.0
/admin/driver/xxcustfile.d
rv does not exist.
Create file $APPL_TOP/xxcust/11.5.0/admin/driver/xxcustfile.drv
with following contents:
File
$APPL_TOP/xxcust/11.5.0
/sql/XXCUSTNLINS.sql
does not exist.
Create file $APPL_TOP/xxcust/11.5.0/sql/XXCUSTNLINS.sql with
following contents:
File
$APPL_TOP/xxcust/11.5.0
/admin/sql/XXCUSTNLA
DD.sql does not exist.
Create file
$APPL_TOP/xxcust/11.5.0/admin/sql/XXCUSTNLADD.sql with
following contents:
# Dummy xxcustfile.drv
commit;exit;
commit;exit;
E-6 Oracle Application Management Pack for Oracle E-Business Suite Guide
F
Known Product Limitations
Known Product Limitations
1.
Use of the native Oracle Enterprise Manager patch mechanism to apply core
technology patches (Developer Forms, Application Server, Database or other
standalone technologies) against Oracle E-Business Suite managed targets should
NOT be done under any circumstances.
While Enterprise Manager can be used to apply such patches to standalone
installations of Developer Forms, Application Server and the RDBMS products,
when these components are part of an Oracle E-Business Suite environment
(installed at the same time via the Rapid Install Wizard), they must not be patched
using Oracle Enterprise Manager.
Failure to acknowledge this caveat could result in unrecoverable system status.
2.
Start and Stop features present in some of the Enterprise Manager console pages
should NOT be used against individual Oracle E-Business Suite sub-targets. One
example is starting and stopping the Oracle E-Business Suite database. While
Oracle Enterprise Manager has no problems starting and stopping individual
standalone product services, doing the same with Oracle E-Business Suite
components will produce unexpected and inconsistent results. The one exception to
this rule is that the Oracle Application Management Pack for Oracle E-Business
Suite's administration feature can be used to start and stop the application tier
service from the Enterprise Manager console.
3.
The only mechanisms for cloning an Oracle E-Business Suite system from within
the Oracle Enterprise Manager Cloud Control console are those provided in the
cloning chapter of this guide. Alternatively, for more information on cloning, refer
to the following Oracle E-Business Suite documents on My Oracle Support:
Knowledge Document 230672.1, "Cloning Oracle Applications Release 11i with
Rapid Clone", and Knowledge Document 406982.1, "Cloning Oracle Applications
Release 12 with Rapid Clone".
Known Product Limitations F-1
4.
Creating copies of the out-of-box cloning procedures is not supported. The "Create
Like" feature is provided for customers to extend the cloning functionalities based
on their own specific business needs.
5.
In discovery and monitoring, Oracle Application Management Pack for Oracle
E-Business Suite does not support multiple Oracle E-Business Suite instances with
the same name across different hosts on a given Oracle Management Server; that is,
instances are differentiated only by the Oracle System Identifier (SID) and not the
CONTEXT_NAME values.
6.
Metric collection errors will be reported for the target type oracle_apps_jvm if the
setup needed to monitor Applications JVM Usage is not done after discovery. To fix
the issue, you can either set up the metric collection or disable the metric collection;
see: Monitoring JVM Usage, page 8-24.
7.
If you have changed your APPS password, you should change it for the plug-in in
two places: for the named credentials and target monitoring properties (if the
Monitoring Configuration has the password). After changing the password, wait at
least 15 minutes for it to propagate to the targets.
F-2 Oracle Application Management Pack for Oracle E-Business Suite Guide
G
Third-Party Product License Information
Third-Party Product License Information
This section includes third-party license information for certain third-party products
that are part of Oracle Application Management Pack for Oracle E-Business Suite
Release 12.1.0.2.0. Oracle acknowledges that the following third-party proprietary and
open source software are used in the provided programs covered by this
documentation.
Apache Software Foundation
Notice
Apache POI
Copyright 2001-2007 The Apache Software Foundation
This product includes software developed by The Apache Software Foundation
(http://www.apache.org/).
Unit testing support is provided by JUnit, under the Common Public License Version
1.0:
http://www.opensource.org/licenses/cpl.php
See http://www.junit.org/
A single resource file of the POI scratchpad component HDGF is taken from VSDump,
and is under the GNU General Public Licence version 3 (GPL v3):
http://gplv3.fsf.org/
Since this is a data file, and has no compiled version (the original file is distributed in
both source and binary versions of POI), there should be little difference in licencing
requirements compared to the ASL. For those wishing to avoid this component, the
HDGF part of the POI scratchpad should be omitted.
Third-Party Product License Information G-1
See http://www.gnome.ru/projects/vsdump_en.html
The Office Open XML experimental support had additional dependencies, with their
own licensing:
•
XML Beans - http://xmlbeans.apache.org/
Apache Licence Version 2.0 - http://www.apache.org/licenses/LICENSE-2.0
•
DOM4J - http://www.dom4j.org/
BSD Licence - http://www.dom4j.org/license.html
•
Jaxen - http://jaxen.org/
Apache Style Licence - http://jaxen.org/license.html
•
OpenXml4J - http://www.openxml4j.org/
BSD Licence or Apache Licence Version 2.0 http://www.openxml4j.org/Licensing/Default.html
License
Apache License
Version 2.0, January 2004
http://www.apache.org/licenses/
TERMS AND CONDITIONS FOR USE, REPRODUCTION, AND DISTRIBUTION
1.
Definitions.
"License" shall mean the terms and conditions for use, reproduction, and
distribution as defined by Sections 1 through 9 of this document.
"Licensor" shall mean the copyright owner or entity authorized by the copyright
owner that is granting the License.
"Legal Entity" shall mean the union of the acting entity and all other entities that
control, are controlled by, or are under common control with that entity. For the
purposes of this definition, "control" means (i) the power, direct or indirect, to cause
the direction or management of such entity, whether by contract or otherwise, or (ii)
ownership of fifty percent (50%) or more of the outstanding shares, or (iii) beneficial
ownership of such entity.
"You" (or "Your") shall mean an individual or Legal Entity exercising permissions
granted by this License.
"Source" form shall mean the preferred form for making modifications, including
but not limited to software source code, documentation source, and configuration
files.
G-2 Oracle Application Management Pack for Oracle E-Business Suite Guide
"Object" form shall mean any form resulting from mechanical transformation or
translation of a Source form, including but not limited to compiled object code,
generated documentation, and conversions to other media types.
"Work" shall mean the work of authorship, whether in Source or Object form, made
available under the License, as indicated by a copyright notice that is included in or
attached to the work (an example is provided in the Appendix below).
"Derivative Works" shall mean any work, whether in Source or Object form, that is
based on (or derived from) the Work and for which the editorial revisions,
annotations, elaborations, or other modifications represent, as a whole, an original
work of authorship. For the purposes of this License, Derivative Works shall not
include works that remain separable from, or merely link (or bind by name) to the
interfaces of, the Work and Derivative Works thereof.
"Contribution" shall mean any work of authorship, including the original version of
the Work and any modifications or additions to that Work or Derivative Works
thereof, that is intentionally submitted to Licensor for inclusion in the Work by the
copyright owner or by an individual or Legal Entity authorized to submit on behalf
of the copyright owner. For the purposes of this definition, "submitted" means any
form of electronic, verbal, or written communication sent to the Licensor or its
representatives, including but not limited to communication on electronic mailing
lists, source code control systems, and issue tracking systems that are managed by,
or on behalf of, the Licensor for the purpose of discussing and improving the Work,
but excluding communication that is conspicuously marked or otherwise
designated in writing by the copyright owner as "Not a Contribution."
"Contributor" shall mean Licensor and any individual or Legal Entity on behalf of
whom a Contribution has been received by Licensor and subsequently incorporated
within the Work.
2.
Grant of Copyright License. Subject to the terms and conditions of this License, each
Contributor hereby grants to You a perpetual, worldwide, non-exclusive,
no-charge, royalty-free, irrevocable copyright license to reproduce, prepare
Derivative Works of, publicly display, publicly perform, sublicense, and distribute
the Work and such Derivative Works in Source or Object form.
3.
Grant of Patent License. Subject to the terms and conditions of this License, each
Contributor hereby grants to You a perpetual, worldwide, non-exclusive,
no-charge, royalty-free, irrevocable (except as stated in this section) patent license to
make, have made, use, offer to sell, sell, import, and otherwise transfer the Work,
where such license applies only to those patent claims licensable by such
Contributor that are necessarily infringed by their Contribution(s) alone or by
combination of their Contribution(s) with the Work to which such Contribution(s)
was submitted. If You institute patent litigation against any entity (including a
cross-claim or counterclaim in a lawsuit) alleging that the Work or a Contribution
incorporated within the Work constitutes direct or contributory patent
infringement, then any patent licenses granted to You under this License for that
Third-Party Product License Information G-3
Work shall terminate as of the date such litigation is filed.
4.
Redistribution. You may reproduce and distribute copies of the Work or Derivative
Works thereof in any medium, with or without modifications, and in Source or
Object form, provided that You meet the following conditions:
1.
You must give any other recipients of the Work or Derivative Works a copy of
this License; and
2.
You must cause any modified files to carry prominent notices stating that You
changed the files; and
3.
You must retain, in the Source form of any Derivative Works that You
distribute, all copyright, patent, trademark, and attribution notices from the
Source form of the Work, excluding those notices that do not pertain to any part
of the Derivative Works; and
4.
If the Work includes a "NOTICE" text file as part of its distribution, then any
Derivative Works that You distribute must include a readable copy of the
attribution notices contained within such NOTICE file, excluding those notices
that do not pertain to any part of the Derivative Works, in at least one of the
following places: within a NOTICE text file distributed as part of the Derivative
Works; within the Source form or documentation, if provided along with the
Derivative Works; or, within a display generated by the Derivative Works, if
and wherever such third-party notices normally appear. The contents of the
NOTICE file are for informational purposes only and do not modify the
License. You may add Your own attribution notices within Derivative Works
that You distribute, alongside or as an addendum to the NOTICE text from the
Work, provided that such additional attribution notices cannot be construed as
modifying the License.
You may add Your own copyright statement to Your modifications and may
provide additional or different license terms and conditions for use, reproduction,
or distribution of Your modifications, or for any such Derivative Works as a whole,
provided Your use, reproduction, and distribution of the Work otherwise complies
with the conditions stated in this License.
5.
Submission of Contributions. Unless You explicitly state otherwise, any
Contribution intentionally submitted for inclusion in the Work by You to the
Licensor shall be under the terms and conditions of this License, without any
additional terms or conditions. Notwithstanding the above, nothing herein shall
supersede or modify the terms of any separate license agreement you may have
executed with Licensor regarding such Contributions.
6.
Trademarks. This License does not grant permission to use the trade names,
trademarks, service marks, or product names of the Licensor, except as required for
reasonable and customary use in describing the origin of the Work and reproducing
G-4 Oracle Application Management Pack for Oracle E-Business Suite Guide
the content of the NOTICE file.
7.
Disclaimer of Warranty. Unless required by applicable law or agreed to in writing,
Licensor provides the Work (and each Contributor provides its Contributions) on
an "AS IS" BASIS, WITHOUT WARRANTIES OR CONDITIONS OF ANY KIND,
either express or implied, including, without limitation, any warranties or
conditions of TITLE, NON-INFRINGEMENT, MERCHANTABILITY, or FITNESS
FOR A PARTICULAR PURPOSE. You are solely responsible for determining the
appropriateness of using or redistributing the Work and assume any risks
associated with Your exercise of permissions under this License.
8.
Limitation of Liability. In no event and under no legal theory, whether in tort
(including negligence), contract, or otherwise, unless required by applicable law
(such as deliberate and grossly negligent acts) or agreed to in writing, shall any
Contributor be liable to You for damages, including any direct, indirect, special,
incidental, or consequential damages of any character arising as a result of this
License or out of the use or inability to use the Work (including but not limited to
damages for loss of goodwill, work stoppage, computer failure or malfunction, or
any and all other commercial damages or losses), even if such Contributor has been
advised of the possibility of such damages.
9.
Accepting Warranty or Additional Liability. While redistributing the Work or
Derivative Works thereof, You may choose to offer, and charge a fee for, acceptance
of support, warranty, indemnity, or other liability obligations and/or rights
consistent with this License. However, in accepting such obligations, You may act
only on Your own behalf and on Your sole responsibility, not on behalf of any other
Contributor, and only if You agree to indemnify, defend, and hold each Contributor
harmless for any liability incurred by, or claims asserted against, such Contributor
by reason of your accepting any such warranty or additional liability.
END OF TERMS AND CONDITIONS
APPENDIX: How to apply the Apache License to your work.
To apply the Apache License to your work, attach the following boilerplate notice, with
the fields enclosed by brackets "[]" replaced with your own identifying information.
(Don't include the brackets!) The text should be enclosed in the appropriate comment
syntax for the file format. We also recommend that a file or class name and description
of purpose be included on the same "printed page" as the copyright notice for easier
identification within third-party archives.
Copyright [yyyy] [name of copyright owner] Licensed under the Apache License,
Version 2.0 (the "License"); you may not use this file except in compliance with the
License. You may obtain a copy of the License at
http://www.apache.org/licenses/LICENSE-2.0
Unless required by applicable law or agreed to in writing, software distributed under
the License is distributed on an "AS IS" BASIS, WITHOUT WARRANTIES OR
Third-Party Product License Information G-5
CONDITIONS OF ANY KIND, either express or implied. See the License for the specific
language governing permissions and limitations under the License.
Office Open XML (OOXML) xsds:
These were downloaded as part of the Office Open XML ECMA Specification from
<http://www.ecma-international.org/publications/standards/Ecma-376.htm>
These are included within the Apache POI distribution, and are available under
compatible licensing terms.
Copyright - ECMA International, "made available without restriction"
http://www.ecma-international.org/memento/Ecmabylaws.htm - section 9.4
Patent License - Microsoft Open Specification Promise (OSP)
http://www.microsoft.com/interop/osp/
G-6 Oracle Application Management Pack for Oracle E-Business Suite Guide
Index
A
Administration of Oracle E-Business Suite, 8-14
AD Patch Log, 13-30
amp.properties
replaced by Preferences, 2-5
APPS password
changing, F-2
AutoConfig, 4-1
Availability Status charts, 8-7
C
Change approval framework, 7-5, 12-2
Change Management dashboard, 12-2
Changing the APPS password, F-2
Cloning, 11-1
custom steps in deployment, 11-38
diagnostic tests, 10-3
for Oracle E-Business Suite Release 12.2, 11-31
multi node to single node, 11-8
scale-down and scale-up, 11-19
single node to single node, 11-8
upgrade considerations, 2-4
Coding standards, D-1
Command line discovery, 4-10
Compliance
standards, 8-19
summary, 3-2
Concurrent processing
dashboard, 8-32
metrics, 8-42
Configuration, 8-16
comparing configurations, 8-17
of all members, 8-16
Configuration Topology Viewer, 8-2
Configuring monitoring, 9-1
Creating a package, 14-19
Creating a report (Customization Manager), 1436
Credentials
named, 5-1
preferred, 5-8, 5-11, 12-4
Custom applications
managing, 14-44
validation, E-1
Customization Manager
coding standards, D-1, D-10
creating a package, 14-19
creating a report, 14-36
custom applications
validating, E-1
diagnostic tests, 10-12
E-Business Suite Mapping, 14-17
features, 14-1, 14-2
File Metadata Repository, 14-42
File Source Mapping, 14-11
file types
recommended locations, C-12
supported, C-1
file validation, 14-4
obsoleting a package, 14-33
package details, 14-30
package reports, 14-35, 14-39, 14-41
registering source control, 14-11
releasing a package, 14-33, 14-41
Index-1
saving a package, 14-29
sharing a package, 14-41
standards checker, 14-4, D-1
updating a package, 14-27
updating package metadata, 14-33
D
Deleting an Oracle E-Business Suite instance, 416
Deployment Procedure Manager (Oracle
Enterprise Manager), 13-29
Diagnostic tests, 10-1, 12-5
cloning, 10-3
Customization Manager, 10-12
Patch Manager, 10-10
user monitoring, 10-15
Discovery, 4-6
customizing, 4-7
Discovery Wizard, 4-2
log for troubleshooting, 4-7
multiple Oracle E-Business Suite targets, 4-6
preparatory steps, 4-1
prevalidation, B-1
rediscovery, 4-16
restrictions, 4-7
Discovery Wizard, 4-2
E
E-Business Suite Mapping, 14-17
F
File Metadata Repository, 14-42
File Source Mapping, 14-11
parameters, 14-15
H
HTTPS/SSL targets
monitoring, 8-26
monitoring, 8-24
K
Known product limitations, F-1
M
Metrics, 8-3
concurrent processing, 8-42
current activity, 8-20
incidents, 8-11
performance, 8-8
thresholds, 8-4
usage, 8-9
Monitoring, 8-1
availability computation, 9-2
configuration, 9-1
current activity, 8-20
HTTPS/SSL targets
configuration, 8-26
JVM usage, 8-24
metrics, 8-3
topology, 8-2
user sessions, 8-21
N
Named credentials, 5-1
Notifications
setup, 12-4
O
Obsoleting a package, 14-33
Oracle Application Management Pack for Oracle
E-Business Suite
overview, 1-1
Oracle Applications Manager, 8-30
Oracle E-Business Suite Release 12.2
coding standards, D-10
Patch Manager deployment procedure, 13-20
Oracle E-Business Suite system home page, 8-5
I
Installation, 2-1, 2-2
J
JVM usage
Index-2
P
Package details, 14-30
Package reports, 14-35, 14-39, 14-41
Patch Manager
deployment procedure, 13-20
diagnostic tests, 10-10
extending deployment, 13-29
features, 13-1
patch run, 13-8
restarting failed workers, 13-30
troubleshooting, 13-31
upgrade considerations, 2-4
Patch run, 13-8
copying, 13-28
Preferences, 2-5, 6-1
Preferred credentials, 5-8, 5-11, 12-4
Prevalidation in discovery, B-1
Privileges, 7-1, 7-7
Change Management, 7-5, 12-2
Provisioning Manager (Oracle Enterprise
Manager), 13-29
cloning considerations, 2-4
Patch Manager considerations, 2-4
User monitoring, 8-21
diagnostic tests, 10-15
User session monitoring, 8-21
R
Releasing a package, 14-33, 14-41
Roles, 7-1, 7-7
S
Saving a package, 14-29
Services, 8-12
starting and stopping, 8-14
Sharing a package, 14-41
Smart Clone, 11-1
custom steps in deployment, 11-38
multi node to single node, 11-8
scale-down and scale-up cloning, 11-19
single node to single node, 11-8
SQL file types
execution sequence, C-14
Standards checker, 14-4, D-1
System Management page, 3-2
System requirements, 2-2
T
Target types, A-1
Topology, 8-2
U
Updating a package, 14-27
Updating package metadata, 14-33
Upgrading, 2-3
Index-3


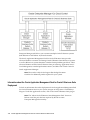


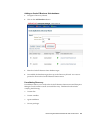
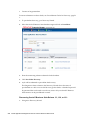


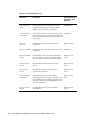


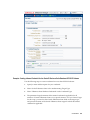
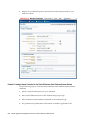

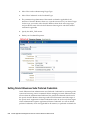

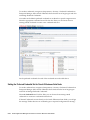


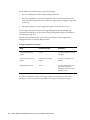
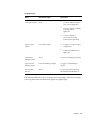

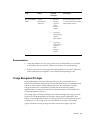

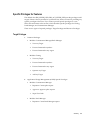


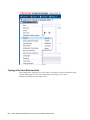

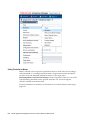


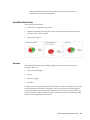
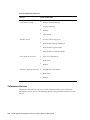
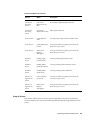


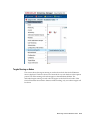


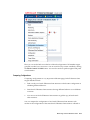


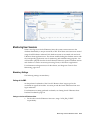


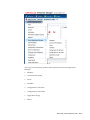
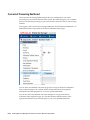
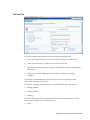

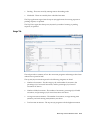
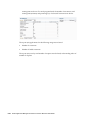
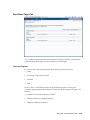

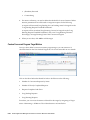


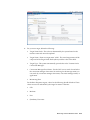
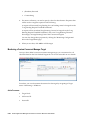
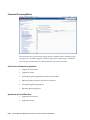


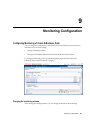
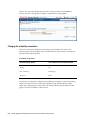
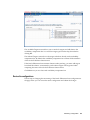


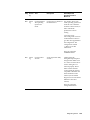


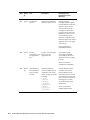

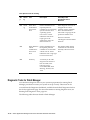

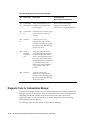
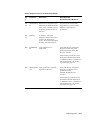


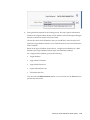
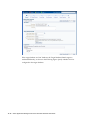
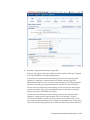


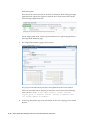


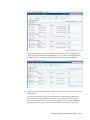
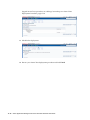
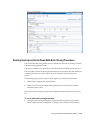
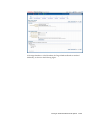


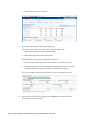
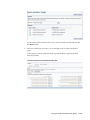
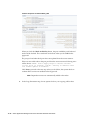
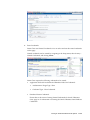
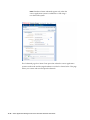

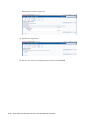


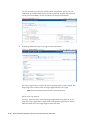
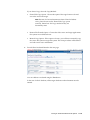
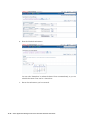
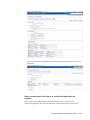

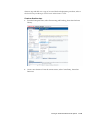
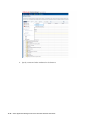
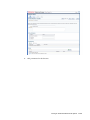


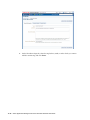


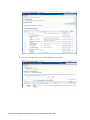


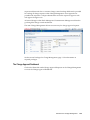
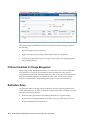


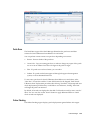
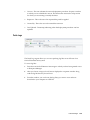

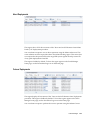

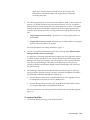
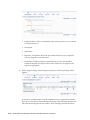
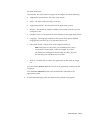
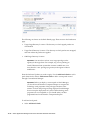

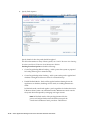


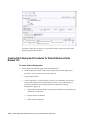

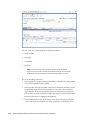


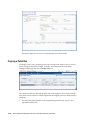


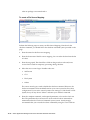


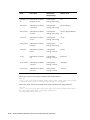
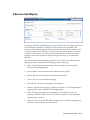
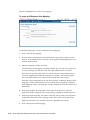

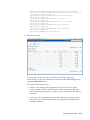


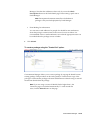
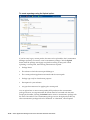


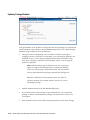

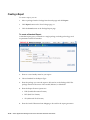
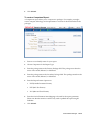
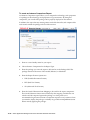


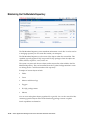
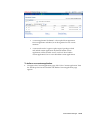
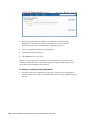
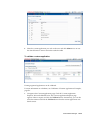


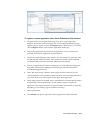
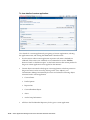
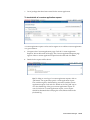
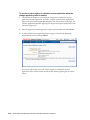
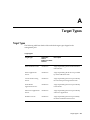


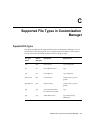


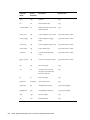


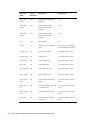


![[1 ] Oracle® Enterprise Manager](http://vs1.manualzilla.com/store/data/005669073_1-0396df232df5e560fdd03210f5126330-150x150.png)