1
Multichannel Power Amplifier
User's Manual
1
2
Content
1
Preface ......................................................................................... 4
1.1
Included ........................................................................................ 5
1.2
Transportation............................................................................... 5
2
Overview control elements......................................................... 6
2.1
Front panel.................................................................................... 6
3
Overview connections................................................................. 7
3.1
Back panel .................................................................................... 7
4
Installation and power supply ................................................... 8
4.1
Placement ..................................................................................... 8
4.2
Mains connection.......................................................................... 8
4.3
Orientation of mains plug ............................................................. 9
5
Inputs and outputs.................................................................... 10
5.1
Line inputs .................................................................................. 10
5.2
Speaker terminals ....................................................................... 11
6
Operating................................................................................... 11
6.1
Switching on/off ......................................................................... 11
6.2
Mains phase detection ................................................................ 12
6.3
Audionet Link............................................................................. 12
7
Protection system...................................................................... 13
8
Security notes ............................................................................ 15
9
Technical data ........................................................................... 16
3
1
Preface
The Audionet Team congratulates you to your purchase of this unit.
AMP V is Audionet's latest 5-channel power amplifier. For everyone,
who needs more power, but is not willing to provide the space for giantific amplifiers occupying cubicmeters of your listening room. AMP V is
our power amplifier for multi-channel setups, and in conjunction with our
high-class home theater pre amplifier MAP 1, it is more space-saveing as
many of the surround receiver flagships. And even better: In no way more
expensive!
AMP V accomplishes the feat to combine outstanding performance and
matchless sound character with utmost compactly dimensions. Its five
channels render recent 5.1 home cinemas possible. With these features,
the AMP V is predestined for home theater solutions in particular suitable
for your living space and primarily convincing in sound.
Wether it is Mozart or King Kong, AMP V masters all its tasks with
dedication and captivates its audience with an authenticity rarely to be
experienced. Its sound is fast, vigorous and thoroughly honest, but simultaneously full of concinnity, grace and accuracy. Paired with its contagious delight of performance, an amazingly realistic sound experience
arises.
AMP V represents the lastest state of Audionet's award-winning amplifier
technology and audiophile passion: Engineered and produced in Bochum,
Germany.
Like in all our mono and stereo power amplifiers, we consequently realized Audionet's ultra linear amplifier concept in the AMP V, too. The
circuitry is designed to achieve exemplary low distortion, celerity and
stability. The internal structure of the AMP V was developed in a way
that all five channels work independently as far as possible. Only exclusively selected high-grade components are used. Influences harmful to
the sound quality of the amplifier have been completely eliminated, and
an exemplary stability of performance is granted.
AMP V is controlled and monitored by a capable microprocessor. It provides an easy handling, comforting reliability and even checks the correct
polarization of the mains plug. Of course, the AMP V can be remotely
controlled by the Audionet Link interface.
But before you start listening to your new Audionet AMP V, please read
this manual carefully so you are able to use and enjoy all functions of this
unit without drawback on music quality.
4
1.1
Included
Included you will find the following items:
·
the multichannel amplifier AMP V
·
the user's manual (that you are currently reading)
·
one standard mains chord.
1.2
Transport
Important
·
Please transport the AMP V only in the included package.
·
Always use the plastic bag to prevent scratches on the housing.
·
Please allow the AMP V to adapt to the climatic conditions in your
listening room before you switch on the unit for the first time after
transport.
5
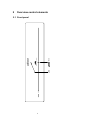
power
LED
power key
Multichannel power amplifier
AMP V
audionet
2
Overview control elements
2.1 Front panel
6
7
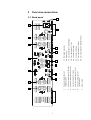
Speaker terminal channel 3 (Right)
Speaker terminal channel 2 (Center)
Line input channel 2 (Center)
Speaker terminal channel 1 (Left)
Speaker terminal channel 5
(Left Surround)
Mains switch
3
4
5
6
7
14
2
15
3
Speaker terminal channel 4
(Right Surround)
2
1
1
13
11
10
Line input channel 5 (Left Surround)
5
6
18 Line input channel 4 (Right Surround)
17 Line input channel 3 (Right)
16 Audionet Link input
15 Audionet Link output
14 Line input channel 1 (Left)
13
12 Mains input
11 Marking mains phase
12
4
9
7
8
3
Overview connections
3.1 Back panel
4
Installation and power supply
Important
·
For connecting or removing loudspeakers and/or the pre amplifier the your AMP V must be switched off to prevent damage on
the amplifier or the connected units.
·
Please make sure that all cables are in absolute best conditions!
Broken shields or short-cut loudspeaker cables could damage
speakers and/or amplifiers.
4.1 Placement
Please find a place for your Audionet AMP V that is sufficiently ventilated to allow the heat to dissipate. It is recommended to place the
AMP V into a high quality rack or onto a stable table. Do not expose the
unit to direct sunlight. Do not place the unit in close range to heat sources
like radiators. Do not cover the ventilation slots of the AMP V.
4.2 Mains connection
The mains input 9 * is on the back panel of the AMP V. To connect the
unit to mains use the included mains cord. If you want to use a different
power cord make sure that it meets the specifications for your home
country.
Important
·
The electrical specifications printed onto the back panel must meet
the electrical specifications of your home country.
·
The AMP V is a Class I unit and must be earthed. Please ensure a
stable earth connection. 'Phase' ('hot' pin) is marked on the back panel
('PHASE') 8 .
·
Never pull the mains plug while the AMP V is switched on. Always
power down the unit to stand-by mode first, before you use the mains
switch 7 on the back panel or pull the mains plug.
*
see numbers in section 'Back panel'
8
Only in case of extended absence (like vacations) or if massive trouble on
the mains power is to be expected you should disconnect the unit from
mains. To disconnect the AMP V completely from mains pull the mains
plug.
4.3 Orientation of mains plug
The correct polarization of mains is important for reasons of audio clarity
and stability. Please connect the mains cord that the hot pin of the wall
outlet is connected to the pin of mains input 9 marked 'PHASE' 8 on
the back panel of the unit.
Note
·
Your Audionet AMP V is able to detect a wrong polarization of the
mains plug. The LED in the front panel will flash quickly while powering up from stand-by mode using the power key. In this case,
power done the unit and flip the mains plug (see section 'Mains phase
detection').
9
5
Inputs and outputs
Important
·
For connecting or removing loudspeakers and/or the pre amplifier the your AMP V must be switched off to prevent damage on
the amplifier or the connected units.
·
Please make sure that all cables are in absolute best conditions!
Broken shields or short-cut loudspeaker cables could damage
speakers and/or amplifiers.
5.1
Line inputs
At first, connect your pre amplifier to the line inputs 4 , 10 , 11 , 14
and 15 of the AMP V. Go by the names of the channels printed above
the input jacks.
Note
·
In case you would like to use a speaker configuration besides the
usual 5.1 system, please refer to the following table for a recommended speaker setup:
1
AMP V line inputs
2
3
4
5
5.1 standard system
L
C
R
RS
LS
7.1 system with separate
stereo amplifier for L/R
LS
C
RS
RB
LB
7.1 system with separate
stereo amplifier for LB/RB
L
C
R
RS
LS
4 channel system
L
n.c.
R
RS
LS
3 chanel system
L
C
R
n.c.
n.c.
Stereo bi-amping
L
high pass
n.c.
R
high pass
R
low pass
L
low pass
Configuration
L = Left
C = Center
R = Right
LS = Left Surround
RS = Right Surround
n.c. = not connected
LB = Left Back
RB = Right Back
·
Of course, channel assignments differing from the table above are
possible. Assign channels preferably in order of their numbers.
·
If you are setting up a bi-amping system, please use channel pair
1 & 5 or 3 & 4 for one speaker each. Connect the high pass input of
your speakers prefferably to channel 1 or 3; use channels 4 & 5 for
the low pass input repectively. Also, keep warnings regarding biamping in the following section in mind!
10
5.2
Speaker terminals
Now, connect your speakers to the gold plated terminals on the back
panel. The assignment to the respective line input is clearly indicated.
Note
·
Look out for the correct connection of your speaker cables. Usually,
the terminals of your speakers ( 1 , 2 , 3 , 5 and 6 ) are marked '+'
and '-'. The AMP V uses the same marks.
·
Wrong speaker polarization will result in severe loss of sound quality!
Important
·
Although the AMP V has an effective protection system to prevent damage to the circuits, switch off the unit while working on
the speaker and/or audio cables.
·
If you use 2 or more amplifiers of your AMP V for bi-amping,
please make absolutely sure, that you removed any jumpers at
the terminals of your speakers (please consult the user's manual
of your speakers), before you switch on the system. Otherwise the
speakers and/or amplifiers could suffer damage!
·
The nominal loudspeaker impedance should be 4 Ohms or higher.
·
Never use force or tools tightening the terminal screws.
6
Operating
6.1
Switching on/off
First switch on the AMP V using the mains switch 7 on the back panel.
For about 2 seconds the LED will flash rapidly while the unit is initialized. Afterwards, the AMP V is in stand-by mode; the LED is off.
Press power key on the front panel to switch on the unit. The LED on the
front panel reports the polarization of mains phase for a few seconds (see
sections 'Mains phase detection') until the speaker outputs are enabled.
The AMP V is now ready to playback music.
To switch off the AMP V press power key on the front panel again. The
unit is in stand-by mode; the LED is off.
11
Note
·
During shut down procedure the LED will flash 7 times. Before you
can switch on the AMP V again, you have to wait until the shut down
procedure is finished and the LED if off. Do not switch off the amplifier with the mains switch 7 at the back panel during shut down procedure.
6.2
Mains phase detection
The AMP V is able to detect the correct polarization of the mains plug.
After pressing the power key until the speaker outputs are enabled, the
LED will flash in different rhythms:
·
If the polarization is correct, the LED flashes slowly: Ä___Ä___Ä…
·
If you see the LED flashing rapidly: Ä_Ä_Ä_Ä_Ä… please switch
off the unit and flip the mains plug. If you now switch on the AMP V
again, the unit should show the correct mains polarization by a slowly
flashing LED.
6.3
Audionet Link
For your convenience, the AMP V can be controlled remotely by one of
Audionet's multi-channel pre amplifiers MAP or MAP 1, as well as one
of Audionet's stereo pre amplifiers PRE or PRE 1 using the 'Audionet
Link' interface.
You only need a simple optical 'Toslink' cable to connect the 'Audionet
Link' output of your Audionet pre amplifier to the 'Audionet Link' input
13 of your AMP V. Now, the AMP V will be switched on/off automatically, when you switch on/off your pre amplifier at the front panel or by
remote control.
In case you would like to automatically control further Audionet units in
your system with the 'Audionet Link' interface, please connect the
'Audionet Link' output 12 of your AMP V to the 'Audionet Link' input
of the next Audionet unit using a simple optical 'Toslink' cable.
Note
·
The 'switch on' signal is issued to any further Audionet units daisy
chained to the 'Audionet Link' output of your AMP V with a little delay to avoid all units switching on at the same moment, which could
cause an overload of your mains fuse.
·
Independently from the 'Audionet Link' interface, you can switch
on/off your AMP V at any time by using the power key on the front
plate.
12
7
Protection system
Your Audionet AMP V is equipped with a powerful protection system
that safeguards your speakers and itself.
In case of an error the AMP V will report the cause in two steps. First, the
LED on the front panel will flash the number of the error occurred. Just
count how often the LED flashes and check that number with the following table:
1x DC failure:
dangerous DC voltage level at the speaker output: defective pre amplifier, source or active crossover carrying DC
2x High frequency (HF):
high frequency oscillation, please check your input source
3x Overload:
short-circuit of a loudspeaker cable or speaker is defective
4x Temperature:
do not cover the ventilation slots of your AMP V
Press power key at the front panel. Now, the AMP V reports the number
of the erroneous channel. Count how often the LED flashes to get the
channel number. The channel number is printed on the back panel right
beside the speaker terminals 1 , 2 , 3 , 5 and 6 , and also printed below the line inputs 4 , 10 , 11 , 14 and 15 .
Press power key again to enter stand-by mode.
Important
·
Remove cause of error before switching on the AMP V again!
Note
·
The AMP V will report the error code or channel number repeatedly
until you press the power key at the front panel.
·
Between each repetition of the error report is a small pause of about 1
second. During this pause the LED is off.
13
Example
An error occurred. The AMP V switches off the speakers, and the LED
on the front panel flashes:
Ä_Ä______Ä_Ä______Ä_Ä______Ä_Ä ...
According to the table above 2 flashes denote 'High Frequency Error'.
Now, press the power key. The AMP V will report the channel number.
The LED flashes:
Ä_Ä_Ä_Ä______Ä_Ä_Ä_Ä______Ä_Ä_Ä_Ä ...
Between the pauses, you can count 4 flashes of the LED which denotes
that the error occurred in channel nr. 4.
To enter stand-by mode please press the power key again.
Legend:
Ä = LED on
_ = LED off
14
8
Security notes
Important
·
Avoid packaging material, especially plastic bags, coming into children's hands!
·
Store and operate the unit in a dry room at a reasonable room temperature only!
·
Avoid moisture, any liquids, dirty or small objects getting into the
unit!
·
Set up the unit in a sufficiently ventilated environment!
·
Do not cover the unit!
·
Do not open the unit. Unauthorised opening will void warranty!
·
Do not short circuit the outputs!
·
If you use 2 or more amplifiers of your AMP V for bi-amping, please
make absolutely sure, that you removed any jumpers at the terminals
of your speakers (please consult the user's manual of your speakers),
before you switch on the system. Otherwise the speakers and/or amplifiers could suffer damage!
·
For connecting or removing loudspeakers and/or the pre amplifier the
your AMP V must be switched off to prevent damage on the amplifier or the connected units.
·
Use dry cloth for cleaning!
We would like to wish you many exciting listening experiences you’re
your new Audionet product.
If you still have any questions, do not hesitate to ask your competent
Audionet dealer or contact us directly.
15
9
Technical data
Function
5-channel power amplifier
Power
100 Watts in 8 Ohms per channel
180 Watts in 4 Ohms per channel
Frequency response
2 – 300,000 Hz (-3dB)
Damping factor
> 2,000 from 10 Hz to 10 kHz
THD+N
< -100 dB (25 Watts / 4 Ohms)
SNR
> 120 dB (A-weighted)
Channel separation
> 100 dB for 1 kHz
Input impedance
37 kOhms, 150 pF
Inputs
5 Cinch Line, AC coupled, gold plated
1 Audionet Link, optical
Outputs
5 pairs of WBT speaker terminals, gold plated
1 Audionet Link, optical
Mains
230 V, 50..60 Hz
Power consumption
1 Watt Stand by, max. 1,200 Watts
Dimensions
Width:
Height:
Depth:
Weight
19 kg
Finish Front
brushed aluminium, 10 mm,
black anodized, light grey print or
aluminium 'nature' anodized, black print,
LED red or blue
Features
Processor controlled protection circuit for HF, DC,
temperature and overload
Remote control by Audionet Link (optical)
Automatic mains phase detection
430 mm
110 mm
360 mm
Errors and omissions excepted. Specifications and design are subject to changes without prior notice.
audionet is a trademark of Idektron GmbH & Co KG
Engineered and produced by:
Idektron GmbH & Co. KG, Herner Str. 299, Gebäude 6, 44809 Bochum, Germany
www.audionet.de
[email protected]
16