1
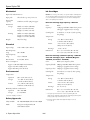
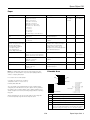
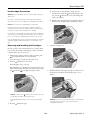
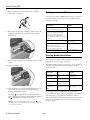
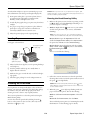
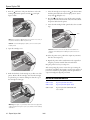
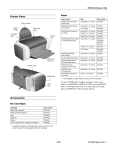
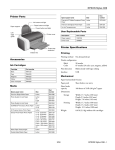
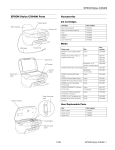
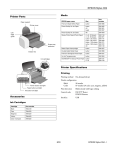
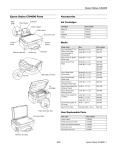
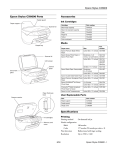
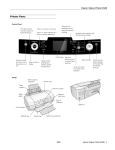
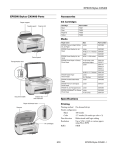
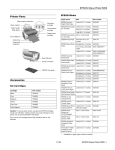
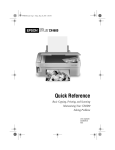
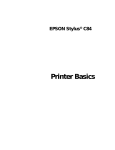
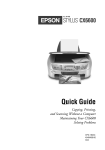
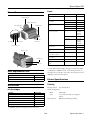
Epson Stylus C86 Paper Printer Parts Paper support Right edge guide Left edge guide Output tray Paper name* Size Part number Epson Premium Bright White Paper Letter (8.5 x 11 inches) S041586 Epson DURABrite Ink Glossy Photo Paper Letter (8.5 x 11 inches) S041731 4 x 6 inches S041734 Epson Photo Quality Ink Jet Paper Letter (8.5 x 11 inches) S041062 Epson Glossy Photo Paper or Epson Photo Paper Ink button Power button Output tray extension Paper button Printer cover Parallel port USB port A4 (8.3 x 11.7 inches) S041061 Legal (8.5 x 14 inches) S041067 Letter (8.5 x 11 inches) S041141 S041649 S041271 S041272 A4 (8.3 x 11.7 inches) S041140 4 x 6 inches S041134 S041671 S041458 S041809 Epson Matte Paper Heavyweight Letter (8.5 x 11 inches) S041257 8 x 10 inches S041467 Epson Double-Sided Matte Paper Letter (8.5 x 11 inches) S041568 PremierArt Matte Scrapbook Photo Paper for Epson Letter (8.5 x 11 inches) SCR1002 Epson Premium Semigloss Photo Paper Letter (8.5 x 11 inches) S041331 Epson Ink Jet Transparencies Letter (8.5 x 11 inches) S041064 Epson Photo Quality Ink Jet Cards A6 (4.1 x 5.8 inches) S041054 * The availability of paper types and sizes varies by location. To order Epson ink cartridges, and paper, contact your dealer or call Epson at (800) 873-7766 or visit the Epson Store at www.Epsonstore.com (U.S. sales only). In Canada, please call (800) 463-7766 for dealer referral. User Replaceable Parts Part Part number Paper support 1262104 Power cord 2068927 Printer Specifications Printing Accessories Printing method Ink Cartridges On-demand ink jet Nozzle configuration Cartridge Part number Black (high capacity)* T043120 Black (standard capacity)* T044120 Cyan T044220 Magenta T044320 Yellow T044420 Color multipack (cyan, magenta, and yellow) T044520 Black Color Print direction 180 nozzles 177 nozzles (59 each: cyan, magenta, yellow) Bidirectional with logic seeking * Availability of black ink cartridge types varies by location. 3/04 Epson Stylus C86 - 1 Epson Stylus C86 Mechanical Ink Cartridges Paper feed method Friction Caution: To ensure good results, use genuine Epson cartridges and do not refill them. Other products may cause damage to the printer not covered by Epson’s warranty. Don’t use an ink cartridge if the date on the package has expired. Paper path Sheet feeder, top entry, front out Sheet feeder capacity 120 sheets of 24 lb (90 g/m2) paper Black Ink Cartridge (high capacity) - T043120 Dimensions Storage Width: 18.1 inches (460 mm) Depth: 9.5 inches (242 mm) Height: 7.5 inches (191 mm) Printing Width: 18.1 inches (460 mm) Depth: 17.2 inches (437 mm) Height: 11.9 inches (302 mm) Weight Electrical 120 or 220 V (90 to 266 V) Rated frequency range 50 to 60 Hz Input frequency range 49.5 to 60.5 Hz Rated current 0.2 A (Max. 0.4 A) Black Capacity* 1350 pages ISO/IEC 10561 letter pattern 950 pages of graphics at 5% coverage Cartridge life 6 months at 77 °F (25 °C) after opening the package Temperature 10.5 lb (4.8 kg) Input voltage Color Storage –4 to 104 °F (–20 to 40 °C) 1 month at 104 °F (40 °C) Transit –22 to 122 °F (–30 to 50 °C) 10 days at 122 °F (50 °C) Freezing** 3.2 °F (–16 °C) Dimensions 0.9 × 2.9 × 2.2 inches (W × D × H) 22 × 73.5 × 55.3 mm (W × D × H) Black Ink Cartridge (standard capacity) - T044120 Color Ink Cartridges (Cyan - T044220, Magenta T044320, and Yellow - T044420) Power consumption Approx. 19 W (ISO 10561 Letter Pattern) Approx. 4.5 W in standby mode Approx. 0.8 W in power-off mode Environmental Temperature Color Black, cyan, magenta, yellow Capacity (black)* 600 pages ISO/IEC 10561 letter pattern 420 pages of graphics at 5% coverage Capacity (color)* 450 pages of graphics at 5% coverage Cartridge life 6 months at 77 °F (25 °C) after opening the package Temperature Operation 50 to 95 °F (10 to 35 °C) Storage* −4 to 104 °F (−20 to 40 °C) 1 month at 104 °F (40 °C) Transit* –4 to 140 °F (–20 to 60 °C) 120 hours at 140 °F (60 °C) Humidity (without condensation) Operation 20 to 80% RH Storage* 5 to 85% RH EMC FCC part 15 subpart B class B CSA C108.8 Class B 2 - Epson Stylus C86 Transit –22 to 122 °F (–30 to 50 °C) 10 days at 122 °F (50 °C) Freezing** 3.2 °F (–16 °C) 0.5 × 2.9 × 2.2 inches (W × D × H) 12.7 × 73.5 × 55.3 mm (W × D × H) * The figure given is based on continuous printing after ink replacement. Cartridge yields will vary with images printed, print settings, paper types and frequency of use. Safety Approvals UL 1950, EN 60950, CSA C22.2 No. 60950 –4 to 104 °F (–20 to 40 °C) 1 month at 104 °F (40 °C) Dimensions *Stored in shipping container Safety standards Storage ** Ink thaws and is usable after approximately 3 hours at 77 °F (25 °C). 3/04 Epson Stylus C86 Paper Media type Size Paper types Thickness Weight Single sheets A4 (8.3 × 11.7 inches) A5 (5.8 × 8.3 inches) A6 (4.1 × 5.8 inches) Letter (8.5 × 11 inches) Legal (8.5 × 14 inches) Half-letter (5.5 × 8.5 inches) Executive (7.3 × 10.5 inches) 4 × 6 inches 5 × 7 inches 3.5 × 5 inches 8 × 10 inches User Defined up to 8.5 × 44 inches Plain bond paper 0.003 to 0.004 inch (0.08 to 0.11 mm) 17 to 24 lb (64 to 90 g/m2) DURABrite Ink Glossy Photo Paper Letter (8.5 x 11 inches) 4 × 6 inches DURABrite Ink Glossy Photo Paper distributed by Epson — — Matte Paper Heavyweight Letter (8.5 × 11 inches) 8 × 10 inches Matte Paper Heavyweight distributed by Epson — — Double-Sided Matte Paper Premium Semigloss Photo Paper All-Purpose Glossy Paper PremierArt Matte Scrapbook Photo Paper for Epson Ink Jet Transparencies Premium Bright White Paper Letter (8.5 × 11 inches) Double-Sided Matte paper, Premium — Semigloss Photo Paper, All- Purpose Glossy Paper, PremierArt Matte Scrapbook Photo Paper, Ink Jet Transparencies, Premium Bright White Paper distributed by Epson — Envelopes No. 10, 4.1 × 9.5 inches (104 × 241 mm) DL, 4.3 × 8.7 inches (110 × 220 mm) C6, 4.4 × 6.4 inches (114 × 162 mm) Plain bond paper or air mail paper 12 to 20 lb (45 to 75 g/m²) Photo Quality Ink Jet Paper Letter (8.5 × 11 inches) Legal (8.5 × 14 inches) A4 (210 × 297 mm) Photo Quality Ink Jet Paper distributed — by Epson — Ink jet cards A6 (105 × 148 mm) Ink jet cards distributed by Epson — — Glossy Photo Paper (Photo Paper) distributed by Epson — — Glossy Photo Paper (Photo Paper) Letter (8.5 × 11 inches) A4 (210 × 297 mm) 4 × 6 inches — Printable Area Note: Poor quality paper may reduce the print quality and cause paper jams or other problems. If you have print quality problems, switch to a higher grade paper. A Do not load curled or folded paper. B-L Use paper only under these conditions: Temperature: 59 to 77 °F (15 to 25 °C) Humidity: 40 to 60% RH B-R Normal C Since the quality of any particular brand or type of paper may be changed by the manufacturer at any time, Epson cannot guarantee the quality of any non-Epson brand or type of paper. Always test a sample of paper stock before purchasing large quantities or printing large jobs. Envelope Borderless* A Always load paper into the sheet feeder with the short edge first. Load envelopes flap edge left with the flap side down. 3/04 The minimum top margin is 0.12” (3.0 mm). B-L The minimum left margin is 0.12” (3.0 mm). B-R The minimum right margin is 0.12” (3.0 mm). C The minimum bottom margin is 0.12” (3.0 mm). D The minimum bottom margin is 0.78” (20 mm) for envelopes * When printing with the borderless feature, print quality may decline in the expanded area. Before printing large jobs with the borderless setting, print a single sheet to check print quality. Epson Stylus C86 - 3 Epson Stylus C86 Control Panel Replacing an Ink Cartridge To diagnose some problems, check the printer’s control panel, as described below. ❏ When the red ink light flashes, one or more ink cartridges are low on ink. Paper button and paper out light (also cancels print jobs) ❏ When the red cartridge(s). When you print, you’ll also see a message on your screen telling you which cartridge is low or empty. Power button and light Ink button and ink out light When a cartridge is more than six months old, you may need to replace it if printouts don’t look their best. If the quality doesn’t improve after cleaning and aligning the print head, you can replace the cartridge even if the red ink light is off. Checking the Ink Supply Follow the guidelines in this table when you check the control panel lights: Green power light flashes The printer is receiving a print job, charging ink, cleaning the print head, or ink is being replaced. Red is on Your paper ran out. Load more and press the paper button. paper light Red paper light flashes Paper is jammed in the printer. Press the paper button to eject the jammed paper. If the light is still flashing, open the cover and remove all paper, including any jammed or torn pieces. Then reload paper and press the paper button to continue printing. Red ink light flashes One of the cartridges is low on ink. Check the message that appears on your screen to determine which cartridge is low. Make sure you have a replacement cartridge. Red To check your ink supply, do the following: ❏ Windows: Double-click the taskbar. One or more ink cartridges is not installed correctly. Reinstall cartridges. Green power light is off; red paper and ink lights flash alternately Paper may be blocking movement of the print head. Turn off the printer, open the cover, and remove any jammed paper or other foreign objects. Turn the printer back on again. If the lights are still flashing, contact your dealer or Epson. Green power light is off; red paper and ink lights flash The printer may have an internal error. Turn off the printer, wait a few seconds, and turn it on again. If the lights are still flashing, contact your dealer or Epson. Green power light is off The printer is not receiving power. Make sure the printer is on. Turn off the printer, plug in the power cord securely, and turn the printer on again. Make sure the outlet is working and is not controlled by a switch or timer. If in doubt, try another outlet. 4 - Epson Stylus C86 icon on the Windows Note: If you don’t see the icon, go to your printer properties window, click the Maintenance tab, then select Status Monitor. You see a window like this: ink light is on One of the cartridges is out of ink or not installed. Make sure you have a replacement cartridge. If you have just installed a new cartridge, it may be incompatible with the printer or incorrectly installed. Reinstall it or replace it with the correct cartridge. power Green light and red ink light are on ink light stays on, you need to replace the ❏ Macintosh OS X: Double-click the Epson Printer Utility icon in the Applications folder. Choose C86 Series and click OK. Then click Epson Status Monitor. You see a window like this: ❏ Macintosh OS 9: From the File menu, select Print, then click the ink icon. 3/04 Epson Stylus C86 ❏ If more than one ink cartridge is empty, the next cartridge moves under the mark. This happens after you press the ink button for every ink cartridge that needs to be replaced. Ink Cartridge Precautions Warning: Keep ink cartridges out of the reach of children and do not drink the ink. If ink gets on your hands, wash them thoroughly with soap and water. If ink gets in your eyes, flush them immediately with water. ❏ If all the empty cartridges have been identified, the print head moves to the ink cartridge replacement position. Caution: Don’t remove the cartridge label, or ink will leak. Don’t remove the green IC chip from the cartridge. Installing a cartridge without an IC chip can damage the printer. Avoid touching the green IC chip, as this can damage the ink cartridge. If you remove an ink cartridge temporarily, protect the ink supply port on the bottom of the cartridge from dirt and dust. Place it in a small box, or, if you have the original packaging, return it to its own box. Store ink cartridges in the same environment as the printer. Stand the cartridges upright (the label identifying the color should be on the top). Removing and Installing Ink Cartridges 5. Open the cartridge cover. Be sure you have a new ink cartridge before you begin. Once you start the ink cartridge replacement procedure, you must complete all the steps in one session. 1. Make sure the printer is turned on and not printing. The power light should be on, but not flashing. 2. Lower the output tray and open the printer cover. 3. Press the ink button for one second. If the ink light is off, go to step 5. If the ink light is on or flashing, the print head moves to the left, and the cartridge that needs to be replaced stops under the mark. The power light also begins to flash. 6. Pinch the back tab of the empty cartridge as you lift it out of the printer. Don’t take the used cartridge apart or try to refill it. Caution: Don’t press the ink button for more than 2 seconds, or the printer will start to clean the print head. To avoid damaging the printer, never move the print head by hand. 4. Press the Warning: If ink gets on your hands, wash them thoroughly with soap and water. If ink gets into your eyes, flush them immediately with water. ink button again. 3/04 Epson Stylus C86 - 5 Epson Stylus C86 7. Before you remove the new cartridge from its package, shake it four or five times. Printing on Special Media Select the correct Type or Media Type setting so your printer knows what kind of paper you’re using and adjusts the ink coverage accordingly. 8. Remove the cartridge from its package and lower it into the cartridge holder. Push down gently until the cartridge is firmly seated. Paper name Media/paper Type setting Plain paper sheets or envelopes Epson Premium Bright White Paper Plain Paper / Bright White Paper Epson Photo Quality Ink Jet Paper Epson Photo Quality Ink Jet Cards Epson Matte Paper Heavyweight Epson Double-Sided Matte Paper PremierArt Matte Scrapbook Photo Paper for Epson Matte Paper - Heavyweight Epson DURABrite Ink Glossy Photo Paper DURABrite Ink Glossy Photo Paper Epson Photo Paper Epson Glossy Photo Paper Epson Premium Semigloss Photo Paper Epson All-Purpose Glossy Paper Glossy Photo Paper Epson Ink Jet Transparencies Ink Jet Transparencies Printing Borderless Photos You can print your photos with no margins, extending the image all the way to the edges of the page. 9. Repeat steps 5 through 8 for each cartridge that you need to replace. Although borderless printing is a bit slower, you get beautiful snapshots and enlargements, without trimming, on these papers and sizes: 10. Close the cartridge cover. 11. Close the printer cover and press the ink button for one second. The printer moves the print head and begins charging the ink delivery system. Sizes Media/paper Type setting Epson Matte Paper Heavyweight Letter (8.5 × 11 inches) 8 × 10 Matte Paper Heavyweight Epson Photo Paper 4×6 Letter (8.5 × 11 inches) Glossy Photo Paper Epson Glossy Photo Paper 4×6 Letter (8.5 × 11 inches) Epson DURABrite Ink Glossy Photo Paper 4×6 Letter (8.5 × 11 inches) DURABrite Ink Glossy Photo Paper With proper care, photographs from your Epson Stylus printer will last for many years. The special Epson DuraBrite inks designed for your printer are formulated to achieve improved lightfastness when used with Epson papers for prints that are properly displayed or stored. For best results, always use Epson papers. The green power light flashes and the printer makes noise. Charging takes about one minute. When it’s finished, the power light stops flashing and stays on. Caution: Never turn off the printer while the green power light is flashing, unless the printer hasn’t moved or made noise for more than 5 minutes. 6 - Epson Stylus C86 Paper name 3/04 Epson Stylus C86 As with traditional photos, Epson recommends proper care that will minimize color changes and lengthen display life: Caution: When you don’t turn on your printer for a long time, print quality can decline, so turn it on and print a few pages at least once a month to maintain good print quality. ❏ Frame prints under glass or a protective plastic sleeve to protect them from atmospheric contaminants like humidity, smoke, and high levels of ozone. Running the Head Cleaning Utility ❏ As with all photographs, keep your prints away from direct sunlight. 1. Make sure the printer is turned on but not printing, and the red ink light is off. (If the ink light is flashing or on, you need to replace a cartridge.) ❏ For proper storage, keep your prints in a photo album or plastic photo storage box in acid-free, archival sleeves commonly available from most camera stores. 2. Windows: Right-click the printer icon on your taskbar (in the lower right corner of your screen). Select Head Cleaning. ❏ Always keep unused paper in the original package. Note: If you don’t see the icon, go to your printer properties window, click the Maintenance tab, then select Head Cleaning. Loading Paper Macintosh OS X: Open the Applications folder and double-click Epson Printer Utility. Select Stylus C86 in the printer list, click OK, and select Head Cleaning. Load paper as shown below. Macintosh OS 9: Open the File menu and choose Page Setup or Print. Click the utility button, then click the Head Cleaning button. Insert paper against the right edge You see a screen like the following: Slide the left edge guide against the paper ❏ Always load the short edge first, even for printing landscapeoriented photos. ❏ Load the printable side face up. It’s usually whiter or brighter than the other side. ❏ Make sure the paper is under the tabs on the left and right edge guides. 3. Follow the on-screen instructions to clean the print head. ❏ Check the paper package for more loading instructions. Cleaning takes several seconds. The printer makes noise and the green power light flashes. Cleaning the Print Head Caution: Never turn off the printer while the green power light is flashing, unless the printer hasn’t moved or made noise for more than 5 minutes. If your printouts are unexpectedly light, or dots or lines are missing, you may need to clean the print head. This unclogs the nozzles so they can deliver ink properly. Print head cleaning uses ink, so clean it only if quality declines. 4. When the green power light stops flashing, make sure paper is loaded in the printer, then do the following: Windows: Click Print nozzle check pattern. Then click Print. This section explains how to clean the print head using the Head Cleaning utility. Macintosh: Click Confirmation, then click Next. You can also clean the print head by holding down the button on the printer for three seconds. (This only works when the red light is off.) The nozzle check pattern prints (see “Examining the Nozzle Check Pattern” on the following page for details). 3/04 Epson Stylus C86 - 7 Epson Stylus C86 5. If the nozzle check pattern has no gaps or white lines, click Finish. 4. Follow the instructions on the screen to print a black vertical alignment test page. You see a screen like this: If the pattern has white lines, click Clean to clean the print head again. You can also turn the printer off and wait overnight—this allows any dried ink to soften—and then try cleaning the print head again. Examining the Nozzle Check Pattern Examine the nozzle check pattern you printed. Each staggered line should be solid, with no gaps, as shown. 5. Look at the five sets of patterns in your printout. For each set, if you see a pattern with no visible vertical lines, enter its number in the corresponding box on the screen and click Next. ❏ If your printout looks okay, you’re done. ❏ If you see any gaps (as shown below), clean the print head again. If you can’t find a pattern without any vertical lines, select the best pattern. Click Realignment and then Print to print another alignment sheet and repeat this step. 6. Click Print to print the color vertical alignment sheet. You see a screen like this: Aligning the Print Head If your printouts look blurry or grainy, or you see light or dark horizontal banding, you may need to align the print head. Note: Banding may also occur if your cartridges are low on ink or you need to clean the print head. 1. Turn on the printer. 2. Load several sheets of paper. 7. Look at the four sets of patterns in your printout. For each set, if you see a pattern with no visible vertical lines, enter its number in the corresponding box on the screen and click Next. 3. Windows: Right-click the printer icon on your taskbar (in the lower right corner of your screen). Select Print Head Alignment. Note: If you don’t see the icon, go to your printer properties window, click the Maintenance tab, then select Print Head Alignment If you can’t find a pattern without any vertical lines, select the best pattern. Click Realignment to print another alignment sheet and repeat this step. Macintosh OS X: Open the Applications folder and double-click the Epson Printer Utility icon. Select Stylus C86 in the printer list, click OK, and select Print Head Alignment. Macintosh OS 9: From the File menu, select Page Setup or Print. Click the Utility button, then click the Print Head Alignment button. 8 - Epson Stylus C86 3/04 Epson Stylus C86 8. Click Print to print a black horizontal alignment sheet. After it’s printed you see a screen like this: Cleaning the Printer To keep your printer working at its best, you should clean it several times a year. 1. Turn off the printer, unplug the power cord, and disconnect the cable. 2. Remove all the paper, then use a soft brush to clean the sheet feeder. 3. If the outer case or inside of the sheet feeder is dirty, clean it with a soft cloth dampened with mild detergent. Keep the printer cover closed to prevent water from getting inside. 4. If ink accidentally gets inside the printer, wipe off the rollers shown below with a damp cloth. 9. In your printout, select the pattern with no gap or line between the rectangles. Enter its number in the box on the screen and click Next. If you can’t find an aligned pattern, choose the best pattern. Then click Realignment to print another alignment sheet and repeat this step. 10. Click Print to print a color horizontal alignment sheet. After it’s printed, you see a screen like this: Clean here Warning: Don’t touch the gears or any other parts inside the printer. Caution: Never use a hard or abrasive brush, or benzine, alcohol, or paint thinner for cleaning; they can damage the printer components and case. Don’t get water on the printer components and don’t spray lubricants or oils inside the printer. Transporting the Printer 11. In your printout, find the pattern with no gap or line between the rectangles and enter its number in the box on the screen. If you need to ship your printer, you must prepare it for transportation by removing the ink cartridges and packing the printer in its original box or one of a similar size. If you can’t find an aligned pattern, choose the best pattern. Then click Realignment to print another alignment sheet and repeat this step. 1. Turn on the printer. 2. Remove any paper from the printer, then remove the paper support. 12. Click Finish to close the Print Head Alignment Utility. 3. Open the printer cover. 3/04 Epson Stylus C86 - 9 Epson Stylus C86 4. Press the ink button. The print head moves to the ink cartridge replacement position, and the power light begins to flash. 7. Close the cartridge cover and press the ink button. Wait until the print head locks in the far right position. (Don’t worry if the ink light is on.) 8. Press the power button to turn off the printer. Unplug the power cord from the electrical outlet. Then disconnect the printer cable from the printer. 9. Secure the ink cartridge holder (print head) to the case with tape. Tape Note: Don’t press the ink button for more than 2 seconds, or the printer will start to clean the print head. Caution: To avoid damaging the printer, never move the print head by hand. 5. Open the cartridge cover. Caution: Be sure to remove the tape and reinstall the ink cartridges immediately after installing the printer in its new location. 10. Close the printer cover, push in the output tray extension, then close the output tray. 11. Repack the printer and its attachments in the original box using the protective materials that came with them. Keep the printer level as you transport it. After transporting the printer, remove the tape securing the print head, reinstall the ink cartridges, and test your printer. If you notice a decline in print quality, clean the print head; if output is misaligned, align the print head. 6. Pinch the back tab of each cartridge as you lift it out of the printer. Remove all the cartridges. Store the ink cartridges in a plastic bag or container, making sure that the tops of the cartridges are facing up. Related Documentation Warning: If ink gets on your hands, wash them thoroughly with soap and water. If ink gets in your eyes, flush them immediately with water. 10 - Epson Stylus C86 3/04 CPD-17833 Epson Stylus C86 Start Here CPD-17832 Epson Stylus C86 Quick Guide CPD-17834 Epson Stylus C86 CD-ROM with User’s Guide