1
Doc. No. 78-1923-09
The LightStream 2020 Release Notes
for Software Release 2.0.9
These release notes describe features, enhancements, special considerations, and software upgrade
procedures for software Release 2.0.9 of the LightStream 2020 enterprise ATM switch.
This software base release is an upgrade to base Release 2.0.7. It subsumes upgrade 2.0.8, and it
supersedes base release 2.0.7 node software and all prior releases. StreamView Network
Management software is not updated in this release.
Introduction
These release notes are organized as follows:
•
New Features and Enhancements
Describes new features of Release 2.0.9 and enhancements to existing features.
•
Hardware Compatibility Table
Describes compatibility issues that must be resolved by bringing hardware up to current revision
levels before upgrading LS2020 software.
•
Flash Memory Image Checksum Values
Lists checksum values for flash memory on cards for this release.
•
Special Considerations
Describes special considerations and caveats for Release 2.0.9 of the LS2020 product.
•
Software Upgrade Procedures
Describes how to determine the software release presently installed on the system hard disk.
Describes how to upgrade your software to Release 2.0.9. Discusses disk utilization.
•
Special Procedures
Describes procedures related to the upgrade process, such as how to free up disk space, fall back
to prior versions of the software, and verify connections to the backup NP.
•
Resolved Problems
Lists problems of Release 2.0.8 that have been resolved in Release 2.0.9.
Copyright 1995
Cisco Systems, Inc.
All rights reserved.
1
New Features and Enhancements
New Features and Enhancements
Release 2.0.9 contains improvements to existing functionality found in Release 2.0. The
improvements are in the following areas:
•
•
•
•
•
•
•
•
Command Line Interface (CLI)
Network Processor Software
Low-Speed Line Card
LightStream’s Operating System (LynxOS)
LightStream’s Trucking Software
LightStream Congestion Avoidance Software
LightStream’s Test and Control System (TCS)
LightStream’s Line Card Flash Code
The only change in functionality is that the modem and terminal ports on the switch card no longer
support the BREAK detection mechanism. The user must configure the proper baud rates for local
and remote (modem) access.
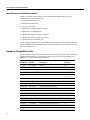
Hardware Compatibility Table
The following table specifies the minimum hardware revision levels required by this version of the
LightStream 2020 software. The part number and revision level can be found on each piece of
hardware or by using the bash command sysver -a.
2
Part Number
Previous Part
Number
Description
Minimum
Revision
73-1430-01
2121973G01
Midplane
P01
73-1449-01
2123864G01
Release 2 switch card
F
73-1428-01
2121701G01
Network processor
K
73-1431-01
2121992G01
Network processor access card
PB
73-1432-01
2122002G01
Low-speed line card
i (G if TCS slave
min. rev. C0)
73-1433-01
2122007G01
Low-speed access card
C
800-00408-01
2222718G01
V.35 fantail (for low-speed card)
P01
800-00410-01
2222807G01
RS-449 fantail (for low-speed card)
P01
800-00414-01
2223856G01
X.21 fantail (for low-speed card)
A
73-1434-01
2122009G01
Medium-speed line card
i
73-1560-01
N/A
Medium-speed line card 2
A
N/A
2122012G01
T3 medium-speed access card
A
N/A
2122012G02
E3 medium-speed access card
B
73-1438-01
2123258G01
T3 medium-speed access card
A
73-1439-01
2123258G02
E3 PLCP medium-speed access card
P03
73-1440-01
2123258G03
E3 G.804 medium speed access card
A
73-1437-01
2123086G01
Packet line card
E
73-1450-01
2123988G01
Ethernet access card
B
Flash Memory Image Checksum Values
Part Number
Previous Part
Number
Description
Minimum
Revision
73-1452-01
2124055G01
FDDI access card
C
73-1441-01
2123263G01
Cell line card, 2 TSUs (for 2-port OC3AC)
G
73-1442-01
2123263G02
Cell line card, 1 TSU (for 1-port OC3AC)
C
73-1444-01
2123265G01
Single-mode, 2-port OC-3c access card
D
73-1445-01
2123265G02
Multimode, 2-port OC3 access card
C
73-1446-01
2123265G03
Single-mode, 1-port OC3 access card
A
73-1447-01
2123265G04
Multimode, 1-port OC3 access card
A
Software releases 2.0.0 and above require a 32 MB network processor (NP).
Software Release 2.0.5 is the minimum software revision necessary for the support of redundant
switches.
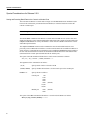
Flash Memory Image Checksum Values
Every time you install a card in a slot of the system, you must verify that it has the correct flash
memory checksum and upgrade flash if necessary. The procedures are given in the LightStream 2020
Hardware Reference and Troubleshooting Guide. Use the bash command sysver -a to display flash
checksums. The checksums for this new release are as follows:
Network Processor:
Switch Card 1:
Switch Card 2:
Low Speed Card:
Medium Speed Card:
Packet Line Card:
Cell Line Card:
Flash
Flash
Flash
Flash
Flash
Flash
Flash
Image
Image
Image
Image
Image
Image
Image
Checksum:
Checksum:
Checksum:
Checksum:
Checksum:
Checksum:
Checksum:
0xC1DE
0x5D00
0x64A2
0x181C
0xA7FC
0x0339
0xE782
If the flash checksum is 0x64A2 for a Release 2 switch card or 0x5D00 for a Release 1 switch card,
then the specified switch card already has the latest flash image.
Note The label Switch Card 1 denotes Release 1 of the switch card, and the label Switch Card 2
denotes Release 2 of the switch card.
Special Considerations
This section describes special considerations that apply to Release 2.0.9 of the LightStream 2020
enterprise ATM switch. These special considerations are drawn from reports of hands-on experience
with the product by LightStream 2020 customers, Cisco developers, and Cisco software quality
assurance personnel.
Most of the special considerations here are given Cisco case numbers. If you contact Cisco Systems
about any of these special considerations, please refer to the case number.
3
Special Considerations
Special Considerations for Release 2.0.9
Setting and Detecting Baud Rate on the Console or Modem Ports
The TCS HUB for Release 2 switch cards no longer uses the BREAK detection mechanism (also
known as the auto-baud or pseudo-auto-baud mechanism) to select the baud rate on either the
console or modem port.
Note Setting and detecting the baud rate applies only to the Release 2 switch card.
The set and show commands of the Release 2 switch card TCS HUB are now used to select and
display the baud rate. These commands manipulate and interpret the contents of certain fields in the
midplane EEPROM that are used by the Release 2 switch card TCS HUB to initialize the console
and modem port baud rates.
The midplane EEPROM locations used to maintain the console and modem baud rates were
previously reserved. When the new Release 2 switch card TCS HUB code is installed in a Release 2
switch card in a system that has never had those reserved midplane EEPROM locations initialized,
the new code detects that these locations are uninitialized and initializes them with default values
(9600 baud for the console port and 2400 baud for the modem port).
The syntax of the set command of the Release 2 switch card TCS HUB is as follows:
set {sa | sb} {console | modem} baudrate rate
The arguments of the command are as follows:
{ sa | sb }
Specify Switch Card A or Switch Card B.
{console | modem}
Specify whether the baud rate is for the console port or the modem port.
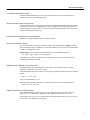
baudrate rate
Specify the rate as follows:
Console port
Modem port
300
1200
2400
4800
9600
19,200
38,400
2400
9600
(default)
(default)
The syntax of the show command of the Release 2 switch card TCS HUB is as follows:
show {sa | sb} {console | modem} baudrate
4
Special Considerations
The arguments of the command are as follows:
{ sa | sb }
Specify Switch Card A or Switch Card B.
{console | modem}
Specify whether the display is for the console port or the modem port.
baudrate
Specify that the baud rate is to be displayed.
You can change the baud rate at any time. It takes effect on power-up or board reset, or (for the
modem port) when the modem port is reinitialized with the TCS HUB init command. The syntax of
the init command is as follows:
init {sa | sb} modem
How to Match Console Terminal and Port Baud Rates
There are currently three ways to match console terminal and console port baud rates if the console
port is initialized with a baud rate other than the one to which the console terminal is set:
•
If the console terminal does not support one or more of the baud rates described in the set
command description (above), use the following method to try all the baud rates that the console
terminal does support:
Change the console terminal baud rate (if possible) until the Release 2 switch card TCS HUB
prompt is displayed when you press the [Return] key. There are seven possible console baud
rates. Starting with the default rate, set up the console terminal to run with each one until a match
has been found.
•
If the above method fails and you have a modem and the ability to dial in to the LightStream 2020
switch, do this:
Dial into the LightStream 2020 switch. Use the command set {sa | sb} console baudrate rate to
change the console port baud rate to the console terminal baud rate, specifying the switch whose
baud rate you wish to set.
Reset the Release 2 switch card by entering the following TCS HUB reset command:
reset {sa | sb}
This breaks the modem connection and reinitializes the console port to the selected baud rate.
•
If the above methods fail and you have redundant Release 2 cards, one of which is already
accessible through the console or modem port, do this:
Use the console attached to the fully operational switch, or dial in to the switch through the
modem port. From this switch, use the command set {sa | sb} console baudrate rate to change
the console port baud rate to the console terminal baud rate, specifying the other switch.
If none of the above works, contact Cisco Systems, Inc.
How to Change the Modem Baud Rate if a Connection Cannot Be Established
If the modem port is initialized with a baud rate other than the one with which the modem can
operate, you can change the modem port baud rate in either of two ways:
•
If you have access to the local console, use the command set {sa | sb} modem baudrate
{2400|9600} to change the modem port baud rate through the local console.
5
Special Considerations
•
If you do not have access to the local console, then use the modem port on the redundant switch.
This method requires redundant Release 2 switch cards and redundant modems and the ability to
dial in to the LightStream 2020 chassis, using the other Release 2 switch card and modem.
Dial in to the LightStream 2020 chassis and determine the address of this switch card (the one to
which the modem is attached).
Type the following commands at the TCS HUB prompt:
set {sa | sb} modem baudrate {2400|9600}
init {sa | sb} modem
Use the address of the other switch. That is, if you are connected to Switch Card A, specify sb in
these commands, and if you are connected to Switch Card B, specify sa in these commands.
Specify the baud rate to which the modem is set.
Loss of Carriage Return or Echo Functionality
A terminal may lose carriage return or echo functionality.
Workaround: Execute the bash tset command to restore the lost property.
LIGle00221 CLI and TCS Can Show Different Primary Switches
The primary TCS hub and the primary (active) switch fabric may be on different switch cards in a
redundant system.
The CLI show chassis primaryswitch command indicates which switch fabric is active. The
primary TCS hub is indicated in any of the following three ways:
1 The following TCS command:
status { sa | sb }
2 The use of uppercase letters in the TCS HUB prompt. That is, the prompt TCS HUB <<B>>
indicates that the TCS hub on the card in Slot B is active, and the prompt tcs hub <<b>>
indicates that it is secondary. (In both cases, the name of the hub card to which you are connected
is indicated by the letter in brackets.)
3 The LED labelled TCS SEL on the switch card is lit.
Changing Primary Switch Causes Chassis to Reboot
On systems with at least one Release 1 switch card, using a CLI command to change which switch
is primary causes the chassis to reboot. The CLI command is set chassis primaryswitch.
LIGle00225 Rates Can Be Set to Unsupported Values on Low-Speed Card
The configuration tool and CLI allow rates to be set to 6 Mbps aggregate for low-speed cards. The
maximum throughput per port for the low-speed card is about 4.1 Mbps and 4600 frames/sec, when
you are using committed traffic and an 88-byte frame. If the rate is set above this limit, the excess
may be dropped.
Workaround: Do not set rates higher than 3.84 Mbps per port on low-speed cards.
6
Special Considerations
Frame Relay NNI Interface Limited
Although limited functionality for a frame relay NNI interface is present in the Release 2.0.9
software, this is not a supported functionality.
Internal Looping of Frame Relay UNI Port
Looping of a Frame Relay UNI interface provides no useful diagnostic information because the UNI
protocol is asymmetric. The LightStream 2020 switch supports internal looping of such a port by
first converting it to an NNI interface. A successful loop sets the administrative state of the port to
testing and the operational state to up.
Looping of FDDI and Ethernet Ports Not Supported
In Release 2.0.9, FDDI and Ethernet ports cannot be looped.
No Error Checking with setsnmp
The CLI utility allows you to directly modify variables in the MIB using the setsnmp command.
This command performs no validation of its input data and does not prevent you from setting a MIB
variable to an inappropriate value.
Workaround: Use the following command within the CLI to change MIB variables:
set <object-type> [object-id] [parameter1 ... ]
This approach gives the CLI enough context to validate the new value for the variable before
performing the change to the MIB.
Modifying the PLC/Ethernet Access Card POST
The POST timeout value on all packet line cards and cell line cards (PLC and CLC) must be
modified to support new PLC and CLC POST.
Verify the POST timeout value of cards in your system by typing the following at the TCS command
prompt:
read slot ee 44 word
The value read should be 0x0e4e.
If the value read is different from this one, enter the following at the TCS command prompt:
write
slot
ee 44 e4e word
Support for Synchronous Digital Hierarchy
The oc3InfoMediumType object can be set to 1 for Synchronous Optical Network (SONET)
operation or to 2 for Synchronous Digital Hierarchy (SDH) operation of the OC-3 card.
The default for OC-3 ports is to use SONET. The following paragraphs tell you how to set a series
of OC-3 ports to use SDH instead of SONET.
7
Special Considerations
Plan the Network Configuration
Identify all OC-3 ports in your network that you want to run SDH.
Step 1 List the SDH ports for each switch.
Step 2 Use the long port number format cc0pp, where cc is the card number (leading 0 not
required) and pp is the port number. For example, Port 1 on Card 5 of an OC-3 card is 5001.
(For a detailed description of this port number format, see the LightStream 2020 CLI
Reference Manual.)
Configure OC-3 Ports to Use SDH
To configure OC-3 ports to use SDH, follow this procedure for each switch:
Step 1 Log in to the switch.
Step 2 Start the CLI
Step 3 Enter protected mode with the protected command and password:
cli> pro
Enter Password:
*cli>
Step 4 Set the SNMP community name to a community that has write authorization. In the
following sample command, this community is named write:
*cli> set snmp community write
*cli>
Step 5 Set the configuration lock so that your changes are written to the configuration database:
*cli> set config lock
*cli>
Step 6 Configure identified OC-3 ports to use SDH:
*cli> setsnmp oc3InfoMediumType.cc0pp 2
*cli>
The MIB object name must be typed with uppercase letters exactly as shown, e.g.
oc3InfoMediumType.10003 for Port 3 on OC-3, Card 10.
Step 7 When you have reconfigured all of the identified OC-3 ports, unlock the configuration
database:
*cli> set config unlock
*cli>
Note If you want to configure a port for SONET, carry out this same procedure, substituting the
following command in Step 6:
*cli> setsnmp oc3InfoMediumType.cc0pp 1
*cli>
8
Special Considerations
Installing a Card
Every time you install a card in a slot of the system, use this procedure:
Step 1 Log in to the active NP as root. (See the Software Upgrade Procedures for instructions for
identifying the active NP.)
Step 2 To see the current flash checksums of all cards in the chassis, enter the following command:
bash# sysver -a | more
The correct checksums are as follows:
Network Processor:
Switch Card 1:
Switch Card 2:
Low Speed Card:
Medium Speed Card:
Packet Line Card:
Cell Line Card:
Flash
Flash
Flash
Flash
Flash
Flash
Flash
Image
Image
Image
Image
Image
Image
Image
Checksum:
Checksum:
Checksum:
Checksum:
Checksum:
Checksum:
Checksum:
0xC1DE
0x5D00
0x64A2
0x181C
0xA7FC
0x0339
0xE782
Note The label Switch Card 1 denotes Release 1 of the switch card, and the label Switch Card 2
denotes Release 2 of the switch card.
Step 3 If a line card or NP flash checksum is not correct, load the flash into the card by using the
following command:
bash# fcload -s slot# -flash -force
Here, slot# represents the slot number of the card with the incorrect flash checksum.
If a new switch card has an incorrect flash checksum, load the flash by following the
procedure described in “Procedure 4, Verify Switch Card Flash.”
Step 4 Verify flash again (Step 1 and Step 2 above).
Step 5 If the card still has an incorrect flash checksum the flash is loaded, contact Cisco Customer
Support.
Other Special Considerations
The special considerations in this section are provided with a Cisco case number. If you contact
Cisco about any of these special considerations, please refer to the case number.
Severity Level 2 Problems
LIGle00213 CLI
CLI does not allow you to set bandwidth parameters for virtual circuits to defaults.
Use the values specified in the LightStream 2020 Configuration Guide.
9
Special Considerations
LSCle00509 PVC
Deleting one PVC hangs up MMA when hundreds of PVCs are used.
If hundreds of PVCs are created on a single port, the deleting of one PVC can take a long time. The
result will be an SNMP timeout to the Net Management tool that you are using to delete the PVC.
The delay could be several minutes when over 100 PVCs are created on a given port.
LSCle01083 HP OpenView
A bug in HP OpenView limits collections to less than 20 variables.
Data collection fails with collections set up for more than 20 variables. In compliance with the
SNMP standard, the LightStream 2020 software drops such requests.
Workaround: When setting up a data collection by using HP OpenView, limit the collection to
fewer than 20 variables.
LIGle00038 LynxOS
The tar utility is usable with floppy disk, but it generates errors.
If you attempt to use tar on a floppy drive (for example tar xvf /dev/sd1) when no diskette is
present in the drive, various uninformative error messages appear on the console. Similar error
messages appear when you use a disk that has not been formatted for an IBM PS/2 (Models 50, 60,
70, 80 and compatibles). Furthermore, if you use a floppy disk with media errors, the software
process using the device may hang, preventing access to the floppy or terminal where the tar
command is being run.
Workaround: Reboot the network processor.
LIGle00117 Bandwidth Allocation
Bandwidth allocation does not check egress port capacity.
LSCle00500 Release 1 Medium-Speed Control Processors
Release 1 medium-speed card counts receive errors when a cable is not attached.
When the receive port on a Release 1 medium-speed card has no cable attached or is attached to an
unterminated cable, the receive error counts are incremented (if that port is configured, high
error-rate traps appear on the console).
LSCle00645 Install
The ckswinstall command (for verifying a software installation) has two confusing aspects.
1 The ckswinstall utility reports spurious permission mismatches on directories under /usr/app.
2 When you use the ckswinstall command to verify an update distribution (for instance
Release 2.0.8), ckswinstall only verifies the software in the update. On a system running an
update, most of the software in use is from the original release, so ckswinstall should also be run
on that original release (for example, Release 2.0.7). When you run ckswinstall on the underlying
release, spurious errors are reported against software that was upgraded as part of the update.
10
Special Considerations
LSCle00710 Checking Software
No procedure is described for checking software on the standby NP.
When you verify a software installation using the ckswinstall utility on a redundant-NP system, the
software installation on each of the two NPs must be checked explicitly. Here are the procedures for
doing so:
Step 1 Run ckswinstall on the current primary NP.
Step 2 Run ckswinstall on the current backup NP.
bash# rsh other-np ckswinstall ...
LSCle00711 rdist
Periodic rdist to the secondary NP doesn’t check for disk space available.
On a redundant NP system, an automatic mechanism updates software and configuration
information, taking data from the current primary NP and applying it to the current secondary NP.
If the current secondary NP runs out of disk space, the secondary NP is not kept consistent with the
primary NP. Furthermore, no error is reported.
Workaround: Establish a regular maintenance procedure for checking disk space availability on
both NPs.
LSCle00726 Disk Tray Assembly
Insertion of the disk tray assembly can cause damage to connectors.
Rapid insertion of the disk tray assembly can defeat the guiding mechanism and may damage the
pins of the connectors. Use care when inserting or removing the disk tray.
LSCle00760 Switch Fault LED
The Switch Fault LED lights when a redundant power supply is inserted.
The switch fault LED lights if a power tray is present, but is not generating 48 volts. When a power
supply is inserted, it can take up to 750 ms to produce 48 volts after AC power is supplied. If the
system checks the power supply during these 750 ms, it finds that the system is not generating
48 volts and sets the DC OK signal to False. In this circumstance, ignore the fault LED. Normal
operation is never interrupted.
LSCle00767 SC-HUB (with Release 1 Switch Card)
You do not need to enable the NP after a power-off/power-on sequence (Release 1 switch cards
only).
The proper sequence to bring up a card from the TCS HUB after a power slot off command is to
issue the reset slot command. This turns on the card power and initiates the card boot sequence.
Issuing a power slot on command only turns the card VCC on; it does not initiate the card boot
sequence.
11
Special Considerations
LSCle00867 Disk Space
You may be unable to free up sufficient disk space for a new release.
When attempting to install a new release, you may be told that insufficient disk space is available on
the sd0c partition. See “Special Procedure A, Freeing Up Disk Space” for instructions on deleting
old releases to free up sufficient space for the new release. If, after you do this, the installation
procedure still reports that insufficient disk space is available on sd0c, contact your support
organization for assistance.
LSCle00923 Release 1 Low Speed Card (with Release 1 Switch Card)
HUB reported POST PASSED and POST error at the same time.
There are several situations in which this can happen. With a Release 1 switch card, it happens most
often when the TCS power off command is used followed by a TCS power on command.
If you are using TCS commands with a Release 1 switch card, the proper method for bringing a card
back to life is to use the power off command and then to use the reset command.
The following TCS hub command reports POST passed:
show slot# post
The following TCS hub command reports POST_ERR:
status slot#
LSCle00929 Trunks
The command show chassis listtrunks shows the same trunk twice.
The CLI command show chassis listtrunks shows a separate record for each trunk from each end.
This might be improved in the future with information being consolidated into one record per trunk.
LSCle00945 Discarded Cells
Discarded cells are not accounted for in CLI statistics.
On the OC3 card, the per-port Discarded Rcvd Packets statistic in the CLI show port display does
not include permit drops. Permit blocks are displayed correctly in the per-VCI statistics.
LSCle00956 Save As
PVC has no “Save As” file menu item
The PVC and VLI configurators do not support a “Save As” function. To create copies of the
database, use the “Save As” option of the node configurator (cfg). Do not copy the .dat/.pag files with
bash shell commands.
LSCle00961 Backup NP
You cannot connect to backup NP in diagnostic mode.
Network processor (NP) diagnostics must be run from the hub. The mechanism by which diagnostics
are run on some cards using the CLI on the primary NP (the CLI test command) is not supported for
running diagnostics on a second NP.
12
Special Considerations
LSCle00962 PVC
The deleted PVC cannot be added in again: “Waiting to be deleted from switch.”
The current implementation restriction requires that, after initiating a download, the user wait until
the download completes before trying to modify the records involved in the download. Further, the
user needs to reread the database after the download completes before modifying the records.
LSCle01015 Config Files
Fallback from swchgver does not copy config files back.
LightStream 2020 configuration information is stored on disk as part of a specific release.
Configuration information from an old release is copied forward to a new release as part of
installation of the new release. Configuration information, however, is not automatically copied
between releases when swchgver is used to change the current release.
Take, for example, the situation where a node is upgraded to run new software and, after the upgrade,
configuration changes are made. If the node is then downgraded to a previous release, the node runs
with the configuration information that was cached at the time of the upgrade, not the changes that
were made after the upgrade.
After falling back to an old version, the current configuration cache can be downloaded to the node
to set the newest configuration.
Alternatively, before falling back to an old version, the files in /usr/app/base-newrel/config can be
copied to /usr/app/base-oldrel/config (replace newrel and oldrel with the appropriate release
numbers, such as 2.0.8 and 2.0.7).
LSCle01044 External Bridge Loops
External bridge loops cause loss of VLI functionality.
When configuring LightStream 2020 nodes with external topology loops, configure the bridge
priority for the nodes to make one node the spanning-tree root.
LSCle01068 Rate Statistics
The rate information produced by the CLI when displaying port statistics is not accurate.
LSCle01096 ATM UTI and FF Ports
An ATM UNI or FF port reports operationally up when disconnected.
Currently, the frame forwarding and ATM-UNI interfaces cannot report their actual operational
status. This is because these interfaces do not provide a link-level reliability indication (such as the
LMI for FR or Trunk-Up-Down (TUD) for LightStream 2020 trunks). The operational status on
these ports is always the same as the administrative status of the port. The operational status does
not indicate physical layer or data-link layer status.
LSCle01141 Abort Download
Request a way to abort an unwanted download.
Currently, there is no function for aborting long downloads. However, it is possible to abort
downloads with the UNIX kill command. Use the command ps ax to find the process ID (PID) of
each cfg_a process. Do not kill the cfg_a process with the lowest PID, because it is the parent cfg_a
process. Any cfg_a process with a higher PID is a child process, which you may kill. If more than
13
Special Considerations
one download is in process, the downloads can be distinguished only by remembering the order in
which they were invoked (one with a lower PID was invoked earlier, and one with a higher PID was
invoked later). Even when the correct process is killed, the results can be unpredictable, because part
of the configuration might have been downloaded.
LSCle01164 FR
FR should be upgraded to support T1.617a-1993.
The Frame Relay LMI conforms to T1.617-1991 but has not been upgraded to meet T1.617a-1993.
This should not affect normal operation of the port, but may affect conformance tests designed to
verify the updated standard. The FR port interoperates with LMIs that conform to either version of
this standard.
LSCle01171 Open/Save Dialog Box
The file Open/Save dialog box filter does not work.
If you are making a backup of the global database using the Save As command, the backup file
should end in the .pag extension.
LSCle01195 NP1 Diagnostics
CDN #1745 (NP1 diagnostic fails tests 22,23,24 intermittently).
This is a problem with the revision of the PIT timer used on some NP cards. A modified software
algorithm has been put in the NP to make this test more reliable. Some problems remain.
LSCle01238 Operations Guide
The procedure to make backup copies of install diskettes should be documented in the Network
Operations Guide. See “Special Procedure E, Backing Up the Distribution Diskettes.”
LSCle01291 Database Directory Not Found
File->Open defaults to the home directory of the ovw initializer.
When a database is opened from the File->Open menu item, the path defaults to the home directory
of the initiator of ovw instead of following LSC_DATABASE.
Workaround: Double-click in Directories to navigate to the /usr/OV/databases/ls directory, and
then select the appropriate directory.
LSCle01294 Supported Modems
The Release 1 switch card and the Release 2 switch card interoperate with the following modems:
Zoom 9624V
Zoom FXV (FX9624V)
Hayes SmartModem 2400 V.24
Using any other modem may cause unpredictable results.
14
Software Upgrade Procedures
LSCle01318 OC3 Port
OC-3 card continuously bounced when connected to SONET MUX.
When connecting an OC3 port to a SONET multiplexor, you should normally use a clocking type of
external (rather than the default of internal). Use of internal clocking may prevent the port from
operating correctly.
LSCle01369 External SNMP
External SNMP devices impact system performance.
The NP software does not throttle excess traffic from external SNMP devices. This can consume
CPU resources and cause timeouts, such as spanning-tree timeouts that degrade system
performance. Typical sources of SNMP packets include the LightStream 2020 monitor, HP
OpenView statistical graphing facilities that display a large number of MIB variables, and
third-party network management applications. When SNMP traffic is degrading system
performance, you must reduce the SNMP traffic from the external device. You might reduce the
number of variables being tracked, increase the polling interval, or reduce the number of concurrent
network management processes which are requesting data.
LSCle02116 Testing a Card
The command set card card# testing no longer works and is rejected by the CLI. The test command
puts the card in the testing state. Use the command test card# -m to put card card# in the testing
state, load diagnostics, and establish an I/O tap connection from the CLI to card card#.
LSCle01599 Installation and Troubleshooting Manual
The Release 2.0 Installation and Troubleshooting Manual, on page 3-38, says to search the
/etc/services file for the string snmp-traps. It should say to search for the string snmp-trap.
Page 3-42 of the same document suggests that you change the polling interval to 1 minute. The
polling interval should be left at the default of 5 minutes.
LSCle02666 Ping Requests and Responses
When connected to an FDDI with an AGS+, the LightStream 2020 switch loses a small number of
ping requests and responses. Probes on the FDDI Access Card have detected the LightStream 2020
inserting an IDLE/VIOLATION symbol pair and idles after the source address is transmitted. The
cause and conditions for this behavior are not currently known. The problem is under investigation.
Software Upgrade Procedures
This section provides information about upgrading the LightStream 2020 enterprise ATM switch to
release 2.0.9 of LightStream 2020 software.
Note The following procedures are for upgrades, not for new installations. If you are installing a
network processor (NP) with an uninitialized disk, use the installation procedures given in the
LightStream 2020 Installation Guide. Use the upgrade procedures described here only if you are
upgrading software on a LightStream 2020 node that has already been installed and is running.
15
Software Upgrade Procedures
Note The following procedure for software installation of Release 2.0.9 causes flash memory to be
reloaded. The flash reload time depends on your system configuration. Also, you must explicitly
reload switch card flash memory according to the installation procedure.
Requirements for Upgrade
For Release 2.0.9 to be installed, the network processor must have 32 Mb of memory.
For Release 2.0.9 to be installed successfully, you must currently be running at least Release 2.0.3
software.
You must have a modem in each remote node to which the software upgrade is to be sent. Refer to
the section entitled “Modem Recommendations” in the LightStream 2020 Site Planning and Cabling
Guide.
Caution The LightStream 2020 NP is a special-purpose communications processor. It should not
be used as a general-purpose UNIX host. If any files have been copied to or placed on the disk
(especially in the root partition), they should be removed before the upgrade to release 2.0.9. If the
names of any Cisco-provided files have been changed, the original file names should be restored.
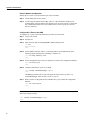
Distribution Media
Below is a list of the LightStream 2020 Release 2.0.9 node software distribution diskettes.
16
LightStream 2020 Release 2.0.9
Distribution Diskettes
Version Listed on
Diskette Label
Boot Disk
2.0.9
System Disk 1
2.0.9
System Disk 2
2.0.9
System Disk 3
2.0.9
Application Disk 1
2.0.9
Application Disk 2
2.0.9
Application Disk 3
2.0.9
Application Disk 4
2.0.9
Application Disk 5
2.0.9
Application Disk 6
2.0.9
Diagnostic Disk 1
2.0.9
Diagnostic Disk 2
2.0.9
Firmware Disk 1
2.0.9
Firmware Disk 2
2.0.9
Software Upgrade Procedures
Outline of Upgrade Procedures
The following procedures are used to upgrade a network to Release 2.0.9 software:
•
Procedure 1, Copy New Software to the Distribution Node
Use the swinstall command to copy the new software from the installation diskettes to the node
being used as the software distribution node. (If swinstall reports insufficient disk space, you will
be directed to perform Special Procedure A, Freeing Up Disk Space.)
•
Procedure 2, Copy New Software to Remote Nodes
Use the swremoteinstall command to copy the new software from the distribution node to other
nodes in the LightStream 2020 network. (If swremoteinstall reports insufficient disk space, you
will be directed to perform Special Procedure A, Freeing Up Disk Space.)
•
Procedure 3, Change the Running Software Version
Use the swchgver command to change the version of software running on each node after
copying the new software to the node.
•
Procedure 4, Verify Switch Card Flash
Verify that the current version of switch card flash memory is present on the switch cards, and
upgrade it if necessary.
Outline of Special Procedures
These procedures are not normally needed. However, it is possible that an upgrade step will require
you to perform one or more of these procedures.
•
Special Procedure A, Freeing Up Disk Space
If the swinstall command or the swremoteinstall command reports that you do not have enough
disk space, delete files for obsolete releases of software.
•
Special Procedure B, Falling Back to the Prior Version
You have the option of falling back to the prior version of software if you wish to do so for any
reason.
•
Special Procedure C, Verifying Connection to Backup NP
If the swchgver command fails to contact the backup NP on a redundant system, look in this
section for some of the common causes and how to correct them.
•
Special Procedure D, Getting rsh to Work Successfully on a Remote Node
If the swremoteinstall command (which uses the rsh command) reports that it does not have
permission to copy the files to the remote node, look in this section for some common causes and
how to correct them.
•
Special Procedure E, Backing Up the Distribution Diskettes
Some users may wish to back up the distribution diskettes.
17
Software Upgrade Procedures
Procedure 1, Copy New Software to the Distribution Node
With this procedure you copy the new software from the distribution disk set to a local LightStream
2020 node. This local node is referred to as the distribution node. In Procedure 2, Copy New
Software to Remote Nodes, you use the distribution node as the source from which to copy the
software to other nodes in the network.
Note If for any reason you discontinue installation of this release after you have started loading
software, you should delete this release using Special Procedure A, Freeing Up Disk Space. This
minimizes the impact of the interrupted installation on future installations. When you resume
installation of this release, you must restart at the beginning of this procedure.
Overview
The following tasks are necessary for an upgrade of the distribution node (or any local node) to
Release 2.0.9 node software:
1 Connect to the Primary NP.
2 Copy Release 2.0.9 Software from Floppies to Hard Disk.
To perform these tasks, use a terminal connected to the console port of the distribution node. The
system should be running with no one else logged on the system.
Connect to the Primary NP
Step 1 Enter ‘. (backquote plus dot, that is, left single quote plus period).
Step 2 At the TCS HUB prompt, use the connect command to connect to the NP in slot 1:
TCS HUB <<A>> connect 1
You may need to press [Return] a second time after typing the connect command in order
to get a prompt from the NP.
A prompt should appear asking for a user login name:
user name:
Note If someone using the machine before you has not logged out, your prompt may be different
from the one shown here. If this occurs, log out and log back in as root.
Step 3 Log in as root. The bash prompt appears (with # indicating a root login).
user name: root
password:
bash#
If your system has only one NP, go to Step 6 now.
18
Software Upgrade Procedures
Step 4 On a system with redundant NPs, verify that you are connected to the primary NP (the
active NP):
•
At the bash prompt, enter the cli command to start the CLI.
bash# cli
•
At the CLI prompt, enter the show chassis command and examine the entries for “Slot
of Primary NP” and “Slot of This NP.”
•
Determine whether the entries for Slot of Primary NP and Slot of This NP identify the
same NP number or not.
If the two entries identify the same NP number, then you are connected to the primary NP (the
active NP). Since you connected to slot 1 in Step 2 above, the following is true:
primary= 1
backup= 2
Make a note of this. You will use the value 1 where you see the parameter name “primary” in
later procedures.
If the two entries do not identify the same NP number, then you are connected to the backup NP.
Since you connected to slot 1 in Step 2 above, the following is true:
primary = 2
backup = 1
Make a note of this. You will use the value 2 where you see the parameter name “primary” in
Step 5, below, and in other procedures.
•
Use the exit or quit command to exit from the CLI.
Step 5 If you are connected to the backup NP, disconnect from it and connect to the primary NP
(the active NP) as follows:
•
Enter ‘. (backquote plus dot, that is, left single quote plus period) to return to the TCS
HUB.
•
Connect to the slot of the primary NP by typing the following command:
TCS HUB<<A>> connect primary
•
If necessary, log in to the NP as root.
Copy Release 2.0.9 Software from Floppies to Hard Disk
Step 6 Determine which floppy disk drive is appropriate to use for the upgrade. NP slot 1 is
connected to the bottom disk drive, and NP slot 2 is connected to the top disk drive.
The boot disk is not used in this upgrade procedure. You will run the swinstall utility once
for each diskette set. If you are currently running any version from Version 2.0.3 through
2.0.8a3, install the diskette sets in this order: system, application, diagnostics, firmware.
Step 7 Enter the swinstall command at the bash prompt:
bash# swinstall
If the swinstall program reports that there is insufficient disk space for the installation, carry out
Special Procedure A, Freeing Up Disk Space, before continuing.
19
Software Upgrade Procedures
When the program prompts you for a diskette, insert the first diskette (of the diskette set
that you are currently installing) into the appropriate drive and press [Return]. Repeat as
the program prompts you for more diskettes in the current set.
Step 8 Repeat Step 7 for each diskette set, following the order given under Step 6.
Procedure 2, Copy New Software to Remote Nodes
With this procedure you distribute new software from the distribution node to other LightStream
2020 nodes. Carry out this procedure for each remote node in turn. Then carry out Procedure 3,
Change the Running Software Version, for each remote node in turn. After all other nodes have and
are running the new software, carry out Procedure 3, Change the Running Software Version, on the
distribution node.
Note It is also possible to upgrade software directly from the distribution diskettes on each node in
your LightStream 2020 network. To do this, carry out Procedure 1, Copy New Software to the
Distribution Node, and Procedure 3, Change the Running Software Version, on each node in the
network.
Requirements for Performing the Procedure
The following connectivity requirements apply:
Distribution Node
Remote Node
• You should be logged in to the distribution
node.
• You do not need to be physically located at the
remote node site. However, you must be able to
establish an rsh connection and a modem connection
to each remote site.
• No other user should be logged in.
• The distribution node must be running
LightStream 2020 application software.
• The remote node must be running LightStream 2020
application software.
Overview
Carry out these tasks for each node in your LightStream 2020 network in turn:
1 Verify Remote Command Execution
2 Distribute Release 2.0.9 to the Remote Node
Verify Remote Command Execution
Verify that it is possible to execute commands on the remote node from the distribution node.
Step 1 On the distribution node, execute the following command:
bash# rsh remote-node hostname
20
Software Upgrade Procedures
Enter the name of the remote node in place of remote-node.
If the command succeeds, it prints the name of remote-node. Continue to Step 2.
If the command fails, it prints one of the following messages:
hostname: unknown host
hostname: Connection timed out
Permission denied.
Refer to the Special Procedures, Special Procedure D, Getting rsh to Work Successfully on a
Remote Node.
Note If this is the first time you have upgraded, then this step is likely to fail. For more information,
see “Special Procedure D, Getting rsh to Work Successfully on a Remote Node” later in this
document.
Distribute Release 2.0.9 to the Remote Node
Step 2 Copy Release 2.0.9 files to remote-node. In a window running a login on distribution-node,
execute the following command:
bash# swremoteinstall -h remote-node 2.0.9
Enter the name of the remote node in place of remote-node.
The swremoteinstall process checks disk space and copies Release 2.0.9 to remote-node. It
should take 5 to 10 minutes, depending upon bandwidth between the nodes.
If the swremoteinstall program reports that there is not enough disk space for the installation,
connect to the remote node through a modem port or telnet connection and follow Special
Procedure A, Freeing Up Disk Space on the remote node. Then repeat Step 2.
Procedure 3, Change the Running Software Version
With this procedure you activate the software that has been copied to the node, and the node begins
running the new LightStream 2020 application software.
Overview
Carry out these tasks for each node in your LightStream 2020 network in turn:
1 Connect to the Primary NP
2 Change the Running Software Version
Connect to the Primary NP
Step 1 Connect to the TCS hub on the node. Use a console terminal if you are on site. Use a dial-in
modem to connect to a remote node.
Caution Do not use a network connection such as Telnet to connect to the node for purposes of
changing the running software version. During the procedure, a card may be reset, breaking your
Telnet connection and interrupting the change process.
21
Software Upgrade Procedures
Step 2 Enter ‘. (backquote plus dot, that is, left single quote plus period).
Step 3 At the TCS HUB prompt, use the connect command to connect to the NP in Slot 1, as
follows:
TCS HUB <<A>> connect 1
The user name: prompt should appear. Log in as root. The bash prompt appears (with #
indicating a root login).
user name: root
password:
bash#
You may need to enter a second [Return] after typing the connect command in order to get
a prompt from the NP.
If someone using the machine before you has not logged out of their session, your prompt
may be different than the one shown above. Attempt to get back to a bash prompt and log
out.
If your system has only one NP, skip Step 4 and Step 5 and go to Step 6 now.
Step 4 On a system with redundant NPs, verify that you are connected to the primary NP:
•
At the bash prompt, enter the cli command to start the CLI.
bash# cli
•
At the CLI prompt, enter the show chassis command and examine the entries for “Slot
of Primary NP” and “Slot of This NP.”
•
At the CLI prompt, enter the show chassis command and examine the entries for “Slot
of Primary NP” and “Slot of This NP.”
If the two entries identify the same NP number, then you are connected to the primary NP (the
active NP). Since you connected to slot 1 in Step 3 above, the following is true:
primary= 1
backup= 2
Make a note of this. You will use the value 1 where you see the parameter name “primary” in
later procedures.
If the two entries do not identify the same NP number, then you are connected to the backup NP.
Since you connected to slot 1 in Step 3 above, the following is true:
primary = 2
backup = 1
Make a note of this. You will use the value 2 where you see the parameter name “primary” in
Step 5, below, and in other procedures.
•
Use the exit or quit command to exit from the CLI.
Step 5 If the two entries identify the same NP number, you are connected to the primary NP. If you
are connected to the backup NP, disconnect from it and connect to the primary NP as
follows:
•
22
Enter ‘. (backquote plus dot, that is, left single quote plus period) to return to the TCS
HUB.
Software Upgrade Procedures
•
Connect to the slot of the primary NP (the active NP) by typing the following command:
TCS HUB<<A>> connect primary
Substitute 1 or 2 in place of primary, using the value that you arrived at in Step 4, above.
•
If necessary, log in to the NP as root.
Change the Running Software Version
Note The swchgver program ordinarily takes about a minute to run. However, it can take as much
as 2.5 hours if it loads program images into flash memory on all the cards (about 15 minutes per card
for ten cards). A card’s fault light comes on and stays on for the duration of loading of flash on that
card.
Step 6 Use the swchgver program to run the software that you have just installed:
bash# swchgver
The swchgver program produces the following results:
•
•
Flash memory is reloaded (if appropriate).
•
The network processor (NP) is rebooted, so that the above changes take effect (both NPs
in a redundant system).
•
The line cards reload their software images.
The newly installed software is made the active version (on both NPs in a redundant
system).
Caution Do not interrupt the loading of flash memory, particularly on an NP. A card with partially
loaded flash cannot complete its boot sequence until flash is reloaded. If you create this situation,
call Cisco Customer Support at 1-800-553-NETS (6387) or 1-800-553-2447.
Step 7 On a redundant NP system, the swchgver program automatically copies the new software
from the primary NP (the currently active NP) to the backup NP. This copy may fail—for
example, if the other NP is not currently running application software. If the copy fails, the
swchgver program may print out a diagnostic message and return to the bash prompt.
Example of a diagnostic message:
WARNING: Unable to contact standby network processor:
Use [-force] option to bypass standby network processor.
[Consult your release note for advice on dealing with
a failure distributing to the other network process.]
If this occurs, refer to Special Procedure C, Verifying Connection to Backup NP
If everything fails then someone physically at the node site must later install the software on the
other NP as though it were a new NP/disk addition. See the LightStream 2020 Network
Operations Guide.
23
Software Upgrade Procedures
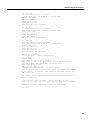
Example Output From a Successful Upgrade
The following is an example of output seen when this upgrade procedure is carried out with the
console trap level set to info:
bash# swchgver
Checking and downloading FLASH memory for all function cards
Checking and downloading files for standby network processor.
Rebooting standby network processor.
....
Forcing reset of line cards
==> (OPER) NDD_5 at 10/20/94 18:11:24 EDT (10/20/94 22:11:24 GMT)
Line Card lsnode8:3 (LS-EDGE) down (ERMP failure 0x401).
==> (GENERIC) at 10/20/94 18:11:28 EDT (10/20/94 22:11:28 GMT)
Link Down Trap at 10/20/94 18:11:28 EDT (10/20/94 22:11:28 GMT)
Port 3002
==> (GENERIC) at 10/20/94 18:11:28 EDT (10/20/94 22:11:28 GMT)
Link Down Trap at 10/20/94 18:11:28 EDT (10/20/94 22:11:28 GMT)
Port 3003
==> (GENERIC) at 10/20/94 18:11:28 EDT (10/20/94 22:11:28 GMT)
Link Down Trap at 10/20/94 18:11:28 EDT (10/20/94 22:11:28 GMT)
Port 3004
==> (GENERIC) at 10/20/94 18:11:28 EDT (10/20/94 22:11:28 GMT)
Link Down Trap at 10/20/94 18:11:28 EDT (10/20/94 22:11:28 GMT)
Port 3005
Rebooting the network processor
NP040 POST Version 0.225 Feb 21, 1995
4Meg Bit value = 1
Configuring Main Memory for 32 Megabytes
Clearing memory (32 Megabytes)...
booting: drive:0, partition:0, kernel:”lynx.os”, flags:0x4308
Resetting SCSI bus
Kernel linked for 0xea010000
LOAD AT 0x10000
483328+49152+262504[+62736+51815]
TOTAL SIZE: 909536 at 0x1001c
START AT 0x10020
NP memory size: 32 MB
ILACC: EEPROM enet addr:8:0:8:0:14:6f, Silicon Rev:0x5, IB:0xea1dfce0
Old-style NP detected
virtual console: IB: 0xea1dfe68
NCR 53C710: Chip Revision: 0x2, IB: 0xec18e000
LynxOS/68040-MVME167 Version 2.1.0
Copyright 1992 Lynx Real-Time Systems Inc.
All rights reserved.
LynxOS release 2.1.0, level 1: NP-LynxOS #107: compiled Apr 17 1995 14:50:57
LynxOS Startup: ma
fsck /dev/sd0a
(all sizes and block numbers in decimal)
(file system creation time is Mon Apr 11 08:57:19 1994)
checking used files
recovering orphaned files
making free block list
making free inode list
40518 free blocks 3314 free inodes
24
Software Upgrade Procedures
fsck /dev/sd0b
(all sizes and block numbers in decimal)
(file system creation time is Mon Apr 11 08:57:52 1994)
checking used files
recovering orphaned files
making free block list
making free inode list
17838 free blocks 3426 free inodes
fsck /dev/sd0c
(all sizes and block numbers in decimal)
(file system creation time is Mon Apr 11 08:58:25 1994)
checking used files
recovering orphaned files
making free block list
making free inode list
8645 free blocks 3534 free inodes
fsck /dev/sd0d
(all sizes and block numbers in decimal)
(file system creation time is Mon Apr 11 08:58:58 1994)
checking used files
recovering orphaned files
making free block list
making free inode list
26597 free blocks 3601 free inodes
Mounting all filesystems
Starting VM system ... Virtual Memory Engaged!
inetd started
Starting crond ...
Initializing the switch hardware interface ...
Using switch A, cards are NOT synchronized, fast cutover is supported
PCP version: 0x410, CMP version: 0x12, FSU version 0x109
Starting the switch software
LightStream 2020 Version 2.0.9
Copyright 1993 LightStream Corp. All rights reserved.
Portions copyright 1992 by Lynx Real-Time Systems Inc., 1983 by the Regents
of the University of California, 1988 and 1990 by Paul Vixie, and 1991 by
SNMP Research Inc.
This software contains unpublished proprietary and trade secret information
of Cisco Systems, Inc.
LightStream 2020 Software provided to the U.S. Government is subject to the
notices on the software and on the LightStream user documentation copyright
page.
PROGRAM: cbuf: (ls2_0) compiled Apr 26 1995 @ 21:49:18 [pid:48]
user name:
25
Software Upgrade Procedures
Procedure 4, Verify Switch Card Flash
With this procedure you verify the version of flash memory in each node’s switch cards, and upgrade
if necessary.
Requirements to Perform the Procedure
If the verification step that follows indicates that switch card flash needs to be upgraded, a console
connection to the NP is required for performance of the upgrade. To do this, you must use either a
console terminal located at the node site or a dial-in modem connected to the TCS HUB modem port.
Caution This operation takes your node out of operation.
Overview
Carry out this procedure for each node in your LightStream 2020 network in turn:
1 Log In as Root
2 Verify Need to Upgrade Switch Card Flash
3 Upgrade Flash
4 Repeat for Redundant Switch (if applicable)
5 Reboot NP
6 Verify Flash Version on All Upgraded Switch Cards
Log In as Root
Step 1 You should be logged in as root on the primary NP. If not, log in as root on the primary NP
(see Step 1 to Step 5 in “Procedure 1, Copy New Software to the Distribution Node”).
Verify Need to Upgrade Switch Card Flash
Step 2 Determine the checksum for the switch card flash image.
•
First check the switch card in Slot A. To do this, enter the following command:
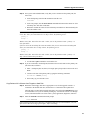
bash# sysver -s sa -all
If the flash checksum is 0x64A2 for a Release 2 switch card or 0x5D00 for a Release 1
switch card, the specified switch card already has the latest flash image.
•
If there is a second switch card in Slot B, enter the following command:
bash# sysver -s sb -all
As above, if the flash checksum is 0x64A2 for a Release 2 switch card or 0x5D00 for a
Release 1 switch card, the specified switch card already has the latest flash image.
Note A card whose flash checksum is not as specified above does not have the latest flash image.
Perform Step 3 through Step 12 of this procedure for each such card. If both cards (or one in a
non-redundant system) have the latest flash image, skip the remaining steps of the procedure
(Step 3 through Step 12).
26
Software Upgrade Procedures
Upgrade Flash
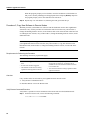
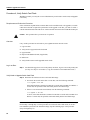
Step 3 If a new image is to be loaded into flash on a switch card, shutdown the node:
bash# reboot -n
This takes the node down.
The following display appears:
**** LynxOS [rebooted by /bin/reboot] is down ****
Memory Autosizing ... (32 Meg) ... Done
Clearing 32 Meg Memory... Done
NP1 POST Version 0.225 Feb 21, 1995
NP1 POST Summary
---------------0 Tests Failed
Network Processor bootstrap (version 1.3: Sep 13 1993)
1 - Boot ATM switch application
2 - Begin full installation with boot from floppy disk
3 - List contents of hard disk root directory
4 - List contents of floppy disk root directory
5 - Boot system single-user
6 - Escape to full set of bootstrap options
7 - Extended help
Option>
Step 4 At the Option> prompt, select Option 6:
Option> 6
The following display appears:
Network Processor bootstrap (version 1.3: Sep 13 1993)
Enter ”help” for documentation on extended bootstrap options
Default: (sd0a)lynx.os
Boot:
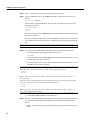
Step 5 At the Boot: prompt, enter the following command (the 0 in sd0b is a zero):
Boot: (sd0b)diag/sys_np1.aout
The node reboots using the system monitor software. The following display appears:
booting: drive:0, partition:1, kernel:”diag/sys_np1.aout”, flags:0x4201
Resetting SCSI bus
Diagnostic linked for 0x0
LOAD AT 0x0
184552+102336+56408[+14748+17879]
START AT 0x5000
ACTIVE FABRIC ON SWA
******************************************
* System Diagnostic Debug Monitor
*
* Revision 1.405 (Jul 18 1995)
*
* Type ’help’ or ’?’ for help
*
******************************************
System Monitor->
27
Software Upgrade Procedures
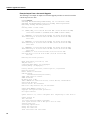
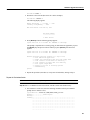
Step 6 Load the switch card flash memory for Slot A.
•
For a Release 2 switch card in Slot A, enter the following command at the System
Monitor prompt (the 0 in sd0b is a zero):
System Monitor-> fload sa (sd0b)fware/flash_sc2.rec
Reading...............(238811 bytes)
Erasing...............
Loading............................................................
............................................................
............................................................
............................................................
............................................................
............................................................
............................................................
............................................................
................................
Load Statistics
Data bytes
= 84898
Overhead bytes = 42464
Messages sent = 2654
S-records
= 5307
System Monitor->
•
For a Release 1 switch card in Slot A, enter the following command at the System
Monitor prompt (the 0 in sd0b is a zero):
System Monitor-> fload sa (sd0b)fware/flash_sc1.rec
Reading...............(162978 bytes)
Load Statistics
Data bytes
= 57934
Overhead bytes = 29024
Messages sent = 1814
S-records
= 3622
System Monitor->
If you see the following error message, repeat Step 6:
flash failed to erase or is not erased
ACTION_FLASH=0x45
If you do not see this message, and you do not see the System Monitor-> prompt, go to Step 7.
If you see the following error message when loading a Release 1 switch card, reboot the primary
NP:
Flash failure occurred when setting DONE bit.. (timeout)
Then perform Step 2 to verify that the checksum is 0x5D00. This problem only occurs with
redundant Release 1 switch cards. The message is misleading, because the flash update does
complete successfully.
If you do see the System Monitor-> prompt, the flash load has completed successfully. Go to
Step 8.
If the Flash Load Fails
Step 7 If you do not see the System Monitor-> prompt, the flash load has failed. Do the following:
28
•
Disconnect from the NP by typing ‘. (backquote plus dot, that is, left single quote plus
period).
•
Reset the NP as follows (the NP in slot 1 in this example):
Software Upgrade Procedures
TCS HUB<<A>>reset 1
•
Reconnect to the same NP (the NP in slot 1 in this example):
TCS HUB<<A>> connect 1
The following display appears:
Memory Autosizing ... (32 Meg) ... Done
Clearing 32 Meg Memory ... Done
NP1 POST Version 0.225 Feb 21, 1995
NP1 POST Summary
---------------0 Tests Failed
•
Press [Return] when the following prompt appears:
System will boot in 5 seconds: hit <RETURN> to interrupt.
This prompt is repeated once a second, giving you more than one opportunity to press
the [Return] key and prevent a reboot. When you press [Return], the boot menu
appears:
System will boot in 5 seconds: hit <RETURN> to interrupt.
System will boot in 4 seconds: hit <RETURN> to interrupt.
Network Processor bootstrap (version 1.3: Sep 13 1993)
1 - Boot ATM switch application
2 - Begin full installation with boot from floppy disk
3 - List contents of hard disk root directory
4 - List contents of floppy disk root directory
5 - Boot system single-user
6 - Escape to full set of bootstrap options
7 - Extended help
Option>
•
Repeat this procedure (Procedure 4, Verify Switch Card Flash), starting at Step 4.
Repeat for Redundant Switch
If there is no redundant switch, skip this step.
Step 8If there is a redundant switch card in Slot B, load the switch card’s flash memory.
•
For a Release 2 switch card, enter the following command at the System Monitor
prompt (the 0 in sd0b is a zero):
System Monitor-> fload sb (sd0b)fware/flash_sc2.rec
Reading...............(238811 bytes)
Erasing...............
Loading............................................................
............................................................
............................................................
............................................................
............................................................
............................................................
............................................................
............................................................
................................
29
Software Upgrade Procedures
Load Statistics
Data bytes
=
Overhead bytes =
Messages sent =
S-records
=
System Monitor->
•
84898
42464
2654
5307
For a Release 1 switch card, enter the following command at the System Monitor
prompt (the 0 in sd0b is a zero):
System Monitor-> fload sb (sd0b)fware/flash_sc1.rec
Reading...............(162978 bytes)
Load Statistics
Data bytes
= 57934
Overhead bytes = 29024
Messages sent = 1814
S-records
= 3622
System Monitor->
If you see the following error message, repeat Step 8:
flash failed to erase or is not erased
ACTION_FLASH=0x45
If you do not see this message and do not see the System Monitor-> prompt, go back to Step 7
followed by Step 4 and Step 5 (as specified in Step 7). After performing Step 5, resume the present
procedure at Step 9.
If you see the following error message when loading a Release 1 switch card, reboot the primary
NP:
Flash failure occurred when setting DONE bit.. (timeout)
Then perform Step 2 to verify that the checksum is 0x5D00. This problem only happens with
redundant Release 1 switch cards. The message is misleading, because the flash update does
complete successfully.
If you see the System Monitor-> prompt, the flash load has completed successfully. Go to Step 9.
Reboot NP
Step 9 To load operational software into the NP, reboot it as follows:
System Monitor-> reset
Verify Flash Version on All Upgraded Switch Cards
Step 10 Log in on the NP as root.
Step 11 To see the current flash checksums of Switch Card A, enter the following command:
bash# sysver -s sa -all
To see the current flash checksums of Switch Card B, enter the following command:
bash# sysver -s sb -all
If the flash checksum is 0x64A2 for a Release 2 switch card or 0x5D00 for a Release 1
switch card, the specified switch card now has the latest flash image.
30
Special Procedures
Reload Flash If Necessary
Step 12 If the switch card has an incorrect flash checksum, load the flash again by executing the
present procedure, Procedure 4, Verify Switch Card Flash.
Verify flash again (Step 10 and Step 11 above).
If the card still has an incorrect flash checksum after you load flash a second time, contact
Cisco Customer Support at 1-800-553-NETS (6387) or 1-800-553-2447.
Special Procedures
Special Procedure A, Freeing Up Disk Space
Use this procedure if swinstall or swremoteinstall reports that there is insufficient disk space.
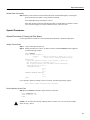
Identify Files to Delete
Step 1 Log in on the target node as root.
Step 2 Identify the software to remove. To do this, enter the command swdelete with no argument,
as in the following example:
bash# swdelete
Usage: swdelete version -f
version:
version of software to delete (e.g. 2.0.0)
-f:
remove even if currently running version
Description:
Deletes the indicated release, first checking to make sure
that the release is not currently in use.
(For an update release, both the update and the underlying
major release are in use.)
VERSIONS ON DISK
2.0.5
2.0.7
2.0.8
CURRENTLY RUNNING VERSIONS:
2.0.7
2.0.8
bash#
If you attempt to delete the running version of software, the following message appears:
Can’t remove current running release ($version)
Delete Obsolete Version Files
Step 3Use the swdelete command to delete obsolete version files:
bash# swdelete 2.0.5
Deleting version 2.0.5
bash#
Caution Do not delete the currently running software versions (2.0.7 and 2.0.8 in the example
shown in Step 2, above).
31
Special Procedures
Return to the section that referred you to this procedure (“Procedure 1, Copy New Software to the
Distribution Node” or “Procedure 2, Copy New Software to Remote Nodes”).
Special Procedure B, Falling Back to the Prior Version
Use this procedure if you wish to revert to the prior version of software:
Step 1 Log in to the Primary NP as root if you have not already done so.
Step 2 Use Procedure 3, Change the Running Software Version, to revert to the prior version,
giving the earlier version number as the argument of the swchgver command. For example,
if the prior version is 2.0.8, enter the command as follows:
bash# swchgver 2.0.8
Note LightStream 2020 configuration information, when downloaded from the NMS, is stored
with the current release. When you upgrade to a new release, that configuration information is copied
forward to initialize the new release’s configuration. When falling back to a previous release, the
configuration will match the last time that software release was operational, which may not reflect
the current configuration.
Note The fallback procedure does not reload old flash versions in cards.
Special Procedure C, Verifying Connection to Backup NP
Use this procedure to verify that the primary NP can communicate with the other NP.
To perform this procedure, you should be using a terminal connected to the console port of a chassis
with redundant NPs.
Note In this procedure the other NP is assumed not to be rebooting. During reboot, the other NP is
not accessible for several minutes.
Step 1 If you are not already connected to the slot of the primary NP, connect to the primary NP.
Do this by typing ‘. (backquote plus dot, that is, left single quote plus period) to connect
to the TCS hub, and entering the following command (substituting the slot number of the
primary NP for primary):
TCS HUB<<A>> connect primary
Step 2 If you are not already logged in to the primary NP as root, log in to the primary NP as root.
32
Special Procedures
Step 3 If there is a redundant NP in this chassis, verify that the other NP is functioning as backup.
Enter the following command:
bash# rsh other-np /bin/true
The following results are possible:
•
No error message
bash# rsh other-np /bin/true
bash#
This result indicates success. The other NP is up and accessible. Return to the section
that referred you to this Special Procedure (“Procedure 3, Change the Running Software
Version”).
•
Connection timed out (the timeout takes about 75 seconds)
bash# rsh other-np /bin/true
other-np: connection timed out
bash#
This result indicates that the backup NP is not up. Go to Step 4.
•
Permission denied
bash# rsh other-np /bin/true
Permission denied.
bash#
This result indicates that the backup NP is up, but not accessible because of a
permissions mismatch. Go to Step 4.
Step 4 The following error message may be generated (after about 75 seconds):
other-np: connection timed out
If this message is displayed, reset the other NP:
•
•
Return to the TCS by typing ‘. (backquote plus dot, that is, left single quote plus period).
Reset the backup NP by typing the following (substituting the slot number of the backup
NP for backup):
TCS HUB<<A>>reset backup
•
Connect to the backup NP by typing the following (substituting the slot number of the
backup NP for backup):
TCS HUB<<A>>connect backup
•
Monitor the reboot, looking for the following two trap messages:
==> (OPER) NDD_2 at mm/dd/yy/ hh:mm:ss <time-zone> (mm/dd/yy hh:mm:ss GMT)
Network Processor <node_name:slot> becoming backup np
==> (GENERIC) at mm/dd/yy/ hh:mm:ss <time-zone> (mm/dd/yy hh:mm:ss GMT)
Cold Start Trap at mm/dd/yy hh:mm:ss <time-zone> (mm/dd/yy hh:mm:ss GMT)
Note You may have to wait about 5 minutes for these traps to appear.
•
Reconnect to the primary NP. Repeat Step 3. If the same failure occurs, call Cisco
Customer Support at 1-800-553-NETS (6387) or 1-800-553-2447.
33
Special Procedures
Step 5 The following error message may be generated:
Permission denied.
If this message is displayed, the rsh permissions on the backup NP are incorrect.
•
Log in to the backup NP as root using rsh.
bash# rsh other-np
login root vt100
password:
.
.
.
bash#
•
Verify that the file “/.rhosts” contains the line “other-np root”. If this line is missing, add
it with the following command:
bash# cp /.rhosts /.rhosts.bak
bash# echo “other-np root” >>/.rhosts
Note Be sure you enter the redirect operator twice, with no space (>>). If you enter it only once
(>), you will overwrite the existing file rather than appending to it. If you make a mistake, enter the
command cp /.rhosts.bak /.rhosts to recover the original file.
•
Log out of the backup NP. That leaves you connected to the primary NP again. Repeat
Step 3. If the same failure occurs, call Cisco Customer Support at 1-800-553-NETS
(6387) or 1-800-553-2447.
Return to the section that referred you to this procedure (“Procedure 3, Change the Running
Software Version”).
34
Special Procedures
Special Procedure D, Getting rsh to Work Successfully on a Remote Node
Use this procedure if the rsh command reports an error message:
Step 1 On the distribution node, examine the file /etc/hosts to verify that there is an entry for
remote-node in it. You can use the grep command for this:
bash# grep remote-node /usr/etc/hosts
•
If there is no entry for remote-node, create a backup copy of the /usr/etc/hosts file and
then create an entry for remote-node in /usr/etc/hosts:
bash# cp /usr/etc/hosts /usr/etc/hosts.bak
bash# echo ”Primary_IP_address remote-node” >> /usr/etc/hosts
Enter the name of the remote node in place of remote-node and the IP address of the
remote node in place of Primary_IP_address. (You can use the vi editor in place of the
echo command. See the LightStream 2020 NP O/S Reference Manual for information
about the vi editor.)
Note Be sure you enter the redirect operator twice, with no space (>>). If you enter it only once
(>), you will overwrite the existing file rather than appending to it. If you make a mistake, enter the
command cp /usr/etc/hosts.bak /usr/etc/hosts to recover the original file.
•
If you see the error message “Connection Timed Out,” the remote node or a link to it is
down. Refer to the chapter entitled “Troubleshooting Procedures” in the LightStream
2020 Network Administration Guide for Release 2.0. When the problem is corrected, go
back to the beginning of this step.
If you see the error message “Permission Denied” or any other message, ignore it and
continue to Step 2.
Step 2 Make a telnet connection to remotenode and log in.
Step 3 Verify that the .rhosts file is a read-only file for group and world:
bash# ls -l /.rhosts
-rw-r--r-1 root
71 Aug
1 14:54 /.rhosts
If any value other than -rw-r--r-- appears at the beginning of the ls output, enter the
following command:
bash# chmod 644 /.rhosts
Step 4 Examine the file /.rhosts to see if it includes an entry for distribution-node. Use the
following command (enter the name of the distribution node in place of distribution-node):
bash# grep distribution-node /.rhosts
Step 5 If the entry for distribution-node is not displayed, edit the file /.rhosts, adding to it a line
consisting of the name of the distribution node followed by the word root (enter the name
of the distribution node in place of distribution-node):
bash# cp /.rhosts /.rhosts.bak
bash# echo ”distribution-node root” >> /.rhosts
(You can use the vi editor in place of the echo command. See the LightStream 2020 NP O/S
Reference Manual for information about the vi editor.)
35
Special Procedures
Note Be sure you enter the redirect operator twice, with no space (>>). If you enter it only once
(>), you will overwrite the existing file rather than appending to it. If you make a mistake, enter the
command cp /.rhosts.bak /.rhosts to recover the original file.
Step 6 On the remote node, examine the file /usr/etc/hosts to verify that there is an entry for
distribution-node in it. You can use the grep command for this (enter the name of the
distribution node in place of distribution-node):
bash# grep distribution-node /usr/etc/hosts
Step 7 If there is no entry for distribution-node, create one:
bash# cp /usr/etc/hosts /usr/etc/hosts.bak
bash# echo ”Primary_IP_address distribution-node” >> /usr/etc/hosts
Enter the IP address of the distribution node in place of Primary_IP_address, and the name
of the distribution node in place of distribution-node. (You can use the vi editor in place of
the echo command. See the LightStream 2020 NP O/S Reference Manual for information
about the vi editor.)
Note Be sure you enter the redirect operator twice, with no space (>>). If you enter it only once
(>), you will overwrite the existing file rather than appending to it. If you make a mistake, enter the
command cp /usr/etc/hosts.bak /usr/etc/hosts to recover the original file.
Step 8 Log out of the remote node and repeat Step 1.
If the test fails again, contact Cisco Customer Support at 1-800-553-NETS (6387) or
1-800-553-2447.
Return to the section that referred you to this procedure (“Procedure 2, Copy New Software to
Remote Nodes”).
Special Procedure E, Backing Up the Distribution Diskettes
To protect the software distribution diskettes, you can back them up before proceeding with the
upgrade.
Requirements for the Procedure
In this procedure, you are assumed to have access to a PC running DOS 5.0 or later and supporting
at least one 1.44 MB floppy disk drive. You are also assumed to have a supply of at least 15 blank,
DOS-formatted 1.44 MB diskettes.
Note With the /v option, the diskcopy command verifies that the copy is correct. If you wish to use
the diskcomp command redundantly to verify that the copy is correct, refer to your DOS
documentation for that command.
36
Resolved Problems
Note Do not use the dir command to verify the contents of the diskette. There is no FAT (the DOS
file allocation table) on LightStream 2020 distribution diskettes, so there can be none on your backup
diskettes. Consequently, if you enter dir a: or dir b:, DOS issues a read error message.
If Your PC Has Two 1.44 MB Floppy Disk Drives
For each LightStream 2020 software distribution diskette, do the following:
Step 1 Insert the distribution diskette in the floppy disk drive. (In the examples shown here, this is
Disk Drive A.
Step 2 Insert the blank, formatted diskette in the second 1.44 MB disk drive. (In the examples
shown here, this is Disk Drive B.
Step 3 Enter the following command at the DOS prompt:
C:\> diskcopy a: b: /v
Step 4 The program copies the data from the distribution diskette in Drive A to the backup diskette
in Drive B.
If Your PC Has Just One 1.44 MB Floppy Disk Drive
For each LightStream 2020 software distribution diskette, do the following:
Step 1 Insert the distribution diskette in the floppy disk drive. (In the example shown here, this is
Disk Drive A.)
Step 2 Enter the following command at the DOS prompt:
C:\> diskcopy a: a: /v
Step 3 The program reads a portion of the disk contents into memory. When it prompts you to do
so, remove the distribution diskette and insert a blank, formatted diskette into the floppy
disk drive.
Step 4 The program copies the data from memory onto the diskette. When it prompts you to do so,
remove the backup diskette and insert the distribution diskette into the floppy disk drive.
Step 5 Alternate Step 3 and Step 4 in response to program prompts until the disk copy is complete.
Resolved Problems
The platform bugs listed below have been fixed in Release 2.0.9.
LIGle00261
Intermittent port shutdowns on LSC
LSCle01633
Loss of ERMP (Emerald Reliable Message Protocol) keep-alive messages causes repeated
line up/down
LSCle01716
The Virtual Interface Manager has potential infinite loop: causes watchdog reset, info dump
LSCle01801
Loss of IP routing info, IP addresses, and name (shared memory)
LSCle02047
Connect Reply status ATMM error 26 trap interval very short
LSCle02053
TCS SEL A&B lit: requires R2.1 flash
LSCle02103
FDDI debug enhancement
LSCle02463
ARPD (Address Resolution Protocol Daemon) memory leak
37
Resolved Problems
LIGle00261
Intermittent port shutdowns on LSC
LSCle02690
NP does not cut over to primary switch on CLI switch cutover
LSCle02739
Ping fails when data bandwidth not available — NMS assumes net down
LSCle02751
Chassis IP and oblan addresses being zeroed
The platform bugs listed below have been fixed in Release 2.0.8a2 and are incorporated in
Release 2.0.9.
38
LSCle01633
Loss of ERMP (Emerald Reliable Message Protocol) keep-alive messages causes repeated
line up/down
LSCle01761
Card and port name field display wrong size string
LSCle02008
Description of sysDescr.0 in the MIB refers to LS2010 instead of LS2020
LSCle02117
Couldn’t send ether traffic between testbed systems.
LSCle02131
Typos entered into TCS HUB cause Release 2 switch card to hang, console port to hang, and
both TCS SEL LEDs to light.
LSCle02205
Loss of GID (Global Information Database) when system was exhausted of memory
LSCle02246
Release 2 switch card synced slip changed to 75 PPM
LSCle02379
NMS procedures do not delete FF PVCs from node
LSCle02386
Trunk up/down is repeated for a while before trunk stays up
LSCle02576
CA stops receiving update on edge if more than 200 circuits are configured over a port
LIGle00261
Intermittent port shutdowns on LS1.