1
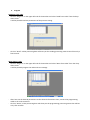
User guide for the G11 programming software Checking/ changing the COM port You must check if the number of the virtual COM port automatically created by the driver is 8 or less. Otherwise the programming software can not communicate with it. 1) Unplug the USB connector of the programming cable from the PC. 2) Press Start – Control Panel, and then double click the System icon. The System window will open. 3) Click the Hardware tab, and then press the Device Manager button. The Device Manager window will open. 4) Click the small box on the left “Ports (COM & LPT)” in order to show all the ports in use. 5) Plug the USB connector of the programming cable to the PC. After one second you will see the USB Serial Port and its COM port (in the down stated example COM 3). 6) If the COM port number is from 1 to 8, just exit and go to step 10. If not, go on with the next steps. 7) Right click on the USB Serial Port and select Properties. The Properties window will open. 8) Click the Port Settings tab, and then click the “Advanced” button. The Advanced Settings window will open. 9) Using the COM Port Number: drag down the button to change the COM port number with another one. You will see which COM port is in use by the indication ”(in use)”. In the over stated screenshot “COM4” is in use, so you can’t select it. 10) Click OK many times in order to save end exit. 11) Write down the COM number currently used by the USB serial Port (you will need it in the next paragraphs). Insert the CD rom into your PC Enter “My computer” and then doubleclick the CD icon Doubleclick on “install”: the setup automatically run and last a few minutes; the icon G11 of the software will appear on the desktop. Click on the icon to enter the G11 programming software. On the opening window at the upper left side of it, you will find 4 settable options (Model, Edit, Program, Communication): each option gives you the chance to set new functions in order to improve the performance of your G11 transceiver. 1.
Communication Communication port setup To operate with the programming software, you must first of all set the COM port in use. ‐
Click on “Comunication” on the upper left side of the window; you will see the following window ‐ Connect the programming cable (USB) to the PC and select the COM port in use. ‐ Click on “Confirm” to confirm your selection Once have selected the COM port, you will be able to let your computer communicate with the G11, manage new functions and program your transceiver. Before setting any feature, remember that you have to set the used COM port first. 2. Model Model select (to select the radio model) ‐ Click on “Model” on the upper left side of the window. You will see a little window showing the model radio connected and its working frequency ‐ Click on “Confirm” to confirm your selection 3. Edit Channel information ‐ Click on “Edit” on the upper left side of the window and select “Channel information” from the drop‐
down menu; ‐ A channel information table will show you the eight default PMR446 channels together with the eight PMR channels with the CTCSS tones set. ‐ By clicking on the empty fields of the TX/RX frequencies, you will be able to set the PMR446 frequency of each channel. Select a tone for the transmission frequency from the drop‐down menu. ‐ The value chosen will be automatically stored on the main “Channel information” window and the drop‐
down menu will be automatically closed. ‐ To set other parameter fields, follow the same operating steps. Note: if the “Channel information” table is empty, press on the “Default” button; the 8+8 channels will be reported on the table. Optional Features ‐ Click on “Edit” on the upper left side of the window and select “Optional features” from the drop‐down menu. ‐ A little table will show you the settable optional features 〉 Time Out Timer: is the maximum transmission time allowed, settable from 0 sec. (off) to a maximum of 270 seconds. 〉 VOX Level: it is possible to set a VOX level (hands free conversations) from 1 to 9, which level 1 is the most sensitive and level 9 is the least sensitive one. 〉 Squelch level: eliminates all background noises of the channel in use. It is possible to choose among 9 levels: level 1 is the least sensitive and level 9 is the most sensitive one. By default, the Squelch level of the radio is set on level 5. 〉 ANI: it is possible to choose and set a secret code composed by 8 digits in DTMF format to send to your interlocutor. There are different modes to set the ANI: • PTT ID Off : function disabled • Pre‐only: the ANI code is sent only when the PTT button is pressed • Post‐only: the ANI code is sent only when the PTT button is released • Both: the ANI code is sent when you press and when you release the PTT button 〉 Data password: this feature allows to set a numeric password (MAX six‐figure) in order to prevent external users from data access. The data password setting do not allow you to access and read the data information but it doesn’t limit you on setting and creating new settings. (“read” data function not allowed, ” write” data function allowed). 〉 Beep: if this feature is enabled, the two function keys (function key 1 and function key 2) of your G11 will emit a beep sound every time you press a button. 〉 Roger beep: is the end of transmission tone. If this feature is enabled, your transceiver will emit a beep tone at the end of every your transmission(once have release the PTT button). 〉 Battery saver: to enable/disable the “Automatic power save” function Key assignment Click on “Edit” on the upper left side of the window and select “Key assignment” from the drop‐down menu. You will be able to match specific features to the Function key 1 and Function key. The red dot shows the key you are matching the selected function. It will be possible combine only two function per key: one matched to the short press and the other one to the long press of the key. After have chosen the function you would like to set, click on “Close”. The settings will be automatically stored and they will be ready to be programmed on the radio. Briefly press the key for 1/ 2 seconds to recall the feature matched to the short press, while to recall the feature matched to the long press, keep pressed the button for about 3/ 4 seconds. For each operation, the transceiver will emit a beep sound to confirm that the selected function has been enabled/disabled. Herewith following there will be briefly described the settable feature of the drop‐down menu; on the user manual such features will be described in a more exhaustive way. 〉 No function: no function enabled 〉 Monitor: with this feature the Squelch function will be opened and it will be possible to receive weak signals. 〉 Scan on/off: the Scan function is used to check and monitor the conversations on the channel you intend to transmit. 〉 Scan + Temporary delete: to check and monitor the conversations on the channels before transmitting excluding the channel which such function is enabled on. 〉 Hi/Low power: it is possible to choose the transmission output power (high/low) 〉 Talk Around: even if you have programmed different frequencies and tones, with this function enabled, you can transmit and receive on the same frequency band. The channel frequency on TX will be the same of the RX channel frequency and the CTCSS/DCS tones won’t influence the communication among users. 〉 Reverse frequency: by enabling this function it is possible to have a frequency exchange: the transmission frequency with the reception one and viceversa. 〉 Vox On/Off: to enable/disable hand free conversations. DTMF Setting Click on “Edit” on the upper left side of the window and select from the drop‐down menu “DTMF”. This setting window specify and customize the PTT button. 〉 Pre‐time(ms): indicates the time needed to send the tone 〉 Interval(ms): indicates the interval between two transmission tones 〉 Duration(ms): indicates the long lasting time of the tone Once have customized the PTT button, click on “Close” and the setting will automatically be saved and ready to be programmed on the radio. 4. Program Read data from radio ‐ Click on “Program” on the upper left side of the window and select “Read from radio” from the drop‐
down menu. It will be possible read the parameters of the previous setting. ‐ Click on “Read”. A blue processing bare will show you the reading processing status that will last only a few seconds. Write data to radio ‐ Click on “Program” on the upper left side of the window and select “Write from radio” from the drop‐
down menu. It will be possible program the radio with new settings. ‐ After have set the desired parameters on the Channel information chart, connect the programming cable to the radio turned on. ‐ Click on “Write”; a blue processing bare will show you the programming processing status that will last only a few seconds. Test mode/Power adjust: ‐ Click on “Program” on the upper left side of the window and select “Test mode” from the drop‐down menu. It will be possible set the desired transmission output power. ‐ Connect the programming cable to the radio turned on ‐ Through the empty field of the Low Power and Hi Power it will be possible to vary the output power from a few mW till 5Watt: By operating on the “Low Power” bare, you manage the low output power; while operating on the “Hi Power” bare you manage the high output power. Once have adjust the output power, it is not necessary write/program such setting on the radio, as G11 automatically store the output power chose. This is valid only and exclusively for the output power adjust; for all the other settings, before operating the radio, you have to program them first.