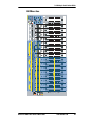
1
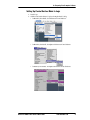
®ÂØÒňΠVS-2480CD 24bit/24track Digital Studio Workstation Control Surface Mode Guide (For Operating System Version 2.011 or higher) ® Copyright © 2003 ROLAND CORPORATION All rights reserved. No part of this publication may be reproduced in any form without written permission of ROLAND CORPORATION. All product names in this publication are trademarks or registered trademarks of their respective owners. Roland US Web site: www.RolandUS.com Table of Contents 1—Introducing Control Surface Mode 5 What Is Control Surface Mode? ...................................................................................................................................... Control and Synchronization ................................................................................................................................... Connecting the VS-2480CD and Your Computer ......................................................................................................... Preparing for Control Surface Mode .............................................................................................................................. 2—Preparing Your Computer Software 5 5 6 6 7 Obtaining the Necessary Drivers .................................................................................................................................... 7 Preparing Emagic Logic 5.X ............................................................................................................................................ 7 Installing the Control Surface Driver in Logic for Mac OS X .............................................................................. 7 Installing the Control Surface Driver in Logic for Mac OS 9 ............................................................................... 8 Installing the Control Surface Driver in Logic for Windows .............................................................................. 8 Setting Up Control Surface Mode In Logic ............................................................................................................ 9 Preparing Steinberg Cubase .......................................................................................................................................... 11 Installing the Control Surface Driver in Cubase ................................................................................................. 11 Setting Up Control Surface Mode in Cubase ....................................................................................................... 11 Preparing HUI Operation .............................................................................................................................................. 12 Setting Up Control Surface Mode in ProTools .................................................................................................... 12 Setting Up Control Surface Mode in Performer .................................................................................................. 13 3—VS-2480CD Control Surface Settings 15 Configuring the VS-2480CD as a Control Surface ...................................................................................................... Arming Control Surface Mode .............................................................................................................................. Selecting a Control Surface Template ................................................................................................................... Selecting a Communication Method ..................................................................................................................... USER Control Surface Templates .......................................................................................................................... 4—Working in Control Surface Mode 19 Activating Control Surface Mode ................................................................................................................................. Overview .......................................................................................................................................................................... The L5 (Emagic Logic 5) Template ............................................................................................................................... L5 Control Area ........................................................................................................................................................ L5 Mixer Area ........................................................................................................................................................... The S.C (Steinberg Cubase) Template .......................................................................................................................... S.C Control Area ...................................................................................................................................................... S.C Mixer Area ......................................................................................................................................................... The VS-2480 (Logic 16-Channel) Template ................................................................................................................. VS-2480 Control Area .............................................................................................................................................. VS-2480 Mixer Area ................................................................................................................................................. The HUI Template .......................................................................................................................................................... HUI Control Area .................................................................................................................................................... HUI Mixer Area ....................................................................................................................................................... Known Issues ................................................................................................................................................................... Roland VS-2480CD Control Surface Mode Guide 15 15 16 16 16 www.RolandUS.com 19 19 20 20 21 22 22 23 24 24 25 26 26 27 28 3 Table of Contents 4 www.RolandUS.com Roland VS-2480CD Control Surface Mode Guide 1—Introducing Control Surface Mode What Is Control Surface Mode? Since the initial release of the VS-2480, the VS-2480, VS-2480HD and VS-2480CD have always had the capability of controlling external MIDI devices using V.FADER mode, described on Page 300 of the VS-2480 Owner’s Manual . For the sake of simplicity from here on in, we’ll refer to the VS-2480, VS-2480HD and VS-2480CD as simply the “VS-2480CD.” All three V-Studios share identical software as well as control surface functionality. Starting with Operating System (“OS”) Version 2.011, however, this capability has been greatly expanded. The VS-2480CD OS now includes pre-configured templates that map the VS-2480 buttons, knobs and faders, to key parameters in popular computer-based sequencing/recording software programs. There are templates for: • • • Emagic Logic 5.X sequencing/recording software for Mac or PC Steinberg Cubase sequencing/recording software for Mac or PC programs that can be controlled by Mackie’s HUI control surfaces hardware, such as Digidesign ProTools and Mark of the Unicorn Performer. You can also design your own re-usable user templates for other programs. This means that you can control supported programs directly from the VS-2480 without having to use your computer’s mouse for most major operations. The VS-2480CD makes an excellent control surface with its wealth of buttons, knobs and faders. Control and Synchronization While you can control the parameters in external sequencing/recording software using Control Surface mode, you can also synchronize the software’s transport functions with the VS-2480CD’s using the standard synchronization techniques described starting on Page 307 in the VS-2480CD Owner’s Manual . If the external software supports it, you can control the software’s transport using the VS-2480CD’s transport buttons using MMC (MIDI Machine Control) messages. The Difference Between V.Fader Mode and Control Surface Mode In a sense, Control Surface mode is actually a form of V.Fader mode, since it’s activated the same way. It simply overrides and replaces normal V.Fader functionality with enhanced control surface features. Whenever Control Surface mode is armed, standard V.Fader mode becomes unavailable. Roland VS-2480 Control Surface Mode Guide www.RolandUS.com 5 1—Introducing Control Surface Mode Connecting the VS-2480CD and Your Computer To control your sequencing/recording software from the VS-2480CD, you’ll need to connect the VS-2480CD to your computer. Control Surface mode uses MIDI for twoway communication, so you can connect the VS-2480 to a computer using: • • R-BUS—In order to use R-BUS, your computer must have an R-BUS-supporting PCI card installed. You can use a Roland RPC-1 PCI card, included with the Roland Studio Package Pro, or available separately. Connect the RPC-1’s R-BUS jack to an available R-BUS jack on your VS-2480CD. MIDI—To connect the VS-2480CD to your computer, the computer must have a PCI card with MIDI IN and OUT jacks, or be connected to a separate MIDI interface with IN and OUT jacks. Connect the VS-2480’s MIDI OUT jack to the computer’s MIDI IN jack. Connect the computer’s MIDI OUT jack to the VS-2480CD’s MIDI IN jack. (Control Surface mode requires two-way MIDI communication.) We describe how to select your R-BUS or MIDI jacks for control surface communication on Page 16. Preparing for Control Surface Mode Assuming you’ve installed the sequencing/recording software on your computer, and that you’ve connected the computer to the VS-2480CD, you’ll need to: • • configure your computer for VS-2480CD Control Surface mode. configure the VS-2480CD as a control surface. We’ll describe both of these procedures in the next two chapters. Once everything’s set up, we’ll discuss activating and working in Control Surface mode in Chapter 3. 6 www.RolandUS.com Roland VS-2480 Control Surface Mode Guide 2—Preparing Your Computer Software In order for your computer-based sequencing/recording software to recognize the VS-2480CD as a control surface, you may need to install VS-2480CD driver software and configure the sequencing/recording software. This chapter explains how to prepare the software for which the VS-2480CD provides control surface templates. Obtaining the Necessary Drivers If your sequencing/recording software requires a driver for the VS-2480CD Control Surface mode, you can download it from the Roland US Web site at: http://www.RolandUS.com If you don’t have Internet access, call Roland US Product Support at 323-890-3700. The control surface drivers are relatively small files, so any Internet connection should suffice for downloading. The VS-2480CD’s Control Surface mode uses the same drivers that Roland’s SI-24 uses. For this reason, driver files are named for the SI-24 not the VS-2480CD. Preparing Emagic Logic 5.X Emagic’s Logic Version 5.X is available on both Mac and Windows platforms. On the Mac side, it’s available in Mac OS 9 and Mac OS X versions. Though each Logic flavor has its own driver installation process, the simple configuration process is identical for all three versions. Installing the Control Surface Driver in Logic for Mac OS X 1. 2. 3. 4. Download the Logic for Mac OS X control surface driver from www.RolandUS.com. You’ll find the driver on the VS-2480CD’s Updates and Drivers page. Un-stuff the driver using an un-stuffing tool such as StuffIt Expander (available from www.aladdinsys.com). The driver is called “SI-24.bundle.” Locate the Logic application on your Mac. While holding down the keyboard’s ctrl key and click the Logic application to reveal its contextual menu. Roland VS-2480 Control Surface Mode Guide www.RolandUS.com 7 2—Preparing Your Computer Software 5. From the contextual menu, select Show Package Contents—the Logic package opens, revealing the Contents folder. 6. Double-click the Contents folder—you’ll see a collection of folders and documents. 7. Drag the SI-24.bundle file into the MIDI Device Plug-Ins folder. Installing the Control Surface Driver in Logic for Mac OS 9 1. 2. 3. 4. 5. Download the Logic for Mac OS 9 control surface driver from www.RolandUS.com. You’ll find the driver on the VS-2480CD’s Updates and Drivers page. Un-stuff the driver using an un-stuffing tool such as StuffIt Expander (available from www.aladdinsys.com). The driver is called “SI-24.” Locate the Logic folder on your Mac. Locate the folder called “Control Surface Plug-Ins X.XX,” where “X.XX” is the version number of the Logic application. Drag the SI-24 file into the Control Surface Plug-Ins X.XX folder. Installing the Control Surface Driver in Logic for Windows 1. 2. 3. 4. 5. 8 Download the Logic for Windows control surface driver from www.RolandUS.com. You’ll find the driver on the VS-2480CD’s Updates and Drivers page. Un-zip the driver. The driver is called “SI-24.dll.” Locate the Logic folder on your PC. Locate the folder called “Control Surface Plug-Ins X.XX,” where “X.XX” is the version number of the Logic application. Drag the SI-24.dll file into the Control Surface Plug-Ins X.XX folder. www.RolandUS.com Roland VS-2480 Control Surface Mode Guide 2—Preparing Your Computer Software Setting Up Control Surface Mode In Logic 1. 2. Launch Logic. Add the control surface driver to Logic by selecting the Install... dialog: • In Mac OS X, select Install... from Preferences>Control Surfaces> • In Mac OS 9, select Install... from Options>Preferences>Control Surfaces> • In Windows, select Install... from Options>Preferences>Control Surfaces>. Roland VS-2480 Control Surface Mode Guide www.RolandUS.com 9 2—Preparing Your Computer Software 3. In the list of control surfaces, select SI-24, and click Add. 4. 5. Close the Install window. Open Logic’s Setup window. • In Mac OS X, select Setup... from Preferences>Control Surfaces>. • In Mac OS 9, select Setup... from Options>Preferences>Control Surfaces>. • In Windows, select Setup... from Options>Preferences>Control Surfaces>. The Setup window opens, showing a picture of the Roland SI-24. MIDI Output and Input settings 6. 7. 10 Click on the SI-24 in the Setup window. At the left of the Setup window, select the MIDI input and output jacks, or “ports,” to which the VS-2480CD is connected. www.RolandUS.com Roland VS-2480 Control Surface Mode Guide 2—Preparing Your Computer Software Preparing Steinberg Cubase VS-2480CD Control Surface mode works with Cubase VST 5 or higher for Windows and Mac OS 9 and with Cubase SX for Windows and Mac OS X. All versions require installation of the VS-2480 control surface driver, and setup within Cubase. The setup instructions for the Windows and Mac OS 9 and X versions of Cubase are identical. Installing the Control Surface Driver in Cubase 1. 2. 3. Download the Cubase control surface driver from www.RolandUS.com. You’ll find the driver on the VS-2480CD’s Updates and Drivers page. De-compress the driver using a de-compression tool such as WinZip or StuffIt Expander (available from www.aladdinsys.com). The driver is called “si24v6.” You can keep the driver anywhere on your hard drive—during setup within Cubase, you’ll tell the program where the driver’s located. To make the driver easy to find, we recommend moving it to your Cubase folder. Setting Up Control Surface Mode in Cubase 1. 2. Launch Cubase. Select Setup... from the Devices menu. The Device Setup setup dialog opens. Roland VS-2480 Control Surface Mode Guide www.RolandUS.com 11 2—Preparing Your Computer Software 3. Click Generic Remote. The window expands to show additional options. Import button 4. 5. 6. 7. Select the MIDI input and output jacks, or “ports,” to which the VS-2480CD is connected. Click Import. Navigate to the s124v6 file, select it click Open. Click Apply and then OK. Preparing HUI Operation The VS-2480CD’s HUI template makes the VS-2480CD act like a Mackie HUI control surface that can control digidesign’s ProTools as well as Mark of the Unicorn’s Performer. Neither program requires installation of a driver to work with the VS-2480CD’s Control Surface mode. Both programs require configuration. Setting Up Control Surface Mode in ProTools 1. From the Setups menu, select Peripherals. The Peripherals window appears. 12 www.RolandUS.com Roland VS-2480 Control Surface Mode Guide 2—Preparing Your Computer Software 2. Click on the MIDI Controllers tab. 3. From the Type pull-down menu, select HUI. 4. From the Receive From and Send to pull-down menus, select the MIDI port to which your VS-2480CD is connected. Click OK. 5. Setting Up Control Surface Mode in Performer 1. Select Control Surface Setup from the Basics menu. Roland VS-2480 Control Surface Mode Guide www.RolandUS.com 13 2—Preparing Your Computer Software The Control Surface window opens. 2. 3. 4. 14 Select HUI from the Hardware pop-up menu. Select the MIDI IN and OUt ports to which your VS-2480CD is connected. Click OK. www.RolandUS.com Roland VS-2480 Control Surface Mode Guide 3—VS-2480CD Control Surface Settings Configuring the VS-2480CD as a Control Surface The VS-2480CD’s control surface parameters allow you to configure the VS-2480CD so that its buttons, knobs and faders transmit the appropriate MIDI messages for the software you want to control. These parameters are found on the VS-2480CD’s CONTROL SURFACE screen in the UTILITY menu. To view the control surface parameters: 1. You can use the VGA main display or the VS-2480CD’s buttons, as desired: • Select CONTROL SURFACE from the VGA main display’s UTILITY menu. • Press UTILITY on the VS-2480CD, PAGE until “C.Srfc” appears above F3, and then press F3 (C.Srfc). In addition to using the VS-2480CD as a control surface, you can synchronize its transport with the transport of your external software. You can also control both devices’ transports from the VS-2480CD or from the external software. See Page 307 in the VS-2480 Owner’s Manual. Arming Control Surface Mode Before you can actually activate Control Surface mode, you must first arm the mode by setting the CONTROL SURFACE screen’s V.FADER CONTROL SURFACE Sw parameter to On. Once the mode has been armed, you can turn it on as described on Page 19. When Control Surface mode is armed, the VS-2480CD continues to operate normally until you actually turn on, or activate, the mode as described on Page 19. Roland VS-2480 Control Surface Mode Guide www.RolandUS.com 15 3—VS-2480CD Control Surface Settings Selecting a Control Surface Template The VS-2480CD provides a variety of control surface templates in which its buttons, knobs and faders are mapped to useful parameters in a software sequencing/recording software program. You select the desired template by setting the CONTROL SURFACE screen’s CONTROL SURFACE TYPE parameter. You can choose: • • • • • L5 (for Logic 5.X)—to control any Emagic Logic 5.X-generation sequencing/ recording software on a Mac or PC using the VS-2480CD’s controls. S.C (for “Steinberg Cubase”) —to control Steinberg Cubase on a PC or Mac using the VS-2480CD’s controls. (See “Known Issues” on Page 28.) H (for “HUI”)—to control any sequencing/recording program that works with a HUI interface, such as Digidesign ProTools and Mark of the Unicorn Performer, using the VS-2480CD’s controls. VS-2480—This template is a 16-channel version of the L5 template. It is not fully implemented as of this writing. See “Known Issues” on Page 28. USR 1, USR 2—to load one of the user-defined templates described in “USER Control Surface Templates” on Page 16. Chapter 4 provides details on the sequencing/recording software parameters controlled in each template. Selecting a Communication Method The VS-2480CD can act as a control surface when connected to an external device via: • • R-BUS—if the VS-2480CD is connected to a computer that has an installed RPC-1 card. MIDI—when the VS-2480CD is connected to a computer via MIDI. The CONTROL SURFACE screen’s CONTROL SURFACE PORT parameter selects the type of connection to be used in Control Surface mode. You can select the R-BUS jack to which your computer is connected or MIDI. USER Control Surface Templates The VS-2480CD offers two pairs of USER control surface templates with which you can create your own control surface setups. This allows you to control virtually any MIDI device from the VS-2480CD. In each of the two templates, you can set the MIDI messages to be transmitted from: • • the VS-2480CD's buttons, knobs, faders and TIME/VALUE dial. the buttons, knobs and faders of a connected VE-7000. In Control Surface mode, the buttons and PAN/AUX SEND 1-8 knobs act as on/off switches that transmit either a full-on or full-off value. When you: • • press a button—it sends a full-on value when it’s depressed, and a full-off value when you let go. turn a PAN/AUX SEND 1-8 knob—one tick to the left, it sends a full-on value. When you turn it one tick to the right, it sends a full-off value. Move the faders and TIME/VALUE dial to send a continuous range of values. When: 16 www.RolandUS.com Roland VS-2480 Control Surface Mode Guide 3—VS-2480CD Control Surface Settings • • a fader’s all the way down, or the TIME/VALUE dial’s turned all the way counterclockwise—the lowest possible values are transmitted. a fader’s all the way up, or the TIME/VALUE dial’s turned all the way clockwise —the highest possible values are transmitted. For the sake of simplicity, when we refer to faders in the following sections, we’re also including the TIME/VALUE dial, whose settings appear on the same screen as the faders’. Since the buttons, knobs and faders operate differently, here’s how to take fullest advantage of each: • • When you want to simply switch something on or off in the external device you’re controlling from the VS-2480CD, do it with a button or a PAN/AUX SEND 1-8 knob. When you want to adjust something continuously over its range of possible values—volume, pan or filter settings, for example—control it using a fader. To Create a USER Template 1. 2. 3. Set the CONTROL SURFACE TYPE parameter to USR 1 or USR 2, as desired. To set the buttons, knobs and/or faders in the USER 1 set, press: • F1 (USR1)—to set the behavior of the buttons, knobs and faders on the VS-2480CD. • F3 (VEUSR1)— to set the behavior of the buttons knobs and faders on a connected VE-7000. To set the buttons, knobs and/or faders in the USER 2 set, press: • F2 (USR2)—to set the behavior of the buttons knobs and faders on the VS-2480CD. • F4 (VEUSR2)— to set the behavior of the buttons knobs and faders on a connected VE-7000. To set the MIDI controllers to be transmitted from the selected: • buttons—press F1 (BUTTON). • knobs—press F2 (KNOB). • faders—press F1 (FADER). The SETUP screen appears for the selected buttons, knobs or faders: Turn the TIME/ VALUE dial to scroll up or down the list of buttons, knobs or faders. The SETUP screen is divided into three columns: • The left-hand column lists the selected buttons, knobs or faders. • The CONTROL TYPE column shows the type of MIDI controller to be transmitted when you press, turn or move each button, knob or fader, respectively. • The Val column shows the value of the selected MIDI controller to be transmitted from the VS-2480CD. Roland VS-2480 Control Surface Mode Guide www.RolandUS.com 17 3—VS-2480CD Control Surface Settings 4. 5. 6. 7. 8. 18 Select the control type you wish to set by cursoring to it or clicking on it with your mouse. Once the control type is highlighted, turn the TIME/VALUE dial to select: • OFF—so that no MIDI data is transmitted from the corresponding button, knob or fader. • NOTE OFF—to transmit a MIDI note-off message. • NOTE ON—to transmit a MIDI note-off message • KEY PRESSURE—to transmit a MIDI aftertouch value. • CONTROL CHANGE—to transmit a value for one of the numbered MIDI Control Change messages. • PITCH BEND—to transmit a MIDI pitch bend value. Highlight the corresponding Val setting to set the desired value for the selected control type. If your control type is: the Val setting determines: NOTE OFF the MIDI number of the note for which a note-off message is sent NOTE ON the MIDI number of the note for which a note-on message is sent KEY PRESSURE the MIDI number of the note for which an aftertouch message is sent CONTROL CHANGE the MIDI control change message for which a value is to be sent PITCH BEND the MIDI number of the note for which a pitch bend message is sent To switch from buttons, to knobs to faders, press the desired F button. To finish setting up a USR template, press F6 (EXIT). www.RolandUS.com Roland VS-2480 Control Surface Mode Guide 4—Working in Control Surface Mode Activating Control Surface Mode Here’s a checklist of things you need to do before turing on Control Surface mode: Setup step: See Chapter: Connect your computer snd the VS-2480CD 1 Configure your sequencing/recording software 2 Set up and arm Control Surface mode in the VS-2480CD 3 Once you’ve set everything up, you can activate and use Control Surface mode. To Turn Control Surface Mode On and Off 1. 2. 3. Launch your sequencing/recording software. While holding down SHIFT on the VS-2480CD, press TR 17-24/FX RTN. The default VS-2480’s FADER buttons for the selected control surface template light and the faders move all the way down. To turn off Control Surface mode, press EXIT/NO. Due to the way data passes back and forth between your software and the VS-2480CD, it may be necessary to refresh communications by pressing the VS-2480CD’s TR 1-16 and TR 17-24/FX RTN buttons a few times, one after the other. Overview While each template offers control features specific to its sequencing/recording software, here are a couple of general guidelines to help you get started. • • In all of the control surface templates, the buttons at the righthand side of the VS-2480CD set the current overall behavior of Control Surface mode. They determine, among other things what the numeric keypad controls. The VS-2480CD’s FADER buttons determine what the channel strips control. In the following pages, we’ll present maps of each template to show the functions to which the VS-2480CD’s buttons, knobs and faders are assigned. Roland VS-2480 Control Surface Mode Guide www.RolandUS.com 19 3—Working in Control Surface Mode The L5 (Emagic Logic 5) Template L5 Control Area Tips • • 20 The MARKER/LOCATE, SHORTCUT and SCREENSET buttons set the behavior of the numeric keypad. When you press PLUG-IN or EQ/SEND, the EQ 1-4 buttons display plug-ins or EQ modules, respectively. www.RolandUS.com Roland VS-2480 Control Surface Mode Guide 3—Working in Control Surface Mode L5 Mixer Area Tips • • PAN/AUX SEND 1-8 Knob 11 is a bypass switch when working with plug-ins. Each rightward tick of the PAN/AUX SEND 1-8 Knob 12 selects the next set of parameters in the current plug-in when working with plug-ins. Each tick to the left selects the next-lower set. Roland VS-2480 Control Surface Mode Guide www.RolandUS.com 21 3—Working in Control Surface Mode The S.C (Steinberg Cubase) Template S.C Control Area Tips • • 22 The MARKER/LOCATE, SHORTCUT and SCREENSET (or “window sets”) buttons set the behavior of the numeric keypad. When you press PLUG-IN or EQ/SEND, the EQ 1-4 buttons display plug-ins or EQ modules, respectively. www.RolandUS.com Roland VS-2480 Control Surface Mode Guide 3—Working in Control Surface Mode S.C Mixer Area Tips • PAN/AUX SEND 1-8 Knob 11 is always a bypass switch when working with plug-in effects. Roland VS-2480 Control Surface Mode Guide www.RolandUS.com 23 3—Working in Control Surface Mode The VS-2480 (Logic 16-Channel) Template VS-2480 Control Area See the L5 template for tips. 24 www.RolandUS.com Roland VS-2480 Control Surface Mode Guide 3—Working in Control Surface Mode VS-2480 Mixer Area See the L5 template for tips. Roland VS-2480 Control Surface Mode Guide www.RolandUS.com 25 3—Working in Control Surface Mode The HUI Template HUI Control Area Tips • • 26 The MARKER/LOCATE, SHORTCUT and SCREENSET (or “window sets”) buttons set the behavior of the numeric keypad. When you press PLUG-IN or EQ/SEND, the EQ 1-4 buttons display plug-ins or EQ modules, respectively. www.RolandUS.com Roland VS-2480 Control Surface Mode Guide 3—Working in Control Surface Mode HUI Mixer Area Roland VS-2480 Control Surface Mode Guide www.RolandUS.com 27 3—Working in Control Surface Mode Known Issues As of this writing, certain Control Surface mode features are not currently available. In the: • • 28 VS-2480 template—level control is available from Channel Strips 1-12. The other channel strips and other template functions are not yet implemented. S.C template—Windows (SCREEN SETS) and shortcut functionality is not yet implemented. In addition, when working with plug-ins, the PAN/AUX SEND 1-8 knobs select plug-ins instead of adjusting parameter values for the currently selected plug-ins. www.RolandUS.com Roland VS-2480 Control Surface Mode Guide ®ÂØÒňΠRoland Corporation U.S. 5100 S. Eastern Avenue Los Angeles, CA 90040-2938 Tel: (323) 890-3700 www.RolandUS.com ® v2011