1
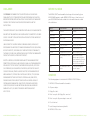
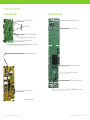
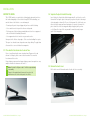
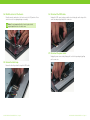
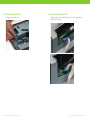
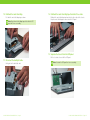
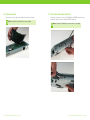
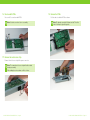
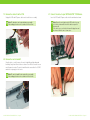
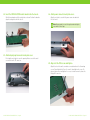
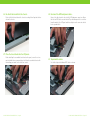
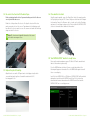
INSTALLATION GUIDE
AND WARRANTY
DISCLAIMER
BEFORE YOU BEGIN
WE STRONGLY RECOMMEND THAT YOU ARE TECHNICALLY SKILLED AND
FAMILIAR WITH PC SYSTEM MODIFICATION AND PERIPHERAL INSTALLATION
BEFORE PROCEEDING WITH INSTALLATION. PLEASE CAREFULLY FAMILIARIZE
YOURSELF WITH THE INSTALLATION PROCEDURE AND FOLLOW THE
INSTRUCTIONS.
The NVIDIA G-SYNC™ monitor modification changes the functionality of your
ASUS VG248QE monitor to enable NVIDIA G-SYNC features. Some features of
your ASUS VG248QE will not be available after the modification as described
in the table below.
THIS MODIFICATION KIT IS ONLY COMPATIBLE WITH AN ASUS VG248QE MONITOR.
ENSURE THAT THE MONITOR IS UNPLUGGED AND NOT CONNECTED TO A POWER
SOURCE. FAILURE TO FOLLOW THE INSTALLATION INSTRUCTIONS MAY RESULT
IN PERSONAL INJURY.
UNLESS DIRECTLY CAUSED BY NVIDIA’S OWN NEGLIGENCE, NVIDIA IS NOT
RESPONSIBLE FOR ANY PRODUCT DAMAGE OR WARRANTY ISSUES (INCLUDING,
BUT NOT LIMITED TO, THE VOIDING OF A THIRD PARTY PRODUCT WARRANTY)
THAT MAY OCCUR BY USING, INTEGRATING OR SUBSTITUTING THE WARRANTED
PRODUCT WITH OR INTO A THIRD PARTY PRODUCT.
EXCEPT AS EXPRESSLY PROVIDED HEREIN AND TO THE MAXIMUM EXTENT
PERMITTED BY APPLICABLE LAW, NVIDIA DISCLAIMS ALL OTHER WARRANTIES
WITH RESPECT TO THE PRODUCT, WHETHER EXPRESS,IMPLIED, STATUTORY
OR OTHERWISE, INCLUDING WITHOUT LIMITATION, SATISFACTORY QUALITY,
COURSE OF DEALING, TRADE USAGE OR PRACTICE OR THE WARRANTIES OF
MERCHANTABILITY, FITNESS FOR A PARTICULAR PURPOSE, TITLE, OR NONINFRINGEMENT OF THIRD PARTY RIGHTS. FEDERAL LAW, SOME STATES,
PROVINCES AND OTHER JURISDICTIONS DO NOT ALLOW EXCLUSIONS OF
CERTAIN IMPLIED WARRANTIES. SOME STATES, PROVINCES AND OTHER
JURISDICTIONS DO NOT ALLOW LIMITATIONS ON HOW LONG AN IMPLIED
WARRANTY LASTS, SO SOME OF THE ABOVE LIMITATIONS MAY NOT
APPLY TO YOU.
Features
Original VG248QE
After NVIDIA G-SYNC mod
Resolution
1920x1080
1920x1080
Display Colors
16.7M
16.7M
Display Inputs
VGA, DP, HDMI
DP only (no audio support)
G-SYNC Refresh Rates
Not Available
30-144 Hz
2D Refresh Rates
60, 100, 120, 144 Hz
60, 85, 100, 120, 144 Hz
Tracefree Setting
Adjustable
Fixed at optimum setting
3D Vision
3D supported at 100, 120 Hz
Superior 3D quality at 100, 120 Hz
OSD
ASUS VG248QE On-screen
Display
NVIDIA G-SYNC OSD with
additional support for Monitor
Control Command Set PC-based
utilities for superior RGB color
control. (utilities not supplied)
Power
110 – 240 VAC, direct into
monitor
90 – 264 VAC with supplied
external AC adapter
CONTENTS
The following equipment is included in the NVIDIA G-SYNC DIY Kit box:
1. NVIDIA G-SYNC monitor modification module.
2. AC power adapter.
3. DisplayPort cable.
4. Metal cover plate (for DisplayPort connector).
5. Metal cover plate (for power adapter connector).
6. Plastic shim tool.
7. Installation guide and warranty booklet.
8. NVIDIA G-SYNC stickers.
G-SYNC INSTALLATION GUIDE VER. 2.0 | Page 2
G-SYNC INSTALLATION GUIDE VER. 2.0 | Page 3
TOOLS REQUIRED
REGISTER NOW AND UNLOCK YOUR NEW BENEFITS!
1. Philips head screwdriver.
1. Gain priority access to NVIDIA Customer Care
2. Flat head screwdriver.
2. Keep current on software updates, product information and promotions
3. Hand pliers (needle nose).
3. It is quick and easy. Simply follow t he registration process at
www.nvidia.com/register
4. Pair of tweezers.
5. Metal surface or dry erase marker.
IMPORTANT: Please retain your sales r eceipt; NVIDIA Customer Care may
request proof of purchase to validate eligibility for 1 year warranty service.
6. Plastic shim tool (included).
7. Black electrical tape (may be required).
WARRANTY INFORMATION
www.nvidia.com/warranty
SYSTEM REQUIREMENTS
PRODUCT SUPPORT
GPU:
G-SYNC features require an NVIDIA GeForce GTX650Ti BOOST GPU or higher.
NVIDIA G-SYNC™ is supported by the following GPUs:
> GTX TITAN
> GTX 760
> GTX 660 Ti
> GTX 780 Ti
> GTX 690
> GTX 660
> GTX 780
> GTX 680
> GTX 650 Ti Boost
> GTX 770
> GTX 670
www.nvidia.com/nvcc
SERIAL AND PART NUMBERS FROM THE BOX LABEL:
Please refer to www.nvidia.com/g-sync for the latest list of supported GPUs.
Display:
The NVIDIA G-SYNC DIY modification kit requires an ASUS VG248QE monitor.
Driver:
331.77 or higher.
Operating System:
> Windows 8.1
> Windows 8
G-SYNC INSTALLATION GUIDE VER. 2.0 | Page 4
> Windows 7
G-SYNC INSTALLATION GUIDE VER. 2.0 | Page 5
CONNECTOR DIAGRAMS
Asus VG 248QE Boards:
NVIDIA G-SYNC™ Board:
LVDS Connectors
LVDS Cable
Backlight Connector
Power Connector
LCD Panel Power Connector
LCD Panel Power Cable
Audio Connector
Blue Ribbon Cable Connector
Control Board Connector
DisplayPort Connector
LVDS Connectors
LCD Panel Power Connector
Power Connector
Blue Ribbon Cable Connector
Backlight Connector
G-SYNC INSTALLATION GUIDE VER. 2.0 | Page 6
G-SYNC INSTALLATION GUIDE VER. 2.0 | Page 7
INSTALLATION
BEFORE YOU BEGIN.
This G-SYNC module uses a printed circuit board and semiconductor devices
that can be damaged by electrostatic discharge (ESD). When handling, care
must be taken so that the devices are not damaged.
> Do not open the protective packaging until you have read the following
> Use a conductive wrist strap attached to an earth ground.
> Discharge yourself by touching a grounded bare metal surface or approved
anti-static mat before handling the module.
02. Separate the plastic monitor housing.
Insert the plastic shim tool into the bottom opening. Be careful not to scratch
the monitor. Push up the plastic shim gently to separate the plastic housing at
a fastening point as shown. You’ll hear a clicking sound. Use a flat head screw
driver to keep the upper and lower housing pieces separate, then move the
plastic shim to the next fastening point and push up gently until you hear
a click. Repeat the steps all the way around the monitor housing to open
up all 20 fastening points.
> Use an approved anti-static mat to cover your work surface.
Some parts in the kit have sharp edges. Take care when handling these parts.
Take great care when disconnecting and reconnecting cabling. The application
of too much force can result in broken components.
01. Place monitor face down on a clean surface.
If in use, turn off monitor, disconnect monitor from AC power outlet, and
disconnect all display cables connected to the monitor. Place monitor
face down on a flat surface.
If in packaging, remove monitor from packaging, remove foam protector cover,
and place monitor face down on a flat surface.
Note: Set aside the AC power cable. It will be required during
reassembly.
To protect the monitor bezel from scratches, place the
monitor on a soft cloth or other protective surface.
G-SYNC INSTALLATION GUIDE VER. 2.0 | Page 8
03. Remove the back cover.
Lift the back cover off the monitor and set it aside for later reassembly.
G-SYNC INSTALLATION GUIDE VER. 2.0 | Page 9
04. Mark the corners of the chassis.
Using the marker, mark where the chassis meets the LCD panel in all four
corners to assist in realigning during reassembly.
06. Disconnect the LVDS cable.
Unplug the LVDS connector by pressing the two locking clips on the edges of the
connector and gently pulling out the connector.
Note: It’s very important that the chassis is placed in its
original position to close the back cover.
07. Disconnect the power cable.
Unplug the power connector by lifting up the lock at the top and gently pulling
out the connector.
05. Remove the black tape.
Remove the black tape from the top of the LVDS cable.
G-SYNC INSTALLATION GUIDE VER. 2.0 | Page 10
G-SYNC INSTALLATION GUIDE VER. 2.0 | Page 11
08. Disconnect the audio cable.
Gently pull out the audio cable.
G-SYNC INSTALLATION GUIDE VER. 2.0 | Page 12
09. Disconnect the blue flex cable.
Unplug the power connector by lifting up the lock at the top and gently
pulling out the connector.
G-SYNC INSTALLATION GUIDE VER. 2.0 | Page 13
10. Fold back the metal shielding.
Peel back the metal shielding tape as shown.
Note: Keep the metal shielding tape attached to the LCD
panel for later re-assembly.
12. Fold back the metal shielding tape from other three sides.
Fold back the metal shielding tape from the other three sides of the chassis.
Keep the metal shielding tape connected to the LCD panel.
13. Separate the chassis from the LCD panel.
11. Disconnect the backlight cable.
Gently pull out the backlight cable.
G-SYNC INSTALLATION GUIDE VER. 2.0 | Page 14
Lift the electronics chassis off the LCD panel.
Note: Set aside the LCD panel for later reassembly.
G-SYNC INSTALLATION GUIDE VER. 2.0 | Page 15
14. Remove insulation.
Turn over the chassis and remove the black insulation as shown.
Note: Set aside the insulation for later reassembly.
G-SYNC INSTALLATION GUIDE VER. 2.0 | Page 16
15. Unscrew the video input connectors.
Remove the two small screws on the DisplayPort and HDMI connectors and
remove the two Hex Jack screws from the DVI connector.
Note: Set aside the DisplayPort screw for later re-assembly.
G-SYNC INSTALLATION GUIDE VER. 2.0 | Page 17
16. Unscrew both PCBs.
Unscrew all 5 screws from both PCB’s.
Note: Set aside screws for later re-assembly.
18. Remove the PCBs.
Pull out and set aside both PCBs as shown.
Note: The boards can only be lifted on one side. The other
side is held in place by metal guides.
17. Remove the metal cover strip.
Remove the metal cover strip for the power connector.
Note: The removed metal cover strip will not be needed
during reassembly.
If discarding, do so in accordance with local laws.
G-SYNC INSTALLATION GUIDE VER. 2.0 | Page 18
G-SYNC INSTALLATION GUIDE VER. 2.0 | Page 19
19. Remove the cables from the PCB.
Unplug the LVDS and LCD power cables and set aside for re-assembly.
Note: The boards are not required during reassembly.
If discarding, please do so in accordance with local laws.
21. Connect the cables to your NVIDIA G-SYNC™ PCB Module.
Insert the LVDS and LCD power cables into the main board as shown.
Note: Ensure the metal plate on the LVDS cable is face up
after the insertion and the two thick cables are parallel
(not twisted).
If the cables cross each other, the two white plugs have not
been inserted in the correct connectors.
20. Remove the metal standoff.
Using the pliers, carefully remove the metal standoff by gently bending and
breaking it away from the metal base as shown. Clean the hole to make sure no
metal fragments remain. The metal standoff must be removed for the G-SYNC
module to seat properly in the chassis.
Note: The metal standoff is not required for reassembly.
If discarding, please do so in accordance with local laws.
G-SYNC INSTALLATION GUIDE VER. 2.0 | Page 20
G-SYNC INSTALLATION GUIDE VER. 2.0 | Page 21
22. Insert the NVIDIA G-SYNC monitor module into the chassis.
Slide the board underneath the metal guides as shown. Position the board to
align the tooling holes with the chassis.
24. Attach power connector metal plate cover.
Align the metal plate cover with the power connector and attach
it to the chassis.
Note: You may need to secure the replacement metal plate
cover with electrical tape.
23. Attach display input connector metal plate cover.
First align the metal plate to cover the opening. Next use one of the small
screws to fasten the DP connector.
25. Align all of the PCB screws and tighten.
Align the holes with a small screwdriver as needed and insert the 5 mounting
screws. Do not tighten fully. Once all screws fit, hand-tighten all screws. Do
not over tighten. Insert and tighten the screw, set aside from earlier, above the
DisplayPort connector.
G-SYNC INSTALLATION GUIDE VER. 2.0 | Page 22
G-SYNC INSTALLATION GUIDE VER. 2.0 | Page 23
26. Re-attach the insulation to the chassis.
Re-insert the black insulation to the chassis inserting all four flaps into the four
slots on the chassis.
28. Reconnect the LVDS and power cables.
Connect the cables from the chassis to the LVDS and power connectors. Ensure
that the two LVDS cables are not twisted. They should run parallel to each other
from the module to the LCD panel and the metal plate on the connector should
be face up and visible.
27. Place the chassis back onto the LCD panel.
Before installing the assembled chassis back on the panel, ensure there is no
material within the area you marked earlier. Align the assembled chassis with
the markings you made earlier at the four corners.
G-SYNC INSTALLATION GUIDE VER. 2.0 | Page 24
29. Tape down the cables.
Use the black tape to hold down LVDS cables as shown.
G-SYNC INSTALLATION GUIDE VER. 2.0 | Page 25
30. Reconnect the backlight cable.
Insert the backlight power connector into the left power input connector
(labeled J1).
31. Reconnect the blue flex cable.
Insert the front panel blue flex cable into the connector marked J6 as shown.
Push it in completely until locked.
Note: You may need to detach the tape holding the blue flex
cable to the chassis to enable the cable to fully reach the
connector.
If you have difficulty raising the top of the connector, do not
apply excessive force.
Insert the pointed tip of the plastic shim tool into the guide
holes on the top of the connector to unlock and separate the
top from the connector body (as shown in the picture). Once
separated, raise the top of the connector.
After the cable is inserted, push the connector top down and
back to lock it in place.
Guide
holes
G-SYNC INSTALLATION GUIDE VER. 2.0 | Page 26
G-SYNC INSTALLATION GUIDE VER. 2.0 | Page 27
32. Re-secure the chassis with the metal tape.
Before continuing, double check all your work making sure that all cables are
correctly installed and secure.
Double check the position of the chassis. Re-align the chassis with the four
marks you made earlier at the corners. Tape down metal shielding tape on all
four sides of the chassis and also secure the unconnected audio cable with tape
along one side of the chassis.
34. Place monitor on stand.
Stand the monitor upright, connect the DisplayPort cable to the monitor and to
the DisplayPort port on your GPU. Connect the power cable from the AC adapter
to the monitor. Connect the AC power cable, set aside earlier, to the AC adapter
and connect the wall plug to a power outlet. If desired, affix the NVIDIA G-SYNC
stickers to the monitor bezel and back of the monitor.
Note: The chassis must align with the marks at the corners
or the back cover may not close.
35. Your NVIDIA G-SYNC™ monitor is ready to use.
Power up the monitor and power up your PC. A blue LED on the monitor bezel
indicates the monitor is powered up.
33. Replace the plastic housing.
Align the back cover on the LCD panel and re-attach by pressing the back
cover and front panel together all around the monitor until all 20
fastening points click.
G-SYNC INSTALLATION GUIDE VER. 2.0 | Page 28
Press the MENU button on the bezel. An on-screen display similar to the
following will appear on the monitor. Press the MENU button again to turn off
the on-screen display.
Install the latest NVIDIA GeForce GPU drivers. NVIDIA G-SYNC will be enabled
during driver installation in the NVIDIA Control Panel. Refer to the online
documentation for more information on the NVIDIA Control Panel and the
NVIDIA G-SYNC on-screen display menus.
G-SYNC INSTALLATION GUIDE VER. 2.0 | Page 29
WARRANTY
WHAT DOES THIS LIMITED WARRANTY COVER?
(5) fire or spillage of food or liquid, external electrical fault, or any acts of God (such as, but not limited to,
lightning), or any other external factor.
NVIDIA IS NOT RESPONSIBLE FOR DAMAGE TO OR LOSS OF ANY PROGRAMS, DATA, OR REMOVABLE STORAGE
This NVIDIA limited warranty covers your NVIDIA G-SYNC™ hardware product, along with any accessories
MEDIA. NVIDIA IS NOT RESPONSIBLE FOR THE RESTORATION OR REINSTALLATION OF ANY PROGRAMS OR
received with the hardware product (“Warranted Product”) under normal use conditions for manufacturing
DATA OTHER THAN SOFTWARE INSTALLED BY NVIDIA WHEN THE PRODUCT IS MANUFACTURED.
defects or hardware component failures in your Warranted Product that is still within warranty. Accessories
sold separately are covered by the applicable warranty accompanying the accessory. This warranty is for
Before returning any Warranted Product for service, it is recommended that you back up data and remove any
the original owner only and is therefore non-transferable, non-assignable and is voided when the Warranted
confidential, proprietary, or personal information.
Product is transferred to another party.
WHAT TO DO IF YOU HAVE A PROBLEM?
This warranty gives you specific legal rights and is only valid in the United States and Canada. You may also have
If you are experiencing a problem, or if you believe that your product is defective, please contact the NVIDIA
other rights which vary from state to state or province to province.
Customer Care team. We will help you troubleshoot your issue and process a replacement if it is found to be
This warranty applies to consumers only. Other parties, including but not limited to system builders, installers
and integrators, should refer to the NVIDIA sales terms and conditions for warranty information.
NOTE: THIS AGREEMENT CONTAINS A BINDING INDIVIDUAL ARBITRATION AND CLASS ACTION/JURY TRIAL WAIVER
PROVISION THAT AFFECTS YOUR RIGHTS UNDER THIS AGREEMENT. YOU HAVE THE RIGHT TO OPT OUT OF THE
defective. NVIDIA Customer Care can be reached here, where you can search our knowledgebase for solutions
to common problems or interact with our staff via the “Ask a Question“ or “Live Chat“ tabs: www.nvidia.com/
nvcc.
LIMITATIONS OF WARRANTY
BINDING ARBITRATION AND CLASS ACTION WAIVER PROVISIONS AS DESCRIBED HEREIN.
This limited warranty applies only to the original purchases of the Warranted Products from a retailer, mail
FOR HOW LONG?
Product on a used basis.
This NVIDIA warranty applies for one (1) year from the date of purchase of your new Warranted Product
(“Warranty Period”).
WHAT WILL NVIDIA DO?
NVIDIA will repair, or if repair is not reasonably possible, replace your defective Warranted Product.
Replacement partsand/or products may include new or refurbished parts or products and are warranted only
until the expiration of the original Warranty Period.
WHAT DOES THIS WARRANTY NOT COVER?
NVIDIA does not guarantee that the operation of the Warranted Product will be uninterrupted or error free.
NVIDIA is not responsible for any interoperability or compatibility issues that may arise when (a) products,
order operation, or on-line retail store; this warranty will not extend to any person that acquires a Warranted
Your exclusive remedy, and NVIDIA‘s sole obligation and liability with respect to any defective product, is limited
to the repair or replacement of such product as described in this warranty. NVIDIA may, at its sole discretion,
use new or refurbished parts or units to meet the conditions of the warranty.
DISCLAIMER OF WARRANTY
EXCEPT AS EXPRESSLY PROVIDED HEREIN AND TO THE MAXIMUM EXTENT PERMITTED BY APPLICABLE
LAW, NVIDIA DISCLAIMS ALL OTHER WARRANTIES WITH RESPECT TO THE PRODUCT, WHETHER EXPRESS,
IMPLIED, STATUTORY OR OTHERWISE, INCLUDING WITHOUT LIMITATION, SATISFACTORY QUALITY, COURSE
OF DEALING, TRADE USAGE OR PRACTICE OR THE WARRANTIES OF MERCHANTABILITY, FITNESS FOR A
PARTICULAR PURPOSE, TITLE, OR NON-INFRINGEMENT OF THIRD PARTY RIGHTS.
software, or options not supported by NVIDIA are used; (b) configurations not supported, provided or approved
FEDERAL LAW, SOME STATES, PROVINCES AND OTHER JURISDICTIONS DO NOT ALLOW EXCLUSIONS OF
by NVIDIA are used; (c) parts intended for one system are installed in another system of different make or model.
CERTAIN IMPLIED WARRANTIES. SOME STATES, PROVINCES AND OTHER JURISDICTIONS DO NOT ALLOW
NVIDIA will have no warranty obligation with respect to the following: (a) Warranted Product hardware that has
LIMITATIONS ON HOW LONG AN IMPLIED WARRANTY LASTS, SO SOME OF THE ABOVE LIMITATIONS MAY NOT
no defects in materials or workmanship, (b) software, games or applications, (c) cosmetic damage; (d) normal
APPLY TO YOU.
wear and tear; (e) expendable or consumable parts; (f) defects or damage to the Warranted Product arising from
or related to: (1) any modifications, alterations, tampering, repair, or servicing by any party other than NVIDIA
LIMITATION OF LIABILITY
or its authorized representatives; (2) handling, transit, storage, installation, testing, maintenance, or use not in
IN NO EVENT SHALL NVIDIA BE LIABLE FOR INDIRECT, INCIDENTAL, SPECIAL, EXEMPLARY, PUNITIVE,
accordance with the Warranted Product documentation; (3) abuse, negligence, neglect, accidents, or misuse;
OR CONSEQUENTIAL DAMAGES OF ANY NATURE INCLUDING, BUT NOT LIMITED TO, LOSS OF PROFITS,
(4) third party software or viruses; or software loss or data loss that may occur during repair or replacement;
DATA, REVENUE, PRODUCTION, OR USE, BUSINESS INTERRUPTION, OR PROCUREMENT OF SUBSTITUTE
G-SYNC INSTALLATION GUIDE VER. 2.0 | Page 30
G-SYNC INSTALLATION GUIDE VER. 2.0 | Page 31
GOODS OR SERVICES ARISING OUT OF OR IN CONNECTION WITH THIS LIMITED WARRANTY, OR THE USE OR
and will require you to pay an initial filing fee of $250.00 (unless you successfully apply for a waiver of this fee
PERFORMANCE OF ANY PRODUCT, WHETHER BASED ON CONTRACT OR TORT, INCLUDING NEGLIGENCE, OR
from JAMS). All other JAMS costs associated with the arbitration will be borne by NVIDIA. The arbitration will
ANY OTHER LEGAL THEORY, EVEN IF NVIDIA HAS BEEN ADVISED OF THE POSSIBILITY OF SUCH DAMAGES.
be conducted in Santa Clara County, California (or the nearest JAMS Office to Santa Clara County), unless you
NVIDIA‘S TOTAL AGGREGATE LIABILITY FOR DAMAGES OF ANY NATURE, REGARDLESS OF FORM OF ACTION,
request an in-person hearing where you live or you and NVIDIA agree otherwise. The award rendered by the
SHALL IN NO EVENT EXCEED THE AMOUNT PAID BY YOU TO NVIDIA FOR THE PRODUCT UPON WHICH
arbitrator may include your costs of arbitration, your reasonable attorneys’ fees and your reasonable costs for
LIABILITY IS BASED. SOME STATES AND JURISDICTIONS DO NOT ALLOW FOR THE EXCLUSION OR LIMITATION
expert and other witnesses, and any judgment on the award rendered by the arbitrator may be entered in any
OF INCIDENTAL OR CONSEQUENTIAL DAMAGES, SO THIS LIMITATION AND EXCLUSION MAY NOT APPLY TO YOU.
court of competent jurisdiction. Further, in the event that the arbitrator makes an award in your favor greater
WITHOUT LIMITING THE GENERALITY OF THE ABOVE DISCLAIMERS, NVIDIA DOES NOT WARRANT ANY
SOFTWARE PRODUCTS UNDER THESE TERMS AND CONDITIONS. WARRANTIES, IF ANY, FOR SOFTWARE ARE
CONTAINED IN THE APPLICABLE LICENSE AGREEMENT WHICH ACCOMPANIES THE WARRANTED PRODUCTS.
NVIDIA RESERVES THE RIGHT TO UNILATERALLY CHANGE ITS WARRANTIES AT ANY TIME, IN ITS SOLE
DISCRETION WITHOUT PRIOR NOTICE. IF MATERIAL CHANGES ARE MADE THEY WILL BE POSTED AT WWW.
NVIDIA.COM/WARRANTY. YOUR CONTINUED USE OF THE WARRANTED PRODUCT WILL SIGNIFY YOUR
ACCEPTANCE OF THESE CHANGES. IF YOU DO NOT ACCEPT MATERIAL CHANGES TO THE AGREEMENT,
CONTACT NVIDIA TO TERMINATE THIS AGREEMENT AND ANY CORRESPONDING ACCOUNT(S).
GOVERNING LAW AND YOUR RIGHTS
This warranty gives you specific legal rights. You may also have other rights which vary from state to state, and
jurisdiction to jurisdiction. You hereby agree to all terms of this warranty in the English language. The United
Nations Convention on Contracts for the International Sale of Goods does not apply to this warranty and is strictly
excluded. This warranty and all disputes that may arise from it arise out of the sale of a product in interstate
commerce and shall be governed by the Federal Arbitration Act, in addition to the internal substantive laws
than NVIDIA’s last written offer, NVIDIA will pay you the greater of the award or $500, plus your reasonable
attorney’s fees, if any, and reimburse any reasonable expenses (including reasonable expert witness fees
and costs) that are reasonably accrued for investigating, preparing, and pursuing your claim in arbitration,
as determined by the arbitrator or agreed to by you and NVIDIA. Nothing in this Section shall prevent either
party from seeking injunctive or other equitable relief from the courts as necessary to prevent the actual or
threatened infringement, misappropriation, or violation of that party’s data security, Intellectual Property
Rights, or other proprietary rights. You may sue under state law in a small claims court of competent jurisdiction
without first engaging in arbitration, but you must engage in arbitration before suing under the Federal
Magnuson-Moss Act.
Class Action & Jury Trial Waiver. ALL CLAIMS MUST BE BROUGHT IN THE PARTIES’ INDIVIDUAL CAPACITY,
AND NOT AS A PLAINTIFF OR CLASS MEMBER IN ANY PURPORTED CLASS OR REPRESENTATIVE
PROCEEDING. THIS WAIVER APPLIES TO CLASS ARBITRATION UNLESS SUCH ARBITRATION IS NECESSARY
TO EFFECTUATE THE ENFORCEMENT OF THE COURT CLASS ACTION WAIVER OR IN THE EVENT THAT CLASS
ARBITRATION IS EXPRESSLY AGREED TO BY NVIDIA. YOU AGREE THAT, BY ENTERING INTO THIS AGREEMENT,
YOU AND NVIDIA ARE EACH WAIVING THE RIGHT TO A TRIAL BY JURY OR TO PARTICIPATE IN A CLASS ACTION.
of the State of California, without respect to its conflict of laws principles. You agree to submit to the personal
Right to Opt Out. YOU MAY OPT OUT OF THE FOREGOING ARBITRATION AND CLASS ACTION/JURY TRIAL
jurisdiction of the federal and state courts located in Santa Clara County, California for any actions for which
WAIVER PROVISION OF THIS AGREEMENT BY NOTIFYING NVIDIA IN WRITING WITHIN 30 DAYS OF PURCHASE.
we retain the right to seek injunctive or other equitable relief in a court of competent jurisdiction to prevent the
SUCH WRITTEN NOTIFICATION MUST BE SENT TO ATTN: SHIELD-LEGAL, 2701 SAN TOMAS EXPRESSWAY,
actual or threatened infringement, misappropriation or violation of a our copyrights, trademarks, trade secrets,
SANTA CLARA, CALIFORNIA, 95050 AND MUST INCLUDE (1) YOUR NAME, (2) YOUR ADDRESS, (3) YOUR
patents, or other intellectual property or proprietary rights, as set forth in the Arbitration provision below.
WARRANTED PRODUCT’S SERIAL AND PART NUMBER, AND (4) A CLEAR STATEMENT INDICATING THAT YOU
BINDING ARBITRATION AND CLASS ACTION/JURY TRIAL WAIVER
Arbitration. For any dispute with NVIDIA, you agree to first contact us by U.S. Mail at NVIDIA Corporation, ATTN:
SHIELD-Legal, 2701 San Tomas Expressway, Santa Clara, California, 95050 and attempt to resolve the dispute
with us informally by providing your name, address and contact information and describing the nature of the
dispute. In the unlikely event that NVIDIA has not been able to resolve a dispute it has with you within 60 days
of your original informal claim (or sooner if, in NVIDIA’s opinion, a dispute is not likely to be resolved within 60
days), we each agree to resolve any claim, dispute, or controversy (excluding any NVIDIA claims for injunctive or
other equitable relief) arising out of or in connection with or relating to this Agreement, or the breach or alleged
breach thereof (collectively, “Claims”), by binding arbitration before an arbitrator from Judicial Mediation and
Arbitration Services (“JAMS”) located in Santa Clara County, California under the Optional Expedited Arbitration
Procedures then in effect for JAMS, except as provided herein. JAMS may be contacted at www.jamsadr.com
G-SYNC INSTALLATION GUIDE VER. 2.0 | Page 32
DO NOT WISH TO RESOLVE DISPUTES THROUGH ARBITRATION AND DEMONSTRATING COMPLIANCE WITH
THE 30 DAY TIME LIMIT TO OPT OUT.
Severability. If any clause herein is found to be illegal or unenforceable, that clause will be severed from this
agreement and the remainder of the agreement will be given full force and effect. As noted above, if a class
action waiver of both court and arbitration class actions is found unenforceable, class arbitration will be
expressly allowed under the agreement.
FCC COMPLIANCE STATEMENT
This device complies with Part 15 of the FCC Rules. Operation is subject to the following two conditions: (1) this
device may not cause harmful interference, and (2) this device must accept any interference received, including
interference that may cause undesired operation.
G-SYNC INSTALLATION GUIDE VER. 2.0 | Page 33
This equipment has been tested and found to comply with the limits for a Class B digital device, pursuant
to Part 15 of the FCC Rules. These limits are designed to provide reasonable protection against harmful
interference in a residential installation. This equipment generates, uses and can radiate radio frequency energy
and, if not installed and used in accordance with the instructions, may cause harmful interference to radio
communications. However, there is no guarantee that interference will not occur in a particular installation. If
this equipment does cause harmful interference to radio or television reception, which can be determined by
turning the equipment off and on, the user is encouraged to try to correct the interference by one or more of the
following measures:
> Reorient or relocate the receiving antenna.
> Increase the separation between the equipment and receiver.
> Connect the equipment into an outlet on a circuit different from that to which the receiver is connected.
> Consult the dealer or an experienced radio/TV technician for help.
G-SYNC INSTALLATION GUIDE VER. 2.0 | Page 34
176-0171-000
176-0171-000
www.nvidia.com
© 2014 NVIDIA Corporation. All rights reserved.