1
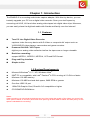
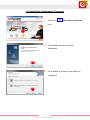
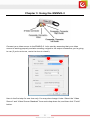
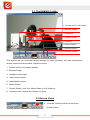
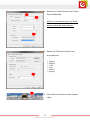
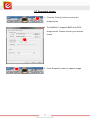
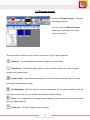
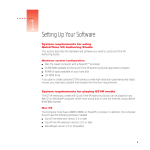
© 2011 Encore Electronics, Inc. All rights reserved.COVER © 2012 Encore Electronics, Inc. Product specifications, size, and shape are subject to change without notice, and actual product appearance may differ from that depicted herein. All trademarks and brand names are the properties of their respective holders. TABLE OF CONTENTS CHAPTER 1: INTRODUCTION ........................................................................... 2 1.1 FEATURES ........................................................................................................ 2 1.2 SYSTEM REQUIREMENTS .................................................................................. 2 1.3 SPECIFICATIONS ............................................................................................... 3 1.4 PACKAGE CONTENTS ........................................................................................ 3 1.5 CONNECTION DIAGRAM ................................................................................... 3 CHAPTER 2: GETTING STARTED ..................................................................... 3 2.1 DEVICE DRIVER INSTALLATION ........................................................................ 4 2.2 INSTALL THE APPLICATION PROGRAM .............................................................. 6 CHAPTER 3: USING THE ENMVG-3 ................................................................. 8 3.1 THE ENMVG-3 UTILITY .................................................................................. 9 3.2 RECORD VIDEO ................................................................................................ 9 3.3 SNAPSHOT IMAGE .......................................................................................... 11 3.4 PLAYBACK VIDEO .......................................................................................... 12 3.5 BROWSE IMAGE ............................................................................................. 14 CHAPTER 4: TECHNICAL SUPPORT ............................................................. 16 APPENDIX A: USER’S NOTICE ........................................................................ 16 Product specifications, size, and shape are subject to change without notice, and actual product appearance may differ from that depicted herein. All trademarks and brand names are the properties of their respective holders. © 2012 Encore Electronics, Inc. All rights reserved. 1 www.encore-usa.com Chapter 1: Introduction The ENMVG-3 is an analog audio/video capture adapter. With this tiny device, you can instantly upgrade your PC into a digital video recorder. Save your shelf space by converting old VHS, Hi-8 and other analog video tapes into digital video clips. Moreover, you can easily share the digitized media with friends and family over the Internet! 1.1 Features Turn PC into Digital Video Recorder: captures video from any device with S-Video or composite AV output such as VHS/Hi8/DVD video players, camcorders and game consoles Preserve Old VHS / Hi-8 Tapes: digitize your analog video collection before the tapes are no longer viewable Real-time recording: support MPEG-1, MPEG-2, MPEG-4, VCD and DVD format. Plug and Play interface Simple to Use 1.2 System Requirements ® Microsoft Windows 8 / 7 / XP; Windows Vista® IBM® PC or compatible, with Intel® Pentium® 4 CPU running at 2.0 GHz or faster Minimum 128 MB memory Minimum 100 MB free hard disk space, 5400 RPM or greater One free USB 2.0 port 1024x768 Graphic Card, DirectX® 9.0 compatible or higher CD-ROM/DVD-ROM drive Notes: Video recording can use several gigabytes an hour (the higher the quality of the video you record, the more space it takes on the disc) so a hard drive spinning at 5400 RPM or faster and with plenty of free space is advisable for recording. 2 www.encore-usa.com 1.3 Specifications Device Interface USB 2.0, backward compatible with USB 1.x Dimension 93 x 30 x 15 mm (excluding cables) Video Signal Format NTSC and PAL Input Composite RCA and S-Video Resolution NTSC — 720x480, 352x480, 352x240 AD Converter 10-bit Analog-to-Digital Converter File Format MPEG-1(VCD), MPEG-2 (DVD) and MPEG-4 (XVID)** PAL — 720x576, 352x576, 352x288 Audio Audio Channel Stereo Input L/R RCA Sample Rate 48KHz Audio Data Rate 224k bit/second ** MPEG4 format only provide Full D1 and SIF resolution. 1.4 Package Contents ENMVG-3 Installation CD User manual USB extension cable 1.5 Connection Diagram 3 www.encore-usa.com Chapter 2: Getting Started 2.1 Device Driver Installation 1. Insert the installation CD into the CD-ROM drive. The setup screen should automatically appear. 2. Click the ” Software Driver” icon. 3. Wait Installation Wizard copying necessary driver files onto your system. 4. Click “Finish” button to complete installation. 4 www.encore-usa.com 5. Connect the ENMVG-3 to PC USB Hub. 6. 7. The system will detect new driver. To examine if this device is properly installed, you can go to “Device Manager” in Windows®. 8. Open “Sound, video and game controllers” and you should see” USB Video Capture Device” now. 5 www.encore-usa.com 2.2 Install the Application Program 1. Click the ” Application Program” icon. 2. Click “Next” button to start the Installation. 3. Click “Next” or choose setup folder for installation. 6 www.encore-usa.com 4. Click “install” button to begin installation. 5. Click “Finish” button to close the wizard. 7 www.encore-usa.com Chapter 3: Using the ENMVG-3 Connect your video source to the ENMVG-3. Let’s start by assuming that your video source is working properly and also sending a signal to the output connectors you’re going to use (if you're not sure, now’s the time to check!). Here is the first step for one time only. You may also change it later. Select the “Video Source” and “Video Source Standard” from each drop-down list, and then click “Finish” button. 8 www.encore-usa.com 3.1 The ENMVG-3 utility 1. Double click to full screen 2. Browse Image 3. Snapshot 4. Video Format 5. Record 6. Movie Player 7.Source Switch 8.Volume Control This section lets you view and edit the settings for video recording. You may use both the remote control and the toolbar. Options include: 1. Double click to full screen display. 2. Browse Image 3. Snapshot still image 4. Video format select. 5. Video/Audio record 6. Movie Player 7. Source Switch: click it to select Video In or S-Video In. 8. Volume control: Adjust the Volume or mute. 3.2 Record Video 1. Click the “Setting” button to setup the record format. 9 www.encore-usa.com 2. Select the “Video Source” and “Video Source Standard”. Notes: If you cannot hear any audio, please check the audio device. 3. Select the “Record Format” from drop-down list: • • • • • Mpeg-1 Mpeg-2 VCD DVD HiDVD • Mpeg-4 4. Click “Record” button to start capture video. 10 www.encore-usa.com 3.3 Snapshot Image 1. Click the “Setting” button to setup the image format. 2. The ENMVG-3 supports BMP and JPEG image format. Please choose your desired format. 3. Click ‘Snapshot’ button to capture image 11 www.encore-usa.com 3.4 Playback Video 1. Click the “Playback” button to Play the recording Video. 2. Click “Play List” button to select video file. 3. Choose the video then click “open” button. Exit:To exit the video playback window, press [Esc] or [ALT]+[F4] on keyboard Minimize:To minimize the video playback window; click "MoviePlayer" in desktop taskbar to restore display Hide Control Panel:To hide video control panel, right click video window and select "Control Panel" to restore display Setting:Click to pop-up setting dialog, you can test the video playback; refer to "Playback Setting" page. 12 www.encore-usa.com Browse Image:To launch image browse window and browse the snapshot or saved image in your computer, refer to "Image Browse" page Step Backward:To reverse play video Step Forward:To step forward play video Slow Backward:To slow reverse play video Slow Forward:To slow forward play video file Play:Click to play the current video file Pause:click again to pause, click once more to continue play Fast Forward:To fast forward play video file Fast Backward:To fast reverse play video file Volume Adjust:Drag the slider to adjust volume, or use Left and Right arrow on keyboard Mute:To close sound. Click again to restore Stop Play:Stop playing current video file Snapshot:Save current video as BMP or JPG image File is default named as snapshot time and saved into C:\My Pictures folder. You also can open "Snap Setting" option in "Options" dialog, set snapshot save directory, image format, and select rename after snapshot or not, refer to "Playback Setting" page Play List:Click to pop-up sub panel below main panel, the default list for the record file is under the record directory, from which you can select the needed item to play. 13 www.encore-usa.com 3.5 Browse Image Click the “Browse Image” to retrieve the saved pictures. You can use the “Browse Image” software to control picture zoom in/out, or rename. The top toolbar contains many function buttons for you to easily operate: Refresh:To renew display snapshot image in current folder Path Panel:Show/Hide path panel on left of window, which is for you to easily browse and select folder Image Panel:Show/Hide image panel on left of window, through which you can easily preview snapshot image Set Wallpaper:Set the current image as wallpaper for Windows desktop, click the right drop arrow and you can select the wallpaper display mode Skin:To set appearance of image browse window, you can select your favorite panel from the right drop box Zoom out:To shrink display current image 14 www.encore-usa.com Zoom in:To magnify current image Match Zoom:You can select the matched display mode in the right drop box Full Size: Shows image at 100% magnification Fit Image: Magnifies image to fit screen or window Fit Width: Magnifies image to fit width of screen or window Fit Height: Magnifies image to fit height of screen or window Lock: Locks the viewer at the current magnifying level. 15 www.encore-usa.com Chapter 4: Technical Support Please visit www.encore-usa.com for the latest product information and downloads. Appendix A: User’s Notice This manual is provided “as is” without warranty of any kind, either express or implied, including but not limited to the implied warranties or conditions of merchantability or fitness for a particular purpose. In no event shall we, its directors, officers, employees or agents be liable for any indirect, special, incidental, or consequential damages (including damages for loss of profits, loss of business, loss of use or data, interruption of business), even if we have been advised of the possibility of such damages arising from any defect or error in this manual or product. Specifications and information contained in this manual are furnished for information use only, and are subject to change at any time without notice, and should not be construed as a commitment by us. We assume no responsibility or liability for any errors or inaccuracies that may appear in this manual, including the products and software described in it. No part of this manual, including the products and software described in it, may be reproduced, transmitted, transcribed, stored in a retrieval system, or translated into any language in any form or by any means, except documentation kept by the purchaser for backup purposes, without the express written permission of us. Product warranty or service will not be extended if: (1) the product is repaired, modified or altered, unless such repair, modification of alteration is authorized in writing by us; or (2) the serial number of the product is defaced or missing. Products and corporate names appearing in this manual may or may not be registered trademarks or copyrights of their respective companies, and are used only for identification or explanation and to the owners’ benefit, without intent to infringe. Windows, MS-DOS, and DirectX are registered trademarks of Microsoft Corporation. Adobe and Acrobat are registered trademarks of Adobe Systems Incorporated. The product name and revision number are both printed on the product itself. Manual revisions are released for each product design represented by the digit before and after the period of the manual revision number. Manual updates are represented by the third digit in the manual revision number. 16 www.encore-usa.com