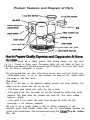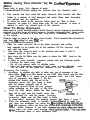
1
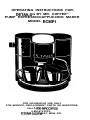
OPERATING INSTRUCTIONS FOR,
DETAILSTM BY MR. COFFEE”
PUMP ESPRESSO/CAPPUCCINO MAKER
MODEL ECMPl
FOR HOUSEHOLD USE ONLY
FOR SERVICE, REPLACEMENT PARTS OR QUESTIONS,
CALL 1-600~MRCOFFEE
(l-800-672-6333)
6:30AM-5:OOPM
EST, MON.-FRI.
IMPORTANT SAFEGUARDS
When using electrical
appliances, basic safety precautions should always be
followed to reduce the risk of fire, electric shock,
and / or injury to persons
including the following:
1. Read all instructions before using the machine.
2 . Do not touch hot surfaces. Use handles or knobs.
3. To protect against electric shock, do not immerse cord, plugs, or
machine in water or other liquid.
4. This product is not recommended for use by children.
5. Turn control switch to OFF and unplug from outlet when not in use
and before cleaning. Allow lo cool before putting on or taking off
parts and before cleaning the machine.
6 . Do not operate any appliance with a damaged cord or plug or after
the appliance malfunctions,
or has been damaged in any manner.
Return this appliance only to the nearest authorized service center
for repair.
7. The use of accessory attachments not recommended by MR.
COFFEE, may cause hazards or injuries.
8 . Do not use outdoors.
9 . Do not let cord hang over edge of table or counter, or touch hot surlaces.
10. Do not place this appliance on or near a hot gas or electric burner or
in a heated oven.
11. To disconnect, turn any control to OFF, then remove plug from wall
outlet.
12. Do not use appliance for other than intended use.
13. Use on a hard, flat level surface only, to avoid interruption 01 air flow
undernealh the appliance.
14. WARNING: To reduce the risk of fire or electric shock, do not remove
any service covers. No user serviceable parts inside. Repair
should be done by authorized
personnel only.
SAVE THESE INSTRUCTIONS
2
SPECIAL CORD SET INSTRUCTIONS
2.
3.
A short power supply cord Is provided to reduce the hazards resulting
from becoming entangled In or tripping over-a longer cord.
An extenslon cord may be purchased and used If care Is exercised In
its use.
If an extension cord Is used, the marked electrical rating of the extension cord must be at least 10 amps and 120 volts. The resulting
extended cord must be arranged so that it will not drape over the
counter top or table top where it can be pulled on by children or
tripped over accidentally.
Note:
This appliance has a polarized plug (one blade Is larger than the
other). As a safety feature, this plug will fit in a polarized outlet
only one way. If the plug does not fully fit in the outlet, reverse
the plug. If lt still does not fit, contact a qualified electrlclan. Do
not attempt to defeat this safety feature.
CAUTION:
1) Do not remove the filter holder at any tlme durlng
the brewlng process.
2) Do not let the pump run wlth an empty water contalner.
Thls can damage the pump permanently.
3) Use caution when removing the filter holder from the
brew head. The metal parts may still be very hot. Also,
there may be hot water floating on the top of the filter
basket.
4) WHEN USING OR CLEANING THE FROTHING TUBE:
Place a frothlng pitcher or large cup (with a 16 ounce
cspaclty) half full of water or milk under the frothlng tube.
Make sure the tip of the frothlng tube Is submerged In
liquid before turning on the steam selector control knob.
3
Introduction
Congratulalionsl You are the owner of a Defeilsu by Mr. Coffee model
ECMPl pump espresso/cappuccino maker. This unique appliance has
been designed to provide you with delicious restaurant quality
espresso/cappuccino quickly and conveniently.
Espresso is a unique method of coffee brewing in which hot waler is forced
through finely ground coffee. Popular in Europe, it is a far richer and more
full-bodied brew than regular American coffee. Because of its richness,
espresso is usually served In 1 -l/2 to 2 oz. portions, in demitasse cups.
Most espresso drinkers outside of Europe prefer cappuccino, a drink made
of about one third espresso, one third hot milk, and one third foam.
Preparing espresso or cappuccino is very different from brewing regular drip
coffee. To ensure your safely and the long fife of this appliance, please read
all instructions, cautions, notes, and attentions.
Table of Contents
Page #
Important Safeguards . . . . . . . . . . . . . . . . . . . . . . . . . . . . . . . . . . . . . . . . . . . . . . . . . . . . . . . . . . . . . . . . . . . . . . . . . . . . . . . . . . . . . 2
Special Cord Set Instructions . . . . . . . . . . . . . . . . . . . . . . . . . . . . . . . . . . . . . . . . . . . . . . . . . . . . . . . . . . . . . . . . . . . . . . . . . 3
3
Caution . . . . . . . . . . . . . . . . . . . . . . . . . . . . . . . . . . . . . . . . . . . . . . . . . . . . . . . . . . . . . . . . . . . . . . . . . . . . . . . . . . . . . . . . . . . . . . . . . . . . . . . . . . .
............... 4
Introduction . . . . . . . . . . . . . ,.......................................................................
Product Features and Diagram of Parts . . . . . . . . . . . . . . . . . . . . . . . . . . . . . . . . . . . . . . . . . . . . . . . . . . . . . . . . . 5
How lo Prepare Espresso . . . . . . . . . . . . . . . . . . . . . . . . . . . . . . . . . . . . . . . . . . . . . . . . . . . . . . . . . . . . . . . . . . . . . . . . . . . . . . 5
... 6
Before Using Your Espresso Maker . . . . . . . . . . . . . . . . . . . . . . . . . . . . . . . . . . . . . . . . . . . . . . . . . . . . . .
6-7
How lo Brew Espresso . . . . . . . . . . . . . . . . . . . . . . . . . . . . . . . . . . . . . . . . . . . . . . . . . . . . . . . . . . . . . . . . . . . . . . . . . . . .
How to Make Cappuccino . . . . . . . . . . . . . . . . . . . . . . . . . . . . . . . . . . . . . . . . . . . . . . . . . . . . . . . . . . . . . . . . . . . . . . . . . . 7-8
I
8-9
Problems and Causes . . . . . . . . . . . . . . . . . . . . . . . . . . . . . . . . . . . . . . . . . . . . . . . . . . . . . . . . . . . . . . . . . . . . . . . . . . . . . .
9
If Service is Required . . . . . . . . . . . . . . . . . . . . . . . . . . . . . . . . . . . . . . . . . . . . . . . . . . . . . . . . . . . . . . . . . . . . . . . . . . . . . .
.
.
.
.
.
.
.
.
.
.
.
.
.
.
.
.
10
Cleaning Your Espresso/Cappuccino Maker . . . . . . . . . . . . . . . . . . . . . . . . . . . . . . . .
Additlonal Helpful Hints . . . . . . . . . . . . . . . . . . . . . . . . . . . . . . . . . . . . . . . . . . . . . . . . . . . . . . . . . . . . . . . . . . . . . . . . . . . . . . . . . 11
Deliming . . . . . . . . . . . . . . . . . . . . . . . . . . . . . . . . . . . . . . . . . . . . . . . . . . . . . . . . . . . . . . . . . . . . . . . . . . . . . . . . . . . . . . . . . . . . . . . . . . . . . . . 11
Recipes . . . . . . . . . . . . . . . . . . . . . . . . . . . . . . . . . . . . . . . . . . . . . . . . . . . . . . . . . . . . . . . . . . . . . . . . . . . . . . . . . . . . . . . . . . . . . . . . . . . . . . . . 12
Limited Warranty . . . . . . . . . . . . . . . . . . . . . . . . . . . . . . . . . . . . . . . . . . . . . . . . . . . . . . . . . . . . . . . . . . . . . . . . . . . . . . . . . . . . . . . . . . 12
..
4
Product Features and Diagram of Parts
waler reservoir lid
removable drip grate
The coffee should be a freshly ground, dark roasted variety. You may want
to try a French or Italian roast. Pre-ground coffee will only retain its flavor for
7-8 days, provided It is stored in an air tight container, in a cool, dark area.
Do not store in refrigerator or freezer.
We recommend that you start with whole beans, and grind just before use.
Coffee beans stored in an air tight container will keep up to 4 weeks before
they begin to lose their flavor.
The Grind
This is a vital step in the espresso making process and takes practice. The
coffee must be ground fine, but not too fine.
l
The correct grind should look gritty, like salt or sand.
l If the grind is too
fine, the water wiii not flow through the coffee even under
pressure. This grind looks like powder and feels like flour when rubbed
between fingers.
l if the grind is too coarse‘, the water flows through the coffee too fast,
preventing a full flavored extraction.
Be sure to use a quality grinder or mill for uniform consistency in your
espresso grind. Oval shaped coffee mills are not recommended because the
grind is not consistent. We recommend using the D&i/s” by Mr. Coffee’
Burr Mill.
5
Before Using Your Details” by Mr. Coffee@’ Espmsso
Maker
Please refer to page 5 for diagram of parts.
1. Turntheon/off switch Off and unplug the machine from the electrical outlet
2.
3.
First remove and then wash the water reservoir, filter baskets and filter
holder in a mixture of mild detergent and waler. Rinse each thoroughly
and replace into the machine.
To clean the inside of the machine, follow steps for “How to Brew
Espresso” on pages 6-7, using water only. Do not immerse in water or
attempt to reach any internal parts of the machine.
How To Brew Espresso
Espresso is a full bodied coffee drink. Every cup’of espresso should be
crowned by a thin layer of light cinnamon brown, extremely fine foam called
"crema". Crema IS the mark of a truly fine cup, and is a testament to the skill
of the brewer.
Please refer to page 5 for dia ram of parts. First unwind the electrical
cord from the bottom of your mat i n e .
Filling the Water Reservoir...
1 . Open the water reservoir lid of the water reservoir, and pull the
lank upwards by its handle out of the machine. Fill the reservoir only
with cold tap water.
2 . Then place the reservoir back in the machine and press it until it
engages firmly in the base.
3 . Now close the lid. Make sure the water is above the “MIN’ level on the
filling indicator.
4 . In order to make aromatic espresso, please note the following points:
l C h a n ge the water every day!
l
Do no use mineral water or distilled water.
l
Clean the fresh water reservoir at least once a week. Wash the reservoir by hand. Do not place the reservoir in the dishwasher.
Preparing the Coffee...
1 . .According to whether you wish to make one. cup of espresso or two,
place either the 1 -cup filler basket or the 2-CUP filter basket into the filler
older (l=for one l- /2, ounce cup of espresso; 2=for two l-1/2 ounce
cups of espresso). See figuure 1. Fill the
desired filter basket with the aid of the
measuring spoon and then press it down
with the tamper (opposite end of the
measuring spoon). Wipe off any ground
coffee remaining on the edge of the filter.
2 . Insert the filter holder: Rotate the filter holder
from left to right until the handle asses the
FIGURE 1
“MIN’ position (i.e. with the handle pointing
forwards) . Make sure the filter holder is firmly
in place b efore beginning the brewing process. See flgure 2 page 7.
wish to make one
3 . Place the demitasse cup(s) in position: If
cup, align one demitasse cup under the fi
thal the espresso coffee can flow into it
basket holder. However, if you wish to
lasse cups, one under each opening of
is a convenient place lo store additional cups.
6
.
’
Brewing Espresso...
1.1. Switch ON the main ON/OFF switch. To do so, flick the main ON/OFF
switch upwards. The on light and brew ready light will be illuminated.
This indicates that the machine is warming up. The brew ready light will
go out as soon as the proper operating
FIGURE 2
temperature has been reached. See figure 3.
2. S t a r t brewing- switch on the brew switch:
When you start the brewing cycle, the heated
water is forced through the espresso ground
coffee at a high internal pressure. When the
brew ready light has gone out you can start the
brewing process by flipping the brew switch
upwards.. When the demitasse cup(s) are about
half full (about l-1/2 ounces) press the brew
switch to the OFF "O" position. Turn the
ON/OFF switch OFF.
If you wish to make another cup of espresso, leave the ON/OFF Switch
FIGURE 3
ON. Remove the filter basket and holder. Push
the filter retainer clip against the filter basket
and dump out the used coffee grinds. Then proceed as described under “How to Brew
Espresso/Preparing the Coffee...“on page 6.
If you are making cappuccino leave the ON/OFF
switch ON to froth milk See below, “How to
Make Cappuccino".
NOTE:
Do not remove the filter holder at any time during the brewing process. Do not let the pump
run with an empty water container. This can
damage the pump permanently.
How to Make Cappuccino
Cappuccino is 1/3 espresso tapped with 1/3 steamed and 1/3 frothed milk.
Therefore, to make cappuccino, first froth and steam the milk. Then proceed
with espresso.
For best results, we recommend frothing the milk In a separate pitcher and
pouring the milk Into your coffee. The milk and pitcher should be. cold. Do
not use a pitcher which has just been washed with warm water.
CAUTION: The steam released from the frothing tube is HOT. Be sure it is
aimed into a container and the tip Is submerged into the liquid.
1.
To generate steam, first switch the machine ON with the main ON/OFF
switch and wait until operating temperature has been reached. The
brew ready light must go out.
7
2.
Then immerse the frothing tube into the milk. Start generating steal,. by
turning the steam selector control knob upwards. A 15-30 second delay
may occur.
FIGUR
Note:A little water will first escape from the frothing
w
tube. This will not harm the frothed milk In any way. A II ’
3. Immerse the frothing tube only about half way into
the liquid, so that the flow of air Is not hlndered.
The frothing tube should not be allowed to touch
the base of the container as this mlght restrict the
outflow of steam. Frothed milk will resemble a
whlpped cream texture. Sea flgun 4.
4. To stop the flow of steam, turn the steam control
knob downward back to the OFF position.
5. Afterwards, turn the frothing tube as far as it will go
to the left so that the last few drops of liquid can fall
into the drip grate.
Note: Frothing aid may shut off when you prepare froth for two cups of
capcappuccino. Just restart the machine by turning on the on/off
switch.
After steaming, the following steps are necessary:
1. Put the filter holder and filter basket (but without coffee) In the brew
head
Place an empty cup or frothing pitcher under the filter holder.
Turn the ON/OFF swith ON, until approximately 3 ounces of water flows
out of t he filter holder. Then tur n the ON/OFF switch OFF.
Remove filter holder. Make sure the steam selector control knob is
in the OFF position.
Problems and Causes
. ..the espresso temperature Is too low
l
Tamp the espresso ground coffee down a little more firmly.
l Pre-warm the cups by rinsing
them in warm water. (See page 11).
l Delime
the appliance.
. . the flow-through speed of the espresso falls off noticeably
l
Do not tamp the espresso ground coffee down so firmly.
l Delime
the appliance.
. .the espresso runs out at the side of the filter holder
l
Make sure the filter holder is fitted into the holding ring properly.
l
Tighten the filter holder a little more firmly into the holding ring.
l
Clean the espresso ground coffee off the edge of the filter holder.
l Clean the brew head. (See
page 10).
. ..espresso will not come out
l
Ensure that the water reservoir is full.
l
Ensure that the water reservoir is properly fitted into position.
l
Ensure that the filter holder is properly fitted into the holding ring.
.
Do not tamp the firmly1324 Tc0.48w 22.7504 3w 0.5 30 541.5 85 Tm481
Cleaning Your Espresso/Cappuccino Maker
Remove filter holder
First unplug the appliance power cord.
CAUTION: The metal parts of the filter holder might still be very hot.
Also there may be hot water floating on the top of the filter basket.
Remove the filer holder by rotating it to the left and taking it out of the brew
head. If you are not going to use the machine again for some time, do not
re-insert the filter holder; this will lengthen the service life of the filter seal.
Cleaning the filter and filter holder
Knock the used espresso ground coffee out of the filter, holding the filter
firmly to the filter holder by the filter retainer clip. Then clean the filter and
the filter basket under running water. Do not place your filter holder or filter
basket in the dishwasher.
Remove the remaining water from the fresh water reservoir.
Cleaning frothing tube
Clean the frothing nozzle, particularly after frothing milk. with a damp cloth.
If necessary. the frothing nozzle can be unscrewed in a counter-clockwise
direction u s e the end of the measuring spoon andaand
thenthen it can be cleaned.
The nozzle must be screwed on again in a
clockwise direction. Tighten
using reasonable
force with the end of the measuring spoon provided.
Cleaning the drip grate and drlp tray
The drip grate can be taken out for cleaning very easily with the aid of the
finger-shaped depression at the rear left-hand edge of the drip tray. The drip
tray can be taken out for cleaning by simply lifting it forward out of
machine base. The drip grate and drip tray should be washed by hand.
Cleaning the brew head
After it has been in use for some time, the brew head should be cleaned with
a damp cloth. If the brewing sieve (the underside of the brew head) Is particularly dirty it can be unscrewed from the brew head with the aid of a coin and
cleaned under running water.
Switch machine off
If the machine will not be used for some time it should be steamed out, so
that fresh water-is always available next time it is used. Place a container
half-full of water under the frothing tube and proceed as follows: Open the
steam selector control knob and let the steam out. If no more steam comes
out, close the steam selector control knob again. To switch the appliance
off, flip the ON/OFF switch downward. The brew ready light goes out.
10
Deliming
delime
service life of your automatic espresso machine will be lengthened if you
it regularly.
Your espresso maker may be delimed using white household vinegar. The
frequency
of deliming depends upon the hardness of the water used. The
following table gives the suggested cleaning intervals.
I
/
SUGGESTED CLEANING INTERVAL
Type of Water
Cleaning Frequency
Soft water
H a r d
every 80 brew cycles
every 40 brew cycles
w a t e r
When deliming, it is essential, first to unscrew the. brew sieve from the brew
head with the aid of a coin. (See page 10 “Cleaning the brew head”).
First fill about 18 ounces of vinegar into the water reservoir. Place a sufficiently large container in the middle
the vinegar to run through the
were making espresso. Switch the
gar to work in for 10 to 15 minutes, Then run the rest of it through the sys
tem. It may be necessary to repeat the deliming if the lime deposits are
heavy. After the last cycle. run one or two water reservoirs of fresh cold
: water through the system to prevent the vinegar from having any effects on
the flavor of the espresso. Then fit the brewing sieve back into the brewing
head. (see page 10 “Cleaning
the brew head”).
A D D I T I O N A L HELPFU L
H I N T S:
If the first cup of espresso is not hot enough for your taste, we recommend
that you proceed as follows:
the machine, wait until the yellow brawready tight turns off. Place a
u n d e r n e a t h the filter holder and pump approximately 1/2 cup of water
through the system. The yellow. brew ready light will go on again.
From now
on you will have. maximum temperature for espresso since all parts are prewarmed.
Filter holder:
Leave the filter holder (without filter) in the machine to, keep it warm.
Warm up espresso cups before using:
To prepare a perfect cup of espresso or cappuccino, warm up the demitasse
/ cups before brewing the espresso by rinsing them with warm water.
11
RECIPE IDEAS THAT YOU WILL LOVE TO TRY!
San Francisco Cappuccino
Cafe Tia Maria
espresso, hot steamed chocolate,
brandy, topped with whipped
cream and cinnamon
espresso, Tia Maria liqueur topped
with frothed milk
Cafe Irish
Cafe Grand Marnier
espresso, Grand Mamier liqueur,
espresso, Irish whiskey, topped
with whipped cream
topped with whipped cream and grated
orange peel
Cafe Tuaca
Mexican Cafe
espresso.Tuaca liqueur, topped
with whipped cream
espresso, Kahlua, tequila, topped
with whipped cream
Cafe Vienna
Cafe Romano
espresso, brandy, topped with
whipped cream
espresso, brandy and lemon twist
Limited Warranty
Mr. Coffee. warrants to the purchaser that the ECMP1 by Mr. Coffee, (except
for cord set) is free from manufacturer defects in material and workmanship for a
period of one year from the date of origlnal purchase when used in compliance with
directions as outlined in the manufacturer’s instructions, which will constitute reasonable and necessary maintenance by the purchaser.
In case of manufacturer defects in material or workmanship, Mr. Coffee,
agrees lo repair (remedy) a defective espresso/cappuccino maker without charge.
The purchaser’s exclusive remedy. against Mr. Coffee, inc. shall be for the repair or
replacemenl of a defective Mr. Coffee product.
All repairs must be made at an authorized Mr. Coffee Service Center. To locate
a Mr. Coffee Service Center, call l-800-MRCOFFEE (l-800-672-6333). As the purchaser, you assume all cost incurred in transporting your Mr. Coffee machine to and
from the authorized Mr. Coffee Service Center. Mr. Coffee, shall not be responsible
for any repairs performed al any facility which is not an authorized Mr. Coffee
Service Center.
This warranty gives you specific legal rights. and you may also have other
rights which vary from state to state. Any Implied warranty Is limited in duration to the
one year provided in this, the only, expressed warranty. Some states do not allow
limitations on how long an implied warranty lasts, so the above limitation may not
apply to you.
In no event shalt Mr. Coffee, be responslble for lncidental or consquen-
tia/ damages, nor damage due to misuse or the use of any unauthorized attachment; nor assumption of responsibility for damage caused by use of an electrical circuit not specified on the Mr. Coffee, product. Some states do not allow the exclusion
or limitation of incidental or consequential damages, so the above limtiation or exclusion may not apply to you.
Mr. Coffee, a Product of Sunbeam Corporation.
Boca Raton, Florida 33431
FORM 5600
R e v . 4
9 / 9 4