1
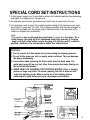
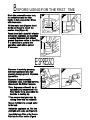
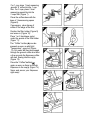
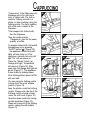
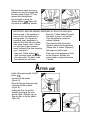
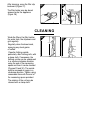
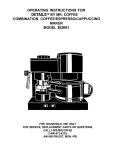
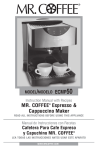
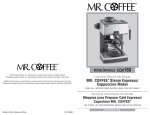
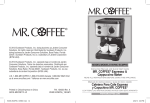
IMPORTANT SAFEGUARDS
When using electrical appliances, basic safet y precautions should always be followed
to reduce the risk of fire, electric shock, and/or Injury to persons, including the following:
1. Read all Instructions before using the machlne.
2. Do not touch hot surfaces. Use handles or knobs.
3. To protect against electric shock, do not immerse cord, plugs, or machine in water
or olher liquid.
4. This product is not recommended for use by children.
5. Turn control switch to OFF and unplug from outlet when not in use and before
cleaning. Allow to cool before pulling on or taking off parts, and before cleaning
the machine.
6. Do not operate any appliance with a damaged cord or plug or after the appliance
malfunctions, or has been damaged in any manner. Return this appliance only to
the nearest authorized service center for repair.
7. The use of accessory attachments not recommended by MR. COFFEE, inc., may
cause hazards or injuries.
8. Do not use outdoors.
9. Do not let cord hang over edge of table or counter, or touch hot surfaces.
10. Do not place this appliance on or near a hot gas or electric burner or in a
heated oven.
11. To disconnect, turn any control to OFF, then remove plug from wall outlet.
12. Do not use appliance for other than intended use.
13. Use on a hard, flat level surface only, to avoid interruption of air flow underneath
the appliance.
14. WARNING: To reduce the risk of fire or electric shock, do not remove any service
covers. No user serviceable parts inside. Repair should be done by authorized
personnel only.
15. While using the appliance the water level should never be lower than the “min.
mark on the water tank.
SAVE THESE INSTRUCTIONS
If Service Is Required, Do Not Return To Your Store
For service, call l-800-MR COFFEE.
To assist us in servlng you, please have the model number (ECMP3)
and date of purchase avallable.
8:30 a.m. to 5:00 p.m. Eastern Standard Time, Monday through Friday.
All repairs must be made by Mr. Coffee or an authorized Mr. Coffee Service Center.
Please call us for the authorized service center in your area. Please do not return this
appliance to your store.
We welcome your questlons, comments or suggestlons. Please call us at
l-800-672-6333 or wrile to us al: Consumer Affairs Department
MR. COFFEE
P.O. Box 948389
Maitland, Florida 32794-8389
SPECIAL CORD SET INSTRUCTIONS
1. A short power supply cord is provided to reduce the hazards resulting from becoming
entangled in or tripping over a longer cord.
2. An extension cord may be purchased and used If care is exercised in its use.
3. If an extension cord is used, the marked electrical rating of the extension cord must
be at least 10 amps and 120 volts. The resulting extended cord must be arranged so
that it will not drape over the counter top or table top where it can be pulled on by
children or tripped over accidentally.
Note:
This appliance has a polarized plug (one blade is larger than the other). As a
safety feature, this plug will fit In a polarized outlet only one way. If the plug
does not fully fit in the outlet, reverse the plug. If It still does not fit, contact a
qualified electrician. Do not attempt to defeat this safety feature.
CAUTION:
1. Do not remove the filter holder at any tlme durlng the brewing process.
2. Do not let the pump run with an empty water container. This can damage
the pump permanently.
3. Use caution when removing the filter holder from the brew head. The
metal parts may still be very hot. Also, there may be hot water floating on
the top of the filter basket.
4. WHEN USING OR CLEANING THE FROTHING NOZZLE: Place a frothing
pitcher or large cup (wllh a 16 ounce capacity) half full of water or milk
under the frothing nozzle. Make sure the tip of the frothing tube is
submerged In liquid before turning on the steam control knob.
Water
Spoon
3
T
ABLE OF CONTENTS
lmportant Safeguards ................................................................... .2
If Service Is Required ..................................................................... .
Special Cord Sel lnstructions ............................................................ .3
Before Using For The First lime ............. .......................................... .5
Espresso ................................................................................. .5
Cappuccino ............................................................................... 7
After Use .................................................................................. .8
Cleaning ................................................................................... 9
Deliming ..................... . ........................................................... 10
11
Troubleshooting
I
NTRODUCTION
Congratulalionsl You are the owner of a Mr. Coffee model ECMP3 pump espresso/
cappuccino maker. This unique appliance has been designed to provide you with
delicious restaurant quality espresso/cappuccino quickly and conveniently.
Espresso is a unique method of coffee brewing in which hot water is forced through
finely ground coffee. Popular in Europe, it is a far richer and more full-bodied brew than
regular American coffee. Because of its richness, espresso is usually served In l-112 to
2 oz. portions, in demilasse cups.
Most espresso drinkers outside of Europe prefer cappuccino, a drink made of about
one third espresso, one third hot milk, and one third foam.
Preparing espresso or cappuccino is very different from brewing regular drip coffee.
To ensure your safely and the long life of this appliance, please read all inslruclions,
cautions, notes, and attentions.
H
ELPFUL HINT:
Inside the Espresso machine water is heated up. This water will expand and as
a result some drops may leak from the frothing nozzle and/or the waler outlet opening.
This is quite normal. Do not forget to move the frothing nozzle backwards into a position
over the grid if you do not wish to use it.
The Espresso machine is protected against damage due to overheating. If the pump
operates for too long it will automatically turn off. If this happens, switch the appliance
completely off and let it cool down for approximately 45 minutes. Then remove air. After
this you can use the Espresso machine again.
B
EFORE USING FOR THE FIRST TIME
Wash the removable water tank,
the coffee filters and the filter
holder In hot soapy water. Rinse
with clean water.
Fill the water tank (Figures 2 and
3). Do not forget to insert the
suction tube (Figure 4).
Pump about hall a tank full of water
through the appliance as described
in section’Espresso,”but without
ground Espresso coffee in the filter.
It is advisable to perform this
operation again after a period
0f non-use.
E SPRESSO
Espresso is made by pumping
hot water rapidly and at a high
pressure through ground. Espresso
type coffee.
Espresso is best served in
demitasse cups. lndividual serving
size should bel-1/2 to 2 ounces.
*Your Espresso coffee will be at
optimum (hot) temperature if the
filler holder is in place while the
machine Is heating up.
*You can pre-heat your cups by
rinsing them wilh hot tap water.
Ensure that there is enough water
in the tank.
Switch the appliance on. The two
pilot lights will come on (Flgure 5).
Insert the 1 cup filter or the 2 cups
filter into the filter holder (Figure
For 1 cup, place 1 level measuring
spoonful 0f coffee lnto the 1 cup
filler. For 2 cups, place 2 level
measuring spoonfuls into the
2 cups filter (Figure 7).
Press the coffee down with the
base of the measuring spoon
(Figure 8).
If necesssary, clean traces of
coffee off the edge of the filter.
Position the filter holder (Figure 9)
and screw in (Figure 10).
Place 1 or 2 demitasse cup(s)
under the spouts of the filter holder
(Figure 11).
The “Coffee” button (R) can be
pressed as soon as pilot light
“Temperature” goes out (Figure
12). Hot water will then be pumped
through the ground coffee and after
a few seconds the Espresso coffee
will start flowing into the cup(s)
(Figure 13).
Press the “Coffee” button(
again as soon as there is enough
Espresso in the cup(s) (Figure 14).
Serve and savour your Espresso
right away!
C
“Cappuccino” is the Italian name for
Espresso with a Iittle milk and a
layer of frothed milk. The froth is
made by frothing cold milk in a
pitcher or other container using the
frothing nozzle. The froth, together
with a little milk, is added to the
Espresso.
*First prepare the frothed milk,
then the Espresso.
*Use the wider special
“Cappuccino” cups for the same
quantity of coffee.
To prepare frothed milk, first switch
the appliance on by pressing
“On/Off" button ( ) (Figure 15).
‘the appliance is cold, both pilot
lights will now come on. If the
appliance is already hot,only pilot’
light “On” will now come on.
Press the “Steam” button (a).
Orange pilot light “Temperature”
will come on (Figure 16). After
some time the orange pilot light will
go out (Figure 17). The appliance
is now ready for making steam.
Fill a frothing pitcher about half full
with cold milk.
You can swing the frothing nozzle
to bring it into the most suitable
position (Figure 18).
Keep the pitcher under the frothing
nozzle. Please note: the tip of the
frothing nozzle should remain
under the milk level (Figure 19).
Open the steam control by turning
counter-clockwise (Figure 20).
Steam will come out of the frothing
nozzle, making the milk bubble
(Figure 21).
Stop the steam supply by turning
clockwise as soon as enough froth
has been made (Figure 22). Then
remove the frothing pitcher.
Do not forget to press the
“Steam” button
(Figure 23).
The button is now in “up” position.
IMPORTANT- BEFORE MAKING ESPRESSO AFTER FROTHING MILK:
Now the water in the appliance is
extra hot: this was necessary for
making steam. For Espresso a
somewhat lower temperature is
required. Only then will your coffee .
have a nice ‘crema” crest. “Crema”
is a light layer of light cinnamon
brown, extremely fine foam covering
your espresso. .
!
Press the ‘Coffee’ button (
Wait until some water comes from
the water outlet. The boiler Inside
the machine will cool down,
A
Switch off by pressing the “On/Off”
button
Unscrew the filler holder’
(Figure 24).
Move the filter clip forward so that
it anchors the filter in place
(Figure 25).
Holding the filter clip pushed
forward, throw away the used
ground coffee. (With the clip you
keep the filter in the filler holder Figure 26).
!
!
!
!
Press the “Coffee” button (P) again.
The button Is now in “up” position.
Then the appliance is ready for
making Espresso.
Then place the filter holder with
Espresso coffee into the appliance.
(Please refer lo section ‘Espresso”).
Add sugar and milk to taste.
Place one or two teaspoons of froth
on the Espresso. Sprinkle wilh
cocoa powder or ground cinnamon
if desired.
FTER USE
After cleaning, move the filler clip
backward (Figure 27).
The filter holder may be stored
screwed onto the appliance
(Figure 28).
CLEANING
Wash the filters, the filter holder,
the water tank, the drip-basin and
grid regularly.
Regularly clean the brew head,
removing any stuck grains
of coffee.
Clean the frothing nozzle,
particularly after frothing milk, with
a damp clolh. If necessary, the
frothing nozzle can be unscrewed
in a counter-clockwise direction
using the end of the measuring
spoon and then it can be cleaned
(Figures 29 and 30). The nozzle
must be screwed on again in a
clockwise direction. Tighten using
reasonable force with the end of
the measuring spoon provided.
The exterior of the unit may be
cleaned with a damp cloth.
Delime your Espresso machine regularly. With
normal household use the following rule applies:
*If you use soft water delime two or three times
a year.
*If you use hard water delime four or five times
a year.
Your water supply company can inform you about
the hardness of your water.
Operate the appliance twice as indicated in
section‘Espresso”. However, fill water tank l/2 full
with vinegar and 1/2 with water and do not fill the
filter with ground coffee.
To remove any scale that has set in the inside of
the frothing nozzle, let the appliance produce
vinegar steam for some time.
When deliming is complete remove all traces of
vinegar and scale, by operating the appliance
twice with fresh cold water in the same manner.
Then clean all removable items.
T
ROUBLESHOOTING
If your Espresso machine does not operate as expected you may, in most
cases, find the cause and solution below. Also refer to the corresponding
sections In your instructions for usel
The pump is too noisy.
*There is no water in the tank.
Refill with water.
*The water tank is not placed
correctly.
The machine does not produce
Espresso.
*There is no water in the water
tank or the water tank is not
placed correctly.
*The coffee has been ground too
finely and/or has been tamped
own too much.
*The water outlet opening is
clogged.
*The machine needs deliming.
Water leaks from the water
outlet opening and/or the
frothing nozzle.
*The water inside the appliance
expands when being heated up.
This is
normal. Swing the
frothing nozzle into a position
over the grid:
*If excessive leaking occurs:
delime or clean the valve.
The “crema” crest on the
Espresso Is too thin or Isn’t
there altogether.
*The coffee has not been tamped
down firmly enough.
*There was not enough coffee in
the filler.
*The machine was not heated-up
sufficiently. (Had the pilot light
gone out)
*The coffee was ground too
coarsely.
The “crema” is too dark and/or
the coffee has a burnt taste.
*The machine was too hot.
(Was the steam button still in
‘on” [down] position)
*The coffee has been ground
too finely.
*The coffee has been tamped
down too much.
The pump does not work
anymore.
*The pump has been switched off
automatically to prevent damage
due to overheating. Switch the
machine off and let it cool down
for approximately 45 minutes. Fill
the water tank and remove air.
After this you can use the
machine again.
RECIPE IDEAS THAT YOU WILL LOVE TO TRY!
San Francisco Cappuccino
Cafe Tia Maria
espresso, hot steamed chocolate,
brandy, topped with whipped
cream and cinnamon
espresso, Tia Maria liqueur topped
with frothed milk
Cafe Irish
Cafe Grand Marnier
espresso, Grand Mamier liqueur,
espresso, Irish whiskey, topped
with whipped cream
topped with whipped cream and grated
orange peel
Cafe Tuaca
Mexican Cafe
espresso.Tuaca liqueur, topped
with whipped cream
espresso, Kahlua, tequila, topped
with whipped cream
Cafe Vienna
Cafe Romano
espresso, brandy, topped with
whipped cream
espresso, brandy and lemon twist
Limited Warranty
Mr. Coffee. warrants to the purchaser that the ECMP3 by Mr. Coffee, (except
for cord set) is free from manufacturer defects in material and workmanship for a
period of one year from the date of origlnal purchase when used in compliance with
directions as outlined in the manufacturer’s instructions, which will constitute reasonable and necessary maintenance by the purchaser.
In case of manufacturer defects in material or workmanship, Mr. Coffee,
agrees lo repair (remedy) a defective espresso/cappuccino maker without charge.
The purchaser’s exclusive remedy. against Mr. Coffee, inc. shall be for the repair or
replacemenl of a defective Mr. Coffee product.
All repairs must be made at an authorized Mr. Coffee Service Center. To locate
a Mr. Coffee Service Center, call l-800-MRCOFFEE (l-800-672-6333). As the purchaser, you assume all cost incurred in transporting your Mr. Coffee machine to and
from the authorized Mr. Coffee Service Center. Mr. Coffee, shall not be responsible
for any repairs performed al any facility which is not an authorized Mr. Coffee
Service Center.
This warranty gives you specific legal rights. and you may also have other
rights which vary from state to state. Any Implied warranty Is limited in duration to the
one year provided in this, the only, expressed warranty. Some states do not allow
limitations on how long an implied warranty lasts, so the above limitation may not
apply to you.
In no event shalt Mr. Coffee, be responslble for lncidental or consquen-
tia/ damages, nor damage due to misuse or the use of any unauthorized attachment; nor assumption of responsibility for damage caused by use of an electrical circuit not specified on the Mr. Coffee, product. Some states do not allow the exclusion
or limitation of incidental or consequential damages, so the above limtiation or exclusion may not apply to you.
Mr. Coffee, a Product of Sunbeam Corporation.
Boca Raton, Florida 33431
FORM 581
R N 1 8 / 9 4