1
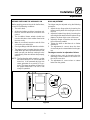
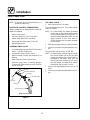
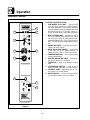
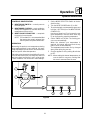
COS-20G
INSTALLATION AND OPERATION MANUAL
FOR
EXPORT SERIES GAS COMBINATION OVENS
BLODGETT COMBI
www.blodgett.com
44 Lakeside Avenue, Burlington, Vermont 05401 USA Telephone (800) 331-5842, (802) 860-3700 Fax: (802)864-0183
PN R8203 Rev D (6/01)
E 2000 --- Blodgett Combi
Table of Contents
Introduction
The Blodgett Combi-Oven/Steamer . . . . . . . . . . . . . . . . . . . . . . . . . . . . . . . . .
Description of the Combi-Oven/Steamer . . . . . . . . . . . . . . . . . . . . . . . . . . . .
Oven Features . . . . . . . . . . . . . . . . . . . . . . . . . . . . . . . . . . . . . . . . . . . . . . . . . . .
2
3
4
Installation
Owner’s Responsibilities . . . . . . . . . . . . . . . . . . . . . . . . . . . . . . . . . . . . . . . . . .
Location and Ventilation . . . . . . . . . . . . . . . . . . . . . . . . . . . . . . . . . . . . . . . . . . .
Utility Connections . . . . . . . . . . . . . . . . . . . . . . . . . . . . . . . . . . . . . . . . . . . . . . .
Adjustments . . . . . . . . . . . . . . . . . . . . . . . . . . . . . . . . . . . . . . . . . . . . . . . . . . . . .
Final Check Lists . . . . . . . . . . . . . . . . . . . . . . . . . . . . . . . . . . . . . . . . . . . . . . . . .
5
6
7
9
10
Operation
Safety Information . . . . . . . . . . . . . . . . . . . . . . . . . . . . . . . . . . . . . . . . . . . . . . . .
Oven Start-Up . . . . . . . . . . . . . . . . . . . . . . . . . . . . . . . . . . . . . . . . . . . . . . . . . . .
Standard Controls . . . . . . . . . . . . . . . . . . . . . . . . . . . . . . . . . . . . . . . . . . . . . . . .
Optional Cook & Hold . . . . . . . . . . . . . . . . . . . . . . . . . . . . . . . . . . . . . . . . . . . .
Optional Meat Probe . . . . . . . . . . . . . . . . . . . . . . . . . . . . . . . . . . . . . . . . . . . . . .
12
13
14
16
19
Maintenance
Spray Bottle Operating Procedure . . . . . . . . . . . . . . . . . . . . . . . . . . . . . . . . . .
Cleaning and Preventive Maintenance . . . . . . . . . . . . . . . . . . . . . . . . . . . . . .
Decalcification . . . . . . . . . . . . . . . . . . . . . . . . . . . . . . . . . . . . . . . . . . . . . . . . . . .
20
21
22
Introduction
The Blodgett Combi-Oven/Steamer
For easy operation you can choose from three
modes:
For quite some time, commercial cooking equipment has remained more or less unchanged.
There are kettles, deck ovens, the good old range
with its legion of pots and many other extra
appliances. The result: time expenditure, excessive manual work, and countless cleaning processes. The last few years have paved the way for
a revolution in the equipment of restaurant and institutional kitchens. All Blodgett Combi appliances
improve your kitchen through:
D
D
D
Steam
In the Steam mode you can:
D
D
increased productivity
a wider range of menu choices
a simplified cleaning process
D
steam
defrost
D
D
blanch
rethermalize
D
poach
D
braise
In the Hot Air mode you can
D
roast
D
bake
In the Combi mode you can:
defrost
D roast
reheat
D bake
D proof*
D cook & hold*
* with optional digital controls
D
D
D
D
rethermalize
sous vide*
The COS-20G model includes a built in steam generator. This unit includes an inlet, funnel assembly
and valve lever for decalcification.
With the Oven/Steamer you have the choice of two
cooking processes: Steam and Hot Air, either...
D
Combi
Steam &
Hot Air
The work process is simplified since products are
prepared on or in steam table pans and trays.
Food can be cooked, stored, and transported with
the same pans. Small amounts of product can be
processed efficiently; pre-cooked and convenience foods can be reheated within minutes.
D
Hot Air
Separately
Combined, or
In Sequence using two or three functions during
one cooking process. We call this combi-steaming and combi-baking.
2
Introduction
Description of the Combi-Oven/Steamer
ABOUT THE OVEN/STEAMER
OVEN/STEAMER OPERATION
Blodgett Combi-Oven/Steamers are quality produced using high-grade stainless steel with first
class workmanship.
The practical oven door, with a viewing window,
has a wide swing radius and handle which can be
operated easily, even with wet or greasy hands.
The high performance fresh steam generator with
its control system makes it possible to enjoy all of
the advantages of a high quality steamer at the
flick of a switch. Fresh steam enters the oven cavity without pressure and is circulated at high
speed. This process enables quick and gentle
cooking and ensures high quality food while providing convenient working methods. The steam
generator is completely automatic and protected
from running dry.
Ease of operation is guaranteed through the simple arrangement of the controls. Graphic symbols
make the appliance easy for even inexperienced
kitchen staff to operate. Steam, Hot Air and Combi
modes can be selected with one switch. A fourth
function on the mode selection switch, the Cool
Down mode, allows the oven cavity to cool down
rapidly with the door opened or closed.
Cleaning is kept to a minimum. The interior is
sprayed with a self-acting cleaning solution which
interacts with steam to easily remove crusts and
stains. The oven is designed for easy care and is
welded water tight so that the internal cooking
cavity may be rinsed with a hose after the steam
cleaning process.
A patented quench system keeps the air in the
oven clean. Fumes which arise from roasting and
grilling are sucked from the appliance, quenched,
and directed out through the condenser drain.
The exhaust system is effective in all cooking
modes and results in better quality foods and no
flavor transfer. The fan, which is guarded against
accidental finger contact, is driven by a quiet and
powerful motor. The condenser draws out excess
steam from the appliance. Condensation and
waste water, which result during steaming and
cleaning, are continuously drained.
The use of high quality insulation impedes excessive heat radiation and saves energy.
3
Introduction
Oven Features
Standard Features
4
2
3
5
1
6
COS-20G
Figure 1
1
Control Panel
4
Vent (not shown)
2
Oven Door
5
Decalcifying Inlet & Funnel Assembly
3
Door Handle
6
Decalcifying Valve Lever
4
Installation
Owner’s Responsibilities
1. Oven(s) are uncrated, stacked (if applies) and
put in place.
2. The owner/operator must have the following
utility requirements met and installed.
NOTE: Refer to the Utility Connection information provided.
MAXIMUM SHELF LOADING
COS-20G
ELECTRICAL
15 amp grounded outlet
PLUMBING
Water
Water pressure
345 kPa to unit
Cold water supply
19 mm hose fitting
Hot water supply
19 mm hose fitting
Drainage
Atmospheric vented drain
Drain connection
5 cm copper
Average water drain temperature
Approximately 50_C
GAS PRESSURE
Gas Connection
BSP/ISO 3/4-14 7/1
Orifice at Sea Level
Steam (gas type --- G20)
5.156 mm diameter
Hot Air (gas type --- G20)
2.00 mm diameter
Inlet Pressure to the Unit
Gas type --- G20
20 mbar
Hot Air Pressure
Gas type --- G20
7.6 mbar
Steam Pressure
Gas type --- G20
8.6 mbar
CALORIFIC INPUT (Nett)
Steam
29.0 KW
Hot Air
49.8 KW
5
45,5 Kg (100 lbs)
Installation
Location and Ventilation
LOCATION
VENTILATION
The well planned and proper placement of your
appliance will result in long term operator convenience and satisfactory performance.
The necessity for a properly designed and installed ventilation system cannot be over emphasized. The ventilation system will allow the unit to
function properly while removing unwanted vapors and products of combustion from the operating area.
The following clearances must be maintained between the unit and any combustible or non-combustible construction.
The appliance must be vented with a properly designed mechanically driven exhaust hood. The
hood should be sized to completely cover the
equipment plus an overhang of at least 15 cm on
all sides not adjacent to a wall. The capacity of the
hood should be sized appropriately and provisions made for adequate makeup air.
Right side of unit --- 15 cm
D Left side of unit --- 15 cm
D Back of unit --- 15 cm
NOTE: For models with hose assemblies on the
back of the unit, the hose must be 15 cm
from the wall.
D
The following clearances are recommended, but
not required, for servicing.
D
D
WARNING!!
Failure to properly vent the oven can be
hazardous to the health of the operator;
and will result in operational problems,
unsatisfactory baking, and possible damage to the equipment. Damage sustained
as a direct result of improper ventilation
will not be covered by the Manufacturer’s
warranty.
Left side of unit --- 30 cm
Back of unit --- 30 cm
Place the unit in an area which is free of drafts and
accessible for proper operation and servicing.
Keep the operating area free and clear of all combustibles such as paper, cardboard, and flammable liquids and solvents.
Installation must conform with Local and National
installation standards. Local installation codes
and/or requirements may vary. If you have any
questions regarding the proper installation and/or
operation of your unit, please contact your local
distributor. If you do not have a local distributor,
please call Blodgett Combi at 0011-802-860-3700.
DO NOT place the unit on a curb base or seal to
the wall; either condition will prevent proper ventilation to the blower motors. Slight unevenness can
be corrected with the adjustable legs.
Heat sources should not be located near the air
vents on the left hand side of the unit. Consult the
factory for an optional protective side heat shield
kit if a warm surface or water source is to the left
of the unit.
On all models, tripping the blower motor’s thermal
overload device indicates an excessive ambient
temperature on the side of the oven. This must be
corrected to prevent permanent damage to the
oven. All motor bearings are permanently lubricated by the manufacturer; there is no need for
additional lubrication during the operational lifetime of the motors.
6
Installation
Utility Connections
NOTE: Utility connections must be performed by
a qualified installer only.
DRAIN CONNECTION
A 5 cm copper pipe with standard drain pitch must
be run to an open drain or connected to a standpipe equipped with a vent.
WATER CONNECTION
NOTE: Hot water maximizes steam production
but is not required. Cold water may be
supplied to both inlets if hot water is not
available.
NOTE: The waste water can also be directed to a
nearby floor drain. Flexible hose which allows trapped water to accumulate in
sagged runs must be avoided.
Connect the appliance to quality cold water via a
pressure hose with 19 mm couplings. Cold water
is connected to the left solenoid/pressure regulator as views from the rear of the oven. Hot water
connection, right solenoid/pressure regulator, to
the boiler is recommended. A shut off valve must
be provided adjacent to the oven.
1. Find the drain connection on the lower rear of
the unit.
2. Loosen the coupling clamps. Attach a 5 cm
copper drain pipe to the drain connection. Retighten the coupling clamps.
NOTE: The open end of the drain should be installed facing the floor. Copper line, used
for installation to an open drain or floor
sink, must be supplied by the installer. Use
of a trap inline will cause drain backup.
13mm appliance hose
with 19 mm hose fittings
Figure 2
5 cm Drain
Customer
Supplied
Water must meet the following minimum requirements:
D
D
Total Dissolved Solids (TDS) content will not exceed 30 parts per million.
Water PH must be 7.0 or higher
Oven
Drain
To Drain
Figure 3
WARNING!!
The use of poor quality water will invalidate your warranty.
7
Installation
Utility Connections
ELECTRICAL CONNECTION
GAS PIPING AND PRESSURE
Before making any electrical connections to these
units, check that the power supply is adequate for
the voltage, amperage, and phase requirements
stated on the rating name plate mounted on the
appliance.
A properly sized gas supply system is essential for
maximum oven performance. Piping should be
sized to provide a supply of gas sufficient to meet
the maximum demand of all appliances on the line
without loss of pressure at the equipment.
A strain relief for the power supply cord is required.
The installer must supply a cord bushing that meets
all Local and National installation standards.
Pressure Regulation and Testing
The gas pressure to the appliance must be rated
for 20 mbar while the burners are on. A sufficient
gas pressure must be present at the inlet to satisfy
these conditions.
The circuit breaker that is used to provide power
to this appliance must have a minimum of 3mm
contact spacing. The circuit breaker must meet all
Local and National installation standards.
Each unit has been adjusted at the factory to operate with the type of gas specified on the rating
plate attached to the right side of the unit.
All ovens must be installed in accordance with Local or National Electrical codes.
Each oven is supplied with gas regulators to maintain the proper gas pressure for steam and hot air
production. The regulators are essential to the
proper operation of the oven and should not be
removed. The hot air system is regulated to 7.6
mbar. The steam system is regulated to 8.6 mbar.
A wiring schematic is located on the inside of the
removeable side panel.
NOTE: Disconnect the power supply to the unit
before servicing.
DO NOT INSTALL AN ADDITIONAL REGULATOR
WHERE THE OVEN CONNECTS TO THE GAS
SUPPLY.
WARNING!!
Improper electrical installation will invalidate your warranty.
The oven and its individual shutoff valve must be
disconnected from the gas supply piping system
during any pressure testing of that system at test
pressures in excess of 35 mbar.
The oven must be isolated from the gas supply
piping system by closing its individual manual
shutoff valve during any pressure testing of the
gas piping system at test pressures equal or less
than 35 mbar.
Prior to connecting the unit, gas lines should be
thoroughly purged of all metal filings, shavings,
pipe dope, and other debris. After connection, the
unit should be checked for correct gas pressure.
Installation must conform with Local and National
installation standards. Local installation codes
and/or requirements may vary. If you have any
questions regarding the proper installation and/or
operation of your unit, please contact your local
distributor. If you do not have a local distributor,
please call Blodgett Combi at 0011-802-860-3700.
8
Installation
Adjustments
BEFORE SWITCHING THE APPLIANCE ON
DOOR ADJUSTMENT
Before applying power to the unit for the first time,
check for the following conditions:
The hinges may be adjusted using the following
procedure:
1. Adjust the top hinge plate by loosening the
three mounting bolts on the top right corner of
the unit.
2. Adjust the bottom hinge pin by loosening the
mounting bolt located under the bottom hinge
plate on the lower right corner of the oven.
3. Adjust the hinges so that the door back and
the unit face are parallel.
4. Tighten the bolts so that there is no further
movement.
5. The adjustment is correct when the door
closes firmly and no steam leaks from the gasket.
The hinges can also be adjusted as follows:
j The unit is level.
j All electrical safety provisions have been ad-
hered to and the electrical connections are
correct.
j The circulation blower wheels should turn
counter-clockwise: check rotation from inside
the oven cavity.
j Water is connected, turned on and all of the
connections are water tight.
j Check gas fittings with leak detection solution.
j The transport cart is inserted into the cooking
cavity. When the cart is not inserted into the unit,
water can spill onto the floor causing it to become slippery. If the door will not close properly,
use the
1. Adjust the door catch by loosening the four
mounting screws located on the inside surface of the oven door.
2. The adjustment is correct when no steam
leaks from the gasket.
NOTE: The first time the unit is turned on, or after
the unit has been OFF for 5 hours and then
turned on, it will automatically flush the
steam generator for a period of 75 seconds. The steam generator will then fill to
the proper water level. The unit is now
ready for operation.
Oven
Door
Oven
Door
COS-20G
Figure 4
9
Installation
Final Check Lists
NOTE: Final check list must be performed by a
qualified installer only.
ELECTRICAL CONTROL COMPARTMENT
Applied voltage to unit voltage/phase suitable for
appliance specified.
j
j
j
j
j
Remove side panel
Set motor protector (F2) to on position
Adjust motor protector to maximum
Reset high limit thermostats F3 and F6
Reinstall side panel
GAS FINAL CHECK
j Verify inlet pressure is 20 mbar.
Turn manual gas valve to on. Turn mode selector
switch to STEAM.
NOTE: On initial startup, the steam generation
system may go into lockout mode until all
air has been purged from the gas line. To
reset the steam generator system, turn the
mode selector to OFF, then back to
STEAM. Repeat until the steam generator
burner ignites.
j Verify the regulator pressure is set at 8.6 mbar.
j Check for gas leaks using leak detection solu-
PLUMBING FINAL CHECK
j Incoming water pressure within 276 kPa (minimum) --- 345 kPa (maximum)
j Atmospheric vented drain in place
j Water solenoid properly bracketed and not
leaking
j Water feed lines intact without leaks
j Optional Spray Hose connected properly.
Connect the optional spray hose to the fill solenoid as shown.
tion.
Turn the mode selector switch to HOT AIR.
NOTE: On initial startup, the hot air system may go
into lockout mode until all air has been
purged from the gas line. Lockout mode is
indicated by the amber lamp near the
manual gas valve. If lockout occurs, press
the reset switch to initiate hot air startup.
Repeat until hot air ignition occurs.
j Verify hot air manifold pressure is set at 7.6
mbar.
Washer
j Check for gas leaks using leak detection solu-
Regulator Assembly
“Y” Fitting
tion.
Cold water supply
Fill
Solenoid
Washer
Hose and Spray
Spray Hose Connection
Figure 5
10
Installation
Final Check Lists
OVEN OPERATIONAL TESTS
NOTE: Checks to be made by customer or authorized service agent.
Cool Down Mode
j Check fan rotation is correct, counter clockwise from inside of the oven
Combi Mode
Turn to COMBI mode, set thermostat to 177_C and
verify:
j Boiler flushes and fills
j Boiler preheats to 85_C then switches to HOT
AIR
j When HOT AIR reaches 177_C, HOT AIR shuts
off and STEAM comes on
Steam Mode
Turn on STEAM mode and verify (control panel removed):
j Check timer operation in all three positions
a.) Set timer to OFF position, buzzer should
sound
b.) Set timer in position other than OFF or
STAY ON, timer should count down
c.) Set timer in STAY ON position, oven should
operate continuously without timer
j Run light (power light) turns on
j Unit produces steam, window fogs, door seal
does not leak
j Quenching system working
11
Hot Air Mode
Turn to HOT AIR mode and set thermostat to
204_C and verify:
j Heat demand light is on
j Oven is heating properly
j Heat lights shuts off at 204_C and oven maintains 204_C.
Operation
Safety Information
THE INFORMATION CONTAINED IN THIS SECTION IS PROVIDED FOR THE USE OF QUALIFIED
OPERATING PERSONNEL. QUALIFIED OPERATING PERSONNEL ARE THOSE WHO HAVE
CAREFULLY READ THE INFORMATION CONTAINED IN THIS MANUAL, ARE FAMILIAR WITH
THE FUNCTIONS OF THE OVEN AND/OR HAVE
HAD PREVIOUS EXPERIENCE WITH THE OPERATION OF THE EQUIPMENT DESCRIBED. ADHERENCE TO THE PROCEDURES RECOMMENDED HEREIN WILL ASSURE THE
ACHIEVEMENT OF OPTIMUM PERFORMANCE
AND LONG, TROUBLE-FREE SERVICE.
Please take the time to read the following safety
and operating instructions. They are the key to the
successful operation of your Blodgett Combi gas
appliance.
SAFETY TIPS
What to do if you smell gas:
D
D
D
NOTE: In the event of a shut-down of any kind, allow a five (5) minute shut off period before
attempting to restart the oven.
General safety tips:
D
D
D
For your safety read before operating
D
What to do in the event of a power failure:
Turn all switches to off.
D DO NOT attempt to operate the unit until the
power is restored.
D
DO NOT try to light any appliance.
DO NOT touch any electrical switches.
Use an exterior phone to call your gas supplier
immediately.
If you cannot reach your gas supplier, call the
fire department.
12
DO NOT use tools to turn off the gas control. If
the gas cannot be turned off manually do not try
to repair it. Call a qualified service technician.
If the oven needs to be moved for any reason,
the gas must be turned off and disconnected
from the unit before removing the restraint
cable. Reconnect the restraint after the oven
has been returned to its original location.
DO NOT remove the control panel cover unless
the oven is unplugged.
Operation
Oven Start-Up
INITIAL OVEN START-UP
COMBI MODE (if applicable)
1. Turn the manual gas valve to ON.
1. Turn the mode selector switch to COMBI.
2. The combustion blower turns on.
STEAM MODE (if applicable)
3. The green POWER indicator lamp on the front
control panel lights.
1. Turn the mode selector switch to STEAM.
2. The combustion blower turns on.
3. The green POWER Indicator lamp on the front
control panel lights.
4. The steam generator flushes and drains automatically for 75 seconds if the unit has been off
for at least 5 hours.
5. The steam generator begins to fill. After two
minutes, the FILL indicator lamp on the front
control panel blinks. The convection blower
and POWER lamp turn off.
6. When the steam generator is filled to the proper
level and preheated, the convection blower, interior lights and POWER indicator lamp turn on.
7. Several relay contacts change state. A click is
heard when the gas valve opens.
8. The steam generator main burner ignites.
9. Steam fills the cavity and is controlled by a
non-accessible internal thermostat.
HOT AIR MODE (if applicable)
4. Set the Hot Air thermostat to the desired temperature.
5. The steam generator flushes and drain automatically for 75 seconds if the unit has been off
for at least 5 hours.
6. The steam generator begins to fill. After two
minutes the FILL indicator lamp on the front
control panel blinks. The convection blower
and POWER lamp do not shut down.
7. When the steam generator is filled to the proper level, several relay contacts change state.
A click is heard when the gas valve opens.
8. When the steam generator comes up to a predetermined temperature, the hot air thermostat lamp illuminates, indicating the cavity
temperature is below the desired set point.
9. Two series of clicks are audible as the hot air
pilot burners and main burners ignite.
10. When the cavity temperature reaches the desired set point, the temperature indicator lamp
goes off. The main burners shut off.
11. The steam and hot air burners toggle back
and forth responding to the thermostat set
points.
1. Turn the mode selector switch to Hot Air.
2. The convection blower turns on.
3. Set the hot air thermostat to the desired temperature.
4. The thermostat lamp lights, indicating the cavity temperature is below the desired set point.
5. Two series of clicks are audible as the hot air
pilot burners and main burners ignite.
6. When the cavity temperature reaches the desired set point, the temperature indicator lamp
goes off. The main burners shut off.
13
Operation
Standard Controls
CONTROLS IDENTIFICATION
1. LOW WATER FILL LIGHT --- during the fill
cycle, this light remains on until the water in
the steam generator is at the proper level and
up to temperature. During normal operation the
light should not be on. If the light comes on,
check the water level in the steam generator.
2. DON’T STEAM LIGHT --- indicates the unit is
too hot to operate in the steam mode. Place
the unit in the Cool Down mode until the temperature is below 230_F (110_C) and open the
door. This light does not inhibit steam production.
3. POWER ON LIGHT --- indicates the unit is in
Steam, Hot Air or Combi.
4. MODE SELECTOR SWITCH --- turns power
to the oven on or off. Allows selection of
Steam, Hot Air, Combi or Cool Down modes.
5. TEMPERATURE DIAL --- used to set desired
cooking temperature.
6. HEATING INDICATOR LIGHT --- lights when
the Hot Air heating is in operation.
7. TIMER DIAL --- used to set desired cooking
time.
8. FLUSH/DRAIN SWITCH --- used to flush/
drain the steam generator for decalcification.
9. LOCKOUT LIGHT --- lights when hot air control system is in lockout mode.
10. RESET SWITCH --- used to reset the hot air
control system after a lockout condition.
2
1
3
4
5
6
7
8
9
10
COS-20G Shown
Figure 6
14
Operation
Standard Controls
OPERATION
1. Turn the MODE SELECTOR Switch (4) to the
desired function.
The POWER ON Light (3) illuminates.
2. Set the TIMER (7) for the desired cooking time
or set it to STAY ON. The buzzer sounds and
the unit shuts off when the time has expired.
3. For the HOT AIR and COMBI modes, set the
TEMPERATURE Dial (5) to the desired cook
temperature. The HEATING INDICATOR Light
(6) illuminates and stays lit until the desired
temperature is reached. The temperature dial
does not operate during the STEAM portion of
the COMBI mode.
4. The selected mode operates automatically.
The temperature, time and mode can be altered at any time during the cooking process.
The operation can be stopped by the use of
the Mode Selector Switch or by opening the
door.
15
5. At the end of the specified time period, the
buzzer sounds and the appliance will shut off
automatically. Move the TIMER (7) to the STAY
ON position to stop the buzzer and restart the
unit.
6. To cool down the oven cavity, switch the
MODE SELECTOR Switch (4) to COOL
DOWN. In the Cool Down mode neither the
temperature dial or the timer will be operational. The blower will function with the door open
or closed.
7. The mode selector switch is also the main
power switch. In the OFF position the appliance is not operational.
Operation
Optional Cook & Hold
CONTROLS IDENTIFICATION
1. LOW WATER FILL LIGHT --- during the fill
cycle, this light remains on until the water in
the steam generator is at the proper level and
up to temperature. During normal operation the
light should not be on. If the light comes on,
check the water level in the steam generator.
2. DON’T STEAM LIGHT --- when lit indicates
the unit is too hot to operate in the steam
mode.
3. POWER ON LIGHT --- when lit indicates power to the unit is turned on.
4. MODE SELECTOR SWITCH --- controls power to the oven and selection of steam, hot air
and combi modes. The convection fan runs
with the switch in steam, hot air, combi or cool
down.
5. TIME DISPLAY --- shows cook time.
6. TIME ARROW KEYS --- press to enter cook
time from 00:00 to 99:59.
7. TEMPERATURE DISPLAY --- shows cook
temperature.
8. HEAT LIGHT --- when lit indicates hot air or
steam is in operation.
9. TEMPERATURE ARROW KEYS --- press to
enter cook temperature from 120---212_F
(48---100_C) for steam and 140---500_F
(60---260_C) for hot air/combi.
10. STAGE ONE LED --- when lit indicates operation or programming of stage one for the current product. Cook cycles may contain one or
two different stages.
11. ACTUAL TEMP KEY --- press to display actual
oven/steamer temperature
12. STAGE TWO KEY --- press to enter stage two
cook time and temperature.
13. PRODUCT KEYS --- three programmable keys.
14. MANUAL PRODUCT KEY --- default product
key used for manual and programmed cooking.
15. START KEY --- press to begin a cook cycle.
16. STOP KEY --- press to silence audible alarms
and pause or cancel cook cycles.
2
1
3
4
5
7
8
6
10
9
11
12
13
14
15
16
17
18
19
20
COS-20G Shown
Figure 7
16
Operation
Optional Cook & Hold
17. PROGRAM KEY --- press to enter programming mode and save programmed settings.
18. FLUSH/DRAIN SWITCH --- Used to flush/
drain the steam generator for decalcification.
19. LOCKOUT LIGHT --- lights when hot air control system is in lockout mode.
20. RESET SWITCH --- used to reset the hot air
control system after a lockout condition.
MANUAL OPERATION
1. Turn the SELECTOR SWITCH (4) to the desired mode. The LED above the manual key
lights.
2. Press the TEMPERATURE ARROW KEYS (9)
to set the stage one cook temperature.
3. Press the TIME ARROW KEYS (6) to set the
stage one cook time.
4. Press the STAGE TWO KEY (12).
NOTE: Stage two can be used for either a
hold mode or a second cook temperature. Example: Cook meats or poultry
at a low temperature for maximum
moisture retention, then set the second stage for browning. To use the
second stage for holding, you must
set an appropriate hold time for the
unit to count down from.
NOTE: If stage two is not required enter a
cook time of 00:00.
5. Press the TEMPERATURE ARROW KEYS (9)
to set the stage two cook temperature.
6. Press the TIME ARROW KEYS (6) to set the
stage two cook time.
7. Press the START KEY (15) to begin the cook
cycle. The STAGE ONE LED (10) lights. The
TIME DISPLAY (5) counts down the stage one
cook time.
If stage two is selected an alarm sounds at the
end of stage one. The time display counts
down the stage two cook time.
8. When all cook stages are complete the TIME
DISPLAY (5) flashes 00:00, the TEMPERATURE DISPLAY (7) flashes 0 and an audible
alarm sounds. Press the STOP KEY (16) to silence the alarm. The control maintains the
stage one cook temperature.
17
9. Turn the SELECTOR SWITCH (4) to OFF to
shut down the oven/steamer.
NOTE: Time and temperature settings may be
changed at any time during manual operation. Press the time arrow keys to change
the cook time. Press the temperature arrow keys to change the cook temperature.
PROGRAMMED OPERATION
NOTE: See page 18 for programming instructions.
1. Turn the SELECTOR SWITCH (4) to the desired mode.
2. Press the desired PRODUCT KEY (13). The
LED above the selected key lights. Allow the
oven to preheat before loading product. The
HEAT light (8) goes off when unit has reached
the set temperature.
3. Load the product. Press the START KEY (15)
to begin the cook cycle. The STAGE ONE LED
(10) lights. The TIME DISPLAY (5) counts
down the stage one cook time.
NOTE: Press the STOP KEY (16) once to pause
an active stage one cycle. Press the
START KEY (15) to resume.
NOTE: Press the STOP KEY (16) twice to cancel an active stage one cycle.
4. An alarm sounds at the end of stage one. The
time display counts down the stage two cook
time.
NOTE: Press the STOP KEY (16) once to cancel an active stage two cycle. Stage
two cycles cannot be paused.
5. When all cook stages are complete, the TIME
DISPLAY (5) flashes 00:00, the TEMPERATURE DISPLAY (7) flashes 0 and an audible
alarm sounds. Press the STOP KEY (16) to silence the alarm. The control maintains the
stage one cook temperature.
Operation
Optional Cook & Hold
PROGRAMMING THE PRODUCT KEYS
PROGRAMMING THE MANUAL KEY
NOTE: Each product key can hold two programs:
one for steam and one for hot air/combi. Hot
air programs can be used in combi.
NOTE: The manual key may be used for manual
cooking and programmed for two products, one for steam and one for hot air/combi. Hot air programs can be used in combi.
1. Turn the SELECTOR SWITCH (4) to the desired mode.
2. Press the desired PRODUCT KEY (13).
3. Press and hold the PROGRAM KEY (17) for
five seconds. The control beeps. The product
key LED and STAGE ONE LED (10) light.
4. Press the TEMPERATURE ARROW KEYS (9)
to set the stage one cook temperature.
5. Press the TIME ARROW KEYS (6) to set the
stage one cook time.
6. Press the STAGE TWO KEY (12).
NOTE: Stage two can be used for either a
hold mode or a second cook temperature. Example: Cook meats or poultry
at a low temperature for maximum
moisture retention, then set the second stage for browning. To use the
second stage for holding, you must
set an appropriate hold time for the
unit to count down from.
NOTE: If stage two is not required enter a
cook time of 00:00.
7. Press the TEMPERATURE ARROW KEYS (9)
to set the stage two cook temperature.
8. Press the TIME ARROW KEYS (6) to set the
stage two cook time.
9. Press and hold the PROGRAM KEY (17) to
save the program settings.
18
1. Turn the SELECTOR SWITCH (4) to the desired mode.
2. Press the MANUAL KEY (14). The LED above
the manual key lights.
3. Press the TEMPERATURE ARROW KEYS (9)
to set the stage one cook temperature.
4. Press the TIME ARROW KEYS (6) to set the
stage one cook time.
5. Press the STAGE TWO KEY (12).
NOTE: Stage two can be used for either a
hold mode or a second cook temperature. Example: Cook meats or poultry
at a low temperature for maximum
moisture retention, then set the second stage for browning. To use the
second stage for holding, you must
set an appropriate hold time for the
unit to count down from.
NOTE: If stage two is not required enter a
cook time of 00:00.
6. Press the TEMPERATURE ARROW KEYS (9)
to set the stage two cook temperature.
7. Press the TIME ARROW KEYS (6) to set the
stage two cook time.
8. Press and hold the PROGRAM KEY (17) to
save the program settings.
NOTE: Time and temperature settings may be
changed at any time during operation of a
programmed manual key. Press the time
arrow keys to change the cook time. Press
the temperature arrow keys to change the
cook temperature.
Operation
Optional Meat Probe
CONTROLS IDENTIFICATION
1. MEAT PROBE SWITCH --- controls power to
the meat probe.
2. MEAT PROBE CONTROL --- use to set the desired probe temperature. Indicates the actual
temperature of the product
3. MEAT PROBE CONNECTOR --- receptacle
for the plug in meat probe.
NOTE: For sanitation it is recommended that
the meat probe remain plugged into
the front panel receptacle at all times.
OPERATION
Measuring the product core temperatures during
long roasting periods is very practical. It is especially important for products such as Roast Beef to
reach a specific internal temperture.
Place the probe through to the middle of the product’s thickest section. Be sure the probe does not
touch any bone and the tip is not in a fat pocket.
These conditions can cause inaccurate readings.
1. Set the MODE SELECTOR Switch to the desired function.
2. Turn the MEAT PROBE Switch (1) to ON.
3. To set the desired core temperature press and
hold the * BUTTON (4) on the MEAT PROBE
CONTROL (2).
Use the up arrow key (6) to increase the setpoint temperature. Use the down arrow key
(5) to decrease the setpoint temperature.
4. Set the TIMER to STAY ON. The cooking process runs automatically.
When the selected core temperature is
reached, the buzzer will sound and the appliance shuts off automatically.
The temperature and mode can by changed
at any time during the process.
5. Shut the appliance off by setting all switches
to OFF.
NOTE: When setting the internal temperature, be
sure to allow for carry-over cooking after
the roast is removed from the oven
1
2
3
4
Figure 8
19
5
6
Maintenance
Spray Bottle Operating Procedure
Service Parts:
WARNING!!
1.
2.
3.
4.
5.
6.
Always disconnect the power supply before servicing or cleaning the unit.
Unscrew the sprayer head and fill the container to the MAX mark. Screw the head assembly
on firmly to ensure an airtight seal. The liquid
must be clean and free from foreign matter. Do
not overfill - space must be left for compressing air.
To build up pressure, pump approximately 20
full strokes when the container is filled with liquid. The higher the pressure, the finer the
spray. If the container is only partially filled,
then more pumping is required to compress
the additional air space.
To spray, depress the trigger with your thumb.
After a period of spraying, the pressure will
drop. Restore the pressure by operating the
air pump.
Release pressure after use by inverting the
spray head and depressing the trigger or by
slowly unscrewing the spray head assembly
which will allow air to escape from around the
filling aperture.
After use, rinse the spray bottle with clean water and check that the hole in the nozzle is perfectly clean and clear. Warm water (not hot)
used with a household detergent is a useful
cleaning agent for this purpose.
NOTE: Further information can be found in the instruction leaflet supplied with your spray
bottle.
20
Complete Spray Bottle --- P/N R0006
Spray Head Repair Kit --- P/N R6332
WARNING!!
Protective clothing and eyewear should
be worn while using cleaning agents.
Spray
Head
Pressure Pump
Pump
Spray Trigger
MAX
Pressure
Vessel
Clean the pump 2 or 3 times per week with warm water
Figure 9
Maintenance
Cleaning and Preventive Maintenance
CLEANING THE INTERIOR
CLEANING THE EXTERIOR
Daily cleaning of the appliance is essential for sanitation, and to ensure against operational difficulties. Use an oven cleaning detergent in conjunction with the supplied spray bottle.
Oven exteriors may be cleaned and kept in good
condition with a light oil. Saturate a cloth and wipe
the oven when it is cold; wipe dry with a clean
cloth.
On stainless interiors, deposits of baked on splatter, oil, grease or light discoloration may be removed with a good non toxic industrial stainless
steel cleaner. Apply cleaners when the oven is
cold and always rub with the grain of the metal.
The racks, rack supports and the blower wheel
may be cleaned in the oven or by removing them
from the oven and soaking them in a solution of
ammonia and water.
NOTE: DO NOT use corrosive cleaners!
1. Cool the oven down to 60_C or, if the oven
has been idle, turn the steam mode on for 3 to
4 minutes in order to warm the oven surfaces.
2. Fill the spray bottle and pump air into the container with the pressure pump.
3. Spray the interior of the oven with a cleaning
solution.
NOTE: Never spray water into the unit when
the temperature is above 100_C. NEVER SPRAY WATER IN THE UNIT AFTER
USING THE HOT AIR OR COMBI
MODES.
4. Let the cleaner work for 10 to 20 minutes with
the oven off. For difficult, baked on grease,
etc. allow to work over night.
5. Set the timer for 15 to 20 minutes.
6. Set the mode selector switch to Steam. This
will soften all burned on residue.
7. Rinse the interior with the spray assembly.
8. Set themodeselectorto steamfor anotherfive
minutes to flush out the oven interior and remove all detergent residue.
NOTE: The oven cavity should never be scoured
or scraped.
21
WARNING!!
DO NOT spray the outside of the appliance
with water or clean with a water jet.
PREVENTIVE MAINTENANCE
The best preventive maintenance measures are
the proper initial installation of the equipment and
a program for cleaning the oven routinely. The
Oven/Steamer requires no lubrication. Contact
the factory, the factory representative or a local
Blodgett Combi service company to perform
maintenance and repairs should they be required.
WARNING!!
Always disconnect the power supply before servicing or cleaning the unit.
Maintenance
Decalcification
WARNING!!
1.
2.
3.
4.
Protective clothing and eyewear should
be worn while using cleaning agents.
Turn the Mode Selection Switch (1) to the
STEAM mode. Wait until steam is produced.
This will ensure that the water in the steam
generator is hot.
Turn the Mode Selection Switch (1) to the
COOL DOWN mode and leave the door open.
Let the oven compartment cool to 66_C. This
ensures that the Drain/Flush switch will function in STEP 8.
Turn the Mode Selection Switch (1) to OFF.
In a suitable size container, mix together the
deliming solution and hot tap water. Refer to
the following chart for the proper mixture:
Model
Deliming
Solution
Hot Tap
Water
COS20G
776 ml
10.4 liters
7. Shut the Deliming Port Valve (2). Screw on the
Deliming Port Cap. Let the mixture stand for 20
minutes. In areas of the country with hard water, allow the mixture to stand for 1 hour.
8. Depress and hold the Drain/Flush Switch (4)
in the FLUSH position for 90 seconds. This
completes the deliming procedure.
3
open
2
1
NOTE: These volumes are approximate. You
may need slightly more or less hot water depending on your site.
5. Remove the Deliming Port Cap. Attach the
supplied Funnel and Hose Assembly (3) to the
deliming inlet.
6. Open the Deliming Port Valve (2) and pour in
the deliming mixture. Stop pouring when the
funnel stops draining. This is the correct
amount for your site.
22
close
4
Figure 10
INSERT
WIRING DIAGRAM
HERE