1
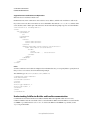
Using
ADOBE® COLDFUSION® BUILDER™ 2.0
Legal notices
Legal notices
For legal notices, see http://help.adobe.com/en_US/legalnotices/index.html.
Last updated 5/15/2012
iii
Contents
Chapter 1: What’s New in ColdFusion Builder
What’s new in ColdFusion Builder 2.0.1 . . . . . . . . . . . . . . . . . . . . . . . . . . . . . . . . . . . . . . . . . . . . . . . . . . . . . . . . . . . . . . . . . . . . . . . . . . . . . . . . . 1
What’s new in ColdFusion Builder 2.0
.................................................................................. 2
Chapter 2: Introduction
ColdFusion and ColdFusion Builder documentation
ColdFusion and ColdFusion Builder learning resources
.................................................................... 7
................................................................. 8
Chapter 3: About ColdFusion Builder
ColdFusion Builder configurations . . . . . . . . . . . . . . . . . . . . . . . . . . . . . . . . . . . . . . . . . . . . . . . . . . . . . . . . . . . . . . . . . . . . . . . . . . . . . . . . . . . . . 9
Activating ColdFusion Builder
......................................................................................... 9
Installing third-party Eclipse plug-ins
Getting started experience
. . . . . . . . . . . . . . . . . . . . . . . . . . . . . . . . . . . . . . . . . . . . . . . . . . . . . . . . . . . . . . . . . . . . . . . . . . . . . . . . . 10
. . . . . . . . . . . . . . . . . . . . . . . . . . . . . . . . . . . . . . . . . . . . . . . . . . . . . . . . . . . . . . . . . . . . . . . . . . . . . . . . . . . . . . . . . . . 11
ColdFusion Builder Help System
. . . . . . . . . . . . . . . . . . . . . . . . . . . . . . . . . . . . . . . . . . . . . . . . . . . . . . . . . . . . . . . . . . . . . . . . . . . . . . . . . . . . . . 11
Getting started with ColdFusion Builder
. . . . . . . . . . . . . . . . . . . . . . . . . . . . . . . . . . . . . . . . . . . . . . . . . . . . . . . . . . . . . . . . . . . . . . . . . . . . . . . 14
Chapter 4: ColdFusion Builder Workbench Basics
About the workbench . . . . . . . . . . . . . . . . . . . . . . . . . . . . . . . . . . . . . . . . . . . . . . . . . . . . . . . . . . . . . . . . . . . . . . . . . . . . . . . . . . . . . . . . . . . . . . . . 16
Workbench menus and toolbars
. . . . . . . . . . . . . . . . . . . . . . . . . . . . . . . . . . . . . . . . . . . . . . . . . . . . . . . . . . . . . . . . . . . . . . . . . . . . . . . . . . . . . . 17
About ColdFusion Builder perspectives
. . . . . . . . . . . . . . . . . . . . . . . . . . . . . . . . . . . . . . . . . . . . . . . . . . . . . . . . . . . . . . . . . . . . . . . . . . . . . . . 21
ColdFusion Builder Development perspective
ColdFusion Debugging perspective
Add views to the workbench
. . . . . . . . . . . . . . . . . . . . . . . . . . . . . . . . . . . . . . . . . . . . . . . . . . . . . . . . . . . . . . . . . . . . . . . . . 22
. . . . . . . . . . . . . . . . . . . . . . . . . . . . . . . . . . . . . . . . . . . . . . . . . . . . . . . . . . . . . . . . . . . . . . . . . . . . . . . . . . . 30
. . . . . . . . . . . . . . . . . . . . . . . . . . . . . . . . . . . . . . . . . . . . . . . . . . . . . . . . . . . . . . . . . . . . . . . . . . . . . . . . . . . . . . . . . . 36
ColdFusion Builder editors
. . . . . . . . . . . . . . . . . . . . . . . . . . . . . . . . . . . . . . . . . . . . . . . . . . . . . . . . . . . . . . . . . . . . . . . . . . . . . . . . . . . . . . . . . . . . 36
Customizing a perspective
. . . . . . . . . . . . . . . . . . . . . . . . . . . . . . . . . . . . . . . . . . . . . . . . . . . . . . . . . . . . . . . . . . . . . . . . . . . . . . . . . . . . . . . . . . . . 36
Chapter 5: Code Editing in ColdFusion Builder
CFML Editor . . . . . . . . . . . . . . . . . . . . . . . . . . . . . . . . . . . . . . . . . . . . . . . . . . . . . . . . . . . . . . . . . . . . . . . . . . . . . . . . . . . . . . . . . . . . . . . . . . . . . . . . . . 38
Code Assist
. . . . . . . . . . . . . . . . . . . . . . . . . . . . . . . . . . . . . . . . . . . . . . . . . . . . . . . . . . . . . . . . . . . . . . . . . . . . . . . . . . . . . . . . . . . . . . . . . . . . . . . . . . . 39
Select tag blocks of your choice
Jump to matching tag
Quick Fix
. . . . . . . . . . . . . . . . . . . . . . . . . . . . . . . . . . . . . . . . . . . . . . . . . . . . . . . . . . . . . . . . . . . . . . . . . . . . . . . . . . . . . . . 45
. . . . . . . . . . . . . . . . . . . . . . . . . . . . . . . . . . . . . . . . . . . . . . . . . . . . . . . . . . . . . . . . . . . . . . . . . . . . . . . . . . . . . . . . . . . . . . . . 46
. . . . . . . . . . . . . . . . . . . . . . . . . . . . . . . . . . . . . . . . . . . . . . . . . . . . . . . . . . . . . . . . . . . . . . . . . . . . . . . . . . . . . . . . . . . . . . . . . . . . . . . . . . . . . 46
Code Formatter
. . . . . . . . . . . . . . . . . . . . . . . . . . . . . . . . . . . . . . . . . . . . . . . . . . . . . . . . . . . . . . . . . . . . . . . . . . . . . . . . . . . . . . . . . . . . . . . . . . . . . . 47
Auto-formatting
. . . . . . . . . . . . . . . . . . . . . . . . . . . . . . . . . . . . . . . . . . . . . . . . . . . . . . . . . . . . . . . . . . . . . . . . . . . . . . . . . . . . . . . . . . . . . . . . . . . . . . 49
Code colorization
SQL Editor
. . . . . . . . . . . . . . . . . . . . . . . . . . . . . . . . . . . . . . . . . . . . . . . . . . . . . . . . . . . . . . . . . . . . . . . . . . . . . . . . . . . . . . . . . . . . . . . . . . . . 49
. . . . . . . . . . . . . . . . . . . . . . . . . . . . . . . . . . . . . . . . . . . . . . . . . . . . . . . . . . . . . . . . . . . . . . . . . . . . . . . . . . . . . . . . . . . . . . . . . . . . . . . . . . . . 50
Code folding and unfolding
. . . . . . . . . . . . . . . . . . . . . . . . . . . . . . . . . . . . . . . . . . . . . . . . . . . . . . . . . . . . . . . . . . . . . . . . . . . . . . . . . . . . . . . . . . 51
Syntax checking and highlighting
Navigate through code
Code refactoring
Tag Editor
. . . . . . . . . . . . . . . . . . . . . . . . . . . . . . . . . . . . . . . . . . . . . . . . . . . . . . . . . . . . . . . . . . . . . . . . . . . . . . . . . . . . . 52
. . . . . . . . . . . . . . . . . . . . . . . . . . . . . . . . . . . . . . . . . . . . . . . . . . . . . . . . . . . . . . . . . . . . . . . . . . . . . . . . . . . . . . . . . . . . . . . 54
. . . . . . . . . . . . . . . . . . . . . . . . . . . . . . . . . . . . . . . . . . . . . . . . . . . . . . . . . . . . . . . . . . . . . . . . . . . . . . . . . . . . . . . . . . . . . . . . . . . . . 55
. . . . . . . . . . . . . . . . . . . . . . . . . . . . . . . . . . . . . . . . . . . . . . . . . . . . . . . . . . . . . . . . . . . . . . . . . . . . . . . . . . . . . . . . . . . . . . . . . . . . . . . . . . . . 57
Typing preferences
. . . . . . . . . . . . . . . . . . . . . . . . . . . . . . . . . . . . . . . . . . . . . . . . . . . . . . . . . . . . . . . . . . . . . . . . . . . . . . . . . . . . . . . . . . . . . . . . . . . 57
CFML Editor keyboard shortcuts
. . . . . . . . . . . . . . . . . . . . . . . . . . . . . . . . . . . . . . . . . . . . . . . . . . . . . . . . . . . . . . . . . . . . . . . . . . . . . . . . . . . . . . 58
Last updated 5/15/2012
iv
USING COLDFUSION BUILDER
Contents
ColdFusion Builder Search
Add tasks to Task View
. . . . . . . . . . . . . . . . . . . . . . . . . . . . . . . . . . . . . . . . . . . . . . . . . . . . . . . . . . . . . . . . . . . . . . . . . . . . . . . . . . . . . . . . . . . . 59
. . . . . . . . . . . . . . . . . . . . . . . . . . . . . . . . . . . . . . . . . . . . . . . . . . . . . . . . . . . . . . . . . . . . . . . . . . . . . . . . . . . . . . . . . . . . . . . 61
Chapter 6: Managing Servers
Understanding web server terminology
Adding ColdFusion servers
Using Servers View
. . . . . . . . . . . . . . . . . . . . . . . . . . . . . . . . . . . . . . . . . . . . . . . . . . . . . . . . . . . . . . . . . . . . . . . . . . . . . . . 63
. . . . . . . . . . . . . . . . . . . . . . . . . . . . . . . . . . . . . . . . . . . . . . . . . . . . . . . . . . . . . . . . . . . . . . . . . . . . . . . . . . . . . . . . . . . 64
. . . . . . . . . . . . . . . . . . . . . . . . . . . . . . . . . . . . . . . . . . . . . . . . . . . . . . . . . . . . . . . . . . . . . . . . . . . . . . . . . . . . . . . . . . . . . . . . . . . 70
Import RDS server settings
. . . . . . . . . . . . . . . . . . . . . . . . . . . . . . . . . . . . . . . . . . . . . . . . . . . . . . . . . . . . . . . . . . . . . . . . . . . . . . . . . . . . . . . . . . . . 71
Chapter 7: Managing Projects
About projects . . . . . . . . . . . . . . . . . . . . . . . . . . . . . . . . . . . . . . . . . . . . . . . . . . . . . . . . . . . . . . . . . . . . . . . . . . . . . . . . . . . . . . . . . . . . . . . . . . . . . . . 72
Creating a ColdFusion project
. . . . . . . . . . . . . . . . . . . . . . . . . . . . . . . . . . . . . . . . . . . . . . . . . . . . . . . . . . . . . . . . . . . . . . . . . . . . . . . . . . . . . . . . 72
Configure properties for projects and servers
. . . . . . . . . . . . . . . . . . . . . . . . . . . . . . . . . . . . . . . . . . . . . . . . . . . . . . . . . . . . . . . . . . . . . . . . . . 73
Add ColdFusion pages, interfaces, and components
Create CFM/CFC files outside the workspace
Set Launch Page
Set URL Prefix
. . . . . . . . . . . . . . . . . . . . . . . . . . . . . . . . . . . . . . . . . . . . . . . . . . . . . . . . . . . . . . . . . . . 73
. . . . . . . . . . . . . . . . . . . . . . . . . . . . . . . . . . . . . . . . . . . . . . . . . . . . . . . . . . . . . . . . . . . . . . . . . . 75
. . . . . . . . . . . . . . . . . . . . . . . . . . . . . . . . . . . . . . . . . . . . . . . . . . . . . . . . . . . . . . . . . . . . . . . . . . . . . . . . . . . . . . . . . . . . . . . . . . . . . . 75
. . . . . . . . . . . . . . . . . . . . . . . . . . . . . . . . . . . . . . . . . . . . . . . . . . . . . . . . . . . . . . . . . . . . . . . . . . . . . . . . . . . . . . . . . . . . . . . . . . . . . . . . 76
Import, export, and delete projects
Cloak projects and files
. . . . . . . . . . . . . . . . . . . . . . . . . . . . . . . . . . . . . . . . . . . . . . . . . . . . . . . . . . . . . . . . . . . . . . . . . . . . . . . . . . . 76
. . . . . . . . . . . . . . . . . . . . . . . . . . . . . . . . . . . . . . . . . . . . . . . . . . . . . . . . . . . . . . . . . . . . . . . . . . . . . . . . . . . . . . . . . . . . . . . 77
Link to resources outside the workspace
. . . . . . . . . . . . . . . . . . . . . . . . . . . . . . . . . . . . . . . . . . . . . . . . . . . . . . . . . . . . . . . . . . . . . . . . . . . . . . 77
Deploy projects over FTP and Secure FTP connections
Import Ajax libraries
. . . . . . . . . . . . . . . . . . . . . . . . . . . . . . . . . . . . . . . . . . . . . . . . . . . . . . . . . . . . . . . . . 78
. . . . . . . . . . . . . . . . . . . . . . . . . . . . . . . . . . . . . . . . . . . . . . . . . . . . . . . . . . . . . . . . . . . . . . . . . . . . . . . . . . . . . . . . . . . . . . . . . . 79
Working with Flash Builder projects
Developing AIR applications
. . . . . . . . . . . . . . . . . . . . . . . . . . . . . . . . . . . . . . . . . . . . . . . . . . . . . . . . . . . . . . . . . . . . . . . . . . . . . . . . . . . 79
. . . . . . . . . . . . . . . . . . . . . . . . . . . . . . . . . . . . . . . . . . . . . . . . . . . . . . . . . . . . . . . . . . . . . . . . . . . . . . . . . . . . . . . . . . 79
Chapter 8: Debugging Applications
Using ColdFusion debugger . . . . . . . . . . . . . . . . . . . . . . . . . . . . . . . . . . . . . . . . . . . . . . . . . . . . . . . . . . . . . . . . . . . . . . . . . . . . . . . . . . . . . . . . . . 82
Debugging your application
. . . . . . . . . . . . . . . . . . . . . . . . . . . . . . . . . . . . . . . . . . . . . . . . . . . . . . . . . . . . . . . . . . . . . . . . . . . . . . . . . . . . . . . . . . 83
Debugging remote applications
. . . . . . . . . . . . . . . . . . . . . . . . . . . . . . . . . . . . . . . . . . . . . . . . . . . . . . . . . . . . . . . . . . . . . . . . . . . . . . . . . . . . . . 87
Chapter 9: ColdFusion Builder Extensions
About extensions . . . . . . . . . . . . . . . . . . . . . . . . . . . . . . . . . . . . . . . . . . . . . . . . . . . . . . . . . . . . . . . . . . . . . . . . . . . . . . . . . . . . . . . . . . . . . . . . . . . . . 89
What's new with extensions in ColdFusion Builder 2
Developing extensions
Creating user interfaces for extensions
Create views
. . . . . . . . . . . . . . . . . . . . . . . . . . . . . . . . . . . . . . . . . . . . . . . . . . . . . . . . . . . . . . . . . . . 89
. . . . . . . . . . . . . . . . . . . . . . . . . . . . . . . . . . . . . . . . . . . . . . . . . . . . . . . . . . . . . . . . . . . . . . . . . . . . . . . . . . . . . . . . . . . . . . . 89
. . . . . . . . . . . . . . . . . . . . . . . . . . . . . . . . . . . . . . . . . . . . . . . . . . . . . . . . . . . . . . . . . . . . . . . . . . . . . . . 106
. . . . . . . . . . . . . . . . . . . . . . . . . . . . . . . . . . . . . . . . . . . . . . . . . . . . . . . . . . . . . . . . . . . . . . . . . . . . . . . . . . . . . . . . . . . . . . . . . . . . . . . . 109
Specifying callback commands from handlers
Using the Extensions view
. . . . . . . . . . . . . . . . . . . . . . . . . . . . . . . . . . . . . . . . . . . . . . . . . . . . . . . . . . . . . . . . . . . . . . . . 111
. . . . . . . . . . . . . . . . . . . . . . . . . . . . . . . . . . . . . . . . . . . . . . . . . . . . . . . . . . . . . . . . . . . . . . . . . . . . . . . . . . . . . . . . . . . 116
Use ColdFusion Builder Extension Creator to create and package extensions
. . . . . . . . . . . . . . . . . . . . . . . . . . . . . . . . . . . . . . . . . . 118
Contribute to Code Assist from extensions
. . . . . . . . . . . . . . . . . . . . . . . . . . . . . . . . . . . . . . . . . . . . . . . . . . . . . . . . . . . . . . . . . . . . . . . . . . . 119
Extension support for setting Launch Page
. . . . . . . . . . . . . . . . . . . . . . . . . . . . . . . . . . . . . . . . . . . . . . . . . . . . . . . . . . . . . . . . . . . . . . . . . . . 120
Chapter 10: Using Extensions
Adobe CFC Generator . . . . . . . . . . . . . . . . . . . . . . . . . . . . . . . . . . . . . . . . . . . . . . . . . . . . . . . . . . . . . . . . . . . . . . . . . . . . . . . . . . . . . . . . . . . . . . . 122
AS Class Generator
. . . . . . . . . . . . . . . . . . . . . . . . . . . . . . . . . . . . . . . . . . . . . . . . . . . . . . . . . . . . . . . . . . . . . . . . . . . . . . . . . . . . . . . . . . . . . . . . . . 125
Last updated 5/15/2012
1
Chapter 1: What’s New in ColdFusion
Builder
What’s new in ColdFusion Builder 2.0.1
ColdFusion Builder 2.0.1 includes support for ColdFusion 10 language and server, several bug fixes, and the following
enhancements:
Performance enhancements
• Enhanced importing of large projects containing Application.cfc.
• Improved Code Assist efficiency with large projects.
• Improved efficiency of the editor.
Adobe CFC Generator has improved user experience
The Adobe CFC Generator has been enhanced to provide a better user experience. See “Use Adobe CFC Generator (in
ColdFusion Builder 2.0.1)” on page 124
New and enhanced callback commands
New commands
getProjects, reloadExtensions, and sendMessageToExtension
Enhanced commands
The response returned by the callback command getfunctionsandvariables now includes variable scope-related
information. You can write extension to determine the scope, for example if the variable is var scoped in the function.
See “Specifying callback commands from handlers” on page 111
New attribute keepfocus in view contribution
Set the attribute keepFocus to true to avoid focus from shifting when an extension view is generated dynamically. See
“Create views” on page 109.
New events added
Event
Description
onfilechangeineditor
Extension can listen for events when file changes in the editor
onRDSDataViewSelectionChan
ge
Extension can listen for event when selection changes in the RDS data view
OnFileSaved
Add event notification when file is saved
Last updated 5/15/2012
2
USING COLDFUSION BUILDER
What’s New in ColdFusion Builder
See “New events added in ColdFusion Builder 2.0.1” on page 93.
Support for menu contribution on multiple nodes
In RDS Data View, menu contributions can be added to server, database, and file nodes in addition to table nodes. See
“Support for menu contribution on multiple nodes” on page 102.
Sending messages between extensions
An extension can now send messages to another extension to perform an action or to notify of some event. The
extension that receives the message can either take action or ignore the message. See “Sending messages between
extensions” on page 104.
Other enhancements
• New Upload On Save option on the FTP connector dialog box to upload a file by way of FTP when saved locally.
• Use shortcuts to perform Synchronize and Upload (Ctrl+Alt+W U)/Download (Ctrl+Alt+W D) simultaneously.
• Take advantage of the shortcut for Synchronize (Ctrl+Alt+W Y).
• Turn Quick Fixes on/off facilitated using a new option. To use the option, go to Preferences > ColdFusion >
Profiles > Editor > SyntaxChecking and select the Enable Quick Fix option.
• Start/Stop the ColdFusion server remotely.
• Set Dictionary version for code assist when creating a project.
What’s new in ColdFusion Builder 2.0
ColdFusion Builder 2.0 Express Edition
Use a feature-limited Express Edition of ColdFusion Builder after the trial expires. Till you purchase a license, you can
continue to use the basic features such as editor, code assist, and syntax highlighting. See “Activating ColdFusion
Builder” on page 9.
Getting started experience
A dynamic getting started experience that invites access to tutorials, workflows, movies, notifications, tips and tricks,
and useful resources any time you start ColdFusion Builder. See “Getting started experience” on page 11.
Editor enhancements
Add tasks to Task View
If you define tasks as CFML comments, the Task View displays them based on the priority you set. The tasks are listed
with the default TODO and FIXME tags or the custom task tag prefix. See “Add tasks to Task View” on page 61.
Select tag blocks of your choice
The enclosing tag block from the caret position can be selected using the shortcut Ctrl+Alt+B (Windows) or
Command+Option+B (Mac). Retain the selection and then repeat the shortcut for cumulative selection of code.
“Select tag blocks of your choice” on page 45.
Last updated 5/15/2012
3
USING COLDFUSION BUILDER
What’s New in ColdFusion Builder
Jump to matching tag
Move the caret position from beginning to end or end to beginning of a tag block using the shortcut Ctrl+Alt+M
(Windows) or Command+Option+M (Mac). See “Jump to matching tag” on page 46.
Code Assist enhancements
Auto-insert required attributes
Auto-insert required attributes based on preference (the default option). If preference is not set, instead of insertion,
attributes are only proposed. See “Auto-insertion of required attributes” on page 44.
Shows separate list of required and optional tag attributes
Prompts you with a list of attributes showing required attributes at the top of the proposal list with check marks to
indicate that the attributes are mandatory. A line separates the mandatory and optional attributes. See “Separate list of
required and optional attributes” on page 44.
Lists proposals for createObject
Proposes all objects (and the corresponding arguments) supported by the function createObject. See “Proposals for
createObject” on page 44.
Cyclic Code Assist proposals
Use Ctrl+<Space> to cycle through your Code Assist proposal. You can switch from one proposal group at a time to
the next, for example from variables to function. See “Cyclic Code Assist proposals” on page 44.
Filter proposals containing text
Filter proposals based on the text you specify. All proposals that contain the filter text are listed with selection set to
the proposal that starts with the specified text. See “Filter proposals containing text” on page 45.
Datatype-aware Code Assist
Shows Code Assist proposals based on expected data types. See “Datatype-aware Code Assist” on page 45.
Auto-insertion of function arguments
When you insert a function, all required arguments are automatically inserted. See “Auto-insertion of function
arguments” on page 45.
Function context assist enhancements
• Displays function context assist whenever you load Code Assist inside function parameters
• Highlights the parameter that you currently edit in bold
• Displays the optional parameters inside [].
See “Function context assist” on page 45.
Smart Code Assist for connection attributes
Displays connection variables created for tags such as cfexchangeconnection and cfftp. See “Smart Code Assist for
connection attributes” on page 45.
Usage-based Code Assist for cfloop
Based on the type of loop, the required attribute is auto-inserted. See “Usage-based Code Assist for cfloop” on page 45.
Last updated 5/15/2012
4
USING COLDFUSION BUILDER
What’s New in ColdFusion Builder
Code folding enhancements
Hide and display code blocks of your preference (Ctrl+Alt+F (Windows) or Command+Option+F (Mac)). The code
folding that you define is saved and is available for future sessions. See “Code folding and unfolding” on page 51.
Code Formatting
Code formatter
Change the look of your CFML code by standardizing indentation, line length, and the case of tags and attribute names
(Ctrl+Shift+F (Windows) or Command+Shift+F (Mac)). Code formatter formats both tag and script-based syntax.
Code Formatter provides an off-the-shelf set of preferences. You can customize, import, and export the preferences.
See “Code Formatter” on page 47.
Auto-formatting
Automatically indents lines of code and adjusts the ending tag. See “Auto-formatting” on page 49
Quick Fix
When you open/edit a file, ColdFusion Builder automatically identifies the function calls, CFCs, and CFMs that are
not defined. A bulb icon appears in the left margin of the editor which, if clicked, prompts you to perform the
appropriate quick fix. See “Quick Fix” on page 46.
ColdFusion Builder Search
Specialized find and replace functionality (Ctrl+F (Win) or Command+F (Mac)) that searches text or tag in the current
and open documents, selected resource, project, working set, workspace, local directory, FTP location, and RDS
location. Regular expressions and multi-line search are also supported. To save time, you can run remote search in the
background and continue with other tasks. ColdFusion Builder search applies to the following file types: CFC, CFM,
HTML, XML, CSS, and JS. See “ColdFusion Builder Search” on page 59.
Keyboard shortcut enhancements
• Use a Quick Assist that displays a catalog of shortcuts related to wizards, tags, and custom shortcuts
• Create custom keyboard shortcuts
• Modify and remove shortcuts
• Search shortcuts for specific action based on filter text
• Export shortcuts in CSV format and import
• Restore defaults shortcut settings
See “CFML Editor keyboard shortcuts” on page 58.
Default keyboard shortcut changes
Action
Default shortcut in ColdFusion Builder
Default shortcut in ColdFusion Builder 2.0
Insert cfabort
Ctrl+Shift+A
Ctrl+T,A
Insert cfdump
Ctrl+Shift+D
Ctrl+T,D
Insert CFScript block
Ctrl+Alt+R
Ctrl+T,S
Last updated 5/15/2012
5
USING COLDFUSION BUILDER
What’s New in ColdFusion Builder
Action
Default shortcut in ColdFusion Builder
Default shortcut in ColdFusion Builder 2.0
Insert cfset
Ctrl+=
Ctrl+T,=
Access tag editor
Ctrl +T
Ctrl+Shift+T
Wrap/Unwrap
ColdFusion comment
Ctrl+Shift+M
Ctrl+T,M
Wrap in ##
Ctrl+Shift+H
Ctrl+T,H
Wrap in cfoutput
Ctrl+Shift+O
Ctrl+T,O
Wrap in try/catch
Ctrl+Shift+T
Ctrl_T,T
Navigation enhancements
Code navigation
Navigate from a user-defined function to the next or previous one or (in CFC files) to the top-level members of the
CFC (Ctrl + Shift + Up arrow/Down arrow key (Windows) or Command + Shift + Up/Down arrow key (Mac)). For
flow-control statements provided in CFScript, in both CFC page and CFM page, navigate to the next or previous code
blocks if the caret position is within any of these statements. See “Code navigation” on page 54.
Smart tab navigation
Quickly navigate to the next (use Ctrl + ] on Windows/ Command + ] on Mac) and previous (use Ctrl + [ on
Windows/Command + [ on Mac) function argument or tag attribute. Smart tab navigation is applicable to cffunction
arguments also in the case of function definition. See “Smart tab navigation” on page 55.
Extension enhancements
Specifying callback commands from handlers
You can complete the following operations in the execution phase: refresh file, folder, or project; open file or insert
text; get a list of servers or data sources; get details of tables; search and return content of a file; and list the functions
and variables in a file. See “Specifying callback commands from handlers” on page 111.
Create views
Create views and specify and toolbar items for the view you create using extensions. This helps you use the IDE features
concurrently while seeing the data. See “Create views” on page 109.
Contribute to Code Assist from extensions
Add proposals to Code Assist from extensions. See “Contribute to Code Assist from extensions” on page 119.
Extension support for setting Launch Page
Dynamically generate Start Page URL for framework applications using extensions. ColdFusion Builder features such
as ColdFusion Debugger, Use External Browser, and Run as ColdFusion Application use this URL as the Start Page
URL. The generated URL can also have query param added to it. See “Extension support for setting Launch Page” on
page 120.
Last updated 5/15/2012
6
USING COLDFUSION BUILDER
What’s New in ColdFusion Builder
Version and server details
ideeventinfo.xml sent to Handler CFM files from ColdFusion Builder will have ColdFusion Builder version
information and server details such as hostname and port number. See “Understanding ColdFusion Builder and
handler communication” on page 102.
Other enhancements
Create CFM/CFC files outside the workspace
Create CFM/CFC files outside the workspace using the File view. See “Create CFM/CFC files outside the workspace”
on page 75.
Set Launch Page
Designate a specific file as the Launch Page for your project. This page is loaded when you run/debug a file. See “Set
Launch Page” on page 75.
Help improvements
• Context-sensitive Help is displayed on mouse hover. This applies to functions, tags, and UDFs. For UDFs, the value
of the hint attribute is displayed in the Help window.
• Context-sensitive Help is available when you run Code Assist and then highlight a parameter or attribute.
Additional resources
• What's new in ColdFusion Builder 2
In this article, Ramchandra Kulkarni provides an overview of the ColdFusion Builder 2 features, to help you take
full advantage of all the productivity tools provided in ColdFusion Builder 2.
• Getting started with ColdFusion Builder 2
In this Adobe TV video tutorial, Adobe Platform Evangelist Terry Ryan shows you how to use the newest features
in ColdFusion Builder 2.
• ColdFusion Builder team blog
Provides latest news, updates, and other helpful information from the ColdFusion Builder team.
Last updated 5/15/2012
7
Chapter 2: Introduction
Adobe® ColdFusion® Builder™ is an integrated development environment (IDE) for developing Adobe®
ColdFusion®applications.
There are various resources to help you get started and become proficient in using ColdFusion Builder. Depending on
your background and what you want to accomplish with ColdFusion Builder, take a few minutes to read through the
appropriate documentation resources.
New to ColdFusion
❖ It is most useful if you have basic ColdFusion experience before you start using ColdFusion Builder. You can start
by viewing the Getting Started experience, which is available from the ColdFusion Administrator.
Experienced ColdFusion developers
• ColdFusion Builder is built on Eclipse™(an open source IDE), so you must know specific terms and concepts to
effectively use it. If you are, however, familiar with working in an Eclipse-based environment, you will find that
ColdFusion Builder uses similar workbench conventions.
For more information, see “ColdFusion Builder Workbench Basics” on page 16.
• If you have developed code using a text editor in the past, you will find that ColdFusion Builder provides enhanced
functionality that makes developing code much easier. For more information, see “About ColdFusion Builder” on
page 9.
• For a quick overview of the features that are available with ColdFusion Builder, see “Getting started with
ColdFusion Builder” on page 14.
• To successfully develop ColdFusion applications using ColdFusion Builder, use CFML Reference and ColdFusion
Developer Guide. The CFML Reference contains detailed information on the CFML language elements and is
available from the ColdFusion Builder Help system. For more information, see “Display CFML Reference Help” on
page 13.
• For information about the complete documentation available for ColdFusion and ColdFusion Builder, see
“ColdFusion and ColdFusion Builder documentation” on page 7.
ColdFusion and ColdFusion Builder documentation
All ColdFusion and ColdFusion Builder documentation is accessible from within ColdFusion Builder through the
integrated Help system. For more information, see “ColdFusion Builder Help System” on page 11.
Go to the ColdFusion Help and Support pages at www.adobe.com/go/learn_cfu_support_en to view the online
documentation.
In addition to viewing the documentation, you can also add and view comments to the documentation.
Adobe ColdFusion documentation
The ColdFusion documentation set includes the following titles:
Last updated 5/15/2012
8
USING COLDFUSION BUILDER
Introduction
Manual
Description
Installing Adobe® ColdFusion® 9
Describes system installation and basic configuration for Windows, Macintosh,
Solaris, Linux, and AIX.
Adobe ColdFusion® 9 Administrator's Guide
Describes how to perform ColdFusion administration tasks such as managing server
settings, configuring data sources and web servers, managing security, and
deploying ColdFusion applications.
This book also provides information about caching, setting up CFX tags, and
monitoring server activity using the ColdFusion Server Monitor.
Developing Adobe® ColdFusion® 9 Applications
Describes how to develop your dynamic web applications.
This book provides detailed information about using the CFML programming
language and ColdFusion features, such as ColdFusion Web Services, ColdFusion
Portlets, ColdFusion ORM, Ajax support, Flex and AIR integration, and integration
with other products and technologies such as Microsoft Office, OpenOffice, and
SharePoint.
Adobe® ColdFusion® 9 CFML Reference
Provides descriptions, syntax, usage, and code examples for all ColdFusion tags,
functions, and variables.
Adobe ColdFusion Builder documentation
The ColdFusion Builder documentation set includes the following titles:
Manual
Description
Installing Adobe® ColdFusion® Builder 2.0
Describes ColdFusion Builder installation, as a standalone installation or as a set of
plug-ins within an existing Eclipse workbench, for Windows and Macintosh
platforms.
Using ColdFusion® Builder 2.0
Describes how to use ColdFusion Builder as an integrated development environment
(IDE) for developing applications using ColdFusion.
ColdFusion and ColdFusion Builder learning resources
The following additional online resources are available for learning ColdFusion and ColdFusion Builder:
Resource
Link
ColdFusion Help and Support
www.adobe.com/go/learn_cfu_support_en
ColdFusion Developer Center
www.adobe.com/go/learn_cfu_cfdevcenter_en
Adobe ColdFusion online forums
www.adobe.com/go/learn_cfu_forums_en
Last updated 5/15/2012
9
Chapter 3: About ColdFusion Builder
Adobe® ColdFusion® Builder™ is built on top of Eclipse™, an open-source IDE (Integrated Development Environment).
An IDE contains most of the tools that developers need within a single application. ColdFusion Builder provides tools
for editing and validating code, managing files and projects, and debugging. The plug-in architecture of ColdFusion
Builder lets you extend the functionality for your own needs.
ColdFusion Builder runs on Microsoft® Windows® and Apple® Macintosh platforms. The installation configuration
options let you install ColdFusion Builder as a standalone installation or as a set of plug-ins within an existing Eclipse
workbench installation. For more information, see Installing Adobe ColdFusion Builder.
ColdFusion Builder configurations
The ColdFusion Builder installer provides the following two configuration options:
Standalone ColdFusion Builder IDE Installation Installs ColdFusion Builder as a standalone IDE (Integrated
Development Environment) built on Eclipse™ 3.6.2
ColdFusion Builder plug-ins within Eclipse IDE Installs ColdFusion Builder as a plug-in within an existing Eclipse or
Adobe® Flash® Builder™ installation. This configuration is for users who already use the Eclipse workbench and want
to add ColdFusion Builder plug-ins to their toolkit of Eclipse plug-ins.
Note: You must have Eclipse 3.6.2 or higher installed on your computer to install the plug-in configuration of ColdFusion
Builder.
If you are not sure which configuration to use, follow these guidelines:
• If you already use and have Eclipse 3.6.2 or higher installed, select the plug-in configuration.
• If you do not have Eclipse 3.6.2 or higher installed, select the standalone configuration. This configuration also
allows you to install other Eclipse plug-ins, so you can expand the scope of your development work in the future.
The two configurations provide the same functionality. However, some menu names and the ways to access the menu
commands sometimes differ slightly in the plug-in configuration.
Activating ColdFusion Builder
When you start ColdFusion Builder, you are prompted to enter the product serial number. When you enter a valid
product serial number, activation happens in the background the first time the software detects an Internet
connection. For more information, visit the Adobe Product Activation Center at www.adobe.com/go/activation.
If you do not enter the product serial number when you start ColdFusion Builder, you can use the trial version of the
full-featured ColdFusion Builder 2.0 for 60 days. After the trial expires, you need to purchase a license to continue
using all the features. If not, ColdFusion Builder switches to a feature-limited Express Edition.
ColdFusion Builder 2 Express Edition
The Express Edition lets you use ColdFusion Builder with the basic features such as editor, code assist, and syntax
highlighting.
Last updated 5/15/2012
10
USING COLDFUSION BUILDER
About ColdFusion Builder
But the following key features are not available in the Express Edition:
• Code assist for extensions
• Code insight
• Extension callback
• Connection to remote server
• Quick fix
• Debugging remote projects
• Refactoring
• ColdFusion search
• Code formatting
• FTP support
• Log viewer
• Local file browser
• Code hyperlinks
• Hover help
You can convert the Express Edition to a full-featured version by purchasing the license and specifying the product
serial number.
Managing ColdFusion Builder licenses
If you are a single-license user you can use ColdFusion Builder on up to two computers. To use your ColdFusion
Builder license on a different computer than your original two computers, deactivate the ColdFusion Builder license
on one of the two computers. After which, you can use it on another computer.
To deactivate the ColdFusion Builder license, select Help > Adobe ColdFusion Builder Deactivation.
Note: If you are uninstalling ColdFusion Builder, Adobe recommends that you first deactivate your license and then
uninstall ColdFusion Builder.
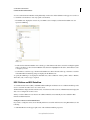
Installing third-party Eclipse plug-ins
ColdFusion Builder provides integration with third-party Eclipse plug-ins that let you extend or customize your
development environment. You can install the third-party Eclipse plug-ins on Windows and Mac OS X platforms.
Note: To ensure that the plug-in installs correctly, add the Helios Update Site URL
http://download.eclipse.org/releases/helios (or an equivalent Eclipse update site URL).
1 In Adobe ColdFusion Builder, select Help > Install New Software.
2 Click Add.
3 Enter the name and URL of the plug-in to install. For example, to install Subclipse version 1.0, enter the following
URL: http://subclipse.tigris.org/update_1.6.x
4 Select the plug-ins to Install.
5 Click Next and follow the instructions in the Install wizard.
6 Click Finish.
Last updated 5/15/2012
11
USING COLDFUSION BUILDER
About ColdFusion Builder
Getting started experience
ColdFusion Builder presents a dynamic getting started experience. Any time you start ColdFusion Builder, the Getting
Started screen invites access to:
• Getting started tutorials
• Workflows
• Movie tutorials
• Notifications such as What is new in a release and details of ColdFusion and ColdFusion Builder releases and hot fixes
• Tips and tricks
• Useful resources
• Most used options such as Recently Open Files, Links to Open Project Wizard, Add server, Recommended
extensions, and Install Extensions
You can choose to hide the Getting Started screen, and then later display it again.
Display the Getting Started screen
❖ Select Help > Getting Started with ColdFusion Builder
Hide the Getting Started screen
❖ Do either of the following:
• Select the Don't Show Again option on the Getting Started screen
• Uncheck the option Show welcome page on startup in the Preferences dialog box (Window > Preferences >
ColdFusion > Startup)
Additional resources
• ColdFusion Builder Start Page
ColdFusion Builder engineering team member Sandeep Paliwal elaborates on the getting started experience.
ColdFusion Builder Help System
While you work in ColdFusion Builder, you can display context-sensitive Help for specific user interface elements of
the workbench (views and dialog boxes) and language-reference help for code elements.
Adobe Community Help Client
Adobe Community Help client (CHC) is an AIR application that displays help content for ColdFusion Builder. The
Help content is served directly from the web. When you open the CHC for the first time, an Internet connection is
needed. You can then download the Help content to your desktop to use and search offline.
To open and view the ColdFusion Builder Help system, select Help > ColdFusion Builder Help.
Use context-sensitive Help
1 Select a view, dialog box, or any other user interface element in the workbench.
Last updated 5/15/2012
12
USING COLDFUSION BUILDER
About ColdFusion Builder
2 Press F1 (Windows) to open the associated Help page in the Community Help Client.
To use context-sensitive Help on Mac OS, set a keyboard shortcut to the Dynamic Help command. To specify a
keyboard shortcut for the Dynamic Help command, do the following:
1 Select Adobe ColdFusion Builder > Preferences.
2 In the tree view, select General > Keys.
3 Select the Dynamic Help command.
4 Press the key binding combination that you want to set. For example, to enter Ctrl+Shift+1, press and hold the keys
Ctrl and Shift and then press 1. A plus sign (+) between the keys indicates that you must press the keys in succession.
Community Help Client Preferences
You can set CHC preferences to control the Help content display.
1 In the CHC, select Edit > Preferences.
2 In the Preferences dialog box, set the following options, as required.
General Settings
• You can select a light or dark theme for the CHC. A theme is a formatting choice that determines the appearance
of the CHC. For example, when you apply a dark theme, the CHC has a dark background and theme-specific fonts.
• The CHC is launched as an AIR application, by default. You can, however, choose to launch the CHC in your web
browser. To do so, select On (Launch Help In Browser).
Download Preferences
You can select the products and Help packages that you want to have available for offline use.
Updater Settings
CHC provides content updates and feature enhancements without reinstalling the AIR application. Select Notify Me
When Updates Are Available to be prompted for new updates when you either open or close the CHC. You can also
choose to manually search and install updates.
Local Content
You can manually delete the Help packages that you downloaded to your desktop.
Search and Filter options
CHC lets you search across different Help packages and search locations.
Click Search Options to display the following Search locations.
Local Help Searches the Help package downloaded to your desktop for offline viewing. Click Filter Results to narrow
down your search results to a specific book in the Help package.
Adobe.com Searches up-to-date definitive reference content across all online resources available on adobe.com,
including Developer Center articles, tutorials, and knowledgebase articles.
Community Help This search is cumulative of all the resources available on adobe.com as well as the most relevant
content contributed by experts from the Adobe community.
Code Search The integrated code search lets you search through relevant code snippets available on adobe.com
Last updated 5/15/2012
13
USING COLDFUSION BUILDER
About ColdFusion Builder
Dynamic navigation
CHC provides dynamic navigation based on search results to find related content. All related content appears in the
Related Topics tab.
Feedback and rating
You can comment on, rate, and contribute to Help content if you have a valid Adobe ID. If you do not have an Adobe
ID, you can get one by registering yourself at https://www.adobe.com/membership.
Click Feedback And Rating in the bottom left-corner of the CHC, and provide your feedback. You can provide
feedback in the form of a tip, example, or by suggesting a link to a relevant online resource.
Eclipse Help System
The Eclipse Help system displays CFML reference Help for code elements. The Eclipse Help system also displays Help
for any third-party plug-ins that you install or that come packaged with ColdFusion Builder.
To open and view the Eclipse Help system, select Help > Help Contents.
Display CFML Reference Help
The CFML Reference is integrated into ColdFusion Builder, letting you quickly review the reference Help for a CFML
tag or function.
• To open the Help topic for a CFML tag or function, do the following:
1 In the CFML editor, select a CFML tag element or function by highlighting or placing the pointer on the built-
in tag or function name.
2 Press F1 (Windows) or the equivalent keyboard shortcut for Mac OS. A link to the Help page for the selected
tag is displayed in the docked Help window.
Note: In Mac OS, when you press Command+Shift+/ to view Help for a CFML tag or function, generic editor Help
appears in the docked Help window. To see the tag or function-specific Help, click the selected tag or function name
in the CFML Editor again.
3 Click the Help page link. The Help page for the selected tag or function is displayed.
Set Help Preferences
You can set Help preferences to control how Help is displayed in the Eclipse Help system.
1 In ColdFusion Builder, select Window > Preferences.
2 In the Preferences dialog box, you see a tree-view structure on the left side. Select Help.
3 Set the following options, as required.
Open help search Determines whether to display the help search in the Dynamic Help view window or in a
browser. By default, in the Dynamic Help is selected.
Open help view documents Determines where to display documents that are opened from links in Dynamic Help.
By default, In-place is selected, and Help documents open in the Dynamic Help view window. To open Help
documents in the ColdFusion Builder IDE editing area, select In the editor area.
Open help contents Lets you display help in a web browser of your choice. By default, the embedded browser of the
IDE displays Help. Select In an external browser and then select the Web Browser link to select your web browser.
Open window context help Determines how to display context-sensitive Help links for an open window. By
default, context-sensitive Help links are displayed in the Dynamic Help view which, when opened, is docked into
Last updated 5/15/2012
14
USING COLDFUSION BUILDER
About ColdFusion Builder
the current perspective like all other views. To display context-sensitive Help links in an infopop (similar to a
tooltip), select In An Infopop.
Open dialog context help Determines how to display context-sensitive Help links for an open dialog box. By
default, Help is displayed in the dialog box. To display context-sensitive Help links in an infopop (similar to a
tooltip), select In An Infopop.
Use dynamic Help
Dynamic Help is docked to the current perspective and displays topics for the associated views and dialog boxes.
❖ Select Help > Dynamic Help.
To change the default keyboard shortcut binding, select Window > Preferences > General > Keys, and change the
associated binding for the Dynamic Help command. For more information on changing keyboard shortcuts, see
“CFML Editor keyboard shortcuts” on page 58.
Getting started with ColdFusion Builder
Using ColdFusion Builder, you can develop ColdFusion applications in a full-featured IDE that lets you complete the
following tasks:
Note: Before getting started with the tasks, ensure that you are familiar with the ColdFusion Builder workbench and its
capabilities and features. For more information, see “ColdFusion Builder Workbench Basics” on page 16.
• Create ColdFusion projects: Using the Project wizard, you can create a project and configure a local or remote
server with it. For more information, see “Creating a ColdFusion project” on page 72.
• Add and manage servers: ColdFusion Builder includes integrated server management that allows you to manage
your ColdFusion servers, the ColdFusion Administrator, and Server Monitor within ColdFusion Builder.
You can configure both JRun and non-JRun servers. To manage your applications efficiently, ColdFusion Builder
provides features such as virtual hosts, virtual directories, and URL prefixes.
For more information on using these features and managing your servers, see “Managing Servers” on page 63.
• Deploy remote projects over FTP connection: ColdFusion Builder lets you manage both local and remote servers.
The remote servers can be connected either through RDS (Remote Data Services) or FTP (File Transfer Protocol)
connection. For more information about deploying and synchronizing remote projects over FTP connection, see
“Deploy projects over FTP and Secure FTP connections” on page 78.
• Create ColdFusion pages, components, and interfaces: ColdFusion Builder provides wizards that let you create
resources such as, ColdFusion pages, ColdFusion components (CFCs), and interfaces. You can associate these
resources to a project. For more information, see “Add ColdFusion pages, interfaces, and components” on page 73.
• Write and edit your ColdFusion application source code using the CFML editor: ColdFusion Builder provides
code editors to edit CFML, HTML, JavaScript, and CSS code. Based on the type of code that you are editing, the
appropriate editor is opened. For more information, see “ColdFusion Builder editors” on page 36.
The editors provide many features, including code colorization, code assist, and Outline view, which help you
navigate through your code.
The CFML editor provides features such as code completion, code refactoring, and streamlined code navigation.
ColdFusion Builder lets you use different colors and fonts to display your code in the editor. For more information
on the complete feature-functionality of the CFML Editor, see “Code Editing in ColdFusion Builder” on page 38.
Last updated 5/15/2012
15
USING COLDFUSION BUILDER
About ColdFusion Builder
• Write and edit SQL statements using the SQL Editor: The CFML editor has an integrated SQL editor that lets you
edit and write SQL statements. You can also set code colorization preferences for supported SQL statements. For
more information on the SQL Editor, see “SQL Editor” on page 50.
• Use and create CFML dictionaries: ColdFusion Builder provides built-in CFML dictionaries that assist you with
CFML code completion. CFML dictionaries are supported for ColdFusion versions 7, 8 and 9. You can also create
your own custom CFML dictionary. For more information about using and creating dictionaries, see “CFML
Dictionaries” on page 43.
• Use ColdFusion Builder development views: ColdFusion Builder provides many views that let you develop your
applications easily.
The RDS FileView lets you access and explore file systems on local and remote servers. The RDS DataView lets you
access and explore local or remote data sources. For more information, see “RDS FileView and RDS DataView” on
page 23.
You can also query data on a local or remote data servers using the RDS Query Viewer. For more information, see
“RDS Query viewer” on page 24.
The Services Browser view lets you browse through CFCs and their methods within the server web root. You can
access both local and remote CFCs and web services. For more information, see “Services Browser view” on
page 27.
The Snippets view and Outline view let you reuse and streamline your code. For more information, see “Snippets
view” on page 28 and “Outline view” on page 22.
For more information about all the development views, see “ColdFusion Builder Development perspective” on
page 22.
• Use the ColdFusion debugger to debug applications: ColdFusion Builder provides an integrated debugger with
debugging views, like the Debug view and the Breakpoints view, which let you debug your applications. For more
information about these views, see “ColdFusion Debugging perspective” on page 30.
You can add breakpoints to your code, step into or over functions, and examine and evaluate expressions. You can
debug files on both local and remote servers. For more information, see “Debugging Applications” on page 82.
The Problems view, TailView view, and Console view detect syntax, server, and compilation errors and display
them.
• Use and develop ColdFusion Builder extensions: Use the Extensions view to manage ColdFusion Builder
extensions.
You can develop extensions to generate code, design user interfaces, and perform basic CRUD (Create, Read,
Update, and Delete) operations on the database. You can also develop extensions to perform custom actions such
as opening files in the CFML Editor or inserting text in an open file. For more information about creating
extensions, see “ColdFusion Builder Extensions” on page 89.
ColdFusion Builder provides the ColdFusion Builder Extension Creator to guide you through the process of
creating and packaging extensions. For more information, see “Use ColdFusion Builder Extension Creator to create
and package extensions” on page 118.
The following extensions come packaged with ColdFusion Builder.
• Adobe CFC Generator
• ActionScript Class Generator
For more information on installing and using these extensions, see “Using Extensions” on page 122.
Last updated 5/15/2012
16
Chapter 4: ColdFusion Builder
Workbench Basics
ColdFusion Builder is an Eclipse-based development environment that allows you to develop Adobe ColdFusion
applications and run them on ColdFusion servers. You use it to develop ColdFusion applications using coding and
debugging tools.
About the workbench
The ColdFusion Builder workbench is a full-featured environment for developing Adobe ColdFusion applications.
Much of the basic functionality of the ColdFusion Builder IDE comes from Eclipse. The ColdFusion Builder plug-ins
add features and functionality for creating ColdFusion applications. The plug-ins also provide tools for modifying the
IDE user interface and supply some core functionality to support application building.
Workbench The workbench is the ColdFusion Builder development environment. The workbench contains three
primary elements: perspectives, editors, and views. You use all three in various combinations at various points in the
application development process. The workbench contains all the tools you use to develop applications.
Perspective A perspective is a group of views, editors, menus, and toolbars in the workbench. Essentially it is a special
work environment that helps you accomplish a specific type of task. For example, ColdFusion Builder contains two
perspectives. You use the ColdFusion Builder Development perspective to develop applications and the ColdFusion
Debugging perspective to debug them.
For more information about perspectives, see “About ColdFusion Builder perspectives” on page 21.
Editor An editor allows you to edit various types of files. The editors available to you vary according to the number
and types of Eclipse plug-ins installed. ColdFusion Builder contains editors for writing CFML, HTML, JavaScript, and
Cascading Style Sheets (CSS) code. For more information about code editing in ColdFusion Builder, see “ColdFusion
Builder editors” on page 36 and “Code Editing in ColdFusion Builder” on page 38.
Views A view typically supports an editor. For example, when you edit CFML, the Outline view and Snippet view are
also displayed in the ColdFusion Builder Development perspective. These views support the development of
ColdFusion applications and are therefore displayed when a CFML file is opened for editing.
Some views support the core functionality of the workbench itself. For example, the File Explorer view allows you to
manage files and folders within the workbench. The RDS Dataview and RDS Fileview display data sources, files, and
directories on both remote and local servers.
The term view is synonymous with the term panel as it is used in Adobe Dreamweaver® and other Adobe development
tools.
For more information about the views in the ColdFusion Builder Development perspective, see “ColdFusion Builder
Development perspective” on page 22.
For more information about the views in the ColdFusion Debugging perspective, see “ColdFusion Debugging
perspective” on page 30.
Workspace Not to be confused with workbench, a workspace is a defined area of the file system. The workspace
contains the resources (files and folders) that make up your application projects. A workspace can contain multiple
Last updated 5/15/2012
17
USING COLDFUSION BUILDER
ColdFusion Builder Workbench Basics
projects. You can work with only one workspace at a time; however, you can select a different workspace each time
you start ColdFusion Builder. For more information, see “Managing Projects” on page 72.
Resource The general term resource applies to the files and folders in the projects in a workspace. For more
information, see“Add ColdFusion pages, interfaces, and components” on page 73 and “Add other files” on page 75.
Project All the resources that make up your applications are contained within projects. You cannot build an
application in ColdFusion Builder without first creating a project. For more information, see “Managing Projects” on
page 72.
Workbench menus and toolbars
You access workbench commands through the menu bar, right-click context menus, toolbars, and keyboard shortcuts.
Workbench menus
The ColdFusion Builder workbench contains the following main menus:
File menu
The File menu lets you create, save, close, print, import, and export workbench resources and exit the workbench.
Menu command
Description
New
Creates a resource. Before you create a ColdFusion component, interface, or page, ensure
that you have created a project to store these resources.
Open File
Open a file for editing. You can also open files that are not in the workspace.
Close
Closes the active editor. You are prompted to save changes before the file closes.
Close All
Closes all open editors. You are prompted to save changes before the files close.
Save
Saves the content of the active editor
Save As
Lets you save the contents of the active editor in a different filename and location
Save All
Saves the contents of all open editors.
Revert
Replaces the contents of the active editor with the previously saved contents.
Move
Moves the currently selected resources to a different project
Rename
Lets you change the name of the selected resource
Refresh
Refreshes the resource with the contents in the file system
Convert Line Delimiters To
Lets you convert line delimiters to the operating system applicable to your development or
deployment platform:
•
Windows (default)
•
Unix
•
MacOS 9
Print
Prints the contents of the active editor
Switch Workspace
Opens the Workspace Launcher that lets you switch to a different workspace. When you
switch to a different workspace, the workbench is restarted.
Last updated 5/15/2012
18
USING COLDFUSION BUILDER
ColdFusion Builder Workbench Basics
Menu command
Description
Restart
Restarts ColdFusion Builder
Import
Lets you import resources to the workbench using the Import wizard
Export
Lets you export resources from the workbench using the Export wizard
Properties
Displays the properties dialog box for the selected resource. The Properties For dialog box
provides information about the path to the resource and the date of the last modification on
the resource. It also provides information if the project's resources have inherited their
encoding and line delimiters or if they are set to a particular value.
Recent File List
A list of the most recently accessed files in the workbench. You can open these files from the
File menu by clicking the filename. You can control the number of files that must appear in
this list using the Preferences dialog box.
Exit
Closes the open resources and exits the workbench
Navigate menu
The Navigate menu lets you locate and navigate through resources in your workbench.
Menu command
Description
Go Into
Lets you navigate within hierarchies of resources such that the selected resource is at the
root. That is, when you select a folder within a project and select Go Into, only the selected
folder (and artifacts within the folder) appear in the Navigation view.
This command is useful in navigating through large-sized projects with complex
hierarchies.
Go To
Lets you jump to a specific resource or display the hierarchy that appeared before the
current display.
For example, select the Go Into command for a resource, and then select Go To > Back. The
Back command displays the same hierarchy from which you activated the Go Into
command.
Open Declaration
Opens declaration for selected code element.
Quick Outline
Displays a quick view of the Outline view. A hierarchical view of the code structure of the
page appears in a pop-up menu.
Open Resource
Lets you select a resource in the workspace and open it in an editor using the Open
Resource dialog box
Show In
Lets you find and select the currently selected resource in another view. If an editor is active,
these commands are used to select the resource that is currently being edited in another
view.
Next
Lets you navigate to the next item in a list or table in the active view
Previous
Lets you navigate to the previous item in a list or table in the active view
Last Edit Location
Lets you jump to the last edit position in the active editor
Go To Line
Lets you jump to a specific line in the active editor
Back
Lets you move editor focus to a previously opened file.
Forward
Lets you return editor focus from the previous file.
Project menu
The Project menu lets you manage projects in the workbench.
Last updated 5/15/2012
19
USING COLDFUSION BUILDER
ColdFusion Builder Workbench Basics
Menu command
Description
Open Project
Opens the currently selected project. The selected project must be closed for this command
to be available.
Close Project
Closes the currently open project]
Properties
Displays the project properties dialog box
Window menu
The Window menu lets you display, hide, and manage the various views, perspectives, and actions in the workbench.
Menu command
Description
New Window
Opens a new workbench window with the same perspective as the currently open
perspective
New Editor
Opens an editor that is of the same type as the currently active editor
Open Perspective
Opens a new perspective in the workbench
Show View
Lets you select the views to display in the workbench
Customize Perspective
Lets you customize the currently selected perspective
Save Perspective As
Lets you save the currently selected perspective, creating your own customized perspective.
Reset Perspective
Lets you reset a customized perspective
Close Perspective
Closes the currently open perspective
Close All Perspectives
Closes all the open perspectives in the workbench
Navigation
Contains shortcuts to navigate between the views, perspectives, and editors in the
workbench
Preferences
Lets you set you preferences for using the workbench. There are a number of preferences
to configure the appearance of the workbench andtheviews and editors contained in the
workbench.
Toolbars
Workbench toolbar
The workbench toolbar contains buttons for important and frequently used commands. These commands are also
available from various ColdFusion Builder menus.
Workbench toolbar
The following buttons appear in the workbench toolbar (shown left to right):
Button/command
Description
New
Displays a pop-up menu that displays all the types of projects and documents you can
create.
Save
Saves the document that is open in the editor and currently selected
Print
Prints the document that is open in the editor and currently selected
Last updated 5/15/2012
20
USING COLDFUSION BUILDER
ColdFusion Builder Workbench Basics
Button/command
Description
New ColdFusion Project
Opens the wizard to create a ColdFusion project.
Open CFC
Lists all the CFCs that are available for projects displayed in the Navigator view.
Debug
Uses the project’s currently open file to begin a debugging session. You can also select other
application files in the project from the attached pop-up menu.
Run
Runs the project’s currently open file. You can also select other application files in the
project from the attached pop-up menu.
External Tools
Selects a custom launch configuration
Search
Searches for text strings and filename patterns for files in the project
Next Annotation
Allows you to select and move forward to code annotations
Previous Annotation
Allows you to select and move backward to code annotations
Last Edit Location
Takes you to the code element that you last edited in the currently open file.
Back To
Lets you move editor focus to a previously opened file.
Forward To
Lets you return editor focus from the previous file.
CFML Editor toolbar
The CFML Editor contains buttons that are user interface shortcuts to frequently used commands. These commands
are also available from various ColdFusion Builder menus. Some buttons in the toolbar are shortcuts to frequently used
code elements, and are context sensitive to the code that you enter in the CFML Editor.
CFML editor toolbar
Button/command
Description
Open Tag Editor
Opens the Tag Editor.
For more information about using the Tag Editor, see “Tag Editor” on page 57.
Insert cfabort
Inserts the cfabort tag.
This command is context sensitive to the script code.
Insert cfdump
Inserts the cfdump tag. This command is context sensitive to the script code.
Wrap in cfoutput
Wraps the selected code within the cfoutput tag.
This command is context sensitive to the script code that you enter in the CFML Editor.
Insert cfset
Inserts the cfset tag.
Insert cfscript Block
Inserts a cfscript code block.
Wrap in cftry/cfcatch
Wraps the selected code within the cftry or cfcatch tag, depending on the code.
This command is context sensitive to the script code.
Wrap in ##
Wraps the selected code within "#" marks.
Wrap/Unwrap in cfcomment
Comments or uncomments the selected code.
Wrap/Unwrap in /* */
Wraps or unwraps the selected code within ""/* */"" marks
Wrap in Single Quotes
Wraps the selected code within single quotation marks.
Last updated 5/15/2012
21
USING COLDFUSION BUILDER
ColdFusion Builder Workbench Basics
Button/command
Description
Wrap in Double Quotes
Wraps the selected within double quotation marks.
To Uppercase
Changes the text in the selected code to uppercase.
To Lowercase
Changes the text in the selected code to lowercase.
About ColdFusion Builder perspectives
A perspective is a group of editors and views that support the completion of a task. ColdFusion Builder contains two
perspectives: the ColdFusion Builder Development perspective and the ColdFusion Builder Debugging perspective.
Open and switch perspectives
When you open a file that is associated with a particular perspective, ColdFusion Builder automatically opens that
perspective. That is, perspectives change automatically to support the task at hand. For example, when you create a
ColdFusion project, the workbench displays the Development perspective. Similarly, when you start a debugging
session, ColdFusion Builder switches to the Debugging perspective.
By default, perspectives open in the same window. To open a perspective in a new window, do the following:
1 Select Window > Preferences
2 In the tree view structure, select General > Perspectives.
3 Under Open a New Perspective, select In The Same Window.
You can manually switch perspectives by doing one of the following:
• Select Window > Open Perspective > Other from the main menu.
• Use the perspective bar in the main workbench toolbar.
Eclipse provides many predefined perspectives. So, if you use the plug-in configuration of ColdFusion Builder, you
sometimes have additional perspectives.
You can access the other Eclipse perspectives by doing one of the following:
• Select Window > Open Perspective > Other from the main menu.
• Click
in the perspective bar in the main workbench toolbar and select Other.
Set a default perspective
1 Select Window > Preferences.
2 In the tree view structure, select General > Perspectives.
3 Under Available Perspectives, select the perspective that you want to set as the default, and click Make Default.
4 Click OK.
The default perspective has the word "default" in parentheses after the perspective name.
Last updated 5/15/2012
22
USING COLDFUSION BUILDER
ColdFusion Builder Workbench Basics
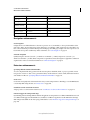
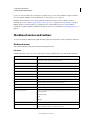
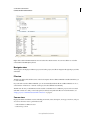
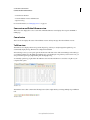
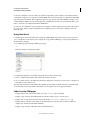
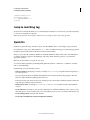
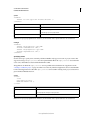
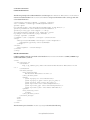
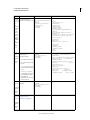
ColdFusion Builder Development perspective
You use the ColdFusion Builder Development perspective to create, edit, configure, and run ColdFusion applications
in ColdFusion Builder. In addition, you can configure and manage local or remote ColdFusion servers.
A
B
C
D
E
F
G
H
I
J
K
L
M
N
ColdFusion perspective
A. Outline view B. RDS Dataview C. RDS Fileview D. Perspective Bar E. Navigator view F. File view G. Source view H. Servers view
I. Default Browser view J. Console view K. TailView view L. Services Browser M. Extensions view N. Snippets view
The ColdFusion Builder Development perspective includes these views:
Outline view
The Outline view displays a hierarchy of elements in the file that is currently open in the editor. For example, it displays
the functions in a CFC file and the tags in an HTML file.
You use Outline view to inspect and navigate the structure of your CFML, HTML, JavaScript, and CSS pages. If a page
contains multiple code elements, you can use the Outline view to see a hierarchical view of the code structure of the page.
Last updated 5/15/2012
23
USING COLDFUSION BUILDER
ColdFusion Builder Workbench Basics
You can sort the elements in Outline view alphabetically or in the order of their definition in the page. You can choose
to view all the code elements or view only specific code elements.
• The Outline view displays the structure of your CFML code. For example, each item in the Outline view can
represent a CFML tag.
Outline view
• Double-click an element in Outline view to directly go to that element in the editor, instead of scrolling through the
entire code. When you select an item in Outline view, that item is highlighted in the editor, which makes it easier
to navigate your code.
• Use the filter to search for a tag or element in the Outline view. Enter the name of the tag or element to search for
in the Filter field. The matching strings are displayed in the Outline view.
To specify the CFML tags to be displayed in an Outline view, select ColdFusion > Editor profiles > Editor > Outline.
Then select, add, or remove tags, as required.
RDS FileView and RDS DataView
To use Remote Data Services (RDS), enable RDS while installing the ColdFusion server. ColdFusion Builder provides
views to access files and data sources on a remote server.
The RDS FileView displays the files and directories on both remote and local servers. The RDS DataView displays the
data sources configured in a remote server.
When you add a ColdFusion server instance in ColdFusion Builder, it automatically becomes available in RDS
FileView and RDS DataView.
Configure a remote server for RDS FileView
If you want to configure a remote server manually and then access its files and directories using RDS FileView, do the
following:
1 Click RDS FileView in the upper-right corner of the ColdFusion Builder perspective.
Last updated 5/15/2012
24
USING COLDFUSION BUILDER
ColdFusion Builder Workbench Basics
2 Right-click in RDS FileView and select RDS Configuration.
3 Click New.
4 Specify remote server information such as the host name, port number, user name, and password.
5 Select Prompt For Password.
6 Click Test Connection to check that the RDS configuration is correct. Then, click OK.
7 Select the remote server from RDS FileView.
8 Specify the password for the remote server to view its files and directories.
Configure a remote server for RDS DataView
To configure a remote sever and access data sources from the remote server using RDS DataView:
1 Click RDS DataView.
2 Right-click in RDS DataView and select RDS Configuration.
3 Click New.
4 Specify the server information such as host name, port number, remote server user name, and password.
5 Select Prompt for Password.
6 Click Test Connection to check that the RDS configuration is correct. Then, click OK.
7 Expand the new server in RDS DataView to view data sources.
RDS Query viewer
The RDS Query viewer lets you create and run queries on a selected data source.
The RDS Query Viewer is available in the RDS DataView toolbar. To create and execute a query using the RDS Query
viewer, do the following:
1 Click
in RDS DataView to open RDS Query Viewer area.
2 Type the query in the blank area.
You can also build a query by dragging tables and columns from the RDS DataView view into the RDS Query
Viewer.
3 Select the server and data source from the drop-down list.
4 Click Execute Query. The results of the query are displayed in the RDS Query Viewer area.
Last updated 5/15/2012
25
USING COLDFUSION BUILDER
ColdFusion Builder Workbench Basics
RDS query viewer
Right-click a table in the RDS DataView view and select Show Table Contents. You can view all the records of the
selected table in the RDS Query Viewer.
Navigator view
The Navigator view displays ColdFusion projects and other projects, and allows navigation through the project’s files
and folders.
File view
The File view displays files and directories on the local computer where ColdFusion Builder is installed and allows you
to create new files.
If you edit a file outside ColdFusion Builder, you can automatically refresh the file in ColdFusion Builder. To do so,
select Window > Preferences > General > Workspace, and select Refresh Automatically.
The File view also lets you add FTP sites and browse files on the FTP server. ColdFusion projects can be associated
with FTP connections so that you can easily upload, download, and synchronize files. For more information, see
“Deploy projects over FTP and Secure FTP connections” on page 78.
Servers view
Displays the details of ColdFusion servers including server name, status, description, server type, server host, and port.
You can use the Server view to perform these tasks:
• Add and delete a ColdFusion server
• Start and stop a server
Last updated 5/15/2012
26
USING COLDFUSION BUILDER
ColdFusion Builder Workbench Basics
• Launch Server Monitor
• Launch ColdFusion Server Administrator
• Open server log
For more information, see “Managing Servers” on page 63.
Source view and Default Browser view
The Source view displays the source code for files. The Default Browser View displays the output in an HTML or
CFML page.
Console view
The Console view displays the status of the ColdFusion server and any messages from the ColdFusion server.
TailView view
The TailView view displays the Server log and Workspace log, and lets you easily navigate through the logs. To
automatically display the logs, RDS must be configured and enabled.
After selecting a server, you can open logs from the shortcut in the button bar of the Server Manager. Select the log to
open it in the TailView view. By default, the TailView view opens the Exception log. When you are in Server view, you
can open the Exception log by right-clicking and selecting Open Log.
To manually open the logs, right-click in the TailView view and select Add. Browse to and select a log file on your
computer’s file system.
TailView view
The Tailview view toolbar contains the following buttons (left to right) that let you manage multiple logs in different
tabs.
TailView toolbar
Last updated 5/15/2012
27
USING COLDFUSION BUILDER
ColdFusion Builder Workbench Basics
Button/command
Description
Move Left
Moves the Server log or Workspace log to the left
Move Right
Moves the Server log or Workspace log to the right
Adds Log
Opens a log file on your computer’s file system
Starts Watching Log File
Starts watching on a log file
Stops Watching Log File
Stop watching on a log file
Reloads The Log File
Reloads a log file
Clears Log File In Display
Removes the log file displayed in the TailView view, without deleting it from the computer’s
file system
Erases Log File On Disk
Remove a log file from the computer’s file system
Deletes Log Tab
Removes a log file from the computer’s file system
Deletes All Log Tabs
Removes all the log tabs from the TailView view
Scroll Lock
Prevents the Console view from scrolling.
Color Settings
Sets color preferences for displaying the log file in the TailView view
Services Browser view
The Services Browser view lists the servers added in the Server Manager and lets you browse through ColdFusion
components (CFCs), web services and their methods.
Browse ColdFusion components
The Services Browser view lists the following components:
• Components that the ColdFusion component browser lists. The ColdFusion component browser is located at
cf_root/wwwroot/CFIDE/componentutils/componentdoc.cfm
• Components that are located in any directories specified in the ColdFusion Administrator Mappings page
• Components that are located in any directories specified in the ColdFusion Administrator Custom Tag paths page
The Services Browser view toolbar contains the following buttons (left to right) that let you filter methods in CFCs
based on the access type - remote, public, package, and private.
Services browser toolbar
Button/command
Description
Show System CFCs
A toggle button that shows or hides system CFCs. System CFCs are stored within the server
web root.
Show Remote
A toggle button that shows or hides methods with the access type - remote
Show Public
A toggle button that shows or hides methods with the access type - public
Show Package
A toggle button that shows or hides methods with the access type - package
Show Private
A toggle button that shows or hides methods with the access type - private
Last updated 5/15/2012
28
USING COLDFUSION BUILDER
ColdFusion Builder Workbench Basics
Manage web services
The Services Browser view lets you manage a list of web services by adding or deleting WSDL URLs from a list.
• To view the list of web services, click
• To add a web service to the list, click
in the Services Browser view.
, enter a valid WSDL URL, and click OK.
• To delete a web service, select the web service, and click
.
When you are editing a ColdFusion file, you can use the Services Browser view to generate CFML code to run a web
service or to create a web service object. Similarly, when you are editing an ActionScript file, you can use the Services
Browser to generate ActionScript.
To run or create a web service, do the following:
1 Place your pointer where you want to insert the code.
2 View the list of web services.
3 Highlight a web service or a method in a web service, right-click, and select:
• Insert CFObject to insert a web service.
• Insert CreateObject to create a web service.
Extensions view
You use the Extensions view to perform the following tasks:
• “Install and uninstall extensions” on page 117
• “Import and reload extensions” on page 117
The Extensions view also displays details like the extension name and description of the installed extension.
The Extensions view toolbar contains the following buttons (left to right) that let you manage extensions in the
Extensions view.
Extensions view toolbar
Button/command
Description
Install Extension From Archive File
Lets you select the Archive file to install and opens the Extension Install wizard to guide you
through the installation.
Import Extension From Folder
Lets you select the folder that contains the extension files.
Uninstall Selected Extension
Uninstalls the selected extension.
View Details About Selected Extension
Displays details about the selected extension.
Snippets view
A code snippet is a piece of text that you can insert and reuse in your files, without having to type the text each time.
You use the ColdFusion Snippet view to create and save code snippets, variables, and plain text. You can add code
snippets to an existing or new document.
The Snippet view toolbar contains the following buttons (left to right) that let you manage code snippets in the
Snippets view.
Last updated 5/15/2012
29
USING COLDFUSION BUILDER
ColdFusion Builder Workbench Basics
Code snippet toolbar
Button/command
Description
Refresh Snippet View
Refreshes the Snippet view
Insert The Selected Snippet
Inserts the selected snippet into the document
Create A New Snippet
Creates a code snippet
Edit The Selected Snippet
Lets you modify the selected code snippet
Delete The Selected Snippet
Deletes the selected code snippet
Create A New Snippet Package
Creates a snippet package to which you can add code snippets
Delete Selected Snippet Package
Deletes the selected snippet package only if it is empty. You cannot delete a snippet
package that contains snippets.
Create a code snippet
1 In the Code Snippet area, click
.
2 In the New Snippet dialog box, specify the snippet name, and the start and end blocks of code.
3 Click OK to create the code snippet.
Insert a code snippet
1 Move the cursor to the desired insertion point.
2 Select the code snippet from the Code Snippet area.
3 Click
in the Code Snippet toolbar.
If you select code in the editor, and then insert a snippet, the snippet is wrapped between the start and end block of the
selected code. If you insert a snippet without selecting code in the editor, the snippet is inserted at the current caret
position. caret is the marker in the CFML editor that indicates where the next character appears.
You can also edit or delete an existing code snippet or an entire code snippet package from the Code Snippet area.
Using trigger text to insert snippets
You can insert snippets in the CFML editor using trigger text. For example, you create a snippet and give it the trigger
text "abc." To insert this snippet in the editor, you type abc and press Ctrl + J (Windows) or Command + J (Mac). The
text abc is replaced with the associated snippet.
Specify the path to store snippets
Snippets are stored in a snippet’s directory as an XML file. By default, snippets are stored in the
workspace/.metadata/snippets directory of your project workspace. To specify a different directory, do the following:
1 From the Windows menu, select Preferences.
2 In the tree view structure of the Preferences dialog box, select ColdFusion > Snippets.
3 Specify the path to the directory in which to store snippets.
System-defined snippet variables
Snippet variables are case sensitive. The following system-defined variables are available.
Last updated 5/15/2012
30
USING COLDFUSION BUILDER
ColdFusion Builder Workbench Basics
Variable
Description
$${DATE}
The system date with the year as a four-digit number. For example, 12/01/2009
$${TIME}
The system time using a 12-hour clock. For example, 03:15:05 PM
$${DATETIME}
The system date and time. For example, 12/01/2009 15:15:05 PM
$${DAYOFWEEK}
The full name of the day of the week. For example, Monday
$${CURRENTFILE}
The filename of the currently open file. For example, application.cfm
$${CURRENTFOLDER}
The fully qualified path of the currently open folder. For example, C:\workspace\myproject
$${CURRENTPATH}
The fully qualified path of the currently open file. For example,
C:\workspace\myproject\application.cfm
$${CURRENTPRJPATH}
The project name of the currently open project. For example, myproject
$${USERNAME}
The name of the current user.
$${MONTHNUMBER}
The month, from 01 through 12.
$${DAYOFMONTH}
The day of the month from 01 through 31.
$${DAYOFWEEKNUMBER}
The day of the week as a number, from 1 through 7. Sunday is considered as the start of ther
week. So, for example, Monday is 2.
$${DATETIME24}
The date and time using a 24-hour clock. For example, 12/01/2009 15:30:00
$${YEAR}
The current year as a four-digit number. For example, 2009
$${YEAR2DIGIT}
The current year as a two-didgit number. For example, 09
For example, to insert the current date, use the following system-defined variable:
Date: $${DATE}
User-defined snippet variables
User-defined variables prompt you for the variable name and default value. For example, the following user-defined
variable prompts you to enter the author’s name:
Author name: $${Author}
ColdFusion Debugging perspective
The ColdFusion Debugging perspective contains tools to debug your ColdFusion applications. There are different
views that let you add breakpoints to your code, step into or over functions in your code, and examine and evaluate
expressions. The editor works with the debugging tools to locate and highlight lines of code that need correction.
Last updated 5/15/2012
31
USING COLDFUSION BUILDER
ColdFusion Builder Workbench Basics
A
B
C
D
E
F
G
H
I
J
K
ColdFusion Debugging perspective
A. Variables view B. Debug output buffer view C. Breakpoints view D. Expressions view E. Outline view F. Debug view G. Edit view
H. Servers view I. Console view J. Problems view K. TailView view
The ColdFusion Debugging perspective contains the following views:
Variables view
The Variables view toolbar contains the following buttons (left to right) that let you show the current variables,
including the variable scope.
Variables view toolbar
Button/command
Description
Show Type Names
Displays the type of the variables
Show Logical Structure
This command is not supported in ColdFusion Builder
Collapse All
Collapses the information in the view to show only variable types
Last updated 5/15/2012
32
USING COLDFUSION BUILDER
ColdFusion Builder Workbench Basics
Debug Output Buffer view
The Debug Output Buffer contains two panes:
Browser Displays what appears in the browser during application execution. Specify the URL of the page that you
want to debug.
Note: When you click the Home button, the URL that you specified as the Home Page URL in the Preferences dialog box
(Window > Preferences > ColdFusion > Debug Settings) appears. For more information on editing the Debugger settings,
see “Specify debugger settings in ColdFusion Builder” on page 83.
Server Output Buffer Displays the Debugger output in two views - source view and HTML view.
The Server Output Buffer pane displays an output only when the Debugger is suspended at breakpoint. The output
that appears is only up to the suspended breakpoint.
Note: The Server Output Buffer displays the output even for a page that is executed using an external browser.
Breakpoints view
The Breakpoints view toolbar contains the following buttons (left to right) that let you manage breakpoints during a
debugging session.
Breakpoint view toolbar
Button/command
Description
Remove Selected Breakpoints
Removes the selected breakpoint
Remove All Breakpoints
Removes all breakpoints
Show Breakpoints Supported by Selected
Targets
Displays the breakpoints that you are currently debugging
Go to File for Breakpoint
Goes to the file in which the selected breakpoint is set
Skip All Breakpoints
Ignores all breakpoints
Expand All
Expands all the breakpoint information in the view
Collapse All
Collapses all the breakpoint information in the view
Link with Debug View
Highlights the selected breakpoint when the application stops execution in the Debug View
Add Java Exception Breakpoint
Lets you specify which Java exception to throw when you reach the selected breakpoint
Menu
Lets you specify the type of information to display in the Breakpoints view
Expressions view
The Expressions view lets you create expressions using variables and functions; you can inspect, evaluate, and watch
these expressions. The Expressions view also lets you evaluate and watch variables that you selected in the Variables
view.
Last updated 5/15/2012
33
USING COLDFUSION BUILDER
ColdFusion Builder Workbench Basics
Expressions view
The Expression view toolbar contains the following buttons (left to right) that let you create, evaluate, and watch
expressions.
Expressions view toolbar
Button/command
Description
Show Type Names
Displays the type of the variables
Show Logical Structure
Displays the logical structure in the view
Collapse All
Collapses all expressions in the view
Create a New Watch Expression
Adds a watch expression
Remove Selected Expressions
Removes the selected variable or watch expression
Remove All Expressions
Removes all variables and watch expressions in the Expressions view
Outline view
The Outline view displays the current source file’s content in outline form. For more information, see “Outline view”
on page 22.
Debug View
The Debug view keeps the results of each debug session. The Debug view shows the stack trace when the page
execution is suspended at breakpoint or when stepping into or over code.
The Debug toolbar contains the following buttons (left to right):
Debug toolbar
Last updated 5/15/2012
34
USING COLDFUSION BUILDER
ColdFusion Builder Workbench Basics
Button/command
Description
Resume
Resumes a debugging session
Suspend
Pauses a debugging session
Terminate
Stops a debugging session
Disconnect
Disconnects the debugger from the selected debug target when debugging remotely
Remove All Terminated Launches
Clears all terminated debug targets from the display
Step Into
Executes code line by line, including included code, UDFs, and CFCs
Step Over
Executes code line by line, excluding included code, UDFs, and CFCs
Step Return
Returns to the original page from which you entered the included code, UDF, or CFC
Drop to Frame
This command is not supported in ColdFusion Builder.
Use Step Filters/Step Debug
Ensures that all step functions apply step filters
Edit view
The Edit view displays the stacked source tabs, one tab for each source file that you have open.
Servers view
The Servers View lets you start, stop, and manage servers in ColdFusion Builder. You can also launch the ColdFusion
Server Monitor and ColdFusion Server Administrator from the Servers View.
Servers view toolbar
The Servers view toolbar contains the following buttons (left to right) that let you manage servers.
Button/command
Description
Add Server
Adds a server
Start Server
Starts a server
Restart Server
Stops and starts a server
Pause Server
Pauses the server
Stop Server
Stops a server
Open Console/Shell
Opens a new console and displays a pop-up menu to select other servers
Open Log
Opens the server log in the TailView view
For more information about managing servers and using Servers view, see “Using Servers View” on page 70.
Console view
Console view displays the output from trace statements placed in your CFML code and also feedback, like status,
warnings, and errors from the debugger itself.
Last updated 5/15/2012
35
USING COLDFUSION BUILDER
ColdFusion Builder Workbench Basics
Console view
The Console view toolbar contains the following buttons (left to right) that let you view and manage the trace
statements in the Console view.
Console toolbar
Button/command
Description
Clear Console
Clears all content from the Console view
Scroll Lock
Prevents the Console view from scrolling
Pin Console
Prevents the console from refreshing its contents when another process is selected
Display Selected Console
Displays the selected console
Open Console
Opens a new console and displays a pop-up menu to select other console views
Problems view
As you enter code, the ColdFusion Builder compiler detects syntax and other compilation errors, and displays the
errors in the Problems view. The Problems view shows errors only for CFML files that are open in ColdFusion Builder.
Problems view
TailView view
The TailView view displays the server logs. For more information, see “TailView view” on page 26.
Last updated 5/15/2012
36
USING COLDFUSION BUILDER
ColdFusion Builder Workbench Basics
Add views to the workbench
The workbench contains views besides the views associated with ColdFusion Builder’s default development and
debugging perspectives. These additional workbench views help you streamline the application development process.
❖ To add a view to the workbench, select Window > Show View > Other > General
These optional views are categorized by type and are associated with distinct workbench functionality or with specific
Eclipse plug-ins.
Several workbench views, like the Tasks, Bookmarks, and Search views, are valuable aids as you develop your
applications in ColdFusion Builder.
ColdFusion Builder editors
Editors are associated with resource types. As you open resources in the workbench, the appropriate editor is opened.
The workbench is a document-centric (and project-centric) environment for developing applications.
Use the CFML editor to edit CFML files. For more information, see “Code Editing in ColdFusion Builder” on page 38.
Use the HTML editor to edit HTML code and the JavaScript editor to edit JavaScript code. The CSS editor lets you
display and edit Cascading Style Sheets; you can then apply styles to the visual elements of your applications.
You can use the Link with Cursor feature to switch between the different editors based on the type of code you are
editing. The editors provide many features, including code colorization, code assist, and Outline view, that help you
navigate through your code and keep it valid.
As you enter CFML, HTML, JavaScript, and CSS code, hints are displayed to help you complete your code. This feature
is called Code Assist. For more information, see “Code Assist” on page 39.
Customizing a perspective
You can configure the layout of your perspective; that is, you can configure the views and editors that are visible in the
perspective. For example, you can configure the Tasks view to be visible in one perspective, and hidden in another
perspective. You can also configure several other aspects of a perspective, such as the following:
• File > New submenu items
• Window > Perspective > Other submenu items
• Window > Other Views submenu items
• Action sets (buttons and options) that appear in the toolbar and in the main menu
Note: Menu names differ slightly in the plug-in configuration of ColdFusion Builder.
Create a customized perspective
1 Open the perspective to modify.
2 Select Window > Customize Perspective.
3 Select the Shortcuts tab or the Commands Groups Availability tab, depending on the items that you want to add or
remove in your customized perspective.
Last updated 5/15/2012
37
USING COLDFUSION BUILDER
ColdFusion Builder Workbench Basics
4 Use the check boxes to select the element that you want to be visible on menus and toolbars in the selected
perspective.
5 Click OK.
6 Select Window > Save Perspective As.
7 In the Save Perspective As dialog box, enter a name for the modified perspective and click OK.
Note: When you save a modified perspective, ColdFusion Builder adds the name of the modified perspective to the
Window > Open Perspective > Other menu.
Delete a customized perspective
You can only delete perspectives that you created. You cannot delete perspectives that are delivered with the
workbench.
1 In ColdFusion Builder, select Window > Preferences.
2 In the Preferences dialog box, you see a tree-view structure on the left side.
3 In the tree-view structure, select General > Perspectives.
4 Under Available Perspectives, select the perspective that you want to delete.
5 Click Delete, and then click Yes to confirm the delete action.
6 Click OK.
Reset a customized perspective
After you have modified a perspective, you can restore it to its original layout.
1 In ColdFusion Builder, select Window > Preferences.
2 In the Preferences dialog box, you see a tree-view structure on the left side.
3 In the tree-view structure, select General > Perspectives.
4 Under Available Perspectives, select the modified perspective that you want to reset.
5 Click Reset, and then click OK.
Last updated 5/15/2012
38
Chapter 5: Code Editing in ColdFusion
Builder
CFML Editor
ColdFusion Builder provides a CFML Editor that has feature-rich code editing capabilities for CFM, CFC, HTML,
JavaScript, and CSS files. The CFML Editor assists you in writing code by including features like, code completion, and
streamlined code navigation. The CFML Editor lets you use different colors and fonts to display your code in the
workspace.
You can customize your development environment by setting editor profiles and preferences.
Editor profiles
An editor profile lets you group and save the following editor preferences under one profile.
• Code Assist
• Colors
• Keys
• Outline
• Syntax Checking
• Typing
Editor profiles are useful when you have different editor preferences for various development needs. For example, you
can select a set of preferences like Code Assist, code colorization, and keyboard shortcut preferences and save them
under a single editor profile. You can apply all these settings at once by selecting the editor profile.
To create an editor profile, do the following:
1 Specify the different editor preferences that you want to set.
2 From the Window menu, select Preferences.
3 In the tree-view, select ColdFusion > Profiles, and click Create New Profile.
4 Enter a name for the profile. The current editor preference values that you set are saved under this profile.
You can also modify default settings and save the modified settings as a new profile. Additionally, you can also import
or export profiles.
By default, ColdFusion Builder provides three editor profiles:
• Default - Sets the ColdFusion Builder default editor preferences
• Dreamweaver - Sets editor preferences similar to Dreamweaver editor preferences
• CFEclipse - Sets editor preferences similar to CFEclipse editor preferences
To select an editor profile, click the Active Profile drop-down list in the Profiles dialog box, and select the profile.
Last updated 5/15/2012
39
USING COLDFUSION BUILDER
Code Editing in ColdFusion Builder
Editor preferences
1 From the Window menu, select Preferences.
2 In the tree-view, select ColdFusion > Profiles > Editor.
You can specify default filenames for the CFM and CFC files that you create. To remove any trailing whitespaces in
the file, select Trim Spaces Before Saving Files.
You can also specify any text or boilerplate code that must appear, by default, in every CFM and CFC file. For example,
suppose you want copyright information to appear in every CFC file that you create. In this case, you can specify the
copyright text in the CFC tab under New File Settings.
The editor preferences that you can set include code assist, code colorization, keyboard shortcuts, outline view, syntax
checking, and typing preferences.
Optimizing ColdFusion Builder performance
The preference options that you select affect the performance of ColdFusion Builder. For faster editor performance,
you can apply preset editor preferences. Once you apply the preset settings, your current preference settings are lost
permanently. To save your current preference settings, save the settings as an editor profile.
To apply preset editor preferences, click Optimize Editor Preferences. The following preference settings are applied:
Code Assist
The following options are deselected.
• Automatically Display Code Assist When Typing
• Automatically Display SQL Code Assist When Typing
• Automatically Insert A Single Proposal
• Automatically Insert A Closing Tag
The following options are selected.
• Append Space After Inserting Selection
• Automatically Insert Equal Sign (=)
• Automatically Quote Attributes
Typing
• Enable Auto-insertion is selected.
• All the Auto-insert Matching Character For options are deselected.
• Auto-close Tags is selected as Never.
Code Assist
Note: Code Assist is also called Content Assist. These terms are used interchangeably.
Last updated 5/15/2012
40
USING COLDFUSION BUILDER
Code Editing in ColdFusion Builder
Code Assist is designed to assist you with code completion. Depending on the code that you enter, hints relevant to
complete the code appear. As you type the code in the CFML editor, Code Assist prompts you with a list of valid CFML
tags, parameters, and attributes. These suggestions appear in a pop-up menu. If you have HTML, JavaScript, or CSS
content within the CFML code, Code Assist displays code completion hints for this code as well. Double-click or press
Enter, to insert the code completion hint in the CFML Editor.
Code Assist is also available for script-based syntax; for example, code hints appear for functions and components in
the script syntax. When you import Ajax libraries into ColdFusion projects, Code Assist is available even for the
JavaScript code.
Using Code Assist
Code hints appear whenever the framework or language (CFML, HTML, JavaScript, and CSS) provides options for
you to complete the current expression. For example, if you type within a CFML tag, you are prompted with a list of
all the attributes of that tag.
1 In a CFML page, begin entering a CFML tag by typing:
<cf
Relevant code hints are displayed as follows:
Code hints
2 Navigate through the list of code hints using the Up Arrow and Down Arrow keys.
3 Select a code hint and press Enter. The selected tag is added to the editor.
4 As you continue to enter code, additional code hints are displayed. You can also press Ctrl+<Space> to display code
hints while you enter a line of code.
The Smart Tag Assist feature of the CFML editor identifies if a tag attribute is already entered for a particular tag. If
you have already entered a tag attribute, that attribute does not appear in the list of suggested attributes.
Code Assist for CFM pages
• Displays methods and component list when you use the <cfinvoke> tag in a CFM file.
• Displays a drop-down list of predefined attributes and values when you press <cf+Ctrl+<space>.
• Displays a list of components (CFC) that can be loaded using createobject() or the <cfobject> tag.
• Displays methods created in a CFC, which can be called using the component object created in a CFM. Also
displays a list of methods of all extended CFC files.
• Displays a drop-down list of all built-in and user-defined functions.
Last updated 5/15/2012
41
USING COLDFUSION BUILDER
Code Editing in ColdFusion Builder
• Provides a list of variables, like, struct, array, query. These variables are declared in a page. The variables also appear
as Code Assist for attribute values.
• Displays all the queries created using <cfquery> or queryNew(). To view the recordset, type <cfoutput
query="">, and press Enter. or use queryname. (that is, query name followed by dot).
• Includes the functions, variables, tags, and queries from another CFM page once it is included in the current CFM
page using the <cfinclude> tag.
• Allows you to browse and select a file as the input value for an attribute of CFM tags. CFM tags that require a file
as the input value include <cfinclude>, <cfimage>, <cfdirectory>, <cfpdf>, <cffile>, <cfzip>,
<cfspreadsheet>, and <cfcollection>.
Code Assist for CFC pages
• Displays a list of components (CFC) that can be loaded using createobject().
• Displays a list of components (CFC) that can be loaded using the <cfobject> tag.
• Displays methods created in a CFC, which can be called using the component object created in a CFM.
Examples:
•
<cfset obj1 = createobject("component", "c1")>
<cfset x = obj1.method1()>
•
<cfset obj2 = createobject("component", "c2").init()>
•
<cfset obj3 = new "c3"().method3()>
•
<cfinvoke component="c4" method="method4">
• Displays a list of methods of all extended CFC files. The "extends" and "implements" keyword/attribute lists the
available components and interfaces.
• Displays a list of components that can be extended in the current CFC file.
Note: Code Assist is not supported for comments that are added to component properties. For example, Code Assist is
not supported for a comment that you add to the numeric accountID property as follows:/** @ -- code assist
is not supported here --*/
• Displays a list of interfaces that can be used in a CFC with the implement keyword.
• Allows you to browse and select a file as the input value for an attribute of CFM tags or functions like <cfif
fileexists()>.
CFM tags that require a file as the input value include <cfinclude>, <cfimage>, <cfdirectory>, <cfpdf>,
<cffile>, <cfzip>, <cfspreadsheet>, and <cfcollection>.
Code Assist for scoped variables using variable mapping
Many ColdFusion frameworks create CFCs during application startup and store these CFCs as scope variables. To
provide Code Assist for such CFCs, ColdFusion Builder must determine the content and data type (fully qualified
name of the CFC).
To enable Code Assist for CFCs that are stored in scoped variables, define a project-level mapping for the variable
name and its corresponding CFC type. ColdFusion Builder uses this mapping information and displays a list of CFC
methods for the mapped variable, without creating an object of that data type. For example, you can map mycfc1 to
com.adobe.mycfcs.cfc1. When you type mycfc1 and press Ctrl+<space>, all the methods available for
com.adobe.mycfcs.cfc1 appear.
Last updated 5/15/2012
42
USING COLDFUSION BUILDER
Code Editing in ColdFusion Builder
To configure a variable mapping, in the Properties dialog box, Specify the variable to map as mycfc1 and the mapped
to value as com.adobe.mycfcs.cfc1. For more information, see “Configure variable mappings” on page 73.
Code Assist for ColdFusion ORM
Object Relational Mapping (ORM) is a programming technique that lets you define a mapping strategy using object
models. You can use Object Relational Mapping to store and retrieve data from a relational database.
ColdFusion Builder provides Code Assist for the following ColdFusion ORM settings:
• Entity names in entityLoad, entityNew, and entityFindByPK functions.
• Methods and properties returned by entityLoad, entityNew, and entityFindByPK functions.
• Code hyperlinks for entity names and methods.
• Data sources in application.cfc. For example, <cfset
this.datasource = >.
• Table attribute of the cfcomponent tag.
For more information about using ColdFusion ORM, see ColdFusion ORM in the ColdFusion Developer Guide.
Code Assist for Application.cfm and Application.cfc files
Code Assist is available for Application.cfm and Application.cfc files.
Application.cfm is considered an included file and Code Assist is available for all variables and functions within the
file.
For Application.cfc, Code Assist is available only for scoped variables that are declared in onApplicationStart.
Set CFML Editor Code Assist preferences
1 From the Window menu, select Preferences.
2 In the tree-view, select ColdFusion > Profiles > Editor > Code Assist.
• You can select the Code Assist Dictionary version to assist with code completion. ColdFusion 9, ColdFusion 8,
and ColdFusion MX7 dictionary versions are supported.
• Select the Automatically Display Code Assist When Typing check box to automatically display Code Assist
when typing.
Note: When editing large-sized files, you can deselect the Automatically Display Code Assist When Typing check
box to improve performance of the editor. You can, however, display code hints while you enter a line of code by
pressing Ctrl+<Space> or any other keyboard shortcut that is set.
• You can choose to automatically quote attributes and select closing tags.
Code hyperlinks for CFCs and UDFs
Component names and UDFs are hyperlinked on Ctrl+hover. If you click the hyperlink, the corresponding code is
opened in ColdFusion Builder. Code hyperlinks are available for:
• UDFs: local, included, and cfc.udfName
• Template in <cfinclude template=””>
• CFCs in createobject(), <cfobject>, <cfinvoke>, new keyword, and extends attribute.
Last updated 5/15/2012
43
USING COLDFUSION BUILDER
Code Editing in ColdFusion Builder
CFC name resolution using server mapping
Use ColdFusion Administrator to define server mapping for CFCs. The server mappings allow you to view these CFCs
as part of Code Assist when you use the extend or implement keywords.
ColdFusion server mappings let cfobject and cfinvoke tags, or functions like createObject or new, access pages
and find ColdFusion components outside the document root.
If you specify a path in these tags that starts with the mapping's logical path, ColdFusion looks for the CFC using the
mapping's directory path. You can define server mapping for the CFCs using the ColdFusion Administrator. After
mapping, you can view the CFCs in Code Assist when you use the extend or implement keywords, and component
or method attributes. The CFCs suggested in Code Assist are resolved with their fully qualified names.
Once mappings are created for the CFC name resolution from the server, the server settings are cached and available
even when the server is not running. The server settings are collected when the server is started or refreshed from
ColdFusion Builder.
Specify server settings
1 From the Windows menu, select Preferences.
2 In the tree view structure, select ColdFusion > Server Settings.
3 Select the Build Server Settings check box and the Required check box to indicate the action for collecting server
settings. For example, to collect server settings each time you start ColdFusion Builder, select the ColdFusion
Builder Started check box.
CFML Dictionaries
ColdFusion Builder provides in-built dictionaries that assist you with CFML code completion. The CFML dictionary
is an XML file that contains information about each tag and function contained in the library. For example, the CF9
dictionary file (cf9.xml) contains information about all the available CF9 tags and functions.
ColdFusion Builder provides dictionary support for ColdFusion 9, ColdFusion 8, and ColdFusion MX7 versions.
To select a dictionary version, do the following:
1 From the Window menu, select Preferences.
2 In the tree-view, select ColdFusion > Profiles > Editor > Code Assist.
3 Select the Code Assist Dictionary version drop-down list and select a dictionary version to assist with code
completion.
4 Click Reload Dictionaries to reload all the dictionaries, including custom dictionaries.
Create custom CFML dictionaries
You can create a custom CFML dictionary (XML file) and make it available to use for Code Assist and Tag Editor
within ColdFusion Builder.
1 Within the ColdFusion Builder installation, navigate to the following location:
\plugins\com.adobe.ide.coldfusion.dictionary_XXX\dictionary
2 Create a folder called "Custom" within the Dictionary directory.
3 Create an XML file to describe the custom tags and functions.
For example, in the XML file, you describe each tag within <tag></tag> elements, and enclose all the tag elements
within <dictionary></dictionary> elements as follows:
Last updated 5/15/2012
44
USING COLDFUSION BUILDER
Code Editing in ColdFusion Builder
<dictionary>
<tags>
!-cfabort
showError = "error_message"
-->
<tag endtagrequired="false" name="cfabort" single="true"
xmlstyle="false">
<parameter name="showerror" required="false" type="String">
</parameter>
</tag>
</tags>
</dictionary>
See the cf9.xml or cf8.xml files as reference to create the custom CFML dictionary.
Auto-insertion of required attributes
In the Code Assist (Window > Preferences > ColdFusion > Profiles > Editor > Code Assist), select Auto Insert
Required Tag Attributes to insert the required attributes of a tag.
Note: This is the default setting.
For example, if you select cfpdf "action=write", all the required attributes destination, source, and name are
automatically inserted.
If the preference is not selected, the attributes are not inserted but only proposed.
Separate list of required and optional attributes
Code Assist prompts you with a list of tag attributes as follows:
• Shows required tag attributes at the top of the proposal list with check marks to indicate that the attributes are
mandatory.
• A line separates the mandatory and optional attributes.
Proposals for createObject
Code Assist proposes all objects (and the corresponding arguments) supported by the function createObject.
Cyclic Code Assist proposals
In the Code Assist (Window > Preferences > ColdFusion > Profiles > Editor > Code Assist), select Cycling Code Assist
Proposals for cyclical code assistance.
Note: This is the default setting.
Consider the scenario where when you press Ctrl+<Space>:
• Variables, scopes, and UDFs are listed
• On this list, if you further press Ctrl+<Space>, all built-in functions are proposed
• On this list, if you further press Ctrl+<Space>, all proposals are listed.
• The cyclic proposals continue on subsequent use of Ctrl+<Space>.
Note: Cyclic Code Assist does not appear if you manually specify a part of the text for which you want prompt.
Last updated 5/15/2012
45
USING COLDFUSION BUILDER
Code Editing in ColdFusion Builder
Filter proposals containing text
In the Code Assist (Window > Preferences > ColdFusion > Profiles > Editor > Code Assist), select Filter Proposals
Containing Text to filter proposals based on the text you specify.
Note: This is the default setting.
All proposals that contain the filter text you specified are listed with selection set to the proposal that starts with the
specified text.
Datatype-aware Code Assist
Shows Code Assist proposals based on expected data types.
For example, when you load Code Assist within the function Abs, it shows functions and variables of type numeric,
Any, or complex data types such as array, struct, or component.
Auto-insertion of function arguments
When you insert a function, all required arguments are automatically inserted. By default, the first argument is
selected.
Function context assist
• ColdFusion Builder displays function context assist whenever you load Code Assist inside function parameters.
Note: In ColdFusion Builder (the previous release), function context assist appears only after you insert functions from
the Code Assist proposals.
• Parameter that you currently edit is highlighted in bold.
• Optional parameters are displayed inside [].
Smart Code Assist for connection attributes
Smart Code Assist displays connection variables created for tags such as cfexchangeconnection and cfftp.
Usage-based Code Assist for cfloop
Based on the type of loop, the required attribute is auto-inserted. For example, if you loop over an array, the attribute
index is auto-inserted.
Select tag blocks of your choice
Use the shortcut Ctrl+Alt+B (Windows) or Command+Option+B (Mac) to select tag blocks. The enclosing tag block
from the caret position is selected.
Retain the selection and repeat the shortcut for cumulative selection of code.
For example, in the following snippet, when you press Ctrl+Alt+B/Command+Option+B, the cfform tag block is
selected. If you retain the selection and then press Ctrl+Alt+B/Command+Option+B, code selection is extended to the
next level of enclosure. That is, the entire code block is selected.
Last updated 5/15/2012
46
USING COLDFUSION BUILDER
Code Editing in ColdFusion Builder
<cffunction name="test">
<cfform name="form1">
<!--- caret position --->
</cfform>
Jump to matching tag
Use the shortcut Ctrl+Alt+M (Windows) or Command+Option+M (Mac) to move the caret position from beginning
to end or end to beginning of a tag block.
Note: The caret position can be anywhere within the start or end tag (and not exactly on the tag name).
Quick Fix
Quick Fix recognizes the usage of methods, classes, and CFC/CFM files in the code and helps you generate them.
For example, if you type a user-defined function test() that is not defined in the page or any included page, Quick
Fix helps you generate the function. The function call is inserted in the file.
When you open/edit a file, ColdFusion Builder automatically identifies the function calls, CFCs, and CFMs that are
not defined. A bulb icon appears in the left margin of the editor which, if clicked, prompts you to perform the
appropriate quick fix.
Note: The shortcut CTRL+1 also yields the same result.
You can turn off the Quick Fix by unchecking Enable Quick Fix (Window > Preferences > ColdFusion > Profiles >
Editor > Syntax Checking).
Quick Fix helps you in the following scenarios:
• Call to local UDF in any language construct, for example cfset or cfscript assignment, function arguments, or
any other expression.
If you specify any arguments in the UDF, then Quick Fix also creates the arguments. Depending on where the
function is called, ColdFusion Builder generates the code.
Both tag and script-style syntax are supported, depending on the context. That is, Quick Fix generates a method in
script-style if it is called in script-based syntax.
• Method call on a CFC, for example cfc1.function1(). If function1 is not defined in CFC1, then Quick Fix
creates it.
• Create CFC from createObject, new, cfobject, and cfinvoke. ColdFusion Builder provides options to create
CFC with respect to wwwroot (if the server is associated with the project), project, or in a folder selected by the user.
• Create CFM page from cfinclude and cfmodule
• Create CFCs and CFMs from extends and implement attributes.
Last updated 5/15/2012
47
USING COLDFUSION BUILDER
Code Editing in ColdFusion Builder
Example
<cfset o1 = new component1()>
<cfset st = structNew()>
<cfset result = getResults("abc", 10, st)>
<cfinclude template="test3.cfm" >
<cfscript >
o2 = new component2();
//Assume that component2 exists
o2.someFunction();
</cfscript>
In the snippet, Quick Fix finds four unresolved issues and prompts action:
Line of code
Issue
Prompt
<cfset o1 = new component1()>
Component is not created
Create CFC
<cfset result =
getResults("abc", 10, st)>
Function getResults does not exist
Create the function getResults
<cfinclude template="test3.cfm"
>
test3.cfm does not exist
Create test3.cfm
Component does not exist
Create someFunction in component2.
o2 = new component2();
Additional resources
• Quick Fix in ColdFusion Builder
ColdFusion Builder engineering team member Sagar Ganatra demonstrates the usage of Quick Fix.
Code Formatter
You can change the look of your CFML code using Code Formatter. The feature helps you standardize indentation,
line length, and the case of tags and attribute names. Code formatter formats both tag and script-based syntax.
You can
• Select a CFML file within a project and format its code.
• Format code of an open CFML file in editor.
• Select a section of code in CFML file and format.
In addition to CFM and CFC files, Code Formatter supports formatting of HTML, XML, CSS, and JavaScript code
within a CFM or CFC file.
Formatting your code
1 In the editor, open the CFM or CFC file.
2 Do either of the following:
• Right-click and then select Format.
• Use the keyboard shortcut Ctrl+Shift+F (Windows) or Command+Shift+F (Mac)
Note: To format a section of the code, select it before step 2.
Last updated 5/15/2012
48
USING COLDFUSION BUILDER
Code Editing in ColdFusion Builder
Customizing the preferences
Code Formatter has an off-the-shelf set of preferences defined in a profile. To customize the preferences, create a
profile or modify the default profile after giving a new name.
1 In ColdFusion Builder, select Window > Preferences.
2 In the tree view, select ColdFusion > Profiles > Editor > Formatter.
3 Click Add to add a new profile or Edit to edit an existing profile after selecting the profile in the Active Profile.
Note: You cannot edit the default profile.
4 In the CFML Formatting Profile, add or modify the profile by setting the rules specified in the following table. The
code formatting preferences are based on the rules. Each tab in the dialog box represents a rule.
Rule
Options to
General
•
Specify if you want to maintain the case currently used for tags and attributes, or change it to upper
or lowercase.
•
Append /> at the end of the tag, for example, modify <cfargument …. > as <cfargument …. />.
Specify the tag to which you want to append /> and then click Add.
•
Place the closing tag for cfoutput (</cfoutput>) on a new line only if the content spans to
multiple lines.
Indentation
•
Specify the indentation details and the name of the tags for which you do not want to apply
indentation.
White space
•
Add white space based on your selections.
•
Add blank lines based on your selections.
•
Specify the number of blank lines that you want to retain.
•
Specify the number of attributes in a line within a tag and set the column width.
•
Specify various constructs for wrapping.
•
Specify if the curly braces are placed in the same or new line for component and function declarations
and switch, if, else, and try blocks.
Wrapping
Braces
Sharing the preferences
You can share the formatting preferences in XML format.
Use the appropriate buttons in the Formatter section of the Preferences dialog box (Window > Preferences >
ColdFusion > Profiles > Editor > Formatter) to export your preferences or import preferences shared by somebody.
Additional resources
• CFML Code Formatter – An Introduction
ColdFusion Builder engineering team member Sandeep Paliwal explains how to enforce coding guidelines using
CFML Code Formatter.
Last updated 5/15/2012
49
USING COLDFUSION BUILDER
Code Editing in ColdFusion Builder
Auto-formatting
ColdFusion Builder automatically indents lines of code and adjusts the ending tag, to improve readability.
Auto-formatting works in the following scenarios:
When you type code
• Indents when you press Enter with the cursor placed after
•
> of the start tag
• Opening curly brace ({)
•
> for closing tag.
• the closing tag if it is auto-completed while typing </.
• When closing, curly brace (}) is placed in alignment with the opening curly brace ({).
When you use Code Assist
• If you auto-insert closing tag, while typing forward slash (/), it is placed at the correct location with respect to
the start tag.
• If you auto-insert closing tag, it is aligned to the start tag.
Code colorization
ColdFusion Builder can highlight the syntax for CFML tag names, attributes, attribute values, keywords, comments,
and various other elements in different colors. Code colorization is also supported in script-style coding. You can
customize the color preferences and override the default Eclipse editor color preferences.
Set CFML Editor color preferences
1 From the Window menu, select Preferences.
2 In the tree-view, select ColdFusion > Profiles > Editor > Colors.
•
You can import and export your color preferences as a COL file.
•
You can specify color preferences for Tokens. Tokens include language preferences, errors, identifiers,
keywords, literals, punctuators, and tags.
• You can specify color preferences for specific regions of your code. You can specify a region between the start
and end of code elements, and define a distinguishing color for that region.
Set SQL Editor color preferences
1 From the Window menu, select Preferences.
2 In the tree-view, select ColdFusion > Profiles > Editor > Colors. Under Tokens, scroll down to SQL, and select color
preferences for comments, keywords, and text.
Last updated 5/15/2012
50
USING COLDFUSION BUILDER
Code Editing in ColdFusion Builder
SQL Editor
The CFML editor has an integrated SQL editor that lets you edit, write, and execute SQL statements.
To use the SQL editor, you must have a server configured and running in ColdFusion Builder. The SQL editor does
not support offline databases.
The SQL Editor supports Code Assist and code colorization for the following types of SQL statements:
• Select
• Insert
• Update
• Delete
Note: For SQL statements within the cfquery tag, Code Assist is available in the CFML Editor itself. You need not open
the SQL Editor for code completion hints.
Using SQL Editor
1 Do one of the following:
• Right-click in the CFML editor, and select SQL Editor.
• Use the keyboard shortcut Ctrl+Alt+S (Windows) or Command_Alt+S (Mac OS).
2 In the SQL Editor, select a server from the Server drop-down list and a database from the Datasources drop-down list.
3 Enter the SQL statement and do the following:
• Click Execute Query to display the results of the SQL statement in the Query Result tab. You can execute only
SELECT statements in the SQL Editor.
• Click OK to insert the SQL statement in the CFML editor at the current caret position. caret is the marker in the
CFML editor that indicates where the next character appears.
4 You can also copy SQL code blocks from the SQL Editor directly into the CFML editor by selecting the code block
and pressing Shift+Enter.
5 To edit a SQL code block in the CFML editor, select the code block, right-click, and select SQL Editor. The selected
code block appears in the SQL Editor.
For more information about basic SQL syntax and writing SQL statements, see Using SQLin the ColdFusion
Developer Guide.
SQL Code Assist
SQL Code Assist is available only for database table names and field names in the SQL statement.
By default, SQL Code Assist is turned on in ColdFusion Builder, and code hints for SQL statements are automatically
displayed in the CFML Editor. To turn off the automatic display of SQL Code Assist, do the following:
1 From the Window menu, select Preferences.
2 In the tree-view, select ColdFusion > Profiles > Editor > Code Assist.
3 Deselect Automatically Display SQL Code Assist When Typing.
Last updated 5/15/2012
51
USING COLDFUSION BUILDER
Code Editing in ColdFusion Builder
Even with the automatic display of SQL Code Assist turned off, you can still get code hints within your SQL statements
as follows:
1 Begin entering the SQL statement in the SQL editor and press Ctrl+<Space> to display the database table names or
field names.
2 Navigate through the list of table names or field names using the Up Arrow and Down Arrow keys.
3 Select a table name or field name and press Enter. The selected table or field is added to the SQL statement.
ColdFusion Builder provides Code Assist for the query attribute of the <cfoutput> tag. For example, when you type,
<cfoutput query="">, and press Ctrl+<Space> with the caret position between the double quotes "". A list of queries
created in that file or included files appears.
Code Assist is also provided for query names that are used in expressions.
For example, if you create a query like:
<cfquery datasource="dsn1"name="q1">
Select id, firstName, lastName from employee
</cfquery>
When you type the expression <cfset name = q1.> and press Ctrl+<Space>, ColdFusion Builder displays the
columns selected in that SQL query.
SQL Code colorization
In the CFML editor, SQL code colorization is supported only within the cfquery tag. You can colorize SQL keywords,
comments, and text within the cfquery tag. Colorization is supported only for the following types of SQL comments:
• /* */
• -To set SQL code colorization preferences, see “Set SQL Editor color preferences” on page 49.
Code folding and unfolding
The CFML editor provides many shortcuts for navigating through your code. Shortcuts include folding and unfolding
code blocks, opening the source of code definitions, and browsing and opening types. You can collapse and expand
multiline code blocks to navigate, view, and manage complex code documents. In ColdFusion Builder, collapsing and
expanding multiline code statements is called code folding and unfolding. You can use this feature in a CFM, CFC, or
HTML file.
You can hide and display code blocks of your preference. The code folding that you define is saved and therefore is
available for future sessions.
1 In the CFML Editor, click the fold icon (-) or the unfold icon (+) in the left margin of the editor.
Folding a code block hides all but the first line of code.
Last updated 5/15/2012
52
USING COLDFUSION BUILDER
Code Editing in ColdFusion Builder
Move the pointer over the unfold icon (+) to show the folded code in a tool tip.
Unfold a code block to make the code visible
2 By default, all the lines of code are expanded. To fold or collapse all the lines of code except the first line, right-click
in the left margin of the editor. Then select Folding > Collapse All.
Add code folding
1 Select the block of code you want to hide.
2 Do either of the following:
• Press Ctrl+Alt+F (Windows) or Command+Option+F (Mac)
• Right-click and then select Source > Toggle Folding at Selection
Remove code folding
To remove code folding for a block of code,
❖ Place the cursor on the first line of code and then repeat the steps used to fold the code.
Note: You cannot have multiple code folding starting with the same line of code.
Syntax checking and highlighting
When you select a tag or code bracket in a CFM file, the matching pair of the tag or bracket is automatically
highlighted.
If you type code that is not recognized as valid CFML code, you are notified in the following ways:
• A cross-mark appears next to the line of code as follows:
Last updated 5/15/2012
53
USING COLDFUSION BUILDER
Code Editing in ColdFusion Builder
Syntax problem highlighted
Hovering your pointer on the cross-mark gives more details about the error.
• The Problems view lists the error as follows:
Syntax problem displayed in Problems view
Each message contains a brief description of the error, the file and folder in which the error occurs, and its line
number in the file. When you double-click the error, the file is opened in the editor and the line of code is
highlighted.
Note: Syntax errors are displayed only for open CFM files and are not displayed after you close a CFM file.
Depending on the nature and severity of the errors, your application sometimes does not run properly until the errors
are corrected.
Syntax checking preferences
1 From the Window menu, select Preferences.
2 In the tree-view, select ColdFusion > Profiles > Editor > Syntax Checking.
3 Syntax checking is turned on by default. To turn off syntax checking, deselect Enable Syntax Checking.
4 To display syntax errors only when opening or saving a file, select Display Syntax Errors Only on File Save. While
editing the file, all errors in the file are removed from the Problems view.
Last updated 5/15/2012
54
USING COLDFUSION BUILDER
Code Editing in ColdFusion Builder
Navigate through code
Code navigation
Use the shortcuts Ctrl + Shift + Up arrow key and Ctrl + Shift + Down arrow key (Windows) or Command + Shift +
Up arrow key and Command + Shift + Down arrow key (Mac) to easily navigate inside your code.
Code navigation works for both tag and script-based syntax.
The following sections explain how code navigation functions in various scenarios:
In CFM files
Caret position changes from a user-defined function to the next or previous one.
For example, in the following snippet, if the caret position is on or within func1, if you press Ctrl + Shift + Down arrow
key, then the caret position moves to func2 and selects the function name. From anywhere on or within funct2, if
you press Ctrl + Shift + Up arrow key, then the caret position changes to func1 function and selects the function name.
<cffunction name="func1">
</cffunction>
<cffunction name="func2">
</cffunction>
In CFC files
Caret position changes
• From a user-defined function to the next or previous one.
• To the top-level members of the CFC, for example to cfproperty directly inside the CFC.
For example, in the following snippet, if you navigate from line number 1 (<cfcomponent>) downward, then caret
position first changes to line 2 (<cfproperty name="prop1">), and further to line 4 (<cffunction
name="func1">), and line 6 (<cffunction name="func2">). Moving upward, the caret position changes, taking
the same path in the reverse order.
When the caret position changes to cfproperty, the name is selected.
<cfcomponent>
<cfproperty name="prop1">
<cfset this.var1 = 100>
<cffunction name="func1">
</cffunction>
<cffunction name="func2">
</cffunction>
</cfcomponent>
In flow-control statements
For flow-control statements provided in CFScript (for example, in statements if-else, switch-case, and try-catch), in
both CFC page and CFM page, caret position changes to the next or previous code blocks if the caret position is within
any of these statements.
For instance, if you press the same key combination within cfif tag, then caret position changes to the next cfelseif
or cfelse statement.
Last updated 5/15/2012
55
USING COLDFUSION BUILDER
Code Editing in ColdFusion Builder
In the following example, if you navigate down from
• Line 1 (<cffunction
name="func1">), caret position changes directly to line 10 (<cffunction
name="func2">).
• Within cfif in line 2 (<cfif
a eq 10>), caret position changes to line 4 (<cfelseif a gt 10>) and cfelseif
is selected, provided the caret position is on line 2.
•
Line 4 (<cfelseif a gt 10>), caret position changes to line 6 (<cfelse>)and cfelse is selected
•
Line 6 (<cfelse), caret position changes to line 8 (</cfif>).
• Line 8 (</cfif>), caret position changes to line 10(<cffunction
name="func2">) and func2 is selected.
If you do a reverse navigation (Ctrl + Shift + Up arrow key),
• From line 6 (<cfelse), caret position changes to line 4 (<cfelseif
• From line 10, caret position changes to line 1
a gt 10>) and cfelseif is selected.
(<cffunction name="func1">).
<cffunction name="func1">
<cfif a eq 10>
<cfset b = 10>
<cfelseif a gt 10>
<cfset b = 20>
<cfelse>
<cfset b = 30>
</cfif>
</cffunction>
<cffunction name="func2">
</cffunction>
Smart tab navigation
You can quickly navigate to the next (use Ctrl + ] on Windows or Command + ] on Mac) and previous (use Ctrl + [
on Windows or Command + [ on Mac) function argument or tag attribute.
If caret position is at function call or tag name, for downward navigation, the position changes to the first
parameter/attribute value.
For nested function calls, caret position changes to the next or previous parameter when you reach the end/beginning
of parameters.
Smart tab navigation is applicable to cffunction arguments also in the case of function definition, for example
<cfscript>function abc(int a, int b) access="package" output="false"</cfscript>
In this case, when the caret position is on abc or function, it navigates to int a, int b , package, and false.
Smart tab navigation applies to both tag-based and script-based syntax.
Code refactoring
Code refactoring is the process of improving the source code of a program without changing the overall result.
Generally, code refactoring improves code readability and maintainability.
ColdFusion Builder supports various refactoring techniques like renaming, searching, and previewing of CFCs, CFMs,
and UDFs at the project and workspace levels.
Last updated 5/15/2012
56
USING COLDFUSION BUILDER
Code Editing in ColdFusion Builder
Refactor CFC or CFM filenames
When you rename a CFC or CFM, you can refactor all valid instances of the CFM or CFC, including all references to
the CFM or CFC.
1 Right-click the file in the Navigator pane.
2 Select Refactor > Rename.
3 Enter the new name and preview the changes. When you preview the changes, you can review the selected instances
and deselect any instance that you do not want to rename.
4 To rename CFCs or CFMs across all projects in the workspace, select Update All Projects In The Workspaces.
Note: You cannot rename a CFC or CFM in HTTP or Web server URLs unless the server is registered and running.
To undo refactoring, use the keyboard shortcut Ctrl+Z (Windows) or Command+Z (Mac).
Refactor UDFs in CFC or CFM files
1 Open the CFM or CFC file in the editor.
2 Point to the function name, right-click, and select Refactor > Rename
3 Specify the UDF name and click OK.
Note: Currently, function renaming is supported only through the main function declaration and not from function
calls.
Notes and considerations
• The location of a CFM or CFC file cannot be changed although the inherent Eclipse editor provides the capability
to move files using the Move option.
• The CFML Editor does not support renaming a folder although Eclipse provides this option.
Refactoring methods
You can refactor methods created for application variables by creating variable mappings.
For example, consider a scenario where an application variable is defined for a CFC object as follows:
<cfset Application.appVar = createObject("component","abc.AppCFM.a")>
Say, you have a CFC function, Method(), that you call as follows:
<cfset Application.appVar.Method()>
To refactor the Method() function, create a variable mapping for the application variable Application.appVar as
follows:
1 In the Navigator view, right-click the project and select Properties.
2 In the Properties dialog box, select ColdFusion Variable Mappings.
3 Click New, enter the following details in the Add Mappings dialog box:
• Variable Name: Application.appVar
• Mapped To: abc.AppCFM.a
Last updated 5/15/2012
57
USING COLDFUSION BUILDER
Code Editing in ColdFusion Builder
Reference search
You can search for a CFC, CFM, or UDF in a project or workspace.
1 Right-click the project in the Navigator pane.
2 Click References and select Project or Workspace. The results are displayed in the Search window in ColdFusion
Builder.
Other than searching for references at the project or workspace level, you can search for references while working in
the CFML code editor. Right-click in the CFML editor and select References > File to search for file references. You
can also search for references at the project and workspace level from within the CFML editor.
Tag Editor
The Tag Editor assists you in adding tags and their attributes, even if you are not familiar with CFML. To use the Tag
Editor in ColdFusion Builder, do the following:
1 Click the CFML tab in the Source area, if it is not already open.
2 Click the Tag Editor icon from the CFML toolbar. You can also open the Tag Editor by pressing the Ctrl+Shift+T.
3 If you do not know the tag, then search for the tag using the Tag Editor dialog box.
4 Specify the values for the tag attributes. The Tag Editor also displays values specific to an action attribute.
5 Click OK to add the tag to a CFML page.
Note: The Tag Editor is context sensitive, so you can edit a tag by moving the cursor to the tag and pressing Ctrl+Shift+T.
The Tag Editor for that tag is displayed, and you can specify or change the tag attributes.
Typing preferences
When typing CFML tags, you can customize your typing preferences. You can specify preferences like the following:
• Auto-insert closing tags and matching characters (like, quotes and curly brackets)
• Auto-indent child tags on pressing Enter and replace whitespace with indentation character
• Auto-change the matching tag when you modify a pair tag
• Auto-suggest single quote and double quote when you quote attributes
Set CFML Editor typing preferences
Auto-insertion is enabled, by default. You can auto-insert matching characters for single and double quotes, brackets,
and the ’#’ sign.
To turn off auto-insertion, do the following:
1 From the Window menu, select Preferences.
2 In the tree-view, select ColdFusion > Profiles > Editor > Typing.
3 Deselect Enable Auto-insertion.
Last updated 5/15/2012
58
USING COLDFUSION BUILDER
Code Editing in ColdFusion Builder
CFML Editor keyboard shortcuts
ColdFusion Builder lets you:
• Use a Quick Assist that displays a catalog of shortcuts related to wizards, tags, and custom shortcuts
• Create custom keyboard shortcuts
• Modify and remove shortcuts
• Search shortcuts for specific action based on filter text
• Export shortcuts in CSV format and import
• Restore defaults shortcut settings
Default shortcuts
Default shortcuts are the factory defaults listed in the Preferences dialog box (Window > Preferences > ColdFusion >
Profiles > Keys).
You can import and export default shortcuts, but cannot change their name or description.
You can temporarily remove default shortcuts or modify them. When you click Restore Defaults in the Keys section
of the Preferences dialog box, you lose all shortcuts you added, and any modifications. Also, the default shortcuts you
deleted are restored.
Shortcut conventions
For ease of organizing and use, it would be a best practice to follow a standard format for your keyboard shortcuts. For
the default shortcuts, ColdFusion Builder follows the following formats:
• For tags, Ctrl + T (Windows) or Command+T (Mac). For example, Ctrl + T, A (Windows) or Command+T, A
(Mac) for cfabort.
Note: The comma between Ctrl + T/Command+T and A indicates a sequence. That is, you have to first press
Ctrl+T/Command+T, release the keys, and then press A for the shortcut to take effect.
• For wizard-related shortcuts, Ctrl+Alt+W (Windows) or Command+Option+W (Mac).
Similarly, follow a convention which can make your shortcuts intuitive.
Also, to avoid shortcut conflicts, ensure that you define unique key bindings.
Create custom keyboard shortcuts
1
In ColdFusion Builder, select Window > Preferences > ColdFusion > Profiles > Keys.
2 Click Add.
3 Specify a unique name and description for the shortcut.
4 In the Key Binding, specify the shortcut.
Conflicts are listed if you do not specify a unique key binding.
5 In the Inserting Text box, specify the text that must be inserted in the editor when you use the shortcut.
The section Define caret position explains how to use macros to specify the caret position in the inserted text.
6 Click Save and then OK to close the preferences.
Last updated 5/15/2012
59
USING COLDFUSION BUILDER
Code Editing in ColdFusion Builder
Define caret position
You can use macros to define caret position in the text (for which you create the shortcut) when it appears in the editor.
In the Keys section of Preferences dialog box, when you insert the text, specify the $${cp} macro in the position where
you want the cursor to appear.
For example, if you specify
if($${cp}){ <cfoutput>#A#</cfoutput>}
with the binding Alt + T, when you use the shortcut, the block of text is inserted in the editor with the cursor between
the parentheses that follows if.
Quick Assist
Quick Assist shows up the catalog of shortcuts for quick reference:
• Press Ctrl+T (Windows) or Command+T (Mac) to launch Quick Assist for tag-related shortcuts and custom
keyboard shortcuts.
• Press Ctrl+Alt+T (Windows) or Command+Option+T (Mac) to launch Quick Assist for wizards-related shortcuts.
• Press the part of the custom keyboard shortcut that precedes comma. For example, assume that you have set the
bindings Alt+T, A and Alt+T, B. Then, if you press Alt+T, Quick Assist lists both the shortcuts.
Additional resources
• A cheat sheet of keyboard shortcuts in ColdFusion Builder
ColdFusion Builder engineering team member Sagar Ganatra lists all the shortcuts in ColdFusion Builder.
• ColdFusion Search vs Eclipse Search
ColdFusion Builder engineering team member Kiran Sakhare provides a comparison between Eclipse Search and
ColdFusion Builder search.
• Keyboard shortcuts in ColdFusion Builder
ColdFusion Builder engineering team member Sagar Ganatra explains the keyboard shortcut enhancements in
ColdFusion Builder 2.
ColdFusion Builder Search
ColdFusion Builder Search provides specialized find and replace functionality to search text or tag. Apart from
searching the current document, the scope of search can be any open document, selected resources in the Navigator
pane, project, working set, workspace, local directory, FTP location, or RDS location. The feature also supports regular
expressions and multi-line search.
To save time, you can run remote search in the background and continue with other tasks. The Search View provides
the results with details of matches in each file you search.
ColdFusion Builder search applies only to the following file types: CFC, CFM, HTML, XML, CSS, and JS.
Performing search
1 Run the ColdFusion Search dialog box using either of the following options:
• In an open document, use the shortcut Ctrl+F (Win) or Command+F (Mac).
Last updated 5/15/2012
60
USING COLDFUSION BUILDER
Code Editing in ColdFusion Builder
• From the Window menu, select Search > ColdFusion Search.
Note: If you use this shortcut in any other context, for example, in a TXT file, the Eclipse Find/Replace dialog box
appears instead. However, you can purposely open ColdFusion Search dialog box using the option Search >
ColdFusion Search.
2 In the ColdFusion Search dialog box, specify the scope of your search. Depending on the scope, the search options vary.
For example, the option Recurse subfolders (used to include subfolders in the search) applies only when your scope
is FTP location, RDS location, or local directory.
3 (If the file is not open) To narrow down the search, specify the filename extension.
4 Do either of the following:
• Specify the text to search and if necessary, the text to replace.
• Specify the tag to search, and then
1 Choose a tag and specify the conditions for search. For example, search for cfimage tag with attribute
source containing cf.jpg.
2 Click Add to add the condition to the list.
3 Select an action, that you want to perform, when the tag is found (such as removing or replacing the tag).
If applicable, specify any additional information necessary to perform the action. For example, setting a new
attribute for cfimage thickness.
Note: Actions apply only if you use Replace or Replace All.
4 Use the following options to expand or limit the search:
• Match Case: Limits the search to text that exactly matches the case of the text you want to find.
• Match Whole Word: Limits the search to text that matches one or more complete words.
• Search Backwards
• Search Incrementally: Lets you progressively search for and filter through text. When you specify search
criteria, highlights the first occurrence of the typed characters.
• Use Regular Expressions: Causes certain characters and short strings (such as ?,
*, \w, and \b) in your search
string to be interpreted as regular expression operators.
For example, a search for the b\w*\b dog matches both the black dog and the barking dog.
• Ignore White space: Treats all whitespace as a single space for the purposes of matching. For example, with this
text but not thistext. This option is
option selected, this text would match this text and this
not available when the Use Regular Expressions option is selected; you must explicitly write your regular
expression to ignore whitespace.
Note: The tags <p> and <br> are not treated as whitespace.
• Wrap Search: Performs end-to-end search from the current cursor position.
Note: Depending on the search scope, some options are disabled.
5 To search (and not perform any action), click Find or Find All.
• Find jumps to and selects the next occurrence of the search text (only) in the current document.
If tag is selected, the tag block is highlighted.
• Find All lists the files and the number of matches in each file in the Search View.
6 To replace found text/perform action on tag, click Replace or Replace All.
Last updated 5/15/2012
61
USING COLDFUSION BUILDER
Code Editing in ColdFusion Builder
Search options are saved when you close ColdFusion Builder.
ColdFusion Builder Search View
ColdFusion Builder Search View displays the search results of current search and maintains the history of previous
searches.
ColdFusion Builder Search View
• Shows results only if the user clicks Find All.
• Displays results with folder hierarchy; click the file to see the search instances.
• Displays the line numbers for code if search criteria matches. Double-click the line to open the file and see the
specific occurrence.
• Indicates if no matches are found.
Additional resources
• ColdFusion Builder Search\Replace
ColdFusion Builder engineering team member Sagar Ganatra explains the features of ColdFusion Builder search.
• Tag search
ColdFusion Builder engineering team member Sagar Ganatra explains how to find tags that match your search
criteria.
Add tasks to Task View
If you define tasks as CFML comments, the Task View (Window > Show View > Tasks) displays them based on the
priority you set. The tasks are listed according to the default TODO and FIXME tags or the custom task tag prefix.
Add tasks
1 Open the CFM or CFC file in the editor.
2 Add the task in the format as shown in the following examples:
<!--- TODO: Fix the bug 268451 --->
or in cfscript
//TODO: Fix the bug 268451
and
/*TODO: Fix the bug 268451*/
View tasks
The Task View (Window > Show view > Tasks) displays the first line of the CFML task comments.
The priority column indicates if the task is of high, normal, or low priority. High priority tasks are indicated using red
color.
Tasks in all open CFM files are displayed. Since the tasks are saved, they are displayed in the later sessions, when you
open the files.
Last updated 5/15/2012
62
USING COLDFUSION BUILDER
Code Editing in ColdFusion Builder
Create a custom Task Tag
1 Go to Window > Preferences > ColdFusion > Profiles > Editor > Task Tags.
2 Click New.
3 In the Add Task Tag dialog box, specify a unique name for the custom task tag and then select the priority.
Use the custom tags in the tasks you create as comments.
Removing tasks
Manually delete the tasks from the source code.
This is unlike the tasks you manually create in the Task View, which can be deleted in the View itself.
Last updated 5/15/2012
63
Chapter 6: Managing Servers
The comprehensive Server Management feature of ColdFusion Builder lets you start, stop, and restart the ColdFusion
server, and access the ColdFusion Administrator and Server Monitor from a single Servers view. For more information
about the Servers view, see “Using Servers View” on page 70.
You add a server, and associate it with a project to debug or preview files in the project. You also associate a server with
a project to install and run the extensions that are packaged with ColdFusion Builder. For more information about
adding servers, see “Adding ColdFusion servers” on page 64.
Understanding web server terminology
Before you set up and manage your server, read through the following topics to understand web server terms and
concepts that are used in the documentation.
For detailed information about web servers and configuring them for ColdFusion, see Web Server Management in the
ColdFusion Administrator's Guide
Document root
The term Document Root refers to a file system directory, from where your web server serves web pages. The term can
vary from server to server, but the same concepts apply to most web servers.
URL prefix
A URL prefix maps a local file system resource with a URL.
In ColdFusion Builder, you use a URL prefix to preview or debug projects outside your web root or document root.
You can specify a URL prefix while creating a server, or by editing settings for an existing server. For more information,
see “URL Prefix” on page 65.
You can also specify a URL prefix to an existing project or folder. For more information, see “Set URL Prefix” on
page 76.
Usage Scenario
You have a project called "Project1". Project1 is configured to server1, whose document root is at C:\server1\MyDocs
and URL is http://www.example1.com. Within Project1, you have a linked folder called "xyz". The folder xyz points
to the document root of server2, which is C:\server2\MyDocs and the URL to access it is http://www.example2.com.
You want to preview all the files within the xyz linked folder in ColdFusion Builder.
In this scenario, to preview files within the xyz linked folder, you create a URL prefix. You create a URL prefix by
specifying the following details:
• Absolute path: C:\server2\MyDocs\
• URL to access the xyz folder: http://www.example2.com
Last updated 5/15/2012
64
USING COLDFUSION BUILDER
Managing Servers
Virtual host
The term Virtual Host refers to the method of hosting multiple websites (domain names) on a single web server. The
multiple websites are differentiated by their apparent host names. For example, you can run websites
www.example1.com, www.example2.com, and www.example3.com, on a single IP address.
In the ColdFusion Builder context, you can use a single ColdFusion server to run multiple websites that are configured
as virtual hosts on an external web server like IIS or Apache.
For information on how to configure virtual hosts in the web server, see the web server- specific documentation.
When you associate a project with a virtual host, ColdFusion Builder functionality like, previewing, debugging,
Content Assist, and building extensions, is extended to all the folders and subfolders within the project.
Virtual directory
The term Virtual Directory refers to a folder that is not physically contained in the document root although it is
accessible through the server URL. To create a virtual directory, you specify an alias for the folder’s path in the URL.
The alias name is used to access resources within the folder.
Suppose the document root for your website (www.example.com) is c:\xyz\docs, and the folder that provides contents
to your website is at d:\abc\content. Then, you define an alias for this folder called content. You can then access the
website using the URL: http://www.example.com/content/
Adding ColdFusion servers
You add a ColdFusion server to test projects or applications that you create in the ColdFusion Builder workspace. The
ColdFusion server can be a development server for testing and running your applications before you deploy them on
a production server. You can add a local or remote ColdFusion server.
Add a local server
In the Servers view, do one of the following:
• Right-click and select Add Server.
• Click
.
Enter the following details in the ColdFusion Server Setup wizard:
General Settings
• Server Name: ColdFusion server name.
• Description: (optional) Description of the server.
• Application Server: Select the drop-down list and select JRun or select Other to configure a non-Jrun server.
Note: You cannot start, stop, or restart a non-JRun server within ColdFusion Builder.
• Host Name: Name of the ColdFusion server host. For example, localhost or 127.0.0.1.
• Select Is Local.
Last updated 5/15/2012
65
USING COLDFUSION BUILDER
Managing Servers
Other Settings
• Webserver Port: Specify the port number of the ColdFusion server instance you are configuring. The default port
number of the ColdFusion server is 8500.
• Context root: (applicable only for JRun servers with J2EE configuration) Enter the context root. The J2EE
environment supports multiple, isolated web applications running in a server instance. Hence, J2EE web
applications running in a server are each rooted at a unique base URL, called a context root (or context path).
• Application Server Name: (applicable only for JRun servers with J2EE configuration) Name of the JRun Server on
which ColdFusion is deployed.
• RDS User Name: (optional) If you are using RDS, specify the RDS user name.
• RDS Password: (optional) Specify the RDS password.
Note: You set the RDS password in the ColdFusion Administrator. Do not confuse the RDS password with the
ColdFusion Administrator password, which is also managed through the ColdFusion Administrator.
• Select Enable SSL to enable SSL support in ColdFusion Builder. Servers registered in the Server Manager can
communicate using SSL.
• Select Auto Start and Auto Stop to automatically start and stop the ColdFusion server every time you launch and
exit ColdFusion Builder.
Click Next.
Local Server Settings
Select the Local Server Settings tab, and specify the following local server settings, as applicable.
• Server Home: (applicable only for JRun servers) Browse and select the ColdFusion Server home directory. For
example, C:\ColdFusion9 for a standalone ColdFusion server instance. For a multiserver instance, the server home
is the Application Server Home directory, for example, C:\JRun4 for a JRun-J2EE or multiserver configuration.
• Document Root: Browse and select the web root location. If ColdFusion is configured with a web server, say IIS,
then select the document root of the web server; for example, c:\inetpub\wwwroot.
This setting is required for previewing, debugging, and CFC name resolution in ColdFusion Builder.
• Version: (applicable only for JRun servers running on Windows) Select the ColdFusion server version from the
Version drop-down list.
• Windows Service: (applicable only for JRun servers running on Windows) The Windows Service option is available
only for standalone and multi-server configurations, and not J2EE configuration. If you want to start and stop the
ColdFusion server using the Windows Service, select Use Windows Service To Start/Stop Server.
URL Prefix
(optional)
Note: You don’t necessarily have to specify a URL when creating a server. You can specify a URL prefix even after creating
the server by editing the server settings in the Servers view. You can also specify a URL prefix to an existing project or
folder; for more information, see “Set URL Prefix” on page 76.
Select the URL Prefix tab and enter the following details:
1 Local Path: Browse to or enter the path to the local file system resource.
2 URL prefix: Enter the URL prefix.
3 Click Add.
Last updated 5/15/2012
66
USING COLDFUSION BUILDER
Managing Servers
Virtual Host Settings
(optional)
Note: When you specify a virtual host or virtual directory in ColdFusion Builder, corresponding settings must be specified
in the configured web server. ColdFusion Builder does not validate these settings. So, if the settings in the web server are
different from what you specify in ColdFusion Builder, ColdFusion Builder does not give an error.
To configure a virtual host, select the Virtual Host Settings tab, and do the following:
1 Click New and enter the following details in Virtual Host Settings section.
a Name: Specify a name for the virtual host. For example, vh1.
Note: You can provide any name and not necessarily the name that you provide in the web server.
b Host Name: The virtual host name as specified in your IIS or Apache web server settings. For example,
www.example1.com
When you create a virtual host in ColdFusion Builder, the virtual host uses a naming convention server namevirtual host name. The Server drop-down list in Project properties displays the virtual host name using this
naming convention. For example, if you created a virtual host named "vh1" in your ColdFusion server
(localhost), the naming convention that ColdFusion Builder uses to identify the virtual host is "localhost-vh1".
c Port: The port assigned to the virtual host in the web server.
d Type: Select HTTP or HTTPS from the drop-down list.
e Document Root: Browse to or enter the home directory of the virtual host.
For example, if your website www.example.com is mapped to the directory C:\abc on the Apache web server,
enter C:\abc as the home directory.
2 (optional) To create a virtual directory, click Virtual Directory, and enter the following details.
a Alias: Specify an alias for the folder path.
b Location: Browse to or enter the folder path to which you want to specify an alias.
For example, if the document root of your website (www.example.com) is c:\abc, and you want to include
images from a folder available on d:\xyz\images. Then, you can define an alias called "images" for the folder path
"d:\xyz\images". To understand more about virtual directories, see “Virtual directory” on page 64.
c Click Add.
d Click OK to add the virtual directory to the Virtual Directory Settings table.
3 Click Apply. The virtual host is added to the List Virtual Hosts table.
To modify the virtual host settings, select the virtual host from the List Virtual Hosts table, modify the settings, and
click Update.
To understand more about virtual hosts, and its relevance in the ColdFusion Builder context, see “Virtual host” on
page 64.
Install Extensions
Select Install Extensions to install the extensions that are packaged with ColdFusion Builder.
1 Browse and select the ColdFusion web root location.
2 Browse to a location within the web root to install the extension. The extension is installed in the Extensions
directory within the selected location.
Last updated 5/15/2012
67
USING COLDFUSION BUILDER
Managing Servers
Click Finish to create the ColdFusion local server instance. For information on using these extensions, see “Using
Extensions” on page 122.
Add a remote server
Before you add a remote server in ColdFusion Builder, do the following tasks.
Run the Admin server instance in the remote ColdFusion server
Depending on your remote server version and configuration, do the necessary tasks.
Standalone remote server version 7.0.2, 8.0.1
1 Unzip the file AdminServerComponents.zip to {CFHome}
The following files are copied to {cfhome}/runtime/bin:
• adminstart.bat
• admin_jvm.config
• adminstart.sh
The Admin Server instance is copied to {cfhome}/runtime/servers
2 Go to {cfhome}/runtime/bin and run adminstart.bat (for Windows) or adminstart.sh (for Mac OS)
Multi-server/J2EE remote server version 7.0.2, 8.0.1
1 In the AdminServerComponents.zip file, unzip the following files to JRun_Home/bin:
• admin_jvm.config
• adminstart.bat (for Windows) or adminstart.sh (for Mac OS)
2 Go to JRun_Home/bin and run adminstart.bat (for Windows) or adminstart.sh (for Mac OS)
Standalone/multi-server/J2EE remote server version 9
For version 9 of the remote server, the Admin Server components are shipped, by default.
• For standalone server configuration, go to {cfhome}/runtime/bin and run the adminstart script file.
• For multi-server or J2EE server configurations, go to JRun_Home/bin and run the adminstart script file.
Update security properties for the remote ColdFusion server
1 Go to {CFHome}/runtime/lib/security.properties
2 Update the values of jrun.subnet.restriction and jrun.trusted.hosts with the IP address of computer where
ColdFusion Builder is installed. Alternatively, you can use the asterisk wildcard (*) as the IP address value, to allow
the server to start and stop without any restriction.
Specify the remote server settings in ColdFusion Builder
In the Servers view, do one of the following:
• Right-click and select Add Server.
• Click
.
Enter the following details in the ColdFusion Server Setup wizard:
Last updated 5/15/2012
68
USING COLDFUSION BUILDER
Managing Servers
General Settings
• Server Name: ColdFusion server name.
• Description: (optional) Description of the server.
• Application Server: Select the drop-down list and select JRun or select Other to configure a non-Jrun server.
Note: You cannot start, stop, or restart a non-JRun server within ColdFusion Builder.
• Host Name: Name of the remote server host.
• Select Is Remote.
Note: When you enter a Host Name other than localhost or 127.0.0.1, Is Remote is automatically selected.
Other Settings
• Webserver Port: Specify the port number of the ColdFusion server instance you are configuring. The default port
number of the ColdFusion server is 8500.
• Context root: (applicable only for JRun servers with J2EE configuration) Enter the context root.
The J2EE environment supports multiple, isolated web applications running in a server instance. Hence, J2EE web
applications running in a server are each rooted at a unique base URL, called a context root (or context path).
• Application Server Name: (applicable only for JRun servers with J2EE configuration) Name of the JRun Server on
which ColdFusion is deployed.
• RDS User Name: (optional) If you are using RDS, specify the RDS user name.
• RDS Password: (optional) Specify the RDS password.
Note: You set the RDS password in the ColdFusion Administrator. Do not confuse the RDS password with the
ColdFusion Administrator password, which is also managed through the ColdFusion Administrator.
• Select Enable SSL to enable SSL support in ColdFusion Builder. Servers registered in the Server Manager can
communicate using SSL.
• Select Auto Start to automatically start the ColdFusion server every time you launch ColdFusion Builder.
Note: Auto Stop is not available for remote servers.
Click Next.
Remote Server Settings
1 Naming Port: Specify the naming port of the administrator server instance running on the remote server. By
default, the naming port value is 2910. The naming port value is specified in {servers}/admin/SERVERINF/jndi.properties. The port value of property java.naming.provider.url is the naming port/jndiport.
2 User Name: Specify the jmc user name, which is listed in the jrun-users.xml file.
3 Password: Specify the jmc password.
4 Document Root: Browse and select the web root location. If ColdFusion is configured with a web server, say IIS,
then select the document root of the web server; for example, c:\inetpub\wwwroot.
5 Select the Mappings tab, and enter the following details. The mapping details are used for previewing and
debugging files on the remote server.
• Local path: Path that ColdFusion Builder uses to find projects or folders on the remote ColdFusion server.
• Remote path: (optional if you specify the URL prefix) Path to the project on the remote ColdFusion server.
Last updated 5/15/2012
69
USING COLDFUSION BUILDER
Managing Servers
• URL prefix: (optional if you specify the remote path) Enter the URL prefix. To understand more about a URL
prefix, and in what scenarios you can use a URL prefix, see “URL prefix” on page 63.
Note: You don’t necessarily have to specify a URL when creating a server. You can specify a URL prefix even after
creating the server by editing the server settings in the Servers view. You can also specify a URL prefix to an existing
project or folder; for more information, see “Set URL Prefix” on page 76.
• Click Add to add this mapping.
6 (optional) To configure a virtual host, select the Virtual Host Settings tab, and do as follows:
Note: When you specify a virtual host or virtual directory in ColdFusion Builder, corresponding settings must be
specified in the configured web server. ColdFusion Builder does not validate these settings. So, if the settings in the web
server are different from what you specify in ColdFusion Builder, ColdFusion Builder does not give an error.
• Click New and enter the following details in Virtual Host Settings section.
1 Name: Specify a name for the virtual host. For example, vh1.
Note: You can provide any name and not necessarily the name that you provide in the web server.
2 Host Name: The virtual host name as specified in your IIS or Apache web server settings. For example,
www.example1.com
When you create a virtual host in ColdFusion Builder, the virtual host uses a naming convention server namevirtual host name. The Server drop-down list in Project properties displays the virtual host name using this
naming convention. For example, if you create a virtual host named "vh1" in your ColdFusion server
(localhost), the naming convention that ColdFusion Builder uses to identify the virtual host is "localhost-vh1".
3 Port: The port assigned to the virtual host in the web server.
4 Type: Select HTTP or HTTPS from the drop-down list.
5 Document Root: Browse to or enter the home directory of the virtual host.
For example, if your website www.example.com is mapped to the directory C:\abc on the Apache web server,
enter C:\abc as the home directory.
• (optional) To create a virtual directory, click Virtual Directory, and enter the following details.
1 Alias: Specify an alias for the folder path.
2 Location: Browse to or enter the folder path to which you want to specify an alias.
For example, if the document root of your website (www.example.com) is c:\abc, and you want to include
images from a folder available on d:\xyz\images. Then, you can define an alias called "images" for the folder
path "d:\xyz\images". To understand more about virtual directories, see “Virtual directory” on page 64.
3 Click Add.
4 Click OK to add the virtual directory to the Virtual Directory Settings table.
• Click Apply. The virtual host is added to the List Virtual Hosts table.
To modify the virtual host settings, select the virtual host from the List Virtual Hosts table, modify the settings, and
click Update.
To understand more about virtual hosts, and its relevance in the ColdFusion Builder context, see “Virtual host” on
page 64.
Click Next.
Last updated 5/15/2012
70
USING COLDFUSION BUILDER
Managing Servers
Install Extensions
Select Install Extensions to install the extensions that are packaged with ColdFusion Builder.
1 Browse and select the ColdFusion web root location.
2 Browse and select the ColdFusion web root location on the remote ColdFusion server.
3 Browse to a location within the web root to install the extensions. The extensions are installed in the Extensions
directory within the selected location.
Click Finish to add the remote ColdFusion server instance. For information on using these extensions, see “Using
Extensions” on page 122.
If the remote server is connected successfully, then the server status in ColdFusion Builder is displayed as Running. If
the remote server is not connected successfully, the server status is displayed as Unknown. For more details about the
error, see “Console view” on page 34.
Using Servers View
Use the Servers View to start, stop, and restart servers in ColdFusion Builder. You can also launch the ColdFusion
Server Monitor and ColdFusion Server Administrator from the Servers View.
If the Servers View is not already displayed in the workbench, add the Servers View by selecting Window > Show View
> Other. Then, in the Show View dialog box, select ColdFusion > Servers View.
Start, stop, restart, or delete a server
1 Right-click the server in Server View.
2 Select one of the following: Start Server, Stop Server, Restart Server, or Delete Server. Restart Server first stops and
then starts the server.
Start ColdFusion Server Monitor
1 Right-click in the Server View.
2 Select Launch Server Monitor to open ColdFusion Administrator.
3 Specify the password.
4 Click OK to view the Server Monitor.
Start ColdFusion Server Administrator
1 Right-click in the Server View.
2 Select Launch ColdFusion Administrator.
3 Specify the username and password.
4 Click OK to view ColdFusion Administrator.
Last updated 5/15/2012
71
USING COLDFUSION BUILDER
Managing Servers
Import RDS server settings
If you have an RDS server configured, you can import the RDS server settings directly and add your RDS server to the
Servers view.
1 Right-click in the Servers view, and select Add Server.
2 Select Import Configuration From RDS Server, and select the RDS server that you want to add to the Server view
from the drop-down list.
3 Click OK.
4 To modify the RDS settings, specify changes in the Modify ColdFusion Server Setup dialog box, and click Finish.
You can now associate the server with your project, and debug, preview, and test your project.
Last updated 5/15/2012
72
Chapter 7: Managing Projects
About projects
Projects contains resources such as ColdFusion components, interfaces, and HTML and CFML pages that are used to
develop ColdFusion applications.
Each project is stored in a default workspace. The workspace stores your projects and other metadata. The preferred
workspace location is the ColdFusion document root
You can associate a project with a ColdFusion server. By doing so, you can test the project before final deployment.
Note: To preview files in your project using a web browser, ensure that you have set your project location to the
ColdFusion document root.
To do any CFML development in ColdFusion Builder, you first create a ColdFusion project. To know more about
creating a project in ColdFusion Builder, see “Creating a ColdFusion project” on page 72.
Creating a ColdFusion project
The Project Builder wizard guides you through the steps of creating a ColdFusion project.
Enter project information
1 Right-click in the Navigator area and click New > ColdFusion Project.
2 In the Project Builder wizard, specify the project name.
3 To change the default project location, deselect Use Default Location.
4 Click Next to specify the ColdFusion server details.
Enter server details
1 Select a server from the Server pop-up menu. If you have not configured a ColdFusion server, then click Add Server
to add a server. For more information about setting up a ColdFusion Server, see “Adding ColdFusion servers” on
page 64.
Note: If the project is in the server web root, then the Sample URL box is automatically populated with the server URL.
For example, http://127.0.0.1:8500/eval, where 127.0.0.1 is the server host, 8500 is the port number, and eval is the
project name.
2 Specify your preview settings to use an external web browser by selecting a web browser installed on your computer.
The internal browsers are selected, by default.
3 Click Next.
Add existing sources
1 In this step, you can:
• Link existing resources folder to the project.
Last updated 5/15/2012
73
USING COLDFUSION BUILDER
Managing Projects
• Select previously configured applications with the current project.
2 Click Add to select the folder to link to the project.
3 Click Finish to build a new ColdFusion project.
For more information about linking resources, see “Link to resources outside the workspace” on page 77.
Configure properties for projects and servers
You can use the Properties dialog box in ColdFusion Builder to configure project properties and server settings.
To open this dialog box, right-click the project in the Navigator view and select Properties.
Configure project properties
❖ Select ColdFusion Project from the left pane of the Properties dialog box. You can add and remove external projects
as links here.
Configure variable mappings
You use variable mappings to provide Code Assist for component variables that are not defined in the file being edited
or in the included files.
1 In the Properties dialog box, you see a tree-view structure on the left. Select ColdFusion Variable Mappings.
2 Click New.
3
In the Variable Name field, specify the name of the variable to map, for example, application.cfc1
4 In the Mapped To field, enter the fully qualified name of the project variable, for example, com.adobe.mycfcs.cfc1
Configure server settings
• To open the ColdFusion Server Settings page, select ColdFusion Server Settings in the left pane of the Properties
dialog box.
• To create a ColdFusion Server instance, use the Servers pop-up menu.
If you have already configured a server instance, you can assign it to your ColdFusion project. For more
information about creating a server instance, see “Adding ColdFusion servers” on page 64.
Add ColdFusion pages, interfaces, and components
ColdFusion Builder provides wizards that guide you through the creation of ColdFusion pages, interfaces, and
components.
Create a ColdFusion page
1 Right-click the ColdFusion project in the Navigator.
2 Click New > ColdFusion Page.
3 In the New ColdFusion Page wizard, specify a name for the ColdFusion (CFM) page.
Last updated 5/15/2012
74
USING COLDFUSION BUILDER
Managing Projects
4 Click Finish.
Create a ColdFusion component
1 Right-click the ColdFusion project in the Navigator.
2 Click New > ColdFusion Component.
3 In the New ColdFusion Component wizard, specify the following:
• Component name
• Hint to identify the component (optional).
• Any component that you want to extend.
• Any interface that you want to implement.
4 Select the output type to be true or false.
5 Click Next.
6 Click Add to specify the component property details, such as the property name, display name, hint, and default
value.
7 Enter or select a property type from the Type drop-down list.
8 (optional) Select Add Getter and select its access type from the Access drop-down list.
9 (optional) Select Add Setter and select its access type from the Access drop-down list.
10 Click OK to return to the New ColdFusion Component wizard.
11 To add functions to the ColdFusion component, click Add Function.
12 In the New Function wizard, specify the functions details, such as the function name, display name, hint, access
type, return type, roles, and output type.
13 Click OK.
14 To add arguments to the selected function, click Add Argument.
15 In the New Function Argument dialog box, specify the argument name, display name, hint, argument type, and
the default value of the argument.
Note: The options for the argument type are the same as the argument type options for ColdFusion Interface.
16 Click OK.
17 Click Finish to create a ColdFusion component (CFC file).
Note: You can use Outline View to navigate through the functions and tags that you add to your ColdFusion page or
ColdFusion component.
Create a ColdFusion interface
1 Right-click the ColdFusion project in the Navigator.
2 Click New > ColdFusion Interface.
3 In the New ColdFusion Interface wizard, specify the interface name, hint, and display name.
4 To extend another interface, browse or specify the name of the CFC.
5 Click Add Functions to add a function and specify its details, such as the function name, function hint, return type,
roles, and output (true or false).
Last updated 5/15/2012
75
USING COLDFUSION BUILDER
Managing Projects
6 Click Add Arguments to specify the arguments for the selected function. Enter or select an argument type from the
Type drop-down list.
7 Click Finish to create a ColdFusion interface.
Add other files
You can also add the following types of files to your ColdFusion project:
• .html
• .js
• .css
• .lxr (lexer file)
• .col (colorization file)
• .sdoc (ScriptDoc file)
• Untitled versions of the preceding files
In addition, you can create generic text files, folders, and projects. You add these files to a project much as you add
ColdFusion pages or components. To add any of these files to a project, do the following:
1 Right-click the project.
2 Select New > Other.
3 Expand Project Files to specify a filename or expand Untitled Files to create an untitled file.
4 Select the file that you want to create.
• If you are creating an untitled file, click Finish.
• If you selected Project Files, click Next and specify the filename. Then click Finish.
Create CFM/CFC files outside the workspace
You can create CFM/CFC files outside the workspace using the File view.
1 In the File view, right-click the local folder in which you want to create the CFM/CFC file.
2 Select New > ColdFusion Page/ColdFusion Component/ColdFusion Interface and then specify the details.
Set Launch Page
You can designate a specific file as the Launch Page for your project. This page is loaded when you run/debug a file in
the project.
1 In the Navigator view, select the page to set as Start Page.
2 Right-click the page and then select Set As Start Page.
To disable a page from being the Launch Page,
1 In the Project View, right-click the project and then select Properties > ColdFusion Project.
2 In the Start Page Setting, deselect Use Start Page.
Last updated 5/15/2012
76
USING COLDFUSION BUILDER
Managing Projects
Dynamically generate Start Page URL for framework applications using extensions
See “Extension support for setting Launch Page” on page 120
Set URL Prefix
1 In the Navigator view, select the project or folder for which you want to specify a URL prefix.
2 Right-click the selected project or folder and select Set URL Prefix.
3 Enter the URL for the selected resource.
Import, export, and delete projects
Import projects
You can import both ColdFusion and non-ColdFusion projects into ColdFusion Builder.
1 Right-click in the Navigator view and select Import.
2 In the Import wizard, select ColdFusion > Import Existing Projects.
3 In the Import ColdFusion Project dialog box, browse and select the project location. A list of all projects is
displayed.
4 Click Refresh to search and refresh the project list.
5 Select Show All Projects to display all non-ColdFusion and non-ColdFusion Builder projects in the same location.
6 Select Add ColdFusion Nature To Non-ColdFusion Projects to apply ColdFusion Builder functionality, such as
preview, editing, and debugging, to non-ColdFusion Builder projects.
7 Select the appropriate projects and click Finish.
Note: Importing a project retains the project properties including the server details, launching settings, browser details,
application details, and linked folders.
Export projects
You can export files and folders from a ColdFusion Builder or non-ColdFusion Builder project to a designated
location. However, for ColdFusion Builder projects, ColdFusion Builder functionality like server settings, preferences,
and such are not exported.
1 Right-click in the Navigator view and select Export.
2 In the Export wizard, select ColdFusion > Export.
3 In the Export Project dialog box, browse and select the location where you want to export the project.
4 Click Select All to export all files and folders within the project, or click Filter Types to specify the files that you want
to export.
5 Click Finish to export your project to the designated location.
Last updated 5/15/2012
77
USING COLDFUSION BUILDER
Managing Projects
Delete projects
When you delete a project, you remove the project from the current workspace. You can also remove the project from
your computer’s file system at the same time.
1 Right-click in the Navigator view and select Delete.
2 To remove the project from the workspace and the file system, select Delete Project Contents On Disk. The project
is then permanently removed from the file system; you cannot undo the command.
Cloak projects and files
In ColdFusion Builder, you can cloak or hide files, file types, and folders from all synchronization, upload, download
operations. This feature is useful if you have a large directory of files that you want to exclude from your
synchronization or uploads.
You can cloak a file or folder in two ways:
• Right-click the file or folder in the Navigator view and select Synchronize > Cloak this file type. To uncloak the file
type, right-click the file or folder and select Synchronize > Uncloak this file type.
• Set up your preferences to cloak certain file types, using wildcards and regular expressions by performing the
following actions:
1 Right-click the file or folder in the Navigator view and select Synchronize > Advanced Cloaking Preferences.
2 In the Preferences dialog box, click the (+) icon.
3 In the Ignore File/Folder dialog box, specify the file or folder name.
4 Click OK. The specified file or folder is displayed in the list of files on which cloaking has been applied.
Link to resources outside the workspace
You can link to resources outside the project and workspace. This feature is useful when you have to use resources that
are available on shared locations. The linked resource or the folder that contains linked resources appear as follows:
Link to resources outside workspace
1 In the Navigator view of ColdFusion Builder, right-click the project to add the linked resources to.
2 Select the resource that you want to link. For example, if you want to link to a folder, select New > Folder.
3 Enter a name for the resource that you are linking. If you do not enter a name, the default name of the resource is
taken.
4 Click Advanced.
Last updated 5/15/2012
78
USING COLDFUSION BUILDER
Managing Projects
5 Select Link to folder in the file system. Enter or browse to the resource location.
6 Click Finish to link the resource to your project.
Use path variables to link to resources
When you link to resources, you can define path variables instead of providing the full path to where the resource is
stored. You can define a path variable and then set the path to the resource that you want to link to.
1 In the Navigator view of ColdFusion Builder, right-click the project to add the linked resources to.
2 Select the resource that you want to link. For example, if you want to link to a folder, select New > Folder.
3 Enter a name for the resource that you are linking. If you do not enter a name, the default name of the resource is
taken.
4 Click Advanced.
5 Select Link to folder in the file system. Enter or browse to the resource location.
6 Click Variables.
7 You can select an existing path variable or click New to create a path variable.
Note: The list of existing resource variables is also available by selecting Window > Preferences from the main menu
and then selecting General > Workspace > Linked Resources. You can edit and create linked resource variables using
the Linked Resources dialog box.
8 To create a path variable, enter a name for the resource and browse to or provide the full path to the resource. Click
OK to add the path variable to the path.
9 Click Finish to link the resource to your project.
Deploy projects over FTP and Secure FTP connections
ColdFusion Builder lets you deploy ColdFusion projects on a web server using File Transfer Protocol (FTP).
ColdFusion Builder also supports file transfers using Secure File Transfer Protocol (SFTP) and File Transfer Protocol
Secure (FTPS) connections. SFTP and FTPS are a secure form of FTP, which encrypt the files that you send and receive
to a remote server.
Create an FTP or secure FTP connection in ColdFusion Builder
1 Right-click the project in the Navigator view.
2 Click Synchronize > Create New Synchronize Connection.
3 Specify a name for the connection.
4 Select the ColdFusion project or file to deploy by selecting the Local drop-down list and the location that contains
the file or project.
5 Select a remote server, and enter the following details in the New Connection Dialog Box.
a Site name: Name of the new remote site.
b Select the connection type.
c Server: URL of the site to connect to (for example, admin.myWebSite.com). You can also enter the IP address
of the site.
Last updated 5/15/2012
79
USING COLDFUSION BUILDER
Managing Projects
d Username/Password: User name and password of the server.
e Use Public Key Authentication: This option is available only if you select SFTP as the connection type. Public
key authentication lets you select a key-pair on your computer, and you copy the public key to the server.
f
Remote path: If you want to connect to a subfolder under the root of the remote site, specify the folder path.
g Click Advanced Options to specify the following:
• Port: If you want to use a port other than 22, specify the port.
• If you want the FTP connect session to run in the background, select Use Passive Mode.
• If you work in a team environment, you sometimes want to upload files that overwrite others' changes. If so,
select Calculate Server/Client Time Offset Automatically as a precaution.
6 Click OK to add the FTP connection.
Upload, download, or synchronize projects, files, and folders
1 Right-click the project or file in the Navigator view and select Synchronize > Upload or Download.
2 From the Choose Site Connection dialog box, select the connection.
3 Click OK.
Import Ajax libraries
1 In the Navigator view, right-click the project in which you want to import Ajax libraries, and click Import.
2 In the Import wizard, select ColdFusion > Ajax Library Import Wizard, and click Next.
3 Select the Ajax libraries that you want to import, and click Finish.
Working with Flash Builder projects
To work with a Flash Builder project in ColdFusion Builder, import the Flash Builder project into ColdFusion Builder.
After that, apply ColdFusion Builder functionality by selecting the Flash Builder project in the Navigator view, then
right-click and select Apply ColdFusion Nature.
Applying ColdFusion Builder functionality to the Flash Builder project lets you preview, edit, and debug the Flash
Builder project from within ColdFusion Builder.
Developing AIR applications
Adobe ColdFusion Builder provides you with tools to create Adobe® AIR® projects, debug, package, and digitally sign
Adobe AIR applications.
Create an AIR project
1 Select File > New > Project.
2 In the Create Project wizard, select HTML Projects > Adobe AIR Project, and click Next.
3 Enter the project name and the location of the files in the project.
Last updated 5/15/2012
80
USING COLDFUSION BUILDER
Managing Projects
4 Specify the HTML start page that contains the sandbox application code. You can also select non-application
sandbox code. Click Next.
5 Specify the following properties of the application XML file, and click Next.
• ID: Unique application ID that is the identifier string for the application.
• Name: Application name
• Filename: Name of the file and folder where the application is installed
• Version: Application version
• Icon: Icon files that represent the application. If you don't specify an icon, the operating system uses a default
icon.
6 Specify the window style, dimension, sizing options, and click Next.
7 Select the AIR frameworks to import into the project, and click Next.
8 Select the Ajax JavaScript libraries that you want to import, and click Finish to create your AIR project.
Run and debug an AIR application
1 From the Navigator view, open the source file (Application.XML) for the application.
2 Click Run on the main toolbar to launch the AIR application.
3 To debug the application, click
in the workbench toolbar.
The application launches and runs in the ADL application (AIR Debugger Launcher). The ColdFusion debugger
catches any breakpoints or runtime errors and you can debug the application like any other ColdFusion application.
For more information, see “Debugging Applications” on page 82
Package and digitally sign an AIR application
When your application is complete and ready to be distributed, you package it into an AIR file. Packaging consists of
the following steps:
1 From the Navigator view, right-click the AIR project that you want to package, and click Export.
2 In the Export wizard, select Adobe AIR > Adobe AIR Package, and click Next.
3 Select the AIR project and the application descriptor file.
4 You can select the default AIR SDK or configure a different Adobe AIR SDK, and click Next. To configure a
different AIR SDK, click Configure Adobe AIR SDKs, and select an AIR SDK. You can also add a new AIR SDK,
or edit and remove an existing AIR SDK.
5 You can digitally sign your AIR application by selecting an existing digital certificate or by creating a self-signed
certificate. Digitally signing your AIR application provides assurance to the users that the application has been
signed with a trusted certificate and displays the publisher identity.
a Select Digitally Sign Exported AIR Application.
b Select an existing digital certificate, or click Configure Certificates to select a different digital certificate. Click
Add to create a self-signed certificate.
c Specify the password for your digital certificate.
d If you select TimeStamp AIR Package, when signing the installation package, the AIR Developer Tool (ADT)
automatically contacts a time-stamp authority to verify the time. The time-stamp information is included in the
AIR file. An AIR file that includes a verified time stamp can be installed at any point in the future.
Last updated 5/15/2012
81
USING COLDFUSION BUILDER
Managing Projects
e Select Migrate AIR Application to migrate an AIR application to a new certificate. When you do so, sign the AIR
file with both new and old certificates. Select the previous certificate from which you want to migrate and the
previous certificate password.
You also have the option of packaging your AIR application without a digital signature. To do so, deselect Digitally
Sign Exported AIR Application. When you package your AIR application without a digital signature, an
intermediate AIR file (.airi) is created. An intermediate AIR file cannot be deployed or installed. It is generally used
for testing (by the developer) and can be launched using the AIR ADT command-line tool.
6 Click Next to optionally select files to exclude from the exported AIR file. By default, all the files are included.
7 Click Finish to generate the AIR file.
Last updated 5/15/2012
82
Chapter 8: Debugging Applications
Debugging lets you examine and troubleshoot your application. When you debug, you can control when the
application must stop at specific points in the code. You can also monitor important variables and test your code.
Debugging uses a configuration to control how applications are launched. When you debug your application, you run
the debug version of the application file.
Using ColdFusion debugger
Before you use the ColdFusion Debugger, ensure that you do the following:
Set up ColdFusion to use the Debugger
Before you use the Debugger, ensure the following:
• A server is associated with the project or the project containing the files that you want to debug.
1 In the Navigator view, right-click the project and select Properties.
2 In the Properties dialog box, select ColdFusion Server Settings.
3 Under Select Servers, ensure that a server is selected. If no server is selected, select the Servers drop-down list
and select an available server, or select Add Server to configure a new server.
• RDS is enabled on the ColdFusion server, and you have specified the correct RDS configuration information in
ColdFusion Builder.
• Debugging is enabled in ColdFusion Administrator.
1 In ColdFusion Administrator, select Debugging & Logging > Debugger Settings.
2 Select Allow Line Debugging.
3 Specify the port to use for debugging. The default value is 5005.
4 Specify the maximum number of simultaneous debug sessions. The default value is 5.
5 Click Submit Changes.
6 To increase the time after which requests time out, do the following:
a Select Server Settings > Settings.
b Select Timeout Requests After (Seconds) and enter the required timeout value. For example, 300.
c Click Submit Changes.
7 The debugger server listens for commands from ColdFusion Builder on a separate port than the one specified
in step 3. By default, ColdFusion launches the debugger server with a random available port. This could be a
problem if ColdFusion (and hence debugger server) is behind a firewall. Because, the firewall blocks the random
port that the debugger is listening.
To prevent this problem, specify a fixed debugger server port number and allow this port in the firewall. To set
a fixed debugger server port number, specify the following JVM argument on the Java And JVM page of the
ColdFusion Administrator (or the appropriate place for your J2EE Application Server). Replace portNumber
with the port that you want to use:
Last updated 5/15/2012
83
USING COLDFUSION BUILDER
Debugging Applications
-DDEBUGGER_SERVER_PORT=portNumber
8 Restart ColdFusion. If you are running the J2EE configuration of ColdFusion, restart the server in debug mode
with the debug port as specified.
Set up debugging for J2EE configuration of ColdFusion
1 If you are not running the server configuration of ColdFusion, specify Java debugging parameters in the
configuration file or startup script of the application server you are running. The parameters must look like the
following:
-Xdebug -Xrunjdwp:transport=dt_socket,server=y,suspend=n,address=<port_number>
Ensure that the port number you specify is the same port number specified on the Debugger Settings page of
ColdFusion Administrator.
If you are running the server configuration, ColdFusion writes these debugging parameters to the jvm.config file
when you use the Debugger Settings page of the ColdFusion Administrator.
2 If you are not running the server configuration and your application server is not running on JRE 1.6, copy the
tools.jar file of the JDK version that your application server is running to the \lib folder of ColdFusion. For example,
if you are running JRun that runs on JRE 1.4, copy the tools.jar file of JDK 1.4 to the \lib folder of ColdFusion.
3 If you are running the server version of ColdFusion and you specify a JRE version other than JRE 1.6 in the
jvm.config file, copy the tools.jar file of the JDK version specified in your jvm.config file to the \lib folder of
ColdFusion.
Set up debugging for multi-server configuration of ColdFusion
To debug ColdFusion applications running on the multiserver configuration, start the ColdFusion server from the
command line using the following command:
jrun -config <path_to_jvm_config> -start <server_name>
Specify debugger settings in ColdFusion Builder
1 In ColdFusion Builder, select Window > Preferences.
2 In the tree view, select ColdFusion > Debug Settings.
3
Specify the home page URL that points to the page that appears in the Debug Output Buffer of the debugger when
you click the Home button.
4 Specify the extensions of the types of files that you can debug and debugger scopes that you want the Debugger to
recognize. To improve performance when debugging large files, deselect all scopes for which you do not require
information.
5 Select Break On CFML Runtime Exception to stop the debugger on the line that causes a ColdFusion error.
6 Select Log An Exception To The Eclipse Error Log to display the server logs in the TailView view instead of showing
a warning dialog.
Debugging your application
After you enabled the debugger in the ColdFusion Administrator and configured the debugger in ColdFusion Builder,
you can debug projects in ColdFusion Builder.
Last updated 5/15/2012
84
USING COLDFUSION BUILDER
Debugging Applications
Create or edit launch configurations
When you debug a project in your application, ColdFusion Builder creates a project-specific launch configuration for
the first time that you debug. The launch configuration automatically defines a project name (based on the project that
you are debugging), main application file, and the path to debug the application.
Launch configurations are managed through the Create, Manage, and Run Configurations dialog box.
Debug configuration
You can edit the default launch configuration that ColdFusion Builder creates.
1 Select the project to debug in the Navigator view.
2 You can access the launch configuration in the following ways:
• Select Run > Debug or Run > Debug Configurations
• Select
in the workbench toolbar.
• Right-click the project and select Debug As > Debug Configurations.
3 Select the launch configuration to edit in the Debug Configurations dialog box.
You can also create a launch configuration or base a new configuration on an existing configuration.
4 Click the Perspectives link to modify the launch configuration preferences, as required.
Last updated 5/15/2012
85
USING COLDFUSION BUILDER
Debugging Applications
Run the application
Run the application that you want to debug before setting any breakpoints. Running the application before debugging
compiles the application and improves performance during debugging.
1 Select the project to run in the Navigator view.
2 Select or modify the Run configuration using the Run Configurations dialog box. You can access this dialog box in
the following ways:
• Select Run > Run configurations.
• Right-click the project and select Run As > Run Configurations.
3 Select the configuration to run or modify, if necessary.
4 Click Run.
The application is run in your computer’s default browser. To specify a different external browser, do as follows:
• (Windows) Right-click the project and select Properties. Go to ColdFusion Server Settings, and select a a web
browser installed on your computer.
• (Mac) In the Preferences dialog box, select General > Web Browser, and select a web browser installed on your
computer.
Set and remove breakpoints
You use breakpoints to control the running of your application so you can inspect your code and debug your
application. You add breakpoints in the code editor and then manage them in the Breakpoints view. You can also set
breakpoints as you write code or while you debug.
For more information about managing breakpoints using the Breakpoints view, see “Breakpoints view” on page 32.
ColdFusion breakpoints
ColdFusion breakpoints have the following four states in the ColdFusion debugger:
Enabled and Valid This state indicates that the breakpoint is at a valid location. The breakpoint appears as a solid blue
circle in the left margin of the CFML Editor. Code execution stops when this breakpoint is encountered.
Unresolved ColdFusion sets the breakpoint for the page that is loaded in its memory. If you modify the page and do
not run it, the source is no longer in sync with the page on the server. In this situation, ColdFusion sometimes does
not know whether the line where you want to set the breakpoint is valid. A question mark (?) represents this type of
breakpoint.
Invalid If ColdFusion determines that the CFML that you are editing in ColdFusion Builder is the same as the CFML
in its memory, and that the breakpoint you have set is at an invalid line, the breakpoint appears as a red X.
Disabled This state indicates that the breakpoint is disabled.
Set a breakpoint in the code editor
1 Open the ColdFusion Builder project that contains the code in which you want to set breakpoints.
2 Locate the line of code where you want to set a breakpoint, and do one of the following:
• Double-click in the marker bar along the left-edge of the editor.
• Select Run > Toggle Breakpoint or Run > Toggle Line Breakpoint.
Note: Toggle Method Breakpoint and Toggle Watchpoint are not supported in ColdFusion Builder.
Last updated 5/15/2012
86
USING COLDFUSION BUILDER
Debugging Applications
3 You can set breakpoints in your CFML file to stop executing the page at particular points. When you set a
breakpoint on a line, the CFML stops executing just before that line. For example, if you set a breakpoint on the
third line in the following CFML page, execution stops before <cfset myName = "Wilson">.
<cfset yourName = "Tuckerman">
<cfoutput>Your name is #yourName#.</cfoutput>
<cfset myName = "Wilson"
A blue dot appears before the line on which you set the breakpoint.
You can also view a list of breakpoints set in the current project in the Breakpoints view of the ColdFusion Builder
Debugging perspective.
Skip all breakpoints in the code editor
After setting breakpoints in your code, you can ignore all breakpoints at the time of debugging.
1 Open the ColdFusion Builder project that contains the code with breakpoints.
2 In the Breakpoints view toolbar, select Skip All Breakpoints.
Remove a breakpoint in the code editor
❖ In the marker bar along the left-edge of the editor, double-click an existing breakpoint.
The breakpoint is removed from the marker bar and the Breakpoints view of the ColdFusion Builder Debugging
perspective.
To remove all the breakpoints in the file, select Run > Remove all Breakpoints from the main toolbar menu.
Start a debugging session
1 In the Navigator view, select the project or file to debug.
2 You can start the debugging session in the following ways:
• Select Run > Debug
• Click
in the workbench toolbar.
• Right-click the project and select Debug As > ColdFusion Application.
The Debug launch configuration is automatically created and launched.
Note: If you are debugging a page and then try to browse to or refresh that page, it can result in unexpected behavior in
the Debugger.
Manage the debugging session
Use the Debug view to control the debugging of the application, to suspend, resume, or terminate the application, or
to step into or over code.
For information about the various views in the ColdFusion Debug perspective, see “ColdFusion Debugging
perspective” on page 30.
Run code line by line
You can use the Step Into, Step Over, and Step Return buttons to proceed through your CFML application line by line.
For the stepping process to work properly, clear the cache of compiled classes. To do so, recompile all CFML pages
compiled with an earlier version of ColdFusion.
Last updated 5/15/2012
87
USING COLDFUSION BUILDER
Debugging Applications
In large files, you sometimes find that stepping and breakpoints are slow. To improve performance, do the following:
1 In ColdFusion Builder, select Windows > Preferences.
2 In the tree view, select ColdFusion > Debug Settings
3 Deselect all scopes for which you do not require information.
Step Into
Use Step Into for UDFs, CFCs, custom tags, and included files.
Avoid using Step Into on CFML tags such as the cfset tag. Step Into is more performance intensive than Step Over.
When stepping into functions, tags, and files, the file must be displayed in one of the open projects. The file that you
are stepping in must be in an open project.
Step Over
Use Step Over to proceed through your CFML application, bypassing included files, such as UDFs or CFCs.
Step Return
Use Step Return to return to the original page from which you entered the included file, such as UDFs or CFCs.
Inspect variables
As you run CFML code, you can see the values and scope of variables in the Variables view. Only variables whose
scopes are what you selected in the Preferences dialog box appear in the Variables view. For more information about
using the Variables view, see “Variables view” on page 31.
Watch expressions
Watch expressions are useful to watch critical variables that sometimes go out of scope when you step into a different
function. You can create your own expressions to watch and evaluate. You can modify the expressions during the
debugging session.
You can do the following in the Expressions view:
• Create a watch expression by right-clicking and selecting Add Watch Expression. You can then enter the expression
in the Add Watch Expression dialog box.
• Ignore a watch expression that you’ve added by right-clicking the expression and selecting Disable.
• Edit a watch expression by right-clicking the expression and selecting Edit Watch Expression. You can then modify
the expression.
For more information about using the Expressions view, see “Expressions view” on page 32.
Debugging remote applications
If ColdFusion is running on a remote server, configure a remote server connection and specify a mapping between
ColdFusion and ColdFusion Builder. Mapping ensures that ColdFusion Builder and ColdFusion are working on a
copy of the same project or file.
1 To configure a remote server, see “Add a remote server” on page 67. Enter the RDS configuration information, as
required.
Last updated 5/15/2012
88
USING COLDFUSION BUILDER
Debugging Applications
2 In the Server view, right-click the server and select Edit Server. In the Mappings screen of the Server wizard, enter
the following mapping details:
• Local Path: Path that ColdFusion Builder uses to find projects or folders on the remote ColdFusion server.
• Remote Path: Path to the project or folder on the remote ColdFusion server.
Note: You can specify multiple mappings between the remote ColdFusion server and ColdFusion Builder.
For example, if you are editing files in a ColdFusion project that points to D:\MyCoolApp and the corresponding
files exist on a remote server at D:\Shared\websites\MyCoolSite. Then, create a mapping by specifying the local
path as D:\MyCool App and the remote path as D:\Shared\websites\MyCoolSite.
When you deploy the files to the ColdFusion server, you copy them to W:\websites\MyCoolSite\, which the
ColdFusion server recognizes as D:\Shared\websites\MyCoolSite.
The mapping in ColdFusion Builder specifies that the ColdFusion Builder directory is D:\MyCoolApp and the
server is D:\Shared\websites\MyCoolSite. So, ColdFusion Builder translates the file path
(D:\MyCoolApp\index.cfm) to a path that the ColdFusion server recognizes
(D:\Shared\websites\MyCoolSite\index.cfm).
To see more information about the interaction between the client and the server, add the following to the JVM
arguments in the ColdFusion Administrator:
-DDEBUGGER_TRACE=true
3 In the Navigator view, select the project or file to debug and click
Last updated 5/15/2012
in the workbench toolbar.
89
Chapter 9: ColdFusion Builder Extensions
About extensions
You can extend the ColdFusion Builder IDE (Integrated Development Environment) functionality to support various
ColdFusion frameworks and code generation requirements. You develop ColdFusion Builder extensions to generate
code, design dynamic user interfaces, and perform basic CRUD (Create, Read, Update, and Delete) operations on the
database. The ColdFusion Builder extension is a structured component that adds context menus in the ColdFusion
Builder IDE and handles events on these menus. You, the ColdFusion developer, can develop a ColdFusion Builder
extension yourself or you can install an available extension.
To develop your own ColdFusion Builder extension, you create the configuration file and handler files. You define the
context menus and events in the configuration file - IDE_Config.xml. For more information, see “Developing
extensions” on page 89.
ColdFusion Builder lets you extend the IDE at various levels including creating user interfaces. For more information,
see “Creating user interfaces for extensions” on page 106.
The extensions that are shipped along with ColdFusion Builder are Adobe CFC Generator and AS Class Generator.
You can install and integrate these extensions with ColdFusion Builder. For more information, see “Using Extensions”
on page 122.
ColdFusion Builder provides the ColdFusion Builder Extension Creator to guide you through the process of creating
and packaging extensions. For more information, see “Use ColdFusion Builder Extension Creator to create and
package extensions” on page 118.
What's new with extensions in ColdFusion Builder 2
Developing extensions
To develop a ColdFusion Builder extension, you create the following elements:
• Configuration file (IDE_config.xml)
• Handler files (CFM files)
You can create these elements by writing the code or by using the ColdFusion Builder Extension Creator wizard. For
more information about using the ColdFusion Builder Extension Creator wizard, see “Use ColdFusion Builder
Extension Creator to create and package extensions” on page 118.
Configuration file
Creating the configuration file (IDE_config.xml) is an important step in developing a ColdFusion Builder extension.
You define all the elements of the configuration file within the application tag.
Last updated 5/15/2012
90
USING COLDFUSION BUILDER
ColdFusion Builder Extensions
Specifying metadata elements
You use metadata elements to create an extension and specify information like, extension name, author, version, and
extension description.
Use the following elements to specify application metadata in the configuration file.
Element
Description
name
The name of the extension.
author
The author's name.
version
The file version.
email
Specifies the e-mail address.
description
A brief description of the application.
The description can be in plain text or you specify a path to an HTML file, which contains
the application description. If you specify a path to an HTML file, store the HTML file in the
Install directory within the extension.
license
License agreement displayed when installing the extension.
The license agreement can be displayed in plain text or you specify a path to an HTML file,
which contains the license agreement. If you specify a path to an HTML file, store the HTML
file in the Install directory within the extension.
Example
<application>
<name>ORM CFC Generator</name>
<author>Adobe</author>
<version>1.0</version>
<email>[email protected]</email>
<description>ORM CFC code Generator</description>
<license>license.html</license>
</application>
Adding pages to the ColdFusion Builder Extension Installation wizard
When you define the Configuration file, you can specify code that adds screens to the ColdFusion Builder Extension
Install wizard. You can use these screens to get user inputs. Generally, user inputs are required for performing any
configuration tasks after installation.
You specify input details using the input tag; for information on how to specify input tags, see “Specifying input types”
on page 98. The handler that is specified in the handlerid attribute of the wizardtag is called with the input details.
You can also specify the height and width of the Install wizard using the height and width attributes of the wizard
tag. You can specify the title for each page in the wizard using the title attribute of the page tag.
Last updated 5/15/2012
91
USING COLDFUSION BUILDER
ColdFusion Builder Extensions
Syntax
<application>
<name>Name of the ColdFusion Builder extension</name>
<install>
<wizard height="" width="" handlerid="handlerID" >
<page title="Wizard page title" >
<input name="Input" ... />
<input name="Input" ... />
</page>
</wizard>
</install>
</application>
Example
In the following example, once the Extension Installation wizard finishes installing the extension, the handler ID,
postinstallhandler, is called with the specified input details.
<application>
<name>ORM CFC Generator</name>
<install>
<wizard height="" width="" handlerid="postinstallhandler" >
<page title="Install settings" >
<input name="Mapping" ... />
<input name="Datasource" ... />
</page>
</wizard>
</install>
</application>
Extending IDE
You can extend the ColdFusion Builder IDE at the following levels:
• Adding context menus: You can add context menus to the following views:
• Resource navigator
• RDS Data view
• Outline view
• CFML Editor
• Handling workspace events: Currently onprojectcreate is the only supported event. See also “New events added
in ColdFusion Builder 2.0.1” on page 93.
• “Create views” on page 109
• “Contribute to Code Assist from extensions” on page 119
You can specify handlers for the context menus and events to perform CRUD or code generation operations.
Specifying Handlers
ColdFusion Builder supports CFM handlers. In the ColdFusion Builder context, a handler is a file that contains code,
which is run in response to an event or an action. You specify handlers within the handlers tag. Use the handlerid
attribute to associate the handler with an event or action. Specify all handler details within the handlers tag. For more
details on specifying events and actions, see “Specifying events” on page 92 and “Specifying context-menus” on
page 96. All the handler files must be stored in the Handlers folder.
Last updated 5/15/2012
92
USING COLDFUSION BUILDER
ColdFusion Builder Extensions
Syntax
<handlers>
<handler id ="cfm" type="cfm" filename="filename" />
</handlers>
Attribute
Description
id
Handler ID
type
Specifies the handler type.
The handler type you can specify is "CFM"
filename
The name of the CFM file
Note: You can specify only alphanumeric characters for the attribute values. Special characters are not allowed.
Example
<handlers>
<handler id="cfcgenerator" type="CFM"
filename="ormCFCGenerator.cfm" />
<handler id="gridgenerator" type="CFM"
filename="cfgridGenerator.cfm" />
</handlers>
Specifying events
Use the events tag to specify events. Currently, ColdFusion Builder only supports an event on project creation. The
supported event type is onprojectcreate. Pass the required handler ID for the onprojectcreate event. When the
event occurs, the handler associated with the handler ID is called.
All applications for which the onprojectcreate event is specified are listed under the list of applications in the
“Creating a ColdFusion project” on page 72. When a user selects any of the listed applications, the associated handlers
for the selected application are called. The onprojectcreate event is useful in creating a basic project structure for a
given ColdFusion Builder extension.
Syntax
<events>
<event
type="onprojectcreate"
handlerid="handler id" />
</events>
Attribute
Description
type
Specifies the event for which the handler runs.
You can specify the event type="onprojectcreate"
handlerid
Specifies the handler ID to pass.
Note: You can specify only alphanumeric characters for the attribute values. Special characters are not allowed.
Last updated 5/15/2012
93
USING COLDFUSION BUILDER
ColdFusion Builder Extensions
Example
<events>
<event type="onprojectcreate"
handlerid="projectCreationHandler" />
</events>
New events added in ColdFusion Builder 2.0.1
onfilechangeineditor: Extension can listen for events when file changes in the editor
Assume that you move to a different document (by clicking the tab on editor) or by opening a document in the editor.
It is now possible for the extension to know this.
For this, a new event onfilechangeineditor, has been introduced. The event can be registered as follows:
<event
type="onfilechangeineditor" handlerid="any_handler_id/>
The information sent in the event message includes the following:
•
type: Event type is onfilechangeineditor
•
project_path: Absolute path of the project to which the file (that is opened in the editor) belongs.
•
file_path: Absolute path of the file currently opened/switched to in the editor.
•
editor_name: Name of the editor that opened the file. For CFML files, the name is Adobe CFML Editor..
The following is a sample output:
<?xml version="1.0" encoding="UTF-8"?>
<event>
<ide version="2.0">
<callbackurl>
http://[ip_address:port]/index.cfm?extension=<Extension_Name>
</callbackurl>
<eventinfo type="onfilechangeineditor">
<project>
Extensions
</project>
<project_path>
[project_path]
</project_path>
<file_path>
[file_path]
</file_path>
<event>
onfilechangeineditor
</event>
<editor_name>
Adobe CFML Editor
</editor_name>
</eventinfo>
</ide>
<user>
</user>
</event>
Last updated 5/15/2012
94
USING COLDFUSION BUILDER
ColdFusion Builder Extensions
onRDSDataViewSelectionChange: Extension can listen for event when selection changes in the RDS data view
ColdFusion Builder sends different event information messages to the handler, depending on selection in the RDS
Data view.
For this, a new event, onRDSDataViewSelectionChange has been introduced. The event can be registered as follows:
<event
type="onfilechangeineditor" handlerid="any_handler_id/>
Node selected
Information Sent
Sample
Server
•
type: The event type
onRDSDataViewSelectionChange
•
name: Server name
•
node_type: Type of the node- server
<?xml version="1.0" encoding="UTF-8"?>
<event>
<ide version="2.0" >
<callbackurl>http://[ip_address:port]/index.cfm
? extension=<Extension_Name></callbackurl>
<eventinfo type="onRDSDataViewSelectionChange">
<event>onRDSDataViewSelectionChange</event>
<name>LocalCF9</name>
<node_type>server</node_type>
</eventinfo>
</ide>
<user></user>
</event>
•
type: The event type
onRDSDataViewSelectionChange
•
name: Data source name
•
parent_node: Name of parent node.
That is, the name of the server to which
the datasource belongs.
Data source
•
node_type: Type of the node- data
source.
<?xml version="1.0" encoding="UTF-8"?>
<event>
<ide version="2.0" >
<callbackurl>http://[ip_address:port]/index.cfm
? extension=<Extension_Name></callbackurl>
<eventinfo type="onRDSDataViewSelectionChange">
<event>onRDSDataViewSelectionChange</event>
<name>AUTHORS</name>
<parent>Tables</parent>
<node_type>table</node_type>
</eventinfo>
</ide>
<user></user>
</event>
Last updated 5/15/2012
95
USING COLDFUSION BUILDER
ColdFusion Builder Extensions
Node selected
Information Sent
Sample
Table Group
•
type: Event type,
onRDSDataViewSelectionChange
•
name: Table group name
•
parent_node: Name of parent node.
That is, the name of the data source to
which this table group belongs
•
node_type: Type of the node- group.
<?xml version="1.0" encoding="UTF-8"?>
<event>
<ide version="2.0" >
<callbackurl>http://[ip_address:port]/index.cfm
? extension=<Extension_Name></callbackurl>
<eventinfo type="onRDSDataViewSelectionChange">
<event>onRDSDataViewSelectionChange</event>
<name>Tables</name>
<parent>cfbookclub</parent>
<node_type>group</node_type>
</eventinfo>
</ide>
<user></user>
</event>
•
type: Event type,
onRDSDataViewSelectionChange
•
name: Table name
•
parent_node: Name of parent node.
That is, the data source to which the
table belongs.
•
node_type: Type of the node- table.
•
type: The event type
onRDSDataViewSelectionChange
•
name : Column name
•
parent_node: Name of parent node.
That is, the name of the table to which
the column belongs.
•
node_type: Type of the node- column.
Table
Column
<?xml version="1.0" encoding="UTF-8"?>
<event>
<ide version="2.0" >
<callbackurl>http://[ip_address:port]/index.cfm
? extension=<Extension_Name></callbackurl>
<eventinfo type="onRDSDataViewSelectionChange">
<event>onRDSDataViewSelectionChange</event>
<name>AUTHORS</name>
<parent>Tables</parent>
<node_type>table</node_type>
</eventinfo>
</ide>
<user></user>
</event>
<?xml version="1.0" encoding="UTF-8"?>
<event>
<ide version="2.0" >
<callbackurl>http://[ip_address:port]/index.cfm
? extension=<Extension_Name></callbackurl>
<eventinfo type="onRDSDataViewSelectionChange">
<event>onRDSDataViewSelectionChange</event>
<name>AUTHORID</name>
<parent>APP.AUTHORS</parent>
<node_type>field</node_type>
</eventinfo>
</ide>
<user></user>
</event>
OnFileSaved: Add event notification when file is saved
When a file is saved in ColdFusion Builder, an event notification is sent to the Handler CFM file.
For this, a new event onFileSaved has been introduce. The event can be registered as follows:
<event type="onFileSaved" handlerid="OnFileSaved"/
The information sent to the Handler includes:
•
type: Event type is onFileSaved
•
project_path: Absolute path of the project in which the file that is saved belongs.
•
file_path: Absolute path of the file saved.
•
editor_name: Name of the editor that opened the file. For CFML files the name is Adobe CFML Editor.
The following is a sample output:
Last updated 5/15/2012
96
USING COLDFUSION BUILDER
ColdFusion Builder Extensions
<?xml version="1.0" encoding="UTF-8"?>
<event>
<ide version="2.0">
<callbackurl>
http://[ip_address:port]/index.cfm? extension=<Extension_Name>
</callbackurl>
<eventinfo type="onfilechangeineditor">
<project>
Extensions
</project>
<project_path>
[project_path]
</project_path>
<file_path>
[file_path]
</file_path>
<event>
onfilesaved
</event>
<editor_name>
Adobe CFML Editor
</editor_name>
</eventinfo>
</ide>
<user>
</user>
</event>
Specifying context-menus
Use the menucontributions tag to specify a context-menu. A context-menu is a pop-up menu that appears on a
right-click event.
To specify menu contributions for different views, use the contribution tag. Use the target attribute within the
contribution tag to specify the target view where the menu must appear. Use the menu tag within the contribution
tag to specify the menu to add. Use the action tag within the menu tag to specify menu items.
Syntax
<menucontributions>
<contribution target="rdsview|projectview|outlineview">
<menu name="name of the menu item">
<action name="action name">
</action>
</menu>
</contribution>
</menucontributions>
Last updated 5/15/2012
97
USING COLDFUSION BUILDER
ColdFusion Builder Extensions
contribution
Attribute
Description
target
The target view can be any of the following:
•
rdsview
•
projectview
•
outlineview
•
editor
Note: You can specify only alphanumeric characters for the attribute values. Special characters are not allowed.
menu
Attribute
Description
name
Specifies the name of the menu.
Note: You can specify only alphanumeric characters for the attribute values. Special characters are not allowed.
action
Attribute
Description
name
Specifies the name of the action.
handlerid
Specifies the ID of the associated handler.
showresponse
A Boolean that value that specifies if the HTML response that the handler receives
must be shown to the user:
•
yes
•
no
The default value is false.
Note: You can specify only alphanumeric characters for the attribute values. Special characters are not allowed.
Specifying menu filters
Menu filters help control where a menu or menu item must appear. You specify menu filters using the filters tag.
You can specify different filter types within the filters tag; use the type and pattern attributes to specify where the
menu or menu item must appear. If any of the specified filters match, the specified menu or menu item appears.
You can specify filters for both menus and actions. If you specify the filter tag within the menu tag, the filter controls
the display of the menu. For example, in the following code, the ORM Code Generator menu appears only if the user
right-clicks the modelglue.xml file.
<menu name="ORM Code Generator">
<filters>
<filter type="file" pattern="modelGlue.xml" />
<filters>
</menu>
Specifying filters for the Navigator View
You can specify filters on the project, folder, or file of the Navigator view.
Last updated 5/15/2012
98
USING COLDFUSION BUILDER
ColdFusion Builder Extensions
Syntax
<filter type="folder|project|file"
pattern="regular expression to match folder, project, or filename" />
Example
If you want the ORM Code Generator menu to appear only in the context of a folder, you can use code like the
following:
<menu name="ORM Code Generator">
<filters>
<filter type="folder" />
<filters>
</menu>
Specifying filters for the Outline View
You can specify filters on different node types of the Outline view. The node name that you specify acts as the filter. In
the Outline view, you can also specify filters for files. When you open the file that matches the filter in the CFML editor,
the contributed menu appears in the Outline view.
Syntax
<menu name="menu name">
<filters>
<filter type="node name" />
Example
If you want the ORM Code Generator menu to appear only on the CFfunction node in the Outline view, you can use
code like the following:
<menu name="ORM Code Generator">
<filters>
<filter type="cffunction" />
Specifying input types
Before a handler is called, you can get user inputs using the input tag. The associated handler processes the user
inputs. You specify an input tag for every action and the input tag must be within the action tag.
To control the height and width of the input dialogs, you specify the input tag within the dialog tag. For example,
you can specify code like the following:
<dialog height="400" width="600" title="title" image="path to the image file">
<input name="Mapping" ... />
<input name="Datasource" ... />
</dialog>
Attribute
Description
height
Specifies the height of the dialog.
width
Specifies the width of the dialog.
title
Specifies the title for the dialog.
image
Specifies the path to the image that appears in the title bar. The path
that you specify must be relative to the Extension folder.
Last updated 5/15/2012
99
USING COLDFUSION BUILDER
ColdFusion Builder Extensions
Syntax
<action name="action name">
<input name="input variable name"
label="label for the input dialog box"
tooltip="tool tip"
type="dir|string|boolean|file|password|list"/>
</action>
Attribute
Description
name
Input variable name
label
The label of the input dialog box
tooltip
The tool tip that appears when the user moves the mouse over the
input dialog box.
type
The input variable can be any of the following data types:
required
•
dir
•
string
•
Boolean
•
file
•
password
•
list
•
projectdir
•
projectfile
Specifies the input field as required.
When you specify an input field as required, the OK button is not
enabled until the user enters a value in the required field.
pattern
Specifies the regular expression against which user input is validated.
For a validation error, you can specify the error message that must
appear. You use the errormessage attribute to specify the error
message.
errormessage
The error message that appears when validation fails for a given
pattern.
helpmessage
The Help tip that appears in the title area of the dialog for a given
input field.
default
Specifies a default value for a given input type. You cannot specify a
default value for Boolean input types. For lists, the default value is preselected.
checked
A Boolean value that specifies if the check box field is selected or
deselected, by default:
•
true - check box is selected (default value).
•
false - check box is deselected
Note: You can specify only alphanumeric characters for the attribute values. Special characters are not allowed.
Last updated 5/15/2012
100
USING COLDFUSION BUILDER
ColdFusion Builder Extensions
Each data type corresponds to an input type as specified in the table below. The syntax for each input type is also
specified.
Datatype
Input type
Syntax
dir
Directory selection field
<input name="input variable name"
label="label" tooltip=" tooltip" type="dir"/>
string
Text field
<input name="input variable name"
label="label" tooltip=" tooltip"
type="string"/>
boolean
Check box
<input name="input variable name"
label="label" tooltip=" tooltip"
type="boolean"/>
file
File selection field
<input name="input variable name"
label="label" tooltip=" tooltip" type="file"/>
password
Password field
<input name="input variable name"
label="label" tooltip=" tooltip"
type="password"/>
list
List field
<input name="input variable name"
label="label" tooltip=" tooltip" type="list">
<option value=”Option1”> <option
value=”Option2”> </input>
projectdir
Project directory selection field
<input name="input variable name"
label="label" tooltip=" tooltip"
type="projectdir"/>
projectfile
Project file selection field
<input name="input variable name"
label="label" tooltip=" tooltip"
type="projectfile"/>
Last updated 5/15/2012
101
USING COLDFUSION BUILDER
ColdFusion Builder Extensions
Example
<menucontributions >
<contribution target="rdsview" >
<menu name="ORM Code Generator">
<action name="Generate ORM CFC" handlerid="cfm1" >
<input name="Location" label="Enter location"
tooltip="Location where generated CFCs will be stored" type="dir"/>
<input name="generateAppCFC" label="Generate
Application CFC" tooltip="Generate Application CFC along with ORM CFC"
type="boolean"/>
<input name="generateView" label="Generate View"
tooltip="Generate View template along with ORM CFC" type="boolean"/>
</action>
<action name="Generate Ajax Grid" handlerid="cfm2" >
<input name="Location" label="Enter location"
tooltip="Location where generated View will be stored" type="dir"/>
</action>
</menu>
</contribution>
<contribution target="projectview" >
<menu name="ORM Code Generator">
<action name="Generate ORM CFC" handlerid="cfm1" />
<action name="Generate Ajax Grid" handlerid="cfm2" />
</menu>
</contribution>
<contribution target="outlineview" >
<menu name="ORM Code Generator">
<action name="Generate ORM CFC" handlerid="cfm1" />
<action name="Generate Ajax Grid" handlerid="cfm2" />
</menu>
</contribution>
</menucontributions>
Keyword support
ColdFusion Builder supports keywords that are used to add default values in input dialogs. During runtime, actual
values replace the keywords.
The following table lists the supported keywords and the corresponding actual values.
Keyword
Actual value
projectlocation
Absolute path to the project location
projectname
Name of the project
serverhome
Absolute path to the serve installation location
wwwroot
Server web root
For example, you can specify the projectname keyword as follows:
<input name="projectname" label="projectname" default="{$projectname}" type="dir"/>
For information about importing, reloading, packaging, and debugging extensions, see “Using the Extensions view”
on page 116.
Last updated 5/15/2012
102
USING COLDFUSION BUILDER
ColdFusion Builder Extensions
Support for menu contribution on multiple nodes
Note: Introduced in ColdFusion Builder 2.0.1
In RDS Data View, menu contributions can be added to server, database, and file nodes in addition to table nodes.
If you select server node, then server names are sent to the Handler. The attribute selected, if true, indicates if the
server, database, table or field is part of the selection as shown in the following sample response sent to the Handler:
<?xml version="1.0" encoding="UTF-8"?>
<event>
<ide version="2.0">
<callbackurl>
url
</callbackurl>
<rdsview>
<servers>
<server name="server1">
<server name="server2">
</servers>
<database name="db1" server="server1" selected="true">
<table name="table1" selected="false">
<fields>
<field
name="field1" .... selected="true">
</fields>
</table>
</database>
</rdsview>
</ide>
</event>
Filters
As menu contributions can be added to multiple nodes in the RDS data view, you can specify filters to specify the node
that you choose to be active as shown in the following example.
The valid filter types are server, database, table, and field.
<contribution target="rdsview">
<menu name="menu1">
<action name="action1">
</action>
<filters>
<filter type="database" />
<filter type="table" />
</filters>
</menu>
</contribution>-
Understanding ColdFusion Builder and handler communication
Communication between the handler and ColdFusion Builder IDE is through XML. When an event occurs,
ColdFusion Builder sends the event details to the associated handler in XML format. The XML is sent to the handler
as a FORM-scope variable named ideEventInfo. To retrieve the XML from the FORM-scope variable, use the
cfparam tag in the handler.
Last updated 5/15/2012
103
USING COLDFUSION BUILDER
ColdFusion Builder Extensions
Syntax
<cfparam name="ideeventinfo">
or
<cfset ideData= form.ideEventInfo >
Understanding XML structure
To understand the XML structure, let us review the XML code.
Consider the following points before reviewing the code:
• All information sent to the handler is within the event tag.
• All event and action information is within the ide tag.
• Any user inputs are within the user tag.
The following table describes the XML code. The contents of the XML code vary depending on the event.
Code
Context
Description
<rdsview >
<database name="">
<table name="">
<fields>
<field name=""
type=""
length=""
nullallowed=""
primarykey=""/>
</fields>
</table>
</database>
</rdsview>
rdsview
When you click a menu item of the RDS view,
the event details are sent to the associated
handler.
<projectview
projectname=""
projectlocation="">
<resource name=""
path=""
type="file/folder/project" />
</projectview>
projectview
When you click a menu item of the Project
view, the event details are sent to the
associated handler.
<outlineview
projectname=""
projectlocation="" >
<source filename=""
path="" >
<node type="function/other">
<function name=""
returntype="">
<argument name=""
type="" />
</function>
</node>
</source>
</outlineview>
outlineview
When you click a menu item of the Outline
view, the event details are sent to the
associated handler.
Last updated 5/15/2012
104
USING COLDFUSION BUILDER
ColdFusion Builder Extensions
Code
Context
Description
<eventinfo
projectname=""
projectlocation=""
eventtype="" >
<resource name=""
path=""
type="file/folder/project" />
</eventinfo>
on project create
When the specified event occurs, the event
details are sent to the associated handler.
<user>
<input name="" value=""/>
<input name="" value=""/>
<input name="" value=""/>
</user>
input dialog
All user inputs are specified within the user
tag. Each input tag within the user tag,
contains specific user input. The input name is
the same as the input name specified in the
IDE_Config.xml file.
<user> <page index="" > <input name=""
value="" /> </page> </user>
Install wizard
All user inputs are specified within the user
tag and sent to the handler associated with
the Install wizard. Each input tag within the
user tag contains specific user input. The
input name is the same as the input name
specified in the IDE_Config.xml file.
ideeventinfo.xml sent to Handler CFM files from ColdFusion Builder has:
• ColdFusion Builder version information provided as follows:
<event>
<ide version="2.0" >
....
</ide>
</event>
• Server details that include hostname and port number, provided as follows:
<eventinfo projectname="mg1"
projectlocation="C:/Documents and Settings/sandeepp/runtime-EclipseApplication/mg1"
eventtype="onprojectcreate">
<server name="local1" hostname="localhost" port="8501" wwwroot="C:\ColdFusion9\wwwroot"/>
</eventinfo>
Sending messages between extensions
Note: Introduced in ColdFusion Builder 2.0.1
An extension can now send messages to another extension to perform an action or to notify of some event. The
extension that receives the message can either take action or ignore the message.
The following scenario explains how this feature is useful:
You can now create extension that can listen to events, for example switching to a different file in the editor or selection
change in the RDS data view. Using this feature, if you want, you can update the view content with this information
(say about the new selection).
The handler CFM file that receives the event change notification executes a callback command
sendMessageToExtension to ColdFusion Builder with the following:
• Message information
• Name of the extension to which the message has to be sent
• The handler CFM file in the extension that has to be executed
Last updated 5/15/2012
105
USING COLDFUSION BUILDER
ColdFusion Builder Extensions
The following example asks ColdFusion Builder to send message to New Extension Enhacements in CFB Twister
extension and call its handler NewFeaturesTestViewHandler and passes information such as event type and other
event related information:
<cfsavecontent variable="command" > <cfoutput> <response>
<ide> <commands> <command type="sendMessageToExtension">
<params> <param
key="extension_name" value="New Extension Enhacements in CFB Twister" />
<param key="handlerid" value="NewFeaturesTestViewHandler" />
<param key="event_type" value="#type#" /> <cfloop
list="#structKeyList(eventinfo[1])#" index="key"> <param
key="#key#" value="#eventinfo[1][key].xmlText#" />
</cfloop> </params> </command>
</commands> </ide> </response> </cfoutput> </cfsavecontent>
<cftry>
<cfhttp url="#callbackURL#" method="post" result="httpResult">
<cfhttpparam type="body" value="#command#">
</cfhttp>
<cfcatch>
<cfset httpError = cfcatch.Message>
</cfcatch>
</cftry>
Handler communication
ColdFusion Builder sends the event details to the handler NewFeaturesTestViewHandler as XML (as FORM-scope
variable ideEventInfo) as follows:
<event>
<ide version="2.0">
<callbackurl>
http://[ip_address:port]/index.cfm?extension=New Extension Enhacements in CFB
2.0.1
</callbackurl>
<extension_message>
<from_extension_name>
New Extension Enhacements in CFB 2.0.1
</from_extension_name>
<params>
<param key="project" value="Extensions"/>
<param key="project_path" value="[project_path]"/>
<param key="file_path" value="[file_path]"/>
<param key="event" value="onfilechangeineditor"/>
<param key="event_type" value="onfilechangeineditor"/>
<param key="editor_name" value="Adobe CFML Editor"/>
</params>
<from_extension_server>
LocalCF9
</from_extension_server>
</extension_message>
</ide>
<user>
</user>
</event>
The information passed inside the extension_message node include the following:
Last updated 5/15/2012
106
USING COLDFUSION BUILDER
ColdFusion Builder Extensions
Information
Description
from_extensi
on_name
The extension that has sent the message.
params
Parameters of the message.
Creating user interfaces for extensions
Create input dialogs
You can create an input dialog either by using a configuration file (IDE_Config.xml) or using CFM pages.
Note: If you are creating a user interface using XML response, turn off the debug output by specifying cfsetting
showdebugoutput="no" in the relevant code.
Using the configuration file
You create an input dialog by creating a configuration file (IDE_config.xml) and specifying the necessary details. For
more information, see “Configuration file” on page 89.
For, example, you can specify code like the following:
<action name="action name">
<dialog>
<input name="input variable name" label="label for the input dialog"
tooltip="tool tip" type="dir"/>
</dialog>
</action>
Using CFM pages
• In the IDE_config.xml file, specify the showResponse attribute of the Action tag as yes, as follows:
<action name="generate CFC" handlerid="cfcgenerator" showResponse="yes" />
• In the CFM handler, do the following:
1 Specify the content-type value of the cfheader tag as text/xml, as follows:
<cfheader name="Content-Type" value="text/xml">
2 Create the input dialog by constructing the XML as follows:
<cfoutput>
<response>
<ide>
<dialog >
<input name="location" Label="Enter Location"
</dialog>
</ide>
</response>
</cfoutput>
type="dir" />
Create HTML user interfaces
You can create an HTML user interface either by using HTML response or XML response.
Last updated 5/15/2012
107
USING COLDFUSION BUILDER
ColdFusion Builder Extensions
Using HTML response
In the IDE_config.xml file, specify the showResponse attribute of the Action tag as yes, as follows:
<action name="generate CFC" handlerid="cfcgenerator" showResponse="yes" />
The HTML content of the CFM page appears in a dialog box. Ajax and Javascript are not supported in the HTML
content. If you use links in the HTML content, the URL for the link must be an absolute URL and not a relative URL.
Using XML response
In the CFM handler, do the following:
1 Specify the content-type value of the cfheader tag as text/xml, as follows:
<cfheader name="Content-Type" value="text/xml">
2 Create the HTML user interface by constructing the XML as follows:
<cfoutput>
<response showresponse="true">
<ide url="http://localhost:8500/local/Dynamic%20UI%20Test/handlers/main.swf" >
<dialog width="455" height="470" />
</ide>
</response>
</cfoutput>
The HTML content of the specified URL appears in a dialog box.
You can also display HTML user interface through an XML response as follows:
<cfoutput>
<response showresponse="true">
<ide >
<dialog width="100" height="400" />
<body>
<![CDATA[
Any HTML content
]]>
</body>
</ide>
</response>
</cfoutput>
Note: Extensions do not support relative paths for CSS and JavaScript. Ajax and JavaScript code that is specified in the
CDATA section does not work. Any URL that you specify in the CDATA section must be an absolute URL.
Understanding the structure of XML response
Response
The XML response is defined within the response tag that has the following attributes:
Last updated 5/15/2012
108
USING COLDFUSION BUILDER
ColdFusion Builder Extensions
Attribute
Description
showresponse
A Boolean value that specifies if the response must be shown to the
user:
status
•
true
•
false
Displays a success or error dialog box.
Depending on the status - success or error, the dialog appears with a
relevant icon. Applicable only when message attribute is specified in
IDE tag.
This attribute is applicable only when you specify the message
attribute within the IDE tag.
IDE
The IDE tag has the following attributes:
Attribute
Description
message
Displays the message that you specify in a success or error dialog box.
Use status="success/error" attribute of the response tag to specify if
the message must appear as an error message.
url
The URL of a page that you want to display to the user.
handlerfile
Path to the handler file that must be called when a user clicks OK in the
message dialog box.
This attribute is applicable only when input dialogs are created from
an XML response.
Body
Use the body tag to specify any HTML content. The HTML content within the body tag must be specified in the
CDATA section.
Dialog
The dialog tag is used to create input dialogs and has the following attributes:
Attribute
Description
height
Specifies the height of the dialog.
width
Specifies the width of the dialog.
title
Specifies the title for the dialog.
image
Specifies the path to the image that appears in the title bar.
dialogclosehandler
Path to the handler file that must be called when a user clicks Close or
Cancel in the message dialog box.
This attribute is applicable only when input dialogs are created from
an XML response.
To control the height and width of the input dialogs, you use the input tag within the dialog tag.
Last updated 5/15/2012
109
USING COLDFUSION BUILDER
ColdFusion Builder Extensions
Attribute
Description
height
Specifies the height of the dialog.
width
Specifies the width of the dialog.
title
Specifies the title for the dialog.
image
Specifies the path to the image that appears in the title bar. The path
that you specify must be relative to the Extension folder.
Create views
ColdFusion Builder lets you create views using extensions. You can also specify a view icon and toolbar items for the
view you create.
The feature helps you use IDE features concurrently while seeing the data.
Create view in either of the following ways:
• Add contribution to ide_config.xml
• Dynamically from handler response
Add contribution to IDE_config.xml
Specify the details in the configuration file IDE_config.xml as shown in the following code. Adding view contribution
to ide_config.xml adds the view to the list of views under ColdFusion category in Show View dialog box (Window >
Show View > Other).
<viewcontributions>
<view id="ID" title="title" icon="relative_path_to_icon" handlerid="handler_id" >
<toolbarcontributions>
<toolbaritem icon="relative_path_to_icon" handlerid="handler_id" />
<toolbaritem icon="relative_path_to_icon" handlerid="handler_id" />
</toolbarcontributions>
</view>
</viewcontributions>
Attribute
Description
id
Identifies the view. Views contributed by an extension must have unique IDs.
id can be used to update the content of a view from handler response.
title
A title for the view.
toolbaritem
Adds an item to the view toolbar.
Last updated 5/15/2012
110
USING COLDFUSION BUILDER
ColdFusion Builder Extensions
Attribute
Description
icon
Relative path to image file that resides in the installation location of extensions. For example, specifying
images/icon.png (in the images folder of extension installation location) displays icon.png as the view
icon.
The standard sizes are 16x16 pixels or 20x20 pixels.
All popular image formats are supported.
handlerid
ID of the associated handler.
keepFocus
If true, avoids focus from shifting when an extension view is generated dynamically.
(Added in
ColdFusion
Builder 2.0.1)
Assume that you are editing a file and an action results in refresh/creation of extension view. You may not
want the focus to move from the editor to the view. Set the attribute keepFocus to true to avoid focus from
shifting when an extension view is generated dynamically using the <view> tag in IDE_config.xml. By
default, dynamically created extension views do not get focus. The extension views displayed from the
Window menu > Show View option always gets focus.
Displaying the view
1 Install or import the extension which contributes the view.
2 Open Show View dialog box (Window > Show View > Other).
3 Double-click ColdFusion in the folder list.
4 Select the view (that is contributed) and then click OK.
The view appears and calls the corresponding Handler CFM file.
Use Handlers (for dynamic views)
In the CFM handler,
1 Specify the content-type value of the cfheader tag (as text/xml) as follows:
<cfheader name="Content-Type" value="text/xml">
2 Create the view that displays HTML content by constructing the XML as follows:
<cfoutput>
<response showresponse="true">
<ide url="URL">
<view id="ID" title="title" icon="icon_path" />
</ide>
</response>
</cfoutput>
You can also display HTML content through an XML response as follows:
<cfoutput>
<response showresponse="true">
<ide>
<view id="ID" title="title" icon="icon_path" handlerid="ID" />
<body>
[![CDATA[any html content]]>
</body>
</ide>
</response>
</cfoutput>
Note: Currently, views do not persist across ColdFusion Builder sessions.
Last updated 5/15/2012
111
USING COLDFUSION BUILDER
ColdFusion Builder Extensions
Specifying callback commands from handlers
In ColdFusion Builder (the previous release), from the handler CFM files, you can request to run the following
commands: refreshproject, refereshfolder, refreshfile, inserttext, and openfile.
Now you can complete all these operations and few others in the execution phase itself (rather than at the end of
execution). From the Handler CFM files you can send a call to ColdFusion Builder using the callback URL. ColdFusion
Builder provides the callback URL in ideeventinfo XMLas shown here:
<event>
<ide version="2.0">
<callbackurl>
callbackURL
</callbackurl>
</ide>
</event>
In addition to the commands that get context information related to the editor, you can get server-specific information
such as data source and table details.
The following table provides the list of commands that help you perform various operations in the execution phase.
All commands which request data have command result in XML format. The table has the results returned by each
command:
Name
Action
refresh
File
Refreshes the specified file by <command
type="refreshFile">
sending the absolute or
<params>
relative path. If you specify
<param key="filename"
the relative path, specify the value="filePath" />
project name.
<param key="projectname"
projectName is optional. It
can be specified if the file is in
the project.
refresh
Folder
Result
projectName is optional. It
Refreshes the specified
project.
Not applicable
value="#arguments.projectN
ame#" />
</params>
</command>
Refreshes the specified folder. <command
can be specified if the folder is
in the project.
refresh
Project
Input
Not applicable
type="refreshFolder">
<params>
<param key="foldername"
value="folderPath" />
<param key="projectname"
value="projectName" />
</params>
</command>
<command
type="refreshProject">
<params>
<param key="projectname"
value="projectName" />
</params>
</command>
Not applicable
Last updated 5/15/2012
112
USING COLDFUSION BUILDER
ColdFusion Builder Extensions
Name
Action
Input
Result
openFil
e
Opens the specified file for
editing, by sending the
absolute or relative path. If
you specify the relative path,
specify the project name.
<command type="openFile">
<params>
<param key="filename"
value="filePath" />
<param key="projectname"
value="projectName" />
<param key="linenumber"
value="10" />
</params>
</command>
Not applicable
projectName is optional. It
can be specified if folder is in
the project.
lineNumber is an optional
parameter (added in
ColdFusion Builder 2.0 )
insertT
ext
Inserts the specified text in
the active editor. Selected
text in the editor is replaced
after this command runs.
<command
type="inserttext">
<params>
<param key="text">
<![CDATA[ text_to_insert
]]>
</param>
<param key="insertmode"
value="replace/insert" />
</params>
</command>
Not applicable
getServ
ers
Lists the servers added to the
Server Manager.
<command type="getservers"
>
</command>
<?xml version="1.0" encoding="UTF8"?>
<event>
<ide version="2.0">
<callbackurl>
[call back URL]
</callbackurl>
<command_results>
<command_result type="getservers">
<servers>
<server name=""/>
...
</servers>
</command_result>
</command_results>
</ide>
</event>
getData
sources
Lists the data sources for a
given server.
<command
type="getdatasources" >
<params>
<param key="server"
value="comma_seperated_ser
ver_names" />
</params>
</command>
<?xml version="1.0" encoding="UTF8"?>
<event>
<ide version="2.0">
<callbackurl>
[callback url]
</callbackurl>
<command_results>
<command_result
type="getdatasources">
<datasources>
<datasource name="" server=""/>
...
</datasources>
</command_result>
</command_results>
</ide>
</event>
Output variable is commaseparated list of data source
names.
If server name is not specified,
by default, the server on
which the extension runs is
considered.
Last updated 5/15/2012
113
USING COLDFUSION BUILDER
ColdFusion Builder Extensions
Name
Action
getTabl
es
Gets the details of tables for a <command type="gettables">
<params>
<param
given data source.
If server name is not specified,
by default, the server on
which the extension runs is
considered.
getTabl
e
Input
Result
key="server"
value="servers" /> <param
key="datasource"
value="datasources" />
</params> </command>
Gets the details of a particular <command type="gettable">
<params>
table for a given data source.
<param key="server"
If server name is not specified, value="servername" />
<param key="datasource"
by default, the server on
value="dsn" />
which the extension runs is
<param key="table"
considered.
value="tablename" />
</params>
</command>
searchF
ile
Searches for a text content file <command type="searchfile"
>
and returns the content.
<params>
<param key="fileName"
Use getcontent only for text
value="ide_config.xml"/>
files.
<param key="from"
searchDirection indicates value="search_from_this_fi
le_or_folder"/>
if you want to search through
<param key="getcontent"
the parent folders (up) or sub- value="true/false"/>
folders (down)
<param
key="searchDirection"
value="up/down"/>
<param key="matchfolder"
value="true/false"/>
</params>
</command>
<?xml version="1.0" encoding="UTF8"?>
<event>
<ide version="2.0">
<callbackurl>
[callback url]
</callbackurl>
<command_results>
<command_result type="gettables">
<tables>
<table datasource=""
name="table_Name" server="">
<field cfsqltype="" cftype=""
javatype="" name=""
nullallowed=""
primarykey="true|false" type=""/>
[list of other columns]
</table>
...[list of other tables]
</tables>
</command_result>
</command_results>
</ide>
</event>
<?xml version="1.0" encoding="UTF8"?>
<event>
<ide version="2.0">
<callbackurl>
[callback url]
</callbackurl>
<command_results>
<command_result type="gettable">
<table datasource="" name=""
server="">
<field cfsqltype="" cftype=""
javatype="" name=""
nullallowed=""
primarykey="true|false" type=""/>
...
</table>
</command_result>
</command_results>
</ide>
</event>
<?xml version="1.0" encoding="UTF8"?>
<event>
<ide version="2.0">
<callbackurl>
[callback url]
</callbackurl>
<command_results>
<command_result type="searchfile">
<files>
<file path="" type="file"/>
</files>
</command_result>
</command_results>
</ide>
</event>
Last updated 5/15/2012
114
USING COLDFUSION BUILDER
ColdFusion Builder Extensions
Name
Action
Input
Result
getfunc
tionsan
dvariab
les
Lists the functions and
variables in a file you specify.
<command
type="getfunctionsandvaria
bles" >
<params>
<param key="filePath"
value="path"/>
</params>
</command>
<?xml version="1.0" encoding="UTF8"?>
<event>
<ide version="2.0">
<callbackurl>
[callback url]
</callbackurl>
<command_results>
<command_result
type="getfunctionsandvariables">
<cfmlfile
type="component|interface|cfml">
<variables>
<variable function="name of function
if variables is inside function"
name="" type=""/>
...
</variables>
<functions>
<function file="" name=""/>
...
</functions>
</cfmlfile>
</command_result>
</command_results>
</ide>
</event>
Gets the list of ColdFusion
Builder projects.
<commands>
<command
type="getprojects" >
</command>
</commands>
<?xml version="1.0" encoding="UTF8"?><event>
<ide version="2.0">
<callbackurl>
http://<ip_address:port>/index.cfm?ex
tension=untitled
</callbackurl>
<command_results>
<command_result type="getprojects">
<projects>
<project
name="TestProject"
path="<Project_Path>">
<cfproject>
<server name="local_server"/>
</cfproject>
</project>
</projects>
</command_result>
</command_results>
</ide></event>
(For
details on
enhance
ments,
see the
section
Enhance
ments to
existing
callback
comman
ds in
ColdFusi
on
Builder
2.0.1)
getProj
ects
(Added in The details include:
ColdFusi
• name: Name of the project
on
Builder
• path: Absolute path of the
2.0.1)
project.
•
isopen : If project is open
or closed. If open, the value
is true.
•
reloadE
xtensio
ns
iscfproject: false if
not a ColdFusion project. If
it is a ColdFusion project,
then additional
information such as server
name is returned.
Reloads an extension using an <commands>
<command
extension.
type="reloadExtensions" >
</command>
</commands>
(Added in
ColdFusi
on
Builder
2.0.1)
sendMes
sageToE
xtensio
n
Not applicable
For details, see “Sending
messages between
extensions” on page 104.
(Added in
ColdFusi
on
Builder
2.0.1)
Last updated 5/15/2012
115
USING COLDFUSION BUILDER
ColdFusion Builder Extensions
Enhancements to existing callback commands in ColdFusion Builder 2.0.1
The response returned by the callback command getfunctionsandvariables now includes variable scope-related
information. You can write extension to determine the scope, for example if the variable is var scoped in the function.
The following three variables are identified:
• Argument scope
• Var scope
• Tag created variables, for example, the variables created in cfquery.
You can determine the remaining scopes in the Handler CFM file from the variable name prefix, for example this or
application.
The following is a sample getfunctionsandvariables output that includes scope-related information:
<event>
<ide version="2.0">
<callbackurl>
http://ip_address:port/index.cfm?extension=untitled
</callbackurl>
<command_results>
<command_result type="getfunctionsandvariables">
<cfmlfile type="cfml">
<variables>
<variable name="i" type="numeric"/>
</variables>
<functions>
<function name="testFunc"
file="C:\ColdFusion9\wwwroot\MyExtension\handlers\test.cfm">
<variables>
<variable name="j" type="numeric" function="testFunc"
scope="varscope"/>
<variable name="arg1" function="testFunc"
scope="argument"/>
<variable name="variables.l" type="numeric"
function="testFunc"/>
</variables>
</function>
</functions>
</cfmlfile>
</command_result>
</command_results>
</ide>
</event>
Example: Execute commands using callback URL
Step 1: Get ideeventinfo XML
<cfparam name="ideeventinfo" >
<cfset xmldoc=xmlParse (ideeventinfo)>
Step 2: Get callback URL from ideeventinfo XML
<cfset callbackurl= xmldoc.event.ide.callbackurl.xmlText>
Last updated 5/15/2012
116
USING COLDFUSION BUILDER
ColdFusion Builder Extensions
Step 3: Create XML to send command to ColdFusion Builder
<cfsavecontent variable="commandxml" >
<cfoutput>
<response>
<ide>
<commands>
[Any command xml to be executed]
</commands>
</ide>
</response>
</cfoutput>
</cfsavecontent>
Step 4: Execute callback command and get response
<cfhttp method="post" url="#callbackurl#" result="commandresponse" >
<cfhttpparam type="body" value="#commandxml#" >
</cfhttp>
Handling errors while using callback commands
If there is an error while executing commands which return data, command response XML provides the error node
with information about the possible cause of error.
<?xml version="1.0" encoding="UTF-8"?>
<event>
<ide version="2.0">
<callbackurl>
[callback url]
</callbackurl>
<command_results>
<error>
[error message]
</error>
</command_results>
</ide>
</event>
Additional resources
• ColdFusion Builder 2 Extensions - Understanding Callback Commands
ColdFusion Builder engineering team member Sandeep Paliwal explains the possibilities of callback commands in
ColdFusion Builder 2 extensions.
Using the Extensions view
Use the Extensions view to install, uninstall, import, and reload extensions.
If the Extensions view is not already displayed in the workbench, add the Extensions view by selecting Window > Show
View > Other. Then, in the Show View dialog box, select ColdFusion > Extensions view.
Last updated 5/15/2012
117
USING COLDFUSION BUILDER
ColdFusion Builder Extensions
Install and uninstall extensions
1 In the Extensions view, click
and select the Archive file to install.
Note: If the extension that you are installing is shipped with ColdFusion Builder, the Archive file is available in the
Extensions directory within the ColdFusion Builder installation.
2 The Extension Install wizard guides you through the installation.
3 Select the Server. If no server is configured, click Add Server to add a new server. For information about adding a
server, see “Adding ColdFusion servers” on page 64.
You can install the same extension on different servers. For example, CF9 local server and CF8 local server.
However, at any given point, only the server that the extension uses is active.
4 Enter the path to the ColdFusion web root (if the path is not automatically populated when selecting the server).
For example, C:\ColdFusion9\wwwroot\
5 Select a folder within the web root to install the extension. The archive file is extracted to the install location.
6 Click Install.
To view a brief description about the installed extension, click the extension name. If you have installed the same
extension on more than one server, you can make one of the servers active. To do so, select the server that you want to
make active from the Active Server drop-down list.
To uninstall an extension, select the extension in the Extensions view and click
. You can uninstall an extension
from the IDE only, or remove the extension from your IDE and computer’s file system at the same time. When an
extension is permanently removed from the file system, you cannot undo the command.
Note: If you are uninstalling an extension that is installed on multiple servers, repeat the uninstall process for every server.
Import and reload extensions
Use the Extensions view to import and reload extensions.
• You can import extensions from an existing directory into ColdFusion Builder. Click
in the Extensions view,
and select the directory that contains the extension files.
Note: It is useful to import extensions when you use existing extensions to develop new extensions.
• You reload an extension if you change the configuration file of an installed extension. Configuration file changes
are reflected only after you reload the extension. Click
extensions.
in the Extensions view to reload all the installed
Debug and package extensions
While loading extensions from the configuration file, any errors are logged to the Eclipse log. To debug the errors, you
can view the ColdFusion Builder error log by selecting Window > Show View > Other > General > Error Log. The
ColdFusion Builder error log appears in the Error Log view.
To package an extension, add the following contents to a ZIP file:
• Configuration file (IDE_config.xml)
• Handler directory that contains all the Handler CFM files
Note: Ensure that you add the configuration file and handler directory directly under the root of the ZIP file.
Last updated 5/15/2012
118
USING COLDFUSION BUILDER
ColdFusion Builder Extensions
Use ColdFusion Builder Extension Creator to create and
package extensions
The ColdFusion Builder Extension Creator wizard guides you through the process of creating and packaging
extensions. The wizard guides you through creating the Configuration file (IDE_Config.xml) and Handler files
(CFM), specifying metadata elements, adding context menus, and creating user interfaces.
Note: The ColdFusion Builder Extension Creator wizard is installed only if you selected Install Extensions while
configuring a ColdFusion server. See the Extensions view for the list of installed extensions.
1 In the Navigator view, right-click the project in which you want to create the extension, and select Adobe Extension
Builder > New.
2 Enter or browse to a location to store the extension. Select Create Folder With Extension Name to store the
extension files in a folder with the same name as the extension.
3 Select the Extension Details tab to enter the extension name and details. You can also specify any license agreement
text that must appear on installing the extension.
Specify menu contributions
Select the Menu contributions tab and click Add Menu to specify a context-menu. A context-menu is a pop-up menu
that appears on a right-click action.
• Enter the name of the menu and the target view from where the menu must appear. You can specify the target view
as the Navigator or Project view, RDS view, Outline view, or the CFML editor. Then, click Save Menu.
• To specify menu items, click Add Action.
1 You can associate handlers with an action. Handlers display the code generation operations that are fetched
from the server. Specify the Handler ID and Handler name, and select Show Response to display the server
response. Then, click Save.
2 Before a handler is called, you can get user inputs. To do so, click Add Input.
3 Specify the input variable name, label for the input dialog box, tooltip, and the input variable type.
4 You can also specify the pattern against which the user input is validated, and the error message that appears
when the validation fails.
5 Select Required to specify the input field as required, and select Checked to have the check box selected, by
default. Then, click Save.
• To specify filters that control the display of the menu, click Add Filter. You can specify filters at the project, folder,
and file levels.
Specify handlers
Select the Handlers tab to view details about the installed handlers.
1 To specify a new handler, click Add Handler, and enter the necessary details.
2 Select Generates Response to get user inputs before calling the handler.
3 Specify the title of the input dialog box, and the height and width in pixels. Then, click Save Handler.
Last updated 5/15/2012
119
USING COLDFUSION BUILDER
ColdFusion Builder Extensions
Create an extension installation wizard
Select the Install Wizards tab to create an installation wizard that guides you through the extension installation.
1 Specify the height and width of the wizard in pixels. You can also associate a handler with the wizard. Then, click
Save.
2 Specify a title for the wizard, and click Save.
3 Specify the input variable name, label for the input dialog box, tooltip, and the input variable type. You can also
specify the pattern against which the user input is validated, and the error message that appears when the validation
fails.
Package the extension
1 In the Navigator view, right-click the ide_config.xml file and the Handler folder that contains all the Handler CFM
files, and select Adobe Extension Builder > Package. The files are added to a ZIP file.
2 Browse to a location to store the ZIP file.
Contribute to Code Assist from extensions
You can add proposals to Code Assist from extensions.
1 In the IDE_config.xml, do the following:
• To add proposals to Code Assist for function parameters, add the following code:
<codeassistcontribution>
<functions>
<function name="linkTo" variableName="event" componentName="component_name"
handlerId="CodeAssistHandler">
<parameter index="1" />
</function>
</functions>
</codeassistcontribution>
• To add proposals to Code Assist on variables, add the following code:
<codeassistcontribution>
<variables>
<variable name="event" componentName="component_name" handlerId="CodeAssistHandler">
<parameter index="1" />
</variable>
</variables>
</codeassistcontribution>
Attribute
Description
name
Name of the function that has to be listed.
variableN
ame
Name of the variable. If specified, then the handler is called only if the name of the variable on which the
function is called matches the variable name.
For variables, when you specify variablename. ,in the editor, Code Assist presents the contribution for that
variable.
Last updated 5/15/2012
120
USING COLDFUSION BUILDER
ColdFusion Builder Extensions
Attribute
Description
component
Name
If specified, the type of the variable on which the function is called matches the component name you
specify.
handlerID
ID of the associated handler.
index
Specifies parameter indexes for which the handler can provide Code Assist. If not present, then the handler
is called for all parameters in the function.
2 In the Handler CFM file, specify the response to add code assist proposal in the following format:
<codeassist_response>
<proposal display="display_value" insert="insert_this_value" inquotes="true/false"/>
</codeassist_response>
Attribute
Description
display
The value you specify appears in the proposal window.
insert
If that proposal is selected, then the value you specify is inserted in the editor.
inquotes
If set to true, then the text inserted in the editor is enclosed in double quotes.
3 Install/import the extension. When you start ColdFusion Builder Code Assist, the functions are displayed in the
proposal window.
Additional resources
• How to contribute to code assist from extensions
ColdFusion Builder engineering team member Sandeep Paliwal provides answers to the frequently asked questions
about contributing to Code Assist using extensions.
Extension support for setting Launch Page
You can dynamically generate Start Page URL for framework applications using extensions.
ColdFusion Builder features such as ColdFusion Debugger, Use External Browser, Run as ColdFusion Application use
this URL as the Start Page URL.
The generated URL can also have query param added to it.
Note: ColdFusion Builder lets you “Set Launch Page” on page 75 at the project level, which is helpful for simple
applications. This feature provides option to set Launch Page for projects that are based on frameworks.
Add Start Page contribution to IDE_config.xml
Specify the details in the configuration file IDE_config.xml as shown in the following code:
<startpagecontribution>
<urlgenerator handlerid="ID" />
</startpagecontribution>
Handler communication
ColdFusion Builder sends the event details to the handler as XML (as FORM-scope variable ideEventInfo) as
follows:
Last updated 5/15/2012
121
USING COLDFUSION BUILDER
ColdFusion Builder Extensions
<event>
<ide version="2.0">
<callbackurl>
...
</callbackurl>
<startpage_request>
<project name="" projectlocation="">
<resource name="" path="" type="file|Folder|Project"/>
<server name="" hostname="" port="" wwwroot=""/>
</project>
</startpage_request>
</ide>
</event>
This information can be used to generate the URL.
Using extensions to generate Start Page URL
1 In the Project View, right-click the project and then select Properties > ColdFusion Project.
2 In the Start Page Setting, select the option available in the Use Extension list.
3 Click OK.
Next time, when you run the application, the handler identified with the ID you specified in IDE_config.xml is called.
The information related to the project or the CFM is displayed.
Example
<cfheader name="Content-Type" value="text/xml">
<cfoutput>
<startpage_response>
<url>Any URL</url>
</startpage_response>
</cfoutput>
Last updated 5/15/2012
122
Chapter 10: Using Extensions
The following extensions are automatically installed with ColdFusion Builder if you selected the Install Extensions
option when creating a server. For more information, see “Adding ColdFusion servers” on page 64.
• Adobe CFC Generator
• ActionScript Class Generator
The information covered here discusses how to use these extensions. It does not cover information about developing
the extensions.
Note: The extension user interface is rendered in the default browser of your computer. If you want to specify the browser
as Mozilla, go to the Preferences dialog box and select ColdFusion > Extensions. Then, select Use Mozilla Browser For
Extensions.
Adobe CFC Generator
The Adobe CFC Generator generator generates ORM CFCs (ColdFusion Components) from database tables. The
Adobe CFC Generator extension lets you create a traditional CFC or an ORM CFC from a set of tables.
Object Relational Mapping (ORM) is a programming technique that lets you define a mapping strategy to store and
retrieve data from a relational database using object models. The Adobe CFC Generator lets you define the mapping
for relations, specify join conditions, and generate services for the CFCs. For more information about ORM, see
ColdFusion ORM.
Install Adobe CFC Generator
The Adobe CFC Generator extension is installed with ColdFusion Builder, if you selected the Install Extension option
when creating a server.
If you did not install the extension when creating a server and want to install it now, see “Install and uninstall
extensions” on page 117. The Adobe CFC Generator extension archive file (AdobeCfcGenerator.zip) comes packaged
with ColdFusion Builder. The archive file is in the Extensions directory within the ColdFusion Builder installation.
Use Adobe CFC Generator (in ColdFusion Builder 2.0)
1 In the ColdFusion Builder perspective, select RDS Dataview.
2 If you have configured an RDS user name and password, specify the RDS user name and password.
Note: You set the RDS password in the ColdFusion Administrator. Do not confuse the RDS password with the
ColdFusion Administrator password, which is also managed through the ColdFusion Administrator.
3 The list of data sources available in the configured server are listed.
4 Select a data source and the table for which you want to generate CFCs. You can select multiple tables at once by
pressing Shift and selecting the table names.
5 Right-click the selected tables, select Adobe CFC Generator, and select one of the following options:
Last updated 5/15/2012
123
USING COLDFUSION BUILDER
Using Extensions
Note: The Adobe CFC Generator option appears only if you right-click a table name. Clicking the data source or
records within the data source does not show these options.
Create CFC Generates a ColdFusion component.
Create ORM CFC Generates an ORM CFC and maps it to the database.
Create CFC
1 Right-click a table in the selected data source, for example, APP.EMPLOYEES table, and select Adobe CFC
Generator > Create CFC.
2 In the Adobe CFC Generator dialog box, do the following:
• Specify the location to store the generated CFC.
• Select Generate Service to automatically generate methods.
You can modify the CFC source code to provide additional functionality.
Create ORM CFC
1 Right-click a table in the selected data source, for example, APP.EMPLOYEES table, and select Adobe CFC
Generator > Create ORM CFC.
2 Specify the location to store the generated CFCs.
3 The Adobe CFC Generator dialog box displays the selected database tables and fields in a dynamic, editable,
sortable, data grid.
Note: Because the data grid is an Ajax-rich user interface, it can sometimes take a few moments to load.
You can customize the ORM CFC as follows:
• Change the CFC Name: You can edit the auto-generated CFC name in the CFC Name field.
• Change the property name: You can edit the property name in the Property Name field.
• Change the property type: To edit a property type, click the property type that appears in the Property Type
column and select a property type from the drop-down list.
• Specify the primary key: You can edit the primary key settings by selecting "True" or "False" for the required
column.
• You can include or exclude columns that you want to generate in the CFC by selecting or deselecting the check
box next to each column name.
• Sorting data: You can sort tables and columns that appear in the data grid. The direction of the sort can be either
ascending or descending. To sort table names, click the Tables column and select the sort order. To sort column
data, click the column heading and select the sort order.
4 To generate a basic ORM CFC, click the Generate Code link.
To define relations and join conditions for the ORM CFC, do the following:
a In the Relationships data grid, click Insert. A new row is inserted.
b Click the Relation Name field and enter a name for the relationship. For example, you can define a relationship
between the Art table and Artists table.
c Select the target table from the Target Table drop-down list.
d Specify the relationship type by selecting the Multiplicity drop-down list.
e Specify a Link table, if necessary.
Last updated 5/15/2012
124
USING COLDFUSION BUILDER
Using Extensions
f
Click Save.
g When you define a relationship, define a join condition. To define a join condition for the specified relationship,
click the target table that you selected in step 3.
h Click Insert in the Join Conditions data grid.
i
Select the source field from the Source drop-down list.
j
Select the target field from the Target drop-down list.
k
Click Save.
l
Click the Generate Code link.
5 In the Navigator view, right-click the folder that contains the CFC and select Refresh. You can modify the CFC
source code to provide additional functionality.
Use Adobe CFC Generator (in ColdFusion Builder 2.0.1)
The Adobe CFC Generator has been enhanced in ColdFusion Builder 2.0.1 to provide a better user experience.
1 In ColdFusion Builder, select RDS Data View. It is assumed that you have added a ColdFusion server in the servers
view.
2 Select tables within a data source for which you wish to generate CFCs.
3 Right-click on selected tables within the data source and then select Adobe CFC Generator > Create ORM CFC.
4 You can choose to generate services and scripts CFCs by selecting appropriate options. When Generate Services
option is selected, CRUD (create, read, update, and delete) operations are created for each selected table. Scripts
CFC allows you to generate code in Scripts style instead of tags.
5 Specify the location to store the generated CFCs.
6 The Adobe CFC Generator displays the selected tables along with their fields.
Adobe CFC Generator dialog box
Move table
On the Adobe CFC Generator, click the table header and drag to move a table.
Edit table
1 Double-click the table header to display the Table Editor.
2 You can now do any of the following:
• If necessary, you can change the name of the CFC.
• Click property name to edit it.
• Click the property-type you wish to change and select from the drop-down list.
• Individually select/unselect table fields using the check box (first grid column). If not selected, the property is
not created for that field. If no field is selected in the table, then the CFC for that table is not generated.
Create, edit, and delete relationship
• To create a relationship between two fields of different tables, drag one field on to other. This displays a connector
between the two connected fields..
Last updated 5/15/2012
125
USING COLDFUSION BUILDER
Using Extensions
• Double-click the connector to edit the relationship on the Edit Relationship screen dialog box.
• Select to create property for both primary and foreign key.
• Set cardinality of relationship at each end and specify relationship name.
• (For many-to-many relationship) Select a link table from the drop-down list.
• To edit conditions of relationship, click the field that you want to edit.
• To add new condition, click the last empty row of the table.
• To delete relationship, click the X mark in the last column of the table.
• Click the circle in the middle of the linking line to delete the relationship.
AS Class Generator
The AS Class Generator generates ActionScript classes with or without offline metadata. Offline metadata is a part of
the ColdFusion-AIR offline integration feature of ColdFusion 9. You can generate ActionScript classes either from a
CFC or directly from a database table.
Install AS Class Generator
The AS Class Generator extension is installed with ColdFusion Builder, if you selected the Install Extension option
when creating a server.
If you did not install the AS Class Generator extension when creating a server and want to install it now, use the AS
Class Generator extension archive file (ASClassGenerator.zip). The AS Class Generator extension archive file comes
packaged with ColdFusion Builder and is in the Extensions directory within the ColdFusion Builder installation. For
more information on installing an extension, see “Install and uninstall extensions” on page 117.
Use AS Class Generator
The AS Class Generator application is available at the following levels:
• RDS Dataview view
• Project Navigator view
AS class generation is supported in the following scenarios:
• From a database table
• From a CFC
You can generate the AS class from either an ORM CFC or a traditional CFC.
AS Class Generation from a database table
1 In the ColdFusion Builder perspective, select RDS Dataview.
2 If you have configured an RDS user name and password, specify the RDS user name and password.
Note: You set the RDS password in the ColdFusion Administrator. Do not confuse the RDS password with the
ColdFusion Administrator password, which is also managed through the ColdFusion Administrator.
3 The list of data sources available in the configured server are listed.
4 Select a data source.
Last updated 5/15/2012
126
USING COLDFUSION BUILDER
Using Extensions
5 Right-click a table in the data source and select Generate AS Class from DB Table > Generate AS Class.
Note: The Generate AS Class from DB Table option appears only if you right-click the table name. Clicking the data
source or records within the data source does not show these options.
6 Enter the following details in the Generate AS Class dialog box.
• Specify or select a location to store the ActionScript class files.
• Select the Include AS Metadata Tags check box to include the following metadata tags:
[RemoteClass] Maps the ColdFusion CFC or Java objects on the ColdFusion server with the generated
ActionScript class
[Entity] Indicates that the generated ActionScript class has to be persisted to the AIR SQLite database as a
table. This tag is a ColdFusion-AIR offline integration tag.
[Id] Specifies the AS Class property as a primary key after the ActionScript class is persisted to the AIR SQLite
database table.
• Enter the path to the remote CFC class using dot notation relative to the web root. For example, if the path to
the CFC is C:\ColdFusion9\wwwroot\CFProj\xyz.cfc, the dot notation path is CFProj.xyz
Note: This entry is ignored if you have not selected the AS Metadata Tags check box.
• Enter the name of the package. The naming convention is the same as the ActionScript naming convention.
7 The ActionScript Class file is created with the naming convention databasetablename.as
Reviewing the generated ActionScript Class file
The following code is an example of an ActionScript class file - Employees.as that is generated from the Employees
table in the cfdocexamples data source.
Code
Description
package package1
The package is created with the name “package1”
[RemoteClass(alias="cfproj.xyz")]
The ActionScript Class maps with cfproj/xyz.cfc on the server.
[Entity]
public class EMPLOYEES
{
[Id]
public var EMP_ID:int;
public var FIRSTNAME:String;
public var LASTNAME:String;
public var EMAIL:String;
public var PHONE:String;
public var DEPARTMENT:String;
public var LOCATION:String;
public var IM_ID:String;
public function EMPLOYEES()
{
}
}
The class name is the same as the database table name. Each property in this class
corresponds to a column in the Employees database table. The data type of each
property is mapped automatically after introspecting the column data type.
AS Class Generation from CFC
From an ORM CFC
1 Create an ORM CFC.
Note: CFCs for which ActionScript classes are generated must be within the ColdFusion web root.
Last updated 5/15/2012
127
USING COLDFUSION BUILDER
Using Extensions
2 In the Project Navigator, right-click the ORM CFC and select Generate AS Class from CFC > Generate AS Class.
3 Enter the following details in the Generate AS Class dialog box.
• Specify or select a location to store the ActionScript class files.
• Enter the name of the package. The naming convention is the same as the ActionScript naming convention.
• Select the Include AS Metadata tags check box to include the [RemoteClass]tag.
• Select the Include CF-AIR Offline Metadata check box to include the following tags:
•
[Entity]
•
[Id]
• If the ORM CFC already has the necessary information like, primary key and data type for each property, you
need not enter the ColdFusion data source.
From a traditional CFC
1 In the Navigator view, right-click the CFC and select Generate AS Class from CFC > Generate AS Class.
Note: CFCs for which ActionScript classes are generated must be within the ColdFusion web root.
2 Enter the following details in the Generate AS Class dialog box.
• Specify or select a location to store the ActionScript class files.
• Enter the name of the package. The naming convention is the same as the ActionScript naming convention.
• Select the Include AS Metadata tags check box to include the [RemoteClass]tag.
• Select the Include CF-AIR Offline Metadata check box to include the following tags:
•
[Entity]
•
[Id]
• If the primary key and data type for each property is not specified in the CFC, enter the ColdFusion data source
name.
Points to remember
• For CF-AIR offline integration, column-specific metadata tag [Column] additions are not currently supported.
However, you can manually add the column-specific metadata tags after the ActionScript class file is generated.
• RDS does not provide information about the primary key of a table in the data source. Use the cfdbinfo tag to
identify the primary key. The cfdbinfo tag does not support ODBC drivers including Microsoft Access. Hence,
for unsupported data sources, you manually define the Id column in the generated ActionScript Class file.
• CFCs for which ActionScript class files are generated must be within the ColdFusion web root.
• In an ORM CFC, datatype/type is an optional attribute of the cfproperty tag. If this attribute is not present in
the CFC, ActionScript class files are not generated. To ensure that the ActionScript class files are generated, specify
the ColdFusion data source. Data type information is retrieved from the database table and the ActionScript class
file is created.
Last updated 5/15/2012