1
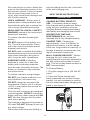
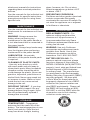
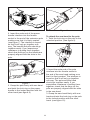
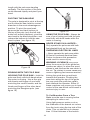
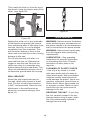
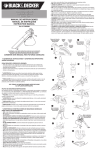
Operator’s Manual
Convertible Cordless
18V Power Handle
Model No. 71.74291
BEFORE returning this
product, first call:
(800) 539-6455
IMPORTANT
OPERATING HINT:
When starting unit, first push the thumb switch forward and then squeeze
the control trigger. It is NOT necessary to keep the thumb switch pushed
forward during use.
CAUTION:
• Safety
Before using this product, read this manual and follow all
its Safety Rules and Operating Instructions.
• Assembly
• Operation
• Maintenance
• Español
• Français
Sears, Roebuck and Co., Hoffman Estates, IL 60179, U.S.A.
www.craftsman.com
rev. 040908
TABLE OF CONTENTS:
Warranty...................................................................................................... 2
Safety Instructions...................................................................................... 2
Operation.................................................................................................... 4
Maintenance................................................................................................ 8
Storage........................................................................................................ 8
Accessories................................................................................................. 8
Service........................................................................................................ 9
Español..................................................................................................... 10
Français..................................................................................................... 19
WARRANTY
Craftsman One Year Full Warranty
If this Craftsman product fails due to manufacturer’s defects within one
year from the date of purchase, return it to any Sears store or other
Craftsman outlet in the United States for free replacement.
This warranty applies for only 90 days if this product is ever used for
commercial or rental purposes.
This warranty gives you specific legal rights, and you may also have other
rights which vary from state to state.
Sears, Roebuck and Co., Hoffman Estates, IL 60179
READ ALL INSTRUCTIONS
Please wash hands after handling the
cord.
SAFETY INSTRUCTIONS
CRAFTSMAN CONVERTIBLE
CORDLESS 18V TOOL SYSTEM
WARNING: Some dust created by
using power tools contains chemicals
known to the state of California to
cause cancer and birth defects or
other reproductive harm.
This product is for use only with the
Craftsman Convertible Cordless 18V
Tool System. Do not use the tool
attachments with any other system
or power source, and do not use any
tool attachment on the power handle
that is not intended for use with this
system.
WARNING TO CALIFORNIA
RESIDENTS: Handling the cord on
this units (or cords with accessories
sold for this product) will expose you
to lead, a chemical known to the State
of California to cause cancer, and birth
defects or other reproductive harm.
WARNING: When using this tool,
basic safety precautions should
2
always be followed to reduce the risk
of fire, electric shock, and personal
injury, including the following:
wear proper eye protection, and use a
face or dust mask if operation is dusty.
MAINTAIN UNIT WITH CARE - Keep
the unit clean for best performance
and to reduce the risk of injury. Follow
instructions for service. Keep handles
dry, clean, and free from oil and
grease.
To reduce risk of injury:
Before any use, be sure everyone
using this electric product reads and
understands all safety and operation
instructions contained in this manual.
UNINTENTIONAL STARTING Don’t carry any tool while holding the
switch area. The unit is shipped partly
charged, and may start inadvertently if
not handled properly.
Save these instructions and review
frequently prior to use. Store in wall
charger slot.
AVOID DANGEROUS
ENVIRONMENTS and weather
conditions when using this tool.
CHECK DAMAGED PARTS - If any
component of the system experiences
a hard impact, check that no parts
were damaged and verify that the
unit operates properly. Check for
misalignment or bending of moving
parts, breakage of parts, and any
other condition that may affect
operation. A part that is damaged
should be properly repaired or replaced by an authorized service
center.
KEEP CHILDREN AWAY - All
visitors should be kept at a safe
distance from work area.
STORE IDLE UNIT INDOORS - When
not in use, the unit should be stored
indoors in a dry location – out of reach
of children.
DON’T FORCE THE TOOL - It will do
the job better and with less likelihood
of a risk of injury at the rate for which it
was designed.
STAY ALERT - Watch what you are
doing. Use common sense. Do not
operate the tool when you are tired.
USE RIGHT TOOL - Do not use the
tool for any job except that for which it
is intended.
DON’T GRASP THE EXPOSED
CUTTING BLADES of the hedge
trimmer or pole saw when picking up
or holding the unit. Do not attempt to
remove cut material nor hold material
to be cut when blades are moving.
Make sure the unit’s switch is off and
the battery pack is removed before
clearing jammed material from blades.
WARNING: KEEP HANDS AND ALL
BODY PARTS AWAY from the blades.
The blade edges are sharp and can
cause injury even when the tool is
OFF.
DRESS PROPERLY - Do not wear
loose clothing or jewelry. They can
be caught in moving parts. Use of
gloves and substantial footwear is
recommended when working outdoors. Wear protective hair covering to
contain long hair.
DON’T GRASP MOVING LINE of the
line trimmer. Do not attempt to remove
cut material or hold material to be cut
when the line is moving. Make sure
the unit’s switch is off and the battery
pack is removed before clearing or
changing line.
DON’T OVERREACH - Maintain
proper footing and balance at all
times. Use both hands to operate unit
safely.
ATTACH LINE GUARD ON LINE
TRIMMER ATTACHMENT - Before
use, attach the line guard correctly.
USE SAFETY GLASSES - Always
3
See instructions on how to attach line
guard in the Operation section of the
line trimmer manual. Failure to attach
the line guard may pose a risk of
injury, may cause motor damage and
will void the warranty.
half and sliding into the slot in the back
of the wall charging rack.
USE A HARDHAT - Always wear a
hardhat when cutting branches overhead with the pole saw to reduce the
risk of injury from falling branches.
CHARGE BATTERY PRIOR TO
USE - The battery does not come
fully charged when purchased. Before
using the unit, the battery must be
charged. Before charging the battery,
read safety and charging instructions.
SAVE THESE INSTRUCTIONS
OPERATION
READ AND FOLLOW ALL SAFETY
WARNING printed in the various tool
attachment manuals.
PROPER RUN TIME AND
PERFORMANCE can only be
obtained with a fully charged battery.
To reduce risk when handling the
battery:
CHARGE TIME - Charging for
approximately 1 hour is sufficient to
replenish the battery to a full charge.
Initial use, long periods of inactivity, or
storage at extreme temperatures may
require extended charge time.
DO NOT dispose of the battery in a
fire. The cells may explode. Check
with local code for possible special
disposal instructions.
DO NOT open or mutilate the battery.
Released electrolyte is corrosive and
may cause damage to the eyes or
skin. It may be toxic if swallowed.
WALL CHARGE BRACKET - Before
charging the unit, make sure the
charge bracket is securely attached to
the wall; attach with screws to a wall
stud. The use of wall board anchors is
NOT recommended.
EXERCISE CARE in handling
batteries in order not to short the
battery with conducting materials
such as rings, bracelets and keys. The
battery or conductor may overheat
and cause burns.
To Charge Battery:
1. Plug the charger into a 120 Volt AC
outlet.
To reduce risk when using charger:
2. Place the Power Handle with
battery attached into the wall charge
bracket. It is not necessary to remove
the tool attachment when charging the
battery. (see figure 1)
DO NOT use charger outdoors or in
wet conditions; use inside only.
DO NOT charge the unit when the
temperature is below +40 F or above
+120 F. It may lessen the service life
of the battery.
This unit and its charger are designed
to work together. DO NOT charge the
battery with any other charger and DO
NOT use this charger with any other
yard tool or battery.
The charger is designed to operate on
120 volts. DO NOT attempt to use it at
any other voltage.
Store these instructions by folding in
Figure 1
4
3. Charge for at least 1 hour.
the charge to each battery and shuts
of the charge when complete. The
batteries can be left in the charger
indefinitely and will not over-charge.
4. The LED will glow red when the
battery is charging and green when
it is ready to use. If the LED does not
illuminate when the handle is placed in
the charge rack, check to make sure
that there is proper contact between
the handle and the charger base.
Longest life and best performance will
be obtained when charging at normal
room temperature.
Battery life is dependent on usage,
storage temperature and time.
5. A second charging bay is provided
on the charge rack to charge a second
battery (not included). To charge a
battery in this bay, insert the battery
until it locks in place and the LED
illuminates. (see figure 2) The LED
will glow red when the battery is
charging and green when it is ready
to use. When charging two batteries
(one in the handle and one directly in
the charger), the charger will charge
whichever battery was inserted
first. Then when that battery is fully
charged, it will automatically switch
and charge the other battery. Each
battery will take approximately 1 hour
to charge (a total of 2 hours for two
batteries).
CONNECTING TOOL ATTACHMENT
TO THE POWER HANDLE
Be sure to follow the following
safety precautions when attaching
and detaching tools from the power
handle.
Remove the battery from the handle
before attaching or detaching tools.
Never touch the control switches on
the power handle when attaching and
detaching tools
To attach a tool:
1. Twist the lock ring on the power
handle to the unlocked position. (see
figure 3)
Figure 2
Figure 3
Charging Notes:
2. Insert the male end of the power
handle interface into the female socket
in the end of the tool attachment
making sure that it is firmly seated.
(see figure 4) The interface is keyed
so that it will only go together one
way. The handle and tool should go
together easily. If you experience
resistance in putting them together,
CAUTION: The charger can only
be used with 60 cycle, 115-120 VAC
electricity.
The charger unit plugged into the AC
outlet will normally become warm to
the touch during charging.
The charger automatically controls
5
check that the keys on the handle are
properly aligned with the slots in the
tool.
Figure 6
2. Pull the power handle and tool
attachment apart. The power handle
and tool attachment should separate
easily. If they do not, check to be
sure that the lock ring is in the fully
unlocked position.
Figure 4
3. Grasp the tool attachment firmly
with one hand (note, do not grasp on
a rotating part such as the auxiliary
handle), and twist the lock ring on the
power handle to the locked position
with the other hand. (see figure 5)
Attaching the Battery
1. Align the rib on the battery pack
with the corresponding slot in the end
of the power handle. (see figure 7)
Figure 5
To detach a tool:
Figure 7
1. Grasp the tool attachment firmly
with one hand (note, do not grasp on
a rotating part such as the auxiliary
handle), and twist the lock ring on the
power handle to the unlocked position
with the other hand. (see figure 6)
2. Insert the battery fully into the
handle making sure that the springloaded buttons on each side of the
battery pack snaps into place in the
handle.
Removing the Battery
1. Depress the spring-loaded
buttons on both sides of the battery
simultaneously. (see figure 8)
6
Figure 8
Figure 10
2. Pull the battery pack straight out
from the handle.
To turn the tool off:
1. Release the control trigger and the
tool will turn off. The thumb switch will
return to the rear position to prevent
accidental re-starting of the tool.
To turn the tool on:
1. Grip the control grip firmly with one
hand and grip the auxiliary handle on
the tool attachment (if provided) with
the other hand.
The power handle can be operated in
two positions, normal and inverted,
depending on the work you are trying
to do. Depending on work position,
both thumb switch or control trigger
will release safety or activate tool, so it
is not necessary to contort your hand
when using the power handle in the
inverted position. (see figure 11)
2. Push the trigger that your thumb
rests on straight forward, this is the
safety release. (see figure 9)
Figure 9
3. While holding the switch under
your thumb in the forward position,
use your fingers to pull upward on the
control trigger. (see figure 10) This
will energize the tool and allow you to
do your work. It is NOT necessary to
keep pressure on the thumb switch
after the tool has started.
Figure 11
OVERLOAD PROTECTION
Some tool attachments incorporate
overload protection devices such as
fuses and circuit breakers. These
devices will cause the tool to stop
operating if an overload condition
exists. See the individual tool
Please note that the tool will not start
if the lock ring is not in the fully locked
position.
7
attachment manuals for instructions
regarding these overload protection
devices.
pipes, furnaces, etc. Do not store
where temperatures go below +40 F
or above +120 F.
See the manuals for the individual tool
attachments for specific instructions,
precautions and tips for using those
specific tools.
PREVENTING CORROSION Fertilizers and other garden chemicals
contain compounds that greatly
accelerate the corrosion of metals. Do
not store the appliance on or adjacent
to fertilizers or chemicals.
MAINTENANCE
See the manuals for the individual tool
attachments for maintenance of those
tools.
ACCESSORIES
REPLACEMENT PARTS - For
optimum cutting results and the
assurance of top performance, it
is recommended that only Sears
Craftsman replacement blades and
cutting line be used.
WARNING: Always remove the
battery when performing any
maintenance on the power handle or
a tool attachment that is connected to
the power handle.
WARNING: Use only Craftsman
accessories and replacement parts
available from Sears. Use of nonCraftsman accessories could be
hazardous. Call 1-800-366-PART.
WARNING: Always keep hands away
from the triggers when performing
maintenance on the power handle.
LUBRICATION - No periodic
lubrication of the power handle parts
is required.
BATTERY RECYCLING - To
preserve natural resources, please
recycle or dispose of this product’s
NICKEL-CADMIUM (NiCd) BATTERY
properly. Local, state and federal laws
prohibit disposal of NiCd batteries
in ordinary trash. The manufacturer
is a participant in the Rechargeable
Battery Recycling Corporation (RBRC)
recycling program. We have paid
a fee to allow for these batteries to
be properly disposed of via a RBRC
collection site (various retailers are
also RBRC participants). Please call
the RBRC toll free number at (800)
822-8837 or visit the RBRC web site
at www.rbrc.com to find a battery
collection center near you.
CLEANING OF PLASTIC PARTS
- Use only a dry brush or a cloth
with warm water and mild soap to
clean plastic parts. Many household
cleaners contain chemicals which
could damage the plastic. Never use
gasoline, turpentine, paint thinner or
similar fluids. Never spray-wash tool
or immerse in water. Water or liquid
inside the tool can cause serious
damage to the unit.
DROPPING THE UNIT - If you drop
the unit, carefully inspect it for any
damage before using it again. Have
the unit professionally repaired if
damage has occurred.
STORAGE
TEMPERATURE – Temperature
extremes limit the useful life of the
battery. The best storage place is one
that is cool and dry. Store the tool
away from direct sunlight, heating
8
SERVICE
If you see any condition that may
affect safe operation, or if you have
any questions, contact our customer
service number at: 1-800-539-6455
NEED MORE HELP?
You’ll find the answer and a more on managemyhome.com – for free!
Find this and all your other product manuals online.
Get answers from our team of home experts.
Get a personalized maintenance plan for your home.
Find information and tools to help with home projects.
9
Get it fixed, at your home or ours!
Your Home
For expert troubleshooting and home solutions advice:
www.managemyhome.com
For repair – in your home – of all major brand appliances,
lawn and garden equipment, or heating and cooling systems,
no matter who made it, no matter who sold it!
For the replacement parts, accessories and
owner’s manuals that you need to do-it-yourself.
For Sears professional installation of home appliances
and items like garage door openers and water heaters.
1-800-4-MY-HOME®
(1-800-469-4663)
www.sears.com
Call anytime, day or night
(U.S.A. and Canada)
www.sears.ca
Our Home
For repair of carry-in items like vacuums, lawn equipment,
and electronics, call anytime for the location of the nearest
Sears Parts & Repair Service Center
1-800-488-1222 (U.S.A.)
www.sears.com
1-800-469-4663 (Canada)
www.sears.ca
To purchase a protection agreement on a product serviced by Sears:
1-800-827-6655 (U.S.A.)
Para pedir servicio de reparación
a domicilio, y para ordenar piezas:
1-888-SU-HOGAR®
(1-888-784-6427)
1-800-361-6665 (Canada)
Au Canada pour service en français:
1-800-LE-FOYERMC
(1-800-533-6937)
www.sears.ca
© Sears Brands, LLC
® Registered Trademark / TM Trademark / SM Service Mark of Sears Brands, LLC
® Marca Registrada / TM Marca de Fábrica / SM Marca de Servicio de Sears Brands, LLC
MC
Marque de commerce / MD Marque déposée de Sears Brands, LLC
Operator’s Manual
Convertible Cordless
18V Pole Saw Attachment
Model No. 71.74295
BEFORE returning this product,
first call:
(800) 539-6455
IMPORTANT OPERATING HINT:
When starting unit, first push the thumb switch
forward and then squeeze the control trigger. It is
NOT necessary to keep the thumb switch pushed
forward during use.
CAUTION:
• Safety
Before using this product, read this manual
and follow all its Safety Rules and Operating
Instructions.
• Assembly
• Operation
• Maintenance
• Español
• Français
Sears, Roebuck and Co., Hoffman Estates, IL 60179, U.S.A.
www.craftsman.com
rev. 040908
TABLE OF CONTENTS:
Warranty...................................................................................................... 2
Safety Instructions...................................................................................... 2
Operation.................................................................................................... 5
Maintenance.............................................................................................. 12
Storage...................................................................................................... 13
Accessories............................................................................................... 13
Service...................................................................................................... 13
Español..................................................................................................... 14
Français..................................................................................................... 27
WARRANTY
Craftsman One Year Full Warranty
If this Craftsman product fails due to manufacturer’s defects within one
year from the date of purchase, return it to any Sears store or other
Craftsman outlet in the United States for free replacement.
This warranty applies for only 90 days if this product is ever used for
commercial or rental purposes.
This warranty gives you specific legal rights, and you may also have other
rights which vary from state to state.
Sears, Roebuck and Co., Hoffman Estates, IL 60179
READ ALL INSTRUCTIONS
defects or other reproductive harm.
Please wash hands after handling the
cord.
SAFETY INSTRUCTIONS
WARNING: Some dust created by
using power tools contains chemicals
known to the state of California to
cause cancer and birth defects or other
reproductive harm.
CRAFTSMAN CONVERTIBLE
CORDLESS 18V TOOL SYSTEM
This product is for use only with the
Craftsman Convertible Cordless 18V
Tool System. Do not use the tool
attachments with any other system
or power source, and do not use any
tool attachment on the power handle
that is not intended for use with this
system.
WARNING TO CALIFORNIA
RESIDENTS: Handling the cord on
this units (or cords with accessories
sold for this product) will expose you
to lead, a chemical known to the State
of California to cause cancer, and birth
WARNING: When using this tool,
2
basic safety precautions should always
be followed to reduce the risk of fire,
electric shock, and personal injury,
including the following:
proper footing and balance at all times.
Use both hands to operate unit safely.
To reduce risk of injury:
ALWAYS WEAR A HARDHAT when
operating the pole saw.
USE SAFETY GLASSES - Always
wear proper eye protection, and use a
face or dust mask if operation is dusty.
Before any use, be sure everyone
using this electric product reads and
understands all safety and operation
instructions contained in this manual.
ALWAYS WEAR SAFETY
FOOTWEAR, snug fitting clothing,
protective gloves, hearing protection
and head protection when using the
pole saw.
SAVE THESE INSTRUCTIONS and
review frequently prior to use. Store in
wall charger slot.
CARRYING THE POLE SAW – Always
carry the saw by gripping the fiberglass
pole at its balance point with the saw
chain in front of you for easy visibility.
AVOID DANGEROUS
ENVIRONMENTS and weather
conditions when using this tool.
MAINTAIN UNIT WITH CARE - Keep
the unit clean for best performance
and to reduce the risk of injury. Follow
instructions for service. Keep handles
dry, clean, and free from oil and
grease.
DO NOT USE battery operated
appliance in the rain.
KEEP CHILDREN AWAY - All visitors
should be kept at a safe distance from
work area.
DO NOT ALLOW CHILDREN or
untrained individuals to use this pole
saw.
AVOID UNINTENTIONAL STARTING
- Don’t carry the appliance while
holding the switch area. The unit is
shipped partly charged, and may start
inadvertently if not handled properly.
STORE IDLE UNIT INDOORS - When
not in use, the unit should be stored
indoors in a dry location – out of reach
of children.
CHECK DAMAGED PARTS - If
any component of the appliance
experiences a hard impact, check that
no parts were damaged and verify that
the unit operates properly. Check for
misalignment or bending of moving
parts, breakage of parts, and any other
condition that may affect operation.
A part that is damaged should be
properly repaired or re-placed by an
authorized service center.
DON’T FORCE THE TOOL - It will do
the job better and with less likelihood
of a risk of injury at the rate for which it
was designed.
USE RIGHT TOOL - Do not use the
tool for any job except that for which it
is intended.
KEEP HANDS AND FEET away from
cutting area.
KEEP TOOLS SHARP and clean for
better and safer performance.
DRESS PROPERLY - Do not wear
loose clothing or jewelry. They can
be caught in moving parts. Use of
rubber gloves and non-skid footwear is
recommended when working outdoors.
Wear protective hair covering to
contain long hair.
FOLLOW INSTRUCTIONS for
lubricating and changing accessories.
KEEP HANDLES DRY, clean, and free
from oil and grease.
REMOVE BATTERY from pole saw
when not in use, before servicing,
DON’T OVERREACH - Maintain
3
and when changing accessories and
attachments such as saw chain and
guide bar.
and animals at least 50 feet away
when using the pole saw.
STAY ALERT - Watch what you are
doing. Use common sense. Do not
operate the tool when you are tired.
NEVER OPERATE the pole saw within
50 feet of overhead electrical lines.
Failure to observe this precaution
could result in severe injury.
KEEP ALL PARTS of the body away
from the saw chain when the motor is
operating.
NEVER STAND DIRECTLY under
the limb being cut. Falling limbs could
cause severe injury.
BEFORE YOU START THE SAW,
make sure the saw chain is not
contacting anything.
KEEP WORK AREA CLEAN
CONSIDER WORK AREA
ENVIRONMENT. Use extreme caution
when cutting small size brush and
saplings because the slender material
may catch the chain and be whipped
toward you or pull you off balance.
CHECK DAMAGED PARTS – Before
further use of the pole saw, a part
that is damaged should be carefully
checked to determine that it will
operate properly and perform its
intended function. Check for alignment
of moving parts, breakage of parts,
mounting, and any other conditions
that may affect its operation. A part
that is damaged should be properly
repaired or replaced by an authorized
service center unless otherwise
indicated elsewhere in this instruction
manual.
WHEN CUTTING A LIMB that is under
tension, be alert for spring-back so that
you will not be struck when the tension
in the wood fibers is released.
DO NOT USE pole saw in the rain.
DO NOT USE pole saw in damp or wet
locations.
DO NOT USE pole saw in the
presence of flammable liquids or
gases.
HAVE DEFECTIVE SWITCHES
replaced by an authorized service
center.
WHEN NOT IN USE, pole saw should
be stored in a dry, and high or lockedup place – out of the reach of children.
DO NOT USE the pole saw if the
switch does not turn it on and off.
ALWAYS USE THE BLADE
SCABBARD when carrying or storing
the pole saw.
DO NOT OPERATE the pole saw if
it is damaged, improperly adjusted,
or it is not completely and securely
assembled. Be sure the saw chain
stops when the trigger is released.
ONLY CUT WOOD with the pole saw.
DO NOT USE the pole saw for
purpose not intended. For example
– do not use chain saw for cutting
plastic, masonry, or non-wood building
materials.
NEVER OPERATE THE POLE SAW
while standing on a ladder.
DO NOT CUT DOWN TREES with the
pole saw.
WARNING: KICKBACK may occur
when the nose or tip of the guide bar
touches an object, or when the wood
closes in and pinches the saw chain in
the cut. Tip contact in some cases may
cause a lightning fast reverse reaction,
kicking the guide bar up and back
BE SURE TO have an escape route
from falling limbs.
ALWAYS ALLOW SPACE for limbs to
fall freely to the ground.
KEEP CHILDREN, BYSTANDERS
4
towards the operator. Pinching the
saw chain along the top of the guide
bar may push the guide bar rapidly
back towards the operator. Either of
these reactions may cause you to lose
control of the saw which could result in
serious injury to user.
It is the saw manufacturer’s
replacement catalogue (or
equivalent) number.
Low-Kickback saw chain is a chain
which has met the kickback performance
requirements of ANSI B175.1 when
tested on the representative sample of
chain saws.
THE FOLLOWING PRECAUTIONS
should be followed to minimize
kickback:
Glossary of Terms
GRIP SAW FIRMLY – Hold the pole
saw firmly with both hands when the
motor is running. Use a firm grip
with thumb and fingers of one hand
encircling the control handle, and the
thumb and fingers of the other hand
encircling the fiberglass pole.
Drive Sprocket or Sprocket – The
toothed part that drives the saw chain.
Guide Bar – A solid railed structure that
supports and guides the saw chain.
Guide Bar Scabbard – Enclosure fitted
over the guide bar to prevent contact
with the saw chain when the pole saw
is not in use.
DO NOT OVERREACH.
Kickback – The backward and upward
motion, or both of the guide bar
occurring when the saw chain near the
nose of the top area of the guide bar
contacts any object such as a log or
branch, or when the wood closes in and
pinches the saw chain in the cut.
KEEP PROPER FOOTING and
balance at all times.
DO NOT LET the nose of the guide
bar contact a log, branch, ground or
other obstruction.
ONLY USE REPLACEMENT bars and
chains specified by the manufacturer.
Low-Kickback Chain - A chain
that complies with the kickback
performance requirements of ANSI
B175.1-1991 when tested on a
representative sample of chain saws.
Store these instructions by folding in
half and sliding into the slot in the back
of the wall charging rack.
Reduced Kickback Guide Bar
– A guide bar which has been
demonstrated to reduce kickback
significantly.
SAVE THESE INSTRUCTIONS
OPERATION
Replacement Saw Chain – A chain
that complies with the kickback
performance requirements of ANSI
B175.1-1991 when tested with specific
chain saws. It may not meet the ANSI
performance requirements when used
with other saws.
CAUTION: Do not use a replacement
chain unless:
It has been designated as
meeting the ANSI B175
kickback performance
requirements on that specific
powerhead;
Saw Chain – A loop of chain having
cutting teeth, that cut the wood, and
that is driven by the motor and is
supported by the guide bar.
It has been designated as
“Low-Kickback” saw chain
in accordance with ANSI
B175.1; or
Spiked Bumper (Spike) – The pointed
5
tooth or teeth for use when pruning to
pivot the saw and maintain position
while sawing.
loosen the chain. (see figure 2) Lift the
chain away from the sprocket and out
of the groove in the guide bar.
Switch – A device that when operated
will complete or interrupt an electrical
power circuit to the motor of the pole
saw.
Switch Lockout – A moveable stop that
prevents the unintentional operation of
the switch until manually actuated.
INSTALLING AND REMOVING THE
SAW CHAIN
Figure 2
WARNING: Sharp moving blade. To
prevent accidental starting, always
remove the battery before installing
or removing the saw chain. Failure to
do so could result in serious personal
injury.
To replace the chain, make sure that
the slot in the guide bar is over the 2
locating pins and that the adjustment
pin is in the hole below the slot. (see
figure 3)
CAUTION: Sharp moving blade.
Always wear gloves when installing
or removing the saw chain. The saw
chain is sharp and can cut you even
when it is not moving.
Put the saw head on a flat stable
surface. Remove the two socket
head screws using the provided
wrench (stored in the side of the
saw head housing) by turning them
counterclockwise. (see figure 1)
Figure 3
Place the chain in the groove of the
guide bar and over the sprocket. Be
sure that the teeth on the saw chain
are facing the correct direction. The
arrows on the chain on the top side
of the bar should point forward. (see
figure 4)
Figure 1
Remove the sprocket cover, bar clamp
and socket head screws.
Remove the chain by turning the
socket head screw in the front of the
saw head counterclockwise, this will
6
front of the saw head to loosen or
tighten the chain as needed. When the
chain is the correct tension, tighten the
two socket head screws that hold the
bar clamp in place.
Do not over-tighten the chain as this
will lead to premature wear of the
chain and bar. Over-tightening can
also reduce battery life and cause the
circuit breaker to trip.
Check the tension on the chain often
when it is new. New chain stretches in
the initial few hours of use.
Figure 4
Rotate the socket head screw on the
front of the saw head clockwise to take
up the slack in the chain. (see figure 2
from previous step)
OILING THE CHAIN
Oil the chain before each use with
unused SAE30 weight motor oil or saw
chain oil. Lubricate the chain along its
entire length.
Replace the sprocket cover, bar clamp
and socket head screws in that order.
Adjust the tension on the chain before
use.
CONNECTING POLE SAW
ATTACHMENT TO THE POWER
HANDLE
ADJUSTING SAW CHAIN TENSION
With the battery removed from the
power handle, pull the center of the
chain away from the bar at the center
of the bar with your fingers (always
wear gloves). The tension is correct
when you can pull the chain 1/8”
from the bar and it snaps back when
released. (see figure 5) The chain
should not sag away from the bar.
Be sure to follow the following safety
precautions when attaching and
detaching tools from the power handle.
Remove the battery from the handle
before attaching or detaching tools.
Never touch the control switches on
the power handle when attaching and
detaching tools
To attach the pole to the power
handle:
1. Twist the lock ring on the power
handle to the unlocked position. (see
figure 6)
Figure 5
To adjust the chain tension, loosen the
socket head screw that hold the bar
clamp.
Turn the socket head screw on the
7
Figure 6
Figure 8
2. Insert the male end of the power
handle interface into the female
socket in the end of the extension pole
making sure that it is firmly seated.
(see figure 7) The interface is keyed
so that it will only go together one
way. The handle and pole should go
together easily. If you experience
resistance in putting them together,
check that the keys on the handle are
properly aligned with the slots in the
pole.
To attach the saw head to the pole:
1. Twist the lock ring on the pole to the
unlocked position. (see figure 9)
Figure 9
2. Insert the male end of the pole
interface into the female socket in
the end of the saw head making sure
that it is firmly seated. The interface is
keyed so that it will only go together
one way. The pole and saw head
should go together easily. If you
experience resistance in putting them
together, check that the keys on the
pole are properly aligned with the slots
in the saw head.
Figure 7
3. Grasp the pole firmly with one hand
and twist the lock ring on the power
handle to the locked position with the
other hand.(see figure 8)
3. Grasp the saw head firmly with one
hand and twist the lock ring on the pole
to the locked position with the other
hand. (see figure 10)
8
the corresponding slot in the end of the
power handle. (see figure 12)
Figure 10
CAUTION: The saw head has safety
features that prevent attaching it
directly to the power handle without
the pole in between. Do not attempt to
defeat these safety features and attach
the saw head directly to the power
handle. Doing so could result in severe
personal injury.
Figure 12
2. Insert the battery fully into the
handle making sure that the springloaded buttons on each side of the
battery pack snap into place in the
handle.
Removing the Battery
To detach the saw head or pole:
1. Depress the spring-loaded
buttons on both sides of the battery
simultaneously. (see figure 13)
1. Grasp the saw head or pole firmly
with one hand and twist the lock ring
to the unlocked position with the other
hand. (see figure 11)
Figure 13
2. Pull the battery pack straight out
from the handle.
Figure 11
2. Pull the saw head and pole
apart. The power handle and tool
attachments should separate easily.
If they do not, check to be sure that
the lock rings are in the fully unlocked
position.
To turn the tool on:
1. Grip the control grip firmly with one
hand and grip the extension pole on
the pole saw with the other hand.
2. Push the trigger that your thumb
rests on straight forward, this is the
safety release or switch lockout. (see
figure 14)
Attaching the Battery
1. Align the rib on the battery pack with
9
a prolonged stall. This device will
cause the tool to stop operating if an
overload condition exists. If the pole
saw becomes jammed on a branch,
release the control trigger immediately.
If, after clearing the jam, the pole saw
does not restart, check to see if the
circuit breaker has popped (see figure
16). The circuit breaker can be reset
by simply waiting 30 seconds and then
pushing it back in until it clicks. You
may then resume normal trimming.
Figure 14
3. While holding the switch lockout
under your thumb in the forward
position, use your fingers to pull
upward on the control trigger. (see
figure 15) This will energize the saw
and allow you to do your work. It is
NOT necessary to keep pressure on
the thumb switch after the tool has
started.
circuit breaker
Please note that the tool will not start if
the lock rings are not in the fully locked
position.
Figure 16
EXTENDING THE POLE
To extend the pole, lay the pole saw
on a horizontal surface. Hold the black
hand grip on the bottom section of the
pole with one hand while turning the
red hand grip counterclockwise with
the other hand. Slide the extension
pole to the desired length and tighten
by turning the red hand grip clockwise.
(see figure 17)
Figure 15
To turn the tool off:
1. Release the control and the tool will
turn off. The thumb switch will return
to the rearward position to prevent
accidental re-starting of the tool.
OVERLOAD PROTECTION
The pole saw attachment incorporates
a circuit breaker which will protect
the hedge trimmer in the event of
Figure 17
CAUTION: Never adjust the pole
10
length with the pole saw standing
vertically. The top section of the pole
could descend rapidly and pinch your
hand.
PIVOTING THE SAW HEAD
The pole is designed to pivot at the top
end to allow the saw head to contact
branches in the most advantageous
position. To pivot the saw head,
squeeze the two black buttons at
the top of the pole (only the left side
button will actually depress), pivot the
saw head to the desired position, and
release the buttons to lock the saw
head in place. (see figure 18)
Figure 19
USING THE POLE SAW – Always be
sure of your footing and hold the pole
saw firmly with both hands while the
motor is running.
NEVER STAND ON A LADDER –
Only operate the pole saw with both
feet planted firmly on the ground.
OVERHEAD ELECTRICAL LINES
– Never operate the pole saw within
50 feet of overhead electrical lines.
Failure to observe this precaution
could result in severe injury.
WARNING: KICKBACK may occur
when the nose or tip of the guide bar
touches an object, or when the wood
closes in and pinches the saw chain in
the cut. Tip contact in some cases may
cause a lightning fast reverse reaction,
kicking the guide bar up and back
towards the operator. Pinching the
saw chain along the top of the guide
bar may push the guide bar rapidly
back towards the operator. Either of
these reactions may cause you to lose
control of the saw which could result in
serious injury to user.
Figure 18
PRUNING WITH THE POLE SAW
HOLDING THE POLE SAW – Hold the
pole saw firmly with both hands when
the motor is running. Use a firm grip
with thumb and fingers of one hand
encircling the control handle, and the
thumb and fingers of the other hand
encircling the fiberglass pole. (see
figure 19)
To Cut Branches From a Tree:
Make sure the saw is running before
attempting to make a cut.
Using light pressure make a cut on
the underside of the branch six inches
from the trunk using the top side of the
chain. This cut should be no deeper
than 1/3 the thickness of the branch.
11
Then make the final cut from the top of
the branch using the bottom side of the
chain. (see figure 20)
Figure 21
MAINTENANCE
Figure 20
WARNING: Always remove the battery
when performing any maintenance on
the power handle or a tool attachment
that is connected to the power handle.
Making the initial cut on the underside
of the branch will prevent the branch
from splintering when it falls away from
the tree. Never try to cut the branch
completely from the underside. This
will cause the branch to bind on the
chain and could stall the motor causing
damage to the saw.
WARNING: Always keep hands away
from the triggers when performing
maintenance.
LUBRICATION – See operating
instructions for specific information
on lubricating the chain. Periodic
lubrication of other parts is not
required.
Do not stop the saw until after it is
removed from the cut. Release the
trigger to stop the saw. Be sure the
chain has come to a complete stop
before setting the pole saw down. The
chain will immediately become dull if it
contacts the ground while still running.
CLEANING OF PLASTIC PARTS
- Use only a dry brush or a cloth
with warm water and mild soap to
clean plastic parts. Many household
cleaners contain chemicals which
could damage the plastic. Never use
gasoline, turpentine, paint thinner or
similar fluids. Never spray-wash tool
or immerse in water. Water or liquid
inside the tool can cause serious
damage to the unit.
WALL BRACKET
Mount the wall bracket securely to
the wall; attach with screws to a wall
stud. The use of wall board anchors
is NOT recommended. Place the tool
attachment in the wall bracket as
shown for convenient storage. (see
figure 21)
DROPPING THE UNIT - If you drop
the unit, carefully inspect it for any
damage before using it again. Have
the unit professionally repaired if
damage has occurred.
12
prohibit disposal of NiCd batteries
in ordinary trash. The manufacturer
is a participant in the Rechargeable
Battery Recycling Corporation (RBRC)
recycling program. We have paid
a fee to allow for these batteries to
be properly disposed of via a RBRC
collection site (various retailers are
also RBRC participants). Please call
the RBRC toll free number at (800)
822-8837 or visit the RBRC web site
at www.rbrc.com to find a battery
collection center near you.
STORAGE
TEMPERATURE – Temperature
extremes limit the useful life of the
battery. The best storage place is one
that is cool and dry. Store the tool
away from direct sunlight, heating
pipes, furnaces, etc. Do not store
where temperatures go below +40 F or
above +120 F.
PREVENTING CORROSION Fertilizers and other garden chemicals
contain compounds that greatly
accelerate the corrosion of metals. Do
not store the appliance on or adjacent
to fertilizers or chemicals.
ACCESSORIES
REPLACEMENT PARTS - For
optimum cutting results and the
assurance of top performance, it
is recommended that only Sears
Craftsman replacement blades and
cutting line be used.
SERVICE
If you see any condition that may
affect safe operation, or if you have
any questions, contact our customer
service number at:
WARNING: Use only Craftsman
accessories and replacement parts
available from Sears. Use of nonCraftsman accessories could be
hazardous. Call 1-800-366-PART.
1-800-539-6455
BATTERY RECYCLING - To preserve
natural resources, please recycle or
dispose of this product’s NICKELCADMIUM (NiCd) BATTERY
properly. Local, state and federal laws
NEED MORE HELP?
You’ll find the answer and a more on managemyhome.com – for free!
Find this and all your other product manuals online.
Get answers from our team of home experts.
Get a personalized maintenance plan for your home.
Find information and tools to help with home projects.
13
Get it fixed, at your home or ours!
Your Home
For expert troubleshooting and home solutions advice:
www.managemyhome.com
For repair – in your home – of all major brand appliances,
lawn and garden equipment, or heating and cooling systems,
no matter who made it, no matter who sold it!
For the replacement parts, accessories and
owner’s manuals that you need to do-it-yourself.
For Sears professional installation of home appliances
and items like garage door openers and water heaters.
1-800-4-MY-HOME®
(1-800-469-4663)
www.sears.com
Call anytime, day or night
(U.S.A. and Canada)
www.sears.ca
Our Home
For repair of carry-in items like vacuums, lawn equipment,
and electronics, call anytime for the location of the nearest
Sears Parts & Repair Service Center
1-800-488-1222 (U.S.A.)
www.sears.com
1-800-469-4663 (Canada)
www.sears.ca
To purchase a protection agreement on a product serviced by Sears:
1-800-827-6655 (U.S.A.)
Para pedir servicio de reparación
a domicilio, y para ordenar piezas:
1-888-SU-HOGAR®
(1-888-784-6427)
1-800-361-6665 (Canada)
Au Canada pour service en français:
1-800-LE-FOYERMC
(1-800-533-6937)
www.sears.ca
© Sears Brands, LLC
® Registered Trademark / TM Trademark / SM Service Mark of Sears Brands, LLC
® Marca Registrada / TM Marca de Fábrica / SM Marca de Servicio de Sears Brands, LLC
MC
Marque de commerce / MD Marque déposée de Sears Brands, LLC