1
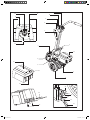
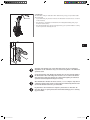
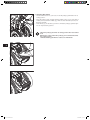
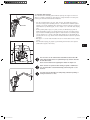
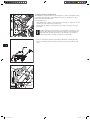
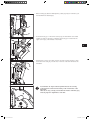
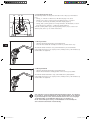
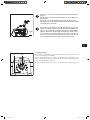
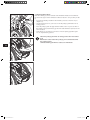
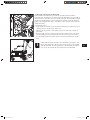
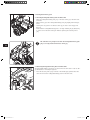
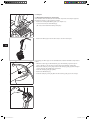
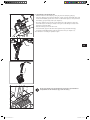
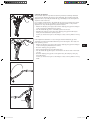
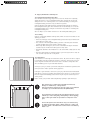
ROLLSTUHL SCHIEBEN OHNE KRAFTAUFWAND viamobil eco Brems- und Schiebehilfe D User manual GB/US Instructions d’utilisation F Manual de instrucciones E Istruzioni per l‘uso I Brugsvejledning DK Gebruiksaanwijzing NL Bruksanvisning N Instruktionsbok S Käyttöohjeet FIN 23.0001.4.99.01 Gebrauchsanweisung Deckblatt.indd 5 12.09.2006 13:11:24 Service Center (Deutschland) Montag bis Donnerstag von 8.00 - 18.00 Uhr Freitags von 8.00 - 16.00 Uhr erreichbar unter Telefon (0800) 9096-250 (gebührenfrei) Das viamobil ist klassifiziert als Gerät Typ B. Deckblatt.indd 6 12.09.2006 13:11:25 11 14 12 10 9 9 8 7 13 6 5 15 4 15 3 19 2 1 20 21 26 24 22 30 28 23 29 18 16 Deckblatt.indd 1 17 27 12.09.2006 13:11:19 Content 1. Introduction 1.1 Important Safety Instructions – please take note 1.2 Purpose of viamobil 1.3 Permissible Operating Conditions / Points of Use 1.4 Standard Scope of Delivery 1.5 Technical Data 1.6 The most Important Elements at a Glance 2. Starting-up 2.1 Extending Drive Wheels 2.2 Activating Roll Operation 2.3 Fixing viamobil to the Wheelchair 2.4 Selecting Requested Speed 2.5 Driving Forwards 2.6 Driving Backwards 2.7 Finishing Driving 2.8 Retracting Drive Wheels 2.9 Removing viamobil from the Wheelchair 2 2 2 2 2 3 4 5 6 7 8 10 10 10 11 12 13 3. Rechargeable battery pack14 3.1 Inserting Rechargeable Battery Pack into Drive Unit 14 3.2 Removing Rechargeable Battery Pack from Drive Unit 14 3.3 Charging Rechargeable Battery Pack 15 3.4 Replacing the Fuse in the Rechargeable Battery Pack 15 3.5 General Information on the Batteries Used 16 4. Storage 17 5. Transport18 5.1 Dismantling viamobil into Components 18 5.2 Assembling viamobil Handle Bar 19 Service Centre (Germany) Monday to Thursday from 8 a.m. to 6 p.m. Fridays from 8 a.m. to 4 p.m. available on phone +49 (0)800/9096-250 (free of charge) GA-V14-USA.indd 1 6. Handle Bar Settings 21 7. Fault Indications 7.1 Continuous Light of LED Status Display 7.2 Blink Code of LED Status Display 7.3 What should be done if... 22 22 22 23 8. Anti-tipers 24 9. Tips on First-time Driving 25 10. Safety Instructions and Hazard Warnings 10.1 Safety Instructions 10.2 Obstacles 10.3 Danger Spots and Danger Situations 26 26 27 27 11. Support, Maintenance and Disposal 11.1 Charging Rechargeable Battery Pack 11.2 Cleaning 11.3 Maintenance 11.4 Disposal 11.5 Reuse 29 29 29 29 30 30 12. Warranty, Guarantee and Liability 12.1 Warranty for Defects 12.2 Service Life Guarantee 12.3 Liability 31 31 31 31 18.09.2006 11:51:17 8 1. Introduction 1.1 Important Safety Instructions – please take note viamobil is a pushing and braking assistance, which is to be exclusively used by a person accompanying the wheelchair occupant. The wheelchair occupant is on no account to personally operate the viamobil as a wheelchair electric drive. For safety reasons viamobil is furthermore only to be operated by people, who • have been instructed as to its operation • are physically and mentally capable of operating this unit safely in all operating situations. Instruction on how to operate the unit is an integral part of the scope of delivery and given after an appointment has been arranged with your specialist dealer or one of Alber‘s regional managers. No additional costs are incurred hereby. Please contact your specialist dealer or one of Alber‘s regional managers if you are still not quite sure how to operate and handle the viamobil. You can also get in touch with the Alber Service Centre on (telephone 0800-9096-250) in the event of any possible technical faults. Please observe the specified values provided by the manufacturer of your wheelchair (i.e. maximum incline, air pressure in the wheels etc.) as well as the general operating instructions when operating the viamobil. Details on threshold values are on no account to be exceeded. The viamobil should be switched off initially on safe terrain when mobile phone or similar device is used. Trips near strong electrical noise fields should also be avoided. Operation of the viamobil could interfere with other facilities, such as checkpoint security systems in large department stores. It is imperative that you avoid starting-up the viamobil prior to being instructed in how to operate it by an Alber regional manager or authorised specialist dealer! 1.2 Purpose of viamobil viamobil is attached to a manual wheelchair as an add-on drive to support the attendant person of a wheelchair occupant when pushing and braking the wheelchair, thus enabling longer trips to be managed without becoming tired. Uphill, the electric motor of the viamobil delivers the power to push the wheelchair; downhill, the viamobil reliably maintains the preset speed and thus allows for the safe manoeuvring of downward sloping routes.. Make sure you become familiar with the safety instructions and hazard warnings in chapter 10 before starting off on your trip. 1.3 Permissible Operating Conditions / Points of Use • Pay attention to the instructions on the permissible operating conditions in the instruction manual for your wheelchair, to which the viamobil is attached. Restrictions of permissible operating conditions (i.e. maximum climbing capability, maximum permissible obstacle height, maximum occupant weight etc.) also have to be observed when using viamobil! • Avoid driving on surfaces that are not firm (i.e. on loose gravel, in sand, mud, snow, ice or through deep puddles of water). • Pay attention to the safety instructions and hazard warnings in chapter 10. 1.4 Standard Scope of Delivery • Hand grips • Drive unit • Battery charger • Rechargeable battery pack • Instruction manual • Information on terms of guarantee • etc. Anti-tippers (see chapter 8) are also available as optional accessories. GA-V14-USA.indd 2 18.09.2006 11:51:18 1.5 Technical Data Drive unit: Speed: Incline: Motor power rating: range up to 12 km(*) continuous up to max. 6 km/h (forwards) or max. 3 km/h (backwards) up to max. 10% incline on uphill slope / downhill slope (at 120 kg occupant weight) 200 Watt Rechargeable battery pack Battery packs: Operating nominal voltage: Operating temperature: 2 x 12 Volt, 9 Ah, permitted for air transportation by IATA and DOT 24 Volt ambient temperature area (approx. -25°C to + 50°C) Weight of components: Rechargeable battery pack: Drive: Hand grips: Battery charger. Total weight: 6.0 kg 10.5 kg 2.0 kg 0.5 kg 19.0 kg (*) The range varies according to the terrain the wheelchair is driven on and the prevailing driving conditions. The specified range can be attained with the optimum driving conditions (flat terrain, freshly charged batteries, ambient temperature of 20°C, smooth drive etc.). The viamobil meets the EC guidelines for medical products 93/42/EWG . Subject to changes in technology and design due to constant further developments. Battery charger Technical notices and instructions can be read in the instructions accompanying the battery charger. GA-V14-USA.indd 3 18.09.2006 11:51:18 8 1.6 The most Important Elements at a Glance (for this, please open up the overview diagram on the book cover) Chassis Drive wheels Pedal Lower bolt Upper bolt Base carrier 1 2 3 4 5 Hand grips Hand wheel Handle Handle bar handle Clamping yoke Clamping screw Headset Operating button LED status display Driving condition scale 6 7 8 9 10 11 12 13 14 Rechargeable battery pack Rechargeable battery pack Fuse 25 A Fuse 3 A Charger socket Handle Unlocking device 15 16 17 18 19 20 Wheelchair Bracket Upper receiver Lower receiver Lock Adjusting collar 21 22 23 24 25 Battery charger Charging plugs 26 Wheelchair anti-tippers Anti-tipper Fork Receiver Shoe Quickpin 27 28 29 30 GA-V14-USA.indd 4 18.09.2006 11:51:19 8 15 2. Starting-up The viamobil is ready for utilisation when delivered to you by your specialist dealer. This means that • a special bracket [21] has been fixed to the wheelchair on both sides as a receiver for the viamobil, • the viamobil is completely assembled and the rechargeable battery pack [15] is inserted into the device, • the viamobil handle bar [8] has been adjusted by your specialist dealer according to the requirements made by the user. 21 Assembly of the bracket [21] on the wheelchair as well as the accompanying adjustments to the viamobil are only to be carried out by Alber or an authorised specialist dealer. You should regularly check whether the brackets [21] are still screwed tightly to the wheelchair. If the screw fittings have become loose or even become unscrewed, then please make sure that they are screwed down again by an authorised specialist dealer. Readjustments may be necessary. Alber manufactures brackets in various versions, i.e. as a complete component or comprising separate parts. Figures in this instruction manual may therefore deviate from the bracket mounted to your wheelchair. Pay attention to the instructions in chapter 9 (instructions on first-time driving) and chapter 10 (safety instructions and hazard warnings) prior to starting up your viamobil . GA-V14-USA.indd 5 18.09.2006 11:51:20 8 2.1 Extending Drive Wheels • Use the forward section of your foot to move the pedal [2] downwards from its resting position . • Press the pedal [2] down strongly with the forward section of your foot when in middle position; both drive wheels [1], which are still retracted at present, are therefore extended. • If the wheels [1] are extended, you have to swivel the pedal [2] upwards again into its original resting position. 2 1 Swivel the pedal [2] back into its resting position after each utilisation! Malfunctions could result if the pedal [2] is not swivelled back into the resting position. viamobil‘s braking performance could also be influenced!! GA-V14-USA.indd 6 18.09.2006 11:51:21 2.2 Activating Roll Operation Your viamobil can be manually pushed without requiring the support of the motor when in so-called „roll operation“. This feature is solely intended for inserting and removing the viamobil underneath the wheelchair. 8 • Turn the operating button [12] into „Roll“ position. The handle bar [8] has to be in the resting position (middle position) - should therefore neither be pulled upwards, nor pressed downwards! Non-observance of these instructions results in a fault indication (6 x blinking light, see also chapter 7.2) in the LED status display [13] • If the operating button [12] is in „Roll“ position, the handle bar [8] with its handle bar handles [7] has to be quickly pressed as far down as possible until it stops and then immediately released again. A fault indication (6 x blinking light, see also chapter 7.2) is shown in the LED status display [13] if the handle bar is pressed down for too long. Switch off the viamobil and then restart and repeat the procedure. • Wait approx. 2 seconds until the brakes unlock. You will be able to hear a clicking sound. • The LED status display [13] lights up permanently, the viamobil can be pushed (without the support of the motor). 12 13 12 The electronics on the viamobil have determined a fault if the LED status display blinks and is not permanently lit up. Switch off viamobil and then restart. Please observe instructions regarding this matter in chapter 7.2. Never activate roll operation when driving on uphill or downhill slopes. The wheelchair could unintentionally start moving due to carelessness! 8 For safety reasons the brakes are temporarily activated if pushing or rolling is deemed as too fast. 7 7 GA-V14-USA.indd 7 18.09.2006 11:51:22 8 2.3 Fixing viamobil to the Wheelchair The wheelchair occupant should sit in the wheelchair in order to facilitate the fixing of viamobil. The lever brakes on the wheelchair also have to be pulled in order to prevent unintentional rolling away. If you haven‘t done so: • check that the drive wheels of your viamobil are extended (see chapter 2) and roll operation has been activated (see chapter 2.2). • Pull the lock [24] upwards on the bracket [21] on both sides until it cannot go any further. 24 i 21 If Alber anti-tippers are attached to your wheelchair (see chapter 8, antitippers) then they have to be removed to be able to fix the viamobil to the wheelchair. The anti-tippers have to be reattached (see chapter 8) when the viamobil is securely connected to the wheelchair. • Push your viamobil from behind underneath the wheelchair, whereby the lower bolt [3] is initially inserted into the lower receiver [23] of the bracket on both sides. 23 3 GA-V14-USA.indd 8 18.09.2006 11:51:24 • When inserting pay attention that adjusting collars [25] may be mounted to your viamobil within the bracket [21]! 21 25 3 • If the lower bolt [3] is in the lower receiver [23], the viamobil has to be tilted forwards as shown in the figure so that the upper bolt [4] is inserted into the upper receiver [22] of the bracket on both sides. 22 4 • If both bolts [3 and 4] are in their receivers [22 and 23] then you have to push down hard on the lock [24] on both sides in order to secure the viamobil to the wheelchair. 24 21 GA-V14-USA.indd 9 24 Your viamobil can only be started up when the bolts are correctly located in their receivers and secured by locks on both sides of the wheelchair. The bolts are only correctly secured when the notches of bracket [21] and lock [24] are in alignment to each other. 18.09.2006 11:51:25 8 13 12 2.4 Selecting Requested Speed The following features are assigned to the data on the scale [14] on the headset [11]: • Setting „0“: viamobil is switched off; LED status display is not active. • Settings 1-6: positions of the speeds to be attained (from 1 = 1 km/h to 6= 6 km/h, continuously selectable), LED status display lights up. • Setting „Roll“: pushing operation for fixing viamobil to the wheelchair, as described in the previous chapter, 2.3; LED status display lights up. Turn the operating button [12] to the appropriate position (1-6) to select a userdefined speed; turn to „0“ to switch off the device. 14 2.5 Driving Forwards • Hold the viamobil by the handles [7] with both hands. • Press the whole handle bar carefully as far down as possible until it stops 10 The viamobil travels forwards as long as the handle bar is pressed downwards. If the handle bar returns to its original position (middle position), the viamobil stops and the brakes are tightened. 7 7 2.6 Driving Backwards • H old the viamobil by the handles [7] with both hands. • Pull the whole handle bar carefully upwards until it cannot go any further. The viamobil travels backwards as long as the handle bar is pulled upwards. If the handle bar returns to its original position (middle position), the viamobil stops and the brakes are tightened. 7 7 Your viamobil is protected against unintentional driving features. It is therefore not possible to operate the handle bar [8] first and then switch on the viamobil. If you still attempt to do this, the device blocks and an error code is displayed (6x blinking light) on the LED status display [13] (see chapter 7.2). In the event of this please leave go of the handle bar on the viamobil; the device will then switch itself on automatically. GA-V14-USA.indd 10 18.09.2006 11:51:26 Kerbs have to be crossed in backwards drive with the viamobil switched off. The wheelchair is to be lifted on its handles (not by the handles of the viamobil). Pay attention to the maximum climbing height as stated by the manufacturer of the wheelchair as well as the instructions in chapter 10.2 when driving over kerbs. Pay attention to the signals on the LED status display [13] (see also chapter 7.2) during the trip. This shows when the rechargeable battery pack of your viamobil is empty by presenting a steady blinking light. You should then finish driving as quickly as possible. If this is not possible, you should preferably switch off your viamobil (see chapter 2.7) and retract the drive wheels (see chapter 2.8). You can thus push the wheelchair without the support of the viamobil. 11 13 GA-V14-USA.indd 11 12 2.7 Finishing Driving After you have finished driving, you should always switch off your viamobil in order to not unnecessarily drain the battery. Turn the operating button [12] to setting „0“; the LED status display [13] goes out. After you have finished driving, you should always switch off your viamobil in order to not unnecessarily drain the battery. Turn the operating button [12] to setting „0“; the LED status display [13] goes out. 18.09.2006 11:51:27 8 2 1 2.8 Retracting Drive Wheels Both drive wheels [1] can be retracted if the wheelchair should be moved without the motorised support of the viamobil. Go ahead as follows to carry out this procedure: • if you haven‘t already switched off the viamobil, proceed to switch it off (see chapter 2.7). • Use the forward section of your foot to move the pedal [2] downwards from its resting position . • Press the pedal [2] down strongly with the forward section of your foot when in the middle position; both wheels [1], which are still extended at present, are therefore retracted. • If the wheels [1] are retracted, you have to move the pedal [2] upwards again into its original resting position. Swivel the pedal [2] back into its resting position after each utilisation! Malfunctions could result if the pedal [2] is not swivelled back into the resting position. viamobil‘s braking performance could also be influenced!! 12 GA-V14-USA.indd 12 18.09.2006 11:51:28 2.9 Removing viamobil from the Wheelchair Once attached to the wheelchair, your viamobil generally remains assembled. If the device has nevertheless to be removed from the wheelchair at all, especially for transport purposes, then this can be done quickly and easily. The wheelchair occupant should sit in the wheelchair in order to facilitate the removal of viamobil. The lever brakes on the wheelchair also have to be pulled in order to prevent it from unintentionally rolling away. 24 If you haven‘t done so: • check that the drive wheels of your viamobil are extended (see chapter 2) and roll operation has been activated (see chapter 2.2). • Pull the lock [24] upwards on the bracket [21] on both sides until it cannot go any further. • Move the pedal [2] from its resting position into the middle position (see figure). • Press the pedal [2] down strongly with the forward section of your foot when it is in the middle position and at the same time remove the viamobil from the brackets. 21 i If Alber anti-tippers are attached to your wheelchair (see chapter 8, antitippers) then they have to be removed to be able to remove the viamobil from the wheelchair. The anti-tippers have to be reattached (see chapter 8) as soon as the viamobil has been removed from the wheelchair. 13 2 GA-V14-USA.indd 13 18.09.2006 11:51:30 8 3. Rechargeable battery pack 5 15 3.1 Inserting Rechargeable Battery Pack into Drive Unit • Place the rechargeable battery pack [15] on the base carrier [5] of the drive unit and insert. • While inserting, press the rechargeable battery pack [15] slightly downwards just before • reaching the stop position on the base carrier [5] in order to let it engage into the lock. • Check that the rechargeable battery pack is correctly installed [15] by attempting to remove it from the drive unit again without operating the unlocking device [20] The viamobil is only ready for use when the rechargeable battery pack [15] is correctly inserted in the base carrier [5]. 14 3.2 Removing Rechargeable Battery Pack from Drive Unit The rechargeable battery pack has to be removed from the drive unit in order to charge the batteries or for transport purposes. • Press the unlocking device [20] mounted on the handle [19] upwards and at the same time remove the rechargeable battery pack from the drive unit. 19 20 GA-V14-USA.indd 14 18.09.2006 11:51:31 3.3 Charging Rechargeable Battery Pack • Remove the rechargeable battery pack [15], as described in chapter 3.2, from the drive unit. • Insert the plug [26] for the mains battery charger into the charger socket [18] on the back of the rechargeable battery pack. 18 26 Pay attention to the instructions in the operating instructions accompanying the battery charger when charging the rechargeable battery pack. A suitable voltage converter is necessary for charging the rechargeable battery pack when driving in a car. This can be obtained from your regional electrical supplier. 15 3.4 Replacing the Fuse in the Rechargeable Battery Pack • Remove the rechargeable battery pack [15], as described in chapter 3.2, from the drive unit. • Remove the defective fuse [16 or 17] from the rechargeable battery pack. • Replace the defective fuse with a new one you have received from your health care specialist. [16] = fuse 25 Ampere [17] = fuse 3 Ampere The reason could be a defect on the viamobil if fuses have to be replaced more often. In such cases please get in touch with your specialist dealer or the Alber Service Centre regarding a technical inspection of your viamobil. GA-V14-USA.indd 15 18.09.2006 11:51:31 8 16 3.5 General Information on the Batteries Used The batteries of your viamobil are maintenance-free and rechargeable. Their service life mainly depends on the charging / discharging cycles. Their service life increases by taking correct care of the batteries ( recharging). • Avoid completely discharging the rechargeable battery pack. You should therefore recharge the rechargeable battery pack of the viamobil after each partial discharge, i.e. after every utilisation. • Lead-acid batteries are subject to a so-called self-discharge. For this reason the viamobil rechargeable battery pack should always be connected to the battery charger at all times whenever possible. Overcharging the rechargeable battery pack is not possible due to the charge mechanism. • If the rechargeable battery pack is stored for a longer period of time (without being charged), it experiences a loss in capacity. Full capacity is usually available again after a few charging / discharging cycles. • Electrolyte fluid can escape if the rechargeable battery pack is not handled properly. Injuries to the skin or damage to clothing could be therefore caused. • If the electrolyte fluid comes into contact with a person‘s skin or eyes, rinse immediately with clear cold water and consult a doctor. • Do not expose the rechargeable battery pack to fire or burn the rechargeable battery pack. This could result in the rechargeable battery pack exploding. • Do not short-circuit the rechargeable battery pack‘s contacts. A short circuit results in extremely high artificial currents which could damage the rechargeable battery pack or the viamobil. • After the service life of the battery has expired, it can be returned to Alber or an Alber specialist dealer for professional disposal. The rechargeable battery pack of your viamobil can be discharged and charged in any user-defined situation. It is so rated as being as safe as dry cells and permitted for air transportation by IATA and DOT. GA-V14-USA.indd 16 18.09.2006 11:51:32 4. Storage • Store your viamobil on an easy-to-clean mat if possible. If your viamobil is parked without the wheelchair, it should be propped up against a wall etc. • If your viamobil is not started up for a longer period of time, the device - and especially the rechargeable battery pack - is to be stored in a dry environment, preferably at room temperature (+15 °C to 25 °C). • The rechargeable battery pack should be permanently connected to the battery charger, if possible, if your viamobil is only being stored and not started up. If this is not possible, then the viamobil should be connected to the supplied battery charger at intervals of one month and completely recharged. This will ensure that your viamobil is ensured functional cabability even over a longer period of storage. • The batteries used are dry cells, which are leak-proof when handled correctly and maintenance-free except for the above-mentioned conservation of charge. The rechargeable battery pack should be preferably stored as in the installation position on the viamobil. Further instructions on the batteries used can be found in chapter 3.5 • If the viamobil is parked with the wheelchair for a longer period of time, the drive wheels should be lifted from the ground by operating the pedal (see chapter 2.8). • If your viamobil is stored for a longer period of time, it should be switched on for a short time every month if possible and moved a few metres forwards and backwards so as to prevent the brake from blocking, for example, due to the long down-time. GA-V14-USA.indd 17 17 18.09.2006 11:51:32 8 5. Transport 6 5.1 Dismantling viamobil into Components Your viamobil can be dismantled into individual components for transport purposes. Go ahead as follows to carry out this procedure: • Remove the rechargeable battery pack (see chapter 3.2). • Loosen and remove the hand wheel [6]. (Do not lose the hand wheel during transport!) • Remove the hand grips from the drive unit, as shown in the figure. 18 If necessary, the hand grips can be dismantled into further individual components as follows: • Mark the location [A] of the handle bar [8] to the headset [11] with a pen in order to be able to set the same position during reassembly at a later date. • Release the clamping screw [10] located in the clamping yoke [9] with a hexagon socket screw key (key width 6mm) and remove. • Move the clamping yoke [9] upwards. • Remove the handle bar [8]. • Screw the clamping screw [10] back into the claming yoke [9] for safe storage. A 10 GA-V14-USA.indd 18 9 18.09.2006 11:51:35 11 8 5.2 Assembling viamobil Handle Bar • Release and remove the clamping screw [10] from the clamping yoke [9]. • Open the clamping yoke [9] with a hexagon socket screw key (key width 6mm) and insert the handle bar [8] into the receiver on the headset [11] to correspond with the marking you previously made (see chapter 5). • Close the clamping yoke [9] and screw together using the clamping screw [10] with 8 Nm torque. For this you should once again use the hexagon socket screw key with a 6 mm key width. • Slide the hand grips into the drive unit. • Screw the hand grips and the drive unit together using the hand wheel [6]. • Insert the rechargeable battery pack into the drive unit (see chapter 3.1). Your viamobil is now ready for operation again. 10 9 8 6 GA-V14-USA.indd 19 19 Please pay attention to the instructions in chapter 6 provided that a readjustment of the handle bar [8] seems necessary. 18.09.2006 11:51:37 8 Caution Danger of crushing! Do not touch the area near the mechanical guide during assembly of the hand grips and drive unit. 20 GA-V14-USA.indd 20 18.09.2006 11:51:37 6. Handle Bar Settings Your specialist dealer is responsible for delivering viamobil, assembling individual components and attaching the device to the wheelchair. This specialist dealer will adjust the device, especially the handle bar [8], individually to suit the height and ergonomic needs of the user. 10 9 8 If, for example, readjustment to the handle bar [8] becomes necessary due to there being a change of user, you can authorise your specialist dealer to carry out this adjustment or carry out the adjustment yourself as follows: • Release the clamping screw [10] located in the clamping yoke [9] with a hexagon socket screw key (key width 6mm) and remove. • Turn the handle bar [8] into a comfortable position for the user. • Retighten the clamping screw [10] in the clamping yoke [9] with 8 Nm torque when you have attained the required position. For this you should once again use the hexagon socket screw key with a 6 mm key width. 10 If the adjustment alternative is not low enough, then the handle bar [8] can be completely removed and reinstalled after being turned 180 degrees. This results in a lower operating position. • Release the clamping screw [10] located in the clamping yoke [9] with a hexagon socket screw key (key width 6mm) and remove. • Move the clamping yoke [9] upwards. • Remove the handle bar [8] from the headset [11]. • Turn the handle bar [8] 180 degrees and reinsert it into the receiver on the headset [11]. • Close the clamping yoke [9] and screw together using the clamping screw [10] with 8 Nm torque. For this you should once again use the hexagon socket screw key with a 6 mm key width. 9 8 21 9 10 11 GA-V14-USA.indd 21 18.09.2006 11:51:39 8 7. Fault Indications 7.1 Continuous Light of LED Status Display A continuous light on the LED status display [13] usually signalises that the viamobil is operating properly and failure-free. If the rechargeable battery pack is almost completely empty, its residual capacity is no longer sufficient to activate a blink code. In this case the LED display also shows a continuous light until the rechargeable battery pack is completely discharged. In this case you should immediately recharge the rechargeable battery pack. 7.2 Blink Code of LED Status Display Your viamobil reports malfunctions to the LED status display [13] via a sequence of blinks. Each blink sequence has a different meaning such as: LED Blink Code (1x blinking light) (3 x blinking light) 22 (6 x blinking light) (9 x blinking light) Cause of Malfunction Remedy The rechargeable battery pack of the viamobil is empty. Recharge your rechargeable battery pack as soon as possible. The rechargeable battery pack has been charged by the motor on a downhill drive until it has reached its capacity limit. Switch off viamobil and then restart (see chapter 2.4). Continue your downhill trip with the slowest speed possible. Avoid going on a longer steep downhill drive with a full rechargeable battery pack. The locking device to prevent unintentional driving features has noticed that you have used the handle bar while switching on the viamobil. Leave go of the handle bar and switch off the viamobil. Switch on the viamobil again without using the handle bar. Internal Fault Switch off viamobil and then restart (see chapters 2.4 and 2.7). No further driving is possible if the fault indication continues. Please get in contact with your specialist dealer or the Alber Service Centre (see inside cover flap for more details). The electronics has determined a defect on the viamobil, if a blink code is displayed which is different to those mentioned in the above-mentioned table. Further driving is no longer possible in such cases. Please get in contact with your specialist dealer or the Alber Service Centre (see inside cover flap for address). GA-V14-USA.indd 22 18.09.2006 11:51:40 7.3 What should be done if... Further malfunctions can, if necessary, be eliminated as follows: Your viamobil reports malfunctions to the LED status display [13] via a sequence of blinks. Each blink sequence has a different meaning such as: What should be done if... Remedy Contact your rechargeable battery pack can no longer be recharged This fault can only be eliminated at the factory your specialist dealer your viamobil can no longer be switched on Check - whether the rechargeable battery pack has been charged - whether the fuses in the rechargeable battery pack are perhaps defective your viamobil can no longer be switched on although the rechargeable battery pack is charged and its fuses are in working order. This fault can only be eliminated at the factory the viamobil suddenly stops Switch off viamobil and then restart. If you get no reaction the device is defecyour specialist dealer tive and has to be sent into the factory for repairs the viamobil is audibly running, but makes no movement Check whether the drive wheels are on the ground or perhaps still unintentionally retracted (see chapter 2.8). your specialist dealer 23 No further driving is usually possible if another malfunction occurs, which is not listed in the table above. Please get in contact with your specialist dealer or the Alber Service Centre (see inside cover flap for more details). GA-V14-USA.indd 23 18.09.2006 11:51:40 8 8. Anti-tipers Alber anti-tippers are only available as an optional accessory for your viamobil, because most wheelchairs are already equipped with anti-tippers as part of their standard equipment. The forks [28] required for driving are already attached to the bracket if anti-tippers are ordered and delivered together with the viamobil. An authorised health care specialist should be able to get anti-tippers attached to your wheelchair at any time, should you want to have them installed at a later date. It is strongly recommended that anti-tippers are mounted to your viamobil or wheelchair for drives on flat surfaces! The use of paired anti-tippers is mandatory on drives on uphill slopes over 8%. • Insert the receiver shoe [29] on the anti-tipper [27] into the fork opening [28]. 24 28 29 27 30 • P ress the unlocking device in the centre of the quickpin [30] with your thumb and completely insert through the fork [28] and the receiver shoe [29] inside the fork until it cannot go any further. • Check that the quickpin [30] is fitted securely in the fork [29]. • Remove the anti-tippers in reverse order. The quickpin [30] should not be able to be removed without pressing the unlocking device! GA-V14-USA.indd 24 18.09.2006 11:51:41 9. Tips on First-time Driving Your viamobil has been prepared by Alber or your specialist dealer and delivered to you. We would therefore like to subsequently give you two tips on first-time driving. • Both drive wheels of the viamobil are approx 2 cm above the ground when in resting position. You thus have the opportunity of moving the wheelchair without the help of viamobil. • Use the lowest possible speed (operating button for speed selection on setting „1“) on the viamobil when driving for the first time and become familiar with the driving properties of the viamobil. You can then gradually increase the speed and drive both backwards and forwards. You should get a feeling for driving your viamobil safely after just a couple of minutes. 25 GA-V14-USA.indd 25 18.09.2006 11:51:41 8 10. Safety Instructions and Hazard Warnings The following instructions are to be implicitly observed in order to guarantee the secure utilisation of your viamobil. 26 10.1 Safety Instructions Pay attention to the following before driving: • the viamobil should only be fixed to push-rim wheel chairs, which have been cleared by the Ulrich Alber GmbH company for this purpose. • Assembly and alteration to the brackets for the viamobil are only to be carried out by the Ulrich Alber GmbH company or by a health care specialist authorised by Alber. • It is imperative that you pay attention to the instruction manual for the wheelchair when using the viamobil. • The permissible peak load of the wheelchair is reduced by the weight of the viamobil (approx. 25 kg). • Only the person pushing is permitted to operate the viamobil. The viamobil is not suitable for self-propelling chairs due to the danger of tilting, especially when manoeuvring inclines. The person pushing must be able to support the wheelchair and wheelchair occupant in the event of it tilting backwards or to the side. • It is strongly recommended that anti-tippers are mounted to your viamobil or wheelchair! The use of paired anti-tippers is mandatory on uphill slopes over 8%. • The lever brakes on the wheelchair, to which the viamobil is attached, have to be arranged so that the person pushing is able to reach them easily. • Check the condition of the drive wheels before setting off on every drive. You are no longer permitted to operate the viamobil if the tyres have reached their wear limit. • Ensure that the air pressure in the wheels of the wheelchair correspond with the specifications of the wheelchair manufacturer. • The viamobil should be checked and serviced every two years by Alber or your specialised dealer (see chapter 11.3). Pay attention to the following when driving your viamobil: • You should know how to handle the drive add-on on flat surfaces before taking the viamobil on uphill or downhill slopes. • Always turn the operating button for the speed selection to the position displaying the lowest speed possible when starting up and gradually increase the speed to the required walking speed. • It is not permitted to drive on uphill or downhill slopes with an incline over 10%. The max. permissable incline as stated by the wheelchair manufacturer is under no circumstances to be exceeded. • Set the operating button for the speed selection to a speed which is not faster than a comfortable walking speed for the person pushing, especially before manoeuvring inclines. • Uphill and downhill slopes should never be manoeuvred in roll operation mode. • Never back up to steps or drops when the drive add-on is switched on. • If the viamobil is switched on, every impulse on the handle bar is tranferred into a driving command. Every unwanted impulse should therefore be eliminated if possible. Switch the viamobil off when stopping or waiting in front of potential danger spots (i.e. while waiting at traffic lights, uphill and downhill slopes or ramps of all kinds) and remove your hands from the handle bar. • Do not attach any objects (carrier bags etc.) to the handle bar of your viamobil! These could cause unwanted driving impulses. • Keep a sufficient distance to the kerb when driving on pavements (if possible at least one wheelchair width). • Always cross the kerb in backwards drive with the viamobil switched off. The wheelchair is to be lifted on its handles (not by the handles of the viamobil). Pay attention to the maximum climbing height as specified by the manufacturer of the wheelchair when driving over kerbs. • Avoid driving on surfaces that are not firm (i.e. on loose gravel, in sand, mud, GA-V14-USA.indd 26 18.09.2006 11:51:41 snow, ice or through deep puddles of water). • Never leave your viamobil unsupervised - when switched on or off. If this can, however, not be avoided, the removal of the rechargeable battery pack protects against the unauthorised use of your viamobil. • The drive of your viamobil may heat up during longer trips. You should therefore avoid touching the drive directly after taking out your viamobil (i.e. when loading the viamobil into the car). • The performance of the viamobil can be influenced by electro-magnetic fields created, for example, by mobile phones. The drive add-on is therefore to be switched off if mobile phones are used in the direct vicinity of the wheelchair. • The viamobil could interfere with other facilities, such as checkpoint security systems in large department stores. Pay attention to the following after driving your viamobil: • Switch the viamobil off immediately if you are not using it in order to prevent a driving impulse from being unintentionally triggered through contact with the handle bar or to stop the battery from self-discharging. • Recharge the rechargeable battery pack of your viamobil after every drive if possible. 10.2 Obstacles Obstacles over 3 cm in height like, for example, kerbs, should only be manoeuvred in backwards drive. • For this, switch the operating button of your viamobil to the setting „ROLL“, lift the drive wheels off the ground by operating the pedal (see chapter 2.8) and back up towards the obstacle. • Pull the wheelchair backwards over the obstacle by using the wheelchair push handles on the wheelchair, but never use the handles of the viamobil to carry out this procedure. • The drive wheels can then be released again by operating the pedal, the viamobil is once again set to the required driving speed by means of the operating button and you can continue driving. Pay attention to the instructions in the instruction manual for the wheelchair regarding the maximum obstacle height that can be manoeuvred! 27 10.3 Danger Spots and Danger Situations The user of the viamobil independently decides on which routes to utilise by taking into account his driving skills and physical abilities. He is to check the viamobil for worn-down or damaged tyres as well as ensure the state of charge of the batteries and determine whether the control elements are in working order prior to driving. These safety inspections as well as personal driving skills are especially important in regard to the following danger spots, the manoeuvring of which are at the discretion of the person pushing the viamobil: • quay walls, landing stages, paths and locations on watercourses, unsecured bridges and dams. • narrow paths, inclines (i.e. ramps and driveways), narrow paths on a slope, mountain paths. • narrow and / or steep downward / sloping paths on main roads or near precipices. • Icy or snow-covered roads or roads covered in leaves. • Ramps and lifting gear on cars. Uphill or downhill slopes with a maximum incline of 10% can be manoeuvred with the viamobil. Prerequisites are proper tread patterns, correct air pressure in the wheelchair wheels, unobjectionable ground conditions and maximum loading of 120 kg. There is an increased tendency towards tilting to the side when on winding roads or when reversing on uphill or downhill slopes due to the shift of balance. These driving manoeuvres should be carried out with great care and only at low speeds! GA-V14-USA.indd 27 18.09.2006 11:51:41 8 Extreme care should be taken when crossing main roads, crossings and level crossings. Never cross over any tracks or rails in streets or on level crossings when your wheelchair is parallel to the tracks or rails, because the wheels could otherwise perhaps get stuck in them. Great care should be taken when driving on ramps or using lifting gear on cars. The viamobil is to be switched off and the handle bar let go of during the lifting or lowering procedure on the ramp or lifting gear. The hand brakes also have to be pulled on the wheelchair. This prevents the wheelchair from rolling away due to, for example, unintentional driving commands. The tyres do not adhere so well to the surface if there is wetness on the ground; there is increased danger of skidding. Adjust your driving behaviour accordingly. 28 GA-V14-USA.indd 28 18.09.2006 11:51:41 11. Support, Maintenance and Disposal 11.1 Charging Rechargeable Battery Pack Your viamobil consumes energy every time it‘s used. You should never completely deplete the reserves in your rechargeable battery pack, because this can become damaged if done on a continuing basis. It is recommended that you recharge the rechargeable battery pack after every use whenever possible. Only use the Alber mains battery charger supplied with the viamobil for charging the rechargeable battery pack. This switches itself off automatically as soon as the rechargeable battery pack is charged. It is therefore not possible to overcharge the rechargeable battery pack. Also see chapter 3.5 for further instructions on the rechargeable battery pack 11.2 Cleaning Only use commercially available cleaning fluids, which are used in households for all cleaning procedures. • Drive unit, hand grips and rechargeable battery pack should only be rubbed down with a damp (not wet) cloth. • The contacts on the rechargeable battery pack and on the base plate should be cleaned regularly with a cloth soaked in cleaning spirits. • When using Alber anti-tippers, the receivers of the Alber anti-tippers should be cleaned every two months with a damp (but not wet) cloth. • The bracket attached to the wheelchair is to be cleaned with a damp (but not wet) cloth. • The drive wheel should be regularly cleaned to get rid of any dirt. This is best carried out with compressed air or a dry brush. 29 11.3 Maintenance Your viamobil is an extremely low-maintenance device. No part of the drive is subject to noteworthy wear and tear with the exception of the tyres. The tyres are not to be used if they have reached their wear limit in order to be able to safely utilise the drive and braking power of your viamobil at all times. A new tyre (see fig. A) boasts a prominent tread pattern and therefore guarantees the perfect pressure as well as optimum driving properties. If the tyre of your viamobil is worn down (see fig. B), then the tread and the lateral radii [R] are no longer recognisable. The diameter [X] of the tyre is now 194 mm and has to be replaced immediately, because there may no longer be sufficient pressure on the ground. A R Even if there are no visible and recognisable wear and tear, damages or malfunctions, a safety-related inspection should be carried out every two years on your viamobil according to §6 of the Medical Product Act (MPBetreibV). R If you determine a worsening in the usual driving behaviour on your viamobil (i.e. erratic rolling away, wheelspinning or wheel-slipping), please contact your health care specialist for an inspection of the tyres. X B GA-V14-USA.indd 29 Please contact your specialist dealer straightaway regarding a replacement tyre. Service and repairs to the viamobil are only to be carried out by an authorised specialist dealer or Alber. Please also contact your specialist dealer or the Alber Service Centre in the event that any faults occur. 18.09.2006 11:51:43 8 11.4 Disposal Your viamobil and its rechargeable battery pack are long-lasting products. After their natural service life has expired, these components can be returned to Alber or an Alber specialist dealer for professional and environmentally-friendly disposal. 11.5 Reuse If you were provided with your viamobil by your health insurance and no longer require its use, please get in contact with your health insurance or health care specialist. Your viamobil can then be simply and economically reused. A safety-related inspection should be carried out on the viamobil before each reuse. The brackets, with which the viamobil is attached to the wheelchair, can be simply and easily removed from the wheelchair that no longer requires its services and attached to a new wheelchair by an authorised specialist dealer. In addition to the apparent instructions on cleaning in chapter 11.2, the handle bar handles [7], operating button [12], and housing of the rechargeable battery pack [15] are to be disinfected prior to each reuse. Use a cleaning fluid suitable for disinfecting according to the instructions of the appropriate manufacturer. 30 GA-V14-USA.indd 30 18.09.2006 11:51:43 12. Warranty, Guarantee and Liability 12.1 Warranty for Defects Alber guarantees that the viamobil is free from defects at the time of delivery. These warranty claims expire 24 months after delivery of the viamobil. 12.2 Service Life Guarantee Alber provides a 24 month service life guarantee on the viamobil (exception: 12 months service life guarantee for the rechargeable battery pack) The service life guarantee does not include the following: • devices whose serial numbers have been changed, defaced or removed • wear parts like, for example, brakes, tyres and control elements • defects caused by natural wear and tear, improper treatment, especially defects due to non-observance of the operating instructions, accidents, negligent damage, effects of fire or water, force majeure and other causes, which are not within the sphere of influence of Alber. • maintenance work resulting from daily utilisation (i.e. replacement of burntthrough fuses, replacement of tyres) • appliance check without finding any defects 12.3 Liability As the manufacturer of the viamobil, Ulrich Alber GmbH is not responsible for its safety if: • the viamobil is handled improperly • the viiamobil is not serviced by an authorised specialist dealer of the Ulrich Alber GmbH every 2 years. • the viamobil is started up contrary to the instructions in this instruction manual • the viamobil is run with insufficient battery charge • repairs or other work is carried out by unauthorised persons • foreign parts are attached or connected to the viamobil • parts of the viamobil are dismantled GA-V14-USA.indd 31 31 18.09.2006 11:51:43 8 32 GA-V14-USA.indd 32 18.09.2006 11:51:43 33 GA-V14-USA.indd 33 18.09.2006 11:51:43 8 Ihre Alber-Vertretung / Your Alber representative / Votre représentation Alber / Vostra rappresentanza Alber / Su representación Alber / Din Alber representant / Din Alber-agenturene / Uw distributeur Alber / Deres Alber-repræsentation 23.0001.4.99.01 Ulrich Alber GmbH Vor dem Weißen Stein 21 72461 Albstadt-Tailfingen Telefon +49 (0)7432 2006-0 Telefax +49 (0)7432 2006-299 [email protected] www.alber.de www.alber.de Deckblatt.indd 4 12.09.2006 13:11:19