1
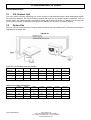
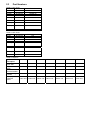
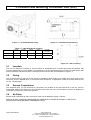
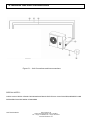
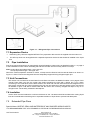
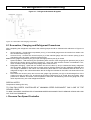
APPLICATION MANUAL
ICU CONDENSING UNIT
ICU CONDENSING UNIT
IF SUPPLIED AS A SYSTEM (ICC,QKK,QLC) PLEASE REFER TO INDOOR UNIT
INSTALLATION MANUAL
ICU Technical.doc
1
Eaton-Williams Ltd
Station Road, Edenbridge, Kent, TN8 6EG
TeL: +44(0)1732 866066, Fax: +44(0)1732 867937
www.eaton0williams.com
Index Page
Section
1.
2.
3.
4.
5.
6.
Installation and Safety
3
1.1
1.2
1.3
1.4
1.5
1.6
3
3
3
3
3
3
8.
9.
Installation
Handling
Application
Electrical connection
Warranty
General
Introduction to Units
4
2.1
2.2
2.3
4
ICU Outdoor Unit
ICU Options
ICU Part Numbers
Locatin and Mounting of Outdoor Unit (ICU)
5
3.1
3.2
3.3
3.4
5
5
5
5
Location
Fixing
Service Connections
Air Entry
Outdoor Unit Access (ICU)
6
4.1
Access Details/Fixings
6
General Service Connections
Power and Control Connections
7
9
6.1
6.2
6.3
7.
Page no.
Wiring-up the Unit
Wiring Requirements
Terminations
11
11
10
Refrigerant Pipe Connections
11
7.1
7.2
7.3
7.4
11
11
11
11
Expansion Device
Pipe Installation
Unit Connections
Insulation
Refrigeration Commissioning
12
8.1
8.2
12
13
Evacuation, Charging and Refrigerant Procedures
Charge Weights
Ancillary Service Connections
14
9.1
14
Condensate Removal
10. Disposal Procedure
11. Final Checks
ICU Technical.doc
14
15
Eaton-Williams Ltd
Station Road, Edenbridge, Kent, TN8 6EG
TeL: +44(0)1732 866066, Fax: +44(0)1732 867937
www.eaton0williams.com
1. Installation and Safety
1.1
Installation
The units making up the Air Conditioning System must only be installed by a qualified engineer, following the
mandatory and local codes of practice.
1.2
Handling
Care must be taken when the units are moved or lifted to ensure that everyone and everything is safe. When lifting
equipment is used it must be suitable and approved.
1.3
Application
Ensure that the unit is only used for suitable purpose/applications.
1.4
Electrical connection
Electrical work and connections must only be made by authorised electricians in accordance with mandatory
regulations and local codes of practice.
1.5
Warranty
Failure to comply with the manufacturers installation instructions could affect the performance of the unit and
invalidate the warranty. Warranty is also subject to the implementation of a planned service/maintenance
agreement as documented in the warranty booklet supplied with the unit.
SAFETY PROCEDURES
1.6
General
a.
b.
All works must be carried out in accordance with the manufacturers installation and operating procedures.
Good working practices must be followed at all times so that Mechanical and Electrical hazards are kept to a
minimum.
c.
The equipment has been fitted with doors and covers to prevent access during operation. These must be
kept in place and additional guards fitted if necessary.
d.
The equipment must be connected to an external electrical isolator if one is not supplied fitted to the unit.
e.
Servicing and maintenance must only be carried out by fully qualified and competent staff. Before any work
is started, electrically isolate the units to make sure that they can not be switched on accidentally and allow
sufficient time for isolated parts to come to rest before removing panels. Electrical isolation switches must be
labelled to show that they are OFF during servicing and maintenance operations.
Note: Some units are dormant in standby mode and can restart without warning if they are not electrically isolated.
f.
Care must be taken not to touch components or pipework which may be extremely hot, or cold for a period
after the unit is electrically isolated.
g.
After completing any tasks ensure all guards, covers and doors are correctly refitted before restoring the
power supply to the unit.
h.
Air conditioning equipment may generate unacceptable noise levels. If noise levels are unacceptable sound
and vibration attenuators may be required. For noise levels guidance refer to technical literature, or contact
Qualitair, or their distribributors for advice.
SPECIAL NOTES
IF ANYTHING IS NOT CLEAR PLEASE CONTACT YOUR DISTRIBUTOR FOR CLARIFICATION
2. Introduction to Units
SYSTEM DESCRIPTION
2.1
ICU Outdoor Unit
The unit is a floor mounting condensing unit, which can also be wall mounted using the QRO Wall Bracket Option
Kit (except the QRO60). The unit is supplied complete with axial fan and guard, hermetic compressor, shut off
service valves, fan speed controller, low pressure switch and an electrical section. On QRO9,12,18 and 24 units
the fan speed controller is Temperature sensing and on QRO36,48 & 60 units it is Pressure sensing.
2.2
Option Kits
The ICU units can be supplied with a range of option kits which will require fitting at site. Instructions for fitting are
supplied with the Option Kits.
FIGURE 2.1
Table 2.2 ICU Packing sizes and weights
ICU25
ICU35
ICU55
ICU70
ICU100
ICU150
ICU180
Width mm
83
83
91
91
116
116
146
Height mm
69
69
84
84
84
84
84
Depth mm
28
28
35
35
35
35
35
Weight kg
42
42
63
64
91
93
100
Table 2.3 ICU Sizes and weights
ICU25
ICU35
ICU55
ICU70
ICU100
ICU150
ICU180
Width mm
720
720
800
800
1050
1050
1350
Height mm
610
610
765
765
765
765
765
Depth mm
250
250
320
320
320
320
320
Weight kg
40
40
60
61
88
90
97
ICU Technical.doc
Eaton-Williams Ltd
Station Road, Edenbridge, Kent, TN8 6EG
TeL: +44(0)1732 866066, Fax: +44(0)1732 867937
www.eaton0williams.com
2.3
Part Numbers
Table 2.4 A/C Units
R22
ICU09
J97233-02
ICU012
J97243-02
ICU018
J97263-02
ICU024
J97283-02
ICU024(3
J97284-02
)
ICU036
N/A
ICU036(3
J97224-02
)
ICU048(3
N/A
)
ICU6093
N/A
Table 2.5 H/P Units
R22
ICU09
J97235-02
ICU012
J97245-02
ICU018
J97265-02
ICU024
J97285-02
ICU024(3
J97286-02
)
ICU036
N/A
ICU036(3
J97226-02
)
ICU048(3
N/A
)
ICU6093
N/A
Table 2.6 Options
Option
Description
Short cycle &
winter start
High pressure
switch
Outdoor
electrical isolator
Wall mounting
brackets
Heat pump
expansion
device
R407C
J97643-02
J97643-02
J97663-02
J97683-02
J97684-02
J97623-02
J97624-02
J97614-02
J97694-02
R407C
N/A
J97645-02
J97665-02
J97685-02
J97686-02
J97625-02
J97626-02
J97616-02
J97696-02
ICU09
ICU012
ICU018
ICU024
ICU036
ICU048
ICU060
J972436
J972436
J972436
J972436
J972436
J972436
J972436
J972433
J972433
J972433
J972433
J972433
J972433
J972433
J972434
J972434
J972434
J972434
320
320
320
J972435
J972435
J972436
J972436
J972436
J972436
NA
Refer to
indoor unit
Refer to
indoor unit
Refer to
indoor unit
Refer to
indoor unit
Refer to
indoor unit
Refer to
indoor unit
Refer to
indoor unit
3. Location and Mounting of Outdoor Unit (ICU)
Figure 3.1 – ICU Wall Bracket Fixing
Figure 3.3 – ICU Wall Unit Positioning
Table 3.1 – QRO Wall Mount Kit Fixing
ICU25
ICU35
ICU55
ICU70
ICU100
ICU150
Dim ‘y’ mm
220
220
290
290
290
Dim ‘Z’
670
670
750
750
1000
Figure 3.2 – ICU Unit Fixing
3.1
Location
The unit can either be mounted on a level surface or suspended from a vertical wall using the Qualitair wall
mounting Optional kit (1) (not available on ICU180units). The unit should always be mounted on a load bearing wall
and not a partition wall. Ensure there is sufficient free area around the unit as detailed in Figure 3.3.
3.2
Fixing
Two off hole fixings (2) and two off slot fixings (3) suitable for M10 fixings are provided in the base of the unit to
secure the unit to a suitable plinth, or to the wall mount bracket kit. If required the contractor should install the unit
on anti - vibration pads.
3.3
Service Connections
The refrigerant pipe (4) and electrical (5) connections are located at the right hand end of the unit, and the
condensate drain for the heat pump unit is located on the base of the unit. A loose drain connector is supplied for
connection on heat pump units where required.
3.4
Air Entry
Ensure there is adequate air entry at the back of the unit as detailed in Figure 3.3 above.
SPECIAL NOTES : ENSURE CONDENSER HAS ADEQUATE CLEARANCE AROUND IT AND IS NOT
AFFECTED BY NEIGHBOURING CONDENSING UNITS
ICU Technical.doc
Eaton-Williams Ltd
Station Road, Edenbridge, Kent, TN8 6EG
TeL: +44(0)1732 866066, Fax: +44(0)1732 867937
www.eaton0williams.com
4. Outdoor Unit Access (ICU)
Figure 4.1 – Unit Internal Access
4.1
Item No.
(1)
(2)
(3)
(4)
(5)
(6)
(7)
(8)
(9)
(10)
(11)
Access Details/Fixings
Unit Component
Fan guard
Fan/motor ((fixed to rear of fan guard)
Condenser coil
Compressor
Removable top panel
Service access panel
Reversing valve (Heat pump unit only)
Electrics/customers connection
Low pressure cutout
High pressure cutout
Unit wiring diagram
Access Details/Fixings
Front access set screw fixings
Front access set screw fixings on guard
Access from rear of unit
Remove “service access panel”
Front and side access screw fixings
Front access screw fixings
Remove “service access panel”
Remove “service access panel”
Remove “ service access panel”
Remove “service access panel”
Remove “service access panel”
SPECIAL NOTES :
CHECK THAT THE INDOOR UNIT IS CORRECTLY MATCHED TO THE OUTDOOR UNIT. ALL PIPEWORK,
INSULATION AND ELECTRICAL CABLING IS TO BE SUPPLIED BY OTHERS.
5. General Service Connections
Figure 5.1 – Unit Connections and Interconnections
SPECIAL NOTES :
CHECK LOCAL REGULATIONS FOR INDOOR/OUTDOOR ELECTRICAL ISOLATION REQUIREMENTS AND
REFRIGERATION PIPEWORK STANDARDS
ICU Technical.doc
Eaton-Williams Ltd
Station Road, Edenbridge, Kent, TN8 6EG
TeL: +44(0)1732 866066, Fax: +44(0)1732 867937
www.eaton0williams.com
5. General Service Connections
Table 7.1 – Refrigerant Line Sizes
ICU25
1/4 “
5/8”
Liquid
Suction
ICU35
1/4 “
5/8”
ICU45/55
1/4 “
5/8”
ICU70
3/8”
3/4”
ICU100
3/8”
3/4”
ICU135
3/8”
7/8”
ICU170
1/2"
7/8”
ICU135
3/8”
7/8”
ICU170
1/2"
7/8”
ICU135
4
6
6
ICU170
4
6
6
Table 7.2 – ICURefrigerant Connections
Liquid connections
Suction connections
ICU25
1/4 “
5/8”
ICU35
1/4 “
5/8”
ICU45/55
1/4 “
5/8”
ICU70
3/8”
3/4”
ICU100
3/8”
3/4”
Table 7.3 – Interconnecting Cable -No. of Cores
A/C Unit
A/C Unit + Heaters
Heat Pump Unit
ICU25
4
4
6
ICU35
4
4
6
ICU45/55
4
6
6
ICU70
4
6
6
ICU100
4
6
6
Table 7.4 – Mains Power Cable – No of Cores
Single Phase
System
Three Phase
System
ICU25
3
ICU35
3
ICU45/55
3
ICU70
3
ICU100
3
ICU135
N/A
ICU170
N/A
N/A
N/A
N/A
5
5
5
5
Table 7.5 – ICU I Phase Fuse Rating
Run Current(A)
Locked Rotor
Current (A)
HRC Fuse Rating
(A)
ICU25
2
28
ICU35
6.6
28
ICU45/55
10.6
53
ICU70
16.1
82
ICU100
25
114
10
10
16
20
32
Table 7.6 - ICU 3 Phase Fuse Ratings – (AMPS/Phase)
Run Current (A)
Locked Rotor Current (A)
HRC Fuse Rating (A)
ICU70
6
33
10
ICU100
7.5
49
16
ICU135
11
62
20
Icu170
15.5
95.8
32
6. Power and Control Connections
ICU SINGLE PHASE COOLING ONLY
ICU Terminal
Customer Connections
PE
Customer Earth Connection
E
Unit earth connection
N
Customer Neutral Connection
L
Customer Live Connection
C
Cooling Signal (From Indoor Unit)
S
Sensor (fan speed controller)
ICU SINGLE PHASE HEAT PUMP
ICU Terminal
Customer Connections
PE
Customer Earth Connection
E
Unit earth connection
N
Customer Neutral Connection
L
Customer Live Connection
C
Cooling Signal (From Indoor Unit)
S
Sensor (fan speed controller)
RV
Reversing valve signal
H
Heating Signal (From Indoor Unit)
ICU THREE PHASE COOLING ONLY
ICU Terminal
Customer Connections
PE
Customer Earth Connection
E
Unit earth connection
N
Customer Neutral Connection
L1
Customer Live Connection
L2
Customer Live Connection
L3
Customer Live Connection
C
Cooling Signal (From Indoor Unit)
S
Sensor (fan speed controller)
ICU THREE PHASE HEAT PUMP
ICU Terminal
Customer Connections
PE
Customer Earth Connection
E
Unit earth connection
N
Customer Neutral Connection
L1
Customer Live Connection
L2
Customer Live Connection
L3
Customer Live Connection
C
Cooling Signal (From Indoor Unit)
S
Sensor (fan speed controller)
RV
Reversing valve signal
H
Heating Signal (From Indoor Unit)
Table 6.1 – Electrical Connection Details
6. Power and Control Connections
ICU Technical.doc
Eaton-Williams Ltd
Station Road, Edenbridge, Kent, TN8 6EG
TeL: +44(0)1732 866066, Fax: +44(0)1732 867937
www.eaton0williams.com
6.1
Wiring-up the Unit
Electrical terminations should be made onto the screw terminal side of the outdoor unit terminal blocks as detailed
in Table 6.1 on page 9
6.2
Wiring Requirements
Power supply – Connection of isolation power supply to the outdoor unit.
Interconnecting Wiring – Power and signal cables run between outdoor and indoor unit.
Details of the fuse ratings and cable requirements are given in tables 7.3, 7.4, 7.5, & 7.6 on page 8 of this
manual.
Note: On units with 3 phase power supplies, ensure the 3 phases are connected in the correct notation i.e.
L1, L2, L3. If the phase notation is incorrect the compressor will fail to pump and will likely be noisy. If
this is the case then two phases will need to be swapped over to achieve correct notation.
6.3
Terminations
Details of cable terminations and interconnections are given in Table 6.1.
Note:- A wiring diagram is located with the outdoor units, on the inside of the access panel.
6.4
Wiring Diagrams
These are fitted.
SPECIAL NOTES :
REFER TO KIT INSTRUCTIONS FOR ELECTRICAL CONNECTION OF SITE OPTION KITS !
DO NOT MEGA OR FLASH TEST WITH ELECTRONIC PCB’S IN CIRCUIT
INDOOR AND OUTDOOR UNITS SHOULD HAVE LOCAL ELECTRICAL ISOLATORS
7 . Refrigerant Pipe Connections
7.1C
7.1B
Figure 7.1 – Refrigerant Pipe Connections
7.1 Expansion Device
•
ICUCooling Only Units are supplied WITHOUT any expansion device as this is supplied with the indoor unit
•
ICU H/Pump Units can be supplied with a separate expansion device kit that should be installed in the liquid
line
7.2
Pipe Installation
Run the suction and liquid lines in appropriately sized refrigeration copper tubing as detailed in table 7.1 on page 8
of this installation manual. When calculating the effective run take into account any bends or oil traps.
Note: 90 deg elbow equivalent length = 25 x pipe O.D.
Oil trap equivalent length = 50 x pipe O.D
Where the vertical separation exceeds 3 metres, oil traps must be fitted at half the vertical distance as shown on
Figure 7.1 above. Ensure the refrigerant lines are adequately supported using refrigerant pipe clips.
7.3 Unit Connections
The outdoor unit connections are terminated in male flare connections as detailed in tables 7.2 on page 8 of this
manual. Place flare nuts onto the copper tube before preparing the tube with a flaring tool (7.1C). When
connecting to the male flares ensure both surfaces are clean and coat the flared surface with refrigerant oil to
help ensure a leak free joint. When tightening the joint use two spanners to prevent twisting of the connections
as detailed in figure 7.1B above. Please note that the indoor unit is factory charged with 50psi of dry air or
nitrogen which can be safely released to atmosphere.
7.4 Insulation
Suction lines must be insulated to a minimum thickness of 3/8”. Hot areas should be avoided when routing liquid
lines and consideration should be given to separate insulation of liquid lines to prevent heat absorption.
7.5
Extended Pipe Runs
Special Notes :SLEEVE, SEAL AND WATERPROOF ANY BUILDER WORKS HOLES !
IT IS RECOMMENDED THAT A FILTER/DRIER IS FITTED IN THE REFRIGERATION CIRCUIT.
ICU Technical.doc
Eaton-Williams Ltd
Station Road, Edenbridge, Kent, TN8 6EG
TeL: +44(0)1732 866066, Fax: +44(0)1732 867937
www.eaton0williams.com
8.0 Refrigeration Commissioning
Figure 8.1 – Refrigerant Schematic Diagrams
Figure - 8.2 Evacuation and Charging Connections
8.1 Evacuation, Charging and Refrigerant Procedures
After completing the refrigerant connections the following steps should be followed with reference to Figure 8.2
above.
a.
Service gauges - Connect the low pressure port (1) of a manifold gauge set to the suction line outdoor unit
shut off valve service port (2).
b.
Vacuum Pump - Connect the centre line port (3) of the manifold gauge set to the vacuum pump (4) and
operate the pump to ensure a vacuum of 200 microns.
Note: Ensure gauge low pressure port (5) is open and high pressure port (6) is closed.
c.
System Isolation - After achieving the specified system vacuum close the gauge low pressure port (5) and
switch off the vacuum pump. Leave the system for 1 hour and check that the vacuum is maintained. If not,
check for leaks, rectify and repeat the pumping down to 200 microns.
d.
Refrigerant Charging - Open both the outside unit shut off valves (7 & 8) to release the factory refrigerant
into the system. Weigh in the site top-up charge using a charging station and any additional extended pipe
run charge as detailed in the indoor unit instructions. (Note that on units ICU36,48 AND 60 there is no
refrigerant charge in the units and therefore the full charge as indicated in the indoor unit instructions must
be made).
e.
Disconnect the vacuum pump and connect the gauge high pressure port (9) to the discharge line of the
outdoor unit shut off valve (10), ensuring that the gauge central port (3) is closed. Run the system, allow
pressures to stabilise and ensure correct operation. After final commissioning remove the gauge set, fit all
valve caps and carry out a final refrigerant leak test.
SPECIAL NOTES
Temperature Sensing HPC only.
TO RUN FAN SPEED CONTROLLER AT MINIMUM SPEED DISCONNECT ONLY ONE OF THE
SENSOR LEADS
TO RUN FAN SPEED CONTROLLER AT MAXIMUM SPEED DISCONNECT BOTH SENSOR LEADS AND LINK
OUT THE TWO TERMINALS.
+ Pressure Fan Speed Controller
8.2 Charge Weights
R407 Cooling Units
Base Charge (g)
Top up charge/m >
5m
ICU9
600
25
ICU12
1100
25
ICU18
1600
40
ICU24
1900
40
ICU36
2800
40
ICU48
R22 Cooling Units
Base Charge (g)
Top up charge/m > 5m
ICU9
1100
25
ICU12
1400
25
ICU18
1524
40
ICU24
1766
40
ICU36
2800
40
ICU9
1150
25
ICU12
1500
25
ICU18
1620
40
ICU24
1800
40
ICU36
2900
40
: R22 Heat Pump Units
Base Charge (g)
Top up charge/m > 5m
? DUTIES
ICU Technical.doc
Eaton-Williams Ltd
Station Road, Edenbridge, Kent, TN8 6EG
TeL: +44(0)1732 866066, Fax: +44(0)1732 867937
www.eaton0williams.com
ICU60
9.0
9.1
Ancillary Service Connections
Heat Pump De-Frost Condensate Removal
Thought should be given to de-frost water from Heat Pump Outdoor units and the potential danger from
freezing if allowed to run onto a roof or similar area.
A separate drain tube plate is provided with the unit which fits over a 15mm sleeve and onto the bare
drain hole.Use 2-off No12 self tapping screws.
To prevent drain pipe from freezing in prolonged sub-zero temperatures, drain line heater boxes or
heater tape should be considered.
10.1 Disposal Procedure
NOTE!
All refrigerants,oils and other waste materials must be disposed of in a professional and
responsible manner in strict adherence to environmental regulations.
NOTE!
The greatest possible care should be taken at all times to avoid the release of refrigerants to the
atmosphere.
The de-comisioning, dismantling and disposal of air handling units should be undertaken only by
experienced personel and by full adherence to all safety rules, in particular protection of lungs,
eyes and skin from refrigerants, dust etc. Only approved lifting gear and power tools should be
used and access to the work area be restricted to authorised personel.
1. Disconnect the unit from the electrical supply.
2. Reclaim all refrigerant from the unit, using approved reclaiming equipment
according to the manufacturer’s instructions. Recovery of refrigerant must be
carried out only by operatives registered fo refrigerant safe handling.
3. Dispose of the reclaimed refrigerant through an approved recycling facility.
4. Separate the unit sections and remove to approved recycling facilities.
SPECIAL NOTES :
ENSURE ALL CONNECTIONS EXTERNAL TO THE UNIT CASING AND DRAIN PIPEWORK IS
ADEQUATELY INSULATED TO PREVENT FREEZING OR CONDENSATION
11.
Final Checks
1) Have all options kits been fitted ?
2) Have units been mounted level and correct drainage
been checked?
3) Have the suction line, expanded
liquid line (if
required) and condensate drains (if required) been
adequately insulated ?
4) Has the correct HRC external fusing/isolating been
installed ?
5) Has the additional site top-up (cooling only unit) and
extended pipe-run refrigerant charge been measured
into the system ?
6) Has the operating manual been handed to the
customer?
7) Has the warranty booklet been read and filled in?
Note:- If a service contract is not taken out only a 1
year warranty is applicable.
ICU Technical.doc
Eaton-Williams Ltd
Station Road, Edenbridge, Kent, TN8 6EG
TeL: +44(0)1732 866066, Fax: +44(0)1732 867937
www.eaton0williams.com
STATION ROAD
EDENBRIDGE
KENT
TN8 6EG
TEL: (01732) 866066
FAX:(01732) 867937
AN EATON-WILLIAMS GROUP COMPANY
As part of the policy of continuous product improvement, we reserve the right to alter specifications without notice