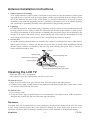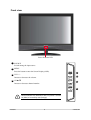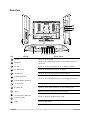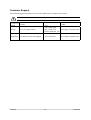
1
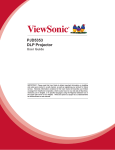
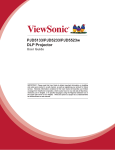
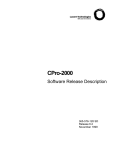
22-Inch Full-HD LCD Display - User Guide - ሢ၊࿁ Model No. : VS12400 ńŰůŵŦůŵŴ Important Safety Instructions .................................................................................................................................................1 Declaration of RoHS Compliance ..........................................................................................................................................2 Copyright Information...............................................................................................................................................................3 Product Registration ..................................................................................................................................................................3 Antenna Installation Instructions ..........................................................................................................................................4 Cleaning the LCD TV...................................................................................................................................................................4 Overview of the LCD Display ...................................................................................5 Product components .................................................................................................................................................................5 Front view ......................................................................................................................................................................................6 Rear view .......................................................................................................................................................................................7 Remote Control ............................................................................................................................................................................8 Getting started ........................................................................................................... 10 Inserting the remote control batteries .............................................................................................................................10 Connecting power ...................................................................................................................................................................10 Cable Connections...................................................................................................................................................................11 Basic Operation .........................................................................................................................................................................14 Using the OSD Menu ............................................................................................... 16 Picture Adjustment ..................................................................................................................................................................17 Sound Adjustment ...................................................................................................................................................................19 TV Tuner Adjustment ..............................................................................................................................................................21 DTV OSD Functions .................................................................................................................................................................23 PC Setup ....................................................................................................................................................................................28 Setup Adjustment....................................................................................................................................................................29 Using a USB Source..................................................................................................................................................................31 Program Guide ........................................................................................................... 33 Other Information..................................................................................................... 34 Toubleshooting .........................................................................................................................................................................34 Customer Support ...................................................................................................................................................................35 Limited Warranty ......................................................................................................................................................................36 Important Safety Instructions 1. Read these instructions completely before using the equipment. 2. Keep these instructions in a safe place. 3. Heed all warnings. 4. Follow all instructions. 5. Do not use this equipment near water. Warning: 7RUHGXFHWKHULVNRI¿UHRUHOHFWULFVKRFN do not expose this apparatus to rain or moisture. &OHDQZLWKDVRIWGU\FORWK,IIXUWKHUFOHDQLQJLVUHTXLUHGVHH³&OHDQLQJWKH/&'79´LQ this guide for further instructions. ' R QRW EORFN DQ\ YHQWLODWLRQ RSHQLQJV ,QVWDOO WKH HTXLSPHQW LQ DFFRUGDQFH ZLWK WKH manufacturer’s instructions. ' RQRWLQVWDOOQHDUDQ\KHDWVRXUFHVVXFKDVUDGLDWRUVKHDWUHJLVWHUVVWRYHVRURWKHUGHYLFHV LQFOXGLQJDPSOL¿HUVWKDWSURGXFHKHDW 9. Do not attempt to circumvent the safety provisions of the polarized or grounding-type plug. A polarized plug has two blades with one wider than the other. A grounding type plug has two blades and a third grounding prong. The wide blade and the third prong are provided for \RXUVDIHW\,IWKHSOXJGRHVQRW¿WLQWR\RXURXWOHWFRQVXOWDQHOHFWULFLDQIRUUHSODFHPHQWRI the outlet. URWHFWWKHSRZHUFRUGIURPEHLQJWUHDGXSRQRUSLQFKHGSDUWLFXODUO\DWWKHSOXJDQGWKH 3 point where if emerges from the equipment. Be sure that the power outlet is located near the equipment so that it is easily accessible. 2QO\XVHDWWDFKPHQWVDFFHVVRULHVVSHFL¿HGE\WKHPDQXIDFWXUHU 12. 8VHRQO\ZLWKDFDUWVWDQGWULSRGEUDFNHWRUWDEOHVSHFL¿HGE\WKHPDQXIDFWXUHU RUVROGZLWKWKHDSSDUDWXV:KHQDFDUWLVXVHGXVHFDXWLRQZKHQPRYLQJWKHFDUW apparatus combination to avoid injury from tip-over. 13. Unplug this equipment when it will be unused for long periods of time. 14. Refer all servicing to qualified service personnel. Service is required when the unit has EHHQGDPDJHGLQDQ\ZD\VXFKDVLIWKHSRZHUVXSSO\FRUGRUSOXJLVGDPDJHGLIOLTXLG LVVSLOOHGRQWRRUREMHFWVIDOOLQWRWKHXQLWLIWKHXQLWLVH[SRVHGWRUDLQRUPRLVWXUHRULIWKH unit does not operate normally or has been dropped. 15. This product is only to perform the useful function of entertainment and visual display tasks are excluded. Following information is only for EU-member states: The mark shown to the right is in compliance with the Waste Electrical and Electronic (TXLSPHQW'LUHFWLYH(&:((( The mark indicates the requirement NOT to dispose the equipment as unsorted PXQLFLSDOZDVWHEXWXVHWKHUHWXUQDQGFROOHFWLRQV\VWHPVDFFRUGLQJWRORFDOODZ ,IWKHEDWWHULHVDFFXPXODWRUVDQGEXWWRQFHOOVLQFOXGHGZLWKWKLVHTXLSPHQWGLVSOD\WKHFKHPLFDO V\PERO+J&GRU3EWKHQLWPHDQVWKDWWKHEDWWHU\KDVDKHDY\PHWDOFRQWHQWRIPRUHWKDQ 0HUFXU\RUPRUHWKDQ&DGPLXPRUPRUHWKDQ/HDG ViewSonic 1 VT2230 Declaration of RoHS Compliance This product has been designed and manufactured in compliance with Directive 2002/95/EC of the European Parliament and the Council on restriction of the use of certain hazardous substances LQ HOHFWULFDO DQG HOHFWURQLF HTXLSPHQW 5R+6 'LUHFWLYH DQG LV GHHPHG WR FRPSO\ ZLWK WKH PD[LPXPFRQFHQWUDWLRQYDOXHVLVVXHGE\WKH(XURSHDQ7HFKQLFDO$GDSWDWLRQ&RPPLWWHH7$& DVVKRZQEHORZ Proposed Maximum Concentration Actual Concentration /HDG3E 0.1% < 0.1% 0HUFXU\+J 0.1% < 0.1% &DGPLXP&G 0.01% < 0.01% Hexavalent Chromium (Cr6+ 0.1% < 0.1% 3RO\EURPLQDWHGELSKHQ\OV3%% 0.1% < 0.1% 3RO\EURPLQDWHGGLSKHQ\OHWKHUV3%'( 0.1% < 0.1% Substance Certain components of products as stated above are exempted under the Annex of the RoHS 'LUHFWLYHVDVQRWHGEHORZ ([DPSOHVRIH[HPSWHGFRPSRQHQWVDUH 0HUFXU\LQFRPSDFWÀXRUHVFHQWODPSVQRWH[FHHGLQJPJSHUODPSDQGLQRWKHUODPSVQRW VSHFL¿FDOO\PHQWLRQHGLQWKH$QQH[RI5R+6'LUHFWLYH /HDGLQJODVVRIFDWKRGHUD\WXEHVHOHFWURQLFFRPSRQHQWVIOXRUHVFHQWWXEHVDQGHOHFWURQLF FHUDPLFSDUWVHJSLH]RHOHFWURQLFGHYLFHV /HDGLQKLJKWHPSHUDWXUHW\SHVROGHUVLHOHDGEDVHGDOOR\VFRQWDLQLQJE\ZHLJKWRUPRUH OHDG /HDG DV DQ DOORWWLQJ HOHPHQW LQ VWHHO FRQWDLQLQJ XS WR OHDG E\ ZHLJKW DOXPLQLXP containing up to 0.4% lead by weight and as a cooper alloy containing up to 4% lead by weight. The “HD ready” Logo is a trademark of EICTA. ViewSonic 2 VT2230 Copyright Information &RS\ULJKW9LHZ6RQLF&RUSRUDWLRQ$OOULJKWVUHVHUYHG 9LHZ6RQLFWKHWKUHHELUGVORJR2Q9LHZ9LHZ0DWFKDQG9LHZ0HWHUDUHUHJLVWHUHGWUDGHPDUNV RI9LHZ6RQLF&RUSRUDWLRQ 'LVFODLPHU9LHZ6RQLF &RUSRUDWLRQ VKDOO QRW EH OLDEOH IRU WHFKQLFDO RU HGLWRULDO HUURUV RU omissions contained herein; nor for incidental or consequential damages resulting from furnishing WKLVPDWHULDORUWKHSHUIRUPDQFHRUXVHRIWKLVSURGXFW ,QWKHLQWHUHVWRIFRQWLQXLQJSURGXFWLPSURYHPHQW9LHZ6RQLF&RUSRUDWLRQUHVHUYHVWKHULJKWWR FKDQJHSURGXFWVSHFL¿FDWLRQVZLWKRXWQRWLFH,QIRUPDWLRQLQWKLVGRFXPHQWPD\FKDQJHZLWKRXW notice. 1R SDUW RI WKLV GRFXPHQW PD\ EH FRSLHG UHSURGXFHG RU WUDQVPLWWHG E\ DQ\ PHDQV IRU DQ\ SXUSRVHZLWKRXWSULRUZULWWHQSHUPLVVLRQIURP9LHZ6RQLF&RUSRUDWLRQ Product Registration 7RPHHW\RXUIXWXUHQHHGVDQGWRUHFHLYHDQ\DGGLWLRQDOSURGXFWLQIRUPDWLRQDVLWEHFRPHV DYDLODEOHSOHDVHUHJLVWHU\RXUSURGXFWRQWKH,QWHUQHWDWZZZYLHZVRQLFFRP For Your Records Product Name: VT2230-1NT ViewSonic LCD Display Model Number: VS12400-1P Document Number: VT2230-1NT_UG_ENG Rev. 1A 11-12-08 Serial Number: ______________________________________ ______________________________________ Purchase Date: Product disposal at end of product life 9LHZ6RQLFLVFRQFHUQHGDERXWWKHSUHVHUYDWLRQRIRXUHQYLURQPHQW3OHDVHGLVSRVHRIWKLVSURGXFW properly at the end of its useful life. Your local waste disposal company may provide information about proper disposal. The lamp in this product contains mercury. Please dispose of properly in accordance with environmental laws of your location. ViewSonic 3 VT2230 Antenna Installation Instructions 1. Outdoor Antenna Grounding ,IDQRXWVLGHDQWHQQDRUFDEOHV\VWHPLVFRQQHFWHGWRWKHSURGXFWEHVXUHWKHDQWHQQDRUFDEOHV\VWHP LVJURXQGHGVRDVWRSURYLGHVRPHSURWHFWLRQDJDLQVWYROWDJHVXUJHVDQGEXLOWXSVWDWLFFKDUJHV$UWLFOH RI WKH 1DWLRQDO (OHFWULFDO &RGH$16,1)3$ SURYLGHV LQIRUPDWLRQ ZLWK UHJDUG WR SURSHU JURXQGLQJRIWKHPDVWDQGVXSSRUWLQJVWUXFWXUHJURXQGLQJRIWKHOHDGLQZLUHWRDQDQWHQQDGLVFKDUJH XQLWFRQQHFWLRQWRJURXQGLQJHOHFWURGHVDQGUHTXLUHPHQWVIRUWKHJURXQGLQJHOHFWURGH 2. Lightning )RUDGGHGSURWHFWLRQIRUWKLVSURGXFWGXULQJDOLJKWQLQJVWRUPRUZKHQLWLVOHIWXQDWWHQGHGDQGXQXVHG IRUORQJSHULRGVRIWLPHXQSOXJLWIURPWKHZDOORXWOHWDQGGLVFRQQHFWWKHDQWHQQDRUFDEOHV\VWHP This will prevent damage to the product due to lightning and power-line surges. Do not disconnect the antenna or the power cord during a heavy storm lighting may strike while you are holding the cable FRUGFDXVLQJVHULRXVLQMXU\WXUQRII\RXU/&'79DQGZDLWIRUWKHZHDWKHUWRLPSURYH 3. Power Lines An outside antenna system should not be located in the vicinity of overhead power lines or other electric OLJKWRUSRZHUFLUFXLWVRUZKHUHLWFDQIDOOLQWRVXFKSRZHUOLQHVRUFLUFXLWV:KHQLQVWDOOLQJDQRXWVLGH DQWHQQDV\VWHPH[WUHPHFDUHVKRXOGEHWDNHQWRNHHSIURPWRXFKLQJVXFKSRZHUOLQHVRUFLUFXLWVDV contact with them might be fatal. Antenna Ground clamp Antenna discharge unit Electric service equipment Ground clamps Grounding conductors Power service grounding electrode system Cleaning the LCD TV 0DNHVXUHWKH/&'79LVWXUQHGRII • Never spray or pour any liquid directly onto the screen or case. To clean the screen: :LSHWKHVFUHHQZLWKDFOHDQVRIWOLQWIUHHFORWK7KLVUHPRYHVGXVWDQGRWKHUSDUWLFOHV ,IVWLOOQRWFOHDQDSSO\DVPDOODPRXQWRIQRQDPPRQLDQRQDOFRKROEDVHGJODVVFOHDQHURQWRDFOHDQ VRIWOLQWIUHHFORWKDQGZLSHWKHVFUHHQ To clean the case: 8VHDVRIWGU\FORWK ,I VWLOO QRW FOHDQ DSSO\ D VPDOO DPRXQW RI D QRQDPPRQLD QRQDOFRKRO EDVHG PLOG QRQDEUDVLYH GHWHUJHQWRQWRDFOHDQVRIWOLQWIUHHFORWKWKHQZLSHWKHVXUIDFH Disclaimer 9LHZ6RQLFGRHVQRWUHFRPPHQGWKHXVHRIDQ\DPPRQLDRUDOFRKROEDVHGFOHDQHUVRQWKH/&'79VFUHHQ RUFDVH6RPHFKHPLFDOFOHDQHUVKDYHEHHQUHSRUWHGWRGDPDJHWKHVFUHHQDQGRUFDVHRIWKH/&'79 9LHZ6RQLFZLOOQRWEHOLDEOHIRUGDPDJHUHVXOWLQJIURPXVHRIDQ\DPPRQLDRUDOFRKROEDVHGFOHDQHUV ViewSonic 4 VT2230 Overview of the LCD Display Congratulation in purchasing the LCD Color Display. This product has been designed to provide you with a rich audio and video experience. This monitor enables you to watch broadcast or cable television ,channels, connect VCR, VCD or DVD player to watch your favorites movies, or connect a computer to use the display as a monitor. The LCD Display is equipped with convenient control buttons located on the front panel and a handy remote control to let you adjust the setting and customize the preferences through an easy-to -use on screen menu system. Enjoy the versatility of your LCD Display with its wide variety of features: Color active matrix TFT LCD Display with remote control Safe, sturdy construction 21.6 inches: Contrast ratio-1000: 1 and Brightness-300 cd/m2 5HVSRQVHWLPH7JPV7\S Maximum display resolution: 1920 x 1080 Audio / Video support • HDMI analog audio input • &RPSRQHQW<&E&U<3E3UYLGHRLQSXW • S-Video input • AV input • Composite video input • Composite audio input • YPbPr video input • VGA input • PC audio in • USB input 2Q6FUHHQ'LVSOD\26'PHQXV\VWHP Product components The following section describes the various components of the LCD Display. Please take a few moments to familiarize yourself with the product and control panel before using it . When you unpack this LCD Display, please make sure the box contains the following items: • LCD Color Display • Power Cord • 5HPRWH&RQWUROZLWK$$$EDWWHULHV • User Manual • Warranty Card * If any of these items were missing or damaging, please contact service party for assistance. ViewSonic 5 VT2230-NT Front view Power Indicator LED 1 SOURCE Switch among the input source. 2 MENU 3UHVVWKHEXWWRQWRHQWHU2Q6FUHHQ'LVSOD\26' 3 VOL +/- 䔌ܹ⑤ 䙌ஂ Increase or decrease the volume. 1 2 ䷇䞣 4 CH S/T ䷇䞣 3 Increase or decrease channel number. 䙌ৄ 䙌ৄ 4 Power indicator LED indicates if the LCD power is turned on (blue) or in stand-by state (orange). ViewSonic 6 VT2230-NT Rear view 11 12 13 䔌ܹ⑤ 䙌 ䷇䞣 ䷇䞣 䙌ৄ 䙌ৄ 1 NO 2 3 4 5 6 7 8 9 10 ITEM FUNCTION 1 AC-IN Connect to the AC outlet. 2 HDMI IN Connect to the HDMI output of your PC or portable computer or A/V device. 3 PC -IN Connect to the VGA output of your PC or portable computer. 4 PC AUDIO IN Connect to the audio output of your computer. 5 AUDIO OUT Connect to the audio input jack of your Audio device. 6 COMPONENT IN 7 COMPONENT AUDIO IN 8 AV AUDIO IN Connect to the A/V output jack of your A/V device. 9 S-VIDEO IN Connect to the S-Video output jack of your S-Video device. AV IN Connect to the A/V output jack of your A/V device. ANTENNA/TV MODULE CONNECTORS Connect to the ATV signal and DTV signal. USB Connect a USB source. 10 11 12 13 Connect to the component output jack of your component device. ViewSonic 7 VT2230-NT Remote Control 1 Ⴋྛ POWER Turn power ON or OFF. 2 COLOR KEYS 1 Context sensitive OSD hotkeys. 3 SOURCE HOTKEYS 2 Press the hotkeys to select the input source. Press DTV once for DTV source; press twice to enter digital radio. 3 4 ঝ๖ FREEZE Freeze the present image on the screen. 5 ӱඈ RETURN Switch to the previous viewed channel. 6 ᚔ EXIT Exit OSD menus. 4 5 7 OSD MENU UP/FAST FORWARD Move up in OSD menus/fast forward media. 6 7 8 OSD MENU RIGHT/SKIP FORWARD Move right in OSD menus/skip to next media. 8 9 ጂᇯ ENTER/PLAY 9 Enter the selected OSD item/Play media. 10 10 ҬᓃġMENU 11 Press to enter current source OSD Menu. 11 ᡗҰ DISPLAY 12 Press to display the information of input signal. 12 ॱ໔ +/- VOL+/- 13 Increase + or decreases - the volume. 14 13 ᓗॱ MUTE 15 Disable the audio output. 16 14 MEDIA CONTROL KEYS Play/Pause/Stop/Rotate/Repeat current media. ViewSonic ® 15 ॱਝ SOUND MODE Select the desired Sound Mode. 16 ᆃ SLEEP TIMER Press repeatedly to set the sleep timer from 15 to 60 mins. ViewSonic 8 VT2230-NT 17 ଉဴྛ SOURCE Select the video source signal. 18 ኵԅᗤ NUMBER KEYS 17 Press the number keys to enter channel numbers. 19 ቶᒉᄍ WIDE Switch the display mode between various wide modes. 20 OSD MENU LEFT/SKIP BACKWARD Move left in OSD menus/skip to previous media 21 *8,'(21/<,1'7926'0(18 Enter the program guide of DTV OSD. 18 22 OSD MENU DOWN/REWIND Move down in OSD menus/rewind media. 23 ᒵᓜ CHANNEL ST Press the S or T keys to increase or decrease the channel number. 24 ኇ PICTURE MODE 19 Switch among four picture modes to change the picture quality : USER, STANDARD, VIVID, SOFT. 25 ᚖᇭ MTS 20 Switch between monaural, stereo, and audio modes. This function enable you to receive a second language or unrelated audio. 21 22 23 24 25 ViewSonic ® ViewSonic 9 VT2230-NT Getting started 3OHDVHUHIHUWRWKHIROORZLQJVHFWLRQVIRUGHWDLOHGLQVWUXFWLRQVDERXWFRQQHFWLQJWKHDXGLRYLGHR$9 device of your LCD Display and view your favorite programmes or movies .These sections describe the basic procedures required to set up your Display for easy and convenient viewing. Inserting the remote control batteries Insert the two AAA batteries provided into the remote control as described below: 1. Pull the latch on the battery compartment cover on the rear of the remote control and remove the cover. 2. Insert the two supplied AAA batteries .Check the + and - ends of the batteries before inserting them in the compartment. 3. Replace the cover and make sure it snaps securely back into place. (A) (A) (B) 1 (B) 2 3 • Do not mix old and new batteries or batteries of different types together. • 'RQRWVKRUWFLUFXLWGLVDVVHPEOHKHDWRU¿UHEDWWHULHV • Remove the batteries to avoid damage from possible battery leakage if you anticipate that the remote control will not be used for an extended period of time. • Please handle the remote control with care. Avoid dropping it ,getting it wet ,or placing it in direct sunlight, near a heater or in an area of high humidity. Connecting power 1. Connect the supplied power cord to the AC IN jack on the rear of Display. 2. &RQQHFWWKHRWKHUHQGRIWKHSRZHUFRUGWRDSRZHURXWOHW$&9+] ViewSonic 10 VT2230-NT Cable Connections PC Connector VGA DVI Supported Resolutions Standard Resolution Hor. Total Hor. Freq. (KHz) DOS VESA VESA VESA VESA MAC VESA VESA VESA VESA 720x400@70Hz 640x480@60Hz 640x480@75Hz 800x600@60Hz 800x600@75Hz 832x624@75Hz 1024x768@60Hz 1024x768@75Hz 1280x1024@60Hz [#+]5 900 800 840 1056 1056 1152 1344 1312 1688 2080 31.47 31.46 37.50 37.87 46.87 48.943 48.36 60.02 63.98 66.587 Hor. Ver. Ver. Freq. Ver. Priority Total (Hz) Priority 449 525 500 628 625 667 806 800 1066 1111 70.09 59.95 75.00 60.31 75.00 74.836 60.00 75.02 60.02 59.934 Pixel Clock (MHz) 28.32 25.17 31.50 40.00 49.50 57.283 65.00 78.75 108.00 138.50 (R) = Reduced Blinking mode (CV-RBT) ViewSonic 11 VT2230-NT Other Connections 1 1 2 2 3 4 5 HDMI Connect to devices with HDMI output such as Blu-ray players, DVD players, Cable boxes, VCR / VCD players, PCs, and portable PCs. Audio cable Connect to devices with audio output such as DVD recorders, VCRs, and Home theater audio equipment. 3 Component cable Connect to devices such as DVD players, Digital TV receivers, and Digital satellite receivers. 4 A/V connector Connect to devices with A/V output such as VCRs, VCD players, and DVD players. 5 S-video cable Connect to devices with S-video output such as DVD players, Digital cameras, and satellite receivers. ViewSonic 12 VT2230-NT Notes: Refer to these notes before connecting any audio / video equipment to this Display: • Refer to the manuals of your Display, stereo, or other equipment. • Disconnect all equipment from the power outlets. Connect the equipment to the power outlets only after you have completed connecting everything. Never make or change connections when equipment still connected to a power outlet. • Connect DVD player directly to the Display. For example, do not connect DVD player to VCR and then connect the VCR to your Display. This type of connection could distort both the picture and the sound. Your VCR might have a copy protection system which could distorted the DVD image. • Set the stereo system to the correct channel or source if your video equipment is also connected to a stereo system. • You only need one audio connection and one video connection between your Display and other audio/ YLGHRHTXLSPHQWVXFKDV'9'SOD\HU9&5&DPFRUGHU7KLVPHDQVLWLVSRVVLEOH\RXZLOOQRWXVH all the jacks on the Display. • If you plan to watch Display via your DVD player or VCR, connect a coaxial cable to the DVD player’s or VCR’s TUNER IN jack then connect to the antenna jack on your LCD Display. This allows you to watch channels on the Display normally when the DVD player or VCR is off. • The function of your existing audio/video equipment, governing the connection mode between your Display and existing audio/video equipment. Progressive Scan Component Video and Component Video have the highest picture quality but it can only be used if the connected video equipment supports Progressive Scan Component Video or component video. S-Video provides a high signal TXDOLW\ &RPSRVLWH 9LGHR D \HOORZ 9LGHR MDFN SURYLGHV D JRRG YLGHR RXWSXW 3OHDVH IROORZ WKH correct step to connect existing audio/video equipment. ViewSonic 13 VT2230-NT Basic Operation 䔌ܹ⑤ 1 5 Turn the LCD Display ON Press the POWER key to turn on or off the power of the LCD Display. The indicate light is blue as power ON and orange as power OFF. 䙌ஂ ䷇䞣 2 3 ䷇䞣 Press ᒵѮŸźRUᒵᓜŸźNH\WRLQFUHDVHRU decrease the channel number. 䙌ৄ 3 2 䙌ৄ Select Channel Adjust Volume Press ॱ໔NH\WRLQFUHDVHRUGHFUHDVH the volume. 5 1 4 Press ᓗॱ key to disable the audio output. 5 5 Mute Switch the input source Press ᒯΣྛ or ଉဴྛ key to list input source. Press ST key to choose the input source, select and switch the wanted input source. Press ጂᇯ PLAY to adjust. 5 Use the Source Hotkeys to select the input source directly. Press DTV once for DTV source, press twice to enter digital radio. 2 3 4 ViewSonic ® ViewSonic 14 VT2230-NT 6 MTS Press ᚖᇭ key to switch monaural and stereo modes. This function enable you to receive a second language or unrelated audio. 7 WIDE Press ቶᒉᄍ key repeatedly to switch the display modes: 16:9, 4:3, Full, Panorama, Crop, Standard. Only DTV and PC Modes support changes to aspect ratio. 8 SLEEP TIMER Press ᆃ repeatedly to set the sleep timer from 15 to 60 mins. 9 Sound Mode Press ॱਝ key repeatedly to select sound mode. 7 10 Display Press ᡗҰ key to display channel number (in 79PRGHDQGLQIRUPDWLRQRIRXSXWVLJQDO 10 6 8 9 ViewSonic ® ViewSonic 15 VT2230-NT Using the OSD Menu 7KH2Q6FUHHQ'LVSOD\26'PHQXV\VWHPSURYLGHVDTXLFNDQGVLPSOHPHWKRGWRDGMXVW/&''LVSOD\ base setting. OSD menu can be viewed using both the remote control and the control buttons on the control panel. 1 Press ᒵ key on the control panel or Ҭᓃ key on the remote control to view OSD menu. 2 Press ST key to select the function. 3 Press X key to enter the sub menu. 4 Press ST key to select the item and press WX to adjust. 5 Press key on the control panel or key on the remote control to exit OSD menu. After change settings on the OSD menu, the new settings are confirmed automatically when OSD picture vanish, even did not press the menu to exit the OSD system. ViewSonic 16 VT2230-NT Picture Adjustment The Picture adjustment enable you to adjust Brightness, Contrast, Sharpness, Color, Hue, Color Temp, and Dynamic Contrast. 1 2 3 Press ᒵ key on the control panel or Ҭᓃ key on the remote control to view OSD menu. Press ST key to select [Picture] mode. Press WXRUNH\WRVHOHFW3LFWXUH0RGHLWHP Press WX or +/- key to select User, Standard, Vivid, Soft. In preset Picture Modes, it is allowed to adjust each subpicture-item setting. Press ST key to select item and press WX key or +/- key to adjust setting. ViewSonic 17 VT2230-NT 4 Press ᒵ key on the control panel or Ҭᓃ key on the remote control to exit OSD menu. %ULJKWQHVV DGMXVWPHQW $GMXVW WKH levels of light on your screen. It should be used in conjunction with the contrast option. &RQWUDVW DGMXVWPHQW $GMXVW WKH GLIference between the dark and light level on your screen. 6KDUSQHVV DGMXVWPHQW $GMXVW WKH sharpness level on your screen. &RORU DGMXVWPHQW FKDQJH WKH GRPLnant color intensity on your screen. Adjust this setting until the colors on the screen look natural. +XH DGMXVWPHQW &KDQJH WKH FRORU balance. Adjust this setting so that colors on the screen are neither too green or too magenta. (No support in PC mode) &RORU 7HPSHUDWXUH DGMXVWPHQW $Gjust the image color intensity: Standard, Cool, Warm '\QDPLF&RQWUDVWWXUQRQRIRIIDXWR contrast adjustment. 1RVXSSRUWLQ3&PRGH ViewSonic 18 VT2230-NT Sound Adjustment The Sound adjustment enable user to adjust volume, treble, bass, balance, speaker output and surround setting. 1 2 3 Press ᒵ key on the control panel or Ҭᓃ key on the remote control to view OSD menu. Press ST key to select [Sound] mode. Press WX or +/- key to enter sub-menu. Press WXNH\WRVHOHFW6RXQG0RGH In preset Audio Modes, it is allowed to adjust each subaudio-item setting. Press ST key to select item and press WX key or +/- key to adjust setting. ViewSonic 19 VT2230-NT 4 5 Press WX or +/- key to select Standard, Music, Movie, Speech, User. Press ᒵ key on the control panel or Ҭᓃ key on the remote control to exit OSD menu. 7UHEOH DGMXVWPHQW $GMXVW WKH KLJK frequency content in audio output. %DVVDGMXVWPHQW$GMXVWWKHORZIUHquency content in audio output. %DODQFHDGMXVWPHQW%DODQFHWKHYROume of right and left speakers. $9&WXUQ$XWR9ROXPH&RQWURO2Q or Off ViewSonic 20 VT2230-NT TV Tuner Adjustment • The Tuner Adjustment enable user to adjust the setting of tuner function. • Tuner Adjustment only can be operated in TV mode. 1 2 3 4 ViewSonic Press ᒵ key on the control panel or Ҭᓃ key on the remote control to view OSD menu. Press ST key to select [Channel] mode. Press WX or +/- key to enter sub-menu. Press STNH\WRVHOHFW&KDQQHO Press WX key to search Channels manually. Press STNH\WRVHOHFW&$79$LUDQGSUHVVX to set the channel signal system for Air or Cable. 21 VT2230-NT 5 6 7 ViewSonic Press STNH\WRVHOHFW$XWR6HDUFKLWHPDQGSUHVV X to start scaning channels. Press STNH\WRVHOHFW6NLSLWHPDQGSUHVVX to skip channels where no signal is detected. Press ᒵ key on the control panel or Ҭᓃ key on the remote control to exit OSD menu. 22 VT2230-NT DTV OSD Functions 7KH'7926'2Q6FUHHQ'LVSOD\PHQXSUHVHQWXVHUDFRQVLVWHQWORRNDQGIHHOWKURXJKRXW8VHUFDQ adjust the DTV channel system setting in this menu. First time enter DTV OSD, the DTV channel system will be automatically search all channels. Press ᒵ key on the control panel or Ҭᓃ key on the remote control to view OSD menu. Press ST key to select [DTV] mode then press WX or +/- key to enter sub-menu (make sure the input VRXUFHLVLQ'79PRGH DTV OSD MENU includes these main options: • • • • • Channel Management Auto Search Manual Search Time Version ViewSonic 23 VT2230-NT DTV Channel Management 1 2 3 Press STNH\WRVHOHFW&KDQQHO0DQDJHPHQW Press X key to enter the Channel Manager submenu. Press STNH\WRVHOHFW&KDQQHO2UJDQL]HU Press X to enter the Channel Organizer screen. Select a channel using ST keys and use the colored buttons on the remote control to organize the listed channels: • Press [Red] to set the selected channel as a Favorite. • Press [Green] to Delete the selected channel. • Press [Yellow] to Skip the selected channel. • Press [Blue] to enter a password to lock the selected channel. Press STNH\WRVHOHFW&KDQQHO6RUWLQJ Press X to enter the Channel Sorting screen. Press WXST and [PLAY] to set your preferences for sorting channels using the three Options provided: • Sort by Status—All, Free, or Scrambled. • Sort Alphabetically— All, A to Z, or Z to A. Select All to display all available channels. ViewSonic 24 VT2230-NT 4 Press STNH\WRVHOHFW&KDQQHO*URXSLQJ Press X to enter the Channel Grouping screen. Select a channel using ST keys and add the channel to groups by pressing the corresponding numeric key on the remote. For example, select channel 02 and press [2] on the remote to add channel 02 to the News group. 3UHVV>3/$<@WRFRQ¿UPWKHJURXSLQJ 5 Press STNH\WRVHOHFW'HOHWH$OO79&KDQQHOVRU 'HOHWH$OO5DGLR&KDQQHOV Press XWRHQWHUDFRQ¿UPDWLRQPHVVDJHVFUHHQ 3UHVV>3/$<@WRFRQ¿UPWKH'HOHWLRQ 6 ViewSonic Press ᒵ key on the control panel or Ҭᓃ key on the remote control to exit OSD menu. 25 VT2230-NT DTV Functions 1 2 3 ViewSonic Press STNH\WRVHOHFW$XWR6HDUFKLWHPDQGSUHVV X to start scaning channels. Discovered TV and Radio channels are displayed in the corresponding panels. Press STNH\WRVHOHFW0DQXDO6HDUFK Press X key to enter the Manual Search screen. Press WX to select a channel to scan. The signal strength and quality are displayed at the bottom of the screen. Press [PLAY] to add the selected channel to the channel list. Press STNH\WRVHOHFW7LPH Press X key to enter the Time screen. 26 VT2230-NT Press WX to select Auto or Manual: Auto—automatically adjusts the date and time. Manual—enter the date and time manually using the Calender screen. 4 • Press [Red] to set the Year. • Press [Green] to set the Month. • Press [Yellow] to set the Day. 3UHVV>3/$<@WRFRQ¿UP Enter the Time using STWX and press [PLAY] to FRQ¿UP Press STNH\WRVHOHFW9HUVLRQ 7KH 9HUVLRQ ¿HOG LV GLVSOD\ RQO\ \RX FDQQRW PDNH changes to the Version displayed. 5 ViewSonic Press ᒵ key on the control panel or Ҭᓃ key on the remote control to exit OSD menu. 27 VT2230-NT PC Setup The PC Setup adjustment enable you to adjust PC mode settings: Auto Adjust, H Position, V Position, Phase, and Clock (make sure the input source is in 3&PRGH 1 2 3 4 Press ᒵ key on the control panel or Ҭᓃ key on the remote control to view OSD menu. Press ST key to select [PC Setup] mode. Press WX or +/- key to enter sub-menu. Press STNH\WRVHOHFW$XWR$GMXVW Press X key to auto adjust screen to the best position. Press ST key to select PC Setup parameters. Press WX key to adjust screen to the best position: • • • • ViewSonic H Position—adjust the horizontal position of the screen. V Position—adjust the vertical position of the screen. Phase—adjust phase for the display. Clock—adjust the clock frequency of display. 28 VT2230-NT Setup Adjustment • The setup Adjustment enable you to adjust OSD Language, OSD Time, Aspect, Background, and Backlight. • User can reset all OSD setting in this option. 1 2 3 4 ViewSonic Press ᒵ key on the control panel or Ҭᓃ key on the remote control to view OSD menu. Press ST key to select [Setup] mode. Press WX or +/- key to enter sub-menu. Press STNH\WRVHOHFW/DQJXDJH Press WX key to select English or Traditional Chinese. Press STNH\WRVHOHFW5HVHW Press X key to Restore to the factory original setting. 6HOHFW<HVDQGSUHVV>3/$<@WRFRQ¿UP 29 VT2230-NT Aspect Ratio Auto—automatically selects the best aspect ratio for the input source. 16:9—A wide-screen aspect ratio for video. 4:3 6WDQGDUG79VFUHHQSURSRUWLRQDOly four units wide for every three units high, no matter the size of the screen. 5 Press STNH\WRVHOHFW$VSHFW Press WX key or +/- to switch image size: 16:9, 4:3, Full, Panorama, Crop, or Standard. 6 Press STNH\WRVHOHFW%DFNJURXQG Press WX key to turn on the optional blue background. Only TV Mode supports the Background function. Panorama Non-linear stretch right and left. 7 Press STNH\WRVHOHFW%DFNOLJKW Press WX key to increase or decrease the brightness of the backlight. Crop Vertically expanded, linearly 13%. ViewSonic 30 VT2230-NT Using a USB Source ,QVHUWD86%NH\FRQWDLQLQJYDOLG¿OHIRUPDWVLQWRWKHVORWRQWKHGLVSOD\DQGSUHVVᒯΣྛ on the control SDQHORU>86%@RQWKHUHPRWHFRQWUROWRVHOHFW86%VRXUFH Supported File Formats PHOTO VIDEO AUDIO Device File System ViewSonic JPEG File types: *.JPG &RPSDWLEOH)LOH)RUPDW-3(*%DVHOLQH Maximum Resolution: 4992 x 3328 pixels BMP File types: *.BMP Compatible File Format: MS Windows V3.1/4/8/24 uncompressed Bitmap Maximum Resolution: 1440 x 1024 pixels GIF Not supported MPEG-1 File Type: *.MPG & *.DAT Compatible File Format: Video is MPEG-1 and MPEG-2; Audio is MPEG-2 MP3, layer 1, 2 and 3 MPEG-2 MP@ML ; File type: *.VOB MPEG-4 File Type: *.AVI Compatible File Format: Video is MPEG-4; Audio is MP3, Xvid VLPSOHSUR¿OHW\SHRQO\DQGLY[VLPSOHSUR¿OHW\SHRQO\9LGHR UHVROXWLRQ S6' ISV 176& S 6' ISV 3$/ Doesn’t support DivX , M-JPEG MP3 File types: *.MP3 32 kbit/s, 44.1 KHz; 40 kbit/s, 44.1 KHz; 48 kbit/s, 44.1 KHz; 56 kbit/s, 44.1 KHz; 64 kbit/s, 44.1 KHz; 80 kbit/s, 44.1 KHz; 96 kbit/s, 44.1 KHz; 112 kbit/s, 44.1 KHz; 128 kbit/s, 44.1 KHz; 192 kbit/s, 44.1 KHz; 224 kbit/s, 44.1 KHz; 256 kbit/s, 44.1 KHz; 320 kbit/s, 44.1 KHz WAV File types: *.WAV WMA, AC3 Not supported Other Photo + Background Music mode not supported USB host 2.0 is compatible with USB 1.1 'RHVQ¶WVXSSRUW86%FDUGUHDGHU86%+XE86%27*2Q7KH*R 6XSSRUW)$7)$7¿OHV\VWHP Can be divided up to four partition 0D[LPXP¿OHVL]HLVUHVWULFWHGWR*%LQWKH)$7DQG)$7¿OHV\VWHP 0D[LPXPSDUWLWLRQVL]HLVUHVWULFWHGWR*%LQWKH)$7¿OHV\VWHP 0D[LPXPSDUWLWLRQVL]HLVUHVWULFWHGWR*%LQWKH)$7¿OHV\VWHP 31 VT2230-NT Select a media type using the colored buttons on the remote control: • 3UHVV>5HG@WRSOD\0RYLH¿OHV • Press [Green] to SOD\0XVLF¿OHV • Press [Yellow] to view 3KRWR¿OHV Although all media formats are shown in all media modes, only media associated with the selected mode can be played. For example, Music files such as .MP3s cannot be played in Movie mode. Press the STNH\VWRPRYHEHWZHHQIROGHUVDQG¿OHVRQWKHFXUUHQWVFUHHQDQGWX to select items. Press X to play the selected media. ViewSonic 32 VT2230-NT Program Guide Press [GUIDE] key on the remote control and wait for few seconds, LCD Display will show the program guide subpage. The Program Guide can be devided into 6 parts: 'DWHDQGWLPH6KRZWKHFXUUHQWGDWHDQGWLPHE\GD\PRQWK\HDU''00<<<< 2. Time range: EPG can show program list within 2 hour range. Current program will be shown in the ¿UVWEORFN 3. Channel menu: Shows all channel name . 4. Program List: Descend the manifestation program name in time zone according to the program length. 5. Program time and name: Display the program time and full name. 6. Program account: This block will present more detail information if any. The following keys are relevant to the operation: STWX keys: browse the programs ጂᇯ/PLAY key: select and change the program S ᒵᓜ T key: page up or down ViewSonic 33 VT2230-NT Other Information Toubleshooting No power • Make sure the Display and the power cord are connected correctly. • Check if you pressed POWER on the remote control unit. If the indicator in the front panel is red, press POWER in the remote control or the front control panel. No picture • Connect to local CATV system equipment, and make sure the signal is unlocked. • Make sure the Display and the Audio/Video signal input devices are connected correctly. • In PC/HDMI Mode, after 15 seconds no signal input that screen will auto off. Strange color, light color, or color misalignment • Is the room too bright? The picture may look dark in a room that is too bright. • Check the input signal setting. No sound • Make sure the Mute function is not operated. • :KHQVLJQDOSDVVHGE\WKH+'0,GLVWULEXWLRQDPSOL¿HUWKDWPD\UHVXOWLQWKLVVLWXDWLRQ Remote control unit does not operate • • • • • &KHFNLIWKHEDWWHULHVDUHLQVHUWHGZLWKWKHSRODULW\FRUUHFWO\DOLJQHG Check if the batteries are discharged. Please replace with new batteries. 0DNHVXUHWKDW\RXGRQRWXVHWKHUHPRWHFRQWUROXQGHUVWURQJRUÀXRUHVFHQWOLJKWLQJ &KHFNLIWKHUHLVDÀXRUHVFHQWOLJKWLOOXPLQDWHGQHDUWKHUHPRWHFRQWUROVHQVRU The path of the remote control beam may be blocked; please make sure the path is clear and that remote control is aimed at the remote control sensor in the Display. Power is cut off suddenly • Check if the off timer or sleep timer are set. • The unit’s internal temperature has increased. Remove any objects blocking the vents and clean them to remove dust. Picture is cut off /with side bar screen • Check if the image position is correct. • Check if the screen mode adjustments such as picture size are made correctly. LCD Display does not operate ([WHUQDO LQÀXHQFHV VXFK DV OLJKWQLQJ RU VWDWLF HOHFWULFLW\ PD\ FDXVH LPSURSHU RSHUDWLRQ ,Q WKLV FDVH RSHUDWHWKHXQLWDIWHU¿UVWWXUQLQJRQWKHSRZHURUSOXJJLQJWKH$&FRUGDQGSOXJJLQJLWLQDJDLQDIWHU to 2 minutes. ViewSonic 34 VT2230-NT Customer Support For technical support or product service, see the table below or contact your reseller. You will need the product serial number. Country/ Website Region Taiwan www.viewsonic.com.tw T=Telephone E-mail F= Fax T=886 2 2246 3456 F=886 2 2249 1751 [email protected] Toll Free=0800 061 198 Hong Kong www.hk.viewsonic.com/support/ T= 852 3102 2900 ViewSonic 35 [email protected] VT2230-NT Limited Warranty VIEWSONIC® LCD Display What the warranty covers: ViewSonic warrants its products to be free from defects in material and workmanship, under normal use, during the warranty period. If a product proves to be defective in material or workmanship during the warranty period, ViewSonic will, at its sole option, repair or replace the product with a like product. Replacement product or parts may include remanufactured or refurbished parts or components. How long the warranty is effective: 9LHZ6RQLF/&'79VDUHZDUUDQWHGIRU\HDUIRUDOOSDUWVH[FOXGLQJWKHOLJKWVRXUFHDQG\HDUIRUODERUIURPWKHGDWHRIWKH¿UVW customer purchase. Who the warranty protects: 7KLVZDUUDQW\LVYDOLGRQO\IRUWKH¿UVWFRQVXPHUSXUFKDVHU What the warranty does not cover: $Q\SURGXFWRQZKLFKWKHVHULDOQXPEHUKDVEHHQGHIDFHGPRGL¿HGRUUHPRYHG 2. Damage, deterioration or malfunction resulting from: D$FFLGHQWPLVXVHQHJOHFW¿UHZDWHUOLJKWQLQJRURWKHUDFWVRIQDWXUHXQDXWKRUL]HGSURGXFWPRGL¿FDWLRQRUIDLOXUHWRIROORZ instructions supplied with the product. b. Repair or attempted repair by anyone not authorized by ViewSonic. c. Any damage of the product due to shipment. d. Removal or installation of the product. H&DXVHVH[WHUQDOWRWKHSURGXFWVXFKDVHOHFWULFSRZHUÀXFWXDWLRQVRUIDLOXUH I8VHRIVXSSOLHVRUSDUWVQRWPHHWLQJ9LHZ6RQLF¶VVSHFL¿FDWLRQV g. Normal wear and tear. h. Any other cause which does not relate to a product defect. 3. Any product exhibiting a condition commonly known as “image burn-in” which results when a static image is displayed on the product for an extended period of time. 4. Removal, installation, and set-up service charges. 5. When you mount it on the wall, the following must be noticed: a. The accessories attached with this product are applicable for this product only. E:KHQWKHSURGXFWLVPRXQWHGRQWKHZDOOKROHVDQG¿[HGVFUHZVZLOOUHPDLQLQWKHZDOOERG\ c. Wall face may discolor when this product has been mounted on the wall for a long time. How to get service: 1. For information about receiving service under warranty, contact ViewSonic Customer Support (please refer to Customer Support SDJH<RXZLOOQHHGWRSURYLGH\RXUSURGXFW¶VVHULDOQXPEHU 7RREWDLQZDUUDQWHGVHUYLFH\RXZLOOEHUHTXLUHGWRSURYLGHDWKHRULJLQDOGDWHGVDOHVVOLSE\RXUQDPHF\RXUDGGUHVV GDGHVFULSWLRQRIWKHSUREOHPDQGHWKHVHULDOQXPEHURIWKHSURGXFW 3. Take or ship the product freight prepaid in the original container to an authorized ViewSonic service center or ViewSonic. 4. For additional information or the name of the nearest ViewSonic service center, contact ViewSonic. Limitation of implied warranties: There are no warranties, express or implied, which extend beyond the description contained herein including the implied warranty of PHUFKDQWDELOLW\DQG¿WQHVVIRUDSDUWLFXODUSXUSRVH Exclusion of damages: ViewSonic’s liability is limited to the cost of repair or replacement of the product. ViewSonic shall not be liable for: 1. Damage to other property caused by any defects in the product, damages based upon inconvenience, loss of use of the product, loss RIWLPHORVVRISUR¿WVORVVRIEXVLQHVVRSSRUWXQLW\ORVVRIJRRGZLOOLQWHUIHUHQFHZLWKEXVLQHVVUHODWLRQVKLSVRURWKHUFRPPHUFLDO loss, even if advised of the possibility of such damages. 2. Any other damages, whether incidental, consequential or otherwise. 3. Any claim against the customer by any other party. Effect of state law: 7KLVZDUUDQW\JLYHV\RXVSHFL¿FOHJDOULJKWVDQG\RXPD\DOVRKDYHRWKHUULJKWVZKLFKYDU\IURPVWDWHWRVWDWH6RPHVWDWHVGRQRWDOORZ limitations on implied warranties and/or do not allow the exclusion of incidental or consequential damages, so the above limitations and exclusions may not apply to you. Sales outside the U.S.A. and Canada: For warranty information and service on ViewSonic products sold outside of the U.S.A. and Canada, contact ViewSonic or your local ViewSonic dealer. 7KHZDUUDQW\SHULRGIRUWKLVSURGXFWLQPDLQODQG&KLQD+RQJ.RQJ0DFDRDQG7DLZDQ([FOXGHGLVVXEMHFWWRWKHWHUPVDQGFRQGLtions of the Maintenance Guarantee Card. For users in Europe and Russia, full details of warranty providedcan be found in www.viewsoniceurope.com under Support/Warranty Information. ViewSonic 36 VT2230-NT