1
&'
/&'0RQLWRU
8VHU*XLGH
*XLGHGHO¶XWLOLVDWHXU
*XtDGHOXVXDULR
0RGHO1R96
Content
Safety Precautions ...................................................................................................5
Package Contents ....................................................................................................6
Optional accessories ................................................................................................................ 6
Parts Name and Functions ......................................................................................7
Front View ................................................................................................................................ 7
Control Panel ........................................................................................................................... 7
Terminal Panel ......................................................................................................................... 8
Remote Control ........................................................................................................................ 10
Installing the Remote Control Batteries.................................................................................... 11
Operating Range for the Remote Control ................................................................................ 11
Handling the remote control ..................................................................................................... 11
Setup Procedure ......................................................................................................12
How to Mount and Attach Options to the LCD Monitor ........................................14
Ventilation Requirements for enclosure mounting ................................................................... 15
To avoid monitor from falling .................................................................................................... 15
Connections .............................................................................................................16
Before making connections: ..................................................................................................... 16
Wiring Diagram ........................................................................................................................ 16
Connecting a Personal Computer ............................................................................................ 17
Connecting with Digital Interface Equipment ........................................................................... 18
Connecting a DVD Player with component out ........................................................................ 19
Connecting to External Speakers............................................................................................. 20
Basic Operation........................................................................................................21
Power ON and OFF Modes...................................................................................................... 21
Power Indicator ........................................................................................................................ 21
Using Power Management ....................................................................................................... 21
Selecting a video source .......................................................................................................... 22
Picture Mode ............................................................................................................................ 22
OSD (On-Screen-Display) Controls ........................................................................23
Picture ...................................................................................................................................... 25
VGA Setting ............................................................................................................................. 26
Option....................................................................................................................................... 27
Input ......................................................................................................................................... 28
Audio ........................................................................................................................................ 29
Special ..................................................................................................................................... 30
Diagnostic ................................................................................................................................ 32
For Long Life Use of Public Display ......................................................................................... 33
Controlling the LCD monitor via RS-232C Remote Control .................................34
Appendix: Installing stands ....................................................................................35
Features ....................................................................................................................36
Troubleshooting.......................................................................................................37
Specifications...........................................................................................................38
Product Specifications.............................................................................................................. 38
Supported Input Signal Resolution........................................................................................... 39
Note for Daisy-Chain Connection............................................................................................. 40
Customer Support....................................................................................................41
Limited Warranty......................................................................................................42
Mexico Limited Warranty.........................................................................................43
ViewSonic
CD4225
i
&RPSOLDQFH,QIRUPDWLRQ
)&&6WDWHPHQW
7KLVGHYLFHFRPSOLHVZLWKSDUWRI)&&5XOHV2SHUDWLRQLVVXEMHFWWRWKHIROORZLQJWZRFRQGLWLRQV
WKLVGHYLFHPD\QRWFDXVHKDUPIXOLQWHUIHUHQFHDQGWKLVGHYLFHPXVWDFFHSWDQ\LQWHUIHUHQFHUHFHLYHG
LQFOXGLQJLQWHUIHUHQFHWKDWPD\FDXVHXQGHVLUHGRSHUDWLRQ
7KLVHTXLSPHQWKDVEHHQWHVWHGDQGIRXQGWRFRPSO\ZLWKWKHOLPLWVIRUD&ODVV%GLJLWDOGHYLFHSXUVXDQW
WRSDUWRIWKH)&&5XOHV7KHVHOLPLWVDUHGHVLJQHGWRSURYLGHUHDVRQDEOHSURWHFWLRQDJDLQVWKDUPIXO
LQWHUIHUHQFHLQDUHVLGHQWLDOLQVWDOODWLRQ7KLVHTXLSPHQWJHQHUDWHVXVHVDQGFDQUDGLDWHUDGLRIUHTXHQF\
HQHUJ\DQGLIQRWLQVWDOOHGDQGXVHGLQDFFRUGDQFHZLWKWKHLQVWUXFWLRQVPD\FDXVHKDUPIXOLQWHUIHUHQFH
WRUDGLRFRPPXQLFDWLRQV+RZHYHUWKHUHLVQRJXDUDQWHHWKDWLQWHUIHUHQFHZLOOQRWRFFXULQDSDUWLFXODU
LQVWDOODWLRQ,IWKLVHTXLSPHQWGRHVFDXVHKDUPIXOLQWHUIHUHQFHWRUDGLRRUWHOHYLVLRQUHFHSWLRQZKLFKFDQEH
GHWHUPLQHGE\WXUQLQJWKHHTXLSPHQWRIIDQGRQWKHXVHULVHQFRXUDJHGWRWU\WRFRUUHFWWKHLQWHUIHUHQFHE\
RQHRUPRUHRIWKHIROORZLQJPHDVXUHV
5HRULHQWRUUHORFDWHWKHUHFHLYLQJDQWHQQD
,QFUHDVHWKHVHSDUDWLRQEHWZHHQWKHHTXLSPHQWDQGUHFHLYHU
&RQQHFWWKHHTXLSPHQWLQWRDQRXWOHWRQDFLUFXLWGLIIHUHQWIURPWKDWWRZKLFKWKHUHFHLYHULV
FRQQHFWHG
&RQVXOWWKHGHDOHURUDQH[SHULHQFHGUDGLR79WHFKQLFLDQIRUKHOS
:DUQLQJ<RXDUHFDXWLRQHGWKDWFKDQJHVRUPRGL¿FDWLRQVQRWH[SUHVVO\DSSURYHGE\WKHSDUW\UHVSRQVLEOH
IRUFRPSOLDQFHFRXOGYRLG\RXUDXWKRULW\WRRSHUDWHWKHHTXLSPHQW
)RU&DQDGD
7KLV&ODVV%GLJLWDODSSDUDWXVFRPSOLHVZLWK&DQDGLDQ,&(6
&HWDSSDUHLOQXPpULTXHGHODFODVVH%HVWFRQIRUPHjODQRUPH10%GX&DQDGD
ViewSonic
CD4225
1
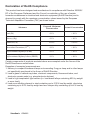
'HFODUDWLRQRI5R+6&RPSOLDQFH
7KLVSURGXFWKDVEHHQGHVLJQHGDQGPDQXIDFWXUHGLQFRPSOLDQFHZLWK'LUHFWLYH
(&RIWKH(XURSHDQ3DUOLDPHQWDQGWKH&RXQFLORQUHVWULFWLRQRIWKHXVHRIFHUWDLQ
KD]DUGRXVVXEVWDQFHVLQHOHFWULFDODQGHOHFWURQLFHTXLSPHQW5R+6'LUHFWLYHDQGLV
GHHPHGWRFRPSO\ZLWKWKHPD[LPXPFRQFHQWUDWLRQYDOXHVLVVXHGE\WKH(XURSHDQ
7HFKQLFDO$GDSWDWLRQ&RPPLWWHH7$&DVVKRZQEHORZ
3URSRVHG0D[LPXP
&RQFHQWUDWLRQ
$FWXDO&RQFHQWUDWLRQ
/HDG3E
0HUFXU\+J
&DGPLXP&G
+H[DYDOHQW&KURPLXP&U
3RO\EURPLQDWHGELSKHQ\OV3%%
3RO\EURPLQDWHGGLSKHQ\OHWKHUV3%'(
6XEVWDQFH
&HUWDLQFRPSRQHQWVRISURGXFWVDVVWDWHGDERYHDUHH[HPSWHGXQGHUWKH$QQH[RIWKH
5R+6'LUHFWLYHVDVQRWHGEHORZ
([DPSOHVRIH[HPSWHGFRPSRQHQWVDUH
0HUFXU\LQFRPSDFWÀXRUHVFHQWODPSVQRWH[FHHGLQJPJSHUODPSDQGLQRWKHUODPSV
QRWVSHFL¿FDOO\PHQWLRQHGLQWKH$QQH[RI5R+6'LUHFWLYH
/HDGLQJODVVRIFDWKRGHUD\WXEHVHOHFWURQLFFRPSRQHQWVÀXRUHVFHQWWXEHVDQG
HOHFWURQLFFHUDPLFSDUWVHJSLH]RHOHFWURQLFGHYLFHV
/HDGLQKLJKWHPSHUDWXUHW\SHVROGHUVLHOHDGEDVHGDOOR\VFRQWDLQLQJE\ZHLJKW
RUPRUHOHDG
/HDGDVDQDOORWWLQJHOHPHQWLQVWHHOFRQWDLQLQJXSWROHDGE\ZHLJKWDOXPLQLXP
FRQWDLQLQJXSWROHDGE\ZHLJKWDQGDVDFRRSHUDOOR\FRQWDLQLQJXSWROHDGE\
ZHLJKW
ViewSonic
CD4225
2
,PSRUWDQW6DIHW\,QVWUXFWLRQV
5HDGWKHVHLQVWUXFWLRQVFRPSOHWHO\EHIRUHXVLQJWKHHTXLSPHQW
.HHSWKHVHLQVWUXFWLRQVLQDVDIHSODFH
+HHGDOOZDUQLQJV
)ROORZDOOLQVWUXFWLRQV
'RQRWXVHWKLVHTXLSPHQWQHDUZDWHU:DUQLQJ7RUHGXFHWKHULVNRI¿UHRUHOHFWULFVKRFN
GRQRWH[SRVHWKLVDSSDUDWXVWRUDLQRUPRLVWXUH
&OHDQZLWKDVRIWGU\FORWK,IIXUWKHUFOHDQLQJLVUHTXLUHGVHH³&OHDQLQJWKH/&'79´LQ
WKLVJXLGHIRUIXUWKHULQVWUXFWLRQV
' R QRW EORFN DQ\ YHQWLODWLRQ RSHQLQJV ,QVWDOO WKH HTXLSPHQW LQ DFFRUGDQFH ZLWK WKH
PDQXIDFWXUHU¶VLQVWUXFWLRQV
'RQRWLQVWDOOQHDUDQ\KHDWVRXUFHVVXFKDVUDGLDWRUVKHDWUHJLVWHUVVWRYHVRURWKHUGHYLFHV
LQFOXGLQJDPSOL¿HUVWKDWSURGXFHKHDW
'RQRWDWWHPSWWRFLUFXPYHQWWKHVDIHW\SURYLVLRQVRIWKHSRODUL]HGRUJURXQGLQJW\SHSOXJ
$SRODUL]HGSOXJKDVWZREODGHVZLWKRQHZLGHUWKDQWKHRWKHU$JURXQGLQJW\SHSOXJKDV
WZREODGHVDQGDWKLUGJURXQGLQJSURQJ7KHZLGHEODGHDQGWKHWKLUGSURQJDUHSURYLGHGIRU
\RXUVDIHW\,IWKHSOXJGRHVQRW¿WLQWR\RXURXWOHWFRQVXOWDQHOHFWULFLDQIRUUHSODFHPHQWRI
WKHRXWOHW
3
URWHFWWKHSRZHUFRUGIURPEHLQJWUHDGXSRQRUSLQFKHGSDUWLFXODUO\DWWKHSOXJDQGWKH
SRLQWZKHUHLIHPHUJHVIURPWKHHTXLSPHQW%HVXUHWKDWWKHSRZHURXWOHWLVORFDWHGQHDUWKH
HTXLSPHQWVRWKDWLWLVHDVLO\DFFHVVLEOH
2QO\XVHDWWDFKPHQWVDFFHVVRULHVVSHFL¿HGE\WKHPDQXIDFWXUHU
8VHRQO\ZLWKDFDUWVWDQGWULSRGEUDFNHWRUWDEOHVSHFL¿HGE\WKHPDQXIDFWXUHU
RUVROGZLWKWKHDSSDUDWXV:KHQDFDUWLVXVHGXVHFDXWLRQZKHQPRYLQJWKHFDUW
DSSDUDWXVFRPELQDWLRQWRDYRLGLQMXU\IURPWLSRYHU
8QSOXJWKLVHTXLSPHQWZKHQLWZLOOEHXQXVHGIRUORQJSHULRGVRIWLPH
5HIHUDOOVHUYLFLQJWRTXDOL¿HGVHUYLFHSHUVRQQHO6HUYLFHLVUHTXLUHGZKHQWKHXQLWKDVEHHQ
GDPDJHGLQDQ\ZD\VXFKDVLIWKHSRZHUVXSSO\FRUGRUSOXJLVGDPDJHGLIOLTXLGLVVSLOOHG
RQWRRUREMHFWVIDOOLQWRWKHXQLWLIWKHXQLWLVH[SRVHGWRUDLQRUPRLVWXUHRULIWKHXQLWGRHV
QRWRSHUDWHQRUPDOO\RUKDVEHHQGURSSHG
ViewSonic
CD4225
3
&RS\ULJKW,QIRUPDWLRQ
&RS\ULJKW 9LHZ6RQLF&RUSRUDWLRQ$OOULJKWVUHVHUYHG
9LHZ6RQLFWKHWKUHHELUGVORJR2Q9LHZ9LHZ0DWFKDQG9LHZ0HWHUDUHUHJLVWHUHG
WUDGHPDUNVRI9LHZ6RQLF&RUSRUDWLRQ
'LVFODLPHU9LHZ6RQLF&RUSRUDWLRQVKDOOQRWEHOLDEOHIRUWHFKQLFDORUHGLWRULDOHUURUVRU
RPLVVLRQVFRQWDLQHGKHUHLQQRUIRULQFLGHQWDORUFRQVHTXHQWLDOGDPDJHVUHVXOWLQJIURP
IXUQLVKLQJWKLVPDWHULDORUWKHSHUIRUPDQFHRUXVHRIWKLVSURGXFW
,QWKHLQWHUHVWRIFRQWLQXLQJSURGXFWLPSURYHPHQW9LHZ6RQLF&RUSRUDWLRQUHVHUYHVWKHULJKW
WRFKDQJHSURGXFWVSHFL¿FDWLRQVZLWKRXWQRWLFH,QIRUPDWLRQLQWKLVGRFXPHQWPD\FKDQJH
ZLWKRXWQRWLFH
1RSDUWRIWKLVGRFXPHQWPD\EHFRSLHGUHSURGXFHGRUWUDQVPLWWHGE\DQ\PHDQVIRUDQ\
SXUSRVHZLWKRXWSULRUZULWWHQSHUPLVVLRQIURP9LHZ6RQLF&RUSRUDWLRQ
3URGXFW5HJLVWUDWLRQ
7RPHHW\RXUIXWXUHQHHGVDQGWRUHFHLYHDQ\DGGLWLRQDOSURGXFWLQIRUPDWLRQDVLWEHFRPHV
DYDLODEOHSOHDVHUHJLVWHU\RXUSURGXFWRQWKH,QWHUQHWDWZZZYLHZVRQLFFRP
)RU<RXU5HFRUGV
3URGXFW1DPH
&'
9LHZ6RQLF´/&'0RQLWRU
0RGHO1XPEHU
96
'RFXPHQW1XPEHU
&'B8*B(1*5HY%
6HULDO1XPEHU
BBBBBBBBBBBBBBBBBBBBBBBBBBBBBBB
3XUFKDVH'DWH
BBBBBBBBBBBBBBBBBBBBBBBBBBBBBBB
3URGXFWGLVSRVDODWHQGRISURGXFWOLIH
9LHZ6RQLFLVFRQFHUQHGDERXWWKHSUHVHUYDWLRQRIRXUHQYLURQPHQW3OHDVHGLVSRVHRI
WKLVSURGXFWSURSHUO\DWWKHHQGRILWVXVHIXOOLIH<RXUORFDOZDVWHGLVSRVDOFRPSDQ\PD\
SURYLGHLQIRUPDWLRQDERXWSURSHUGLVSRVDO
7KHODPSLQWKLVSURGXFWFRQWDLQVPHUFXU\3OHDVHGLVSRVHRISURSHUO\LQDFFRUGDQFHZLWK
HQYLURQPHQWDOODZVRI\RXUORFDWLRQ
ViewSonic
CD4225
4
Safety Precautions
FOR OPTIMUM PERFORMANCE, PLEASE NOTE THE FOLLOWING WHEN SETTING UP AND USING THE LCD
COLOR MONITOR:
• DO NOT REMOVE MONITOR BACK COVER. There are no user serviceable parts inside and opening or removing
covers may expose you to dangerous shock hazards or other risks. Refer all servicing to qualified service personnel.
• Do not spill any liquids into the cabinet or use your monitor near water.
• Do not insert objects of any kind into the cabinet slots, as they may touch dangerous voltage points, which can be
harmful or fatal or may cause electric shock, fire or equipment failure.
• Do not place any heavy objects on the power cord. Damage to the cord may cause shock or fire.
• Do not place this product on a sloping or unstable cart, stand or table, as the monitor may fall, causing serious damage
to the monitor.
• When operating the LCD monitor with an AC 100-120V power supply in North America, use a power supply cord
provided with this monitor.
• When operating the LCD monitor with an AC 220-240V power supply in Europe, use a power supply cord provided with
this monitor.
• In UK, use a BS-approved power cord with molded plug having a black (10A) fuse installed for use with this monitor. If a
power cord is not supplied with this monitor, please contact your supplier.
• When operating the LCD monitor with a 220-240V AC power supply in Australia, use the power cord provided with this
monitor. If a power cord is not supplied with this monitor, please contact your supplier.
• For all other case, use a power cord that matches the AC voltage of the power outlet and has been approved by and
complies with the safety standard of your particular country.
• Do not place any objects onto the monitor and do not use the monitor outdoors.
• The inside of the fluorescent tube located within the LCD monitor contains mercury. Please follow the laws or rules of
your municipality to dispose of the tube properly.
• Do not bend power cord.
• Do not use monitor in high temperature, humid, dusty, or oily areas.
• If monitor or glass is broken, do not come in contact with the liquid crystal and handle with care.
• Allow adequate ventilation around the monitor, so that heat can properly dissipate. Do not block ventilated openings or
place the monitor near a radiator or other heat sources. Do not put anything on top of the monitor.
• The power cable connector is the primary means of detaching the system from the power supply. The monitor should be
installed close to a power outlet, which is easily accessible.
• Handle with care when transporting. Save packaging for transporting.
• Please clean the holes of back cabinet to reject dirt and dust at least once a year because of set reliability.
• If using the cooling fan continuously, it’s recommended to wipe holes a minimum of once a month.
• When installing the remote control batteries;
- Align the batteries according to the (+) and (-) indications inside the case.
- Align the (-) indication of the battery first inside the case.
CAUTION:
Immediately unplug your monitor from the wall outlet and refer servicing to qualified service personnel under the following
conditions:
• When the power supply cord or plug is damaged.
• If liquid has been spilled, or objects have fallen into the monitor.
• If the monitor has been exposed to rain or water.
• If the monitor has been dropped or the cabinet damaged.
• If the monitor does not operate normally by following operating instructions.
Recommended Use
CAUTION:
• For optimum performance, allow 20 minutes for warm-up.
• Rest your eyes periodically by focusing on an object at least 5 feet away. Blink often.
• Position the monitor at a 90° angle to windows and other light sources to minimize glare and reflections.
• Clean the LCD monitor surface with a lint-free, nonabrasive cloth. Avoid using any cleaning solution or glass cleaner!
• Adjust the monitor’s brightness, contrast and sharpness controls to enhance readability.
• Avoid displaying fixed patterns on the monitor for long periods of time to avoid image persistence (after image effects).
• Get regular eye checkups.
Ergonomics
To realize the maximum ergonomic benefits, we recommend the following:
• Use the preset Size and Position controls with standard signals.
• Use the preset Color Setting.
• Use non-interlaced signals.
• Do not use primary color blue on a dark background, as it is difficult to see and may produce eye fatigue due to
insufficient contrast.
ViewSonic
CD4225
5
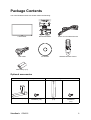
Package Contents
Your new CD4225 monitor box should contain the following:
LCD monitor
Quick Start Guide
Power cord for North America
VGA cable
CD Wizard
Wireless Remote Control
AAA battery (x 2)
Optional accessories
Stand (STND-013)
Monitor stand (x 2)
ViewSonic
CD4225
M4 screw for stand
installation (x 8)
Speaker
External speaker
(x 2)
M3 screw for speaker
installation
(x 6)
6
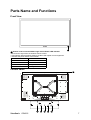
Parts Name and Functions
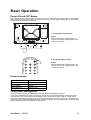
Front View
1
1 Remote control sensor/Ambient light sensor/Power LED indicator
• Receives the signal from the wireless remote control.
• Automatically detects ambient lighting condition and adjusts screen brightness.
• Indicates the power status of the monitor.
Status
Color
Power ON
Green
Power OFF
Red
Power Standby
Orange
Failure detected
Flashing red
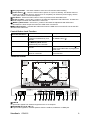
Control Panel
1
2
ViewSonic
CD4225
3
4
5
6
7
1 Carrying handles - Use these handles to move the LCD monitor while installing.
2 Power button (
3
4
5
6
) - Turns the LCD monitor’s power on or put it to standby. This button does not
isolate the LCD monitor from AC power input. To completely cut off the AC power supply, use the
main power switch on the terminal panel.
Exit button - Acts as the EXIT button to move to previous menu with OSD menu.
PLUS (+) button - Acts as the (+) button to increase the adjustment with OSD menu. Increase the
audio output level when the OSD menu is turned off.
MINUS (-)/Auto button - Acts as the (-) button to decrease the adjustment with OSD menu.
Decreases the audio output level when the OSD menu is turned off.
Menu/Enter button - Activates the OSD menu when the OSD menu is turned-off. Acts as the SET
button with OSD menu.
Control Button Lock Function
To activate/deactivate Press these buttons...
these lock functions....
Button lock
Press and hold the Exit and PLUS
(+) buttons simultaneously for 5
seconds.
Menu lock
Press and hold the Menu/Enter
and MINUS (-)/Auto buttons
simultaneously for 5 seconds.
Power lock
Press and hold the Exit button for 5
seconds.
Remote control lock
Press and hold the Menu/Enter
button for 5 seconds.
Description
Locks/unlocks all control buttons except
the Power button ( ).
Locks/unlocks the Menu/Enter button.
Locks/unlocks the Power button ( ).
Keeps power status after re-plugging the
power cord.
Locks/unlocks the wireless remote
control function.
Terminal Panel
1
2
3
4
5
6
7
8
9
10
11
12
13
14
15
1 LINE-IN
To input audio signals from external equipment such as a computer.
2 SPEAKER OUT (8 Ω, 6W x 2)
To output audio signals for external speakers from the LINE-IN, AUDIO-IN or HDMI jack.
ViewSonic
CD4225
8
3 AUDIO-IN R/L
To input audio signals from external equipment such as a VCR or DVD player.
4 HDMI
To input digital RGB signals from a computer.
* This connector does not support analog input. Audio is supported via HDMI.
5 DVI-IN
To input digital RGB signals from a computer.
*This connector does not support audio input. The audio signal should be connected to the LINE-IN
jack.
6 DVI-OUT
To output digital RGB signals from DVI-IN to another monitor.
7 VGA IN (mini D-Sub 15 pin)
To input analog RGB signals from a computer or other RGB equipment.
8 VGA OUT (mini D-Sub 15 pin)
To output signals from VGA IN.
9 RS232C-IN (mini D-Sub 9 pin)
Connects to the RS-232 output connector of a computer, or the RS232C-OUT connector of a multiconnected CD4225 monitor.
10 RS232C-OUT (mini D-Sub 9 pin)
Connects to the RS232C-IN connector of another CD4225 monitor.
11 Y Pb Pr IN
Connects to equipment such as a DVD player, HDTV device or Laser disc player.
12 Y Pb Pr OUT
To output signals from Y Pb Pr IN.
13 Main power switch
Turns the LCD monitor’s main power on or off.
14 AC-IN (100-240VAC, 5.5A)
Connects to the supplied power cord.
15 AC-OUT (100-240VAC, 5.5A)
Outputs AC power to another CD4225 monitor.
ViewSonic
CD4225
9
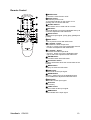
Remote Control
2
1
3
1 MUTE button
To switch the mute function on/off.
2 Power button
Switches the power on/off.
*If the Power indicator on the monitor is not
glowing, then no controls will work.
3 Number buttons
These buttons are not used and do not work.
5
4
6
4 UP button
Acts as button to move the highlighted area up to
select the adjustment with OSD menu.
7
8
5 INPUT button
Selects from input signal: [VGA], [DVI], [HDMI] and
[YPbPr].
9
10
12
11
13
15
17
14
16
6 EXIT button
Turns to previous menu with OSD menu.
7 /Volume - button
• Decreases the audio output level.
• Acts as button to move the highlighted area left
to select the adjustment with OSD menu.
8 /Volume + button
• Increases the audio output level.
• Acts as button to move the highlighted area
right to select the adjustment with OSD menu.
9 ENTER button
Acts as SET button with OSD menu.
10 Information button
Displays information about the current status of the
monitor.
11 MENU button
Displays or hides the OSD menu.
12 VGA button
Selects VGA as the input signal.
13 DOWN button
Acts as button to move the highlighted area
down to select the adjustment with OSD menu.
14 DVI button
Selects DVI as the input signal.
15 AV button
(No function)
16 YPbPr button
Selects YPbPr as the input signal.
17 HDMI button
Selects HDMI as the input signal.
ViewSonic
CD4225
10
Installing the Remote Control Batteries
The remote control is powered by 1.5V AAA batteries. To install or replace batteries:
1. Press and slide to open the cover.
2. Align the batteries according to the (+) and (-) indications inside the case.
3. Replace the cover.
CAUTION:
Incorrect use of batteries can result in leaks or bursting. Be careful especially about the following
points.
• Place “AAA” batteries matching the + and - signs on each battery to the + and - signs of the battery
compartment.
• Do not mix battery types.
• Do not combine new batteries with used ones. It causes shorter battery life or leakage of batteries.
• Remove dead batteries immediately to prevent battery liquid from leaking into the battery
compartment. Don't touch exposed battery acid, it cause damage to your skin.
NOTE:
If you do not intend to use the Remote Control for a long period, remove the batteries.
Operating Range for the Remote Control
Point the top of the remote control toward the LCD monitor's
remote sensor during button operation. Use the remote control
within a distance of about 7 m/23 ft. from the front of the LCD
monitor's remote control sensor and at a horizontal and vertical
angle of within 15 .
CAUTION:
Important, the remote control system may not function when direct
sunlight or strong illumination strikes the remote control sensor of
the LCD monitor, or when there is an object in the path.
Handling the remote control
• Do not subject to strong shock.
• Do not allow water or other liquid to splash the remote control. If
the remote control gets wet, wipe it dry immediately.
• Avoid exposure to heat and steam.
• Other than to install the batteries, do not open the remote.
ViewSonic
CD4225
11
Setup Procedure
1. Determine the installation location
CAUTION: DO NOT ATTEMPT TO INSTALL THE LCD MONITOR BY YOURSELF. Installation of your
LCD monitor must be done by a qualified technician. Contact your dealer for more information.
CAUTION: MOVING OR INSTALLING THE LCD MONITOR MUST BE DONE BY TWO OR MORE
PEOPLE. Failure to follow this caution may result in injury if the LCD monitor falls.
CAUTION: Do not mount or operate the monitor upside down, face up, or face down.
CAUTION: Do not install the LCD monitor where it will be exposed to direct sunlight, as this will result in
display defects.
IMPORTANT:
Lay the protective sheet, which was wrapped around the LCD monitor when it was packaged, beneath
the LCD monitor so as not to scratch the panel.
2. Connect external equipment
To protect the connected equipment, turn off the main power before making connections.
Refer to your equipment user manual.
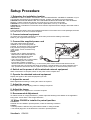
3. Connect the supplied power cord
The power outlet socket should be
installed as near to the equipment as
possible, and should be easily accessible.
Fully insert the prongs into the power
outlet socket. Loose connection may
cause noise.
NOTE:
• Please refer to “Safety Precautions,
Maintenance & Recommended Use”
section of this manual for proper
selection of AC power cord.
• This LCD monitor has no power switch.
When installing the LCD monitor,
incorporate a readily accessible
disconnect device in the fixed wiring, or connect the power cord to socket-outlet which must be
provided near the LCD monitor and easily accessible. If a fault should occur during operation of the
unit, operate the disconnect device to switch the power supply off, or disconnect the power cord.
4. Switch on the power of all the attached external equipment
When connected to a computer, switch on the power of the computer first.
5. Operate the attached external equipment
Display the signal on the external equipment you wish.
6. Adjust the sound
Make adjustments lowering or raising the volume as required.
7. Adjust the screen
Make adjustments to the display position or settings if required.
8. Adjust the image
Make adjustments to brightness or contrast if required.
9. Recommended Adjustment
To reduce the risk of “image persistence”, please adjust the following items based on the application
being used: “Power Save“ and “Image Retention“.
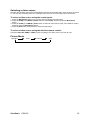
10. When CD4225 is installed in portrait position
Conditions
CD4225 can be installed in portrait position, under the following conditions:
Caution:
• Portrait position is effective only when wall-mounted or ceiling-mounted.
• The stands (legs) can not be fitted to the monitor in portrait position.
ViewSonic
CD4225
12
• Placing the monitor in portrait position will shorten the average life of the LCD backlight.
• Operational Environment (Temperature) shall be limited, as shown below:
Operational
Environment
Temperature 5 - 35 C / 41 - 95 F
Humidity
20 - 80% (without condensation)
Please orientate the monitor in the direction shown below:
Do not place monitor in landscape in any other manner.
How to set-up
1. Remove the stands (legs) if attached.
2. The ViewSonic logo should be on the LEFT side when facing the monitor.
Remove the stands(legs)
Counterclockwise
ViewSonic
CD4225
90
90
Clockwise
13
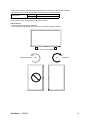
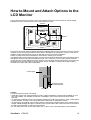
How to Mount and Attach Options to the
LCD Monitor
Lay the protective sheet on a table, which was wrapped around the monitor when it was packaged,
beneath the screen surface so as not to scratch the screen face.
400mm
200mm
200mm
This device cannot be used or installed without the Tabletop Stand or other mounting accessory. Failure
to follow correct mounting procedures could result in damage to the equipment or injury to the user or
installer. Product warranty does not cover damage caused by improper installation.
Failure to follow these recommendations could result in voiding your warranty.
Use M6 mounting screws (having a length 10-15mm longer than the thickness of the mounting bracket)
and tighten them securely. (Recommended torque: 470 - 635N•cm). The mounting interface should
comply with the UL1678 standard in North America. The mounting means should strong enough to bear
the weight of the monitor (approx. 24.5kg without stand). ViewSonic recommends using mounting
interface that comply with TÜV-GS standard.
LCD monitor
Thickness of the
mounting bracket
10-15mm
Caution:
For preventing the monitor from falling.
• Install the monitor with metal brackets for wall or ceiling installation (commercially available) on your
own responsibility. For detailed procedures of installation, refer to the instructions of the metal
brackets.
• To lessen the probability of injury and damage resulting from fall of the monitor in case of earthquake
or other disaster, be sure to consult the bracket manufacturer for installation location.
• To lessen the risk of falling of the monitor, thread commercially available rope (having a load capacity
at least 1960N (200kgf)) through the handles at the right and left of the monitor and secure the rope to
the wall mount brackets or ceiling mount brackets.
• Do not sleep where the monitor may topple over or fall in case of an earthquake or other disaster.
ViewSonic
CD4225
14
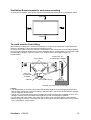
Ventilation Requirements for enclosure mounting
To allow heat to disperse, leave space between surrounding objects as shown in the diagram below.
100mm
100mm
100mm
100mm
To avoid monitor from falling
Take measures to prevent the monitor from falling over in case of an earthquake or other disaster to
lessen the probability of injury and damage resulting from fall.
As shown in the figure, secure the monitor to a solid wall or pillar using rope (commercially available)
strong enough to bear the weight of the monitor. (CD4225: approx. 26.4 kg) When you use screw hooks
(commercially available), ring screw hooks, not C-shaped screw hooks (with opening), are
recommended.
Screw Holes
Screw hook, etc.
Commercially available
Rope, etc.
Commercially
available
Clamper
Screw (M4 x 8mm)
* Clamper and screws are not supplied
Caution:
• The effectiveness of preventing from falling substantially depends on the strength of brackets and
base to which prevention device from falling is attached. When you cannot ensure sufficient strength,
provide adequate reinforcement.
• Though the recommended prevention from falling is intended to lessen the probability of injury and
damage, it doesn’t assure its effectiveness against any kind of earthquake or disaster.
• Do not sleep where the monitor may topple over or fall in case of an earthquake or other disaster.
• Before moving the monitor, remove the rope that is securing the monitor. Failure to do so may result in
injury or breakdown of the monitor.
ViewSonic
CD4225
15
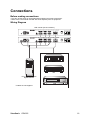
Connections
Before making connections:
• First turn off the power of all the attached equipment and make connections.
• Refer to the user manual included with each separate piece of equipment.
Wiring Diagram
LCD monitor (second monitor)
DVD
HD
PC or equipment with
digital interface
VCR
* Cables are not supplied
ViewSonic
CD4225
16
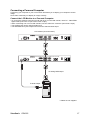
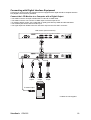
Connecting a Personal Computer
Connecting your computer to your LCD monitor will enable you to display your computer's screen
image.
Some video cards may not display an image correctly.
Connect the LCD Monitor to a Personal Computer
• To connect the VGA IN connector (mini D-sub 15 pin) on the LCD monitor, use a PC - Video RGB
signal cable (mini D-sub 15 pin to mini D-sub 15 pin).
• When connecting one or more LCD monitors, use the VGA OUT connector (mini D-sub 15 pin).
• The LINE-IN jack can be used for audio input.
• The SPEAKER OUT jack outputs sound from the selected Audio input.
LCD monitor (second monitor)
To analog RGB output
To audio output
* Cables are not supplied
ViewSonic
CD4225
17
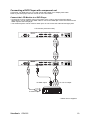
Connecting with Digital Interface Equipment
Connections can be made with equipment that is equipped with a digital interface compliant with the
DVI (Digital Visual Interface) standard.
Connect the LCD Monitor to a Computer with a Digital Output
• The HDMI connector accepts a HDMI cable or a DVI-D to HDMI cable.
• The HDMI connector can connect to HDMI output or DVI-D output of PC.
• To maintain display quality, use a cable with a quality prescribed by HDMI and DVI standards.
• The LINE-IN jack can be used for audio input.
• The signal input from HDMI connector cannot be output to the VGA OUT connector.
LCD monitor (second monitor)
To DVI-D
output
To HDMI
output
To DVI-D
output
To audio output
* Cables are not supplied
ViewSonic
CD4225
18
Connecting a DVD Player with component out
Connecting your DVD player to your LCD monitor will enable you to display DVD video.
Refer to your DVD player owner’s manual for more information.
Connect the LCD Monitor to a DVD Player
• Connect the Y Pb Pr IN jacks of the LCD monitor to the Y Pb Pr output of the DVD player.
Alternatively, you can also use a HDMI cable to connect the HDMI jack of the LCD monitor to the
HDMI output of the DVD player.
• The AUDIO-IN jacks can be used for audio input. Do not reverse the audio left and right jacks.
LCD monitor (second monitor)
To HDMI output
To Y Pb Pr output
To audio output
DVD
* Cables are not supplied
ViewSonic
CD4225
19
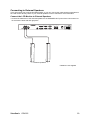
Connecting to External Speakers
This LCD monitor has a built-in 6W+6W amplifier, so you can connect the optional external speakers to
the LCD monitor directly. Refer to your external speakers’ owner's manual for more information.
Connect the LCD Monitor to External Speakers
• Connect the lead wires of the external speakers to the SPEAKER OUT jacks of the LCD monitor. Do
not reverse the audio left and right jacks.
External speakers
* Cables are not supplied
ViewSonic
CD4225
20
Basic Operation
Power ON and OFF Modes
The main power of the LCD monitor can be turned on or off using the main power switch on the terminal
panel. With the main power of the LCD monitor turned on, you can toggle between the on and standby
modes using the following two options:
1. Pressing the Power button.
NOTE:
Before pressing the power button, be
sure to connect the supplied power cord
to the LCD monitor.
2. Using the remote control.
NOTE:
Before operating the remote control, be
sure to connect the supplied power cord
to the LCD monitor.
Power Indicator
Status
Power ON
Power OFF
Power Standby
Failure detected
Color
Green
Red
Orange
Flashing red
Using Power Management
The LCD monitor follows the VESA approved DPM Power Management function.
The power management function is an energy saving function that automatically reduces the power
consumption of the monitor when the keyboard or the mouse has not been used for a fixed period.
The power management feature on your new monitor has been set to the ”ON” mode. This allows your
monitor to enter a Power Saving Mode when no signal is applied. This could potentially increase the life
and decrease the power consumption of the monitor.
ViewSonic
CD4225
21
Selecting a video source
Normally the CD4225 LCD monitor automatically searches for available video sources after it is turned
on. You can also manually select one if multiple video sources are connected to the LCD monitor.
To select a video source using the control panel:
1. Press the Menu/Enter button on the control panel to display the OSD menu.
2. Press the PLUS (+) or MINUS (-)/Auto button to select Input, and then press the Menu/Enter
button.
3. Press the PLUS (+) or MINUS (-)/Auto button to select an input source (VGA, DVI, HDMI or YPbPr),
and then press the Menu/Enter button.
4. Press the Exit button several times to close the OSD menu.
To select a video source using the wireless remote control:
Press the VGA, DVI, HDMI or YPbPr button according to the video source you wish to view.
Picture Mode
Standard
ViewSonic
Vivid
CD4225
Cinema
User
22
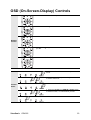
OSD (On-Screen-Display) Controls
1. Press the MENU button to open Main menu.
2. Press the or button to select sub-menu.
3. Press the ENTER button to decide.
Remote
Control
4. Press the or button to select function, or control which
you like.
5. Press the EXIT button to exit.
1. Press the Menu/Enter button to open the Main
menu.
2. Press the PLUS (+) or MINUS (-)/Auto button
to select sub-menu.
3. Press the Menu/Enter button to decide.
Control
Panel
4. Press the PLUS (+) or MINUS (-)/Auto button
to select function, or control which you like.
5. Press the Exit button to exit.
ViewSonic
CD4225
23
OSD Screen
Picture
VGA Setting
Option
Input
Audio
Special
Diagnostic
1360 x 768
Picture Mode
60Hz
Auto Adjustment
Language
VGA
Contrast
Clock
OSD H. Pos.
DVI
Brightness
Phase
OSD V. Pos.
HDMI
YPbPr
Color Temp
H. Position
OSD Timer
Temp Adjust
V. Position
Ambient Light
Sharpness
LED Indicator
Auto Detection
Standard
1360 x 768
60Hz
1360 x 768
Volume
60Hz
1360 x 768
Thermal
Operating
Ambient
5V Detect
12V Detect
Aspect Ratio
Mute
60Hz
Overscan
Power Save
1360 x 768
60Hz
xx C
xxhr
x.xx V
x.xx V
Image Retention
Auto Adjustment
Monitor ID
Reset
Original
1360 x 768
ViewSonic
CD4225
60Hz
1360 x 768
60Hz
24
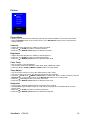
Picture
Picture Mode
Contrast
Brightness
Color Temp
Temp Adjust
Sharpness
Standard
1360 x 768
60Hz
Picture Mode
• Allows you to choose from the following preset picture modes: Standard, Vivid, Cinema and User.
• Press the ENTER button on the remote control, or the Menu/Enter button on the control panel to
change selection.
Contrast
• Adjusts the image brightness in relation to the input signal.
• Press the or PLUS (+) button to increase contrast.
• Press the or MINUS (-)/Auto button to decrease contrast.
Brightness
• Adjusts the image brightness in relation to the background.
• Press the or PLUS (+) button to increase black level.
• Press the or MINUS (-)/Auto button to decrease black level.
Color Temp
• Use to choose a color temperature.
• The following options are available: 9300, 6500, 5800, sRGB and USER.
• Press the / or PLUS (+)/MINUS (-)/Auto button to change setting.
Temp Adjust
• You can use this function to set up the USER mode of Color Temp.
• The color levels of red, green, and blue are adjusted by the color bars.
• Press the /PLUS (+) or /MINUS (-)/Auto button to select Red, Green or Blue, and then press the
ENTER button on the remote control, or the Menu/Enter button on the control panel.
• Press the or PLUS (+) button to increase color level.
• Press the or MINUS (-)/Auto button to decrease color level.
Sharpness
• This function is digitally capable to keep crisp image at any timings.
• It is adjustable to get a distinct image or a soft one as you prefer and set independently for each
picture mode.
• Press the or PLUS (+) button to increase sharpness.
• Press the or MINUS (-)/Auto button to decrease sharpness.
ViewSonic
CD4225
25
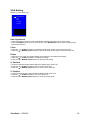
VGA Setting
NOTE: For VGA input only.
Auto Adjustment
Clock
Phase
H. Position
V. Position
1360 x 768
60Hz
Auto Adjustment
• Use this function to let the monitor automatically optimize the display of PC input image.
• Press the ENTER button on the remote control, or the Menu/Enter button on the control panel to
execute this function.
Clock
• Press the or PLUS (+) button to expand the width of the image on the screen the right.
• Press the or MINUS (-)/Auto button to narrow the width of the image on the screen the left.
Phase
• Improves focus, clarity and image stability by increasing or decreasing this setting.
• Press the or PLUS (+) button to increase the setting.
• Press the or MINUS (-)/Auto button to decrease the setting.
H. Position
• Controls Horizontal Image position within the display area of the LCD.
• Press the or PLUS (+) button to move screen to the right.
• Press the or MINUS (-)/Auto button to move screen to the left.
V. Position
• Controls Vertical Image position within the display area of the LCD.
• Press the or PLUS (+) button to move the screen up.
• Press the or MINUS (-)/Auto button to move the screen down.
ViewSonic
CD4225
26
Option
Language
OSD H. Pos.
OSD V. Pos.
OSD Timer
Ambient Light
LED Indicator
Auto Detection
1360 x 768
60Hz
Language
• Allows you to select a preferred language for the OSD menu.
• Press the / or PLUS (+)/MINUS (-)/Auto button to select a language.
OSD H. Pos.
• Adjusts the horizontal position of the OSD menu.
• Press the or PLUS (+) button to move the OSD menu right.
• Press the or MINUS (-)/Auto button to move the OSD menu left.
OSD V. Pos.
• Adjusts the vertical position of the OSD menu.
• Press the or PLUS (+) button to move the OSD menu up.
• Press the or MINUS (-)/Auto button to move the OSD menu down.
OSD Timer
• Specifies the time the OSD menu remains visible on the screen.
• Press the or PLUS (+) button to increase time.
• Press the or MINUS (-)/Auto button to decrease time.
Ambient Light
• Enables or disables the ambient light sensor on the front panel of the monitor.
• Press the ENTER button on the remote control, or the Menu/Enter button on the control panel to
change setting.
LED Indicator
• Enables or disables the LED indicator on the front panel of the monitor.
• Press the ENTER button on the remote control, or the Menu/Enter button on the control panel to
change setting.
Auto Detection
• Enables or disables the auto input source detection function of the monitor. Once disabled, the input
source can only be selected manually.
• Press the ENTER button on the remote control, or the Menu/Enter button on the control panel to
change setting.
ViewSonic
CD4225
27
Input
VGA
DVI
HDMI
YPbPr
1360 x 768
60Hz
VGA
• Selects the signal connected to the VGA IN input terminal as the input source.
DVI
• Selects the signal connected to the DVI-IN input terminal as the input source.
HDMI
• Selects the signal connected to the HDMI input terminal as the input source.
YPbPr
• Selects the signal connected to the Y Pb Pr IN input terminal as the input source.
ViewSonic
CD4225
28
Audio
Volume
Mute
1360 x 768
60Hz
Volume
• Adjusts the audio volume.
• Press the or PLUS (+) button to increase volume.
• Press the or MINUS (-)/Auto button to decrease volume.
Mute
• Turns audio off temporarily.
• Press the ENTER button on the remote control, or the Menu/Enter button on the control panel to turn
this function on or off.
ViewSonic
CD4225
29
Special
Aspect Ratio
Overscan
Power Save
Image Retention
Auto Adjustment
Monitor ID
Reset
Original
1360 x 768
60Hz
Aspect Ratio
• With this function, you can choose to let the LCD monitor display the input image in its original aspect
ratio (when Original is selected), or force the LCD monitor to fill the input image on the entire display
area (when Full is selected).
• Press the ENTER button on the remote control, or the Menu/Enter button on the control panel to
change selection.
Overscan
• Only available when HDMI is the input source.
• Turns on or off the over scan function when displaying HDMI input image.
• Press the ENTER button on the remote control, or the Menu/Enter button on the control panel to turn
this function on or off.
Power Save
• If turned on, the LCD monitor will go to power management mode when PC sync is lost, and will go to
power management mode after about 10 minutes delay when DVD/HD and VIDEO input signal is lost.
• Press the ENTER button on the remote control, or the Menu/Enter button on the control panel to turn
this function on or off.
Image Retention
• If turned on, the LCD monitor automatically displays swift moving patterns every 10 seconds to
prevent the formation of image retention on the screen.
• Press the ENTER button on the remote control, or the Menu/Enter button on the control panel to turn
this function on or off.
NOTE: IMAGE PERSISTENCE
• Please be aware that LCD Technology may experience a phenomena known as Image Persistence.
Image Persistence occurs when residual or “ghost” image of a previous image remains visible on the
screen. Unlike CRT monitors, LCD monitors’ image persistence is not permanent, but constant
images being displayed for a long period of time should be avoided.
• To alleviate image persistence, turn off the monitor for as long as the previous image was displayed.
For example, if an image was on the monitor for one hour and a residual image remains, the monitor
should be turned off for one hour to erase the image.
• As with all personal display devices, ViewSonic recommends displaying moving images and using a
moving screen saver at regular intervals whenever the screen is idle or turning off the monitor when
not in use.
Auto Adjustment
• If turned on, when changing PC timing, the horizontal position, vertical position and clock-phase will
adjust automatically.
• Press the ENTER button on the remote control, or the Menu/Enter button on the control panel to turn
this function on or off.
Monitor ID
• By connecting multiple CD4225 monitors to a PC using RS-232C cables, you can control any one
monitor or all the monitors on the PC. Assign arbitrary ID number to each of multi-connected CD4225
ViewSonic
CD4225
30
monitors using this function. ID numbers 1 to 26 are selectable. It is recommended to assign
sequential ID numbers from 1 and up.
• Press the ENTER button on the remote control, or the Menu/Enter button on the control panel, and
then press the / (or PLUS (+)/MINUS (-)/Auto) button to change the ID number.
Reset
• If activated, all OSD settings (except the Language setting) will be restored to the factory settings.
• Press the ENTER button on the remote control, or the Menu/Enter button on the control panel to
activate the reset.
ViewSonic
CD4225
31
Diagnostic
Thermal
Operating
Ambient
5V Detect
12V Detect
xx C
xxhr
xxLux
x.xx V
x.xx V
Thermal
• Displays current temperature inside the LCD monitor.
Operating
• Displays the operating hours of the LCD monitor since it was first turned on.
Ambient
• Displays current ambient brightness around the LCD monitor.
5V Detect
• Displays current 5V voltage detection result.
12V Detect
• Displays current 12V voltage detection result.
ViewSonic
CD4225
32
For Long Life Use of Public Display
< Image Sticking of LCD Panel >
When LCD panel is operated continuously for long hours, a trace of electric charge remains near the
electrode inside LCD, and residual or “ghost” image of previous image may be observed. (Image
Persistence)
Image Persistence is not permanent, but when fixed image is displayed for long period, ionic impurities
inside LCD are accumulated along the displayed image, and it is observed permanently. (Image
Sticking)
< Recommendations >
For preventing the fast transition to Image Sticking, and for longer life usage of LCD, following are
recommended.
1. Fixed image should not be displayed for long period, and changed to another images with short
cycle.
2. When not in use, please turn off the monitor.
3. Reducing the environmental temperature is effective for long life use.
ViewSonic
CD4225
33
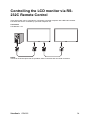
Controlling the LCD monitor via RS232C Remote Control
This LCD monitor can be controlled by connecting a personal computer with a RS-232C terminal.
Functions that can be controlled by a personal computer are:
Connection
LCD Monitor + PC
NOTE:
Two kinds of RS-232 protocols are provided: serial connection and non-serial connection.
ViewSonic
CD4225
34
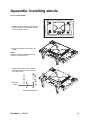
Appendix: Installing stands
How to install stands
1. Spread the protective sheet on the flat
surface, such as a desk. Place monitor
on the protective sheet.
2. Place the stands on the monitor as
shown.
NOTE:
Install the stands so that their longer
portions come to the front.
3. Use the M4 screws and a suitable
screwdriver to secure the stands on
the LCD monitor.
M4 screw
holes
ViewSonic
CD4225
35
Features
Signage-friendly Design
• All metal (aluminum) construction
• Industrial-grade superior reliability
• VESA mounting compliance with carrying handles
• Various mounting schemes for player carriers
PC-Based Multi-panel Management
• Full-function display controls
• Real-time diagnostics for detecting voltage and temperature
ViewSonic
CD4225
36
Troubleshooting
No picture
• The signal cable should be completely connected to the display card/computer.
• The display card should be completely seated in its slot.
• Monitor and computer power should be switched ON.
• Check to make sure that a supported mode has been selected on the display card or system being
used. (Please consult display card or system manual to change graphics mode.)
• Check the monitor and your display card with respect to compatibility and recommended settings.
• Check the signal cable connector for bent or pushed-in pins.
• If nothing is displayed on the screen when HDCP device is connected, reset the power of the device.
The Power button does not respond
• Unplug the power cord of the monitor from the AC outlet to turn off and reset the monitor.
Image persistence
• Please be aware that LCD technology may experience a phenomenon known as Image Persistence.
Image Persistence occurs when a residual or “ghost” image of a previous image remains visible on
the screen. Unlike CRT monitors, LCD monitors’ image persistence is not permanent, but constant
images being displayed for a long period of time should be avoided. To alleviate image persistence,
turn off the monitor for as long as the previous image was displayed. For example, if an image was on
the monitor for one hour and a residual image remains, the monitor should be turned off for one hour
to erase the image.
NOTE:
As with all personal display devices, VIEWSONIC recommends displaying moving images and using a
moving screen saver at regular intervals whenever the screen is idle or turning off the monitor when not
in use.
Image is unstable, unfocused or swimming is apparent
• Signal cable should be completely attached to the computer.
• Use the OSD controls to focus and adjust display by increasing or decreasing the fine adjustment.
• Check the monitor and your display card with respect to compatibility and recommended signal
timings.
• If your text is garbled, change the video mode to non-interlace and use 60 Hz refresh rate.
Image of component signal is greenish
• Check to see if the DVD/HD input connector is selected.
The LED on monitor is not lit (no green or red color can be seen)
• The power cord should be connected.
• The main power switch should be turned on.
• Make certain the computer is not in a power-saving mode (touch the keyboard or mouse).
Display image is not sized properly
• Use the OSD Image Adjust controls to increase or decrease the coarse adjustment.
• Check to make sure that a supported mode has been selected on the display card or system being
used. (Please consult display card or system manual to change graphics mode.)
No Sound
• Check to see if speaker cable is properly connected.
• Check to see if mute is activated.
• Check to see if volume is set at minimum.
Remote Control is not available
• Check the Remote Control’s batteries status.
• Check if batteries are inserted correctly.
• Check if the Remote Control is pointing at the monitor’s remote sensor.
Stripe Noise
Either light vertical or horizontal stripes may appear, depending on the specific display pattern. This is
no product fault or degradation.
ViewSonic
CD4225
37
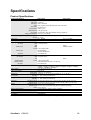
Specifications
Product Specifications
Product specifications
LCD Module
Frequency
Pixel Clock
Viewable Size
Input Signal
PC Input:
Diagonal:
Pixel Pitch:
Resolution:
Color:
Brightness:
Analog Input
Digital Input
42.02" / 106.73 cm
0.4845 mm
1920 x 1080 dots
Over 16 million colors (depending on video card used)
500 cd/m2 (typ.)
Contrast Ratio: 1500:1 (typ.)
Response time: 5 ms (typ. G to G)
View Angle: Up and Down 178 , Left and Right 178 (typ.) @CR>10
Design View Distance: 1100 mm / 43.34 inches
Horizontal: 31 - 70 KHz
Vertical: 50 - 70 Hz
25.2 - 85 MHz
25.2 - 148.5 MHz
930.24 x 523.26 mm / 36.62 x 20.6 inches
VIDEO Input:
AUDIO Input
RS-232C
Output Signal
PC-Output:
VIDEO Output:
Speaker Output:
RS-232C:
Y Pb Pr Resolutions Supported
Power Supply
Power Consumption
Operational
Environment
VGA 15 Pin Mini D-sub
DVI
HDMI
Y Pb Pr Y Pb Pr (RCA jacks)
L/R (RCA jacks)
L/R (3.5mm Mini-jack)
9 Pin Mini D-sub
DVI-D
HDMI with HDCP
VGA 15 Pin Mini D-sub
DVI
DVI-D
Y Pb Pr Y Pb Pr (RCA jacks)
External Speaker Jack 6 W + 6 W (8 ohm)
9 Pin Mini D-sub
NTSC,PAL,SECAM,4.43NTSC,PAL60
480i@60, 576i@50, 480p@60, 576p@50, 720p@60, 720p@50, 1080i@60,
1080i@50, 1080p@60, 1080p@50
100 - 240 V AC, 50 / 60 Hz
Max. 220 W
Power Save: Less than <1W (Standby)
Temperature: Landscape: 0 - 40 C / 32-104 F, Portrait: 5 - 35 C / 41-95 F
Humidity: 20 - 80% (Without condensation)
Temperature: -20 - 60 C / -4 - 140 F
Humidity: 10 - 90% (Without condensation)
Dimension
Net without stand: 992 mm (W) x 585 mm (H) x 119.6 mm (D) / 39" (W) x 23" (H) x 4.7" (D)
Net with stand: 992 mm (W) x 665 mm (H) x 320 mm (D) / 39" (W) x 26.2" (H) x 12.6" (D)
Weight
Net without stand: 54 lbs / 24.5 kg (Approximately)
Net with stand: 58.2 lbs / 26.4 kg (Approximately) (Stand is optional accessory)
Gross: 65 lbs / 29.5 kg
Wall mounting interface
6 Holes (200mm x 200mm, 400mm x 200mm)
Complied Regulatory and Guidelines
FCC, ICES-B, UL/cUL, NOM
Power Management
VESA DPM
Plug & Play
VESA DDC2B
Storage Environment
Note: Specifications and functions of this monitor are subject to change without prior notice.
ViewSonic
CD4225
38
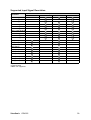
Supported Input Signal Resolution
Input source
Resolution
YPbPr
VGA
HDMI
DVI
640 x 480 @ 60Hz
720 x 400 @ 70Hz
800 x 600 @ 60Hz
1024 x 768 @ 60Hz
1280 x 768 @ 60Hz
1280 x 960 @ 60Hz
1280 x 1024 @ 60Hz
1366 x 768 @ 60Hz
1600 x 1200 @ 60Hz
1920 x 1080 @ 60Hz
576i (50Hz)
480i (60Hz)
480p (60Hz)
576p (50Hz)
720p (50Hz)
720p (60Hz)
1080i (50Hz)
1080i (60Hz)
1080p (50Hz)
1080p (60Hz)
Note:
• : supported
• Blank: not supported
ViewSonic
CD4225
39
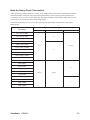
1RWHIRU'DLV\&KDLQ&RQQHFWLRQ
:KHQFRQQHFWLQJPXOWLSOHPRQLWRUVLQDGDLV\FKDLQFRQ¿JXUDWLRQSOHDVHUHIHUWRWKHWDEOHEHORZIRUWKH
PD[LPXPQXPEHURIPRQLWRUVWKDWFDQEHGHSOR\HGGHSHQGLQJRQWKHVLJQDOW\SHDQGUHVROXWLRQXVHG
)RUH[DPSOHLI\RXXVH9*$DVWKHVLJQDOW\SHDQGVLJQDOUHVROXWLRQLV[#+]WKHQ\RXFDQ
FRQQHFWXSWRPRQLWRUVLQDGDLV\FKDLQFRQ¿JXUDWLRQ
,WLVUHFRPPHQGHGWKDW\RXXVH9*$DVWKHVLJQDOW\SHIRULQSXWRXWSXWFRQQHFWLRQLQDGDLV\FKDLQ
FRQ¿JXUDWLRQ
5HVROXWLRQ
6LJQDOW\SH
9*$
'9,
<3E3U
[#+]
[#+]
[#+]
[#+]
[#+]
[#+]
[#+]
1$
[#+]
[#+]
[#+]
L+]
L+]
S+]
S+]
S+]
S+]
1$
1$
L+]
L+]
S+]
S+]
ViewSonic
CD4225
40
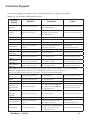
&XVWRPHU6XSSRUW
)RUWHFKQLFDOVXSSRUWRUSURGXFWVHUYLFHVHHWKHWDEOHEHORZRUFRQWDFW\RXUUHVHOOHU
1RWH<RXZLOOQHHGWKHSURGXFWVHULDOQXPEHU
&RXQWU\
5HJLRQ
$XVWUDOLD1HZ
=HDODQG
:HE6LWH
7HOHSKRQH
(PDLO
ZZZYLHZVRQLFFRPDX
$86 1= VHUYLFH#DXYLHZVRQLFFRP
&DQDGD
ZZZYLHZVRQLFFRP
77ROO)UHH 77ROO ) VHUYLFHFD#YLHZVRQLFFRP
(XURSH
ZZZYLHZVRQLFHXURSHFRP
ZZZYLHZVRQLFHXURSHFRPXN6XSSRUW&DOOGHVNKWP
+RQJ.RQJ
ZZZKNYLHZVRQLFFRP
7 VHUYLFH#KNYLHZVRQLFFRP
,QGLD
ZZZLQYLHZVRQLFFRP
7 VHUYLFH#LQYLHZVRQLFFRP
,UHODQG(LUH
ZZZYLHZVRQLFHXURSH
FRPXN
ZZZYLHZVRQLFHXURSHFRP
XNVXSSRUWFDOOGHVN
VHUYLFHBLH#
YLHZVRQLFHXURSHFRP
ZZZNUYLHZVRQLFFRP
7 VHUYLFH#NUYLHZVRQLFFRP
ZZZYLHZVRQLFFRPOD
7 VRSRUWH#YLHZVRQLFFRP
ZZZYLHZVRQLFFRPOD
7 VRSRUWH#YLHZVRQLFFRP
ZZZYLHZVRQLFFRPOD
7 VRSRUWH#YLHZVRQLFFRP
ZZZYLHZVRQLFFRPOD
7 VRSRUWH#YLHZVRQLFFRP
.RUHD
/DWLQ$PHULFD
$UJHQWLQD
/DWLQ$PHULFD
&KLOH
/DWLQ$PHULFD
&ROXPELD
/DWLQ$PHULFD
0H[LFR
5HQWD\'DWRV685&2//$3$=38(%/$38(7HO&21/,1($6
(OHFWURVHU$Y5HIRUPD1R*[\0pULGD<XFDWiQ7HO
2WKHUSODFHVSOHDVHUHIHUWRKWWSZZZYLHZVRQLFFRPODVRSRUWHLQGH[KWP0H[LFR
/DWLQ$PHULFD
3HUX
0DFDX
ZZZYLHZVRQLFFRPOD
7 VRSRUWH#YLHZVRQLFFRP
ZZZKNYLHZVRQLFFRP
7 VHUYLFH#KNYLHZVRQLFFRP
0LGGOH(DVW
DSYLHZVRQLFFRPPH
&RQWDFW\RXUUHVHOOHU
VHUYLFH#DSYLHZVRQLFFRP
3XHUWR5LFR
9LUJLQ,VODQGV
ZZZYLHZVRQLFFRP
7 (QJOLVK
7 6SDQLVK
) VHUYLFHXV#YLHZVRQLFFRP
VRSRUWH#YLHZVRQLFFRP´
6LQJDSRUH
0DOD\VLD
7KDLODQG
ZZZYLHZVRQLFFRPVJ
7 VHUYLFH#VJYLHZVRQLFFRP
6RXWK$IULFD
DSYLHZVRQLFFRP]D
&RQWDFW\RXUUHVHOOHU
VHUYLFH#DSYLHZVRQLFFRP
8QLWHG.LQJGRP
ZZZYLHZVRQLFHXURSH
FRPXN
ZZZYLHZVRQLFHXURSHFRP
XNVXSSRUWFDOOGHVN
VHUYLFHBJE#
YLHZVRQLFHXURSHFRP
8QLWHG6WDWHV
ZZZYLHZVRQLFFRP
77ROO)UHH 77ROO ) VHUYLFHXV#YLHZVRQLFFRP
ViewSonic
CD4225
41
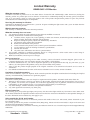
/LPLWHG:DUUDQW\
9,(:621,&/&'0RQLWRU
:KDWWKHZDUUDQW\FRYHUV
9LHZ6RQLF ZDUUDQWV LWV SURGXFWV WR EH IUHH IURP GHIHFWV LQ PDWHULDO DQG ZRUNPDQVKLS XQGHU QRUPDO XVH GXULQJ WKH
ZDUUDQW\SHULRG,IDSURGXFWSURYHVWREHGHIHFWLYHLQPDWHULDORUZRUNPDQVKLSGXULQJWKHZDUUDQW\SHULRG9LHZ6RQLF
ZLOO DW LWV VROH RSWLRQ UHSDLU RU UHSODFH WKH SURGXFW ZLWK D OLNH SURGXFW 5HSODFHPHQW SURGXFW RU SDUWV PD\ LQFOXGH
UHPDQXIDFWXUHGRUUHIXUELVKHGSDUWVRUFRPSRQHQWV
+RZORQJWKHZDUUDQW\LVHIIHFWLYH
9LHZ6RQLF/&'0RQLWRUVDUHZDUUDQWHGIRU\HDUVIRUDOOSDUWVH[FOXGLQJWKHOLJKWVRXUFHDQG\HDUVIRUODERUIURPWKH
GDWHRIWKH¿UVWFXVWRPHUSXUFKDVH
:KRWKHZDUUDQW\SURWHFWV
7KLVZDUUDQW\LVYDOLGRQO\IRUWKH¿UVWFRQVXPHUSXUFKDVHU
:KDWWKHZDUUDQW\GRHVQRWFRYHU
$Q\SURGXFWRQZKLFKWKHVHULDOQXPEHUKDVEHHQGHIDFHGPRGL¿HGRUUHPRYHG
'DPDJHGHWHULRUDWLRQRUPDOIXQFWLRQUHVXOWLQJIURP
D $FFLGHQWPLVXVHQHJOHFW¿UHZDWHUOLJKWQLQJRURWKHUDFWVRIQDWXUHXQDXWKRUL]HGSURGXFWPRGL¿FDWLRQRU
IDLOXUHWRIROORZLQVWUXFWLRQVVXSSOLHGZLWKWKHSURGXFW
E 5HSDLURUDWWHPSWHGUHSDLUE\DQ\RQHQRWDXWKRUL]HGE\9LHZ6RQLF
F $Q\GDPDJHRIWKHSURGXFWGXHWRVKLSPHQW
G 5HPRYDORULQVWDOODWLRQRIWKHSURGXFW
H &DXVHVH[WHUQDOWRWKHSURGXFWVXFKDVHOHFWULFSRZHUÀXFWXDWLRQVRUIDLOXUH
I 8VHRIVXSSOLHVRUSDUWVQRWPHHWLQJ9LHZ6RQLF¶VVSHFL¿FDWLRQV
J 1RUPDOZHDUDQGWHDU
K $Q\RWKHUFDXVHZKLFKGRHVQRWUHODWHWRDSURGXFWGHIHFW
$Q\ SURGXFW H[KLELWLQJ D FRQGLWLRQ FRPPRQO\ NQRZQ DV ³LPDJH EXUQLQ´ ZKLFK UHVXOWV ZKHQ D VWDWLF LPDJH LV
GLVSOD\HGRQWKHSURGXFWIRUDQH[WHQGHGSHULRGRIWLPH
5HPRYDOLQVWDOODWLRQDQGVHWXSVHUYLFHFKDUJHV
+RZWRJHWVHUYLFH
)RU LQIRUPDWLRQ DERXW UHFHLYLQJ VHUYLFH XQGHU ZDUUDQW\ FRQWDFW9LHZ6RQLF &XVWRPHU 6XSSRUW SOHDVH UHIHU WR
&XVWRPHU6XSSRUWSDJH<RXZLOOQHHGWRSURYLGH\RXUSURGXFW¶VVHULDOQXPEHU
7RREWDLQZDUUDQWHGVHUYLFH\RXZLOOEHUHTXLUHGWRSURYLGHDWKHRULJLQDOGDWHGVDOHVVOLSE\RXUQDPHF\RXU
DGGUHVVGDGHVFULSWLRQRIWKHSUREOHPDQGHWKHVHULDOQXPEHURIWKHSURGXFW
7DNH RU VKLS WKH SURGXFW IUHLJKW SUHSDLG LQ WKH RULJLQDO FRQWDLQHU WR DQ DXWKRUL]HG9LHZ6RQLF VHUYLFH FHQWHU RU
9LHZ6RQLF
)RUDGGLWLRQDOLQIRUPDWLRQRUWKHQDPHRIWKHQHDUHVW9LHZ6RQLFVHUYLFHFHQWHUFRQWDFW9LHZ6RQLF
/LPLWDWLRQRILPSOLHGZDUUDQWLHV
7KHUHDUHQRZDUUDQWLHVH[SUHVVRULPSOLHGZKLFKH[WHQGEH\RQGWKHGHVFULSWLRQFRQWDLQHGKHUHLQLQFOXGLQJWKHLPSOLHG
ZDUUDQW\RIPHUFKDQWDELOLW\DQG¿WQHVVIRUDSDUWLFXODUSXUSRVH
([FOXVLRQRIGDPDJHV
9LHZ6RQLF¶VOLDELOLW\LVOLPLWHGWRWKHFRVWRIUHSDLURUUHSODFHPHQWRIWKHSURGXFW9LHZ6RQLFVKDOOQRWEHOLDEOHIRU
'DPDJHWRRWKHUSURSHUW\FDXVHGE\DQ\GHIHFWVLQWKHSURGXFWGDPDJHVEDVHGXSRQLQFRQYHQLHQFHORVVRIXVHRI
WKHSURGXFWORVVRIWLPHORVVRISUR¿WVORVVRIEXVLQHVVRSSRUWXQLW\ORVVRIJRRGZLOOLQWHUIHUHQFHZLWKEXVLQHVV
UHODWLRQVKLSVRURWKHUFRPPHUFLDOORVVHYHQLIDGYLVHGRIWKHSRVVLELOLW\RIVXFKGDPDJHV
$Q\RWKHUGDPDJHVZKHWKHULQFLGHQWDOFRQVHTXHQWLDORURWKHUZLVH
$Q\FODLPDJDLQVWWKHFXVWRPHUE\DQ\RWKHUSDUW\
(IIHFWRIVWDWHODZ
7KLVZDUUDQW\JLYHV\RXVSHFL¿FOHJDOULJKWVDQG\RXPD\DOVRKDYHRWKHUULJKWVZKLFKYDU\IURPVWDWHWRVWDWH6RPHVWDWHV
GRQRWDOORZOLPLWDWLRQVRQLPSOLHGZDUUDQWLHVDQGRUGRQRWDOORZWKHH[FOXVLRQRILQFLGHQWDORUFRQVHTXHQWLDOGDPDJHVVR
WKHDERYHOLPLWDWLRQVDQGH[FOXVLRQVPD\QRWDSSO\WR\RX
6DOHVRXWVLGHWKH86$DQG&DQDGD
)RUZDUUDQW\LQIRUPDWLRQDQGVHUYLFHRQ9LHZ6RQLFSURGXFWVVROGRXWVLGHRIWKH86$DQG&DQDGDFRQWDFW9LHZ6RQLFRU\RXU
ORFDO9LHZ6RQLFGHDOHU
7KHZDUUDQW\SHULRGIRUWKLVSURGXFWLQPDLQODQG&KLQD+RQJ.RQJ0DFDRDQG7DLZDQ([FOXGHGLVVXEMHFWWRWKHWHUPVDQG
FRQGLWLRQVRIWKH0DLQWHQDQFH*XDUDQWHH&DUG
)RUXVHUVLQ(XURSHDQG5XVVLDIXOOGHWDLOVRIZDUUDQW\SURYLGHGFDQEHIRXQGLQZZZYLHZVRQLFHXURSHFRPXQGHU6XSSRUW:DUUDQW\
,QIRUPDWLRQ
9LHZ6RQLF/&'79:DUUDQW\/79B/:5HY&
ViewSonic
CD4225
42
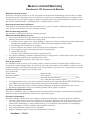
0H[LFR/LPLWHG:DUUDQW\
9LHZ6RQLF/&'&RPPHUFLDO0RQLWRU
:KDWWKHZDUUDQW\FRYHUV
9LHZ6RQLFZDUUDQWVLWVSURGXFWVWREHIUHHIURPGHIHFWVLQPDWHULDODQGZRUNPDQVKLSXQGHUQRUPDOXVHGXULQJ
WKHZDUUDQW\SHULRG,IDSURGXFWSURYHVWREHGHIHFWLYHLQPDWHULDORUZRUNPDQVKLSGXULQJWKHZDUUDQW\SHULRG
9LHZ6RQLFZLOODWLWVVROHRSWLRQUHSDLURUUHSODFHWKHSURGXFWZLWKDOLNHSURGXFW5HSODFHPHQWSURGXFWRUSDUWV
PD\LQFOXGHUHPDQXIDFWXUHGRUUHIXUELVKHGSDUWVRUFRPSRQHQWVDFFHVVRULHV
+RZORQJWKHZDUUDQW\LVHIIHFWLYH
9LHZ6RQLF/&'&RPPHUFLDO0RQLWRUVDUHZDUUDQWHGIRU\HDUVIRUDOOSDUWVH[FOXGLQJWKHOLJKWVRXUFHDQG
\HDUVIRUODERUIURPWKHGDWHRIWKH¿UVWFXVWRPHUSXUFKDVH
:KRWKHZDUUDQW\SURWHFWV
7KLVZDUUDQW\LVYDOLGRQO\IRUWKH¿UVWFRQVXPHUSXUFKDVHU
:KDWWKHZDUUDQW\GRHVQRWFRYHU
$Q\SURGXFWRQZKLFKWKHVHULDOQXPEHUKDVEHHQGHIDFHGPRGL¿HGRUUHPRYHG
'DPDJHGHWHULRUDWLRQRUPDOIXQFWLRQUHVXOWLQJIURP
D $FFLGHQWPLVXVHQHJOHFW¿UHZDWHUOLJKWQLQJRURWKHUDFWVRIQDWXUHXQDXWKRUL]HGSURGXFWPRGL¿FDWLRQ
XQDXWKRUL]HGDWWHPSWHGUHSDLURUIDLOXUHWRIROORZLQVWUXFWLRQVVXSSOLHGZLWKWKHSURGXFW
E $Q\GDPDJHRIWKHSURGXFWGXHWRVKLSPHQW
F &DXVHVH[WHUQDOWRWKHSURGXFWVXFKDVHOHFWULFDOSRZHUÀXFWXDWLRQVRUIDLOXUH
G 8VHRIVXSSOLHVRUSDUWVQRWPHHWLQJ9LHZ6RQLF¶VVSHFL¿FDWLRQV
H 1RUPDOZHDUDQGWHDU
I $Q\RWKHUFDXVHZKLFKGRHVQRWUHODWHWRDSURGXFWGHIHFW
$Q\SURGXFWH[KLELWLQJDFRQGLWLRQFRPPRQO\NQRZQDV³LPDJHEXUQLQ´ZKLFKUHVXOWVZKHQDVWDWLFLPDJHLV
GLVSOD\HGRQWKHSURGXFWIRUDQH[WHQGHGSHULRGRIWLPH
5HPRYDOLQVWDOODWLRQLQVXUDQFHDQGVHWXSVHUYLFHFKDUJHV
+RZWRJHWVHUYLFH
)RULQIRUPDWLRQDERXWUHFHLYLQJVHUYLFHXQGHUZDUUDQW\FRQWDFW9LHZ6RQLF&XVWRPHU6XSSRUW3OHDVHUHIHUWR
WKHDWWDFKHG&XVWRPHU6XSSRUWSDJH<RXZLOOQHHGWRSURYLGH\RXUSURGXFW¶VVHULDOQXPEHUVRSOHDVHUHFRUGWKH
SURGXFWLQIRUPDWLRQLQWKHVSDFHSURYLGHGEHORZRQ\RXUSXUFKDVHIRU\RXUIXWXUHXVH3OHDVHUHWDLQ\RXUUHFHLSW
RISURRIRISXUFKDVHWRVXSSRUW\RXUZDUUDQW\FODLP
)RU<RXU5HFRUGV
3URGXFW1DPHBBBBBBBBBBBBBBBBBBBBBBBBBBBB0RGHO1XPEHUBBBBBBBBBBBBBBBBBBBBBBBBBBBBBBB
'RFXPHQW1XPEHUBBBBBBBBBBBBBBBBBBBBBBBB 6HULDO1XPEHUBBBBBBBBBBBBBBBBBBBBBBBBBBBBBBBB
3XUFKDVH'DWHBBBBBBBBBBBBBBBBBBBBBBBBBBBB([WHQGHG:DUUDQW\3XUFKDVH"BBBBBBBBBBBBBBBB<1
,IVRZKDWGDWHGRHVZDUUDQW\H[SLUH"BBBBBBBBBBBBBB
7RREWDLQZDUUDQW\VHUYLFH\RXZLOOEHUHTXLUHGWRSURYLGHDWKHRULJLQDOGDWHGVDOHVVOLSE\RXUQDPHF
\RXUDGGUHVVGDGHVFULSWLRQRIWKHSUREOHPDQGHWKHVHULDOQXPEHURIWKHSURGXFW
7DNHRUVKLSWKHSURGXFWLQWKHRULJLQDOFRQWDLQHUSDFNDJLQJWRDQDXWKRUL]HG9LHZ6RQLFVHUYLFHFHQWHU
5RXQGWULSWUDQVSRUWDWLRQFRVWVIRULQZDUUDQW\SURGXFWVZLOOEHSDLGE\9LHZ6RQLF
/LPLWDWLRQRILPSOLHGZDUUDQWLHV
7KHUHDUHQRZDUUDQWLHVH[SUHVVRULPSOLHGZKLFKH[WHQGEH\RQGWKHGHVFULSWLRQFRQWDLQHGKHUHLQLQFOXGLQJWKH
LPSOLHGZDUUDQW\RIPHUFKDQWDELOLW\DQG¿WQHVVIRUDSDUWLFXODUSXUSRVH
([FOXVLRQRIGDPDJHV
9LHZ6RQLF¶VOLDELOLW\LVOLPLWHGWRWKHFRVWRIUHSDLURUUHSODFHPHQWRIWKHSURGXFW9LHZ6RQLFVKDOOQRWEHOLDEOHIRU
'DPDJHWRRWKHUSURSHUW\FDXVHGE\DQ\GHIHFWVLQWKHSURGXFWGDPDJHVEDVHGXSRQLQFRQYHQLHQFHORVVRI
XVHRIWKHSURGXFWORVVRIWLPHORVVRISUR¿WVORVVRIEXVLQHVVRSSRUWXQLW\ORVVRIJRRGZLOOLQWHUIHUHQFH
ZLWKEXVLQHVVUHODWLRQVKLSVRURWKHUFRPPHUFLDOORVVHYHQLIDGYLVHGRIWKHSRVVLELOLW\RIVXFKGDPDJHV
$Q\RWKHUGDPDJHVZKHWKHULQFLGHQWDOFRQVHTXHQWLDORURWKHUZLVH
$Q\FODLPDJDLQVWWKHFXVWRPHUE\DQ\RWKHUSDUW\
5HSDLURUDWWHPSWHGUHSDLUE\DQ\RQHQRWDXWKRUL]HGE\9LHZ6RQLF
ViewSonic
CD4225
43
&RQWDFW,QIRUPDWLRQIRU6DOHV$XWKRUL]HG6HUYLFH&HQWUR$XWRUL]DGRGH6HUYLFLRZLWKLQ0H[LFR
1DPHDGGUHVVRIPDQXIDFWXUHUDQGLPSRUWHUV
0p[LFR$YGHOD3DOPD3LVR'HVSDFKR&RUSRUDWLYR,QWHUSDOPDV
&RO6DQ)HUQDQGR+XL[TXLOXFDQ(VWDGRGH0p[LFR
7HO
KWWSZZZYLHZVRQLFFRPODVRSRUWHLQGH[KWP
1Ò0(52*5$7,6'($6,67(1&,$7e&1,&$3$5$72'20e;,&2
+HUPRVLOOR
'LVWULEXFLRQHV\6HUYLFLRV&RPSXWDFLRQDOHV6$GH&9
&DOOH-XDUH]ORFDO
&RO%XJDPELOLDV&3
7HO
(0DLOGLVF#KPRPHJDUHGQHWP[
9LOODKHUPRVD
&RPSXPDQWHQLPLHWQRV*DUDQWL]DGRV6$GH&9
$9*5(*25,20(1'(=
&2/)/25,'$&3
7HO
(0DLOFRPSXPDQWHQLPLHQWRV#SURGLJ\QHWP[
3XHEOD3XH0DWUL]
5(17$<'$7266$'(&9'RPLFLOLR
685&2//$3$=
38(%/$38(
7HO&21/,1($6
(0DLOGDWRV#SXHEODPHJDUHGQHWP[
9HUDFUX]9HU
&21(;,21<'(6$552//26$'(&9$Y
$PHULFDV
(175(3,1=Ï1<$/9$5$'2
)UDFF5HIRUPD&3
7HO
(0DLOJDFRVWD#TSOXVFRPP[
&KLKXDKXD
6ROXFLRQHV*OREDOHVHQ&RPSXWDFLyQ
&0DJLVWHULR&RO0DJLVWHULDO
&KLKXDKXD&KLK
7HO
(0DLO&HIHR#VROXJOREDOHVFRP
&XHUQDYDFD
&RPSXVXSSRUWGH&XHUQDYDFD6$GH&9
)UDQFLVFR/H\YD&RO0LJXHO+LGDOJR
&3&XHUQDYDFD0RUHORV
7HO
(0DLODTXHYHGR#FRPSXVXSSRUWFYDFRP
'LVWULWR)HGHUDO
43/866$GH&9
$Y&R\RDFiQ
&RO'HO9DOOH0p[LFR')
7HO
(0DLOJDFRVWD#TSOXVFRPP[
*XDGDODMDUD-DO
6(59,&5(&(6$GH&9
$Y1LxRV+pURHV
&RO$UFRV6XU6HFWRU-XiUH]
*XDGDODMDUD-DOLVFR
7HO
(0DLOPPLUDQGD#VHUYLFUHFHFRP
*XHUUHUR$FDSXOFR
*6&RPSXWDFLyQ*UXSR6HVLFRPS
3URJUHVR$&ROR&HQWUR
$FDSXOFR*XHUUHUR
7HO
0RQWHUUH\
*OREDO3URGXFW6HUYLFHV
0DU&DULEH(VTXLQDFRQ*ROIR3pUVLFR
)UDFF%HUQDUGR5H\HV&3
0RQWHUUH\1/0p[LFR
7HO
(0DLOD\GHHP#JSVFRPP[
0(5,'$
(/(&7526(5
$Y5HIRUPD1R*[\
0pULGD<XFDWiQ0p[LFR&3
7HO
(0DLOUUUE#VXUHVWHFRP
2D[DFD2D[
&(1752'(',675,%8&,21<
6(59,&,26$GH&9
0XUJXtD3$&RO&HQWUR2D[DFD
7HO
)D[
(0DLOJSRWDL#KRWPDLOFRP
7LMXDQD
67'
$Y)HUURFDUULO6RQRUD/&
&ROGH1RYLHPEUH
7LMXDQD0H[LFR
)2586$6833257
9LHZ6RQLF&RUSRUDWLRQ
%UHD&DQ\RQ5RDG:DOQXW&$86$
7HO(QJOLVK6SDQLVK
)D[
(0DLOKWWSZZZYLHZVRQLFFRP
9LHZ6RQLF0H[LFR/LPLWHG:DUUDQW\/79B/:5HY$
ViewSonic
CD4225
44