1
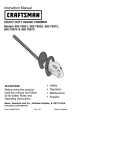
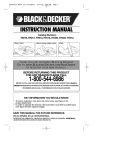
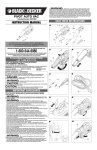
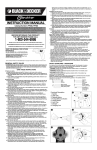
90530436 TR016 etc htrimmers
12/12/07
8:52 AM
Page 1
INSTRUCTION MANUAL
Catalog Numbers
TR016, TR017, HT012, HT018, HT020, HT022, HT512,
TR016, TR017
HT012, HT018, HT020, HT512
HT022
T HANK YOU FOR CHOOSING B LACK & D ECKER !
G O T O WWW.B LACKAND D ECKER . COM /N EW O WNER
T O REGISTER YOUR NEW PRODUCT.
BEFORE RETURNING THIS PRODUCT
FOR ANY REASON PLEASE CALL
1-800-544-6986
BEFORE YOU CALL, HAVE THE CATALOG No.AND DATE CODEAVAILABLE. IN MOSTCASES,ABLACK &
DECKER REPRESENTATIVE CAN RESOLVE THE PROBLEM OVER THE PHONE. IF YOU HAVEA SUGGESTION
OR COMMENT, GIVE USACALL. YOUR FEEDBACK IS VITALTO BLACK & DECKER.
KEY INFORMATION YOU SHOULD KNOW:
• To insure extension cord does not come loose see Figure 8 for
proper attachment.
• In order to operate the trimmer, the lock button must first be pulled back
(see figure 9) then squeeze trigger.
SAVE THIS MANUAL FOR FUTURE REFERENCE.
VEA EL ESPAÑOL EN LA CONTRAPORTADA.
INSTRUCTIVO DE OPERACIÓN, CENTROS DE SERVICIO Y PÓLIZA DE GARANTÍA. ADVERTENCIA:
LÉASE ESTE INSTRUCTIVO ANTES DE USAR EL PRODUCTO.
90530436 TR016 etc htrimmers
12/12/07
8:52 AM
Page 2
SAFETY GUIDELINES - DEFINITIONS
It is important for you to read and understand this manual. The information it contains
relates to protecting YOUR SAFETY and PREVENTING PROBLEMS. The symbols
below are used to help you recognize this information.
DANGER: Indicates an imminently hazardous situation which, if not avoided, will
result in death or serious injury.
WARNING: Indicates a potentially hazardous situation which, if not avoided, could
result in death or serious injury.
CAUTION: Indicates a potentially hazardous situation which, if not avoided, may
result in minor or moderate injury.
CAUTION: Used without the safety alert symbol indicates a potentially hazardous
situation which, if not avoided, may result in property damage.
WARNING: IMPORTANT SAFETY WARNINGS AND INSTRUCTIONS
TO REDUCE RISK OF INJURY:
• Before any use, be sure everyone using this tool reads and understands all safety
instructions and other information contained in this manual.
• Save these instructions and review frequently prior to use and in instructing others.
CAUTION: Wear appropriate personal hearing protection during use. Under some
conditions and duration of use, noise from this product may contribute to hearing loss.
WARNING: When using electric gardening appliances, basic safety precautions
should always be followed to reduce risk of fire, electric shock, and personal injury,
including the following:
READ ALL INSTRUCTIONS.
GENERAL SAFETY WARNINGS AND INSTRUCTIONS FOR ALL
TOOLS
• AVOID DANGEROUS ENVIRONMENT - Don’t use hedge trimmers in damp or wet
locations.
• DON’T USE IN RAIN.
• KEEP CHILDREN AWAY - All visitors should be kept at a safe distance from the work
area.
• DRESS PROPERLY - Don’t wear loose clothing or jewelry. They can be caught in
moving parts. Use of rubber gloves and substantial footwear is recommended when
working outdoors. Wear protective hair covering to contain long hair.
• USE SAFETY GLASSES - Also use face or dustmask if operation is dusty.
• GROUND FAULT CIRCUIT INTERRUPTER (GFCI) protection should be provided on
the circuit(s) or outlet(s) to be used for the hedge trimmer. Receptacles are available
having built-in GFCI protection and may be used for this measure of safety.
• USE RIGHT APPLIANCE - Do not use appliance for any job except that for which it is
intended.
• EXTENSION CORD. To reduce the risk of electric shock use only with an extension
cord intended for outdoor use, such as SW-A, S0W-A, STW-A, STOW-A, SJW-A,
SJOW-A, SJTW-A or SJTOW-A. Make sure your extension cord is in good condition.
When using an extension cord be sure it is heavy enough to carry the current your
product will draw. An undersized extension cord will cause a drop in line voltage
resulting in loss of power and overheating. The following table shows the correct size
to use depending on cord length and nameplate ampere rating. If in doubt, use the
next heavier gage. The smaller the gage number, the heavier the cord.
2
90530436 TR016 etc htrimmers
Volts
120V
240V
Ampere
More
Than
0
6
10 12 -
12/12/07
8:52 AM
Page 3
Minimum Gage for Cord Sets
Total Length of Cord in Feet
0-25
26-50
51-100
101-150
(0-7,6m) (7,6-15,2m) (15,2-30,4m) (30,4-45,7m)
0-50
51-100
101-200
201-300
(0-15,2m) (15,2-30,4m) (30,4-60,9m) (60,9-91,4m)
Rating
Not more
Than
6
18
10
18
12
16
16
14
American Wire Gage
16
16
16
12
16
14
14
12
14
12
Not Recommended
• AVOID UNINTENTIONAL STARTING - Don’t carry plugged in hedge trimmer with
finger on switch. Be sure switch is off when plugging in.
• DON’T ABUSE CORD - Never carry hedge trimmer by cord or yank it to disconnect
from receptacle. Keep cord from heat, oil, and sharp edges.
• DO NOT ATTEMPT to remove cut material or hold material to be cut when blades are
moving. Make sure trimmer switch is off when clearing jammed material from blades.
Do not grasp the exposed cutting blades or cutting edges when picking up or holding
the hedge trimmer.
• DON’T FORCE HEDGE TRIMMER - It will do the job better and with less likelihood of
a risk of injury at the rate for which it was designed.
• DON’T OVERREACH - Keep proper footing and balance at all times.
• STAY ALERT - Watch what you are doing. Use common sense. Do not operate hedge
trimmer when you are tired.
• DISCONNECT HEDGE TRIMMER from the power supply when not in use or when
servicing or cleaning.
• STORE IDLE HEDGE TRIMMER INDOORS - When not in use, hedge trimmer should
be stored indoors in a dry and high or locked-up place- out of reach of children.
• MAINTAIN HEDGE TRIMMER WITH CARE - Keep cutting blades sharp and clean
for best performance and to reduce the risk of injury. Inspect extension cord
periodically and replace if damaged. Keep handles dry, clean and free from oil and
grease.
• CHECK DAMAGED PARTS - before further use of the hedge trimmer, a guard or
other part that is damaged should be carefully checked to determine that it will operate
properly and perform its intended function. Check for alignment of moving parts,
binding of moving parts, breakage of parts, mounting and any other condition that may
affect its operation. A guard or other part that is damaged should be properly repaired
or replaced by an authorized service center unless otherwise indicated elsewhere in
this manual.
DANGER: Laceration hazard. Keep hands away from blades. Keep both hands on
handles when power is on.
CAUTION: Laceration hazard. Blades coast after turn off.
SAFETY WARNINGS: DOUBLE INSULATION
Double insulated tools are constructed throughout with two separate layers of electrical
insulation or one double thickness of insulation between you and the tool’s electrical
system. Tools built with this insulation system are not intended to be grounded. As a
result, your tool is equipped with a two prong plug which permits you to use extension
cords without concern for maintaining a ground connection.
NOTE: Double insulation does not take the place of normal safety precautions when
operating this tool. The insulation system is for added protection against injury resulting
from a possible electrical insulation failure within the tool.
Replacement parts: When servicing all tools, USE IDENTICAL REPLACEMENT
PARTS. Repair or replace damaged cords.
3
90530436 TR016 etc htrimmers
12/12/07
8:52 AM
Page 4
SAFETY WARNINGS AND INSTRUCTIONS: POLARIZED PLUGS
To reduce the risk of electric shock, this equipment has a polarized plug (one blade is
wider than the other). This equipment must be used with a suitable polarized 2 wire or 3
wire extension cord. Polarized connections will fit together only one way. Make sure that
the receptacle end of the extension cord has large and small blade slot widths. If the
plug does not fit fully into the extension cord, reverse the plug. If it still does not fit, obtain
a suitable extension cord. If the extension cord does not fit fully into the outlet, contact a
qualified electrician to install the proper outlet. Do not change the tool plug or extension
cord in any way.
SPECIFIC SAFETY WARNING
WARNING: Some dust created by this product contains chemicals known to the
State of California to cause cancer, birth defects or other reproductive harm. Some
examples of these chemicals are:
• compounds in fertilizers
• compounds in insecticides, herbicides and pesticides
• arsenic and chromium from chemically treated lumber
To reduce your exposure to these chemicals, wear approved safety equipment such
as dust masks that are specially designed to filter out microscopic particles.
1
2
3
4
5
6
4
90530436 TR016 etc htrimmers
12/12/07
8:52 AM
7
8
9
10
Lock Button
Bouton de verrouillage
Botón de seguridad
Trigger
Gâchette
Interruptor de Gatillo
11
12
13
5
Page 5
90530436 TR016 etc htrimmers
12/12/07
8:52 AM
Page 6
ASSEMBLY INSTRUCTIONS
ASSEMBLY TOOLS REQUIRED (NOT SUPPLIED):
- Phillips Screwdriver
ATTACHING BAIL HANDLE TO TRIMMER (HT012, HT018, HT020, HT022, HT512 ONLY)
The trimmer is shipped with the bail handle tied to the trimmer. To attach the bail handle:
• Cut the zip tie which holds the handle to the trimmer.
• Remove the phillips head screws from both sides of the trimmer housing or from the
carton.
• For catalog numbers (HT012, HT018, HT020, HT512), position the handle in place by
sliding it on over the blade as shown in figure 1. Push the handle up onto the housing
and click it into place as shown in figure 2.
• Insert the phillips head screws into the openings on both sides of the handle and tighten
securely (do not over tighten) as shown in figure 3.
• For catalog number (HT022) attach the handle and insert the threaded screw through
the handle and housing as shown in figure 4.
• Insert the two screws into the holes shown in figure 5 and screw down. Do not over
tighten.
• Screw on the plastic knob to tighten handle to unit (figure 6).
NOTE: The handle on the HT022 is adjustable to four different positions as shown figure
7. To move handle, unscrew plastic knob, position handle as desired and retighten
knob.
WARNING: DO NOT OPERATE THE HEDGE TRIMMER WITHOUT THE BAIL HANDLE
ATTACHED.
ATTACHING EXTENSION CORD TO TRIMMER
WARNING: BE SURE HEDGE TRIMMER IS NOT LOCKED ON.
An extension cord retainer is built into the switch handle that prevents the tool from
coming unplugged. To use this feature, simply double the extension cord about 8 inches
(203 mm) from the end, and insert it into the slot in the bottom of the handle area. Hook
the loop formed by doubling the cord over the tab, as shown in figure 8. Gently tug on
the cord to insure that it is firmly retained in the trimmer’s handle. Plug the receptacle
end of the extension cord into the plug blades in the trimmer (figure 8).
SAVE THESE INSTRUCTIONS FOR FUTURE USE
OPERATING INSTRUCTIONS
TO TURN THE TOOL ON
Pull the LOCK BUTTON back with your thumb and then squeeze the TRIGGER with
your fingers as shown in figure 9. (Once the tool is running you can release the LOCK
BUTTON.) To turn the tool OFF, release the TRIGGER.
TO LOCK THE TOOL ON FOR CONTINUOUS RUN
WITH THE TOOL RUNNING, pull the LOCK BUTTON ALL THE WAY back, release
the TRIGGER, then release the LOCK BUTTON. The tool is now locked ON. To turn
the tool OFF, squeeze and release the TRIGGER. NOTE: In order to lock the tool on, it
is important to first release the trigger and then release the lock button.
TRIMMING INSTRUCTIONS
1. EXTENSION CORD – (Figures 8 and 10) Always keep extension cord behind
trimmer and away from the trimming operation. Never drape it over a hedge being
trimmed. If you cut or damage the cord, unplug it at the electrical outlet
immediately, before inspecting or repairing cord.
2. WORKING POSITION – ( Figure 10) Maintain proper footing and balance and do
not overreach. Wear safety goggles, non-skid footwear and rubber gloves when
trimming. Hold the tool firmly in both hands and turn the tool ON. Always hold the
trimmer, with one hand on the switch handle and one hand on the bail handle.
Never hold the tool by the blade guard.
3. TRIMMING NEW GROWTH - (Figure 11) – A wide, sweeping motion, feeding the
blade teeth through the twigs is most effective. A slight downward tilt of the blade, in
the direction of motion gives the best cutting.
6
90530436 TR016 etc htrimmers
4.
5.
•
•
•
•
•
12/12/07
8:52 AM
Page 7
CAUTION: Do not use the trimmer for cutting stems greater than its capacity.
TR016, TR017 3/8 in.(5mm).
HT012, HT018 5/8 in.(8mm).
HT020, HT512, HT022 3/4 in.(19mm).
Use the trimmer only for cutting normal shrubbery found around houses and buildings.
LEVEL HEDGES (Figure 12) – To obtain exceptionally level hedges, a piece of
string can be stretched along the length of the hedge as a guide.
SIDE-TRIMMING HEDGES (Figure 13) – Begin at the bottom and sweep up.
WARNING: TO GUARD AGAINST INJURY, OBSERVE THE FOLLOWING:
READ INSTRUCTION MANUAL BEFORE USING, SAVE INSTRUCTION
MANUAL.
KEEP HANDS ON HANDLES. DON’T OVERREACH.
DO NOT USE UNDER WET CONDITIONS.
DO NOT USE WITH DAMAGED EXTENSION CORD.
DO NOT UNPLUG OR STORE WITH SWITCH LOCKED ON.
DANGER: KEEP HANDS AWAY FROM BLADES.
N: BLADE COASTS AFTER TURN OFF.
CAUTION
Troubleshooting
Problem
•Unit will not start.
Possible Cause
• Cord not plugged in.
• Circuit fuse is blown.
• Circuit breaker
is tripped.
• Cord or switch is
damaged.
Possible Solution
• Plug in cord.
• Replace circuit fuse.
• Reset circuit breaker.
• Have cord or switch
replaced at Black & Decker
Service Center or Authorized
Servicer.
For assistance with your product, visit our website www.blackanddecker.com for the
location of the service center nearest you or call the BLACK & DECKER help line at
1-800-544-6986.
MAINTENANCE
The cutting blades are made from high quality, hardened steel and with normal usage,
they will not require resharpening. However, if you accidentally hit a wire fence, stones,
glass or other hard objects, you may put a nick in the blade. There is no need to remove
this nick as long as it does not interfere with the movement of the blade. If it does
interfere, unplug unit and while wearing proper eye protection use a fine toothed file or
sharpening stone to remove the nick.
If you drop the trimmer, carefully inspect it for damage. If the blade is bent, housing
cracked, or handles broken or if you see any other condition that may affect the
trimmer’s operation, contact your local Black & Decker Service Center for repairs
before putting it back into use.
Fertilizers and other garden chemicals contain agents which greatly accelerate the
corrosion of metals. Do not store the tool on or adjacent to fertilizers or chemicals.
With the unit unplugged, use only mild soap and a damp cloth to clean the tool. Never
let any liquid get inside the tool; never immerse any part of the tool into a liquid.
IMPORTANT: To assure product SAFETY and RELIABILITY, repairs, maintenance and
adjustment should be performed by authorized service centers or other qualified service
organizations, always using identical replacement parts.
7