1
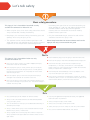
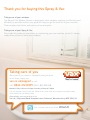
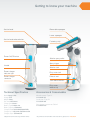
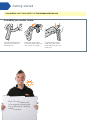
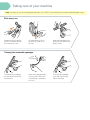
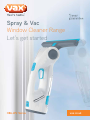
Spray & Vac
Window Cleaner Range
Let’s get started
H86-WV Series
vax.co.uk
Let’s talk safety
Basic safety precautions
This Spray & Vac is intended for household use only
and NOT for commercial or industrial use.
have been given supervision or instruction concerning use
of the appliance in a safe way and understand the hazards
involved. Children shall not play with the appliance.
Cleaning and user maintenance shall not be made by
children without supervision
• When using the Spray & Vac basic safety precautions should
always be observed, including the following
• Keep fingers, hair and loose clothing from moving parts and
openings whilst using the Spray & Vac
• Only Vax recommend charger, accessories and solution
should be used with this Spray & Vac
• This appliance can be used by children aged 8 years and
above and persons with reduced physical, sensory or mental
capabilities or lack of experience and knowledge if they
Please keep instructions for future reference and use the
Spray & Vac only as instructed in this guide
Don’ts
This Spray & Vac is intended for indoor use only
and NOT for outdoor use.
8 Don’t handle the plug or use the Spray & Vac with wet hands
8 Don’t use the Spray & Vac whilst connected to the charger unit
8 Don’t use this Spray & Vac if it has been dropped, damaged,
immersed in water or left outdoors
8 Don’t throw the Spray & Vac into fire or expose to high
temperatures, as the Spray & Vac contains a rechargeable
battery which may cause damage or burst. Never dismantle the
battery or replace with a different type
8 Don’t unplug the Spray & Vac or pull the Spray & Vac by the
charger cord. Don’t use the charger cord as a handle, pull the
charger cord around corners or sharp edges or close a door
over the charger cord
8 Don’t attempt to remove blockages with sharp objects as this
may cause damage to your Spray & Vac
8 Don’t charge the Spray & Vac if the Charger cord or plug is
damaged. Please contact our Customer Care Line
8 Don’t use the Spray & Vac charger with incorrect voltage as this
may result in damage or injury to the user. The correct voltage is
listed on the ratings label
8 Don’t vacuum up hot coals, cigarette butts, matches or smoking
hot burning items or use in an area where there may be harmful
fluids (chlorine, bleach, and ammonia drain cleaner)
Do’s
3 Only use the Spray & Vac indoors on vertical surfaces
3 Always make sure water container are fitted correctly before
using your Spray & Vac
3 Turn off all controls on the Spray & Vac before disconnecting or
connecting the charger
3 Always switch off the Spray & Vac and disconnect the charger
before carrying out any maintenance
3 Always replace the fuse in the plug with a British 13amp fuse.
Always protect the charger cable from heated surfaces or near
open flames
3 Use only CE approved 13amp extension cords, non-approved
extension cords may overheat
3 Always charge the Spray & Vac indoors
3 Always carry the Spray & Vac by the handle
3 Store your Spray & Vac in a cool, dry area away from children
3 Only use Vax recommended batteries and solution
Thank you for buying this Spray & Vac
Taking care of your windows
The Spray & Vac Window Cleaner is designed to clean windows regularly as effectively and
efficiently as possible and this user guide will help you get the most out of your machine.
Clean windows look better and make your home brighter.
Taking care of your Spray & Vac
Also inside this guide are instructions on maintaining your new machine, so that it’s always
ready when you are to tackle your windows.
Taking care of you
We’re here if you need us. Instead of taking me back
to the shop, simply visit:
vax.co.uk/support or call:
(UK) 0844 412 8455 (ROI) 1-800 928 308
Monday-Friday 8.30am to 6.30pm, Saturday 9.00am to 5.00pm
Calls are charged at the UK local rate. Please make a note of the serial number and model number
of the window vacuum before calling.
Alternatively, you can write to us at:
Vax Ltd., Kingswood Road, Hampton Lovett, Droitwich, Worcestershire, WR9 0QH, UK
Let us know what you think @VaxUK
Contents
Let’s talk safety
Getting to know your machine
Getting started
Spray & Vac
Included with
your machine
Charger
Microfibre pad
Using your machine
Scrub pad
Taking care of your machine
Notes
What to do if it goes wrong
Getting in touch
Funnel
Getting to know your machine
Suction head
Removable squeegee
Lower squeegee
Suction head release button
Power On/Off button
Fastening strip
Solution spray outlet
Spray trigger
Handle
Power charger
indicator light
Power charger
connector
Solution tank
Dirty water tank
Exhaust vent
Tank release buttons
Dirty water
release cap
Technical Specification
Accessories & Consumables
Name Spray & Vac
Voltage 3.7V
Weight 0.8kg
Run time 30 minutes
Charge time 3 hours
Battery Type Lithium-ion
Battery capacity 1500mAH
Charger Model KSA34A0550060VKD
Charger input 100-240v 50/60hz 0.15A
Charger output 5.5V 0.6A
Microfibre pads (Type 1)*
1-1-133091-00
Subject to technical change without notice.
*To purchase consumables and accessories, please visit vax.co.uk
Scrub pads (Type 2)*
1-1-133092-00
Glass cleaner concentrate 500ml*
1-9-132547-00
Getting started
PLEASE READ ‘Let’s talk SAFETY’ AT THE BEGINNING BEFORE USE
Assembling your window vacuum
Choose microfibre/scrub
pad and push onto the
fastening strip
Insert the suction head
into the machine and push
until it clicks into place
TIP
Note: The microfibre pad
is for general cleaning and
the scrub pad for cleaning
stubborn marks
To remove the suction
head, press the suction
head release button and
gently pull
Using your machine
Using your window vacuum
120ml
80ml
40ml
Insert the charger cable into
the power charger connector.
Plug the charger into the mains.
Power charger indicator light will
flash during charging, when fully
charged the indicator light will
show solid red. The Spray & Vac
will need to charge for 2 hours
Top up with water (Max 35�C)
to MAX line on solution side of
the dual tank and turn the cap
clockwise to close
Squeeze the tank release
buttons to remove the tank
from the window vacuum
To attach the dual tank back
onto the unit, insert top first
and gently push the bottom
until it fastens into place
Turn the lid of the
cleaning solution tube
anticlockwise and lift
to remove
Pour 40ml of Vax window
solution into the cleaning
solution side of the dual
tank, using the funnel
Pull the trigger to spray
solution onto the surface
to be cleaned
Wipe/scrub the surface
with the microfibre or
scrub pad on the
suction head
Note: You may need to press the trigger a few times first before solution is dispensed, this clears air from the system
Turn the Spray & Vac
on using the power
on/off button
Vacuum up the water using
slow, straight strokes
When you reach the bottom of
the window, apply pressure and
the suction head will pivot
Taking care of your machine
Note: The Spray & Vac must be emptied after each use – DON’T store water/solution in the machine between usage
After every use
Squeeze the tank release
buttons to remove the tank
from the Spray & Vac
Lift the emptying cap to
let the dirty water out of
the tank
Wipe the squeegee with a
damp cloth to remove any
excess water
Cleaning the removable squeegee
To remove the squeegee,
pull and slide through the
suction head
Wash the squeegee under
running water (Max 40’C)
to remove dirt and debris.
Let it dry
To attach the squeegee
push and slide through
the suction head
Notes
What to do if it goes wrong
Problem
Why won’t the window
vacuum turn on?
Why won’t the window
vacuum pick up?
Why does my window
vacuum leak?
Why does my window
vacuum leave a smear
on my window?
Why won’t the
battery recharge?
Solution
• The battery may not be charged. Connect the charger, the
indicator light will flash red when charging and show a solid
red light when fully charged. The initial charge should be for
2 hours.
• The unit might be plugged in. The window vacuum will not
run when the charger is plugged in
• The squeegee blade may be blocked, remove from the
machine, rinse and clear any dirt/debris
• The window vacuum may be low on charge, plug the window
vacuum in to recharge
• The dual tank may be full, empty the dual tank
• You may be using the window vacuum on a flat, horizontally
surface, only use the window vacuum on vertical surfaces
• The dual tank may be full, empty the dual tank
• The squeegee blade is dirty, detach and clean. Go to ‘Taking
care of your machine’ page 8
• The charger may not be inserted correctly
• Check the mains power is switched on
• The electrical outlet may not be working. Check the fuse in
the plug, always replace with a British 13amp fuse
Warning: Always turn off and unplug the Spray and Vac before carrying out and maintenance/troubleshooting checks
Getting in touch
* Calls are charged at the UK local rate. Please make a note of the serial number and model number of the window vacuum
before calling.
@VaxUK
Vax Ltd., Kingswood Road, Hampton Lovett, Droitwich, Worcestershire, WR9 0QH, UK
email: [email protected] website: vax.co.uk
Version 1.0
EEC Statement of Compliance: Manufacturer/EEC importer: Vax Limited, hereby on our own responsibility,
declare that the H86-WV series is manufactured in compliance with the following Directives:
Safety: 2006/95/EC Low Voltage Directive. EMC: 2004/108/EC Electromagnetic Compatibility Directive.
Waste electrical products should not be disposed of with household waste. Please recycle where facilities exist.
Check with your Local Authority or retailer for recycling advice.