1
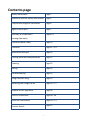
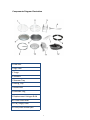
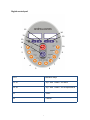
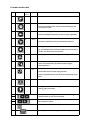
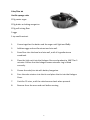
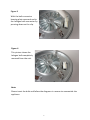
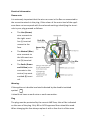
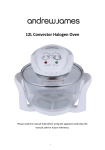
12L Digital Halogen Oven Please read the manual fully before using the appliance and keep the manual safe for future reference. 1 Contents page Safety instructions Page 2 Additional specific safety instructions Page 4 Components diagram illustration Page 6 Digital control pad Page 7 Assembly & Preparation Page 8–9 Starting Operation Functions Mode Table Page 10 Functions Page 11—14 Attachment Recipes Page 16 Cooking times and temperatures Page 22 Cleaning Page 23 Storing Page 24 Troubleshooting Page 24 Using Extender Ring Page 25 Replacing the halogen bulb Page 26—27 Disposal of the appliance Page 28 UK & EU Guarantee Page 28– 29 Electrical information Page 30—31 Contact details Page 32 2 Safety Instructions When using any electrical appliance, basic safety precautions should always be followed, including: This appliance can be used by children aged from 8 years and above and persons with reduced physical, sensory or mental capabilities or lack of experience and knowledge if they have been given supervision or instruction concerning use of the appliance in a safe way and understand the hazards involved. Children shall not play with the appliance. Cleaning and user maintenance shall not be made by children unless they are older than 8 and supervised. Keep the appliance and its cord out of reach of children less than 8 years old. Always ensure the voltage on the rating label corresponds to the voltage in your home. Check the power cord and plug regularly for any damage. If the cord or the plug is damaged, it must be replaced by a qualified electrician or a service repair centre. If in doubt please contact our customer service team. The appliance is intended for domestic use only. Industrial or commercial use will void the warranty. The supplier cannot be held responsible for injury or damage if the appliance has been used for anything other than its intended use. Incorrect operation and use can damage the appliance and cause injury to the user. Do not use the appliance if it has been dropped or damaged in anyway. If the unit has been damaged take the unit for examination and or repair by an authorised service agent. Do not immerse or expose the motor assembly, plug or the power cord in water or any other liquid for any reason. If the supply cord is damaged, it must be replaced by the manufacturer or by someone who is suitably qualified to avoid a potential hazard. Do not let the cord hang over the edge of a table or counter. Ensure that the cord is not in a position where it can be pulled or tripped over accidentally. Do not allow the cord to touch hot surfaces and do not place the cord near hot gas, electric burners or in a heated oven. Use of an extension cord with this appliance is not recommended. 3 However if it is necessary to use an extension cord, ensure that the extension cord is equal to or greater than the power consumption of the appliance to avoid overheating of the appliance and extension cord. Do not use any other appliance on the extension cord. Do not place the extension cord in a position where it can be pulled on by children or animals or be tripped over. Always operate the appliance on a smooth, even and stable surface. Do not place the unit on a hot surface. Always remove the plug of the appliance safely. Do not pull on the appliances cord to remove the appliance plug from the electrical socket. Never handle or operate the appliance with wet hands. Appliance specific safety advice Only use the appliance indoors. Place the appliance on a level, sturdy and heat resistant surface. Do not move the appliance when it is in use. Do not place the appliance close to other objects when it is in use. Only use the handle to lift the lid. Position the mains cable so that it does not come into contact with hot surfaces or objects. Do not use the appliance in the oven, on a stove top or near a gas source. Positioning the appliance Do not place the appliance in the immediate vicinity of a naked flame or a heat source such as hot plates, oven etc. Protect the appliance from spray and drops of water. 4 Damage to the appliance If the appliance is defective, do not attempt to carry out repairs yourself. In the event of damage, contact customer services. If water gets into the appliance or if it is damaged in any other way, it will need to be checked by a qualified electrician or service agent. Always lift the halogen oven lid by the handle located on the front of the control panel. Do not allow the lid to get wet. Do not immerse the appliance in water or any other liquid for any reason. Always leave the top in the “up” position whenever the bowl is removed. Warning! All surfaces of the halogen oven will get very hot during the cooking process, avoid touching these surfaces before the oven cools as this may cause an injury. Do not touch any part of the oven other than the handles until it has cooled down. After the glass bowl has cooled down, hold the bowl with a dry cloth or a suitable oven glove to avoid the risk of burning. Please note: If the E1 message comes up on the halogen this means that the item has been left plugged in and switched on for an extended period of time. To remove this please switch the unit off at the mains. 5 Components Diagram illustration 1. Low rack 2. High rack 3. Tongs 4. Skewers 5. Steamer Tray 6. Baking Tray 7. Bread rack 8. Extender ring 9. Replacement Halogen Bulb 10. Glass oven bowl 11. Lid/ hinge/ base 12. Rice/Cake cooker pan 6 Digital control pad 12 14 11 13 15 16 10 1 2 9 3 8 7 4 5 6 1-10 Function keys 11-12 “Up” and “Down” for time 13-14 “Up” and “Down” for temperature 15 “Start” 16 “Cancel” 7 Assembly and preparation of Halogen Oven 1. Place the base of the appliance (11) on a level, sturdy, heat resistant surface. 2. Remove the extender ring (8) from the base of the Halogen Oven bowl. 3. Place the glass dish (10) into the base (11) of the appliance. 4. Place one of the food racks, high or low (1/2), into the glass oven bowl(10). 5. Carefully place the lid (11) on top of the glass oven bowl (10). 6. Pre-heat the oven by setting the timer to 10 minutes approx. 7. Set the thermostat to 200˚C and turn the oven on. 8. After the timer has turned the oven off, allow it too cool for 10 minutes. You can then open the lid. Please be aware that the oven may emit a slight odour the first time you use it, this is due to the burning off of substances left on during the manufacturing process and is completely natural. It will not affect yourself or the food being cooked. Starting operation 1. Place the wire rack in the bowl of the oven. 2. For best results always ensure food/bakeware is placed on a low or high rack to ensure the heat can circulate, for even cooking. 3. Place the oven lid in the recessed lip of the bowl. 4. Plug the oven into the mains outlet. It will make a short beeping sound and the digital display will light up and the timer and thermostat will show “00:00”. 8 5. Choose the desired cooking function key, the display lights will show the corresponding time and temperature. If you want to increase or decrease the time and temperature press “+” or “-”. 6. Press the “start” button. 7. Once the cooking process has finished it will be signalled by a beep and flashing lights. The food can be removed at any time, but be careful as the food and the surfaces around it will be extremely hot. Always use the tongs provided. 9 Function mode table No . Time (mins) Temp. Function 1 30ˊ 250℃ Roast Chicken, Steam Rice with Rice pot (supplied) 2 11ˊ 190℃ Cupcake mode Please note additional time may be added depending on the size of the cup cakes. 3 13′ 250℃ Steam Seafood/Vegetables Please see additional instruction on how to steam vegetables. 4 15′ 250℃ Bake Pizza The time is dependent on the size and filling of the pizza. 5 5′ 250℃ Heating up crispy food, such as French fries. E.g. For toasting bread 5 minutes and add an extra 2 minutes if you like your bread to be more toasted. 6 30′ 00℃ For drying the bowl or defrosting after cleaning the container. 7 10′ 250℃ Cleaning the halogen bowl, please ensure that you do not add water more than half way up the bowl when using the cleaning function. 8 6′ 90℃ Dehydrator This function can be used for drying out food. Please note additional time may be required depending on the food. 9 13′ 130℃ Cleaning 10 20′ 250℃ Grilling pork ribs and chicken wings, which can be crispy on the outside,soft on the inside 11 12 Time up and down keys (the minimum time is 1 minute, maximum time is 1 hour and 59 minutes). 14 Temperature up and down keys (the minimum temperature is 0̊˚C, maximum is 250˚C). 15 Start key, press it after confirming the time and temperature. 16 Cancel key, used for cancelling operation or settings. 13 10 Functions: - For foods like steamed rice and roast chicken Rice 1. Preheat the halogen oven on 2. Measure 1 cup of rice. Wash the rice in a sieve before placing into the rice/cake tin. 3. Add two and a half cups of water. 4. Place the rice/cake tin in the Halogen Oven, replace the lid and reset for 30 minutes. 5. Run a fork through the rice to fluff it up and serve. - Cupcakes 100g self raising flour 100g butter/baking margarine 100g sugar 2 eggs 1 tsp vanilla extract 1. Cream together the butter and the sugar until light and fluffy. 2. Add two eggs and vanilla extract and mix well. 3. Sieve flour into the bowl and mix well, until all ingredients are combined. 4. Spoon mixture into silicone cupcake moulds and place onto the high rack inside the Halogen Oven. 5. Press and cook cupcakes for approximately 11 minutes until the cake bounces back when touched. Remove from oven and cool. 11 Functions: - For steaming fish and vegetables Root vegetables 1. Cut the root vegetables (e.g. parsnips, carrots & turnip) into chunks. 2. Take a piece of tin foil large enough to hold the vegetables. 3. Place the vegetables in the middle of the tin foil and fold the sides of the tin foil up creating a parcel. 4. Add 2 tablespoons of water to the vegetables before sealing the tin foil parcel. 5. Place the parcel of vegetables onto the steamer tray on a low rack in the halogen bowl, replace the lid and press the button. Re-set the time to 26 minutes. 6. Before removing parcels from the Halogen Oven, test to ensure they are cooked as required. More tips for steaming vegetables Soft vegetables should be cooked for around 15-20 minutes. Hard vegetables should be cooked for around 30 minutes. Potatoes with a skin on should be pierced with a fork and placed in the oven for 35-40 minutes. 12 Functions: - Bake Pizza 1. Press the button and preheat the oven at the temperature recommended on the pizza packaging by adjusting the temperature using “+” or “-”. 2. Place the pizza on the steamer tray, onto the low rack in the Halogen Oven bowl. 3. Cook the pizza for 15 minutes, until golden and crispy. 4. Remove from the oven and serve. Please note: The time and temperature may need to be adjusted according the size and topping of the pizza. - Crumpets and Toasting Muffins Prepare crumpets/toasting muffins as required. Place the crumpets/toasting muffins on the high rack. Press After 3 minutes, turn the crumpets/toasting muffins over. Cook for a further 2 minutes. Remove and serve. 13 Functions: - for food that you want to be crispy on the outside and soft on the inside Recipe—Mini burgers Makes approximately 12 mini burgers 400g Lean mince 1/2 red onion Garlic paste 1. Finely chop the onions and add to the mince with a small amount of garlic paste (to taste). 2. Knead together with your hands, until it is well combined. 3. Form burgers using Andrew James Mini Burger Press or by hand. 4. Place the high rack in the oven with the baking tray underneath to catch any drips, then preheat the oven for 3 minutes using the function. 5. Once preheated, place the burgers on the high rack. Set the time for 15 minutes, turning once whilst cooking. 6. Once cooked, remove burgers from the Halogen Oven and allow the oven to cool before cleaning as instructed. Serving Tip Place burger in a freshly baked bun with cheese, salad and tangy gherkins. 14 Cake/Rice tin Vanilla sponge cake 125g caster sugar 125g butter or baking margarine 125g self raising flour 2 eggs 1 tsp vanilla extract 1. Cream together the butter and the sugar until light and fluffy. 2. Add two eggs and vanilla extract and mix well. 3. Sieve flour into the bowl and mix well, until all ingredients are combined. 4. Place the high rack into the Halogen Oven and preheat to 180°C for 3 minutes. Ensure that the halogen ovens extender ring is fitted correctly. 5. Grease the cake/rice tin with butter/margarine. 6. Pour the cake mixture into the tin and place the tin into the Halogen Oven. 7. Cook for 22 mins, until the cake bounces back when pressed. 8. Remove from the oven and cool before serving. 15 The following attachments can also be purchased separately from our website, www.andrewjamesworldwide.com: Airfryer Attachment Breakfast Rack Airfryer Attachment Recipes Roasted Vegetables 2 Sweet potatoes 1 red pepper 1 yellow pepper 1 red onion Olive oil Mixed herbs 1. Place the airfryer attachment in the rim of the Halogen Oven bowl. Extend the hinge until it can be easily placed on top of the airfryer. Preheat the Halogen Oven at 180°C. 2. Peel the sweet potatoes and cut into chunks. Coat in a drizzle of olive oil and sprinkle with mixed, dried herbs. 3. Lie the sweet potato chunks on the airfryer mesh evenly, in one layer. 4. Cook the sweet potato for 13 minutes. 5. Prepare the peppers and onion. Drizzle in oil and sprinkle with mixed herbs. 6. Lie the peppers and onion on the airfryer mesh evenly, in one layer. 7. Cook all of the vegetables together for a further 15 minutes. 8. Once cooked, remove from oven and serve. 16 Chips Potatoes Olive oil Seasoning 1. Place the airfryer attachment in the rim of the Halogen Oven bowl. Extend the hinge until it can easily place on top of the airfryer. Preheat the Halogen Oven at 200°C. 2. Peel and cut the chips to the required thickness. Drizzle in olive oil and mix until all coated. Season to taste. 3. Place an even layer of chips onto the airfryer and set the time to 30 minutes. 4. Turn chips halfway through cooking for even colour. 17 Sticky Honey Chicken Wings 12 chicken wings 3 tbsp. honey 3 cloves of garlic 25ml soy sauce 50g brown sugar 3 tbsp. cornflour Sesame seeds 1. Place the airfryer attachment in the rim of the Halogen Oven bowl. Extend the hinge until it can easily place on top of the airfryer. 2. Halve the chicken wings at the joint. 3. Crush the garlic. 4. Add honey, soy sauce, brown sugar and cornflour to the garlic and mix until all ingredients are combined. 5. Place the marinade mixture into a large bowl. Add the chicken wings and move the chicken around in the bowl until the chicken is completely coated. 6. Leave the chicken in the marinade for 15 minutes. 7. Preheat the Halogen Oven to 180°C. for 3 minutes. 8. Once marinated, place the chicken onto the airfryer attachment and replace the lid. 9. Cook for 15 minutes, turning occasionally for even coverage. 18 Pork chops with Apricot Stuffing 2 red eating apples 3 ready to eat dried apricots 1 clove of garlic 2 tbsp. fresh breadcrumbs 2 tbsp. apple juice Salt and pepper 2 pork chops, on the bone Olive oil 1. Place the airfryer attachment in the rim of the Halogen Oven bowl. Extend the hinge until it can easily place on top of the airfryer. Preheat the oven to 190°C. 2. Quarter and core the apples and thinly slice. Finely chop the apricots and crush the garlic. 3. For the stuffing, put the breadcrumbs into a small bowl and stir in the seasoning apple juice, apricots and garlic. 4. Cut a wide pocket in the side of each pork chop and push some stuffing into the cavity. 5. Put the chops on the airfryer, drizzling with a little oil. Cook for 10-12 minutes then turn over cooking for a further 10 minutes until the meat is cooked through. 19 Herby fish fingers 2 fillets of white fish e.g. cod, pollock 1 egg 3 stale slices of bread Mixed herbs 1. Place the high rack into the Halogen Oven. 2. Cut the fish fillets into strips. 3. Grate the bread on a box grater or alternatively cut into chunks and pulse in a food processor. Pour onto the baking tray supplied with the Halogen Oven and place in the oven on the high rack. Set Halogen Oven on 180°C for 3 minutes, move the breadcrumbs around then cook for a further 2 minutes. Remove the breadcrumbs from the Halogen Oven and sprinkle over some dried mixed herbs. 4. Crack the egg into a shallow dish and lightly beat with a fork. 5. Turn the fish in the egg mix until completely coated. Then repeat coating the fish into the breadcrumbs and coat evenly. Repeat until all of the fish pieces are coated. 6. Place the airfryer attachment in the rim of the Halogen Oven bowl. Extend the hinge until it can easily place on top of the airfryer. Preheat the Halogen Oven to 180°C. 7. Lay the fish on the Airfryer and replace the lid. Cook for 12-15 minutes, until the breadcrumbs are golden and the fish is cooked through. Remove and serve. 20 Breakfast Rack Attachment 1. Place the breakfast rack in the Halogen Oven according to what you want to cook. High side is suitable for bacon, sausage, hash browns, eggs. Low side is suitable for toast and eggs. 2. Preheat the Halogen Oven to 200°C for 3 minutes. 3. Lie bacon rashers on the breakfast rack. 4. Pierce eggs with a pin then place in the egg holder on rack. 5. Cook bacon for 4 minutes then turn over for a further 1 minute on the other side. 6. Cook eggs alongside the bacon for 6 minutes for soft boiled and 8 minutes for hard boiled. If you are using eggs that have come straight from the fridge, add an extra 12 minutes to the original cooking time. Toast 1. Ensure the breakfast rack is on the low side and place the bread in the rack. 2. Press the TOAST button. 3. Remove once timer is complete. 21 Cooking times and Temperatures Food Temperature in ˚c Cooking time in minutes Chicken (1.6kg/3 lbs. 7 oz.) 190—200°C 60-75 minutes Chicken breast (175g/ 6 oz) 190—200°C 15-20 minutes Cod fillet (150g/ 5 oz) 200°C 12-18 minutes Potatoes (fried, small, halves) 200°C 30-40 minutes Potatoes (baked, medium) 200°C 50-60 minutes Pepper (halved) 200°C 15-25 minutes Parsnip (approx. 2cm strips) 200°C 35-45 minutes Chips (frozen) 200°C 25-30 minutes Beef (1 kg/ 2lbs 3 oz) 180°C 65—75 minutes Yorkshire pudding (prepared) 200°C 25-30 minutes Onions (quartered) 200°C 50-60 minutes Onions (small/chopped) 200°C 20-30 minutes As a general rule, when using recipes intended for conventional ovens, temperatures will remain the same but cooking times will be reduced. Generally for cakes etc. it is recommended to reduce the conventional oven temperature by 10˚c. The cooking times in this manual should be used as a guide only. 22 Cleaning and storing the appliance No liquids should enter the top of the halogen lid as this could cause the electrics to short circuit resulting in a fire. If liquid enters the halogen lid it must be checked over by a qualified electrician before It can be used. Always disconnect the appliance from the mains and turn it off before cleaning the appliance. Improper cleaning may damage the appliance and the mains, always turn the appliance off before any cleaning. Clean the halogen lid with a damp cloth only. The base and accessories can be hand washed as normal using a mild detergent and warm water. Self cleaning function Improper cleaning can result in damage to the appliance. Allow the glass bowl to completely cool before filling it with cold water. Placing cold water in the bowl before it has cooled down will cause the glass to crack. Setting the self-cleaning function 1. Remove any food and thick grease. 2. Fill the bowl approximately half full with cold water and a drop of washing up liquid. 3. Place the lid down to the closed position. 4. Press the sanitize button. 5. Press the start button. Please note: The water and the Halogen Oven may still be hot after the cleaning process has finished. Allow them to cool down completely before moving the oven or emptying it of water. 23 Storing the appliance There is a risk of fire from hot components. Always allow the appliance time to cool down thoroughly before cleaning and storing. The appliance and accessories must be left to dry out thoroughly before storing. The appliance must be stored in a dry and clean location. Troubleshooting Problem Possible cause and solution Appliance does not switch on There maybe a fault with the power cord, plug or electrics of the appliance. Seek professional help from a fully qualified electrician or service centre. The fan is working but no heat is being produced The bulb may need to be replaced. 24 Increasing the size of the Glass Bowl With the use of the extender ring you can increase the volume of the glass bowl from 12 L to 17 L. Please ensure that the oven is not hot and is fully unplugged before performing this operation. To bring the lid up to fit the extender ring or to bring the lid down after removing the extender ring: 1. Place the extender on top of the bowl (Fig 1). 2. Slide the white button to the right and hold (refer to Fig. 2) at the same time press the grooved mechanism underneath (refer to Fig. 3) then adjust the lid by lifting it upwards or downwards. Place the lid back down. Fig 1. Fig. 2 Fig. 3 This is the button to adjust the lid. Slide this button to the right hand side. At the same time push up this grooved mechanism to adjust the lid. 25 Replacing the Halogen bulb Figure 1 Remove the 3 bulb cover screws with a Phillips head screwdriver, and turn all the screws anticlockwise. Figure 2 When the bulb cover has been removed, use a Phillips screwdriver turn the bulb connector housing plate screw anti clockwise. Next unclip the halogen bulb from the unit by lifting the 3 bulb holder clips. 26 Figure 3 With the bulb connector housing plate removed unclip the halogen bulb connector by pressing down on the clip. Figure 4 This picture shows the halogen bulb completely removed from the unit. Note: Please insert the bulb and follow the diagrams in reverse to reassemble the appliance 27 Disposal of the appliance THIS PRODUCT IS FOR HOUSEHOLD USE ONLY! Correct disposal of this product This marking indicates that this product should not be disposed with other household wastes throughout the EU. To prevent possible harm to the environment or human health from uncontrolled waste disposal, recycle it responsibly to promote the sustainable reuse of material resources. To return your used device, please use the return and collection systems or contact the retailer where the product was purchased. They can take this product for environmental safe recycling. UK and EU Guarantee Your new Andrew James product comes with a 24 month guarantee and a 2 year fixed warranty, effective from receipt confirmation. Your receipt or order number is required as proof of purchase date so it is imperative that you keep it safe. This guarantee only applies if the item has been used solely for the use intended, and all instructions have been followed accordingly. Please note this product is only for domestic use only and is not for commercial use. Abuse of your product will invalidate the guarantee. Returned goods can only be accepted if repackaged properly within the original colour product box, and presented with the original receipt of sale/order number. This does not affect your statutory rights. Returned products must be cleaned and returned to us in as close to delivery condition as possible. If your product develops a problem within the first 12 months of the fixed warranty, we will pay all shipping costs to have it returned to us. After 12 months the customer will be liable for the cost of returning the product to us. We will then pay to have the repaired/replaced item shipped back to the 28 customer. If you wish to return your item for a full refund, you have the right to do so within the first 7 days. For our returns policy please go to www.andrewjamesworldwide.com Customers are responsible for any taxes applied to our products when they are shipped outside of the EU. All of our prices are inclusive of VAT. Once a product has been returned to us, we will aim to repair or replace it within 30 days of receipt. The guarantee does not cover any defect arising from improper use, damage, build-up of lime scale or repair attempts made by third-parties. Also, the guarantee does not cover normal wear and tear of individual parts. 29 Electrical information Please note: It is extremely important that the wires or cores in the flex are connected to the correct terminals in the plug. If the colour of the mains lead of the appliance does not correspond with the coloured markings identifying the terminals in your plug proceed as follows: The Live (Brown) wire connects to the right- most live (L) terminal nearest to the fuse. The Neutral (Blue) wire connects to the left-most neutral (N) terminal. The Earth (Green and Yellow) wire connects to the central, top most earthed (E) terminal. Warning: If the appliance is double insulated indicated by the double insulated symbol: it should not have an earth wire or earth connection. Plug The plug must be protected by the correct AMP fuse; this will be indicated on the case of the plug. Only BSI or ASTA approved fuses should be used. When changing the fuse always replace it with a fuse that is of the same 30 identical rating as the original. If you are unsure about which plug or fuse to use, always refer to a qualified electrician. Please note after replacing the fuse, ensure that the cover is correctly fitted back onto the plug. Never attempt to run the appliance if the plug does not have a cover. If a moulded plug is fitted and has to be removed take great care in disposing of the plug and severed cable, it must be destroyed to prevent it from engaging into a socket. If the supply cord is damaged it must be replaced by a service agent or a similarly qualified person in order to avoid a hazard. All of our electrical appliances conform to pre-existing EC Directives 2006/95/EC (Low Voltage Directive) and 2004/108/EC (EMC Directives). For further information please visit http://www.esc.org.uk/industry/product -safety/product-testing-screening/kitchen-appliances/ Please note: This guarantee does not cover the glass bowl or the halogen oven accessories. 31 Contact details Andrew James UK LTD Unit 1 P C Henderson Premises Bowburn North Industrial Estate Bowburn Co Durham DH6 5NG Customer Service / Technical Support- Telephone 0844 335 8464 Customer Service/ Technical Support Email: [email protected] Website: www.andrewjamesworldwide.com Copyright Andrew James 32