1
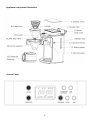
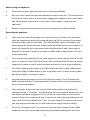
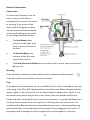
Premium Coffee Maker With Integrated Grinder Please read the manual fully before using the appliance and keep the manual safe for future reference. Contents Page Safety instructions Page 3 Appliance specific safety instructions Page 4 Appliance components illustration Page 5 Control panel Page 5 Before using the appliance Page 6 Operating the appliance Page 6 Making coffee with coffee powder Page 7 Setting the Automatic start function Page 8 Cleaning and maintenance Page 8 Disposal of the appliance Page 9 UK and EU Guarantee Page 10 Electrical information Page 11 Contact details Page 12 2 Safety instructions When using any electrical appliance, basic safety precautions should always be followed, including: This appliance can be used by children aged from 8 years and above and persons with reduced physical, sensory or mental capabilities or lack of experience and knowledge if they have been given supervision or instruction concerning use of the appliance in a safe way and understand the hazards involved. Children shall not play with the appliance. Cleaning and user maintenance shall not be made by children unless they are older than 8 and supervised. Keep the appliance and its cord out of reach of children less than 8 years old. Always ensure the voltage on the rating label corresponds to the voltage in your home. Check the power cord and plug regularly for any damage. If the cord or the plug is damaged, it must be replaced by a qualified electrician or a service repair centre. If in doubt please contact our customer service team. The appliance is intended for domestic use only. Industrial or commercial use will void the warranty. The supplier cannot be held responsible for injury or damage if the appliance has been used for anything other than its intended use. Incorrect operation and use can damage the appliance and cause injury to the user. Do not use the appliance if it has been dropped or damaged in any way. If the unit has been damaged take the unit for examination and or repair by an authorised service agent. Do not immerse or expose the motor assembly, plug or the power cord in water or any other liquid for any reason. If the supply cord is damaged, it must be replaced by the manufacturer or by someone who is suitably qualified to avoid a potential hazard. Do not let the cord hang over the edge of a table or counter. Ensure that the cord is not in a position where it can be pulled or tripped over accidentally. Do not allow the cord to touch hot surfaces and do not place the cord near hot gas, electric burners or in a heated oven. Use of an extension cord with this appliance is not recommended. However if it is necessary to use an extension cord, ensure that the extension cord is equal to or greater than the power consumption of the appliance to avoid overheating of the appliance and extension cord. Do not use any other appliance on the extension cord. Do not place the extension cord in a position where it can be pulled on by children or animals or be tripped over. Always operate the appliance on a smooth, even and stable surface. Do not place the unit on a hot surface. Always remove the plug of the appliance safely. Do not pull on the appliances cord to remove the appliance plug from the electrical socket. Never handle or operate the appliance with wet hands. 3 Appliance specific safety instructions Before cleaning, attaching components or carrying out repairs on the appliance always remove the cord from the electrical supply. The use of accessory attachments that are not approved by the manufacturer is not recommended and may cause the appliance to malfunction and injury to the user. Only ever use the grinder for grinding roasted coffee beans. Never use it for any other ingredients. Do not use the appliance if it has a damaged container, please take it to a service repair centre or call our customer service team for repairs. When the appliance is in operation avoid contact with the moving blades as they are sharp. 4 Appliance components illustration Control Panel 5 Before using the appliance Ensure that all parts and accessories are in working condition. Run only clean water through the appliance to remove any dirt. This can be done by filling the water reservoir with water, plugging the appliance into to the mains and following the steps found in the section of the manual “operating the appliance”. Repeat the process at least twice to ensure the appliance is fully cleaned. Operating the appliance Open the tank cover (3) and pour the required amount of water into the water tank, we recommend using the tempered glass jug (13) to measure the amount of cups of coffee you wish to make . The level of water can be indicated by the water gauge (6). Please note the coffee produced will be less than the amount of water you originally put in the water tank therefore always add 1 extra cup for example if you wish to produce ten cups of coffee add the equivalent of 11 cups to the water tank. Press the funnel key button (5) once and rotate the funnel support (12) to the left until it is locked in place. Place the funnel (10) and coffee filter (8) into the funnel support and rotate it until it locks into place and return it to its original position. Lift off the coffee grinder cover (1) and fill the grinder box (2) with coffee beans (maximum 200g of coffee beans). Place the grinder cover (1) back on the grinder box (2) ensuring it is securely in place. Plug the appliances power cord into the electrical supply. The LCD display will flash and now display 12: 00 automatically. Set the correct time by pressing the hour (and minute buttons Then select the amount of cups you wish the coffee machine to produce by pressing the cup 2-12 button . The LCD display will now show the amount of cups you want to produce ranging from 2-12, press the cups button to increase the amount of cups in increments of two. If you do not select the required amount of cups it will be set at a default of 12 cups. Turn the knob (9) to choose how coarse you wish the ground coffee to be. We recommend using a medium setting. Press the “Strength control” to increase or decrease the strength of the coffee produced, the one bean symbol represents the weakest setting with the three 6 bean symbol the strongest. Press the “On/Off” button once and wait for three seconds, the coffee will now start grinding. Once the grinding process has finished wait for three seconds and the coffee should begin to brew, this is indicated in the LCD display by the letters “Brew”. Once the brewing process has finished the Brew letters will disappear from the LCD display. The coffee will be kept warm automatically by the appliance for up to 35 minutes. Making coffee with coffee powder Open the tank cover (3) and pour the required amount of water into the water tank, we recommend using the tempered glass jug (13) to measure the amount of cups of coffee you wish to make . The level of water can be indicated by the water gauge (6). Please note the coffee produced will be less than the amount of water you originally put in the water tank therefore always add 1 extra cup for example if you wish to produce ten cups of coffee add the equivalent of 11 cups to the water tank. Add the coffee powder to coffee filter (8) using a measuring spoon. Press the funnel key button (5) once and rotate the funnel support (12) to the left until it is locked in place. Place the funnel (10) and coffee filter (8) into the funnel support and rotate it until it locks into place and return it to its original position. Plug the appliances power cord into the electrical supply. The LCD display will flash and now display 12: 00 automatically. Set the correct time by pressing the hour and minute buttons. Then select the amount of cups you wish the coffee machine to produce by pressing the cup 2-12 button The LCD display will now show the amount of cups you want to produce ranging form 2-12, press the cups button to increase the amount of cups in two’s. if you do not select the required amount of cups it will be set at a default of 12 cups. Press the “Grind Off” button once, the button will now be illuminated blue. The LCD display will now display the letters “BREW” and begin the brewing process. Once the brewing process has finished the letters will disappear from 7 the LCD display. The coffee will be automatically kept warm for 35 minutes by the appliance. Setting the Automatic start function 1. Follow steps 1-6 in the section “operating the appliance” 2. Set the current time and wait till the numbers stop flashing. 3. Press the programme button and set the time you wish the coffee making process to begin. 4. Once the timer has been set (the numbers stop flashing in the LCD display press the “programme” button again. The word “AUTO” will now be displayed in the LCD display. The appliance will now be set in “Automatic” mode. 5. The coffee will now begin to brew at the pre-set time. This is indicated by the illuminated “On/Off” button. Please note: To cancel the Automatic start function at any time press the “Program” button once. The “Program” sign will disappear from the LCD Display. Cleaning and maintenance To descale the appliance , run clean water mixed with a specific descaling product through the appliance at least once a month by just filling the water tank and not adding any coffee beans and following the instructions for “operating the appliance”. Use specific products for descaling at a ratio of 1/4 parts descaling product to water and always fill the water tank to the maximum mark . Do not use vinegar to descale the appliance. Do not put any part of the appliance in the dishwasher. Clean the appliances bowl with soapy water and clean it with clear water. When cleaning the grinder always ensure the appliance is not plugged in. Clean the main body and grinder with a damp wet cloth and dry immediately. Do not immerse the appliance in water or any liquid for any reason. 8 Disposal of the appliance Please note that this Andrew James product is mark with this Symbol: This means that this product must not be disposed of together with ordinary household waste, as electrical and electronic waste must be disposed of separately. In accordance with the WEEE directive, every member state must ensure correct collection, recovery, handling and recycling of electrical and electronic waste. Private households in the E.U. can take used equipment to special recycling stations free of charge. In certain member states used apparatus can be returned to the dealer where they were bought on the condition you buy new products. Contact your retailer, distributor or the municipal authorities for further information on what you should do with electrical and electronic waste. 9 UK and EU Guarantee Your new Andrew James product comes with a 24 month guarantee and a 2 year fixed warranty, effective from receipt confirmation. Your receipt or order number is required as proof of purchase date so it is imperative that you keep it safe. This guarantee only applies if the item has been used solely for the use intended, and all instructions have been followed accordingly. Please note this product is only for domestic use only and is not for commercial use. Abuse of your product will invalidate the guarantee. Returned goods can only be accepted if repackaged properly within the original colour product box, and presented with the original receipt of sale/order number. This does not affect your statutory rights. Returned products must be cleaned and returned to us in as close to delivery condition as possible. If your product develops a problem within the first 12 months of the fixed warranty, we will pay all shipping costs to have it returned to us. After 12 months the customer will be liable for the cost of returning the product to us. We will then pay to have the repaired/replaced item shipped back to the customer. If you wish to return your item for a full refund, you have the right to do so within the first 7 days, however we will deduct the cost of shipping from the value of the refund. Customers are responsible for any taxes applied to our products when they are shipped outside of the EU. All of our prices are inclusive of VAT. Once a product has been returned to us, we will aim to repair or replace it within 30 days of receipt. The guarantee does not cover any defect arising from improper use, damage, build-up of lime scale or repair attempts made by third-parties. Also, the guarantee does not cover normal wear and tear of individual parts. 10 Electrical Information Please note: It is extremely important that the wires or cores in the flex are connected to the correct terminals in the plug. If the colour of the mains lead of the appliance does not correspond with the coloured markings identifying the terminals in your plug proceed as follows: The Live (Brown) wire connects to the right- most live (L) terminal nearest to the fuse. The Neutral (Blue) wire connects to the left-most neutral (N) terminal. The Earth (Green and Yellow) wire connects to the central, top most earthed (E) terminal. Warning: If the appliance is double insulated indicated by the double insulated symbol: it should not have an earth wire or earth connection. Plug The plug must be protected by the correct AMP fuse; this will be indicated on the case of the plug. Only BSI or ASTA approved fuses should be used. When changing the fuse always replace it with a fuse that is of the same identical rating as the original. If you are unsure about which plug or fuse to use, always refer to a qualified electrician. Please note after replacing the fuse, ensure that the cover is correctly fitted back onto the plug. Never attempt to run the appliance if the plug does not have a cover. If a moulded plug is fitted and has to be removed take great care in disposing of the plug and severed cable, it must be destroyed to prevent it from engaging into a socket. If the supply cord is damaged it must be replaced by a service agent or a similarly 11 qualified person in order to avoid a hazard. All of our electrical appliances conform to pre-existing EC Directives 2006/95/EC (Low Voltage Directive) and 2004/108/EC (EMC Directives). For further information please visit http://www.esc.org.uk/industry/product-safety/ product-testing-screening/kitchen-appliances/ Contact details Andrew James UK LTD Unit 1 P C Henderson Premises Bowburn North Industrial Estate Bowburn Co Durham DH6 5NG Customer Service / Technical Support- Telephone 0844 335 8464 Customer Service/ Technical Support Email: [email protected] Website: www.andrewjamesworldwide.com Copyright Andrew James Version 2 12