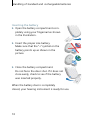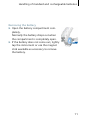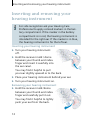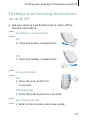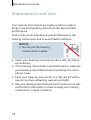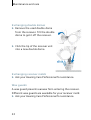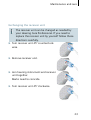
1
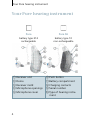
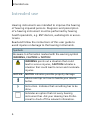
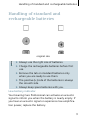
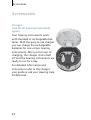
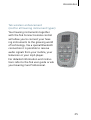
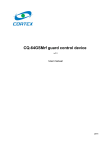
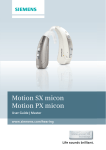
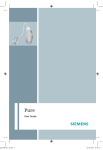
Pure, Pure SE
User Guide
Content
Content
Your Pure hearing instrument
4
Intended use
6
General notes on safety
7
Handling of standard and rechargeable batteries
9
Inserting the battery
10
Removing the battery
11
Inserting and removing your hearing instrument
12
Inserting your hearing instrument
12
Removing your hearing instrument
12
Turning your hearing instrument on and off
13
Via battery compartment
13
Via push button
13
Via remote control
13
Power-on delay
14
Changing the hearing program
2
9
Low battery indicator
15
Via push button
15
Via remote control
15
Content
Changing the volume
16
Automatic
16
Via remote control
16
Functionalities
17
Maintenance and care
18
Domes and receiver molds
19
Exchanging the receiver unit
23
Accessories
24
Charger
24
Tek wireless enhancement
25
Remote control
26
Troubleshooting
27
Technical information
28
Disposal information
30
3
Your Pure hearing instrument
Your Pure hearing instrument
Pure
Pure SE
battery type 312
rechargeable
battery type 10
non-rechargeable
① Receiver unit
② Dome
③ Receiver mold
④ Microphone openings
⑤ Microphone cover
4
⑥ Push button
⑦ Battery compartment
⑧ Charging contacts
⑨ Serial number
⑩ Type of hearing instrument
Your Pure hearing instrument
Your Hearing Care Professional offers an assortment of
receiver lengths and dome sizes to fit your ear best.
5
Intended use
Intended use
Hearing instruments are intended to improve the hearing
of hearing impaired persons. Diagnosis and prescription
of a hearing instrument must be performed by hearing
health specialists, e.g. ENT doctors, audiologists or acousticians.
Read and follow the instructions of this user guide to
avoid injuries or damage to the hearing instruments.
Symbols:
Be aware to information marked with the warning symbol
WARNING, CAUTION or NOTICE!
WARNING points out a situation that could
lead to serious injuries, CAUTION indicates a
situation that could lead to minor and moderate
injuries.
NOTICE
NOTICE indicates possible property damage.
Advice and tips on how to handle your device
better.
Instruction. Indicates that something has to be
done.
Indicates an option that not every hearing
instrument has. Ask your Hearing Care Professional to check off the relevant information.
6
General notes on safety
General notes on safety
NOTICE
Your hearing instruments are sensitive to extreme
heat, high humidity, strong magnetic fields (>
0.1T), X-rays and mechanical stress.
Do not expose your hearing instruments to
extreme temperature or high humidity.
Do not leave them in direct sunlight.
Do not wear them in the shower or when you
apply make-up, perfume, aftershave, hairspray
or suntan lotion.
Do not wear your hearing instruments when
you are exposed to short-waves, a strong magnetic field, a high frequency field or X-rays.
Do not place your hearing instruments in a
microwave oven.
WARNING
Choking hazard posed by small parts.
Keep hearing instruments, batteries and accessories out of children‘s reach.
If swallowed consult a physician or hospital immediately.
If infants, small children or mentally disabled
persons need to wear hearing instruments
ensure adequate supervision.
7
General notes on safety
WARNING
Hazard of explosion!
Do not use your hearing instruments in areas
where there is a danger of explosions (e.g. mining).
NOTICE
Leaking batteries damage the hearing instruments.
Turn the hearing instruments off when not in
use to preserve the battery.
Remove batteries when the instruments are not
in use for a prolonged period of time.
NOTICE
Batteries contain harmful substances that pollute
the environment.
Do not throw used batteries into household
trash.
Dispose batteries according to national regulations or return them to your Hearing Care
Professional.
In some countries restrictions for the usage of
wireless equipment exist.
Refer to local authorities for further information.
8
Handling of standard and rechargeable batteries
Handling of standard and
rechargeable batteries
original size
Always use the right size of batteries.
Charge the rechargeable batteries before first
use.
Remove the tab on standard batteries only
when you are ready to use them.
The positive (+) side of the batteries is always
the smooth side.
Always keep spare batteries with you.
Low battery indicator
Your Hearing Care Professional can activate an acoustic
signal to inform you when the battery is nearly empty. If
you hear an acoustic signal or experience low amplification power, replace the battery.
9
Handling of standard and rechargeable batteries
Inserting the battery
Open the battery compartment completely using your fingernail as shown
in the illustration.
Insert the proper size battery.
Make sure that the "+" symbol on the
battery points up as shown in the
picture
Close the battery compartment.
Do not force the door shut. If it does not
close easily, check to see if the battery
was inserted properly.
When the battery door is completely
closed, your hearing instrument is ready for use.
10
Handling of standard and rechargeable batteries
Removing the battery
Open the battery compartment completely.
Normally the battery drops out when
the compartment is completely open.
If the battery does not come out, lightly
tap the instrument or use the magnet
stick available as accessory to remove
the battery.
11
Inserting and removing your hearing instrument
Inserting and removing your
hearing instrument
For side recognition ask your Hearing Care
Professional to apply colored markers in the battery compartment. If the marker in the battery
compartment is in red, the hearing instrument is
intended for the right ear. If the marker is in blue,
the hearing instrument is for the left ear.
Inserting your hearing instrument
Turn your hearing instrument
off.
Hold the receiver mold / dome
between your thumb and index
finger and insert it carefully into
the ear canal.
You may find it helpful to pull
your ear slightly upward or to the back.
Place your hearing instrument behind your ear.
Turn your hearing instrument on.
Removing your hearing instrument
Hold the receiver mold / dome
between your thumb and index
finger and carefully pull it out.
You may find it helpful to lightly
push your ear from the back.
12
Turning your hearing instrument on and off
Turning your hearing instrument
on and off
Ask your Hearing Care Professional to check off the
relevant information.
Via battery compartment
On
Close the battery compartment.
Off
Open the battery compartment.
Via push button
On
Press the push button for
2 seconds.
Off (stand by)
Press the push button for 2 seconds.
Via remote control
Refer to the remote control user guide.
13
Turning your hearing instrument on and off
Power-on delay
Your hearing instrument is equipped with a "power-on
delay" feature which can be activated by your Hearing
Care Professional. This allows you to turn the hearing
instrument on with an automatic delay of 6, 12 or 18
seconds, so that you may insert the hearing instrument
into your ear without experiencing unpleasant feedback
(whistling).
14
Changing the hearing program
Changing the hearing program
Via push button
Press the push button.
The hearing instrument changes
to the next program.
Via remote control
Refer to the remote control user guide.
15
Changing the volume
Changing the volume
The volume of your hearing instruments is controlled
automatically and there is no need to manually adjust it.
Should you prefer manual volume control, your Hearing
Care Professional can program the hearing instrument for
manual adjustment.
Automatic
The volume is adjusted automatically when in use.
Via remote control
Refer to the remote control user guide.
16
Functionalities
Functionalities
Your Hearing Care Professional can activate the following
functionalities.
e2e wireless function
■ Allows the use of a remote control.
■ Automatically adjusts both hearing instruments
simultaneously to change the instrument settings, e.g. volume or program.
The performance of the e2e wireless function may
be affected by electromagnetic interference – e.g.
from a computer monitor or fluorescent lamp
system.
Move away from the source of interference if
you experience difficulty.
17
Maintenance and care
Maintenance and care
Your hearing instruments are highly sensitive systems.
Proper care and handling will ensure the best possible
performance.
Clean instruments regularly to prevent damage to the
hearing instruments and to avoid health problems.
NOTICE
Do not put the hearing
instruments in water.
Clean your hearing instruments with a soft, dry tissue,
as necessary.
If the hearing instruments sound distorted or weak ask
your Hearing Care Professional to exchange the microphone cover.
Place your hearing instruments in a "dry aid kit" with a
special moisture-attracting capsule overnight.
Ask your Hearing Care Professional for special care sets
and further information on how to keep your hearing
instruments in good condition.
18
Maintenance and care
Domes and receiver molds
CAUTION
Risk of injury caused by incorrect use of receiver
unit and domes/receiver molds.
Always wear the receiver unit with a dome or
receiver mold.
Make sure that the dome/receiver mold is completely attached to the receiver unit.
If the dome/receiver mold remains in your ear,
have it removed by a medical professional.
Insert the receiver unit with the dome/receiver
mold carefully and not too deeply into the ear.
Use the receiver unit and the dome/receiver
mold only as described in this user guide.
19
Maintenance and care
Your hearing instruments have one of the following ear
pieces:
Single dome
Double dome
Receiver mold
Cleaning domes and receiver molds
Cerumen (ear wax) on the dome/ receiver mold affects
sound quality.
Clean domes/ receiver molds
right after taking the hearing
instruments off.
This way, cerumen can not dry
and harden.
Remove cerumen with a soft tissue. No other tools are required.
To remove dried cerumen,
moisten the soft tissue with a
cerumen solvent. Dab the cerumen with the moistened
tissue and wait a short period of time.
This will loosen the cerumen.
20
Maintenance and care
Exchanging domes
The packaging of your dome has
a slot on one side to remove the
dome from the receiver.
Insert the receiver into the slot
of the dome packaging.
Hold the dome tight while tilting
the receiver towards the packaging (refer to the picture).
Click the tip of the receiver unit
into a new dome.
21
Maintenance and care
Exchanging double domes
Remove the used double dome
from the receiver. Tilt the double
dome to get it off the receiver.
Click the tip of the receiver unit
into a new double dome.
Exchanging receiver molds
Ask your Hearing Care Professional for assistance.
Wax guards
A wax guard prevents earwax from entering the receiver.
Different wax guards are available for your receiver mold.
Ask your Hearing Care Professional for assistance.
22
Maintenance and care
Exchanging the receiver unit
The receiver unit can be changed as needed by
your Hearing Care Professional. If you need to
replace the receiver unit by yourself follow these
directions carefully.
Turn receiver unit 45° counterclockwise.
Remove receiver unit.
Join hearing instrument and receiver
unit together.
Marks need to coincide.
Turn receiver unit 45° clockwise.
23
Accessories
Accessories
Charger
(not for all hearing instrument
types)
Your hearing instruments work
with standard or rechargeable batteries. With the easy-to-use charger
you can charge the rechargeable
batteries for one or two hearing
instruments. After just 6 hours of
charging, the charger shuts itself
off and the hearing instruments are
ready to run for a day.
For detailed information and
instructions refer to the charger
user guide or ask your Hearing Care
Professional.
24
Accessories
Tek wireless enhancement
(not for all hearing instrument types)
Your hearing instruments together
with the Tek Connect remote control
will allow you to connect your hearing instruments to the growing world
of technology. Via a special Bluetooth
connection it is possible to receive
audio signals from your mobile, your
television or your mp3-player.
For detailed information and instructions refer to the Tek user guide or ask
your Hearing Care Professional.
25
Accessories
Remote control
(not for all hearing instrument types)
The wireless function of your hearing instruments allows
you to use a remote control to change the program and
volume of your hearing instruments.
For further information about the remote control, contact
your Hearing Care Professional or refer to the remote
control user guide.
In the event your hearing instruments can be
controlled by another person's remote control,
return hearing instruments and remote control
to your Hearing Care Professional.
26
Troubleshooting
Troubleshooting
Problem
Possible solution
Sound is weak
Replace empty battery.
Clean dome/ receiver mold.
Exchange microphone cover.
Increase volume.
Hearing instrument emits
whistling sounds
Reinsert dome/receiver mold
until it fits securely.
Decrease volume.
Clean dome/receiver mold.
Sound is distorted
Decrease volume.
Replace empty battery.
Clean dome/receiver mold.
Hearing instrument emits
signal tones
Gently close battey compartment completely.
Replace empty battery.
Hearing instrument does
not work.
Turn hearing instrument on.
Gently close battery compartment completely.
Replace empty battery.
Make sure battery is inserted
correctly.
Power-on delay is active. Wait
18 seconds and check again.
Consult your Hearing Care Professional if you encounter
further problems.
27
Technical information
Technical information
Siemens Pure 700, Pure 500, Pure 300
Siemens Pure 701, Pure 501, Pure 301
Siemens Pure SE 701, Pure SE 501
FCC ID: SGI-WL002BTE
IC: 267AB-WL002
Operating frequencies: Fc=3.28 MHz
N14203
This Class B digital apparatus complies with Canadian
ICES-003.
Changes or modifications not expressly approved by
SAT GmbH for compliance could void the users authority
to operate the equipment.
FCC compliance
This device complies with Part 15 of the FCC Rules and
with RSS-310 of Industry Canada.
Operation is subject to the following conditions:
■ this device may not cause harmful interference, and
■ this device must accept any interference received,
including interference that may cause undesired operation.
This equipment has been tested and found to comply with
the limits for a Class B digital device, pursuant to Part 15
of the FCC Rules. These limits are designed to provide reasonable protection against harmful interference in a resi28
Technical information
dential installation. This equipment generates, uses and
can radiate radio frequency energy and, if not installed
and used in accordance with the instructions, may cause
harmful interference to radio communications. However,
there is no guarantee that interference will not occur in a
particular installation. If this equipment does cause harmful interference to radio or television reception, which can
be determined by turning the equipment off and on, the
user is encouraged to try to correct the interference by
one or more of the following measures:
■ Reorient or relocate the receiving antenna.
■ Increase the separation between the equipment and
receiver.
■ Connect the equipment to an outlet on a circuit different from that to which the receiver is connected.
■ Consult the dealer or an experienced radio/TV technician for help.
29
Disposal information
Disposal information
Within the European Union, the marked equipment is covered by "Directive 2002/96/EC of
the European Paliament and of the Council
of 27 January 2003 on waste electrical and
electronical equipment."
Amended by "Directive 2003/108/EC" (WEEE).
Recycle hearing instruments, batteries and accessories according to national regulations.
With the CE marking Siemens confirms compliance
with the European Directive 93/42/EEC concerning
medical devices.
For the products with e2e wireless 2.0 Siemens additionally confirms compliance with the European Directive
99/5/EC (R&TTE) concerning radio and telecommunications terminal equipment.
30
Hearing instrument
LEFT
RIGHT
Model
Serial number
Battery
□ yes □ no
□ yes □ no
Power-on delay
□ yes □ no
Push button
□ yes □ no
Signal tones
□ on □ off
Program change
□ on □ off
□ on □ off
Low battery warning
□ on □ off
□ on □ off
Volume control limit
□ on □ off
□ on □ off
volume control change
□ on □ off
Program
Description of the program
1
2
3
4
5
Remote control
Model
Serial number
31
© Siemens AG, 02.2010 · SB
Document No. A91SAT-00311-99T5-7600
Order/Item No. 104 172 08
Printed in Germany
Siemens Audiologische Technik GmbH
Gebbertstrasse 125
91058 Erlangen
Germany
Phone +49 9131 308 0
www.siemens.com /hearing