1
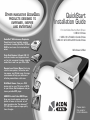
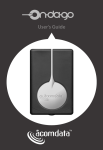
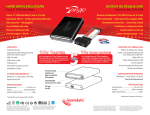
OTHER
INNOVATIVE ACOMDATA
PRODUCTS DESIGNED TO
EMPOWER, INSPIRE
AND ENTERTAIN!
RocketPod™ Hi-Performance Peripherals:
Revolutionary line of portable, modular
peripherals––including DrivePod, DVDPod,
NASPod, and more––that stack without
wires.
QuickStart
Installation Guide
For AcomData External Hard Drives:
• USB 2.0 Drives
• USB 2.0 & FireWire Combo Drives
• USB 2.0 & FireWire 800 Combo Drives
Windows & Mac
Flash Card Readers: Hi-Speed USB 2.0
multi-card readers and single-card readers for fast, convenient transfer of digital
media files to and from your PC or Mac.
Remote Laser Pointer Mouse: Featuring
a built-in laser pointer, full-function wireless mouse, and 40-foot range, this ergonomic device will help you make more
effective presentations––with ease.
MultiMedia Viewer: View your JPEG
photos right on your TV. Listen to MP3s
on your stereo. Add headphones and you
have a portable MP3 player.
AWEGO Portable Tablet DVD Player:
Enjoy your favorite movies, music, and
photos at home, on the road, or just
about anywhere else. The advanced 7”
TFT LCD offers superior image quality
from all angles.
Please retain
this guide for
future reference.
25
Contact
Information
AcomData
3410 Pomona Blvd.
Pomona, CA 91768
Telephone:
(909) 348-0680
Fax:
(909) 598-8663
Web Site:
www.acomdata.com
Customer Service:
[email protected]
Technical Support:
[email protected]
©2004 AcomData.
The AcomData name and its logos are registered trademarks of AcomData.
“RocketPod”, “DrivePod”, “Stack & Play” and the RocketPod logo are trademarks used
under license by AcomData. All other trademarks and logos are the property of their
respective owners.
Prices and specifications are subject to change without notice.
For more information about AcomData products, visit us on the web at www.acomdata.
com.
24
AcomData is not responsible for any damage to, or loss of, any
programs, data, or other information stored on any media or any
part of any Product serviced hereunder. Be sure to remove all
features, parts, options, alterations, and attachments not under
warranty prior to returning the Product to AcomData. AcomData
is not liable for any loss or damage to these items.
This limited warranty does not cover: (1) any consumables (such
as batteries) supplied with this product; cosmetic damages; damage or loss to any software programs, data or removable storage
media; or damage due to the Product such as but not limited to
excessive heat or humidity, or modifications of this Product; (2)
improper installation, operation, testing or maintenance of this
Product; (3) power failure or connection to improper voltage supply; or; (4) attempted repair by any party other than AcomData.
This Warranty does not apply when the malfunction results from
the use of this Product in conjunction with accessories, products
or ancillary or peripheral equipment, or where it is determined by
AcomData that there is no fault with this Product itself.
This Limited Warranty is invalid if the factory applied serial number has been altered or removed from the Product.
Repair or replacement as provided under this warranty is the
exclusive remedy of the consumer. AcomData shall not be liable
for any incidental or consequential damages for breach of any
express or implied warranty, breach of contract, negligence,
strict liability or any other legal theory related to this product.
Such damage include, but are not limited to, loss of profits, loss
of data, loss of use of the product or any associated equipment,
down time and purchaser’s time. Except to the extend prohibited
by applicable law, any implied warranty of merchantability or fitness for a particular purpose on this product is limited in duration
of this warranty.
Some states do not allow the exclusion or limitation of incidental
or consequential damages, or allow limitations on how long on
implied warranty lasts, so the above limitation or exclusions may
not apply to you. This warranty gives you specific rights; you may
have other rights which vary from state to state.
Contents
Introduction ............................................................ 2
FireWire and USB 2.0 Compared.............................. 3
Parts & Accessories List ......................................... 4
System Requirements ............................................. 5
Precautions ............................................................ 6
AcomData External Hard Drive at a Glance ................ 7
Connecting the Drive to Your Computer ..................... 8
Installing the USB 2.0 CD (Windows 98SE/ME) ........ 9
Formatting Your AcomData External Hard Drive .......
Formatting the Drive in Windows 98/ME .................
Formatting the Drive in Windows 2000/XP ...............
Formatting the Drive in Mac OS 9 ..........................
Formatting the Drive in Mac OS 10 .........................
10
11
12
12
13
How to safely dismount and turn off your
AcomData External Hard Drive ............................... 14
Performing Basic Tasks ......................................... 16
Troubleshooting /
Frequently Asked Questions (FAQ) ........................ 17
Glossary ............................................................... 21
One Year Limited Warranty .................................. 23
Contact Information .............................................. 25
2
23
Introduction
One Year
Limited Warranty
Welcome, and thank you
for purchasing an AcomData
External Hard Drive. The information in this QuickStart Guide
pertains to the following models:
AcomData warrants this product (the “Product”) against defects
in material or workmanship as follows:
• USB 2.0 External Hard Drives
• USB 2.0 & FireWire Combo External Hard Drives;
• USB 2.0 & FireWire 800 Combo External Hard Drives.
In photos and illustrations in this guide, Combo Drives are
shown. (Except for the addition of FireWire ports and logos
on Combo Drives, AcomData USB 2.0 and Combo Drives
are visually identical.)
The following alert symbols are used in this guide:
This signifies important information for
ALL users.
This signifies important information for
USB 2.0 users.
This signifies important information for
FireWire users.
USB 2.0 compatibility with USB 1.x
USB 2.0 is backward compatible with USB 1.x. However, if
you connect the Drive to a USB 1.x port, it will operate at
USB 1.x speeds.
Combo Drive Users
You have the choice of using either the USB 2.0 or a
FireWire connection. You cannot use the USB 2.0 and
FireWire connections at the same time. You must select
one interface or the other. If you have both USB 2.0 and
FireWire connections available with your computer system,
you may be wondering which interface to use. To help you
decide, see “FireWire and USB 2.0 Compared” on the next
page.
1. LABOR: For a period of one (1) year from the original date
of purchase from AcomData or its local representative supplier,
AcomData will repair defective Product (or, at its option, replace
with a new or recertified product) at no charge. After this 1 year
period, you must pay for all labor charges.
2. PARTS: For a period of one (1) year from the original date
of purchase from AcomData or its local representative supplier,
AcomData will supply, at no charge, new or rebuilt replacement parts in exchange for defective parts of this Product. Any
replacement parts will be warranted for the remainder of the
original warranty period or ninety (90) days from installation by
AcomData. All exchanged parts replaced under this warranty will
become the property of AcomData.
This warranty only covers the hardware components packaged
with the Product. This warranty does not cover any software
contained in, or included with, the Product; any such software is
provided “AS IS”. Please refer to any documentation included with
the software for your rights and obligations with respect to the
software.
This warranty extends only to you, the original purchaser. It is not
transferable to any one who subsequently purchases the Product
from you.
Proof of purchase in the form of a bill of sale (which is evidence
that the Product is within the warranty period) must be presented
to obtain warranty service.
To obtain warranty service you must take the Product, or deliver
the Product freight prepaid, in either it’s original packaging, or in
a package that provides the Product with a degree of protection
equivalent to that of the original packaging, to AcomData. Please
contact AcomData at the number listed on the reverse side for
further information.
22
3
cally measured in bits (kilobits, megabits etc) per second.
MB (Megabyte) - 1,048,576 bytes.
Operating System (OS) - Software that controls the
assignment and use of hardware and application software
resources.
Peripheral - A generic term for hard drives, printers, scanners and other discreet devices that add functionality to a
computer.
Port - A connection which enables compatible peripherals
to send and receive data.
Software- A set of instructions that enable the computer
to perform pre-programmed functions in the order specified by the user.
Storage - Any equipment which stores data, such as hard
drives, CDs, and DVDs.
FireWire & USB 2.0
Compared
Data transfer rate of 400 Mbps
(FireWire) and 800 Mbps (FireWire
800)
FireWire is suitable for applications
where delayed or out-of-order data
frames are unacceptable, such as digital video editing.
Data transfer rates up to
480 Mbps
With USB, data transfer rates can
vary depending on a number of factors,
including available CPU resources.
Supports up to 63 devices
FireWire devices can be linked in a
daisy-chain configuration. With the use
of FireWire hubs, up to 63 devices can
be linked on a single FireWire bus.
Supports up to 127 devices
Connecting more than one or two USB
devices to a computer typically requires
the use of one or more hubs: each hub
can accommodate several USB devices.
Peer-to-peer architecture
FireWire devices are intelligent. Data
transmission can take place without the
need for input from the computer.
Master-slave architecture
The computer dictates data flow to,
from, and between attached devices.
Cable length up to 4.5 m
Cable length up to 5 m
On-bus power up to 45 W
FireWire can power larger, higher
power consumption devices than USB
2.0.
On-bus power up to 2.5 W
Suitable for low-power-consumption
devices such as flash card readers.
Plug & Play
You do not need to install drivers,
assign unique ID numbers, or connect
terminators.
Plug & Play
You do not need to assign unique ID
numbers, or connect terminators. On
most operating system you do not need
to install drivers.
Hot-swappable
Devices can be added and removed
while the computer is running. Also,
you can turn off the device when not
needed, in order to conserve electricity.
Hot-swappable
Devices can be added and removed
while the computer is running. Also,
you can turn off the device when not
needed, in order to conserve electricity.
4
21
Parts &
Accessories List
The package should contain the following items:
• AcomData External Hard Drive
• USB cable
• FireWire cable
(supplied with Combo Drives only)
• AC adapter and power cord
• USB 2.0 Installation CD
(required for Windows 98SE and ME only)
• Quick Start Installation Guide
• Warranty Registration Card
• If you are missing any items listed above, please contact
Customer Service:
- E-mail: [email protected]
- Telephone: 800-470-4495.
• Please retain a copy of your receipt. You will need it if
warranty repair service is required in the future.
Glossary
Bit - The smallest unit of digital data. In binary code, a bit
is represented logically as a either 1 or a 0.
Buffer - RAM cache that temporarily stores data so it can
be delivered to a device as it is needed.
Bus - An electronic link for the transmission of data
between digital devices, such as computers and computer
peripherals.
Byte - A unit of digital data, usually made up of eight bits.
Daisy Chain - A bus wiring scheme in which, for example,
device A is wired to device B, device B is wired to device
C, etc.
Data Stream - The flow of data between digital devices
such as computers and hard drives.
Driver - Software that enables the computer to communicate with a peripheral.
Gigabyte - 1,024 Megabytes, or approximately one billion
bytes. The capacity of most hard drives is measured in
Gigabytes.
Hardware - Physical components of a computer system
(computer, hard drives, printers, etc.)
Hub - A device which links peripherals together onto the
same bus.
Interface - Junction between two items of hardware or
software for the exchange of data.
Mb (Megabit) - One million bits.
Mbps (Megabits per second) - A data transmission speed
of one million bits per second. Data transmissions are typi-
20
5
Q: I set up my External Hard Drive on Mac OS 9 and it
was working fine. Then when I upgraded to Mac OS X my
computer asked me to re-initialize the Drive.
A: If this message appears, you have no choice but to
re-initialize the Drive in order to use it on Mac OS X. You
will need to copy the data stored on your External Hard
Drive to another hard drive or other storage device before
upgrading to Mac OS X. After the upgrade is complete,
re-initialize the Drive on Mac OS X, and then copy the data
back to it.
Q: Can I partition the External Hard Drive?
A: Not recommended.
Q: Why does my Drive ask me to initialize it when I plug
it into OS 9?
A: Sometimes on Mac OS 9 you may need to initialize the
Drive the first time you connect it to your computer. Follow
the instructions in this manual to format the Drive.
Q: Why is my Drive asking me to format it? It was
already formatted and it contains data.
A: The file system might have become corrupted, in which
case it needs to be repaired. Use disk utility software, such
as Norton Utilities, to repair the disk. Periodic testing of
a hard drive is recommended to keep it in good working
order and prevent the corruption of data.
If an issue cannot resolved by using our FAQ, please contact Technical Support via the AcomData web site: www.
acomdata.com or call: (909) 348-0698.
System Requirements
System Requirement for PC
•
•
•
•
•
Pentium-based PC with 233 MHz or faster CPU
Windows 98SE, ME, 2000, or XP
32 MB RAM
Available USB port (for USB 2.0 Drives)
Available USB port or FireWire port (for Combo Drives)
Windows 98 users:
• Windows 98 First Edition does not support USB 2.0.
The AcomData External Hard Drive will operate at USB 1.x
speeds on Windows First Edition.
• Windows 98 First Edition does not support FireWire. If
using Windows 98, you must have Windows 98SE.
Windows XP users:
In order to use the USB 2.0 connection, you must have at
least Service Pack 1 for Windows XP.
System Requirements for Mac
• Power Macintosh
(G5, G4, Blue & White G3, iBook or iMac)
• Mac OS 9 or Mac OS X
• Available USB port (for USB 2.0 Drives)
• Available USB port or FireWire port (for Combo Drives)
Mac OS 9 Users:
• We recommended using the latest version (OS 9.2.2).
You can download the updates you need at http://docs.
info.apple.com/article.html?artnum=75288.
• Mac OS 9 does not support USB 2.0. The AcomData
External Hard Drive will operate at USB 1.x speeds on OS 9.
6
19
• Mac OS 9 requires USB Mass Storage Support version 1.3.5 or later. You can download the latest update at
http://docs.info.apple.com/article.html?artnum=60394.
• Mac OS 9 requires FireWire Support and Enabler version
2.3.3 or higher. You can download the latest update at:
http://docs.info.apple.com/article.html?artnum=86020.
Precautions
Failure to follow the precautions described below may
cause damage to your AcomData External Hard Drive and
void the warranty.
• DO NOT open the case. Doing so will void the warranty.
• Do not use a third-party AC adapter or power cord.
Doing so may damage the Drive and void the warranty.
• DO NOT bump, jar or drop the Drive as this may damage
it or result in loss of data.
• DO NOT try to set the Drive on its side; it is not designed
to be placed on its side. It may fall over and get damaged.
• DO NOT disconnect any cables while the Drive is powered
on without first properly dismounting the device via your
operating system; doing so can result in data loss and possible damage.
• DO NOT set any liquids or beverages on the Drive as they
may damage the internal electronics.
• AcomData highly recommends that you regularly backup the files stored on your AcomData External Hard Drive.
AcomData is not responsible for any data loss, nor will
AcomData perform any recovery on lost data or files.
sage if you plugged the Drive into a USB port that only support USB 1.x. This is fine, except your Drive will operate
USB 1.x speeds.
FAQs for Mac Users:
Q: I’m using a USB connection on a Mac. Do I need to
install the USB 2.0 Installation CD?
A: No, the External Hard Drive uses the built-in Mac USB
Mass Storage Support software, which includes the necessary system extensions. However, to use the External
Hard Drive you must have USB Mass Storage Support version 1.3.5 or later. You can download the latest update at
http://docs.info.apple.com/article.html?artnum=60394.
Please note: Mac OS 9 does not support USB 2.0, so if
using Mac OS 9, the Drive will operate at USB 1.x speeds.
Q: When I connected the Drive to my computer and
turned it on, I got the following alert message: “Please
insert disk ‘untitled’.”
A: If you get this alert message, your Mac is not recognizing your Drive, and the mouse cursor may actually freeze
on screen. If this happens, hold down the Apple/Control
key and press the Period “.” key. You should regain control
of your mouse. Restart your computer and rebuild the
Desktop. (Refer to the manual that came with your Mac for
instructions on how to rebuild the Desktop. It is good practice to periodically rebuilt the Desktop anyway.) After your
Mac reboots, the Drive should mount normally and you
should not have this problem again.
Q: My computer does not recognize the Drive.
A: First, check to make sure that all of your connections
are secure. Then check if your External Hard Drive is listed
in the Apple System Profiler. If the driver listed is “USB
Authoring Support” or “Toast USB Support”, disable this
Extension(s) in the Extensions Manager. These Extensions
can cause a conflict with the Drive.
18
7
Q: Can you make the External Hard Drive bootable?
A: This depends on your computer’s BIOS (Basic Input/
Output System). The BIOS contains code required to control
a number of miscellaneous functions. Please check with
your computer manufacturer for BIOS updates to determine if your computer’s BIOS supports this feature.
AcomData
External Hard Drive
at a Glance
Q: Is the Drive compatible with Windows NT 4.0?
A: No.
Q: When I leave my computer idle for a while, my Drive
won’t work properly.
A: The most likely cause is that your computer is going
into sleep mode. The immediate solution is to shut down
your computer and turn off the Drive, and then restart
your computer. Once your computer is completely booted
up, turn on the Drive. You should see the Drive mounted
on your Desktop. To prevent this problem from recurring,
open the “Power Settings/Energy Saver” and set it to never
go into sleep mode.
Q: Can I partition the External Hard Drive?
A: Not recommended.
Q: Where are the drivers for 2000/XP?
A: None are needed.
Q: When I try to format my Drive on Windows 2000/XP
I get a “Could not complete format” error.
A: This problem can occur if you are using a USB 2.0 or
FireWire card to connect the Drive. Plug the Drive into a
USB or FireWire port on your computer and try the format
again. You may also come across this error if you are using
Windows 2000 or XP and you try to format the Drive
using the FAT 32 file system. If reformatting the Drive and
you do not need Mac compatibility, Windows 2000/XP
users should use the NTFS files system.
Q: After I connected the Drive to my PC, I got the following alert message: HI-SPEED USB Device Plugged into
non-HI-SPEED USB Hub.” What does this mean?
A: Windows 2000 and XP users will get this alert mes-
Data/Power
indicator light
• Lights green when the
Drive is powered on
• Flashes red when the Drive
is reading or writing data
FireWire ports
(Combo Drives only)
• Two ports for daisy chaining
other FireWire devices
USB port
Power switch
AC adapter power port
Stackable Case
If you need more storage, you
can install additional External
Hard Drives without taking up
more desktop space.
8
17
Connecting the Drive
to Your Computer
1. Plug the AC adapter cord into the power
port on the back of
the Drive. The plug
AcomData
AcomData
should not require
much effort to insert. External
Hard Drive
If the plug will not go
in, do not force it;
the plug is probably
USB 2.0 cable
upside down. Rotate
AC adapter
& power cord
the plug and try again.
Incorrectly inserting
the plug could damage the Drive and void the warranty.
2. Plug the power cord into the cord socket in the AC
adapter. Plug the other end into a three-prong outlet.
3. Plug in the USB 2.0 or FireWire data cable.
Each end of the USB cable has different plugs. One plug
matches the USB port on your computer; the other
matches the USB port on the Drive. Be sure to plug the
correct plug into the corresponding port, or you may
damage the Drive and void the warranty.
• FireWire plugs are shaped so they can only be properly
inserted one way. Be sure to insert the plugs properly or
you may damage the Drive and void the warranty.
• The Drive has two FireWire ports for connecting another FireWire device in a daisy chain. You can use either
port to connect the Drive to your computer.
4. Press the power switch located on the back of the
Drive. Once the Drive is powered up, your computer should
recognize it and the Drive will be ready to use. No formatting is required.
Troubleshooting/
Frequently Asked
Questions (FAQs)
FAQs for PC Users:
Q: My computer does not recognize the Drive.
A: Make sure all of your connections are secure. If you
have an add-on card, make sure it is working properly and/
or update the driver. Also, make sure you have all the latest updates for your Windows operating system.
Q: I do not see my Drive listed in the My Computer window, but it does appear in the Device Manager list.
A: Right-click on My Computer. Select Manage in the
pop-up menu. In the Computer Management window,
select Storage, then select Disk Management. In the Disk
Management window, you should see a list of available storage devices. Look for the Disk that has a capacity closest
to your AcomData External Hard Drive. Right-click on the
right-hand box; in the pop-up menu select Delete Partition.
Once you do this, it will say “Online" & "Unallocated”. Rightclick on the box and select Create New Partition in the
pop-up menu. When the Partition Wizard appears, select
Primary Partition and click on Next. You will see a default
value for the Drive; click Next. You will then see a drive letter (you can change this drive letter if you wish); click Next.
You will then be asked to format the Drive.
Q: Does the Drive work with Norton Ghost?
A: Yes, but only with Norton Ghost 2003.
Q: Do you have “DOS Driver” for the Drive?
A: No.
16
9
Performing Basic Tasks
How to open files and folders stored
on the External Hard Drive
PC and Mac Users
1. Double-click on the Drive icon. A window showing the
files and folders stored on the Drive will appear.
2. Double-click on the file or folder that you want to open.
How to copy files and folders to your
External Hard Drive
Installing
the USB 2.0 CD
(For Windows 98SE and ME* only)
*Windows ME users:
If you have upgraded your Windows ME OS with all of
the latest available updates from Microsoft, you will not
need to install the USB 2.0 CD.
1. After the Drive has been properly connected and turned
on, the Add New Hardware Wizard should appear with
the message: “Found New Hardware --> USB 2.0 Storage
Adapter.” Click Next.
PC Users
2. You will then see the message: “What do you want
Windows to do?” with two options. Select “Search for the
best driver for your device (Recommended).” Click Next.
2. Go to “Edit --> Copy”.
3. In the next window that appears, check the box labeled
CD-ROM drive and insert the USB 2.0 Installation CD into
your CD drive. Click Next.
1. Single-click the file or folder that you want to copy in
order to highlight it.
3. Double-click the Drive icon to open it.
4. If you want to copy the file or folder to a specific folder
on the Drive, double-click that folder to open it.
5. Go to “Edit --> Paste”. The file or folder will copy over.
Mac Users
1. Highlight the file or folder that you want to copy by clicking on it, but do not release the mouse button.
2. While keeping the mouse button pressed down, drag
the highlighted file or folder to the Drive icon or to a specific folder on the Drive.
3. Release the mouse button. The file or folder will copy
over.
4. You will then see the message: “Windows is now ready
to install the best driver for this device…” Click Next.
5. Once the software installation is complete, you will see
the message “Windows has finished installing the software
that your new hardware device requires.” Click Finish and
then eject the CD. You should now see a new icon (a gray
box with a green arrow) next to the time display on your
System Tray.
10
15
Formatting
your AcomData
External Hard Drive
safe to remove the device.
It is not necessary to format your AcomData External Hard
Drive. It was formatted at the factory with the FAT 32 file
system, which makes the Drive both PC and Mac compatible. We provide formatting instructions in the event that
you need to reformat your Drive, or if you want to format
your Drive with a file system other than FAT 32.
Mac Users
Reformatting Options for PC Users
If you are running Windows 2000 or XP and do not plan to
use the Drive on a Mac or on Windows 95 or ME, consider reformatting your Drive with the NTFS file system. NTFS
provides several advantages over FAT 32, including support
for files larger than 4 GB.
Reformatting Options for Mac Users
If you plan to use the Drive only on a Mac, you may want to
consider reformatting your Drive with the Mac OS Extended
file system.
Reformatting the Drive for Cross-Platform Compatibility
If you ever need to reformat your Drive and you need PC/
Mac cross-platform compatibility, you have two recommended options:
1. Format the Drive on a PC with the FAT 32 file system (if
this option is available with your operating system).
2. Format the Drive on Mac OS X v.10.3.x with the DOS
file system.
Although it is possible to format a hard drive on earlier
versions of Mac OS X and on Mac OS 9 using the DOS file
system, we do not recommend this, as an artificial capacity
limit may be imposed on the drive and performance will be
unpredictable.
4. Click OK. The Drive will dismount and you can then safely
turn if off. You may then unplug the power cord and data
cable if you want to disconnect the drive.
Drag the icon for the External Hard Drive to the Trash. The
Drive will dismount and you can then safely turn if off. You
may then unplug the power cord and data cable if you want
to disconnect the drive.
How to turn off and disconnect the
Drive with the computer turned off
(PC and Mac)
When you shut down your computer the Drive dismounts
automatically. With the computer turned off, simply turn off
the Drive. You may then unplug the power cord and data
cable if you want to disconnect the drive.
14
11
How to Safely Dismount
and Turn Off the
External Hard Drive
What do 'mounting' and 'dismounting' mean? When a
device such as a hard drive is mounted, that means the
computer ‘sees’ the device and is able to communicate with
it. When you dismount a device, the computer no longer
sees it. The device may still be running but the computer
cannot access it, as though the device no longer exists.
• Never turn off or unplug a hard drive without dismounting it first. Doing so could cause data on the drive to be
lost or damaged.
How to safely dismount and turn off
the Drive with the computer running
Formatting a hard drive erases all data contained on the
drive. If you wish to reformat your AcomData External
Hard Drive, be sure to create a copy of the files you
wish to keep before reformatting.
Formatting the Drive in
Windows 98SE/ME
1. Double-click on the My Computer icon. In the My
Computer window you should see an icon and drive letter
for the External Hard Drive. (If you are not sure which icon
represents the External Hard Drive, turn off the Drive and
see which icon disappears. Then turn the Drive back on
and wait for the icon to reappear.)
2. Right-click on the drive letter and select Format. In the
Format window, verify the Drive’s capacity; it should be
close to the stated capacity of your Drive in megabytes.
PC Users
3. Under Format type, Select Full; everything else should
be left at the default setting. In the Label field under Other
options you may assign a name to the External Hard Drive.
(The name you assign is limited to 8 characters and no
symbols are allowed.)
2. Left-click on this icon.
4. Click Start. The following warning message will appear:
“This device is either a hard disk or a large removable disk.
Formatting it will destroy all files currently on the drive. Are
you sure you want to format this drive?” If no data was
previously written to the Drive or you already backed up the
data you wish to keep, click OK.
1. Locate the System Tray. The System Tray includes the
time display in the bottom right, and icons to the left of the
time. One of the icons will be an icon with a green, diagonal arrow on it.
On Windows 98SE/ME a rectangle will appear with the
name of the Drive followed by the drive letter.
On Windows 2000/XP you will receive the alert message
“Safely Remove…” or “Stop…” followed by the drive letter
for the device.
3. Left-click on the appropriate device (with the drive letter
matching the one used by the External Hard Drive). After
a few seconds, Windows will give you a message that it is
5. If you see a warning message from an antivirus program, click Exclude.
6. When formatting is complete, you will be asked to run a
thorough Scandisk. Periodically running Scandisk is a part
of regular hard drive maintenance. If you do not wish to run
Scandisk at this time, close the format window.
12
13
Formatting the Drive in
Windows 2000/XP
1. Double-click on My Computer/Explorer. In the My
Computer/Explorer window, you should see the drive letter
for the External Hard Drive. If you are not sure which drive
letter represents the Drive, turn it off and see which one of
the icons disappears. Then turn on the Drive and wait for
the drive letter to reappear.
4. Right-click on the drive letter and select Format… in the
pop-up menu. The Format dialog box will appear.
5. Under Capacity, verify the Drive capacity. It should be
close to the stated capacity of your Drive in gigabytes.
6. In the File System pop-up menu, select NTFS. Do not
select FAT 32 as you cannot format the Drive using the
FAT 32 file system on Windows 2000 or XP. The default
formatting option is Full format. A Full format will take
about 30-90 minutes. A Quick format will take just a few
minutes, but will do less verifying of the Drive than a Full
format. Click Start. Once the format process is complete,
your External Hard Drive is ready to use.
Formatting the Drive
in Mac OS 9
1. On the Desktop, click on the Special pull-down menu
and select Erase Disk… An alert will pop up which says:
“Completely erase disk named...?”
2. In the Name field, assign the Drive a name.
3. From the Format menu, select a format type. If you plan
to use the Drive on Mac only, select Mac OS Extended. If
you also need the Drive to be PC compatible, see the section titled “Formatting Your AcomData External Hard Drive.”
4. Click Initialize. You should then get the alert message:
“Initializing will erase all information on this disk.” Click
Continue. Once initializing is complete, you should see
the Drive mounted on your Desktop with the name you
assigned.
Formatting the Drive
in Mac OS X
1. Launch the Disk Utility application (Disk Utility is located
inside the Utilities folder, which is inside the Applications
folder). The Disk Utility window will open with a small subwindow at left and a larger sub-window with a series of
tabs at the top.
2. You should see the Drive listed in the left sub-window.
Click on the drive to highlight it. Information about the Drive
will appear in the Information sub-window.
3. Click on the Erase tab. In the Erase sub-window you will
see a Volume Format pop-up menu and a Name field.
4. In the Volume Format pop-up, select the format type.
If you plan to use the Drive on Mac only, select Mac OS
Extended. If you also need the Drive to be PC compatible,
see the section titled “Formatting Your AcomData External
Hard Drive” for more information.
5. Click Erase. You should see an alert pop up with the
message: “Erasing a disk will destroy all information on all
of the volumes of the disk…” Click Erase. Once initializing
is complete, you should see the Drive listed in the left subwindow of the Disk Utility screen with whatever name you
assigned. Quit Disk Utility. You should now see the Drive
icon on the Desktop.
14
11
How to Safely Dismount
and Turn Off the
External Hard Drive
What do 'mounting' and 'dismounting' mean? When a
device such as a hard drive is mounted, that means the
computer ‘sees’ the device and is able to communicate with
it. When you dismount a device, the computer no longer
sees it. The device may still be running but the computer
cannot access it, as though the device no longer exists.
• Never turn off or unplug a hard drive without dismounting it first. Doing so could cause data on the drive to be
lost or damaged.
How to safely dismount and turn off
the Drive with the computer running
Formatting a hard drive erases all data contained on the
drive. If you wish to reformat your AcomData External
Hard Drive, be sure to create a copy of the files you
wish to keep before reformatting.
Formatting the Drive in
Windows 98SE/ME
1. Double-click on the My Computer icon. In the My
Computer window you should see an icon and drive letter
for the External Hard Drive. (If you are not sure which icon
represents the External Hard Drive, turn off the Drive and
see which icon disappears. Then turn the Drive back on
and wait for the icon to reappear.)
2. Right-click on the drive letter and select Format. In the
Format window, verify the Drive’s capacity; it should be
close to the stated capacity of your Drive in megabytes.
PC Users
3. Under Format type, Select Full; everything else should
be left at the default setting. In the Label field under Other
options you may assign a name to the External Hard Drive.
(The name you assign is limited to 8 characters and no
symbols are allowed.)
2. Left-click on this icon.
4. Click Start. The following warning message will appear:
“This device is either a hard disk or a large removable disk.
Formatting it will destroy all files currently on the drive. Are
you sure you want to format this drive?” If no data was
previously written to the Drive or you already backed up the
data you wish to keep, click OK.
1. Locate the System Tray. The System Tray includes the
time display in the bottom right, and icons to the left of the
time. One of the icons will be an icon with a green, diagonal arrow on it.
On Windows 98SE/ME a rectangle will appear with the
name of the Drive followed by the drive letter.
On Windows 2000/XP you will receive the alert message
“Safely Remove…” or “Stop…” followed by the drive letter
for the device.
3. Left-click on the appropriate device (with the drive letter
matching the one used by the External Hard Drive). After
a few seconds, Windows will give you a message that it is
5. If you see a warning message from an antivirus program, click Exclude.
6. When formatting is complete, you will be asked to run a
thorough Scandisk. Periodically running Scandisk is a part
of regular hard drive maintenance. If you do not wish to run
Scandisk at this time, close the format window.
10
15
Formatting
your AcomData
External Hard Drive
safe to remove the device.
It is not necessary to format your AcomData External Hard
Drive. It was formatted at the factory with the FAT 32 file
system, which makes the Drive both PC and Mac compatible. We provide formatting instructions in the event that
you need to reformat your Drive, or if you want to format
your Drive with a file system other than FAT 32.
Mac Users
Reformatting Options for PC Users
If you are running Windows 2000 or XP and do not plan to
use the Drive on a Mac or on Windows 95 or ME, consider reformatting your Drive with the NTFS file system. NTFS
provides several advantages over FAT 32, including support
for files larger than 4 GB.
Reformatting Options for Mac Users
If you plan to use the Drive only on a Mac, you may want to
consider reformatting your Drive with the Mac OS Extended
file system.
Reformatting the Drive for Cross-Platform Compatibility
If you ever need to reformat your Drive and you need PC/
Mac cross-platform compatibility, you have two recommended options:
1. Format the Drive on a PC with the FAT 32 file system (if
this option is available with your operating system).
2. Format the Drive on Mac OS X v.10.3.x with the DOS
file system.
Although it is possible to format a hard drive on earlier
versions of Mac OS X and on Mac OS 9 using the DOS file
system, we do not recommend this, as an artificial capacity
limit may be imposed on the drive and performance will be
unpredictable.
4. Click OK. The Drive will dismount and you can then safely
turn if off. You may then unplug the power cord and data
cable if you want to disconnect the drive.
Drag the icon for the External Hard Drive to the Trash. The
Drive will dismount and you can then safely turn if off. You
may then unplug the power cord and data cable if you want
to disconnect the drive.
How to turn off and disconnect the
Drive with the computer turned off
(PC and Mac)
When you shut down your computer the Drive dismounts
automatically. With the computer turned off, simply turn off
the Drive. You may then unplug the power cord and data
cable if you want to disconnect the drive.
16
9
Performing Basic Tasks
How to open files and folders stored
on the External Hard Drive
PC and Mac Users
1. Double-click on the Drive icon. A window showing the
files and folders stored on the Drive will appear.
2. Double-click on the file or folder that you want to open.
How to copy files and folders to your
External Hard Drive
Installing
the USB 2.0 CD
(For Windows 98SE and ME* only)
*Windows ME users:
If you have upgraded your Windows ME OS with all of
the latest available updates from Microsoft, you will not
need to install the USB 2.0 CD.
1. After the Drive has been properly connected and turned
on, the Add New Hardware Wizard should appear with
the message: “Found New Hardware --> USB 2.0 Storage
Adapter.” Click Next.
PC Users
2. You will then see the message: “What do you want
Windows to do?” with two options. Select “Search for the
best driver for your device (Recommended).” Click Next.
2. Go to “Edit --> Copy”.
3. In the next window that appears, check the box labeled
CD-ROM drive and insert the USB 2.0 Installation CD into
your CD drive. Click Next.
1. Single-click the file or folder that you want to copy in
order to highlight it.
3. Double-click the Drive icon to open it.
4. If you want to copy the file or folder to a specific folder
on the Drive, double-click that folder to open it.
5. Go to “Edit --> Paste”. The file or folder will copy over.
Mac Users
1. Highlight the file or folder that you want to copy by clicking on it, but do not release the mouse button.
2. While keeping the mouse button pressed down, drag
the highlighted file or folder to the Drive icon or to a specific folder on the Drive.
3. Release the mouse button. The file or folder will copy
over.
4. You will then see the message: “Windows is now ready
to install the best driver for this device…” Click Next.
5. Once the software installation is complete, you will see
the message “Windows has finished installing the software
that your new hardware device requires.” Click Finish and
then eject the CD. You should now see a new icon (a gray
box with a green arrow) next to the time display on your
System Tray.
8
17
Connecting the Drive
to Your Computer
1. Plug the AC adapter cord into the power
port on the back of
the Drive. The plug
AcomData
AcomData
should not require
much effort to insert. External
Hard Drive
If the plug will not go
in, do not force it;
the plug is probably
USB 2.0 cable
upside down. Rotate
AC adapter
& power cord
the plug and try again.
Incorrectly inserting
the plug could damage the Drive and void the warranty.
2. Plug the power cord into the cord socket in the AC
adapter. Plug the other end into a three-prong outlet.
3. Plug in the USB 2.0 or FireWire data cable.
Each end of the USB cable has different plugs. One plug
matches the USB port on your computer; the other
matches the USB port on the Drive. Be sure to plug the
correct plug into the corresponding port, or you may
damage the Drive and void the warranty.
• FireWire plugs are shaped so they can only be properly
inserted one way. Be sure to insert the plugs properly or
you may damage the Drive and void the warranty.
• The Drive has two FireWire ports for connecting another FireWire device in a daisy chain. You can use either
port to connect the Drive to your computer.
4. Press the power switch located on the back of the
Drive. Once the Drive is powered up, your computer should
recognize it and the Drive will be ready to use. No formatting is required.
Troubleshooting/
Frequently Asked
Questions (FAQs)
FAQs for PC Users:
Q: My computer does not recognize the Drive.
A: Make sure all of your connections are secure. If you
have an add-on card, make sure it is working properly and/
or update the driver. Also, make sure you have all the latest updates for your Windows operating system.
Q: I do not see my Drive listed in the My Computer window, but it does appear in the Device Manager list.
A: Right-click on My Computer. Select Manage in the
pop-up menu. In the Computer Management window,
select Storage, then select Disk Management. In the Disk
Management window, you should see a list of available storage devices. Look for the Disk that has a capacity closest
to your AcomData External Hard Drive. Right-click on the
right-hand box; in the pop-up menu select Delete Partition.
Once you do this, it will say “Online" & "Unallocated”. Rightclick on the box and select Create New Partition in the
pop-up menu. When the Partition Wizard appears, select
Primary Partition and click on Next. You will see a default
value for the Drive; click Next. You will then see a drive letter (you can change this drive letter if you wish); click Next.
You will then be asked to format the Drive.
Q: Does the Drive work with Norton Ghost?
A: Yes, but only with Norton Ghost 2003.
Q: Do you have “DOS Driver” for the Drive?
A: No.
18
7
Q: Can you make the External Hard Drive bootable?
A: This depends on your computer’s BIOS (Basic Input/
Output System). The BIOS contains code required to control
a number of miscellaneous functions. Please check with
your computer manufacturer for BIOS updates to determine if your computer’s BIOS supports this feature.
AcomData
External Hard Drive
at a Glance
Q: Is the Drive compatible with Windows NT 4.0?
A: No.
Q: When I leave my computer idle for a while, my Drive
won’t work properly.
A: The most likely cause is that your computer is going
into sleep mode. The immediate solution is to shut down
your computer and turn off the Drive, and then restart
your computer. Once your computer is completely booted
up, turn on the Drive. You should see the Drive mounted
on your Desktop. To prevent this problem from recurring,
open the “Power Settings/Energy Saver” and set it to never
go into sleep mode.
Q: Can I partition the External Hard Drive?
A: Not recommended.
Q: Where are the drivers for 2000/XP?
A: None are needed.
Q: When I try to format my Drive on Windows 2000/XP
I get a “Could not complete format” error.
A: This problem can occur if you are using a USB 2.0 or
FireWire card to connect the Drive. Plug the Drive into a
USB or FireWire port on your computer and try the format
again. You may also come across this error if you are using
Windows 2000 or XP and you try to format the Drive
using the FAT 32 file system. If reformatting the Drive and
you do not need Mac compatibility, Windows 2000/XP
users should use the NTFS files system.
Q: After I connected the Drive to my PC, I got the following alert message: HI-SPEED USB Device Plugged into
non-HI-SPEED USB Hub.” What does this mean?
A: Windows 2000 and XP users will get this alert mes-
Data/Power
indicator light
• Lights green when the
Drive is powered on
• Flashes red when the Drive
is reading or writing data
FireWire ports
(Combo Drives only)
• Two ports for daisy chaining
other FireWire devices
USB port
Power switch
AC adapter power port
Stackable Case
If you need more storage, you
can install additional External
Hard Drives without taking up
more desktop space.
6
19
• Mac OS 9 requires USB Mass Storage Support version 1.3.5 or later. You can download the latest update at
http://docs.info.apple.com/article.html?artnum=60394.
• Mac OS 9 requires FireWire Support and Enabler version
2.3.3 or higher. You can download the latest update at:
http://docs.info.apple.com/article.html?artnum=86020.
Precautions
Failure to follow the precautions described below may
cause damage to your AcomData External Hard Drive and
void the warranty.
• DO NOT open the case. Doing so will void the warranty.
• Do not use a third-party AC adapter or power cord.
Doing so may damage the Drive and void the warranty.
• DO NOT bump, jar or drop the Drive as this may damage
it or result in loss of data.
• DO NOT try to set the Drive on its side; it is not designed
to be placed on its side. It may fall over and get damaged.
• DO NOT disconnect any cables while the Drive is powered
on without first properly dismounting the device via your
operating system; doing so can result in data loss and possible damage.
• DO NOT set any liquids or beverages on the Drive as they
may damage the internal electronics.
• AcomData highly recommends that you regularly backup the files stored on your AcomData External Hard Drive.
AcomData is not responsible for any data loss, nor will
AcomData perform any recovery on lost data or files.
sage if you plugged the Drive into a USB port that only support USB 1.x. This is fine, except your Drive will operate
USB 1.x speeds.
FAQs for Mac Users:
Q: I’m using a USB connection on a Mac. Do I need to
install the USB 2.0 Installation CD?
A: No, the External Hard Drive uses the built-in Mac USB
Mass Storage Support software, which includes the necessary system extensions. However, to use the External
Hard Drive you must have USB Mass Storage Support version 1.3.5 or later. You can download the latest update at
http://docs.info.apple.com/article.html?artnum=60394.
Please note: Mac OS 9 does not support USB 2.0, so if
using Mac OS 9, the Drive will operate at USB 1.x speeds.
Q: When I connected the Drive to my computer and
turned it on, I got the following alert message: “Please
insert disk ‘untitled’.”
A: If you get this alert message, your Mac is not recognizing your Drive, and the mouse cursor may actually freeze
on screen. If this happens, hold down the Apple/Control
key and press the Period “.” key. You should regain control
of your mouse. Restart your computer and rebuild the
Desktop. (Refer to the manual that came with your Mac for
instructions on how to rebuild the Desktop. It is good practice to periodically rebuilt the Desktop anyway.) After your
Mac reboots, the Drive should mount normally and you
should not have this problem again.
Q: My computer does not recognize the Drive.
A: First, check to make sure that all of your connections
are secure. Then check if your External Hard Drive is listed
in the Apple System Profiler. If the driver listed is “USB
Authoring Support” or “Toast USB Support”, disable this
Extension(s) in the Extensions Manager. These Extensions
can cause a conflict with the Drive.
20
5
Q: I set up my External Hard Drive on Mac OS 9 and it
was working fine. Then when I upgraded to Mac OS X my
computer asked me to re-initialize the Drive.
A: If this message appears, you have no choice but to
re-initialize the Drive in order to use it on Mac OS X. You
will need to copy the data stored on your External Hard
Drive to another hard drive or other storage device before
upgrading to Mac OS X. After the upgrade is complete,
re-initialize the Drive on Mac OS X, and then copy the data
back to it.
Q: Can I partition the External Hard Drive?
A: Not recommended.
Q: Why does my Drive ask me to initialize it when I plug
it into OS 9?
A: Sometimes on Mac OS 9 you may need to initialize the
Drive the first time you connect it to your computer. Follow
the instructions in this manual to format the Drive.
Q: Why is my Drive asking me to format it? It was
already formatted and it contains data.
A: The file system might have become corrupted, in which
case it needs to be repaired. Use disk utility software, such
as Norton Utilities, to repair the disk. Periodic testing of
a hard drive is recommended to keep it in good working
order and prevent the corruption of data.
If an issue cannot resolved by using our FAQ, please contact Technical Support via the AcomData web site: www.
acomdata.com or call: (909) 348-0698.
System Requirements
System Requirement for PC
•
•
•
•
•
Pentium-based PC with 233 MHz or faster CPU
Windows 98SE, ME, 2000, or XP
32 MB RAM
Available USB port (for USB 2.0 Drives)
Available USB port or FireWire port (for Combo Drives)
Windows 98 users:
• Windows 98 First Edition does not support USB 2.0.
The AcomData External Hard Drive will operate at USB 1.x
speeds on Windows First Edition.
• Windows 98 First Edition does not support FireWire. If
using Windows 98, you must have Windows 98SE.
Windows XP users:
In order to use the USB 2.0 connection, you must have at
least Service Pack 1 for Windows XP.
System Requirements for Mac
• Power Macintosh
(G5, G4, Blue & White G3, iBook or iMac)
• Mac OS 9 or Mac OS X
• Available USB port (for USB 2.0 Drives)
• Available USB port or FireWire port (for Combo Drives)
Mac OS 9 Users:
• We recommended using the latest version (OS 9.2.2).
You can download the updates you need at http://docs.
info.apple.com/article.html?artnum=75288.
• Mac OS 9 does not support USB 2.0. The AcomData
External Hard Drive will operate at USB 1.x speeds on OS 9.
4
21
Parts &
Accessories List
The package should contain the following items:
• AcomData External Hard Drive
• USB cable
• FireWire cable
(supplied with Combo Drives only)
• AC adapter and power cord
• USB 2.0 Installation CD
(required for Windows 98SE and ME only)
• Quick Start Installation Guide
• Warranty Registration Card
• If you are missing any items listed above, please contact
Customer Service:
- E-mail: [email protected]
- Telephone: 800-470-4495.
• Please retain a copy of your receipt. You will need it if
warranty repair service is required in the future.
Glossary
Bit - The smallest unit of digital data. In binary code, a bit
is represented logically as a either 1 or a 0.
Buffer - RAM cache that temporarily stores data so it can
be delivered to a device as it is needed.
Bus - An electronic link for the transmission of data
between digital devices, such as computers and computer
peripherals.
Byte - A unit of digital data, usually made up of eight bits.
Daisy Chain - A bus wiring scheme in which, for example,
device A is wired to device B, device B is wired to device
C, etc.
Data Stream - The flow of data between digital devices
such as computers and hard drives.
Driver - Software that enables the computer to communicate with a peripheral.
Gigabyte - 1,024 Megabytes, or approximately one billion
bytes. The capacity of most hard drives is measured in
Gigabytes.
Hardware - Physical components of a computer system
(computer, hard drives, printers, etc.)
Hub - A device which links peripherals together onto the
same bus.
Interface - Junction between two items of hardware or
software for the exchange of data.
Mb (Megabit) - One million bits.
Mbps (Megabits per second) - A data transmission speed
of one million bits per second. Data transmissions are typi-
22
3
cally measured in bits (kilobits, megabits etc) per second.
MB (Megabyte) - 1,048,576 bytes.
Operating System (OS) - Software that controls the
assignment and use of hardware and application software
resources.
Peripheral - A generic term for hard drives, printers, scanners and other discreet devices that add functionality to a
computer.
Port - A connection which enables compatible peripherals
to send and receive data.
Software- A set of instructions that enable the computer
to perform pre-programmed functions in the order specified by the user.
Storage - Any equipment which stores data, such as hard
drives, CDs, and DVDs.
FireWire & USB 2.0
Compared
Data transfer rate of 400 Mbps
(FireWire) and 800 Mbps (FireWire
800)
FireWire is suitable for applications
where delayed or out-of-order data
frames are unacceptable, such as digital video editing.
Data transfer rates up to
480 Mbps
With USB, data transfer rates can
vary depending on a number of factors,
including available CPU resources.
Supports up to 63 devices
FireWire devices can be linked in a
daisy-chain configuration. With the use
of FireWire hubs, up to 63 devices can
be linked on a single FireWire bus.
Supports up to 127 devices
Connecting more than one or two USB
devices to a computer typically requires
the use of one or more hubs: each hub
can accommodate several USB devices.
Peer-to-peer architecture
FireWire devices are intelligent. Data
transmission can take place without the
need for input from the computer.
Master-slave architecture
The computer dictates data flow to,
from, and between attached devices.
Cable length up to 4.5 m
Cable length up to 5 m
On-bus power up to 45 W
FireWire can power larger, higher
power consumption devices than USB
2.0.
On-bus power up to 2.5 W
Suitable for low-power-consumption
devices such as flash card readers.
Plug & Play
You do not need to install drivers,
assign unique ID numbers, or connect
terminators.
Plug & Play
You do not need to assign unique ID
numbers, or connect terminators. On
most operating system you do not need
to install drivers.
Hot-swappable
Devices can be added and removed
while the computer is running. Also,
you can turn off the device when not
needed, in order to conserve electricity.
Hot-swappable
Devices can be added and removed
while the computer is running. Also,
you can turn off the device when not
needed, in order to conserve electricity.
2
23
Introduction
One Year
Limited Warranty
Welcome, and thank you
for purchasing an AcomData
External Hard Drive. The information in this QuickStart Guide
pertains to the following models:
AcomData warrants this product (the “Product”) against defects
in material or workmanship as follows:
• USB 2.0 External Hard Drives
• USB 2.0 & FireWire Combo External Hard Drives;
• USB 2.0 & FireWire 800 Combo External Hard Drives.
In photos and illustrations in this guide, Combo Drives are
shown. (Except for the addition of FireWire ports and logos
on Combo Drives, AcomData USB 2.0 and Combo Drives
are visually identical.)
The following alert symbols are used in this guide:
This signifies important information for
ALL users.
This signifies important information for
USB 2.0 users.
This signifies important information for
FireWire users.
USB 2.0 compatibility with USB 1.x
USB 2.0 is backward compatible with USB 1.x. However, if
you connect the Drive to a USB 1.x port, it will operate at
USB 1.x speeds.
Combo Drive Users
You have the choice of using either the USB 2.0 or a
FireWire connection. You cannot use the USB 2.0 and
FireWire connections at the same time. You must select
one interface or the other. If you have both USB 2.0 and
FireWire connections available with your computer system,
you may be wondering which interface to use. To help you
decide, see “FireWire and USB 2.0 Compared” on the next
page.
1. LABOR: For a period of one (1) year from the original date
of purchase from AcomData or its local representative supplier,
AcomData will repair defective Product (or, at its option, replace
with a new or recertified product) at no charge. After this 1 year
period, you must pay for all labor charges.
2. PARTS: For a period of one (1) year from the original date
of purchase from AcomData or its local representative supplier,
AcomData will supply, at no charge, new or rebuilt replacement parts in exchange for defective parts of this Product. Any
replacement parts will be warranted for the remainder of the
original warranty period or ninety (90) days from installation by
AcomData. All exchanged parts replaced under this warranty will
become the property of AcomData.
This warranty only covers the hardware components packaged
with the Product. This warranty does not cover any software
contained in, or included with, the Product; any such software is
provided “AS IS”. Please refer to any documentation included with
the software for your rights and obligations with respect to the
software.
This warranty extends only to you, the original purchaser. It is not
transferable to any one who subsequently purchases the Product
from you.
Proof of purchase in the form of a bill of sale (which is evidence
that the Product is within the warranty period) must be presented
to obtain warranty service.
To obtain warranty service you must take the Product, or deliver
the Product freight prepaid, in either it’s original packaging, or in
a package that provides the Product with a degree of protection
equivalent to that of the original packaging, to AcomData. Please
contact AcomData at the number listed on the reverse side for
further information.
24
AcomData is not responsible for any damage to, or loss of, any
programs, data, or other information stored on any media or any
part of any Product serviced hereunder. Be sure to remove all
features, parts, options, alterations, and attachments not under
warranty prior to returning the Product to AcomData. AcomData
is not liable for any loss or damage to these items.
This limited warranty does not cover: (1) any consumables (such
as batteries) supplied with this product; cosmetic damages; damage or loss to any software programs, data or removable storage
media; or damage due to the Product such as but not limited to
excessive heat or humidity, or modifications of this Product; (2)
improper installation, operation, testing or maintenance of this
Product; (3) power failure or connection to improper voltage supply; or; (4) attempted repair by any party other than AcomData.
This Warranty does not apply when the malfunction results from
the use of this Product in conjunction with accessories, products
or ancillary or peripheral equipment, or where it is determined by
AcomData that there is no fault with this Product itself.
This Limited Warranty is invalid if the factory applied serial number has been altered or removed from the Product.
Repair or replacement as provided under this warranty is the
exclusive remedy of the consumer. AcomData shall not be liable
for any incidental or consequential damages for breach of any
express or implied warranty, breach of contract, negligence,
strict liability or any other legal theory related to this product.
Such damage include, but are not limited to, loss of profits, loss
of data, loss of use of the product or any associated equipment,
down time and purchaser’s time. Except to the extend prohibited
by applicable law, any implied warranty of merchantability or fitness for a particular purpose on this product is limited in duration
of this warranty.
Some states do not allow the exclusion or limitation of incidental
or consequential damages, or allow limitations on how long on
implied warranty lasts, so the above limitation or exclusions may
not apply to you. This warranty gives you specific rights; you may
have other rights which vary from state to state.
Contents
Introduction ............................................................ 2
FireWire and USB 2.0 Compared.............................. 3
Parts & Accessories List ......................................... 4
System Requirements ............................................. 5
Precautions ............................................................ 6
AcomData External Hard Drive at a Glance ................ 7
Connecting the Drive to Your Computer ..................... 8
Installing the USB 2.0 CD (Windows 98SE/ME) ........ 9
Formatting Your AcomData External Hard Drive .......
Formatting the Drive in Windows 98/ME .................
Formatting the Drive in Windows 2000/XP ...............
Formatting the Drive in Mac OS 9 ..........................
Formatting the Drive in Mac OS 10 .........................
10
11
12
12
13
How to safely dismount and turn off your
AcomData External Hard Drive ............................... 14
Performing Basic Tasks ......................................... 16
Troubleshooting /
Frequently Asked Questions (FAQ) ........................ 17
Glossary ............................................................... 21
One Year Limited Warranty .................................. 23
Contact Information .............................................. 25
25
Contact
Information
AcomData
3410 Pomona Blvd.
Pomona, CA 91768
Telephone:
(909) 348-0680
Fax:
(909) 598-8663
Web Site:
www.acomdata.com
Customer Service:
[email protected]
Technical Support:
[email protected]
©2004 AcomData.
The AcomData name and its logos are registered trademarks of AcomData.
“RocketPod”, “DrivePod”, “Stack & Play” and the RocketPod logo are trademarks used
under license by AcomData. All other trademarks and logos are the property of their
respective owners.
Prices and specifications are subject to change without notice.
For more information about AcomData products, visit us on the web at www.acomdata.
com.
OTHER
INNOVATIVE ACOMDATA
PRODUCTS DESIGNED TO
EMPOWER, INSPIRE
AND ENTERTAIN!
RocketPod™ Hi-Performance Peripherals:
Revolutionary line of portable, modular
peripherals––including DrivePod, DVDPod,
NASPod, and more––that stack without
wires.
QuickStart
Installation Guide
For AcomData External Hard Drives:
• USB 2.0 Drives
• USB 2.0 & FireWire Combo Drives
• USB 2.0 & FireWire 800 Combo Drives
Windows & Mac
Flash Card Readers: Hi-Speed USB 2.0
multi-card readers and single-card readers for fast, convenient transfer of digital
media files to and from your PC or Mac.
Remote Laser Pointer Mouse: Featuring
a built-in laser pointer, full-function wireless mouse, and 40-foot range, this ergonomic device will help you make more
effective presentations––with ease.
MultiMedia Viewer: View your JPEG
photos right on your TV. Listen to MP3s
on your stereo. Add headphones and you
have a portable MP3 player.
AWEGO Portable Tablet DVD Player:
Enjoy your favorite movies, music, and
photos at home, on the road, or just
about anywhere else. The advanced 7”
TFT LCD offers superior image quality
from all angles.
Please retain
this guide for
future reference.