1
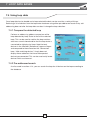
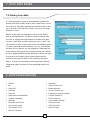
Fire
HEADING
LP800 Loop Tester
User Manual V1.3.0
CONTENTS
1
Table of contents
2
2
Hardware connections
3
3
Software
3.1
3.2
3
3
3
Installation
Start up
4
Loop devices
4.1
Pre-addressed
4.1.1
Retrieve existing devices
4.1.2
Standard search
4.1.3
Search defined range
4.1.4
Search range of selected loop
4.2
Soft addressing
4.3
Remove addresses
4-5
4
4
4
4
4
5
5
5
Device statuses
5.1
Device icons
5.1.1
Analogue values
5.1.2
Details
5.1.3
Test LED
5.1.4
Automatic test LED
5.1.5
Cycling test LEDs
5.2
Device settings
5.2.1
Device classes
5.2.2
Copying settings
5.3
Filters
5-8
5
6
6
7
7
7
7
8
8
8
6
Reports
6.1
6.1.1
6.1.2
6.1.3
6.2
9
9
9
9
9
9
History log
Communication
Event
Device status
Loop overview
7
Loop databases
7.1
What is a loop database?
7.2
Loop database sources
7.2.1
Site Installer database
7.2.2
From a panel
7.3
Selecting a loop
7.4
Using loop data
7.4.1
Compare the detected loop
7.4.2
Pre-addressed search
7.5
Saving loop data
10-12
10
10
10
10
10
11
11
11
12
8
Supported devices
12
2
2 HARDWARE CONNECTIONS
HEADING
The loop tester hardware requires a free serial port on the
PC, either internal or via a USB extension, a mains power
supply and a direct connection to the device loop. It need
only be connected to one end of the loop, effectively making
it a spur.
• Connect the loop leads into the loop tester hardware
ensuring to match the positive and negative
sides of the connection.
• Connect the device to the PC serial port using a regular RS232 cable.
• Power up the device before loading the PC software to avoid confusion.
3 SOFTWARE
3.1 Installation
The install program will guide you through the setup process, including asking for a password. This
password is to prevent unauthorised and/or accident readdress of loop devices. See “Soft
addressing.” The password maybe left blank if desired.
3.2 Start up
On start up, the application will attempt to connect to the
loop device via the com port last used. On first run, no
connection will be attempted until a port is selected from the
list. Upon successfully opening the com port an initial
handshake with the hardware is performed. If this fails,
please ensure all hardware is correctly connected and the
device has a working mains power supply. If the device is
connected to a port other than the default, select it from the
drop down list. This will restart the connection and handshake process. If the port you’re using is not
listed, seek technical advice from your administrator or consult your hardware documentation.
Upon successful connection to the loop tester hardware, you will be informed in the status bar and
the features for interfacing with the loop will be enabled.
3
PUBLIC
4
LOOP ACCESS
DEVICESLEVEL 1
Before devices on the loop can be interfaced with, they need to be addressed and learned by the
loop tester. If the loop being tested is already commissioned, using the existing device addresses is
advisable under normal circumstances. Once the loop devices have been learnt by either of the
processes below, the features for querying the loop devices will be enabled and the view will
automatically switch to the “Devices” pane.
4.1 Pre-addressed
This process simply queries the loop for all devices and uses their existing address. No change to the
devices take place and is thus suitable for working on an already commissioned loop.
4.1.1 Retrieve existing devices
Simply and quickly retrieves devices currently known to the loop tester hardware. No querying
of the loop is performed. This does require that hardware have learnt the contents of the loop
since being power up.
4.1.2 Standard search
A standard search polls each address in turn until no device is found. This is fine if you are sure
the loop is complete and all devices are addressable. If you believe otherwise, see sections
4.1.3 and 4.1.4.
4.1.3 Search defined range
Like a standard search, but this will search all addresses in turn up to a define point entered by
the user. This will allow the hardware to detect all connected devices, even if earlier devices are
missing or otherwise un-addressable.
4.1.4 Search range of selected loop
Functionally identical to “Search defined range” except the range is defined according to the
currently selected loop data. See section 7 “Loop databases” for details on loading and using
loop data.
4
4 LOOP DEVICES
HEADING
4.2 Soft addressing
Soft addressing will assign a new, and potentially different, address to every device found on the
loop. This does mean that once testing is complete, the loop will have to be commissioned again by
the panel it is to be connected to. Do not use this option unless you have to. A password will be
required from the user to initiate the soft addressing process to avoid unauthorised and/or accidental
readdressing of commissioned loop devices. See “Installation.”
4.3 Remove addresses
Removes the address from all connected devices; essentially resetting them back to factory settings.
This option requires the same password as “Soft addressing” for the same reasons.
5 DEVICE STATUSES
5.1 Device icons
The “Devices” pane will show all known devices on the loop.
If a device is missing it most likely indicates a problem with
the physical connections in the loop. This will need to be
resolved before any interaction with the missing devices will
be possible. A “Missing device” icon will be displayed if the
loop was searched over a specific range.
The device icons each show a symbolic representation of
the device type along with its given address. Devices are
displayed in address order, although this may be different to the order they are physically connected.
To the right of this, the textual device type, analogue value and status as determined by its analogue
value. See “Device settings.”
If an “Unknown device” appears on your loop, it could be that the device is faulty and sending an
incorrect type ID back to the loop tester hardware. This can be confirmed in the communications log.
It could also mean that the version of Loop Tester you are using does not recognise the device
because it is new. Please obtain a newer release of the software. Section 8 lists currently support
devices.
5
SILENCE
5
DEVICEALARMS
STATUSES
5.1 Device icons
The “Devices” pane will show all known devices on the loop.
If a device is missing it most likely indicates a problem with
the physical connections in the loop. This will need to be
resolved before any interaction with the missing devices will
be possible. A “Missing device” icon will be displayed if the
loop was searched over a specific range.
The device icons each show a symbolic representation of
the device type along with its given address. Devices are
displayed in address order, although this may be different to the order they are physically connected.
To the right of this, the textual device type, analogue value and status as determined by its analogue
value. See “Device settings.”
If an “Unknown device” appears on your loop, it could be that the device is faulty and sending an
incorrect type ID back to the loop tester hardware. This can be confirmed in the communications log.
It could also mean that the version of Loop Tester you are using does not recognise the device
because it is new. Please obtain a newer release of the software. Section 8 lists currently support
devices.
5.1.1 Analogue values
Upon retrieving a list of devices, an initial query for analogue values is performed. During this
time, all devices may appear in the fault state, this is perfectly normal. These values can be
refreshed at any time using the “Refresh now” button; this may take a few seconds depending
on the number of devices connected. It will not detect devices added or removed from the
loop. Those removed will receive an analogue value of 0 (zero) which will be taken to indicate a
fault on that device. Analogue value refresh may to scheduled to occur at regular intervals by
setting an interval (this is the delay between successfully retrieving analogue values and
beginning the process again, not between beginning the process once and beginning it a
subsequent time) and checking the box labelled “Automatically refresh every” This feature will
enable you to visit and test (with a smoke can for example) each device whilst recording the
results. See “Reports” for how to make use of this information.
5.1.2 Details
Each device will have its analogue value processed to produce its status, status text and status
colour. The processing performed varies between devices and is outside the scope of this
document.
6
5 DEVICE STATUSES
HEADING
5.1.3 Test LED
The test LED of any device can be enabled or disabled from this pane. Right click on the
device icon and select “Toggle test LED”. Also, on small loops, options for turning the test LED
on for all devices is available from the “Settings and Commands” pane. Note: enabling the test
LED of a sounder will cause the sounder to enter the alarm state.
5.1.4 Automatic test LED
It is also possible to illuminate the test LED for all devices currently displayed, by checking the
“Illuminate visible” check box. See section 5.3 on filtering which devices are displayed and
which are hidden. If this is used along with the automatic analogue value refresh feature, it can
be used to turn the test LED on and off according to device state. This feature may be used,
for example, when locating devices requiring maintenance.
5.1.5 Cycling test LEDs
In the case of large loops when it is impossible to turn
all LEDs on, the feature to cycle through each one in
turn is available. You can either step through the
devices in turn yourself using the next and previous
buttons or if you wish, you can start the process of
automatically stepping through them. The delay can
be adjusted in the cases where you need time to get
from one to the next to confirm the test is successful.
Because the cycle is performed in address order, this also allows you to confirm the devices
are physically connected to the points you would expect.
5.2 Device settings
All devices are broken down into one of three general categories according to how the analogue
value of the device is processed. Each device can then have the details of this altered. Note that
retrieving a device list, either by pre-addressed or by soft addressing, will remove any changes made
to these values.
7
5 DEVICE STATUSES
5.2.1 Device classes
5.2.1.1 Analogue
Devices that fall into this category have their value interpreted according to ranges for OK, Prealarm and Alarm. The boundaries for these ranges can be changed. Any value that is outside
these ranges will be interpreted as a fault.
5.2.1.2 Enumerating
The analogue values of these devices are assigned specifically. A list of values for OK, Prealarm and Alarm can be assigned. These lists should be space separated (e.g. “10 20 30”). Any
value not in any list will be interpreted as a fault.
5.2.1.3 Binary
Binary devices use their analogue values to indicate a set of flags. No changes can be made to
the way these flags are interpreted. Loop Tester will interpret them according the device
specification.
5.2.2 Copying settings
Once a device has had its settings changed, those settings can be copied to similar and
identical devices. Identical devices would be those of the same type, e.g. copying the settings
of one optical detector to all other optical detectors, whereas a similar device would be one in
the same class, e.g. copying the settings of an ion detector to all devices in the analogue class.
5.3 Filters
When working with very large loops, it may not be possible to show all device icons on screen at
once. In this case, it is possible to filter the list of displayed icons according to their type (either
specific device types or by the more general types listed above) and/or by their status, as determined
by their current settings and analogue value. The impact on device visibility according to status is reevaluated upon a refresh of analogue values. For example, selecting “Alarm” would clear the display
of all devices to begin with, but triggering a call point with a key would cause it to appear the next
time its analogue value is refreshed. If the “illuminate visible” check box is checked, the test LED of
each device will be adjusted according to its currently visibility.
8
6 REPORTS
Two flavours of log are available depending on what details you need.
6.1 History log
This log shows all the history of events that have taken place on the loop since the application was
started (or the log was manually cleared.) It is possible to only select certain event types to reduce
report size and improve readability. This report is available from the “Communication history” pane.
6.1.1 Communication
This is a very low level log of all communication between the PC and the loop tester hardware.
Its verbosity makes it useful only for diagnosing faults and producing very large reports.
6.1.2 Event
This will show a summarised version of the communication log indicating the beginning and
end of operations, such as retrieving analogue values. It can be mixed with the communication
log to provide an indication of what operation produced what communication data.
6.1.3 Device status
These log events simply show when a device changed state and can be used to provide a
history of the loop status over a long period of time, perhaps while a visit it each device took
place.
6.2 Loop overview
The loop overview simply provides a report of all devices found on their loop along with current
status, a count of how many times each device has been in any given state and finally a summary of
the loop.
9
7 LOOP DATA BASES
7.1 What is a loop database?
A loop database is the computer record of what devices are connected to the loop. This database
can be used to compare what has been found by the loop tester to what is believed should be there
according to the system installation.
7.2 Loop database sources
A loop database can be acquired from one of two places as follows.
7.2.1 Site Installer database
If you have access to the Site Installer database used to commission the loop being tested, it
can be loaded directly into Loop Tester for comparison. Click “Use loop database” and then
“Load from Site Installer.” If you have used this feature before, recently used files will be
available from the menu; otherwise you can select “Open…” to browse for another one. All
loops on all panels contained within the database will be loaded into Loop Tester.
7.2.2 From a panel
If a panel is present and commissioned and you have the required supervisor access codes,
you can download the loop database from the panel itself. Put the panel into commissioning
mode and begin the “Download CDR to Laptop” process, then selected “Download from
panel” and the com port being used. The download may take a while depending on the size of
the CDR and the application may become unresponsive in this time; this is normal. Note: If you
are using a single com port for both the CDR download and the loop tester, you will be
automatically disconnected from the loop tester when the transfer begins. As such you will
need to reconnect by selecting the com port from the “Settings and Commands” pane, see
section 3.2 for details.
7.3 Selecting a loop
After loop data has been loaded by any of the processes detailed in section 7.2, the menu will
contain the “Select panel” option. Under the option will be all the panels loaded and under each of
these will be the loops on these panels. You may select a different loop as often as you wish and you
may also load more databases after a selection has been made.
10
7 LOOP DATA BASES
7.4 Using loop data
Once loop data has be loaded and a loop selected the data can be used for a variety of things.
Retrieving a list of devices from the loop tester hardware using either pre-addressed search or by soft
addressing does not alter the loop data nor does it change the loop selection.
7.4.1 Compare the detected loop
Perform an address by address comparison of the
loop detected by Loop Tester to that of the selected
loop. This can be used to confirm the loop matches
what was commissioned and/or that the loop tester is
connected to right physical loop. Note that only
devices in the selected (“Reference”) loop are shown
and compared to those found on the “Connected”
loop. “Hide matching devices” simply does not
display those addresses that have the expected
device type connected. This can be used easily locate
devices which are incorrect.
7.4.2 Pre-addressed search
As discussed in section 4.1.4, you can search the loop for all devices on the loop according to
the database.
11
7 LOOP DATA BASES
7.5 Saving loop data
It is also possible to create a loop database (suitable for
loading into Site Installer) directly from Loop Tester. Once a
list of devices has been retrieved and verified to be correct,
you can select “Save to Site Installer” from the “Use loop
database” menu.
Shown to the right are the options that must be filled in
prior to saving the data. The Site Installer Database path
must be an already existing database created using Site
Installer. Loop Tester cannot create one from scratch. You
can however create a new panel within that database given
its name, type and network address. You can also replace
the data for any loop on any existing panel. Repeated use
of this feature on each physical loop will allow the creation
of a fully populated Site Installer database without the need
of a panel or the tedious job of inserting each device
manually. Note that all devices will be initially placed in
Zone 1 and will all have default cause and effect settings.
Loop tester does not allow for the uploading of data to a
panel.
8 SUPPORTED DEVICES
•
•
•
•
•
•
•
•
•
•
•
•
Optical
Ion
Heat A1R
Heat BS
Heat CS
Optical heat combination
Carbon monoxide
Sounder
Sounder control unit
Voice annunciator
3-Channel IO unit
Manual call point
•
•
•
•
•
•
•
•
•
•
•
12
Repeater
Zone monitor unit
Beam detector
Access control unit
Emergency lighting module
4-20ma interface
SP40s interface
Associated controller
Technical input
Technical timer
Non-fire input
NOTES
13
LP800 Loop Testet
PR209-165-501-02M
PINSTLP800
Cooper Lighting and Safety Ltd
Wheatley Hall Road, Doncaster, South Yorkshire. DN2 4NB
www.cooperfire.com
Sales
Technical
Export
T: +44 (0)1302 303999
F: +44 (0)1302 303333
E: [email protected]
T: +44 (0)1302 303350
F: +44 (0)1302 303332
E: [email protected]
T: +44 (0)1302 303250
F: +44 (0)1302 303251
E: [email protected]
CC1747