1
640H
Music server
User’s manual
2
ENGLISH
azur
Contents
Introduction
Introduction .................................................................................................2
Thank you for purchasing this Cambridge Audio 640H Music Server. In
the last few years hard disk technology and compressed audio formats
such as MP3 and AAC have revolutionised the way we listen to and store
music. Yet despite these technological advances, so far there hasn't
been a solution which combines true audiophile standards of
effective
reproduction with a high capacity storage server in a cost-e
package. This, we hope you’ll agree, changes with the launch of the
640H with AudioFile™ – a suite of proprietary embedded software
developed to manage storage, transfer and playback of music in a real
hi-ffi environment.
End User Licence Agreement.....................................................................3
Technical specifications..............................................................................3
Limited warranty..........................................................................................4
Safety precautions ......................................................................................4
Important safety instructions .....................................................................5
Rear panel connections..............................................................................6
Front panel controls ...................................................................................7
Remote control ............................................................................................8
Remote control of matching products .......................................................8
Introduction to AudioFile.............................................................................9
Getting started with your 640H............................................................9-12
Extra features of the 640H ................................................................13-15
Custom installation (C.I.) use...................................................................15
Product upgrades .....................................................................................15
Networking your 640H .............................................................................16
Setting up IP addresses for your network ...............................................17
PC/PDA control .........................................................................................18
Album art management ...........................................................................18
Troubleshooting.........................................................................................19
About this unit
AudioFile is seen for the first time in the 640H Music Server, where you
can appreciate the quality of music reproduction you've come to expect
from Cambridge Audio matched to a capacious 160GB AV quality hard
drive and a high speed CD burner. With such a large hard drive available,
approximately 300 albums can be stored in uncompressed format for
the highest sound quality.
Other features include a Hi-fi DAC board using the same Wolfson DAC
and proprietary balanced virtual earth filter technology as used in our
Azur CD players; an Audiophile oversize toroidal transformer where most
competitors use a PC power supply; and no fewer than seven linear
regulated PSUs (Power Supply Units) for all the critical audio stages,
DAC, clock etc.
Once your music is stored in uncompressed or compressed MP3 format
(where you can choose the compression level) you can form your own
personal music library to make music compilations for use in your home,
burn to CD or transfer to portable media players. Share uncompressed
or compressed music files via a wired or wireless network and playback
music from your PC or Mac (stored in programs such as iTunes™ or
Windows Media Player) or other network devices via the 640H.
The 640H can also stream to and from other AudioFile based units in
your home or even your PC/Mac via wired or wireless network
technology using ethernet/Wi-Fi adaptors. On-board internet radio gives
you access to stations across the world, and unlike a PC, the 640H
offers virtually instant start-up and shut-down from Standby mode.
To access the comprehensive on-screen display menus, it is
recommended you connect your 640H to a TV (via Composite, S-Video
or VGA OSD outputs). An Azur Navigator remote control is also provided,
giving full remote control of your 640H in an attractive and easy to use
handset.
Finally, to allow seamless integration with multi-room entertainment
systems, a Control Bus input and output have been fitted, plus an IR
emitter input and RS232C.
Your 640H can only be as good as the system it is connected to. Please
do not compromise on your amplifier, speakers or cabling. Naturally we
particularly recommend amplification from the Cambridge Audio Azur
range, which have been designed to the same exacting standards as
this unit. Your dealer can also supply excellent quality Cambridge Audio
interconnects to ensure your system realises its full potential.
Thanks for taking the time to read this manual, we do recommend you
keep it for future reference.
Matthew Bramble
Technical Director
2
azur
640H
Technical specifications
You have acquired a device ("DEVICE") which includes software licensed
by Cambridge Audio from one or more software licensors (Cambridge
Audio's “SOFTWARE SUPPLIERS").
Hard Drive
160GB hard drive
Processor
VIA C3 1GHz
Such software products, as well as associated media, printed materials
and "online" or electronic documentation ("SOFTWARE") are protected by
international intellectual property laws and treaties. The SOFTWARE is
licensed, not sold. All rights reserved.
D/A Converter
Wolfson WM8740
24-Bit/192kHz capable
Frequency Response
20Hz - 20kHz +/- 1dB (PCM)
THD
<0.008% @ 1kHz 0dB (PCM)
S/N Ratio
>104 dB 'A' weighted (PCM)
Playback Formats
•Uncompressed PCM
44.1kHz / 16-Bit
48kHz / 16-Bit
•Windows Media Audio (.wma)
32, 48, 64, 96, 128, 160, 192 kbps
CBR or VBR, Voice
•Fraunhofer MPEG-1 Layer 3 (.mp3)
48, 96, 128, 160, 192VBR, 192CBR
and 320kb
•Advanced Audio Coding (.aac)
•Microsoft MPEG-1 Layer 1
•Microsoft MPEG-1 Layer 2
•Waveform Audio (.wav)
•Sound File (.snd)
•Unix Audio (.au)
•Audio Interchange File Format
(.aif, .aiff, .aifc)
Input Voltage
UK/EU/AU 230V AC ~ 50Hz
CU 115V AC ~ 50-60Hz
IF YOU DO NOT AGREE TO THIS END USER LICENSE AGREEMENT
("EULA"), DO NOT USE THE DEVICE. INSTEAD, PROMPTLY CONTACT
CAMBRIDGE AUDIO FOR INSTRUCTIONS ON RETURN OF THE UNUSED
DEVICE FOR A REFUND. ANY USE OF THE SOFTWARE, INCLUDING BUT
NOT LIMITED TO USE OF THE DEVICE, WILL CONSTITUTE YOUR
AGREEMENT TO THIS EULA (OR RATIFICATION OF ANY PREVIOUS
CONSENT).
GRANT OF SOFTWARE LICENSE. This EULA grants you the following
license:
•USE. You may use the SOFTWARE only on the DEVICE
•NOT FAULT TOLERANT. The SOFTWARE is not fault tolerant. Cambridge
Audio has independently determined how to use the SOFTWARE in the
DEVICE and the SOFTWARE SUPPLIERS have relied upon Cambridge
Audio to conduct sufficient testing to determine that the software is
suitable for such use.
•NO WARRANTIES FOR THE SOFTWARE. The SOFTWARE is provided "AS
IS" and with all faults. The entire risk as to satisfactory quality,
performance accuracy, and efforts (including lack of negligence) is
with you. Also, there is no warranty against interference with your
enjoyment of the SOFTWARE or against infringement. If you have
received any warranties regarding the DEVICE or the SOFTWARE, those
warranties do not originate from, and are not binding on SOFTWARE
SUPPLIERS.
• NO LIABILITY FOR CERTAIN DAMAGES. Except as prohibited by law,
SOFTWARE SUPPLIERS shall have no liability for any indirect, special,
consequential or incidental damages arising from or in connection
with the use or performance of the SOFTWARE. This limitation shall
apply even if any remedy fails of its essential purpose. In no event
shall SOFTWARE SUPPLIERS be liable for any amount in excess of U.S.
Two Hundred and Fifty Dollars (U.S.$250.00).
• LIMITATIONS ON REVERSE ENGINEERING, DECOMPILATION, AND
DISASSEMBLY. You may not reverse engineer, decompile, or
disassemble the SOFTWARE except and only to the extent that such
activity is expressly permitted by applicable law notwithstanding this
limitation.
• SOFTWARE TRANSFER ALLOWED BUT WITH RESTRICTIONS. You may
permanently transfer rights under this EULA only as part of a
permanent sale or transfer of the DEVICE, and only if the recipient
agrees in full to this EULA. If the SOFTWARE is available as an
upgrade to the DEVICE, any transfer must also include any prior
versions of the SOFTWARE.
• EXPORT RESTRICTIONS. You acknowledge that SOFTWARE is subject
to U.S. and European Union export jurisdiction. You agree to comply
with all applicable international and national laws that apply to the
SOFTWARE, including the U.S. Export Administration Regulations, as
well as end-user, end-use and destination restrictions issued by U.S.
and other governments.
• USE RESTRICTIONS. This DEVICE is not intended for use in medical,
life saving, or life sustaining applications and no liability whatsoever is
accepted by Cambridge Audio, nor by the SOFTWARE SUPPLIERS, for
any failure of the DEVICE when used in this manner.
ENGLISH
End User Licence Agreement (“EULA”)
Maximum Power Consumption 70W
Dimensions - H x W x D
80 x 430 x 315mm (3 x 17 x 12.4")
Weight
8.0kg (17.6Lbs)
Connections
1 x Ethernet
3 x USB V2.0/1.1
1 x PS/2 keyboard
1 x RS232C
1 x IR emitter in and out (modulated)
1 x Control Bus in and out (unmodulated)
1 x Composite video
1 x S-Video
1 x VGA
1 x IEC mains inlet
1 x SPDIF digital out
1 x Optical digital out
Visit www.cambridge-audio.com and register to receive notification of future
hardware and software releases.
This guide is designed to make installing and using this unit as easy as possible.
Information in this document has been carefully checked for accuracy at the time
of printing; however, Cambridge Audio's policy is one of continuous improvement,
therefore design and specifications are subject to change without prior notice.
For the latest version of this manual please visit:
www.cambridgeaudio.com/support.php
This document contains proprietary information protected by copyright. All rights
are reserved. No part of this manual may be reproduced by any mechanical,
electronic or other means, in any form, without prior written permission of the
manufacturer. All trademarks and registered trademarks are the property of their
respective owners.
AudioFile is a registered trademark of Cambridge Audio Ltd.© Copyright Cambridge
Audio Ltd 2007
iPod and iTunes are copyright © Apple Computer, Inc. All rights reserved.
3
Limited warranty
Safety precautions
Cambridge Audio warrants this product to be free from defects in
materials and workmanship (subject to the terms set forth below).
Cambridge Audio will repair or replace (at Cambridge Audio's option) this
product or any defective parts in this product. Warranty periods may vary
from country to country. If in doubt consult your dealer and ensure that
you retain proof of purchase.
Checking the Power Supply Rating
To obtain warranty service, please contact the Cambridge Audio authorised
dealer from which you purchased this product. If your dealer is not
equipped to perform the repair of your Cambridge Audio product, it can be
returned by your dealer to Cambridge Audio or an authorised Cambridge
Audio service agent. You will need to ship this product in either its original
packaging or packaging affording an equal degree of protection.
This unit is designed to operate only on the supply voltage and type that is
indicated on the rear panel of the unit. Connecting to other power sources may
damage the unit.
Proof of purchase in the form of a bill of sale or receipted invoice, which
is evidence that this product is within the warranty period, must be
presented to obtain warranty service.
This Warranty is invalid if (a) the factory-applied serial number has been
altered or removed from this product or (b) this product was not
purchased from a Cambridge Audio authorised dealer. You may call
Cambridge Audio or your local country Cambridge Audio distributor to
confirm that you have an unaltered serial number and/or you purchased
from a Cambridge Audio authorised dealer.
This Warranty does not cover cosmetic damage or damage due to acts of
God, accident, misuse, abuse, negligence, commercial use, or modification
of, or to any part of, the product. This Warranty does not cover damage due
to improper operation, maintenance or installation, or attempted repair by
anyone other than Cambridge Audio or a Cambridge Audio dealer, or
authorised service agent which is authorised to do Cambridge Audio
warranty work. Any unauthorised repairs will void this Warranty. This
Warranty does not cover products sold AS IS or WITH ALL FAULTS.
REPAIRS OR REPLACEMENTS AS PROVIDED UNDER THIS WARRANTY ARE
THE EXCLUSIVE REMEDY OF THE CONSUMER. CAMBRIDGE AUDIO SHALL
NOT BE LIABLE FOR ANY INCIDENTAL OR CONSEQUENTIAL DAMAGES FOR
BREACH OF ANY EXPRESS OR IMPLIED WARRANTY IN THIS PRODUCT.
EXCEPT TO THE EXTENT PROHIBITED BY LAW, THIS WARRANTY IS EXCLUSIVE
AND IN LIEU OF ALL OTHER EXPRESS AND IMPLIED WARRANTIES
WHATSOEVER INCLUDING, BUT NOT LIMITED TO, THE WARRANTY OF
MERCHANTABILITY AND FITNESS FOR A PRACTICAL PURPOSE.
Some countries and US states do not allow the exclusion or limitation of
incidental or consequential damages or implied warranties so the above
exclusions may not apply to you. This Warranty gives you specific legal
rights, and you may have other statutory rights, which vary from state to
state or country to country.
Plug Fitting Instructions (UK Only)
The cord supplied with this appliance is factory fitted with a UK mains plug fitted
with a 3 amp fuse inside. If it is necessary to change the fuse, it is important that
a 3 amp one is used. If the plug needs to be changed because it is not suitable for
your socket, or becomes damaged, it should be cut off and an appropriate plug
fitted following the wiring instructions below. The plug must then be disposed of
safely, as insertion into a mains socket is likely to cause an electrical hazard.
Should it be necessary to fit a 3-pin BS mains plug to the power cord the wires
should be fitted as shown in this diagram. The colours of the wires in the mains
lead of this appliance may not correspond with the coloured markings identifying
the terminals in your plug. Connect them as follows:
The wire which is coloured BLUE must be
connected to the terminal which is marked
with the letter ‘N’ or coloured BLACK.
The wire which is coloured BROWN must be
connected to the terminal which is marked
with the letter ‘L’ or coloured RED.
The wire which is coloured GREEN/YELLOW
must be connected to the terminal which is
marked with the letter ‘E’ or coloured GREEN.
If your model does not have an earth wire,
then disregard this instruction.
If a standard 13 amp (BS 1363) plug is used, a 3 amp fuse must be fitted, or if any
other type of plug is used a 3 amp or 5 amp fuse must be fitted, either in the plug
or adaptor, or on the distribution board.
4
For your own safety please read the following instructions carefully before
attempting to connect this unit to the mains.
Check that the rear of your unit indicates the correct supply voltage. If your mains
supply voltage is different, consult your dealer.
This equipment must be switched off when not in use and must not be used unless
correctly earthed. To reduce the risk of electric shock, do not remove the unit's cover
(or back). There are no user serviceable parts inside. Refer servicing to qualified
service personnel. If the power cord is fitted with a moulded mains plug the unit must
not be used if the plastic fuse carrier is not in place. Should you lose the fuse carrier
the correct part must be reordered from your Cambridge Audio dealer.
The lightning flash with the arrowhead symbol within an equilateral triangle
is intended to alert the user to the presence of un-insulated ‘dangerous
voltage’ within the product’s enclosure that may be of sufficient
magnitude to constitute a risk of electric shock to persons.
The exclamation point within an equilateral triangle is intended to alert
the user to the presence of important operating and maintenance
instructions in the service literature relevant to this appliance.
The crossed-out wheeled bin is the European Union symbol for
indicating separate collection for electrical and electronic
equipment. This product contains electrical and electronic
equipment which should be reused, recycled or recovered and
should not be disposed of with unsorted regular waste. Please
return the unit or contact the authorised dealer from whom you
purchased this product for more information.
Approvals
This product complies with European Low Voltage (73/23/EEC)
and Electromagnetic Compatibility (89/336/EEC) Directives
when used and installed according to this instruction manual.
For continued compliance only Cambridge Audio accessories
should be used with this product and servicing must be referred
to qualified service personnel.
NOTE: THE MANUFACTURER IS NOT RESPONSIBLE FOR ANY RADIO OR TV
INTERFERENCE CAUSED BY UNAUTHORIZED MODIFICATIONS TO THIS
EQUIPMENT. SUCH MODIFICATIONS COULD VOID THE USER AUTHORITY TO
OPERATE THE EQUIPMENT.
This equipment has been tested and found to comply with the limits for a Class B
digital device, pursuant to Part 15 of the FCC Rules. These limits are designed to
provide reasonable protection against harmful interference in a residential
installation. This equipment generates, uses and can radiate radio frequency
energy and, if not installed and used in accordance with the instructions, may
cause harmful interference to radio communications. However, there is no
guarantee that interference will not occur in a particular installation.
If this equipment does cause harmful interference to radio or television reception,
which can be determined by turning the equipment off and on, the user is
encouraged to try to correct the interference by one or more of the following
measures:
- Re-orient or relocate the receiving antenna.
- Increase the separation between the equipment and receiver.
- Connect the equipment into an outlet on a circuit different from that to which the
receiver is connected.
- Consult the dealer or an experienced radio/TV technician for help.
azur
640H
Please take a moment to read these notes before installing your 640H,
as they will enable you to get the best performance and prolong the life
of the unit. We advise you follow all instructions, heed all warnings and
keep the instructions for future reference.
Ventilation
IMPORTANT - The unit will become hot when in use.
Power cord protection
The unit must be installed in a manner that makes disconnection of the
mains plug from the mains socket outlet (or appliance connector from the
rear of the unit) possible. Where the mains plug is used as the disconnect
device, the disconnect device shall remain readily operable. Protect the
power cord from being walked on or pinched particularly at plugs,
convenience receptacles, and the point where they exit from the unit.
This unit has a powerful processing engine that naturally generates
heat. The outer chassis will therefore be hotter than other hi-fi
components. This is quite normal and will not affect performance or
safety.
Be sure to insert each power cord securely. To prevent hum and noise, do
not bundle the interconnect leads with the power cord or speaker leads.
Please ensure there is ample ventilation (at least 10cm clearance all
round). Do not put any objects on top of this unit. Do not situate it on a
rug or other soft surface and do not obstruct any air inlets or outlet
grilles. Do not install near any heat sources such as radiators, heat
registers, stoves, or other apparatus (including amplifiers) that produce
heat. Do not stack multiple units on top of each other. Do not place in
an enclosed area such as a bookcase or in a cabinet without sufficient
ventilation. When in a 19" rack tray, leave 1 unit space (minimum)
between units.
Do not overload wall outlets or extension cord as this can result in a risk
of fire or electric shock. Overloaded AC outlets, extension cords, frayed
power cords, damaged or cracked wire insulation, and broken plugs are
dangerous. They may result in a shock or fire hazard.
Ensure that small objects do not fall through any ventilation grille. If this
happens, switch off immediately, disconnect from the mains supply and
contact your dealer for advice.
Positioning
Choose the installation location carefully. Avoid placing it in direct
sunlight or close to a source of heat. Also avoid locations subject to
vibration and excessive dust, cold or moisture. Do not place the unit on
an unstable surface or shelf. The unit may fall, causing serious injury to
a child or adult as well as serious damage to the product. Do not place
a DVD player or other equipment on top of the unit.
This unit must be installed on a sturdy, level surface. Do not place in a
sealed area such as a bookcase or in a cabinet. Any space
open at the back (such as a dedicated equipment rack) is fine
however. When a cart is used, use caution when moving the
cart to avoid injury from tip-over.
WARNING - To reduce the risk of fire or electric shock, do not expose this
unit to rain or moisture. This unit must not be used near water or
exposed to dripping or splashing water or other liquids. No objects filled
with liquid, such as vases, shall be placed on the unit. In the event,
switch off immediately, disconnect from the mains supply and contact
your dealer for advice.
Electronic audio components have a running in period of around a week
(if used several hours per day). This will allow the new components to
settle down, the sonic properties will improve over this time.
Grounding and polarisation
Overloading
Lightning
For added protection during a thunderstorm, or when it is left
unattended and unused for long period of time, unplug the unit from the
wall outlet and disconnect the antenna or cable system. This will prevent
damage to the unit from lightning and power-line surges.
Cleaning
To clean the unit, wipe its case with a dry, lint-free cloth. Do not use any
cleaning fluids containing alcohol, ammonia or abrasives. Do not spray
an aerosol at or near the amplifier. The use of a lens cleaning disc at
least once a month can also prolong unit life.
Attachments
Do not use attachments not recommended by your dealer as they may
cause harm to the unit. Only use the specified attachments/accessories
with this unit.
Servicing
These units are not user serviceable, never attempt to repair,
disassemble or reconstruct the unit if there seems to be a problem. A
serious electric shock could result if this precautionary measure is
ignored. In the event of a problem or failure, please contact your dealer.
Contact the service department should any of these conditions occur:
- When the power-supply cord or plug is damaged.
- If liquid has been spilled, or objects have fallen into the unit.
- If the unit has been exposed to rain or water.
- If the unit does not operate normally after following the operation
instructions, adjust only those controls that are covered by the
operation instructions.
Do not defeat the safety purpose of the polarized or grounding type plug.
A polarized plug has two blades with one wider than the other. A
grounding type plug has two blades and a third grounding prong. The
wide blade or third prong are provided for your safety. If the provided
plug does not fit your outlet, consult an electrician for replacement of
the obsolete outlet.
- If the unit has been dropped or damaged in any way.
Power sources
This unit has been designed to play compact discs,
recordable CDs (CD-R) and re-writable CDs (CD-RW)
bearing the identification logo shown here. No other
discs can be used. The CD-R/CD-RW discs should
contain properly recorded TOC (Table of Contents) information so that
they can be played back. This unit can play only the discs recorded in the
CD-DA format designed for music reproduction. Do not attempt to play a
disc on this unit containing other data, such as a CD-ROM for PCs.
The unit is of Class 1 construction and must be connected to a Mains
socket outlet with a protective earthing connection.
The unit should be operated only from the type of power source
indicated on the marking label. If you are not sure of the type of powersupply to your home, consult your product dealer or local Power
Company.
This unit has been designed to be left in Standby mode when not in use,
this will increase the life of the amplifier (this is true with all electronic
equipment). To turn the unit off completely switch off on the rear panel.
If you do not intend to use this unit for a long period of time, unplug it
from the mains socket.
- When the unit exhibits a distinct negative change in performance.
Important Note
Be aware of plasma screen image retention or “screen-burn” when
using your 640H. Always use the “I/O” button to switch off the on-screen
display when not using the menu system to change settings etc. LCD or
conventional CRT TVs do not suffer from this problem.
5
ENGLISH
Important safety instructions
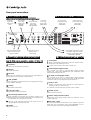
Rear panel connections
1. Connections to a TV or monitor
2. Audio connections to an amplifier/source
Note: The 640H must be connected to a monitor or TV before it is
switched on so that the 640H can detect the connection type being used.
To TV Audio
input using
phono cable
(2RCA-2RCA)
To TV
Composite Video
input using
phono video
cable (RCA-RCA)
7
In
1
3
Monitor
Composite
Video
USB 1
USB 2
6
Out
On
In
L
R
8
10
11
Mains Voltage Selector Switch
115V/230V AC~50/60Hz
13
9
12
Caution
Risk of electric shock
Do not open
Avis
Risque de choc electrique
Ne pas ouvrir
Achtung
Vorm offnen des gerates
Netzstecker ziehen
To Ethernet port using
Ethernet cable
(RJ-45 plugs)
1 Keyboard
Connections for an optional PS/2 keyboard.
2
Monitor
VGA monitor connection.
3
Ethernet
Ethernet port for connecting to a network (see the ‘Networking your
640H’ section of this manual for more information).
4
USB 1/USB 2
Ports for interfacing to a flash/memory card or storage device. All ports
are fully “USB2.0” compliant.
5
S-Video
S-Video (SVHS) TV connection.
6
Composite video
Composite Video (CVBS) TV connection.
7
IR (Infra Red) Emitter In/Out
In - Allows modulated IR commands from multi-room systems to be
received by the unit. Commands received here are not looped out of
the Control Bus (they are looped out of IR Out).
Out - Loop out of IR modulated commands. Also allows the unit to
generate IR commands (for future use).
8
RS232
For custom install use.
6
15
Manufactured in an
ISO9002 approved facility
To the digital or DAC inputs of your
AV receiver using either toslink
optical or coaxial digital cables
(COAX-COAX or OPT-OPT)
3. Connections to optional external devices/network
Note: The 640H must be connected to a monitor or TV before it is
switched on so that the 640H can detect the connection type being used.
Power AC
Max Power Consumption: 70W
www.cambridge-audio.com
Keyboard and USB devices
to be connected by their
respective cables
14
Off
azur 640H Music Server
RS232
Out
5
Audio
S/P DIF
Co-axial
In
S-Video
2
Toslink
Optical
Out
4
Keyboard
Class 1 Laser Product
Luokan 1 Laserplaite
Klass 1 Laserapparat
Control Bus
To line outputs of a
source device using
phono cable
(2RCA-2RCA)
Power
Digital Outputs
IR Emitter
Ethernet
R
Designed in London, England
To line inputs of
an amplifier using
phono cable
(2RCA-2RCA)
Out
OR
In
To TV S-Video
input using
S-Video cable
(MINIDINMINIDIN)
OR
L
To Monitor
input using
VGA/D-Sub
cable
4. Digital audio connections to an amplifier
9
Control Bus
In - Allows un-modulated commands from multi-rooms systems or other
components to be received by the unit.
Out - Loop out for control bus commands to another unit.
10 Toslink Optical Digital output
Use to connect to the input of a separate DAC or digital recording
machine. Use a high quality TOSLINK fibre optic interconnect cable
designed specifically for audio use.
11
S/P DIF Co-axial Digital output
Use to connect to the input of a separate DAC or digital recording
machine. To obtain best results, use a high quality 75 ohm digital RCA
interconnect cable (not one designed for normal audio use).
12
Audio In/Out
In - Connect to the line level output terminals of a source device for
recording (ie CD input or Aux input etc).
Out - Connect to the line level input terminals on your amplifier.
13
Power On/Off
Switches the unit on and off.
14
Mains Voltage Selector Switch
Switches the mains voltage between 115V and 230V. For use by
installer/dealer only.
15
AC power socket
Once you have completed all connections to the amplifier, plug the AC
power cable into an appropriate mains socket. IMPORTANT - Do not
remove the power cable without switching the 640H off first.
azur
640H
ENGLISH
Front panel controls
azur 640H
Music Server
8
1
2
Standby / On
Open / Close
3
4
5
6
Play / Pause
Stop
Skip
7
Record
9
1 Standby / On
Switches the unit between Standby mode (indicated by dim power LED)
and on (indicated by bright power LED). The unit should be left in
standby mode when not in use, particularly if the unit is to perform
background compression or if serving content to other playback devices.
Press and hold for 5 seconds to fully turn the unit off. If the unit is not
going to be used for an extended period of time, it should also be turned
off at the rear panel.
2
Open / Close
Opens and closes the disc tray allowing you to load a disc. Pressing Play
will also close the tray and start the disc.
3
8 Navigator / Select
Press to navigate around the menus. Press the centre Select button to
accept the item/function highlighted in the menu.
9
USB port
USB connector for interfacing to a "Mass Storage Device" or USB
keyboard.
Note: Only USB 2.0 certified products with the USB 2.0 logo on them are
supported by the 640H. Please either consult the manufacturer of the
USB 2.0 product to make sure it is properly certified, or go to
www.usb.org for a list of approved products, before purchase. We
cannot be held responsible for any incompatibility issues.
Infrared sensor
Receives IR commands from the supplied Azur remote control. A clear
unobstructed line of sight between the remote control and the sensor is
required.
4
Play / Pause
Plays the disc, selected album/track or internet radio station. Press to
pause if currently playing.
5
Stop
Stops the CD, selected album/track or internet radio station currently
playing.
6
Skip < >
Allows for skipping between tracks. Press the left button to skip
backwards by one track, the right button to skip forwards by one track.
7
Record
Allows for ripping of CDs to the hard drive of the 640H.
7
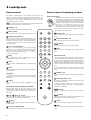
Remote control
Remote control of matching products
The 640H is supplied with an Azur Navigator remote control that
operates both the 640H and Cambridge Audio Azur amplifiers. The
remote is important in setting up your 640H Music Server as many of
the menus are most easily accessed from the remote. Insert the
supplied AAA batteries to activate.
Amp Control mode
The 640H remote features an Amplifier Control button,
that activates a special Amp mode allowing operation
of a matching Cambridge Audio Azur amplifier. When
pressed, the LED will light up for 7 seconds (to let you
know your are in Amp mode), and will then flash when
any one of the circled Amp buttons is used
(Standby/On, 1 - 8, Volume up/down and Mute). All
other remote buttons are inactive when in Amp mode.
Note: The remote may be in Amp mode when first activated. Please refer
to the Amp Control section for more information.
Standby / On
To exit Amp mode, press the Amp Control button again
(LED will light up for one second).
Switches the unit between On and Standby mode.
Open / Close
Standby / On
Opens and closes the disc tray allowing you to load a CD.
é
Alphanumeric buttons
Buttons to enter numbers and text into the editable menu
fields. Pressing the button will scroll through the available
characters on that button. The ‘é’ button allows access to
accents etc. Press the number ‘0’ button to add a space
in any editable text.
Info / Extra characters
Brings up the Now Playing menu which displays
information on the currently playing album/artist/radio
station etc. When entering text, press this button to
access extra punctuation symbols (eg # , ; “/ ? !), like on
a mobile phone keypad.
Shift
Press to switch the amplifier between On and Standby
mode.
é
abc
def
é
Numerical buttons 1-8
Press to change the input source of the amplifier.
ghi
jkl
mno
Volume
Increase or decrease the volume of the amplifier.
pqrs
tuv
wxyz
Mute
Shift
Mutes the audio of the amplifier. Press again to cancel
mute.
Amp
Control
AV Control mode
Shift
The 640H Amp Control mode can alternatively be used to
control a connected Azur AV Receiver (ie Azur 540R). To
put the remote into AV mode, first put the remote into Amp
mode then press and hold the Track button. After 12
seconds the blue LED will flash twice. Amp mode will now
send AV receiver instructions instead of Azur amplifier
ones.
When entering text, press to toggle between capital
letters, lower-case letters and numbers.
Home
Takes you back to the Main Menu of the 640H operating
system.
To put the remote back into normal Amp mode, simply
hold the Track button down again (the LED will flash
once).
Back
Press to go back to the previous menu page. Also deletes
any editable text.
Album
Artist
Genre
Navigation
To navigate around the menus, press the directional
arrows. Press the left arrow to move backwards through
editable text.
Select
Press to accept the item/function highlighted in the
menu.
Playlist
Track
iRadio
Standby / On
Press to switch the AV receiver between On and Standby
mode.
é
Numerical buttons 1-8
Press one of the circled Amp buttons to change the input
source to the AV receiver:
Album/Artist/Genre/Playlist/Track/iRadio
1 - DVD, 2 - Video1, 3 - Video 2, 4 - Video 3, 5 - Tuner
mode (toggles between AM and FM), 6 - Tape/MD/CDR, 7
- CD/Aux, 8 - 6.1 Direct In
Pressing these buttons takes you directly to their
respective menu pages. See the ‘Getting started with your
640H’ section of this Manual for more information on
each menu.
Increase or decrease the volume of the AV receiver
output.
Play /
Stop /
Pause
Press the relevant button to play/pause/stop the CD,
selected album/track or internet radio station.
Skip
Pressing the Skip buttons will skip forward or backwards
between tracks.
On-screen display (OSD)
Turns the OSD to the connected monitor/screen on or off.
8
Volume
Tuning
Press the right arrow to increase tuner frequency, press
the left arrow to decrease tuner frequency.
Select
Press to shift through the different AV receiver sources.
Mute
Mutes the audio on the AV receiver. Press again to cancel
mute.
640H
Introduction to AudioFile™
Getting started with your 640H
The AudioFile operating system of the 640H is easy to follow and use,
and has been designed to allow you to get the most out of your 640H.
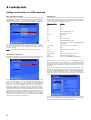
Note: When you turn on the 640H for the first time you will see an
advisory message with the address for the Windows XP patch that is
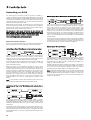
required on your PC if you want to network effectively with the 640H (Fig.
1). This page will be displayed every time you start up until you select
“Accept”.
Menu system
A basic navigational menu is displayed on the front of the 640H, but the
full menu system is accessible by connecting your 640H to a monitor or
TV. To move around the menus, simply use the directional arrow buttons
(on your remote control or front panel of the unit) and press the centre
Select button to accept your selection or progress to a sub-menu.
From the Main Menu you can access the following menus:
Music library - Access the various menus to play and record music,
create and organise playlists and search for any music
content that is available to the 640H (either on the 640H
or via a connected music storage device/computer).
1
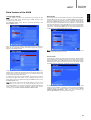
Playing a CD
After you have made all the connections to the 640H and turned the unit
on, the first menu screen displayed is the Main Menu. To play a CD, open
the CD tray, insert a CD and the CD menu will open automatically (Fig. 2).
CD - Access CD functions such as playing, storing and burning.
iRadio - With internet access listen to internet radio stations.
Line in - Access and record from a connected device which has phono
out sockets (eg a DAB tuner).
Info/now playing - Displays the music currently playing on the 640H.
Settings - Access the Information, User and System menus.
Data entry into these menus is available from the remote control, but It
is advised to connect a keyboard (USB or PS/2 types can be used) if you
wish to enter a large amount of track and/or album names.
Network features
To get the most from your 640H you can connect it to your PC/Mac and
the internet. This will allow you to:
• Automatically download album/track details when your rip a CD
• Archive and store your music on your PC/Mac
2
There is a short delay before you can play the CD whilst the 640H
searches for CD details. If there is an internet connection the album title
and track names will be displayed. If you are not connected to the
internet it will display "CD Album X". Once the CD has loaded it can then
be played by pressing the Play button. When loaded, all tracks are
automatically selected to be played. To unselect, choose CLEAR ALL and
then you can select specific/individual tracks to be played.
• Transfer album cover art onto the 640H
• Share music with your PC/Mac
Storing CDs
• Access to internet radio stations
To copy the CD onto the hard drive of the 640H, select the STORE CD
option in the CD menu. From here, the whole album or individual tracks
can be stored if desired. Continue to the STORE CD option and select
START to begin copying to the hard drive. Alternatively, the Record button
on the front panel may be used. Before storing to the hard drive, you may
want to choose the file compression format. CD’s can also be played as
they are ripped onto the 640H’s hard drive. The first track will start to
play after it has been ripped.
For more information and the latest news on the AudioFile software,
audio.com
please visit the Cambridge Audio website: www.cambridge-a
9
ENGLISH
azur
Getting started with your 640H continued
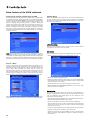
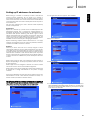
File compression formats
Naming CDs
Music being stored on the 640H can be stored in a number of different
file formats (Fig. 3). To choose the compression format, go to CD/STORE
CD/FORMAT. The default is “Uncompressed”, meaning the CD will be
copied in it’s original format, the recommended highest quality format.
If you do not have internet access or are storing “home-made” CDs, the
details of these CDs will be need to be entered manually into the 640H.
It is advisable to connect a keyboard to the 640H for manual data input,
and a list of keyboard shortcuts is provided:
3
Keyboard shortcut
Function
F1
Play
F2
Pause
F3
Stop
F4
Skip backwards one track
F5
Skip forward one track
F6, F7
No function
F8
Mute
F9
CD tray open/close
F10
INFO/NOW PLAYING screen
[, ]
The lower the MP3 file format chosen, the more the music is
compressed, reducing the file size and allowing more music to be stored
on the hard drive (ie from 300 uncompressed songs to 30,000
compressed songs).
Fast rewind/fast forward (INFO/NOW PLAYING
screen only)
<arrow> keys
Navigation (as on remote control)
Enter
Select
Note: The lower the file size, the more the sound quality is effected.
Home
Home (return to main menu)
Back space
Back
Background compression
As ripping and compressing music to the hard drive of the 640H can take
some time, a ‘Background compression’ feature is available (Fig. 4).
Page Up/Down
Pages up and down in a menu list
Insert
Shortcut to the LOOK IN menu
Pause/Break
Shortcut to the RESCAN LOCATION menu
When connected to the internet (refer to the ‘Networking your 640H’
section of this manual for more information), the 640H automatically
searches for the genre, track, artist and album names for the loaded CD
(original CDs only). If the CD is then stored onto the 640H, so are these
CD details.
When the CDs details are being searched for on the internet, it is
possible that more than one set of album details may be returned. This
is shown in the CD/ALBUM ID option (Fig. 5). Scroll through the available
Album ID’s, choose the one you prefer, and then press STORE CD to
accept that choice. Once you have stored some CDs on your 640H,
these can now be accessed through the MUSIC LIBRARY menu.
4
After choosing a compression format, the 640H automatically stores the
music as “uncompressed” and the “compressing” process will take
place when the 640H is put into Standby mode (“Background
compression”). For example, the unit will compress the music overnight
when you are not using the 640H. If you want to compress the file
immediately, background compression can by disabled by going to
STORE CD/OPTIONS and unselecting this option. During this process,
“Compressing” will appear on the front of the 640H. If the unit is turned
on during this time, background compression will stop, the current track
being compressed will stop, and will start compressing again from the
beginning of that track when returned to Standby mode. If multiple
albums are being compressed, each album will not become available
until all tracks in the album is compressed.
5
You can also download album/track names from CDs that were ripped
when no internet connection was available. Select the album/track and
select the EDIT DETAILS option and choose IDENTIFY.
10
640H
Music Library Menus
Creating Playlists
The Music Library is the music management system of the 640H (Fig.
6), allowing you to select and play your music through a number of
different menu categories.
Playlists can be created very easily by selecting tracks from the available
content and adding these to a new or “current” playlist. To create a
Playlist, simply select the tracks then select ADD TO PLAYLIST (Fig. 8).
Once created, a playlist can be organized, renamed, copied, deleted,
played, burned to CD, sent to another device e.g. PC etc.
6
Look in...
8
It is possible to have multiple locations from external sources in your
640H (e.g. networked PC, external hard drive). Please refer to the
‘Connecting an external portable device via USB’ section of this manual
for more information.
Genres
Choose music by genre (eg blues, rock, classical). Genres are preassigned when you are connected to the internet, or you can manually
enter in the genre to your own loaded playlists.
Artists
Choose by artist name. Names are displayed alphabetically. By selecting
a specific artist from MUSIC LIBRARY/ARTIST and then selecting MUSIC
LIBRARY/TRACK, all of the tracks (or albums by selecting MUSIC
LIBRARY/ALBUM) by that artist can then be selected and played.
Albums
Choose by album name.
Tracks
Choose by track title.
To type in text for naming your playlists you can use your remote or
connected keyboard. If using your remote, move to the red field and
press Select. This field will now turn white and will now allow you to enter
text using the alphanumeric buttons. You can scroll through the text
available to each button by pressing the button repeatedly, press Shift
to turn on and off capitals, use 0 to add a space, and Back to delete.
Pressing the Select button will then accept the name of the Playlist.
Note: If you want to burn a created playlist to CD, you can only burn the
available time length of the blank CD (ie 74 minutes). You may select the
blank CD size from the menu.
Info/Now Playing
By going to the Main Menu and selecting INFO/NOW PLAYING (or by
pressing the Info button on the remote) a screen will be displayed that
gives you an instant view of what music is being played on your 640H,
the file format, a countdown of the time remaining for that track (Fig. 9),
and album art if available.
Simply navigate through the selected menu, choose the album or track
you want and select the PLAY option (Fig. 7).
9
7
Note: To use the Shuffle and Repeat functions, make sure they are
turned to ‘On’ before you select the track/album you want to
repeat/shuffle.
It is also possible to fast forward and rewind through a track from this
screen. Press the Right Arrow or Left Arrow button to begin fast forward
or rewind; press either again to speed up the process. Press the Select
or Play buttons to resume play.
Note: Track information is also displayed on the LCD on the front of the
640H. If the information cannot be displayed on the LCD, a message will
read “See Screen Display”, prompting you to connect a TV/Monitor to
access the menu’s details.
11
ENGLISH
azur
Getting started with your 640H continued
Finding music on the 640H
Deleting music on the 640H
When your music collection builds up, either through copying CDs to the
hard drive, recording from external sources, or downloading music from
your PC, you may well end up with many thousands of tracks. Here are
some ways to make what you are looking for easier:
Content can be deleted off the 640H in single tracks, whole albums, by
artist or genre or in 2000 track blocks of the total content. To delete
content off the 640H, follow these steps:
1. Within the MUSIC LIBRARY section choose SEARCH. Enter in the
details of what you are looking for (often just the first and second
letter is required), then choose to search through either genre, artist
or album and press Select (Fig. 10).
1. Select the album, artist or genre that the track you want deleted is in.
If you are selecting an artist or a genre, you will then need to press
TRACKS.
2. All the tracks in the category are then automatically selected.
Deselect any tracks that you do not want deleted.
3. Go to EDIT DETAILS.
4. Select DELETE; the 640H will show the total number of tracks for
deletion.
5. Select CONFIRM and wait whilst the 640H deletes the tracks.
You can also delete up to 2000 tracks of the total content of the 640H
by pressing the Tracks button on the remote from the home menu and
following the process above.
10
2. To narrow your search, you can also include (or exclude) music that
can be “seen” by your 640H. When you connect devices to your
640H, whether another 640H, a PC or a portable storage device, by
going to MUSIC LIBRARY/LOOK IN you are provided with a list of these
music sources which you can select or unselect to make their music
content available or unavailable to your 640H.
For example, the screenshot opposite (Fig. 11) shows that the 640H has
been set up to look for music only on a connected media library.
11
Once the 640H has found all of the music in these locations, the albums
and tracks are immediately available from the same menu system as all
the locally held content. When a source of music is added, it is
automatically added to the list and enabled. Each source can be
disabled or re-enabled later if required.
Note: Network connectivity is required for many of these options. Please
refer to the ‘Networking your 640H’ section of this manual for more
information.
12
azur
640H
Internet Radio menus
Burning CDs
Note: The 640H is required to be connected to the internet for this
feature. Please refer to the ‘Networking your 640H’ section of this
manual for more information.
To burn music stored on your 640H to CD, insert a blank recordable/rewritable CD into the disc tray. Go to the MUSIC LIBRARY and select the
music to be burnt by track, album, artist or a specially created playlist.
Choose the CREATE CD option from the menu (Fig. 14), choose the CD
format you require (Audio CD format is best if the CD is to be played on
separate audio equipment, while Data CD format is only being played on
a computer), then select the CREATE CD option to begin burning to disc.
If you use a re-writable CD (CDRW), you can also use the 640H to clear
the CD disc of any unwanted files before burning.
The INTERNET RADIO screen menu is structured identically to the
MUSIC LIBRARY screen.
12
From this menu you can select Internet Radio stations, selecting by
genre (Fig. 12), geographic location, broadcast language (Fig. 13) or by
looking at all available stations.
14
Note: The file format of the music to be burnt needs to be chosen and
compressed before being burnt to CD.
Line in menu
Any device with a phono out socket can be connected to, played through
and recorded onto the 640H. Simply connect the device to the Audio In
socket of the 640H, got to LINE IN where the connected device will be
displayed (Fig. 15). From this menu you can listen to the device through
the 640H as well as record from the device onto the hard drive.
13
Simply move around the screen using the navigation arrows and the
Select button to choose your desired station and it will play within a few
seconds. You can also use the Info button on the remote to display the
currently playing internet radio station.
To save/preset your favourite radio stations, simply select the station
then press the Right Arrow button. Up to 9 favourite stations can be
stored which can then be selected through the PRESETS option on the
INTERNET RADIO menu.
Note: New internet radio stations cannot be added by the user to the
pre-loaded list of stations, as the streaming format may not be
compatible. However, the list will be checked and updated automatically
when connected to the internet. To update internet radio stations
manually, go to SETTINGS/SYSTEM/CONTENT/UPDATE RADIO.
15
For example, you can connect a DAB/FM tuner and record from radio
stations onto the 640H. If a recording is made, the file is then added to
the Music Library as an “Unknown album” (and also located in MUSIC
LIBRARY/GENRES/RECORDING) which then can be renamed (by
selecting EDIT DETAILS) and then added to a playlist.
13
ENGLISH
Extra features of the 640H
Extra features of the 640H continued
Connecting an external portable device via USB
Settings Menus
The 640H is compatible with USB mass storage devices (e.g. Flash disks
or external hard drives). When connected it is scanned and becomes
available through the MUSIC LIBRARY to be played on the 640H (there
may be a delay of up to 30 seconds whilst the 640H recognises the
device, a message saying “Scanning device...” is shown). To copy the
contents of the device to the 640H, from the 640H to the device, or to
another connected storage device, you need to select the connected
device in the LOOK IN... menu where it will appear listed (Fig. 16). Select
the tracks you wish to copy from the list, select SEND TO..., choose the
hard drive of the 640H and then select SEND (copying will only happen
in the same format).
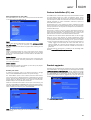
Within the SETTINGS menus (Fig. 18) you can tailor your 640H to how
you want the unit to operate. A large number of settings can be altered
from here, all of which are essentially self explanatory, but a few of the
key areas are outlined here.
18
Information settings
View the current software version, how much space you have used and
is available on the hard drive of your 640H.
16
Note: Devices that include their own memory management (such as
MP3 players, iPods™ etc) are usually not suitable for direct connection
to the 640H via USB. Plugging a NAS (Network Attached Storage) drive
directly into a 640H via either the USB or Ethernet socket will not work.
Connections to such devices must be done via a network with a PC/Mac.
User settings
This menu allows you to change the default settings of the 640H:
- Choose a different language for your 640H menus (Fig. 19).
Send to... Menu
As well as copying music from connected devices to the 640H, it is also
possible to send from the 640H back to the connected devices. As
explained previously, simply select the tracks from the Music Library you
wish to copy, select the SEND TO... option (Fig. 17), choose the
destination where you want to send the music, choose the file format
and then select START to send. If the content on the 640H is not in a
suitable format for sending to the device, a file conversion can be done
before sending, without affecting the original file format on the 640H.
19
- Choose the keyboard language format.
- Choose the default actions for when a CD is put into the 640H. Select
from the options of automatic playing, showing of tracks, storing the CD
onto the hard drive, or no action.
- Choose the CD burn format and file storage compression rates.
- Within OPTIONS, Select FEEDBACK SOUNDS for a small “click” noise
each time a button is selected.
System settings
17
Please refer to the ‘Networking your 640H’ section of this manual for
more information on how to connect your 640H to a network/PC/Mac.
The system settings are important if you wish to use the 640H with a
wireless or wired network to communicate with other 640H units or a PC
(see the ‘Networking your 640H’ section of this manual for more
information). Features include:
- Select the monitor/video display format - PAL (UK/Europe/Australia) or
NTSC (Canada/USA) depending on your TV type.
- Set the “screen blank” time to turn off a connected TV/Monitor.
- Time and date can be set, as well as the Standby timeout. We advise
the time be set so that the unit can perform important housekeeping
duties from time to time.
- Update the operating system of the 640H from CD (see the ‘Product
Upgrades’ section of this manual for more information).
- Choose from automatic IP settings (DHCP) or enter in the Ethernet IP
settings manually. Select APPLY to update the network settings you
have entered.
14
azur
640H
Data management on the 640H
The 640H allows you to rescan, reset, backup and restore the database
on the hard drive of the 640H (Fig. 20).
The 640H features a Control Bus input/output (the Control Bus sockets
are colour-coded orange) that allow un-modulated remote control
commands (positive logic, TTL level) to be received electrically by the
unit and looped to another unit if desired. These control commands are
typically generated by custom installation (multi-room) systems or
remote IR receiver systems.
An IR Emitter Input is also provided that allows modulated IR remote
control commands to be received electrically by the unit. Commands on
this input operate the unit only and are not looped out demodulated on
the Control Bus Output.
This feature is useful for multi-room systems which feature routed I.R.
emitter outputs. Instead of using window emitters stuck over the CD
players front panel IR receiver, a mono 3.5mm mini-jack to 3.5mm minijack lead can be used for a more reliable electrical connection.
20
Reset
Used to reset the entire database to a blank state, but does not affect
the audio content. You may be prompted to perform this from an
OPTIMISE DATABASE screen which may appear after switching the unit
back on.
Rescan
‘Rescan’ completely updates the unit's music library with all content
visible in the location chosen to be rescanned. This may be an added
location via a networked PC/Mac or another 640H, or the 640H's own
Hard Drive.
In addition the units feature 'direct' IR/Control codes as well as toggle
codes for many of their features to simplify programming custom
installation systems. Special direct On/Off commands can be accessed
on the supplied remote control for teaching into C.I. systems as follows:
1. Press and hold the Standby/On button. The remote first generates its
standby (toggle) command. Keep the button held down, after 12
seconds a 640H “On” command will be generated. If the button is
kept held down for a further 12 seconds, a 640H “Off” command is
generated.
A full code table for this product is available on the Cambridge Audio
website: www.cambridgeaudio.com/support.php
Backup database
This is a function to store and preserve the current music library data
base and Playlist details. This library information is not deleted when
you “reset” the database.
Restore database
‘Restore database’ recovers the backed up music library and playlists
without having to perform a ‘Rescan’.
Archive your music
To archive (and restore) music to an external hard drive or storage
device, select ARCHIVE MUSIC (located in the System Settings).
The ‘Archive Music’ option is used to backup hard disc audio content,
but is not the same as a ‘Backup database’ as described in the previous
section. This can only be performed to an external portable USB mass
storage device. The device can then only be seen as an archive disk.
Multiple backups can be performed to the device.
Product upgrades
Upgrades may be provided for this product from time to time, available
as a downloadable “.iso” image file from the Cambridge Audio website
(www.cambridgeaudio.com/support.php). Simply download the image
(the “.iso” format requires specific software to be handled), burn the file
to a CD-R/CD-RW disc (or alternatively, contact your dealer where you
purchased your 640H to order an upgrade disc). Once you have burnt
the disc, load it into the 640H and follow the upgrade process (Fig. 22).
Select the connected external disk to archive your music onto (Fig. 21)
and then select BACKUP. A CONFIRM screen will appear before backup,
which will display the date of the last backup and the amount of memory
used. To restore your backed-up data, select RESTORE.
22
audio.com and register to receive notification of
Visit www.cambridge-a
future software updates.
21
Note: This will restore missing files but will not delete files added to your
Music Library.
15
ENGLISH
Custom Installation (C.I.) use
Networking your 640H
This section gives an overview on how to connect your 640H to a
network. Networking (i.e. connecting devices together) can allow you to
expand the overall capabilities of your 640H. By networking your 640H
to a PC, Mac or other device, you will be able to have access to (and play)
music files stored on other devices. You can also access the internet for
CD database lookup and internet radio.
Network Type C: "Home" Wired network via a Router, Hub or Switch
Before setting up your network, we encourage you to read through the
entire section and then decide on the network layout that you wish to
implement. We advise this because different network layouts require
different setups of your 640H and your computer.
www.cambridgeaudio.com/support.php
This is the most common network where a router (a device that routes
signals from the phone line to multiple network devices on a network),
hub or switch (devices that allow data to be shared between many
network devices) is used to connect multiple devices together. These
could be one or more 640H's, PC's, Macs and network devices. Each
640H can then play back or move content from/to other devices. If
connected to the internet (via a router or PC/Mac), the 640H can also
access the CD recognition and internet radio (iRadio) features. Using a
router is the recommended way to connect 640H's to other 640H's and
network devices.
Network connection selection
If you already have an existing home network, then adding the 640H to
it is simple via an Ethernet cat5e lead from the 640H to the router, hub
or switch. If you do not currently have a network, then we recommend
you seek expert help on computer networking configuration.
The information in this manual is brief and for more detailed and
specific network setup instructions and file sharing information for
either Windows XP, Windows 2000 or Mac OS 10.3 or higher, please
visit our support website to download a detailed network guide:
There are many network variations you can make with your 640H, but to
keep things simple we will be explaining some basic network types:
Network Type D: "Wireless" Network
Network Type A: "Basic" Wired Network via Cable set-ttop box modem
Set-ttop box/modem
If you have a broadband (internet connection) service supplied by your
telecom provider but you do not have a PC/Mac, you can connect
directly to the built in modem in your Cable set-top box to access the CD
recognition and internet radio (iRadio) features on the 640H.
Your modem plugs into the telephone or cable TV sockets (for DSL and
cable broadband modems respectively), and converts the incoming
signals into Ethernet format.
While your set-top box and 640H are switched off, make a wired
connection between the two units via an Ethernet cat5e lead (see the
‘Computer network advice’ section for more information). Switch on the
modem and follow your broadband connection set up and set-top box
instruction manual to check it has a connection to the internet. Once
you have confirmed this, switch on the 640H. When the 640H has
finished its start up checks and has the UI (User Interface) displayed,
check the Ethernet connection on the rear panel of the 640H. If the
green LED above it is lit, there is a good physical connection to the
modem.
Note: It is also possible to add a cable broadband router to the set top
box, and plug the 640H into the router (see Network Type C).
Network Type B: "Peer to Peer" Wired Network with no Router, Hub or
Switch
Or other network
compatible device
This involves connecting one 640H to another 640H or network
compatible device (i.e. a PC/Mac). This is a network where only two units
are connected directly to each other with no router, hub or switch. When
networked, the 640H can play, burn a copy or transfer music from the
other device.
To connect the two devices together, you must use an Ethernet crossover lead. Plug one end of the lead into the 640H Ethernet port and the
other end into the other devices' Ethernet port. If the green LED above
the 640H Ethernet port is lit, there is a good physical connection to the
other device.
16
The 640H supports wireless networking via its Ethernet port. To make
the 640H wireless, you need to purchase a "Wireless Ethernet Bridge" (a
device that converts an Ethernet wired connection to a wireless
connection) from any good IT retailer. The 640H is connected to the
bridge via an Ethernet Cat5e lead.
Although these devices operate wirelessly, they appear to the 640H as
a normal Ethernet connection, and therefore the 640H is setup in the
same way as the wired networks described above. The 640H is
compatible with the wireless 802.11b and 802.11g standards.
Note: The Wireless Ethernet Bridge that you purchase will need setting
up according to your network setup and the instructions that come with
the bridge. Before connecting the bridge to the 640H, it is always best
to test that the bridge is fully set up to your network according to the
bridges' user instructions.
azur
640H
Setting up IP addresses for networks
2. In the right hand menu that appears, select SYSTEM:
ENGLISH
Before setting up a network it is necessary to know a little about IP
(Internet Protocol) addressing. For any device on a network to
communicate with another it must have a unique IP address (a bit like a
house number and street name so that each house can be identified for
mail). Each device then uses these to identify which device they wish to
communicate with.
Two types of IP addressing are used in networks called respectively
Static IP and Dynamic IP:
Dynamic IP
Dynamic IP is achieved by a process known as DHCP (Dynamic Host
Configuration Protocol). This is a protocol for assigning dynamic (i.e.
changeable) IP addresses to all the devices on a network without user
intervention. With dynamic addressing, each device is given a new IP
address automatically each time it connects to the network. This kind of
network will require a PC with DHCP server enabled or a router. The
router is able to connect together multiple devices and usually contains
the DHCP 'server' that does the job of assigning IP addresses.
3. Now select PRODUCT:
Dynamic addressing simplifies network administration as it is largely
automatic and transparent to the user, and is the preferred (and default)
method for the 640H to connect to a network.
Static IP
Static IP just means that each unit it manually assigned a unique
unchanging IP address by the user/network administrator. This requires
more setup and is not recommended. This system is typically used in
very large networks where the administrator may find it useful to always
know the exact IP address of each network device (since they cannot
change) or conversely very small networks of only two devices where as
no hub is used there is no DHCP server present and Dynamic IP cannot
be used.
Network Type A might be able to be configured as either Static IP or
Dynamic IP depending on the set-top box/modem (consult the manual
for your equipment).
4. Select NETWORK:
Network Type B must be configured as Static IP as no hub is involved
and for this reason is not the recommended configuration.
Network Type C and D can be configured as either Static IP or Dynamic
IP. Dynamic IP is strongly recommended as the process is largely
automatic.
Once you have decided on the basic layout of your network, then you can
decide whether it will be a wired network (connected via cables) or a
wireless network (connected via wireless devices).
The 640H is by default set to Dynamic IP addressing, so if you wish to
use this type you do not need to make any changes to the 640H setup.
If you wish to use Static IP addressing, follow the steps below.
1. In the main menu, select SETTINGS in the left hand menu:
5. In the "Network Options" page that now appears, there is a menu item
called AUTOMATIC IP SETTINGS (DHCP). Deselect this and click apply.
This now turns off Dynamic DHCP addressing. The request could take
a few seconds to take effect:
17
PC/PDA control
6. When Dynamic DHCP addressing has been turned off, select the
ETHERNET menu item:
The 640H can now be controlled by a PC running Windows XP or a PDA
(Pocket PC) running Windows Mobile 2003 or Windows Mobile 5.0. This
software is designed so you can control your 640H from the comfort of
your living room chair, bed etc without the need for a remote control or
keyboard.
The control software not only allows you to perform the navigation
functions as found on your remote control, but it can also browse the
contents of the 640H music database and allow you to play a track,
album, or even a whole catalogue of music by an artist. This can also be
filtered by alphabet as you would using the remote control.
The control software essentially has two different modes:
1. Remote Control Mode
2. Browse Mode
7. This brings up four text input boxes that you can change: IP address,
Subnet mask, Gateway and Name server. As with your computer
setup, the IP address should be 192.168.0.X where X is a number
between 1 and 254 that is unique to the 640H. The Subnet mask
should be set to 255.255.255.0. The Gateway and Name server
should be set to the IP address of the device controlling your internet
connection (i.e. router). If you are using a network with no internet
connection, the Gateway and Name server should be set to the IP
address of the network device you are connecting to (i.e. PC/Mac or
another 640H etc):
PC minimum requirements are Windows XP with service Pack 2 and .net
2.0 installed. PDA minimum requirements are Windows Mobile 2003 or
Windows Mobile 5.0 both with .net 2.0 installed. Your 640H should be
running software version 02.01.77 or higher.
For installation instructions and software download links, click on the
Azur 640H link at:
www.cambridgeaudio.com/support.php
8. After you have entered the correct information, click APPLY to store
the settings. This may take a few seconds to take effect:
Album art management
Album art can be transferred to your 640H from compatible networked
sources (e.g PC or Mac). Album art can be found on various websites
and copied into your personal computer files as a JPEG/JPG/GIF/BMP
file.
To do this, simply drag and drop the album art into the appropriate
albums directory on the 640H from your PC/Mac. You can even use your
own images in place of downloaded ones, but name any you create as
"user.jpg" and put it in the directory as above.
When using iTunes, your album art must be stored in the individual
album’s track listing folder as a JPEG for successful transfer and
relationship with the music content. Simply cutting and pasting the
album art into the ‘Album Art’ location on the iTunes screen is not
sufficient for the AudioFile software to recognise this as album art.
For detailed instructions click on the Azur 640H link at:
The process is now complete.
www.cambridgeaudio.com/support.php
Note: After adding album art to the 640H, a rescan by the 640H is
necessary to update its database.
18
azur
640H
Despite our selection of the very highest quality components and
extensive testing regime the 640H, like all units using a hard disk drive,
is subject to occasional random failure. In the unlikely event of a harddrive failure, some or all of the music content stored on the 640H’s
hard-drive may be lost. It is therefore strongly recommended that all
music content is regularly backed up to another storage medium to
prevent lengthy re-ripping or transferring of content in this event.
Cambridge Audio cannot be held responsible for any consequential
damage caused by hard-drive failures.
After installing a software upgrade the unit no longer
recognises all of the information on the database
There is no power
I have a large quantity of music on my PC, which the
640H is unable to recognise or scan
Ensure the AC power cord is connected securely.
Ensure the plug is fully inserted into the wall socket and is switched on.
Check fuse in the mains plug or adaptor.
The player will not read the disc
Check the disc is not loaded upside down.
Check that the disc is not too scratched or dirty.
There is no sound
Ensure that the amplifier is set correctly.
Check that the interconnects are inserted correctly.
The disc is skipping
Check that the disc is not too scratched or dirty.
Ensure the player is on a firm surface and not subject to vibrations.
In order to synchronise the software upgrade with the hard drive
content, it may be necessary to rescan the database. If this does not
rectify the issue, reset the database, then rescan (refer to the
information on Data management in the 'Settings Menus' section of this
manual). This procedure will not remove or alter content on the hard
drive.
For larger music collections, please refer to the 'Content Management'
section in the 640H Networking Guides available for download on the
Cambridge Audio website.
My 640H is still making noises after I have put it into
standby
The unit is performing tasks such as background compression, file and
database management, and self checks. This is part of normal
operation, and will often occur for a few minutes after the unit is placed
in standby. If there is a large amount of music on the hard drive awaiting
compression, this procedure will take longer than usual.
For more frequently asked questions (FAQ’s), technical advice and
information on getting the most out of your 640H, please visit the
Cambridge Audio website:
www.cambridgeaudio.com/support.php
There is a hum coming from the speaker
Ensure that all cable connections are secure.
The remote handset will not function
Check that the batteries have not expired.
Ensure that nothing is blocking the remote sensor.
Check the remote is in the correct mode - 640H, Amp or AV mode (see
the ‘Remote control’ section of this manual for more information).
There are no menus displayed on a connected monitor
The monitor/TV must be connected to the 640H before you turn on
power via the On/Off switch on the rear panel of the 640H.
The player will not burn tracks to disc
Ensure the CD is not scratched or dirty. The CD must also be blank and
the correct format for burning (CD-R and CD-RW).
The connected device is not accessible
Ensure the USB cable is connected securely to the portable device and
the 640H, and the USB has power.
The unit freezes
Allow a reasonable amount of time before switching the 640H Off on the
rear panel of the unit, as the 640H may still be processing a function.
The 640H is not connecting to a network
Double-check all the settings, restart the computers and the 640H in
your network and try again.
19
ENGLISH
Troubleshooting
Cambridge Audio
Gallery Court
Hankey Place
London SE1 4BB
England
© 2007 Cambridge Audio Ltd
AP17159/3-A
www.cambridge-audio.com