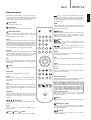
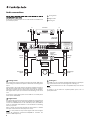
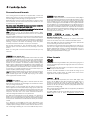
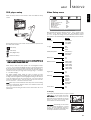
1
540D V2
DVD player
User’s manual
2
ENGLISH
azur
Contents
Introduction
Introduction .................................................................................................2
Thank you for purchasing this Cambridge Audio Azur range DVD player.
We hope that you enjoy many years of pleasure from it.
Limited warranty..........................................................................................3
Safety precautions ......................................................................................3
Important safety instructions ....................................................................4
Rear panel connections..............................................................................5
Front panel controls ....................................................................................6
Front panel display......................................................................................6
Remote control ............................................................................................7
Audio connections.......................................................................................8
Analog video connections...........................................................................9
HDMI connections.......................................................................................9
Surround-sound formats ..........................................................................10
Video formats ............................................................................................10
DVD player setup ......................................................................................11
Video Setup menu ....................................................................................11
Audio Setup menu ....................................................................................13
Dolby Digital Setup menu.........................................................................14
Preference menu ......................................................................................15
The new 540D V2 was designed from the ground up for the Azur range
based on a new and highly evolved DVD chipset which includes the
ability to reproduce a progressive scan image in both PAL and NTSC
formats via either analog component video or the new digital HDMI
output. Great care has been taken with both the digital and analog video
circuitry to achieve the best possible video performance whichever
connection you use. The HDMI output is also capable of up-scaling to
720p or 1080i video formats for use with HD TV sets.
A newly developed proprietary Phase Locked Loop (PLL) system
generates very low jitter audio clocks locked to the master video clock
fed to the MPEG decoder. This PLL scheme and our normal attention to
the DAC and anti-alias filtering circuits ensure the 540D V2 has audio
performance equivalent to a dedicated CD player, a rare thing in a DVD
player.
The jitter at the SPDIF digital output is also very low for best possible
performance when using this connection with an AV receiver for
surround-sound use.
Your 540D V2 can only be as good as the system it is connected to.
Please do not compromise on your partnering equipment. Naturally we
particularly recommend equipment from the Cambridge Audio Azur
range, which have been designed to the same exacting standards as
this product. Your dealer can also supply excellent quality Cambridge
Audio interconnects to ensure your system realises its full potential.
Thank you for taking the time to read this manual, we do recommend
you keep it for future reference.
Basic operating instructions ....................................................................16
DivX/MP4 playback ..................................................................................16
Custom installation use............................................................................17
Technical Specifications ..........................................................................17
Troubleshooting ........................................................................................17
Visit www.cambridge-audio.com and register to receive notification of future
hardware and software releases.
This guide is designed to make installing and using this product as easy as
possible. Information in this document has been carefully checked for accuracy at
the time of printing; however, Cambridge Audio's policy is one of continuous
improvement, therefore design and specifications are subject to change without
prior notice. If you notice any errors please feel free to email us at:
[email protected]
This document contains proprietary information protected by copyright. All rights
are reserved. No part of this manual may be reproduced by any mechanical,
electronic or other means, in any form, without prior written permission of the
manufacturer. All trademarks and registered trademarks are the property of their
respective owners.
© Copyright Cambridge Audio Ltd 2007
“Dolby”, “Pro Logic”, “Surround EX” and the double-D symbol are trademarks of
Dolby Laboratories.
“DTS”, “DTS Digital Surround”, “DTS-ES” and “Neo:6” are trademarks of Digital
Theater Systems, Inc.
DivX and the DivX logo are registered trademarks of DivX, Inc.
2
Matthew Bramble,
Cambridge Audio Technical Director
and the DVD player design team.
Limited warranty
Safety precautions
Cambridge Audio warrants this product to be free from defects in
materials and workmanship (subject to the terms set forth below).
Cambridge Audio will repair or replace (at Cambridge Audio's option) this
product or any defective parts in this product. Warranty periods may vary
from country to country. If in doubt consult your dealer and ensure that
you retain proof of purchase.
Checking the Power Supply Rating
To obtain warranty service, please contact the Cambridge Audio authorised
dealer from which you purchased this product. If your dealer is not
equipped to perform the repair of your Cambridge Audio product, it can be
returned by your dealer to Cambridge Audio or an authorised Cambridge
Audio service agent. You will need to ship this product in either its original
packaging or packaging affording an equal degree of protection.
Proof of purchase in the form of a bill of sale or receipted invoice, which
is evidence that this product is within the warranty period, must be
presented to obtain warranty service.
This Warranty is invalid if (a) the factory-applied serial number has been
altered or removed from this product or (b) this product was not
purchased from a Cambridge Audio authorised dealer. You may call
Cambridge Audio or your local country Cambridge Audio distributor to
confirm that you have an unaltered serial number and/or you purchased
from a Cambridge Audio authorised dealer.
This Warranty does not cover cosmetic damage or damage due to acts of
God, accident, misuse, abuse, negligence, commercial use, or modification
of, or to any part of, the product. This Warranty does not cover damage due
to improper operation, maintenance or installation, or attempted repair by
anyone other than Cambridge Audio or a Cambridge Audio dealer, or
authorised service agent which is authorised to do Cambridge Audio
warranty work. Any unauthorised repairs will void this Warranty. This
Warranty does not cover products sold AS IS or WITH ALL FAULTS.
REPAIRS OR REPLACEMENTS AS PROVIDED UNDER THIS WARRANTY ARE
THE EXCLUSIVE REMEDY OF THE CONSUMER. CAMBRIDGE AUDIO SHALL
NOT BE LIABLE FOR ANY INCIDENTAL OR CONSEQUENTIAL DAMAGES FOR
BREACH OF ANY EXPRESS OR IMPLIED WARRANTY IN THIS PRODUCT.
EXCEPT TO THE EXTENT PROHIBITED BY LAW, THIS WARRANTY IS EXCLUSIVE
AND IN LIEU OF ALL OTHER EXPRESS AND IMPLIED WARRANTIES
WHATSOEVER INCLUDING, BUT NOT LIMITED TO, THE WARRANTY OF
MERCHANTABILITY AND FITNESS FOR A PRACTICAL PURPOSE.
Some countries and US states do not allow the exclusion or limitation of
incidental or consequential damages or implied warranties so the above
exclusions may not apply to you. This Warranty gives you specific legal
rights, and you may have other statutory rights, which vary from state to
state or country to country.
Plug Fitting Instructions (UK Only)
The cord supplied with this appliance is factory fitted with a UK mains plug
fitted with a 3 amp fuse inside. If it is necessary to change the fuse, it is
important that a 3 amp one is used. If the plug needs to be changed because
it is not suitable for your socket, or becomes damaged, it should be cut off
and an appropriate plug fitted following the wiring instructions below. The
plug must then be disposed of safely, as insertion into a mains socket is likely
to cause an electrical hazard. Should it be necessary to fit a 3-pin BS mains
plug to the power cord the wires should be fitted as shown in this diagram.
The colours of the wires in the mains lead of this appliance may not
correspond with the coloured markings identifying the terminals in your plug.
Connect them as follows:
The wire which is coloured BLUE must be
connected to the terminal which is marked
with the letter ‘N’ or coloured BLACK.
The wire which is coloured BROWN must be
connected to the terminal which is marked
with the letter ‘L’ or coloured RED.
The wire which is coloured GREEN/YELLOW
must be connected to the terminal which is
marked with the letter ‘E’ or coloured GREEN.
540D V2
For your own safety please read the following instructions carefully
before attempting to connect this unit to the mains.
Check that the rear of your unit indicates the correct supply voltage. If
your mains supply voltage is different, consult your dealer.
This unit is designed to operate only on the supply voltage and type that
is indicated on the rear panel of the unit. Connecting to other power
sources may damage the unit.
This equipment must be switched off when not in use and must not be
used unless correctly earthed. To reduce the risk of electric shock, do
not remove the unit's cover (or back). There are no user serviceable
parts inside. Refer servicing to qualified service personnel. If the power
cord is fitted with a moulded mains plug the unit must not be used if the
plastic fuse carrier is not in place. Should you lose the fuse carrier the
correct part must be reordered from your Cambridge Audio dealer.
The symbol on this product indicates that it is of CLASS II (double
insulated) construction.
The lightning flash with the arrowhead symbol within an
equilateral triangle is intended to alert the user to the
presence of un-insulated ‘dangerous voltage’ within the
product’s enclosure that may be of sufficient magnitude
to constitute a risk of electric shock to persons.
The exclamation point within an equilateral triangle is
intended to alert the user to the presence of important
operating and maintenance instructions in the service
literature relevant to this appliance.
The crossed-out wheeled bin is the European Union symbol
for indicating separate collection for electrical and electronic
equipment. This product contains electrical and electronic
equipment which should be reused, recycled or recovered
and should not be disposed of with unsorted regular waste.
Please return the unit or contact the authorised dealer from
whom you purchased this product for more information.
Approvals
This product complies with European Low Voltage
(73/23/EEC) and Electromagnetic Compatibility
(89/336/EEC) Directives when used and installed
according to this instruction manual. For continued
compliance only Cambridge Audio accessories should be used with this
product and servicing must be referred to qualified service personnel.
NOTE: THE MANUFACTURER IS NOT RESPONSIBLE FOR ANY RADIO OR
TV INTERFERENCE CAUSED BY UNAUTHORIZED MODIFICATIONS TO
THIS EQUIPMENT. SUCH MODIFICATIONS COULD VOID THE USER
AUTHORITY TO OPERATE THE EQUIPMENT.
This equipment has been tested and found to comply with the limits for
a Class B digital device, pursuant to Part 15 of the FCC Rules. These
limits are designed to provide reasonable protection against harmful
interference in a residential installation. This equipment generates,
uses and can radiate radio frequency energy and, if not installed and
used in accordance with the instructions, may cause harmful
interference to radio communications. However, there is no guarantee
that interference will not occur in a particular installation.
If this equipment does cause harmful interference to radio or television
reception, which can be determined by turning the equipment off and
on, the user is encouraged to try to correct the interference by one or
more of the following measures:
- Re-orient or relocate the receiving antenna.
- Increase the separation between the equipment and receiver.
If your model does not have an earth wire, then disregard this instruction.
- Connect the equipment into an outlet on a circuit different from that to
which the receiver is connected.
If a standard 13 amp (BS 1363) plug is used, a 3 amp fuse must be fitted,
or if any other type of plug is used a 3 amp fuse must be fitted, either in the
plug or adaptor, or on the distribution board.
- Consult the dealer or an experienced radio/TV technician for help.
3
ENGLISH
azur
Important safety instructions
Please take a moment to read these notes before installing your 540D
V2, as they will enable you to get the best performance and prolong the
life of the unit. We advise you follow all instructions, heed all warnings
and keep the instructions for future reference.
Ventilation
IMPORTANT - The unit will become hot when in use.
Please ensure there is ample ventilation (at least 10cm clearance all
round). Do not put any objects on top of this unit. Do not situate it on a
rug or other soft surface and do not obstruct any air inlets or outlet
grilles. Do not install near any heat sources such as radiators, heat
registers, stoves, or other apparatus (including amplifiers) that produce
heat. Do not stack multiple units on top of each other. Do not place in
an enclosed area such as a bookcase or in a cabinet without sufficient
ventilation.
Ensure that small objects do not fall through any ventilation grille. If this
happens, switch off immediately, disconnect from the mains supply and
contact your dealer for advice.
Positioning
Choose the installation location carefully. Avoid placing it in direct
sunlight or close to a source of heat. Also avoid locations subject to
vibration and excessive dust, cold or moisture. Do not place the unit on
an unstable surface or shelf. The unit may fall, causing serious injury to
a child or adult as well as serious damage to the product. Do not place
other equipment on top of the unit.
This unit must be installed on a sturdy, level surface. Do not
place in a sealed area such as a bookcase or in a cabinet. Any
space open at the back (such as a dedicated equipment rack)
is fine however. When a cart is used, use caution when moving
the cart to avoid injury from tip-over.
WARNING - To reduce the risk of fire or electric shock, do not expose this
unit to rain or moisture. This unit must not be used near water or
exposed to dripping or splashing water or other liquids. No objects filled
with liquid, such as vases, shall be placed on the unit. In the event,
switch off immediately, disconnect from the mains supply and contact
your dealer for advice.
Electronic audio components have a running in period of around a week
(if used several hours per day). This will allow the new components to
settle down, the sonic properties will improve over this time.
Grounding and polarisation
Do not defeat the safety purpose of the polarized or grounding type plug.
A polarized plug has two blades with one wider than the other. A
grounding type plug has two blades and a third grounding prong. The
wide blade or third prong are provided for your safety. If the provided
plug does not fit your outlet, consult an electrician for replacement of
the obsolete outlet.
Power sources
Power cord protection
The unit must be installed in a manner that makes disconnection of the
mains plug from the mains socket outlet (or appliance connector from the
rear of the unit) possible. Where the mains plug is used as the disconnect
device, the disconnect device shall remain readily operable. Protect the
power cord from being walked on or pinched particularly at plugs,
convenience receptacles, and the point where they exit from the unit.
Be sure to insert each power cord securely. To prevent hum and noise, do
not bundle the interconnect leads with the power cord or speaker leads.
Overloading
Do not overload wall outlets or extension cord as this can result in a risk
of fire or electric shock. Overloaded AC outlets, extension cords, frayed
power cords, damaged or cracked wire insulation, and broken plugs are
dangerous. They may result in a shock or fire hazard.
Lightning
For added protection during a thunderstorm, or when it is left
unattended and unused for long period of time, unplug the unit from the
wall outlet and disconnect the antenna or cable system. This will prevent
damage to the unit from lightning and power-line surges.
Cleaning
To clean the unit, wipe its case with a dry, lint-free cloth. Do not use any
cleaning fluids containing alcohol, ammonia or abrasives. Do not spray
an aerosol at or near the unit. The use of a lens cleaning disc at least
once a month can also prolong unit life.
Attachments
Do not use attachments not recommended by your dealer as they may
cause harm to the unit. Only use the specified attachments/accessories
with this unit.
Servicing
These units are not user serviceable, never attempt to repair,
disassemble or reconstruct the unit if there seems to be a problem. A
serious electric shock could result if this precautionary measure is
ignored. In the event of a problem or failure, please contact your dealer.
Contact the service department should any of these conditions occur:
- When the power-supply cord or plug is damaged.
- If liquid has been spilled, or objects have fallen into the unit.
- If the unit has been exposed to rain or water.
- If the unit does not operate normally after following the operation
instructions, adjust only those controls that are covered by the
operation instructions.
- If the unit has been dropped or damaged in any way.
- When the unit exhibits a distinct negative change in performance.
The unit is of Class 1 construction and must be connected to a Mains
socket outlet with a protective earthing connection.
The unit should be operated only from the type of power source
indicated on the marking label. If you are not sure of the type of powersupply to your home, consult your product dealer or local Power
Company.
This unit has been designed to be left in Standby mode when not in use,
this will increase the life of the amplifier (this is true with all electronic
equipment). To turn the unit off completely switch off on the rear panel.
If you do not intend to use this unit for a long period of time, unplug it
from the mains socket.
4
Important Note
This unit has been designed to play video DVDs,
compact discs, recordable CDs (CD-R) and re-writable
CDs (CD-RW) bearing the identification logo shown
here. No other discs can be used. The CD-R/CD-RW
discs should contain properly recorded TOC (Table of
Contents) information so that they can be played
back. This unit can play only the discs recorded in the
CD-DA format designed for music reproduction. Do not attempt to
play a disc on this unit containing other data, such as a CD-ROM for
PCs.
azur
540D V2
Rear panel connections
Caution
1
6
Power Off
2
3
Control Bus
Power AC
Stereo
Out
5.1 Channel Audio Out
Digital Outputs
Toslink
Optical
C
SL
Video Out
Designed in London, England
L
Y
azur 540D V2.0 DVD Player
Cb/Pb
www.cambridge-audio.com
8
Out
Vorm öffnen des gerätes.
Netzstecker ziehen.
Composite
Power Rating: 100-240V AC ~ 50/60Hz
Max Power Consumption: 25W
L
S/P DIF
Co-axial
In
Avis
Achtung
IR Emitter
In
Risk of electric shock.
Do not open.
Risque de choc electrique.
Ne pas ouvrir.
5
4
9
7
SW
SR
R
R
SCART (Composite/RGB/Stereo Audio)
This product complies with DHHS rules 21 CFR, Chapter 1,
Subchapter J, Part 1040 at date of manufacture.
Apparatus claims of US patent nos. 4,631,603; 4,577,216;
4,819,098 and 4,907,093 licensed for limited viewing only.
“DTS” is a trademark of Digital Theatre Systems Inc.
Manufactured under license from Dolby Laboratories.
“Dolby” and the double-D symbol are trademarks of Dolby Laboratories.
Confidential Unpublished Works
©1992-1997 Dolby Laboratories. All rights reserved.
This device complies with part 15 of the FCC Rules. Operation is
subject to the following two conditions: 1) This device may not cause
harmful interference; 2) This device must accept any interference,
including interference that may cause undesired operation.
10
Cr/Pr
S-Video
Component
ENGLISH
On
Class 1 Laser Product
Luokan 1 Laserplaite
Klass 1 Laserapparat
HDMI Out
Manufactured in an ISO9002 approved facility.
1
AC power socket
Once you have made all audio and video connections, plug the IEC type
AC power cable into the rear of the unit and an appropriate mains socket
then switch on. Your DVD player is now ready for use.
2
Power On/Off
Switches the unit on and off.
8
RGB/SCART
Use a SCART/Peritel cable to connect to the 21-pin scart input jack of a
TV. SCART carries both audio (stereo) and video (as either Composite, SVideo or RGB) at the same time.
9
Analog Video Outputs
Composite - Connect to your television via 75 ohm RCA/phono cable
designed specifically for video use.
S-V
Video - Connect to your television via dedicated S-Video cable.
3
Control Bus
In - Allows un-modulated commands from multi-rooms systems or other
components to be received by the unit.
Component - Connect to the YCbCr or YPbPr terminals of a television set
via three 75 ohm RCA/phono cables designed specifically for video use.
Out - Loop out for Control Bus commands to another unit.
10
4
IR (Infra-Red) Emitter In
Allows modulated IR commands from multi-room systems or IR repeater
systems to be received by the unit. Commands received here are not
looped out of the Control Bus. Refer to the ‘Custom Installation’ section
of this manual for more information.
5
Digital Outputs
Digital audio outputs are normally used to connect to a suitable
Audio/Video Receiver for surround sound decoding (output must be set
for ‘RAW Bitstream’ - refer to the ‘Audio setup’ section). These outputs
can also be used to connect to a separate DAC or digital recording
device (output must be set for ‘PCM Stereo’ - refer to the ‘Audio setup’
section).
HDMI Out
HDMI (High-Definition Multi-Media Interface) is a purely digital
connection that can carry both audio and video. Use a dedicated HDMI
cable to connect to a TV/Monitor with a compatible HDMI input.
Note: The preferred connection method for video sources is always
HDMI (highest quality, and can also carry audio in some
circumstances) then Component Video then RGB/SCART then SVideo then Composite Video (lowest quality). The HDMI and
Component outputs also support Progressive Scan which gives
better picture quality if supported by your TV.
Toslink Optical - Use a high quality TOSLINK fibre optic cable.
S/P DIF Co-A
Axial Digital - Use a high quality 75 ohm digital RCA/Phono
interconnect cable designed specifically for digital audio use.
6
5.1 Channel Audio Out
If Downmix is set to ‘Off’ in the Speaker Setup section of the 540D V2’s
Setup menus, these sockets provide 5.1 output from the 540D V2's built
in Dolby Digital / Pro Logic II decoder. This can be used to connect to the
5.1 audio line-level inputs of an amplifier/AV receiver or amplified
speaker package if required.
If Downmix is set to ‘On’, the Left and Right outputs only are active and
provide a stereo downmixed output.
7
Stereo Audio Out
A separate permanent Stereo output (or Stereo downmix in the case of
multi-channel material) is available for connection to the analog stereo
inputs of an amplifier/AV receiver etc. This is the best connection to use
for listening to CDs.
5
Front panel controls
azur 540D
DVD Player
4
1
Standby / On
2
Open
Close
Play
Pause
Stop
Skip
5
6
7
8
3
1
Standby/On
Switches the unit between Standby mode (indicated by a dim power
LED) and On (indicated by a bright power LED). Standby is a low power
mode where the power consumption is less than 10 Watts. The unit
should be left in Standby mode when not in use.
2
Front panel display
1
2
3
4 5
6
IR sensor
Receives IR commands from the supplied Azur remote control. A clear
unobstructed line of sight between the remote control and the sensor is
required.
8
1
7
Title/Chapter
Indicates the chapter title and chapter number fields.
3
Display
Used to display the 540D V2’s functions and playback state etc. Please
refer to the following ‘Front Panel Display’ section for more information.
2
3
4
Disc tray
DVD/Compact Disc tray. Use the Open/Close button to activate.
Video format
Displays the video output format: NTSC or PAL.
Time
Shows the hour, minutes and seconds elapsed on the disc.
4
MP4
Indicates a DivX/MP4 encoded disc is playing.
5
Open/Close
Allows you to open and close the disc tray for loading of discs. Pressing
Play will also close the tray and start playing a disc if one is loaded.
6
Play/Pause
Plays the disc and pauses (freezes) play when playing.
5
6
7
Stop
8
Skip
Press once to skip between tracks/chapters.
6
Repeat
Shows when Repeat (
functions are in use.
7
Press once to stop playback. Pressing Play will cause the playback be restarted from the same position. Press again to fully stop playback.
Decoding mode indicators
Indicate when a Dolby Digital soundtrack is being played back (either
decoded internally or output digitally for external decoding) or DTS
soundtrack (for external decoding only).
), Repeat All (
) and A-B Repeat (
Playback
Shows when the disc is being played or paused.
8
Main information display
Used to display the various functions of the unit.
)
azur
540D V2
Note: If Stop is pressed once playback can be resumed
from the same place by pressing Play. Press Stop twice to
completely stop playback. If Pause is selected pressing
the Slow key then allows frame by frame advancement of
the paused frame.
The 540D V2 is supplied with an Azur Navigator remote
control. Insert the 3 supplied AAA batteries to activate. For
further details of the various adjustment functions
available, refer to the later sections of this manual.
Open/Close
Slow
Opens and closes the disc tray.
When playing a DVD, press repeatedly to cycle round the
various speeds of slow motion, forwards and backwards
and back to normal speed).
Standby/On
Switches the unit between On and Standby mode.
Search
Numerical buttons
Press repeatedly to cycle between 2X, 4X, 8X and 16X
playback speed (without sound) and back to normal
playback. Left button for backwards playback options,
right button for forwards playback.
Press the number of a desired chapter or track to go
directly to it. For a number greater than ten, press 10+
followed by the number(s) required.
Go To
Press once to access Chapter Selection then enter the
required chapter via the numerical buttons. Press twice to
access Disc Time Selection and enter the required time from
the start of the disc as H:MM:SS (Hours, Minutes, Seconds).
Press three times to access Chapter Time Selection and
enter the required time from the start of the chapter.
Skip
Right Skip - Press once to skip forward by one
track/chapter on the disc. Press and hold to skip forwards
through several tracks.
Go To
Repeat
A-B
Disc
Menu
Setup
Info
Left Skip - Press once to skip backward by one
track/chapter on the disc. Press and hold to skip
backwards through several tracks.
Repeat
Press to repeatedly play a single chapter/title on a DVD
video or a single track/entire disc on a CD. The first press
selects chapter/track repeat, the second press selects
title/disc repeat, the third press selects all repeat.
Disc
Title
Audio
Press to access alternate audio soundtracks on the DVD
(if available on the DVD disc).
Sub
A-B
Press to mark a segment between A and B for repeated
playback. The first press marks point A, the second press
marks point B.
Press to enable/disable Subtitles (if available on the DVD
disc).
Enter
Angle
Press to access various camera angles (if available on the
DVD disc).
Return
Press to return to the previous operation in any setup
menu.
Slow
Disc Menu
Press to go to a DVD disc’s own setup menu.
Setup
Press to enter the 540D V2's Setup menu. Please refer to
the ‘DVD player setup’ section of this manual for more
information.
Audio
Sub
Angle
Amp / AVR
While playing a DVD, press to cycle through the following
information options to be displayed on the screen: Title
Elapsed, Title Remain, Chapter Elapsed, Chapter Remain,
Info Off.
Vol
Source
Disc Title
Press to access the DVDs Title Menu. This is usually the
root menu from where the film can be started or where
navigation to scene selections, special features etc can
be made.
Navigation
Press the directional arrows to move around the Setup
menus.
Enter
Press to accept the item/function highlighted in the
display menu.
Stop /
Pause
Press the relevant button to play, stop or pause playback.
Press to cycle through the various zoom magnifications
(and back to normal display).
Amp/AVR buttons
The 540D V2 remote also has buttons that allow control of
a Cambridge Audio Azur Amplifier or AV Receiver.
Info
Play /
Zoom
Zoom
Vol
Note: These buttons are default set to transmit codes
for our Azur 540R AV Receiver. To set the remote to an
Azur 640R instead, simply remove the batteries, leave
the remote for a few minutes and then hold down the
Source button whilst re-inserting the batteries. To
control an Azur 540A/640A/740A/840A follow the
same steps as before, but hold down the
Standby/On/Mute button.
The functions relevant to the amplifier or AV Receiver
chosen are as follows:
DVD
Source
Press repeatedly to scroll round the source inputs one by
one.
Standby/On / Mute
Press to switch the amplifier/AV Receiver between
Standby mode and On. Press and hold to mute/un-mute
the amplifier/AV Receiver.
Volume
Press to decrease or increase the volume of the
amplifier/AV Receiver.
7
ENGLISH
Remote control
Audio connections
Do not plug in the mains power lead or turn the unit on until all
connections have been made.
1 Analog Stereo
2 Digital Audio
Three types of audio connection can be made between the 540D V2 and
your stereo/AV system:
In
3 Analog 5.1
In
AV receiver
1
2
OR
Phono cable
(2RCA-2RCA)
On
Power Off
Video Out
Class 1 Laser Product
Luokan 1 Laserplaite
Klass 1 Laserapparat
Power AC
Caution
Control Bus
C
SL
L
Composite
Y
azur 540D V2.0 DVD Player
Power Rating: 100-240V AC ~ 50/60Hz
Max Power Consumption: 25W
L
S/P DIF
Co-axial
Cb/Pb
www.cambridge-audio.com
This product complies with DHHS rules 21 CFR, Chapter 1,
Subchapter J, Part 1040 at date of manufacture.
Apparatus claims of US patent nos. 4,631,603; 4,577,216;
4,819,098 and 4,907,093 licensed for limited viewing only.
“DTS” is a trademark of Digital Theatre Systems Inc.
Manufactured under license from Dolby Laboratories.
“Dolby” and the double-D symbol are trademarks of Dolby Laboratories.
Confidential Unpublished Works
©1992-1997 Dolby Laboratories. All rights reserved.
This device complies with part 15 of the FCC Rules. Operation is
subject to the following two conditions: 1) This device may not cause
harmful interference; 2) This device must accept any interference,
including interference that may cause undesired operation.
In
Avis
Achtung
Digital Outputs
Toslink
Optical
In
Risk of electric shock.
Do not open.
Risque de choc electrique.
Ne pas ouvrir.
Designed in London, England
Stereo
Out
5.1 Channel Audio Out
IR Emitter
Cr/Pr
Out
Vorm öffnen des gerätes.
Netzstecker ziehen.
SW
SR
R
R
SCART (Composite/RGB/Stereo Audio)
S-Video
Component
HDMI Out
Manufactured in an ISO9002 approved facility.
AV receiver
with 5.1
analog inputs
3
Front right
speaker
Front left
speaker
Centre speaker
Surround left
speaker
1
Analog stereo
The analog stereo outputs should be used play back of CDs, DVDs etc in
stereo through a conventional amplifier or AV receiver with analog stereo
inputs.
Analog stereo is also usually the best connection method for listening to
CDs and other stereo discs for best possible sound quality. It is often a
good idea to connect both the analog stereo outputs (for CD playback)
and digital audio outputs (for surround sound decoding) at the same
time.
To connect an analog stereo system to the 540D V2, use stereo phono
cables (stereo 2RCA-2RCA).
2
Digital audio
The digital audio outputs should be used to decode the surround-sound
soundtracks of DVDs with an external AV Receiver (Note: SPDIF output
must be set to ‘RAW Bitstream’ in the Audio Setup menu). The 540D V2
sends an undecoded audio bitstream to the AV Receiver for decoding
into 5.1/6.1/7.1 etc.
Either a 75ohm co-axial cable designed for digital audio or a TOSlink
fibre optic cable should be used (only one at a time).
Note: It is also possible to output stereo digital audio from the Digital
Outputs for recording on conventional CD-R/MD etc. machines, see
section on DVD Player setup.
8
Subwoofer
3
Surround right
speaker
Analog 5.1
The 540D V2 is also capable of decoding Dolby Digital 5.1 or Dolby Pro
Logic II soundtracks itself and outputting these as Analog 5.1.
Note: Downmix should be set to ‘Off’ in the Speaker Setup menu for this
to work.
To connect to an AV receiver or amplified speaker system, use 6 x
phono/RCA cables.
azur
540D V2
1 Component - Connect with 75 ohm Component video cables (3RCA3RCA).
The 540D V2 can output video in both fully digital (HDMI) and analog
(Composite, S-Video, RGB/SCART and Component) formats. If your TV
set supports HDMI then this is the preferred format (see next section).
2 SCART/RGB - Connect with a dedicated Scart Audio/Video cable.
If your TV set supports only analog video the preferred connection is (in
declining order of quality) Component, then RGB/SCART, S-Video and
finally Composite.
3 S-Video - Connect with S-Video cable.
4 Composite - Connect with single 75 ohm video phono cable (RCARCA).
4
1
TV/Monitor
On
Power Off
TV/Monitor
Video Out
Class 1 Laser Product
Luokan 1 Laserplaite
Klass 1 Laserapparat
Stereo
Out
5.1 Channel Audio Out
Control Bus
Power AC
IR Emitter
Digital Outputs
Toslink
Optical
In
Caution
Risk of electric shock.
Do not open.
C
SL
L
L
S/P DIF
Co-axial
Designed in London, England
Composite
Y
azur 540D V2.0 DVD Player
Power Rating: 100-240V AC ~ 50/60Hz
Max Power Consumption: 25W
Cb/Pb
www.cambridge-audio.com
This product complies with DHHS rules 21 CFR, Chapter 1,
Subchapter J, Part 1040 at date of manufacture.
Apparatus claims of US patent nos. 4,631,603; 4,577,216;
4,819,098 and 4,907,093 licensed for limited viewing only.
“DTS” is a trademark of Digital Theatre Systems Inc.
Manufactured under license from Dolby Laboratories.
“Dolby” and the double-D symbol are trademarks of Dolby Laboratories.
Confidential Unpublished Works
©1992-1997 Dolby Laboratories. All rights reserved.
This device complies with part 15 of the FCC Rules. Operation is
subject to the following two conditions: 1) This device may not cause
harmful interference; 2) This device must accept any interference,
including interference that may cause undesired operation.
In
Avis
Risque de choc electrique.
Ne pas ouvrir.
Out
Achtung
Cr/Pr
Vorm öffnen des gerätes.
Netzstecker ziehen.
SW
SR
R
R
S-Video
SCART (Composite/RGB/Stereo Audio)
Component
HDMI Out
Manufactured in an ISO9002 approved facility.
2
TV/Monitor
TV/Monitor
3
HDMI connections
As HDMI can carry both digital audio and video, HDMI can be used to
connect to AV receivers that support this function. If your AV receiver is
able to receive audio over HDMI only one cable is required*.
HDMI (High-Definition Multi-Media Interface) is a digital connection that
can carry both audio and video in one cable. Direct digital transfer of
video and support for various types of High Definition video content
make this the best connection type for picture quality.
*If your AV receiver can switch HDMI but not receive audio in this way,
an additional SPDIF or TOSlink cable will be required.
DVI output can be supported simply by using DVI to HDMI adaptors as
these two connection types are compatible. When using DVI only video
will be passed to the TV/Monitor. A Co-axial (SPDIF) or Optical (TOSlink)
digital audio connection must be made from the 540D V2 to the AV
receiver for it to be able to receive audio and decode surround sound etc.
HDMI cable
1
*
Out
In
AV receiver
OR
TV/Monitor with HDMI input
HDMI cable
On
Power Off
Video Out
Class 1 Laser Product
Luokan 1 Laserplaite
Klass 1 Laserapparat
Power AC
Caution
Control Bus
Digital Outputs
Toslink
Optical
C
SL
L
L
S/P DIF
Co-axial
Designed in London, England
Composite
Y
azur 540D V2.0 DVD Player
Power Rating: 100-240V AC ~ 50/60Hz
Max Power Consumption: 25W
Cb/Pb
www.cambridge-audio.com
This product complies with DHHS rules 21 CFR, Chapter 1,
Subchapter J, Part 1040 at date of manufacture.
Apparatus claims of US patent nos. 4,631,603; 4,577,216;
4,819,098 and 4,907,093 licensed for limited viewing only.
“DTS” is a trademark of Digital Theatre Systems Inc.
Manufactured under license from Dolby Laboratories.
“Dolby” and the double-D symbol are trademarks of Dolby Laboratories.
Confidential Unpublished Works
©1992-1997 Dolby Laboratories. All rights reserved.
This device complies with part 15 of the FCC Rules. Operation is
subject to the following two conditions: 1) This device may not cause
harmful interference; 2) This device must accept any interference,
including interference that may cause undesired operation.
In
Avis
Achtung
IR Emitter
In
Risk of electric shock.
Do not open.
Risque de choc electrique.
Ne pas ouvrir.
Stereo
Out
5.1 Channel Audio Out
Out
Cr/Pr
Vorm öffnen des gerätes.
Netzstecker ziehen.
SW
SR
R
R
SCART (Composite/RGB/Stereo Audio)
S-Video
Component
HDMI Out
Manufactured in an ISO9002 approved facility.
2
1 Connection to a TV via an AV Receiver
TV/Monitor
with HDMI
input
2 Direct connection to a TV
In
9
ENGLISH
Analog video connections
Surround-sound formats
Via its analog outputs the 540D V2 can playback CDs in stereo and
DVDs in either stereo or up to 5.1 output when they have been encoded
with Dolby Digital or Dolby Pro Logic / Pro Logic II formats.
Dolby Digital EX 6.1 discs can also be played back but only 5.1 output
will be available (the 6th channel will be shared between the rear
surround left and right speakers).
The Stereo outputs of the 540D V2 always output stereo whether the
material is a stereo CD/DVD or multi-cchannel DVD.
The 5.1 outputs can be set for downmix (in which case the front left and
right only will be active) or 5.1 output (downmix off).
Note: If Downmix is set to ‘Off’ the default playback system is Dolby
Digital. If Pro Logic II is preferred this needs to be set to ‘On’ in the 540D
V2 Setup menus.
The optional DTS soundtracks on some discs cannot be decoded by the
540D V2, however the machine is able to send a raw bitstream version
of any soundtrack via its digital outputs for decoding by an external AV
Receiver and this is actually the preferred setup even if just Dolby Digital
decoding is required. This allows the decoding of the many other
surround-sound formats available in 5.1/6.1/7.1 and beyond.
We naturally recommend our own AV Receivers which offer many
decoding options and other facilities for the processing of surround
sound.
Below is a brief guide to common surround-sound formats you may
encounter:
Dolby Digital (5.1)
The mandatory soundtrack encoding for DVD movies. Known also as DD
(3/2) or DD 5.1, DD provides (up to) 5.1 output from suitable encoded
Dolby Digital DVD's. There are 5 main channels (Front Left, Front Right,
Centre, Surround Left, Surround Right) and a Low Frequency Effects
Channel for the subwoofer, all discretely encoded. Decoding Dolby
Digital requires a Dolby Digital encoded DVD disc (nearly all DVDs) and
either a digital connection from the 540D V2 to a suitable AV Receiver
(preferred method) or the 540D V2's own built in decoder can be used
in which case a 5.1 analog connection from the 5.1 Audio outputs to a
suitable amplifier/speaker package is required.
Note: Dolby Digital and DTS formats can sometimes carry less channels
than their maximum such as Dolby Digital (2/0) which means a Dolby
Digital encoded signal which is actually only carrying a two channel
stereo signal (other channels inactive).
Pro Logic II
Pro Logic II is a Dolby technology where 5 channels (Front Left, Front
Right, Centre, Surround Left, Surround Right) are encoded into a Stereo
mix by an analog matrix process.
Dolby Pro Logic II is also compatible with the earlier 4 channel (Left,
Centre, Right and mono Surround) Dolby Pro Logic system (which was
the decoding counterpart to Dolby Surround encoding) which was used
widely on TV material and earlier films. PL and PLII are present on many
early films and often also in the stereo soundtrack available as
alternative alongside the DD 5.1 on many newer films.
The 540D V2 can decode PLII via its own decoder or an external AV
Receiver can be used. Because the encoding process is analog an AV
Receiver can usually decode PLII from either an Analog Stereo or Digital
connection from the 540D V2 to the AV Receiver. Consult your receivers
manual.
If it is desired to use the 540D V2's own built in PLII decoder a 5.1
analog connection from the 540D V2's 5.1 Audio outputs to a suitable
amplifier/speaker package should be made, downmix should be set to
‘Off’ and Pro logic II decoding set to ‘On’ in the 540D V2 Setup menus.
10
Dolby Digital EX
Known also as DD (3/3) or DD 6.1, an enhanced form of Dolby Digital.
On top of the discretely encoded 5.1 channels DD EX provides an extra
6th channel (Surround Back, giving 6.1 or 7.1 with mono rear surrounds)
matrix encoded into the rear surrounds. Decoding Dolby Digital EX
requires a Dolby Digital EX encoded DVD disc and a digital connection
from the 540D V2 to a suitable AV Receiver that can decode this format
as the 540D V2 itself cannot decode DD EX. If a DD EX encoded disc is
played back on the 540D V2 however 5.1 output will still be created as
DD EX is backwards compatible with DD 5.1 decoding. The 6th Surround
Back signal will be present in both Left and Right Rear Surrounds
(forming a phantom rear centre).
DTS 5.1, DTS-ES 6.1 Matrix, DTS-ES 6.1 Discrete,
DTS Neo:6, DTS 96/24
Various DTS technologies that provide (up to) 5.1/6.1 (and 7.1 with
mono rear surrounds) output from suitable encoded DTS material.
Some newer DVDs carry both the mandatory DD and an optional DTS
surround encoding on alternative audio tracks.
The 540D V2 cannot decode these optional DTS formats itself but can
pass them via its digital outputs for decoding externally by a suitable AV
Receiver. Decoding DTS requires a suitably encoded DTS disc and a
digital connection from the 540D V2 to an AV Receiver capable of
decoding the appropriate DTS encoding type.
Video formats
DVDs are encoded using the MPEG 2 lossy video format giving over 2
hours of high-quality digital video on single layer discs or over 4 hours on
dual-layer discs.
Note: Dual layer discs always exhibit a small pause or delay in playback
when the layer transition is made.
As well as the video itself DVDs are also capable of storing up to 8
alternative tracks of digital audio, 32 subtitle tracks and 9 camera
angles (where used by the film producers).
DivX is an even more compressed (than normal DVD) digital video
format a bit like MP3 for video. DivX compresses the video data to a
fraction of its original size using the more lossy MPEG 4 Part 2
compression. DivX enhances the basic MP4 encoding by allowing extra
features on the disc and various levels of quality/compression to be
applied at the encoding stage.
DivX or straight forward raw MPEG 4 files are supported by the 540D V2
on either CD or DVD discs.
The 540D V2 MAY also be able to play MP4 type files created with other
CODEC programs (such as Xvid®) but playback of these is not
guaranteed.
azur
540D V2
Video Setup menu
DVD player setup
ENGLISH
Press the Setup button on the remote to enter the 540D V2 Setup
menus:
-- Video S etup M enu -TV Display
T V Ty p e
Scart / Component
HDMI Output
HDMI Resolution
Angle Mark
OSD Lang
Screen Saver
Setup
PS
PAL
Comp
On
On
ENG
On
G o To Video S et up M enu
With the Video Setup menu selected, use the
and
arrows to move
up/down to the desired sub-menu. Use the Navigation arrows
(
) to adjust the settings and press the Enter button to confirm
your selection. See the following list for the Video Setup menu structure:
Menus
Settings
TV Display
4:3 PanScan
4:3 LettBox
16:9 Wide
TV Type
PAL
AUTO
NTSC
SCART/Component
Component-p
Component-i
Scart RGB
HDMI output
On
Off
HDMI resolution
480p (60Hz)
576p (50Hz)
720p (50Hz)
1080i (50Hz)
720p (60Hz)
1080i (60Hz)
Angle mark
On
Off
OSD Lang
English
Español
Deutsch
Français
Italiano
Nederlands
Running along the top of the screen are four icons that represent the
four main menu sections:
Video Setup
Audio Setup
Dolby Digital Setup
Preference Setup*
* Note: To enter the Preferences menu the unit must first be in
stop mode with the disc drawer out.
Press Setup to enter the menu system. Use the Navigation arrows
(
) on the remote to highlight the icon at the top of the screen
for the main menu you want to select and then either press Enter or
to go into that menu and select its first sub-menu. You can now navigate
to each sub-menu item you might want to change using
and then
to select settings.
The yellow highlight always shows the menu or setting you have
navigated to, the orange/brown highlight shows the current setting that
is being used. Pressing Enter stores a highlighted setting as the new one
to use. To navigate back out of a sub-menu press
to move to the sub
menu list if necessary and
again to move to the top main menu list.
You can now use
to select a new main menu.
Note: Some setup is inter-related with other setup items, and if enabling
a function automatically disables another, the disabled function will
appear grey and cannot be set.
All setup is saved on exiting the menus and is saved even if the unit is
powered off.
Русский
Screen Saver
On
Off
TV Display
Use to select the screen format to fit your TV screen.
4:3 PanScan - You can select this screen
when connected to a normal TV set. The
widescreen picture will display on the full
screen, but some parts of the video
picture will be cut off automatically.
4:3 LettBox - Alternatively you can select
this screen when connected to a normal
TV set. The full widescreen picture is
displayed on the screen with black strips
on the top and bottom of the screen.
11
Video Setup menu continued
16:9 Wide - Select this screen when
connected to a widescreen TV set. The full
picture will now normally be displayed
with no picture cropping (unless the movie
itself has black bars recorded into the
video).
HDMI Setup
The default setting is ‘Off’. If you can make an HDMI connection to your
TV, turn the HDMI output to ‘On’ and the HDMI resolution choices will
become available. Choose the resolution you desire:
480p (60Hz) - Progressive format PAL
576p (50Hz) - Progressive format NTSC
TV Type
720p (50Hz) - Upscaled to PAL at 720 lines progressive
Either select ‘NTSC’ or ‘PAL’ to force the analog video outputs of the
540D V2 to the TV system in your area (the 540D V2 will also then
automatically convert any PAL DVDs to NTSC playback or vice versa as
necessary) or select ‘AUTO’ to allow the output of the 540D V2 to follow
the encoding on the disc.
1080i (50Hz) - Upscaled to PAL at 1080 lines interlaced
Note: Some TVs are unable to display both types of system and a blank
screen/no picture may appear if the wrong system is selected.
SCART / Component
Note: HDMI output must be set to ‘Off’ for this menu to be accessible.
720p (60Hz) - Upscaled to NTSC at 720 lines progressive
1080i (60Hz) - Upscaled to NTSC at 1080 lines interlaced
Note: Selecting a 50Hz format will automatically cause the TV Type
menu item to show PAL. Selecting a 60Hz format will automatically
cause the TV Type menu item to show NTSC.
Important! If you select an HDMI resolution that your TV does not
support you may lose the picture. In this case you may need to make an
analog video connection to your TV to be able to see the picture again
and select another resolution in the Setup menu.
Select between the following choices:
Component-p
p - Enables progressive scan component (YPbPr) using the
3 phono/RCA component outputs on the rear panel.
Component-ii - Enables interlaced scan component (YCbCr) using the 3
phono/RCA component outputs on the rear panel.
SCART RGB - Enables interlaced scan RGB + Sync using the
SCART/Peritel output on the rear panel.
Angle Mark
For DVDs recorded with multi-angular scenes, you can change the angle
of the screen. There are two modes in the Angle Mark setting: ‘On’ and
‘Off’. When set to ‘On’, the current playing angle number is displayed in
the top right hand corner of the TV screen. When set to ‘Off’, no angle
mark number is displayed on the TV screen.
Note: The angle number differs from disc to disc or from scene to scene.
Note: Not all TV sets can accept Progressive Scan Component and a
blank screen may result if the TV set does not support this format.
Press the Angle button on the remote to switch between multi-angles.
For Component-p the component outputs will be 480p if the TV type has
been set to NTSC, 576p if the TV type has been set to PAL. Similarly for
Component-i the component outputs will 480i if the TV type has been
set to NTSC, 576i if the TV type has been set to PAL. If the Auto setting
is used the format will follow the disc type.
OSD Language
There are seven language modes to select from: English, Spanish,
German, French, Italian, Dutch and Russian.
Notes:
• The Composite (CVBS) and S-Video outputs are always present and
always output interlaced video whether Component, RGB or HDMI is
selected.
• Setting HDMI output to ‘On’ disables the TV type and
SCART/Component menus and in fact always forces the component
outputs ‘On’ in component-p (Progressive Scan) format.
• With HDMI output ‘On’ all analog video outputs will output PAL if a
50Hz HDMI mode is selected or will output NTSC if a 60Hz HDMI
mode is selected.
• With HDMI output ‘Off’ all analog video outputs follow the TV type for
their PAL/NTSC mode choice.
12
Screen Saver
If you activate the screen saver function, when the unit is stopped, the
disc tray is open or there is no disc or the picture is still for about 60
seconds, a screen saver picture will appear. The purpose of this screen
saver is to protect the display screen from damage (screen burn) by a
static image. Screen burn can affect Plasma TVs but LCD and CRT TVs
are largely immune to it.
Note: The default setting is ‘On’.
azur
540D V2
Large = Speakers with an extended low frequency response of
approximately 20-40Hz to 16-20kHz (floorstanders or high quality larger
stand-mounted speakers).
- - A u d i o S e t up Me n u - S p e a k e r Se t up
S P D I F O ut put
L P C M O ut
HDMI Audio
P R O L ogi c I I
Small = Speakers with a less extended low frequency response of
approximately 80-100Hz to 16-20kHz (small stand-mounted, bookshelf
or satellite speakers).
R AW
48K
P CM
Setting each speaker allows the 540D V2 to perform what is called Bass
Management and to direct low frequency bass from music and the Low
Frequency Effects channel of surround sound material away from
speakers not able to reproduce it and to the subwoofer channel instead.
Go To Speak er Se tup Pa g e
With the Audio setup menu selected, use the
and
arrows to move
to the desired sub-menu. Use the Navigation arrows (
) to
adjust the settings and press the Enter button to confirm your selection.
See below for the Audio Setup menu structure:
Menus
Settings
Speaker Setup
Downmix
SPDIF Output
Stereo
Off
Front Speaker
Large
Small
Centre Speaker
Large
Small
Rear Speaker
Large
Small
Test Tone
On
Off
SPDIF Off
RAW Bitstream
PCM Stereo
Front, Centre and Rear Speakers
These settings allow selection of ‘Large’ or ‘Small’ speaker ‘size’ as
described above.
Note: Only the three configurations All speakers Large, Large Fronts /
Centre with Small Rears and All speakers Small are supported by the
540D V2.
Test Tone
With the unit in Stop mode, the disc drawer open and Downmix set to
‘Off’, select ‘On’ to carry out a test tone procedure. The 540D V2 will
then play ‘white-noise’ sound from each of the 5.1 outputs in turn. They
can be used to adjust the levels of your external amplifier/receiver or
speaker system so that each channel is at approximately the same level
for best surround-sound performance. Listen to each channel in turn as
the 540D V2 cycles through them and adjust the level on your
amplifier/receiver or speaker system so that each channel sounds the
same in terms of loudness (bear in mind smaller speakers and
subwoofers etc will sound different in terms of the tone of the sound but
the overall level sound be matched).
SPDIF (and TOSlink Optical) Output
Three options are available: Off, Raw Bitstream and PCM Stereo.
LPCM Out
48k
96k
If PCM Stereo is selected the digital output will always be Digital PCM
Stereo (LPCM) for use with a DAC, recording to a MD or CD-R machine
etc.
HDMI Audio
Follow SPDIF
PCM stereo
If Raw bitstream is selected the output will either be PCM Stereo for
Stereo disc/soundtracks or a surround-sound bitstream from surroundsound soundtracks for decoding by an external AV Receiver, see below:
Pro Logic II
Pro Logic II
PL II Mode
On
Off
Music
Movie
DISC
CD
SETTING
DVD-V
V
PCM
Raw
PCM @ 16/44.1
PCM @ 16/44.1
Downmixed PCM
@ 16/48 or 16/96*
Raw bitstream for
surround sound
soundtracks
PCM @ 16/48 or 16/96*
for stereo soundtracks
Speaker setup
Downmix
Stereo - When in Stereo mode any DD 5.1 or PLII 5.1 content will be
downmixed to Stereo and output from the Front Left and Right sockets
of the 5.1 output only.
* 48kHz or 96kHz depending on soundtrack bit depth and LPCM limit
set as below.
Off - When Off, full 5.1 output will be available (depending on disc).
LPCM Out
Note: The 540D V2 also features a separate set of permanent Stereo
Outputs that will always output true Stereo (for Stereo material) or
downmixed Stereo from 5.1 regardless of the above setting.
If Downmix is ‘On’, only the Front Speaker size and Sub On/Off can be
selected.
Selects whether the SPDIF LPCM output from DVDs can be at 96kHz
maximum sample rate (if the disc supports it) or will be downsampled to
48kHz maximum. Some equipment can only support a 48kHz maximum
sample rate and hence it can be useful to set this maximum limit. CDs
are 16/44.1 so are unaffected.
In the next series of menus for each speaker type, select from ‘Large’
and ‘Small’ for each speaker (‘Large’ and ‘Small’ are used to describe
each speaker in terms of bass response and do not necessarily reflect
the actual physical size of the speaker).
13
ENGLISH
Audio setup menus
Audio Setup menu continued
Dolby Digital Setup menus
HDMI Audio
Two options are available PCM Stereo and Follow SPDIF.
-- Dolby Digital S etup --
When HDMI Audio is set to PCM stereo the HDMI output will be 16/44.1
for CDs and 16/48 or 16/96 stereo/stereo downmix for DVD depending
on the soundtrack bit depth.
Dynamic
Channel Delay
When the 540D V2 is connected directly to a TV set able to receive
Stereo Audio over HDMI PCM Stereo is the best setting to use. Your TV
set will now always receive a two channel downmix from CDs or DVDs.
When HDMI Audio is set to Follow SPDIF the HDMI output will exactly
follow the SPDIF output as per the previous section and table.
G o To Dolby Dig it al S et up
When the 540D V2 is connected to an AV receiver by HDMI there are two
possibilities depending whether the receiver accepts HDMI audio
directly or switches HDMI video and uses SPDIF for digtial audio
reception:
When the Dolby Digital setup menu is selected, use the
and
arrows to move to the desired menu. Use the Navigation arrows
(
) to adjust the settings and press the Enter button to confirm
your selection.
1. For AV receivers that can receive HDMI audio set the HDMI Output to
Follow SPDIF. Now set the SPDIF Output to RAW/Bitstream. The AV
Receiver can now decode the bitstream over HDMI into whichever
formats it supports. The TV itself will normally now not receive any
audio (unless the receiver has the capability of making a stereo
downmix and outputting it over HDMI).
Dynamic
2. For AV receivers that switch HDMI and use SPDIF for audio reception
(such as our own Azur 540R V3 and 640R) set the HDMI output to
PCM Stereo and SPDIF Output to RAW/Bitstream. The AV receiver
now receives and decodes surround-sound via the SPDIF connection.
The TV will always also receive a two channel downmix directly from
the DVD player over HDMI which can be used if desired.
When ‘Full’ is selected, the peak-to-peak value of the audio signal is
compressed by the maximum amount. When ‘Off’ is selected, no
compression is applied.
Pro Logic II
The 540D V2 can decode Stereo soundtracks (that have been suitably
encoded) into 5 channel surround-sound using Dolby Pro Logic II. Two
modes are available (Music and Movie), optimised for the different
Programme types.
Dolby Digital encoded discs allow for the dynamic range (the difference
between loud and quiet passages) to be compressed (i.e. for late night
listening). The options are:
Full, 7/8, 3/4, 5/8, 1/2, 3/8, 1/4, 1/8, Off
Channel Delay
For best surround-sound effects it is desirable to adjust the channel
delay so that sounds from each speaker arrive at the listener at the
same time. This is done by measuring the distance from the listening
position to the Left or Right Front speaker (which should be equidistant
from the listener), distance from the listening position to the Centre
Speaker and similarly to the Right Rear Speaker, Left Rear Speaker and
Subwoofer. See diagram below:
To use Pro Logic II first turn it On and then select either Movie or Music
mode depending on the programme type.
1
Note: Enabling Pro Logic II decoding disables Dolby Digital decoding as
Pro Logic is used instead as you’d expect.
2
1 = Front Left & Right speakers
2 = Centre speaker
3 = Surround Left speaker
5
4 = Surround Right speaker
5 = Subwoofer
3
4
The measurements are not too critical so do not worry if your front
speakers are slightly asymmetric or about making very precise
measurements (+/- a foot or 30cm or so is fine).
The channel delay to be entered for each speaker is then the difference
between the distance to the Front Speakers and the speaker to be
configured.
So for instance if the Front Speakers are 5 ½ feet from the listener and
the Centre speaker 3 feet from the listener the channel delay to be
entered for the Centre Speaker is 2 ½ feet. Similarly if the Right Rear
Surround is 3 ½ feet from the listener the channel delay would then be
2 feet.
Note: The distance between the surround speakers and the listener
must be shorter than or equal to that between the front speakers and
the listener.
The units are feet for units sold in North America / Canada and metres
for units sold in Europe / Australasia.
Use
value.
to select each speaker in turn and
to enter a distance
The 540D V2 uses this to calculate and use the correct delay time for each
channel so that each channel reaches the listener at the same moment.
14
azur
540D V2
Note: To access the Preference menu, the disc tray drawer must be
open.
Audio
Use this to set the default language of the sound output from the
speakers.
- - P r e f e r e n c e Pa g e - -
Subtitle
Audio
Subtitle
D i sc M e nu
P are nt al
P assw ord
Default
Use this to set the default language of the subtitles displayed on the TV.
ENG
ENG
ENG
Disc Menu
Use this to set the default language of the menus in the disc top menu.
Go To Preferenc e Pag e
The Preferences menus are used to set the default language tracks the
540D V2 will use for Soundtrack, Subtitles and Disc Menu if they are
available on the disc. The 540D V2 will automatically select the
appropriate language from those available on the disc where possible.
Also it is possible to restrict the type of disc able to be played back via
the Parental control menu item.
When the Preference menu is selected, use the
and
arrows to
move to the desired menu. Use the Navigation arrows (
) to
adjust the settings and press the Enter button to confirm your selection.
See below for the Preference menu structure:
Menus
Settings
Audio
English
French
German
Spanish
Italian
Dutch
Russian
Subtitle
English
French
German
Spanish
Italian
Dutch
Russian
Disc Menu
English
French
German
Spanish
Italian
Dutch
Russian
Parental
1 KID SAF
2G
3 PG
4 PG 13
5 PGR
6R
7 NC 17
8 ADULT
Password
Change
Default
Reset
Parental
Use this to restrict the playback of adult rated DVDs you do not want
children to view. Select the rating level you do not want to be accessed
and press Enter. Discs with this rating and higher will now not be able to
be played without a password.
Note: Viewing cannot be restricted unless the restriction level is
recorded on the disc. Discs without a restriction level encoded will still
be accessible.
Password
Use this to change the password. The unit’s default password is 1234.
Default
Select ‘Default’ and press the Enter button to restore the DVD player to
it’s factory default settings.
Note: All settings previously set by the user will be lost!
15
ENGLISH
Preference menu
Basic operating instructions
Getting started
Turn on the power of the TV, amplifier/AV receiver and any other
components which are connected to the DVD player. Make sure the TV
and the audio receiver are set to the correct input channel.
1. Press the Open/Close button to open the disc tray.
2. Place the disc on the tray, label side facing up.
3. Press the Play/Pause button. The tray will automatically close and
playback will begin.
For CDs playback will begin straight away at track 1. For DVDs, normally
the disc will go to the Title Menu which is the main menu recorded on
the DVD itself. This is where various disc options will be presented on
screen depending on the disc.
DVDs are normally split into one or more Titles, each subdivided into
Chapters. Each Title may also have alternative soundtracks and
subtitles available. From the Title Menu it is normally possible to start
playback of the main film, go directly to different chapters or access
special features.
Examples of special features are alternative soundtracks (Stereo or DD
5.1 for instance, perhaps DTS 5.1, also commentaries and different
language versions of the soundtrack) and subtitles. Also more than one
title may be available (different versions of the film or making-of
featurettes for instance). These features are encoded on the disc and
the options presented are entirely disc dependant.
Move around the options using the Navigation arrows (
), select
the option that starts the film playing in the version you want and press
Enter.
4. Press the Stop button at anytime to stop playback.
Note:
• Do not put anything except a DVD/CD sized disc into the tray, foreign
objects may damage the mechanism.
• Do not force the tray by hand during the opening and closing
operations.
• To avoid dirt and dust entering the mechanism, keep the disc tray
closed when not in use.
• If the disc is seriously scratched or too dirty the player may not be able
to read it or play it.
• Never load more than one disc into the disc tray at one time.
Skip playback
1. Press once to skip forward by one track/chapter on the disc. Press
and hold to skip forwards through several tracks.
Note: The repeat chapter/title setting will be cleared when moving to
other chapter or title.
A-B Repeat
1. Press the A-B button at your desired starting point. ‘A’ appears briefly
on the TV screen.
2. Press the A-B button at your desired end point. ‘A-B’ appears briefly
on the TV screen, and the repeat sequence begins.
3. To exit the sequence, press the A-B button.
Note:
• The A-B repeat section can only be set within the current title (for DVD
video) or current track (for DVD audio, Video CD and Audio CD).
• A-B repeat playback is not available with some scenes on DVD.
• A-B repeat playback does not function during title, chapter, track or all
repeat playback.
During DVD playback it is also possible to access soundtracks, subtitles
and angles (where present on the disc) without having to go back to the
Title Menu or stopping playback. Use the following remote control
buttons:
Audio
Press to directly access alternate audio soundtracks on the DVD (if
available on the DVD disc).
Sub
Press to enable/disable Subtitles (if available on the DVD disc).
Angle
Press to access various camera angles (if available on the DVD disc).
Zoom
Press to cycle through the various zoom magnifications (and back to
normal display).
DivX/MP4 playback
If a disc (CD or DVD) with DivX/MP4 files on it is loaded, the 540D V2
will detect these file types and show a special folder navigation screen
as below:
2. Press
once to skip backward by one track/chapter on the disc.
Press and hold to skip backwards through several tracks.
Go To
Press the Go To button on the remote once to access Chapter Selection
then enter the required chapter via the numerical buttons. Press twice
to access Disc Time Selection and enter the required time from the start
of the disc as H:MM:SS (Hours, Minutes, Seconds). Press three times to
access Chapter Time Selection and enter the required time from the
start of the chapter.
\
..
FILE 1
FILE 2
FILE 3
FILE 4
Fast Forward/Rewind search
Press repeatedly to cycle between 2X, 4X, 8X and 16X playback speed
(without sound) and back to normal playback. Press
button for
backwards playback options, or the
button for forwards playback.
Slow
When playing a DVD, press repeatedly to cycle round the various speeds
of slow motion (1/2, 1/4, 1/8 and 1/16), forwards and backwards and
back to normal speed.
Repeat
Note: The Repeat function is available only during playback.
Press the Repeat button on the remote to repeatedly play a single
chapter/title on a DVD video or a single track/entire disc on a CD.
The first press selects chapter/track repeat, the second press selects
title/disc repeat, the third press selects All repeat.
16
Navigate the folders using the Navigation arrows (
) to highlight
the desired movie clip. Press Play or Enter to start playback of that file.
Note: If there are multiple DivX/MP4 files in one folder you can also
select them by using 'Go To' on the remote then pressing the required
file number.
Once playing a file you can also use the Go To button. Press once for file
number entry, press twice to enter a specific time to jump to (as elapsed
time since start of that file).
During playback the Play, Pause, Stop and Forward/Reverse Scan
buttons work as for CD/DVD. Back and Forward Track Skip select the
last/next DivX/MP4 file in folder.
Custom installation (C.I.) use
Troubleshooting
Control Bus
The 540D V2 features a Control Bus input/output IR Emitter
that allow un-modulated remote control
commands (positive logic, TTL level) to be received
electrically by the unit and looped to another unit
if desired. These control commands are typically
In
In
Out
generated by custom installation (multi-room)
systems or remote IR receiver systems. The Control Bus sockets are
colour-coded orange.
There is no power
An IR Emitter Input is also provided that allows modulated IR remote
control commands to be received electrically by the unit. Commands on
this input operate the unit only and are not looped out demodulated on
the Control Bus Output. This feature is useful for multi-room systems
(such as the Cambridge Audio Incognito multi-room system) which
feature routed I.R. emitter outputs. Instead of using window emitters
stuck over the CD players front panel IR receiver, a mono 3.5mm minijack to 3.5mm mini-jack lead can be used for a more reliable electrical
connection.
Check the disc is not loaded upside down.
The 540D V2 also features a ‘direct’ IR/Control code for On/Off that can
be accessed on the supplied remote control for teaching into C.I.
systems as follows:
Press and hold the Standby button. The remote first generates it's
standby (toggle) command. Keep the button held down, after 12
seconds a DVD player “On” command will be generated. If the button is
kept held down for a further 12 seconds, a DVD player “Off” command
is generated.
A full code table for this product is available on the Cambridge Audio
audio.com
website at: www.cambridge-a
540D V2
Ensure the AC power cord is connected securely.
Ensure the plug is fully inserted into the wall socket and is switched on.
Check fuse in the mains plug or adaptor.
The player will not read the disc
Check that the disc is not too scratched or dirty.
The disc type is unsupported by this unit (e.g. MP3, DVD-A, SACD etc).
There is no sound
Ensure that the amplifier is set correctly.
Check that the interconnects are inserted correctly.
The disc is skipping
Check that the disc is not too scratched or dirty.
Ensure the player is on a firm surface and not subject to vibrations.
A low hum or buzz sound can be heard
Power cords or lighting placed near this product.
Analog inputs not connected securely.
No sound from the rear speakers
Technical specifications
Source being played is not recorded in surround-sound.
A stereo mode has been selected.
No sound from the centre speaker
Disc types
CD (CD-DA), DVD-V, CD-R/RW,
DVD-R/RW, DVD+R/RW, DivX, MP4
DAC architecture
Crystal/Cirrus Logic CS4382
8-channel (5.1 + 2ch Stereo) 24 Bit
No sound from the subwoofer
Analog audio outputs
• Stereo
• 5.1 (from DD or PLII)
DD PLII mode (which has no LFE channel) has been selected with all
speakers set to ‘Large’.
Analog video outputs
• Composite Video (CVBS)
• S-Video (SVHS)
• RGB/SCART
• Component (YCbCr/YPbPr)
HDMI output
Scaling/Deinterlacing to 480p, 576p,
720i/p, 1080i
THD (unweighted)
< 0.002% @ 1kHz
< 0.008% @ 20Hz - 20kHz
IMD (19/20kHz) 0dBFs
< 0.002%
S/N ratio
< -103dB
Crosstalk @1kHz
< -103dB @ 1kHz
Dynamic Range
> 105dB
Frequency response
5Hz - 20kHz ± 0.2dB
Jitter (correlated)
< 140 psec
Composite Video
1.0V pk-pk (75 ohms)
S-V
Video
Y: 1.0V pk-pk (75 ohms)
C: 0.286V pk-pk (75 ohms)
Component Video
Y: 1.0V pk-pk (75 ohms)
Cb/Cr: 0.75V pk-pk (75 ohms)
Pb/Pr: 0.75V pk-pk (75 ohms)
Power supply
100-240V AC ~ 50/60Hz
Max power consumption
25W
Dimensions (H x W x D)
70 x 430 x 310mm
Weight
3.8kg (8.4Lbs)
A stereo mode has been selected.
Remote control is not working
The batteries are flat.
The remote is too far from the unit or out of the effective range.
17
ENGLISH
azur
Cambridge Audio
Gallery Court
Hankey Place
London SE1 4BB
England
© 2007 Cambridge Audio Ltd
AP20597/1
www.cambridge-audio.com