Download Epson R1900 - Stylus Photo Color Inkjet Printer Specifications
Transcript
Epson Stylus Photo R1900 Series
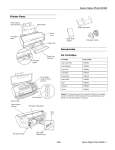
Printer Parts
Edge guide
Paper support
and extensions
Control panel
buttons
Roll paper holders
CD/DVD tray
guide
Output tray and
extensions
8-cm CD/DVD adapter
CD/DVD tray
USB port
(for camera cable)
Printer cover
(open)
Single sheet guide
Ink cartridge
holder (in
home position)
Accessories
Ink Cartridges
Power button
and light
Paper button
and light
Ink button
and light
Roll paper
button
Ink color
Part number
Part number on
software screens
Photo Black
87
T0871
Matte Black
87
T0878
Cyan
87
T0872
Magenta
87
T0873
Yellow
87
T0874
Red
87
T0877
Orange
87
T0879
Gloss Optimizer
87
T0870
Roll paper
edge guide
Roll paper
feeder
USB ports
(for computer
cables)
11/07
Epson Stylus Photo R1900 Series - 1
Epson Stylus Photo R1900 Series
Epson Papers
Paper type
®
Epson Premium Photo Paper Glossy
Epson Ultra Premium Photo Paper Glossy
Epson Photo Paper Glossy
Epson Premium Photo Paper Semi-gloss
Epson Ultra Premium Photo Paper Luster
Epson Ultra Premium Presentation Paper Matte
Epson Premium Presentation Paper Matte
Epson Premium Presentation Paper Matte Double-sided
2 - Epson Stylus Photo R1900 Series
Size
Part number
Sheet count
4 × 6 inches
S041808
S041727
40
100
5 × 7 inches
S041464
20
8 × 10 inches
S041465
20
Letter (8.5 × 11 inches)
S041286
S041667
20
50
11 × 14 inches
S041466
20
B (11 × 17 inches)
S041290
20
A3 (11.7 × 16.5 inches)
S041288
20
Super B (13 × 19 inches)
S041289
20
8.3 inches × 32 feet
S041376
Roll
13 inches × 32 feet
S041378
Roll
4 × 6 inches
S041934
50
Letter (8.5 × 11 inches)
S041935
20
4 × 6 inches
S041809
S042038
50
100
Letter (8.5 × 11 inches)
S041141
S041649
S041271
20
50
100
B (11 × 17 inches)
S041156
20
Super B (13 × 19 inches)
S041143
20
4 × 6 inches
S041982
40
Letter (8.5 × 11 inches)
S041331
20
Super B (13 × 19 inches)
S041327
20
Letter (8.5 × 11 inches)
S041405
50
A3 (11.7 × 16.5 inches)
S041406
50
Super B (13 × 19 inches)
S041407
50
8.3 inches × 32.8 feet
S041408
Roll
13 inches × 32.8 feet
S041409
Roll
Letter (8.5 × 11 inches)
S041341
50
A3 (11.7 × 16.5 inches)
S041343
50
Super B (13 × 19 inches)
S041339
50
8 × 10 inches
S041467
50
Letter (8.5 × 11 inches)
S041257
50
11 × 14 inches
S041468
50
A3 (11.7 × 16.5 inches)
S041260
50
Super B (13 × 19 inches)
S041263
50
Letter (8.5 × 11 inches)
S041568
50
11/07
Epson Stylus Photo R1900 Series
Paper type
Size
Part number
Sheet count
Epson Presentation Paper Matte
Letter (8.5 × 11 inches)
S041062
100
Legal (8.5 × 14 inches)
S041067
100
B (11 × 17 inches)
S041070
100
Super B (13 × 19 inches)
S041069
100
Letter (8.5 × 11 inches)
S041636
20
Super B (13 × 19 inches)
S041637
20
Super B (13 × 19 inches)
S041351
20
Epson UltraSmooth Fine Art Paper 250 gsm
Super B (13 × 19 inches)
S041896
25
PremierArt™ Matte Scrapbook Photo Paper for Epson
Letter (8.5 × 11 inches)
SCR1002
20
12 × 12 inches
SCR1003
10
13 inches × 20 feet
SP91220
Roll
Piezo Pro Matte Canvas for Epson
13 inches × 20 feet
S041992
Roll
Epson Bright White Paper
Letter (8.5 × 11 inches)
S041586
500
Epson Photo Quality Self-adhesive Sheets
A4 (8.3 × 11.7 inches)
S041106
10
Epson Iron-on Cool Peel Transfer Paper
Letter (8.5 × 11 inches)
S041153
10
Epson Velvet Fine Art Paper
Epson Watercolor Paper Radiant White
®
PremierArt Water Resistant Canvas for Epson
®
Printer Specifications
Single-sheets
Size
A4 (8.3 × 11.7 inches)
A6 (4.1 × 5.8 inches)
Letter (8.5 × 11 inches)
Legal (8.5 × 14 inches)
4 × 6 inches
5 × 7 inches
8 × 10 inches
11 × 14 inches
12 × 12 inches
Half letter (5.5 × 8.5 inches)
B (11 × 17 inches)
A3 (11.7 × 16.5 inches)
Super B (13 × 19 inches)
Paper types
Plain paper
Special papers distributed by Epson
(see page 2)
Thickness
0.003 to 0.004 inch (0.08 to 0.11 mm)
Weight
17 lb (64 g/m2) to 24 lb (90 g/m2)
Printing
Paper path
Sheet feeder
capacity
Sheet feeder, top entry
Roll paper feeder, rear entry
Approx. 120 sheets at 24 lb (90 g/m2)
Paper
Use paper under normal conditions:
Temperature: 59 to 77 °F (15 to 25 °C)
Humidity: 40 to 60% RH
Note: Since the quality of any particular brand or type of paper may be
changed by the manufacturer at any time, Epson cannot guarantee
the quality of any non-Epson brand or type of paper. Always test a
sample of paper stock before purchasing large quantities or printing
large jobs.
11/07
Epson Stylus Photo R1900 Series - 3
Epson Stylus Photo R1900 Series
Borderless printing margins
Printable Area
Note: When printing borderless, quality may decline in the expanded
printable area.
Between print jobs
after pressing the
roll paper button
Sheets
0
Top
Left
Between multi-page print jobs
or print jobs you send without
pressing the
roll paper
button afterward
0
Right
1.97 inches
(50 mm)
1.97 inches
(50 mm)
2.56 inches
(65 mm)
0
Bottom
Sheets with borders
2.56 inches
(65 mm)
Borderless printing
Top: 0.12 inch (3 mm) minimum
Left: 0.12 inch (3 mm) minimum
Right: 0.12 inch (3 mm) minimum
Bottom: 0.12 inch (3 mm) minimum
CDs or DVDs
Do not print outside of
4.6 inch (116 mm) area
Roll Paper
Do not print within
0.8 inch (21 mm) area
Standard margins
Between print jobs
after pressing the
roll paper button
0.12 inch
(3 mm)
Between multi-page print jobs
or print jobs you send without
pressing the
roll paper
button afterward
12-cm discs
0.12 inch
(3 mm)
1.97 inches
(50 mm)
2.56 inches
(65 mm)
Do not print outside of
3.0 inch (76 mm) area
0
8-cm discs
2.56 inches
(65 mm)
4 - Epson Stylus Photo R1900 Series
Do not print within
0.8 inch (21 mm) area
1.97 inches
(50 mm)
Caution: Avoid printing in the clear plastic areas of your discs to
prevent staining the disc with ink.
11/07
Epson Stylus Photo R1900 Series
Ink Cartridges
Electrical
Note: We recommend that you use genuine Epson cartridges and do
Power supply
rating
100 to 120 V
Input voltage
range
90 to 132 V
Rated frequency
range
50 to 60 Hz
Input frequency
range
49.5 to 60.5 Hz
Rated current
0.5 A (1.0 A maximum)
not refill them. The use of other products may affect your print quality
and could result in printer damage.
Yields vary considerably based on images printed, print settings,
paper type, frequency of use, and temperature. For print quality, a
small amount of ink remains in the cartridge after the “replace
cartridge” indicator comes on. The printer ships with full cartridges
and part of the ink from this first set of cartridges is used for priming
the printer.
For best printing results, use up a cartridge within six months of
opening the package.
Color
Cartridge life
Temperature
Photo Black, Matte Black, Cyan,
Magenta, Yellow, Red, Orange,
Gloss Optimizer (see page 1 for part
numbers)
Opened package: within 6 months
Unopened package: do not use if the date
on the package has expired
Storage: –4 to 104 °F (–20 to 40 °C)
1 month at 104 °F (40 °C)
Ink freezes at 10.4 °F (–12 °C)
Ink thaws and is usable after 3 hours at
77 °F (25 °C)
Size and Weight
Size
Stored:
Printing:
Weight
Power consumption
Width: 24.3 inches (616 mm)
Depth: 12.7 inches (322 mm)
Height: 8.4 inches (214 mm)
Width: 24.3 inches (616 mm)
Depth: 31.4 inches (797 mm)
Height: 16.3 inches (415 mm)
26.9 lb (12.2 kg)
(without accessories)
Printing:
Approx. 20 W (ISO/IEC 10561
Letter Pattern)
Ready mode:
Approx. 8 W
Sleep mode:
Approx. 3.1 W
Power off
mode:
Approx. 0.2 W
Environmental
Temperature
Operation: 50 to 95 °F (10 to 35 °C)
Storage: –4 to 104 °F (–20 to 40 °C)
1 month at 104 °F (40 °C)
Humidity
(without
condensation)
Operation: 20 to 80% RH
Storage: 5 to 85% RH
Standards
Safety
UL60950-1
CAN/CSA C22.2 No. 60950-1
EMC
FCC part 15 Subpart B class B
CAN/CSA-CEI/IEC CISPR 22 Class B
Interfaces
USB ports
11/07
Two USB 2.0 Hi-Speed (Device Class
for computers)
One USB 2.0 Hi-Speed (for PictBridge
compliant devices)
Epson Stylus Photo R1900 Series - 5
Epson Stylus Photo R1900 Series
Checking the Control Panel Light
Status
Light status
I paper on
Problem and solution
A printer check will help you determine if the R1900 Series is
operating properly.
Paper may be out. Load paper and press the
1. Turn off the printer and your computer, if connected.
I paper button.
2. Disconnect any connected USB cables.
If multiple sheets have fed into the sheet
feeder, press the
paper button to
resume printing.
I
If you’re printing on a CD or DVD, the
CD/DVD tray is not inserted. Insert the
paper button.
CD/DVD tray and press the
I
I paper flashing
Running a Printer Check
3. Load plain paper in the sheet feeder.
4. Hold down the I paper button and press the P power
button to turn on the printer, then release the buttons.
5. The R1900 Series begins printing the nozzle check pattern.
❏ If the page prints, your printer is operating. Your
problem may be caused by your computer, cable,
software, or setting selections. Check for additional
solutions or re-install your software.
Paper may have jammed in the sheet feeder,
manual feed slot, or roll paper slot.
Sheet Feeder or Manual Feed Slot:
Press the
paper button to eject any
jammed sheets, then open the printer cover
and remove any paper jammed inside. Press
paper button again to clear the error.
the
Roll Paper Slot:
Cut off any printed roll paper or canvas
media, then remove and reload the paper.
I
❏ If the pattern on the page has gaps, clean or align the
print head.
I
❏ If the page does not print, the printer may have a
problem. Check for additional solutions. If they don’t
work, contact Epson.
If you’re printing on a CD or DVD, the
CD/DVD tray may be unable to eject. Gently
pull out the CD/DVD tray and press the
paper button.
I
The printer cover may be open. Close the
printer cover to continue. (Leaving the printer
cover open stops or prevents printing.)
H ink on
An ink cartridge is expended or not installed
correctly, or is not compatible with the
printer. Replace or reinstall the cartridge.
H ink flashing
Ink in a cartridge is low. You can continue
printing, or check which cartridge is low and
replace it.
I paper flashing
The CD/DVD tray guide cover is open while
printing from paper loaded in the sheet
feeder. Remove the loaded paper to print on
a CD/DVD or close the CD/DVD tray guide
paper
cover to print on paper. Press the
button to clear the error.
H ink flashing fast
Loading Paper
Before you print, load paper in the correct place for the type of
paper you are using.
You can load plain paper and most glossy and matte papers in
the sheet feeder (except roll paper; see page 9). Check the list
on page 8 to see if you must load your special paper one sheet
at a time using the single sheet guide and the manual feed slot.
Note: When printing on paper, make sure the CD/DVD tray guide
cover is closed.
I
P power on
I paper and H ink
flashing or flashing
alternately
P power off
I paper and H ink
flashing alternately
P power off
I paper and H ink
flashing fast
An unsupported device is connected to the
external USB port. Connect only
PictBridge compatible digital cameras to the
external USB port.
CD/DVD tray
guide cover
Parts inside the printer are at the end of their
service life or an unknown error has
occurred. Contact Epson for help.
The print head is obstructed by paper or
another foreign material. Turn off the printer,
remove any obstructions, and turn it back on.
If the error persists, contact Epson.
6 - Epson Stylus Photo R1900 Series
11/07
Epson Stylus Photo R1900 Series
3. Slide the edge guide left.
Loading Paper in the Sheet Feeder
You can load these types and sizes of paper in the sheet feeder:
Paper type
Load up to this many sheets
Plain paper
Approximately 120
Epson Presentation Paper
Matte
100
50 (B or Super B)
Epson Bright White Paper
80
Epson Photo Paper Glossy
30 (all sizes)
Epson Premium Photo Paper
Glossy
30 (4 × 6 inch, 8 × 10 inch, Letter)
20 (5 × 7 inch)
10 (11 × 14 inch, B, A3, Super B)
4. Insert paper, glossy or printable side up, short edge first,
against the right side and beneath the tab.
Epson Ultra Premium Photo
Paper Glossy
30 (4 × 6 inch, 8 × 10 inch, Letter)
20 (5 × 7 inch)
5. Press the button on the edge guide and slide it to the edge of
the paper, but not too tightly.
Epson Ultra Premium Photo
Paper Luster
Epson Ultra Premium
Presentation Paper Matte
30 (Letter)
10 (A3 or Super B)
Epson Premium Photo Paper
Semi-gloss
30 (4 × 6 inch or Letter)
10 (B)
Epson Premium Presentation
Paper Matte
30 (8 × 10 inch or Letter)
10 (11 × 14 inch, A3, or Super B)
Epson Premium Presentation
Paper Matte Double-sided
Epson Photo Quality
Self-adhesive Sheets
Epson Iron-on Cool Peel
Transfer Paper
1 sheet
1. Open the paper support and pull up the extensions.
2. Open the output tray and pull out the extensions.
Note: Load only up to the recommended number of sheets.
Load paper short edge first, no matter which way your photo or
document faces.
Load letterhead or pre-printed paper top edge first and printed
side up.
Do not load paper above the arrow on the edge guide.
Check the paper package for any additional loading instructions.
The left edge guide may move slightly during paper feeding and
printing. Do not adjust the edge guide or open the printer cover
during printing.
11/07
Epson Stylus Photo R1900 Series - 7
Epson Stylus Photo R1900 Series
Loading Special Paper in the Single Sheet
Guide
You can load one sheet of these types and sizes of paper in the
single sheet guide.
Paper type
Size
Epson Velvet Fine Art Paper
Letter (8.5 × 11 inches)
Super B (13 × 19 inches)
Epson Watercolor Paper Radiant White
Super B (13 × 19 inches)
Epson UltraSmooth Fine Art Paper
250 gsm
Super B (13 × 19 inches)
PremierArt Matte Scrapbook Photo
Paper for Epson
Letter (8.5 × 11 inches)
12 × 12 inches
6. Insert one sheet of paper, printable side up and against the
right side, then slide the edge guide against the sheet, but
not too tightly.
Note: Load paper short edge first, no matter which way your
photo faces. Check the paper package for any additional loading
instructions.
1. Remove any paper from the sheet feeder and close the paper
support.
2. Open the output tray and pull out the extensions.
7. Push the paper into the printer until it meets resistance and
hold it there until the printer pulls it in slightly. Once the
printer begins feeding the paper, let go of it.
3. Slide the roll paper edge guide on the back of the printer all
the way to the right.
8. Open the printer cover and make sure the paper has fed all
the way into the printer and is straight. The paper must feed
straight so the printer can properly identify the edge of it.
4. Attach the single sheet guide by aligning the notches on its
base with the slots on the back of the printer. Then hook
the tabs over the top of the slot (marked with orange
triangles).
If the paper is crooked or the front edge is visible, you may
receive a paper jam error when you print. To avoid this,
press and hold the M roll paper button for three seconds to
back the paper out. Remove the paper from the printer,
press the I paper button to clear the paper out error, and
load the paper again.
5. Turn on the printer so it can load the paper correctly.
8 - Epson Stylus Photo R1900 Series
11/07
Epson Stylus Photo R1900 Series
6. Insert the left roll paper holder (marked with a down orange
triangle) into the far left slot on the back of the printer
(marked with a right orange triangle). Then insert the other
roll paper holder in the corresponding slot on the right.
Loading Roll Paper
You can load roll paper or canvas media for printing large
images, panoramic images, or multiple photos, with or
without borders.
You can load roll paper or canvas media in these widths:
❏ 8.3-inches wide
❏ 13-inches wide
Tip: It’s a good idea to check the ink status and replace
cartridges, if necessary, before loading roll paper. This is
because you must remove roll paper from the printer before
replacing cartridges to avoid ink marks on the paper.
1. Turn on the printer.
7. Feed the end of the paper into the roll paper feeder, located
behind the roll and marked with the M roll paper icon.
Then slide the roll paper edge guide against the right side of
the paper, but not too tightly.
2. Remove any paper loaded in the sheet feeder and remove
the single sheet guide, if it is installed. Also close the paper
support.
3. Open the output tray, but do not pull out the extensions.
4. Place the roll paper holders on each end of the paper roll as
shown.
5. Remove any tape and protective paper from the end of the
roll and make sure the corners of the paper are cut at 90°
angles to avoid paper feeding problems.
Caution: Do not load roll paper or
canvas media into the manual feed slot
(marked with up orange triangles).
Note: Avoid touching the surface of your paper or canvas media.
With canvas media that you have previously loaded, it’s a good
idea to cut the edge straight each time you reload it.
8. Guide the paper into the slot and
hold it for a few seconds until the
printer feeds in the paper
automatically.
90°
Note: When loading canvas media, leave two to three inches of
slack in the roll as it feeds and prints for the best results. If you
have trouble feeding canvas media, check that the edge is
straight and reload it, making sure to keep the roll slack.
9. Open the printer cover and look into the printer to make
sure the roll paper or canvas media is feeding straight. The
paper must feed straight so the printer can properly identify
the edge of it.
11/07
Epson Stylus Photo R1900 Series - 9
Epson Stylus Photo R1900 Series
If it is crooked or the front edge is visible, you may receive a
paper jam error when you print. To avoid this, press the
M roll paper button for three seconds to back the paper
out. Press the I paper button to clear the paper out error,
and load the roll paper or canvas media again.
Loading a CD or DVD
You can use your Epson Stylus® Photo R1900 Series to print a
design directly onto ink jet-printable CDs or DVDs to create
a custom label.
You can print on CDs or DVDs using the Epson Print CD
computer software that came with your printer. See the onscreen Reference Guide for instructions.
Before you load a CD or DVD, be sure to clean the rollers
inside the printer.
Note: If you’re using discs where the printable area extends to within
0.16 inch (4 mm) of the edge of the center hole, you may need to
adjust the Inner Diameter setting in the File menu of the Epson Print
CD software. See the on-screen Reference Guide for instructions.
Cleaning the Roller
10. For roll paper, turn the knobs on the roll paper holders
backward to remove excess slack. (Leave 2 to 3 inches of
slack for canvas media.)
Before you print on a CD or DVD, it’s a good idea to clean
the rollers inside the printer by feeding several sheets of plain
paper through it.
11. Close the printer cover and do not open it during printing.
1. Turn on the printer.
Remove Prints on Roll Paper or Canvas Media
1. Press the M roll paper button to feed the roll paper forward.
2. Cut off your printed photos straight across the paper at the
cutting guideline.
Caution: Do not pull on the paper as you cut it to avoid
damaging your printout. Also do not cut the paper too close to
the printer to avoid paper feeding problems.
3. To continue printing on roll paper, press the M roll paper
button again to return the paper to printing position.
2. Open the paper support and output tray.
3. Load several sheets of plain paper in the sheet feeder.
4. Press the I paper button to feed the paper through the
printer.
5. Press the I paper button again to eject the paper.
6. Feed several sheets of paper in this way to completely clean
the rollers.
4. Turn the knobs on the roll paper holder backward to
remove excess slack. (Leave two to three inches of slack for
canvas media.)
Inserting a CD or DVD
5. After cutting off your printed photos, you can remove the
roll paper or canvas media from the printer. Press the
M roll paper button for three seconds to feed the paper
backwards and out of the printer. If it does not feed all the
way out, press the M roll paper button again.
1. First burn files, music, or video onto your CD/DVD before
printing on it to prevent errors.
6. Turn the knobs on the roll paper holder backward to roll up
the paper, then remove the paper and holders from the
printer.
You can print on any compatible, ink jet-printable CDs or
DVDs.
2. Turn on the printer.
3. Remove any paper loaded in the sheet feeder and remove
the single sheet guide, if it is installed. Also close the paper
support.
7. Press the I paper button to stop the I paper light from
flashing.
Store the unused roll paper or canvas media in its original
package away from high temperatures, humidity, and direct
sunlight.
10 - Epson Stylus Photo R1900 Series
11/07
Epson Stylus Photo R1900 Series
4. Open the output tray, but do not pull out the extensions.
Then open the CD/DVD tray guide cover.
Caution: Do not turn the printer on or off with a CD or DVD
loaded in it. Always remove the disc first.
After printing, handle the CD/DVD carefully. You may need
to wait up to 24 hours for the ink to dry fully before inserting
it in a drive. Keep printed discs away from moisture and direct
sunlight.
Selecting the Media Type Setting
For optimal image quality, it is important to choose the
correct Type or Media Type setting. It tells your Epson Stylus
Photo R1900 Series what kind of paper you’re using and
adjusts the ink coverage accordingly.
5. Place your disc on the CD/DVD tray with the label side up.
12-cm discs
For this paper
Select this paper Type
or Media Type setting
Epson Premium Photo Paper Glossy
Epson Ultra Premium Photo Paper Glossy
Premium Photo Paper
Glossy
Plain paper
Epson Bright White Paper
Plain Paper/Bright White
Paper
Epson Photo Paper Glossy
Photo Paper Glossy
Epson Presentation Paper Matte
Presentation Paper
Matte
Epson Premium Photo Paper Semi-gloss
Premium Photo Paper
Semi-Gloss
Epson Ultra Premium Photo Paper Luster
PremierArt Water Resistant Canvas for
Epson*
Ultra Premium Photo
Paper Luster
Epson Ultra Premium Presentation Paper
Matte
Ultra Premium
Presentation Matte
Epson Premium Presentation Paper Matte
Piezo Pro Matte Canvas for Epson*
Epson Photo Quality Self-adhesive Sheets
Epson Iron-on Cool Peel Transfer Paper
Premium Presentation
Paper Matte
Epson Velvet Fine Art Paper
Velvet Fine Art Paper
Epson Watercolor Paper Radiant White
Watercolor Paper Radiant White
Epson UltraSmooth Fine Art Paper
250 gsm
PremierArt Matte Scrapbook Photo Paper
for Epson
UltraSmooth Fine Art
Paper
Epson Premium Presentation Paper Matte
Double-sided
Double-Sided Matte
Paper
Ink jet-printable CD or DVD
CD/DVD
8-cm discs
Note: For small 8-cm discs, place the adapter on the tray and
then place the disc in the adapter.
6. Insert the tray into the tray guides and slide it in until the
arrows are aligned. Make sure the tray is beneath the guide
rails.
7. Now you can print on the CD/DVD using the Epson
Print CD software; see the on-screen Reference Guide.
8. After printing, the tray ejects partially from the printer. Pull
out the tray and remove the disc.
CD/DVD Premium
Surface
* For the best results on this paper, print using a premium ICC
profile, downloadable from Epson at http://www.epson.com/
SPR1900Profiles.
11/07
Epson Stylus Photo R1900 Series - 11
Epson Stylus Photo R1900 Series
Replacing an Ink Cartridge
You may also see this screen the first time you try to print
when ink is low (if your computer is connected to the
Internet):
Your Epson Stylus Photo R1900 Series and its software will let
you know when an ink cartridge is low or expended.
If an ink cartridge is low, the H ink light flashes.
When an ink cartridge is expended, the H ink light stays on.
If a cartridge is expended, you must replace it to be able to
print. If a cartridge is low, you can continue printing until a
cartridge needs replacement.
Note: You cannot print when an ink cartridge is expended even if the
other cartridges are not expended. Replace any expended cartridges
before printing.
When an installed ink cartridge is more than six months old,
you may need to replace it if your printouts do not look their
best, even after cleaning and aligning the print head.
Click Accept or Decline to continue.
To disable checking for ink offers or updates from Epson,
right-click the
icon in the bottom right corner of your
screen and select Monitoring Preferences. Then click the
checkbox at the bottom of the screen to uncheck it.
Checking the Cartridge Status
You can check the ink cartridge status anytime using your
Windows® or Macintosh® software.
Windows
Double-click the
icon in the bottom right corner of your
screen (the taskbar).
Macintosh
1. Open the Applications folder on your hard drive.
2. Open the EPSON Printer Utility2.
3. Select SP R1900 and click OK.
12 - Epson Stylus Photo R1900 Series
11/07
Epson Stylus Photo R1900 Series
4. Select EPSON StatusMonitor.
Removing and Installing Ink Cartridges
Be sure you have your replacement cartridges handy before
you begin. You must install new cartridges immediately after
removing the old ones.
Caution: Do not open ink cartridge packages until you are ready to
install the ink. Cartridges are vacuum packed to maintain reliability.
Remove the CD/DVD tray and close the CD/DVD tray guide cover
before replacing ink cartridges.
1. Turn on the printer.
2. Open the printer cover.
3. Press the H ink button to move the print head to the ink
replacement position. If a cartridge is low or expended, the
light above the cartridge flashes or stays on.
Purchasing Ink Cartridges
Purchase these genuine Epson cartridges:
Ink color
Part number
Part number on
software screens
Photo Black
87
T0871
Matte Black
87
T0878
Cyan
87
T0872
Magenta
87
T0873
Yellow
87
T0874
Red
87
T0877
Orange
87
T0879
Gloss Optimizer
87
T0870
Caution: Don’t move the print head by
hand or touch the flat white cable
behind the print head to avoid damaging
your printer.
4. Open the cartridge cover.
Leave your old cartridges in the printer until you are ready to
replace them to prevent the print head nozzles from drying
out.
Note: We recommend that you use genuine Epson cartridges and do
not refill them. The use of other products may affect your print quality
and could result in printer damage.
Yields vary considerably based on images printed, print settings,
paper type, frequency of use, and temperature. For print quality, a
variable amount of ink remains in the cartridge after the “replace
cartridge” indicator comes on. The printer ships with full cartridges
and part of the ink from this first set of cartridges is used for priming
the printer.
5. Squeeze the tab on the cartridge and lift the cartridge
straight up to remove it. Dispose of it carefully. Do not take
the used cartridge apart or try to refill it.
For best printing results, use up a cartridge within six months of
opening the package.
Store ink cartridges in a cool, dark place. If you bring them inside from
out in the cold, allow them to warm up to room temperature for at
least 3 hours before using them.
WARNING: If ink gets on your hands, wash them thoroughly
with soap and water. If ink gets into your eyes, flush them
immediately with water. Keep ink cartridges out of the reach
of children.
11/07
Epson Stylus Photo R1900 Series - 13
Epson Stylus Photo R1900 Series
6. Before opening the cartridge package, shake the package
four or five times.
10. Once you replace all the necessary cartridges, close the
cartridge cover and push it down until it clicks into place.
Note: All the ink cartridges, except the gloss optimizer cartridge,
make a clicking sound when you shake them.
11. Close the printer cover.
Caution: Do not shake the cartridges after opening the
packages or ink will leak.
7. Remove the cartridge from the package, but be careful not
to touch the green chip on the cartridge.
12. Press the H ink button to begin charging the ink. This takes
about 2 ½ minutes. The P power light flashes as the ink
charges.
8. Remove the yellow tape from the bottom of the cartridge.
Caution: Do not remove any other labels or seals, or ink will
leak.
When the P power light stops flashing and the H ink light
goes out, ink charging is finished.
Caution: Never turn off the printer while ink is charging or
you’ll waste ink.
If the H ink light is flashing, press the H ink button, then press
down all the cartridges securely.
9. Insert the new cartridge into the holder and push it down
until it clicks into place.
If you remove a low or expended ink cartridge, you cannot
reinstall and use the cartridge.
Cleaning the Print Head
If your printouts become too light, or you see dark or light
bands across them, you may need to clean the print head
nozzles. Cleaning uses ink, so clean the nozzles only if print
quality declines.
You can check for clogged nozzles before you clean them so
you don’t clean them unnecessarily.
It’s best to run the automatic nozzle check and cleaning utility
first to let the printer check and clean the nozzles, if necessary.
If you still notice quality problems, you can check and clean
the nozzles manually.
Note: You cannot clean the print head if an ink cartridge is low or
expended. You must replace the cartridge first.
14 - Epson Stylus Photo R1900 Series
11/07
Epson Stylus Photo R1900 Series
Automatically Checking and Cleaning the
Print Head
You can check and clean the print head nozzles automatically
using the Auto Nozzle Check and Cleaning utility in your
software. It prints a check pattern that your printer then reads
to see if you have any clogged nozzles, which is then cleans, if
necessary.
1. Load a few sheets of plain paper in the sheet feeder.
2. Windows: Right-click the
icon in the bottom right
corner of your screen (the taskbar) and select Auto Head
Cleaning.
Macintosh: Open the Applications folder, open the
EPSON Printer Utility2, select SP R1900, and click OK.
Then select Auto Head Cleaning.
Running the Head Cleaning Utility
If print quality has declined and the nozzle check pattern
indicates clogged nozzles, you can clean the print head
manually. You can also clean the print head manually if the
Auto Nozzle Check and Cleaning utility displays a message
telling you to manually clean the print head.
You can clean the print head using the R1900 Series control
panel or your software.
Using the Control Panel
1. Load a few sheets of plain paper in the sheet feeder.
2. Press and hold the H ink button for three seconds.
Cleaning lasts around 2 minutes. The P power light flashes
throughout the cleaning cycle and stays on green when the
cycle is finished.
3. Click Start and follow the on-screen instructions to allow
the printer to print and examine the nozzle check pattern.
Caution: Never turn off the printer during a cleaning cycle or
you may damage it.
3. Now you can manually run a nozzle check and confirm that
the print head is clean.
4. If necessary, the printer cleans the print head and may print
and check the nozzle check pattern a few times. If nozzles
are still clogged, you see a message on your computer screen
telling you to clean the print head manually.
If you still have print quality problems, you can turn the
printer off and wait at least 6 hours. Then try printing again.
You may need to clean the print head up to 4 times. You can
also turn the printer off and wait at least 6 hours. Then try
printing again.
From the Computer
1. Load a few sheets of plain paper in the sheet feeder.
2. Windows: Right-click the
icon in the bottom right
corner of your screen (the taskbar) and select Head
Cleaning.
11/07
Epson Stylus Photo R1900 Series - 15
Epson Stylus Photo R1900 Series
Macintosh: Open the Applications folder, open the
EPSON Printer Utility2, select SP R1900, and click OK.
Then select Head Cleaning.
Aligning the Print Head
If your printouts become grainy or blurry, or you see dark or
light bands across them, you may need to align the print head.
It’s best to run the automatic alignment utility first to let the
printer check and align the print head, if necessary. If you still
notice alignment problems, you can align the print head
manually.
Note: Banding may also occur if your print head nozzles need
cleaning.
3. Click Start and follow the on-screen instructions to start
the cleaning cycle, which lasts around 2 minutes.
The P power light flashes throughout the cleaning cycle
and stays on green when the cycle is finished.
Caution: Never turn off the printer during a cleaning cycle or
you may damage it.
1. Load a few sheets of Epson Presentation Paper Matte (or the
photo paper you have on hand) in the sheet feeder. It’s best
to use matte or photo paper for the most accurate
alignment.
2. Windows: Right-click the
icon in the bottom right
corner of your screen (the taskbar) and select Print Head
Alignment.
Macintosh: Open the Applications folder, open the
EPSON Printer Utility2, select SP R1900, and click OK.
Then select Print Head Alignment.
4. When the P power light stops flashing and remains on, you
can check to see if the nozzles are clean:
Windows: Click Print Nozzle Check Pattern and click
Print.
Macintosh: Click Confirmation and click Next.
5. Check the nozzle check pattern that prints to see if there are
gaps in the lines.
Nozzles are clean
Nozzles need cleaning
3. To have the printer check and align the print head
automatically, click Automatic, then click OK. Follow the
on-screen instructions to print the alignment check patterns
and align the print head as necessary.
To align the print head manually, click the Manual button,
click OK, and continue with the rest of the steps here.
Note: Do not press the I paper button to cancel a print job
when the alignment sheet is printing.
6. If there are no gaps, click Finish.
If there are gaps or the pattern is faint, click Clean to clean
the print head again.
You may need to clean the print head up to 4 times. You can
also turn the printer off and wait at least 6 hours. Then try
printing again.
16 - Epson Stylus Photo R1900 Series
11/07
Epson Stylus Photo R1900 Series
4. Follow the on-screen instructions to print an alignment
sheet.
Transporting the Printer
If you need to ship your printer or transport it a long distance,
prepare it for transportation as follows:
1. Turn off the printer.
2. Unplug all the connected cables.
3. Remove all the paper and paper loading accessories.
4. Close the paper support and output tray.
5. Lift up the printer cover and check that the ink cartridge
holder is all the way to the right (the home position). If
necessary, plug in and turn on the printer, then turn it off
again using the P power button.
5. Check the alignment pattern that prints and compare it to
the alignment criteria on your screen.
6. Fasten the ink cartridge holder to the case using tape. Leave
the ink cartridges installed to avoid damaging the printer.
6. If necessary, enter the number of the best pattern and click
Finish.
Note: If no patterns are aligned, choose the closest one and click
Realignment. Then print another alignment sheet and check it.
7. When you’re done, click Finish.
Cleaning the Printer
7. Close the printer cover, then fasten the output tray to the
case using tape.
To keep the R1900 Series working at its best, you should
clean it several times a year.
Caution: Do not use a hard brush, benzine, alcohol, or paint thinner
to clean the printer or you may damage it. Do not use oil or other
lubricants inside the printer or let water get inside it.
1. Turn off the printer.
2. Unplug the power cable.
3. Disconnect the USB cable.
4. Remove all the paper.
8. Pack the printer and its accessories in its original box or one
of a similar size using protective material to keep it from
moving inside the box.
5. Clean all the paper feeders using a soft brush.
9. Keep the printer level during transportation to prevent
damage.
6. Close the paper support, printer cover, CD/DVD tray
guide cover, and output tray, then clean the outer case with
a soft cloth dampened with mild detergent.
10. After unpacking the printer, remove the tape securing the
ink cartridge holder and output tray.
7. Plug the power cable back into the electrical outlet and turn
on the printer.
If print quality has declined when you print again in a new
location, clean and align the print head.
8. Load several sheets of plain paper in the sheet feeder and
clean the rollers inside the printer.
11/07
Epson Stylus Photo R1900 Series - 17
Epson Stylus Photo R1900 Series
Related Documentation
Epson Stylus Photo R1900 Series
Start Here sheet
CPD-24044
Epson Stylus Photo R1900 Series
User’s Guide
CPD-24045
Epson Stylus Photo R1900 Series
CD-ROM with on-screen Reference Guide
CPD-24046
18 - Epson Stylus Photo R1900 Series
11/07


