1
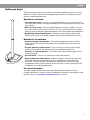
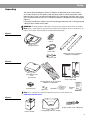
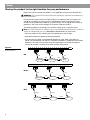
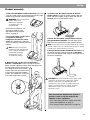
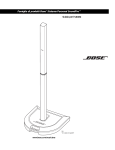
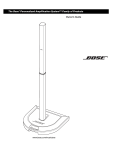
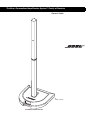
The Bose® Personalized Amplification System™ Family of Products
Owner’s Guide
70
“A Mark of Quality”
www.bose.com/musicians
Safety Information
Please read this owner’s guide
English
Dansk
Please take the time to follow the instructions in this owner’s guide carefully. It will help you set up and operate your system properly and enjoy all of its advanced features. Please save this owner’s guide for future reference.
WARNING: To reduce the risk of fire or electrical shock, do not expose the system to rain or moisture.
WARNING: To prevent electric shock, match the wide blade of the line cord plug to the wide slot of the AC (mains)
receptacle.
Deutsch
Español
Dansk
C AU T IO N
RISK OF ELECTRICAL SHOCK
DO NOT OPEN
Français
Deutsch
Italiano
CAUTION: TO REDUCE THE RISK OF ELECTRIC SHOCK,
DO NOT REMOVE COVER (OR BACK).
NO USER-SERVICABLE PARTS INSIDE.
REFER SERVICING TO QUALIFIED PERSONNEL.
WARNING: To reduce the risk of electric shock, do not disassemble this system unless you are qualified.
Refer servicing to qualified service personnel.
These CAUTION marks may be located on the enclosures of the Personalized Amplification System™ PS1 power stand:
Nederlands
Español
The lightning flash with arrowhead symbol within an equilateral triangle alerts the user to the presence of
uninsulated dangerous voltage within the system enclosure that may be of sufficient magnitude to constitute a risk of electrical shock.
The exclamation point within an equilateral triangle, as marked on the system, is intended to alert the user
to the presence of important operating and maintenance instructions in this owner’s guide.
Français
Svenska
CAUTION: No naked flame sources, such as lighted candles, should be placed on the apparatus.
Svenska
Nederlands
Italiano
CAUTION: Where the mains plug is used as the disconnect device, such disconnect device shall remain readily
operable.
©2005 Bose Corporation. No part of this work may be reproduced, modified, distributed or otherwise used without prior written
permission.
2
Important Safety Instructions
1. Read these instructions.
3. Heed all warnings.
4. Follow all instructions.
5. Do not use this apparatus near water.
6. Clean only with a dry cloth.
8. Do not install near any heat sources, such as
radiators, heat registers, stoves or other apparatus (including amplifiers) that produce heat.
11. Only use attachments/accessories specified by
the manufacturer.
16. Do not let objects or liquids enter the product –
as they may touch dangerous voltage points or shortcircuit parts that could result in a fire or electric shock.
17. See product enclosure bottom for safety related
markings.
18. Use proper power sources – Plug the product into
a proper power source, as described in the operating
instructions or as marked on the product.
19. Apparatus shall not be exposed to dripping or
splashing, and no objects filled with liquids,
such as vases, shall be placed on the apparatus.
Italiano
13. Unplug this apparatus during lightning storms
or when unused for long periods of time.
15. To prevent risk of fire or electric shock, avoid
overloading wall outlets, extension cords, or
integral convenience receptacles.
Français
Svenska
12. Use only with the cart, stand, tripod,
bracket or table specified by the manufacturer or sold with the apparatus.
When a cart is used, use caution when
moving the cart/apparatus combination to avoid
injury from tip-over.
14. Refer all servicing to qualified service personnel.
Servicing is required when the apparatus has
been damaged in any way, such as power-supply
cord or plug is damaged, liquid has been spilled
or objects have fallen into the apparatus, the
apparatus has been exposed to rain or moisture,
does not operate normally, or has been dropped.
Nederlands
Español
10. Protect the power cord from being walked on or
pinched, particularly at plugs, convenience
receptacles, and the point where they exit from
the apparatus.
This product complies with the Canadian ICES-003
Class A specifications.
Français
Deutsch
Italiano
9. Do not defeat the safety purpose of the polarized or grounding-type plug. A polarized plug
has two blades with one wider than the other. A
grounding-type plug has two blades and a third
grounding prong. The wider blade or third prong
is provided for your safety. If the provided plug
does not fit into your outlet, consult an electrician for replacement of the obsolete outlet.
This equipment has been tested and found to comply with the limits for a Class A digital device,
pursuant to Part 15 of the FCC rules. These limits
are designed to provide reasonable protection
against harmful interference in a commercial environment. This equipment generates, uses, and can
radiate radio frequency energy and, if not installed
and used in accordance with the instructions, may
cause harmful interference to radio communications.
Operation of this equipment in a residential area is
likely to cause harmful interference in which case the
user will be required to correct the interference at his
own expense.
Deutsch
Español
Dansk
7. Do not block any ventilation openings. Install in
accordance with the manufacturer’s instructions.
Information about products that
generate electrical noise
English
Dansk
2. Keep these instructions.
Nederlands
Svenska
3
Información de seguridad
Lea esta guía del usuario
Dedique el tiempo que sea necesario para seguir las instrucciones de esta guía del usuario cuidadosamente. Le ayudará a
configurar y utilizar correctamente el sistema y a disfrutar de todas sus funciones avanzadas. Guarde la guía del usuario para
utilizarla como material de referencia en el futuro.
ADVERTENCIA: Con el fin de reducir el riesgo de descargas eléctricas, no exponga el sistema a la lluvia o la humedad.
ADVERTENCIA: Para evitar que se produzcan descargas eléctricas, ponga la patilla de hoja plana de la clavija del cable de línea en
la ranura ancha de la toma de CA (red eléctrica).
ADVERTENCIA: Para reducir el riesgo de descargas eléctricas, no desmonte el sistema si no es usted un técnico cualificado. Las
reparaciones debe llevarlas a cabo personal cualificado. Las indicaciones de PRECAUCIÓN que se muestran en este manual se
encuentran en las cajas del sistema.
Estas marcas de PRECAUCIÓN se pueden encontrar en las cajas del pedestal PS1 Personalized Amplification System™:
El símbolo de un relámpago con una flecha dentro de un triángulo equilátero avisa al usuario de que dentro de la caja del sistema puede haber voltaje sin aislar de una magnitud suficiente para constituir un riesgo de descarga
eléctrica.
El signo de exclamación dentro de un triángulo equilátero, tal como aparece marcado en el sistema, sirve para avisar al
usuario de que existen instrucciones de funcionamiento y mantenimiento importantes en esta guía del usuario.
PRECAUCIÓN: No coloque sobre el aparato ninguna fuente de llama viva, como velas encendidas.
PRECAUCIÓN: Cuando se usa la clavija de conexión a la red eléctrica como dispositivo de desconexión, debe ser posible usar este
dispositivo de forma inmediata.
Instrucciones de seguridad importantes
1.
2.
3.
4.
5.
6.
7.
Lea las siguientes instrucciones.
Lea las siguientes instrucciones.
Tenga presentes todas las advertencias.
Siga todas las instrucciones.
No utilice este aparato cerca del agua o humedad.
Límpielo sólo con un trapo seco.
No bloquee las aberturas de ventilación. Realice la
instalación de acuerdo con las instrucciones del
fabricante.
8. No lo instale cerca de fuentes de calor, tales como
radiadores, salidas de aire caliente, hornos u otros
aparatos (incluidos amplificadores) que generen calor.
9. No elimine el dispositivo de seguridad del enchufe con
toma a tierra o polarizado. Los enchufes polarizados
disponen de dos clavijas, una de mayor tamaño que la otra.
Los enchufes con toma de tierra tienen dos patillas y un
tercer terminal de tierra. La patilla más ancha y el tercer
terminal se incluyen como medida de seguridad. Si el
enchufe suministrado no encaja en la toma, póngase en
contacto con un electricista para sustituir la toma antigua.
10. Proteja el cable de alimentación de forma que nadie lo pise
ni quede apretado, en particular cerca de los enchufes,
receptáculos de tomas múltiples y en el lugar en que sale
del aparato.
11. Utilice sólo conexiones y accesorios suministrados por el
fabricante.
12. Utilícelo sólo con el carrito, soporte, trípode,
abrazadera o mesa suministrado por el fabricante
o incluido con el dispositivo. Cuando se utilice un
carrito, tenga cuidado al mover la combinación
de carrito/dispositivo para evitar que se
produzcan lesiones en caso de que se caiga.
4
13. Desenchufe el aparato eléctrico en caso de tormenta
eléctrica o cuando no vaya a utilizarlo durante mucho tiempo.
14. Toda reparación debe ser realizada por personal cualificado.
Lleve el dispositivo a reparar si presenta algún daño como, por
ejemplo, si el cable de alimentación o el enchufe están
dañados, si se han vertido líquidos o se han caído objetos
sobre el dispositivo o si éste ha estado expuesto a la lluvia o
humedad; si no funciona correctamente o se ha caído al suelo.
15. Para prevenir el riesgo de incendio o descarga eléctrica,
evite la sobrecarga de los enchufes, alargadores o
receptáculos de las tomas.
16. Impida que caigan objetos o líquidos sobre el producto, ya
que podrían entrar en contacto con puntos de niveles de voltaje
altos o partes que podrían sufrir un cortocircuito y causar
incendios o descargas eléctricas.
17. Consulte las indicaciones de seguridad en la parte inferior
de la caja del producto.
18. Utilice fuentes de alimentación adecuadas: conecte el
producto a una fuente de alimentación, tal y como se describe en
las instrucciones de funcionamiento o como está marcado en el
propio producto.
19. El aparato no debe recibir salpicaduras ni mojarse, por lo
que cualquier objeto que contenga líquido, como jarrones,
no debe colocarse sobre éste.
©2005 Bose Corporation. Ninguna parte de esta obra puede reproducirse, modificarse, distribuirse o usarse de ninguna otra manera sin
consentimiento previo por escrito.
Informations de sécurité
Veuillez lire cette notice d’utilisation
Prenez le temps de lire attentivement les instructions de cette notice d’utilisation. Elles vous seront précieuses pour installer et utiliser correctement
votre système et vous aideront à tirer le meilleur parti de sa technologie. Conservez cette notice d’utilisation pour référence ultérieure.
AVERTISSEMENT : Afin de limiter les risques d’incendie ou d’électrocution, n’exposez pas l’appareil à la pluie ou à l’humidité.
AVERTISSEMENT : Afin d’éviter tout risque d’électrocution, insérez bien la fiche du cordon d’alimentation dans la fente correspondante de la
prise d’alimentation.
AVERTISSEMENT : Afin de limiter les risques d’électrocution, ne démontez pas ce système à moins de disposer des qualifications requises.
Adressez-vous à un réparateur qualifié. Les marquages de SÉCURITÉ présentés sur cette page sont situés sur les boîtiers de votre système.
Ces marquages de SÉCURITÉ peuvent être situés sur les boîtiers du socle amplificateur PS1 Personalized Amplification System™ :
Le symbole représentant un éclair avec une flèche à l’intérieur d’un triangle équilatéral est utilisé pour prévenir l’utilisateur de la
présence d’une tension électrique dangereuse non isolée à l’intérieur de l’appareil. Cette tension est d’un niveau suffisamment
élevé pour représenter un risque d’électrocution.
Le symbole représentant un point d’exclamation à l’intérieur d’un triangle équilatéral, tel qu’il figure sur le système, signale à
l’utilisateur la présence d’instructions importantes relatives au fonctionnement et à l’entretien de l’appareil dans cette notice
d’installation.
ATTENTION : Ne placez jamais d’objets enflammés, tels que des bougies allumées, sur l’appareil.
ATTENTION : Lorsque la fiche d’alimentation est utilisée comme dispositif de débranchement de l’appareil, elle doit rester facilement accessible.
Instructions importantes relatives à la sécurité
1.
2.
3.
4.
5.
Veuillez lire ces instructions.
Veuillez conserver ces instructions.
Respectez tous les avertissements.
Suivez toutes les instructions.
N’utilisez pas cet appareil à proximité d’eau ou d’une source
d’humidité.
6. Utilisez uniquement un chiffon sec pour le nettoyage.
7. Ne bloquez jamais les orifices d’aération. Suivez les
instructions du fabricant pour l’installation.
8. N’installez pas cet appareil à proximité d’une quelconque
source de chaleur, telle qu’un radiateur, une arrivée d’air
chaud, un four ou tout autre appareil (notamment les
amplificateurs) produisant de la chaleur.
9. Ne tentez pas de modifier les dispositifs de sécurité que
constituent les fiches de type terre ou polarisées. Les fiches
polarisées sont équipées de deux bornes de largeurs différentes.
Les fiches de type terre sont équipées de deux bornes et d’un
orifice permettant la mise à la terre. Ces deux types de dispositifs
ont pour but d’assurer votre sécurité. Si la prise fournie ne
s’adapte pas à votre prise de courant, consultez un électricien
pour qu’il remplace cette prise obsolète.
10. Protégez le cordon d’alimentation contre les risques de
piétinement ou de pincement, notamment au niveau des
fiches, des prises de courant et des branchements à l’appareil.
11. Utilisez uniquement les accessoires spécifiés par le fabricant.
12. Utilisez uniquement le chariot, le support, le
trépied, l’équerre ou la table spécifié(e) par le
fabricant ou vendu(e) avec l’appareil. Lorsque vous
utilisez un chariot, faites attention à ne pas vous
blesser en déplaçant l’ensemble chariot/appareil,
car celui-ci risque de basculer.
13. Débranchez cet appareil pendant les orages ou au cours des
longues périodes de
non-utilisation.
14. Confiez toute réparation à du personnel qualifié. Une réparation
est nécessaire lorsque l’appareil a été endommagé de quelque
façon que ce soit (endommagement du cordon d’alimentation
ou de la fiche électrique, renversement d’un liquide ou de tout
objet sur l’appareil, exposition de l’appareil à la pluie ou à
l’humidité, mauvais fonctionnement, chute de l’appareil, etc.).
15. Pour éviter tout risque d’incendie ou d’électrocution, ne
surchargez pas les prises murales, les rallonges ou les prises
multiples.
16. Ne laissez jamais d’eau ou d’objets pénétrer à l’intérieur du
produit : des éléments sous tension pourraient être touchés ou il
pourrait se produire un court-circuit susceptible d’entraîner un incendie
ou un risque d’électrocution.
17. Examinez les marquages de sécurité présents sur le boîtier du
produit.
18. Utilisez des sources d’alimentation appropriées : branchez le
produit sur une source d’alimentation appropriée, comme indiqué dans
les instructions relatives au fonctionnement ou signalé sur le produit.
19. Protégez l’appareil de tout risque de ruissellement ou
d’éclaboussure. Ne placez pas d’objets contenant des liquides,
tels que des vases, sur l’appareil.
©2005 Bose Corporation. Toute reproduction, modification, distribution ou autre utilisation, même partielle, de ce document est interdite sans
autorisation écrite préalable.
5
Contents
Where to find...
Setup . . . . . . . . . . . . . . . . . . . . . . . . . . . . . . . . . . . . . . . . . . . . . . . . . . . . . . . . . . . . . . . . . . . . . . . .
Before you begin . . . . . . . . . . . . . . . . . . . . . . . . . . . . . . . . . . . . . . . . . . . . . . . . . . . . . . . . . . .
Unpacking . . . . . . . . . . . . . . . . . . . . . . . . . . . . . . . . . . . . . . . . . . . . . . . . . . . . . . . . . . . . . . . .
Placing the product in the right location for your performance . . . . . . . . . . . . . . . . . . . . . . . .
Product assembly . . . . . . . . . . . . . . . . . . . . . . . . . . . . . . . . . . . . . . . . . . . . . . . . . . . . . . . . . . .
Disassembly . . . . . . . . . . . . . . . . . . . . . . . . . . . . . . . . . . . . . . . . . . . . . . . . . . . . . . . . . . . . . . .
Connecting a B1 bass module to the PS1 power stand (optional) . . . . . . . . . . . . . . . . . . . . .
Connecting one B1 bass module . . . . . . . . . . . . . . . . . . . . . . . . . . . . . . . . . . . . . . . . . . . .
Connecting two B1 bass modules . . . . . . . . . . . . . . . . . . . . . . . . . . . . . . . . . . . . . . . . . . .
7
7
8
9
10
11
12
12
13
Controls, Indicators and Connections . . . . . . . . . . . . . . . . . . . . . . . . . . . . . . . . . . . . . . . . . . . . . .
Channel 1/2 connections and controls . . . . . . . . . . . . . . . . . . . . . . . . . . . . . . . . . . . . . . . . . . .
Channel 3/4 connections and controls . . . . . . . . . . . . . . . . . . . . . . . . . . . . . . . . . . . . . . . . . . .
Power amp patch, bass, remote and AC power connections . . . . . . . . . . . . . . . . . . . . . . . . .
R1 remote control features . . . . . . . . . . . . . . . . . . . . . . . . . . . . . . . . . . . . . . . . . . . . . . . . . . . .
14
14
15
16
17
Operating Instructions . . . . . . . . . . . . . . . . . . . . . . . . . . . . . . . . . . . . . . . . . . . . . . . . . . . . . . . . . .
Producing individualized sound . . . . . . . . . . . . . . . . . . . . . . . . . . . . . . . . . . . . . . . . . . . . . . . .
Using input channels 3 and 4 . . . . . . . . . . . . . . . . . . . . . . . . . . . . . . . . . . . . . . . . . . . . . .
Using an effects processor . . . . . . . . . . . . . . . . . . . . . . . . . . . . . . . . . . . . . . . . . . . . . . . . . . . .
Serial connection method . . . . . . . . . . . . . . . . . . . . . . . . . . . . . . . . . . . . . . . . . . . . . . . . .
Parallel connection method . . . . . . . . . . . . . . . . . . . . . . . . . . . . . . . . . . . . . . . . . . . . . . . .
Using a serial effects connection with the PS1 power stand . . . . . . . . . . . . . . . . . . . . . .
Using parallel effects connection with the PS1 power stand . . . . . . . . . . . . . . . . . . . . . .
18
18
18
19
19
19
20
21
Troubleshooting . . . . . . . . . . . . . . . . . . . . . . . . . . . . . . . . . . . . . . . . . . . . . . . . . . . . . . . . . . . . . . .
Customer service . . . . . . . . . . . . . . . . . . . . . . . . . . . . . . . . . . . . . . . . . . . . . . . . . . . . . . . . . . .
Cleaning your product . . . . . . . . . . . . . . . . . . . . . . . . . . . . . . . . . . . . . . . . . . . . . . . . . . . . . . .
Limited Warranty and Registration . . . . . . . . . . . . . . . . . . . . . . . . . . . . . . . . . . . . . . . . . . . . . .
Accessories . . . . . . . . . . . . . . . . . . . . . . . . . . . . . . . . . . . . . . . . . . . . . . . . . . . . . . . . . . . . . . .
22
24
24
24
24
Technical Information . . . . . . . . . . . . . . . . . . . . . . . . . . . . . . . . . . . . . . . . . . . . . . . . . . . . . . . . . . .
Mechanical . . . . . . . . . . . . . . . . . . . . . . . . . . . . . . . . . . . . . . . . . . . . . . . . . . . . . . . . . . . . . . . .
Electrical . . . . . . . . . . . . . . . . . . . . . . . . . . . . . . . . . . . . . . . . . . . . . . . . . . . . . . . . . . . . . . . . . .
Audio Input/Output . . . . . . . . . . . . . . . . . . . . . . . . . . . . . . . . . . . . . . . . . . . . . . . . . . . . . . . . . .
25
25
25
25
For your records
The product serial number is located on the bottom of each component:
PS1 power stand serial number:___________________________________________________
L1 Cylindrical Radiator™ loudspeaker serial number:_________________________________
B1 bass module (optional) serial number:___________________________________________
B1 bass module (optional) serial number:___________________________________________
Dealer name:___________________________________________________________________
Dealer phone:____________________ Purchase date:_______________________________
Please keep your sales receipt together with this owner’s guide.
6
Setup
Before you begin
English
Dansk
Thank you for purchasing one of the Bose® Personalized Amplification System™ family of
products. This new revolutionary technology brings the benefits of the intimate acoustic concert to amplified performances.
Benefits for musicians
• Quick and easy setup – The Personalized Amplification System™ product is easy to carry and can be set up in minutes, not hours. This frees you from the time-consuming,
draining, and frustrating effort required to properly set up conventional sound equipment.
Deutsch
Español
Dansk
• You control the sound – Just as in an unamplified performance, you, and no one else,
control the sound. You will no longer wonder how you sound to your fellow musicians or to
your audience.
• Dramatically improved performance – Performance and enjoyment dramatically
improve because you will no longer struggle to hear yourself and the other musicians.
Français
Deutsch
Italiano
Benefits for the audience
• Creates excitement and emotion – The enhanced performance of the musicians creates the kind of excitement and emotion that is valued by music lovers more than anything else.
Nederlands
Español
• You hear what the audience hears – For the first time, musicians hear what their audiences hear and thus, are unlikely to play at uncomfortable sound levels.
• The music is naturally dynamic – The softest to the more intense passages can be
heard and enjoyed.
• You look better – There is less clutter on the stage and more room.
70
Français
Svenska
“A Mark of Quality”
• Sound reproduction unlike before – Audience members report that the clarity and
excitement that come from hearing the accurate reproduction of sound from each
instrument, and from hearing the sound of each instrument in its position on stage
(as opposed to mono or even stereo mix of all instruments) is unlike anything they have
heard before in an amplified performance.
For more information
This owner’s guide provides only basic setup and operating instructions. For more
in-depth information on using this system, including tips, techniques, and frequently asked
questions, please visit www.bose.com/musicians on the Internet.
Italiano
Nederlands
Svenska
7
Setup
Unpacking
English
Dansk
Your Personalized Amplification System™ products are delivered to you in two cartons. One carton contains the PS1 power stand, AC power cord, R1 remote control with cable,
protective plug, Owner’s and Quick Setup guides, PS1 carrying bag, CD-ROM, and a spare
fuse. The other carton contains the L1 Cylindrical Radiator™ loudspeaker and carrying bags
(Figure 1).
If you purchased B1 bass modules, they will be packaged separately with a carrying bag and
a (blue) B1 bass module 4-wire cable.
Deutsch
Español
Dansk
WARNING: To avoid danger of suffocation, keep the plastic bags out of the reach of children.
Note: Now is a good time to record the serial number on the bottom of these components, on
page 6 of this guide. Refer to page 24 for registration information.
Figure 1
System components
Français
Deutsch
Italiano
R1 remote
control
PS1 power stand
Nederlands
Español
Remote
control cable
Upper and Lower L1 Cylindrical
Radiator™ loudspeaker
AC power cord
Figure 2
Français
Svenska
Included equipment
Carrying bag for the
PS1
power stand
Carrying bags for the L1 Cylindrical
Radiator™ loudspeaker
Italiano
Owner’s Guide and
Quick Setup Guide
The Bose® Personalized Amplification System™ Family Of Products
Free Personalized Support
877-335-2673
www.bose.com/musicians
Thank you for your purchase. Many new owners have told us that their first experience
using this system was a pivotal point in their musical life. They describe hearing and
playing in a completely new way.
Our advice for new owners is this: Get to know the product and learn how to get the
most out of this new approach to live amplified music.
We offer free personalized support to help you with the process of setting up and
optimizing your sound. This free service is available by phone or online.
Call us toll-free at 877-335-2673 to speak one-on-one with a professional musician
who specializes in the Personalized Amplification System™ family of products.
Spare fuse
CD-ROM
Visit us online at www.bose.com/musicians, where an enthusiastic
community of owners and support staff are ready to answer your questions.
Browse the site to find the information you need, or join the conversation on
our Message Boards.
These free support options will help you get up to speed quickly, so you can
begin enjoying the full potential of this new approach.
The Live Music Technology Group
Bose Corporation
Live Performances Calendar
Nederlands
Protective plug
Warranty
sheet
When you register, you could be eligible to post your gigs
on the Live Performances Calendar on our website.
Visit www.bose.com/musicians to check out our
featured artists and find a performance near you.
Note: For a complete list of optional equipment and accessories please visit
www.bose.com/musicians.
Figure 3
Optional equipment
Svenska
B1 bass module 4-wire cable (blue)
B1 bass module
Carrying bag for B1 bass module
8
Setup
English
Dansk
Placing the product in the right location for your performance
Before you start to assemble this product, it is a good idea to find the best location for it.
WARNING: The completed unit weighs about 60 lb. Moving the completely assembled unit is
not recommended.
Deutsch
Español
Dansk
Placing the PS1 power stand in the right location is an important step in the process of setting up this product to create your own individualized sound. Determining the best
location for your performance depends on several things: size of staging area, number of performers, and if you will be sharing the PS1 power stand connections.
The following guidelines should get you started in setting up for a concert or show.
Note: For more information on setting up your Personalized Amplification System™ product to
achieve an individualized sound, visit www.bose.com/musicians on the Internet.
• Place the product at the rearmost part of the performance area or stage.
Français
Deutsch
Italiano
• If possible, position the product behind the performer.
• If you are part of a group, avoid crowding together on stage. Allow some distance (ideally 7-8 feet) between you and the L1 Cylindrical Radiator™ loudspeaker and another performer. This allows the sound to wrap around performers and reflect off adjacent surfaces of the room, creating a more pleasing room-filling sound.
Nederlands
Español
Figure 4
Wall
Placement
recommendations
OK
3 ft
3 ft
Drummer
Keyboard
Français
Svenska
3 ft
3 ft
3 ft
Bass
Wall
Better
5 ft
5 ft
5 ft
Italiano
Keyboard
5 ft
5 ft
Drummer
Bass
Wall
Nederlands
Best
7-8 ft
Svenska
Keyboard
9
7-8 ft
7-8 ft
Drummer
7-8 ft
7-8 ft
Bass
Setup
Product assembly
4. Connect the R1 remote control to the PS1
power stand. Plug the R1 remote control cable into
either end of the remote. Plug the other end into the
Remote jack on the PS1 power stand.
Deutsch
Español
Dansk
WARNING: The completed unit
weighs about 60 lb.
Moving the completely
assembled unit is not
recommended.
English
Dansk
1. Place the PS1 power stand on the floor. Place it on
a flat, dry, stable surface at the rearmost part of the stage,
handle facing forward, behind the performer.
For placement guidelines, see
“Placing the product in the
right location for your performance” on page 9.
5. Place the R1 remote control within reach of
your performance position. This will allow you to
both hear your performance and to control it directly.
Note: If you power up the system without the R1 remote
control, it will function as if all the knobs on the R1 remote
control are at center position (12 o’clock).
6. Plug in the PS1 power stand and turn it on. Plug
the female end of the power cord into the AC Mains
jack on the PS1 power stand. Plug the other end into an
AC (mains) receptacle.
Français
Svenska
3. Mount the top section of the L1 Cylindrical
Radiator™ loudspeaker. Place one foot on the PS1
power stand to support your back. Insert the bayonet on
the top section into the channel that
runs along the back of the bottom
section. Lower the top section until it
is flush with the top of the bottom
section. You should hear a soft click
as the top section locks in place.
Nederlands
Español
Note: Electrical connections
between the PS1 power stand
and L1 Cylindrical Radiator™
loudspeaker are made
automatically as you
assemble the product.
Français
Deutsch
Italiano
2. Insert the bottom section of the
L1 Cylindrical Radiator™
loudspeaker into the PS1 power
stand. You should hear a soft click
when it is properly seated and locked
in place.
Italiano
Nederlands
CAUTION: Bose recommends using a quality surge
suppressor on all electronic equipment. Voltage
variations and spikes can damage electronic
components in any system. A quality suppressor,
which can eliminate the vast majority of failures
attributed to surges, may be purchased at
electronics stores.
Your Personalized Amplification System™
product is now set up and ready for the
addition of other equipment.
Svenska
• See “Connecting a B1 bass module to the PS1
power stand (optional)” on page 12.
• See “Using an effects processor” on page 19.
10
Setup
English
Dansk
Disassembly
WARNING: Before disassembly, turn the power off and then remove the AC power cord and all
other cables from the PS1 power stand.
Français
Svenska
Nederlands
Español
Français
Deutsch
Italiano
Deutsch
Español
Dansk
Remove the top L1 Cylindrical RadiatorTM
loudspeaker section
Place one foot on the PS1 power stand to support
your back. Firmly grasp the top section with one
hand. Using your other hand, press the release
button with your thumb and remove the top section
from the bottom section.
Svenska
Nederlands
Italiano
Remove the bottom L1 Cylindrical
Radiator loudspeaker section
Using your foot, push down on the PS1 power
stand treadle and lift the bottom L1
Cylindrical Radiator™ loudspeaker section
up and out of the PS1 power stand.
11
Setup
Connecting a B1 bass module to the PS1 power stand (optional)
English
Dansk
The %%DVV0RGXOH$PS287 jack on the PS1 power stand can adequately drive one or
two B1 bass modules. B1 bass modules can be placed on the floor vertically or horizontally.
Up to four modules can be stacked when placed horizontally (Figure 1).
CAUTION: Do not connect more than two B1 bass modules to the B1 Bass Module (Amp 3
OUT) jack on the PS1 power stand. Driving more than two B1 bass modules from the B1 Bass
Module (Amp 3 OUT) output will improperly load the amplifier in the PS1 power stand, resulting
in less than full system performance.
Figure 5
Bass module orientations
B1 bass modules can
be placed vertically or
horizontally
B1 bass modules can
be stacked in a column
of up to four, maximum
Deutsch
Español
Dansk
CAUTION: Only B1 bass modules should be used in the B1 Bass Module (Amp 3 OUT) jack.
Français
Deutsch
Italiano
Nederlands
Español
Français
Svenska
Connecting one B1 bass module
Figure 6
B1 bass module
Italiano
Insert one end of the B1 bass module 4-wire cable into one of the jacks on the rear panel of the B1 bass module. Insert the other end of the 4-wire cable into the %%DVV0RGXOH
$PS287 jack on the PS1 power stand connector panel.
To connect, push the plug
into the jack and rotate it
clockwise to lock it.
Nederlands
To
B1 Bass Module
(Amp 3 OUT)
B1 bass module 4-wire cable (blue)
Svenska
To disconnect, slide back the metal tab on the
body of the plug, rotate the plug counterclockwise
and pull it out of the jack.
Note: The B1 bass module connector will click softly upon being properly engaged.
CAUTION: A B1 bass module cannot be shared between two PS1 power stands.
12
Setup
Connecting two B1 bass modules
English
Dansk
Connect the first B1 bass module to the PS1 power stand as shown in “Connecting one B1
bass module.”
Insert one end of the second B1 bass module cable into the unused jack on the rear panel of
the first B1 bass module. Insert the other end of the cable into one of the jacks on the rear
panel of the second B1 bass module.
Note: Use only the supplied (blue) B1 bass module 4-wire cable to connect B1 bass modules
to the PS1 power stand. The PS1 power stand uses the signals on two of the four wires to
automatically sense how many B1 bass modules are connected to it. DO NOT SUBSTITUTE
the supplied cable with a 2-wire speaker cable.
Figure 7
Installation of two B1 bass
modules
Nederlands
Español
Français
Deutsch
Italiano
Deutsch
Español
Dansk
CAUTION: Do not connect more than two B1 bass modules to the B1 Bass Module (Amp 3
OUT) jack on the PS1 power stand. Driving more than two B1 bass modules from the B1 Bass
Module (Amp 3 OUT) output will improperly load the amplifier in the PS1 power stand resulting
in poor system performance.
Svenska
Nederlands
Italiano
Français
Svenska
To
B1 Bass Module
(Amp 3 OUT)
13
Controls, Indicators and Connections
Deutsch
Español
Dansk
English
Dansk
Channel 1/2 connections and controls
Français
Deutsch
Italiano
Input ..........................................Combination XLR (mic) or ¼-inch phone connector unbalanced (line) input. Inserting a male XLR connector
sends the input signal to a balanced microphone preamplifier. Inserting a ¼-inch phone plug sends the input
signal to an unbalanced high-impedance line-level circuit
which is suitable for most instruments such as active or passive guitars or basses, keyboards, etc. Both inputs can
be adjusted with the Trim control.
Trim 0 to 12 ...............................Controls the input level.
Nederlands
Español
Signal/OL ..................................Indicates signal presence (green) or signal overload (red).
Phantom Off/+24V ....................When depressed turns on the +24V phantom power. The
LED lights when phantom power is on.
Français
Svenska
Preset Select ............................Selects a comprehensive channel equalization, which results
in a “normal” or useful sound when the product is used with
commonly available equipment such as microphones, musical instruments or sound processors. The selectable
settings from 00 to 99 apply only to channels 1 and 2. Settings are identical on both channels but are independently selected. See the preset guide inside the PS1
power stand panel door for a list of available presets.
Line OUT ...................................XLR output for sending to external recording equipment or to
conventional sound mixing consoles (for using the Bose
approach in large venues).
Italiano
Insert .........................................A TRS line input/output for connecting to external equipment, such as digital effects processors.
Svenska
Nederlands
Note: Use a stereo plug in the Insert jack for connecting send and return signals. The ring
connects to the “Send”; and the tip connects to the “Return”.
14
Controls, Indicators and Connections
Deutsch
Español
Dansk
English
Dansk
Channel 3/4 connections and controls
Line IN ....................................... ¼-inch phone connector unbalanced line input
Svenska
Nederlands
Italiano
Français
Svenska
Nederlands
Español
Français
Deutsch
Italiano
Level 0 to 12 ............................. Controls the source input level
15
Controls, Indicators and Connections
Power amp patch, bass, remote and AC power connections
English
Dansk
Deutsch
Español
Dansk
Amp 1 IN............................................. Amplifier 1 input jack
Amp 2 IN............................................. Amplifier 2 input jack
Français
Deutsch
Italiano
Used only when an L1
Cylindrical Radiator™
loudspeaker is NOT
installed in the PS1
power stand.
Amp 3 IN............................................. Amplifier 3 input jack
All Amps IN ........................................ Input jack to all amplifiers
Amp 1 OUT......................................... Amplifier 1 output jack
Amp 2 OUT......................................... Amplifier 2 output jack
Nederlands
Español
B1 Bass Module (Amp 3 OUT).......... Bass output (amplifier 3 output) jack. Used to drive
one or two B1 bass modules
Bass - Line OUT ................................ Balanced or unbalanced bass signal output for
extended bass configurations
Note: For more information on extended bass configurations, visit www.bose.com/musicians.
Data OUT ........................................... Channel 1/2 digital output
Remote............................................... Input connection for the R1 remote control
Français
Svenska
Data IN ............................................... Digital data input. Used for updating product software
AC Mains............................................ 3-conductor power cord connections
Fuse .................................................... AC power fuse
Italiano
On/Off................................................. PS1 power stand on/off switch
Nederlands
Svenska
16
Controls, Indicators and Connections
English
Dansk
R1 remote control features
CH1
CH2
0
-12
+12
Deutsch
Español
Dansk
0
-12
Français
Deutsch
Italiano
-12
+12
+12
0
MID
0
-12
0
HIGH
-12
0
LOW
+12
+12
-12
+12
LEVEL
SIG / OL
0
SIG / OL
0
12
12
MASTER
Nederlands
Español
0
12
CH1/CH2 HIGH -12 to +12 ...............Cuts (-) or boosts (+) high-frequency sounds
CH1/CH2 MID -12 to +12 .................Cuts (-) or boosts (+) mid-frequency sounds
CH1/CH2 LOW -12 to +12................Cuts (-) or boosts (+) low-frequency sounds
Français
Svenska
CH1/CH2 LEVEL 0 to 12...................Adjusts the channel’s volume level
Svenska
Nederlands
Italiano
MASTER 0 to 12................................Adjusts volume level of all channels
17
Operating Instructions
English
Dansk
Producing individualized sound
This product will produce sound whether it is properly adjusted or not. However, if you take a
few moments to follow a simple startup procedure, you can optimize the sound for a superior
presentation based on your performance style and preferences.
Deutsch
Español
Dansk
Unless you make big changes in how you perform, this is typically a one-time event.
1.
Set all Trim and Level controls on the PS1 power stand to zero (0).
2.
Set the MASTER and all LEVEL controls on the R1 remote control to zero (0).
3.
Set the Power switch to On.
CAUTION: The peak inrush current for the system is approximately 32 amps. If more than one
system is plugged into the same AC circuit, make sure you stagger the turn-on times. This can
prevent tripping the circuit breaker or blowing the house mains fuse.
Français
Deutsch
Italiano
4.
Plug your microphone or instrument into the Channel 1 or 2 Input jack. If phantom
power is required for your microphone (condenser or electret/condenser type), depress
the Phantom power button.
Nederlands
Español
Note: You can dial in a preset to improve the tone of many commonly used microphones and
musical instruments. See the preset list inside the rear panel door for a list of supported
instruments.
5.
Sing or play as loud as you would in a performance while following steps 6 and 7.
6.
Adjust the Trim control so that the Signal/OL indicator goes from unlit to green, and
finally to occasionally blinking red. Make sure that your instrument is at the highest volume setting that you are planning to use. For vocalists, sing as loud as you would during
the performance to achieve the maximum expected input signal.
7.
Adjust the LEVEL control on the R1 remote control and make the SIG/OL indicator go
from unlit to green, and finally to occasionally blinking red.
That’s it! You’re done! When you go to your concert or show:
Français
Svenska
• Use the CH 1 and 2 LEVEL controls on the R1 remote control to adjust the Channel 1 and
2 volume level.
• Use the MASTER control on the R1 remote control to adjust the volume level of all outputs.
• Use the HIGH, MID, and LOW equalization controls on the R1 remote control to adjust the
timbre of your sound.
Italiano
Initially, keep the R1 remote control close at hand. This allows you to conveniently adjust the
volume level when you first start playing. Later, you can move it out of the way or backstage
once the system is performing the way you want it to.
Note: For more information on presets and amplifying the true sound of your instrument(s),
please visit www.bose.com/musicians.
Nederlands
Using input channels 3 and 4
Svenska
The Channel 3 and 4 inputs are optimized for 0 dB line-level signals, such as the signals from
an effects processor, mixer, or CD player. Simply connect the equipment to the PS1 power
stand and raise the output level using the Channel 3 and 4 Level control on the rear panel of
the PS1 power stand.
18
Operating Instructions
English
Dansk
Using an effects processor
IMPORTANT: When using an effects processor, determine and use the proper connection
method (serial or parallel) for your application. Some effects MUST be hooked up in serial.
Serial connection method
Deutsch
Español
Dansk
With the serial method, the complete signal is routed directly into one or more effects processors. Serially connected effects processors are connected in a chain and the signal is
processed sequentially. Nearly all “stomp boxes” for guitars work this way, such as, an overdrive followed by a reverb.
In a serial effect hookup, the order in which effects are connected together matters. For
example, it makes a big difference whether you run first through the overdrive and then the
reverb, or first through the reverb and then through the overdrive.
Français
Deutsch
Italiano
Parallel connection method
Nederlands
Español
Note: Always connect electronic equalizers, compressors, and limiters in serial.
Note: The parallel method mixes the original signal with the processed version. In the case of an
equalizer, this generates highly undesirable interference and potential phase cancellation. Many
digital effects processors have an internal processing delay, which is applied to the signal, even
if no effect setting is applied. Mixing this delayed output with the original signal can result in
unintended comb filtering.
Svenska
Nederlands
Italiano
Français
Svenska
The parallel method is mainly implemented in conventional mixers through “aux” or “effect”
send/return connections and controls. Effects processors get the original (unprocessed) signal as an input. The output of effects processors is then added together
and summed with the original clean signal. There is a component of the original signal
present in the output, such as reverb and delay, which are used for vocals.
19
Operating Instructions
Using a serial effects connection with the PS1 power stand
Insert the TRS plug into the Channel 1 Insert jack on the PS1 power stand.
2.
Connect the ¼-inch mono plug (labeled “send”, “ring”, or “right”) to the input of the
effects processor.
3.
Connect the other ¼-inch mono plug (labeled “return”, “tip”, or “left”) to the output of the
effects processor.
4.
Adjust the effects level and mix of the effects processor.
Deutsch
Español
Dansk
1.
English
Dansk
Note: Connecting an effects unit in serial requires a TRS split “insert” cable (with a ¼-inch TRS
connector on one side, and two mono ¼-inch phone connectors on the other). This type of cable
is readily available at most musical instrument stores and on the Internet.
Note: A very high output from the effects processor can overload the input of the PS1 power
stand. If the LED on the remote turns red, even if the channel LEVEL control on the R1 remote
control is below the 12 o’clock position, reduce the output level of your effects processor.
TRS
Figure 8
Français
Deutsch
Italiano
Note: The effects processor does interrupt the audio path. This may result in no audio output if
the effects processor is turned off. To use a “clean” signal, do not turn the effects processor off,
but put it in bypass mode.
TRS split “insert” cable
Using a serial effects
connection
(Return, Left or Tip)
Connect to Effects Unit
OUTPUT
Nederlands
Español
Connect to
Channel 1 Insert
(Send, Right, or Ring)
Connect to Effect Unit INPUT
Digital Effects Unit
Français
Svenska
PS1 power stand
Italiano
Nederlands
Svenska
20
Operating Instructions
Using parallel effects connection with the PS1 power stand
Français
Deutsch
Italiano
Deutsch
Español
Dansk
English
Dansk
Note: Connecting an effects unit in parallel requires one ¼-inch unbalanced (instrument) cable,
one mono ¼-inch phone (M) to dual mono ¼-inch phone (F) “Y” cable adaptor, and one TRS split
“insert” cable (with a ¼-inch TRS connector on one side and two mono ¼-inch phone connectors on the other).
1.
Insert the TRS plug into the Channel 1 Insert jack on the PS1 power stand.
2.
Connect both ¼-inch plugs from the “insert” cable into both receptacles on the “Y” cable
adaptor.
3.
Connect the plug of the “Y” cable adapter into the input of the effects processor.
4.
Connect the ¼-inch unbalanced (instrument) cable from the output of the effects processor to Channel 3 Line IN of the PS1 power stand.
5.
Set the effects level of the processor to full and turn the mix level of the effects processor
to full “wet”.
6.
Adjust the Channel 3 Level control of the PS1 power stand for the desirable effects mix.
Figure 9
TRS split “insert” cable
Using a parallel effects
connection
Nederlands
Español
1/4-inch Instrument Cable
Connect to Effects
Unit OUTPUT
Connect to
Channel 1 Insert
Connect to
Channel 3 Line IN
Mono 1/4-inch Phone (M) to
dual mono 1/4-inch Phone (F)
“Y” cable adaptor
Connect to Effect Unit INPUT
Français
Svenska
Digital Effects Unit
Svenska
Nederlands
Italiano
PS1 power stand
21
Troubleshooting
English
Dansk
If you experience problems while using this product, try the following solutions. If you still
can’t solve the problem, please call the Bose® Live Music Product and Technical Support
Team direct at 877-335-2673 to arrange for service.
Svenska
Nederlands
Italiano
Français
Svenska
Nederlands
Español
Français
Deutsch
Italiano
Deutsch
Español
Dansk
Recommended troubleshooting tools:
• Portable voltmeter
• B1 bass module 4-wire cable (blue)
• Cable tester
• Spare T15AH fuses
• AC outlet tester
• Spare AC power cord
• XLR and ¼-inch phone plug cables
Problem
What to do
System is plugged in,
power switch is on, but
power LED is off
• Make sure you have power at the AC outlet. Try operating a lamp or other equipment
from the same AC outlet or test the outlet using an AC outlet tester.
• Make sure the PS1 power stand’s power cord plug is fully inserted into the AC outlet.
• Check the line fuse on the PS1 power stand.
Power LED is on (green),
but no sound
• Make sure volume control is turned up on your instrument.
• Make sure the applicable level control is turned up (Trim, or Channel 3/4 Level on the
PS1 power stand; CH 1/2 LEVEL and MASTER level on the R1 remote control).
• Make sure your instrument is plugged into the Channel 1/2 Input or Channel 3/4 Input
jack.
• Connect your instrument to the PS1 power stand using a different cable.
• Plug your instrument into a different amplifier to make sure the instrument is working.
Power LED is red while the
PS1 power stand is on
• Please call Bose Live Music Customer Support at (877) 335-2673 for assistance.
House circuit breaker
keeps tripping
• If you have more than one PS1 power stand plugged into the same AC circuit, stagger
the turn-on times. Each PS1 power stand has an inrush current of about 32 amps when
turned on.
• If you have more than three PS1 power stands plugged into a single 15 amp circuit,
move some systems to another AC circuit. Each PS1 power stand can draw 5 amps or
more when playing at high volumes for long periods of time.
With nothing plugged into
the audio input or output
connectors on the rear
panel of the PS1 power
stand, a slight hum or buzz
is heard from the L1 or B1
• Using an AC outlet tester, test the AC outlet that the PS1 power stand is plugged into
for reversed or open (hot, neutral, and/or ground) contacts.
• If using an extension cord, make sure that the cord is also tested as above.
B1 bass module is plugged
in, but no bass audio is
heard
• Make sure you are using the (blue) B1 bass module 4-wire cable included with the B1
bass module.
• Make sure that the B1 bass module cable is plugged into the B1 Bass Module (Amp 3
OUT) jack on the PS1 power stand.
• Try a different 4-wire cable.
• Check that the B1 bass module cable connectors are fully engaged in the jacks.
• If available, try a different B1 bass module.
B1 bass module sounds
out of balance with the
system
• Make sure you are using the (blue) B1 bass module 4-wire cable included with the B1
bass module package.
• Make sure that the B1 bass module grille is facing forward toward the musicians and
audience.
22
Problem
What to do
No mid/high sounds heard
from the L1 Cylindrical
Radiator™ loudspeaker
• Make sure L1 Cylindrical Radiator™ loudspeakers are firmly seated in their connectors.
• Make sure connections are not bent or broken.
• Try cleaning the contacts on the L1 Cylindrical Radiator™ loudspeakers with electronic
contact spray cleaner.
System momentarily mutes • This is a feature of the PS1 power stand that allows the user to hear that internal
when changing presets or
changes have been made.
plugging/unplugging the
B1 bass module
Microphone sounds distorted
• Make sure the red clip light is not constantly on. If it is, lower the trim.
• Try a different microphone.
• Try your microphone on another PS1 power stand.
One of the four
instruments plugged into
the PS1 power stand is at
a lower volume than the
others
• If the instrument is plugged into Channel 3/4, use a direct box or high-to-low
transformer (high impedance instruments, such as non-active guitars or basses, are not
designed to be plugged directly into a low impedance input).
• If the instrument’s volume is still lower than the others, try a similar instrument in the
same channel. If this solves the problem, your instrument may not be working correctly.
Line OUT signals on channels 1 and 2 are very
loud when connected to
another PS1 power stand
or a mixer with only mic-level input
• The Line OUT jack operates at a +4dBu professional line level; It is meant to connect to
compatible mixing consoles.
• Use inline pads to reduce the signal gain to a manageable level.
• Line OUT is not meant to be used with PS1 power stands. Some advanced configurations are detailed online at www.bose.com/musicians.
Line OUT signals on channels 1 and 2 are very
noisy
• Check to make sure that the receiving device (mixer) is set up to receive a +4dBu level
signal.
• Try powering the receiving device from the same outlet as the PS1 power stand.
• Try using an XLR ground-lift barrel adapter or direct box.
Third-party powered subwoofer sounds poor when
connected to the Bass Line OUT connector on
the PS1 power stand
• Unplug any B1 bass modules that may be connected to the PS1 power stand.
• The signal from the Bass - Line Out may be too high for the powered subwoofer, try
attenuating the signal using commercially available direct boxes or in-line pad devices.
• Try different connections to the third-party powered subwoofer such as balanced or
unbalanced cabling and/or a direct box.
• Check that the gain and input controls on the third-party powered subwoofer are set
appropriately.
• If using a powered subwoofer with an adjustable crossover, set the crossover to 180Hz.
B1 bass modules powered
by a third-party power
amplifier and connected to
the Bass - Line OUT connector sounds poor
• Ensure that at least two B1 bass modules are powered directly from the PS1 power
stand (connected to the PS1 power stand’s B1 Bass Module (Amp 3 OUT) jack) and
using the (blue) B1 bass module 4-wire cable.
• Check the gain settings on the third-party power amplifier. The volume level of the B1
bass modules powered by the PS1 power stand should be similar to the bass modules
powered by the external amplifier.
Svenska
Nederlands
Italiano
Français
Svenska
Nederlands
Español
Français
Deutsch
Italiano
Deutsch
Español
Dansk
English
Dansk
Troubleshooting
23
Troubleshooting
R1 remote control is not
working
• Try a different 7-pin cable for the R1 remote control.
• Make sure the R1 remote control cable is firmly seated in the jack on the remote and the
PS1 power stand.
• Try resetting the PS1 power stand: Turn the PS1 power stand off, wait 30 seconds, and
turn back on.
Poor-sounding prerecorded stereo
playback (using such
devices as a CD player)
• Run both left and right stereo channels into separate channels in the PS1 power stand
such as Channel 1 for left and Channel 2 for right.
• Do not use a 1/8-inch stereo (F) to ¼-inch stereo (M) adapter when connecting portable devices to a channel on the PS1 power stand.
• Disable any extended bass or EQ features when using portable CD or MP3 players.
Customer service
For additional help in solving problems, contact Bose® Live Music Customer Service Product
and Technical Support Team at (877) 335-2673 or visit our support area online at
www.bose.com/musicians.
Nederlands
Español
• Orient the microphone so that it is not pointing directly at its respective L1 Cylindrical
Radiator™ loudspeaker.
• Try a different microphone.
• Try a different position for the L1 Cylindrical Radiator™ loudspeaker and/or vocalist on
stage.
• Increase the distance from the L1 Cylindrical Radiator™ loudspeaker to the
microphone.
• Reduce the HIGH control on the R1 remote control for that microphone.
• If using a vocal effects processor, make sure that it is not contributing to the feedback
problem.
Français
Deutsch
Italiano
Microphone is encountering feedback
Deutsch
Español
Dansk
What to do
English
Dansk
Problem
Français
Svenska
Cleaning your product
• You may clean the product enclosures using only a soft dry cloth.
• Do not use any solvents, chemicals, or cleaning solutions containing alcohol, ammonia or abrasives.
• Do not use any sprays near the product or allow liquids to spill into any openings.
Limited Warranty and Registration
Accessories
Nederlands
Your Personalized Amplification System™ product is covered by a limited transferable warranty. Details of the warranty are provided with your product. Register your products online at www.bose.com/register or call 800-905-1044. Failure to do so will not affect your
warranty rights.
Italiano
• If necessary, you may carefully vacuum the grille assembly of the L1 Cylindrical Radiator™
loudspeaker.
Visit www.bose.com/musicians, or call (800) 905-0886 for accessory information.
Svenska
24
Technical Information
Mechanical
English
Dansk
Dimensions
• PS1 power stand: 26.0
W x 26.0
D x 5.0
H (66 cm x 66 cm x 12.7 cm)
• L1 Cylindrical Radiator™ loudspeaker (each section): 3.5
W x 4.0
D x 43.0
H (8.9 cm x 10.5 cm x 109.2 cm)
• R1 remote control: 2.8
W x 5.6
D x 1.6
H (7.1 cm x 14.1 cm x 4.0 cm)
Deutsch
Español
Dansk
• B1 bass module (optional): 10.3
W x 18.0
D x 15.3
H (25.0 cm x 45.7 cm x 38.0 cm)
Weight
• PS1 power stand: 35 OE (16 kg)
• Lower L1 Cylindrical Radiator™ loudspeaker: 16.0 OE (7 kg)
Français
Deutsch
Italiano
• Upper L1 Cylindrical Radiator™ loudspeaker: 14.5 OE (6 kg)
• R1 remote control: 0.6 OE (0.27 kg)
• B1 bass module (optional): 28 OE(13 kg)
Electrical
Nederlands
Español
Impedance
• L1 Cylindrical Radiator™ loudspeaker: 4:
• B1 bass module (optional): 8:
AC power rating
50/60Hz 1400W
• Peak inrush current: 32A @ 120V
Français
Svenska
• USA/Canada: 100-127V
60Hz
Audio Input/Output
• Amplifier 1 output power (Amp 1 OUT): 250W (rms, into 4:), assigned to upper L1 Cylindrical Radiator™ loudspeaker or the Amp 1 OUT connector
Italiano
• Amplifier 2 output power: 250W (rms, into 4:), assigned to lower L1 Cylindrical Radiator™ loudspeaker or the Amp 2 OUT connector
• Amplifier 3 output power: 250W (rms, into 4:), assigned to one or two B1 bass modules using the B1 Bass Module (Amp 3 OUT) connector
• Output level, Line OUT: Balanced XLR connection, +4dBu
• Output level, Bass–Line OUT:
• With an unbalanced TS connection: -10dBu (nominal), +3dBu (max)
• Bass–Line OUT Frequency Response:
• With 1 or 2 B1 bass modules connected to B1 Bass Module (Amp 3 OUT): 40 -180Hz, compensated for B1 bass module
Svenska
• Without B1 bass modules connected to B1 Bass Module (Amp 3 OUT): 40 -180Hz,
flat bandpass
Nederlands
• With a balanced TRS connection: -4dBu (nominal), +9dBu (max)
• Data Output: 48KHz, S/PDIF compatible interface. L=Channel 1 output, R=Channel 2
output.
25
English
Dansk
Deutsch
Español
Dansk
Français
Deutsch
Italiano
Nederlands
Español
Français
Svenska
Italiano
Nederlands
Svenska
26
27
Svenska
Nederlands
Italiano
Français
Svenska
Nederlands
Español
Français
Deutsch
Italiano
Deutsch
Español
Dansk
English
Dansk
©2005 Bose Corporation, The Mountain,
Framingham, MA 01701-9168 USA
263976 AM Rev.03 CCM-001549
www.bose.com/musicians