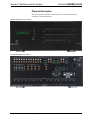
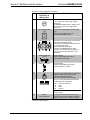
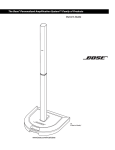
1
Crestron SWAMP(I)-24X8
Sonnex™ Multiroom Audio System
Operations Guide
This document was prepared and written by the Technical Documentation department at:
Important Safety Instructions
•
Read these instructions.
•
Keep these instructions.
•
Heed all warnings.
•
Follow all instructions.
•
Do not use this apparatus near water.
•
Clean only with dry cloth.
•
Do not block any ventilation openings. Install in accordance
with the manufacturer's instructions.
•
Do not install near any heat sources such as radiators, heat
registers, stoves, or other apparatus (including amplifiers) that
produce heat.
•
Do not defeat the safety purpose of the polarized or groundingtype plug. A polarized plug has two blades with one wider than
the other. A grounding-type plug has two blades and a third
grounding prong. The wide blade or the third prong are
provided for your safety. If the provided plug does not fit into
your outlet, consult an electrician for replacement of the
obsolete outlet.
•
Protect the power cord from being walked on or pinched
particularly at plugs, convenience receptacles, and the point
where they exit from the apparatus.
WARNING:
TO REDUCE THE RISK OF FIRE OR ELECTRIC SHOCK,
DO NOT EXPOSE THIS APPARATUS TO RAIN OR
MOISTURE. THE APPARATUS SHALL NOT BE
EXPOSED TO DRIPPING OR SPLASHING. OBJECTS
FILLED WITH LIQUIDS, SUCH AS VASES, SHOULD
NOT BE PLACED ON THE APPARATUS.
WARNING:
TO PREVENT ELECTRIC SHOCK, DO NOT REMOVE
COVER. THERE ARE NO USER SERVICEABLE PARTS
INSIDE. ONLY QUALIFIED SERVICE PERSONNEL
SHOULD PERFORM SERVICE.
CAUTION
RISK OF ELECTRIC SHOCK
DO NOT OPEN
AVIS: RISQUE DE CHOC ELECTRIQUE NE PAS OUVRIR
The lightning flash with arrowhead symbol, within an
equilateral triangle, is intended to alert the user to the
presence of uninsulated “dangerous voltage” within the
product's enclosure that may be of sufficient magnitude to
constitute a risk of electric shock to persons.
•
Only use attachments/accessories specified by the
manufacturer.
•
Use only with the cart, stand, tripod, bracket or
table specified by the manufacturer or sold with
the apparatus. When a cart is used, use caution
when moving the cart/apparatus combination to
avoid injury from tip-over.
•
Unplug this apparatus during lightning storms or when unused
for long periods of time.
WARNING:
•
Refer all servicing to qualified service personnel. Servicing is
required when the apparatus has been damaged in any way,
such as power-supply cord or plug is damaged, liquid has been
spilled or objects have fallen into the apparatus, the apparatus
has been exposed to rain or moisture, does not operate
normally, or has been dropped.
THIS IS AN APPARATUS WITH CLASS I
CONSTRUCTION. IT SHALL BE CONNECTED TO AN
ELECTRICAL OUTLET WITH AN EARTHING GROUND
TERMINAL.
•
Disconnect power prior to connecting or disconnecting
equipment.
•
Do not install in direct sunlight.
•
The apparatus must be installed in a way that the power cord
can be removed either from the wall outlet or from the device
itself in order to disconnect the mains power.
•
Prevent foreign objects from entering the device.
The exclamation point within an equilateral triangle is
intended to alert the user to the presence of important
operating and maintenance (servicing) instructions in the
literature accompanying the appliance.
IMPORTANT:
The SWAMP-24X8 and SWAMPI-24X8 can be used with
Class 2 output wiring.
Regulatory Compliance
As of the date of manufacture, the SWAMP-24X8 and SWAMPI-24X8 have been tested and found to comply
with specifications for CE marking and standards per EMC and Radiocommunications Compliance Labelling.
Federal Communications Commission (FCC) Compliance Statement
This device complies with part 15 of the FCC Rules. Operation is subject to the following conditions:
(1) This device may not cause harmful interference and (2) this device must accept any interference received,
including interference that may cause undesired operation.
CAUTION: Changes or modifications not expressly approved by the manufacturer responsible for compliance
could void the user’s authority to operate the equipment.
NOTE: This equipment has been tested and found to comply with the limits for a Class B digital device,
pursuant to part 15 of the FCC Rules. These limits are designed to provide reasonable protection against harmful
interference in a residential installation. This equipment generates, uses and can radiate radio frequency energy
and, if not installed and used in accordance with the instructions, may cause harmful interference to radio
communications. However, there is no guarantee that interference will not occur in a particular installation. If
this equipment does cause harmful interference to radio or television reception, which can be determined by
turning the equipment off and on, the user is encouraged to try to correct the interference by one or more of the
following measures:
Reorient or relocate the receiving antenna
Increase the separation between the equipment and receiver
Connect the equipment into an outlet on a circuit different from that to which the receiver is connected
Consult the dealer or an experienced radio/TV technician for help
Industry Canada (IC) Compliance Statement
This Class B digital apparatus complies with Canadian ICES-003.
Cet appareil numérique de la classe B est conforme à la norme NMB-003 du Canada.
The specific patents that cover Crestron products are listed at www.crestronpatents.com.
Crestron, the Crestron logo, Air, Cresnet, Crestron e-Control, Crestron Home, Crestron RoomView, Crestron Toolbox, Excite, Intermedia Delivery
System, Sonnex, Sonnex Speaker Protect, SSP, and SystemBuilder are either trademarks or registered trademarks of Crestron Electronics, Inc. in the
United States and/or other countries. iPod is either a trademark or registered trademark of Apple, Inc. in the United States and/or other countries.
Windows is either a trademark or registered trademark of Microsoft Corporation in the United States and/or other countries. Other trademarks,
registered trademarks and trade names may be used in this document to refer to either the entities claiming the marks and names or their products.
Crestron disclaims any proprietary interest in the marks and names of others.
©2012 Crestron Electronics, Inc.
Crestron SWAMP(I)-24X8
Sonnex™ Multiroom Audio System
Contents
Sonnex™ Multiroom Audio System: SWAMP(I)-24X8
1
Introduction ............................................................................................................................... 1
Features and Functions ................................................................................................ 1
Applications................................................................................................................. 6
Specifications .............................................................................................................. 7
Physical Description.................................................................................................. 10
Setup ........................................................................................................................................ 16
Network Wiring......................................................................................................... 16
Sonnex Link Wiring .................................................................................................. 16
Identity Code ............................................................................................................. 16
Installation ................................................................................................................. 17
Hardware Hookup ..................................................................................................... 19
Configuration........................................................................................................................... 25
Source Setup.............................................................................................................. 25
Zone Setup................................................................................................................. 26
Expander Status......................................................................................................... 35
Amplifier Status ........................................................................................................ 35
Network Setup........................................................................................................... 35
Control Setup............................................................................................................. 38
About......................................................................................................................... 40
Programming Software ............................................................................................................ 41
Earliest Version Software Requirements for the PC ................................................. 41
Programming with SystemBuilder ............................................................................ 41
Programming with SIMPL Windows ........................................................................ 41
Uploading and Upgrading........................................................................................................ 44
Establishing Communication..................................................................................... 44
Programs and Firmware ............................................................................................ 45
Program Checks ........................................................................................................ 46
Operation ................................................................................................................................. 47
Problem Solving ...................................................................................................................... 48
Troubleshooting......................................................................................................... 48
Check Network Wiring.............................................................................................. 48
Reference Documents................................................................................................ 49
Further Inquiries ........................................................................................................ 49
Future Updates .......................................................................................................... 50
Return and Warranty Policies .................................................................................................. 51
Merchandise Returns / Repair Service ...................................................................... 51
Crestron Limited Warranty........................................................................................ 51
Operations Guide – DOC. 7049B
Contents • i
Crestron SWAMP(I)-24X8
Sonnex™ Multiroom Audio System
Sonnex™ Multiroom Audio
System: SWAMP(I)-24X8
Introduction
The SWAMP-24X8 is the centerpiece of a fully-scalable audio distribution system
that delivers high-output audiophile sound quality to every room with significantly
reduced cabling, low power consumption, advanced DSP, and integrator-friendly
setup. The Sonnex™ Multiroom Audio System facilitates massive systems with up
to 74 zones and over 30,000 Watts of power.
The SWAMP-24X8 and SWAMPI-24X8 are functionally identical. For simplicity
within this guide, the term “SWAMP-24X8” is used except where noted.
Features and Functions
•
•
•
•
•
•
•
•
•
•
•
•
•
•
•
•
Advanced multiroom audio distribution for homes and offices
High-efficiency audiophile grade amplification built in
140 Watts/Ch. @ 8 Ohms, 400 Watts/Ch. bridged
Eight amplified stereo zone outputs and two S/PDIF zone outputs
Output Bussing—enables linked operation of multiple zones
Bridgeable outputs—extra power for pools and other large areas
Sonnex Link—provides one-wire, plug-and-play interface to eight
SWAMPE-8 expanders up to 200 feet (61 meters) away
12 unbalanced, four balanced/unbalanced, and eight S/PDIF inputs
Supports direct audio connection of the Crestron® Interface for iPod®
(sold separately) and other “CH” CAT5 sources
User adjustable volume, bass, treble, loudness, and selectable “tone
profiles”
Installer adjustable 5-band graphic or parametric EQ per zone
Dynamic Range Control—maintains even listening levels in both quiet
and loud ambient environments
Speaker Profiles—allows upload of custom preset speaker settings
Sonnex Speaker Protect™—affords extra headroom while preventing
component damage
Individual zone power control and global standby
Setup and adjustment via front panel or Sonnex Tools software
(Continued on following page)
Operations Guide – DOC. 7049B
Sonnex™ Multiroom Audio System: SWAMP(I)-24X8 • 1
Sonnex™ Multiroom Audio System
Crestron SWAMP(I)-24X8
Features and Functions
(Continued)
•
•
•
•
•
Remote fault monitoring
Seamless Crestron system integration
Heavy duty detachable terminal blocks ease speaker wire termination
Low power consumption, cool-running operation
4-space 19” rack-mountable
The Sonnex system topology minimizes speaker wiring distances by allowing
expansion units to be placed central to the rooms they serve, routing 24 stereo
channels of uncompressed digital audio and control to each expander over a single
inexpensive shielded CAT5e cable.* Gone is all the clutter of amplifier interconnects
and input loop-thru cables, meticulously integrating eight zones of high-performance
power amplification and signal processing, plus input switching for a generous 24
analog and digital sources, all in one compact 4-space rack-mountable package.
Integrated Audiophile Amplifier
The amplifiers in the SWAMP-24X8 use a custom hybrid design that achieves the
warmth and neutrality of a fine Class AB amplifier with all the efficiency benefits of
modern Class D.
Each of the SWAMP-24X8’s 16 channels (configured as eight zones) delivers 140
Watts into 8 Ohms, or 240 Watts into 4 Ohms. For large, noisy areas, any two
adjacent zones can be bridged (Zone 1 + Zone 2, Zone 3 + Zone 4, Zone 5 + Zone 6,
Zone 7 + Zone 8) to produce 400 Watts per channel at 8 Ohms. Sonnex uses only
four rack spaces while maintaining effective cooling with no need for extra clearance
above or below. Each zone is individually controllable, saving further energy by
turning off any unused channels.
24x8 Matrix Switcher
Designed with flexibility and expansion in mind, the Sonnex Multiroom Audio
System provides numerous inputs to manage all your stereo audio sources, both
analog and digital. Sonnex handles the multi-zone outputs from a Crestron ADMS
Intermedia Delivery System™ or CEN-TRACK multi-tuner (both sold separately),
plus all your digital television receivers and other devices. Sonnex even accepts a
direct input from the CEN-IDOCV Interface for iPod® (sold separately) and other
Crestron Home® CAT5 Balanced sources without requiring a separate converter.
A total of 24 discrete inputs are spread across an array of connectors, including
unbalanced RCA, balanced terminal blocks, and S/PDIF coaxial. For ease of use,
descriptive names can be entered for display on the front panel LCD and push
buttons for every source input and zone output. Via the front panel controls or from a
Crestron® touch screen or remote, any input can be selected for listening in any zone
or group. Additional features include mono summing for distribution to non-stereo
zones, scaling factor settings for defining minimum and maximum volume levels,
source signal detection, and source gain compensation to assure a consistent level
when switching between disparate sources.
*
For connection of the Sonnex Link between the SWAMP-24X8 and each SWAMPE-8, use Crestron
DM-CBL-8G or high-quality CAT5e shielded twisted-pair cable with DM-8G-CONN connectors.
The maximum cable length is 200 feet (61 meters) per run.
2 • Sonnex™ Multiroom Audio System: SWAMP(I)-24X8
Operations & Installation Guide – DOC. 7049B
Crestron SWAMP(I)-24X8
Sonnex™ Multiroom Audio System
Bonus Zones
Sonnex leaves no zone behind, providing two additional S/PDIF digital outputs for
sharing stereo sources with centralized audio processors and AV receivers.
Sonnex Digital Audio Transport
Among the many features that set Sonnex apart from all other multiroom systems is
the Sonnex Audio Transport. On the rear of the SWAMP-24X8 are eight Sonnex
Link ports, enabling the connection of up to eight SWAMPE-4 or SWAMPE-8
expanders1. Each link transports professional-quality 24-bit, 48 kHz digital audio
from all 24 inputs simultaneously to each expander, supporting wiring distances up
to 200 feet (61 meters) over a single CAT5e shielded twisted-pair (STP) cable.2
While the expanders can be installed centrally with the SWAMP-24X8, the ease of
running just one tiny wire instead of 16 heavy speaker cables clearly affords a much
better decentralized system approach. Installing each expander local to the rooms it
serves, whether on a different floor, another wing, or a completely separate building,
significantly reduces the amount of speaker wiring you need to install. The benefits
of reducing speaker wiring include faster, easier and less expensive installation, as
well as overall higher performance and efficiency by minimizing the signal loss
inherent in long speaker runs.
Plug and Play Expansion
Control for each expander is also embedded in the Sonnex Link, dramatically
simplifying installation and setup through a true one-wire interface. There is no need
to set addresses or write any special programming. Simply connect each expander to
the SWAMP-24X8 and instantly control the complete system from the
SWAMP-24X8’s front panel or Sonnex Tools software.1
Advanced DSP
To truly deliver an ultimate listening experience in every room, Sonnex includes
built-in digital signal processing, providing a virtual arsenal of controls and
adjustments, intelligently deployed to streamline both the installer setup procedure
and day-to-day user operation. Key setup functions are accessible via the front panel,
while more advanced settings are provided via Sonnex Tools software. Naturally, the
essential user controls can be made available on any Crestron touch screen, keypad,
handheld remote, or mobile device as part of a complete Crestron system.
Sonnex DSP features include:
Operations Guide – DOC. 7049B
•
User Controls — From a Crestron touch screen or other user interface,
Sonnex provides the essential controls for day-to-day listening. Controls
include room volume, bass, treble, balance, loudness, mute, zone on/off,
and five selectable tone profiles. Through the control system program,
many advanced user functions are possible including priority modes (who
can control which sources), zone grouping (source sharing), paging,
do-not-disturb, alarm clock, sleep timer, and much more.
•
Tone Profiles — With one touch, users can select from five preset EQ
curves including Classical, Jazz, Pop, Rock, or Spoken Word, each tailored
for a different type of material or listening preference.
1.
If using Cresnet® as the control system interface, system expansion is limited to one SWAMPE
expander. Support for more than one expander requires Ethernet as the control system interface.
2.
For connection of the Sonnex Link between the SWAMP-24X8 and each SWAMPE-8, use Crestron
DM-CBL-8G or high-quality CAT5e shielded twisted-pair cable with DM-8G-CONN connectors.
The maximum cable length is 200 feet (61 meters) per run.
Sonnex™ Multiroom Audio System: SWAMP(I)-24X8 • 3
Sonnex™ Multiroom Audio System
Crestron SWAMP(I)-24X8
•
Dynamic Range Control — When you listen to music or watch TV, you
want to enjoy it at a volume level that lets you hear everything clearly —
which can be difficult to do if there are competing background noises or
someone resting in the next room. Not only that, but the level from one
song to the next, and between TV programs and commercials, can fluctuate
wildly. Sonnex provides user-selectable DRC to help keep everything at a
consistent level, whether in a quiet bedroom, a loud swimming pool, or an
outdoor patio, facilitating a more cohesive listening experience without
disturbing the neighbors.
•
Sonnex Speaker Protect™ (SSP) — When the occasion calls for cranking
the volume*, SSP™ output limiting assures maximum headroom while
preventing damage to the amplifier or speakers. SSP lets the installer set the
protection to match the speakers’ power handling capability, achieving a
transparent effect right up to the limits of the speaker device.
CAUTION: As speaker ratings vary greatly across manufacturers, there is
no guarantee that Sonnex Speaker Protect protects against speaker damage
in all situations.
•
5-Band Equalizer — To tailor the sound of your speakers to the unique
acoustical environment of each room or space, Sonnex provides the choice
of graphic or parametric 5-band EQ. Using Sonnex Tools software and a
wireless laptop, the installer can easily move from room to room, sculpting
the sound for optimal audio clarity and impact.
Speaker Profiles
AV system integrators typically rely on just a few select speaker models for the
majority of installs, and subsequently find themselves repeating many of the same
adjustments at each project. The Speaker Profiles feature in Sonnex Tools alleviates
the repetition, allowing installers to save a complete set of EQ and SSP settings for
every type of speaker, room, and customer listening preference. So, tuning the next
room or project can be as simple as loading the appropriate Speaker Profile for each
zone. Using Speaker Profiles, a complete Sonnex system can be effectively
“pre-tuned” before a single note of music or test signal is even played.
Output Bussing
The spacious, open floor plans typical of today’s homes and offices commonly
present multiple adjacent listening zones with no sonic boundary between them —
e.g., a kitchen and dinette, a living room and dining room, or an outdoor pool and
terrace. One click in Sonnex Tools instantly busses adjacent zones together to
function as one group while preserving the individual speaker profile settings for
each. Volume Offset adjustments easily allow for balancing the levels of each bussed
zone for smooth, even coverage of the complete space.
*
Excessive audio volume may damage your hearing. Crestron advocates enjoying your music at a
safe listening level.
4 • Sonnex™ Multiroom Audio System: SWAMP(I)-24X8
Operations & Installation Guide – DOC. 7049B
Crestron SWAMP(I)-24X8
Sonnex™ Multiroom Audio System
Passive Subwoofer Support
Sonnex lets you enjoy extended low frequency performance in any room, providing
high-performance biamplification capability to support any passive in-wall, in-floor,
or freestanding subwoofer. Configuring Sonnex to handle a 2.1 speaker system is
both simple and powerful using its parametric equalizers, offering the choice of 2nd
or 4th order active crossover filters for each sub and satellite output, plus up to four
additional filters for further room correction and enhancement. With 400 Watts
available in bridged mode, there is plenty of power on hand to fill any room with
deep, gratifying bass.1
Intelligent Monitoring and Protection
To help ensure the most seamless user experience and long-lived operation, Sonnex
includes several ways to keep tabs on its operating status and health. On its own,
Sonnex possesses the intelligence to protect itself from many types of faults
including over temperature, over current, over voltage, under voltage, and DC offset
on any channel. In the event of a fault, the front panel LCD provides clear fault
indication to speed the troubleshooting of incorrect wiring, poor rack ventilation, and
other unforeseen issues. Fault alerts may also be broadcast to a system touch screen
or mobile device, and integrators can even monitor and track the data remotely
through Crestron RoomView® software to ensure a rapid service response.
Ultimate Integration
Without question, Sonnex delivers unprecedented intelligence from source to
speaker. Via Cresnet®2 or high-speed Ethernet, Sonnex affords incredible integration
potential as part of a complete Crestron system, enabling seamless control of every
room and source through a wide selection of touch screens, keypads, wireless
remotes, computers and mobile devices. Complete setup is afforded via USB or
Ethernet using Sonnex Tools software, part of the Crestron Toolbox™ installer
toolkit.
Operations Guide – DOC. 7049B
1.
Passive subwoofer support requires one zone output to drive the main left and right (i.e., satellite)
speakers, plus one additional zone output to drive a subwoofer with 140W @ 8 Ohms, or two
additional zone outputs bridged to drive a subwoofer with 400W @ 8 Ohms.
2.
If using Cresnet as the control system interface, system expansion is limited to one SWAMPE
expander. Support for more than one expander requires Ethernet as the control system interface.
Sonnex™ Multiroom Audio System: SWAMP(I)-24X8 • 5
Sonnex™ Multiroom Audio System
Crestron SWAMP(I)-24X8
Applications
The following diagram shows a SWAMP-24X8 in a multi-zone application.
SWAMP-24X8 in a Multi-Zone Application
6 • Sonnex™ Multiroom Audio System: SWAMP(I)-24X8
Operations & Installation Guide – DOC. 7049B
Crestron SWAMP(I)-24X8
Sonnex™ Multiroom Audio System
Specifications
Specifications for the SWAMP(I)-24X8 are listed in the following table.
SWAMP(I)-24X8 Specifications
SPECIFICATION
DETAILS
Audio
Features
24x10 stereo matrix switcher, 8 stereo zone
DSP, 8 stereo zone power amplifier, Sonnex
Digital Audio Transport, speaker profiles,
Sonnex Speaker Protect, 5-band graphic or
parametric EQ, Dynamic Range Control
(DRC), tone profiles, source gain
compensation, amp bridging, output
bussing, individual zone power control,
global standby, source signal detection,
amplifier temperature and fault monitoring,
1
1
1
priority modes , paging , do-not-disturb ,
1
alarm clock and sleep timer
Input Signal Types
Stereo analog line (unbalanced and
balanced), S/PDIF coaxial (2-channel PCM
only)
Output Signal Types
Stereo speaker level, S/PDIF coaxial
(2-channel PCM only), Sonnex Link
Analog-to-Digital Conversion2
2
±10.0 dB per input
Source Compensation
2
Source Signal Detect
Input Monitoring
Digital-to-Analog Conversion
3
3
24-bit 48 kHz
140 Watts per channel at 8 Ohms
240 Watts per channel at 4 Ohms
400 Watts per channel at 8 Ohms bridged
Output Power
Damping Factor
24-bit 48 kHz
3
> 200 @ 20 Hz
3
Amplifier Monitoring
Over Current, Over/Under Voltage, Over
Temperature, DC Offset, Clipping
Frequency Response3
20 Hz to 20 kHz, ±0.5 dB
Total Harmonic Distortion
3
(THD)
0.02%
S/N Ratio3
>105 dB S/PDIF in, >100 dB balanced or
unbalanced analog in, A-weighted
Stereo Separation
3
> 90 dB
3
Zone Separation
> 95 dB
Zone Volume Level Control3
-80.0 to +20.0 dB, adjustable from 0% to
100% plus mute
3
±12.0 dB
Bass Control
3
±12.0 dB
Treble Control
3
Loudness Compensation
On/Off
Dynamic Range Control3
On/Off
(Continued on following page)
Operations Guide – DOC. 7049B
Sonnex™ Multiroom Audio System: SWAMP(I)-24X8 • 7
Sonnex™ Multiroom Audio System
Crestron SWAMP(I)-24X8
SWAMP(I)-24X8 Specifications (Continued)
SPECIFICATION
DETAILS
Audio (continued)
Balance Control3
Left/right adjustable
3
Selectable
Mono Summing
Power Limiting
3
Sonnex Speaker Protect (SSP) output
limiting;
Configurable 40 to 140 Watts @ 8 Ohms
40 to 240 Watts @ 4 Ohms
40 to 400 Watts @ 8 Ohms bridged
Tone Profiles3
Flat, Classical, Jazz, Pop, Rock, Spoken
Word
EQ Modes3
5-band graphic or 5-band parametric EQ
3
GEQ Center Frequencies
63, 250, 1k, 4k, 16 kHz
GEQ Gain3
±12.0 dB per band
PEQ Filter Types
3
PEQ Center Frequency3
3
10 to 20,000 Hz per band
±12.0 dB per band
PEQ Gain
PEQ Bandwidth3
Speaker Profiles
EQ, High Pass, Low Pass, Treble Shelf,
Bass Shelf, Notch
0.1 to 3.5 octaves per band
3
Comprises 5-band GEQ and SSP settings
Bus Volume Offset3
4
Resolution/Bitrate
Communications
Ethernet
±12.0 dB per zone for output bussing
24-bit 48 kHz
For control and console, 10BASE-T /
100BASE-TX, auto-switching, autonegotiating, auto-discovery, full/half duplex,
TCP/IP, UDP/IP, CIP, DHCP
Cresnet
For control and console
Cresnet slave5
Sonnex
64-channel (48 utilized) digital audio
w/embedded control, auto-discovery, autonegotiating
Power Requirements
Main Power
SWAMP-24X8
12 Amps @ 120 Volts AC, 50/60 Hz
SWAMPI-24X8
6 Amps @ 220-240 Volts AC, 50/60 Hz
Cresnet Power Usage
None
Environmental
Temperature
41º to 104º F (5º to 40º C)
Humidity
10% to 90% RH (non-condensing)
Heat Dissipation
475 BTU/Hr (140 W@8Ω)
819 BTU/Hr (240 W@4Ω)
(Continued on following page)
8 • Sonnex™ Multiroom Audio System: SWAMP(I)-24X8
Operations & Installation Guide – DOC. 7049B
Crestron SWAMP(I)-24X8
Sonnex™ Multiroom Audio System
SWAMP(I)-24X8 Specifications (Continued)
SPECIFICATION
DETAILS
Enclosure
Chassis
Metal with black finish, vented sides,
variable-speed fan-cooled
Front Panel
Extruded aluminum, black finish with
polycarbonate label overlay
Mounting
Freestanding or 4U 19-inch rack-mountable
(feet and rack ears included)
Dimensions
Height
7.51 in (191 mm) with feet
6.97 in (178 mm) without feet
Width
19.00 in (483 mm) with ears
17.29 in (439 mm) without ears
Depth
18.47 in (470 mm)
Weight
62.0 lbs (28.2 kg)
Available Accessories
1.
2.
3.
4.
5.
Operations Guide – DOC. 7049B
AIR-SR
AIR™ Outdoor Surface Mount Speakers
CBL-RCA
Crestron Certified RCA S/PDIF Audio
Interface Cable
CBL-RCA2
Crestron Certified RCA Stereo Audio
Interface Cable
DM-CBL-8G
High Performance Shielded Twisted Pair
Cable
DM-8G-CONN-100
Cable Connector for DM-CBL-8G, 100-Pack
DM-8G-CRIMP
Crimping Tool for DM-8G-CONN
EXCITE-IC
Excite™ In-Ceiling Speakers
EXCITE-IW
Excite In-Wall Speakers
S-EXT1-S
Sonnex Link Over Fiber Extender
SAT-70V/100V-2
Sonnex Output Transformer, 2 Channels
SAT-70V/100V-4
Sonnex Output Transformer, 4 Channels
SWAMPE-4
Sonnex Multiroom Audio Expander, 4-Zone
SWAMPE-8
Sonnex Multiroom Audio Expander, 8-Zone
Feature enabled via control system program.
Typical of 24 Stereo inputs.
Typical of up to eight amplified stereo zone outputs.
Typical of up to two digital stereo zone outputs.
If using Cresnet as the control system interface, system expansion is limited to one SWAMPE
expander. Support for more than one expander requires Ethernet as the control system interface.
Sonnex™ Multiroom Audio System: SWAMP(I)-24X8 • 9
Sonnex™ Multiroom Audio System
Crestron SWAMP(I)-24X8
Physical Description
This section provides information on the connections, controls and indicators
available on your SWAMP-24X8.
SWAMP-24X8 Physical View (Front)
SWAMP-24X8 Physical View (Rear)
10 • Sonnex™ Multiroom Audio System: SWAMP(I)-24X8
Operations & Installation Guide – DOC. 7049B
Crestron SWAMP(I)-24X8
Sonnex™ Multiroom Audio System
SWAMP-24X8 Overall Dimensions (Top)
18.47 in
(470 mm)
17.29 in
(439 mm) 19.00 in
(483 mm)
Operations Guide – DOC. 7049B
Sonnex™ Multiroom Audio System: SWAMP(I)-24X8 • 11
Sonnex™ Multiroom Audio System
Crestron SWAMP(I)-24X8
SWAMP-24X8 Overall Dimensions (Front & Back)
1
2
3
4
5
6
6.97 in
(178 mm)
7.51 in
(191 mm)
7
8
9
10
11
19
12
13
14
18
15
20
16
17
21
Connectors, Controls & Indicators
#
CONNECTORS1,
CONTROLS &
INDICATORS
1
LCD Display and
SOFTKEYS
2
MENU
DESCRIPTION
Green LCD alphanumeric, adjustable
backlight, 2 lines x 20 characters per line;
Displays source & zone setup, amplifier and
expander status, network & control
configuration, volume levels, and other
parameters;
(4) Push buttons for execution of LCD driven
functions
(1) push button, steps menu back one level
(Continued on following page)
12 • Sonnex™ Multiroom Audio System: SWAMP(I)-24X8
Operations & Installation Guide – DOC. 7049B
Crestron SWAMP(I)-24X8
Sonnex™ Multiroom Audio System
Connectors, Controls & Indicators (Continued)
#
CONNECTORS1,
CONTROLS &
INDICATORS
3
K, J (Up, Down)
(2) push buttons, scroll up or down through
menu and adjust menu parameters
4
ENTER
(1) push button, executes highlighted menu
item or value
5
On/Off
(1) Rocker switch, turns power amplifier on
and off and resets the unit
6
SOURCE (1-24)
Buttons and LEDs
(24) Push buttons and green LEDs, select
input source for routing and adjustment
1
7
DESCRIPTION
24
COMPUTER
Pin 2
Pin 1
Pin 3
Pin 4
USB Type B female, USB 1.1 computer
console port (6 ft cable included)
PIN
DESCRIPTION
1
+5 VDC
2
Data -
3
Data +
4
Ground
8
VOLUME
(1) Continuous turn rotary encoder, adjusts
audio volume
9
ZONE (1-10)
Buttons and LEDs
(10) Push buttons and green LEDs, select
output zone for routing and adjustment
1
10
10
ANALOG SOURCES
L/R (1–16)
16 Stereo Analog Inputs, (32) RCA female
comprising (16) unbalanced stereo line level
audio inputs;
Input Impedance: 10k Ohms;
Maximum Input Level: 2 Vrms
11
ANALOG SOURCES
BALANCED (13-16)
(4) 5-pin 3.5mm detachable terminal blocks
Balanced stereo line level audio inputs
(mutually exclusive of corresponding
unbalanced inputs);
Input Impedance: 20k Ohms;
Maximum Input Level: 4 Vrms
L
R
(Continued on following page)
Operations Guide – DOC. 7049B
Sonnex™ Multiroom Audio System: SWAMP(I)-24X8 • 13
Sonnex™ Multiroom Audio System
Crestron SWAMP(I)-24X8
Connectors, Controls & Indicators (Continued)
#
CONNECTORS1,
CONTROLS &
INDICATORS
DESCRIPTION
12
FUSE
The SWAMP-24X8 requires a T15AH (1/4” x
1-1/4”, 250V, 15A, time-lag, high-rupture
2
rated) fuse ;
The SWAMPI-24X8 requires a T8AH (5 mm x
20 mm, 250V, 8A, time-lag, high-rupture
rated) fuse 2
13
120V~50/60Hz MAX
12A3
(1) IEC C14 male chassis plug, main power
input;
Mates with removable power cord
(included with SWAMP-24X8)
14
DIGITAL OUT (1-8)
(8) 8-wire RJ-45 female (8P8C modular jack);
Green LED indicates link status;
Amber LED indicates data communication on
the corresponding output;
Sonnex expansion link outputs;
Connect to SWAMPE Multiroom Audio
4,5
Expander (sold separately) or S-EXT1-S
Sonnex Link Over Fiber Extender4,5 (sold
separately)
15
S/PDIF SOURCES
(17-24)
(8) RCA female;
S/PDIF coaxial digital audio inputs;
Input Impedance: 75 Ohms
16
S/PDIF OUT (9-10)
(2) RCA female;
S/PDIF coaxial digital audio outputs;
Output Impedance: 75 Ohms
17
LAN
(1) 8-wire RJ-45 female (8P8C modular jack);
10BASE-T/100BASE-TX Ethernet port;
Green LED indicates link status;
Yellow LED indicates Ethernet activity
18
NET
(2) 4-pin 3.5mm detachable terminal blocks
Cresnet slave ports, paralleled
24:
Y:
Z:
G:
Power (24 Volts DC)
Data
Data
Ground
NOTE: The NET port does not supply or
consume power.
19
SETUP
(LED and button)
(1) recessed miniature push button and (1)
red LED, used for touch-settable ID (TSID) in
conjunction with Crestron Toolbox software
(Continued on following page)
14 • Sonnex™ Multiroom Audio System: SWAMP(I)-24X8
Operations & Installation Guide – DOC. 7049B
Crestron SWAMP(I)-24X8
Sonnex™ Multiroom Audio System
Connectors, Controls & Indicators (Continued)
#
CONNECTORS1,
CONTROLS &
INDICATORS
20
GROUND
21
SPEAKER OUTPUTS
(1-8)
DESCRIPTION
(1) 6-32 screw, chassis ground lug
(16) 2-pin 7.62mm 15A detachable terminal
blocks;
Power amplifier outputs;
Wire Size: Terminals accept up to 14 AWG;
The following outputs can be bridged
together: 1 and 2 (L+R), 3 and 4 (L+R), 5 and
6 (L+R), 7 and 8 (L+R);
Red LED indicates bridged operation
NOTE: Outputs can only be bridged into an 8
ohm load.
1. Interface connectors for NET, ANALOG SOURCES (BALANCED), and SPEAKER OUTPUTS
ports are provided with the unit.
2. Refer to “Fuse Replacement” on page 24 for additional details.
3. Port on SWAMPI-24X8 is labeled 220-240V~50/60Hz MAX 6A.
4. Supports any combination of up to eight SWAMPE Multiroom Audio Expanders or S-EXT1-S
Sonnex Link Over Fiber Extenders (connected to a SWAMPE Multiroom Audio Expander). For
connection of the Sonnex Link between the SWAMP-24X8 and each peripheral, use Crestron
DM-CBL-8G or high-quality CAT5e shielded twisted-pair cable. The maximum cable length is 200 ft
(61 m) per run.
5. If using Cresnet for communications between the SWAMP-24x8 and a control system, only one
SWAMPE Multiroom Audio Expander or one S-EXT1-S Sonnex Link Over Fiber Extender
(connected to a SWAMPE Multiroom Audio Expander) can be connected.
Operations Guide – DOC. 7049B
Sonnex™ Multiroom Audio System: SWAMP(I)-24X8 • 15
Sonnex™ Multiroom Audio System
Crestron SWAMP(I)-24X8
Setup
Network Wiring
When wiring the Cresnet network, consider the following:
•
Use Crestron Certified Wire.
•
Use Crestron power supplies for Crestron equipment.
•
Provide sufficient power to the system.
CAUTION: Insufficient power can lead to unpredictable results or damage
to the equipment. Please use the Crestron Power Calculator to help calculate
how much power is needed for the system (www.crestron.com/calculators).
For networks with 20 or more devices, use a Cresnet Hub/Repeater (CNXHUB) to
maintain signal quality.
NOTE: If using Cresnet for communications between the SWAMP-24x8 and a
control system, only one SWAMPE Multiroom Audio Expander or one S-EXT1-S
Sonnex Link Over Fiber Extender (connected to a SWAMPE Multiroom Audio
Expander) can be connected.
For more details, refer to “Check Network Wiring” on page 48.
The SWAMP-24X8 can also use high-speed Ethernet for communications between
the device and a control system, computer, digital media server and other IP-based
devices.
For information on connecting Ethernet devices in a Crestron system, refer to the
latest version of the Crestron e-Control® Reference Guide (Doc. 6052), which is
available from the Crestron Web site (www.crestron.com/manuals).
Sonnex Link Wiring
Crestron recommends using Crestron DM-CBL-8G or high-quality CAT5e shielded
twisted-pair cable for Sonnex Link connections between the SWAMP-24X8 and
each peripheral.
NOTE: Shielded connectors such as the DM-8G-CONN must be used.
DM-CBL-8G wire can carry Sonnex Link signals up to 200 feet (61 meters).
Identity Code
Net ID
The Net ID of the SWAMP-24X8 has been factory set to A1. The Net IDs of
multiple SWAMP-24X8 devices in the same system must be unique. Net IDs are
changed from the front panel or from a personal computer (PC) via Crestron Toolbox
(refer to “Establishing Communication” on page 44).
When setting the Net ID, consider the following:
•
The Net ID of each unit must match an ID code specified in the SIMPL
Windows program.
16 • Sonnex™ Multiroom Audio System: SWAMP(I)-24X8
Operations & Installation Guide – DOC. 7049B
Crestron SWAMP(I)-24X8
Sonnex™ Multiroom Audio System
•
Each network device must have a unique Net ID.
The Net ID can be set from the SWAMP-24X8’s front panel or with Crestron
Toolbox. For more details, refer to “Set the Cresnet ID” on page 38 or the Crestron
Toolbox help file.
IP ID
The IP ID is set from the SWAMP-24X8’s front panel or within the
SWAMP-24X8’s IP table using Crestron Toolbox. For more details, refer to “Set the
IP ID” which starts on page 39 or the Crestron Toolbox help file. The IP IDs of
multiple SWAMP-24X8 devices in the same system must be unique.
When setting the IP ID, consider the following:
•
The IP ID of each unit must match an IP ID specified in the SIMPL
Windows program.
•
Each device using IP to communicate with a control system must have a
unique IP ID.
Installation
Ventilation
The SWAMP-24X8 should be used in a well-ventilated area. The venting holes
should not be obstructed under any circumstances.
To prevent overheating, do not operate this product in an area that exceeds the
environmental temperature range listed in the table of specifications. Consider using
forced air ventilation and/or incrementing the spacing between units to reduce
overheating. Consideration must be given if installed in a closed or multi-unit rack
assembly since the operating ambient temperature of the environment may be greater
than the room ambient temperature. Contact with thermal insulating materials should
be avoided on all sides of the unit.
Rack Mounting
The SWAMP-24X8 can be mounted in a rack or stacked with other equipment. Two
“ears” are provided with the SWAMP-24X8 so that the unit can be rack mounted.
These ears must be installed prior to mounting. Complete the following procedure to
attach the ears to the unit. The only tool required is a #1 or #2 Phillips screwdriver.
WARNING: To prevent bodily injury when mounting or servicing this unit in a
rack, take special precautions to ensure that the system remains stable. The following
guidelines are provided to ensure your safety:
•
When mounting this unit in a partially filled rack, load the rack from the
bottom to the top with the heaviest component at the bottom of the rack.
•
If the rack is provided with stabilizing devices, install the stabilizers before
mounting or servicing the unit in the rack.
NOTE: Feet are preinstalled for tabletop mounting or stacking. If the unit is to be
rack mounted, the feet are not required and can be removed to provide more space in
the rack.
NOTE: Reliable earthing of rack-mounted equipment should be maintained.
Particular attention should be given to supply connections other than direct
connections to the branch circuit (e.g. use of power strips).
To install the ears:
1.
Operations Guide – DOC. 7049B
Using a #1 or #2 Phillips screwdriver, remove the feet installed on the
bottom of the SWAMP-24X8.
Sonnex™ Multiroom Audio System: SWAMP(I)-24X8 • 17
Sonnex™ Multiroom Audio System
Crestron SWAMP(I)-24X8
2.
There are screws that secure each side of the SWAMP-24X8 top cover.
Using a #1 or #2 Phillips screwdriver, remove the four screws closest to the
front panel from one side of the unit. Refer to the diagram following step 4
for a detailed view.
3.
Position a rack ear so that its mounting holes align with the holes vacated
by the screws in step 2.
4.
Secure the ear to the unit with the four screws from step 2 and the additional
screw that is shipped with the SWAMP-24X8, as shown in the following
diagram.
Ear Attachment for Rack Mounting
5.
Stacking
Repeat procedure (steps 2 through 4) to attach the remaining ear to the
opposite side.
Four “feet” are preinstalled with the SWAMP-24X8 so that if the unit is not rack
mounted, the feet can provide stability when the unit is placed on a flat surface or
stacked.
NOTE: No more than two SWAMP-24X8 units should be stacked.
18 • Sonnex™ Multiroom Audio System: SWAMP(I)-24X8
Operations & Installation Guide – DOC. 7049B
Crestron SWAMP(I)-24X8
Sonnex™ Multiroom Audio System
Hardware Hookup
Connect the Device
Make the necessary connections as called out in the illustration that follows this
paragraph. Refer to “Network Wiring” on page 16 for additional information. Apply
power after all connections have been made.
Hardware Connections for the SWAMP-24X8
ANALOG SOURCES:
From Analog Audio Sources
POWER:
From Line Voltage
DIGITAL OUT:
To SWAMPE
Multiroom Audio
Expander or
S-EXT1-S Sonnex
Link Over Fiber
Extender
NET:
To Cresnet Devices
SPDIF SOURCES:
From Digital Audio
Sources
Ground
SPDIF OUT:
To Digital Audio
Receiver
LAN:
10BASE-T/100BASE-TX
Ethernet to LAN
SPEAKER OUTPUTS:
To Speakers or SAT-70V/100V
Sonnex Output Transformer
CAUTION: Keep the device unplugged until all the input, network, and speaker
wiring is complete.
CAUTION: Check the speaker wires for shorts and frayed wiring around the
SPEAKER OUTPUTS connectors.
NOTE: Ensure the unit is properly grounded by connecting the chassis ground lug
to an earth ground (building steel).
NOTE: To prevent overheating, do not operate this product in an area that exceeds
the environmental temperature range listed in the table of specifications.
Four balanced/unbalanced audio inputs are provided, utilizing five-pin terminal
block connectors. For connection details, refer to the following table and diagrams.
Audio Connections
Operations Guide – DOC. 7049B
SIGNAL
NAME
BALANCED
AUDIO INPUT
UNBALANCED
AUDIO INPUT
L+
Source L +
Source L +
L-
Source L -
Source L jumper to GND
G
Shield/Ground
Ground
R+
Source R +
Source R +
R-
Source R -
Source jumper to GND
Sonnex™ Multiroom Audio System: SWAMP(I)-24X8 • 19
Sonnex™ Multiroom Audio System
Crestron SWAMP(I)-24X8
Typical Balanced/Unbalanced Inputs
Balanced
Input
L
Unbalanced
Input
R
+-G+-
L
R
+-G+-
Shield
Source L
Source R
+
Source L
+
Jumpers
Shield
+
Source R
+
Shield
CH Device Connections
Devices with a RJ-45 CH output such as the CEN-IDOCV can be connected to the
balanced inputs on the SWAMP-24X8 as shown in the following table.
CH Output to SWAMP-24X8 Balanced Input
PIN
Speaker Connections
WIRE COLORS (568B)
AUDIO I/O
+ Audio Left Out
BALANCED INPUT
CONNECTION
1
WHITE/ORANGE
2
ORANGE
- Audio Left Out
L-
3
WHITE/GREEN
+ Audio Right Out
R+
4
BLUE
N/A
5
WHITE/BLUE
N/A
6
GREEN
- Audio Right Out
7
WHITE/BROWN
N/A
8
BROWN
N/A
L+
R-
Make speaker connections to the SWAMP-24X8 as shown in the following diagram.
Speaker Connections
+
-
+
NOTE: If the SAT-70V/100V Sonnex Output Transformer is connected to a
speaker terminal, use the SAT-70V/100V profile built into the Sonnex Tools
application to configure a high-pass filter on the zone that is connected to the
SAT-70V/100V. For details, refer to the Sonnex Tools help file.
20 • Sonnex™ Multiroom Audio System: SWAMP(I)-24X8
Operations & Installation Guide – DOC. 7049B
Crestron SWAMP(I)-24X8
Bridge Speaker Outputs
(Optional)
Sonnex™ Multiroom Audio System
The speaker outputs on the SWAMP-24X8 can be bridged to deliver higher power to
a speaker. The left channel on an individual output can be bridged with the right
channel on the same output. Refer to the following diagram when bridging outputs.
Bridging Outputs
+
+
L
R
The possible bridging combinations are: Zone 1 + Zone 2, Zone 3 + Zone 4, Zone 5
+ Zone 6, Zone 7 + Zone 8. LEDs on the back of the SWAMP-24X8 indicate
bridged outputs.
After the zones are wired for bridged operation, the SWAMP-24X8 must be
configured with the “Installer Mode” menu or with the Sonnex Tools application.
Refer to “Bridge Outputs” which starts on page 32 or the Sonnex Tools help file for
more information.
WARNING: This amplifier is capable of delivering immense amounts of
undistorted power to your loudspeakers. Please use caution and adequate ear
protection if listening to content at high volume levels as continued exposure to high
sound pressure levels can cause permanent hearing impairment or loss.
Subwoofer Applications
(Optional)
Using a sound level (SPL) meter and Sonnex Tools, the SWAMP-24X8 can be used
to deliver sound to a left-right stereo pair/subwoofer speaker layout. There are two
different wiring configurations that can be used.
Wiring Diagram: Passive Subwoofer Using an Additional Output Pair
-
SUB
+
+
-
LEFT
-
+
BUSSED
RIGHT
STEREO PAIR
ROOM
Operations Guide – DOC. 7049B
Sonnex™ Multiroom Audio System: SWAMP(I)-24X8 • 21
Sonnex™ Multiroom Audio System
Crestron SWAMP(I)-24X8
Wiring Diagram: Passive Subwoofer Using Bridged Output
BUSSED
+
-
+
-
SUB
-
LEFT
+
BRIDGED
RIGHT
STEREO PAIR
ROOM
1.
Connect the speakers and subwoofer as shown in one of the previous
diagrams.
2.
The SWAMP-24X8 can use a 2nd or 4th order crossover filter to separate the
audio signals between the subwoofer and the left-right stereo pair speakers.
A 4th order crossover filter offers better performance while the 2nd order
crossover filer uses fewer resources (one eq for each zone instead of two).
The 2nd order filters have a 40 dB/decade (or 12 dB/octave) slope, while 4th
order filters have an 80 dB/decade (or 24 dB/octave) slope.
Use Sonnex Tools’ parametric equalizer to configure a 2nd or 4th order
crossover filter. For more information, refer to the Sonnex Tools help file.
•
To use a 2nd order crossover filter:
⇒ Create a low pass filter on the subwoofer zone.
a.
Set the filter frequency to the desired crossover frequency.
b.
Set the filter bandwidth to 1.9.
⇒ Create a high pass filter on the left-right stereo pair zone.
•
a.
Set the filter frequency to the desired crossover frequency.
b.
Set the filter bandwidth to 1.9.
To use a 4th order crossover filter:
⇒ Create two low pass filters on the subwoofer zone.
a.
Set both filters frequency to the desired crossover frequency.
b.
Set both filters bandwidth to 1.9.
⇒ Create two high pass filters on the left-right stereo pair zone.
3.
c.
Set both filters frequency to the desired crossover frequency.
d.
Set both filters bandwidth to 1.9.
Use Sonnex Tools or the SWAMP-24X8’s Installer Mode to bus the outputs
together. If using a bridged subwoofer, use Sonnex Tools or the
SWAMP-24X8’s “Installer Mode” menu to bridge the subwoofer outputs.
22 • Sonnex™ Multiroom Audio System: SWAMP(I)-24X8
Operations & Installation Guide – DOC. 7049B
Crestron SWAMP(I)-24X8
Sonnex™ Multiroom Audio System
For more information, refer to “Set Bus Assignment” which starts on page
31, “Bridge Outputs” which starts on page 32, or the Sonnex Tools help
file.
4.
Use Sonnex Tools or the SWAMP-24X8’s “Installer Mode” menu to set the
subwoofer output to Mono.
For more information, refer to “Set Mono/Stereo” which starts on page 29
or the Sonnex Tools help file.
5.
Trim the subwoofer using an SPL meter, the pink noise files (satellite pink
noise.wav and subwoofer pink noise.wav) found in the Sonnex Tools help
file, and Sonnex tools.
NOTE: The audio output of the PC used to configure the system should be
connected to an input on the SWAMP-24X8. The input should be routed to
the connected outputs. For information on routing signals, refer to
“Operation” on page 47.
Connect to SWAMPE Sonnex
Multiroom Audio Expander or
S-EXT1-S Sonnex Link Over
Fiber Extender
a.
Set the SPL meter to C-Weighted, Slow Response.
b.
Place the SPL meter at the listening position with the meter pointing
straight up.
c.
Play satellite pink noise.wav on the left speaker.
d.
Turn the volume up until the SPL meter reads 85 dB.
e.
Play satellite pink noise .wav on the right speaker. The SPL meter
should read very close to 85 dB.
f.
Play subwoofer pink noise.wav on the left speaker.
g.
Use Sonnex Tools or the “Installer Mode” menu to adjust the bus
volume offset of the subwoofer zone until the SPL meter reads 85 dB.
For more information, refer to the Sonnex Tools help file or “Set Bus
Volume Offset” which starts on page 31.
The SWAMP-24X8 can be connected to a SWAMPE Sonnex Multiroom Audio
Expander or S-EXT1-S Sonnex Link Over Fiber Extender via shielded CAT5e cable
to increase the number of output zones. Up to eight SWAMPE Sonnex Multiroom
Audio Expanders or eight S-EXT1-S Sonnex Link Over Fiber Extenders (connected
to a SWAMPE Sonnext Multiroom Audio Expander) can be connected to one
SWAMP-24X8.
NOTE: When connecting a SWAMP-24X8 to a peripheral, Crestron recommends
using Crestron DM-CBL-8G or high-quality CAT5e shielded twisted-pair cable.
Shielded connectors such as the DM-8G-CONN must be used.
NOTE: When the SWAMP-24X8 is connected to a control system by Cresnet, only
one SWAMPE Multiroom Audio Expander or one S-EXT1-S Sonnex Link Over
Fiber Extender (connected to a SWAMPE Multiroom Audio Expander) can be
connected.
Operations Guide – DOC. 7049B
Sonnex™ Multiroom Audio System: SWAMP(I)-24X8 • 23
Sonnex™ Multiroom Audio System
Crestron SWAMP(I)-24X8
SWAMP-24X8 to SWAMPE Connection (SWAMPE-8 shown)
NOTE: The maximum cable length between a SWAMP-24X8 and a peripheral is
200 feet (61 meters).
Fuse Replacement
If the SWAMP-24X8 does not power up when it is plugged into an AC outlet, the
fuse may need to be replaced. The fuse holder is located on the rear panel, above the
IEC socket assembly. To replace the fuse:
1.
Use a flat head screwdriver to push in the fuse holder.
2.
While pushing in the fuse holder, turn screwdriver counterclockwise until
the fuse holder pops out.
3.
Remove the fuse from the fuse holder and insert a new fuse.
CAUTION: Only use the specified type of fuse when replacing a blown
fuse. Failure to do so may cause damage to the device.
SWAMP-24X8 MODEL
Label the Buttons
REQUIRED FUSE TYPE
SWAMP-24X8
(US & Canada)
T15AH (1/4” x 1-1/4”, 250V, 15A,
time-lag, high-rupture rated)
SWAMPI-24X8
(International/220-240VAC)
T8AH (5 mm x 20 mm, 250V, 8A,
time-lag, high-rupture rated)
4.
Insert the fuse holder into the device.
5.
Push in the fuse holder with a flat head screwdriver. While pushing in the
fuse holder, turn the screwdriver clockwise until the fuse holder sinks in.
6.
Push in the fuse holder a little further and turn the screwdriver clockwise
until the fuse holder locks in place.
7.
Connect power to the device.
Use Crestron Engraver software to print custom labels for the SWAMP-24X8’s front
panel buttons and LEDs. Crestron recommends printing on 100-pound paper. Paper
weighing less than 100 pounds tends to crumple while sliding in, while paper
weighing more than 100 pounds may not fit.
24 • Sonnex™ Multiroom Audio System: SWAMP(I)-24X8
Operations & Installation Guide – DOC. 7049B
Crestron SWAMP(I)-24X8
Sonnex™ Multiroom Audio System
Configuration
After making all hardware connections, the SWAMP-24X8 must be configured for
operation. The SWAMP-24X8 can be configured from the SWAMP-24X8’s front
panel using the “Installer Mode” menu or from a PC using the Sonnex Tools
application in Crestron Toolbox. This document contains instructions for using the
"Installer Mode” menu. For information on using Sonnex Tools to configure the
SWAMP-24X8, refer to the Sonnex Tools help file.
Enter the “Installer Mode”
Menu
To enter the “Installer Mode” menu, press and hold the T and ▲ buttons for
approximately five seconds. The “Installer Mode” menu is displayed.
“Installer Mode” Menu
The “Installer Mode” menu is separated into seven menus:
•
Source Setup: Select this option to adjust the compensation level for each
of the input sources.
•
Zone Setup: Select this option to configure each output zone’s settings for
audio, Sonnex links (busses), bridging (with other outputs) and power
output.
•
Expander Status: Select this option to view the status of each connected
SWAMPE Sonnex Multiroom Audio Expander.
•
Amplifier Status: Select this option to view the settings and operating
status of each of the SWAMP-24X8 amplifiers as well as the amplifiers of
connected SWAMPE Sonnex Multiroom Audio Expanders.
•
Network Setup: Select this option to configure and view the Ethernet
settings of the SWAMP-24X8.
•
Control Setup: Select this option to configure the SWAMP-24X8 for use
with a Crestron control system and lock/unlock the front panel controls.
•
About: Select this option to view information about the firmware.
NOTE: Changes made to any setting are only saved upon exiting the “Installer
Mode” menu. For instructions on exiting the “Installer Mode” menu, refer below.
Exit the “Installer Mode” Menu
To exit the “Installer Mode” menu, press the MENU button until the “Installer
Mode” menu is displayed (refer to illustration above), release and press MENU
again.
Source Setup
Select this option to adjust the compensation level of each input source. To set the
compensation level:
Operations Guide – DOC. 7049B
1.
Enter the “Installer Mode” menu as described above.
2.
Press ENTER to select Source Setup.
Sonnex™ Multiroom Audio System: SWAMP(I)-24X8 • 25
Sonnex™ Multiroom Audio System
Crestron SWAMP(I)-24X8
3.
Press ENTER to select Compensation and display the list of sources.
4.
Press the T or ▲ buttons to scroll through the sources until the input
source to be adjusted is displayed.
5.
Press ENTER to select the input source and display the gain control.
Gain Control
6.
Press the T or ▲ buttons to display the amount of gain to be applied and
press ENTER. The display returns to the list of input sources.
7.
Repeat steps 4 through 6 for each input source.
8.
Press MENU twice to return to the “Installer Mode” menu.
Zone Setup
Select this option to adjust the following parameters for each zone:
•
EQ (Equalization): Choose from six preset equalization settings.
•
Bass: Adjust the bass level to the desired preference.
•
Treble: Adjust the treble level to the desired preference.
•
Loudness: Apply loudness compensation to any signal routed to a zone.
•
Balance: Adjust the balance to the desired preference.
•
Mono: Set the zone for mono or stereo sound.
•
Minimum Volume: Set the lowest volume setting to which the zone can be
set.
•
Maximum Volume: Set the highest volume setting to which the zone can
be set.
•
Startup Volume: Set the volume level that is used when a zone is turned
on.
•
Bussing: Assigns the selected zone to a group of zones (bus). Zones in a
bus track each others’ volume and source. (i.e. when the source or volume
for one zone in the bus is adjusted, the other zones in that bus follow).
•
Bus Volume Offset: Specifies a volume offset between -12 to +12 dB that
is applied on top of the volume setting for the selected zone when it is a
member of a bus. Since zone volumes track in a bus this ensures the
selected zone is always at the specified level above/below the other zones in
the bus.
•
Bussing Lists: View the zones that are currently members of a bus.
•
Bridging: Selects output zones to be bridged.
•
Wattage: Specify the wattage rating for a speaker that is connected to a
selected zone. This value is used by the Speaker Protect algorithm. When
enabled, the Speaker Protect function prevents the delivered power from
exceeding the speaker’s power rating.
26 • Sonnex™ Multiroom Audio System: SWAMP(I)-24X8
Operations & Installation Guide – DOC. 7049B
Crestron SWAMP(I)-24X8
Sonnex™ Multiroom Audio System
•
Impedance: Specifies the impedance of a speaker connected to a selected
zone.
•
Speaker Protect: Enables or disables the Speaker Protect function.
NOTE: As speaker ratings vary greatly across manufacturers, there is no
guarantee that Sonnex Speaker Protect protects against speaker damage in
all situations.
Enter/Exit the “Zone Setup”
Menu
Set EQ (Equalization)
•
Crestron DRC: Enables or disables the Crestron Dynamic Range Control
function.
•
Global EQ: Sets the same EQ preset for all zones in the system. Setting this
option overrides any EQ selection that was previously set for an individual
zone.
To enter the “Zone Setup” menu:
1.
Enter the “Installer Mode” menu as described in “Enter the “Installer
Mode” Menu” on page 25.
2.
Press the T or ▲ buttons to display Zone Setup and press ENTER.
3.
To exit the “Zone Setup” menu and return to the “Installer Mode” menu,
press MENU.
To adjust a zone’s EQ setting:
1.
Enter the “Zone Setup” menu as described in “Enter/Exit the “Zone Setup”
Menu” above.
2.
Press ENTER to select EQ.
3.
Press the T or ▲ buttons to display the zone to be controlled and press
ENTER. The EQ setting is displayed.
EQ Setting
Set Bass
Operations Guide – DOC. 7049B
4.
Press the T or ▲ buttons to display the setting to be applied and press
ENTER.
5.
Repeat for every zone to be adjusted.
6.
Press MENU to return to the “Zone Setup” menu.
To adjust a zone’s bass setting:
1.
Enter the “Zone Setup” menu as described in “Enter/Exit the “Zone Setup”
Menu” above.
2.
Press the T or ▲ buttons to display Bass and press ENTER. A list of
zones is displayed.
3.
Press the T or ▲ buttons to display the zone to be controlled and press
ENTER. The bass setting is displayed.
Sonnex™ Multiroom Audio System: SWAMP(I)-24X8 • 27
Sonnex™ Multiroom Audio System
Crestron SWAMP(I)-24X8
Bass Setting
Set Treble
4.
Press the T or ▲ buttons to display the setting to be applied and press
ENTER.
5.
Repeat for every zone to be adjusted.
6.
Press MENU to return to the “Zone Setup” menu.
To adjust a zone’s treble setting:
1.
Enter the “Zone Setup” menu as described in “Enter/Exit the “Zone Setup”
Menu” on page 27.
2.
Press the T or ▲ buttons to display Treble and press ENTER. A list of
zones is displayed.
3.
Press the T or ▲ buttons to display the zone to be controlled and press
ENTER. The treble setting is displayed.
Treble Setting
Set Loudness
4.
Press the T or ▲ buttons to display the setting to be applied and press
ENTER.
5.
Repeat for every zone to be adjusted.
6.
Press MENU to return to the “Zone Setup” menu.
To adjust a zone’s loudness setting:
1.
Enter the “Zone Setup” menu as described in “Enter/Exit the “Zone Setup”
Menu” on page 27.
2.
Press the T or ▲ buttons to display Loudness and press ENTER. A list of
zones is displayed.
3.
Press the T or ▲ buttons to display the zone to be controlled and press
ENTER. The loudness setting is displayed.
Loudness Setting
4.
Press the T or ▲ buttons to display the setting to be applied and press
ENTER.
5.
Repeat for every zone to be adjusted.
6.
Press MENU to return to the “Zone Setup” menu.
28 • Sonnex™ Multiroom Audio System: SWAMP(I)-24X8
Operations & Installation Guide – DOC. 7049B
Crestron SWAMP(I)-24X8
Set Balance
Sonnex™ Multiroom Audio System
To adjust a zone’s balance setting:
1.
Enter the “Zone Setup” menu as described in “Enter/Exit the “Zone Setup”
Menu” on page 27.
2.
Press the T or ▲ buttons to display Balance and press ENTER. A list of
zones is displayed.
3.
Press the T or ▲ buttons to display the zone to be controlled and press
ENTER. The balance setting is displayed.
Balance Setting
Set Mono/Stereo
4.
Press the T or ▲ buttons to display the setting to be applied and press
ENTER.
5.
Repeat for every zone to be adjusted.
6.
Press MENU to return to the “Zone Setup” menu.
To adjust a zone’s mono/stereo setting:
1.
Enter the “Zone Setup” menu as described in “Enter/Exit the “Zone Setup”
Menu” on page 27.
2.
Press the T or ▲ buttons to display Mono and press ENTER. A list of
zones is displayed.
3.
Press the T or ▲ buttons to display the zone to be controlled and press
ENTER. The mono/stereo setting is displayed.
Mono/Stereo Setting
Set Minimum Volume
Operations Guide – DOC. 7049B
4.
Press the T or ▲ buttons to display the setting to be applied and press
ENTER.
5.
Repeat for every zone to be adjusted.
6.
Press MENU to return to the “Zone Setup” menu.
To adjust a zone’s minimum volume setting:
1.
Enter the “Zone Setup” menu as described in “Enter/Exit the “Zone Setup”
Menu” on page 27.
2.
Press the T or ▲ buttons to display Minimum Volume and press ENTER.
A list of zones is displayed.
3.
Press the T or ▲ buttons to display the zone to be controlled and press
ENTER. The minimum volume setting is displayed.
Sonnex™ Multiroom Audio System: SWAMP(I)-24X8 • 29
Sonnex™ Multiroom Audio System
Crestron SWAMP(I)-24X8
Minimum Volume Setting
Set Maximum Volume
4.
Press the T or ▲ buttons to display the setting to be applied and press
ENTER.
5.
Repeat for every zone to be adjusted.
6.
Press MENU to return to the “Zone Setup” menu.
To adjust a zone’s maximum volume setting:
1.
Enter the “Zone Setup” menu as described in “Enter/Exit the “Zone Setup”
Menu” on page 27.
2.
Press the T or ▲ buttons to display Maximum Volume and press ENTER.
A list of zones is displayed.
3.
Press the T or ▲ buttons to display the zone to be controlled and press
ENTER. The maximum volume setting is displayed.
Maximum Volume Setting
Set Startup Volume
4.
Press the T or ▲ buttons to display the setting to be applied and press
ENTER.
5.
Repeat for every zone to be adjusted.
6.
Press MENU to return to the “Zone Setup” menu.
To adjust a zone’s startup volume setting:
1.
Enter the “Zone Setup” menu as described in “Enter/Exit the “Zone Setup”
Menu” on page 27.
2.
Press the T or ▲ buttons to display Startup Volume and press ENTER. A
list of zones is displayed.
3.
Press the T or ▲ buttons to display the zone to be controlled and press
ENTER. The startup volume setting is displayed.
Startup Volume Setting
4.
Press the T or ▲ buttons to display the setting to be applied and press
ENTER.
5.
Repeat for every zone to be adjusted.
6.
Press MENU to return to the “Zone Setup” menu.
30 • Sonnex™ Multiroom Audio System: SWAMP(I)-24X8
Operations & Installation Guide – DOC. 7049B
Crestron SWAMP(I)-24X8
Set Bus Assignment
Sonnex™ Multiroom Audio System
To assign a zone to a bus of zones:
1.
Enter the “Zone Setup” menu as described in “Enter/Exit the “Zone Setup”
Menu” on page 27.
2.
Press the T or ▲ buttons to display Bussing and press ENTER. A list of
zones is displayed.
3.
Press the T or ▲ buttons to display the zone to be controlled and press
ENTER. The bus setting is displayed.
Bus Setting
Set Bus Volume Offset
4.
Press the T or ▲ buttons to display the bus to which the zone is to be
assigned and press ENTER.
5.
Repeat for every zone to be assigned.
6.
Press MENU to return to the “Zone Setup” menu.
To adjust a zone’s bus volume offset setting:
1.
Enter the “Zone Setup” menu as described in “Enter/Exit the “Zone Setup”
Menu” on page 27.
2.
Press the T or ▲ buttons to display Bus Volume Offset and press ENTER.
A list of zones is displayed.
3.
Press the T or ▲ buttons to display the zone to be controlled and press
ENTER. The offset setting is displayed.
Offset Setting
View Bussing Lists
Operations Guide – DOC. 7049B
4.
Press the T or ▲ buttons to display the setting to be applied and press
ENTER.
5.
Repeat for every zone to be adjusted.
6.
Press MENU to return to the “Zone Setup” menu.
To view the zones assigned to a bus:
1.
Enter the “Zone Setup” menu as described in “Enter/Exit the “Zone Setup”
Menu” on page 27.
2.
Press the T or ▲ buttons to display Bussing Lists and press ENTER. A list
of busses is displayed.
3.
Press the T or ▲ buttons to display the bus to view and press ENTER. The
first zone in the bus is displayed.
Sonnex™ Multiroom Audio System: SWAMP(I)-24X8 • 31
Sonnex™ Multiroom Audio System
Crestron SWAMP(I)-24X8
Bus Display
Bridge Outputs
4.
Press the T or ▲ buttons to display the other zones contained in the bus.
5.
Press ENTER to return to the list of busses.
6.
Repeat for every bus to be viewed.
7.
Press MENU to return to the “Zone Setup” menu.
To bridge outputs together:
1.
Enter the “Zone Setup” menu as described in “Enter/Exit the “Zone Setup”
Menu” on page 27.
2.
Press the T or ▲ buttons to display Bridging and press ENTER. A list of
zones is displayed.
3.
Press the T or ▲ buttons to display the zone to be configured and press
ENTER. The bridging setting is displayed.
NOTE: Since only odd-numbered zones can be bridged with their
respective, adjacent, even-numbered zones, only odd-numbered zones are
listed.
Bridging Setting
4.
Press the T or ▲ buttons to display the desired bridging setting and press
ENTER.
NOTE: Bridged outputs are indicated with LEDs near the speaker
terminals on the rear of the SWAMP-24X8 and SWAMPE Multiroom
Audio Expander.
Set Speaker Wattage Rating
5.
Repeat for every zone to be bridged/unbridged.
6.
Press MENU to return to the “Zone Setup” menu.
To specify the wattage of speakers connected to a zone output:
1.
Enter the “Zone Setup” menu as described in “Enter/Exit the “Zone Setup”
Menu” on page 27.
2.
Press the T or ▲ buttons to display Wattage and press ENTER. A list of
zones is displayed.
3.
Press the T or ▲ buttons to display the zone to be configured and press
ENTER. The wattage setting is displayed.
32 • Sonnex™ Multiroom Audio System: SWAMP(I)-24X8
Operations & Installation Guide – DOC. 7049B
Crestron SWAMP(I)-24X8
Sonnex™ Multiroom Audio System
Wattage Setting
4.
Press the T or ▲ buttons to display the speaker’s wattage rating and press
ENTER.
NOTE: If your speaker rating is not displayed, select the next-lowest rating
to avoid damage to the connected speakers.
Set Speaker Impedance
5.
Repeat for every zone to be configured.
6.
Press MENU to return to the “Zone Setup” menu.
To specify the impedance of speakers connected to a zone output:
1.
Enter the “Zone Setup” menu as described in “Enter/Exit the “Zone Setup”
Menu” on page 27.
2.
Press the T or ▲ buttons to display Impedance and press ENTER. A list
of zones is displayed.
3.
Press the T or ▲ buttons to display the zone to be configured and press
ENTER. The impedance setting is displayed.
Impedance Setting
Set Speaker Protection
4.
Press the T or ▲ buttons to display the speaker’s impedance rating and
press ENTER.
5.
Repeat for every zone to be configured.
6.
Press MENU to return to the “Zone Setup” menu.
To enable/disable speaker protection for a zone output:
NOTE: As speaker ratings vary greatly across manufacturers, there is no guarantee
that Sonnex Speaker Protect protects against speaker damage in all situations.
Operations Guide – DOC. 7049B
1.
Enter the “Zone Setup” menu as described in “Enter/Exit the “Zone Setup”
Menu” on page 27.
2.
Press the T or ▲ buttons to display Speaker Protect and press ENTER. A
list of zones is displayed.
3.
Press the T or ▲ buttons to display the zone to be configured and press
ENTER. The protect setting is displayed.
Sonnex™ Multiroom Audio System: SWAMP(I)-24X8 • 33
Sonnex™ Multiroom Audio System
Crestron SWAMP(I)-24X8
Speaker Protect Setting
Set Crestron Dynamic Range
Control (DRC)
4.
Press the T or ▲ buttons to display the desired setting and press ENTER.
5.
Repeat for every zone to be configured.
6.
Press MENU to return to the “Zone Setup” menu.
To enable/disable DRC for a zone output:
1.
Enter the “Zone Setup” menu as described in “Enter/Exit the “Zone Setup”
Menu” on page 27.
2.
Press the T or ▲ buttons to display Crestron DRC and press ENTER. A
list of zones is displayed.
3.
Press the T or ▲ buttons to display the zone to be configured and press
ENTER. The Crestron DRC setting is displayed.
Crestron DRC Setting
Set Global EQ
4.
Press the T or ▲ buttons to display the desired setting and press ENTER.
5.
Repeat for every zone to be configured.
6.
Press MENU to return to the “Zone Setup” menu.
To adjust a global EQ setting:
NOTE: Adjusting a global EQ setting overrides the individual EQ settings for all
zones.
1.
Enter the “Zone Setup” menu as described in “Enter/Exit the “Zone Setup”
Menu” on page 27.
2.
Press the T or ▲ buttons to display Global EQ and press ENTER. A list of
Global EQ settings is displayed.
3.
Press the T or ▲ buttons to display the desired setting and press ENTER.
Confirm Global EQ Setting
4.
Press the T or ▲ buttons to display Yes or No and press ENTER. The
display returns to the “Zone Setup” menu.
34 • Sonnex™ Multiroom Audio System: SWAMP(I)-24X8
Operations & Installation Guide – DOC. 7049B
Crestron SWAMP(I)-24X8
Sonnex™ Multiroom Audio System
Expander Status
Select this option to view the status and information about SWAMPE Multiroom
Audio Expanders that are connected to the SWAMP-24X8. To view information:
1.
Enter the “Installer Mode” menu as described in “Enter the “Installer
Mode” Menu” on page 25.
2.
Press the T or ▲ buttons to display Expander Status and press ENTER.
3.
Press the T or ▲ buttons to display the expander to view and press
ENTER.
4.
Press the T or ▲ buttons to view available information.
5.
Press ENTER to return to the list of expanders.
6.
To exit and return to the “Installer Mode” menu, press MENU.
Amplifier Status
Select this option to view the settings and operating status of each of the
SWAMP-24X8 amplifiers as well as the amplifiers of connected SWAMPE
Multiroom Audio Expanders. To view information about the amplifier:
1.
Enter the “Installer Mode” menu as described in “Enter the “Installer
Mode” Menu” on page 25.
2.
Press the T or ▲ buttons to display Amplifier Status and press ENTER.
You can view a list of amplifier faults or view information about a specific zone
from the “Amplifier Status” menu.
View Amplifier Faults
View Zones
To view a list of amplifier faults in all of the zones:
1.
Press the T or ▲ buttons to display Faults and press ENTER.
2.
Press the T or ▲ buttons to scroll through the list of amplifier faults.
3.
Press MENU to return to the “Amplifier Status” menu.
4.
Press MENU to return to the “Installer Mode” menu.
To view information for a specific zone:
1.
Press the T or ▲ buttons to display the desired zone and press ENTER.
2.
Press the T or ▲ buttons to scroll through the available information.
3.
Press MENU to return to the “Amplifier Status” menu.
4.
Press MENU to return to the “Installer Mode” menu.
Network Setup
Select this option to configure and view the SWAMP-24X8 network settings.
Enter/Exit the “Network
Setup” Menu
Operations Guide – DOC. 7049B
To enter the “Network Setup” menu:
1.
Enter the “Installer Mode” menu as described in “Enter the “Installer
Mode” Menu” on page 25.
2.
Press the T or ▲ buttons to display Network Setup and press ENTER.
3.
To exit the “Network Setup” menu and return to the “Installer Mode” menu,
press MENU.
Sonnex™ Multiroom Audio System: SWAMP(I)-24X8 • 35
Sonnex™ Multiroom Audio System
Set the IP Address
Crestron SWAMP(I)-24X8
The SWAMP-24X8 can use TCP/IP for communication between a control system
and a SWAMP-24X8. The IP address can be manually set or obtained from a DHCP
server. For information on enabling DHCP to obtain an IP address, refer to
“Enable/Disable DHCP” on page 37. To view or manually set an IP address:
1.
Enter the “Network Setup” menu as described above.
2.
Press the T or ▲ buttons to display IP Address and press ENTER. The IP
address is displayed.
IP Address
Set the Subnet Mask
3.
Press the T or ▲ buttons to set the first octet of the IP address.
4.
Press the soft key under the next octet (or press ENTER to move to the next
octet) to select it for editing.
5.
Repeat steps 3 and 4 for each octet.
6.
To save the IP address and return to the “Network Setup” menu, move the
cursor to the right-most octet and press ENTER. To cancel the operation
and return to the previous screen, press MENU.
The subnet mask can be manually set or obtained from a DHCP server. For
information on enabling DHCP to obtain a subnet mask, refer to “Enable/Disable
DHCP” which starts on page 37. To view or manually set the subnet mask:
1.
Enter the “Network Setup” menu as described above.
2.
Press the T or ▲ buttons to display Subnet Mask and press ENTER. The
subnet mask is displayed.
Subnet Mask
Set the Default Router
3.
Press the T or ▲ buttons to set the first octet of the subnet mask.
4.
Press the soft key under the next octet (or press ENTER to move to the next
octet) to select it for editing.
5.
Repeat steps 3 and 4 for each octet.
6.
To save the subnet mask and return to the “Network Setup” menu, move the
cursor to the right-most octet and press ENTER. To cancel the operation
and return to the previous screen, press MENU.
The default router can be manually set or obtained from a DHCP server. For
information on enabling DHCP to obtain a default router, refer to “Enable/Disable
DHCP” which starts below. To view or manually set the default router:
1.
Enter the “Network Setup” menu as described on page 35.
2.
Press the T or ▲ buttons to display Default Router and press ENTER. The
default router is displayed.
36 • Sonnex™ Multiroom Audio System: SWAMP(I)-24X8
Operations & Installation Guide – DOC. 7049B
Crestron SWAMP(I)-24X8
Sonnex™ Multiroom Audio System
Default Router
Enable/Disable DHCP
3.
Press the T or ▲ buttons to set the first octet of the default router.
4.
Press the soft key under the next octet (or press ENTER to move to the next
octet) to select it for editing.
5.
Repeat steps 3 and 4 for each octet.
6.
To save the default router and return to the “Network Setup” menu, move
the cursor to the right-most octet and press ENTER. To cancel the
operation and return to the previous screen, press MENU.
The SWAMP-24X8 can obtain an IP address, subnet mask, and default router
information from a DHCP server. To enable or disable DHCP:
1.
Enter the “Network Setup” menu as described on page 35.
2.
Press the T or ▲ buttons to display DHCP and press ENTER. The DHCP
setting is displayed.
DHCP Setting
3.
Enable/Disable WINS
Press the T or ▲ buttons to display the desired setting and press ENTER.
The display returns to the previous screen.
The SWAMP-24X8 can be configured to use a WINS server for communication. To
enable or disable WINS:
1.
Enter the “Network Setup” menu as described on page 35.
2.
Press the T or ▲ buttons to display WINS and press ENTER. The WINS
setting is displayed.
WINS Setting
3.
Display MAC Address
Operations Guide – DOC. 7049B
Press the T or ▲ buttons to display the desired setting and press ENTER.
The display returns to the previous screen.
To display the MAC address:
1.
Enter the “Network Setup” menu as described on page 35.
2.
Press the T or ▲ buttons to display MAC Address and press ENTER. The
MAC address is displayed.
3.
Press ENTER to return to the previous screen.
Sonnex™ Multiroom Audio System: SWAMP(I)-24X8 • 37
Sonnex™ Multiroom Audio System
Display Hostname
Crestron SWAMP(I)-24X8
To display the hostname:
1.
Enter the “Network Setup” menu as described on page 35.
2.
Press the T or ▲ buttons to display Hostname and press ENTER. The
hostname is displayed.
3.
Press ENTER to return to the previous screen.
NOTE: The hostname can be changed with Crestron Toolbox.
Display Domain Name
To display the domain name:
1.
Enter the “Network Setup” menu as described on page 35.
2.
Press the T or ▲ buttons to display Domain Name and press ENTER. The
domain name is displayed.
3.
Press ENTER to return to the previous screen.
NOTE: The domain name can be changed with Crestron Toolbox.
Control Setup
Select this option to configure and view the SWAMP-24X8 control system settings.
Enter/Exit the “Control Setup”
Menu
Lock Front Panel
To enter the “Control Setup” menu:
1.
Enter the “Installer Mode” menu as described in “Enter the “Installer
Mode” Menu” on page 25.
2.
Press the T or ▲ buttons to display Control Setup and press ENTER.
3.
To exit the “Control Setup” menu and return to the “Installer Mode” menu,
press MENU.
The front panel controls of the SWAMP-24X8 can be locked to prevent unauthorized
access. To lock or unlock the front panel:
1.
Enter the “Control Setup” menu as described above.
2.
Press the T or ▲ buttons to display Front Panel Lock and press ENTER.
The Front Panel Lock setting is displayed.
Front Panel Lock Settings
3.
Set the Cresnet ID
Press the T or ▲ buttons to display the desired setting and press ENTER.
The display returns to the previous screen.
If the SWAMP-24X8 is to talk to a control system over Cresnet, the Net ID must be
set. To set the Net ID using the front panel:
1.
Enter the “Control Setup” menu as described on page 38.
2.
Press the T or ▲ buttons to display Cresnet ID and press ENTER. The
Cresnet ID setting is displayed.
38 • Sonnex™ Multiroom Audio System: SWAMP(I)-24X8
Operations & Installation Guide – DOC. 7049B
Crestron SWAMP(I)-24X8
Sonnex™ Multiroom Audio System
Cresnet ID Setting
3.
Set the IP ID
Press the T or ▲ buttons to display the desired setting and press ENTER.
The display returns to the previous screen.
If the SWAMP-24X8 is to talk to a control system over TCP/IP, the IP ID must be
set. To set the IP ID using the front panel:
1.
Enter the “Control Setup” menu as described on page 38.
2.
Press the T or ▲ buttons to display IP ID and press ENTER. The IP ID
setting is displayed.
IP ID Setting
3.
Set the Control System IP
Address
Press the T or ▲ buttons to display the desired setting and press ENTER.
The display returns to the previous screen.
If the SWAMP-24X8 is to talk to a control system over TCP/IP, the control system’s
IP address must be set. To set the control system’s IP address using the front panel:
1.
Enter the “Control Setup” menu as described on page 38.
2.
Press the T or ▲ buttons to display Ctrl Sys IP Addr and press ENTER.
The control system IP address is displayed.
Control System IP Address
Operations Guide – DOC. 7049B
3.
Press the T or ▲ buttons to set the first octet of the control system IP
address.
4.
Press the soft key under the next octet (or press ENTER to move to the next
octet) to select it for editing.
5.
Repeat steps 3 and 4 for each octet.
6.
To save the control system IP address and return to the “Control Setup”
menu, move the cursor to the right-most octet and press ENTER. To cancel
the operation and return to the previous screen, press MENU.
Sonnex™ Multiroom Audio System: SWAMP(I)-24X8 • 39
Sonnex™ Multiroom Audio System
Crestron SWAMP(I)-24X8
About
Select this option to view information about the SWAMP-24X8. To view
information about the SWAMP-24X8:
1.
Enter the “Installer Mode” menu as described in “Enter the “Installer
Mode” Menu” on page 25.
2.
Press the T or ▲ buttons to display About and press ENTER.
3.
Press the T or ▲ buttons to display information about the SWAMP-24X8.
4.
Press ENTER to return to the “Installer Mode” menu.
40 • Sonnex™ Multiroom Audio System: SWAMP(I)-24X8
Operations & Installation Guide – DOC. 7049B
Crestron SWAMP(I)-24X8
Sonnex™ Multiroom Audio System
Programming Software
Have a question or comment about Crestron software?
Answers to frequently asked questions (FAQs) can be viewed in the Online Help
section of the Crestron Web site. To post a question or view questions you have
submitted to Crestron’s True Blue Support, log in at www.crestron.com/support.
First-time users need to establish a user account.
Earliest Version Software Requirements for the PC
NOTE: Crestron recommends that you use the latest software to take advantage of
the most recently released features. The latest software is available from the Crestron
Web site.
Crestron has developed an assortment of Windows®-based software tools to develop
a customized system. Use SystemBuilder™ or SIMPL Windows to create a program
to control the SWAMP-24X8.
Programming with SystemBuilder
SystemBuilder is the easiest method of programming but does not offer as much
flexibility as SIMPL Windows. For additional details, download SystemBuilder from
the Crestron Web site and examine the extensive help file.
Programming with SIMPL Windows
NOTE: While SIMPL Windows can be used to program the SWAMP-24X8, it is
recommended to use SystemBuilder for configuring a system.
SIMPL Windows is Crestron’s premier software for programming Crestron control
systems. It is organized into two separate but equally important “Managers”:
Configuration and Program.
Configuration Manager
Configuration Manager is the view where programmers “build” a Crestron control
system by selecting hardware from the Device Library.
1.
The SWAMP-24X8 must first be incorporated into the system.
a.
Operations Guide – DOC. 7049B
To incorporate the SWAMP-24X8 (Cresnet) into the system, drag the
SWAMP-24X8 from the Cresnet Control Modules | Cresnet Audio
Modules folder of the Device Library and drop it in the System Views.
Sonnex™ Multiroom Audio System: SWAMP(I)-24X8 • 41
Sonnex™ Multiroom Audio System
Crestron SWAMP(I)-24X8
Locating the SWAMP-24X8 (Cresnet) in the Device Library
b.
To incorporate the SWAMP-24X8 (Ethernet) into the system, drag the
drag the SWAMP-24X8 from the Ethernet Control Modules | Ethernet
Audio Modules folder of the Device Library and drop it in the System
Views.
Locating the SWAMP-24X8 (Ethernet) in the Device Library
The system tree of the control system displays the device in the appropriate
slot(s) with a default Net ID or IP ID as shown in the following illustration.
NOTE: In the following illustration, there is both an Ethernet device in
Slot 8 and a Cresnet device in Slot 9. It is possible to have both types of
device attached to a control system as long as the control system has either
a built-in or expansion Ethernet interface. If Cresnet operation is desired,
the IP table for the SWAMP-24X8 must be empty.
SWAMP-24X8 Device, Slots 8 and 9
42 • Sonnex™ Multiroom Audio System: SWAMP(I)-24X8
Operations & Installation Guide – DOC. 7049B
Crestron SWAMP(I)-24X8
Sonnex™ Multiroom Audio System
NOTE: If using Cresnet for communications between the SWAMP-24x8
and a control system, only one SWAMPE Multiroom Audio Expander or
one S-EXT1-S Sonnex Link Over Fiber Extender (connected to a
SWAMPE Multiroom Audio Expander) can be connected.
2.
If additional SWAMP-24X8 devices are to be added, repeat step 1 for each
device. Each SWAMP-24X8 is assigned a different Net ID number as it is
added.
3.
If necessary, double click a device to open the “Device Settings” window
and change the Net ID, as shown in the following illustrations.
“Device Settings: Crestron SWAMP-24X8 (Cresnet)” Window
“Device Settings: Crestron SWAMP-24X8 (Ethernet)” Window
NOTE: The ID code specified in the SIMPL Windows program must
match the Net ID or IP ID of each unit. Refer to “Identity Code” on page
16.
Program Manager
Program Manager is the view where programmers “program” a Crestron control
system by assigning signals to symbols.
The symbol can be viewed by double clicking on the icon or dragging it into Detail
View. Each signal in the symbol is described in the SIMPL Windows help file (F1).
Operations Guide – DOC. 7049B
Sonnex™ Multiroom Audio System: SWAMP(I)-24X8 • 43
Sonnex™ Multiroom Audio System
Crestron SWAMP(I)-24X8
Uploading and Upgrading
Crestron recommends using the latest programming software and that each device
contains the latest firmware to take advantage of the most recently released features.
However, before attempting to upload or upgrade it is necessary to establish
communication. Once communication has been established, files (for example,
programs or firmware) can be transferred to the control system (and/or device).
Finally, program checks can be performed (such as changing the device ID or
creating an IP table) to ensure proper functioning.
Establishing Communication
Use Crestron Toolbox for communicating with the SWAMP-24X8; refer to the
Crestron Toolbox help file for details. There are three methods of communication:
indirect, USB, and TCP/IP.
Indirect
Indirect Communication
Serial,
PC Running
Crestron Toolbox
LAN
Control System
SWAMP-24X8
Cresnet
or USB
SWAMP-24X8 connects to control system via Cresnet:
USB
1.
Establish communication between the PC and the control system as
described in the latest version of the 2-Series Control Systems Reference
Guide (Doc. 6256).
2.
Use the Address Book in Crestron Toolbox to create an entry for the
SWAMP-24X8 using the expected communication protocol (indirect).
Select the Cresnet ID of the SWAMP-24X8 and the address book entry of
the control system that is connected to the SWAMP-24X8.
3.
Display the SWAMP-24X8’s “System Info” window (click the
icon);
communications are confirmed when the device information is displayed.
NOTE: Required for initial setup of Ethernet parameters.
USB Communication
PC Running
Crestron Toolbox
USB
SWAMP-24X8
The COMPUTER port on the SWAMP-24X8 connects to the USB port on the PC
via the included Type A to Type B USB cable:
1.
Use the Address Book in Crestron Toolbox to create an entry using the
expected communication protocol (USB). When multiple USB devices are
connected, identify the SWAMP-24X8 by entering “SWAMP-24X8” in the
Model textbox, the unit’s serial number in the Serial textbox or the unit’s
hostname in the Hostname textbox. The hostname can be found in the
44 • Sonnex™ Multiroom Audio System: SWAMP(I)-24X8
Operations & Installation Guide – DOC. 7049B
Crestron SWAMP(I)-24X8
Sonnex™ Multiroom Audio System
“System Info” window in the section marked Ethernet however,
communications must be established in order to see this information in the
“System Info” window.
2.
TCP/IP
Display the SWAMP-24X8’s “System Info” window (click the
icon);
communications are confirmed when the device information is displayed.
Ethernet Communication
PC Running
Crestron Toolbox
LAN
SWAMP-24X8
The SWAMP-24X8 connects to PC via Ethernet:
1.
Establish indirect / USB communication between SWAMP-24X8 and PC.
2.
Enter the IP address, IP mask and default router of the SWAMP-24X8 via
Crestron Toolbox (Functions | Ethernet Addressing); otherwise enable
DHCP.
NOTE: Use the Device Discovery Tool in Crestron Toolbox to detect all Ethernet
devices on the network and their IP configuration. The tool is available in Toolbox
version 1.15.143 or later.
3.
Confirm Ethernet connection between SWAMP-24X8 and PC. If
connecting through a hub or router, use CAT5 straight through cables with
8-pin RJ-45 connectors. Alternatively, use a CAT5 crossover cable to
connect the two LAN ports directly without using a hub or router.
4.
Use the Address Book in Crestron Toolbox to create an entry for the
SWAMP-24X8 with the SWAMP-24X8’s TCP/IP communication
parameters.
5.
Display the “System Info” window (click the
SWAMP-24X8 entry.
icon) and select the
Programs and Firmware
Program or firmware files may be distributed from programmers to installers or from
Crestron to dealers. Firmware upgrades are available from the Crestron Web site as
new features are developed after product releases. One has the option to upload
programs via the programming software or to upload and upgrade via the Crestron
Toolbox. For details on uploading and upgrading, refer to the SIMPL Windows help
file or the Crestron Toolbox help file.
SIMPL Windows
If a SIMPL Windows program is provided, it can be uploaded to the control system
using SIMPL Windows or Crestron Toolbox.
Firmware
Check the Crestron Web site to find the latest firmware. (New users may be required
to register to obtain access to certain areas of the site, including the FTP site.)
Upgrade SWAMP-24X8 firmware via Crestron Toolbox.
Operations Guide – DOC. 7049B
1.
Establish communication with the SWAMP-24X8 and display the “System
Info” window.
2.
Select Functions | Firmware… to upgrade the SWAMP-24X8 firmware.
Sonnex™ Multiroom Audio System: SWAMP(I)-24X8 • 45
Sonnex™ Multiroom Audio System
Crestron SWAMP(I)-24X8
Program Checks
Actions that can be performed on the SWAMP-24X8 vary depending on whether it is
connected via Cresnet or Ethernet.
Cresnet Connections
For Cresnet connections, using Crestron Toolbox, display the network device tree
(Tools | Network Device Tree View) to show all network devices connected to the
control system. Right-click on the SWAMP-24X8 to display actions that can be
performed on the SWAMP-24X8.
Ethernet Connections
For Ethernet connections, using Crestron Toolbox, display the “System Info window
(click the
icon) and select the Functions menu to display actions that can be
performed on the SWAMP-24X8.
Be sure to use Crestron Toolbox to create the SWAMP-24X8 IP table.
1.
Select Functions | IP Table Setup.
2.
Add, modify or delete entries in the IP table. The SWAMP-24X8 can have
only one IP table entry.
3.
A defined IP table can be saved to a file or sent to the device.
Edit the control system’s IP table to include an entry for the SWAMP-24X8. The
entry should list the SWAMP-24X8’s IP ID (specified on the SWAMP-24X8’s IP
table) and the internal gateway IP address 127.0.0.1.
46 • Sonnex™ Multiroom Audio System: SWAMP(I)-24X8
Operations & Installation Guide – DOC. 7049B
Crestron SWAMP(I)-24X8
Sonnex™ Multiroom Audio System
Operation
The SWAMP-24X8 can be controlled from the front panel or the Sonnex Tool in
Crestron Toolbox.
NOTE: For more information, refer to the Crestron Toolbox help file.
When operated from the front panel, the SWAMP-24X8 operates in either the Zone
mode or Source mode.
Use the “Main” menu to select Zone mode or Source mode. To display the “Main”
menu, press MENU until Main Menu appears.
“Main” Menu
Power
Turn on the SWAMP-24X8 by moving the POWER switch to . To turn off the
SWAMP-24X8, move the POWER switch to
Zone Mode
The Zone mode uses the front panel to route a source signal to a selected zone. To
enter the Zone mode:
1.
From the “Main” menu, press the T or ▲ buttons to display Zone Mode
and press ENTER.
2.
Press the ZONE button of the zone to be controlled.
3.
Press the SOURCE button of the source to be routed. The associated
SOURCE and ZONE LEDs light.
Alternatively, press the ZONE button twice to turn on the zone and connect
the last-selected source.
4.
Source Mode
Press MENU to return to the “Main” menu.
The Source mode uses the front panel to select a source signal and route it to
multiple zones. To enter the Source mode:
1.
From the “Main” menu, press the T or ▲ buttons to display Source Mode
and press ENTER.
2.
Press the SOURCE button of the source to be routed. The associated
SOURCE LED lights.
3.
Press the ZONE button(s) of the zone(s) to be selected. The associated
ZONE LED(s) lights.
To remove a zone from a source, press the desired ZONE button. The
associated ZONE LED turns off.
4.
Volume Control
Operations Guide – DOC. 7049B
Press MENU to return to the “Main” menu.
To raise the volume in the selected zone(s), turn the VOLUME knob clockwise. To
lower the volume in the selected zone(s), turn the VOLUME knob
counterclockwise.
Sonnex™ Multiroom Audio System: SWAMP(I)-24X8 • 47
Sonnex™ Multiroom Audio System
Crestron SWAMP(I)-24X8
Problem Solving
Troubleshooting
The following table provides corrective action for possible trouble situations. If
further assistance is required, please contact a Crestron customer service
representative.
SWAMP-24X8 Troubleshooting
TROUBLE
POSSIBLE CAUSE(S)
CORRECTIVE ACTION
Device does not
function.
Device is not
communicating with the
network.
Use Crestron Toolbox to
poll the network. Verify
network connection to the
device.
Audio dropouts heard
on SWAMPE zone.
Bad or no shield on
Sonnex cable connecting
SWAMP-24X8 and
peripheral device.
Ensure continuity and
integrity of shield on both
ends of the Sonnex cable.
60 Hz hum heard on
a selected input
source.
The source has no earth
ground.
Connect the chassis of the
source to the G (Ground)
screw on the
SWAMP-24X8.
Incorrect Audio
signal.
Signal is incorrectly
routed.
Reroute the signal.
Zone is incorrectly
bussed with other
zone(s).
Remove zone from bus.
Improper grounding.
Check that all ground
connections have been
made properly.
Loss of functionality
due to electrostatic
discharge.
Check Network Wiring
Use the Right Wire
To ensure optimum performance over the full range of your installation topology,
use Crestron Certified Wire only. Failure to do so may incur additional charges if
support is required to identify performance deficiencies because of using improper
wire.
Calculate Power
CAUTION: Use only Crestron power supplies for Crestron equipment. Failure to
do so could cause equipment damage or void the Crestron warranty.
CAUTION: Provide sufficient power to the system. Insufficient power can lead to
unpredictable results or damage to the equipment. Use the Crestron Power
Calculator to help calculate how much power is needed for the system
(www.crestron.com/calculators).
When calculating the length of wire for a particular Cresnet run, the wire gauge and
the Cresnet power usage of each network unit to be connected must be taken into
consideration. Use Crestron Certified Wire only. If Cresnet units are to be daisy
chained on the run, the Cresnet power usage of each network unit to be daisy
chained must be added together to determine the Cresnet power usage of the entire
48 • Sonnex™ Multiroom Audio System: SWAMP(I)-24X8
Operations & Installation Guide – DOC. 7049B
Crestron SWAMP(I)-24X8
Sonnex™ Multiroom Audio System
chain. If the unit is run from a Crestron system power supply network port, the
Cresnet power usage of that unit is the Cresnet power usage of the entire run. The
wire gauge and the Cresnet power usage of the run should be used in the following
equation to calculate the cable length value on the equation’s left side.
Cable Length Equation
40,000
L<
RxP
Where: L = Length of run (or chain) in feet
R = 6 Ohms (Crestron Certified Wire: 18 AWG (0.75 mm 2 ))
or 1.6 Ohms (Cresnet HP: 12 AWG (4 mm 2 ))
P = Cresnet power usage of entire run (or chain)
Make sure the cable length value is less than the value calculated on the right side of
the equation. For example, a Cresnet run using 18 AWG Crestron Certified Wire and
drawing 20 watts should not have a length of run more than 333 feet (101 meters). If
Cresnet HP is used for the same run, its length could extend to 1250 feet (381
meters).
NOTE: All Crestron certified Cresnet wiring must consist of two twisted pairs. One
twisted pair is the +24V conductor and the GND conductor and the other twisted
pair is the Y conductor and the Z conductor.
Strip and Tin Wire
When daisy chaining Cresnet units, strip the ends of the wires carefully to avoid
nicking the conductors. Twist together the ends of the wires that share a pin on the
network connector and tin the twisted connection. Apply solder only to the ends of
the twisted wires. Avoid tinning too far up the wires or the end becomes brittle.
Insert the tinned connection into the Cresnet connector and tighten the retaining
screw. Repeat the procedure for the other three conductors.
Add Hubs
Use of a Cresnet Hub/Repeater (CNXHUB) is advised whenever the number of
Cresnet devices on a network exceeds 20 or when the combined total length of
Cresnet cable exceeds 3000 feet (914 meters).
Reference Documents
The latest version of all documents mentioned within the guide can be obtained from
the Crestron Web site (www.crestron.com/manuals).
List of Related Reference Documents
DOCUMENT TITLE
2-Series Control Systems Reference Guide
Crestron e-Control Reference Guide
Further Inquiries
If you cannot locate specific information or have questions after reviewing this
guide, please take advantage of Crestron's award winning customer service team by
calling Crestron at 1-888-CRESTRON [1-888-273-7876]. For assistance in your
region, please refer to the Crestron Web site (www.crestron.com/offices) for a listing
of Crestron worldwide offices.
You can also log onto the online help section of the Crestron Web site
(www.crestron.com/onlinehelp) to ask questions about Crestron products. First-time
users need to establish a user account to fully benefit from all available features.
Operations Guide – DOC. 7049B
Sonnex™ Multiroom Audio System: SWAMP(I)-24X8 • 49
Sonnex™ Multiroom Audio System
Crestron SWAMP(I)-24X8
Future Updates
As Crestron improves functions, adds new features and extends the capabilities of
the SWAMP-24X8, additional information may be made available as manual
updates. These updates are solely electronic and serve as intermediary supplements
prior to the release of a complete technical documentation revision.
Check the Crestron Web site periodically for manual update availability and its
relevance. Updates are identified as an “Addendum” in the Download column.
50 • Sonnex™ Multiroom Audio System: SWAMP(I)-24X8
Operations & Installation Guide – DOC. 7049B
Crestron SWAMP(I)-24X8
Sonnex™ Multiroom Audio System
Return and Warranty Policies
Merchandise Returns / Repair Service
1.
No merchandise may be returned for credit, exchange or service without prior authorization
from Crestron. To obtain warranty service for Crestron products, contact an authorized
Crestron dealer. Only authorized Crestron dealers may contact the factory and request an
RMA (Return Merchandise Authorization) number. Enclose a note specifying the nature of
the problem, name and phone number of contact person, RMA number and return address.
2.
Products may be returned for credit, exchange or service with a Crestron Return Merchandise
Authorization (RMA) number. Authorized returns must be shipped freight prepaid to
Crestron, 6 Volvo Drive, Rockleigh, N.J. or its authorized subsidiaries, with RMA number
clearly marked on the outside of all cartons. Shipments arriving freight collect or without an
RMA number shall be subject to refusal. Crestron reserves the right in its sole and absolute
discretion to charge a 15% restocking fee plus shipping costs on any products returned with
an RMA.
3.
Return freight charges following repair of items under warranty shall be paid by Crestron,
shipping by standard ground carrier. In the event repairs are found to be non-warranty, return
freight costs shall be paid by the purchaser.
Crestron Limited Warranty
Crestron Electronics, Inc. warrants its products to be free from manufacturing defects in materials and
workmanship under normal use for a period of three (3) years from the date of purchase from Crestron,
with the following exceptions: disk drives and any other moving or rotating mechanical parts, pan/tilt heads
and power supplies are covered for a period of one (1) year; touch screen display and overlay components
are covered for 90 days; batteries and incandescent lamps are not covered.
This warranty extends to products purchased directly from Crestron or an authorized Crestron dealer.
Purchasers should inquire of the dealer regarding the nature and extent of the dealer's warranty, if any.
Crestron shall not be liable to honor the terms of this warranty if the product has been used in any
application other than that for which it was intended or if it has been subjected to misuse, accidental
damage, modification or improper installation procedures. Furthermore, this warranty does not cover any
product that has had the serial number altered, defaced or removed.
This warranty shall be the sole and exclusive remedy to the original purchaser. In no event shall Crestron
be liable for incidental or consequential damages of any kind (property or economic damages inclusive)
arising from the sale or use of this equipment. Crestron is not liable for any claim made by a third party or
made by the purchaser for a third party.
Crestron shall, at its option, repair or replace any product found defective, without charge for parts or labor.
Repaired or replaced equipment and parts supplied under this warranty shall be covered only by the
unexpired portion of the warranty.
Except as expressly set forth in this warranty, Crestron makes no other warranties, expressed or implied,
nor authorizes any other party to offer any warranty, including any implied warranties of merchantability or
fitness for a particular purpose. Any implied warranties that may be imposed by law are limited to the terms
of this limited warranty. This warranty statement supersedes all previous warranties.
Operations Guide – DOC. 7049B
Sonnex™ Multiroom Audio System: SWAMP(I)-24X8 • 51
Sonnex™ Multiroom Audio System
Crestron SWAMP(I)-24X8
This page is intentionally left blank.
52 • Sonnex™ Multiroom Audio System: SWAMP(I)-24X8
Operations & Installation Guide – DOC. 7049B
Crestron SWAMP(I)-24X8
Sonnex™ Multiroom Audio System
This page is intentionally left blank.
Operations Guide – DOC. 7049B
Sonnex™ Multiroom Audio System: SWAMP(I)-24X8 • 53
Crestron Electronics, Inc.
15 Volvo Drive Rockleigh, NJ 07647
Tel: 888.CRESTRON
Fax: 201.767.7576
www.crestron.com
Operations Guide – DOC. 7049B
(2028550)
01.12
Specifications subject to
change without notice.