1
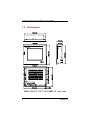
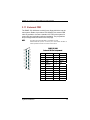
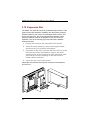
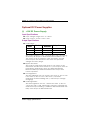
PANEL PC 1000 All-in-One 10.4” Super Slim PANEL PC User’s Manual Disclaimers The information in this manual has been carefully checked and is believed to be accurate. ACNODES assumes no responsibility for any infringements of patents or other rights of third parties, which may result from its use. ACNODES assumes no responsibility for any inaccuracies that may be contained in this document. ACNODES makes no commitment to update or to keep current the information contained in this manual. ACNODES reserves the right to make improvements to this document and/or product at any time and without notice. No part of this document may be reproduced, stored in a retrieval system, or transmitted, in any form or by any means, electronic, mechanical, photocopying, recording, or otherwise, without the prior written permission of ACNODES. Copyright 2002 by ACNODES All rights reserved. May 2002, Version A1 ii Safety Approvals !" CE Marking !" FCC Class A FCC Compliance This equipment has been tested and complies with the limits for a Class-A digital device, pursuant to Part 15 of the FCC Rules. These limits are designed to provide reasonable protection against harmful interference in a residential installation. If not installed and used in accordance with proper instructions, this equipment might generate or radiate radio frequency energy and cause harmful interference to radio communications. However, there is no guarantee that interference will not occur in a particular installation. If this equipment does cause harmful interference to radio or television reception, which can be determined by turning the equipment off and on, the user is encouraged to try to correct the interference by one or more of the following measurers: 1. Reorient or relocate the receiving antenna. 2. Increase the separation between the equipment and receiver. 3. Connect the equipment into an outlet on a circuit different from that to which the receiver is connected. 4. Consult the dealer or an experienced radio/TV technician for help. Shielded interface cables must be used in order to comply with emission limits. iii Safety Precautions Before getting started, read the following important cautions. 1. The PANEL PC 1000 does not come equipped with an operating system. An operating system must be loaded first before installing any software into the computer. 2. Be sure to ground yourself to prevent static charge when installing the internal components. Use a grounding wrist strap and place all electronic components in any static-shielded devices. Most electronic components are sensitive to static electrical charge. 3. Disconnect the power cord from the PANEL PC 1000 before making any installation. Be sure both the system and the external devices are turned OFF. Sudden surge of power could ruin sensitive components. Make sure the PANEL PC 1000 is properly grounded. 4. The brightness of the flat panel display decreases with usage. However, hours of use vary depending on the application environment. 5. Turn OFF the system power before cleaning. Clean the system using a cloth only. Do not spray any liquid cleaner directly onto the screen. The PANEL PC 1000 may come with or w/o a touch screen. Although the touch screen is chemical resistant, it is recommended that you spray the liquid cleaner on a cloth first before wiping the screen. In case your system comes without the touch screen, you must follow the same procedure and not spray any cleaner on the flat panel directly. 6. Avoid using sharp objects to operate the touch screen. Scratches on the touch screen may cause malfunction or internal failure to the touch screen. 7. The flat panel display is not susceptible to shock or vibration. When assembling the PANEL PC 1000, make sure it is securely installed. iv 8. Do not open the system’s back cover. If opening the cover for maintenance is a must, only a trained technician is allowed to do so. Integrated circuits on computer boards are sensitive to static electricity. To avoid damaging chips from electrostatic discharge, observe the following precautions: #"Before handling a board or integrated circuit, touch an unpainted portion of the system unit chassis for a few seconds. This will help to discharge any static electricity on your body. #"When handling boards and components, wear a wrist-grounding strap, available from most electronic component stores. Trademarks Acknowledgments ACNODES is a trademark of ACNODES Inc. ALI is a trademark of Acer Laboratories, Inc. AMD is a trademark of Advanced Micro Devices, Inc. AMI is a trademark of American Mega trends, Inc. Cyrix is a trademark of Cyrix Corporation. ELO is a trademark of ELO Touch Systems, Inc. IBM, PC/AT, PS/2, VGA are trademarks of International Business Machines Corporation. Intel and Pentium are trademarks of Intel Corporation. MS-DOS, Microsoft C and Quick BASIC are trademarks of Microsoft Corporation. SMC is a trademark of Standard Microsystems Corporation. C&T is a trademark of Chips and Technologies, Inc. SST is a trademark of Silicon Storage Technology, Inc. UMC is a trademark of United Microelectronics Corporation. Other brand names and trademarks are the properties of their respective owners. v This page does not contain any information. vi Table of Contents Chapter 1 Introduction ------------------------------- 1 1.1 1.2 1.3 1.4 1.5 General Description ......................................... Specifications .................................................. Dimensions ...................................................... I/O Outlets........................................................ Utilities Supported ........................................... 1 2 4 5 6 Chapter 2 System Configuration ------------------ 7 2.1 System Configuration ...................................... 7 2.1.1 2.2 Front View ............................................................... 7 Panel Mount ..................................................... 8 Chapter 3 System Installation --------------------- 9 3.1 3.2 3.3 3.4 3.5 3.6 3.7 3.8 3.9 3.10 3.11 3.12 3.13 CPU .................................................................10 DRAM ..............................................................10 HDD.................................................................11 4 x Serial Ports ...............................................12 Parallel Port ....................................................13 VGA.................................................................13 Ethernet ..........................................................13 Digital I/Os ......................................................14 Keyboard ........................................................14 PS/2 Mouse .....................................................14 External FDD ...................................................15 Expansion Slot................................................16 System O/S and Software Installation.............17 Appendix A Power Supply Specifications---- 19 Standard AC Power Supplies ...................................19 Optional DC Power Supplies ....................................21 Table of Contents vii This page does not contain any information. x PANEL PC 1000 All-in-One PANEL PC User’s Manual Chapter 1 Introduction This chapter contains the general information and the detailed specifications of the PANEL PC1000. Chapter 1 includes the following sections: $"General Description $"System Specification $"Dimensions $"I/O Outlets $"Utilities Supported 1.1 General Description The PANEL PC 1000 super slim industrial PANEL PCs are mainly designed for industrial automation and some space-constricted embedded applications. For some space-concerned industries, a traditional PC with a separate main system, display monitor and keyboard is simply not integrated enough. Ruggedly designed, the PANEL PC 1000 is 100% IBM PC/AT compatible and it integrates super I/Os, VGA, 10.4” TFT, touch screen, Ethernet, and packs special industrial features like watchdog timer, CMOS double backup, all in a single system. The full PC functionality coupled with its industrial-grade construction easily tailors the system for any embedded applications and allows the system to endure continuous operation in any hostile industrial environments where stability and reliability are a must. Common applications of the PANEL PC 1000 include tooling machine, POI terminal, stand-alone KIOSK, medical instrument, mobile communication device and banking system - to name just a few. Designed by the PC experts for PC professionals, the PANEL PC 1000 is virtually the ultimate one-step solution for your space-limited applications. Introduction 1 PANEL1000-370 All-in-One PANEL PC User’s Manual 1.2 Specifications Core System for system board $"CPU: Intel Celeron 300 up to 733 MHz; Intel Pentium III 500 up to1.0Ghz $"System Chipset: Intel 440BX Core Logic Controller $"BIOS: Award BIOS, Y2K compliant 2Mbit Flash ROM, DMI, Plug and Play $"System Memory: One 168-pin DIMM (PC-100) Maximum SDRAM of up to 256MB $"L2 Cache: Integrated in CPU $"Real Time Clock: Dallas STM48T86PC1 or latest product $"Watchdog Timer: System reset or Non-Mask Interrupt software programmable Time interval and jumper selectable; 64 levels, 0.5~8 / 5~80 / 50~800 / 100~1600 seconds I/O System $"Standard I/O: − 4 x serial ports with power; 3 x RS-232, 1 x RS-232/422/485 jumper selectable − 1 x parallel port, SPP/EPP/ECP − 1 x External FDD Interface − 2 x HDD Interface − 1 x Keyboard Interface − 1 x PS/2 Mouse Interface − 2 x USB Ports $"Digital I/O: Input x 4, Output x 4 $"Ethernet: − 32-bit Plug & Play Fast Ethernet Controller − RJ-45 connector $"Audio: − ESS Solo-1 1938 32-bit PCI 2.1 Audio Drive controller $"VGA/Flat Panel Controller: − AGP Interface C&T69000 controller with integrated 2MB SDRAM − Simultaneously supports CRT and flat panel displays 2 Introduction PANEL PC 1000 All-in-One PANEL PC User’s Manual Built-in Peripherals $"Standard 100W power supply $"2.5” Hard disk (540MB or up) $"10.4” ELO anti-glare analog resistive touch screen with RS- 232 controller sharing COM3 $"System cooling fan NOTE: Optional DC power supplies rated at +12V, +24V and +48V are also available. (See Appendix A) System Specification $"10.4” TFT with 640 x 480 resolution $"External FDD interface $"NEMA 4/12 sealed front panel $"Heat dispensing design $"PC/104 expansion Bus $"One free slot for PCI/ISA expansion $"Net weight: 4.2 KGS $"Dimension (main body size): − PANEL PC 1000 − 330 x 266 x 93 mm (with one ISA or PCI expansion card) $"Operating Temperature Range: 0 o C ~ 40 o C $"Relative Humidity: 5% ~ 95%; non-condensing NOTE: Introduction For more detailed information on the system engine board used in your PANEL PC, refer to the system board User’s Manual that came with the system packaging. 3 PANEL1000-370 All-in-One PANEL PC User’s Manual 1.3 Dimensions PANEL1000-370 10.4" FLAT PANEL PC (unit: mm) 4 Introduction PANEL PC 1000 All-in-One PANEL PC User’s Manual 1.4 I/O Outlets The following figure shows the I/O arrangement of the PANEL PC 1000. The backside of the chassis contains most of the connectors. 1. Ethernet RJ-45 phone jack 8. COM3 2. PS/2 mouse 10. COM1 3. Keyboard 11. VGA port IF 4. External FDD 12. AC inlet 5. 4-channel Digital Inputs/outputs 13. Power switch 6. Parallel port 9. COM2 14. +5V/12V DC outlet 7. COM4 Introduction 5 PANEL1000-370 All-in-One PANEL PC User’s Manual 1.5 Utilities Supported %"Watchdog Utility %"Ethernet Utility %"VGA Drivers %"Touch screen Utility 6 Introduction PANEL PC 1000 All-in-One PANEL PC User’s Manual Chapter 2 System Configuration This chapter details the system parts and components with figures. Sections include $" System Major Parts 2.1 $" Panel Mount System Configuration 2.1.1 Front View The figure below shows the front views of PANEL PC1000. 12 3 1. Power LED 2. HDD LED 3. Ethernet LED System Configuration 7 PANEL1000-370 All-in-One PANEL PC User’s Manual 2.2 Panel Mount The PANEL PC 1000 is mainly designed for panel mount application. To mount the PANEL PC 1000, the standard set of mounting kit (included in the system packaging) is needed. Please refer to the following figure. 8 System Configuration PANEL PC 1000 All-in-One PANEL PC User’s Manual Chapter 3 System Installation This chapter describes the installation and the cable connection to the system connectors. See system board User’s Manual that came with your PANEL PC packaging for more details. Sections in this chapter includes $"CPU $"DRAM $"HDD $"4 x Serial Ports $"Parallel Port $"VGA $"Ethernet $"Digital I/O $"Keyboard $"PS/2 Mouse $"External FDD $"Expansion Slot $"System O/S and Software Installation The PANEL PC 1000 has a Pentium III little board with a free PCI/ISA slot inside. It already builds in a Pentium III CPU, relevant DRAM and a 2.5” HDD. These are all standard and the system is ready to play. System performance can be increased by upgrading to a higher performance CPU, higher capacity DRAM modules and hard disk drive. The user can use the I/O ports located at the back side of the chassis to connect external peripheral devices, such as a monitor, serial devices, parallel printer…etc. NOTE: Make sure the power cord is disconnected before any installation. To install any internal device such as CPU, DRAM and HDD, take out the rear chassis cover first. System Installation 9 PANEL1000-370 All-in-One PANEL PC User’s Manual 3.1 CPU The standard PANEL PC 1000 system already builds in Pentium III-level CPU. When upgrading to a new CPU of the same level, follow the instructions below; 1. To remove the existing CPU requires the use of a chip puller. 2. Locate pin 1 at the corner of the CPU socket and align the CPU’s pin 1 with the pin 1 on the socket. 3. Place the CPU in the socket. If the insertion of the CPU to the socket is not easy, then check whether the notch on the corner of the CPU and the notch on the socket are properly aligned. 4. When a new CPU is installed, other settings on the system control board including CPU type, CPU bus clock and CPU voltage may need to be adjusted. Make sure all the settings are correct for the installed CPU. (See the CPU jumper settings in the CPU card User’s Manual that came with the PANEL PC packaging). 3.2 DRAM The system control board provides 1 x 168-pin DIMM sockets supporting system memory up to 256MB. To install the memory module; 1. Disconnect all power sources. 2. The memory module can only fit into the socket one way. Holding the memory module with the notch on the upper right corner, then insert the memory module at a 45° Angle and push the module upright until it clicks into place. The system auto detects the new memory size and it is not necessary to change the system configuration after installation. 10 System Installation PANEL PC 1000 All-in-One PANEL PC User’s Manual 3.3 HDD The standard PANEL PC 1000 already builds in a 2.5” hard disk drive. If the user intends to remove the existing device for repair or for a higher-capacity one, then follow the installation instructions below. 1. Take out the screws and remove the HDD bracket. Mounting orientation of the HDD brackets on PANEL PC 1000 are not similar to each other. The four screws mounting the PANEL PC 1000 HDD bracket sits at the bottom of the bracket. 2. Reinstall the new hard disk driver to the HDD bracket and screw the HDD bracket to the system compartment again. The four rubber stands act as cushions to lessen the vibration that usually causes damage to mechanical devices like a hard disk driver. 3. Use the IDE cable to connect the HDD to the IDE pin connector. Match pin 1 of the HDD and the pin 1 of the cable. System Installation 11 PANEL1000-370 All-in-One PANEL PC User’s Manual 3.4 4 x Serial Ports The PANEL PC 1000 provides four onboard serial ports installed on the bottom rear side of the chassis. Arrangements on PANEL PC 1000 specify COM1, COM2, COM3 providing RS-232 interface, and with its RS-422/485 interface connected to COM4. Each serial port comes with +5V/+12V power capabilities on both Pin 1 and Pin 9, ready to accommodate a wide array of serial devices such as fax modem, scanner, serial mouse, touch screen...etc. If the touch screen option is included, its controller will share COM3. COM1 to COM4 are all D-SUB 9-pin connectors. To attach to any serial device, just plug in the device connector to the 9-pin D-SUB. In terms of transmission distance, the RS-422/485 will perform better than RS-232. In this case, the COM2 is suggested to be set to RS-422/485 and the related jumpers have to be set correctly first (see the system board User’s Manual). The RS-485 pin assignment is listed below. Pin # 1 2 6 12 3 7 4 8 5 9 1 2 3 4 5 6 7 8 9 Signal Name R2-422 TXTX+ RX+ RXGND No connector No connector No connector No connector RS-485 DATADATA+ No connector No connector GND No connector No connector No connector No connector System Installation PANEL PC 1000 All-in-One PANEL PC User’s Manual 3.5 Parallel Port The printer interface is a 25-pin D-SUB connector. To connect any parallel device, just plug in the device connector to the 25-pin D-SUB. 3.6 VGA The PANEL PC 1000 has an analog RGB interface connector. It is able to connect to an expansion CRT monitor, and the system can display on both the flat panel and the CRT simultaneously. 3.7 Ethernet The PANEL PC 1000 provides an NE2000 compatible Ethernet (RJ-45) interface. For network connection, just plug in one cable end of the PANEL PC 1000 100-Base-T Hub into the standard Ethernet phone jack. The pin assignment of the RJ-45 is listed below; RJ-45 Connector Pin Assignment 1 2 3 4 5 6 7 8 RJ-45 System Installation Pin 1 2 3 6 others Description Tx+ (Data transmission positive) Tx- (Data transmission negative) Rx+(Data reception positive) Rx- (Data reception negative) Not use 13 PANEL1000-370 All-in-One PANEL PC User’s Manual 3.8 Digital I/Os The PANEL PC 1000 provides a digital I/O of 4-channel inputs/outputs for simple automation control. For example, it can be used to control the opening and closing of the cash drawer on a POS system. It can also be used for UPS control. It comes with a 15-pin D-SUB connector, and its pin position and pin assignment is shown on the following page. Digital I/O Pin Assignment 1 6 2 11 12 3.9 7 3 8 4 9 5 10 13 14 15 P1 OUT 1 P9 GND P2 OUT 2 P10 GND P3 OUT 3 P11 IN1 P4 OUT4 P12 IN2 P5 GND P13 IN3 P6 GND P14 IN4 P7 GND P15 GND P8 GND Keyboard The PANEL PC 1000 provides a standard PS/2 keyboard connector. If the user would like to use AT keyboard interface, a conversion cable is also provided to make this connection. 3.10 PS/2 Mouse The PANEL PC 1000 has one PS/2 mouse connector. A simple plug-in will make the connection. 14 System Installation PANEL PC 1000 All-in-One PANEL PC User’s Manual 3.11 External FDD The PANEL PC 1000 does not build in any floppy disk drive into the main system. Rather, it provides a FDD interface. An external FDD cable is provided to connect a standard 3.5” FDD to the system for system O/S and application software installation. The pin positions and pin assignments are listed on the next page. NOTE: 26 25 24 23 22 21 20 19 18 17 16 15 14 An optional external FDD is available for the PANEL1000-370 system. Consult your authorized dealers or sales representatives for more information. PANEL PC 1000 External FDD Pin Assignment 13 12 11 10 P1 SIDE1- P 14 WPT- 9 P2 RDATA- P 15 TRK0- 8 P3 GND P 16 GND 6 P4 GND P 17 WGATE- 5 P5 GND P 18 GND 3 P6 WDATA- P 19 NC 2 P7 REDWC- P 20 STEP- 1 P8 NC P 21 DIR- P9 NC P 22 MOTE0- P 10 DRVS0- P 23 NC P 11 VCC +5V P 24 DSKCHG- P 12 VCC P 25 NC P 13 INDEX- P 26 VCC 7 4 System Installation 15 PANEL1000-370 All-in-One PANEL PC User’s Manual 3.12 Expansion Slot The PANEL PC 1000, this comes as a standard system feature. If the system comes with expansion capability, then the system includes a PCI/ISA expansion riser card to accommodate either an ISA or PCI device at a given time. Due to the internal space limitation, only a half-size expansion card can be adapted. To use the ISA or PCI expansion, refer to the following figure and follow the installation instructions below; 1. Plug the riser card into the onboard PCI/ISA slot first. 2. Screw the metal opening to the power supply bracket and the multi-I/O conversion metal piece. 3. Plug either an ISA or PCI card into the ISA or PCI slot on the riser card and screw the expansion card to the metal opening piece. All the connectors of the expansion card will come out from the opening on the rear cover for further cable connection. 4. Screw the rear cover to the chassis. Please also note that the total height of the system with expansion slot is 93 mm. 16 System Installation PANEL PC 1000 All-in-One PANEL PC User’s Manual 3.13 System O/S and Software Installation The PANEL PC 1000 is not equipped with any operating system. It builds in a 2.5” HDD and 1.5MB Solid State Disk as memory storage device. As both devices are built in the system chassis, to load any O/S or application software into the computer, an external device is needed to act as a bridge. There are three major ways to load software into the system. 1. Use an external FDD: Attach a 3.5” FDD to the external FDD port via the provided external FDD cable.26-pin FDD connector must be plugged into the system FDD connector; the 34-pin standard 3.5” FDD signal connector and the 4-pin FDD power connector are connected to the standard 3.5” FDD. Then, configure the system BIOS setup and insert a 3.5” disk containing necessary software and start the installation. 2. Use Ethernet: If the Ethernet BOOTROM is already included in the system, the user can boot up the system via BOOTROM and download system O/S or application software from the net. 3. Use External CD-ROM/ HDD: When using an external CD-ROM or HDD for software installation on P PANEL PC 1000 an optional P-IDE device is needed. The P-IDE device is a converter to convert the parallel port to the IDE interface. System Installation 17 PANEL1000-370 All-in-One PANEL PC User’s Manual This page does not contain any information. 18 System Installation PANEL PC 1000 All-in-One PANEL PC User’s Manual Appendix A Power Supply Specifications Standard AC Power Supplies PANEL PC 1000 Power Supply The power supply used in the PANEL PC 1000 is a 100W open frame power supply. The specifications and features of this special power supply are listed in the following sections. Specifications $"High efficiency 100W output $"Universal input 100 to 240 VAC $"Over-voltage protection $"Small size 3” X 5” footprint $"Continuous short circuit protection $"Conductive EMI meets FCC class B Output Specifications $"Voltage Accuracy %"+5VDC primary output: + 5% %"Auxiliary output: + 5% $"Total output power %"Convection cooled: 100W %"Forced air cooling: 125W @ 25CFM $"Hold-up time: 50ms type. $"Over-voltage protection: approx. 5.8V $"Short circuit protection: Continuous $"Ripple and noise: 1% peak ~ peak max. Input Specifications $"Input voltage range: 100~240 VAC $"Inrush current: 2.4A at 100V AC or 30A at 240V AC (cold start) $"Input frequency: 47~63 Hz $"Line regulation: + 1% Power Supply Specifications 19 PANEL1000-370 All-in-One PANEL PC User’s Manual General Specifications $"Efficiency: 86% typ. Environmental Specifications $"Operating temperature range: 0°C to 40°C $"Storage temperature range -40°C to +85°C $"Humidity, non-condensing: 5% ~ 95% $"Altitude: 0 to 10,000 feet International Standards Safety Standards $"Designed to meet the following standards: UL 1950, CSA 22.2 NO. 234, VDE EN 60 950 EMI Standards $"Designed to meet the following limits: FCC docket 20780 curve “B”, EN55022 “B” CE Standards $"Designed to meet the following standards: IEC-801-2 Level IEC-801-3 Level IEC-801-4 Level IEC-801-5 Level 20 3 3 3 3 8KV air discharge 3V/M 2KV 2KV Power Supply Specifications PANEL PC 1000 All-in-One PANEL PC User’s Manual Optional DC Power Supplies (I) +12V DC Power Supply Input Specifications $"Input voltage range: +9VDC to +18V DC $"Input current: 10A at +12V DC max. Output Specifications $"Load Range: Output Min. Load Rated Load Voltage Accuracy +5V 0A 10A 4.95V to 5.05V +12V 0A 1.5A (open) 11.4V to12.6V -12V 0A 0.3A -11.4V to –12.6V The output range of +12V, -12V and down with +5V setting. At factory, all outputs in 60% rated load conditions, the +5V output is set to between 4.95V and 5.05V, and the other outputs are checked to be within the specified voltage accuracy range. $"Ripple and Noise: The peak-to-peak ripple and noise for +5V output is less than 50mV and less than 100mV for +/-12V outputs, both at rated loads. Measuring is done by 15MHz bandwidth limited oscilloscope and terminated each output with 0.47uF capacitor. $"Line Regulation: The line regulation for +5V output is less than +/-1%, for 12V is less than +/-2%, for –12V is less than +/-3% while measuring at rated loading and +/-10% of input voltage changing. $"Load Regulation: The load regulation for +5V, +12Vare less than +/-3%, for -12V is less than +/-5%, measuring is done by changing the measured output loading +/-40% from 60% rated load, and keep other output at 60% rated load. Power Supply Specifications 21 PANEL1000-370 All-in-One PANEL PC User’s Manual General Features $"Efficiency: The efficiency is 70% typical while measuring at nominal line and rated load. $"Protection: For some reason the power supply fails to control itself, the built-in over-voltage protection circuit will shut down the outputs to prevent damage to external circuits. The trip point of crowbar circuit is around 5.7V to 7.0V. The power supply will go into latch-off mode against short circuit or over load conditions, and have to turn OFF and then ON the DC input to restart the power supply. Environmental Specifications $"Operating temp. range: 0°C to 50°C with forced air 20cfm $"Storage temperature range: -40°C to +85°C International Standards Safety Standards $"Designed to meet the following standards: UL 1950, CSA 22.2 NO. 234, TUV/LVD EN60 950 EMI Standards $"Designed to meet the following limits:: FCC docket 20780 curve “B”, EN55022 “B” 22 Power Supply Specifications PANEL PC 1000 All-in-One PANEL PC User’s Manual (II) +24V DC Power Supply Input Specifications $"Input voltage range: +18VDC to +36V DC $"Input current: 5A at +24V DC max. Output Specifications $"Load Range: Output Min. Load Rated Load Voltage Accuracy +5V 0A 10A 4.95V to 5.05V +12V 0A 1.5A (open) 11.4V to12.6V -12V 0A 0.3A -11.4V to –12.6V The output range of +12V, -12V and down with +5V setting. At factory, all outputs in 60% rated load conditions, the +5V output is set to between 4.95V and 5.05V, and the other outputs are checked to be within the specified voltage accuracy range. $"Ripple and Noise: The peak-to-peak ripple and noise for +5V output is less than 50mV and less than 100mV for +/-12V outputs. Measuring is done by 15MHz bandwidth limited oscilloscope and terminated each output with 0.47uF capacitor. $"Line Regulation: The line regulation for +5V output is less than +/-1%, for +12V is less than +/-2%, for –12V is less than +/-3% while measuring at rated loading and +/-10% of input voltage changing. $"Load Regulation: The load regulation for +5V is less than +/-3%, for +12V is less than +/-5%, -12V is less than +7% -3%, measuring is done by changing the measured output loading +/-40% from 60% rated load, and keep other output at 60% rated load. Power Supply Specifications 23 PANEL1000-370 All-in-One PANEL PC User’s Manual General Features $"Efficiency: The efficiency is 75% typical while measuring at nominal line and rated load. $"Protection: For some reason the power supply fails to control itself, the built-in overvoltage protection circuit will shut down the outputs to prevent damage to external circuits. The trip point of crowbar circuit is around 5.7V to 7.0V. The power supply will go into latch-off mode against short circuit or over load conditions, and have to turn OFF and then ON the DC input to restart the power supply. Environmental Specifications $"Operating temp. range: 0°C to 50°C with forced air 20cfm $"Storage temperature range: -40°C to +85°C International Standards Safety Standards $"Designed to meet the following standards: UL 1950, CSA 22.2 NO. 234, TUV/LVD EN60 950 EMI Standards $"Designed to meet the following limits: FCC docket 20780 curve “B”, EN55022 “B” 24 Power Supply Specifications PANEL PC 1000 All-in-One PANEL PC User’s Manual (III) +48V DC Power Supply Input Specifications $"Input voltage range: +36VDC to +72V DC $"Input current: 3A at +48V DC max. Output Specifications $"Load Range: Output Min. Load Rated Load Voltage Accuracy +5V 0A 10A 4.95V to 5.05V +12V 0A 1.5A 11.4V to12.6V -12V 0A 0.3A -11.4V to –12.6V At factory, all outputs in 60% rated load conditions, the +5V output is set to between 4.95V and 5.05V, and the other outputs are checked to be within the specified voltage accuracy range. $"Ripple and Noise: The peak-to-peak ripple and noise for +5V output is less than 60mV and less than 100mV for +/-12V outputs. Measuring is done by 15MHz bandwidth limited oscilloscope and terminated each output with 0.47uF capacitor. $"Line Regulation: The line regulation for +5V output is less than +/-1%, for +12V is less than +/-2%, for –12V is less than +/-3% while measuring at rated loading and +/-10% of input voltage changing. $"Load Regulation: The load regulation for +5V is less than +/-3%, for +12V is less than +/-5%, -12V is less than +7% -3%, measuring is done by changing the measured output loading +/-40% from 60% rated load, and keep other output at 60% rated load. Power Supply Specifications 25 PANEL1000-370 All-in-One PANEL PC User’s Manual General Features $"Efficiency: The efficiency is 75% typical while measuring at nominal line and rated load. $"Protection: For some reason the power supply fails to control itself, the built-in over-voltage protection circuit will shut down the outputs to prevent damage to external circuits. The trip point of crowbar circuit is around 5.7V to 7.0V. The power supply will go into latch-off mode against short circuit or over load conditions, and have to turn OFF and then ON the DC input to restart the power supply. Environmental Specifications $"Operating temp. range: 0°C to 50°C with forced air 20cfm $"Storage temperature range: -40°C to +85°C International Standards Safety Standards $"Designed to meet the following standards: UL 1950, CSA 22.2 NO. 234, TUV/LVD EN60 950 EMI Standards $"Designed to meet the following limits: FCC docket 20780 curve “B”, EN55022 “B” 26 Power Supply Specifications