1
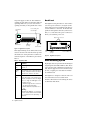
DigiDrive Guide
Ultra 160/LVD
Version 4.0
Digidesign Inc.
2001 Junipero Serra Boulevard
Daly City, CA 94014-3886 USA
tel: 650-731-6300
fax: 650-731-6399
Technical Support (USA)
650·731·6100
650·856·4275
Product Information (USA)
650·731-6102
800·333·2137
Fax on Demand (USA)
1·888·USE·DIGI (873·3444)
International Offices
Visit the Digidesign Web site
for contact information.
Web Site
www.digidesign.com
Copyright
This User’s Guide is copyrighted ©2001 by Digidesign, a
division of Avid Technology, Inc. (hereafter “Digidesign”), with
all rights reserved. Under copyright laws, this manual may not
be duplicated in whole or in part without the written consent of
Digidesign.
DIGIDESIGN, AVID, DIGIDRIVE, QUIETDRIVE, and PRO TOOLS
are trademarks or registered trademarks of Digidesign and/or
Avid Technology, Inc. All other trademarks are the property of
their respective owners.
All features and specifications subject to change without
notice.
PN 932909835-00 11/01
contents
Chapter 1. Using This Guide . . . . . . . . . . . . . . . . . . . . . . . . . . . . . . . . . . . . . . . . . . . . . . . . . . 1
Chapter 2. Overview . . . . . . . . . . . . . . . . . . . . . . . . . . . . . . . . . . . . . . . . . . . . . . . . . . . . . . . . . 3
Controls and Indicators . . . . . . . . . . . . . . . . . . . . . . . . . . . . . . . . . . . . . . . . . . . . . . . . . . . . 3
Rack-Mounting Option . . . . . . . . . . . . . . . . . . . . . . . . . . . . . . . . . . . . . . . . . . . . . . . . . . . . . 4
Handling the DigiDrive . . . . . . . . . . . . . . . . . . . . . . . . . . . . . . . . . . . . . . . . . . . . . . . . . . . . . 5
SCSI Configuration Requirements . . . . . . . . . . . . . . . . . . . . . . . . . . . . . . . . . . . . . . . . . . . . . 5
Chapter 3. Installation . . . . . . . . . . . . . . . . . . . . . . . . . . . . . . . . . . . . . . . . . . . . . . . . . . . . . . . 9
Before You Begin . . . . . . . . . . . . . . . . . . . . . . . . . . . . . . . . . . . . . . . . . . . . . . . . . . . . . . . . 9
Installing a DigiDrive . . . . . . . . . . . . . . . . . . . . . . . . . . . . . . . . . . . . . . . . . . . . . . . . . . . . . . 9
Determining SCSI IDs . . . . . . . . . . . . . . . . . . . . . . . . . . . . . . . . . . . . . . . . . . . . . . . . . . . . 16
Chapter 4. SCSI Performance Guidelines . . . . . . . . . . . . . . . . . . . . . . . . . . . . . . . . . . . . . . 19
SCSI Performance Guidelines . . . . . . . . . . . . . . . . . . . . . . . . . . . . . . . . . . . . . . . . . . . . . . . 19
Chapter 5. DigiDrive Management for Mac OS . . . . . . . . . . . . . . . . . . . . . . . . . . . . . . . . . 21
Checking DigiDrives . . . . . . . . . . . . . . . . . . . . . . . . . . . . . . . . . . . . . . . . . . . . . . . . . . . . . . 21
Initializing DigiDrives . . . . . . . . . . . . . . . . . . . . . . . . . . . . . . . . . . . . . . . . . . . . . . . . . . . . . 24
Troubleshooting . . . . . . . . . . . . . . . . . . . . . . . . . . . . . . . . . . . . . . . . . . . . . . . . . . . . . . . . 24
Chapter 6. DigiDrive Management for Windows NT and Windows 2000 . . . . . . . . . . 27
Windows Drive Subsystem Overview . . . . . . . . . . . . . . . . . . . . . . . . . . . . . . . . . . . . . . . . . . 27
Creating Primary Partitions . . . . . . . . . . . . . . . . . . . . . . . . . . . . . . . . . . . . . . . . . . . . . . . . 28
Formatting Partitions . . . . . . . . . . . . . . . . . . . . . . . . . . . . . . . . . . . . . . . . . . . . . . . . . . . . . 30
Creating an Emergency Repair Disk . . . . . . . . . . . . . . . . . . . . . . . . . . . . . . . . . . . . . . . . . . 31
Saving the Disk Configuration. . . . . . . . . . . . . . . . . . . . . . . . . . . . . . . . . . . . . . . . . . . . . . . 31
Keeping Your Hard Drive Tuned Up . . . . . . . . . . . . . . . . . . . . . . . . . . . . . . . . . . . . . . . . . . . 32
Troubleshooting . . . . . . . . . . . . . . . . . . . . . . . . . . . . . . . . . . . . . . . . . . . . . . . . . . . . . . . . 33
Contents
iii
Appendix A. Specifications . . . . . . . . . . . . . . . . . . . . . . . . . . . . . . . . . . . . . . . . . . . . . . . . . . 35
Dimensions and Weights. . . . . . . . . . . . . . . . . . . . . . . . . . . . . . . . . . . . . . . . . . . . . . . . . . 35
Environmental Specifications . . . . . . . . . . . . . . . . . . . . . . . . . . . . . . . . . . . . . . . . . . . . . . . 36
Power Supply Specifications . . . . . . . . . . . . . . . . . . . . . . . . . . . . . . . . . . . . . . . . . . . . . . . 36
Power Cord Specifications . . . . . . . . . . . . . . . . . . . . . . . . . . . . . . . . . . . . . . . . . . . . . . . . . 37
Appendix B. SCSI Cables and Terminators . . . . . . . . . . . . . . . . . . . . . . . . . . . . . . . . . . . . 39
Index . . . . . . . . . . . . . . . . . . . . . . . . . . . . . . . . . . . . . . . . . . . . . . . . . . . . . . . . . . . . . . . . . . . . . 43
iv
DigiDrive Guide
chapter 1
Using This Guide
The DigiDrive™ uses an innovative new QuietDrive™ technology. This technology allows the
DigiDrive to perform as one of the fastest
(10,000 rpm) and quietest drives on the market
today. In addition, the DigiDrive is designed for
rack-mounting in industry-standard racks (with
the optional Avid/Digidesign Rack Mount Kit),
or multiple drives can be stacked on top of one
another to minimize desk-space requirements.
About This Guide
The information in this guide is a supplement to
the hard drive installation instructions found in
the setup guide that came with your Digidesign
system. This guide contains alternative DigiDrive installation and configuration instructions.
This guide contains the following information:
Chapter 2, “Overview”, describes the front
and rear panels of the DigiDrive. It also includes
information on SCSI bus configuration, LVD
and single-ended SCSI standards, available SCSI
cables, considerations for mixing wide drives (rS
and iS) and narrow DigiDrives on the same SCSI
bus, and SCSI bus termination requirements.
◆
Chapter 3, “Installation”, provides step-bystep instructions for connecting a DigiDrive to
your Digdesign system.
◆
Chapter 4, “SCSI Performance Guidelines”,
documents performance guidelines for SCSI
hard drives.
◆
◆ Chapter 5, “DigiDrive Management for
Mac OS”, covers management and troubleshooting issues specific to the Mac, including
how to handle, check, and erase a DigiDrive and
how to resolve basic problems that might occur
during installation and operation.
◆ Chapter 6, “DigiDrive Management for
Windows NT and Windows 2000” covers management and troubleshooting issues specific to
Windows, including how to create partitions,
create logical drives, how to format logical
drives, and how to resolve basic problems that
might occur during installation and operation.
◆ Appendix A, “Specifications”, provides physical dimension, environmental, power, and
power cord specifications for the DigiDrive.
◆ Appendix B, “SCSI Cables and Terminators”,
provides detailed information on the type of cables and terminators that can be used with the
DigiDrive.
If You Need Help
If you are having trouble setting up and configuring
the DigiDrive:
1 Retry the action, carefully following the in-
structions given for that task in this guide.
2 Check the documentation that came with
your hardware for maintenance or hardware-related issues.
Chapter 1: Using This Guide
1
3 Digidesign has both product information and
technical support on-line via the World Wide
Web. In addition, there are many user forums
which Digidesign encourages, but does not
sponsor. For the most current, accurate information about Digidesign products, please browse
Digidesign-sponsored forums at the Digidesign
Web site (www.digidesign.com).
4 See the additional technical resources on the
web at:
http://www.digidesign.com/support/techsupport.html
Related Information
The following documents provide additional information that might be useful when configuring the DigiDrive:
◆
2
DigiDrive Utilities Read Me
DigiDrive Guide
chapter 2
Overview
The Digidesign DigiDrive uses industry-standard ultra wide SCSI-2 Ultra160 drives that can
be run in LVD or Single-Ended mode, and are
optimized for use with Digidesign’s video and
audio applications. With its fast operating speed
(10,000 rpm) and its QuietDrive sound-absorbing enclosure, the DigiDrive is among the fastest
and quietest drives available today.
Multiple drives can be stacked on top of one another to minimize desk-space requirements. A
rack-mounting option enables the DigiDrive to
be mounted in industry-standard racks.
The internal drives have a 3 1/2-inch form factor. The SCSI-2 compatible drives transfer data
on a 16-bit data bus. The drives also support
8-bit data transfers for compatibility with narrow SCSI buses, like the Macintosh built-in SCSI
bus. The drive enclosure provides the cooling,
the power, and the cabling connections.
This chapter provides the following information
on the DigiDrive:
• Controls and Indicators
• Rack-Mounting Option
• Handling the DigiDrive
• SCSI Configuration Requirements
Controls and Indicators
The Digidesign DigiDrive has the controls and
indicators on the front, and the connectors on
the back. These controls and indicators let you
configure the drive and provide the operating
status.
Front Panel
The DigiDrive front panel is shown in Figure 1.
You can use the Digidesign product identification label to determine the capacity and type of
drive. The power switch turns the drive’s inter-
Chapter 2: Overview
3
nal power supply on and off. The ventilation
openings provide airflow for the drive while it is
operating. Make sure you do not block these
openings and that you keep them clear of dust.
Power, Activity, and
Thermal LEDs
Identification
Label
Back Panel
The DigiDrive back panel has two SCSI connectors and a power connector (see Figure 2). The
SCSI connectors are for attaching SCSI cables or
a SCSI terminator to the drive. An internal fan
pushes air through the enclosure, from front to
back, to cool the drive. The power connector is
where you attach the power cord.
MediaDrive
rS18 Plus
68-pin SCSI connectors
2
Power switch
Ventilation
openings
SCSI ID switch
Figure 1. DigiDrive front panel
4
Three light emitting diodes (LEDs) indicate the
status of the drive. The SCSI ID switch provides
the method for setting the drive’s SCSI ID. Detailed descriptions of the LEDs are provided in
Table 1.
Figure 2. DigiDrive back panel
Table 1. DigiDrive LEDs
Rack-Mounting Option
LED
Function
Power
LED
The LED (green) is on when the drive is
turned on.
Activity
LED
The LED (yellow) is on when the drive is
turned on and then flickers as data is
transferred to and from the drive.
Thermal
LED
The LED (red) is on when the thermal
overload circuitry on the board senses
that the temperature inside the DigiDrive is too high. The LED lights for the
following reasons:
• Airflow through the drive is blocked.
• The internal fan has failed.
• Outside ambient temperature is too
hot.
Warning:
Operating the DigiDrive for extended
periods of time with the thermal indicator on reduces the life expectancy of
the drive.
DigiDrive Guide
Ventilation
openings
Power connector
Digidesign offers an optional rack-mounting kit
(Digidesign model number MH163) that allows
you to mount a pair of DigiDrive enclosures in a
rack. The kit supports two drives mounted sideby-side, occupying two rack units in an industry-standard rack.
The DigiDrive is designed so that all of the controls and indicators are accessible when
mounted. Instructions for mounting the drives
are included with the kit.
Handling the DigiDrive
You need to use reasonable care when you handle a DigiDrive. Though the drive is ruggedly
constructed, it has delicate internal mechanisms
that can be damaged when handled in an incorrect manner. The following lists contain tips for
handling and caring for the drives attached to
your Digidesign system.
◆ Do not turn off the power to a drive while an
application is reading data from or writing data
to the drive. This can cause directory structure
problems and might create incomplete files.
◆ Never disconnect SCSI cables or the SCSI terminator while the Digidesign system and the
drives are running. Shut down the system and
turn off the drives before making cabling
changes.
When the drives are not operating:
Be careful not to drop a drive as you move it
from one system to another.
◆
Keep the area around the drives free of dust
and dirt.
SCSI Configuration
Requirements
◆
When you stack the drives, limit the stack
height to four drives. This helps to prevent the
stack from tipping over.
◆
Do not open a DigiDrive enclosure; there
are no user-repairable parts inside. Opening
the enclosure voids your Digidesign warranty and prevents you from having the
drive mechanism repaired without charge.
When the drives are operating:
Do not shake or jar the drive enclosures. This
can damage the read/write heads or the magnetic coating on the drive platters.
◆
As you add a DigiDrive to your Digidesign system, you need to be aware of the Digidesign requirements for installing the drives correctly.
These requirements include:
◆
Laying out drives on the SCSI bus
◆
Cabling the drives
◆
Setting the drive SCSI IDs
◆
Terminating the SCSI bus
The following sections list the requirements for
installing a DigiDrive and configuring the SCSI
bus. If you fail to meet all of the requirements,
your DigiDrive and Digidesign software might
not function properly.
Do not turn off the power to a drive while you
can see the icon on a Macintosh desktop. This
can cause directory structure problems and
might create incomplete files.
◆
Chapter 2: Overview
5
Cables
SCSI ID Conflicts
Use only high-quality LVD SCSI cables when
you are attaching a DigiDrive to the SCSI bus on
your Digidesign system.
When you add a new DigiDrive to your system,
always check which SCSI IDs are currently in
use. Assigning duplicate SCSI IDs causes problems such as system errors, the drive not appearing on the desktop, multiple copies of the same
drive appearing on the desktop, possible data
corruption, or system startup failures.
The DigiDrive includes a 30" Avid SCSI LVD cable that meets all requirements for optimal performance. This cable is backward-compatible
and also operates in single-ended fast, wide
mode.
For more information on SCSI cables,
see Appendix B.
SCSI IDs
Your Digidesign system identifies the DigiDrives
connected on the SCSI bus by the drive’s assigned SCSI ID. When you are assigning SCSI
IDs to the drives, remember the following:
◆
Each SCSI ID on a SCSI bus must be unique.
◆ Each device on each SCSI bus, including the
system SCSI accelerator board, has its own SCSI
ID.
◆ SCSI ID 7 is reserved for each SCSI accelerator
board in your system. You must never assign
SCSI ID 7 to a DigiDrive.
◆ Narrow drives can only use SCSI IDs 0
through 6.
◆ Wide drives, such as the DigiDrive, can use
SCSI IDs 0 through 6 and 8 through 15.
Termination
You need to connect a SCSI LVD terminator to
the last drive on each SCSI bus. Make sure to use
only the highest quality SCSI terminators to ensure data integrity.
The DigiDrive comes with Avid's patented 68pin multi-mode (LVD or Single-Ended) terminator for optimal data integrity across the SCSI
chain. The Avid LVD terminator detects the
SCSI bus mode. The LED on the end of the terminator is green when the SCSI bus is in LVD
mode, and amber when the SCSI bus is in singleended fast, wide mode.
You need to connect an ultra, wide-to-narrow
SCSI adapter to change from 68-pin cabling to
50-pin cabling. The adapter terminates the unused lines to help prevent any SCSI bus problems.
Mixing an LVD drive with a single-ended wide
and/or narrow drive on an LVD bus causes the
bus to default to single-ended mode. When you
mix drive types, cable length restrictions for single-ended SCSI chains apply.
For more information on SCSI terminators,
see Appendix B.
6
DigiDrive Guide
Mixing Wide and Narrow Drives on the Same SCSI Bus
68-pin to 68-pin cable
Wide drives
4
68-pin to 50-pin adapter
3
l
o
50-pin to 50 -pin cable
5
DigiDrive
enclosures
l
o
6
To computer’s
SCSI host bus adapter
50-pin terminator
Narrow drives
Figure 3. Mixed Drive Layout
You can mix the DigiDrive and other wide and
narrow drives. This allows you to continue using existing narrow drives as you expand your
system’s storage capability. When mixing wide
drives and narrow drives on the same SCSI bus,
remember the following:
You must place the wide drives physically on
the SCSI bus before the narrow drives (see
Figure 3).
◆
◆ Always use a 68-pin to 68-pin cable and a
wide-to-narrow terminating adapter (68-pin to
50-pin) for the connection between the last
wide drive and the first narrow drive (see
Figure 3). The adapter terminates unused data
lines in the cable to ensure data integrity on the
SCSI bus.
◆ PCI-based SCSI buses that contain a mixture
of wide and narrow DigiDrives can have up to
eight drives on the SCSI bus.
Chapter 2: Overview
7
8
DigiDrive Guide
chapter 3
Installation
The following sections describe how to connect
a DigiDrive to your Digidesign system.
Before You Begin
Before you begin to install a DigiDrive:
Check the contents of the DigiDrive kit
against the packing label on the outside of the
shipping box to confirm that you have received
all the parts.
■
Check for available SCSI IDs on the Digidesign SCSI bus.
■
DigiDrive Components
The DigiDrive package contains:
• DigiDrive
• 30-inch 68-pin to 68-pin SCSI LVD cable
• Avid multi-mode 68-pin terminator
• Utilities CD ROM
• Power cable
Installing Software
The Utilities CD-ROM that comes with DigiDrive contains utilities that will performancetune your DigiDrive and perform diagnostic
tests when necessary. To install the software,
drag and drop the DigiDrive Utilities folder to
your system drive. For your convenience, we
suggest you drag it to your Digidesign software
folder.
Refer to the DigiDrive Utilities Read Me document on the DigiDrive Utilities CD-ROM
for complete instructions on the use of your
DigiDrive Utilities.
Installing a DigiDrive
When you add a new DigiDrive to your Digidesign system, the DigiDrive is connected to one
of the SCSI buses in the system. In some cases,
you might need to disconnect some or all of the
drives on a SCSI bus when you add a new drive.
Use the instructions in the following sections to
install the DigiDrive.
• Drive-stacking brackets
• Registration card
Chapter 3: Installation
9
Powering Down the Digidesign
System
To temporarily interlock the drives:
1 Place the first (bottom) DigiDrive on a stable
surface.
Before you begin to install the DigiDrive, power
down the system:
1 Do one of the following:
• If you have a Macintosh operating system,
choose Shut Down from the Special menu.
• If you have a Windows operating system, select Shut Down from the Start button. Select
“Shut down the computer?” from the Shut
Down Windows dialog box and click Yes.
2 Position a second DigiDrive slightly over and
behind the first drive.
3 Slide the top DigiDrive forward so the slots in
the four top drive interlock stacking brackets
slide over the four tabs on the bottom drive interlock stacking brackets (see Figure 4).
DigiDrive
Interlock
stacking
bracket
2 Turn off power to all peripherals connected to
the Digidesign system.
Stacking the DigiDrive
When you have more than one DigiDrive you
might want to stack the drives so they take up a
minimal amount of desk space. The DigiDrive
has patented interlock stacking brackets attached to the side that are designed for stacking.
The interlock stacking brackets provide three
methods of stacking.
2
rive
iaD s
Med Plu
rS18
rive
iaD s
Med Plu
Slots
rS18
Tabs
Figure 4. Stacking the DigiDrive
Gravity Stacking
Permanent Interlock
Gravity stacking allows you to place one drive
on top of another. An impression in the base of
the interlock stacking brackets increases the stability when compared to just having the enclosures stacked without the bracket. This method
is only recommended when temporarily moving the drive from one system to another.
Permanent interlock is an enduring way of
stacking the drives. After interlocking the drives,
a locking plate is positioned so that the top and
bottom drives are secured in place.
To permanently interlock the drives:
1 Perform steps 1, 2, and 3 as described in “Tem-
Temporary Interlock
Temporary interlock provides a more secure
method of stacking the DigiDrive enclosures.
Grooves in the interlock stacking brackets stabilize the drives. An indentation in each groove
settles the drive in the correct position.
10
DigiDrive Guide
porary Interlock” on page 10.
2 Remove the top locking plate screw on both
sides of each drive (see Figure 5).
3 Loosen the bottom locking plate screw on
both sides of each drive.
A
Top locking plate screw
Top locking plate
turned 180 degrees
2
2
Drive
dia us
Pl
Me
rS18
1
rive
iaD s
Med Plu
rS18
Drive
dia us
Pl
1
Me
rS18
Bottom locking
plate screw
rive
iaD s
Med Plu
rS18
Figure 5. DigiDrive Locking Plate
4 Swing the locking plate on each side of the
Figure 7. Secured DigiDrive Enclosures
bottom drive 90 degrees (to a horizontal position) and tighten the locking plate screw (see
Figure 6).
8 Repeat steps 5 through 7 for the other side of
the top drive.
9 Repeat this entire procedure if stacking a third
and fourth drive.
2
rive
iaD s
Med Plu
rS18
1
rive
iaD s
Med Plu
rS18
Bottom locking plate
turned 90 degrees
Figure 6. Bottom Drive Locking Plate
When more than four drives are used, consider
creating two drive stacks. In order to prevent the
stack from toppling over, be sure to stack the
drives with the largest units on the bottom.
If you have the dual-channel SCSI accelerator
board or two single-channel SCSI accelerator
boards, you might want to arrange the drives in
two separate stacks; one stack for each SCSI
chain. Attach the drives to the system one group
at a time.
5 Swing the locking plate on the top drive 180
degrees so that the upper hole in the top locking
plate aligns with the upper hole in the bottom
drive.
6 Replace the screw into the top hole in the bottom drive so that the top and bottom drives are
secured to each other (see Figure 7).
7 Replace the remaining screw into the top hole
in the top drive.
Chapter 3: Installation
11
Connecting DigiDrives
To connect an external SCSI drive to your
computer:
1 Be sure that power to both the computer and
hard drive is off.
2 Connect the SCSI drives to your computer
with their accompanying SCSI cables.
Always use high-quality cables. Additionally,
use the shortest possible SCSI cables to make the
best possible connection—if you are using a single-ended accelerator card, your total SCSI cable
length should never exceed 3 meters. If you are
running an LVD accelerator, your total SCSI cable length can run as long as 12 meters.
SCSI Hard Drive
SCSI Terminator
to computer’s
To computer’s SCSI
host
SCSI port
bus adapter
to external
SCSI hard drive
Connecting a SCSI cable to the SCSI port
Connecting an external SCSI hard drive
3 Secure the SCSI cables in place with their
thumbscrews. Loose SCSI cables can cause problems with your system.
4 Connect any other drives by daisy- chaining
from one drive to another. Cable lengths on the
computer SCSI chain should be kept to a minimum. Use the shortest length possible. The
overall SCSI chain length should not exceed 3
meters.
5 Verify that the last SCSI device connected is
properly terminated (see the section that follows regarding termination).
6 Attach a power cable to your hard drives.
Your hard drives should now be properly connected and ready for use.
12
DigiDrive Guide
Connecting Only DigiDrive
Enclosures
The following procedure explains how to connect a DigiDrive. Stack the drives before connecting any cables and turning the drives on.
3 Attach one end of the cable to the remaining
SCSI connector on the first DigiDrive in the
drive stack (see Figure 9). Secure the cable by using the thumbscrews that are part of the cable
connector.
DigiDrive
To connect DigiDrive enclosures:
1 Attach the 68-pin SCSI connector from the
computer's SCSI host bus adapter to either SCSI
connector on the DigiDrive
To avoid bending pins, make sure the 68pin cable is perpendicular to the back panel
and properly aligned before inserting.
DigiDrive
68-pin SCSI cable from computer's SCSI
host bus adapter or other drives
68-pin to 68-pin
15-inch SCSI cable
Figure 9. Additional DigiDrive Connection
68-pin SCSI cable from computer's SCSI
host bus adapter or other drives
Figure 8. SCSI Cable to First DigiDrive Connection
2 If you have more than one DigiDrive, locate
the SCSI cable with 68-pin connectors on both
ends in the next drive kit.
4 Repeat steps 2 through 5 until you have all the
drives connected.
5 Attach the other end to either SCSI connector
on the next DigiDrive in the drive stack. Secure
the cable by using the thumbscrews that are part
of the cable connector.
Chapter 3: Installation
13
6 Attach the SCSI terminator to the remaining
SCSI connector on the last DigiDrive in the drive
stack (see Figure 10). Secure the terminator by
using the thumbscrews that are part of the terminator.
Ultra, wide SCSI terminator
DigiDrive
DigiDrive
68-pin SCSI cable from computer's
SCSI host bus adapter
Figure 11. SCSI Cable to DigiDrive Connection
2 If you are connecting a wide drive, locate the
68-pin SCSI cable from computer's SCSI
host bus adapter or other drives
SCSI cable with 68-pin connectors on both ends
in the drive kit.
3 Attach one end of the cable to the remaining
Figure 10. Ultra, Wide SCSI Terminator Connection
7 Attach an ac power cord to the ac power con-
nector on the back of each DigiDrive.
8 Plug the ac power cords into a power strip.
9 If your system came with the dual-channel
board, repeat steps 1 through 8 to attach a second SCSI chain to the system.
SCSI connector on the DigiDrive in the drive
stack (see Figure 12). Secure the cable by using
the thumbscrews that are part of the cable connector.
Wide drive
4
Connecting Wide and Narrow SCSI
Drives
The following procedure explains how to connect a mix of wide and narrow drives.
68 -pin to 68-pin
15-inch SCSI cable
DigiDrive
To connect wide and narrow drives:
1 Attach the 68-pin SCSI connector on the system cable to either SCSI connector on the
DigiDrive (see Figure 11). Secure the cable by using the thumbscrews that are part of the cable
connector.
To avoid bending pins, make sure the 68pin cable is perpendicular to the back panel
and properly aligned before inserting.
14
DigiDrive Guide
68-pin SCSI cable from computer's SCSI
host bus adapter or other drives
Figure 12. Additional Wide Drive Connection
4 Attach the other end to the bottom connector
on the Wide drive in the drive stack. Secure the
cable by using the thumbscrews that are part of
the cable connector.
5 Repeat steps 2 through 4 until you have all the
wide drives connected.
6 Locate a SCSI cable with 68-pin connectors on
10 If you have more than one narrow drive, locate the SCSI cable with 50-pin Centronics connectors on both ends.
11 Attach one end of the 50-pin cable to the top
connector on the first narrow drive (see
Figure 14). Secure the cable by using the baillatches that are part of the narrow drive.
both ends in the drive kit.
+
7 Attach one end of the cable to the remaining
0
Narrow
Drive
connector on the last (top) wide drive in the
drive stack (see Figure 12). Secure the cable by
using the thumbscrews that are part of the cable
connector.
50-pin to 50-pin
SCSI cable
8 Locate an ultra, wide-to-narrow SCSI adapter.
The adapter has a 68-pin female connector on
one end and a 50-pin Centronics® connector on
the other end.
Refer to the DigiDrive Utilities Read Me document on the DigiDrive Utilities CD-ROM
for complete instructions on the use of your
DigiDrive Utilities.
+
0
Narrow
Drive
68-pin SCSI cable
from drives
Figure 14. Additional Narrow Drive Connection
9 Attach the wide-to-narrow SCSI adapter to the
first (bottom) narrow drive (see Figure 13). Secure the adapter by using the bail-latches that
are part of the narrow drive.
Narrow Drive
Bail-latches
12 Attach the other end of the narrow SCSI cable to the bottom connector on the next narrow
drive. Secure the cable by using the bail-latches
that are part of the narrow drive.
13 Repeat steps 10 through 12 until you have
connected all the drives.
+
0
14 Locate the ultra, narrow 50-pin SCSI terminator.
Wide-to-narrow
SCSI adapter
15 Attach the SCSI terminator to the top connector on the top narrow drive in the drive stack
(see Figure 15). Secure the terminator by using
the bail-latches that are part of the DigiDrive.
68-pin SCSI connector
16 Attach an ac power cord to the ac power con-
nector on the back of each drive.
Figure 13. SCSI Cable to Narrow Drive Connection
17 Plug the ac power cords into a power strip.
Chapter 3: Installation
15
Ultra, narrow SCSI terminator
Terminator
Digidesign system
+
0
Narrow
Drive
SCSI drives
ID 3
50- pin SCSI connector
ID 2
Figure 15. Ultra, Narrow SCSI Terminator Connection
ID 1
18 If your system came with the dual-channel
ID 7
board, repeat steps 1 through 17 to attach the
second stack of drives to the system.
Determining SCSI IDs
You must consider the type of system the drives
are attached to when determining the SCSI ID
for the drive. Macintosh systems have an internal SCSI bus, an external SCSI bus, and a PCIbased SCSI board. Windows systems may have
support for SCSI integrated into the motherboard (e.g. IBM Intellistation) or provided by
one or more PCI-based expansion cards.
Do not set the SCSI ID for any drive on any
SCSI bus to SCSI ID 7. This SCSI ID is reserved for the SCSI accelerator board to
which the drive is attached. Setting a drive
to the same SCSI ID as the SCSI accelerator
board can prevent the drive from mounting
on the desktop, or prevent your Digidesign
system from booting correctly.
Digidesign recommends that you set the SCSI
IDs for the devices on each SCSI bus in sequential order, that is, starting with the device attached closest to the Digidesign system as ID 0
(see Figure 16).
16
DigiDrive Guide
ID 0
SCSI accelerator
board
SCSI cables
Figure 16. Setting SCSI IDs
Connect all 68-pin, wide SCSI devices on a
SCSI bus before connecting the 50-pin, narrow SCSI devices. All narrow drives must
use SCSI IDs less than 7.
SCSI IDs on Macintosh Systems
For each SCSI hard drive you connect to the
Macintosh operating system, you must assign a
SCSI ID so the system can find and access the
drive. When you are setting the SCSI IDs, remember the following:
◆ The Macintosh system might have several
SCSI buses: a built-in internal SCSI bus, a builtin external SCSI bus (on PCI-based systems), and
one or more Digidesign SCSI buses that are
added using SCSI accelerator boards. The dualchannel SCSI accelerator board adds two SCSI
buses to the Digidesign system.
◆ You can attach six additional narrow SCSI devices to the external built-in SCSI bus on the
Digidesign systems. This SCSI bus has its own
set of unique SCSI IDs from 0 through 6.
Each PCI-based SCSI bus has its own set of
unique SCSI IDs from 0 through 6 and 8
through 15.
◆
• If you are connecting only DigiDrive enclosures to the SCSI bus, use any of the available SCSI IDs from 0 through 6 and 8
through 15.
Setting the DigiDrive SCSI ID
To set a DigiDrive SCSI ID:
1 Locate the SCSI ID switch on the front of the
DigiDrive (see Figure 17).
• If you are connecting a mix of wide and
narrow drives to the SCSI bus, use SCSI IDs
0 through 6 for the narrow drives and SCSI
IDs 8 through 15 for the wide drives.
MediaDrive
rS18 Plus
2
You cannot have two SCSI drives with the
same SCSI ID on the same SCSI bus.
◆
SCSI ID switch
Figure 17. DigiDrive SCSI ID Switch Location
SCSI IDs on Windows Systems
For each SCSI hard drive you connect to the
Windows operating system, you must assign a
SCSI ID so the system can find and access the
drive. When you are setting the SCSI IDs, remember the following:
Each Digidesign PCI-based SCSI bus has its
own set of unique SCSI IDs from 0 through 6
and 8 through 15 (for a maximum of eight
drives).
◆
• If you are connecting only DigiDrive enclosures to the SCSI bus, use any of the available SCSI IDs from 0 through 6 and 8
through 15.
• If you are connecting a mix of wide and
narrow drives to the SCSI bus, use SCSI IDs
0 through 6 for the narrow drives and SCSI
IDs 8 through 15 for the wide drives.
You cannot have two SCSI drives with the
same SCSI ID on the same SCSI bus.
◆
Be sure the drive power is off when changing
the SCSI ID switch. When the drive is
turned on it will read the new SCSI ID.
2 Set the SCSI ID to an available SCSI ID on the
SCSI bus by using the SCSI ID switch (see
Figure 18). The current SCSI ID number appears
in the window in the middle of the switch.
• Press the top button to decrement the SCSI
ID.
• Press the bottom button to increment the
SCSI ID.
-
2
+
Decrement ID
Current SCSI ID
Increment ID
Figure 18. DigiDrive SCSI ID Switch
Chapter 3: Installation
17
There are two SCSI ID switch versions used with
the DigiDrive. One version uses the numbers 0
through 15, and the other version uses the numbers 0 through 9 and the letters A through F. Use
the table below to associate the letters A through
F with a SCSI ID number.
Numbers Associated with SCSI Switch Letters
Switch Letter
SCSI ID Number
A
10
B
11
C
12
D
13
E
14
F
15
When setting the SCSI ID for a drive other
than a DigiDrive, see the documentation
that came with that drive.
18
DigiDrive Guide
chapter 4
SCSI Performance Guidelines
SCSI Performance Guidelines
Make sure to run DigiDrive Tuner to optimize your drive for your Digidesign system.
Pro Tools systems have strict hard drive requirements. The recording and playback performance of your system depends on several factors.
Factors affecting system performance:
Hard drive performance. The faster the drive’s
seek time, the better. The data transfer rate required for 32 track, 24-bit performance (at a
sample rate of 44.1 kHz) is 4.04 MB per second
of sustained throughput. This rate must be reflected in the performance of one or more of the
drives and SCSI subsystems in your computer to
achieve this level of performance.
◆
CPU speed. The faster the CPU, the better.
Overall system performance can affect track
count.
◆
◆ Size of your DAE Playback Buffer. See the
Pro Tools System Installation Guide for an explanation of DAE Playback Buffer size and its effect
on system performance.
performance may depend on the session you are
playing. While there is no specific definition of
high or low edit density, most Pro Tools users
will work with low to moderate edit density sessions. However, extensive use of crossfades, or
certain processing like Beat Detective can create
high levels of edit density in any session.
If you suspect that you are receiving poor drive
performance due to high edit density, use the
Consolidate command for heavily edited tracks.
This will reduce the number of seeks required.
In general, you can obtain the following performance goals with the following setups:
To achieve up to 16 simultaneous tracks of 16- or
24-bit audio with heavy edit density, or 32 tracks
with low to moderate edit density, you will need:
◆ One or more Digidesign-approved hard drives
connected to your SCSI adapter card or built-in
SCSI ports. If your sessions have high-density
edits (for example, 3 edits per second across all
tracks, all with crossfades), you will need to distribute your audio files over more than one hard
drive to allow for increased demand on drive
seek capability.
Edit density (the number of edits per second)
affects the number of different files that a drive
must seek. Sessions with high edit density are
more demanding on hard drives than sessions
with lower edit density. For this reason, drive
◆
Chapter 4: SCSI Performance Guidelines
19
To achieve up to 32 simultaneous tracks of 16- or
24-bit audio with high edit density, or 64 tracks
with low to moderate edit density you will need:
◆ Two or more Digidesign-approved hard drives
connected to your SCSI adapter card or built-in
SCSI ports. If you use a dual-channel SCSI host
adapter card, equally allocate audio files to
drives connected to each of the two busses on
the card for optimal performance.
For details on allocation of tracks to drives, see
the section on Recording to Multiple Hard
Drives in the Pro Tools Reference Guide.
Additional Hard Drive Performance Tips:
Use at least two drives You can improve performance by allocating audio files between two or
more hard drives. It is best to use drives that
have similar performance characteristics.
Avoid distributing audio files within a session over different partitions on the same
drive, as this will slow drive performance.
Minimize SCSI cable length The maximum cable
length that can be used on a “wide” singleended SCSI bus is 3 meters if you are using fewer
than four devices, or 1.5 meters if you are using
four or more devices. Please note that cable
length includes the cabling inside the drive enclosures themselves—which can be up to 12
inches in length. If you are running the DigiDrive in LVD mode, the maximum SCSI cable
length is 12 meters.
20
DigiDrive Guide
chapter 5
DigiDrive Management for Mac OS
To keep your DigiDrive and other hard drives on
your Macintosh operating system in peak operating condition, you should perform maintenance operations and checks on a regular basis.
This chapter contains the following sections:
◆
Checking DigiDrives
◆
Initializing DigiDrives
◆
Troubleshooting
Checking DigiDrives
Many drive problems are not hardware related,
but are instead problems with the file system
written on the drive. The file system consists of
data structures that hold critical information
about the files stored on your drive. Some of
these data structures allow your drive to be recognized as a Macintosh volume.
Using utilities such as Disk First Aid™ and
Norton Disk Doctor™ helps to maintain the file
system and its data structures. Digidesign recommends periodic use of these utilities on any
DigiDrive and other hard drives, as well as your
Macintosh internal drive, to ensure a healthy
file system.
File system errors tend to grow over time. They
should be fixed as soon as possible after discovery. File system errors are generally caused by
system crashes, improper system shutdowns,
and power failures. They should not be interpreted as a precursor to a mechanical drive failure.
The following list contains examples of some
common file system structure errors that
Norton Disk Doctor can diagnose and, in most
cases, fix without damaging data (media files or
project data):
◆
Master directory block errors
◆
Alternate master directory block errors
◆
Leaf node errors
◆
Header node errors
◆
Volume bit map errors
◆
Files with bad creation dates
Every drive has a directory or index that informs
the system where files reside. If the directory becomes damaged or corrupted, the system will
not be able to locate the files.
Chapter 5: DigiDrive Management for Mac OS
21
Using Disk First Aid
Disk First Aid is a drive directory structure repair
tool that is supplied with each system by Apple
Computer, Inc. This tool can find and repair
many basic directory structure problems to help
keep your drives functioning properly.
3 Select the drive you want to verify and repair
by clicking on the drive icon in the Drive Selection window. An alert box opens if you are
checking a drive with open files or a shared drive
(Figure 20). You can only verify these drives
while they are not in use. Click OK to close the
alert box.
You should use Disk First Aid when your system
is reporting drive errors or when files on the
drive cannot be opened and used by Digidesign
software.
You should run Disk First Aid regularly as a
proactive method of avoiding drive problems.
You can find a copy of Disk First Aid in one of
the following locations:
◆
The Utilities folder on the system drive
The system software CD-ROM that came with
your system
◆
Repairing DigiDrives with Disk First Aid
To repair a DigiDrive:
1 Open the Utilities folder on the Digidesign (or
system) drive.
Figure 20. Disk Repair failure notification
4 Verify and repair the selected drive by clicking
the Repair button. Disk First Aid scans the directory structures, reports any problems, repairs
the selected drive (if possible), and reports the
results.
5 If Disk First Aid reports that the selected drive
cannot be verified or repaired, follow the steps
in “If Drive Status Cannot Be Verified” on
page 22.
6 Choose Quit from the File menu when you are
finished.
If Drive Status Cannot Be Verified
If Disk First Aid is unable to verify or repair the
DigiDrive:
1 If possible, copy all media files and other data
files to another drive.
2 Try using Norton Disk Doctor to repair the
Figure 19. Disk First Aid—controls
2 Double-click the Disk First Aid icon to start
the application. The Disk First Aid window
opens (Figure 19). This window contains all the
necessary controls for you to run Disk First Aid.
22
DigiDrive Guide
drive. See “Using Norton Disk Doctor” on
page 23.
If you are still experiencing problems or are unable to repair the drive, contact Digidesign
Technical Support for additional assistance.
Using Norton Disk Doctor
Norton Disk Doctor is a third-party application
for diagnosing and repairing drive problems.
Norton Disk Doctor provides more comprehensive coverage of drive problems than Disk First
Aid, and can repair directory structure and file
problems that Disk First Aid cannot repair.
Load Norton Utilities® onto one or more of the
drives on your system before you continue with
the following sections. You might want to load
Norton Utilities into the Utilities folder with
Disk First Aid for convenience.
You should perform a custom installation
of the Norton Utilities to load only the Repair and Recovery utilities and the Startup
Disk Builder. Other functions in the Norton
Utilities can cause conflicts with Digidesign
software.
You should run Norton Disk Doctor regularly as a proactive method of avoiding
drive problems.
Repairing DigiDrives with Norton Disk
Doctor
To repair a DigiDrive:
1 Open the Norton Utilities folder on your
Digidesign system.
Figure 21. Norton Utilities Main menu
4 Follow the instructions in the Using the Norton
Utilities manual for drive repair and recovery. Attempt to fix all of the problems noted by Norton
Disk Doctor as it is running. Follow any special
instructions or recommendations that Norton
Disk Doctor provides.
5 When Norton Disk Doctor is finished, a dialog
box appears. Click Show Report to see a listing
of the problems that were found with the drive,
or click Done to return to the Norton Disk Doctor window.
6 Repeat steps 4 and 5 to make sure the prob-
lems were fixed.
7 Choose Quit from the File menu when you are
finished.
After using Norton Disk Doctor and Disk
First Aid for drive repair and recovery,
Digidesign recommends that you backup
your data and reinitialize your drive as soon
as possible.
2 Double-click the Norton Utilities icon to start
the application. The Norton Utilities Main
menu appears (Figure 21).
3 Choose Norton Disk Doctor from the Norton
Utilities Main menu. The Norton Disk Doctor
window opens.
Chapter 5: DigiDrive Management for Mac OS
23
Initializing DigiDrives
Occasionally, you might want to initialize the
drives on your Digidesign system to remove all
the data that is on them. Initializing re-creates
the partition map and directory structure, improving overall drive performance. It is best to
initialize drives when you are between projects,
or when the media files and other data on the
drives are no longer needed.
Initializing a drive destroys all the data on
the drive. Make sure you back up all the critical data on the drive to tape or another
drive before you initialize the drive.
For more information on initializing drives, see
the ATTO ExpressPro-Tools manual.
DigiDrive Does Not Appear on the
Desktop
When a DigiDrive does not appear on the desktop:
1 Make sure the drive turns on. Follow the in-
structions in “DigiDrive Does Not Turn On” on
page 24 if the drive does not turn on.
Before making any changes to DigiDrive cabling or termination, make sure you shut
down the Digidesign system and turn off all
of the drives on the SCSI bus.
2 Make sure all the cables in the SCSI bus are
properly connected and secured in place by
thumbscrews for wide drives or bail-latches for
narrow drives. See Chapter 3 for cable and setup
information.
3 Make sure each SCSI bus is properly termi-
Troubleshooting
Occasionally, you might have problems with a
DigiDrive that you can repair on your own. The
following sections present several scenarios and
steps to take to repair them.
DigiDrive Does Not Turn On
When a DigiDrive does not turn on after you
press the power switch, you should do the following:
1 Make sure the ac power cord is securely con-
nected to the drive enclosure.
2 Make sure the drive is plugged into a power
strip or a wall outlet.
3 If the drive is plugged into a power strip, make
sure the power strip is plugged into a wall outlet
and that the power strip is turned on.
After you turn on the drive, the green power
LED on the front of the drive is lit.
24
DigiDrive Guide
nated. See Chapter 3 and Appendix B for information on the correct terminator to use with
the drive configurations on your system.
4 Make sure each drive on a SCSI bus has a
unique SCSI ID. If you have drives with duplicate IDs, one or both of the drives might not appear on the desktop. See “SCSI IDs on
Macintosh Systems” on page 16 for information
on how to set SCSI IDs. Turn the drive off and
then on to ensure that the new SCSI ID is set.
5 After making sure the drive is on, making any
cabling changes, changing drive termination, or
changing SCSI IDs, restart the Digidesign system
for the changes to take effect.
DigiDrive Produces Errors
When a DigiDrive is producing errors or is acting
erratically:
1 Run Disk First Aid to repair any directory
problems.
2 Run Norton Disk Doctor to fix any bad block,
folder, and file problems.
3 Use Norton Utilities to rebuild the drive’s
desktop (the files that maintain the record of
what is on the drive).
4 Contact Digidesign Technical Support if you
need additional assistance.
System Fails to Boot
When the system fails to boot, you should do
the following:
1 Make sure all Digidesign cards and SCSI accelerator cards are properly seated.
2 Check that all SCSI devices on the bus have a
unique SCSI ID. Duplicate SCSI IDs cause system
problems.
3 Make sure all SCSI cables are properly con-
nected.
4 Check that the SCSI bus is properly termi-
nated, as described in Chapter 3.
5 If the system still does not boot or if it hangs,
disconnect all SCSI drives and try to boot the
system. If the system boots, either a drive, a cable, or the SCSI terminator might be defective.
6 See the setup guide that came with your sys-
tem for additional troubleshooting information.
7 Contact Digidesign Technical Support if you
need additional assistance.
Chapter 5: DigiDrive Management for Mac OS
25
26
DigiDrive Guide
chapter 6
DigiDrive Management for Windows NT and
Windows 2000
To use your DigiDrive on a computer running a
Windows operating system, you need to format
and partition the drive properly. Once this has
been accomplished, you need to keep your
DigiDrive in peak operating condition by performing maintenance operations and checks on
a regular basis.
This chapter contains the following sections:
◆
Windows Drive Subsystem Overview
◆
Creating Primary Partitions
◆
Formatting Partitions
◆
Creating an Emergency Repair Disk
◆
Saving the Disk Configuration
◆
Keeping Your Hard Drive Tuned Up
◆
Troubleshooting
Windows Drive Subsystem
Overview
Windows allows you to create multiple partitions on a single drive as a way to manage
projects and files. This section helps to clarify
the function of partitioning a drive and other
features related to drive performance.
Digidesign does not support extended partitions or logical drives on the DigiDrives.
The following list provides some information
concerning partitions and disk devices on Windows systems:
◆ You can partition your drive as one primary
partition, having the partition represented by a
drive letter (Figure 22).
G
One partition (Drive G)
Figure 22. One partition per physical drive
Chapter 6: DigiDrive Management for Windows NT and Windows 2000
27
◆ Each partition is assigned a drive letter and
cannot be further subdivided (Figure 23).
G
H
I
tage to leaving small blocks unformatted is that
it will prevent inadvertent Disk Allocation to a
partition that is too small to be practical for audio recording.
J
Four partitions (Drives G–J)
Figure 23. Four partitions per physical drive (the
maximum)
Choosing a File System
Both Windows NT and Windows 2000 support
the NTFS file system. Because NTFS offers security, improved file recovery, and integrated
compression, you may want to use NTFS for partitions that will store system or applications
data. However, it is strongly recommended that
you use FAT 32 or FAT 16 to format DigiDrive
partitions intended to store digital sound data.
If you are using Windows 2000, you should use
the FAT 32 file system. Windows NT does not
support the FAT 32 file system and refers to FAT
16 as “FAT” in the user interface.
Partition Size
Creating Primary Partitions
To create a primary partition for Windows NT:
1 Start Windows NT 4.0 and log in to an ac-
count with administrative privileges. If you do
not have administrative privileges, see your system administrator to get privileges.
2 Click the Start button, point to Programs, and
select Administrative Tools.
3 From the Administrative Tools menu, click
Disk Administrator. The first Disk Administrator
window opens.
4 From the Windows NT Disk Administrator, se-
lect the disk on which you are going to create
one or more primary partitions.
5 From the Partition menu, choose Create. The
Create Primary Partition dialog box appears
(Figure 24).
Windows applications do not require specific
partition sizes or file systems, so a wide range of
partitioning schemes are possible. In general,
smaller partitions offer somewhat better performance, but the smaller the partition, the smaller
the maximum file size. While the largest FAT 32
partition allowed under Windows 2000 is much
larger than the DigiDrive, Windows NT and FAT
16 partitions are limited to only 4096 MB.
Digidesign recommends that you partition
DigiDrives into 4095 MB partitions. After partitioning a DigiDrive this way, a block of free
space may remain. You can choose to format
this space or leave it unformatted. One advan-
28
DigiDrive Guide
Figure 24. Create Primary Partition
6 Choose the size of the primary partition by
typing a number up to 4095MB or by clicking
the up or down arrow.
7 Click OK to create the primary partition.
8 Repeat steps 1 through 4 to create up to four
primary partitions.
9 From the Partition menu, choose Commit
Changes Now. The first Confirm dialog box appears (Figure 25).
5 Beneath the disk name (located to the left of
the disk), the display will indicate whether the
disk is “basic” or “dynamic.” Pro Tools does not
support dynamic disks. If the disk is dynamic,
right-click on the drive name and select Upgrade To Basic.
6 Right-click an unallocated region of a basic
disk, and then click Create Partition.
7 In the Create Partition wizard, click Next,
then click Primary Partition. Follow the instructions on your screen.
8 Microsoft's published limit for partition size
with FAT 32 is 4 TB. You can choose any size partition up to the complete capacity of the drive.
Figure 25. Confirm
10 Click Yes. The following Disk Administrator
dialog box appears (Figure 26).
Figure 26. Disk Administrator
11 Click OK and follow the procedure explained
in “Creating an Emergency Repair Disk” on
page 31.
To create a primary partition for Windows 2000:
1 Launch Windows 2000 and log in to an ac-
count with administrative privileges. If you do
not have administrative privileges, see your system administrator to get privileges.
2 Go to Start > Settings > Control Panel.
3 Double-click Administrative Tools, and then
double-click Computer Management.
4 In the console tree under Storage, click Disk
Management.
Chapter 6: DigiDrive Management for Windows NT and Windows 2000
29
Formatting Partitions
6 Click OK. When formatting is complete, the
Format Complete dialog box appears
(Figure 29).
To format the primary partitions in Windows NT:
1 From the Windows NT Disk Administrator, se-
lect the primary partition you are going to format.
2 From the Tools menu, choose Format. The
Format window opens.
Figure 29. Format Complete confirmation
7 Click OK.
8 Repeat steps 1 through 8 until you have for-
matted all of the primary partitions you created.
You should now save the new disk configuration to a floppy disk. See “Saving the Disk Configuration” on page 31.
To format the primary partitions in Windows 2000:
1 From the Windows 2000 Disk Management
window, select the primary partition you want
to format.
2 Go to Action > All Tasks > Format.
3 In the Format window, enter a volume name.
Figure 27. Format dialog
4 Choose FAT 32 in the FileSystem pull-down
3 Choose FAT File System (the FAT 16 file system
menu.
is referred to by NT as simply “FAT.”) Type a Volume Label Name. You can enter up to 14 characters.
4 Select Quick Format.
5 Click Start to begin formatting. The Format
warning dialog box appears.
5 Select 32k from the Allocation Unit Size pull-
down menu.
6 Select Quick Format.
7 Click Start to begin formatting.
8 Repeat steps 1 through 5 until you have for-
matted all of the primary partitions you created.
Figure 28. Format warning
30
DigiDrive Guide
Creating an Emergency Repair
Disk
The Repair Disk utility saves all of your current
system settings to an Emergency Repair Disk.
You can then use this disk to restore your computer if files become damaged.
It is strongly recommended that you create
and update an Emergency Repair Disk every
time you make significant changes to your
hardware or software setup.
The repair process relies on information
that is saved in the systemroot\repair
folder. Do not change or delete this folder.
Saving the Disk Configuration
This operation will save configuration information about currently defined drive letters.
To create a configuration floppy disk in
Windows NT:
Store the repair disk until needed. If you have a
problem, search for Emergency Repair Disk in
the Windows Help.
1 Start Windows NT 4.0 and log in to an ac-
To create a repair disk in Windows NT:
2 Click the Start button, point to Programs, and
1 Start Windows NT 4.0 and log in to an ac-
select Administrative Tools.
count with administrative privileges. If you do
not have administrative privileges, see your system administrator to get privileges.
2 Click the Start button and select Run. The Run
window opens.
3 Type
count with administrative privileges. If you do
not have administrative privileges, see your system administrator to get privileges.
3 From the Administrative Tools menu, click
Disk Administrator. The first Disk Administrator
window opens.
4 Choose Configuration from the Partition
menu and select Save.
rdisk /s and press the Enter key.
4 Follow the instructions to create a repair disk.
5 A dialog box appears asking you to put a
floppy disk into the floppy drive.
6 Click Yes. Store the configuration floppy disk
To create a repair disk in Windows 2000:
until needed.
1 Go to Start > Programs > Accessories > System
Tools. Click Backup.
2 In the Tools menu, click Create an Emergency
Repair Disk. Follow the instructions that appear
on your screen.
To create a configuration floppy disk in
Windows 2000:
■
See your Windows 2000 Help Guide.
3 Check “Back up the registry to the repair
disk.”
You will need a blank, PC-formatted, 1.44
MB floppy disk to create an Emergency Repair Disk
Chapter 6: DigiDrive Management for Windows NT and Windows 2000
31
Keeping Your Hard Drive
Tuned Up
Because Pro Tools is a disk-based system, keeping your hard drives in good operating condition is essential.
Avoiding File Fragmentation
What is fragmentation? In multitrack recording,
audio tracks are written in discrete files, spaced
evenly across the disk. If the space required to
write a discrete file is not available in a single
contiguous block, the file is broken up into several file fragments. This distribution of files and
file fragments in blocks spread out over the surface of hard drive disks causes playback to become increasingly seek-intensive. The decrease
in performance due to this process is continuous
and progressive. As you add new sound files and
edit existing files, the hard drive becomes increasingly fragmented.
Defragment your drives To correct fragmentation
and to prevent this gradual decrease in hard
drive performance, use one of the hard disk
maintenance utilities (for example Symantec’s
Norton Speed Disk and Executive Software’s Diskeeper). These utilities will allow you to reassemble file fragments and reorganize discrete
files into continuous so they are contiguous.
How often? If you use your system for intensive
editing, or if you frequently delete audio or fade
files from your hard drive, you may need to optimize your drives on a weekly basis, or even every few days, since it doesn’t take long for even
a large hard disk to become fragmented.
32
DigiDrive Guide
While Symantec and Executive Software
both claim that the use of their products
does not endanger the integrity of hard drive
data, it is always a good idea to backup your
data before defragmenting or reorganizing
files and directories on your hard drive. It is
also a good idea use a use a disk repair utility (such as NT’s ‘chkdsk’ or Norton Utilities) to find and correct file system errors
prior to defragmentation.
Correcting Disk-related Errors
With continued use, a hard drive’s file system
can become corrupted. The best defense against
this corruption is regular use of a disk repair utility, such as NT’s ‘chkdsk’ or Norton Utilities.
However, the most decisive way to resolve file
system corruption is to backup your data and reformat the drive. Therefore, if you are getting
disk errors that cannot be resolved through the
use of the disk repair utilities, it may be necessary to backup your data (to tape or another
hard drive), reformat the drive, and restore the
data.
The term ‘re-format’ refers to a high-level
format, as performed by Windows NT's
Disk Administrator or Windows 2000's
Disk Management utility. This process
erases all data and recreates the file system,
but does not affect low-level sector and track
information.
Digidesign System Fails to Boot
Troubleshooting
Occasionally, you might have problems with a
DigiDrive that you can repair on your own. The
following sections present several scenarios and
steps to take to repair them.
When the Digidesign system fails to boot:
1 Check that all SCSI devices on the bus have a
unique SCSI ID. Duplicate SCSI IDs cause system
problems.
2 Make sure all SCSI cables are properly con-
DigiDrive Does Not Turn On
nected.
When a DigiDrive does not turn on after you press
the power switch:
3 Check that the SCSI bus is properly termi-
nated, as described in Chapter 3.
1 Make sure the ac power cord is securely con-
4 If the system still does not boot or if it hangs,
nected to the drive enclosure.
disconnect all SCSI drives and try to boot the
system. If the system boots, either a drive, a cable, or the SCSI terminator might be defective.
2 Make sure the drive is plugged into a power
strip or a wall outlet.
3 If the drive is plugged into a power strip, make
sure the power strip is plugged into a wall outlet
and that the power strip is turned on. After you
turn on the drive, the green power LED on the
front of the drive is lit.
5 See the setup guide that came with your sys-
tem for additional troubleshooting information.
6 Contact Digidesign Technical Support if you
need additional assistance.
DigiDrive Produces Errors
When a DigiDrive is producing errors or is acting erratically, check the Event viewer for drivespecific errors. The Event viewer is located in the
Windows NT Administrator Tool Group, and
under Disk Management for Windows 2000.
For information that explains how to use the
Event viewer, see your Windows operating system documentation.
Chapter 6: DigiDrive Management for Windows NT and Windows 2000
33
34
DigiDrive Guide
appendix a
Specifications
The following sections provide dimensions and weights, and environmental, power supply, and
power cord specifications for the Ultra 160/LVD DigiDrive.
Dimensions and Weights
Table 2. Dimensions and Weights
Topic
Specification
Width:
without interlock stacking brackets
with interlock stacking brackets
7.50 in (190.5 mm)
8.18 in (207.7 mm)
Height
without interlock stacking brackets
with interlock stacking brackets
2.69 in (68.3 mm)
3.12 in (79.2 mm)
Depth
without interlock stacking brackets
with interlock stacking brackets
9.85 in (250.2 mm)
9.85 in (250.2 mm)
Weight
without interlock stacking brackets
with interlock stacking brackets
7.0 lb (3.1 kg)
7.1 lb (3.2 kg)
Appendix A: Specifications
35
Environmental Specifications
Table 3. Environmental Specifications
Topic
Specification
Room temperature
95°F (35°C) maximum
Operating humidity
5% to 90% noncondensing
Storage temperature
-4°F to 185°F (-20°C to 85°C)
Storage humidity
5% to 95% noncondensing
Operating the drive at room temperatures
higher than recommended will cause the
drive to age prematurely and void your warranty.
Power Supply Specifications
Table 4. Power Supply Specifications
36
Topic
Specification
Voltage
100 to 240 V ac autosensing
Frequency
50 to 60 Hz
Watts
20 W (typical)
40 W (maximum)
DigiDrive Guide
Power Cord Specifications
Choose the power cord according to the country
destination; it must comply with local safety requirements. Use the guidelines in the following
sections to replace the original power cord.
CEE-22 Power Cord Requirements
The female receptacle of the cord set, shown in
Figure 30, must comply with CEE-22 requirements.
Figure 30. Receptacle (CEE-22)
United States and Canada Power
Cord Requirements
In the United States and Canada, the male plug
is a NEMA 5-15P style and is UL listed and CSA
certified (Figure 31). SVT cord can be used with
desktop or stackable units; all other equipment
requires SJT cord. Only SJT-type cord sets can be
used for units that rest on the floor.
Table 5. United States and Canada Power Cord Requirements
Cord
Type
Size of Conductors in Cord
Maximum Current Rating of Unit
SJT
16 AWG
12 A
SVT
18 AWG
10 A
SVT
17 AWG
12 A
Select the cord set according to the current rating of your unit. See Table 5 for the selection criteria for power cords in the United States and
Canada.
Appendix A: Specifications
37
European Countries Power Cord
Requirements
In Europe, use only an H05VV-F, <HAR>, VDE,
PVC, 3 x 1.00 mm2 power cord (“NEMA 5-15P
Style Plug” on page 38). Für den Gebrauch in
Deutschland muß ein Netzkabel des Typs
H05VV-F, <HAR>, PVC, Größe, 3 x 1.00 mm2
verwendet werden. See Table 6 for the selection
criteria for European power cords.
Figure 31. NEMA 5-15P Style Plug
Table 6. European Power Cord Requirements
38
Cord Type
Size of Conductors in Cord
Maximum Current Rating of Unit
SJT
3 x 1.00 mm 2
10 A
SVT
(not applicable)
(not applicable)
DigiDrive Guide
appendix b
SCSI Cables and Terminators
SCSI Cables
Use only the highest quality SCSI cables available when connecting a DigiDrive to your Digidesign
system. Digidesign recommends the use of SCSI cables supplied by Avid Technology. These cables are
specifically designed for systems that run real-time applications, and their lengths and electrical properties are designed to ensure data integrity on the SCSI bus. Descriptions and illustrations are provided in Table 7, which also shows a list of Avid-supplied cables that are available for connecting both
wide and narrow drives to your Digidesign system, and where to use each cable.
Table 7. SCSI Cables
Cable
Type
Length
Purpose
Macintosh system
built-in SCSI to first
narrow drive
25-pin to 50-pin
30 inches
To connect the first narrow drive to the Macintosh external SCSI bus.
SCSI accelerator
board to first drive
68-pin to 50-pin
30 inches
To connect the first narrow drive to the Digidesign SCSI bus. Use only on SCSI buses that contain no wide drives.
68-pin to 68-pin
30 inches
To connect the first wide drive to the SCSI bus
or a single-channel SCSI accelerator board.
60-pin to 68-pin
30 inches
To connect the first wide drive to a dual-channel
SCSI bus.
50-pin to 50-pin
15 inches
To connect vertically stacked narrow drives.
50-pin to 50-pin
30 inches
To connect side-by-side narrow drives.
68-pin to 68-pin
15 inches
To connect vertically stacked wide drives.
68-pin to 68-pin
30 inches
To connect side-by-side wide drives.
SCSI cabling
between drives
Appendix B: SCSI Cables and Terminators
39
SCSI Terminators and Adaptors
The Pro Tools SCSI chain must be properly terminated or your system will not function properly.
Only the last device on the chain should be terminated. Depending on the configuration of your
drives, you will need one of several different types of SCSI terminators and adapters to cover the varying style of connectors found. Descriptions and illustrations are provided in Table 8.
Digidesign recommends the use of SCSI terminators supplied by Avid Technology. These color-coded
terminators are specifically designed to ensure data integrity on the SCSI bus for systems that run realtime applications. Avid terminators are available through your Digidesign dealer.
You need to connect an ultra, wide-to-narrow SCSI adapter to change from 68-pin cabling to 50-pin
cabling. The adapter terminates the unused lines to help prevent any SCSI bus problems.
Table 8. SCSI Terminators and Adapters
Type
40
Style
Description
50-pin terminator
Fast, narrow terminator for SCSI buses that have only
narrow drives (purple).
50-pin terminator
Ultra, narrow terminator for SCSI buses that have a
mixture of wide and narrow drives (blue).
68-pin multi-mode
terminator
Ultra, wide terminator for wide drive SCSI buses which
run in LVD or Single-ended mode (blue).
68-pin to 50-pin
adapter
Ultra, wide-to-narrow terminating adapter for connecting wide and narrow drives (blue).
DigiDrive Guide
Maximum Configurations
Table 9 lists the maximum number of DigiDrive LVD enclosures that can be connected in various
configurations.
If you increase the length of the cables listed below, you must reduce the number of drives in the
daisy-chain.
Table 9. DigiDrive LVD Configurations
Cable Length from
Host System to
First Drive
Cable Length
Between Drives
15 DigiDrive
LVD enclosures
30-inch
15-inch
This configuration uses the
maximum number of LVD
drives but requires that the
cable lengths be at a minimum.
10 DigiDrive
LVD enclosures
10-feet
30-inch
This configuration provides a
greater distance between the
host system and all the
drives.
8 drives
(any combination of DigiDrive
LVD and single-ended)
30-inch
15-inch or 30-inch
Number of DigiDrive LVD
Enclosures
Comments
This configuration includes
DigiDrive LVD and singleended drives.
Appendix B: SCSI Cables and Terminators
41
SCSI LVD Cables
Digidesign strongly recommends the use of Avid SCSI cables when you are attaching DigiDrives to
the accelerator board on your Pro Tools system. These cables are specifically designed with electrical
properties that ensure data integrity on the SCSI bus—either LVD or single-ended.
An Avid 30-inch, 68-pin to 68-pin SCSI LVD cable is supplied with each DigiDrive LVD enclosure. A
green sleeve on the cable denotes that it is an LVD cable. All LVD cables (regardless of length) have
green sleeves.
Avid SCSI LVD Cables Available for Purchase
Cable Length
Purpose
Host Bus Adapter (HBA) cables — 68 VHDCI-pin to 68 HD-pin connectors
10-feet
Available for connecting the first DigiDrive LVD enclosure to the host system (optional)
30-feet
Available for connecting the first DigiDrive LVD enclosure to the host system (optional)
Daisy-chain cables — 68 HD-pin to 68-HD pin connectors
30-inch
Ships with the DigiDrive LVD enclosures. Can be used for connecting the
first DigiDrive to the host system or for providing SCSI connection
between DigiDrives
SCSI LVD Terminator
Avid's patented multi-mode terminator is included with each DigiDrive. The Avid LVD terminator detects the SCSI bus mode. The LED is green when the SCSI bus is in LVD mode, and amber when the
SCSI bus is in single-ended fast, wide mode.
LED
Avid SCSI LVD Terminator
42
DigiDrive Guide
index
Numerics
16-track performance requirements 19
32-track performance requirements 20
50-pin SCSI connector on narrow drive 15
50-pin terminator 40
68-pin SCSI connector
on DigiDrive 13, 14
68-pin terminator 40
68-pin to 50-pin adapter 40
A
Activity LED 4
Administrative Tools 28, 31
Airflow 4
B
Back panel
power connector 4
SCSI connectors 4
Boot failure 25, 33
C
cable length of SCSI drives 20
Checking
DigiDrives 21
power cord 24, 33
SCSI cables 24
SCSI termination 24
Configuration
disk, creating 31
requirements 5
Connecting
DigiDrives 13
external SCSI drive 12
mixed narrow drives and wide DigiDrives 14
Creating
a configuration disk 31
a repair disk 31
primary partitions 28–29
D
DAE Buffer 19
Data transfer 3
Design 1
Device numbering 16
Digidesign product identification label 3
DigiDrive
back panel 4
checking 21
connecting enclosures 13
connecting wide and narrow 14
connector 13
description 3
does not appear on desktop 24
does not turn on 24, 33
errors on the Macintosh 25
errors on Windows 33
fails to boot 33
format partitions 30
front panel 3
handling 5
installation requirements 5
installing 9–17
interlock stacking brackets 10
LEDs 4
locking plate 10
Macintosh management 21
maximum number 7
mixing wide and narrow 7
power switch 3
repairing 22, 23
SCSI ID requirements 17
SCSI ID switch 4
See DigiDrive
specifications 35–37
stacking 10
Index 43
troubleshooting on the Macintosh 24–25
troubleshooting on Windows 33
unpacking 9
Windows management 27
Windows NT management 27
Directory corruption 21
Disk Administrator 28, 31
Disk First Aid
maintaining data structures 21
repairing DigiDrives 22
using 22
verification problems 22
verification results 22
E
Emergency Repair Disk 31
Errors 21
on the Macintosh 24–25
on Windows 33
Event viewer 33
Interlock stacking brackets 10
L
LEDs
activity 4
power 4
thermal 4
Loading
Norton Utilities 23
Locking plate 10
M
Macintosh
Disk First Aid 22
Norton Disk Doctor 23
SCSI settings 16
Managing DigiDrives
on the Macintosh 21
on Windows 27
on Windows NT 27
Mixing DigiDrives 7
F
Factors affecting system performance 19
Fan 4
File system errors 21
Format partitions 30
Fragmentation 32
Front panel 3
G
Gravity stacking 10
N
Narrow SCSI
buses 16
connections 15
terminator 40
Norton Disk Doctor
loading 23
maintaining data structures 21
repairing DigiDrives 23
using 23
utilities 25
H
Handling DigiDrives 5
Hard drive
See DigiDrive
Hard drives
performance issues 19
performance tips 20
I
Identification label 3
Indicators 4
Installing DigiDrives
procedures 9–17
requirements 5
44
DigiDrive Guide
P
Partitions
primary 27
sizes 28
performance goals, with specific setups 19
Performance tips, for hard drives 20
Permanent interlock stacking 10
Power cord
connection 14
specifications 37–??
Power LED 4
Power switch 3
Q
QuietDrive technology 1
R
Repair disk, creating 31
Repairing DigiDrives
on the Macintosh 22, 23
on Windows NT 33
Requirements, SCSI 6
S
SCSI
bus 7
buses 16
cable length 20
configuration requirements 5
connectors 4
ID numbering 16
SCSI adapter, ultra, wide-to-narrow 15, 40
SCSI cables
available 39
connecting to DigiDrive 13, 14
SCSI ID
requirements 6
setting 16, 17
switch location 4
switch versions 18
SCSI terminator
fast, narrow 40
ultra, narrow 15, 40
Setting SCSI IDs 16, 17
Software
Norton Utilities 23
Specifications
DigiDrives 35–37
power cord 37
Stacking DigiDrives
gravity 10
instructions 10
permanent interlock 10
temporary interlock 10
System
fails to boot on the Macintosh 25
fails to boot on Windows NT 33
speed 1
Temporary interlock stacking 10
Thermal LED 4
Troubleshooting DigiDrives
on the Macintosh 24–25
on Windows 33
U
Ultra, narrow SCSI terminator 15, 40
Ultra, wide-to-narrow SCSI adapter 15, 40
Unpacking DigiDrive 9
V
Ventilation 4
W
Wide DigiDrive
See DigiDrive
Windows
Disk Administrator 31
partitions 27
repair disk 31
Windows NT
format DigiDrives 30
SCSI settings 17
T
Technology
Index
45
46
DigiDrive Guide