1
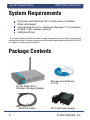
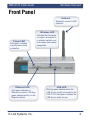
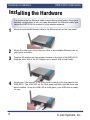
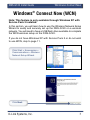
DWL-AG700AP Install Guide
Version 1.0
DNS-G120
Wireless Network Storage Adapter
System Requirements
DNS-G120 Install Guide
System Requirements
Computer with Windows XP or 2000 with an installed
Ethernet Adapter*
Internet Explorer 6.0 or Netscape Navigator 7.0 and above
An 802.11g/b wireless network
USB Hard Drive
* It is required that an Ethernet cable is used during initial setup. Once your wireless
configuration is set, you may disconnect the Ethernet cable and reboot the DNS-G120
to connect to your wireless network.
Package Contents
D-Link DNS-G120
Wireless Storage Adapter
Ethernet Cable
2
Manual and Software
on CD
5V 2.5A Power Supply
D-Link Systems, Inc.
DNS-G120 Install Guide
Hardware Overview
Front Panel
Antenna
Wirelessly connect to WiFi
networks.
Power LED
Solid green indicates
a good power source
connection.
Ethernet LED
Solid green indicates an
Ethernet connection. Blinking
green indicates activity on the
Ethernet network.
D-Link Systems, Inc.
Wireless LED
Indicates that the device
is properly connected to
a wireless network and
blinks when data is being
transmitted.
USB LED
Blinking green indicates when the
USB drive is initially connected to the
DNS-G120. Solid green indicates the
USB drive is ready for use.
3
Hardware Overview
DNS-G120 Install Guide
Rear Panel
Ethernet Port
Connects to your router or
switch using the included
Ethernet cable.
Power Receptor
Receptor for the provided
power adapter.
Reset Button
This button will restore the
factory default settings.
Disconnect Button
Press this button to safely
disconnect USB drives from
the DNS-G120.
4
USB Ports
Connects your USB 1.1 or
2.0 drives to the DNS-G120.
D-Link Systems, Inc.
DNS-G120 Install Guide
Installation Overview
Installation Overview
Once you’ve completed your DNS-G120 installation, your
network may appear similar to the diagram below.
D-Link Systems, Inc.
5
Hardware Installation
DNS-G120 Install Guide
Installing the Hardware
It is required that an Ethernet cable is used during initial setup. Once your
wireless configuration is set, you may disconnect the Ethernet cable and
reboot the DNS-G120 to connect to your wireless network.
1
Attach the provided Ethernet cable to the Ethernet port on the rear panel.
2
3
Attach the other end of the Ethernet cable to an available Ethernet port on
your router or switch.
4
Attach your USB drive(s) to the USB port(s) located on the rear panel of the
DNS-G120. The USB LED on the front panel will blink until the drive has
been installed. Once the USB LED is solid green, your USB drive is ready
for use.
6
Plug the AC adapter into the receptor located on the back of the DNS-G120.
Plug the other end of the AC Adapter into a power strip or wall outlet.
D-Link Systems, Inc.
DNS-G120 Install Guide
Windows® Connect Now
Windows® Connect Now (WCN)
Note: This feature is only available through Windows XP with
Service Pack 2 installed.
In this section, you will learn how to use the Wireless Network Setup
Wizard to easily and securely set up the DNS-G120 on a wireless
network. You will need to have a USB flash drive available to complete
the WCN wireless setup on the DNS-G120.
If you do not have Windows XP with Service Pack 2 or do not wish
to use WCN, skip to page 11.
Click Start > Accessories >
Communications > Wireless
Network Setup Wizard.
Click Next.
D-Link Systems, Inc.
7
Windows® Connect Now
DNS-G120 Install Guide
Windows® Connect Now (Continued)
If you have already used WCN to
configure other wireless devices on
your network and would like to use the
same settings on your DNS-G120, click
Add new computers or devices to
the ‘Wireless Network’ network and
skip to the last step on page 9.
To create new wireless settings, click
Setup a new wireless network.
Click Next.
Enter the Network Name (SSID).
If you want Windows to assign a
random network key (encryption
key), select Automatically assign a
network key.
If you want to manually assign
a network key, select Manually
assign a network key.
To use WPA-PSK, select Use WPA
Encryption instead of WEP.
Click Next.
8
D-Link Systems, Inc.
DNS-G120 Install Guide
Windows® Connect Now
Windows® Connect Now (Continued)
This screen appears if you choose
to set the WEP key manually.
Enter the desired encryption key
in the space provided and then
enter the key again to confirm.
Click Next.
This screen appears if you choose
to set the WPA key manually.
Enter the desired encryption key in
the space provided and then enter
the key again to confirm.
Click Next.
This screen appears when the
WEP or WPA key has been
assigned. Follow the directions
on the screen to transfer settings
to the USB flash drive.
Click Next.
D-Link Systems, Inc.
9
Windows® Connect Now
DNS-G120 Install Guide
Windows® Connect Now (Continued)
This screen appears after the settings are successfully transferred to
the USB flash drive. Follow the directions on the screen.
When inserting the USB flash
drive into the USB port on the
DNS-G120, the USB LED will
blink slowly as it detects the USB
flash drive and then turn off. The
USB LED will then quickly blink 3
times and turn off again. Once the
USB light is solid and the WLAN
LED blinks, you may unplug the
USB flash drive.
Click Next.
When the DNS-G120 wireless
setup is successful, a window
similar to this one will appear.
You have completed the wireless
configuration of the DNS-G120.
Click Finish.
Your wireless setup using WCN is now complete.
10
D-Link Systems, Inc.
DNS-G120 Install Guide
Configuration
Configuration
To access the web-based configuration, insert the DNS-G120 CD
into your CD-ROM drive.
Click Launch D-Link
Easy Search Utility.
Highlight an available
DNS-G120 and click
Configuration to access
the web-based utility.
Type admin for
the user name and
leave the password
field blank.
Click Config
D-Link Systems, Inc.
11
Configuration
DNS-G120 Install Guide
Configuration (continued)
Click Run Wizard
Click Next.
Enter your new password
for the DNS-G120.
Click Next.
12
D-Link Systems, Inc.
DNS-G120 Install Guide
Configuration
Configuration (continued)
Select your Time Zone.
Click Next.
Leave DHCP Client enabled if
your network contains a DHCP
server. If not, select Static
IP and enter the IP address
information to be used. The IP
address must be in the same
range as your network.
Click Next.
Enter the workgroup name
of your network. Enter a
name and a description for
the DNS-G120.
Click Next.
D-Link Systems, Inc.
13
Configuration
DNS-G120 Install Guide
Configuration (continued)
If you have configured the wireless settings using Windows®
Connect Now (WCN), click Next on the following screen without any
configuration changes. Refer to page 7 for WCN setup instructions.
By default, the wireless function is
disabled. To connect to a wireless
network, select Enable and click
Site Survey or manually enter
your wireless settings.
Click Next.
Click Restart.
Your setup is complete. Please close all web browser
windows. Use the Easy Search Utility to locate and
continue advanced configuration of the DNS-G120.
14
D-Link Systems, Inc.
DNS-G120 Install Guide
Viewing Files and Folders
Viewing Files and Folders
To view the content on your USB drive, double-click on the My
Network Places icon on your desktop and double-click on the folder
that represents your USB drive.
By default, all users on your network will have read/write permissions
to all folders and files on the USB drive(s).
For more information on creating users and assigning permissions,
please refer to the Using the Configuration Utility section in the
manual included on your DNS-G120 CD.
D-Link Systems, Inc.
15
Easy Search Utility
DNS-G120 Install Guide
Using the Easy Search Utility
Click Launch D-Link
Easy Search Utility.
Highlight an available
DNS-G120 and click
Configuration to access
the web-based utility.
To assign a static IP
address, highlight the DNSG120 and select Disabled
from the DHCP Client dropdown menu. Click Apply to
save the new IP settings.
16
D-Link Systems, Inc.
DNS-G120 Install Guide
Mapping Drives
Mapping Drives
You can assign a drive letter (e.g. E:) to a specific folder on your
USB drive(s) that are connected to your DNS-G120.
Insert the D-Link DNS-G120
CD into your CD drive.
Click Launch D-Link
Easy Search Utility.
Highlight an available
DNS-G120.
Available shares will be
displayed. Highlight the
share you want to map.
Select an available drive letter from the
drop-down menu and click Connect.
D-Link Systems, Inc.
17
Mapping Drives
DNS-G120 Install Guide
Mapping Drives (continued)
Once you click Connect, your mapped drive will be available.
Double-click on the My Computer icon on your desktop.
Double-click the mapped
drive to access the drive.
Disconnecting Drives
To disconnect your USB drive(s) from the DNS-G120, please do
the following:
Press the Disconnect button on the rear panel.
The USB LED will blink red for a few seconds and turn off.
You may now safely remove both USB drives.
Note: Both drives will be disconnected when the Disconnect button
is pressed. You must remove both drives from the USB ports. This is
a safety feature to reduce the risk of data loss. After both drives have
been removed you may reconnect a drive at any time.
18
D-Link Systems, Inc.
DNS-G120 Install Guide
Notes
Notes
D-Link Systems, Inc.
19
Contacting
Technical
Support
DNS-G120
Install Guide
Contacting
Technical
Support
DNS-G120
Install
Guide
Technical Support
D-Link’s website contains the latest user documentation and software updates
for D-Link products.
D-Link provides free technical support for customers within the United States
and Canada for the duration of the product’s warranty period.
U.S. and Canadian customers can contact D-Link Technical Support through
our website or by phone.
United States
Telephone
(877) 453-5465
Twenty four hours a day, seven days a week.
World Wide Web
http://support.dlink.com
E-mail
[email protected]
Canada
Telephone
(800) 361-5265
Monday through Friday, 7:30am to 12:00am EST.
World Wide Web
http://support.dlink.ca
E-mail
[email protected]
Version 1.0
Revised 05/24/05
Copyright ©2005 D-Link Corporation/D-Link Systems, Inc. All rights reserved. D-Link, the D-Link logo are registered trademarks of
D-Link Corporation or its subsidiaries in the United States and other countries. Other trademarks are the property of their respective
owners. All references to speed are for comparison purposes only. Product specifications, size and shape are subject to change
without notice, and actual product appearance may differ from that depicted herein. Visit www.dlink.com for more details.
20
D-Link Systems, Inc.