1
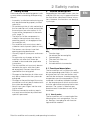
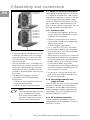
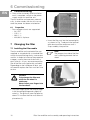
Filterlüfter
Fan-and-filter unit
Ventilateur à filtre
Ventilator
Filterfläkt
Ventilatore-filtro
Ventilador con filtro
SK 3237.xxx
SK 3238.xxx
SK 3239.xxx
SK 3240.xxx
Montage-, Installations- und Bedienungsanleitung
Assembly and operating instructions
Notice d’emploi, d’installation et de montage
Montage- en bedieningshandleiding
Montage- och hanteringsanvisning
Istruzioni di montaggio e funzionamento
Instrucciones de montaje y funcionamiento
SK 3241.xxx
SK 3243.xxx
SK 3244.xxx
SK 3245.xxx
Contents
1 Notes on documentation . . . . . . 4
1.1
1.2
1.3
EN
5
Other applicable
documents . . . . . . . . . . . . . . . . 4
Storing the documents . . . . . . 4
Symbols used . . . . . . . . . . . . . 4
Carrying out the electrical
installation . . . . . . . . . . . . . . . . . 9
5.1
5.2
5.3
2
Safety notes . . . . . . . . . . . . . . . . 5
3
Device description . . . . . . . . . . . 5
3.1
3.1.1
3.1.2
3.1.3
3.1.4
3.2
3.3
4
Functional description . . . . . . 5
How it works . . . . . . . . . . . . . . . 5
Control. . . . . . . . . . . . . . . . . . . . 6
Safety equipment . . . . . . . . . . . 6
Filter mats . . . . . . . . . . . . . . . . . 6
Proper use . . . . . . . . . . . . . . . . 6
Scope of supply . . . . . . . . . . . 6
Assembly and connection . . . . 7
4.1
4.2
4.2.1
4.2.2
4.3
4.3.1
4.3.2
4.4
4.4.1
4.4.2
4.4.3
Choosing the installation
site . . . . . . . . . . . . . . . . . . . . . 7
Assembly instructions . . . . . . 7
General . . . . . . . . . . . . . . . . . . . 7
Layout of the components
in the enclosure. . . . . . . . . . . . . 7
Fitting the fan-and-filter unit
or outlet filter . . . . . . . . . . . . . . 7
Cutting out the enclosure . . . . . 7
Fitting the fan-and-filter unit . . . 7
Notes on electrical
installation . . . . . . . . . . . . . . . 8
Connection data . . . . . . . . . . . . 8
Overvoltage protection and
supply line load . . . . . . . . . . . . . 8
PE conductor connection . . . . . 8
6
Commissioning . . . . . . . . . . . . 10
6.1
7
Installing the filter media . . . 10
Inspection and maintenance . . 11
8.1
9
Properties . . . . . . . . . . . . . . . 10
Changing the filter. . . . . . . . . . 10
7.1
8
Installing the power supply . . 9
Rotating the voltage
connection . . . . . . . . . . . . . . . 9
Changing the direction
of airflow . . . . . . . . . . . . . . . . . 9
General . . . . . . . . . . . . . . . . . 11
Storage and disposal . . . . . . . 11
10 Technical specifications . . . . . 12
11 Cut-out/drilling dimensions . . 16
12 EMC fan/outlet filter. . . . . . . . . 17
13 Connection diagrams . . . . . . . 18
14 EC declaration
of conformity . . . . . . . . . . . . . . 20
Rittal fan-and-filter unit assembly and operating instructions
3
1 Notes on documentation
EN
1 Notes on documentation
1.3 Symbols used
These assembly instructions are aimed at
tradespersons who are familiar with assembly and installation of the fan-and-filter
unit, and at trained specialists who are
familiar with operation of the fan-and-filter
unit.
Please observe the following safety instructions and other notes in this guide:
Symbol for an instructed action:
• The bullet point indicates that you
should perform an action.
Safety and other notes:
1.1 Other applicable documents
There is one set of instructions for the unit
types described here:
– Assembly, installation and operating instructions enclosed with the unit as a
printed document and/or on CD-ROM.
We cannot accept any liability for damage
associated with failure to observe these
instructions. The instructions for the accessories used should also be observed
where applicable.
Danger!
Immediate danger to life
and limb!
Caution!
Potential threat to the product
and its environment.
1.2 Storing the documents
These instructions and all associated documents are part of the product. They must
be given to the plant operator. The operator is responsible for storage of the documents so they are readily available when
needed.
4
Note:
Useful information
and special features.
Rittal fan-and-filter unit assembly and operating instructions
2 Safety notes
2 Safety notes
3 Device description
Please observe the following general safety notes when assembling and operating
the unit:
– Assembly, installation and servicing may
only be performed by properly trained
specialists.
– Do not obstruct the air inlet and outlet of
the fan-and-filter unit inside and outside
the enclosure (see also section “4.2.2
Layout of the components in the enclosure”, page 7).
– The heat loss of the components installed in the enclosure must not exceed the specific air throughput of the
fan-and-filter unit.
– Fan-and-filter units must always be installed on vertical panels (door or walls).
– The louvres must always have their
opening pointing downwards.
– Use only original spare parts and accessories.
– Do not make any changes to the fanand-filter unit other than those described in these and other applicable
instructions.
– The fan-and-filter unit must only be connected to the mains with the system
de-energised. Connect the pre-fuse
specified on the rating plate.
– Changes to the direction of airflow must
only be carried out with the system deenergised.
– Changes to the positioning of the mains
connection must only be carried out with
the system de-energised.
– Never insert your fingers into the rotating fan wheel.
– Electrical connection and any repairs
may only be carried out by authorised
specialist personnel.
Depending on the model chosen, your fanand-filter unit may vary in appearance from
the illustrations contained in these instructions. However, the functions are identical
in principle.
3
1
4
2
5
Fig. 1:
Device description
Key
1 Function logo
(to release the louvred grille)
2 Louvred grille
3 Filter box with filter mat
4 Fan housing
5 Variable electrical connection
3.1 Functional description
The fan-and-filter unit in conjunction with
the corresponding outlet filter(s) is used to
dissipate heat loss from enclosures and
ventilate the enclosure, thereby protecting
temperature-sensitive components. This is
achieved via the direct infeed of ambient
air, the temperature of which must be less
than the admissible enclosure interior temperature. The system is fitted into prepared cut-outs in the door or walls of the
enclosure.
3.1.1 How it works
The fan-and-filter unit is comprised of the
following four main components: Fan motor, filter box, louvred grille with function
logo and filter medium.
Rittal fan-and-filter unit assembly and operating instructions
5
EN
3 Device description
EN
3.1.2 Control
Rittal fan-and-filter units may be controlled
more efficiently using a thermostat (Model
No. SK 3110.000), digital temperature
display (Model No. SK 3114.200), temperature-dependent speed control
(Model No. SK 3120.200) and/or hygrostat
(Model No. SK 3118.000).
Control unit (Model No. SK 3235.440) for
fan-and-filter unit SK 3245.xxx only.
3.1.3 Safety equipment
The fan is equipped with thermal winding
protection devices for protection against
excess current and even, in some cases,
against overtemperature. For rotary current fans, the winding protection is located
in the star earthing of the motor.
3.1.4 Filter mats
The fan-and-filter unit/outlet filter is supplied with a standard filter mat already
installed. Depending on the incidence of
dust, you will need to replace the filter mat
from time to time.
In order to increase the protection category, and in the case of dust with a grain size
of < 10 µm, we recommend the use of fine
filter mats.
Note:
The air throughput volume
will be reduced.
Special filter mats are required
for EMC fan-and-filter units
(see accessories).
3.2 Proper use
Rittal fan-and-filter units were developed
and designed in accordance with the
state of the art and the recognised rules
governing technical safety. Nevertheless,
if used improperly, they may pose a threat
to life and limb or cause damage to property. The unit is only intended for ventilating enclosures and electronic cases. Any
other use is deemed improper. The manufacturer will not be liable for any damages
caused as a result of improper use, or for
incorrect assembly, installation or use.
All risk is borne solely by the user.
Proper usage also includes the observation of all valid documents and compliance with the inspection and servicing
conditions.
3.3 Scope of supply
The fan is supplied in a packaging unit in
a fully assembled state and ready to connect.
Please check the scope of supply for completeness.
Qty.
Description
1
Fan-and-filter unit
4
– Mounting screws
(not for SK 3237.1xx
to SK 3239.1xx)
– Assembly, installation and
operating instructions
1
1
Drilling template, self-adhesive
Tab. 1: Scope of supply
6
Rittal fan-and-filter unit assembly and operating instructions
4 Assembly and connection
4 Assembly and connection
4.1 Choosing the installation site
When choosing the installation site for the
enclosure, please observe the following:
– The site for the enclosure, and hence
the arrangement of the fan-and-filter
unit, must be carefully selected so as to
ensure good ventilation.
– The site must be free from excessive dirt
and moisture.
– The ambient temperature must be lower
than the permissible enclosure interior
temperature.
– The mains connection data as stated
on the rating plate of the unit must be
guaranteed.
4.2 Assembly instructions
4.2.1 General
– Check that the packaging does not show
any signs of damage. Packaging damage may be the cause of a subsequent
functional failure.
– The fan-and-filter unit and outlet filter
must always be mounted on an enclosure in order to ensure air exchange.
Note:
The outlet filter should be
at least the same size as the
fan-and-filter unit.
– The enclosure must be sealed on all
sides (IP 54). If the enclosure has a leak,
unfiltered, contaminated air may enter
the enclosure, depending on the direction of airflow of the fan.
4.2.2 Layout of the components
in the enclosure
Exercise particular caution with the airflow
from the blowers of built-in components.
For installation, it is important to ensure
that the airflows of fans and built-in components do not have a negative influence
on one another (air short-circuit).
The corresponding minimum distances
between the fan and component must be
observed in order to ensure unhindered air
circulation.
4.3 Fitting the fan-and-filter unit
or outlet filter
The fan-and-filter unit or outlet filter is
mounted on a vertical panel of the enclosure:
• For this purpose, the appropriate door,
side or rear panel must be cut out using
the supplied drilling template.
The fan-and-filter unit is generally fitted in
the lower part of the enclosure, and the
outlet filter in the upper part.
4.3.1 Cutting out the enclosure
• Stick the supplied self-adhesive drilling
template to the envisaged position on
the door, side or rear panel of the enclosure.
There are dimensioning lines on the drilling plate for the cut-out and for the holes
required for mounting and securing the
fan, depending on the metal thickness
(cf. also Fig. 8 and Fig. 9, page 16).
Risk of injury!
Carefully deburr all cut-outs
to prevent injuries caused by
sharp edges.
• Make the cut-outs including the line
width as per the drilling template.
Deburr the cut-outs.
4.3.2 Fitting the fan-and-filter unit
• The fan may be fitted without tools, by
simply snapping into the preconfigured
mounting cut-out.
• However, if the metal thickness is greater than 3 mm, the fan will need to be
screw-fastened. To this end, remove the
louvred grille in order to gain access to
the lower mounting holes.
Rittal fan-and-filter unit assembly and operating instructions
7
EN
4 Assembly and connection
4.4 Notes on electrical installation
EN
Fig. 2:
SK 3237.xxx
SK 3238.xxx
When performing the electrical installation,
it is important to observe all valid national
and regional regulations as well as the provisions of the responsible power supply
company. Electrical installation must only
be carried out by a qualified electrician
who is responsible for compliance with the
existing standards and regulations.
SK 3239.xxx
SK 3240.xxx
SK 3241.xxx
SK 3243.xxx
SK 3244.xxx
SK 3245.xxx
4.4.1 Connection data
– The voltage and frequency of the connection must correspond to the values
stated on the rating plate.
– Electrical connection and any repairs
may only be carried out by authorised
specialist personnel.
Use only original spare parts!
– For 1~ and 24 V (DC) fans, install the
pre-fuse prescribed on the rating plate
(circuit-breaker or slow fuse) to protect
against short-circuiting.
– With the rotary current variant, install the
pre-fuse prescribed on the rating plate or
a circuit-breaker/back-up protection to
protect against short-circuiting, and set
it to the prescribed rating value.
– The direction of airflow and the direction
of rotation are each marked on the motor housing with an arrow.
– If a phase is missing, the fan will not
start. If the rotary field is incorrect, the
fan will run backwards.
Remove the louvred grille
• If transporting over long distances or to
a different installation site, we strongly
recommend that you screw-fasten the
fan to prevent it from falling out of the
mounting cut-out.
• The fan-and-filter unit is a rotating component that may transfer vibrations and
oscillations. Suitable design measures
to dampen vibrations should be implemented in advance before constructing
the system.
• The protection category can be increased by means of the following
accessories:
– IP 55 by using an additional fine filter
mat or hose-proof hood.
– IP 56 by using a hose-proof hood.
Note:
To increase the protection category, an additional fine filter
mat or hose-proof hood must
be used in both the fan-andfilter unit and the outlet filter.
8
4.4.2 Overvoltage protection and
supply line load
The unit does not have its own overvoltage
protection. Measures must be taken by
the operator at the supply end to ensure
effective protection against lightning and
overvoltage. The mains voltage must not
exceed a tolerance of ±10%.
4.4.3 PE conductor connection
The PE conductor connection must be
connected to the PE conductor system of
the overall system.
Rittal fan-and-filter unit assembly and operating instructions
5 Carrying out the electrical
5 Carrying out the electrical
installation
fan. Units SK 3238.xxx to SK 3239.xxx are
released by pulling out the clip (see Fig. 4)
of the bayonet connection.
5.1 Installing the power supply
EN
SK 3238.xxx
SK 3239.xxx
• Complete the electrical installation by
following the wiring plans.
Note:
For technical data refer to
the rating plate.
• Remove the red cover from the electrical connection.
Fig. 4:
Release the bayonet connection
Units SK 3240.xxx, SK 3241.xxx,
SK 3243.xxx to SK 3245.xxx are released
by pressing the release button of the
bayonet connection (see Fig. 5), located
on the opposite corner from the connection terminal.
Fig. 3:
Access the electrical connection
• Insert the connection cable with wire end
ferrules into the screwless spring terminals. Choose an appropriate pre-fuse
according to the line cross-section
(2 x 0.75 – 2.5 mm² multi-wire,
2 x 1.5 – 2.5 mm² fine-wire soldered).
Fig. 5:
Caution!
If no wire end ferrules are
used, the insulation of the
individual wires should be
stripped to a max. of 9 mm
(to comply with clearance
and creepage distances).
• Re-attach the electrical connection cover.
5.2 Rotating the voltage connection
If the position of the voltage connection is
not ideally accessible, it may be rotated
through 90° and snapped into position. To
this end, press down on the release button
of the bayonet connection at the rear of the
Release the bayonet connection
5.3 Changing the direction of
airflow
The direction of airflow blows into the enclosure from the outside as standard. Should it
become necessary to change the direction
of airflow for technical reasons (space,
specific component air routing etc.), this is
easily achieved. Simply release the fan
housing and rotate it through 180°.
To release, please follow the same procedure as described under “5.2 Rotating the
voltage connection”, page 9.
Please also observe the instructions outlined under “4.2.1 General”, page 7.
Rittal fan-and-filter unit assembly and operating instructions
9
6 Commissioning
EN
6 Commissioning
• Once all the assembly and installation
work is complete, switch on the power
supply to the fan-and-filter unit.
The fan-and-filter unit operates automatically, in other words, the fan will start up
once the power has been switched on.
6.1 Properties
– Four voltage variants are supported:
– 24 V DC
– 115 V, 1~
– 230 V, 1~
– 400/460 V, 3-phase
7 Changing the filter
Fig. 6:
Release the louvred grille
• Insert the filter mat into the louvred grille
as shown in Fig. 7 and push the louvred
grille back onto the enclosure until it
snaps audibly into position.
7.1 Installing the filter media
The fan-and-filter unit and outlet filter are
supplied as standard with a standard filter
mat for the pre-filtering of dry, coarse dust
and lint. In order to increase the protection
category, and in the case of dust with a
grain size of < 10 µm, we recommend the
use of fine filter mats (optionally available).
Depending on the incidence of dust, you
will need to replace the filter mat from time
to time.
Note:
The progressive side of the filter
mat is pointing towards the fan
wheel.
Caution!
Only change the filter mat
while the fan wheel is
stationary.
Never insert your fingers into
the fan wheel.
Fig. 7:
Install the filter mat
• Use your finger to pull the function logo
in the louvred grille upwards slightly to
unlock it. The grille will now flip open by
about 70° to allow the filter mat to be replaced easily.
10
Rittal fan-and-filter unit assembly and operating instructions
8 Inspection and maintenance
8 Inspection and
maintenance
Risk of electric shock!
The unit is live.
Switch off the power supply
before opening, and take
suitable precautions against
it being accidentally
switched back on.
8.1 General
The built-in, maintenance-free fan is mounted on a friction bearing (SK 3237.xxx,
SK 3238.xxx and SK 3239.xxx) or ball
bearing (SK 3240.xxx, SK 3241.xxx,
SK 3243.xxx to SK 3245.xxx), and is protected against humidity and dust, and
equipped with a temperature monitor. The
life expectancy is at least 40,000 operating hours (L10, 40°C). The fan-and-filter
unit is thus largely maintenance free.
From time to time, the components may
need to be cleaned using a vacuum cleaner or compressed air if they become visibly dirty.
Any stubborn, oily stains may be removed
using a non-flammable detergent, such as
degreaser.
Maintenance interval: 2000 operating
hours. Depending on the level of contamination in the ambient air, the maintenance
interval may be reduced to suit the air pollution intensity.
Caution!
Risk of fire!
Never use flammable liquids
for cleaning.
Sequence of maintenance measures:
– Check the level of dirt.
– Filter soiling?
Replace the filter if necessary.
– Fan membranes soiled?
Clean if necessary.
– Check the noise generation of the fan.
– Compressed air cleaning.
9 Storage and disposal
Caution!
Risk of damage!
The cooling unit must not be
stored at temperatures above
+70°C or below –30°C.
Disposal can be performed at the Rittal
plant.
Please contact us for advice.
Rittal fan-and-filter unit assembly and operating instructions
11
EN
10 Technical specifications
EN
10 Technical specifications
– Observe the pre-fuse as per the specifications on the rating plate.
– Observe the mains connection data
(voltage and frequency) as per the
rating plate.
Unit
Model No. SK
Fan-and-filter unit,
RAL 7035
–
3237.100
3237.110
3237.124
3238.100
3238.110
3238.124
EMC fan-and-filter
unit,
RAL 7035
–
3237.600
–
–
3238.600
–
–
Rated operating
voltage
V
Hz
230, 1~,
50/60
115, 1~,
50/60
24 (DC)
230, 1~,
50/60
115, 1~,
50/60
24 (DC)
Rated current max.
A
0.065/
0.052
0.14/
0.12
0.14
0.12/
0.11
0.24/
0.23
0.28
Power
consumption
W
11/9
3
19/17
Pre-fuse T
A
2
6
Dimensions
B1/H1
mm
116.5 x 116.5
148.5 x 148.5
B2/H2
mm
92 x 92
124 x 124
T1
mm
16
T2
(max. installation
depth)
mm
43
Air throughput,
unimpeded air flow
m³/h
20/25
Air throughput
with outlet filter
including standard
filter mat
m³/h
58.5
1 x 3238.200: 43/50
–
2 x 3238.200: 46/56
3238.200
–
3237.200
EMC outlet filter
–
3237.060
–
Axial, self-starting
shaded pole motor
Noise pressure
level
dB (A) 38/43
Operating
temperature
°C
–15 to +55
Storage
temperature
°C
–30 to +70
Protection category
(to EN 60 529)
–
55
3238.060
Axial,
DC motor
Diagonal, self-starting
shaded pole motor
Diagonal,
DC motor
38
46/49
46
IP 54 standard
IP 55 with hose-proof hood
IP 56 with hose-proof hood
Tab. 2: Technical specifications
12
55/66
1 x 3237.200: 15/18
Outlet filter
Fan
20
IP 54 standard
IP 55 with hose-proof hood
IP 56 with hose-proof hood
We reserve the right to make technical modifications.
Rittal fan-and-filter unit assembly and operating instructions
10 Technical specifications
Unit
Model No. SK
Fan-and-filter unit,
RAL 7035
–
3239.100
3239.110
3239.124
EMC fan-and-filter
unit,
RAL 7035
–
3239.600
–
–
Rated operating
voltage
V
Hz
230, 1~,
50/60
115, 1~,
50/60
24 (DC)
Rated current max.
A
0.12/0.11
0.24/0.23
0.28
Power
consumption
W
19/17
Pre-fuse T
A
2
EN
6
Dimensions
B1/H1
mm
204 x 204
B2/H2
mm
177 x 177
T1
mm
24
T2
(max. installation
depth)
mm
90
Air throughput,
unimpeded air flow
m³/h
105/120
Air throughput
with outlet filter
including standard
filter mat
105
1 x 3239.200: 87/100
m³/h
2 x 3239.200: 93/108
1 x 3240.200: 98/111
Outlet filter
–
3239.200
EMC outlet filter
–
3239.060
Fan
–
Diagonal, self-starting shaded pole motor
Noise pressure
level
dB (A) 46/49
Operating
temperature
°C
–15 to +55
Storage
temperature
°C
–30 to +70
Protection category
(to EN 60 529)
–
Diagonal, DC motor
46
IP 54 standard
IP 55 with additional fine filter mat or hose-proof hood
IP 56 with hose-proof hood
Tab. 3: Technical specifications
We reserve the right to make technical modifications.
Rittal fan-and-filter unit assembly and operating instructions
13
10 Technical specifications
EN
Unit
Model No. SK
Fan-and-filter unit,
RAL 7035
–
3240.100
3240.110
3240.124
3241.100
3241.110
3241.124
EMC fan-and-filter
unit,
RAL 7035
–
3240.600
–
–
3241.600
–
–
Rated operating
voltage
V
Hz
230, 1~,
50/60
115, 1~,
50/60
24 (DC)
230, 1~,
50/60
115, 1~,
50/60
24 (DC)
Rated current max.
A
0.19/0.18
0.38/0.36
0.07
0.27/0.28
0.54/0.52
0.2
Power
consumption
W
33/33
10
42/46
43/46
25
Pre-fuse T
A
2
2
4
2
180
230/250
230
4
Dimensions
B1/H1
mm
255 x 255
B2/H2
mm
224 x 224
T1
mm
25
T2
(max. installation
depth)
mm
107
Air throughput,
unimpeded air flow
m³/h
180/160
Air throughput with
outlet filter
including standard
filter mat
m³/h
1 x 3240.200: 138/121
1 x 3240.200: 183/205
2 x 3240.200: 165/140
2 x 3240.200: 203/230
1 x 3243.200: 165/140
1 x 3243.200: 203/230
Outlet filter
–
3240.200
EMC
outlet filter
–
3240.060
Fan
–
Diagonal, self-starting
shaded pole motor
Noise pressure
level
dB (A) 51/46
Operating
temperature
°C
–30 to +55
Storage
temperature
°C
–30 to +70
Protection category
(to EN 60 529)
–
Diagonal, self-starting
shaded pole motor
Diagonal,
DC motor
51
54/56
54
IP 54 standard
IP 55 with additional fine filter mat or hose-proof hood
IP 56 with hose-proof hood
Tab. 4: Technical specifications
14
Diagonal,
DC motor
We reserve the right to make technical modifications.
Rittal fan-and-filter unit assembly and operating instructions
10 Technical specifications
Unit
Model No. SK
Fan-and-filter
unit,
RAL 7035
–
3243.100 3243.110 3244.100 3244.110 3244.140 3245.500 3245.510
EMC fan-andfilter unit,
RAL 7035
–
3243.600 –
3244.600 –
–
EN
3245.600 –
Rated operating
voltage
V
Hz
230,
1~,
50/60
115,
1~,
50/60
230,
1~,
50/60
115,
1~,
50/60
400/460, 230,
3~,
1~,
50/60
50/60
115,
1~,
50/60
Rated current
max.
A
0.37/
0.43
0.75/
0.80
0.59/
0.81
1.0/
1.4
0.22/
0.24
1.3
2.5
Power
consumption
W
71/89
70/80
109/155
110/156
96/138
170
170
Pre-fuse T
A
4
6
4
6
Motor
circuitbreaker
4
6
Dimensions
B1/H1
mm
323 x 323
B2/H2
mm
292 x 292
T1
mm
25
T2
(max. installation
depth)
mm
118.5
130.5
130.5
Air throughput,
unimpeded air
flow
m³/h
550/600
700/770
900
Air throughput
with outlet filter
including standard
filter mat
m³/h
1 x 3243.200:
465/510
1 x 3243.200:
544/587
1 x 3243.200:
680
2 x 3243.200:
508/548
2 x 3243.200:
614/662
2 x 3243.200:
820
Outlet filter
–
3243.200
EMC outlet filter
–
3243.060
Fan
–
Diagonal, capacitor motor
Noise pressure
level
dB (A) 59/61
Operating
temperature
°C
–30 to +55
Storage
temperature
°C
–30 to +70
Protection
category
(to EN 60 529)
–
65/68
Diagonal,
Diagonal,
rotary
EC motor
current
motor
67/70
IP 54 standard
IP 55 with additional fine filter mat or hose-proof
hood
IP 56 with hose-proof hood
Tab. 5: Technical specifications
72
IP 51 standard
IP 52 with additional
fine filter mat
IP 56 with
hose-proof hood
We reserve the right to make technical modifications.
Rittal fan-and-filter unit assembly and operating instructions
15
11 Cut-out/drilling dimensions
11 Cut-out/drilling dimensions
B2
T2
H2
T1
B = Width
T = Depth
H1
EN
B1
Fig. 8:
Cut-out dimensions
Model No. SK Ø
mm
F mm
3237.xxx
3.5
100.5
3238.xxx
3.5
132.5
3239.xxx
4.5
185
3240.xxx
4.5
234
3241.xxx
4.5
234
3243.xxx
4.5
302
3244.xxx
4.5
302
3245.xxx
4.5
302
Tab. 6: Drilling dimensions
Fig. 9:
16
Drilling pattern
Rittal fan-and-filter unit assembly and operating instructions
12 EMC fan/outlet filter
12 EMC fan/outlet filter
EN
To achieve EMC protection, the EMC fans
and EMC outlet filters should be snapped
into the mounting cut-out and screwfastened using the supplied screws.
Next, the four contact foils should be stuck
on all-round between the fan-and-filter unit
and the inside of the enclosure as shown
in the following illustration.
Fig. 10: EMC contact foils
Note:
Only use original EMC filter
mats (see Accessories in the
Rittal Catalogue).
Rittal fan-and-filter unit assembly and operating instructions
17
13 Connection diagrams
EN
13 Connection diagrams
M
1~
M
1~
L
N PE
3237.100/.110/.600
3238.100/.110/.600
3239.100/.110/.600
L
PE
3243.100/.110/.600
3244.100/.110/.600
M
1~
L
N
M
1~
M
3~
N PE
3240.100/.110/.600
3241.100/.110/.600
L1
L2 L3 PE
3244.140
L
N
P
3245.500/.510/.600
For details,
see page 19
M
24 V DC
–
24
+
3237.124
3238.124
3239.124
3240.124
3241.124
Fig. 11: Connection diagrams
18
Rittal fan-and-filter unit assembly and operating instructions
13 Connection diagrams
For SK 3245 only!
1
EN
2
Fan/motor
Interface
3
2
CON10
2
1
10 V
1V
<1 V
L
N
1 – 10 V
n = max.
n = min.
n=0
1.6 AT
CON11
AC 1
P
AC 2
N
PE
CON12
PE 1
+10 V
3
3
4
I max. = 1.1 mA
15 V
1
3
2
4
10 V/PWM
2
47 k
3
I max. = 10 mA
47 k
1 uF
GND
1
2
10 K
2
Speed
4
12 V
1
100 % PWM
10 % PWM
<10 % PWM
1
680 R
3
1
4
2
ZMM 47
n = max.
n = min.
n=0
Fig. 12: Connection diagram SK 3245
1 Max. speed (as delivered)
2 Adjustable speed
3 Adjustable speed via PWM 1 – 10 kHz
4 Adjustable speed via potentiometer
No.
Connection
CON10
L
Power supply 200 – 240 V AC, 50 – 60 Hz
CON11
N
Neutral conductor
CON12
PE
PE conductor
1
GND
GND connection of the control interface
2
0 – 10 V/PWM
Control input 0 – 10 V or PWM, galvanically isolated, impedance 100 kΩ
3
+10 V
Voltage output 10 V max. 1.1 mA, galvanically isolated, not short circuit-protected
Speed
Speed output Open Collector, 1 pulse per revolution, galvanically isolated
4
Tab. 7:
Function/Assignment
Explanations to Fig. 12
Rittal fan-and-filter unit assembly and operating instructions
19
14 EC declaration of conformity
EN
14 EC declaration of conformity
20
Rittal fan-and-filter unit assembly and operating instructions
Enclosures
Power Distribution
Climate Control
IT Infrastructure
Software & Services
5th edition 11.2011 / ID no.: 328 628 / Drawing no.: A 4474200SK23
䡲
䡲
䡲
䡲
䡲
RITTAL GmbH & Co. KG
Postfach 1662 䡠 D-35726 Herborn
Phone +49(0)2772 505-0 䡠 Fax +49(0)2772 505-2319
E-mail: [email protected] 䡠 www.rittal.com