1
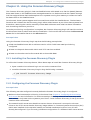
Red Hat Satellite 6.0
User Guide
A guide to using Satellite entitlement management software.
Red Hat Satellite Documentation Team
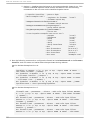
Red Hat Satellite 6.0 User Guide
A guide to using Satellite entitlement management software.
Red Hat Satellite Do cumentatio n Team
Legal Notice
Co pyright © 20 14 Red Hat.
This do cument is licensed by Red Hat under the Creative Co mmo ns Attributio n-ShareAlike 3.0
Unpo rted License. If yo u distribute this do cument, o r a mo dified versio n o f it, yo u must pro vide
attributio n to Red Hat, Inc. and pro vide a link to the o riginal. If the do cument is mo dified, all Red
Hat trademarks must be remo ved.
Red Hat, as the licenso r o f this do cument, waives the right to enfo rce, and agrees no t to assert,
Sectio n 4 d o f CC-BY-SA to the fullest extent permitted by applicable law.
Red Hat, Red Hat Enterprise Linux, the Shado wman lo go , JBo ss, MetaMatrix, Fedo ra, the Infinity
Lo go , and RHCE are trademarks o f Red Hat, Inc., registered in the United States and o ther
co untries.
Linux ® is the registered trademark o f Linus To rvalds in the United States and o ther co untries.
Java ® is a registered trademark o f Oracle and/o r its affiliates.
XFS ® is a trademark o f Silico n Graphics Internatio nal Co rp. o r its subsidiaries in the United
States and/o r o ther co untries.
MySQL ® is a registered trademark o f MySQL AB in the United States, the Euro pean Unio n and
o ther co untries.
No de.js ® is an o fficial trademark o f Jo yent. Red Hat So ftware Co llectio ns is no t fo rmally
related to o r endo rsed by the o fficial Jo yent No de.js o pen so urce o r co mmercial pro ject.
The OpenStack ® Wo rd Mark and OpenStack Lo go are either registered trademarks/service
marks o r trademarks/service marks o f the OpenStack Fo undatio n, in the United States and o ther
co untries and are used with the OpenStack Fo undatio n's permissio n. We are no t affiliated with,
endo rsed o r spo nso red by the OpenStack Fo undatio n, o r the OpenStack co mmunity.
All o ther trademarks are the pro perty o f their respective o wners.
Abstract
The Red Hat Satellite 6 .0 User Guide describes ho w to use Satellite, including subscriptio ns,
co ntent management, pro visio ning, and system co ntro l.
T able of Cont ent s
T able of Contents
. .hapt
C
. . . .er
. .1. .. Int
. . .roduct
. . . . . .ion
. . .t.o. Red
. . . . Hat
. . . . Sat
. . . ellit
...e
. . . . . . . . . . . . . . . . . . . . . . . . . . . . . . . . . . . . . . . . . . . . . . . 5. . . . . . . . . .
1.1. Red Hat Satellite 6 Sys tem Arc hitec ture
5
1.2. Red Hat Satellite 6 Layo ut and To p o lo g y
6
1.3. Red Hat Satellite Server 6 Bas ic Co nfig uratio n Wo rkflo w
10
. .hapt
C
. . . .er
. .2. .. Accessing
. . . . . . . . . .Red
. . . .Hat
. . . Sat
. . . ellit
. . . .e. . . . . . . . . . . . . . . . . . . . . . . . . . . . . . . . . . . . . . . . . . . . . . . . . . 1. 3. . . . . . . . . .
2 .1. Lo g g ing in to Red Hat Satellite
13
2 .2. Chang ing the Pas s wo rd in Red Hat Satellite
14
. .hapt
C
. . . .er
. .3.
. .Configuring
. . . . . . . . . . .O. rganiz
. . . . . .at
. .ions,
. . . . .Locat
. . . . .ions
. . . .and
. . . .Lifecycle
. . . . . . . .Environment
. . . . . . . . . . . s. . . . . . . . . . . . . . . . .1. 6. . . . . . . . . .
3 .1. O rg aniz atio ns
16
3 .1.1. Creating an O rg aniz atio n
17
3 .1.2. Creating an O rg aniz atio n Deb ug Certific ate
17
3 .1.3. Ed iting an O rg aniz atio n
18
3 .1.4. Remo ving an O rg aniz atio n
18
3 .2. Lo c atio ns
19
3 .2.1. Creating a Lo c atio n
19
3 .2.2. Ed iting a Lo c atio n
.2.3. Remo ving a Lo c atio n
3
3 .3. Lifec yc le Enviro nments
3 .3.1. Creating a Lifec yc le Enviro nment
3 .3.2. Remo ving a Lifec yc le Enviro nment
19
20
20
21
21
. .hapt
C
. . . .er
. .4. .. Using
. . . . . .Cont
. . . . ent
. . . .Management
. . . . . . . . . . . . . . . . . . . . . . . . . . . . . . . . . . . . . . . . . . . . . . . . . . . . . . . . . . . . 2. 3. . . . . . . . . .
4 .1. Us ing the Red Hat Satellite Co ntent Das hb o ard
23
4 .2. Co nnec ted Satellite
4 .2.1. Us ing Red Hat Co ntent Pro vid ers
4 .2.1.1. Setting up a Manifes t
4 .2.1.2. Up lo ad ing a Sub s c rip tio n Manifes t
4 .2.1.3. Enab ling Red Hat Rep o s ito ries
4 .2.2. Us ing Pro d uc ts
4 .2.2.1. Creating a Pro d uc t
4 .2.2.2. Ad d ing Rep o s ito ries to a Pro d uc t
4 .2.2.3. Us ing Bulk Ac tio ns fo r Pro d uc ts
4 .2.2.4. Us ing Rep o s ito ry Dis c o very
4 .2.2.5. Remo ving a Pro d uc t
4 .2.3. Sync hro niz ing Co ntent
4 .2.3.1. Sync hro niz atio n Status
4 .2.3.2. Creating a Sync hro niz atio n Plan
4 .2.3.3. Ap p lying a Sync hro niz atio n Sc hed ule
.3. Dis c o nnec ted Satellite
4
4 .3.1. Co nfig uring the Sync hro niz atio n Ho s t
4 .3.2. Sync hro niz ing Co ntent
4 .3.3. Exp o rting Co ntent
4 .3.4. Imp o rting Co ntent to a Dis c o nnec ted Satellite Server
24
24
24
25
26
26
26
27
28
28
29
29
29
30
30
31
32
34
36
36
. .hapt
C
. . . .er
. .5.
. .Using
. . . . . .Cont
. . . .ent
. . . Views
. . . . . . . . . . . . . . . . . . . . . . . . . . . . . . . . . . . . . . . . . . . . . . . . . . . . . . . . . . . . . 39
...........
5 .1. Creating a Co ntent View
39
5 .2. Ad d ing Rep o s ito ries to the Co ntent View
5 .3. Filtering Co ntent
5 .3.1. Creating a Filter
5 .3.2. Ad d ing Co ntent to a Filter
5 .3.3. Remo ving Co ntent fro m a Filter
40
40
40
41
42
1
Red Hat Sat ellit e 6 .0 User G uide
5 .3.3. Remo ving Co ntent fro m a Filter
5 .3.4. Remo ving a Filter
5 .4. Pub lis hing a Co ntent View
42
43
43
. .hapt
C
. . . .er
. .6. .. Searching
. . . . . . . . . for
. . . Cont
. . . . .ent
. . . . . . . . . . . . . . . . . . . . . . . . . . . . . . . . . . . . . . . . . . . . . . . . . . . . . . . . . 4. 5. . . . . . . . . .
6 .1. Bas ic Co ntent Searc h
45
6 .2. Co ntent Co mp aris o n ac ro s s Enviro nments
45
. .hapt
C
. . . .er
. .7. .. Configuring
. . . . . . . . . . . Act
. . . ivat
. . . ion
. . . .Keys
. . . . . . . . . . . . . . . . . . . . . . . . . . . . . . . . . . . . . . . . . . . . . . . . . . . . .4. 6. . . . . . . . . .
7 .1. Creating an Ac tivatio n Key
46
7 .2. Remo ving an Ac tivatio n Key
46
7 .3. Ad d ing O b jec ts to Ac tivatio n Keys
47
7 .3.1. Ad d ing Sub s c rip tio ns to an Ac tivatio n Key
47
.3.2. Ad d ing Ho s t Co llec tio ns to an Ac tivatio n Key
7
7 .4. Remo ving O b jec ts fro m Ac tivatio n Keys
7 .4.1. Remo ving Sub s c rip tio ns fro m an Ac tivatio n Key
7 .4.2. Remo ving Ho s t Co llec tio ns fro m an Ac tivatio n Key
47
47
48
48
. .hapt
C
. . . .er
. .8. .. Configuring
. . . . . . . . . . .G
. .PG
. . .Keys
. . . . . . . . . . . . . . . . . . . . . . . . . . . . . . . . . . . . . . . . . . . . . . . . . . . . . . . . . .4. 9. . . . . . . . . .
8 .1. Creating a G PG Key
8 .2. Remo ving a G PG Key
49
49
. .hapt
C
. . . .er
. .9. .. Configuring
. . . . . . . . . . . t.he
. . .Provisioning
. . . . . . . . . . . Environment
. . . . . . . . . . . . . . . . . . . . . . . . . . . . . . . . . . . . . . . . . . . . . . . . 50
...........
9 .1. Ho s t G ro up s
9 .1.1. Creating a Ho s t G ro up
50
50
9 .2. Parameters
9 .2.1. Creating a G lo b al Simp le Parameter
51
52
9 .2.2. Creating a Pup p et Clas s
52
9 .2.3. Co nfig uring Smart Parameters
9 .2.4. Imp o rting Parameteriz ed Clas s es fro m a Pup p et Mas ter
52
53
.2.5. Co nfig uring Parameteriz ed Clas s es
9
9 .3. Co nfig uring Pro vis io ning Setting s
53
54
9 .3.1. Do mains
54
9 .3.1.1. Creating a Do main
9 .3.2. Sub nets
54
55
9 .3.2.1. Creating a Sub net
55
9 .3.3. Arc hitec tures
9 .3.3.1. Creating an Arc hitec ture
56
56
9 .3.4. Co mp ute Res o urc es
9 .3.4.1. Creating a Co mp ute Res o urc e
56
57
9 .3.5. Hard ware Mo d els
58
9 .3.5.1. Creating a Hard ware Mo d el
9 .3.6 . Ins tallatio n Med ia
58
59
9 .3.6 .1. Ad d ing Ins tallatio n Med ia
9 .3.7. O p erating Sys tems
59
59
9 .3.7.1. Ad d ing an O p erating Sys tem
59
9 .3.8 . Partitio n Tab les
9 .3.8 .1. Defining a New Partitio n Tab le
60
60
9 .3.9 . Pro vis io ning Temp lates
9 .3.9 .1. Creating a Pro vis io ning Temp late
60
61
. .hapt
C
. . . .er
. .1. 0. .. Configuring
. . . . . . . . . . . Host
. . . . .s. . . . . . . . . . . . . . . . . . . . . . . . . . . . . . . . . . . . . . . . . . . . . . . . . . . . . . . . .6. 2. . . . . . . . . .
10 .1. Creating a Ho s t
62
10 .2. Co nfig uring Ho s ts fo r Reg is tratio n
10 .3. Co nfig uratio n O p tio ns
10 .3.1. Auto mated Co nfig uratio n
2
62
63
63
T able of Cont ent s
10 .3.1. Auto mated Co nfig uratio n
0 .3.2. Manual Co nfig uratio n
1
10 .4. Reg is tratio n
63
64
64
10 .4.1. Reg is tering a Ho s t
10 .4.2. Ins talling the Katello Ag ent
64
66
10 .4.3. Ins talling and Co nfig uring the Pup p et Ag ent
66
10 .5. Remo ving a Ho s t
68
. .hapt
C
. . . .er
. .1. 1. .. Using
. . . . . .t.he
. . Foreman
. . . . . . . . Discovery
. . . . . . . . . .Plugin
. . . . . . . . . . . . . . . . . . . . . . . . . . . . . . . . . . . . . . . . . . . . . .6. 9. . . . . . . . . .
11.1. Ins talling the Fo reman Dis c o very Plug in
69
11.2. Co nfig uring the Fo reman Dis c o very Plug in
11.3. Ed iting the Dis c o vered Ho s t
69
71
11.4. Tro ub les ho o ting fo r the Fo reman Dis c o very Plug in
71
. .hapt
C
. . . .er
. .1. 2. .. Configuring
. . . . . . . . . . . Host
. . . . . Collect
. . . . . . ions
. . . . . . . . . . . . . . . . . . . . . . . . . . . . . . . . . . . . . . . . . . . . . . . . . . . 7. 3. . . . . . . . . .
12.1. Creating a Ho s t Co llec tio n
12.2. Ad d ing Ho s ts to a Ho s t Co llec tio n
73
73
12.3. Ad d ing Co ntent to Ho s t Co llec tio ns
74
12.3.1. Ad d ing Pac kag es to a Ho s t Co llec tio n
12.3.2. Ad d ing Errata to a Ho s t Co llec tio n
74
74
12.4. Remo ving Co ntent fro m a Ho s t Co llec tio n
12.5. Chang ing the As s ig ned Lifec yc le Enviro nment o r Co ntent View fo r a Ho s t Co llec tio n
75
75
12.6 . Remo ving a Ho s t fro m a Ho s t Co llec tio n
76
12.7. Remo ving a Ho s t Co llec tio n
12.8 . Clo ning a Ho s t Co llec tio n
76
77
12.9 . Reviewing Ho s t Co llec tio n Ac tio ns
77
. .hapt
C
. . . .er
. .1. 3.
. . Red
. . . . Hat
. . . .Sat
. . .ellit
. . . e. .Capsule
. . . . . . . Servers
. . . . . . . . . . . . . . . . . . . . . . . . . . . . . . . . . . . . . . . . . . . . . . . . . .7. 8. . . . . . . . . .
13.1. Red Hat Satellite Cap s ule Server Sc alab ility
78
13.2. Red Hat Satellite Cap s ule Server Prereq uis ites
79
13.3. Ins talling a Red Hat Satellite Cap s ule Server
13.4. Co nfig uring a Red Hat Satellite Cap s ule Server
82
83
13.5. Ad d ing Lifec yc le Enviro nments to a Red Hat Satellite Cap s ule Server
87
13.6 . Remo ving Lifec yc le Enviro nments fro m the Red Hat Satellite Cap s ule Server
13.7. Reg is tering Ho s t Sys tems to a Red Hat Satellite Cap s ule Server
88
89
13.8 . Refres hing a Red Hat Satellite Cap s ule Server
90
. .hapt
C
. . . .er
. .1. 4. .. Users
. . . . . .and
. . . .Roles
. . . . . . . . . . . . . . . . . . . . . . . . . . . . . . . . . . . . . . . . . . . . . . . . . . . . . . . . . . . . . . .9. 1. . . . . . . . . .
14.1. Co nfig uring LDAP Authentic atio n fo r Red Hat Satellite
91
14.2. Us ers
92
14.2.1. Creating a Us er
92
14.2.2. Ed iting a Us er
14.2.3. Remo ving a Us er
92
93
14.3. Ro les
93
14.3.1. Creating a Ro le
93
14.3.2. Ad d ing Permis s io ns to an Exis ting Ro le
94
14.3.3. Remo ving a Ro le
94
. .hapt
C
. . . .er
. .1. 5.
. . Command
. . . . . . . . . Line
. . . . Reference
. . . . . . . . . . . . . . . . . . . . . . . . . . . . . . . . . . . . . . . . . . . . . . . . . . . . . . . . . . . . 9. 5. . . . . . . . . .
15.1. Us ing the Red Hat Satellite Co mmand -Line Interfac e
95
. .hapt
C
. . . .er
. .1. 6. .. Maint
. . . . . enance
. . . . . . . . . . . . . . . . . . . . . . . . . . . . . . . . . . . . . . . . . . . . . . . . . . . . . . . . . . . . . . . . . . . .9. 6. . . . . . . . . .
16 .1. Lo g g ing and Rep o rting
16 .1.1. Viewing Imp o rt His to ry
16 .2. Dis as ter Rec o very
16 .2.1. Red Hat Satellite Bac kup Pro c ed ure
96
96
97
97
3
Red Hat Sat ellit e 6 .0 User G uide
16 .2.1. Red Hat Satellite Bac kup Pro c ed ure
97
6 .2.2. Red Hat Satellite Res to re Pro c ed ure
1
16 .3. Tro ub les ho o ting
10 0
10 2
16 .3.1. Chang ing Yo ur Red Hat Satellite' s Fully Q ualified Do main Name (FQ DN)
10 2
. .hapt
C
. . . .er
. .1. 7. .. Configuring
. . . . . . . . . . . Ident
. . . . .it. y. .Management
. . . . . . . . . . . .in. .Red
. . . .Hat
. . . Sat
. . . ellit
. . . .e. . . . . . . . . . . . . . . . . . . . . . . . .1.0. 4. . . . . . . . . .
17.1. Co nfig uring Red Hat Satellite Server o r Cap s ule Server fo r IDM Realm Sup p o rt
10 4
17.2. Ad d ing Ho s ts to an IDM Ho s t G ro up
10 6
. .hapt
C
. . . .er
. .1. 8. .. Red
. . . . Hat
. . . .Sat
. . .ellit
. . . e. .User
. . . . Int
. . .erface
. . . . . .Plugins
. . . . . . . . . . . . . . . . . . . . . . . . . . . . . . . . . . . . . . . . . . .1.0. 8. . . . . . . . . .
18 .1. Red Hat Ac c es s Plug in
18 .1.1. Searc hing fo r So lutio ns in the Red Hat Ac c es s Plug in
10 8
10 8
18 .1.2. Utiliz ing Lo g s in the Red Hat Ac c es s Plug in
10 8
18 .1.3. Viewing Exis ting Sup p o rt Cas es Us ing the Red Hat Ac c es s Plug in
10 9
18 .1.4. Mo d ifying Exis ting Sup p o rt Cas es Us ing the Red Hat Ac c es s Plug in
110
18 .1.5. Creating New Sup p o rt Cas es Us ing the Red Hat Ac c es s Plug in
110
. .lossary
G
. . . . . . .of
. . T. erms
. . . . . . . . . . . . . . . . . . . . . . . . . . . . . . . . . . . . . . . . . . . . . . . . . . . . . . . . . . . . . . . . . . . . . . .1.1. 2. . . . . . . . . .
. . . . . . . . .Hist
Revision
. . . ory
. . . . . . . . . . . . . . . . . . . . . . . . . . . . . . . . . . . . . . . . . . . . . . . . . . . . . . . . . . . . . . . . . . . . . . .1.1. 6. . . . . . . . . .
4
Chapt er 1 . Int roduct ion t o Red Hat Sat ellit e
Chapter 1. Introduction to Red Hat Satellite
Red Hat Satellite 6 is the evolution of Red Hat's life cycle management platform. It provides the
capabilities that administrators have come to expect in a tool focused on managing systems and
content for a global enterprise. Satellite 6 covers the use cases requested by Satellite 5 customers,
but also includes functionality that enables larger scale, federation of content, better control of
systems during the provisioning process, and a much more simplified approach to life cycle
management. Satellite 6 also further evolves the inherent approach to certificate-based entitlements
and integrated subscription management. Satellite 6 is based on years of customer feedback and is
an evolution of previous versions.
Report a bug
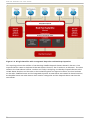
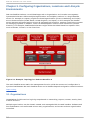
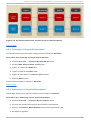
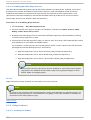
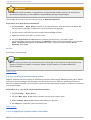
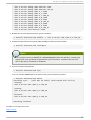
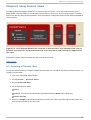
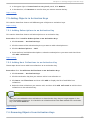
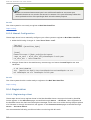
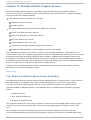
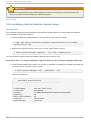
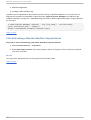
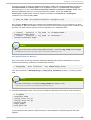
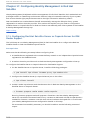
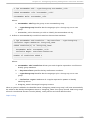
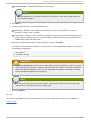
1.1. Red Hat Sat ellit e 6 Syst em Archit ect ure
Red Hat Satellite 6 is based upon several open source projects arranged in the following
architecture.
Fig u re 1.1. R ed H at Sat ellit e 6 Syst em Arch it ect u re
Fo reman
Foreman is an open source application used for provisioning and life cycle management of
physical and virtual systems. Foreman automatically configures these systems using
various methods, including kickstart and Puppet modules. Foreman also provides
historical data for reporting, auditing, and troubleshooting.
K at ello
Katello is a subscription and repository management application. It provides a means to
subscribe to Red Hat repositories and download content. You can create and manage
different versions of this content and apply them to specific systems within user-defined
5
Red Hat Sat ellit e 6 .0 User G uide
different versions of this content and apply them to specific systems within user-defined
stages of the application life cycle.
C an d lep in
Candlepin is a service within Katello that handles subscription management.
Pu lp
Pulp is a service within Katello that handles repository and content management.
H ammer
Hammer is a CLI tool that provides command line and shell equivalents of most Web UI
functions.
R EST API
Red Hat Satellite 6 includes a RESTful API service that allows system administrators and
developers to write custom scripts and third-party applications that interface with Red Hat
Satellite.
C ap su le
Red Hat Satellite Capsule Server acts as a proxy for some of the main Satellite functions
including repository storage, D NS, D HC P , and Puppet Master configuration. Each Satellite
Server also contains integrated Capsule Server services.
Report a bug
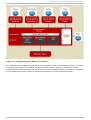
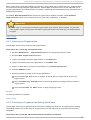
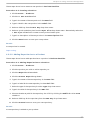
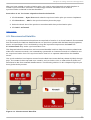
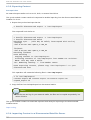
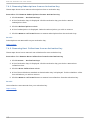
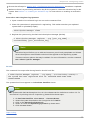
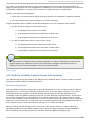
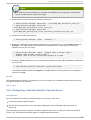
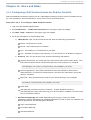
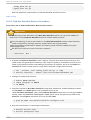
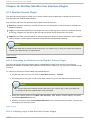
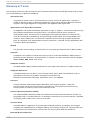
1.2. Red Hat Sat ellit e 6 Layout and T opology
The Red Hat Satellite infrastructure layout has to be considered prior to installing Red Hat Satellite 6.
D etermining the organization of your infrastructure helps align the Satellite Server and Satellite
Capsule Servers to best serve your requirements. The following topology diagrams provide examples
of infrastructure layout.
6
Chapt er 1 . Int roduct ion t o Red Hat Sat ellit e
Fig u re 1.2. Sin g le Sat ellit e wit h In t eg rat ed C ap su le
This topology demonstrates the basic use of Red Hat Satellite 6. In this example, there are five pools
of hosts registered to the Satellite Server. Red Hat Satellite 6 categorizes these pools into three
locations: United States, United Kingdom, and Japan. In addition, each department uses a distinct
organization: Finance, Marketing, and Sales. All Satellite Server functions are shared among these
Locations and Organizations.
7
Red Hat Sat ellit e 6 .0 User G uide
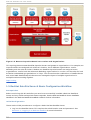
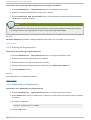
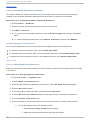
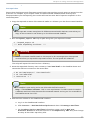
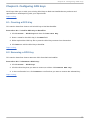
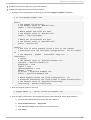
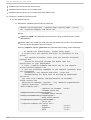
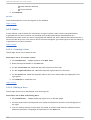
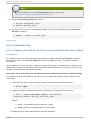
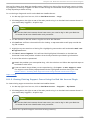
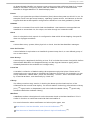
Fig u re 1.3. Sin g le Sat ellit e wit h In t eg rat ed C ap su le an d B acku p C ap su les
This topology shows the addition of two backup Satellite Capsule Servers based in Boston. One
Capsule Server caters to the three US-based offices: Phoenix, San Francisco, and Boston. The other
caters to the international offices: London and Tokyo. Assigning one backup Capsule Server to the
United States location and the other to the United Kingdom and Japan locations, the load reduces
on the main Satellite Server and its integrated Capsule. As new offices are created in these locations,
the Satellite Server can add them to their location categories and the Capsule Server services the
new offices.
8
Chapt er 1 . Int roduct ion t o Red Hat Sat ellit e
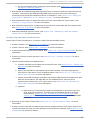
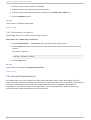
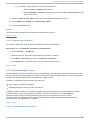
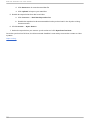
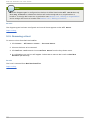
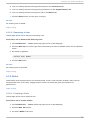
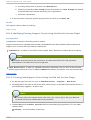
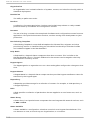
Fig u re 1.4 . R emo t e C ap su les B ased o n Lo cat io n
This topology assigns Satellite Capsule Servers to specific locations. The Satellite Server can create
a hierarchy of locations; for example, having cities attached to a country. The Satellite Capsule
Servers based in these locations are registered to the central Satellite Server in Boston and assigned
to their respective locations. Each Capsule services all hosts in each respective location.
9
Red Hat Sat ellit e 6 .0 User G uide
Fig u re 1.5. R emo t e C ap su les B ased o n Lo cat io n an d O rg an iz at io n
This topology demonstrates Satellite Capsule Servers assignment to organizations. For example, two
Capsule servers are assigned to the Phoenix location, but to different organizations: one for
Marketing and the other for Sales. Likewise, two Satellite Capsule Servers are assigned to two
organizations: one for both the Sales and Marketing organizations in London, and the other for both
the Sales and Marketing organizations in Tokyo. This shows how the combination of Satellite Server
and associated Satellite Capsule Servers can manage the layout of multiple organizations in
multiple locations working together.
Report a bug
1.3. Red Hat Sat ellit e Server 6 Basic Configurat ion Workflow
Prereq u isit es
Before continuing with this workflow you must have successfully installed a Red Hat Satellite 6
Server and any additional required remote capsules. See the Red Hat Satellite 6 Server Installation
Workflow in the Red Hat Satellite 6 Installation Guide for further information.
In it ial C o n f ig u rat io n
These are the initial procedures to configure a basic Red Hat Satellite Server:
1. Log in to the Satellite Server. This requires the administration user and password. See
Section 2.1, “ Logging in to Red Hat Satellite” for more information.
10
Chapt er 1 . Int roduct ion t o Red Hat Sat ellit e
a. For more information about changing the password see Section 2.2, “ Changing the
Password in Red Hat Satellite” .
2. Edit the Red Hat Satellite Integrated Capsule Server to select the desired organizations and
locations. The name of the Satellite Integrated Capsule Server will be the same as the
hostname of the server that Satellite 6 Server is installed on. See Section 3.1.3, “ Editing an
Organization” and Section 3.2.2, “ Editing a Location” for more information.
3. Edit the desired location to select the resources to be associated with that location. See
Section 3.1, “ Organizations” for more information.
4. Edit the default organization to select the resources to be associated with that organization.
See Section 3.2, “ Locations” for more information.
5. Refresh the Satellite Capsule Server. See Section 13.8, “ Refreshing a Red Hat Satellite
Capsule Server” for more information.
C o n f ig u rin g a R ed H at Sat ellit e Server
These are the initial procedures to configure a basic Red Hat Satellite Server:
1. Create a domain. See Section 9.3.1, “ D omains” for more information.
2. Create a subnet. See Section 9.3.2, “ Subnets” for more information.
3. Create the desired lifecycle environments. See Section 3.3, “ Lifecycle Environments” for more
information.
4. Create any desired custom products. See Section 4.2.2.1, “ Creating a Product” for more
information.
5. Choose the desired Red Hat Repositories.
a. Create a manifest from the Red Hat Customer Portal. See Section 4.2.1.1, “ Setting up a
Manifest” for more information.
b. Upload the manifest in the Satellite Server web interface. This will propagate the
subscription information into the Satellite Server. See Section 4.2.1.2, “ Uploading a
Subscription Manifest” for more information.
c. Once the manifest has been uploaded, the Red Hat Repositories available from valid
Red Hat Subscriptions are imported into the Satellite Server. Choose which
repositories are relevant to your organization. See Section 4.2.1.2, “ Uploading a
Subscription Manifest” for more information.
d. Optional:
a. Red Hat source repositories update content based on security errata, bug
fixes, and enhancements. To ensure that the Satellite Server is updated
automatically, Section 4.2.3.2, “ Creating a Synchronization Plan” and
Section 4.2.3.3, “ Applying a Synchronization Schedule” are recommended
practices.
6. Manually synchronize content. See Section 4.2.3.1, “ Synchronization Status” for more
information.
7. Create a content view with the desired repositories, puppet modules, and filters. Publish the
content view then promote it to other lifecycle environments as required. See Chapter 5, Using
Content Views for more information.
11
Red Hat Sat ellit e 6 .0 User G uide
8. Optional:
a. Create a host collection and assign it to the desired lifecycle environment and content
view. See Chapter 12, Configuring Host Collections for more information.
9. Create an activation key assigning it to the desired lifecycle environment and content view.
See Section 7.1, “ Creating an Activation Key” for more information.
10. Edit an existing provisioning template and associate it with the previously created operating
system. See Section 9.3.9, “ Provisioning Templates” for more information.
11. Edit the operating system created by default when creating the content view with the desired
details and ensure it is associated with the desired partition table and provisioning template.
See Section 9.3.7, “ Operating Systems” for more information.
12. Create a installation medium with the desired details. Ensure that the media is associated with
the required locations and organizations. See Section 9.3.6, “ Installation Media” for more
information.
13. Create a host group with the desired details. See Section 9.1.1, “ Creating a Host Group” for
more information.
C reat in g a B acku p o f a R ed H at Sat ellit e Server
This is the procedure to create a backup of the Red Hat Satellite Server:
1. Create a backup of the Satellite Server containing the required configuration files, data files,
repositories, and databases. See the Section 16.2.1, “ Red Hat Satellite Backup Procedure”
for more information.
Report a bug
12
Chapt er 2 . Accessing Red Hat Sat ellit e
Chapter 2. Accessing Red Hat Satellite
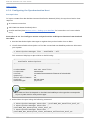
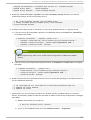
2.1. Logging in t o Red Hat Sat ellit e
After R ed H at Sat ellit e has been installed and configured use the web user interface to log in to
Sat ellit e for further configuration.
These steps show how to log in to Red Hat Satellite.
1. Access the Sat ellit e server using a web browser pointed to the following address:
https: //HOSTNAME/
To identify your hostname, use the ho stname command at the prompt:
# hostname
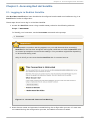
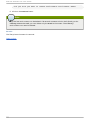
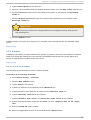
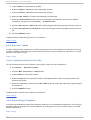
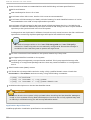
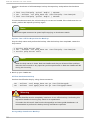
Important
An untrusted connection warning appears on your web browser when accessing
Sat ellit e for the first time. Accept the self-signed certificate and add the Sat ellit e URL
as a security exception to override the settings. This procedure might differ depending
on the browser being used.
Only do this if you are sure that the Sat ellit e URL is a trusted source.
Fig u re 2.1. U n t ru st ed C o n n ect io n Warn in g
2. Enter the user name and password created during the configuration process. If a user was
not created during the configuration process, the default user name is admin.
13
Red Hat Sat ellit e 6 .0 User G uide
R esu lt
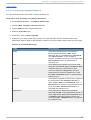
When you have successfully logged in, you are taken to the Sat ellit e dashboard. The dashboard
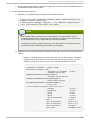
contains an overview of the Sat ellit e and the hosts registered.
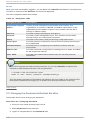
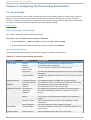
The main navigation tabs are as follows:
T ab le 2.1. N avig at io n T ab s
N avig at io n T ab s
D escrip t io n
O rg ani zati o n@ Lo c
ati o n
Clicking this tab changes the organization and location. If no
organization or location is selected, the default organization is Any
Organization and the default location is Any Location. Use this tab to
change to different values.
Provides summary dashboards and reports.
Provides content management tools. This includes Content Views,
Activation Keys, and Lifecycle Environments.
Provides host inventory and provisioning configuration tools.
Provides general configuration tools and data including Host Groups
and Puppet data.
Provides tools on configuring how Satellite 6 interacts with the
environment.
Provides advanced configuration for settings such as Users and RBAC,
as well as general settings.
Provides user administration where users can edit their personal
information.
Mo ni to r
C o ntent
Ho sts
C o nfi g ure
Infrastructure
Ad mi ni ster
User Name
Note
If you have forgotten the administrative password, log on to the Sat ellit e command-line
interface to reset the administration user and password:
# foreman-rake permissions:reset
Reset to user: admin, password: qwJxBptxb7Gfcjj5
This will reset the password of the default user admin to the one printed on the command line.
Change this password upon logging in to prevent any security issues from occurring.
Report a bug
2.2. Changing t he Password in Red Hat Sat ellit e
These steps show how to change your password.
Pro ced u re 2.1. C h an g in g Passwo rd
1. Click your user name at the top right corner.
2. Select My Acco u n t from the menu.
3. Type in a new password in the P asswo rd field.
14
Chapt er 2 . Accessing Red Hat Sat ellit e
4. Type in the new password again in the Veri fy field.
5. Click the Submi t button to save your new password.
R esu lt :
The password is changed.
Report a bug
15
Red Hat Sat ellit e 6 .0 User G uide
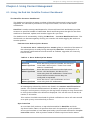
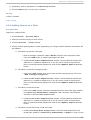
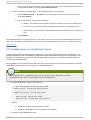
Chapter 3. Configuring Organizations, Locations and Lifecycle
Environments
Red Hat Satellite 6 takes a consolidated approach to Organization and Location management.
System administrators define multiple Organizations and multiple Locations in a single Satellite
server. For example, a company might have three Organizations (Finance, Marketing, and Sales)
across three countries (United States, United Kingdom, and Japan). In this example, the Satellite
server manages all Organizations across all geographical Locations, creating nine distinct contexts
for managing systems. In addition, users can define specific locations and nest them to create a
hierarchy. For example, Satellite administrators might divide the United States into specific cities,
such as Boston, Phoenix, or San Francisco.
Fig u re 3.1. Examp le T o p o lo g y f o r R ed H at Sat ellit e 6
The main Satellite server retains the management function, while the content and configuration is
synchronized between the main Satellite server and a Satellite Capsule assigned to certain locations.
Report a bug
3.1. Organiz at ions
Organizations divide hosts into logical groups based on ownership, purpose, content, security level,
or other divisions.
Multiple organizations can be viewed, created, and managed within the web interface. Software and
host entitlements can be allocated across many organizations, and access to those organizations
controlled.
16
Chapt er 3. Configuring O rganiz at ions, Locat ions and Lifecycle Environment s
Each organization must be created and used by a single Red Hat customer account, however each
account can manage multiple organizations. Subscription manifests can only be imported into a
single organization and Satellite will not upload a certificate that has already been uploaded into a
different organization.
By default, R ed H at Sat ellit e will have one organization already created, called Default
Organization, which can be modified to suit your own installation, or deleted.
Important
If a new user is not assigned a default organization their access will be limited. To grant the
user systems rights, assign them a default organization and have them log out and log back
in again.
Report a bug
3.1.1. Creat ing an Organiz at ion
These steps show how to create a new organization.
Pro ced u re 3.1. C reat in g an O rg an iz at io n
1. Click the Ad min ist er → O rg an iz at io n s menu on the top right hand corner.
2. Click the New O rg ani zati o n button.
3. Type in the name of the new organization in the Name field.
4. Type in the label of the new organization in the Label field.
5. Type in a description of the new organization in the D escri pti o n field.
6. Click the Submi t button.
7. Select the hosts to assign to the new organization.
Click the Assi g n Al l button to assign all hosts with no organization to the new
organization.
Click the Manual l y Assi g n button to manually select and assign the hosts with no
organization.
Click the P ro ceed to Ed i t button to skip assigning hosts.
R esu lt :
A new organization is created.
Report a bug
3.1.2. Creat ing an Organiz at ion Debug Cert ificat e
These steps show how to generate and download a debug certificate for an organization. D ebug
certificates unlock all content from an organization and are required for exporting provisioning
templates.
Pro ced u re 3.2. C reat in g a N ew O rg an iz at io n D eb u g C ert if icat e
17
Red Hat Sat ellit e 6 .0 User G uide
Pro ced u re 3.2. C reat in g a N ew O rg an iz at io n D eb u g C ert if icat e
1. Click the Ad min ist er → O rg an iz at io n s menu on the upper right corner.
2. Select an existing organization from the list on the left.
3. Click the G enerate and D o wnl o ad button. This generates a debug certificate. Save the
certificate in a secure location.
Note
D ebug Certificates are automatically generated for provisioning template downloads if they do
not already exist in the organization for which they are being downloaded.
R esu lt :
R ed H at Sat ellit e generates a debug certificate and saves it to a location of your choice.
Report a bug
3.1.3. Edit ing an Organiz at ion
Pro ced u re 3.3. Ed it in g an O rg an iz at io n
1. Click the Ad min ist er → O rg an iz at io n s menu on the top right hand corner.
2. Click the name of the organization to be edited.
3. Select the resource to edit from the list on the left.
4. Click the name of the desired items to add them to the Sel ected Items list.
5. Click the Submi t button.
R esu lt
The organization is updated and saved.
Report a bug
3.1.4 . Removing an Organiz at ion
Pro ced u re 3.4 . R emo vin g an O rg an iz at io n
1. Click the Ad min ist er → O rg an iz at io n s menu on the top right hand corner.
2. Select D elet e from the drop down menu to the right of the name of the organization you want
to remove.
3. An alert box appears:
Delete Organization Name?
4. Click the O K button.
18
Chapt er 3. Configuring O rganiz at ions, Locat ions and Lifecycle Environment s
R esu lt
The organization is removed from R ed H at Sat ellit e.
Report a bug
3.2. Locat ions
Locations divide organizations into logical groups based on geographical location.
Each location must be created and used by a single Red Hat customer account, however each
account can manage multiple locations and organizations.
By default, R ed H at Sat ellit e will have one location already created, called Default, which can be
modified to suit your own installation, or deleted.
Important
If a new user is not assigned a default location their access will be limited. To grant the user
systems rights, assign them a default location and have them log out and log back in again.
Report a bug
3.2.1. Creat ing a Locat ion
These steps show how to create a location.
Pro ced u re 3.5. C reat in g a Lo cat io n
1. Click the Ad min ist er → Lo cat io n s menu on the top right hand corner.
2. Click the New Lo cati o n button.
3. Type in the name of the new location in the Name field and click the Submi t button.
4. Select the hosts to assign to the new location.
Click the Assi g n Al l button to assign all hosts with no location to the new location.
Click the Manual l y Assi g n button to manually select and assign the hosts with no
location.
Click the P ro ceed to Ed i t button to skip assigning hosts.
R esu lt :
A location is created.
Report a bug
3.2.2. Edit ing a Locat ion
Pro ced u re 3.6 . Ed it in g a Lo cat io n
1. Click the Ad min ist er → Lo cat io n s menu on the top right hand corner.
19
Red Hat Sat ellit e 6 .0 User G uide
2. Click the name of the location to be edited.
3. Select the resource to edit from the list on the left.
4. Click the name of the desired items to add them to the Sel ected Items list.
5. Click the Submi t button.
R esu lt
The location is updated and saved.
Report a bug
3.2.3. Removing a Locat ion
These steps show how to remove an existing location.
Pro ced u re 3.7. R emo vin g a Lo cat io n
1. Click the Ad min ist er → Lo cat io n s menu on the top right hand corner.
2. Select D elet e from the drop down menu to the right of the name of the location you want to
remove.
An alert box appears:
Delete Location Name
3. Click the O K button.
R esu lt
The location is removed from R ed H at Sat ellit e.
Report a bug
3.3. Lifecycle Environment s
The application life cycle is divided into life cycle environments, which mimic each stage of the life
cycle. These life cycle environments are linked in an environment path. You can promote content along
the environment path to the next life cycle stage when required. For example, if development
completes on a particular version of an application, you can promote this version to the testing
environment and start development on the next version.
20
Chapt er 3. Configuring O rganiz at ions, Locat ions and Lifecycle Environment s
Fig u re 3.2. An En viro n men t Pat h C o n t ain in g Fo u r En viro n men t s.
Report a bug
3.3.1. Creat ing a Lifecycle Environment
This procedure shows how to add a lifecycle environment with Sat ellit e.
Pro ced u re 3.8. C reat in g a Lif ecycle En viro n men t
1. Click the C o n t en t → Lif ecycle En viro n men t s menu.
2. Click the New Envi ro nment P ath button.
3. Type in a name in the Name field.
4. Type in a label in the Label field.
5. Type in a description in the D escri pti o n field.
6. Click the Save button.
A lifecycle environment is created in Sat ellit e.
Report a bug
3.3.2. Removing a Lifecycle Environment
These steps show how to remove a lifecycle environment in Sat ellit e.
Pro ced u re 3.9 . R emo vin g a Lif ecycle En viro n men t
1. Click the C o n t en t → Lif ecycle En viro n men t s menu.
2. Click on the name of the lifecycle environment to be removed.
3. Click on the R emo ve Envi ro nment button on the right hand side.
4. An alert box appears:
21
Red Hat Sat ellit e 6 .0 User G uide
Are you sure you want to remove environment Environment Name?
5. Click on the R emo ve button.
Note
Only the last environment can be deleted. If three environments exist in the following order:
Li brary, D ev and P ro d , you can delete only the P ro d environment. The Li brary
environment can never be deleted.
R esu lt :
The lifecycle environment is removed.
Report a bug
22
Chapt er 4 . Using Cont ent Management
Chapter 4. Using Content Management
4 .1. Using t he Red Hat Sat ellit e Cont ent Dashboard
T h e Sat ellit e C o n t en t D ash b o ard
The dashboard provides a status overview of the subscriptions and hosts currently
registered, an overview of promotions and synchronization, and a list of the latest
notifications.
Sat ellit e is used to manage entitlements for client machines. Each entitlement provides
access to a specified number of certificates. Each certificate grants the right for the client
machine to download, update, and receive support for a product.
The dashboard is accessed by clicking the Mo n it o r → C o n t en t D ash b o ard menu. The
dashboard can be rearranged by clicking on a section title and dragging the section to
another position.
C o n t en t H o st Su b scrip t io n St at u s
The C o ntent Ho st Subscri pti o n Status gives an overview of the status of
the subscriptions currently being managed by Sat ellit e. A subscription is a
purchased certificate that unlocks access to software, upgrades, and security
fixes for hosts.
T ab le 4 .1. H o st Su b scrip t io n St at es
St at e
D escrip t io n
Inval i d
Subscri pti o ns
Hosts that have products installed, but have not
consumed a subscription. These hosts need
attention immediately.
Hosts that have consumed a subscription and
have a valid entitlement, but that are not
consuming their full entitlements. These hosts
should be monitored to ensure they are
configured as expected.
Hosts that have a valid entitlement and are
consuming their full entitlements.
Insuffi ci ent
Subscri pti o ns
C urrent
Subscri pti o ns
Lat est N o t if icat io n s
Ico n
All messages produced by the host are listed in the Latest No ti fi cati o ns
section. This includes administration information, product and subscription
changes, and any errors. Clicking on the cog button displays a drop down menu
to change the number of notifications displayed. This can be set to 5 results, 15
results, or 30 results.
This section should be monitored for global notifications sent to all users as well
as to pick up any unusual activity or errors.
Syn c O verview
An overview of all products or repositories enabled in Sat ellit e and their
Synchronization status. All products that are in the queue for synchronization,
are unsynchronized or have been previously synchronized are listed in the Sync
O vervi ew section. Click a product name to view the synchronization status.
23
Red Hat Sat ellit e 6 .0 User G uide
Clicking on the cog button displays a drop down menu to change the number of
notifications displayed. This can be set to 5 results, 15 results, or 30 results.
H o st C o llect io n s
A list of all Host Collections in Sat ellit e and their status, including the number of
content hosts in each host collection. Click a host collection name to view that
host collection. Clicking on the cog button displays a drop down menu to change
the number of notifications displayed. This can be set to 5 results, 15 results, or
30 results.
C u rren t Su b scrip t io n T o t als
An overview of the current subscription totals thats shows the number of active
subscriptions, the number of subscriptions that expire in the next 120 days, and
the number of subscriptions that have recently expired. Clicking on the number for
each type of subscription will show a list of those subscriptions.
C o n t en t Views O verview
A list of all Content Views in Sat ellit e and their publish status. Clicking on the
cog button displays a drop down menu to change the number of notifications
displayed. This can be set to 5 results, 15 results, or 30 results.
Errat a O verview
A list of all errata in Sat ellit e. Clicking on the cog button displays a drop down
menu to change the number of notifications displayed. This can be set to 5
results, 15 results, or 30 results.
Report a bug
4 .2. Connect ed Sat ellit e
Red Hat Satellite provides different types of content to subscribed client hosts. Content types include
packages, errata updates, kickstart trees, and installation images.
Satellite Server requires a source to provide this content. The content is configured by uploading a
subscription manifest file to the Satellite. This file can be obtained through the Red Hat Customer
Portal, or by contacting Red Hat Support. Manifests provide subscriptions to client hosts through the
Red Hat Satellite rather than through Red Hat Network.
This chapter outlines the process of populating your Red Hat Satellite Server, whether it is a
connected Red Hat Satellite Server or a disconnected Red Hat Satellite Server, with the content it
requires so client hosts can be subscribed to it and receive updates.
Report a bug
4 .2.1. Using Red Hat Cont ent Providers
4 .2 .1 .1 . Se t t ing up a Manife st
A subscription manifest can be obtained through the method below or by contacting Red Hat Support.
The manifest is used to set up Red Hat content providers and contains repository information and
subscriptions. It is used as a basis of dispensing subscriptions and Red Hat Network (RHN) content
to client systems from R ed H at Sat ellit e.
24
Chapt er 4 . Using Cont ent Management
Prereq u isit es
You must meet the following conditions before continuing with this task:
A Customer Portal user name and password.
Sufficient subscriptions to add to the manifest.
These steps show how to obtain the subscription manifest from the Customer Portal:
1. Log in to the Customer Portal.
2. Click Su b scrip t io n s → Su b scrip t io n s Man ag emen t → Su b scrip t io n s Man ag emen t
Ap p licat io n s and then click Sat ellit e.
3. On the upper right corner of the Subscriptions Management Applications page, click
R eg i ster a Satel l i te.
4. Create a name to distinguish your Satellite from the other Satellite systems in your account.
5. Select 6 .0 from the drop-down menu as the Satel l i te Versi o n. It is important to select
the correct version as each version requires a certain subset of packages.
6. Click R eg i ster.
7. Click Attach a subscri pti o n, add the subscriptions required for Red Hat Satellite, and
then click At t ach Select ed . See How to generate a certificate for more information.
8. Click D o wn lo ad man if est to generate an archive in .zip format that contains the manifest
for Red Hat Satellite.
R esu lt :
A subscription manifest is created and downloaded for Red Hat Satellite.
Report a bug
4 .2 .1 .2 . Uplo ading a Subscript io n Manife st
This section describes how to upload a subscription manifest to an organization. Because
subscription manifests are assigned to an organization, ensure you select an organization before
you try to upload a subscription manifest. Failing to do so will cause a permission denied error (Error
403).
Pro ced u re 4 .1. T o U p lo ad Su b scrip t io n Man if est :
1. Log in to the Sat ellit e server.
2. Click An y C o n t ext → An y O rg an iz at io n and select the organization that you want to
assign the subscription manifest to.
3. Click C o n t en t → R ed H at Su b scrip t io n s and then click Manag e Mani fest at the upper
right of the page.
4. In the Subscri pti o n Mani fest section, click Acti o ns and under the Upl o ad New
Mani fest subsection, click Bro wse.
5. Select the manifest file to upload, and then click Upl o ad .
Report a bug
25
Red Hat Sat ellit e 6 .0 User G uide
4 .2 .1 .3. Enabling Re d Hat Re po sit o rie s
The Red Hat manifest file gives access to Red Hat products and repositories, however, since most
products have several architectures and product versions, Red Hat Satellite Server allows the
Satellite administrators to choose which repositories are required by their organizations. The
repositories need to be enabled in the Red Hat Satellite Server to prepare it for synchronization.
These steps show how to enable a Red Hat repository:
Pro ced u re 4 .2. En ab lin g R ep o sit o ries
1. Click C o n t en t → R ed H at R ep o sit o ries.
2. Click on the tab of the type of content to be enabled. The tabs are: R P Ms, So urce R P Ms,
D ebug R P Ms, Beta, ISO s, O ther.
3. Expand each Red Hat product to examine the different repository sets available by clicking
on the arrow by the product name.
4. Choose which Red Hat repository sets you wish to add. Choosing it will automatically enable
that repository for your Red Hat Satellite server.
For example, a common basic set of subscriptions which contain repositories with the latest
packages for Red Hat Enterprise Linux 6 would be:
a. Red Hat Enterprise Linux 6 Server Kickstart x86_64 6Server Repository
b. Red Hat Enterprise Linux 6 Server RPMs x86_64 6Server Repository
c. Red Hat Enterprise Linux 6 Server - RH Common RPMs x86_64 Repository
Note
The Red Hat Common repository must be enabled as it provides client systems
registered to the Satellite Server katello-agent and puppet packages for both
katello-agent and puppet-agent.
R esu lt :
Repositories have been enabled and are ready to be synchronized.
Note
Products in the " Enabling Red Hat Repositories" page are dependent on manifest content. If a
required Red Hat repository is not available on this page, consult the manifest or the Red Hat
Customer Portal Subscriptions page.
Report a bug
4 .2.2. Using Product s
4 .2 .2 .1 . Cre at ing a Pro duct
26
Chapt er 4 . Using Cont ent Management
These steps show how to create a new product in R ed H at Sat ellit e.
Pro ced u re 4 .3. C reat in g a Pro d u ct
1. Click C o n t en t → Pro d u ct s.
2. Click the + New P ro d uct link.
3. Type in the name of the new product in the Name field.
4. Type in label for the new product in the Label field.
5. Select a GPG key from the G P G Key drop down menu.
6. Select a synchronization plan from the Sync P l an drop down menu. Alternatively select the
+ New Sync P l an link to create a new synchronization plan.
7. Type in a description of the new product in the D escri pti o n field.
8. Click the Save button to save your new product.
R esu lt :
A new product is created.
Report a bug
4 .2 .2 .2 . Adding Re po sit o rie s t o a Pro duct
These steps show how to add repositories to a product in R ed H at Sat ellit e.
Pro ced u re 4 .4 . Ad d in g R ep o sit o ries t o a Pro d u ct
1. Click C o n t en t → Pro d u ct s.
2. Click the product you wish to add a repository to.
3. Click the R epo si to ri es subtab.
4. Click the C reate R epo si to ry button.
5. Type in the name of the new repository in the Name field.
6. Type in a label for the new repository in the Label field.
7. Select the type of the repository from the T ype drop down menu.
8. Type in the URL of the repository in the UR L field.
9. Choose whether to publish the repository via HTTP by clicking the P ubl i sh vi a HT T P
checkbox.
10. Select a GPG key for the repository from the G P G Key drop down menu.
11. Click the C reate button to save your new repository.
R esu lt :
A new repository is added to your product.
27
Red Hat Sat ellit e 6 .0 User G uide
Report a bug
4 .2 .2 .3. Using Bulk Act io ns fo r Pro duct s
This section describes how to use bulk actions to synchronize or remove products in Red Hat
Satellite. The procedure described here requires that at least one product be available.
Pro ced u re 4 .5. T o Perf o rm T asks o n Mu lt ip le Pro d u ct s:
1. Click C o n t en t → Pro d u ct s.
2. Select the check box for the products you want to work with.
3. Click Bul k Acti o ns.
4. A. To synchronize all selected products, click the Pro d u ct Syn c tab and then click Sync
No w.
B. To remove all selected products, click R emo ve P ro d ucts and then click R emo ve.
U p d at in g Syn ch ro n iz at io n Plan s
You can also update the synchronization plans for multiple products at the same time.
To create a new synchronization plan, click C reat e Syn c Plan .
To remove the synchronization plans from the selected products, click U n at t ach Syn c Plan .
To update the synchronization plans for the selected products, click U p d at e Syn c Plan .
Report a bug
4 .2 .2 .4 . Using Re po sit o ry Disco ve ry
Repository discovery allows you to search a URL to discover repositories available there to include
in a product.
Pro ced u re 4 .6 . U sin g R ep o sit o ry D isco very
1. Click the C o n t en t → Pro d u ct s menu.
2. Click the R epo D i sco very button.
3. Enter the URL where the repositories are located in the Y um R epo D i sco very field.
4. Click the D i sco ver button.
5. A list of the repositories at the URL is displayed under R esul ts.
6. Click the D i sco vered UR Ls check box for the repositories to be added to a product.
7. Click the C reate sel ected button.
8. Choose whether to add the repositories to an existing product or create a new product.
a. To add the repositories to an existing product:
i. Select the Exi sti ng P ro d uct radio button.
ii. Select the required product from the drop down menu.
28
Chapt er 4 . Using Cont ent Management
b. To create a new product to add the repositories to:
i. Select the New P ro d uct radio button.
ii. Enter the Name and Label for the new product and select a G P G Key from the
drop down menu.
9. Select the Serve vi a HT T P check box to serve the repository via HTTP.
10. Edit the Name and Label for the Sel ected UR Ls.
11. Click the C reate button.
R esu lt :
The repositories have been discovered and added to a product.
Report a bug
4 .2 .2 .5 . Re m o ving a Pro duct
This section describes how to remove products from Red Hat Satellite.
Pro ced u re 4 .7. T o R emo ve a Pro d u ct f ro m Sat ellit e:
1. Click C o n t en t → Pro d u ct s.
2. Select the check box next to the products you want to remove.
3. Click Bul k Acti o ns and then click R emo ve P ro d ucts.
4. Click R emo ve to confirm that you want to remove the products.
Report a bug
4 .2.3. Synchroniz ing Cont ent
Synchronization is the act of coordinating updates between the Red Hat Satellite repositories and the
source repositories being used. It is a required step after enabling repositories, in order to populate
the Red Hat Satellite with content from the source repositories.
Constant, scheduled synchronization will result in:
D ata integrity between packages
Updated packages, security fixes, and errata
Satellite's synchronization management capabilities allow organization administrators to create
synchronization plans to configure how often a host should look for and install updates.
Synchronization plans are then paired with the product repositories to come up with a
synchronization schedule that will allow products to be updated at specific intervals that are
convenient for the organization's network.
Report a bug
4 .2 .3.1 . Synchro nizat io n St at us
29
Red Hat Sat ellit e 6 .0 User G uide
Important
The manual synchronization of repositories is required after enabling them. It is at this point
that the local repository in the Satellite is populated by the required packages.
These steps show how to synchronize products in R ed H at Sat ellit e.
Pro ced u re 4 .8. Syn ch ro n iz e Pro d u ct s
1. Click C o n t en t → Syn c St at u s. Based on the subscriptions and repositories enabled, the
list of product channels available for synchronization is displayed.
2. Click the arrow next to the product name to see available content.
3. Select the content you wish to synchronize.
4. Click the Synchro ni ze No w button to starting synchronizing. The status of the
synchronization process will appear in the R esul t column. If synchronization is successful,
Sync co mpl ete will appear in the R esul t column. If synchronization failed, Erro r
synci ng will appear.
R esu lt :
A product is synchronized.
Note
Content synchronization can take a long time. The length of time required is dependent on the
speed of disk drives, network connection speed, and the amount of content selected for
synchronization.
Report a bug
4 .2 .3.2 . Cre at ing a Synchro nizat io n Plan
Regular, frequent synchronization is required to maintain data integrity between packages as well as
making sure that packages are updated to the latest security fixes. Red Hat Satellite provides the
ability to create scheduled synchronization plans that allow package updates at intervals convenient
to the organization.
Pro ced u re 4 .9 . T o C reat e a Syn ch ro n iz at io n Plan :
1. Click C o n t en t → Syn c Plan s.
2. Click the New Sync P l an link to create a new synchronization plan.
3. Enter the Name, D escri pti o n and other details for the plan.
4. Click Save to create the synchronization plan.
Report a bug
4 .2 .3.3. Applying a Synchro nizat io n Sche dule
30
Chapt er 4 . Using Cont ent Management
After you have created a synchronization plan, you need to associate products with that plan to
create a synchronization schedule. The following procedure describes how to create a
synchronization schedule in Red Hat Satellite 6.
Pro ced u re 4 .10. T o C reat e a Syn ch ro n iz at io n Sch ed u le:
1. Click C o n t en t → Syn c Plan s and select the synchronization plan you want to implement.
2. Click Pro d u ct s → Ad d in the synchronization plan main page.
3. Select the check box of the product to associate with the synchronization plan.
4. Click Ad d Sel ected .
Report a bug
4 .3. Disconnect ed Sat ellit e
In high security environments where hosts are required to function in a closed network, disconnected
from the internet, the Red Hat Satellite Server can provision systems with the latest security updates,
errata, and packages. This is achieved by using two important components: the katel l o d i sco nnected utility and a synchronization host.
The diagram below illustrates how a disconnected Satellite is able to keep its content updated even
without an internet connection. An intermediary system with an internet connection is needed to act
as a synchronization host. This synchronization host is in a separate network from the Satellite
server.
The synchronization host imports content from the Red Hat Content D elivery Network (CD N) through
pulp. The content is then exported onto a media, such as D VD s, CD s, or external hard drives and
transferred to the disconnected Satellite server. The following sections in this chapter will guide you
through the whole process.
Fig u re 4 .1. D isco n n ect ed Sat ellit e
31
Red Hat Sat ellit e 6 .0 User G uide
Report a bug
4 .3.1. Configuring t he Synchroniz at ion Host
Prereq u isit es
To import content from the Red Hat Content D istribution Network (CD N), the synchronization host
requires:
An Internet connection
Valid Red Hat Network subscriptions
A valid manifest (See Section 4.2.1.1, “ Setting up a Manifest” for instructions on how to obtain
one.)
Pro ced u re 4 .11. T o C o n f ig u re a H o st t o Syn ch ro n iz e an d Exp o rt C o n t en t f ro m t h e R ed
H at C D N :
1. Use Red Hat Subscription Manager to register the synchronization host to RHN.
2. List all the available subscriptions to find the correct Red Hat Satellite product to allocate to
your system:
# subscription-manager list --available --all
This command displays output similar to the following:
+-------------------------------------------+
Available Subscriptions
+-------------------------------------------+
ProductName:
ProductId:
PoolId:
Quantity:
Multi-Entitlement:
Expires:
MachineType:
Red Hat Satellite
SKU123456
e1730d1f4eaa448397bfd30c8c7f3d334bd8b
10
No
08/20/2013
physical
Note
The SKU and Pool ID depend on the Red Hat Satellite product type that corresponds
to your system version and product type.
3. Subscribe to the pool using the following command:
# subscription-manager subscribe --pool=Red_Hat_Satellite_Pool_Id
# subscription-manager subscribe -pool=Red_Hat_Enterprise_Linux_Pool_Id
# subscription-manager subscribe -pool=Red_Hat_Enterprise_Linux_Software_Collections_Pool_Id
32
Chapt er 4 . Using Cont ent Management
4. D isable all existing repositories:
# subscription-manager repos --disable "*"
5. Enable the Red Hat Satellite and Red Hat Enterprise Linux and Red Hat Software Collections
repositories. Ensure the Red Hat Enterprise Linux repository matches the specific version you
are using.
# subscription-manager repos --enable rhel-6-server-rpms \
--enable rhel-server-rhscl-6-rpms \
--enable rhel-6-server-satellite-6.0-rpms
Note
The commands above are based on Red Hat Enterprise Linux 6. If you are using a
different version of Red Hat Enterprise Linux, change the repository based on your
specific version.
6. Install katello-utils and associated RPMs:
# yum install python-qpid-qmf python-qpid
katello-utils
qpid-cpp-server-store
katello-utils includes the katel l o -d i sco nnected utility that is required to set up
repositories for import while qpid related packages are necessary for p u lp configuration.
7. Generate a secret 32-character alphanumeric string for the oauth_secret entry in the
/etc/pul p/server. co nf file:
# tr -dc "[:alnum:]" < /dev/urandom | head -c 32
randomly_generated_value
8. In the /etc/pul p/server. co nf, uncomment the [oauth] entry and add the randomly
generated value from the previous step as the oauth_secret value:
[oauth]
enabled: true
oauth_key: katello
oauth_secret: randomly_generated_value
9. D isable authentication in /etc/q pi d /q pi d d . co nf:
# Configuration file for qpidd. Entries are of the form:
#
name=value
#
# (Note: no spaces on either side of '=').
# Run "qpidd --help" or see "man qpidd" for more details.
auth=no
All incoming connections authenticate using the Satellite's default realm.
33
Red Hat Sat ellit e 6 .0 User G uide
10. Configure the connection from katel l o -d i sco nnected to Pulp with the previously
generated value as your --oauth-secret option:
# katello-disconnected setup --oauth-key=katello --oauthsecret=randomly_generated_value
This places a configuration value in ~ /. katel l o -d i sco nnected .
11. Configure Pulp on the Synchronization Server:
sudo service qpidd start
sudo chkconfig qpidd on
sudo service mongod start
sleep 10
sudo chkconfig mongod on
sudo -u apache pulp-manage-db
sudo service httpd restart
sudo chkconfig pulp_workers on
sudo service pulp_workers start
sudo chkconfig pulp_celerybeat on
sudo service pulp_celerybeat start
sudo chkconfig pulp_resource_manager on
sudo service pulp_resource_manager start
12. Import the manifest:
# katello-disconnected import -m ./manifest.zip
Importing the manifest sets up the list of available repositories to synchronize to based on the
subscriptions you selected.
The synchronization host is now ready to synchronize content from the Red Hat CD N.
Report a bug
4 .3.2. Synchroniz ing Cont ent
By default, katel l o -d i sco nnected enables all repositories that are included in the manifest for
synchronization. Synchronization time is directly related to the amount of repositories to be
synchronized. If the manifest has a large amount of repositories, the synchronization will take time
and network resources.
katel l o -d i sco nnected allows for the synchronization of specific repositories. This section will
set up Pulp for synchronizing content.
1. D isable all repositories:
# katello-disconnected disable --all
katel l o -d i sco nnected enables all repositories by default.
2. Choose which repositories you wish to sync by listing all available repositories from the
manifest:
# katello-disconnected list --disabled
34
Chapt er 4 . Using Cont ent Management
rhel-5-server-debug-rpms-5Server-i386
rhel-5-server-debug-rpms-5Server-ia64
rhel-5-server-debug-rpms-5Server-x86_64
rhel-5-server-debug-rpms-5_7-i386
rhel-5-server-debug-rpms-5_7-ia64
rhel-5-server-debug-rpms-5_7-x86_64
rhel-5-server-debug-rpms-5_8-i386
rhel-5-server-debug-rpms-5_8-ia64
rhel-5-server-debug-rpms-5_8-x86_64
rhel-5-server-debug-rpms-5_9-i386
rhel-5-server-debug-rpms-5_9-ia64
rhel-5-server-debug-rpms-5_9-x86_64
rhel-5-server-isos-5Server-i386
3. Enable the chosen repositories for synchronization:
# katello-disconnected enable -r rhel-6-server-sam-rpms-6_4-x86_64
4. Create the repositories and push them to Pu lp to allow synchronization:
# katello-disconnected configure
Note
The configure option for katel l o -d i sco nnected reads the manifest, creates pulp
repositories, and generates scripts before synchronization. It needs to be run each
time a repository is enabled or disabled.
5. Synchronize the repositories:
# katello-disconnected sync
You can use the watch option to monitor the synchronization process.
# katello-disconnected watch
Watching sync... (this may be safely interrupted with Ctrl+C)
running:
rhel-6-server-sam-rpms-6_4-x86_64
running:
rhel-6-server-sam-rpms-6_4-x86_64
...
finished:
rhel-6-server-sam-rpms-6_4-x86_64
Watching finished
Content is now synchronized.
Report a bug
35
Red Hat Sat ellit e 6 .0 User G uide
4 .3.3. Export ing Cont ent
Prereq u isit es
An external export media such as a CD , D VD , or external hard drive.
The synchronized content needs to be exported to enable importing into the disconnected Red Hat
Satellite. To do so:
1. Export the synchronized repositories:
# katello-disconnected export -t /var/tmp/export
The output will look similar to:
# katello-disconnected export -t /var/tmp/export
# katello-disconnected watch
Watching sync... (this may be safely interrupted with Ctrl+C)
running:
rhel-6-server-sam-rpms-6_4-x86_64
finished:
rhel-6-server-sam-rpms-6_4-x86_64
Watching finished
Done watching ...
Copying content to /var/tmp/export
Archiving contents of /var/tmp/export into 4600M tar archives.
NOTE: This may take a while.
tar: Removing leading `/' from member names
Done exporting content, please copy /var/tmp/export/* to your
disconnected host
This operation will create the following files in /var/tmp/expo rt:
# ls /var/tmp/export/
content-export-00 content-export-01 content-export-02
expand_export.sh
2. Copy the files from /var/tmp/export into the external media.
Note
If the files are too big for your external media, the files can be copied sequentially in a
series of D VD s.
The synchronized content has now been exported and ready for importing to the disconnected
Satellite server.
Report a bug
4 .3.4 . Import ing Cont ent t o a Disconnect ed Sat ellit e Server
36
Chapt er 4 . Using Cont ent Management
4 .3.4 . Import ing Cont ent t o a Disconnect ed Sat ellit e Server
Prereq u isit es
Ensure that the directory and filesystem containing the exports has enough space to expand out the
archives. For example, if your export is 40G, the disconnected Satellite Server directory and
filesystem where you are importing the content will need an extra 40G of space to expand it on the
same filesystem.
1. Copy the exported contents of the external media to a directory on the disconnected Satellite.
Note
If the exported content was placed in different external media devices, ensure that you
copy all the contents in one directory on the disconnected Satellite.
2. Run the expand _expo rt. sh script copied along with your exported content:
# ./expand_export.sh
*** Done expanding archives. ***
Warning
The disconnected Satellite needs to have equal to the same space as the exported
archive before you expand the exported content. The script will fail otherwise.
The script will expand the archive into a directory.
3. Move the expanded directory tree's content to /var/www/html on the Satellite Server and
restore the SELinux contexts on the moved files:
# mv var/tmp/export/* /var/www/html/
# cd /var/www/html
# restorecon -r *
Note
The Satellite is now acting as its own CD N with the files located in
http: //l o cal ho st/co ntent. This is not a requirement. The CD N can be hosted on
a different machine inside the same disconnected network as long as it is accessible to
the Satellite server via HTTP.
4. Add the CD N address to the Satellite web interface:
a. Log in to the Satellite web interface.
b. Click C o n t en t → R ed H at Su b scrip t io n s and then click Manag e Mani fest.
c. On the Subscri pti o n Mani fest information screen, scroll to R ed Hat
P ro vi d er D etai l s. Click the edit icon on the R epo si to ry UR L entry and change
the entry to the CD N's repository URL.
37
Red Hat Sat ellit e 6 .0 User G uide
d. Click B ro wse to choose the manifest file.
e. Click U p lo ad to import your manifest.
5. Enable the repositories from the local CD N:
a. Click C o n t en t → R ed H at R ep o sit o ries
b. Enable the repositories that were enabled and synchronized in the Synchronizing
Content section.
6. Click C o n t en t → Syn c St at u s.
7. Select the repositories you want to synchronize and click Syn ch ro n iz e N o w.
Once the synchronize finishes, the disconnected Satellite is now ready to serve the content to client
systems.
Report a bug
38
Chapt er 5. Using Cont ent Views
Chapter 5. Using Content Views
Content views are managed selections of content, which contain one or more repositories (yum /
puppet) with optional filtering. These filters can be either inclusive or exclusive, and tailor a system
view of content for lifecycle management. They are used to customize content to be made available to
client systems.
Fig u re 5.1. T h is d iag ram d et ails t h e creat io n o f n ew versio n s o f a C o n t en t View. T h ese
co n t en t view versio n s are p ro mo t ed alo n g an en viro n men t p at h d u rin g t h e ap p licat io n
lif e cycle.
Published content views are used with life cycle environments.
Report a bug
5.1. Creat ing a Cont ent View
A user with administrator privileges creates content views for use within the lifecycle environments. To
create a content view:
1. Log in as a Satellite administrator.
2. Click C o n t en t → C o n t en t Views.
3. Click C reat e N ew View.
4. Fill in the following fields:
Name
Label - this field is automatically populated when the Name field is filled out.
D escri pti o n
5. Select the C o mpo si te Vi ew check box to combine a series of published content views into
one and choose which content view.
39
Red Hat Sat ellit e 6 .0 User G uide
Note
If you select C o mpo si te Vi ew it will override any filtering and allow you to choose a
group of published content views and bundle those views into a composite one.
6. Click Save.
Report a bug
5.2. Adding Reposit ories t o t he Cont ent View
A Repository provides storage for a collection of content. For example, a YUM repository or a Puppet
repository. To associate a repository with a specific content view:
1. Click C o n t en t → C o n t en t View and choose the Content View to add repositories to.
2. Click C o ntent and select R ep o sit o ries from the drop down menu. From the submenu, click
Ad d .
3. Select the repositories to add. Once all the intended repositories have been selected, click
+ Ad d R epo si to ri es.
Repositories have now been added to the Content View.
Report a bug
5.3. Filt ering Cont ent
Filters are created to prevent packages from being promoted to subsequent environments. Package
names or regular expressions are added to the filter to create the rules to blacklist packages and the
filter is then associated to entire products or individual repositories within any product.
Report a bug
5.3.1. Creat ing a Filt er
These steps show how to create a filter.
Pro ced u re 5.1. C reat in g a Filt er
1. Click C o n t en t → C o n t en t Views.
2. Select the Content View you wish to filter.
3. Click the C o n t en t → Filt ers subtab.
4. Click on the + New Fi l ter button.
5. Type in the name of the new filter in the Name field.
6. Choose a content type from the C o ntent T ype drop down menu.
7. Choose whether the filter includes or excludes the selected content type by selecting the T ype
drop down menu.
40
Chapt er 5. Using Cont ent Views
8. Optionally, enter a description in the D escri pti o n field.
9. Click the Save button to save your new filter.
R esu lt :
A filter is created.
Report a bug
5.3.2. Adding Cont ent t o a Filt er
Prereq u isit es
Requires a created Filter.
1. Click C o n t en t → C o n t en t Views.
2. Select the Content View you wish to filter.
3. Click the C o n t en t → Filt ers subtab.
4. Click a created package filter's name. D epending on the type of filter selected, the readout will
be different.
a. If the filter is made for Packages:
i. Enter a package name and select a D et ail value from the dropdown menu.
Click the + Ad d button to add the package to the filter.
ii. Under the Affected R epo si to ri es subtab, choose whether the filter will
affect all or a subset of repositories. If you choose a subset of repositories,
then choose the desired repositories and click the Upd ate R epo si to ri es
button.
b. If the filter is made for package groups:
i. Click on the Ad d subtab, and choose the desired package group. Click the
+ Ad d P ackag e G ro up button.
ii. Under the Affected R epo si to ri es subtab, choose whether the filter will
affect all or a subset of repositories. If you choose a subset of repositories,
then choose the desired repositories and click the Upd ate R epo si to ri es
button.
c. If the filter is made for Errata:
i. Click on the Ad d subtab. Check the desired boxes for the Errata type, whether
is be Securi ty, Enhancement, or Bug fi x. Then choose a start date and
end date. Click the + Ad d Errata button.
ii. Under the Affected R epo si to ri es subtab, choose whether the filter will
affect all or a subset of repositories. If you choose a subset of repositories,
then choose the desired repositories and click the Upd ate R epo si to ri es
button.
d. If the filter is made for Errata - D ate and Type:
i. Under the Erratum D ate R ang e subtab, check the desired boxes for the
Errata type, whether is be Securi ty, Enhancement, or Bug fi x. Then choose
41
Red Hat Sat ellit e 6 .0 User G uide
a start date and end date. Click the Save button.
ii. Under the Affected R epo si to ri es subtab, choose whether the filter will
affect all or a subset of repositories. If you choose a subset of repositories,
then choose the desired repositories and click the Upd ate R epo si to ri es
button.
5. Click the P ubl i sh New Versi o n button. Enter a comment if desired, then click the Save
button.
R esu lt
Packages are added to the filter.
Report a bug
5.3.3. Removing Cont ent from a Filt er
Prereq u isit es
Requires a created Filter.
1. Click C o n t en t → C o n t en t Views.
2. Select the Content View you wish to filter.
3. Click the C o n t en t → Filt ers subtab.
4. Click a created package filter's name. D epending on the type of filter selected, the readout will
be different.
a. If the filter is made for Packages:
i. Click the P ackag es subtab then click the P ackag e Name checkbox next to
the package to remove. Click the R emo ve P ackag es button to remove the
package from the filter.
ii. Under the Affected R epo si to ri es subtab, choose whether the filter will
affect all or a subset of repositories. If you choose a subset of repositories,
then choose the desired repositories and click the Upd ate R epo si to ri es
button.
b. If the filter is made for package groups:
i. Click the Li st/R emo ve subtab then click the Name checkbox next to the
package group to remove. Click the R emo ve P ackag e G ro up button to
remove the package group from the filter.
ii. Under the Affected R epo si to ri es subtab, choose whether the filter will
affect all or a subset of repositories. If you choose a subset of repositories,
then choose the desired repositories and click the Upd ate R epo si to ri es
button.
c. If the filter is made for Errata:
i. Click the Li st/R emo ve subtab then click the Errata ID checkbox next to
the errata to remove. Click the R emo ve Errata button to remove the errata
from the filter.
42
Chapt er 5. Using Cont ent Views
ii. Under the Affected R epo si to ri es subtab, choose whether the filter will
affect all or a subset of repositories. If you choose a subset of repositories,
then choose the desired repositories and click the Upd ate R epo si to ri es
button.
d. If the filter is made for Errata - D ate and Type:
i. Under the Erratum D ate R ang e subtab, check the desired boxes for the
Errata type, whether is be Securi ty, Enhancement, or Bug fi x. Then edit the
start date and end date. Click the Save button.
ii. Under the Affected R epo si to ri es subtab, choose whether the filter will
affect all or a subset of repositories. If you choose a subset of repositories,
then choose the desired repositories and click the Upd ate R epo si to ri es
button.
5. Click the P ubl i sh New Versi o n button. Enter a comment if desired, then click the Save
button.
R esu lt
Packages are removed from the filter.
Report a bug
5.3.4 . Removing a Filt er
These steps show how to remove a filter.
Pro ced u re 5.2. R emo ve a Filt er
1. Click C o n t en t → C o n t en t Views.
2. Select the Content View you wish to filter.
3. Click the C o n t en t → Filt ers subtab.
4. Click the checkbox next to the name of the package filter you wish to remove.
5. Click the R emo ve Fi l ters button.
R esu lt :
A filter is removed.
Report a bug
5.4 . Publishing a Cont ent View
Once a content view has been created, it needs to be published in order for it to be visible and usable
by hosts. Before publishing the content view definition, make sure that the content view definition has
the necessary products, repositories and filters.
To publish a content view definition:
1. Click C o n t en t → C o n t en t Views.
2. Click on the content view to be published.
43
Red Hat Sat ellit e 6 .0 User G uide
3. Click the P ubl i sh New Versi o n button.
4. Fill in a comment.
5. Click the Save button.
A published content view is now available.
Report a bug
44
Chapt er 6 . Searching for Cont ent
Chapter 6. Searching for Content
6.1. Basic Cont ent Search
Content Search allows users to look for specific information about content views, products,
repositories, or errata.
Pro ced u re 6 .1. T o Perf o rm a C o n t en t Search :
1. Click C o n t en t → C o n t en t Search .
2. Select either C o n t en t Views, Pro d u ct s, R ep o sit o ries, Packag es, Errat a, or Pu p p et
Mo d u les from the C o ntent drop-down menu.
3. Enter the name of the content view, product, repository, package, errata, or puppet module
you are searching for in the Pro d u ct s field, and click Search.
Report a bug
6.2. Cont ent Comparison across Environment s
You can compare content across different environments using the content search feature.
Pro ced u re 6 .2. T o Search f o r an d C o mp are C o n t en t Acro ss D if f eren t En viro n men t s:
1. Click C o n t en t → C o n t en t Search .
2. Select the entity type that you want to compare from the C o n t en t drop-down menu.
3. Enter the name of the entity in the Pro d u ct s field and click Ad d .
4. On the right panel, move your cursor over the " plus" (+ ) icon, select the environments you
want to compare, and click Search.
5. Select either U n io n , In t ersect io n , or D if f eren ce from the View drop-down menu to filter
your results.
Report a bug
45
Red Hat Sat ellit e 6 .0 User G uide
Chapter 7. Configuring Activation Keys
Activation Keys are preset keys used when registering the host and define:
Which lifecycle environment the host should be placed in.
Which host collection the host should be assigned to.
Which organization the host should be a part of.
Whether to use a provisioning template for the host.
Setting up a subscription usage limit for the host.
Assigning a specific subscription to the host.
Report a bug
7.1. Creat ing an Act ivat ion Key
This section describes how to create an activation key.
Pro ced u re 7.1. T o C reat e an Act ivat io n K ey:
1. Click C o n t en t → Act ivat io n K eys.
2. Click New Acti vati o n Key.
3. Enter the required details for the activation key in the relevant fields.
4. Clear the Unl i mi ted check box if the activation key is to be used with limitations. Type the
usage limit in the Li mi t field.
5. Enter a suitable description in the D escri pti o n field.
6. Select the Envi ro nment and C o ntent Vi ew that this key should apply to.
7. Click Save to create the activation key.
Note
You can change the activation key details on the D etai l s tab of the Activation Key.
Report a bug
7.2. Removing an Act ivat ion Key
This section describes how to remove an activation key.
Pro ced u re 7.2. T o R emo ve an Act ivat io n K ey
1. Click C o n t en t → Act ivat io n K eys.
2. Click the activation key name that you want to remove.
46
Chapt er 7 . Configuring Act ivat ion Keys
3. In the upper right of the Acti vati o n Key detail panel, click R emo ve.
4. In the alert box, click R emo ve to confirm that you want to remove the key.
Report a bug
7.3. Adding Object s t o Act ivat ion Keys
This section describes how to add different types of objects to activation keys.
Report a bug
7.3.1. Adding Subscript ions t o an Act ivat ion Key
This section describes how to add subscriptions to an activation key.
Pro ced u re 7.3. T o Ad d a Su b scrip t io n t o an Act ivat io n K ey:
1. Click C o n t en t → Act ivat io n K eys.
2. Click the name of the activation key that you want to add subscriptions to.
3. Click the Su b scrip t io n s → Ad d .
4. From the list of available subscriptions, select the subscriptions you want to add and then
click Ad d Sel ected .
Report a bug
7.3.2. Adding Host Collect ions t o an Act ivat ion Key
These steps show how to add host collections to an activation key.
Pro ced u re 7.4 . T o Ad d H o st C o llect io n s t o an Act ivat io n K ey:
1. Click C o n t en t → Act ivat io n K eys.
2. Click the activation key that you want to add a host collection to.
3. Click Ho st C o l l ecti o ns and then click Ad d to display the list of available host
collections.
4. Select the host collections you want to add, and then click Ad d Sel ected to add the host
collections to the activation key.
Note
After you have added the host collections to the activation key, they no longer appear in the
list of available collections. To view the host collections that have been added to an activation
key, click Li st/R emo ve.
Report a bug
7.4 . Removing Object s from Act ivat ion Keys
47
Red Hat Sat ellit e 6 .0 User G uide
7.4 .1. Removing Subscript ions from an Act ivat ion Key
These steps show how to remove subscriptions from an activation key.
Pro ced u re 7.5. R emo ve Su b scrip t io n s f ro m an Act ivat io n K ey
1. Click C o n t en t → Act ivat io n K eys.
2. A list of activation keys is displayed. Click the activation key you wish to remove
subscriptions from.
3. Click the Su b scrip t io n s subtab.
4. A list of subscriptions is displayed. Select the subscriptions you wish to remove.
5. Click the R emo ve Sel ected button to remove subscriptions from the activation key.
R esu lt :
Subscriptions are removed from your activation key.
Report a bug
7.4 .2. Removing Host Collect ions from an Act ivat ion Key
These steps show how to remove host collections from an activation key.
Pro ced u re 7.6 . R emo ve H o st C o llect io n s f ro m t h e Act ivat io n K ey
1. Click C o n t en t → Act ivat io n K eys.
2. A list of activation keys is displayed. Click the activation key you wish to remove host
collections from.
3. Click the H o st C o llect io n s subtab.
4. A list of host collections attached to the Activation Key is displayed. Tick the checkbox of the
host collections you wish to remove.
5. Click the R emo ve Sel ected button to remove host collections from the activation key.
R esu lt :
Host collections are removed from your activation key.
Report a bug
48
Chapt er 8 . Configuring G PG Keys
Chapter 8. Configuring GPG Keys
GPG keys allow you to add your existing GPG keys to Red Hat Satellite Server products and
repositories to enable pairing with your repositories.
Report a bug
8.1. Creat ing a GPG Key
This section describes how to add a GPG key to Red Hat Satellite.
Pro ced u re 8.1. T o Ad d a G PG K ey t o Sat ellit e:
1. Click C o n t en t → G PG K eys and then click New G P G Key.
2. Enter a name for the GPG key in the Name field.
3. Either upload the GPG key file or paste the GPG key contents into the text box.
4. Click Save to add the GPG key to Satellite.
Report a bug
8.2. Removing a GPG Key
This section describes how to remove a GPG from Red Hat Satellite.
Pro ced u re 8.2. T o R emo ve a G PG K ey:
1. Click C o n t en t → G PG K eys.
2. Click the GPG key that you want to remove, and then click R emo ve G P G Key.
3. In the confirmation box, click R emo ve to confirm that you want to remove the selected key.
Report a bug
49
Red Hat Sat ellit e 6 .0 User G uide
Chapter 9. Configuring the Provisioning Environment
9.1. Host Groups
A host group defines a set of default values that hosts inherit when placed in that group. Hosts can
belong to only one host group, but host groups can be nested in hierarchies. you can create a
" base" or " parent" host group that represents all hosts in your organization, and then create nested
or " child" host groups under that parent to provide specific settings.
Report a bug
9.1.1. Creat ing a Host Group
This section describes how to add a host group.
Pro ced u re 9 .1. T o Ad d a H o st G ro u p t o Sat ellit e:
1. Click C o n f ig u re → H o st G ro u p s and then click New Ho st G ro up.
2. Enter the required details for the Host Group, and then click Submi t.
H o st G ro u p At t rib u t es
The following table describes the attributes that apply to Satellite Host Groups.
T ab le 9 .1. T ab le o f H o st G ro u p At t rib u t es
Su b men u
O p t io n s
D escrip t io n
Host Group
Parent
Name
Lifecycle
Environment
Puppet CA
The parent Host Group for the new Host Group.
The name of the Host Group.
The environment containing this Host Group.
Puppet Master
Puppet Classes
Included Classes
Available Classes
Network
D omain
Subnet
Operating System Architecture
Operating
Systems
Media
Partition Table
Parameters
Root Password
Add Parameter
Organizations
Organizations
50
The Red Hat Satellite Capsule Server to use for the Puppet
CA server.
The Red Hat Satellite Capsule Server to use as the Puppet
Master.
The Puppet Classes included with the Host Group.
The Puppet Classes available to use with the Host Group.
The domain for hosts in the Host Group.
The subnet for hosts in the Host Group.
The default architecture for systems in the Host Group.
The default operating system for systems in the Host
Group.
The location of the installation media for the operating
system.
A file system partition layout for the operating system
installation.
The root password for the operating system.
Provides a Name and Value pair to set parameters for the
Host Group.
The organizations that own this host group.
Chapt er 9 . Configuring t he Provisioning Environment
Su b men u
O p t io n s
D escrip t io n
Activation Keys
Content
Environment
D efines the activation keys made available in templates as
@ ho st. params[' kt_acti vati o n_keys' ].
Report a bug
9.2. Paramet ers
Red Hat Satellite parameters define key-value pairs to use when provisioning hosts. These are
similar to Puppet's concept of a default scope parameter. You can define parameters when setting up
a host with Puppet and also define a hierarchy of parameter inheritance.
The following parameter hierarchy applies:
G lo b al Paramet ers
The default parameter that applies to every host in Satellite. Configured in C o n f ig u re →
G lo b al p aramet ers.
D o main Paramet ers
Parameters that affect all hosts in a given domain. D omain parameters override Global
parameters. Configured in In f rast ru ct u re → D o main s.
H o st G ro u p Paramet ers
Parameters that affect all hosts in the Host Group. Host Group parameters override both
Global and D omain parameters. Configured in C o n f ig u re → H o st G ro u p s.
H o st Paramet ers
Parameters that affect a specific host. All previous inherited parameters are visible on the
Parameters subtab and can be overridden. Configured in H o st s → All h o st s →
[ ch o o se_a_h o st ] → Paramet ers or H o st s → C o n t en t H o st s → [ ch o o se_a_h o st ] →
Paramet ers.
D ifferent types of parameters also exist:
Simp le Paramet ers
A basic parameter that defines a relationship between a key and value pair.
Smart Paramet ers
A complex parameter that defines a value for a key but allows conditional arguments,
validation, and overrides for specific object types.
Paramet eriz ed C lasses
Parameters for classes imported from a Puppet Master.
Important
Ensure you enable parameterized class support. Navigate to Ad min ist er → Set t in g s, select
the P uppet tab, and ensure the P arametri zed _C l asses_i n_ENC is set to T rue.
51
Red Hat Sat ellit e 6 .0 User G uide
Report a bug
9.2.1. Creat ing a Global Simple Paramet er
This procedure shows how to add a new global parameter to Satellite.
1. Click C o n f ig u re → G lo b al Paramet ers.
2. Click the New P arameter button.
3. Type a Name for the parameter's key.
4. Type a Val ue for the parameter.
5. Click the Submi t button.
Satellite creates a new simple parameter for global use.
Report a bug
9.2.2. Creat ing a Puppet Class
This procedure shows how to add a new Puppet Class to Satellite.
1. Click C o n f ig u re → Pu p p et C lasses.
2. Click the New P uppet cl ass button.
3. Type a Name for the Puppet Class.
4. Type a P uppet Envi ro nments for the Puppet Class.
5. Select one or more Ho st g ro ups that own the Puppet Class.
6. Click the Submi t button.
Satellite creates a Puppet Class.
Report a bug
9.2.3. Configuring Smart Paramet ers
The following procedure configures smart parameters in a Puppet class.
Pro ced u re 9 .2. T o co n f ig u re smart p aramet ers
1. Click C o n f ig u re → Pu p p et C lasses.
2. Select a class from the list.
3. Click the Smart Vari abl es tab. This displays a new screen. The left section contains a list
of possible parameters the class supports. The right section contains the configuration
options for the parameter selected. Click the Ad d Vari abl e to add a new parameter.
Otherwise, select a parameter from the left-hand list.
4. Type a name for the P arameter field.
5. Edit the D escri pti o n text box to add any plain text notes.
52
Chapt er 9 . Configuring t he Provisioning Environment
6. Select the P arameter type of data to pass. This is most commonly a string, but other data
types are supported.
7. Type a D efaul t Val ue for the parameter.
8. Use the O pti o nal Input Val i d ato r section to restrict the allowed values for the
parameter. Choose a Val i d ato r type (either a l i st of comma separated values or a
regular expression, reg exp) and input the allows values or regular expression code in the
Val i d ato r rul e field.
9. The O verri d e Val ue Fo r Speci fi c Ho sts section at the bottom of the page provides
options for overriding values based upon conditional arguments known as Matchers.
D efine the O rd er that the host values resolve, then click Ad d Matcher-Val ue to add your
conditional argument.
For example, if desired value of the parameter is test for any host with a fully qualified
domain name of www. exampl e. co m, then specify the Match as fq d n= www. exampl e. co m
and the Val ue as test.
10. Click Submi t to save your changes.
R esu lt :
Satellite configures the smart parameter.
Report a bug
9.2.4 . Import ing Paramet eriz ed Classes from a Puppet Mast er
The following procedure imports parameterized classes from your Puppet Master.
Pro ced u re 9 .3. T o imp o rt p aramet eriz ed classes
Note
The import of parameterized classes happens automatically if your puppet modules are
managed via a Product and a Content View.
1. Click C o n f ig u re → Pu p p et C lasses.
2. Click Impo rt fro m Host Name to import parameterized classes from your Puppet Master.
3. The P uppet C l asses page displays with the new classes listed.
R esu lt :
Satellite imports the Puppet Master's parameterized classes.
Report a bug
9.2.5. Configuring Paramet eriz ed Classes
The following procedure configures parameterized classes.
Pro ced u re 9 .4 . T o co n f ig u re p aramet eriz ed classes
53
Red Hat Sat ellit e 6 .0 User G uide
1. Click C o n f ig u re → Pu p p et C lasses.
2. Select a class from the list.
3. Click the Smart C l ass P arameter tab. This displays a new screen. The left section
contains a list of possible parameters the class supports. The right section contains the
configuration options for the parameter selected.
4. Select the a parameter from the left-hand list.
5. Edit the D escri pti o n text box to add any plain text notes.
6. Click the O verri d e checkbox to allow Satellite control over this variable. If the checkbox is
not selected, Satellite does not pass this variable to Puppet.
7. Select the P arameter type of data to pass. This is most commonly a string, but other data
types are supported.
8. Type a D efaul t Val ue for the parameter.
9. The O verri d e Val ue Fo r Speci fi c Ho sts section at the bottom of the page provides
options for overriding values based upon conditional arguments known as Matchers.
D efine the O rd er that the host values resolve, then click Ad d Matcher-Val ue to add your
conditional argument.
For example, if desired value of the parameter is test for any host with a fully qualified
domain name of www. exampl e. co m, then specify the Match as fq d n= www. exampl e. co m
and the Val ue as test.
10. Click Submi t to save your changes.
R esu lt :
Satellite configures the parameters for the class.
Report a bug
9.3. Configuring Provisioning Set t ings
9.3.1. Domains
Satellite has the ability to assign domain names with Red Hat Satellite Capsule Server D NS. This
provides users with a means to group and name hosts within a particular domain.
Report a bug
9 .3.1 .1 . Cre at ing a Do m ain
This procedure shows how to add a D omain.
Pro ced u re 9 .5. C reat in g a D o main
1. Click In f rast ru ct u re → D o main s.
2. Click the New D o mai n button.
3. Type a Name for the D omain. This is the D NS domain name.
54
Chapt er 9 . Configuring t he Provisioning Environment
4. Type a D escri pti o n for the D omain.
5. Choose a D NS-enabled Red Hat Satellite Capsule Server from the D NS P ro xy selection box.
6. Click the Lo cati o ns tab and click the desired locations to add them to the Sel ected
Items list.
7. Click the O rg ani zati o ns tab and click the desired organizations to add them to the
Sel ected Items list.
Important
Ensure that the Locations and Organizations are configured as they will help with
future debugging.
8. Click the Submi t button.
Satellite creates a D omain and registers it on the D NS server configured with the selected Smart
Proxy.
Report a bug
9.3.2. Subnet s
Satellite has the ability to create networks for groups of systems. Subnets use standard IP address
settings to define the network and use the Red Hat Satellite Capsule Server's D HCP features to
assign IP addresses to systems within the subnet.
Report a bug
9 .3.2 .1 . Cre at ing a Subne t
The following procedure shows how to create a Subnet:
Pro ced u re 9 .6 . C reat in g a Su b n et
1. Click In f rast ru ct u re → Su b n et s.
2. Click the New Subnet button.
3. Type a Name for the Subnet.
4. Type the IP address for the Subnet into the Netwo rk box.
5. Type the mask for the network's IP address into the Netwo rk mask box.
6. Type the G ateway ad d ress for the Subnet.
7. Type the P ri mary D NS server and Seco nd ary D NS server for the Subnet.
8. D efine the IP assignment range with the Start o f IP rang e and End o f IP rang e
fields.
9. D efine the VLAN ID for the subnet.
10. Select the applicable domain for the subnet from the D o mai ns tab.
55
Red Hat Sat ellit e 6 .0 User G uide
11. Click the C apsul es tab, and select a Red Hat Satellite Capsule Server for the D HC P P ro xy,
T FT P P ro xy, and D NS P ro xy services.
12. Click the Lo cati o ns tab and click the desired locations to add them to the Sel ected
Items list.
13. Click the O rg ani zati o ns tab and click the desired organizations to add them to the
Sel ected Items list.
Important
Ensure that the Locations and Organizations are configured as they will help with
future debugging.
14. Click the Submi t button.
Satellite creates a Subnet.
Report a bug
9.3.3. Archit ect ures
An architecture in Satellite represents a logical grouping of hosts and operating systems.
Architectures are created by Satellite automatically when hosts check in with Puppet. However, none
exist with a default installation and require creation.
Report a bug
9 .3.3.1 . Cre at ing an Archit e ct ure
This procedure shows how to add an Architecture.
Pro ced u re 9 .7. C reat in g an Arch it ect u re
1. Click H o st s → Arch it ect u res.
2. Click the New Archi tecture button.
3. Type a Name for the Architecture.
4. Select any O perati ng Systems that include this Architecture. If none are available, you
can create and assign them under H o st s → O p erat in g Syst ems.
5. Click the Submi t button.
Satellite creates a Architecture.
Report a bug
9.3.4 . Comput e Resources
Compute resources are hardware abstractions from virtualization and cloud providers. Satellite uses
compute resources to provision virtual machines. Supported private providers include Red Hat
Enterprise Virtualization, oVirt, OpenStack, and VMware. Supported public cloud providers include
EC2 and Rackspace.
56
Chapt er 9 . Configuring t he Provisioning Environment
Report a bug
9 .3.4 .1 . Cre at ing a Co m put e Re so urce
This procedure shows how to add a Compute Resource.
Pro ced u re 9 .8. C reat in g a C o mp u t e R eso u rce
1. Click In f rast ru ct u re → C o mp u t e R eso u rces.
2. Click the New C o mpute R eso urce button.
3. Type a Name for the Compute Resource.
4. Select a P ro vi d er type.
5. Optionally, enter a D escri pti o n.
6. D epending on the provider type chosen, the next few fields ask for authentication and
datacenter details. Refer to the following table for more information about each provider type.
T ab le 9 .2. Pro vid er Set t in g s
T yp e
D escrip t io n
RHEV
Suits Red Hat Enterprise Virtualization
environments. Requires a UR L to the
Manager API, a valid User and P asswo rd ,
and a D atacenter on the system to
abstract compute resources. Click the Lo ad
D atacenters button to populate the
selection box.
Suits Amazon EC2 public cloud accounts.
Requires the Access Key and Secret Key
available from any valid Amazon EC2
account. Requires a R eg i o n to act as a
D atacenter for resource abstraction. Click
the Lo ad R eg i o ns button to populate the
selection box.
Suits VMware-based environments. Requires
the hostname of the VC enter/Server, a
valid VMware User and P asswo rd , and a
D atacenter to abstract compute resources.
Click the Lo ad D atacenters button to
populate the selection box.
Suits OpenStack-based environments.
Requires the UR L of the OpenStack server, a
valid OpenStack User and P asswo rd , and
a T enant to abstract compute resources.
Click the Lo ad T enants button to populate
the selection box.
EC2
VMware
OpenStack
57
Red Hat Sat ellit e 6 .0 User G uide
T yp e
D escrip t io n
Rackspace
Suits Rackspace public cloud accounts.
Requires the UR L of the Rackspace API, a
valid Rackspace User and AP I Key, and a
R eg i o n to abstract compute resources.
Click the T est C o nnecti o n button to
make sure your connection to the chosen
region is valid.
7. Click the Lo cati o ns tab and click the desired locations to add them to the Sel ected
Items list.
8. Click the O rg ani zati o ns tab and click the desired organizations to add them to the
Sel ected Items list.
Important
Ensure that the Locations and Organizations are configured as they will help with
future debugging.
9. Click the Submi t button.
Satellite creates a Compute Resource.
Report a bug
9.3.5. Hardware Models
Hardware models help run unattended Solaris installations. For Solaris SPARC-based machines,
users define the CPU and Vendor information, while other architectures do not need to do so.
Report a bug
9 .3.5 .1 . Cre at ing a Hardware Mo de l
This procedure shows how to add a Hardware Model.
Pro ced u re 9 .9 . C reat in g a H ard ware Mo d el
1. Click H o st s → H ard ware Mo d els.
2. Click the New Mo d el button.
3. Type a Name for the Hardware Model.
4. For Sparc Solaris builds, enter the CPU Hard ware mo d el and Vend o r cl ass. Other
architectures do not require values in these fields.
5. Enter a description of the Hardware Model in the Info rmati o n textbox.
6. Click the Submi t button.
Satellite creates a Hardware Model.
Report a bug
58
Chapt er 9 . Configuring t he Provisioning Environment
9.3.6. Inst allat ion Media
Red Hat Satellite uses installation media (ISO images) as content for kickstart trees and new host
installations.
Report a bug
9 .3.6 .1 . Adding Inst allat io n Me dia
This procedure shows how to add new Installation Media to Satellite.
1. Click H o st s → In st allat io n Med ia.
2. Click the New Instal l ati o n Med i um button.
3. Type a Name for the Installation Media.
4. Type a P ath to the Installation Medium. Options include either a URL or a valid NFS server.
5. Select an O perati ng System Fami l y to define the Installation Media's type.
6. Click the Lo cati o ns tab and click the desired locations to add them to the Sel ected
Items list.
7. Click the O rg ani zati o ns tab and click the desired organizations to add them to the
Sel ected Items list.
Important
Ensure that the Locations and Organizations are configured as they will help with
future debugging.
8. Click the Submi t button.
Satellite adds the new Installation Media to its collection.
Report a bug
9.3.7. Operat ing Syst ems
Operating Systems define combinations of installation methods and media and are grouped within
families. As a default, Red Hat Satellite uses a R ed Hat family. Families allow Satellite to change
certain behaviors when provisioning hosts.
Report a bug
9 .3.7 .1 . Adding an Ope rat ing Syst e m
This procedure shows how to add a Operating System to Satellite.
Pro ced u re 9 .10. Ad d in g an O p erat in g Syst em
1. Click H o st s → O p erat in g Syst ems.
2. Click the New O perati ng system button.
59
Red Hat Sat ellit e 6 .0 User G uide
3. Type a Name for the Operating System.
4. D efine the Majo r Versi o n of the Operating System.
5. D efine the Mi no r Versi o n of the Operating System.
6. Select the O S Fami l y to define the Operating System type.
7. Select the Archi tectures from the list of available Architectures. If none are available,
create and assign them under H o st s → Arch it ect u res.
8. Click the P arti ti o n tabl es tab, then add the applicable file system layouts from the list.
9. Click the Instal l ati o n Med i a tab, then add the applicable file system layouts from the
list.
10. Click the Submi t button.
Satellite adds the Operating System to its collection.
Report a bug
9.3.8. Part it ion T ables
Partition tables define the partitions and file system layout for new installations when provisioning
systems. Satellite users specify the host's disk layout as an explicit sequence of partitions or use a
dynamic disk layout script.
Report a bug
9 .3.8 .1 . De fining a Ne w Part it io n T able
This procedure shows how to define a new Partition Table for new installations.
1. Click H o st s → Part it io n T ab les.
2. Click the New P arti ti o n T abl e button.
3. Type a Name for the partition table.
4. Enter the Layo ut for the Partition Table. The Layo ut textbox also accepts dynamic disk
partitioning scripts.
5. Select the operating system from the O S Fami l y tab to define the Operating System type for
the partitions.
6. Click the Submi t button.
Satellite adds a new Partition Table to its collection.
Report a bug
9.3.9. Provisioning T emplat es
Provisioning templates provide the systematic means to run unattended installations. Provisioning
templates can be executed via several methods including bash scripts, kickstart scripts, and PXEbased installations.
Report a bug
60
Chapt er 9 . Configuring t he Provisioning Environment
9 .3.9 .1 . Cre at ing a Pro visio ning T e m plat e
This procedure shows how to create a Provisioning Template.
Pro ced u re 9 .11. C reat in g a Pro visio n in g T emp lat e
1. Click H o st s → Pro visio n in g T emp lat es.
2. Click the New T empl ate button.
3. Type a Name for the template.
4. Enter your template in the T empl ate ed i to r field. Alternatively, upload your template with
the T empl ate file browser below the T empl ate ed i to r textbox. This replaces the content
in the T empl ate ed i to r field with the content of your chosen file.
5. Enter a comment in the Aud i t C o mment field. Satellite adds the comment to the template
history to track changes. View the template history under the Hi sto ry tab.
6. Click the T ype tab, then select Sni ppet to store the template code without defining it as
particular script or template type, or select the type from the T ype dropdown menu.
7. Select the Asso ci ati o n tab to associate the template to Hostgroups, Environments and
Operating Systems. Select the operating systems from the Appl i cabl e O perati ng
Systems list. Click the Ad d C o mbi nati o n button and select a Ho stg ro up and
Envi ro nment to limit the template's use.
8. Click the Submi t button.
Satellite adds the Provisioning Template to its collection.
Report a bug
61
Red Hat Sat ellit e 6 .0 User G uide
Chapter 10. Configuring Hosts
In R ed H at Sat ellit e, hosts are client systems which have R ed H at Su b scrip t io n Man ag er
installed. R ed H at Su b scrip t io n Man ag er sends updates to R ed H at Sat ellit e and R ed H at
Sat ellit e provides updates to these client systems.
Hosts must be registered in order to be managed. Once a host has been registered, it can be viewed
and edited in the Ho sts tab. This enables a user to add and manage subscriptions, add and remove
software packages, and apply updates.
Report a bug
10.1. Creat ing a Host
The following procedure describes how to create a host in Red Hat Satellite.
Pro ced u re 10.1. T o C reat e a H o st :
1. Click H o st s → N ew H o st to open the New Ho st page.
2. On the Ho st tab, enter the required details.
3. On the Netwo rk tab, enter the D o mai n and R eal m details. This automatically updates the
Subnet list with a selection of suitable subnets.
4. Enter the P ri mary Interface details. You can specify an IP address or click IP ad d ress
auto -sug g est to automatically select an address.
5. On the O perati ng System tab, enter the required details. You can select a partition table
from the drop-down list or enter a custom partition table in the C usto m parti ti o n tabl e
field. You cannot specify both.
6. On the P arameters tab, click Ad d P arameter to add any required parameters. This
includes all Puppet Class Parameters and Host Parameters associated with the host.
7. On the Ad d i ti o nal Info rmati o n tab, enter any required information.
8. Click Submi t to complete your provisioning request.
Report a bug
10.2. Configuring Host s for Regist rat ion
Red Hat Enterprise Linux hosts register to Red Hat Network (RHN) by default. You need to update
each host configuration so that they register to and update from the correct Red Hat Satellite Server.
Address the following requirements before proceeding:
On the Red Hat Satellite Server, ensure that the date and time are correct and synchronized with
the client.
On each client system, address the following requirements:
Ensure that the date and time are correct and synchronized with the server.
Enable ntpd or a similar time synchronization tool in all virtual environments:
62
Chapt er 1 0 . Configuring Host s
# chkconfig ntpd on; service ntpd start
Install the latest version of Red Hat Subscription Manager:
# yum install subscription-manager
Update yum to the latest version.
# yum update yum
Important
In Red Hat Enterprise Linux 6.1, clients with earlier versions of yum, specifically yum3.2.29-17.el6.noarch, are unable to obtain content from the Red Hat Satellite.
Report a bug
10.3. Configurat ion Opt ions
10.3.1. Aut omat ed Configurat ion
These steps show how to automatically configure your client system to register to R ed H at
Sat ellit e.
1. Take note of the R ed H at Sat ellit e hostname or the fully qualified domain name (fqdn).
2. Open a terminal console and login as root on the command line.
3. D ownload and install a copy of the CA Certificate for R ed H at Sat ellit e:
yum -y --nogpgcheck install http://[hostname]/pub/katello-caconsumer-[hostname]-1.0-1.noarch.rpm
Important
yum in Red Hat Enterprise Linux 5 does not support installation via HTTP. If registering
a Red Hat Enterprise Linux 5 client, download the RPM package first and then run yum
on the package. For example:
# wget http://[hostname]/pub/katello-ca-consumer-[hostname]1.0-1.noarch.rpm
# yum -y --nogpgcheck install katello-ca-consumer-[host]-1.01.noarch.rpm
63
Red Hat Sat ellit e 6 .0 User G uide
Note
katello-ca-consumer-latest.noarch.rpm is an additional katello-ca-consumer rpm
available that does not contain the server's hostname. This rpm will always reflect the
most updated version of the package. Both serve the same purpose.
R esu lt
The client system is now ready to register to R ed H at Sat ellit e.
Report a bug
10.3.2. Manual Configurat ion
These steps show how to manually configure your client system to register to R ed H at Sat ellit e.
1. Make the following changes in /etc/rhsm/rhsm. co nf:
[server]
hostname =[satellite_fqdn]
[rhsm]
baseurl=https://[fqdn_pulp]/pulp/repos/
repo_ca_cert = %(ca_cert_dir)scandlepin-local.pem
ca_cert_dir = /etc/rhsm/ca/
2. Change directories to the ca directory, remote copy and move the cand l epi n-ca. crt
certificate:
# cd /etc/rhsm/ca
scp [satellite.fqdn]:/etc/candlepin/certs/candlepin-ca.crt .
mv candlepin-ca.crt candlepin-local.pem
R esu lt
The client system should now be ready to register to the R ed H at Sat ellit e.
Report a bug
10.4 . Regist rat ion
10.4 .1. Regist ering a Host
These steps show how to register hosts in Red Hat Satellite Server. Hosts provisioned by Satellite
Server appear on the All H o st s page accessible through H o st s → All h o st s. Hosts registered to
the Satellite Server via Red Hat Subscription Manager, which can occur either during the post phase
of a kickstart or through the terminal, will appear on the C o n t en t H o st s page accessible through
H o st s → C o n t en t H o st s.
You must meet the following conditions before continuing with this task:
64
Chapt er 1 0 . Configuring Host s
Ensure that all steps in Section 10.2, “ Configuring Hosts for Registration” have been completed.
Make sure there is a pre-existing activation key for the system or create an activation key for the
system. See Section 7.1, “ Creating an Activation Key” for instructions on creating an activation
key.
Pro ced u re 10.2. R eg ist erin g Syst ems
1. Open a terminal console and login as root on the command line.
2. Clear old system data in preparation for registering. This makes sure that your updated
system data is uploaded properly.
subscription-manager clean
3. Register the system using the Red Hat Subscription Manager (RHSM):
# subscription-manager register --org [your_org_name] -activationkey [your_activation_key]
Note
Activation keys will allow you to add environments, provisioning templates and dictate
what subscriptions are available and should be applied to the registering system.
There are various options that may be added. For more information, use the command
man subscri pti o n-manag er.
R esu lt :
The command line output after the registration should look like:
# subscription-manager register --org MyOrg --activationkey TestKey-1
The system has been registered with id: 62edc0f8-855b-4184-b1b872a9dc793b96
The system should now appear in the R ed H at Sat ellit e Server.
Note
For systems with Red Hat Enterprise Linux 6.3, the release version defaults to version 6.0. To
ensure that it is pointing to the 6.3 repository, please follow these steps:
1.
2.
3.
4.
5.
On R ed H at Sat ellit e, select H o st s → C o n t en t H o st s.
Select the system that needs to be changed and click Ed i t.
Click on the O p erat in g Syst em tab.
Select '6.3' from the O p erat in g syst em drop down menu.
Click the Save button.
Report a bug
65
Red Hat Sat ellit e 6 .0 User G uide
10.4 .2. Inst alling t he Kat ello Agent
Prereq u isit e
The Red Hat Common repository must be enabled in the Red Hat Satellite Server as it provides the
required packages.
These steps show how to install and enable the Katello agent. The katello-agent must be enabled so
that the Red Hat Satellite Server or Capsule Server can provide information about errata that are
applicable for the system.
To install katello-agen:
1. Open a terminal console and login as root on the command line.
2. Install the katello-agent using the following command:
# yum install katello-agent
R esu lt :
The Katello agent has been installed and enabled. Packages can now be remotely installed and
removed from the Sat ellit e server.
Report a bug
10.4 .3. Inst alling and Configuring t he Puppet Agent
These steps show how to install and configure the Puppet agent on a host. The Puppet agent must
be configured so that Red Hat Satellite Server can list all available hosts in Al l Ho sts.
Pro ced u re 10.3. In st allin g an d En ab lin g t h e Pu p p et Ag en t
1. Open a terminal console and login as root on the command line.
2. Install the Puppet agent using the following command:
Note
The Red Hat Common repository must be enabled as it provides Puppet.
# yum install puppet
R esu lt :
The Puppet agent has been installed and enabled.
Pro ced u re 10.4 . C o n f ig u rin g t h e Pu p p et Ag en t
Prereq u isit es
You must meet the following conditions before continuing with this task:
The host must be registered to the Red Hat Satellite Server.
66
Chapt er 1 0 . Configuring Host s
The Red Hat Common repository must be enabled.
Puppet packages must be installed on the host.
1. Configure the Puppet agent by changing the /etc/puppet/puppet. co nf file:
# vi /etc/puppet/puppet.conf
[main]
# The Puppet log directory.
# The default value is '$vardir/log'.
logdir = /var/log/puppet
# Where Puppet PID files are kept.
# The default value is '$vardir/run'.
rundir = /var/run/puppet
# Where SSL certificates are kept.
# The default value is '$confdir/ssl'.
ssldir = $vardir/ssl
[agent]
# The file in which puppetd stores a list of the classes
# associated with the retrieved configuratiion. Can be loaded
in
# the separate ``puppet`` executable using the ``-loadclasses``
# option.
# The default value is '$confdir/classes.txt'.
classfile = $vardir/classes.txt
pluginsync = true
report = true
ignoreschedules = true
daemon = false
ca_server = satellite.example.com
server = satellite.example.com
# Where puppetd caches the local configuration. An
# extension indicating the cache format is added automatically.
# The default value is '$confdir/localconfig'.
localconfig = $vardir/localconfig
2. Run the Puppet agent on the host:
# puppet agent -t --server satellite.example.com
3. Sign the SSL certificate for the puppet client through the Satellite Server web interface:
a. Log into the Satellite Server through the web interface.
b. Select In f rast ru ct u re → C ap su les.
c. Click C erti fi cates to the right of the required host.
d. Click Si g n.
67
Red Hat Sat ellit e 6 .0 User G uide
Note
Once the Puppet agent is configured on the host it will be listed under Al l Ho sts but only
when Any C o ntext is selected as the host will not be assigned to an organization or
location. To assign the host to an organization see Section 3.1.3, “ Editing an Organization”
and to assign the host to a location see Section 3.2.2, “ Editing a Location” .
R esu lt :
The Puppet agent has been configured and now all hosts appear under Al l Ho sts.
Report a bug
10.5. Removing a Host
To remove a host from Red Hat Satellite:
1. Click H o st s → All h o st s or H o st s → C o n t en t H o st s.
2. Choose the hosts to be removed.
3. Click Sel ect Acti o n and choose D el ete Ho sts from the drop down menu.
4. A confirmation pop-up box will appear. Select Y es to remove the host from R ed H at
Sat ellit e permanently.
R esu lt
The host is removed from R ed H at Sat ellit e.
Report a bug
68
Chapt er 1 1 . Using t he Foreman Discovery Plugin
Chapter 11. Using the Foreman Discovery Plugin
The Foreman D iscovery plugin in Red Hat Satellite Server adds Metal-as-a-Service (MAAS) features.
Bare metal hosts on the Satellite Server managed networks can be booted over the network through
PXE into stripped-down Red Hat Enterprise Linux systems running from memory to collect and send
hardware facts to the Satellite Server.
Once booted, these systems appear as discovered hosts within the Satellite Server. The hardware
facts that are collected via the D iscovery plugin allow administrators to provision these systems from
these facts, removing the need to manually collect MAC addresses and other hardware information
and shortening the time to provision.
Once the provisioning configuration is complete, the Foreman discovery plugin will send the order to
the discovered host to reboot and start the installation. The host will then move from the D isco vered
H o st s list in the Satellite Server to the All H o st s list.
Prereq u isit es
Using the Foreman D iscovery Plugin requires the following prerequisites:
A Red Hat Satellite Server with a minimum version of 6.0.5 with bare metal provisioning
configured.
At least one Capsule Server with D HCP and TFTP services enabled.
At least one host that can be discovered with at least 1GB RAM.
11.1. Inst alling t he Foreman Discovery Plugin
To utilize the Foreman D iscovery feature, follow these steps to install the Foreman D iscovery Plugin.
1. Open a terminal console and login as root on the command line.
2. Install the Foreman D iscovery Plugin using the following command:
# yum i nstall foreman- discovery-i mage
Report a bug
11.2. Configuring t he Foreman Discovery Plugin
Prereq u isit es
The following must be configured correctly before the foreman discovery plugin is configured:
Make sure that bare metal provisioning is functional. See Chapter 9, Configuring the Provisioning
Environment for more information. To test bare metal provisioning, create a new host entry with a
MAC address and power on the system to provision it. Once Foreman D iscovery is set up, the host
creation will be automated.
The network D HCP server must be able to serve unknown clients and it must point unknown
clients to the TFTP server that the discovery image resides in. If Internet Systems Consortium (ISC)
D HCP was installed via the capsule installer on the Red Hat Enterprise Linux host, this will
already be configured. If you are using a different configuration or a different D HCP server ensure
69
Red Hat Sat ellit e 6 .0 User G uide
the nextserver option is configured to return the proper TFTP server, which is under the Red Hat
Satellite Server's control.
These steps show how to configure the Foreman D iscovery Plugin:
Pro ced u re 11.1. C o n f ig u rin g t h e Fo reman D isco very Plu g in
1. A template needs to be unlocked as it cannot be changed in the user interface. Start a Rails
console on the Satellite Server and run the following command:
# foreman-r ake console
> ct = ConfigTemplate.find_by_name("PXELinux global default");
ct.locked = false; ct.save!
> exit
2. Click H o st s → Pro visio n in g t emp lat es and edit the PXELinux global default template.
Add the following entry at the end of the template:
LABEL discovery
MENU LABEL Foreman Discovery
MENU DEFAULT
KERNEL boot/foremand iscoveryi magel atest.el6.isov mlinuz
APPEND rootflags=loop
initrd=boot/foremand iscoveryi magel atest.el6.isoi mg
root=live:/foreman.iso rootfstype=auto ro rd.live.image
rd.live.check rd.lvm=0 rootflags=ro crashkernel=128M
elevator=deadline max_loop=256 rd.luks=0 rd.md=0 rd.dm=0 nomodeset
selinux=0 stateless foreman.url=<%= foreman_url %>
IPAPPEND 2
The fo reman. url option on the APPEND line defines where the Foreman instance is. Make
sure that this is set correctly in global settings or the discovered hosts will not register to
Foreman.
The IP AP P END 2 option is important as it adds the BO O T IF= MAC option. This is reported
via facter as d i sco very_bo o ti f, which is a key fact used for provisioning. It is expected
that the interface that it is booted from will be the provisioning interface as well. The same
interface will be used as the primary interface and is used to retrieve D NS configuration from
D HCP.
3. Make the fo reman. url option the default by altering the ONTIMEOUT option:
ONTIMEOUT discovery
4. Alternatively, the discovery image can search for a D NS SRV record named
_xf o reman. _tcp. If the D NS server is configured for this, then the fo reman. url option
should not be configured otherwise it will override the D NS SRV record. An example of the
configuration for ISC D NS server is:
_xforeman._tcp SRV 0 5 443 foreman
5. Click H o st s → Pro visio n in g t emp lat es then click Bui l d P XE D efaul t to deploy the
configuration file on the TFTP server.
70
Chapt er 1 1 . Using t he Foreman Discovery Plugin
Note
The Foreman D iscovery image does not support SELinux and the option sel i nux= 0
must be configured in the template. The discovery image is read only.
The Foreman D iscovery Plugin is now configured.
Report a bug
11.3. Edit ing t he Discovered Host
An unknown host is not visible in the Red Hat Satellite Server web interface until the uknown host
boots, reports, and registers to Foreman. Only then is the host discovered and available on the
Satellite Server interface for editing. At the time of reporting, the discovered host will provide Foreman
with system details which populates the D iscovered Host's profile.
Now that the discovered host is in the Red Hat Satellite Server web interface, edit the D iscoved Host's
provisioning profile to allow the Satellite Server to provision the host with the correct requirements.
Pro ced u re 11.2. Ed it in g t h e D isco vered H o st
1. Click H o st s → D isco vered H o st s.
2. Select the host and click P ro vi si o n.
3. Edit the required details.
4. Click Save.
Once changes are made to the provisioning details and saved, the discovered host will reboot and
install the chosen operating system with the correct requirements.
Report a bug
11.4 . T roubleshoot ing for t he Foreman Discovery Plugin
This section provides information about troubleshooting the Foreman D iscovery Plugin. For
example, instances where the unknown hosts booting up and failing to register with Foreman have a
number of common causes.
If the machine fails to boot to the correct image, verify that the
/var/l i b/tftp/pxel i nux. cfg /d efaul t has been configured as detailed in Section 11.2,
“ Configuring the Foreman D iscovery Plugin”
If the machine booted the correct image but failed to contact Foreman, check the fo reman. url
option on the PXELinux Template. Check that the D NS is working for the image or add an IP
address in the fo reman. url option to check if the D HCP is handling IPs to the booted image
correctly.
If the root account is locked on the image and ssh access is disabled but log in access is still
available on the terminal. Provide the ro o tpw option on the command line. To generate a salted
password use:
71
Red Hat Sat ellit e 6 .0 User G uide
$ openssl passwd salt RH redhat
RHhwCLrQXB8zE
Report a bug
72
Chapt er 1 2 . Configuring Host Collect ions
Chapter 12. Configuring Host Collections
The Host Collections application tab is a system management tool that allows the administrator to:
Add hosts to a collection.
Apply a mass installation of packages, errata, or package groups to all host members of a host
collection.
Update specific packages, errata, or specific package groups to all host members.
Report a bug
12.1. Creat ing a Host Collect ion
These steps show how to create Host Collections in R ed H at Sat ellit e.
Pro ced u re 12.1. C reat e H o st C o llect io n s
1. Click H o st s → H o st C o llect io n s.
2. Click the New Ho st C o l l ecti o n button.
3. Add the Name and D escription of the Host Collection.
4. Uncheck the Unl i mi ted C o ntent Ho sts button to specify the maximum number of hosts
that will be allowed to the group. Otherwise, leave it checked to allow unlimited hosts to join
the host collection.
5. Click the Save button.
R esu lt :
A new host collection is created.
Report a bug
12.2. Adding Host s t o a Host Collect ion
These steps show how to add hosts to host collections in R ed H at Sat ellit e.
T ask Prereq u isit es
You must meet the following condition before continuing with this task:
A host must be registered to R ed H at Sat ellit e in order to add it to a Host Collection. Refer to
Section 10.4.1, “ Registering a Host” for information on how to register a host.
Pro ced u re 12.2. C reat e H o st C o llect io n s
1. Click H o st s → H o st C o llect io n s.
2. Click the host collection where the host should be added.
3. Click the C o ntent Ho sts subtab.
4. Click the Ad d tab.
73
Red Hat Sat ellit e 6 .0 User G uide
5. Check the box next to the desired host and click the Ad d Sel ected button.
R esu lt :
A host is added to the host collection.
Report a bug
12.3. Adding Cont ent t o Host Collect ions
12.3.1. Adding Packages t o a Host Collect ion
These steps show how to add packages to host collections in R ed H at Sat ellit e.
T ask Prereq u isit es
You must meet the following conditions before continuing with this task:
The content to be added should be available in one of the existing repositories or added prior to
this procedure.
Content should be promoted to the environment where the hosts are assigned.
Pro ced u re 12.3. Ad d in g Packag es t o H o st C o llect io n s
1. Click H o st s → H o st C o llect io n s.
2. Click the host collection where the package should be added.
3. Click the C o l l ecti o n Acti o ns subtab.
4. Click the P ackag e Instal l ati o n, R emo val , and Upd ates link.
5. In the field provided, type in the package or package group name. Then click:
Instal l ‐ if you wish to install a new package
Upd ate ‐ if you wish to update an existing package in the host collection
R esu lt :
The selected packages or package groups within the host collection will be installed or updated.
Report a bug
12.3.2. Adding Errat a t o a Host Collect ion
These steps show how to add errata to host collections in R ed H at Sat ellit e.
Prereq u isit es
You must meet the following conditions before continuing with this task:
The errata to be added should be available in one of the existing repositories or added prior to
this procedure.
Errata should be promoted to the environment where the hosts are assigned.
74
Chapt er 1 2 . Configuring Host Collect ions
Pro ced u re 12.4 . Ad d in g Errat a t o H o st C o llect io n s
1. Click H o st s → H o st C o llect io n s.
2. Choose the host collection where the errata should be added.
3. Click the C o l l ecti o n Acti o ns subtab.
4. Click the Errata Instal l ati o n link.
5. Choose the errata you wish to push to the host collection and click Instal l Sel ected .
R esu lt :
The selected errata will be installed in the hosts within the host collection.
Report a bug
12.4 . Removing Cont ent from a Host Collect ion
These steps show how to remove packages from host collections in R ed H at Sat ellit e.
Pro ced u re 12.5. R emo vin g C o n t en t f ro m H o st C o llect io n s
1. Click H o st s → H o st C o llect io n s.
2. Click the host collection where the package should be removed.
3. Click the C o l l ecti o n Acti o ns subtab.
4. Click the P ackag e Instal l ati o n, R emo val , and Upd ates link.
5. In the field provided, type in the package or package group name. Then click R emo ve.
R esu lt :
The package or package group will be removed from all hosts within the host collection.
Report a bug
12.5. Changing t he Assigned Lifecycle Environment or Cont ent View
for a Host Collect ion
These steps show change the assigned lifecycle environment or content view of a host collections in
R ed H at Sat ellit e.
Pro ced u re 12.6 . C h an g in g t h e Assig n ed Lif ecycle En viro n men t o r C o n t en t View
1. Click H o st s → H o st C o llect io n .
2. Choose the host collection where the lifecycle enviroment or content view should be changed.
3. Click the C o l l ecti o n Acti o ns subtab.
4. Select C hang e assi g ned Li fecycl e Envi ro nment o r C o ntent Vi ew.
75
Red Hat Sat ellit e 6 .0 User G uide
5. Select a lifecycle environment by checking the checkbox next to the required lifecycle
environment.
6. Select the required content view.
7. Click Assi g n.
R esu lt :
The assigned lifecycle environment or content view has been updated.
Report a bug
12.6. Removing a Host from a Host Collect ion
These steps show how to remove hosts from host collections in R ed H at Sat ellit e.
Pro ced u re 12.7. R emo ve H o st s f ro m H o st C o llect io n s
1. Click H o st s → H o st C o llect io n s.
2. Choose the desired Host Collection.
3. Click the C o ntent Ho sts subtab.
4. Check the box next to the host you wish to remove from the host collection.
5. Click the R emo ve Sel ected button to remove the host from the host collection.
R esu lt :
A host is removed from the host collection.
Report a bug
12.7. Removing a Host Collect ion
These steps show how to remove a host collection in R ed H at Sat ellit e.
1. Click H o st s → H o st C o llect io n s.
2. Choose the host collection to be removed.
3. Click the R emo ve button. An alert box appears:
Are you sure you want to remove host collection Host Collection
Name?
4. Click the R emo ve button.
R esu lt :
The host collection is removed.
Report a bug
12.8. Cloning a Host Collect ion
76
Chapt er 1 2 . Configuring Host Collect ions
12.8. Cloning a Host Collect ion
These steps show how to clone a host collection in R ed H at Sat ellit e.
1. Click H o st s → H o st C o llect io n s.
2. On the left hand panel, click the host collection you wish to clone.
3. On the right hand corner of the host collection details, click C o py C o l l ecti o n.
4. Add the desired name of the newly cloned host collection.
5. Click the C reate button.
R esu lt
A cloned copy of the host collection is created.
Report a bug
12.9. Reviewing Host Collect ion Act ions
Prereq u isit es
Requires an existing host collection.
Pro ced u re 12.8. R eviewin g H o st C o llect io n Act io n s
1. Click H o st s → H o st C o llect io n s.
2. Click the host collection you wish to view the actions of.
3. Click on the D etai l s subtab.
R esu lt
All events history and actions performed on the host collection is displayed.
Report a bug
77
Red Hat Sat ellit e 6 .0 User G uide
Chapter 13. Red Hat Satellite Capsule Servers
The Red Satellite Capsule Server is a Satellite component that provides federated services to
discover, provision, and configure hosts outside of the primary Satellite server. A Satellite Capsule
Server provides the following features:
Pulp Server/Content Node features, including:
Repository synchronization
Content delivery
Red Hat Satellite Provisioning Smart Proxy features, including:
D HCP, including ISC D HCP servers
D NS, including Bind and MS D NS servers
Any UNIX-based TFTP server
Puppet Master servers from 0.24
Puppet CA to manage certificate signing and cleaning
Baseboard Management Controller (BMC) for power management
The Satellite Capsule Server is a means to scale out the Satellite installation. Organizations can
create various capsules in different geographical locations where the data centers are located. These
are centrally managed through the Satellite Server. When a Satellite user promotes content to the
production environment, the Satellite Server will push the content from the Satellite Server to each of
the Satellite Capsule Servers. Host systems pull content and configuration from the Satellite Capsule
Servers in their location and not from the central Satellite Server.
Creating various Satellite Capsule Servers will decrease the load on the central server, increase
redundancy, and reduce bandwidth usage.
Report a bug
13.1. Red Hat Sat ellit e Capsule Server Scalabilit y
The maximum number of Capsule Servers that the Satellite Server can support has no fixed limit but
has been tested on a Satellite Server with a Red Hat Enterprise Linux 6.5 and 7 hostsystems.
Currently, running fourteen capsules with two vCPUs have been tested to run without issues.
Capsule scalability depends heavily on the following factors, especially when managing puppet
clients:
1. Number of CPUs
2. Run-interval distribution
3. Number of puppet classes
The Capsule Server has a concurrency limitations of 100 concurrent puppet agents running at any
single point in time. Running more than 100 concurrent puppet agents will result in a 503 HTTP
error.
For example, assuming that the puppet agent runs are evenly distributed with less than 100
concurrent puppet agents running at any single point during a run-interval, a Capsule Server with
78
Chapt er 1 3. Red Hat Sat ellit e Capsule Servers
four CPUs can expect a maximum of 1250-1600 puppet clients with a moderate workload of 10
puppet classes assigned to each puppet client. D epending on the number of puppet clients required,
the Satellite installation can scale out the number of Capsule Servers to support them.
Based on the following assumptions:
1. There are no external puppet clients reporting directly to the Satellite 6 integrated capsule.
2. All other puppet clients report directly to an external capsule.
Puppet scalability within Satellite on Red Hat Enterprise Linux 6.5 Capsules are as follows:
1. On the minimum amount of CPUs (two CPUs):
a. At 1 puppet class per host: Not tested
b. At 10 puppet classes per host: Maximum of 1020-860
c. At 20 puppet classes per host: Maximum of 375-330
2. On the recommended amount of CPUs (four CPUs):
a. At 1 puppet class per host: Maximum of 2250-1875
b. At 10 puppet classes per host: Maximum of 1600-1250
c. At 20 puppet classes per host: Maximum of 700-560
Note
The maximums in the above given numbers represent an evenly distributed run interval of all
puppet agents. Any deviation runs the risk of filling the passenger request queue and is
subject to the concurrency limitation of 100 concurrent requests.
Report a bug
13.2. Red Hat Sat ellit e Capsule Server Prerequisit es
The Satellite Capsule's requirements are identical to the Satellite Server. These conditions must be
met before installing Red Hat Satellite Capsule:
B ase O p erat in g Syst em
Red Hat Satellite Capsule is supported on Red Hat Enterprise Linux 6.5 or later, as well as Red Hat
Enterprise Linux 7. Install the operating system from disc, local ISO image, kickstart, or any other
methods that Red Hat supports. Red Hat Satellite Capsule requires Red Hat Enterprise Linux
installations with the @Base package group with no other package-set modifications, and without
third-party configurations or software that is not directly necessary for the direct operation of the
server. This restriction includes hardening or other non-Red Hat security software. If such software is
required in your infrastructure, install and verify a complete working Red Hat Satellite Capsule first,
then create a backup of the system before adding any non-Red Hat software.
When installing Red Hat Enterprise Linux from CD or ISO image, there is no need to select any
package groups; Red Hat Satellite Capsule only requires the base operating system installation.
When installing the operating system via kickstart, select the @Base package group.
79
Red Hat Sat ellit e 6 .0 User G uide
There should be at least one networked host with the following minimum specifications:
64-bit architecture
Red Hat Enterprise Linux 6.5 or later
A minimum of two CPU cores, but four CPU cores are recommended
A minimum of 8 GB memory but ideally 12 GB of memory for each Satellite instance. It is also
recommended to use 4 GB of swap space where possible.
A minimum of 5 GB storage for the base install of Red Hat Enterprise Linux, 300 MB for the
installation of Red Hat Satellite Capsule and at least 10 GB storage for each unique software
repository to be synchronized in the /var file system.
Packages that are duplicated in different channels are only stored once on the disk. Additional
repositories containing duplicate packages will require less additional storage.
Note
The bulk of storage resides on the /var/l i b/mo ng o d b and /var/l i b/pul p
directories. These end points are not manually configurable. Ensure that storage is
available on the /var file system to prevent storage issues.
No Java virtual machine installed on the system, remove any if they exist.
No Puppet RPM files installed on the system
No third-party unsupported yum repositories enabled. Third-party repositories may offer
conflicting or unsupported package versions that may cause installation or configuration
errors.
Administrative user (ro o t) access
Full forward and reverse D NS resolution using a fully qualified domain name. Check that
hostname and localhost resolve correctly, using the following commands:
# ping -c1 localhost
# ping -c1 `hostname -s` # my_system
# ping -c1 `hostname -f` # my_system.domain.com
Available subscriptions on the Red Hat Satellite Server.
Important
Make sure that the host system is fully updated before installing Red Hat Satellite. Attempts to
install on host systems running Red Hat Enterprise Linux that are not fully updated may lead
to difficulty in troubleshooting, as well as unpredictable results.
Ap p licat io n Sp ecif icat io n s
Satellite application installation specifications are as follows:
80
Chapt er 1 3. Red Hat Sat ellit e Capsule Servers
It is recommended that a time synchronizer such as n t p d is installed and enabled on Satellite. Run
the following command to start the ntpd service and have it persist across restarts:
# service ntpd start; chkconfig ntpd on
R eq u ired N et wo rk Po rt s
The following conditions must be met before continuing with this task:
Port 443 for HTTPS (secure WWW) must be open for incoming connections.
Port 5671 must be open for SSL communication with managed systems.
Port 80 for HTTP (WWW) must be open to download the bootstrap files.
Port 8080 for TCP must be free for java connections.
Port 8140 must be open for incoming Puppet connections with the managed systems.
Port 9090 must be open for Foreman Smart Proxy connections with the managed systems.
Run the following commands to configure the firewall with the i ptabl es command and to make
these rules persistent during reboots:
1. For Red Hat Enterprise Linux 6:
# iptables -I INPUT -m state --state NEW -p tcp --dport 443 -j
ACCEPT \
& & iptables -I INPUT -m state --state NEW -p tcp --dport 5671 -j
ACCEPT \
& & iptables -I INPUT -m state --state NEW -p tcp --dport 80 -j
ACCEPT \
& & iptables -I INPUT -m state --state NEW -p tcp --dport 8140 -j
ACCEPT \
& & iptables -I INPUT -m state --state NEW -p tcp --dport 9090 -j
ACCEPT \
& & iptables -I INPUT -m state --state NEW -p tcp --dport 8080 -j
ACCEPT \
# iptables-save > /etc/sysconfig/iptables
2. For Red Hat Enterprise Linux 7:
# firewall-cmd --permanent --add-port="443/tcp" --addport="5671/tcp" --add-port="80/tcp" --add-port="8140/tcp" --addport="9090/tcp" --add-port="8080/tcp"
# firewall-cmd --complete-reload
R ed H at Sat ellit e Server
The Satellite Server must have the Red Hat Software Collections repositories enabled and
synchronized prior to the Capsule Server installation.
81
Red Hat Sat ellit e 6 .0 User G uide
Important
Red Hat recommends that the Satellite Capsule system be a freshly provisioned system that
serves no other function except as a Satellite Capsule.
Report a bug
13.3. Inst alling a Red Hat Sat ellit e Capsule Server
Prereq u isit es
The Capsule Server must be registered to the Red Hat Satellite Server to use the Red Hat Satellite
Server products and subscriptions:
1. Install the Red Hat Satellite Server's CA certificate in the Capsule Server:
# rpm -Uvh http://satellite.example.com/pub/katello-ca-consumerlatest.noarch.rpm
2. Register the Capsule Server under your chosen organization's name:
# subscription-manager register --org "your organization"
This procedure installs a Red Hat Satellite Capsule Server onto a host.
Pro ced u re 13.1. T o In st all a Sat ellit e C ap su le Server o n a C ert if icat e- man ag ed Syst em:
1. List all the available subscriptions to find the correct Red Hat Satellite and Red Hat Enterprise
Linux product to allocate to your system:
# subscription-manager list --available --all
The screen displays:
+-------------------------------------------+
Available Subscriptions
+-------------------------------------------+
ProductName:
ProductId:
PoolId:
Quantity:
Multi-Entitlement:
Expires:
MachineType:
82
Red Hat Satellite
SKU123456
e1730d1f4eaa448397bfd30c8c7f3d334bd8b
10
No
08/20/2013
physical
Chapt er 1 3. Red Hat Sat ellit e Capsule Servers
Note
The SKU and Pool ID depend on the Red Hat Satellite product type that corresponds
to your system version and product type.
2. Subscribe to the pool using the following command:
# subscription-manager subscribe --pool=Red_Hat_Satellite_Pool_Id
# subscription-manager subscribe -pool=Red_Hat_Enterprise_Linux_Pool_Id
# subscription-manager subscribe -pool=Red_Hat_Enterprise_Linux_Software_Collections_Pool_Id
3. D isable all existing repositories:
# subscription-manager repos --disable "*"
4. Enable the Satellite and Red Hat Enterprise Linux repositories by running subscri pti o nmanag er. You might need to alter the Red Hat Enterprise Linux repository to match the
specific version you are using.
# subscription-manager repos --enable rhel-6-server-rpms \
--enable rhel-server-rhscl-6-rpms \
--enable rhel-6-server-satellite-capsule-6.0-rpms
5. Install the katello-installer and cyrus-sasl-plain packages using the yum i nstal l command as
the root user:
# yum install katello-installer cyrus-sasl-plain
The katello-installer provides the capsul e-i nstal l er functionality while cyrus-sasl-plain is
required for p u lp .
R esu lt :
The Satellite Capsule Server is installed on your host system. The Satellite Capsule Server must be
configured before it can be used.
Report a bug
13.4 . Configuring a Red Hat Sat ellit e Capsule Server
Prereq u isit e
You must meet the following conditions before continuing on this task:
Install the Red Hat Satellite Server.
Set the SELinux permissions on the system designated as the Satellite Capsule Server as
enforcing.
The following procedures configure a Satellite Capsule Server for use with your Red Hat Satellite
Server. This includes the following types of Satellite Capsule Servers:
83
Red Hat Sat ellit e 6 .0 User G uide
Satellite Capsule Server with Smart Proxy
Satellite Capsule Server as a Content Node
Satellite Capsule Server as a Content Node with Smart Proxy
To configure a Satellite Capsule Server:
1. On the Satellite Server:
a. Generate a Satellite Capsule Server certificate:
capsule-certs-generate --capsule-fqdn capsule_FQDN --certstar ~/capsule.example.com-certs.tar
Where:
capsul e_FQ D N is the Satellite Capsule Server's fully qualified domain name.
(REQUIRED )
certs-tar is the name of the tar file to be generated that contains the certificate to
be used by the Satellite Capsule installer.
Running capsul e-certs-g enerate will generate the following output message:
To finish the installation, follow these steps:
1. Ensure that the capsule-installer is available on the
system.
The capsule-installer comes from the katello-installer
package and
should be acquired through the means that are
appropriate to your deployment.
2. Copy ~/capsule.example.com-certs.tar to the capsule
system capsule.example.com
3. Run the following commands on the capsule (possibly with
the customized
parameters, see capsule-installer --help and
documentation for more info on setting up additional
services):
rpm -Uvh http://master.com/pub/katello-ca-consumerlatest.noarch.rpm
subscription-manager register --org "Default Organization"
capsule-installer --parent-fqdn
"sat6.example.com"\
--register-in-foreman "true"\
--foreman-oauth-key
"xmmQCGYdkoCRcbviGfuPdX7ZiCsdExf
--foreman-oauth-secret
"w5ZDpyPJ24eSBNo53AFybcnqoDYXgLUA"\
--pulp-oauth-secret
"doajBEXqNcANy93ZbciFyysWaiwt6BWU"\
--certs-tar
"~/capsule.example.com-certs.tar"\
--puppet
"true"\
--puppetca
"true"\
--pulp
"true"
84
Chapt er 1 3. Red Hat Sat ellit e Capsule Servers
b. Copy the generated tarball, capsule.example.com-certs.tar, from the Satellite Server to
the Satellite Capsule host system.
2. On the Satellite Capsule Server:
a. Register your Satellite Capsule Server to the Satellite Server:
# rpm -Uvh http://sat6host.example.redhat.com/pub/katello-caconsumer-latest.noarch.rpm
# subscription-manager register --org "Default Organization"
--env [environment]/[content_view_name]
Note
The Satellite Capsule Server must be assigned to an organization as the
Satellite Capsule Server requires an environment to synchronize content from
the Satellite Server. Only organizations have environments.
Assigning a location is optional though recommended to indicate proximity to
the hosts that the Satellite Capsule Server is managing.
b. D epending on the desired Satellite Capsule Server type, choose one of the following
options:
i. Option 1: Satellite Capsule Server with Smart Proxy: This installs a Satellite
Capsule Server with Smart Proxy features (D HCP, D NS, Puppet). Run the
following commands as the root user on the Satellite Capsule Server:
# capsule-installer --parent-fqdn
"satellite.example.com"\
--register-in-foreman "true"\
--foreman-oauth-key
"xmmQCGYdkoCRcbviGfuPdX7ZiCsdExf
--foreman-oauth-secret
"w5ZDpyPJ24eSBNo53AFybcnqoDYXgLUA"\
--pulp-oauth-secret
"doajBEXqNcANy93ZbciFyysWaiwt6BWU"\
--certs-tar
"/root/capsule.example.com-certs.tar"\
--puppet
"true"\
--puppetca
"true"\
--pulp
"true"
--tftp
"true"
--dhcp
"true"\
--dhcp-interface
"virbr1
--dns
"true"\
--dns-forwarders
"8.8.8.8"\
--dns-forwarders
"8.8.4.4"\
--dns-interface
"virbr1"\
--dns-zone
"example.com"
85
Red Hat Sat ellit e 6 .0 User G uide
ii. Option 2 - Satellite Capsule Server as a Content Node with Smart Proxy: This
installs a Satellite Capsule Server with all the features. Run the following
commands as the root user on the Satellite Capsule Server:
# capsule-installer --parent-fqdn
"sat6.example.com"\
--register-in-foreman "true"\
--foreman-oauth-key
"xmmQCGYdkoCRcbviGfuPdX7ZiCsdExf
--foreman-oauth-secret
"w5ZDpyPJ24eSBNo53AFybcnqoDYXgLUA"\
--pulp-oauth-secret
"doajBEXqNcANy93ZbciFyysWaiwt6BWU"\
--certs-tar
"/root/capsule.example.com-certs.tar"\
--puppet
"true"\
--puppetca
"true"\
--pulp
"true"
--tftp
"true"
--dhcp
"true"\
--dhcp-interface
"virbr1
--dns
"true"\
--dns-forwarders
"8.8.8.8"\
--dns-forwarders
"8.8.4.4"\
--dns-interface
"virbr1"\
--dns-zone
"example.com"
3. Run the following commands to configure the firewall to limit elast icsearch to the fo reman,
katel l o and root users and make these rules persistent during reboots:
For Red Hat Enterprise Linux 6:
iptables -A OUTPUT -o lo -p tcp -m tcp --dport 9200 -m
uid-owner foreman -j ACCEPT \
& & iptables -A OUTPUT -o lo -p tcp -m tcp --dport 9200
--uid-owner katello -j ACCEPT \
& & iptables -A OUTPUT -o lo -p tcp -m tcp --dport 9200
--uid-owner root -j ACCEPT \
& & iptables -A OUTPUT -o lo -p tcp -m tcp --dport 9200
iptables-save > /etc/sysconfig/iptables
owner --m owner
-m owner
-j DROP
For Red Hat Enterprise Linux 7:
firewall-cmd --permanent --direct --add-rule ipv4 filter OUTPUT
0 -o lo -p tcp -m tcp --dport 9200 -m owner --uid-owner foreman
-j ACCEPT \
& & firewall-cmd --permanent --direct --add-rule ipv6 filter
OUTPUT 0 -o lo -p tcp -m tcp --dport 9200 -m owner --uid-owner
foreman -j ACCEPT \
& & firewall-cmd --permanent --direct --add-rule ipv4 filter
OUTPUT 0 -o lo -p tcp -m tcp --dport 9200 -m owner --uid-owner
katello -j ACCEPT \
& & firewall-cmd --permanent --direct --add-rule ipv6 filter
OUTPUT 0 -o lo -p tcp -m tcp --dport 9200 -m owner --uid-owner
86
Chapt er 1 3. Red Hat Sat ellit e Capsule Servers
katello -j ACCEPT \
& & firewall-cmd --permanent --direct
OUTPUT 0 -o lo -p tcp -m tcp --dport
root -j ACCEPT \
& & firewall-cmd --permanent --direct
OUTPUT 0 -o lo -p tcp -m tcp --dport
root -j ACCEPT \
& & firewall-cmd --permanent --direct
OUTPUT 1 -o lo -p tcp -m tcp --dport
& & firewall-cmd --permanent --direct
OUTPUT 1 -o lo -p tcp -m tcp --dport
--add-rule ipv4 filter
9200 -m owner --uid-owner
--add-rule ipv6 filter
9200 -m owner --uid-owner
--add-rule ipv4 filter
9200 -j DROP \
--add-rule ipv6 filter
9200 -j DROP
Note
If the configuration is successful, run this command as the root user on the Satellite Capsule
Server:
# echo $?
This command should return a " 0" to indicate success. If it does not, check /var/l o g /kafo
to debug the cause of failure. /var/l o g /kafo is the log file for the output generated by the
commands capsul e-certs-g enerate and capsul e-i nstal l er.
The Satellite Capsule Server should also appear in the Satellite Server's User Interface under
In f rast ru ct u re → C ap su les.
R esu lt :
The Satellite Capsule Server is now configured and registered with the Satellite Server.
Report a bug
13.5. Adding Lifecycle Environment s t o a Red Hat Sat ellit e Capsule
Server
If the newly created Red Hat Satellite Capsule Server has Content Node features enabled, the Satellite
Capsule Server needs an environment added to the Satellite Capsule Server. Adding an environment
to the Red Hat Satellite Capsule Server will allow the Satellite Capsule Server to synchronize content
from the Satellite Server and provide content to host systems.
Important
The Satellite Capsule Server is configured through the Satellite Server's command line
interface (CLI). Execute all hammer commands on the Satellite Server.
To add environments to your Satellite Capsule Server:
1. Log in to the Satellite Server CLI as root.
2. Choose the desired Red Hat Satellite Capsule Server from the list and take note of its i d :
87
Red Hat Sat ellit e 6 .0 User G uide
# hammer capsule list
The Satellite Capsule Server's details can be verified using the command:
# hammer capsule info --id capsule_id_number
3. Verify the list of lifecycle environments available for the Red Hat Capsule Server and note
down the envi ro nment i d :
# hammer capsule content available-lifecycle-environments --id
capsule_id_number
Where:
avai l abl e-l i fecycl e-envi ro nments are lifecycle environments that are available
to the Satellite Capsule but are currently not attached to the Satellite Capsule.
4. Add the lifecycle environment to the Satellite Capsule Server:
# hammer capsule content add-lifecycle-environment --id
capsule_id_number --lifecycle-environment-id environment_id_number
Where:
--i d is the Satellite Capsule Server's identification number.
--l i fecycl e-envi ro nment-i d is the lifecycle environment's identification number.
Repeat this step for every lifecycle environment to be added to the Capsule Server.
5. Synchronize the content from the Satellite Server's environment to the Satellite Capsule
Server:
# hammer capsule content synchronize --id capsule_id_number
When a Satellite Capsule Server has various lifecycle environments, and only one lifecycle
environment needs to be synchronized, it is possible to target a specific environment by
specifying the environment identification:
# hammer capsule content synchronize --id 1 --environment-id 1
R esu lt :
The chosen environments now consume packages from repositories on the desired Satellite Capsule
Server.
Report a bug
13.6. Removing Lifecycle Environment s from t he Red Hat Sat ellit e
Capsule Server
There are multiple reasons to remove lifecycle environments from the Red Hat Satellite Capsule
Server. For example:
88
Chapt er 1 3. Red Hat Sat ellit e Capsule Servers
When lifecycle environments are no longer relevant to the host systems
When lifecycle environments have been incorrectly added to the Satellite Capsule Server
To remove a lifecycle environment from the Satellite Capsule Server:
1. Log in to the Satellite Server CLI as the root user.
2. Choose the desired Red Hat Satellite Capsule Server from the list and take note of its i d :
# hammer capsule list
The Satellite Capsule Server's details can be verified using the command:
# hammer capsule info --id capsule_id_number
3. Verify the list of lifecycle environments currently attached to the Red Hat Capsule Server and
note down the envi ro nment i d :
hammer capsule content lifecycle-environments --id
capsule_id_number
4. Remove the lifecycle environment from the Satellite Capsule Server:
# hammer capsule content remove-lifecycle-environment --id
capsule_id_number --environment-id environment_id
Where:
--i d is the Satellite Capsule Server's identification number.
--envi ro nment-i d is the lifecycle environment's identification number.
Repeat this step for every lifecycle environment to be removed from the Capsule Server.
5. Synchronize the content from the Satellite Server's environment to the Satellite Capsule
Server:
# hammer capsule content synchronize --id capsule_id_number
R esu lt :
The chosen environments are removed from the Satellite Capsule Server.
Report a bug
13.7. Regist ering Host Syst ems t o a Red Hat Sat ellit e Capsule Server
Prereq u isit e
Client system must be configured for registration. The following chapters in the Red Hat Satellite User
Guide can assist with configuration:
1. Configuring Hosts for Registration
2. Automated Configuration
89
Red Hat Sat ellit e 6 .0 User G uide
3. Manual Configuration
4. Creating a New Activation Key
Systems can be registered to the parent host while using a Satellite Capsule as a content source.
Register the system to the Satellite 6 server through subscri pti o n-manag er but reference the
Satellite Capsule by using the --baseurl flag provided by Subscription Manager using /pulp/repos
as the prefix.
# subscription-manager register --org [org_name] --activationkey
[your_activation_key] --baseurl
https://satcapsule.example.com/pulp/repos
Report a bug
13.8. Refreshing a Red Hat Sat ellit e Capsule Server
Pro ced u re 13.2. R ef resh in g a R ed H at Sat ellit e C ap su le Server
1. Select In f rast ru ct u re → C ap su les.
2. Select R ef resh Feat u res from the drop down menu to the right of the name of the capsule
you want to refresh.
R esu lt
The capsule is refreshed with the changes that have been made.
Report a bug
90
Chapt er 1 4 . Users and Roles
Chapter 14. Users and Roles
14 .1. Configuring LDAP Aut hent icat ion for Red Hat Sat ellit e
Red Hat Satellite includes the option to use a Lightweight D irectory Access Protocol (LD AP) service
for user information and authentication, using one or more LD AP directories.
Pro ced u re 14 .1. T o C o n f ig u re LD AP Au t h en t icat io n :
1. Log in as the Satellite administrator.
2. Click Ad min ist er → LD AP Au t h en t icat io n on the upper right of the page.
3. Click New LD AP so urce on the upper right of the page.
4. Fill in the information in the following tabs:
a. LD AP Server Tab. For the LD AP server tab, enter the following information:
Name - LD AP server's name.
Server - the LD AP server's hostname.
Port - the LD AP port. This defaults to port 389.
TLS - Enables Transport Layer Security. Tick the check box to enable encryption.
b. Acco u n t Tab. For the Account Tab, enter the following information:
Account Username - an LD AP user who has read access to the LD AP server. This
field cannot remain blank. Use the full path to the user's object. For example:
uid=$login,cn=users,cn=accounts,dc=example,dc=com
Account password - the LD AP password for the user defined in the Account
username field. This field can remain blank if the Account username is using the
" $login" variable.
Base D N - the top level domain name of your LD AP directory. For example:
cn=users,cn=accounts,dc=redhat,dc=com
LD AP filter
Automatically create accounts in Foreman - creates Satellite accounts
automatically for LD AP users who log in for the first time in Satellite. Tick the check
box to enable this feature.
c. At t rib u t e map p in g s tab. LD AP attributes such as login, name, and email
addresses, need to be mapped to Satellite attributes for LD AP to work on Satellite. The
following attributes can be mapped to Satellite:
Login name attribute
First Name attribute
Surname attribute
91
Red Hat Sat ellit e 6 .0 User G uide
Email address attribute
Photo attribute
5. Click Submi t.
R esu lt :
LD AP authentication is now configured on the Satellite.
Report a bug
14 .2. Users
A User defines a set of details for individuals using the system. Users can be assigned default
organizations and environments, so that when they create new entities, these defaults are
automatically used. Users can also be assigned to a default role, which defines the permissions and
level of access they have. The roles to which users are assigned, give them rights to see and manage
organizations and environments.
Report a bug
14 .2.1. Creat ing a User
These steps show how to create a user.
Pro ced u re 14 .2. T o C reat e a U ser:
1. Click Ad min ist er → U sers and then click New User.
2. Enter the required details on the User tab.
3. On the Lo cati o ns tab, select the required locations for this user.
4. On the O rg ani zati o ns tab, select the required organizations for this user.
5. On the R o l es tab, select the required roles for this user. Active roles are displayed in the
right panel.
6. Click Submi t to create the user.
Report a bug
14 .2.2. Edit ing a User
These steps show how to edit details of an existing user.
Pro ced u re 14 .3. Ed it an Exist in g U ser
1. Click Ad min ist er → U sers at the top right corner of the web page.
2. Click the username of the required user. General information about the user will appear on
the right.
3. You can modify the user's username, first name, surname, email address, default location,
default organization, language, and password in the U ser tab.
92
Chapt er 1 4 . Users and Roles
4. You can modify the user's assigned locations in the Lo cat io n s tab.
5. You can modify the user's assigned organizations in the O rg an iz at io n s tab.
6. You can modify the user's assigned roles in the R o les tab.
7. Click the Save button to save your changes.
R esu lt :
An existing user is edited.
Report a bug
14 .2.3. Removing a User
These steps show how to remove an existing user.
Pro ced u re 14 .4 . R emo ve an Exist in g U ser
1. Click Ad min ist er → U sers at the top right corner of the webpage.
2. Click the D el ete link to the right of the username you want to delete from the list of available
users.
3. An alert box appears:
Delete User Name?
4. Click the O K button.
R esu lt :
An existing user is removed.
Report a bug
14 .3. Roles
Roles define a set of permissions and access levels. Once a role has been created, users can be
assigned that role. In this way, large groups of users can easily be given the same set of
permissions.
Report a bug
14 .3.1. Creat ing a Role
These steps show how to create a role.
Pro ced u re 14 .5. C reat e a R o le
1. Click Ad min ist er → R o les at the top right corner of the webpage.
2. Click the New R o l e link.
3. Provide a Name for the role.
93
Red Hat Sat ellit e 6 .0 User G uide
4. Click the Submi t button to save your new role.
R esu lt :
A role is created.
Report a bug
14 .3.2. Adding Permissions t o an Exist ing Role
These steps show how to add permissions of an existing role.
Pro ced u re 14 .6 . Ad d Permissio n s t o an Exist in g R o le
1. Click Ad min ist er → R o les at the top right corner of the web page.
2. Select Ad d Permissio n from the drop down menu to the right of the required role.
3. Select the R eso u rce t yp e from the drop down menu.
4. Select the required permissions from the Permissio n list by clicking the required permission
to move it to the Select ed It ems list.
5. Select whether the permission is U n limit ed by clicking the check box.
6. Click the Next button. A list of available permissions is listed.
7. Click the Su b mit button to save changes.
R esu lt :
Permissions are added to an existing role.
Report a bug
14 .3.3. Removing a Role
These steps show how to remove an existing role.
Pro ced u re 14 .7. R emo ve an Exist in g R o le
1. Click Ad min ist er → R o les at the top right corner of the web page.
2. Select D elet e from the drop down box to the right of the role to be deleted.
3. An alert box appears:
Delete Role?
4. Click the O K button.
R esu lt :
An existing role is removed.
Report a bug
94
Chapt er 1 5. Command Line Reference
Chapter 15. Command Line Reference
15.1. Using t he Red Hat Sat ellit e Command-Line Int erface
Note
Usage of the command-line interface (CLI) is optional.
hammer is the CLI management tool for Red Hat Satellite functionality. It can:
Provision hosts.
Edit the attributes of a resource or group.
Interact and manipulate hosts, capsules and domains.
hammer can be executed on the command line through its parameters and options or through the
interactive shell. To invoke the shell:
[root@ sat.example.com ~]# hammer shell
Welcome to the hammer interactive shell
Type 'help' for usage information
Command completion is disabled on ruby < 1.9 due to compatibility
problems.
hammer> organization list
---|------------------|------------------|-----------------------------ID | NAME
| LABEL
| DESCRIPTION
---|------------------|------------------|-----------------------------1 | ACME_Corporation | ACME_Corporation | ACME_Corporation Organization
3 | Test Corp
| Test_Corp
|
---|------------------|------------------|-----------------------------hammer>
The full list of options and subcommands are available on the helpfile:
# hammer -h
Report a bug
95
Red Hat Sat ellit e 6 .0 User G uide
Chapter 16. Maintenance
16.1. Logging and Report ing
R ed H at Sat ellit e provides system information in the form of notifications and logs.
Examples of helpful logs for troubleshooting are:
T ab le 16 .1. R elevan t Lo g Files
Lo g File
D escrip t io n
/var/l o g /el asti csearch
/var/l o g /cand l epi n
/var/l o g /fo reman
/var/l o g /fo reman-pro xy
/var/l o g /httpd
/var/l o g /katel l o -i nstal l er
/var/l o g /l i bvi rt
/var/l o g /mo ng o d b
/var/l o g /pul p
/var/l o g /puppet
/var/l o g /rhsm
/var/l o g /to mcat6
Errors concerning the UI search index display
Errors concerning subscription management
Errors concerning foreman
Errors concerning the foreman proxy
Errors concerning the apache http server
Errors concerning the Satellite installer
Errors concerning the virtualization API
Errors concerning the database
Errors in repository management
Errors in configuration management
Errors in the subscription management tool
Issues concerning the apache webserver
Reports can also be generated to view and monitor information about the hosts being maintained.
The fo reman-d ebug command collects configuration and log data for Red Hat Satellite, its backend services and system information. This information is collected into a tarball.
Important
fo reman-d ebug removes all security information such as password, tokens and keys while
collecting information. However, the tarball can still contain sensitive information about the
Red Hat Satellite Server. It is recommended to send this information directly to the intended
recipient and not publicly.
Report a bug
16.1.1. Viewing Import Hist ory
These steps show how to view an import history in R ed H at Sat ellit e.
Pro ced u re 16 .1. Viewin g Imp o rt H ist o ry
1. Click C o n t en t → R ed H at Su b scrip t io n s.
2. Click the Manag e Mani fest button.
3. Click the Impo rt Hi sto ry tab.
R esu lt :
96
Chapt er 1 6 . Maint enance
D etails of the import history are displayed.
Report a bug
16.2. Disast er Recovery
16.2.1. Red Hat Sat ellit e Backup Procedure
Pro ced u re 16 .2. R ed H at Sat ellit e B acku p Pro ced u re
This example uses the /backup directory as our target directory to hold backup archives. Execute
the following commands as the ro o t system account.
Note
When SELinux is enabled users need to ensure that local content they want to synchronize is
labeled with " httpd_sys_content_t" .
1. Prepare your backup location:
umask 0027
export BDIR=/backup
mkdir $BDIR
chgrp postgres $BDIR
chmod 770 $BDIR
cd $BDIR
2. Backup the configuration and data files:
# tar --selinux -czvf config_files.tar.gz \
/etc/katello \
/etc/elasticsearch \
/etc/candlepin \
/etc/pulp \
/etc/gofer \
/etc/pki/katello \
/etc/pki/pulp \
/etc/qpidd.conf \
/etc/sysconfig/katello \
/etc/sysconfig/elasticsearch \
/root/ssl-build \
/var/www/html/pub/* \
# tar --selinux -czvf elastic_data.tar.gz /var/lib/elasticsearch
3. Back up the repositories. The RPM files in repositories already use compression and cannot
be compressed any further. Therefore, depending on instance size, the resulting backup
archive (pul p_d ata. tar) can grow quite large.
There are two options for backing up repositories.
O p t io n O n e: O n lin e R ep o sit o ries B acku p
97
Red Hat Sat ellit e 6 .0 User G uide
Perform a checksum of all timestamps, backup the repository and perform the checksum
again.
# find /var/lib/pulp -printf '%T@ \n' | md5sum
# tar --selinux -cvf pulp_data.tar /var/lib/pulp /var/www/pub
# find /var/lib/pulp -printf '%T@ \n' | md5sum
If both checksums match, the online backup is correct and usable. If the checksums do not
match, perform the repository backup again.
Note
Use the rsync command to speed up file copying so checksums match.
O p t io n T wo : O f f lin e R ep o sit o ries B acku p
Stop the Pulp server and perform the backup. After the backup has completed, restart the
Pulp server.
# service pulp-server stop
# tar --selinux -cvf pulp_data.tar /var/lib/pulp /var/www/pub
# service pulp-server start
Note
When the Pulp server is down, Red Hat Satellite and the yum clients will be unable to
maintain the connection. Any repository actions performed on Red Hat Satellite will fail
during this inactivity.
4. Back up your databases:
O f f lin e D at ab ase B acku p
Perform the offline backup by using these commands:
tar --selinux -czvf mongo_data.tar.gz /var/lib/mongodb
tar --selinux -czvf pgsql_data.tar.gz /var/lib/pgsql/data/
Warning
Red Hat Satellite must be completely inactive to do an offline backup. Performing this
step while Satellite is running may result in corrupted data.
This method archives all data from the PostgreSQL and MongoD B databases. It is
recommended to perform this backup during maintenance periods.
Po st g reSQ L D at ab ases B acku p
98
Chapt er 1 6 . Maint enance
Check the names for Red Hat Satellite PostgreSQL databases. D efault database names are
fo remanschema and cand l epi n. Find all default values in the katel l o -co nfi g ure
manual page, or in the /usr/share/katel l o /i nstal l /d efaul t-answer-fi l e. If the
Red Hat Satellite instance is not using the default names, check the katel l o co nfi g ure. co nf, which stores all options provided to the katel l o -co nfi g ure
command, and look for d b_name.
# grep db_name /etc/katello/katello-configure.conf
Run the pg _d ump command to create online database backups. It is not necessary to stop
PostgreSQL or Red Hat Satellite, and this process does not block logged users. However, the
process can take several minutes to finish depending on database sizes.
# runuser - postgres -c "pg_dump -Fc foremanschema >
/backup/foreman.dump"
# runuser - postgres -c "pg_dump -Fc candlepin >
/backup/candlepin.dump"
Note
For more information about PostgreSQL backups, consult the pg _d ump manual page
or visit http://www.postgresql.org/docs/8.4/static/backup.html.
Mo n g o D B D at ab ase B acku p
Use online tools to backup the pulp database (MongoD B) while the database is running.
Execute the following command in the backup directory:
# mongodump --host localhost --out $BDIR/mongo_dump
This tool creates the /backup/mo ng o _d ump/pul p_d atabase directory, including JSON
files.
Note
For more information, consult the mo ng o d ump man page or visit
http://www.mongodb.org/display/D OCS/Backups.
5. Check the backup process. The process creates the following archive files and a directory:
# ls $BDIR
candlepin.dump
config_files.tar.gz
elastic_data.tar.gz
katello.dump
mongo_dump/
pulp_data.tar
If you performed the optional offline backup of the databases, the following files will also
appear:
99
Red Hat Sat ellit e 6 .0 User G uide
mongo_data.tar.gz
pgsql_data.tar.gz
Red Hat Satellite is now backed up. Red Hat Satellite should be online.
Report a bug
16.2.2. Red Hat Sat ellit e Rest ore Procedure
Pro ced u re 16 .3. R ed H at Sat ellit e R est o re Pro ced u re
Important
The following process describes a full R ed H at Sat ellit e restore. This process deletes all
data from a current R ed H at Sat ellit e instance. Please make sure that:
You are restoring to the correct instance. The R ed H at Sat ellit e instance must have the
same configuration, package versions and errata as the original system.
All commands are executed as ro o t in the directory with archives created during the
backup process.
All SELinux context are correct. Run the command:
restorecon -Rnv /
1. Prepare the R ed H at Sat ellit e host for restore. This process restores the backup on the
same server that generated the backup. If the original system is unavailable, provision the
same configuration with the same settings (hostname, IP address, etc) and run katel l o i nstal l er with the same options using the file from the configuration backup:
# tar --selinux -xzvf config_files.tar.gz -C /tmp
# katello-installer --answer-file=/etc/foreman/database.yml
2. Change to the backup directory.
# export BDIR=/backup
# chgrp postgres -R $BDIR
# cd $BDIR
3. Check the names for R ed H at Sat ellit e PostgreSQL databases. D efault database names
are fo reman and cand l epi n. Find all default values in the
/etc/fo reman/d atabase. yml . If the R ed H at Sat ellit e instance is not using the default
names, check the katel l o -co nfi g ure. co nf, which stores all options provided to the
katel l o -co nfi g ure command, and look for d b_name.
# grep db_name /etc/katello/katello-configure.conf
4. Stop all services prior to restoring the databases:
# katello-service stop
# service postgresql stop
100
Chapt er 1 6 . Maint enance
5. Restore the system files. Make sure that the files extract on the correct host. Restore all system
files with the following commands executed from the backup directory:
# tar --selinux -xzvf config_files.tar.gz -C /
# tar --selinux -xzvf elastic_data.tar.gz -C /
# tar --selinux -xvf pulp_data.tar -C /
6. D rop the existing R ed H at Sat ellit e PostgreSQL databases if any exist:
# service postgresql start
# runuser - postgres -c "dropdb foremanschema"
# runuser - postgres -c "dropdb candlepin"
Note
There is a possibility of the following error appearing during database drop:
database xxx is being accessed by other users
Ensure all processes are stopped.
7. Restore R ed H at Sat ellit e PostgreSQL databases with the following commands:
# runuser - postgres -c "pg_restore -C -d postgres
/backup/katello.dump"
# runuser - postgres -c "pg_restore -C -d postgres
/backup/candlepin.dump"
Note
For more info about PostgreSQL backups consult the pg _d ump manual page or visit
http://www.postgresql.org/docs/8.4/static/backup.html.
8. Ensure MongoD B is running and delete the old data:
# service mongod start
# echo 'db.dropDatabase();' | mongo pulp_database
9. Execute the following command while providing the --username and --passwo rd in the
directory of backup archives.
# mongorestore --host localhost mongo_dump/pulp_database/
101
Red Hat Sat ellit e 6 .0 User G uide
Note
For more information consult mo n g o rest o re man page or visit
http://www.mongodb.org/display/D OCS/Backups.
10. Restart all R ed H at Sat ellit e processes:
# service postgresql start
# katello-service start
11. Check log files for errors, check aud i t. l o g for denials and attempt to ping the R ed H at
Sat ellit e instance:
# hammer -u admin -p admin ping
Report a bug
16.3. T roubleshoot ing
16.3.1. Changing Your Red Hat Sat ellit e's Fully Qualified Domain Name (FQDN)
Prereq u isit e
The Satellite FQD N has been changed correctly and the /etc/sysco nfi g /netwo rk in Red Hat
Enterprise Linux 6 or the /etc/ho stname file in Red Hat Enterprise Linux 7 has been modified
accordingly.
Upon installation, the host system's FQD N is recorded by the Red Hat Satellite Server. Changing the
FQD N without the proper precautions can prevent the Satellite Server from running correctly. It also
renders all custom server certificates incorrect.
Pro ced u re 16 .4 . U p d at in g Yo u r R ed H at Sat ellit e C o n f ig u rat io n Af t er an FQ D N C h an g e
To make sure that Red Hat Satellite continues to run properly even with the FQD N change, follow
these steps:
1. Verify that the FQD N is being properly repored and reflects the hostname/FQD N:
# facter fq d n
2. Update the katello-installer answer file to replace the old FQD N with the new one:
# sed -i "s/$OLD_FQDN/$NEW_FQDN/g" /etc/katelloinstaller/answers.katello-installer.yaml
Where:
a. $OLD _is the Satellite Server's previous FQD N.
b. $NEW_FQD N is the Satellite Server's new FD QN.
3. D elete the amqp-client certificate from the NSS database:
102
Chapt er 1 6 . Maint enance
# certutil -D -d '/etc/pki/katello/nssdb' -n 'amqp-client'
4. Regenerate the server certificates by running katel l o -i nstal l er:
# katello-installer --certs-update-all
5. On client systems registered to the Red Hat Satellite Server, uninstall the existing katello-caconsumer package since it contains the existing SSL certificate with the old FQD N
information and update the package from the new FQD N:
# rpm -e $(rpm -qa "katello-ca-consumer*")
#rpm -Uvh http://NEW_FQDN/pub/katello-ca-consumer-latest.noarch.rpm
The Red Hat Satellite is now fully updated with the new FQD N and server certificates.
103
Red Hat Sat ellit e 6 .0 User G uide
Chapter 17. Configuring Identity Management in Red Hat
Satellite
Identity Management (ID M) deals with the management of individual identities, their credentials and
privileges used in a networking environment. ID M can help to increase the security of your system
and ensure that the right people have access to the right information when they need it.
Red Hat Satellite has a realm feature that will automatically manage the lifecycle of any system
registered to a realm or domain provider. This section will explain how you need to configure the
Satellite Server or Capsule Server for ID M and how to automatically add client systems to the Satellite
6 Identity Management host group.
Report a bug
17.1. Configuring Red Hat Sat ellit e Server or Capsule Server for IDM
Realm Support
The initial step to use Identity Management (ID M) in Red Hat Satellite is to configure the Red Hat
Satellite Server or Red Hat Satellite Capsule Server.
Prereq u isit es
Make sure that the following are setup before configuring ID M:
1. A Satellite Server registered to the content delivery network or an independent Capsule Server
registered to the Satellite Server
2. A realm or domain provider such as Red Hat Identity Management configured and set up
To configure the Satellite Server or Capsule Server for ID M Realm Support:
1. On the Satellite Server or Capsule Server, install the following packages:
# yum install ipa-client foreman-proxy ipa-admintools
2. Configure the Satellite Server (or Capsule Server) as an IPA client:
# ipa-client-install
3. Create a realm-capsule user and the relevant roles in Red Hat Identity Management on the
Satellite Server or Capsule Server:
# foreman-prepare-realm admin realm-capsule
Running foreman-prepare-realm will prepare a FreeIPA or Red Hat Identity Management
server for use with the Foreman Smart Proxy. It creates a dedicated role with the permissions
needed for Foreman, creates a user with that role and retrieves the keytab file. You will need
your Identity Management server configuration details on this step.
If the command successfully executes, you should be able to see the following command
output:
104
Chapt er 1 7 . Configuring Ident it y Management in Red Hat Sat ellit e
Keytab successfully retrieved and stored in: freeipa.keytab
Realm Proxy User:
realm-capsule
Realm Proxy Keytab: /root/freeipa.keytab
4. Move the /ro o t/freei pa. keytab to the /etc/fo reman-pro xy directory and set the
ownership settings to the user foreman-proxy:
# mv /root/freeipa.keytab /etc/foreman-proxy
# chown foreman-proxy:foreman-proxy /etc/foremanproxy/freeipa.keytab
5. Configure the realm based on whether you are using Satellite Server or Capsule Server:
A. If you are using the integrated capsule in the Satellite Server, use katel l o -i nstal l er
to configure the realm:
# katello-installer --capsule-realm true \
--capsule-realm-keytab /etc/foreman-proxy/freeipa.keytab \
--capsule-realm-principal '[email protected]' \
--capsule-realm-provider freeipa
Note
These options may also be run at the initial configuration of Red Hat Satellite
Server.
B. If you are using an independent Capsule Server, use capsul e-i nstal l er to configure
the realm:
# capsule-installer --realm true \
--realm-keytab /etc/foreman-proxy/freeipa.keytab \
--realm-principal '[email protected]' \
--realm-provider freeipa
6. Make sure that the most updated versions of the ca-certificates package is installed and trust
the IPA Certificate Authority:
# cp /etc/ipa/ca.crt /etc/pki/ca-trust/source/anchors/ipa.crt
# update-ca-trust enable
# update-ca-trust
7. (Optional) If you are configuring ID M on an already existing Satellite Server or Capsule
Server, the following steps should also be taken to make sure that the configuration changes
take effect:
a. Restart the foreman-proxy service:
# service foreman-proxy restart
b. Log in to the Satellite Server and click In f rast ru ct u re → C ap su les.
105
Red Hat Sat ellit e 6 .0 User G uide
c. Click on the drop down menu on the right-hand side of the Capsule Server you have
configured for ID M and choose R ef resh Feat u res.
8. Finally, create a new realm entry in the Satellite Server user interface:
a. Click In f rast ru ct u re → R ealms and on the right-hand corner of the main page,
click New R eal m.
b. Fill in the fields in the following subtabs:
a. Realm - provide the realm name, the type of realm to use and the realm proxy.
b. Locations - choose the locations where the new realm is intended for use.
c. Organizations - choose the organizations where the new realm is intended for
use.
c. Click Submi t.
The Satellite Server or Capsule Server is now ready to provision hosts that automatically register to
ID M. The next section will detail the steps on how to automatically add hosts to an ID M host group.
Report a bug
17.2. Adding Host s t o an IDM Host Group
Identity Management (ID M) supports the ability to set up automatic membership rules based on a
system's attributes. Red Hat Satellite's realm feature provides administrators with the ability to map
the Red Hat Satellite host groups to the ID M parameter " userclass" which allow administrators to
configure automembership.
When nested host groups are used, they are sent to the ID M server as they are displayed in the Red
Hat Satellite User Interface. For example, " Parent/Child/Child" .
Note
The Satellite Server or Capsule Server sends updates to the ID M server, however
automembership rules are only applied at initial registration.
1. On the ID M server, create a host group:
# ipa hostgroup-add hostgroup_name
Description: hostgroup_description
---------------------------Added hostgroup "hostgroup_name"
---------------------------Host-group: hostgroup_name
Description: hostgroup_description
Where:
a. hostgroup_name is the hostgroup's name.
b. hostgroup_description is the hostgroup's description.
2. Create an automembership rule:
106
Chapt er 1 7 . Configuring Ident it y Management in Red Hat Sat ellit e
# ipa automember-add --type=hostgroup automember_rule
---------------------------------Added automember rule "automember_rule"
---------------------------------Automember Rule: automember_rule
Where:
a. automember-add flags the group as an automember group.
b. --type=hostgroup identifies that the target group is a host group, not a user
group.
c. automember_rule is the name you wish to identify the automember rule by.
3. D efine an automembership condition based on the userclass attribute:
# ipa automember-add-condition --key=userclass --type=hostgroup -inclusive-regex=^webserver hostgroup_name
---------------------------------Added condition(s) to "hostgroup_name"
---------------------------------Automember Rule: automember_rule
Inclusive Regex: userclass=^webserver
---------------------------Number of conditions added 1
---------------------------Where:
a. automember-add-condition allows you to add regular expression conditions to
identify group members.
b. --key=userclass specifies the key attribute as userclass.
c. --type=hostgroup identifies that the target group is a host group, not a user
group.
d. --inclusive-regex=^webserver is a regular expression pattern to identify
matching values.
e. hostgroup_name is the target hostgroup's name.
When a system is added to the Satellite Server's hostgroup_name host group, it will now automatically
be added to the Identity Management server's " hostgroup_name" host group as well. ID M host groups
allow for Host-Based Access Controls (HBAC), sudo policies and other ID M functions.
Report a bug
107
Red Hat Sat ellit e 6 .0 User G uide
Chapter 18. Red Hat Satellite User Interface Plugins
18.1. Red Hat Access Plugin
The Red Hat Access Plugin allows you to use a limited range of Red Hat Customer Portal services
from the Red Hat Satellite web interface.
The following services are provided by the Red Hat Access plugin:
Search provides the ability to search solutions in the Customer Portal from within the Red Hat
Satellite interface.
Lo g s provide users the ability to send specific parts of the log files to assist in problem solving.
These log snippets can be sent to the Red Hat Customer Portal diagnostic tool chain.
Su p p o rt provides users the ability to access their open support cases, modify an open support
case and open a new support case from within the Red Hat Satellite interface.
Note
To access Red Hat Customer Portal resources, you need to log in with your Red Hat Customer
Portal user identification and password.
Report a bug
18.1.1. Searching for Solut ions in t he Red Hat Access Plugin
The Red Hat Access plugin provides search capabilities that will look through the solutions
database available in the Red Hat Customer Portal without needing to log in to the Customer Portal
interface.
To search for solutions from the Red Hat Satellite Server:
1. On the top right hand corner, click on R ed H at Access → Search .
2. Click Lo g In on the right corner of the main panel to log in to the Red Hat Customer Portal.
Note
To access Red Hat Customer Portal resources, you need to log in with your Red Hat
Customer Portal user identification and password.
3. Enter your search query on the R ed Hat Search: field. Search results display in the lefthand R eco mmend ati o ns list.
4. Click on a solution from the R eco mmend ati o ns list to view the solution article. The solution
will display on the main panel.
Report a bug
18.1.2. Ut iliz ing Logs in t he Red Hat Access Plugin
108
Chapt er 1 8 . Red Hat Sat ellit e User Int erface Plugins
The log file viewer gives Red Hat Satellite users visibility into the log files and allows users to isolate
log snippets. These log snippets can then be sent through the Customer Portal diagnostic tool chain
to help expedite problem solving.
To use the logs diagnostic tool from the Red Hat Satellite Server:
1. On the top right hand corner, click on R ed H at Access → Lo g s.
2. Click Lo g In on the right corner of the main panel to log in to the Red Hat Customer Portal. If
you are already logged in, skip this step.
Note
To access Red Hat Customer Portal resources, you need to log in with your Red Hat
Customer Portal user identification and password.
3. On the file tree on the left, select a log file and click the filename.
4. Click Sel ect Fi l e to choose this file for viewing. A separate window will pop out with the
log file contents.
5. Highlight any text sections of the log file. Highlighting text sections will activate the R ed Hat
D i ag no se button.
6. Click R ed Hat D i ag no se. This will send the highlighted information to the Red Hat
Customer Portal and provide solutions that closely match the provided log information.
7. If one of the solutions presented:
Match the problem you are experiencing, click the solution and follow the required steps to
troubleshoot the issue.
D oes not match the problem you are experiencing, click O pen a New Suppo rt C ase.
The support case will be prepopulated with the highlighted text from the log file. See
Section 18.1.5, “ Creating New Support Cases Using the Red Hat Access Plugin” .
Report a bug
18.1.3. Viewing Exist ing Support Cases Using t he Red Hat Access Plugin
To view existing support cases from the Red Hat Satellite Server:
1. On the top right hand corner, click on R ed H at Access → Su p p o rt → My C ases.
2. Click Lo g In on the right corner of the main panel to log in to the Red Hat Customer Portal. If
you are already logged in, skip this step.
Note
To access Red Hat Customer Portal resources, you need to log in with your Red Hat
Customer Portal user identification and password.
3. Search for a specific support case from existing cases by:
109
Red Hat Sat ellit e 6 .0 User G uide
a. Providing a key word or phrase in the Search field.
b. Choosing a specific C ase G ro up from the drop down list. C ase G ro ups are defined
inside the Red Hat Customer Portal by your organization.
c. Choose a Case Status.
4. From the results, choose a specific support case and click on the C ase ID .
R esu lt :
The support case is ready for viewing.
Report a bug
18.1.4 . Modifying Exist ing Support Cases Using t he Red Hat Access Plugin
Prereq u isit es
Complete the instructions from the previous section.
Support Cases can be updated from the Red Hat Satellite Server web interface. When viewing the
support case, scroll down to the sections marked as:
Attachments - to attach a local file from the system. Add a filename to make it easier to identify.
Note
Filenames must be less than 80 characters. The maximum file size for web uploaded
attachments is 250 MB. Use FTP for larger files.
C ase D i scussi o n - to add any updated information about the case you wish to discuss with
Global Support Services. Click on Ad d C o mment after adding information into the comment field.
Report a bug
18.1.5. Creat ing New Support Cases Using t he Red Hat Access Plugin
1. On the top right hand corner, click on R ed H at Access → Su p p o rt → N ew C ase.
2. Click Lo g In on the right corner of the main panel to log in to the Red Hat Customer Portal. If
you are already logged in, skip this step.
Note
To access Red Hat Customer Portal resources, you need to log in with your Red Hat
Customer Portal user identification and password.
3. The P ro d uct and P ro d uct Versi o n fields are automatically populated. Fill in the other
relevant fields:
Summary - a brief summary of the issue
110
Chapt er 1 8 . Red Hat Sat ellit e User Int erface Plugins
D escri pti o n - a detailed description of the issue.
Note
Recommendations for possible solutions will appear on the main panel based on
the summary typed in.
4. Click Next.
5. On the second screen, choose the appropriate:
Severi ty - Based on the urgency of the ticket, this can be classified as 4 (low), 3
(normal), 2 (high> and 1 (urgent).
Case Group - Based on who needs to be notified, case groups can be associated to the
support case. Case Groups can only be selected in Red Hat Satellite. Case Groups are
created within the Customer Portal.
6. Attach any required files. Add in a file description and click Attach.
To make sure that relevant information is provided, it is recommended to attach the output of
the following commands:
# sosreport
# foreman-debug
Important
fo reman-d ebug removes all security information such as password, tokens and keys
while collecting information. However, the tarball can still contain sensitive information
about the Red Hat Satellite Server. It is recommended to send this information directly
to the intended recipient and not publicly.
Note
Filenames must be less than 80 characters. The maximum file size for web uploaded
attachments is 250 MB. Use FTP for larger files.
7. Click on Submi t
R esu lt :
The case is uploaded to the Customer Portal and a case number is provided for your reference.
Report a bug
111
Red Hat Sat ellit e 6 .0 User G uide
Glossary of Terms
The following terms are used throughout this document. Familiarize yourself with these terms to help
your understanding of Red Hat Satellite 6.
Act ivat io n K ey
A registration token used in a Kickstart file to control actions at registration. These are
similar to Activation Keys in Red Hat Satellite 5, but provide a subset of features because
Puppet controls package and configuration management after registration.
Ap p licat io n Lif e C ycle En viro n men t
An Application Life Cycle Environment represents a step, or stage, in a promotion path through
the Software D evelopment Life Cycle (SD LC). Promotion paths are also known as
development paths. Content such as packages and Puppet modules move through life
cycle environments by publishing and promoting Content Views. All Content Views have
versions, which means you can promote a specific version through a typical promotion
path; for example, from development to test to production. Channel cloning implements this
concept in Red Hat Satellite 5.
At t ach
The process of associating a Subscription to a Host that provides access to RPM content.
C ap su le
A Capsule is an additional server that can be used in a Red Hat Satellite 6 deployment to
facilitate content federation and distribution in addition to other localized services (Puppet
Master, D HC P , D NS, T FT P , and more).
C o mp u t e Pro f ile
Compute Profiles specify default attributes for new virtual machines on a compute resource.
C o mp u t e R eso u rce
A Compute Resource is virtual or cloud infrastructure, which Red Hat Satellite 6 uses for
deployment of hosts and systems. Examples include Red Hat
Enterprise Virtualization Manager, OpenStack, EC2, and VMWare.
C o n t en t
Content includes software packages (RPM files) and Puppet modules. These are
synchronized into the Library and then promoted into Life Cycle Environments using
Content Views so that they can be consumed by Hosts.
C o n t en t D elivery N et wo rk ( C D N )
The Content Delivery Network (CDN) is the mechanism used to deliver Red Hat content in a
geographically co-located fashion. For example, content that is synchronized by a Satellite
in Europe pulls content from a source in Europe.
C o n t en t View
A Content View is a definition of content that combines products, packages, and Puppet
modules with capabilities for intelligent filtering and creating snapshots. Content Views are
a refinement of the combination of channels and cloning from Red Hat Satellite 5.
Ext ern al N o d e C lassif ier
112
G lossary of T erms
An External Node Classifier is a Puppet construct that provides additional data for a Puppet
Master to use when configuring Hosts. Red Hat Satellite 6 acts as an External Node
Classifier to Puppet Masters in a Satellite deployment.
Fact er
Facter is a program that provides information (facts) about the system on which it is run; for
example, Facter can report total memory, operating system version, architecture, and more.
Puppet modules enable specific configurations based on host data gathered by Facter.
H ammer
Hammer is a command line tool for Red Hat Satellite 6. Use Hammer to manage Red Hat
Satellite 6 as a standard CLI, for scripts, and also through an interactive shell.
H iera
Hiera is a key/value look-up tool for configuration data which allows keeping site-specific
data out of puppet manifests.
H o st
A Host refers to any system, either physical or virtual, that Red Hat Satellite 6 manages.
H o st C o llect io n
A Host Collection is equivalent to a Satellite 5 System Group, that is, a user defined group of
one or more Hosts.
H o st G ro u p
A Host Group is a template for building a Host. This includes the content view (which defines
the available RPM files and Puppet modules) and the Puppet classes to apply (which
ultimately determines the software and configuration).
Lo cat io n
A Location is collection of default settings that represent a physical place. These can be
nested so that you can set up an hierarchical collection of locations. For example, you can
set up defaults for " Middle East" , which are refined by " Tel Aviv" , which are further refined
by " D ata Center East" , and then finally by " Rack 22" .
Lib rary
The Library contains every version, including the latest synchronized version, of the
software that the user will ever deploy. For an Information Technology Infrastructure Library
(ITIL) [1] organization or department, this is the D efinitive Media Library [2] (previously
named the D efinitive Software Library).
Man if est
A Manifest transfers subscriptions from the Customer Portal to Red Hat Satellite 6. This is
similar in function to certificates used with Red Hat Satellite 5.
For more information about certificates and subscription types, see:
RHN Classic, Red Hat Satellite, and Channel Entitlements [3]
The Structure of Satellite Certificates (Classic Style of Certificates) [4]
113
Red Hat Sat ellit e 6 .0 User G uide
O rg an iz at io n
An Organization is an isolated collection of systems, content, and other functionality within a
Satellite 6 deployment.
Permissio n
The ability to perform an action.
Pro d u ct
A collection of content repositories. Products can be Red Hat products or newly-created
products made up of software and configuration content.
Pro mo t e
The act of moving a content view comprised of software and configuration content from one
Application Life Cycle Environment to another, such as moving from development to QA to
production.
Pro visio n in g T emp lat e
A Provisioning Template is a user-defined template for Kickstart files, snippets, and other
provisioning actions. In Satellite 6 they provide similar functionality to Kickstart Profiles
and cobbler Snippets in Red Hat Satellite 5.
Pu lp N o d e
A Pulp Node is a Capsule Server component that mirrors content. This is similar to the
Red Hat Satellite 5 Proxy. The main difference is that content can be staged on the Pulp
Node before it is used by a Host.
Pu p p et Ag en t
The Puppet Agent is an agent that runs on a Host and applies configuration changes to that
Host.
Pu p p et Mast er
A Puppet Master is a Capsule Server component that provides Puppet manifests to Hosts for
execution by the Puppet Agent.
R ep o sit o ry
A Repository provides storage for a collection of content. For example, a YUM repository or
a Puppet repository.
R o le
A Role specifies a collection of permissions that are applied to a set of resources, such as
Hosts.
Smart Pro xy
A Smart Proxy is a Capsule Server component that can integrate with external services, such
as D NS or D HC P .
Smart Variab le
A Smart Variable is a configuration value that controls how a Puppet Class behaves. This
can be set on a Host, a Host Group, an Organization, or a Location.
114
G lossary of T erms
St an d ard O p erat in g En viro n men t ( SO E)
A Standard Operating Environment (SOE) is a controlled version of the operating system on
which applications are deployed.
Su b scrip t io n
Subscriptions are the means by which you receive content and service from Red Hat.
Syn ch ro n iz in g
Synchronizing refers to mirroring content from external resources into the Red Hat Satellite 6
Library.
Syn ch ro n iz at io n Plan s
Synchronization Plans provide scheduled execution of content synchronization.
U ser G ro u p
A User Group is a collection of roles which can be assigned to a collection of users. This is
similar to a Role in Red Hat Satellite 5.
U ser
A user is anyone registered to use Red Hat Satellite. Authentication and authorization is
possible through built-in logic, through external LD AP resources, or with Kerberos.
Report a bug
[1] http ://en.wikip ed ia.o rg /wiki/Info rmatio n_Tec hno lo g y_Infras truc ture_Lib rary
[2] http ://en.wikip ed ia.o rg /wiki/Definitive_Med ia_Lib rary
[3] http s ://ac c es s .red hat.c o m/s ite/d o c umentatio n/enUS/Red _Hat_Sub s c rip tio n_Manag ement/1/html/Mig rating RHN/s at-c erts .html
[4] http s ://ac c es s .red hat.c o m/s ite/d o c umentatio n/enUS/Red _Hat_Sub s c rip tio n_Manag ement/1/html/Sub s c rip tio n_Co nc ep ts _and _Wo rkflo ws /ind ex.html#s ub
s c r-leg ac y
115
Red Hat Sat ellit e 6 .0 User G uide
Revision History
R evisio n 1- 18
Fri D ec 19 2014
D avid O ' B rien
Remove requirement for yum-rhn-plugin from chapter " Configuring Hosts" .
Update some command layouts to comply with standards.
R evisio n 1- 17
T u es D ec 9 2014
Meg an Lewis
BZ #1168273 Corrected the package name for Installing the Puppet Agent.
R evisio n 1- 16 .1
Wed N o v 26 2014
At h en e C h an
BZ #1139329 Added introductory text into " Using the Foreman D iscovery Plugin" .
BZ #1167966 Satellite Server backup script has changed, removed grinder from the command list.
R evisio n 1- 16
Mo n N o v 24 2014
At h en e C h an
BZ #1166660 Missing step in the configuring ID M chapter added.
BZ #1166656 Changed " [email protected]" to " [email protected]" for
consistency.
BZ #1139329 Revised the Troubleshooting for the Foreman D iscovery Plugin" section.
R evisio n 1- 15.2
Fri N o v 21 2014
Removed the Foreman D iscovery chapter for further review.
At h en e C h an
R evisio n 1- 15
T h u rs N o v 20 2014
Minor corrections.
Added " Enabling Red Hat Repositories" section.
Meg an Lewis
R evisio n 1- 14
Mo n N o v 17 2014
Added further changes for BZ #1139329.
Meg an Lewis
R evisio n 1- 13
Su n N o v 16 2014
BZ #1139329 Added chapter about Foreman D iscovery.
Meg an Lewis
R evisio n 1- 12
Fri N o v 14 2014
Miro slav Svo b o d a
BZ #1153596 Removed sentence mentioning support of Windows installation media.
BZ #1142477 Corrected procedure for Configuring Hosts for Registration.
R evisio n 1- 11.2
Frid ay N o v 14 2014
BZ #1153567 Added a " Capsule Scalability" section.
BZ #1152797 Added a " Troubleshooting" section.
At h en e C h an
R evisio n 1- 11.1
Mo n N o v 10 2014
At h en e C h an
BZ #1150412 Added " --complete-reload" to the firewall-cmd firewall commands.
BZ #1141954 Changed " Installing the Katello Agent" to " Installing the Katello and Puppet Agents" .
Added information on puppet-agent in the section.
R evisio n 1- 11
Mo n N o v 10 2014
At h en e C h an
BZ #1161254 Added a new firewall rule to the list of firewall rules to allow katello-installer to run after
initial install. Moved the firewall rules to the " Configuring Red Hat Satellite" sections to prevent errors.
BZ #1110837 Implemented QE edits.
BZ #1152630 Added RHEL7 firewall-cmd command examples for the firewall requirements.
R evisio n 1- 10
116
Fri N o v 7 2014
Meg an Lewis
Revision Hist ory
BZ #1149145 D efined the difference between All Hosts and Content Hosts and made sure all
procedures pointed to the correct section.
Removed all instances of non breaking spaces in titles.
R evisio n 1- 9
T h u N o v 6 2014
At h en e C h an
BZ #1110837 Added a " Configuring Identity Management" chapter in the User Guide.
R evisio n 1- 8
T h u N o v 6 2014
Meg an Lewis
BZ #1149144 Corrected steps to locate systems registered via subscription-manager.
R evisio n 1- 7
Removed help file output.
T h u O ct 30 2014
Meg an Lewis
R evisio n 1- 6
T h u O ct 23 2014
Implemented changes suggested by translation.
Meg an Lewis
R evisio n 1- 5
Fri O ct 3 2014
At h en e C h an
BZ #1140520 Changed all " ACME_Corporation" entries to the correct default organization entry
" D efault Organization" .
BZ #1141954 Added example repositories to the " Enabling Red Hat Repositories" section and a note
to enable RH Common repositories for client systems.
BZ #1140722 Added note to highlight that the command needs to change if the repository is different
from the example command.
R evisio n 1- 4
T h u O ct 2 2014
Implemented brand changes.
Added Glossary of Terms in an Appendix.
Meg an Lewis
R evisio n 1- 3
Wed O ct 1 2014
Minor edits based on feedback from translation.
Meg an Lewis
R evisio n 1- 2.01
Fri Sep 12 2014
At h en e C h an
BZ #1140875 Added firewall rules after the Satellite Server and Capsule Server installation.
R evisio n 1- 2
Fri Sep 12 2014
Patched " Red Hat" entries to conform with Brand standards.
D avid O ' B rien
R evisio n 1- 1
T h u Sep 11 2014
At h en e C h an
BZ #1140422 Changed the repository names for Red Hat Satellite Server and Red Hat Satellite
Capsule Server.
R evisio n 1- 0
T u e 9 Sep 2014
Red Hat Satellite 6.0 GA Release.
Meg an Lewis
R evisio n 0- 23
T h u 21 Au g 2014
Meg an Lewis
BZ #1131654 - Removed optional from Step 4 in 15.2.1. Red Hat Satellite Backup Procedure.
BZ #1120722 - Corrected Step 2 in the note in 10.4.1. Registering a Host.
BZ #1131655 - Corrected database name in sections 15.2.1. Red Hat Satellite Backup Procedure and
15.2.2. Red Hat Satellite Restore Procedure.
BZ #1131613 - Section on creating a backup added to 1.3. Red Hat Satellite 6 Workflow.
BZ #1131604 - Section 15.2.1 - Removed " /var/lib/katello" from list for backup.
117
Red Hat Sat ellit e 6 .0 User G uide
R evisio n 0- 22
Fri 15 Au g 2014
Meg an Lewis
BZ #1120722 - Note in 10.4.1. Registering a Host corrected to reference a Host instead of a System.
BZ #1129841 - Added section 10.4.2. Installing the Katello Agent.
BZ #1127285 - Added prefix to baseurl used when registering clients to capsules.
BZ #1129578 - Removed sections 3.3.3 and 3.3.4.
BZ #1104431 - Implemented peer review feedback for Chapters 1-3.
Updated instructions for managing users and roles.
Updated instructions for using host collections.
R evisio n 0- 21
T u e 12 Au g 2014
BZ #1128872 - Removed stray ; in Table 9.1.
At h en e C h an
R evisio n 0- 20
Fri 18 Ju ly 2014
At h en e C h an
BZ #1120713 - Corrected section xml to prevent validation errors.
R evisio n 0- 19
Fri 11 Ju ly 2014
Meg an Lewis
BZ #1109747 - Information added regarding organizations and subscription manifests.
R evisio n 0- 18
T h u 10 Ju ly 2014
BZ # 1117861 - Section 10.3.1 Corrected CA Certificate URL.
BZ #1104914 - Section 5 Partial peer review implementation.
At h en e C h an
R evisio n 0- 17
Wed 9 Ju ly 2014
Meg an Lewis
BZ #1116888 - Section 4.2.2.3 References to Katello CLI corrected to Hammer CLI.
BZ #1116543 - Section 10.3.1 Corrected RPM name.
BZ #1117503 - Section 5.3.1 Removed extra step.
R evisio n 0- 16
Wed 25 Ju n 2014
Preparing book for Beta release.
At h en e C h an
R evisio n 0- 15
Fixing minor issues.
Mo n 11 N o v 2013
D an Macp h erso n
R evisio n 0- 14
Preparation for MD P2.
Mo n 11 N o v 2013
D an Macp h erso n
R evisio n 0- 13
Wed 09 O ct 2013
Adding table for synchronization content directories.
D an Macp h erso n
R evisio n 0- 12
Wed 09 O ct 2013
Finalizing QE review implementation
D an Macp h erso n
R evisio n 0- 11
T u e 1 O ct 2013
BZ #887680 Minor typo corrections.
At h en e C h an
R evisio n 0- 10
Mo n 30 Sep 2013
Rebuild from typo verification.
D an Macp h erso n
R evisio n 0- 09
Wed 18 Sep 2013
Minor tagging errors corrected.
At h en e C h an
R evisio n 0- 08
At h en e C h an
118
T u e 17 Sep 2013
Revision Hist ory
BZ #956256, 969922, 864115 Implemented suggested changes to information on the User Guide.
R evisio n 0- 07
Book product changed.
Fri 13 Sep 2013
R evisio n 0- 06
T h u 12 Sep 2013
Minor grammatical edits.
Added book component to the ent file.
At h en e C h an
At h en e C h an
R evisio n 0- 05
T h u 12 Sep 2013
At h en e C h an
BZ #1004566, 1004567, 1004568, 1004570, 1004571, 1004581, 1004586, 1004588, 1004590,
1004595, 1004597, 1004598, 1004600 Quality assurance edits implemented throughout the book.
R evisio n 0- 04
Removing draft watermark.
Mo n 12 Au g 2013
D an Macp h erso n
R evisio n 0- 03
Mo n 12 Au g 2013
Creating build for technical review.
D an Macp h erso n
R evisio n 0- 02
Initial book creation
At h en e C h an
T u e 28 May 2013
119