1
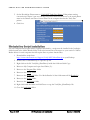
Instructional Management Program & Academic Communication Tool Verify for Administrators User Guide 10/19/2010 Version 2.0 1
Volume
CHICAGO PUBLIC SCHOOLS (CPS)
Verify.Net Administrator’s Guide
Revision 2.0 – 8/20/2010
Verify.Net
Administrator’sGuide
Page 1 of 27
OTI Proprietary and Confidential
Rev. 2.0 – 8/20/2010
V E R I F Y . N E T
A D M I N I S T R A T O R ’ S
G U I D E
CHICAGO PUBLIC SCHOOLS
Verify.Net Administrator’s Guide
Copyright: All design, text, graphics, the selection and arrangement thereof, and all
software is Copyright © 1998-2009, Omicron Technologies, Inc. (OTI) ALL RIGHTS
RESERVED. Privileged/confidential information may be contained in this document and
may be subject to legal privilege. Access to this document by anyone other than the
intended recipient is unauthorized. If you are not the intended recipient (or
responsible for delivery of this document to such person), you may not use, copy,
distribute or deliver to anyone this document (or any part of its contents), or take
any action in reliance on it. Any unauthorized use of this document and the
information contained, including reproduction, modification, distribution, or
replication, without the prior written permission of Omicron Technologies, Inc. (OTI)
is strictly prohibited.
Trademarks: Verify, Verify.Net, Omicron Technologies, Inc. (OTI), all page headers,
custom graphics and button icons are service marks, trademarks, and/or trade dress of
Omicron Technologies, Inc.
Disclaimer: Omicron Technologies, Inc., (OTI) cannot accept responsibility for any loss
or damage arising from the use of document or procedures we recommend. OTI is providing
this document and its contents on an “AS-IS” basis and makes no representations or
warranties of any kind with respect to this document or its contents.
© Omicron Technologies, Inc.
6348 N Milwaukee, 328
Chicago, IL 60646
© Chicago Public Schools
125 S. Clark Street
Chicago, IL 60603
Page 1 of 27
OTI Proprietary and Confidential
Rev. 2.0 – 8/20/2010
V E R I F Y . N E T
Page 2 of 27
A D M I N I S T R A T O R ’ S
G U I D E
OTI Proprietary and Confidential
Rev. 2.0 – 8/20/2010
V E R I F Y . N E T
A D M I N I S T R A T O R ’ S
G U I D E
Welcome to Verify.Net ....................................................................................... 5 Getting Ready.............................................................................................................................. 6 Getting Started ............................................................................................................................ 6 Next Steps ................................................................................................................................... 8 Installing Tardy Pass Printers ............................................................................ 9 Supported Printers .................................................................................................................... 9 Determining Printer Model ....................................................................................................... 9 Installing Tardy Pass Printer Driver ...................................................................................... 10 Driver Installation for Star TSP 143U ........................................................................................ 10 Driver Installation for Star TSP 643 ........................................................................................... 10 Installation of Tardy Pass Page Settings .............................................................................. 11 Enable Direct Printing ............................................................................................................. 13 Installation Procedures for Taking Pictures...................................................... 14 Supported Devices .................................................................................................................. 14 Installing the Video Capture Device ...................................................................................... 14 Belkin F5U228 Hi-Speed USB 2.0........................................................................................... 14 Checking For Video ................................................................................................................. 15 Installing Java .......................................................................................................................... 16 Installing Java Media Framework .......................................................................................... 16 Running Verify.Net Picture Taker .......................................................................................... 18 Installing Temporary ID Printers....................................................................... 19 Getting Ready .......................................................................................................................... 19 Supported Printers .................................................................................................................. 19 Determining Printer Model ..................................................................................................... 19 Installing Temporary ID Printer Drivers ................................................................................ 19 Driver Installation for Dymo LabelWriter 330 Turbo, 330, and 400 Turbo ................................ 20 Installing Temporary ID Page Settings ................................................................................. 20 Page Settings for Dymo LabelWriter 330 Turbo, 330, and 400 Turbo ...................................... 20 Enable Direct Printing ............................................................................................................. 21 Installing ID Card Printers ................................................................................ 22 Getting Ready .......................................................................................................................... 22 Supported Printers .................................................................................................................. 22 Determining Printer Model ..................................................................................................... 22 Installing ID Card Printer Driver ............................................................................................. 22 Driver Installation for Eltron/Zebra P420/P420C ....................................................................... 23 Enable Direct Printing ............................................................................................................. 25 Installing Direct To Printer Functionality ........................................................... 26 Getting Ready .......................................................................................................................... 26 Determining Adobe Version ................................................................................................... 26 Page 3 of 27
OTI Proprietary and Confidential
Rev. 2.0 – 8/20/2010
V E R I F Y . N E T
A D M I N I S T R A T O R ’ S
G U I D E
Configuring Verify.Net ............................................................................................................ 26 Workstation Script Installation .............................................................................................. 27 Page 4 of 27
OTI Proprietary and Confidential
Rev. 2.0 – 8/20/2010
V E R I F Y . N E T
A D M I N I S T R A T O R ’ S
G U I D E
1
Chapter
Welcome to Verify.Net
The main modules of the Verify.Net application that allow school administrators and personnel (Principals,
Assistant Principals, District Office personnel, etc…) to perform their day-to-day activities include the:
•
ID Module: Captures and stores photos of students and staff; prints ID hard cards for students/staff and
temporary ID labels for students.
•
Building Access Module: Scanners at building entrances identify student IDs to determine tardiness
and exclusion, to track individuals who have entered the building, to deny access to inactive and
suspended students, and to serve as a reference to identify class cutters.
•
Student Finance Module: Tracks all student debts and purchases; debts may be assigned in groups
(school fees), individually (lost instrument), or automatically (temporary ID or lost textbook); debt
payments may be made partially; and credit card payments may be approved.
•
Textbook Module: Maintains an inventory of textbooks; distributes labeled textbooks to students
and records book returns; lost books are automatically debited
•
Detention Module: Automatically assigns detentions based on tardy or other criteria; monitors the
serving of detentions; sends out notifications to school personnel, students and parents of pending
detentions
Some additional modules of the Verify.Net application include the:
•
Messaging: Assign and manage student building entry messages
•
Reports: Select and view reports
•
Setup: Manage general properties and access the mobile platform
•
Verify.Net Mobile: Mobile handheld platform used on Omicron handheld devices. Features include:
o Lookup students to view pictures and programs
o Assign detentions, tardies, and perform hall sweeps
o Scan students for special events
o Assign and unassign textbooks
The information, data, and settings stored in the previous Verify application have been converted to a more
robust, new web-based system – Verify.Net. The new system has the same look and feel as the previous
version, so Verify/LSIMSxp veterans will feel right at home.
Page 5 of 27
OTI Proprietary and Confidential
Rev. 2.0 – 8/20/2010
V E R I F Y . N E T
F O R
A D M I N I S T R A T O R ’ S
G U I D E
Getting Ready
To get started you will need the following:
•
A CPS Email /Active Directory account. Please contact your tech coordinator or principal if you
do not know or have an active directory account so that one can be created for you.
•
The appropriate security permissions in Verify.NET. This must be set-up by your principal or
tech coordinator through the CPS Online Data Acquisition system or ODA.
•
A computer with the following hardware/software requirements:
o Pentium 4 1.8Ghz or faster
o 512MB RAM with 256MB free
o 1024x768 resolution
o Windows XP Service Pack 2 or above
o Internet Explorer 7.0 or above
o USB 2.0
o Adobe Reader 8.0 or above (for computers where IDs will be printed, it’s recommended
that Adobe Reader 9.0 or above is installed for better color matching)
o Computer speed and experience must be tolerable (for example if Internet browsing is
slow, Verify.NET will be just as slow)
o Computers where ID pictures will be taken must have the Sun Java Runtime version 6
Update 7 or above.
NOTE: In most cases, computers that were able to run the old Verify/LSIMSxp will be able to run
Verify.NET. However, because Verify.NET is built on new software and technology, there will be some
exceptions.
Getting Started
The best way to determine if you have access to Verify.NET and if your computer is up to par is to try
logging in. You must be inside the CPS network (at a school, central office, area office, or through a CPS
VPN connection). To begin follow the instructions below:
1. Double click on the IMPACT icon on your desktop. If you don not see one, open Internet Explorer
and browse to http://impact.cps.k12.il.us/application.asp.
2. The IMPACT Launchpad will be displayed. Scroll down until you see the Verify icon on the left hand
side of the screen.
3. Click on the Verify icon.
Page 6 of 27
OTI Proprietary and Confidential
Rev. 2.0 – 8/20/2010
V E R I F Y . N E T
F O R
A D M I N I S T R A T O R ’ S
G U I D E
4. A login screen will be displayed. Please enter your username and password you use to log into your
CPS email. In the User Name field, please type in your CPS username without the @cps.edu or
@cps.k12.il.us. In the Password field, type in your password.
5. Click on the Login button.
6. If your username allows you to access multiple schools, select a school from the drop down and click
on the Select Unit button.
7. You should now be at the Home Page. Confirm that your school name is displayed in the upper left
corner. Previous users of Verify/LSIMSxp will see no major change to the layout and functionality.
Page 7 of 27
OTI Proprietary and Confidential
Rev. 2.0 – 8/20/2010
V E R I F Y . N E T
F O R
A D M I N I S T R A T O R ’ S
G U I D E
Next Steps
New and old users alike can download the Verify.Net for Beginner’s Manual from
http://www.omicrontech.net/Support/Verify.NET/Docs/Verify.NETUserManual.pdf
Page 8 of 27
OTI Proprietary and Confidential
Rev. 2.0 – 8/20/2010
V E R I F Y . N E T
F O R
A D M I N I S T R A T O R ’ S
G U I D E
2
Chapter
Installing Tardy Pass Printers
This chapter guides the installer through the installation process for the various Tardy Pass printers that
can be used for Verify.Net and includes:
•
Listing of compatible Tardy Pass printers
•
Instructions on how to install printer drivers
•
Post printer driver installation instructions to enable printing in Verify.Net
Before starting on any procedure in this chapter, ensure you are logged in as a computer admin. In most
cases this is the ‘techco’ user account for the local machine. Please contact the tech coordinator of the
school for this information.
Additionally, make sure that Deep Freeze, Fortress, or any other security software is disabled. Installing
printers and software while security software is active can cause error messages or a complete reversal of
the installation process on a computer reboot.
Supported Printers
Verify.NET is capable of sending a print job to any printer that has a windows driver (shows up in
Windows XP Control Panel / Printer and Faxes). Although support is not guaranteed for all printers, the
following printers have been tested to successfully print a tardy pass:
•
Star Micronics TSP143U – Driver is on CD that came with printer. To download,
http://www.star-micronics.co.jp/eng/dl/dl02_07_02tsp1.htm
•
Star Micronics TSP643C (Raster Driver) – To download,
http://www.omicrontech.net/Support/Verify.NET/TardyPrinter/StarTSP600.zip
Determining Printer Model
Star Micronics printers come in classes: TSP100, TSP200, TSP600, etc… Each class has a particular
model number, depending on the features (partial cut, full cut). To determine your printer model, look on
the box that the printer came in or on the bottom of the printer. On the bottom of the printer there
should be a model number in smaller text. For example, the TSP143U will have ‘143U’; the TSP643C
will have ‘643C’. Keep this in mind while installing the software and drivers for your particular model.
Other printer manufacturers will have different modeling specifications. Check with your vendor or
place of purchase for further details.
Page 9 of 27
OTI Proprietary and Confidential
Rev. 2.0 – 8/20/2010
V E R I F Y . N E T
F O R
A D M I N I S T R A T O R ’ S
G U I D E
Installing Tardy Pass Printer Driver
If the printer is not already installed on the computer, insert the driver CD or download the driver from
the manufacturer’s website. If you were able to print tardy passes from the old Verify/LSIMSxp, the
driver has already been installed and you can then skip to the Installation of Tardy Pass Page Settings
section.
Follow the onscreen instructions to the complete driver installation. If given a menu to select a printer
model and port, ensure that the correct model and port is selected. If the printer has a USB connection,
do not plug the printer into the computer until the driver installation asks you to do or until the
installation is fully complete, including any computer restarts.
Driver Installation for Star TSP 143U
1. Make sure the printer is NOT connected to the computer.
2. Insert the CD that came with the printer or download the CD/Driver from http://www.starmicronics.co.jp/eng/dl/dl02_07_02tsp1.htm.
3. Follow the on-screen instructions to complete the driver installation wizard.
4. After the driver installation is complete, plug the printer into the computer.
5. Windows will detect the new printer and configure it. This may take a few minutes.
6. When complete, ensure Windows recognizes the printer by going into the Control Panel /
Printers and Faxes.
7. If you do not see the new printer (Star TSP143U), press the F5 key while in on Printers and Faxes
page to refresh the screen.
Driver Installation for Star TSP 643
1. If your printer is the USB model, make sure it is off and not connected to the computer.
2. Download the driver from
http://www.omicrontech.net/Support/Verify.NET/TardyPrinter/StarTSP600.zip and extract
the setup program, RasterDrv_2K-XP_20070328.exe, to your desktop from the zip file.
3. NOTE: Attempting to run the setup program from within the zip file may fail.
4. Run the setup program from your desktop and click OK to the welcome message.
5. Since the Automated Printer Install method fails more often than it succeeds, we will perform the
manual installation process.
6. Click on the Extract files for installation via the Windows Add Printer Wizard button.
7. Select No for the Status Monitor installation option.
8. Click OK to confirmation message.
9. Click Exit to close the setup program.
10. Browse to the Control Panel.
Page 10 of 27
OTI Proprietary and Confidential
Rev. 2.0 – 8/20/2010
V E R I F Y . N E T
F O R
A D M I N I S T R A T O R ’ S
G U I D E
11. If Control Panel is in Category View, select Printers and Other Hardware and then open Printers
and Faxes. If in Classic View, select Printers and Faxes.
12. Click on Add a Printer in the left pane.
13. Click Next.
14. Select Local printer attached to this computer and uncheck Automatically detect and install my
Plug and Play printer. Click Next.
15. Select the printer port. If you have a parallel port model, this will almost always be LPT1. If it’s
USB, set it to USB001. Click Next.
16. Click the Have Disk button on the screen that follows.
17. Click Browse and then select the Star folder on your desktop from the Look in: drop down. Open
the StarRas folder and double click on OEMPRINT.INF.
18. Click OK to continue.
19. Scroll down the list of printer choices and select Star TSP643 Raster Printer and click Next.
20. If you are presented with a Use Existing Driver screen, select Replace existing driver and click
Next.
21. Set the printer name to Verify.NET Tardy Pass Printer and click Next.
22. Set Printer Sharing to Do not share this printer and click Next.
23. Set it to print a test page and click Next.
24. Click Finish and wait for driver installation to complete. This may take several minutes.
25. After the wizard is complete, plug the printer into the computer if it is a USB model and turn it
on.
26. Check to see if a test page has printed. If it did continue to the next section, Installation of
Tardy Pass Page Settings.
27. If a test page did not print, right click on the new printer and select Properties…
28. Click on the Ports tab and then select another port, either LPT2, LPT3, or the various USB###
ports.
29. Click Apply. If the test page prints, you may continue to the next section. If not, repeat this step.
IMPORTANT: If you encounter any security permission error messages (cannot access files) while
installing the driver, ensure that the account you are logged in under Windows has the correct Windows
level permissions. Make sure you are logged in as ‘techco’ or another Windows administrator account that
has sufficient permissions.
Installation of Tardy Pass Page Settings
Verify.NET requires that the page settings for the Tardy Pass printer be defined at the Windows driver
level. To do this in Windows XP, you will need to do the following:
Page 11 of 27
OTI Proprietary and Confidential
Rev. 2.0 – 8/20/2010
V E R I F Y . N E T
F O R
A D M I N I S T R A T O R ’ S
G U I D E
1. From Internet Explorer, download the following file:
http:// www.omicrontech.net/Support/Verify.NET/TardyPrinter/tardypasspage.zip
2. Extract the file Verify.NET Tardy Pass Page Settings.reg from the downloaded zip file and
double click on it.
3. Click Run or Yes to any File Security warnings.
4. Click Yes to “Are you sure you want to add the information in…to the registry?”.
5. Click OK on the confirmation message.
6. Click on the Start Button and select Run.
7. Type Services.msc and click OK.
8. Locate the Printer Spooler service and restart it.
9. Browse to the Control Panel.
10. If the Control Panel is in Category View, select Printers and Other Hardware and then open
Printers and Faxes. If it is in Classic View, select Printers and Faxes.
11. Rename the Tardy Pass printer to ‘Verify.NET Tardy Pass Printer’.
12. Right click on the Tardy Pass printer and click on Properties.
13. From this point, continue onto the section relevant to your printer model.
Star TSP 143U and TSP643C
1. Click on the Advanced tab.
2. From the Advanced tab, click on the Printing Defaults button.
3. Set the Orientation to Landscape.
4. Click on the Advanced button.
Page 12 of 27
OTI Proprietary and Confidential
Rev. 2.0 – 8/20/2010
V E R I F Y . N E T
F O R
A D M I N I S T R A T O R ’ S
G U I D E
5. Set the Paper Size to ‘Verify.NET Tardy Pass’ and click OK.
6. Click OK on the prior screen.
7. Click on the General tab and then the Printing Preferences … button.
8. Repeat steps C through F.
9. Click OK to the Printer Properties screen to save your changes.
Enable Direct Printing
Please follow the instructions in Chapter 6 to allow for the tardy pass to print automatically without being
asked to choose a printer.
Page 13 of 27
OTI Proprietary and Confidential
Rev. 2.0 – 8/20/2010
V E R I F Y . N E T
F O R
A D M I N I S T R A T O R ’ S
3
Chapter
G U I D E
Installation Procedures for Taking Pictures
This chapter guides the installer through the installation process for the various video capture devices that
can be used for Verify.Net in taking pictures. Topics include:
•
Listing of compatible video capture devices
•
Instructions on how to install the video capture devices
•
Testing to confirm operation
•
Post printer driver installation instructions to enable video capture in Verify.Net
Before starting on any procedure in this chapter, ensure you are logged in as a computer admin. In most
cases this is the ‘techco’ user account for the local machine. Please contact the tech coordinator of the
school for this information.
Additionally, make sure that Deep Freeze, Fortress, or any other security software is disabled. Installing
printers and software while security software is active can cause error messages or a complete reversal of
the installation process on a computer reboot.
Supported Devices
Verify.NET should work with all video capture devices that appear in the Scanners and Cameras Control
Panel. However, support and compatibility is not guaranteed. The following devices have been
successfully tested and confirmed to work with Verify.NET
•
Belkin F5U228 Hi-Speed USB 2.0
•
Logitech QuickCam 9000
•
Adaptec AVC-1100
Installing the Video Capture Device
If a Verify.Net compatible video capture device is not installed, follow instructions below for your video
capture device:
Belkin F5U228 Hi-Speed USB 2.0
Before beginning driver installation, make sure the video capture device is not plugged into the computer.
1. Download http://www.omicrontech.net/Support/Verify.NET/picturecapture/f5u228setup.exe and
save to you desktop.
Page 14 of 27
OTI Proprietary and Confidential
Rev. 2.0 – 8/20/2010
V E R I F Y . N E T
F O R
A D M I N I S T R A T O R ’ S
G U I D E
2. Double-click on the downloaded file.
3. Click Run, Allow, or Yes buttons for any security dialogs.
4. Follow the steps in the installation wizard to complete the setup.
5. Click Finish when prompted.
6. Plug the video capture device into your computer. Allow the computer to detect and activate the
device.
IMPORTANT: If you encounter any security permissions error messages (cannot access files) while
installing the driver, ensure the account you are logged in under Windows has the correct Windows-level
permissions. Make sure you are logged in as ‘techco’ or another Windows administrator account that has
sufficient permissions.
Checking For Video
You can confirm the video capture device is working properly by following the steps below:
1. Turn on computer and log onto Windows.
2. Plug the video capture device (e.g. Belkin)
3. Plug the camera in and turn it on. Make sure there is a live video feed in the camera viewfinder.
4. If possible, login to the old Verify application and ensure that the camera is working properly by
browsing to ID -> Student ID, searching for student, and clicking the Take Picture button.
5. Close out of the old Verify application.
6. Go to the Control Panel and open Scanners and Cameras.
Page 15 of 27
OTI Proprietary and Confidential
Rev. 2.0 – 8/20/2010
V E R I F Y . N E T
F O R
A D M I N I S T R A T O R ’ S
G U I D E
7. Double-click on the video capture device (the Belkin is called Hi-Speed USB DVD Creator). If
there are no devices under the Scanners and Cameras folder, or your device is not there, there is a
very good chance that the video capture device installed is not supported by Verify.net. Contact
Omicron for more information on obtaining a compatible device.
8. After double clicking on your capture device, press the Test Scanner or Camera button. You
should receive a message “Your imaging device successfully completed the diagnostic test.” Click
on OK.
9. Close the video capture device information page.
Installing Java
1. While in the Control Panel, ensure that the correct version of Java is installed. Open the Java
Control Panel applet (if it is not displayed, Java is not installed). Java must be version 6 or above.
2. If you do not have Java installed or need a more recent version, download and install the latest
version from www.java.com. Before beginning installation of Java, make sure you have admin
privileges to install on the computer. You will need to restart the computer in order to complete
the installation process.
Installing Java Media Framework
1. Before beginning this procedure, make sure you have admin privileges to install on the computer.
You will need to restart the computer in order to complete the installation process.
2. From Internet Explorer, browse to
http://www.omicrontech.net/Support/verify.net/picturecapture/picturesetup.exe When asked
to Run or Save, choose Run. If you must Save, save to the desktop or a folder that you have
permission to save to.
3. Run picturesetup.exe.
Page 16 of 27
OTI Proprietary and Confidential
Rev. 2.0 – 8/20/2010
V E R I F Y . N E T
F O R
A D M I N I S T R A T O R ’ S
G U I D E
4. Follow the onscreen instructions and choose the default options.
5. You will eventually get to the screen below. Please wait while the process detects media devices
installed on the computer. If the process begins to take longer than 5 minutes, make sure the
video capture device is plugged into the computer and that the camera is plugged into the video
capture device. Make sure the camera is on and a live video feed can be seen in the viewfinder.
6. Once the detection process is complete, click Finish to restart the computer.
IMPORTANT: If you encounter any security permissions error messages (cannot access files) while
installing the Java Media Framework, ensure the account you are logged in under Windows has the
Page 17 of 27
OTI Proprietary and Confidential
Rev. 2.0 – 8/20/2010
V E R I F Y . N E T
F O R
A D M I N I S T R A T O R ’ S
G U I D E
correct Windows-level permissions. Make sure you are logged in as ‘techco’ or another Windows
administrator account that has sufficient permissions.
Running Verify.Net Picture Taker
1. Open Internet Explorer. Turn off any popup blockers. If the popup blocker cannot be turned off,
add https://verify.cps.k12.il.us to the popup exemptions list.
2. Login to Verify.net and navigate to ID and then Student ID.
3. Lookup a student and click on the Take Picture button.
4. If the Take Picture screen gets blocked, click on the gold bar in Internet Explorer and choose
Allow. Then lookup the student and click the Take Picture button again.
5. The Take Picture screen will now appear. If you receive any Java warnings check off “trust this
vendor” and click on Yes. Wait for picture screen to load.
6. Once the picture screen loads and a live video stream is visible, click on the Take Picture button.
7. Ensure that a picture has been taken by closing and restarting the Student ID screen. Lookup the
student that you just took a picture for and make sure your picture is there.
Page 18 of 27
OTI Proprietary and Confidential
Rev. 2.0 – 8/20/2010
V E R I F Y . N E T
F O R
A D M I N I S T R A T O R ’ S
G U I D E
4
Chapter
Installing Temporary ID Printers
This chapter guides the installer through the installation process for the various Temporary ID printers
that can be used for Verify.NET. The following sections are included:
•
Listing of compatible Temporary ID printers
•
Detailed instructions for installing printer drivers
•
Post driver installation instructions to enable printing in Verify.NET
Getting Ready
Before starting on any procedure in this chapter, ensure you are logged in as a computer admin. In most
cases this is the ‘techco’ user account for the local machine. Please contact the tech coordinator of the
school for this information.
Additionally, make sure that Deep Freeze, Fortress, or any other security software is disabled. Installing
printers and software while security software is active can cause error messages or a complete reversal of
the installation process on a computer reboot.
Supported Printers
Verify.NET is capable of sending a print job to any printer that has a windows driver (shows up under
the Windows XP Control Panel under Printer and Faxes). Although support is not guaranteed for all
printers, the following printers have been tested to successfully print a temporary ID:
•
Dymo LabelWriter 330 Turbo
•
Dymo LabelWriter 330
•
Dymo LabelWriter 400 Turbo
Determining Printer Model
Dymo printers display the printer model on the front of the printer. Other printer manufacturers will
have different modeling specifications. Check with your vendor or place of purchase for further details.
Installing Temporary ID Printer Drivers
If the printer you are using has not already been installed on the computer, insert the driver CD or
download the driver from the manufacturer’s website. If you were able to print temporary IDs from the
Page 19 of 27
OTI Proprietary and Confidential
Rev. 2.0 – 8/20/2010
V E R I F Y . N E T
F O R
A D M I N I S T R A T O R ’ S
G U I D E
old Verify/LSIMSxp, the driver should already be installed and you can then skip to the Installation of
Temporary ID Page Settings section.
Follow the onscreen instructions to complete the driver installation. If given a menu to select a printer
model and port, ensure that the correct model and port is selected. If the printer has a USB connection,
do not plug the printer into the computer until the driver installation asks you to do so or until after the
installation is fully complete, including any computer restarts.
Driver Installation for Dymo LabelWriter 330 Turbo, 330, and 400 Turbo
1. Make sure the printer is NOT connected to the computer.
2. Download the driver from
http://www.omicrontech.net/Support/Verify.net/TempIDPrinter/LabelWriterDrivers-x86.msi
3. Follow the on-screen instructions to complete the driver installation wizard.
4. When asked by the wizard, select the type of printer (USB, Serial, Parallel).
5. When told to do so by the wizard, plug the printer into the computer.
6. Windows will detect the new printer and configure it. This may take a few minutes.
7. When the wizard is complete, ensure Windows recognizes the printer by going into the Control
Panel under Printers and Faxes.
8. If you do not see the new printer (e.g. Dymo LabelWriter 330), press the F5 key while still in the
Printers and Faxes folder to refresh the screen.
IMPORTANT: If you encounter any security permissions error messages (cannot access files) while
installing the driver, ensure the account you are logged in under Windows has the correct Windows-level
permissions. Make sure you are logged in as ‘techco’ or another Windows administrator account that has
sufficient permissions.
Installing Temporary ID Page Settings
Verify.NET requires that the page settings for the Temporary ID printer be defined at the Windows
driver level. To do this in Windows XP please complete the following:
1. Browse to the Control Panel.
2. If the Control Panel is in Category View, select Printers and Other Hardware and then open
Printers and Faxes. If it is in Classic View, select Printers and Faxes.
3. Rename the Temporary ID printer to ‘Verify.NET Temp ID Printer’.
4. Right click on the Temporary ID printer and click on Properties.
5. From this point, continue onto the section relevant to your printer model.
Page Settings for Dymo LabelWriter 330 Turbo, 330, and 400 Turbo
1. Click on the Advanced tab.
2. From the Advanced tab, click on the Printing Defaults button.
Page 20 of 27
OTI Proprietary and Confidential
Rev. 2.0 – 8/20/2010
V E R I F Y . N E T
F O R
A D M I N I S T R A T O R ’ S
G U I D E
3. Set the Orientation to Landscape.
4. Click on the Advanced button.
5. Set the Paper Size to ‘30256 Mailing Labels’ and click on OK.
6. Click OK on the prior screen.
7. Click on the General tab and then click on the Printing Preferences button.
8. Repeat steps 3 through 6.
9. Click on OK to the Printer Properties screen to save your changes.
Enable Direct Printing
Please follow the instructions in Chapter 6 to allow for the temporary ID to print automatically without
being asked to choose a printer.
Page 21 of 27
OTI Proprietary and Confidential
Rev. 2.0 – 8/20/2010
V E R I F Y . N E T
F O R
A D M I N I S T R A T O R ’ S
G U I D E
5
Chapter
Installing ID Card Printers
This chapter guides the installer through the installation process for the various ID Card printers that can
be used for Verify.NET. The following sections are included:
•
Listing of compatible ID Card printers
•
Detailed instructions for installing printer drivers
•
Post driver installation instructions to enable printing in Verify.NET
Getting Ready
Before starting on any procedure in this chapter, ensure you are logged in as a computer admin. In most
cases this is the ‘techco’ user account for the local machine. Please contact the tech coordinator of the
school for this information.
Additionally, make sure that Deep Freeze, Fortress, or any other security software is disabled. Installing
printers and software while security software is active can cause error messages or a complete reversal of
the installation process on a computer reboot.
Supported Printers
Verify.NET is capable of sending a print job to any printer that has a windows driver (shows up under
the Windows XP Control Panel under Printer and Faxes). Although support is not guaranteed for all
printers, the following printers have been tested to successfully print an ID Card:
•
Eltron/Zebra P420/P420C
•
Zebra P420i
•
Fargo DTC400/400e
•
Fargo DTC550
Determining Printer Model
Eltron, Zebra, and Fargo printers display the printer model on the front of the printer. Other printer
manufacturers will have different modeling specifications. Check with your vendor or place of purchase
for further details.
Installing ID Card Printer Driver
If the driver for the printer you are using has already been installed, you can skip this chapter.
Page 22 of 27
OTI Proprietary and Confidential
Rev. 2.0 – 8/20/2010
V E R I F Y . N E T
F O R
A D M I N I S T R A T O R ’ S
G U I D E
Driver Installation for Eltron/Zebra P420/P420C
1. If the printer is connected to the computer via USB, disconnect the USB cable from the
computer before proceeding. You will be asked to reconnect during the installation wizard.
2. Turn on the printer.
3. Download
http://www.omicrontech.net/Support/Verify.NET/IDCardPrinter/P420_DRV_v2.1B11.exe
to your desktop.
4. Double-click on the downloaded file.
5. Click Run, Allow, or Yes buttons for any security dialogs.
6. Click Setup.
7. Click Next.
8. When dialog appears instructing you to connect and turn on any USB printers, go ahead and do it
and then click OK. Please wait while it installs the Language driver.
9. When the Printer Port selection screen appears, select the port for your printer and click Next.
a. If Parallel was selected, select the Local Port type:: LPT1, LPT2, or LPT3. Most of the
time, the local port selection will be LPT1.
b. If USB was selected, the wizard will automatically locate the printer port.
10. Click Next.
11. The Driver will now be installed.
12. When you see “Printer driver installed successfully” in the memo box, click on the Finished
button.
Page 23 of 27
OTI Proprietary and Confidential
Rev. 2.0 – 8/20/2010
V E R I F Y . N E T
F O R
A D M I N I S T R A T O R ’ S
G U I D E
13. Browse to Control Panel.
14. If the Control Panel is in Category View, select Printers and Other Hardware and then open
Printers and Faxes. If it is in Classic View, select Printers and Faxes.
15. Rename the ID Card printer from Eltron P420 Card Printer to Verify.NET ID Card Printer.
16. Right click on the ID Card printer and click Properties.
17. Click on the Advanced tab and then the Printing Defaults… button.
18. If you intend to print IDs in
Landscape (most common), set the
Orientation to Landscape. If the IDs
will be in Portrait, set the orientation
to Portrait.
19. Click on the Advanced… button.
20. Click on the plus sign next to Ribbon
to expand and show more options.
21. Configure the ribbon by click on
‘Ribbon’ and clicking on the drop
down to select the ribbon. If your IDs
are double sided, the ribbon will most
likely be YMCKOK. If the your IDs
are single sided, the ribbon will mostly
likely be YMCKO.
22. Click on the Set ribbon button. The
printer will begin moving the roller and
ribbon.
23. Click on Enable flip-over. This option
determines whether the printer will flip
the card to print on the back for double sided printing.
24. Configure the Enable flip-over by clicking on the drop down to select single sided or double sided
printing. Selecting ‘Yes’ will enable double sided printing. Selecting ‘No’ will only have the card
print on one side.
25. Click the OK button. Then click the OK button to previous screen.
26. Click on the General tab and then click on the Printing Preferences… button.
27. Follow steps 18 to 25 to ensure your settings are retained.
28. Click OK to close printer properties.
IMPORTANT: If you encounter any security permissions error messages (cannot access files) while
installing the driver, ensure the account you are logged in under Windows has the correct Windows-level
permissions. Make sure you are logged in as ‘techco’ or another Windows administrator account that has
sufficient permissions.
Page 24 of 27
OTI Proprietary and Confidential
Rev. 2.0 – 8/20/2010
V E R I F Y . N E T
F O R
A D M I N I S T R A T O R ’ S
G U I D E
Enable Direct Printing
Please follow the instructions in Chapter 6 to allow for the ID to print automatically without being asked
to choose a printer.
Page 25 of 27
OTI Proprietary and Confidential
Rev. 2.0 – 8/20/2010
V E R I F Y . N E T
F O R
A D M I N I S T R A T O R ’ S
G U I D E
6
Chapter
Installing Direct To Printer Functionality
This chapter guides the installer on setting up workstations to print directly to the Tardy Pass, Temporary
ID, and ID Card printers without out any a print dialog. The following sections are included:
•
Configuration for direct printing in Verify.NET
•
Instructions for setting up individual workstations for direct printing using Adobe Reader 8.0 and
9.0
Getting Ready
Before starting on any procedure in this chapter, ensure you are logged in as a computer admin. In most
cases this is the ‘techco’ user account for the local machine. Please contact the tech coordinator of the
school for this information.
Additionally, make sure that Deep Freeze, Fortress, or any other security software is disabled. Installing
printers and software while security software is active can cause error messages or a complete reversal of
the installation process on a computer reboot.
Determining Adobe Version
The Adobe version installed on a computer can be determined by clicking on the Start Menu and then
going to All Programs. Locate the Adobe Reader icon and take note of the version number. The version
number can also be determined by starting Adobe Reader and clicking on the Help context menu and
clicking About Adobe Reader….
Configuring Verify.Net
Follow the steps below to configure Verify.NET to recognize the ID Card, Temporary ID, and Tardy
Pass printers. This procedure only has to be done once.:
1. Using your CPS username and password, login to Verify.NET.
2. From the Home screen click on Setup and then Printers.
3. Set the Permanent ID Printer name to Verify.NET ID Card Printer. If the printer naming
convention in Chapter 5 was not followed, the printer name should be set to the actual printer
name in the Printers and Faxes Control Panel on the computer that has the ID printer.
4. Set the Temporary ID Printer name to Verify.NET Temp ID Printer. If the printer naming
convention in Chapter 4 was not followed, the printer name should be set to the actual printer
name in the Printers and Faxes Control Panel on the computer that has the Temp ID printer.
Page 26 of 27
OTI Proprietary and Confidential
Rev. 2.0 – 8/20/2010
V E R I F Y . N E T
F O R
A D M I N I S T R A T O R ’ S
G U I D E
5. Set the DoorSwipe Printer name to Verify.NET Tardy Pass Printer. If the printer naming
convention in Chapter 2 was not followed, the printer name should be set to the actual printer
name in the Printers and Faxes Control Panel on the computer that has the Tardy Pass
printer.
6. Click Save.
Workstation Script Installation
For each computer that requires direct to printer functionality, a script must be installed in the JavaScript
folder located in the Adobe Reader folder. Follow the instructions with respect to your version of Adobe
Reader below for each computer that will require direct to printer functionality:
1. Download the script from
http://www.omicrontech.net/Support/Verify.NET/SilentPrint.zip to your Desktop.
2. Double click on SilentPrint.zip to open the zip file.
3. Right click on the file VerifyNet_SilentPrint.js inside the folder and click Copy.
4. Browse to My Computer and open Local Drive (C:).
5. Browse to the Program Files folder.
6. Browse to the Adobe folder.
7. Browse to the Reader 8.0 folder. For Adobe Reader 9.0 the folder name will be Reader 9.0.
8. Browse to the Reader folder.
9. Browse to the JavaScripts folder.
10. Right click inside the folder and click Paste to copy the VerifyNet_SilentPrint.js file.
11. Close the JavaScripts folder.
Page 27 of 27
OTI Proprietary and Confidential
Rev. 2.0 – 8/20/2010
V E R I F Y . N E T
Page 28 of 27
F O R
B E G I N N E R S
G U I D E
OTI Proprietary and Confidential
Rev. 1.2 – 12/21/2009