1
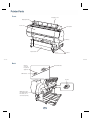
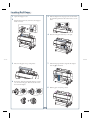
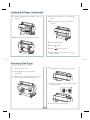
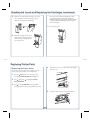
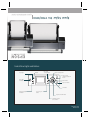
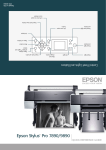
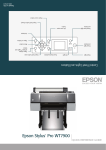
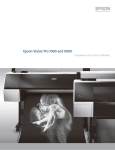
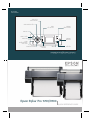
QUICK REFERENCE GUIDE
Epson Stylus Pro 7700/9700
®
Control Panel Lights and Buttons
Paper light
Ink light
Print head
cleaning button
Paper feed up button
Paper release
(ePlaten™) light and
button
Power light
and button
Menu button
Paper cut button
OK button
Pause/reset light
and button
Ink cover open
button
Paper feed down button
Left arrow or paper
source button
Printed in USA
CPD-27718
Printer Parts
Front
Roll paper cover
Roll paper holder
Front cover
Control panel
Ink bay
Paper basket
Casters
Back
Interface
connector
for optional
equipment
Network interface
USB interface
AC inlet
Maintenance tank
(Pro 9700 includes
two tanks, one on
each side of printer)
1
Loading Roll Paper
1
Open the roll paper cover.
2
Push down the lock lever, then move the roll paper
holder to the left.
3
Place the roll paper on top of the printer.
4
If necessary, adjust the roll media adapters to fit the
core size of the roll paper. Then release the tension
lever on both adapters.
2-inch core
3-inch core
2
5
Push the adapters into the paper core at both ends of
the roll. Then push down the tension levers to secure
them.
6
Move the roll paper all the way to the right.
7
Slide the roll paper holder to align the left adapter
with the on the holder.
8
Roll the paper slowly into position.
Loading Roll Paper (continued)
9
11 If the Paper release light is not on, press the
Slide the roll paper holder to the right to secure it in
the printer.
button.
12 Insert the paper into the slot and pull it all the
way down.
10 Pull up the lock lever to lock the paper in place.
13 Close the roll paper cover.
14 Press the
button.
15 Press the
Pause/reset button.
16 Check the printer’s control panel and select the
correct media type.
Removing Roll Paper
1
Open the roll paper cover.
2
Press the
button. The paper rewinds
automatically.
3
Push down the lock lever. Then move the roll paper
holder to the left and remove it from the roll.
3
4
Roll the paper forward to the top of the printer.
5
Pull up the tension levers, then remove the adapters
from the paper roll.
6
Place the roll in its original package.
Loading and Using Cut Sheet Paper
1
Remove any roll paper from the paper path. Make
sure the printer is turned on and the roll paper cover
is closed.
2
Press the Paper source button until the
icon appears on the LCD.
3
Feed the sheet down into
the paper slot until it
meets resistance. Make
sure the right edge of
the paper is straight and
aligned with the vertical
line on the roll paper
cover.
5
Check the printer’s control panel and select the
correct media type, if necessary.
6
Print your page. After it has been printed, the sheet
stays in the printer.
7
To remove your print, press the
holding the sheet.
Sheet
button while
Note: If the sheet is more than 19 mil thick, you
need to use the
Paper release (ePlaten) button.
4
Press . The sheet feeds into printing position
automatically.
Checking and Cleaning the Print Head
Automatically Checking and
Cleaning the Print Head
•
Note: You can also run nozzle checks and head cleaning
cycles from your computer using the Epson Printer
Utility3 (Macintosh®) or the Utility tab in your printer
driver (Windows®). See your User’s Guide for more
information.
The printer automatically checks the nozzles and cleans
them if necessary. You can specify how often you want this
to happen.
1
Press the Menu button. PRINTER SETUP is
highlighted. Press again.
2
Press until AUTO NOZZLE CHECK is
highlighted, then press .
3
Select one of the following, then press OK:
•
ON: PERIODICALLY—The printer periodically
checks its nozzles and runs a cleaning cycle if
necessary (default setting).
•
ON: EVERY JOB—The printer automatically
checks its nozzles and runs a cleaning cycle if
necessary before each print job. This process
uses a very small amount of ink (and no paper)
and is useful if you are running large print jobs
unattended.
OFF—The printer will not perform automatic
nozzle checks and cleaning cycles.
4
Checking and Cleaning the Print Head (continued)
4
Manually Checking and Cleaning the
Print Head
1
Make sure paper is loaded.
2
Press the
3
Press until TEST PRINT is selected, then press .
NOZZLE CHECK is selected.
4
NORMAL CLEANING—Press OK to start the
cleaning cycle.
Menu button.
CLEAN COLOR PAIRS—Press , select the color
pair you want to clean, then press OK to start the
cleaning cycle.
POWER CLEANING—Press OK to start the
cleaning cycle. Use only if the normal cleaning process
is not sufficient to clear the nozzles.
Press , then press OK to start printing the nozzle
check pattern.
If any dots or segments are missing or deflected, run a
cleaning cycle as described below.
1
Press the
2
Press until MAINTENANCE is selected, then
press .
3
Press
Select one of the following, then press :
5
When cleaning is finished, print the nozzle check
again to confirm that the head is clean.
8
Press , then press OK to start the alignment process.
Each head alignment takes about 7 minutes.
Menu button.
until CLEANING is selected, then press .
Aligning the Print Head
If your prints look grainy or blurry, or you see
misregistration or “ghosting,” you need to align the
print head.
1
Caution: Make sure you don’t open the front cover or
turn off the printer during the alignment process.
Make sure the printer is turned on. Load Epson
Enhanced Matte paper. (You can also use Epson
Doubleweight Matte or Ultra Premium Photo Paper
Luster.)
2
Press the
3
Press the or button until HEAD ALIGNMENT
is highlighted. Then press .
4
Press and choose the type of paper you loaded.
Then press OK.
5
Press
3 times.
6
Press
to highlight ALIGNMENT.
7
Press to highlight AUTO, then press again.
UNI-D (uni-directional) is highlighted. This is the
type of alignment to start with.
9
Menu button.
When the uni-directional alignment is finished, press
the Menu button, select HEAD ALIGNMENT,
then select ALIGNMENT.
10 Select BI-D ALL, then press OK again to start the
bi-directional alignment.
11 When done, press the
5
Pause/reset button.
Checking Ink Levels and Replacing Ink Cartridges
Before you begin a large print job, you should check your
ink levels. If one of your cartridges is low, you can replace
it before you start. Or you can wait until the ink runs
out, replace the cartridge, and then continue the job.
When one of the icons has an X and REPLACE INK
CARTRIDGE is displayed, the cartridge is expended. To
replace the cartridge, first make sure the printer is on.
Checking Ink and Maintenance Tank
Levels
1
Press the
2
Open the ink cover all the way.
3
Push in the low or expended cartridge to release it.
4
Remove the expended ink cartridge from the printer.
button to release the ink cover.
The easiest way to check ink levels is from the control
panel. The numbers above the ink cartridge icons
correspond to the 5 cartridge slots in the printer.
Ink gauges for
5 cartridges
listed below
Maintenance
tank gauges
(one tank for
Pro 7700)
Replacing Ink Cartridges
When one of the ink icons flashes, and INK LOW is
displayed on the LCD, the cartridge is nearly expended.
Check the LCD to see which cartridge is low, and make
sure you have the correct replacement cartridge.
Epson UltraChrome® with Vivid Magenta
ink cartridges
Slot
no.
Cartridge
350 ml
700 ml
150 ml
1
2
3
4
5
Vivid Magenta (VM)
Cyan (C)
Photo Black (PK)
Yellow (Y)
Matte Black (MK)
T596300
T596200
T596100
T596400
T596800
T636300
T636200
T636100
T636400
T636800
T642300
T642200
T642100
T642400
T642800
Warning: Do not shake the expended cartridge, or
ink may leak. If ink gets on your hands, wash them
thoroughly with soap and water. If ink gets in your
eyes, flush them immediately with water.
6
Checking Ink Levels and Replacing Ink Cartridges (continued)
5
6
Make sure the replacement cartridge is the correct
color, and remove it from its package. Gently
shake the cartridge before installing it.
Note: If you can’t insert the cartridge smoothly,
you may have the wrong cartridge. Check the
package and product code. If the Ink light remains
on after installing the cartridge, try removing and
then reinserting it.
7
Close the ink cover.
4
To remove the cutter cover, press in the tab and pull
down the cover.
5
Loosen the screw using a cross-head screwdriver.
Hold the cartridge with the arrow
mark pointing toward the printer.
Then insert the cartridge into the
slot. Don’t force it.
Replacing Printer Parts
Replacing the Paper Cutter
If you notice that the paper isn’t cut cleanly, you may
need to replace the cutter (part # C12C815331).
1
Press the Menu button on the printer, then
press until MAINTENANCE is highlighted.
2
Press again. Press
REPLACEMENT.
3
Press to display EXECUTE, then press OK.
The paper cutter moves to the replacement position.
to highlight CUTTER
7
Replacing Printer Parts (continued)
6
Replacing the Maintenance Tank
Carefully remove the cutter.
The Pro 7700 has one maintenance tank (on the right
side) and the Pro 9700 has two (one on either side).
You need to replace the maintenance tank
(part # C12C890501) when the LCD panel instructs you
to do so.
Warning: The blade is sharp. Be careful when
removing it.
1
7
8
9
If you have the Pro 9700, check the LCD to
determine which tank needs to be replaced (left
or right).
Note: The printer will not print if one of the
maintenance tanks is full. On the Pro 9700, the right
tank is used more than the left. To maximize tank life,
you can switch the tanks.
Insert the new cutter. Make sure the cutter pin goes
into the hole.
Tighten the screw using a cross-head screwdriver.
2
Turn off the printer.
3
Pull out the maintenance tank as shown.
Caution: Do not tip the tank or ink may spill out.
Align the cutter cover, then press it in until it snaps
into place.
10 Press OK to finish the replacement procedure. The
cutter moves back to the home position.
8
4
Place the used tank in the plastic bag included with
the new tank and dispose of it carefully.
5
Insert the new tank.
Control Panel Menus
Boldface type indicates the default setting. Press the
Menu button to access the menus. See the User’s Guide for details.
Menu
Item
Settings / Explanation
PRINTER SETUP
PLATEN GAP
STANDARD, NARROW, WIDE, WIDER, WIDEST
PAGE LINE
ON, OFF
ROLL PAPER MARGIN
DEFAULT, 15mm, 3mm, TOP/BOTTOM 15mm, TOP35/BOTTOM
15mm, TOP45/BOTTOM 15mm
PAPER SIZE CHECK
ON, OFF
PAPER SKEW CHECK
ON, OFF
REFRESH MARGIN
ON, OFF
AUTO NOZZLE CHECK
ON: PERIODICALLY, ON: EVERY JOB, OFF
PRINT NOZZLE PATTERN
OFF, ON: EVERY PAGE, ON: EVERY 10 PAGES
INITIALIZE SETTINGS
Restores default settings
NOZZLE CHECK
Shows clogged or deflected nozzles
STATUS SHEET
Printer settings, total prints, and maintenance tank capacity remaining
NETWORK STATUS SHEET
Network settings
JOB INFORMATION
Date and Time and Ink and paper used for the last 10 jobs; most
recent job is number 0
CUSTOM PAPER
Information about registered paper configurations
TEST PRINT
MAINTENANCE
PRINTER STATUS
CUTTER ADJUSTMENT
Adjusts cutter position
CUTTER REPLACEMENT
Moves the cutter to the replacement position
CLEANING
NORMAL CLEANING, CLEAN COLOR PAIRS, POWER CLEANING
CLOCK SETTING
MM/DD/YY HH:MM
VERSION
Current firmware version
INK LEVEL
Percentage of ink remaining in each cartridge
MAINTENANCE TANK
Percentage of capacity remaining in each maintance tank
JOB HISTORY
Ink in milliliters and paper in square centimeters for each saved job;
most recent job is number 0
TOTAL PRINTS
Number of pages printed
EDM STATUS
Status of the printer on myEpsonPrinter.com. If the printer is
registered and enabled, displays time of last status upload.
9
Control Panel Menus (continued)
PAPER SETUP
ROLL PAPER REMAINING
REMAINING PPR SETUP
HEAD ALIGNMENT
Setting appears only when no paper is loaded
OFF, ON
ROLL PAPER LENGTH
From 15 to 300 ft
ROLL LENGTH ALERT
From 4 to 50 ft
PAPER TYPE
Media type loaded in the printer
CUSTOM PAPER
Paper No 1 to 10
PAPER TYPE
Photo, Matte, Plain, Others
PLATEN GAP
STANDARD, NARROW, WIDE, WIDER
THICKNESS PATTERN
PRINT
PAPER FEED ADJUST
-0.70% to 0.70%
DRYING TIME
0.0 sec. to 10.0 sec.
PAPER SUCTION
STANDARD, -1, -2, -3, -4
SET ROLL PAPER TENSION
STANDARD, HIGH, HIGHER
REMOVE SKEW
ON, OFF
PAPER THICKNESS
SELECT PAPER TYPE
Media type loaded in the printer.
SELECT THICKNESS
8 mil (0.2 mm), 4 mil to 60 mil (0.1 to 1.5 mm)
ALIGNMENT
NETWORK SETUP
OPTIONS SETUP
AUTO
UNI-D, BI-D 2-COLOR, BI-D ALL, BI-D #1, BI-D #2, BI-D #3, BI-D #4
MANUAL
UNI-D, BI-D 2-COLOR, BI-D ALL
NETWORK SETUP
DISABLE, ENABLE
IP ADDRESS SETTING
AUTO, PANEL
IP, SM, DG SETTING
IP address, subnet mask, default gateway
BONJOUR
ON, OFF
INIT NETWORK SETTING
Resets all network settings
TAKE-UP REEL
Displays version of the take-up reel installed (Pro 9700 only)
10
Where To Get Help
Service
Access
Internet
You can download drivers, firmware, and documentation, and get FAQs and basic troubleshooting
advice from Epson’s U.S. support website (www.epson.com/support) or Canadian support website
(www.epson.ca/support).
For technical support and service-related questions, please contact your local service provider as
stated in your service contract. If you do not have your service contract, please visit the
Ricoh Americas Corporation website at http://www.ricoh-usa.com for information on how to locate
your local service provider.
Support for non-Epson RIP
Contact the RIP manufacturer.
Web-based printer
information management
system
myEpsonPrinter.com
Epson and Epson Stylus are registered trademarks and Epson Exceed Your Vision is a registered logomark of Seiko Epson Corporation.
UltraSmooth and Epson UltraChrome are registered trademarks and ePlaten is a trademark of Epson America, Inc.
© 2009 Epson America, Inc.
11/09
11
QUICK REFERENCE GUIDE
Epson Stylus Pro 7700/9700
®
Control Panel Lights and Buttons
Paper light
Ink light
Print head
cleaning button
Paper feed up button
Paper release
(ePlaten™) light and
button
Power light
and button
Menu button
Paper cut button
OK button
Pause/reset light
and button
Ink cover open
button
Paper feed down button
Left arrow or paper
source button
Printed in USA
CPD-27718