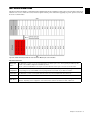
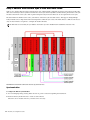
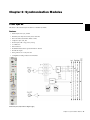
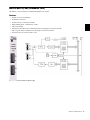
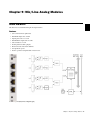
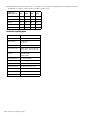
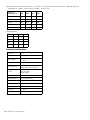
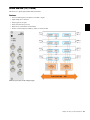
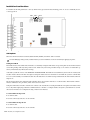
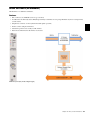
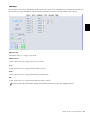
1
Modular I/O Configuration Guide Legal Notices This guide is copyrighted ©2011 by Avid Technology, Inc., with all rights reserved. Under copyright laws, this guide may not be duplicated in whole or in part without the written consent of Avid. 003, 96 I/O, 96i I/O, 192 Digital I/O, 192 I/O, 888|24 I/O, 882|20 I/O, 1622 I/O, 24-Bit ADAT Bridge I/O, AudioSuite, Avid, Avid DNA, Avid Mojo, Avid Unity, Avid Unity ISIS, Avid Xpress, AVoption, Axiom, Beat Detective, Bomb Factory, Bruno, C|24, Command|8, Control|24, D-Command, D-Control, D-Fi, D-fx, D-Show, D-Verb, DAE, Digi 002, DigiBase, DigiDelivery, Digidesign, Digidesign Audio Engine, Digidesign Intelligent Noise Reduction, Digidesign TDM Bus, DigiDrive, DigiRack, DigiTest, DigiTranslator, DINR, DV Toolkit, EditPack, Eleven, HD Core, HD I/O, HD MADI, HD OMNI, HD Process, Hybrid, Impact, Interplay, LoFi, M-Audio, MachineControl, Maxim, Mbox, MediaComposer, MIDI I/O, MIX, MultiShell, Nitris, OMF, OMF Interchange, PRE, ProControl, Pro Tools, Pro Tools|HD, QuickPunch, Recti-Fi, Reel Tape, Reso, Reverb One, ReVibe, RTAS, Sibelius, Smack!, SoundReplacer, Sound Designer II, Strike, Structure, SYNC HD, SYNC I/O, Synchronic, TL Aggro, TL AutoPan, TL Drum Rehab, TL Everyphase, TL Fauxlder, TL In Tune, TL MasterMeter, TL Metro, TL Space, TL Utilities, Transfuser, Trillium Lane Labs, Vari-Fi Velvet, X-Form, and XMON are trademarks or registered trademarks of Avid Technology, Inc. Xpand! is Registered in the U.S. Patent and Trademark Office. All other trademarks are the property of their respective owners. Product features, specifications, system requirements, and availability are subject to change without notice. Guide Part Number 9329-65133-00 REV A 07/11 Documentation Feedback We are always looking for ways to improve our documentation. If you have comments, corrections, or suggestions regarding our documentation, email us at [email protected]. Contents Part I Introduction to Modular I/O Chapter 1. Introduction . . . . . . . . . . . . . . . . . . . . . . . . . . . . . . . . . . . . . . . . . . . . . . . . . . . . . . . . . . . . . . . . . . . . . . . . . . . 7 Frame Specification . . . . . . . . . . . . . . . . . . . . . . . . . . . . . . . . . . . . . . . . . . . . . . . . . . . . . . . . . . . . . . . . . . . . . . . . . . . 7 IO93 Double-Sided Frame . . . . . . . . . . . . . . . . . . . . . . . . . . . . . . . . . . . . . . . . . . . . . . . . . . . . . . . . . . . . . . . . . . . . . . . 9 IO94 Stagebox Frame . . . . . . . . . . . . . . . . . . . . . . . . . . . . . . . . . . . . . . . . . . . . . . . . . . . . . . . . . . . . . . . . . . . . . . . . . 10 IO95 Multi-Zone Frame . . . . . . . . . . . . . . . . . . . . . . . . . . . . . . . . . . . . . . . . . . . . . . . . . . . . . . . . . . . . . . . . . . . . . . . . 11 Frame and Module Summaries. . . . . . . . . . . . . . . . . . . . . . . . . . . . . . . . . . . . . . . . . . . . . . . . . . . . . . . . . . . . . . . . . . . 12 Chapter 2. Typical Frame Configurations . . . . . . . . . . . . . . . . . . . . . . . . . . . . . . . . . . . . . . . . . . . . . . . . . . . . . . . . . . . 13 Digital I/O in IO94 Frame. . . . . . . . . . . . . . . . . . . . . . . . . . . . . . . . . . . . . . . . . . . . . . . . . . . . . . . . . . . . . . . . . . . . . . . 13 Remote Stageboxes with Redundant Fiber Connection . . . . . . . . . . . . . . . . . . . . . . . . . . . . . . . . . . . . . . . . . . . . . . . . . . 17 Dolby E Encoder with Discrete Sync in IO95 Multi–zone Frame . . . . . . . . . . . . . . . . . . . . . . . . . . . . . . . . . . . . . . . . . . . . 24 Part II Frames Chapter 3. IO93 Modular Frame . . . . . . . . . . . . . . . . . . . . . . . . . . . . . . . . . . . . . . . . . . . . . . . . . . . . . . . . . . . . . . . . . . . 29 Features. . . . . . . . . . . . . . . . . . . . . . . . . . . . . . . . . . . . . . . . . . . . . . . . . . . . . . . . . . . . . . . . . . . . . . . . . . . . . . . . . . . 29 Cooling. . . . . . . . . . . . . . . . . . . . . . . . . . . . . . . . . . . . . . . . . . . . . . . . . . . . . . . . . . . . . . . . . . . . . . . . . . . . . . . . . . . . 30 Master Sync Module . . . . . . . . . . . . . . . . . . . . . . . . . . . . . . . . . . . . . . . . . . . . . . . . . . . . . . . . . . . . . . . . . . . . . . . . . . 30 Audio Bus Linking . . . . . . . . . . . . . . . . . . . . . . . . . . . . . . . . . . . . . . . . . . . . . . . . . . . . . . . . . . . . . . . . . . . . . . . . . . . . 30 Control Bus. . . . . . . . . . . . . . . . . . . . . . . . . . . . . . . . . . . . . . . . . . . . . . . . . . . . . . . . . . . . . . . . . . . . . . . . . . . . . . . . . 31 Technical Specifications. . . . . . . . . . . . . . . . . . . . . . . . . . . . . . . . . . . . . . . . . . . . . . . . . . . . . . . . . . . . . . . . . . . . . . . . 31 Chapter 4. IO94 Stagebox Frame . . . . . . . . . . . . . . . . . . . . . . . . . . . . . . . . . . . . . . . . . . . . . . . . . . . . . . . . . . . . . . . . . 33 Features. . . . . . . . . . . . . . . . . . . . . . . . . . . . . . . . . . . . . . . . . . . . . . . . . . . . . . . . . . . . . . . . . . . . . . . . . . . . . . . . . . . 33 Cooling. . . . . . . . . . . . . . . . . . . . . . . . . . . . . . . . . . . . . . . . . . . . . . . . . . . . . . . . . . . . . . . . . . . . . . . . . . . . . . . . . . . . 34 Master Sync Module . . . . . . . . . . . . . . . . . . . . . . . . . . . . . . . . . . . . . . . . . . . . . . . . . . . . . . . . . . . . . . . . . . . . . . . . . . 34 Control Bus. . . . . . . . . . . . . . . . . . . . . . . . . . . . . . . . . . . . . . . . . . . . . . . . . . . . . . . . . . . . . . . . . . . . . . . . . . . . . . . . . 34 Technical Specifications. . . . . . . . . . . . . . . . . . . . . . . . . . . . . . . . . . . . . . . . . . . . . . . . . . . . . . . . . . . . . . . . . . . . . . . . 35 Chapter 5. IO95 Multi-Zone Frame . . . . . . . . . . . . . . . . . . . . . . . . . . . . . . . . . . . . . . . . . . . . . . . . . . . . . . . . . . . . . . . . 37 Features. . . . . . . . . . . . . . . . . . . . . . . . . . . . . . . . . . . . . . . . . . . . . . . . . . . . . . . . . . . . . . . . . . . . . . . . . . . . . . . . . . . 37 Cooling. . . . . . . . . . . . . . . . . . . . . . . . . . . . . . . . . . . . . . . . . . . . . . . . . . . . . . . . . . . . . . . . . . . . . . . . . . . . . . . . . . . . 37 Audio/Sync Zones . . . . . . . . . . . . . . . . . . . . . . . . . . . . . . . . . . . . . . . . . . . . . . . . . . . . . . . . . . . . . . . . . . . . . . . . . . . . 38 Control Bus. . . . . . . . . . . . . . . . . . . . . . . . . . . . . . . . . . . . . . . . . . . . . . . . . . . . . . . . . . . . . . . . . . . . . . . . . . . . . . . . . 38 Technical Specifications. . . . . . . . . . . . . . . . . . . . . . . . . . . . . . . . . . . . . . . . . . . . . . . . . . . . . . . . . . . . . . . . . . . . . . . . 38 Contents iii Part III Modules Chapter 6. Synchronization Modules . . . . . . . . . . . . . . . . . . . . . . . . . . . . . . . . . . . . . . . . . . . . . . . . . . . . . . . . . . . . . . . 41 SY983 Sync HD . . . . . . . . . . . . . . . . . . . . . . . . . . . . . . . . . . . . . . . . . . . . . . . . . . . . . . . . . . . . . . . . . . . . . . . . . . . . . . 41 WC984 4ch WCLK Out . . . . . . . . . . . . . . . . . . . . . . . . . . . . . . . . . . . . . . . . . . . . . . . . . . . . . . . . . . . . . . . . . . . . . . . . . 47 Chapter 7. FC972 Remote . . . . . . . . . . . . . . . . . . . . . . . . . . . . . . . . . . . . . . . . . . . . . . . . . . . . . . . . . . . . . . . . . . . . . . . . 49 Features . . . . . . . . . . . . . . . . . . . . . . . . . . . . . . . . . . . . . . . . . . . . . . . . . . . . . . . . . . . . . . . . . . . . . . . . . . . . . . . . . . . 49 Front Panel . . . . . . . . . . . . . . . . . . . . . . . . . . . . . . . . . . . . . . . . . . . . . . . . . . . . . . . . . . . . . . . . . . . . . . . . . . . . . . . . . 49 Installation Considerations . . . . . . . . . . . . . . . . . . . . . . . . . . . . . . . . . . . . . . . . . . . . . . . . . . . . . . . . . . . . . . . . . . . . . . 50 Technical Specifications . . . . . . . . . . . . . . . . . . . . . . . . . . . . . . . . . . . . . . . . . . . . . . . . . . . . . . . . . . . . . . . . . . . . . . . . 66 Chapter 8. MADI Modules . . . . . . . . . . . . . . . . . . . . . . . . . . . . . . . . . . . . . . . . . . . . . . . . . . . . . . . . . . . . . . . . . . . . . . . . . 67 MM935 MADI In/Out (Coaxial). . . . . . . . . . . . . . . . . . . . . . . . . . . . . . . . . . . . . . . . . . . . . . . . . . . . . . . . . . . . . . . . . . . . 67 MM936 MADI In/Out (Redundant Fiber) . . . . . . . . . . . . . . . . . . . . . . . . . . . . . . . . . . . . . . . . . . . . . . . . . . . . . . . . . . . . . 77 Chapter 9. Mic/Line Analog Modules . . . . . . . . . . . . . . . . . . . . . . . . . . . . . . . . . . . . . . . . . . . . . . . . . . . . . . . . . . . . . . 87 AD914 4ch MIC-In . . . . . . . . . . . . . . . . . . . . . . . . . . . . . . . . . . . . . . . . . . . . . . . . . . . . . . . . . . . . . . . . . . . . . . . . . . . . 87 AD920 4ch Analog Line Input (XLR) . . . . . . . . . . . . . . . . . . . . . . . . . . . . . . . . . . . . . . . . . . . . . . . . . . . . . . . . . . . . . . . . 97 DA921 4ch Analog Line Output (XLR). . . . . . . . . . . . . . . . . . . . . . . . . . . . . . . . . . . . . . . . . . . . . . . . . . . . . . . . . . . . . . . 99 AD922 4ch Analog In (D-Sub) . . . . . . . . . . . . . . . . . . . . . . . . . . . . . . . . . . . . . . . . . . . . . . . . . . . . . . . . . . . . . . . . . . . 101 DA923 4ch Analog Out (D-Sub) . . . . . . . . . . . . . . . . . . . . . . . . . . . . . . . . . . . . . . . . . . . . . . . . . . . . . . . . . . . . . . . . . . 103 Chapter 10. AES I/O and HD Modules . . . . . . . . . . . . . . . . . . . . . . . . . . . . . . . . . . . . . . . . . . . . . . . . . . . . . . . . . . . . . 105 DD915 8ch AES I/O (110 Ohm) . . . . . . . . . . . . . . . . . . . . . . . . . . . . . . . . . . . . . . . . . . . . . . . . . . . . . . . . . . . . . . . . . . 105 DD916 8ch AES I/O (75 Ohm). . . . . . . . . . . . . . . . . . . . . . . . . . . . . . . . . . . . . . . . . . . . . . . . . . . . . . . . . . . . . . . . . . . 113 HD944 SDI-Demux (De-embedder) . . . . . . . . . . . . . . . . . . . . . . . . . . . . . . . . . . . . . . . . . . . . . . . . . . . . . . . . . . . . . . . . 121 Chapter 11. Dolby D/E Modules . . . . . . . . . . . . . . . . . . . . . . . . . . . . . . . . . . . . . . . . . . . . . . . . . . . . . . . . . . . . . . . . . . 131 DE901 Dolby D/E Decoder . . . . . . . . . . . . . . . . . . . . . . . . . . . . . . . . . . . . . . . . . . . . . . . . . . . . . . . . . . . . . . . . . . . . . 131 DE911 Dolby E Encoder . . . . . . . . . . . . . . . . . . . . . . . . . . . . . . . . . . . . . . . . . . . . . . . . . . . . . . . . . . . . . . . . . . . . . . . 141 DE912 Dolby D/D+ Encoder . . . . . . . . . . . . . . . . . . . . . . . . . . . . . . . . . . . . . . . . . . . . . . . . . . . . . . . . . . . . . . . . . . . . 153 Appendix A. Compliance Information . . . . . . . . . . . . . . . . . . . . . . . . . . . . . . . . . . . . . . . . . . . . . . . . . . . . . . . . . . . . . . 167 Environmental Compliance . . . . . . . . . . . . . . . . . . . . . . . . . . . . . . . . . . . . . . . . . . . . . . . . . . . . . . . . . . . . . . . . . . . . . 167 EMC (Electromagnetic Compliance) . . . . . . . . . . . . . . . . . . . . . . . . . . . . . . . . . . . . . . . . . . . . . . . . . . . . . . . . . . . . . . . 167 Safety Compliance . . . . . . . . . . . . . . . . . . . . . . . . . . . . . . . . . . . . . . . . . . . . . . . . . . . . . . . . . . . . . . . . . . . . . . . . . . . 168 iv Modular I/O Configuration Guide Part I: Introduction to Modular I/O Chapter 1: Introduction The Avid Modular I/O system adds flexibility to configuring System 5 audio converters. Three frame types can be fitted with a variety of I/O modules to meet client requirements. Frame controller, Sync, MADI, Analog Mic/Line, AES/EBU, De-Embedder, and Dolby modules are available. The table below lists all modules in their categories. Modular I/O System Components Frame IO93 Double-Sided IO94 Stagebox Sync MADI Analog Mic/Line AES/EBU SY983 Sync HD MM935 MADI I/O (coax) AD914 4ch Mic Input DD915 8ch AES I/O 110 WC984 4x Wordclock Out MM936 MADI I/O (redundant fiber) AD920 4ch Line In DD916 8ch AES I/O 75 Frame Controller FC972 Remote DA921 4ch Line Out IO95 Multi-Zone De-embedder HD944 16ch De-embedder Dolby DD901 Dolby D/E Decoder DD911 Dolby E Encoder DD912 Dolby D/D+ Encoder AD922 4ch Line In DA923 4ch Line Out This chapter includes overviews of each frame and how to choose a frame. See each frame’s chapter for installation and other technical details. Frame Specification A Modular I/O configuration comprises modules selected to perform specific functions, and fitted to frames that accommodate their sync, control, and I/O requirements. Before choosing, installing, or servicing a Modular I/O frame, consider the following criteria. Master Sync Source Each frame must have a master audio sync source module for each sync zone, typically an SY983 Sync HD module. However, several other I/O modules with a Master mode can be used instead, but not in conjunction with an SY983. IO93 Double-Sided and IO94 Stagebox frames consist of a single sync zone. The master sync source module must be positioned in one of four red sync source slots in the rear plane. The IO95 Multi-Zone frame contains five isolated sync zones. Each zone in use requires its own master sync source module. To avoid damaging analog circuits, install a master sync source module in a red reserved slot before applying AC power. Chapter 1: Introduction 7 Control Configuration Each frame must be fitted with an FC972 Remote to externally configure all modules (except analog line in/out and WC984) and control mic preamps remotely using a web browser or console. Install only one FC972 per frame and up to two SY983s (for redundant operation, differentiated by Master/Slave setting). Frame and Module Addresses A Module's system ID consists of the Frame ID + module CAN ID. The Frame ID is determined by the FC972’s IP Address/Subnet/Host Address. The FC972 must be assigned a unique IP Address based on the frame’s role within the system. A CAN ID must be set for each externally controllable module. The AD914 Remote Mic Preamp has 16 CAN ID settings available, whereas most other modules have 32. The FC972 and SY983 have default module CAN IDs that do not interfere with those of other modules. The internal CAN bus must be terminated once per frame, either on the FC972 or SY983. Using the CAN Address switches on the FC972 or SY983 is an older method of setting the Frame ID. An explicit CAN Address must be set only when employing a hardware CAN-BUS remote controller to configure frames. In System 5, the Frame ID is set with the FC972's IP Address for configuration using a web browser interface. CAN Address switches on the FC972 and SY983 must be set to their non-active default values as described in their sections. Frame Space Frames have module slots in one or two backplanes. A module requires either one or two slots. Frames with two backplanes have a front and rear plane. Make sure there is enough physical space in the frame for the specified modules. Each frame’s section in this guide lists the required space per frame. Power Each module is powered by the frame’s +5 VDC rail. Power draw of the modules fitted in the frame must not exceed the frame’s PSU capabilities. Power consumption for each module and power capability per frame is listed in each section of this guide. Audio Busses The Modular I/O backplanes are passive and all frame audio routing is set on the modules: Source audio is assigned to a bus routed to a number of destinations. Each Modular I/O backplane contains 32 audio busses (S1–S32). All I/O modules provide a 2CH mode (two audio channels per bus). Many modules also feature an 8CH mode (eight audio channels per bus). Source and destination modules must be set to the same mode. Some frames consist of multiple audio zones that decouple the audio busses between different frame sections. This supports higher signal densities per frame. 8 Modular I/O Configuration Guide IO93 Double-Sided Frame The IO93 Double-Sided Frame is a 3RU frame with redundant PSU and two backplanes. Master sync source module(s) must be installed in one (or two) of the four red slots in the rear plane near the power outlet before applying AC power. Spare red slots may be used for other modules. Top view of IO93 frame layout with red slots reserved for Master sync source modules IO93 Frame Parameters Master Sync Source The IO93 frame consists of one sync zone that requires one master sync source. This is typically an SY983 Sync HD module or two SY983s configured in redundant sync mode. Another I/O module with Master mode may be used as an alternate master sync source, but not with an SY983. Control Configuration Each IO93 must be fitted with an FC972 Remote to control mic preamps remotely and externally configure all modules (except analog line in/out and WC984) remotely using a web browser. Install only one FC972 in a frame. Frame Space The IO93 frame consists of a front plane with 18 module slots, and a rear plane with 19 module slots. Power The IO93 frame contains dual-redundant PSUs: 13 A @ 5 VDC. Audio Busses Each of the two backplanes has 32 audio busses that can be linked or split between backplanes using internal DIP switches. Depending on the configuration of the modules fitted, each bus can function in 2CH or 8CH mode. Chapter 1: Introduction 9 IO94 Stagebox Frame The IO94 Stagebox Frame is a 3RU frame with redundant PSU and a single backplane. It is ideally suited for stagebox applications and local I/O. Master sync source module(s) must be installed in one (or two) of the four red slots in the rear plane near the power outlet before applying AC power. Spare red slots may be used for other modules. Top view of IO94 Frame layout IO94 Frame Parameters Master Sync Source The IO94 Frame consists of one sync zone and requires a single master sync source, typically an SY983 Sync HD module or two SY983s configured in redundant sync mode. Another I/O module with Master mode may be used as an alternate master sync source, but not with an SY983. Control Configuration The IO94 Frame must be fitted with an FC972 Remote to control mic preamps remotely and configure externally controlled modules using a web browser. Install only one FC972 in the frame in any position. Frame Space The IO94 Frame has one backplane with 19 module slots. Power The IO94 frame contains dual-redundant PSUs: 20 A @ 5 VDC. Audio Busses The backplane has 32 audio busses each of which may be used in 2CH or 8CH mode, depending on the configuration of the frame’s modules. Redundant MADI-over-Fiber Configurations The IO94 Frame’s size and power are ideal for stagebox applications in which a MADI I/O module in Master mode serves as the master sync source. This lets the frame lock to incoming MADI without connecting a separate sync cable to the stagebox. The MM935 MADI I/O (coaxial I/O) is useful for shorter distances. The MM936 MADI I/O (redundant multi-mode fiber) is useful for longer connections. The MM936 auto-switches between fibers if either fails. Multi-mode fiber can be easily converted to single-mode using third-party products, thus letting standard SMPTE camera cables connect to the stagebox. To use the MM936 MADI I/O (redundant fiber) in a stagebox, the redundant fiber must be converted to coaxial MADI to connect to the console. An MM936+MM935 may be fitted in a console-side frame to accomplish this conversion. Alternatively, if fiber auto-switching is not required, third-party MADI fiber-to-coaxial converters are available. 10 Modular I/O Configuration Guide IO95 Multi-Zone Frame The IO95 Multi-Zone is a 3RU frame with redundant PSU and two backplanes. The frame is divided into five discrete audio/sync zones. The IO95 accommodates applications that use multiple I/O streams, each referenced to a separate sync source. For example, several Dolby-E encoder/decoders can be fitted into one IO95, each in its own audio/sync zone and referenced to separate sync sources. The audio is then fed into a central zone (using AES/EBU with SRC decoupling) where they are routed into a single MADI stream. Top view of IO95 frame layout with red lines designating separate audio/sync zones IO95 Frame Parameters Master Sync Source The IO95 frame consists of five discrete sync zones. Each zone in use requires its own master sync source, typically an SY983 Sync HD module or two SY983s configured in redundant sync mode. Another I/O module with Master mode may serve as a master sync source, but not with an SY983 in the same zone. Master sync source module(s) can be installed in any slot in a zone. Control Configuration The IO95 frame must be fitted with an FC972 Remote to remotely control mic preamps and configure externally controlled modules using a web browser. One FC972 may be fitted in any position within the frame. Frame Space The IO95 frame has two backplanes, each divided into five audio/sync zones. Four zones contain six slots and one zone contains 13 slots. Power The IO95 frame contains dual-redundant PSUs: 13 A @ 5 VDC. Audio Busses The IO95 Frame contains five discrete audio/sync zones, each with 32 audio busses. Each bus can be in 2CH or 8CH mode depending on the configuration of the modules fitted. Chapter 1: Introduction 11 Frame and Module Summaries Modular I/O Frame Summary Model Type Sync Backplane Space Power at 5 VDC Audio Busses IO93 Double-Sided Single sync zone Rear: 19 slots Front: 18 slots 13 A Rear: 32 busses Front: 32 busses linked or discrete IO94 Stagebox Single sync zone 19 slots 20 A 32 audio busses IO95 Multi-Zone Five discrete audio/ sync zones Zones 1–4: 6 slots Zone 5: 13 slots 13 A 5 discrete audio/sync zones 32 busses each Modular I/O Module Summary Model Type Connectors Audio Bus Modes Slots Web Browser Configuration Power at 5 VDC Yes 300 mA --- 300 mA --- FC972 Remote RJ45, 9-pin D-Sub 1 SY983 Sync HD BNC x2 (sync in, WC out) 1 WC984 4x Wordclock BNC x4 1 No 100 mA --- MM935 MADI I/O (coax) BNC x2 1 Yes 360 mA 2CH/8CH MM936 MADI I/O (redundant fiber) SC x4 1 Yes 360 mA 2CH/8CH AD914 4ch Mic In RJ45 x4 1 Yes 1.3 A 2CH AD920 4ch Line In XLR x4 2 No 850 mA 2CH DA921 4ch Line Out XLR x4 2 No 650 mA 2CH AD922 4ch Line In 15-pin D-Sub 1 No 850 mA 2CH AD923 4ch Line Out 15-pin D-Sub 1 No 650 mA 2CH DD915 8ch AES I/O 15-pin D-Sub 1 Yes 1A 2CH/8CH DD916 8ch AES I/O BNC x8 2 Yes 1A 2CH/8CH HD944 16ch HD/SD De-embedder BNC x2, (in, thru) 1 Yes 600 mA 2CH/8CH DE901 Dolby D/E Decoder BNC, 9-pin D-Sub 1 Yes 500 mA 2CH/8CH DE911 Dolby E Encoder BNC, 9-pin D-Sub 1 Yes 600 mA 2CH/8CH DE912 Dolby D/D+ Encoder BNC,9-pin D-Sub 1 Yes 600 mA 2CH/8CH 12 Modular I/O Configuration Guide Yes Chapter 2: Typical Frame Configurations This chapter describes three typical frame configurations: • Digital I/O in IO94 Frame with redundant fiber connection • Stagebox I/O in IO94 Frame with console-side I093 Frame with two redundant fiber interfaces • I095 Multi-Zone Frame with discrete sync with Dolby® E Encoder These are useful examples to consult as you consider your own system configuration. Digital I/O in IO94 Frame Features • IO94 Single-sided Frame • Redundant Sync operation • 24 AES/EBU I/O 110 pairs (48 audio channels I/O) • Two Dolby E Decoders (eight audio channels each) • Six HD/SD 16-channel De-embedders (configured as eight audio channels each) • Two MADI console connections IO94 Frame with SY983 master sync source modules outlined in red Chapter 2: Typical Frame Configurations 13 Synchronization To configure the frame for synchronization: 1 To avoid damaging analog circuitry, make sure the AC power is off before beginning the installation. 2 Install SY983 Sync HD #1 in a red reserved slot and set as Master. 3 Install SY983 Sync HD #2 in a red reserved slot and set as Slave. Control To configure remote control, use the FC972 Remote to set the following parameters: 1 Set the IP Address range to 192.168.0.157~159/255.255.255.0 2 Set the Gateway to 192.168.0.1 This gateway permits configuration by the console system computer. See “FC972 Remote” on page 49 for details. This frame does not require console control for mic preamps. Therefore, IP Address range 192.168.0.150~156 is skipped. Module CAN IDs Set the CAN ID of each module to match the table below. See each module’s section in Part III to learn how to set its CAN ID. IO94 Frame Module CAN ID MM935 #1 0 MM935 #2 1 DD915 #1 2 DD915 #2 3 DD915 #3 4 DD915 #4 5 DD915 #5 6 DD915 #6 7 DE901 #1 8 DE901 #2 9 HD944 #1 10 HD944 #2 11 HD944 #3 12 HD944 #4 13 HD944 #5 14 HD944 #6 15 14 Modular I/O Configuration Guide Power The IO94 Frame has a maximum power capacity of 20 A @ 5 VDC. Each module’s power consumption and total power are listed in the table below. IO94 Frame Power Consumption Module Quantity Power (A) Subtotal (A) SY983 2 .30 .60 FC972 1 .30 .30 MM935 2 .36 .72 DD915 6 1.00 6.00 DE901 2 .50 1.00 HD944 6 .60 3.60 Total (A): 12.22 Chapter 2: Typical Frame Configurations 15 Audio Routing The table below shows all module routing for the IO94 Frame with Digital I/O configuration. To connect the IO94 to the console, make the following MADI connections: 1 Connect MM935 #1 MADI Out to Console MADI In. 2 Connect MM936 #2 MADI Out to Console MADI In. 3 Connect Console MADI Out to MM935 #1 MADI In. Module Audio Routing Source Audio Bus Destination Module Signal Channels Bus Mode Module Signal Channels DD915 #1 AES In 1–8 S1 8ch MM935 #1 MADI Out 1–8 DD915 #2 AES In 1–8 S2 8ch MM935 #1 MADI Out 9–16 DD915 #3 AES In 1–8 S3 8ch MM935 #1 MADI Out 17–24 DD915 #4 AES In 1–8 S4 8ch MM935 #1 MADI Out 25–32 DD915 #5 AES In 1–8 S5 8ch MM935 #1 MADI Out 33–40 DD915 #6 AES In 1–8 S6 8ch MM935 #1 MADI Out 41–48 DE901 #1 Dolby E In 1–8 S7 8ch MM935 #1 MADI Out 49–56 DE901 #1 Dolby E In 1–8 S8 8ch MM935 #1 MADI Out 57–64 HD944 #1 HD/SD In 1–8 S9 8ch MM935 #2 MADI Out 1–8 HD944 #2 HD/SD In 1–8 S10 8ch MM935 #2 MADI Out 9–16 HD944 #3 HD/SD In 1–8 S11 8ch MM935 #2 MADI Out 17–24 HD944 #4 HD/SD In 1–8 S12 8ch MM935 #2 MADI Out 25–32 HD944 #5 HD/SD In 1–8 S13 8ch MM935 #2 MADI Out 33–40 HD944 #6 HD/SD In 1–8 S14 8ch MM935 #2 MADI Out 41–48 MM935 #1 MADI In 1–8 S32 8ch DD915 #1 AES Out 1–8 MM935 #1 MADI In 9–16 S31 8ch DD915 #2 AES Out 1–8 MM935 #1 MADI In 17–24 S30 8ch DD915 #3 AES Out 1–8 MM935 #1 MADI In 25–32 S29 8ch DD915 #4 AES Out 1–8 MM935 #1 MADI In 33–40 S28 8ch DD915 #5 AES Out 1–8 MM935 #1 MADI In 41–48 S27 8ch DD915 #6 AES Out 1–8 16 Modular I/O Configuration Guide Remote Stageboxes with Redundant Fiber Connection Features • Remote IO94 Stagebox with 48 mic inputs and 16 line outputs • Redundant MADI-over-fiber audio connection • Console-side IO93 Frame with two redundant fiber interfaces • Console-side IO93 Frame local I/O with 24 line inputs and 32 line outputs Red outline shows master sync source modules for IO94 (MM936) and IO93 (SY983) Chapter 2: Typical Frame Configurations 17 Synchronization To configure each frame for synchronization: 1 To avoid damaging analog circuitry, make sure the AC power is off before beginning the installation. 2 Install the MM936 MADI in a reserved slot in the IO94 Frame and set it as Master. 3 Install the SY983 in a reserved slot in the IO93 Frame and set it as Master. Control To set up remote control for the IO94 and IO93 Frames: 1 Set the FC972 Remote to IP Address range: IO94: 192.168.0.150~156/255.255.255.0 IO93: 192.168.0.157~159/255.255.255.0 (192.168.0.150~156 skipped because this frame does not contain mic preamps.) 2 Set the Gateway for both frames to 192.168.0.1 for configuration by console system computer. Module CAN IDs Set the CAN ID of each module to match the table below. See each module’s section in Part III to learn how to set its CAN ID. IO94 Stagebox Module CAN ID AD914 #1 0 AD914 #2 1 AD914 #3 2 AD914 #4 3 AD914 #5 4 AD914 #6 5 AD914 #7 6 AD914 #8 7 AD914 #9 8 AD914 #10 9 AD914 #11 10 AD914 #12 11 MM936 12 18 Modular I/O Configuration Guide IO93 Frame Module CAN ID MM935 #1 0 MM935 #2 1 MM935 #3 2 MM936 #1 3 MM936 #2 4 Power The IO94 Stagebox has a maximum power capacity of 20 A @ 5 VDC. The IO93 Frame has a maximum power capacity of 13 A @ 5 VDC. Individual module and total frame power consumption are summarized in the tables below. IO94 Stagebox Module Power Consumption Module Quantity Power (A) Subtotal (A) FC972 1 .30 .30 MM935 1 .36 .36 AD914 12 1.30 15.60 DA923 4 .65 2.60 Total (A): 18.86 IO93 Frame Module Power Consumption Module Quantity Power (A) Subtotal (A) SY983 1 .30 .30 FC972 1 .30 .30 MM935 3 .36 1.08 MM936 2 .36 .72 DA922 6 .85 5.10 DA923 8 .65 5.20 Total (A): 12.70 Chapter 2: Typical Frame Configurations 19 Audio Routing All audio routing between modules for the IO94 and IO93 Frames is shown in the two tables that follow. Follow the steps below to make Frame-to-Frame and Frame-to-console connections. To connect the modules in Stagebox #1: 1 Connect IO94 Stagebox #1 MM936 MADI Out to IO93 Frame MM936 #1 MADI In (fiber). 2 Connect IO93 Frame MM936 #1 MADI Out to IO94 Stagebox #1 MM936 MADI In (fiber). 3 Connect Console MADI Out to MM935 #1 MADI In. 4 Connect IO93 MM935 #1 MADI Out to Console MADI In. To connect the modules in Stagebox #2: 1 Connect IO94 Stagebox #2 MM936 MADI Out to IO93 Frame MM936 #2 MADI In (fiber). 2 Connect IO93 Frame MM936 #2 MADI Out to IO94 Stagebox #2 MM936 MADI In (fiber). 3 Connect IO93 MM935 #2 MADI Out to Console MADI In. 4 Connect Console MADI Out to MM935 #2 MADI In. To make Local I/O connections: 1 Connect IO93 MM935 #3 MADI Out to Console MADI In. 2 Connect Console MADI Out to MM935 #3 MADI In. 20 Modular I/O Configuration Guide IO94 Stagebox Module Audio Routing Since Stagebox #2 is the same as Stagebox #1, only Stagebox #1 routing is shown. IO94 Frame Module Audio Routing: Stagebox Fiber Interface Routing Source Module Signal Audio Bus Channels Bus Mode Destination Module Signal Channels AD914 #1 Mic In 1/2 S1 2ch MM936 MADI Out 1/2 AD914 #1 Mic In 3/4 S2 2ch MM936 MADI Out 3/4 AD914 #2 Mic In 1/2 S3 2ch MM936 MADI Out 5/6 AD914 #2 Mic In 3/4 S4 2ch MM936 MADI Out 7/8 AD914 #3 Mic In 1/2 S5 2ch MM936 MADI Out 9/10 AD914 #3 Mic In 3/4 S6 2ch MM936 MADI Out 11/12 AD914 #4 Mic In 1/2 S7 2ch MM936 MADI Out 13/14 AD914 #4 Mic In 3/4 S8 2ch MM936 MADI Out 15/16 AD914 #5 Mic In 1/2 S9 2ch MM936 MADI Out 17/18 AD914 #5 Mic In 3/4 S10 2ch MM936 MADI Out 19/20 AD914 #6 Mic In 1/2 S11 2ch MM936 MADI Out 21/22 AD914 #6 Mic In 3/4 S12 2ch MM936 MADI Out 23/24 AD914 #7 Mic In 1/2 S13 2ch MM936 MADI Out 25/26 AD914 #7 Mic In 3/4 S14 2ch MM936 MADI Out 27/28 AD914 #8 Mic In 1/2 S15 2ch MM936 MADI Out 29/30 AD914 #8 Mic In 3/4 S16 2ch MM936 MADI Out 31/32 AD914 #9 Mic In 1/2 S17 2ch MM936 MADI Out 33/34 AD914 #9 Mic In 3/4 S18 2ch MM936 MADI Out 35/36 AD914 #10 Mic In 1/2 S19 2ch MM936 MADI Out 37/38 AD914 #10 Mic In 3/4 S20 2ch MM936 MADI Out 39/40 AD914 #11 Mic In 1/2 S21 2ch MM936 MADI Out 41/42 AD914 #11 Mic In 3/4 S22 2ch MM936 MADI Out 32/44 AD914 #12 Mic In 1/2 S23 2ch MM936 MADI Out 45/46 AD914 #12 Mic In 3/4 S24 2ch MM936 MADI Out 47/48 MM936 MADI In 1/2 S32 2ch DA923 #1 Line Out 1/2 MM936 MADI In 3/4 S31 2ch DA923 #1 Line Out 3/4 MM936 MADI In 5/6 S30 2ch DA923 #2 Line Out 1/2 MM936 MADI In 7/8 S29 2ch DA923 #2 Line Out 3/4 MM936 MADI In 9/10 S28 2ch DA923 #3 Line Out 1/2 MM936 MADI In 11/12 S27 2ch DA923 #3 Line Out 3/4 MM936 MADI In 13/14 S26 2ch DA923 #4 Line Out 1/2 MM936 MADI In 15/16 S25 2ch DA923 #4 Line Out 3/4 Chapter 2: Typical Frame Configurations 21 IO93 Frame Module Audio Routing IO93 Audio Routing: Stagebox Fiber Interface Routing Source Module Signal Audio Bus Channels Side Bus Destination Mode Module Signal Channels MM936 #1 MADI In 1–8 front S1 8ch MM935 #1 MADI Out 1–8 MM936 #1 MADI In 9–16 front S2 8ch MM935 #1 MADI Out 9–16 MM936 #1 MADI In 17–24 front S3 8ch MM936 #1 MADI Out 17–24 MM936 #1 MADI In 25–32 front S4 8ch MM936 #1 MADI Out 25–32 MM936 #1 MADI In 33–40 front S5 8ch MM936 #1 MADI Out 33–40 MM936 #1 MADI In 41–48 front S6 8ch MM936 #1 MADI Out 41–48 MM935 #1 MADI In 1–8 front S32 8ch MM936 #1 MADI Out 1–8 MM935 #1 MADI In 9–16 front S31 8ch MM936 #1 MADI Out 9–16 MM936 #2 MADI In 1–8 front S7 8ch MM935 #2 MADI Out 1–8 MM936 #2 MADI In 9–16 front S8 8ch MM935 #2 MADI Out 9–16 MM936 #2 MADI In 17–24 front S9 8ch MM936 #2 MADI Out 17–24 MM936 #2 MADI In 25–32 front S10 8ch MM936 #2 MADI Out 25–32 MM936 #2 MADI In 33–40 front S11 8ch MM936 #2 MADI Out 33–40 MM936 #2 MADI In 41–48 front S12 8ch MM936 #2 MADI Out 41–48 MM935 #2 MADI In 1–8 front S30 8ch MM936 #2 MADI Out 1–8 MM935 #2 MADI In 9–16 front S29 8ch MM936 #2 MADI Out 9–16 AD922 #1 Line In 1/2 back S1 2ch MM936 MADI Out 1/2 AD922 #1 Line In 3/4 back S2 2ch MM936 MADI Out 3/4 AD922 #2 Line In 1/2 back S3 2ch MM936 MADI Out 5/6 AD922 #2 Line In 3/4 back S4 2ch MM936 MADI Out 7/8 AD922 #3 Line In 1/2 back S5 2ch MM936 MADI Out 9/10 AD922 #3 Line In 3/4 back S6 2ch MM936 MADI Out 11/12 AD922 #4 Line In 1/2 back S7 2ch MM936 MADI Out 13/14 AD922 #4 Line In 3/4 back S8 2ch MM936 MADI Out 15/16 AD922 #5 Line In 1/2 back S9 2ch MM936 MADI Out 17/18 AD922 #5 Line In 3/4 back S10 2ch MM936 MADI Out 19/20 AD922 #6 Line In 1/2 back S11 2ch MM936 MADI Out 21/22 AD922 #6 Line In 3/4 back S12 2ch MM936 MADI Out 23/24 MM935 #3 MADI In 1/2 back S32 2ch DA923 #1 Line Out 1/2 MM935 #3 MADI In 3/4 back S31 2ch DA923 #1 Line Out 3/4 MM935 #3 MADI In 5/6 back S30 2ch DA923 #2 Line Out 1/2 MM935 #3 MADI In 7/8 back S29 2ch DA923 #2 Line Out 3/4 MM935 #3 MADI In 9/10 back S28 2ch DA923 #3 Line Out 1/2 MM935 #3 MADI In 11/12 back S27 2ch DA923 #3 Line Out 3/4 22 Modular I/O Configuration Guide IO93 Audio Routing: Stagebox Fiber Interface Routing MM935 #3 MADI In 13/14 back S26 2ch DA923 #4 Line Out 1/2 MM935 #3 MADI In 15/16 back S25 2ch DA923 #4 Line Out 3/4 MM935 #3 MADI In 17/18 back S24 2ch DA923 #5 Line Out 1/2 MM935 #3 MADI In 19/20 back S23 2ch DA923 #5 Line Out 3/4 MM935 #3 MADI In 21/22 back S22 2ch DA923 #6 Line Out 1/2 MM935 #3 MADI In 23/24 back S21 2ch DA923 #6 Line Out 3/4 MM935 #3 MADI In 25/26 back S20 2ch DA923 #7 Line Out 1/2 MM935 #3 MADI In 27/28 back S19 2ch DA923 #7 Line Out 3/4 MM935 #3 MADI In 29/30 back S18 2ch DA923 #8 Line Out 1/2 MM935 #3 MADI In 31/32 back S17 2ch DA923 #8 Line Out 3/4 Chapter 2: Typical Frame Configurations 23 Dolby E Encoder with Discrete Sync in IO95 Multi–zone Frame In most cases, Dolby E Encoders may be integrated into any standard frame configuration. However, the Dolby E stream sometimes uses external sync that is asynchronous with the console sync. Each Dolby E Encoder must then be paired with its own sync module isolated from console sync. Audio signals feeding the Dolby E encoders must also be decoupled from console sync. The IO95 Multi-zone Frame has five zones, each with its own discrete sync and audio busses. This supports fitting multiple Dolby E modules into a single frame and referencing them to different sync sources. The frame shares a common control bus so only one FC972 Remote is required to configure all installed modules. The IO95 has no reserved slots for sync modules. One master sync source module must be installed in each active zone. IO95 Multi-zone Frame: Black outline shows discrete sync/audio bus zones Synchronization To configure the IO95 for synchronization: 1 To avoid damaging analog circuitry, make sure the AC power is off before beginning the installation. 2 Install an SY983 Sync HD in Zones 1–4 and set each as Master. Since there are no modules in Zone 5, an SY983 is not necessary. 24 Modular I/O Configuration Guide Control To set up remote control for the IO95 Frame, use the FC972 Remote to configure the following parameters: 1 Set the IP Address range to 192.168.0.157~159/255.255.255.0. 2 Set the Gateway to 192.168.0.1 for configuration by console system computer. See “FC972 Remote” on page 49 for details. This frame does not contain mic preamps so IP Address range 192.168.0.150~156 is skipped. Module CAN IDs Set the CAN ID of each module to match the table below. See each module’s section in Part III to learn how to set its CAN ID. IO95 Multi-zone Frame Module CAN ID MM935 0 DE911 #1 1 DE911 #2 2 DE911 #3 3 DD916 #1 4 DD916 #2 5 DD916 #3 6 DD916 #4 7 DD916 #5 8 DD916 #6 9 Power The IO95 Multi-zone Frame has a maximum power capacity of 13 A @ 5 VDC. Individual module and the IO95’s total power consumption are summarized in the table below. : IO95 Multi-zone Frame Module Power Consumption Module Quantity Power (A) Subtotal (A) SY983 4 .30 1.20 FC972 1 .30 .30 MM935 1 .36 .36 DD915 6 1.00 6.00 DE911 3 .60 1.80 Total (A): 9.66 Chapter 2: Typical Frame Configurations 25 MADI Routing The table below shows all module routing for this configuration. To connect to the console, make the following console-to-IO95 Frame connections: 1 Connect Console MADI Out to IO95 MM935 #1 MADI In 2 Connect IO95 MM935 #1 MADI Out to Console MADI In IO95 MADI Connections Source Module Signal Audio Bus Channels Zone Bus Destination Mode Module Signal Channels MM935 MADI In 1–8 1 S32 8ch DD916 #4 AES Out 1–8 MM935 MADI In 9–16 1 S31 8ch DD916 #5 AES Out 1–8 MM935 MADI In 17–24 1 S30 8ch DD916 #6 AES Out 1–8 DD916 #1 AES Out 1–8 2 S1 8ch DE911 #1 MADI Out 9/10 DD916 #2 AES Out 1–8 3 S1 8ch DE911 #2 MADI Out 11/12 DD916 #3 AES Out 1–8 4 S1 8ch DE911 #3 MADI Out 13/14 26 Modular I/O Configuration Guide Part II: Frames Chapter 3: IO93 Modular Frame The IO93 is housed in a 3-RU, RF-shielded, 19-inch modular chassis. Features • Two PS993 power supplies in redundant mode with 13 A capacity @ 5 VDC • One RP991 Dual Power Inlet with mains filter and switch • Card installation from front and rear • Internal switches connect and disconnect audio busses between backplanes • Common sync bus across backplanes (use only one master sync source module) • Common control bus across backplanes (use only one FC972 Remote) • External dimensions in accordance with DIN 41494: depth = 320 mm • Chromated aluminum side panels; aluminum cross extrusions; 0.8 mm, zinc-passivated steel covers for RF protection PS993 power supply with RP991 dual power inlets (left); top view of IO93 frame layout (right) Chapter 3: IO93 Modular Frame 29 Cooling Install the IO93 with at least 1 RU of space above and below the frame and unrestricted airflow on the sides. Master Sync Module Make sure to install a master sync module in one of the red reserved slots before applying AC power. This is typically an SY983 Sync module, but the following other modules may be used as a master sync module when set to Master mode: MM935 MADI, MM936 MADI, DD915 8ch AES I/O, DD916 8ch AES I/O, and HD944 16ch De-embedder. Place only one master sync module in the frame except when using two SY983 Sync modules in redundant sync mode. In this case, configure the SY983s for redundant sync operation and fit both modules into the frame’s red reserved slots. See page 41. The red reserved slots may be used for other modules after a sync module is installed. Audio Bus Linking The IO93 backplanes are linked by an internal interconnect PCB that contains 32 switches to link or separate the front and back audio busses. Some disassembly is required to access these switches. Since the Sync and Control busses of the front and rear planes are permanently linked, only one FC972 Remote and one master sync module are required. Four red slots for master sync source modules PCB with audio bus switches IO93 with red master sync slots and PCB interconnect for audio busses 30 Modular I/O Configuration Guide Control Bus Each frame must be fitted with an FC972 Remote to externally configure all modules (except analog line in/out and WC984) and control mic preamps remotely using a web browser or console. Install only one FC972 per frame and up to two SY983s (for redundant operation, differentiated by Master/Slave setting). A Module’s system ID consists of the Frame ID + module CAN ID. The Frame ID is determined by the FC972’s IP Address/Subnet/Host Address. The FC972 must be assigned a unique IP Address based on the frame’s role within the system. A CAN ID must be set for each externally controllable module. Most modules have 32 CAN ID settings available but the AD914 Remote Mic Preamp has 16. The FC972 and SY983 have default module CAN IDs that do not interfere with those of other modules. The internal CAN bus must be terminated once per frame, either on the FC972 or SY983. Using the CAN Address switches on the FC972 or SY983 is an older method of setting the Frame ID. An explicit CAN Address must be set only when employing a hardware CAN-BUS remote controller to configure frames. In System 5, the Frame ID is set with the FC972's IP Address for configuration using a web browser interface. Technical Specifications Frame Size Depth 320 mm Rack Space 3 RU Front plane Module Space 72 HP (18 single-width slots) Rear plane Module Space 76 HP (19 single-width slots) Weight ~5.3 kg AC Power Power Supplies Dual redundant Input 100–240 VAC 50/60 Hz auto-sensing Output 13 A @ 5 VDC Connectors 2 IEC Audio Busses Front Plane 32 audio busses Rear Plane 32 audio busses Linking Front and rear plane audio busses may be linked using DIP switches on the interconnect PC board (some disassembly required) Sync/Control Busses Sync Slots Four reserved slots for master sync source (4 HP each) on rear plane (may be used for other modules) Sync Linking Common sync bus, linked between backplanes Control Bus Common CAN bus, linked between backplanes Chapter 3: IO93 Modular Frame 31 32 Modular I/O Configuration Guide Chapter 4: IO94 Stagebox Frame The IO94 is housed in a 3-RU, RF-shielded, 19-inch modular chassis designed specifically for stagebox applications. Features • Two power supplies in redundant mode with 20 A capacity @ 5 VDC • One RP991 Dual Power Inlet with mains filter and switch • Rear plane card installation • Common sync bus • Common control bus • External dimensions in accordance with DIN 41494: depth = 320 mm • Chromated aluminum side panels; aluminum cross extrusions; 0.8 mm, zinc-passivated steel covers for RF protection RP991 dual power inlets (left) and top view of IO94 Frame layout (right) Chapter 4: IO94 Stagebox Frame 33 Cooling Install the IO94 with at least 1 RU of space above and below the frame. There should be unrestricted airflow on the sides and over PSU heatsinks. Master Sync Module Make sure to install a master sync module in one of the four red reserved slots (left side of frame) before applying AC power. This is typically an SY983 Sync module but the following other modules may also be used as a master sync module when set to Master mode: MM935 MADI, MM936 MADI, DD915 8ch AES I/O, DD916 8ch AES I/O, and HD944 16ch De-embedder. Place only one master sync module source in the frame except when using two SY983 Sync modules in redundant sync mode. In this case, configure the SY983s for redundant sync operation and fit both modules into the frame’s red reserved slots. See “SY983 Sync HD” on page 41. The four red reserved slots may also be used for other modules. Control Bus Each frame must be fitted with an FC972 Remote to externally configure all modules (except analog line in/out and WC984) and control mic preamps remotely using a web browser. Install only one FC972 per frame and up to two SY983s (for redundant operation, differentiated by Master/Slave setting). A Module's system ID consists of the Frame ID + module CAN ID. The Frame ID is determined by the FC972’s IP Address/Subnet/Host Address. The FC972 must be assigned a unique IP Address based on the frame’s role within the system. A CAN ID must be set for each externally controllable module. Most modules have 32 CAN ID settings available but the AD914 Remote Mic Preamp has 16. The FC972 and SY983 have default module CAN IDs that do not interfere with those of other modules. The internal CAN bus must be terminated once per frame, either on the FC972 or SY983. Using the CAN Address switches on the FC972 or SY983 is an older method of setting the Frame ID. An explicit CAN Address must be set only when employing a hardware CAN-BUS remote controller to configure frames. In System 5, the Frame ID is set using the FC972's IP Address for configuration using a web browser interface. To avoid damaging analog circuits, install a master sync source module in a red reserved slot before applying AC power. IO94 front (left) and back (right) 34 Modular I/O Configuration Guide Technical Specifications Frame Size Depth 320 mm Rack Space 3 RU Module Backplane Space 76 HP (19 single-width slots) Weight ~5.3 kg AC Power Power Supplies Dual redundant Input 100–240 VAC, 50/60 Hz auto-sensing Output 20 A @ 5 VDC Connectors 2 IEC Busses Audio 32 audio busses Sync Slots Four reserved slots for master sync source (4 HP each) on rear plane (may also be used for other modules) Sync Bus Common sync bus Control Bus Common CAN bus Chapter 4: IO94 Stagebox Frame 35 36 Modular I/O Configuration Guide Chapter 5: IO95 Multi-Zone Frame The IO95 Multi-Zone Frame is a 3RU frame with redundant PSU and two backplanes. The frame is divided into five discrete audio/sync zones. The IO95 accommodates applications that use multiple I/O streams, each referenced to a separate sync source. For example, several Dolby-E encoder/decoders can be fitted into one IO95, each in its own audio/sync zone and referenced to separate sync sources. The audio is then fed into a central zone (using AES/EBU with SRC decoupling) where they are routed into a single MADI stream. Features • Two PS993 power supplies in redundant mode (13 A capacity at 5 VDC) • One RP991 Dual Power Inlet with mains filter and switch • Front and rear plane card installation • Five discrete audio/sync zones • Common control bus across backplanes; requires only one FC972 Remote • External dimensions in accordance with DIN 41494: depth = 320 mm • Chromated aluminum side panels; aluminum cross extrusions; 0.8 mm, zinc-passivated steel covers for RF protection PS993 Power Supply, with RP991 dual power inlets (left) and top view of IO95 frame layout (right) Cooling Install the IO95 Frame with at least 1 RU of space above and below it and unrestricted airflow on the sides. Chapter 5: IO95 Multi-Zone Frame 37 Audio/Sync Zones The IO95 frame consists of five discrete sync zones, each requires its own master sync source. Although this is typically an SY983 Sync HD module (or two SY983s configured in redundant sync mode), an I/O module with Master mode may serve as a master sync source but not in conjunction with an SY983 in the same zone. Examples of modules with Master mode are MM935 MADI, MM936 MADI, DD915 8ch AES I/O, DD916 8ch AES I/O, and HD944 16ch De-embedder. Only one master sync module source should be present in an audio/sync zone except when using two SY983s in redundant sync mode (see “SY983 Sync HD” on page 41). Control Bus Each frame must be fitted with an FC972 Remote to externally configure all modules (except analog line in/out and WC984) and control mic preamps remotely using a web browser. Install only one FC972 per frame and up to two SY983s (for redundant operation, differentiated by Master/Slave setting). A Module's system ID consists of the Frame ID + module CAN ID. The Frame ID is determined by the FC972’s IP Address/Subnet/Host Address. The FC972 must be assigned a unique IP Address based on the frame’s role within the system. A CAN ID must be set for each externally controllable module. Most modules have 32 CAN ID settings available but the AD914 Remote Mic Preamp has 16. The FC972 and SY983 have default module CAN IDs that do not interfere with those of other modules. The internal CAN bus must be terminated once per frame, either on the FC972 or SY983. Using the CAN Address switches on the FC972 or SY983 is an older method of setting the Frame ID. An explicit CAN Address must be set only when employing a hardware CAN-BUS remote controller to configure frames. In System 5, the Frame ID is set with the FC972's IP Address for configuration using a web browser interface. To avoid damaging analog circuits, install a master sync source module before applying AC power. Technical Specifications Physical Depth 320 mm Rack Space 3 RU Control Bus Common CAN bus linked between backplanes Backplanes Rear- and front plane have five discrete audio/sync zones; 4 zones x 6 slots + 1 zone x 13 slots = 37 total slots; each active zone requires its own sync source Weight ~5.3kg AC Power Power Supplies Dual redundant PS993 Input 100–240 VAC, 50/60 Hz auto-sensing Output 20 A @ 5 VDC Connector Two IEC 38 Modular I/O Configuration Guide Part III: Modules Chapter 6: Synchronization Modules SY983 Sync HD The SY983 is the standard sync module for a modular I/O frame. Features • Internal sync: 44.1, 48, 96 kHz • External sync: AES, Word Clock, video reference • Video reference: black burst (NTSC or PAL) • Composite sync: 525, 625 • Tri-level sync: HD - 720p, 1080i, 1080p • Lock indicator • Slave indicator • Redundant master/slave operation with two SY983s • Wordclock output • Front panel Source rotary encoder • Configuration using a web browser interface SY983 front panel (left) and block diagram (right) Chapter 6: Synchronization Modules 41 Installation Considerations Frames employ the CAN-bus for internal communication. Each module must have a unique System ID that consists of the Frame ID + module CAN ID. The Frame ID is determined by the FC972’s IP Address/Subnet/Host Address. The FC972 must be assigned a unique IP Address based on the frame’s role within the system. A CAN ID must be set for each externally controllable module. Most modules have 32 CAN ID settings available but the AD914 Remote Mic Preamp has 16. The FC972 has a default module CAN ID that does not interfere with those of other modules. The internal CAN bus must be terminated once per frame, either on the FC972 or SY983. The SY983 has a preset CAN ID that cannot be changed so it will not interfere with other frame modules. A Modular I/O frame can employ two methods for remote control and configuration: • CAN remote controllers: Set the frame address using the CAN Address switches, available on either the FC972 Remote or the SY983. Set the CAN Address on one of these modules only. The other module must be set to a non-active default value to avoid conflicts. This older method of setting an explicit CAN Address is used only when employing a hardware CAN-BUS remote controller to configure frames. • Web browser interface: In current systems, the frame address is determined by the IP Address assigned with the FC972 Remote. The CAN Address switches on the FC972 Remote and the SY983 modules must be set to non-active default values to avoid conflicts. SY983 internal configuration Insert the SY983 into one of the red reserved slots in the IO93 and IO94 Frames before applying AC power. For redundant sync operation, place both SY983s in these slots and do not set any other module to Master mode. In a IO95 frame, place one SY983 in each active sync zone (any slot). DEV0 – DEV2 These switches set the frame’s overall CAN Address for legacy systems utilizing a CAN remote controller. In systems utilizing the web browser interface, DEV 0 – DEV 2 must all be set to ON (right position). These switches appear on the FC972 Remote and must be set to non-active state on that module as well. 42 Modular I/O Configuration Guide DEV X The DEV X switch accommodates legacy systems requiring a CAN remote to communicate with up to 16 modules spread across two frames. In single SY983 frames, DEVX has no effect. In redundant SY983 frames, the DEVX switch must be set to the same position in both modules. TERM The CAN bus must be terminated only once in a frame on either the SY983 or on an FC972 Remote. Do not terminate the CAN bus twice. SLAVE For fail-safe operation, a frame may be equipped with a second (redundant) sync module. Both sync modules must be placed in one of the red slots at the rear of the frame, close to the mains connectors. • On one SY983 Sync module, set this switch to MASTER (right position), and set the other to SLAVE. • Lock both SY983 modules to external sources synchronized to each other. This prevents audio signal disturbance caused by phase and/or frequency shifts in case of a switch-over. The SLAVE module permanently watches the LOCK status of the MASTER. In case of a MASTER failure (i.e., unlock condition, broken hardware), the SLAVE module takes over and continues clocking the frame while the red Slave LED flashes. If the MASTER module returns to lock status, it automatically takes over clock distribution, the SLAVE returns to watch mode, and the Slave LED lights solid again. Sync Source Select Select a clock source by turning the front panel’s Source rotary encoder with a small screw driver. An LED display shows the clock frequency and sync mode. The web interface shows the status of each sync module. In case of a severe sync problem, the Frame Controller can be programmed to send an SNMP trap and a GPO may be activated. A higher-ranking monitoring system may poll the status of the sync module(s) with SNMP. Remote Configuration using a Web Browser The SY983 supports configuring parameters using a web browser interface, which requires fitting an FC972 Remote in the frame. See “FC972 Remote” on page 35. OVERVIEW Page From the OVERVIEW Page of the web interface, click the SY983’s wrench tool to see its configuration pages. Chapter 6: Synchronization Modules 43 DEVICE Page SY983 Web Configuration Device page Slave LED The Slave status is displayed on the left. The red Slave LED indicates this is a slave module in fail-safe operation. Restart Module Clicking RESTART initiates a warm start. Initialize and restore factory defaults Clicking INITIALIZE restores factory defaults. Controller Version Displays the module’s firmware version. Backup All Settings to File Clicking BACKUP stores the current settings to file on the configuration computer. Restore All Settings from File Clicking RESTORE restores settings from the file/destination on the configuration computer. 44 Modular I/O Configuration Guide PARAMETERS Page This page configures sync source parameters. Web Configuration Parameters page Sync Source Setting the sync source here overwrites the settings made on the front panel’s rotary switch. Select from the following Sync Sources: Internal: 44.1, 48, 96 kHz. External: AES, WCLK, Video. GPI Page This page sets the sync source with GPI. GPO Page This page provides tally for the selected sync source. Chapter 6: Synchronization Modules 45 Technical Specification Internal and External Synchronization Internal Audio Sync 44.1, 48, 96 kHz External Sync Input BNC, 75 External Sync Types Video (BB, CS, TLS), Wordclock, AES/EBU sync Video Synchronization Types Blackburst, Composite, Tri-level Level Blackburst/composite: 0.5–1 Vpp Tri-level: +/- 0.3 V Formats PAL/NTSC/HDTV Rates 525, 625 1080i/50/59.94/60 720p/50/59.94/60 1080p/23.98/24/25/29.97/30/50/59.94/60 Wordclock Level TTL-level @ 75 AES/EBU types AES professional, AES consumer AES/EBU level 0.5–5 Vpp @ 75 General Specifications Backplane Connector DIN41612, 64-pin, a+b, male Power Supply +5 VDC Consumption ~300 mA Dimensions 3 RU, 4 HP (1 slot) In typical applications, the SY983 sync module is the central clock source for a Modular I/O frame, providing all clocks for proper system operation (internal or external sync). Since audio signal distribution and processing within a Modular I/O frame is strictly synchronous, a reliable clock source is as important for system performance as a reliable power supply. 46 Modular I/O Configuration Guide WC984 4ch WCLK Out The WC984 is a wordclock synchronization output module for Modular I/O systems. Features • Word Clock outputs buffered four times • Frame sync bus provides the sync source • Sync output for sync-to-MADI frames WC984 front panel (left) and block diagram (right) Installation Considerations The WC984 requires no settings. Specifications WC984 Specifications Wordclock Output 44.1, 48, 96 kHz (follows frame’s system clock) Connector Four x 75 BNC coaxial Level TTL-level Output Format Wordclock Backplane Connector DIN41612, 64-pin, a+b, male Power Supply +5 VDC Consumption ~100 mA Dimensions 3 RU, 4 HP (1 slot) Chapter 6: Synchronization Modules 47 48 Modular I/O Configuration Guide Chapter 7: FC972 Remote The FC972 Remote is an essential module to configure externally controlled modules and remotely control mic preamps using a web browser interface. Each frame type contains a single control bus and requires one FC972 to be installed in any frame position. During installation, be careful to adhere to the correct IP Address and CAN Bus termination instructions. Features • TCP/IP over Ethernet interface for Modular I/O frames • Native CAN bus interface • Web interface to configure and monitor modules • Optional SNMP agent • Three-tier security scheme with password checking Front Panel • RJ45 Ethernet connector • RJ45 CAN connector • RS232/422 connector • 9-pin serial connector • Init button • Status LED FC972 Remote front panel (left) and block diagram (right) Chapter 7: FC972 Remote 49 Installation Considerations MAC Address Default IP Address FC972 Module diagram The MAC address is printed on the label indicated in the figure above. The default IP address label is located on the Coldfire chip of the controller module and on the module’s front panel. 50 Modular I/O Configuration Guide Connector Pinouts contacts Latch RJ45 cable shown from cable entry side RJ45 LAN Connector (NC for pins 4, 5, 7, 8) Pin # Signal 1 Tx + 2 Tx - 3 Rx + 6 Rx - RJ45 CAN Connector (NC for pins 3, 6, 7, 8) Pin # Signal 1 CAN-H 2 CAN-L 4 GND 5 GND 9-Pin D-Sub RS232 Connector Pin # Function 1 DCD 2 TxD 3 RxD 4 DTR 5 GND 6 DSR 7 CTS 8 RTS 9 N.C. Chapter 7: FC972 Remote 51 Front Panel Init Switch and Status LED The Status LED lights yellow while booting and green when operating. The Init button supports warm module restart or full reset of the module to factory defaults. To initialize the FC972 to factory defaults: 1 Press the Init button briefly. 2 After about 5 seconds the Status LED lights yellow. 3 Press and hold the Init button until the Status LED flashes three times. Rebooting the FC972 has no effect on audio processing. SW1 Options SW1 has four DIP switches that set options for graphics and redundant power. SW1-C has only one usable setting for System 5 products and SW1-D is unused. SW1-A ON: Enables graphics for System 5 products. OFF: Not used for System 5 products. SW1-B OFF: Default setting for redundant power supplies. ON: Use only if one power supply is installed in the frame to prevent false error status messages. SW1-C OFF: Default setting for IO93, IO94, IO95 Frames. ON: Not used for System 5 products. SW1-D No current function. Set to OFF to avoid possible future conflicts. SW2 Options Frames employ the CAN-bus for internal communication. Each module must have a unique System ID that consists of the Frame ID + module CAN ID. The Frame ID is determined by the FC972’s IP Address/Subnet/Host Address. The FC972 must be assigned a unique IP Address based on the frame’s role within the system. A CAN ID must be set for each externally controllable module. Most modules have 32 CAN ID settings available but the AD914 Remote Mic Preamp has 16. The FC972 has a default module CAN ID that does not interfere with those of other modules. The internal CAN bus must be terminated once per frame, either on the FC972 or SY983. The FC972 has a preset CAN ID that cannot be changed so it will not interfere with other frame modules. 52 Modular I/O Configuration Guide A Modular I/O frame can employ two methods for remote control and configuration: • CAN remote controllers: Set the frame address using the CAN Address switches, available on either the FC972 Remote or the SY983. Set the CAN Address on one of these modules only. The other module must be set to a non-active default value to avoid conflicts. This older method of setting an explicit CAN Address is used only when employing a hardware CAN-BUS remote controller to configure frames. In • Web browser interface: In current systems, the frame address is determined by the IP Address assigned with the FC972 Remote. The CAN Address switches on the FC972 Remote and the SY983 modules must be set to non-active default values to avoid conflicts. DEV 0 – DEV 2 These switches set the frame’s overall CAN Address for legacy systems utilizing a CAN remote controller. In systems utilizing the web browser interface, DEV 0 – DEV 2 must all be set to ON (right position). These switches appear on the SY983 and must be set to non-active state on that module as well. CAN-TERM The CAN bus must be terminated once on either the SY983 or the FC972. Do not terminate the CAN bus twice. Network Address Configurations The FC972 and a web browser interface provides the network to connect and configure a Modular I/O frame and its modules. Since all Modular I/O frames require a web browser interface to enter module settings, configuring the FC972 Remote is a vital part of the installation procedure. Microphone Preamp Control The AD914 is controlled by System 5 and Max Air consoles by connecting the frame’s FC972 Remote network port to the System 5/Max Air network switch. The console surface controls the mic settings (i.e., gain, +48 V phantom power, high-pass filter, etc.), which are saved to and recalled from console Title files. For proper console mic control, the correct frame address must be used, which is determined by the IP Address of the installed FC972 remote. The following table shows addresses used by the system. The FC972 network Gateway setting is 192.168.0.1 in all cases (the address of the console’s system computer). Console Mic Control Port TCC (ML530) Frame IP Address Mic Control Port 1 TCC2 192.168.0.150/255.255.255.0 Mic Control Port 2 TCC3 192.168.0.151/255.255.255.0 Mic Control Port 3 TCC4 192.168.0.152/255.255.255.0 Mic Control Port 4 TCC5 192.168.0.153/255.255.255.0 Mic Control Port 5 TCC6 192.168.0.154/255.255.255.0 Mic Control Port 6 TCC7 192.168.0.155/255.255.255.0 Mic Control Port 7 TCC8 192.168.0.156/255.255.255.0 Console mic control ports may be used by any combination of Modular I/O Mic Pre frames or ML530 Mic-Line Interfaces (controlled with a TCC serial control interface). Do not double-assign a mic control port by connecting an ML530 to a TCC control line and a Modular Frame addressed to that port’s equivalent IP Address. For more information about TCC control, see the System 5 or Max Air Operational Manuals. Chapter 7: FC972 Remote 53 Modular I/O frames without AD914 4ch Mic Inputs may also be connected to the console network, which lets the console's system computer configure modules. In this case, use an IP address in the range 192.168.0.157–159 to reserve Console Mic Control Port IP addresses for future expansion. Modular I/O frames that do not contain AD914 4ch Mic Inputs may optionally connect to a separate facility network for configuration and use an appropriate address for that network. All module settings are stored in the frame. Once configured, frames that do not contain mic preamps may be removed from the network. IP Address Setup These procedures should only be performed by individuals familiar with Internet Protocol. There are two methods to change the FC972’s IP configuration: • Serial connection: Requires a PC running a terminal program to create a serial connection between the PC and the FC972. • Network connection: Requires a PC running a web browser and a known IP address for the FC972. If the address is not known, initialize the module to factory default settings to restore a known default IP Address (see “Front Panel Init Switch and Status LED” on page 52). To make a serial connection: 1 Connect the FC972 to a PC’s COM port. Use a physical or virtual COM port (using a serial USB adaptor) and connect it with a 1:1 RS232 cable. 2 Run a terminal program (115.2-8-N-1, no handshake). Terminal program to set new IP address 3 Select Change Network Configuration. You must set an IP address and the subnet mask. If you skip the Netmask entry, the IP ad- dress will not be changed. 4 Select Reboot and enter <y> and <ENTER> to start the reboot process. To make a network connection: 1 Connect the FC972 to a PC using either an Ethernet crossover cable or connect both the FC972 and PC to a network switch. 2 Change the PC’s network setting. The PC must be assigned an IP Address/Subnet in the same address range as the FC972. For example, if the default IP address of the FC972 is 10.110.134.142 / 255.255.0.0, set the PC to 10.110.134.143 / 255.255.0.0 or similar. If the FC972 IP address is unknown, either use the serial connection described above or restore the module to factory default settings (see “Front Panel Init Switch and Status LED” on page 52). The factory default IP address is printed on a label inside the controller module (see “FC972 Module diagram” on page 50). The factory default subnet mask is 255.255.0.0. Make sure the factory default IP address is legible on the label before restoring the module to factory defaults. 54 Modular I/O Configuration Guide 3 Open a browser (IE7. Firefox 3.0 or higher) and enter the FC972’s IP address in the URL field (i.e., http://10.110.134.142). 4 Click on the wrench tool on the CONTROLLER field. This opens the FC972’s SYSTEM CONFIG page. wrench tool Frame Controller Overview page 5 Enter the proper NETWORK settings. NETWORK settings 6 Select CHANGE NETWORK CONFIGURATION. 7 Reboot the FC972. REBOOT CONTROLLER tab 8 Reconfigure the PC’s network address to communicate with the FC972 if necessary. Chapter 7: FC972 Remote 55 Remote Configuration using a Web Browser Modular I/O frames are remote controlled and configured through a network connection between the FC972 and a PC running a common web browser. This Ethernet-based external access is maintained by a dedicated 32-bit communication processor in the FC972 that runs an HTTP server, a UDP server, and an SNMP agent. After launching the browser on the PC and entering the frame’s IP address, all data including GUI is served out from the FC972 to the browser window. Device-specific configuration software is not required on the PC. The FC972 communication processor does not directly control the module parameters. Instead, it transfers commands and data between the individual module’s processors which control their parameters and GPIOs. The FC972 communication processor and individual module processors both communicate internally over the CAN bus. This two-stage approach insulates external communication from audio processing so the Frame Controller’s firmware can be updated without disrupting audio. The functions available from the GUI interface may vary with different versions of the Frame Controller’s firmware. FC972 module example 56 Modular I/O Configuration Guide Settings For IE 7 And Firefox 3 The FC972 supports GUI functions for IE 7.x and Firefox 3.x. For proper operations, these settings may be required: • The browser must allow cookies from Modular I/O units. Pay special attention to settings of third-party tool bars (like Yahoo) which may overwrite the browser’s settings. • To receive files (i.e., frame backup) from the Frame Controller, select the security option: Tools > Internet Options > zone = Internet > Custom level … > Downloads. Download settings for IE (left) and Firefox (right) • Java Script must be allowed. • Java Virtual Machine must be installed on the PC to receive level meter display (feature not currently available). Free download is available from SUN Microsystems at <www.java.com>. • If your PC is part of a MS Domain, check that the LAN settings are correct. If the IE settings are manually configured and the PC is part of a MS domain, disable Automatically detect settings. Otherwise the settings may be overwritten automatically. IE LAN settings (left) and Windows Firewall (right) Chapter 7: FC972 Remote 57 • Declare IE (and/or FireFox) as an exception for the Windows Firewall to maintain proper UDP data transfer from and to the JAVA applet. • If you notice security issues, you may use the UDP PORT RANGE configuration (see “Setting the UDP Port Range” on page 59) to limit the UDP port numbers instead of making an exception for all incoming network connections. • Disable the browser’s caching features. The FC972’s web pages are designed to operate in LANs. The strategy developed for surfing the internet (caching web site elements to save bandwidth download time), may confuse a more technical application like the FC972 because it dynamically generates elements that must be gathered live from the web server. IE: Set Check for newer versions of stored pages to Every time I visit a webpage Firefox: Set Offline Storage to 0 MB of space for the cache. Temporary Internet file settings for IE (left) and cache for Firefox (right) Firefox Privacy tab (left) and Settings for Clearing History (right) 58 Modular I/O Configuration Guide Activating the Security Feature The FC972 Remote offers a three-tier security scheme: • Viewers can only see status information and level displays. • Operators have Viewer privileges and can also load presets. • Administrators have Operator privileges and can also set up frames, change module parameters, and write presets. 1 Select Password checking enabled to activate this feature. 2 Reboot the Frame Controller. 3 Use the default user and password (user admin and password admin) to log in as the administrator. 4 Set up personalized user and password settings for administrator and operator. Password checking enabled Setting the UDP Port Range To receive meter display data if a local firewall is active, UDP ports must be reserved for which the firewall will be held open. 1 Right-click on the network symbol in the Windows task bar. 2 Select Change Windows Firewall settings. 3 Select the Exceptions tab. 4 Open the Add a Port page. 5 Select UDP and assign this rule a unique Name and Port number. Add a Port page Chapter 7: FC972 Remote 59 To connect from different PCs to the same device, use one UDP port per device because different PCs open a different IP socket connection for the same device. To connect from one PC to different devices, a unique UDP port number must be set for every remote device so assign a range of UDP ports for the Frame Controller. UDP Port Range Metering settings Connecting multiple Java applets from the same PC to the same device is not implemented! In this case, the next browser session gets UDP data from that device but the previous applet is terminated. Updating the FC972 Remote Firmware The FC972’s firmware must be burned into its flash memory. Firmware is downloaded as a compressed ZIP file containing the firmware image and may also contain dedicated module firmware packed into an archive file and relevant documents. After downloading, decompress the files and save them to a known directory on the configuration PC. Contact Avid professional support for information on available firmware. To update the FC972’s firmware: 1 Open the frame’s web browser interface and click the wrench tool inside the FC972 graphical symbol. 2 Select the SOFTWARE UPDATE tab. Frame Controller firmware update 3 Click the SEARCH button and navigate to the appropriate image file. This may be on the PC or elsewhere on the network. 60 Modular I/O Configuration Guide 4 Click the START UPDATE NOW button. A progress bar appears when the update process starts. The controller uploads the image file from the PC into its memory, erases the flash memory, and burns the new image. A dialog appears when finished. 5 Click OK and the browser reloads the website from the FC972 Remote. If you still see old firmware version number, flush the browser content by deleting temporary internet files and cookies, and connect with the frame. This is a clear indicator that the caching feature of the browser is still active (see “Settings For IE 7 And Firefox 3” on page 57). Emergency Update Of the FC972 Firmware If for any reason the standard firmware update process is not successful: 1 Reboot the FC972 by briefly pressing the front panel’s Init button or reboot from the web browser interface. 2 After it reboots (approximately 40 s), open the web browser and enter the following URL: http://<FC972 IP Address>/standalone-update.html. The following page opens: Software Update 3 Proceed with the image update as described above. A dialog appears when finished (4–5 minutes). 4 Reset the FC972 manually by pressing the Init button or reboot from the web browser interface. The method by which the Frame Controller’s image is sent from the PC and burned into the flash memory has been rewritten to overcome a possible bottleneck of non-fragmented RAM. If updating from an older version (< 2660), reboot the Frame Controller before starting the image update to make sure there is enough non-fragmented RAM. Module Firmware Bulk and Single Update These tools load software from archive files with the FC972 image. Contact Avid professional support for information on available firmware and how to install it: 650-237-1604. Modules Licensing Several features of the system, including the SNMP feature of the FC972, are options that must be enabled after purchase. To obtain the frame's Licensing Information file: 1 Select CONTROLLER > SOFTWARE UPDATE > MODULES LICENSING. The table below shows the license status of that frame. Modules Licensing Chapter 7: FC972 Remote 61 2 Click SAVE LICENSE INFO and an XML file is generated that should be saved and sent to Avid sales/support. Avid returns a License File that must be uploaded to the FC972 Remote. 3 Click the SEARCH button to navigate to the file. 4 Click APPLY LICENSE NOW. We recommend updating modules before applying the license key file to the frame because some license features require the latest firmware. SNMP Functions Setup Modular I/O supports SNMPv1 GET PDUs (Protocol Data Unit) for polling the Modular I/O frame only. SNMP SET PDUs are not supported. The agent may also send Traps on predefined conditions and/or fire GPOs using GPIO interface(s). SNMP protocol is an optional Modular I/O system feature that can be purchased if required. To set up SNMP functions if the SNMP option has been activated: 1 Open the FC972 SYSTEM CONFIG page. The Frame Name, Frame Location, and System Contact are used by the SNMP sysObject OIDs (Object Identifier). SNMP Setup 2 Click SET FRAME INFORMATION. 3 Enter a Trap Sink IP Address, Trap Port, and the Trap Community string, which must be used for basic authorization. 4 Select desired SNMP Traps and/or set a GPO number for GPIO modules to use. 5 Click CHANGE SNMP CONFIGURATION when finished. SNMP Trap Configuration 62 Modular I/O Configuration Guide SNMP Operation The FC972's SNMP agent polls the system and generates status information. Modules are polled continuously and the status information is condensed for the entire frame. An external monitoring tool (SNMP Manager) may poll the SNMP agent based on the Modular I/O Audio MIB (Management Information Bases). The MIB and associated document can be received upon request. The SNMP manager can also sit and wait to receive Traps from the SNMP agent and poll the frame afterward. The procedure depends on the implementation of the management tool. For generic monitoring applications, the Modular I/O frame may be equipped with GPIO module(s). In this case, the system can fire GPOs (relay closures) based on the settings made in the previous section. Operational Hints Website display relies on data received by the browser from the web server of the communication processor on demand (i.e. it polls the web server). The polling process is divided into time slices of different priorities and the browser content is not updated automatically for all areas. Therefore, a manual reload is recommended to update the current state of the parameters displayed in the GUI. If a module dies or is removed from the frame, the module’s graphic turns red (see below). SNMP Trap Configuration The red graphic can only be cleared by inserting a good module. If the module is permanently removed, reset the FC972 Remote by briefly pressing the Init button on the front panel, REBOOT from the web interface, or select REBOOT from the serial interface menu. Then reload the browser content. The new module must be of the same type and have the same CAN address as the one removed. If a different module type is used with the same CAN address, reboot the Frame Controller! The browser session with the web server of the FC972 Remote may sometimes expire. In this case, Java Script at the browser site may still work but no commands are accepted by the web server. Opening the serial console interface may display a message similar to this: Authorization failure for request “GET / ……” by user 'anonymous', required privileges are 'administer', but user's privileges are none. Close and restart the browser to open a new session. To change some parameter values, the GUI may use a slider. After clicking on an input field, move the slider with the mouse pointer, keyboard arrow keys, or by the mouse wheel, which scrolls vertically if active. Chapter 7: FC972 Remote 63 Using a slider to change parameter values Error Monitoring When an upstream error condition (i.e., processor module) that results in signal loss at the embedder input is detected, the module switches to an alternative bus for fail-safe operation. The alternative bus can be a similar signal bypassing the processing module (i.e., processor input signal), or an alternate audio signal (i.e., pre-recorded announcement). BUS-ROUTING page 64 Modular I/O Configuration Guide Monitoring the Processing Status of a Processing Module The most important audio processing module parameter is its momentary gain, which is permanently changed by an adaptive dynamic process like LevelMagic™. If this gain persists too long at one end of its working range, the processing parameters should be checked. The definition of the Level Magic persistent condition is: The low-pass weighted average gain of the process is equal to or greater than the Leveler max Gain. Processing monitor status may be turned on for each channel by selecting their respective Proc Status Monitor checkboxes. It is important to turn off unused processing channels to prevent false alarms if the error condition is monitored by an external entity. Level Magic Process Control The processing status is displayed on the bottom-left side of the page above. Avid does not currently offer processing modules for Modular I/O Frames. Chapter 7: FC972 Remote 65 Technical Specifications Controller Module Microcontroller MCF8250 Coldfire FLASH 8 Mbyte RAM 16 Mbyte RTC DS 1306 OS eCos Front Panel External Connectors LAN (RJ45) 10/100 Mbit Ethernet RS232 (9-pin D-Sub) Controller serial interface CAN (RJ45) CAN 1.1 (125 kBit/s) Default Settings IP address 10.110.xxx.yyy where xxx and yyy is derived from the MAC address of the Ethernet interface Subnet Mask 255.255.0.0 Gateway No entry Controller Id 0 Frame Address 0 CAN Termination OFF General Backplane Connector ref. to DIN41612, 64-pin, a+b, male Power Supply +5 VDC Consumption ~300 mA Dimensions 3 RU, 4 HP (1 slot) 66 Modular I/O Configuration Guide Chapter 8: MADI Modules MM935 MADI In/Out (Coaxial) The MM935 is an I/O interface for MADI multichannel audio signals. Features • 75 BNC connection • Extended mode: 64 channels @ 48 kHz • High sampling mode: 32 channels @ 96 kHz • 24-bit word length • In Master mode, frame locks to MADI input without requiring an SY983 Sync module • Full crosspoint matrix configuration/setup using a web browser interface MM935 front panel (left) and block diagram (right) Chapter 8: MADI Modules 67 Installation Considerations Switch 1 helps configure the MM935’s master mode and CAN ID. To set a switch ON, move it to the up position. To set the MM935 to clock master mode, set SW1-1 to ON. Otherwise, set it to OFF. To initialize all module parameters to factory default values, press the INIT button during power-on. To avoid damaging analog circuits, install a master sync source module in a red reserved slot before applying AC power. To use the MM935 in master mode in the IO93 or IO94 Frames, insert the MM935 into a red reserved slot and remove all other sync modules from the frame. SW1-1 SW1-2 MM935 installation diagram Setting the CAN ID Each frame must be fitted with an FC972 Remote to externally configure all modules (except analog line in/out and WC984) and control mic preamps remotely using a web browser. Install only one FC972 per frame and up to two SY983s (for redundant operation, differentiated by Master/Slave setting). A Module's system ID consists of the Frame ID + module CAN ID. The Frame ID is determined by the FC972’s IP Address/Subnet/Host Address. The FC972 must be assigned a unique IP Address based on the frame’s role within the system. A CAN ID must be set for each externally controllable module. Most modules have 32 CAN ID settings available but the AD914 Remote Mic Preamp has 16. The FC972 and SY983 have default module CAN IDs that do not interfere with those of other modules. The internal CAN bus must be terminated once per frame, either on the FC972 or SY983. Using the CAN Address switches on the FC972 or SY983 is an older method of setting the Frame ID. An explicit CAN Address must be set only when employing a hardware CAN-BUS remote controller to configure frames. In System 5, the Frame ID is set with the FC972’s IP Address for configuration using a web browser interface. To set the CAN ID in range 0–15: 1 Set SW1-2 to OFF. 2 Use the CAN Rotary Switch to set the CAN ID. To set the CAN ID in range 16–31: 1 Set SW1-2 to ON. 2 Use the CAN Rotary Switch to set the CAN ID. 68 Modular I/O Configuration Guide Remote Configuration using a Web Browser The MM935 is configured using a web browser interface, which requires fitting an FC972 Remote in the frame. See “FC972 Remote” on page 35. PRESET Page Each Preset includes the parameters of the transmitter and the receiver. Eight User Presets are available which can be changed manually or by GPI. MM935 Web Configuration Presets page Load Preset Selecting a preset from the menu and pressing LOAD NOW loads that preset from the module memory. Save as Preset Set a number and name for the preset and press SAVE NOW to save that preset to module memory. Preset Clipboard Clicking COPY TO CLIPBOARD copies the active Preset. Using the configuration computer’s clipboard, you can paste this to other modules within a frame. Backup Presets to File Clicking BACKUP stores all Presets to a file on the configuration computer. Restore Presets from File Clicking RESTORE restores all settings from the selected file/destination on the configuration computer. Chapter 8: MADI Modules 69 DEVICE Page This page sets and displays MM935 parameters. MM935 Web Configuration Device page Device Name This field displays the current name. Clicking CHANGE NAME renames the device. Restart Module Clicking RESTART initiates a warm start. Initialize and restore factory defaults Clicking INITIALIZE restores factory default settings. Controller Version Displays the module’s controller firmware version. FPGA Version Displays the module’s FPGA firmware version. Backup all settings to File Clicking BACKUP stores all settings to file. Restore all settings from File Clicking RESTORE restores all settings from the selected file/destination. 70 Modular I/O Configuration Guide SETUP Page This page sets up MADI and error processing parameters. MM935 Web Configuration Setup page MADI Bypass Selecting Active bypasses MADI processing. MADI Input No function in this module. Error Processing Used for remote system monitoring. Select Active to enable global bus error detection. Error Mask (BUS) Selecting these turns on error detection for individual busses (S1–S32). Error detection must be turned OFF for busses not in use to prevent bad module status message. Chapter 8: MADI Modules 71 RECEIVERS Page This page routes MADI input signals to the frame’s audio busses. MM935 Web Configuration Receivers page 8 Channel Mode (TDM) Groups of eight adjacent MADI input channels can be routed to a single audio bus (S1–S32) or OFF. 2 Channel Mode Pairs of adjacent MADI input channels can be routed to a single audio bus (S1–S32) or OFF. Enable C8000 Bus Driver Selecting this option enables all 32 bus drivers. Make sure there is no conflict with other modules occupying the same bus line before enabling. Only one output can be connected to one bus. Busses not in use should be set to OFF. 72 Modular I/O Configuration Guide TRANSMITTERS Page This page connects the frame’s audio busses to MADI outputs. MM935 Web Configuration Transmitters page Number of Channels The number of audio channels per MADI stream can be set to 56 or 64. Ensure the equipment connected is set to the same number. 8 Channel Mode (TDM) An audio bus (S1–32) can be connected to a group of eight adjacent MADI output channels. Ensure the source signal on the audio bus is also set to 8 Channel Mode. 2 Channel Mode An audio bus (S1–32) can be connected to a group of two adjacent MADI output channels. Ensure the source signal on the audio bus is also set to 2 Channel Mode. Chapter 8: MADI Modules 73 GPI Page This page sets up frame-wide GPI numbers to trigger dedicated module functions. If a GPIO system module detects a GPI input, it puts the associated GPI number on the CAN bus. Each frame module watches for these GPI numbers and performs the programmed action if it reads that number on the CAN bus. Do not assign the same GPIO numbers to different functions because this incorrectly triggers multiple functions. MM935 Web Configuration GPI page Preset 1–8 A GPI input can be entered to trigger a preset recall. MADI Bypass On Set a GPI input can be entered to trigger MADI Bypass On (MADI In to MADI out) bypassing the MADI routing. 74 Modular I/O Configuration Guide GPO Page This page sets up frame-wide GPO numbers to trigger a dedicated GPO (Tally) of a GPIO module. MM935 Web Configuration GPO page Do not assign the same GPIO numbers to different functions because this incorrectly triggers multiple functions. Preset 1–8 A GPO output can be entered that triggers when a Preset is recalled. MADI Bypass On A GPO output can be entered that triggers when MADI Bypass On is enabled. Lock A GPO output can be entered that triggers when the module is sync locked. Chapter 8: MADI Modules 75 Technical Specifications MADI Interface Standard AES 10 (2003) Connection 75 BNC Signal Level 800 mV 10% Audio Data Format 24-bit transparent for C- and U-Bit according to AES3 Audio Sample Rate 48 kHz: 64 channels 96 kHz: 32 channels General Specifications Backplane Connector DIN41612, 64-pin, a+b, male Power Supply +5 VDC Consumption ~360 mA Dimensions 3 RU, 4 HP (1 slot) Ambient 10°C to 40°C Humidity 90%, non-condensing 76 Modular I/O Configuration Guide MM936 MADI In/Out (Redundant Fiber) The MM936 is an I/O interface for MADI multichannel audio signals. Features • Optical receiver and transmitter • Redundant connections • Extended mode: 64 channels @ 48 kHz • High sampling mode: 32 channels @ 96 kHz • 24-bit word length • In Master mode, frame locks to MADI input without requiring an SY983 Sync module • Full crosspoint matrix configuration/setup using a web browser interface • Automatic fail-over switch from IN1 to IN2 MM936 front panel (left) and block diagram (right) Chapter 8: MADI Modules 77 Installation Considerations SW1 helps configure the MM936’s master mode and CAN ID. To set a switch ON, move it to the up position. To set the MM936 to clock master mode, set SW1-1 to ON. Otherwise, set it to OFF. To initialize all module parameters to factory default values, press the INIT button during power-on. To avoid damaging analog circuits, install a master sync source module in a red reserved slot before applying AC power. To use the MM936 in master mode in the IO93 or IO94 Frames, insert the MM936 into a red reserved slot and remove all other sync modules from the frame. SW1-1 SW1-2 MM936 installation diagram Setting the CAN ID Each frame must be fitted with an FC972 Remote to externally configure all modules (except analog line in/out and WC984) and control mic preamps remotely using a web browser. Install only one FC972 per frame and up to two SY983s (for redundant operation, differentiated by Master/Slave setting). A Module's system ID consists of the Frame ID + module CAN ID. The Frame ID is determined by the FC972’s IP Address/Subnet/Host Address. The FC972 must be assigned a unique IP Address based on the frame’s role within the system. A CAN ID must be set for each externally controllable module. Most modules have 32 CAN ID settings available but the AD914 Remote Mic Preamp has 16. The FC972 and SY983 have default module CAN IDs that do not interfere with those of other modules. The internal CAN bus must be terminated once per frame, either on the FC972 or SY983. Using the CAN Address switches on the FC972 or SY983 is an older method of setting the Frame ID. An explicit CAN Address must be set only when employing a hardware CAN-BUS remote controller to configure frames. In System 5, the Frame ID is set with the FC972's IP Address for configuration using a web browser interface. To set the CAN ID in range 0–15: 1 Set SW1-2 to OFF. 2 Use the CAN Rotary Switch to set the CAN ID. To set the CAN ID in range 16–31: 1 Set SW1-2 to ON. 2 Use the CAN Rotary Switch to set the CAN ID. 78 Modular I/O Configuration Guide Remote Configuration using a Web Browser The MM936 is configured using a web browser interface, which requires fitting an FC972 Remote in the frame. See “FC972 Remote” on page 35. PRESET Page Each Preset includes the parameters of the transmitter and the receiver. Eight User Presets are available which can be changed manually or by GPI. MM936 Web Configuration Presets page Load Preset Selecting a preset from the menu and pressing LOAD NOW loads that preset from the module memory. Save as Preset Setting a number and name for the preset and pressing SAVE NOW saves that preset to module memory. Preset Clipboard Clicking COPY TO CLIPBOARD copies the active Preset. Using the configuration computer’s clipboard, you can paste this to other modules within a frame. Backup Presets to File Clicking BACKUP store all Presets to a file on the configuration computer. Restore Presets from File Clicking RESTORE restores all settings from the selected file/destination on the configuration computer. Chapter 8: MADI Modules 79 DEVICE Page This page manages basic settings for the MM935. MM936 Web Configuration Device page Device Name This field displays the current name. Click CHANGE NAME to rename the device. Restart Module Clicking RESTART initiates a warm start. Initialize and restore factory defaults Clicking INITIALIZE restores factory default settings. Controller Version This displays the module’s controller firmware version. FPGA Version This displays the module’s FPGA firmware version. Backup all settings to File Clicking BACKUP stores all settings to file. Restore all settings from File Clicking RESTORE restores all settings from the selected file/destination. 80 Modular I/O Configuration Guide SETUP Page This page sets up MADI and error processing parameters. MM936 Web Configuration Setup page MADI Bypass Selecting Active bypasses MADI processing. MADI Input Selecting Input 1 or Input 2 manually activates that input. Selecting Auto automatically switches over from Input 1 to Input 2 if Input 1 fails due to loss of signal. Error Processing This is used for remote system monitoring. Select Active to enable bus error detection. Error Mask (BUS) This turns on error detection for individual busses (S1–S32) Error detection must be turned OFF for busses not in use to prevent bad module status message. Chapter 8: MADI Modules 81 RECEIVERS Page This page routes MADI input signals to the frame’s audio busses. MM936 Web Configuration Receivers page 8 Channel Mode (TDM) A group of 8 adjacent MADI input channels can be routed to a single audio bus (S1–S32) or OFF. 2 Channel Mode Pairs of adjacent MADI input channels can be routed to a single audio bus (S1–S32) or OFF. Enable C8000 Bus Driver Selecting this option enables all 32 bus drivers. Make sure there is no conflict with other modules occupying the same bus line before enabling. Only one output can be connected to one bus. Busses not in use should be set to OFF. 82 Modular I/O Configuration Guide TRANSMITTERS Page This page connects the frame’s audio busses to MADI outputs. MM936 Web Configuration Transmitters page Number of Channels Sets the number of audio channels per MADI stream to 56 or 64. Ensure the equipment connected is set to the same number. 8 Channel Mode (TDM) An audio bus (S1–32) can be routed to a group of 8 adjacent MADI output channels. Ensure the source signal on the audio bus is also set to 8 Channel Mode. 2 Channel Mode An audio bus (S1–32) can be routed to a group of 2 adjacent MADI output channels. Ensure the source signal on the audio bus is also set to 2 Channel Mode. Chapter 8: MADI Modules 83 GPI Page This page sets up frame-wide GPI numbers to trigger dedicated module functions. If a GPIO system module detects a GPI input, it puts the associated GPI number on the CAN bus. Each frame module watches for these GPI numbers and performs the pre-programmed action if it reads that number on the CAN bus. Do not assign the same GPIO numbers to different functions because this incorrectly triggers multiple functions. MM936 Web Configuration GPI page Preset 1–8 A GPI input can be entered to trigger a preset recall. MADI Bypass On A GPI input can be entered to trigger MADI Bypass On (MADI In to MADI out) bypassing the MADI routing. 84 Modular I/O Configuration Guide GPO Page This page sets up frame-wide GPO numbers to trigger a dedicated GPO (Tally) of a GPIO module. MM936 Web Configuration GPO page Do not assign the same GPIO numbers to different functions because this incorrectly triggers multiple functions. Preset 1–8 A GPO output can be entered to trigger when a Preset is recalled. MADI Bypass On A GPO output can be entered to trigger when MADI Bypass On is enabled. Lock A GPO output can be entered to trigger when the module is sync locked. Chapter 8: MADI Modules 85 Technical Specifications MADI Interface Standard AES 10 (2003) Connections SC duplex x2 62.5/125 micrometer multimode Signal 1310 nm multimode Audio Data Format 24-bit transparent for C- and U-Bit according to AES3 Audio Sample Rate 48 kHz: 64 channels 96 kHz: 32 channels General Specifications Backplane Connector DIN41612, 64-pin, a+b, male Power Supply +5 VDC Consumption ~360 mA Dimensions 3 RU, 4 HP (1 slot) Ambient 10°C to 40°C Humidity 90%, non-condensing 86 Modular I/O Configuration Guide Chapter 9: Mic/Line Analog Modules AD914 4ch MIC-In The AD914 is a four-channel microphone input interface. Features • A/D-converter:24-bit sigma-delta • Maximum sample rate: 96 kHz • Digital gain control: 0–65 dB • Maximum line input level:+20 dBu • Pad attenuation: -10 dB • Floating balanced analog inputs • Electrical isolation between channels • 48-V phantom power • Remote operation using EUCON or web browser AD914 front panel (left) and block diagram (right) Chapter 9: Mic/Line Analog Modules 87 Installation Considerations To initialize all module parameters to factory default values, press the INIT button during power-on. To avoid damaging analog circuits, install a master sync source module in a red reserved slot before applying AC power. AD914 installation diagram RJ45 Connector Wiring Signal Input + 3 GND 4, 5 6 contacts Latch RJ45 cable shown from cable entry side 88 Modular I/O Configuration Guide Configuration for Console Control The AD914 is controlled by System 5 and Max Air consoles by connecting the frame’s FC972 Remote network port to the System 5/Max Air network switch. Mic settings (gain, +48 V, high-pass filter, etc.) are controlled from the console surface. Settings are saved to console Title files and recalled when a Title is loaded. For proper console mic control, you must use the correct frame address which is determined by the IP Address of the installed FC972 remote. The following table shows addresses used by the system. The FC972 network Gateway setting is 192.168.0.1 in all cases (the address of the console’s System Computer). Console Mic Control Port TCC (ML530) Frame IP Address Mic Control Port 1 TCC2 192.168.0.150/255.255.255.0 Mic Control Port 2 TCC3 192.168.0.151/255.255.255.0 Mic Control Port 3 TCC4 192.168.0.152/255.255.255.0 Mic Control Port 4 TCC5 192.168.0.153/255.255.255.0 Mic Control Port 5 TCC6 192.168.0.154/255.255.255.0 Mic Control Port 6 TCC7 192.168.0.155/255.255.255.0 Mic Control Port 7 TCC8 192.168.0.156/255.255.255.0 Console mic control ports may be used by any combination of Modular I/O Mic Pre frames or ML530 Mic-Line Interfaces (controlled with a TCC serial control interface). Do not double-assign a mic control port by connecting an ML530 to a TCC control line and a Modular Frame addressed to that port’s equivalent IP Address. For more information about TCC control, see the System 5 or Max Air Guides. AD914 CAN IDs A Modular I/O frame employs the CAN-bus for internal communication and remote control. For proper operation each module in the frame must have a unique CAN ID. Use the CAN Rotary Switch to set the CAN ID in range 0–16. AD914 Mic Pres CAN IDs should be set starting from the lowest address and continuing upwards without gaps. The CAN ID of the module determines the mic preamp’s position within the Console Control Port: CAN ID Mic #s CAN ID Mic #s 0 1–4 8 33–36 1 5–8 9 37–40 2 9–12 10 41–44 3 13–16 11 45–48 4 17–20 12 49–52 5 21–24 13 53–56 6 25–28 14 57–60 7 29–32 15 61–64 Although 64 mic preamps can be controlled in a single frame, be careful not to overload the frame’s PSU capacity. Chapter 9: Mic/Line Analog Modules 89 Cabling The console Cabling feature maps a console’s mic preamp control port to the MADI input at which the mic’s audio appears. This means that the audio from a mic patched into an audio channel appears at that channel’s input along with relevant preamp controls on the channel’s strip. For more information on Cabling, see the System 5 or Max Air Guides. An ML530 Mic-Line Interface connects to a console mic control port using a TCC serial connection. When the ML530 is cabled to the MADI port, MADI sources 1–24 are mapped to the mic control port positions 1–24. A Modular I/O frame connects to a console mic control port by addressing the FC972 Remote to the correct IP Address (see “Configuration for Console Control” on page 89) and connecting it to the console’s network switch. When a Modular Mic frame is cabled to a MADI port, control mapping is applied to only those sources where an AD914 has been detected. Before configuring the Cabling feature, ensure the Frame is online and detected by the system. For example, in a Modular I/O frame with three AD914s (CAN IDs 0, 1, 2), only mic control port positions 1–12 are mapped. A frame with 12 AD914s (CAN IDs 0–11) maps mic control port positions 1–48. 90 Modular I/O Configuration Guide Remote Configuration using a Web Browser The MM936 is configured using a web browser interface, which requires fitting an FC972 Remote in the frame. See “FC972 Remote” on page 35. PRESET Page Each Preset includes the parameters of the transmitter and the receiver. There are eight User Presets, each can be changed manually or by GPI. AD914 Web Configuration Presets page Load Preset Selecting a preset from the menu and pressing LOAD NOW loads that preset from the module memory. Save as Preset Setting a number and name for the preset and pressing SAVE NOW saves that preset to module memory. Preset Clipboard Clicking COPY TO CLIPBOARD copies the active Preset. You can use the configuration computer’s clipboard to paste this to other frame modules. Backup Presets to File Clicking BACKUP stores all Presets to a file on the configuration computer. Restore Presets from File Clicking RESTORE restores all settings from the selected file/destination on the configuration computer. Chapter 9: Mic/Line Analog Modules 91 DEVICE Page This page configures device-specific parameters of the AD914. AD914 Web Configuration Device page Device Name This field displays the current name. Click CHANGE NAME to rename the device. Restart Module Clicking RESTART initiates a warm start. Initialize and restore factory defaults Clicking INITIALIZE restores factory default settings. Controller Version This displays the module’s firmware version. Backup all settings to File Clicking BACKUP stores all settings to file. Restore all settings from File Clicking RESTORE restores all settings from the selected file/destination. 92 Modular I/O Configuration Guide PARAMETERS Page The PARAMETERS Page enters mic settings manually. AD914 Web Configuration Parameters page Gain 0 dB, 10–65 dB. Line Selecting this option activates a 10-dB input attenuation pad. Mute Selecting this option mutes the selected input. Phantom Selecting this option turns 48 V phantom power on for the selected input. BUS ROUTING Page This page controls bus routing from the AD914. AD914 Web Configuration Bus Routing page Output 1/2 To C8000 Bus Selecting this option routes mic inputs 1/2 to the selected audio bus in 2-channel mode (S1–S32/OFF). Output 3/4 To C8000 Bus Selecting this option routes mic inputs 3/4 to the selected audio bus in 2-channel mode (S1–S32/OFF). Enable C8000 Bus Driver Selecting this option enables module routing. Chapter 9: Mic/Line Analog Modules 93 GPI Page This page sets up frame-wide GPI numbers to trigger dedicated module functions. If a GPIO system module detects a GPI input, it puts the associated GPI number on the CAN bus. Each frame module watches for these GPI numbers and performs the pre-programmed action if it reads that number on the CAN bus. Do not assign the same GPIO numbers to different functions because this incorrectly triggers multiple functions. AD914 Web Configuration GPI page Preset 1–8 A GPI input can be set to recall a preset. Mute 1–4 A GPI input can be set to mute selected channel. Phantom 1–4 A GPI input can be set to enable phantom power for selected mic. Line 1–4 A GPI input can be set to enable a 10-dB input pad for selected channel. 94 Modular I/O Configuration Guide GPO Page This page configures GPO events for the AD914. Do not assign the same GPIO numbers to different functions because this incorrectly triggers multiple functions. AD914 Web Configuration GPO page Preset 1–8 A GPO output can be set to trigger when a Preset is recalled. Mute 1–4 A GPO output can be set to trigger when the selected mic channel is muted Phantom 1–4 A GPO output can be set to trigger when phantom power on the selected channel is enabled Line 1–4 A GPO output can be set to trigger when the 10-dB input pad on the selected channel is enabled Overload 1–4 A GPO output can be set to trigger when the mic overload indicator on the selected channel lights Chapter 9: Mic/Line Analog Modules 95 Technical Specifications Analog Input Dynamic Range 110 dB (RMS) THD+N <0.09% @ maximum input level Equivalent Input Noise 126.5 dB (RMS) @ 200 , 40 dB gain Maximum Input Level +15 dBu (mic) +22 dBu (line) Frequency Response 48 kHz: 10 Hz (-3 dB) – 20 kHz (-0,5 dB) 96 kHz: 10 Hz (-3 dB) – 40 kHz (-0,5 dB) Crosstalk >90 dB (20 kHz) CMR >80 dB (20 kHz) Differential Input Impedance mic: 9 k line: 20 k Gain 0, 10–65 dB, in 1 dB increments Digital Output Resolution 24 bit Sample Rate 32–96 kHz General Specifications RJ-45 Input Connector 4, 5: GND; 3: +; 6: - Backplane Connector DIN41612, 64-pin, a+b, male Power Supply +5 VDC Consumption ~1300 mA Dimensions 3 RU, 4 HP (1 slot) 96 Modular I/O Configuration Guide AD920 4ch Analog Line Input (XLR) The AD920 is a four-channel, analog, line input A/D interface. Features • 24-bit sigma-delta A/D-converter • 96 kHz maximum sample rate • Floating balanced analog inputs • Electrical isolation between channels AD920 front panel (left) and block diagram (right) Installation Considerations Bus Select Jumper 1/2: Routes line inputs 1/2 to the selected audio bus in 2-channel mode (S1–S32/OFF). Bus Select Jumper 3/4: Routes line inputs 3/4 to the selected audio bus in 2-channel mode (S1–S32/OFF). AD920 installation diagram Chapter 9: Mic/Line Analog Modules 97 Input Level Switches: Use the table below to set switches 1–4 to match the selected input level to 0 dBFS (full scale level). For Example: Set 0 dBFS = +24 dB to achieve -20 dBFS = +4 dBU = 0 VU. Analog Level 0 dBFS (full scale) SW1 SW2 SW3 SW4 +15 dBU OFF OFF OFF OFF +18 dBU OFF OFF OFF ON +21 dBU OFF OFF ON OFF +24 dBU OFF ON OFF OFF +28 dBU ON OFF OFF OFF To avoid damaging analog circuits, install a master sync source module in a red reserved slot before applying AC power. Technical Specifications Resolution 24 bit Sample Rate 32–96 kHz Dynamic Range 113 dB (RMS) 116 dB (A) THD+N <0.002% @ maximum input level Frequency Response 48 kHz: 10 Hz – 20 kHz (0,5 dB) 96 kHz: 10 Hz – 40 kHz (0,5 dB) Crosstalk >100 dB (1 kHz) >95 dB (20 kHz) >85dB (40 kHz) Maximum Input Level 15–28 dBu @ 0dBFS Input Impedance 10 k, floating balanced Connector XLR, 1:GND, 2:+, 3: - Backplane Connector DIN41612, 64-pin, a+b, male Power Supply +5 VDC Consumption Dimensions ~850 mA 3 RU, 8 HP (2 slots) 98 Modular I/O Configuration Guide DA921 4ch Analog Line Output (XLR) The DA921 is a four-channel, analog, line output D/A interface. Features • 24-bit sigma-delta A/D-converter • Maximum sample rate: 96 kHz • Floating balanced analog inputs • Electrical isolation between channels DA921 front panel (left) and block diagram (right) Installation Considerations Bus Select Jumper 1/2: Routes line outputs 1/2 to the selected audio bus in 2-channel mode (S1–S32/OFF). Bus Select Jumper 3/4: Routes line outputs 3/4 to the selected audio bus in 2-channel mode (S1–S32/OFF). DA921 installation diagram Chapter 9: Mic/Line Analog Modules 99 OUTPUT LEVEL Switches: Use the table below to set switches 1–4 to match the selected input level to 0 dBFS (full scale level). For Example: Set 0 dBFS = +24 dB to achieve -20 dBFS = +4 dBU = 0 VU. Analog Level 0 dBFS (full scale) SW1 SW2 SW3 SW4 +15 dBU OFF OFF OFF OFF +18 dBU OFF OFF OFF ON +21 dBU OFF OFF ON OFF +24 dBU OFF ON OFF OFF +28 dBU ON OFF OFF OFF Technical Specifications Resolution 24 bit Sample Rate 32–96 kHz Dynamic Range 112 dB (RMS) 117 dB (A) THD+N <0.002% @ maximum output level Frequency Response 48 kHz: 20 Hz – 20 kHz (0,5 dB) 96 kHz: 20 Hz – 40 kHz (0,5 dB) Crosstalk >110 dB (1 kHz) >105 dB (20 kHz) >90 dB (40 kHz) Maximum Output Level 15–28 dBu @ 0dBFS Output Impedance 80 , floating balanced Connector XLR, 1-screen, 2-live, 3-return Backplane Connector DIN41612, 64-pin, a+b, male Power Supply +5 VDC Consumption Dimensions ~650 mA 3 RU, 8 HP (2 slots) 100 Modular I/O Configuration Guide AD922 4ch Analog In (D-Sub) The AD922 is a four-channel, analog, line input A/D interface. Features • 24-bit sigma-delta A/D-converter • Maximum sample rate: 96 kHz • Floating balanced analog inputs • Electrical isolation between channels AD922 front panel (left) and block diagram (right) Installation Considerations AD922 installation diagram Bus Select Jumper 1/2: Routes line inputs 1/2 to the selected audio bus in 2-channel mode (S1–S32/OFF). Bus Select Jumper 3/4: Routes line inputs 3/4 to the selected audio bus in 2-channel mode (S1–S32/OFF). Chapter 9: Mic/Line Analog Modules 101 INPUT LEVEL switches: Use the table below to set switches 1–4 to match the selected input level to 0 dBFS (full scale level). For Example: Set 0 dBFS = +24 dB to achieve -20 dBFS = +4 dBU = 0 VU. Analog Level 0 dBFS (full scale) SW1 SW2 SW3 SW4 +15 dBU OFF OFF OFF OFF +18 dBU OFF OFF OFF ON +21 dBU OFF OFF ON OFF +24 dBU OFF ON OFF OFF +28 dBU ON OFF OFF OFF GND - 15-Pin D-Sub Pinout Signal + Input 1 9 2,10 1 Input 2 11 4, 12 3 Input 3 6 5 13 Input 4 8 7, 14 15 Technical Specifications Resolution 24 bit Sample Rate 32–96 kHz Dynamic Range 113 dB (RMS) 116 dB (A) THD+N <0.002% @ maximum input level Frequency Response 48 kHz: 20 Hz – 20 kHz (0,5 dB) 96 kHz: 20 Hz – 40 kHz (0,5 dB) Crosstalk >100 dB (1 kHz) >95 dB (20 kHz) >85dB (40 kHz) Maximum Input Level 15–28 dBu @ 0dBFS Input Impedance 10 k, floating balanced Connector 15-pin D-Sub, female panel Backplane Connector DIN41612, 64-pin, a+b, male Power Supply +5 VDC Consumption Dimensions ~850 mA 3 RU, 4 HP (1 slot) 102 Modular I/O Configuration Guide DA923 4ch Analog Out (D-Sub) The DA923 is a four-channel, analog, line out D/A interface. Features • 24-bit sigma-delta A/D-converter • 96 kHz maximum sample rate • Floating balanced analog inputs • Electrical isolation between channels DA923 front panel (left) and block diagram (right) Installation Considerations Bus Select Jumper 1/2: Routes the selected audio bus to line outputs 1/2 in 2-channel mode (S1–S32/OFF). Bus Select Jumper 3/4: Routes the selected audio bus to line outputs 3/4 in 2-channel mode (S1–S32/OFF). DA923 installation diagram Chapter 9: Mic/Line Analog Modules 103 OUTPUT LEVEL Switches: Use the table below to set switches 1–4 to match the selected output level to 0 dBFS (full scale level). For Example: Set 0 dBFS = +24 dB to achieve -20 dBFS = +4 dBU = 0 VU. Analog Level 0 dBFS (full scale) SW1 SW2 SW3 SW4 +15 dBU OFF OFF OFF OFF +18 dBU OFF OFF OFF ON +21 dBU OFF OFF ON OFF +24 dBU OFF ON OFF OFF +28 dBU ON OFF OFF OFF 15 Pin D-Sub Pinout Signal + GND - Input 1 9 2,10 1 Input 2 11 4, 12 3 Input 3 6 5 13 Input 4 8 7, 14 15 Technical Specifications Resolution 24 bit Sample Rate 32–96 kHz Dynamic Range 112 dB (RMS) 117 dB (A) THD+N <0.002% @ maximum output level Frequency Response 48 kHz: 20 Hz – 20 kHz (0,5 dB) 96 kHz: 20 Hz – 40 kHz (0,5 dB) Crosstalk >110 dB (1 kHz) >105 dB (20 kHz) >90 dB (40 kHz) Maximum Output Level 15–28 dBu @ 0dBFS Output Impedance 60 , floating balanced Connector 15-pin D-Sub, female panel Backplane Connector DIN41612, 64-pin, a+b, male Power Supply +5 VDC Consumption Dimensions ~650 mA 3 RU, 4 HP (1 slot) 104 Modular I/O Configuration Guide Chapter 10: AES I/O and HD Modules DD915 8ch AES I/O (110 Ohm) The DD915 is an 8-channel AES I/O with four inputs and four outputs. Features • Four balanced AES/EBU inputs, four balanced AES/EBU outputs • Input sample rate converters • Relay bypass for pairs of I/Os • Relay wait time after power up • Master mode (clock master for the frame) • 25-pin D-Sub, industry standard (TASCAM) pin assignment • Remote control using FC972 Remote, GPIO or http based API DD915 front panel (left) and block diagram (right) Chapter 10: AES I/O and HD Modules 105 Installation Considerations To initialize the module parameters to factory default values, press the INIT button during power on. SW1-1 SW1-2 SW1-4 DD915 installation diagram SW1 Functions SW1 has four DIP switches that enable/disable BUS-EN, MASTER, and ID+16. SW1-3 is unused. To set a switch ON, move it to the up position. To avoid damaging analog circuits, install a master sync source module in a red reserved slot before applying AC power. Setting the CAN ID Each frame must be fitted with an FC972 Remote to externally configure all modules (except analog line in/out and WC984) and control mic preamps remotely using a web browser. Install only one FC972 per frame and up to two SY983s (for redundant operation, differentiated by Master/Slave setting). A Module's system ID consists of the Frame ID + module CAN ID. The Frame ID is determined by the FC972’s IP Address/Subnet/Host Address. The FC972 must be assigned a unique IP Address based on the frame’s role within the system. A CAN ID must be set for each externally controllable module. Most modules have 32 CAN ID settings available but the AD914 Remote Mic Preamp has 16. The FC972 and SY983 have default module CAN IDs that do not interfere with those of other modules. The internal CAN bus must be terminated once per frame, either on the FC972 or SY983. Using the CAN Address switches on the FC972 or SY983 is an older method of setting the Frame ID. An explicit CAN Address must be set only when employing a hardware CAN-BUS remote controller to configure frames. In System 5, the Frame ID is set with the FC972’s IP Address for configuration using a web browser interface. To set the CAN ID in range 0–15: 1 Set SW1-4 to OFF. 2 Use the CAN Rotary Switch to set the CAN ID. To set the CAN ID in range 16–31: 1 Set SW1-4 to ON. 2 Use the CAN Rotary Switch to set the CAN ID. 106 Modular I/O Configuration Guide Setting BUS-EN The output configuration is taken from the non-volatile memory. • SW1-1 ON connects the outputs to the audio busses on power up. • SW1-1 OFF disconnects the module outputs from the audio busses on power up. To avoid audio bus conflicts when installing or replacing a module and the configuration is unknown, disable the output bus drivers by setting BUS-EN = OFF before inserting it. If all settings are done remotely and the unit fits into the frame’s bus assignment scheme, remove it and set BUS-EN = ON. Setting MASTER If this module will be the master sync source in a IO93 or IO94 Frame, it must be placed in a red reserved slot. Select the input to use as clock reference using the web browser interface. • SW1-2 ON sets this module as clock master for the frame. • SW1-2 OFF if this module is not clock master for the frame. Front Panel LEDs Status LED Green Status OK Green flashing Module is under FC972 Remote control Red Status is bad, remote reading of the status with GUI is required. The FC972 Remote has probably issued a SNMP trap. MASTER LED Off The audio bus interface clock must be provided by the frame Red DD915 is clock master for the frame 25-Pin D-Sub Pinout Signal + GND - AES 1 In 24 25 12 AES 1 Out 18 19 6 AES 2 In 10 11 23 4 5 17 AES 3 In 21 22 9 AES 3 Out 15 16 3 AES 4 In 7 8 20 AES 4 Out 1 2 14 AES 3 Out Chapter 10: AES I/O and HD Modules 107 Remote Configuration using a Web Browser The DD915 is configured using a web browser interface, which requires fitting an FC972 Remote in the frame. See “FC972 Remote” on page 35. OVERVIEW Page This page provides an overview of the frame’s modules. Click the wrench tool to open the configuration pages of that module. wrench tool DD915 Web Configuration Overview page with wrench tool 108 Modular I/O Configuration Guide DEVICE Page This page configures and displays device-specific DD915 parameters. DD915 Web Configuration Device page Device Name This field displays the current name. Click CHANGE NAME to rename the device. Restart Module Clicking RESTART initiates a warm start. Initialize and restore factory defaults Clicking INITIALIZE restores factory default settings. Controller Version This displays the module’s firmware version. Backup all settings to File Clicking BACKUP stores all settings to file. Restore all settings from File Clicking RESTORE restores all settings from the selected file/destination. Chapter 10: AES I/O and HD Modules 109 Setup/Routing Page This page controls DD915 routing and setup parameters. DD915 Web Configuration Setup/Routing page Relay Bypass The AES I/Os provide a bypass relay for all eight channels, which may be turned off. With Relay Bypass On, the I/Os are in Relay Bypass mode. Relay Wait Time After Power Up The Relay Bypass is active as long as the module has no power. If power is turned on, the module waits this amount of time before the relays are engaged to disable Relay Bypass. MASTER SELECT If the module is set to MASTER mode, select one of the four AES/EBU inputs to use as the clock reference. The module must be installed in one of the frame’s red reserved slots. Sample Rate Converter Each AES/EBU input can be enabled/disabled for SRC. To C8000 Bus Output Mux The multiplex mode for audio signals routed to the audio bus can be set to 2ch or 8ch. 110 Modular I/O Configuration Guide Enable Bus Driver Selecting this option turns on all module bus drivers (from tri-state mode). From C8000 Bus Output Mux The multiplex mode for incoming audio signals from the audio bus can be set to 2ch or 8ch. AES Input Error Detection This option can be enabled to monitor the status of the AES/EBU inputs for signal presence and three detailed error types: Lock AES receiver lock status Validity AES3 validity bit detected Parity AES parity (data errors detection) Each AES/EBU input can be masked for error detection: Grey Error detection disabled Green No error detected/PCM audio Yellow No error detected/non-audio (Dolby E, D) Red Indicates an error condition The input status may be presented to external monitoring systems using SNMP. The frame controller summarizes such status information and generates SNMP traps for the frame as an entity or may activate GPOs (if GPIO module(s) are installed). The SNMP manager may afterwards poll the modules Status (see “SNMP Functions Setup” on page 62). Bus Error Detection Monitors the serial audio data from the frame bus to properly position an Error-Flag. A bad Error-Flag indicates a disturbance upstream (i.e., input signal, input module, other DSP module). The Error Detection can be turned Off and On for each input from the bus. An LED denotes the status of the busses on the left side. Grey Error detection disabled Green No error detected/PCM audio Yellow No error detected/non-audio (Dolby E, D) Red Indicates an error condition Chapter 10: AES I/O and HD Modules 111 GPO Page This page configures GPO events for the DD915. DD915 Web Configuration GPO page AES Input Error 1/2, 3/4, 5/6, 7/8 A GPO output can be set to trigger when an AES/EBU input error is detected on the selected channel pair. Do not assign the same GPIO numbers to different functions because this incorrectly triggers multiple functions. Technical Specifications Audio Resolution 24-bit Sample Rate 32–48 kHz Format AES/EBU Input Impedance 110 balanced Output Impedance 110 balanced Input Level > 0.3 Vpp Output Level 3.0 Vpp General Connector 25-pin D-Sub, female Backplane Connector DIN41612, 64-pin, a+b, male Power Supply +5 VDC Power Consumption ~1.000 mA Dimension 3 RU, 4 HP (1 slot) Temperature 10–40°C Humidity 90%, non-condensing 112 Modular I/O Configuration Guide DD916 8ch AES I/O (75 Ohm) The DD916 is a digital eight-channel AES I/O interface. Features • Four 75-BNC inputs, four balanced 75- BNC outputs • Input sample rate converters • Relay bypass for I/O pairs • Relay wait time after power up • Master mode (clock master for the frame) • Remote control using FC972 Remote, GPIO, or web-based API DD916 front panel (left) and block diagram (right) Chapter 10: AES I/O and HD Modules 113 Installation Considerations To initialize the module parameters to factory default values, press the INIT button during power on. To set a switch ON, move it to the up position. SW1-1 SW1-2 SW1-4 DD916 installation diagram SW1 Options SW1 has four DIP switches that enable/disable BUS-EN, MASTER, and ID+16. SW1-3 is unused. To avoid damaging analog circuits, install a master sync source module in a red reserved slot before applying AC power. Setting the CAN ID Each frame must be fitted with an FC972 Remote to externally configure all modules (except analog line in/out and WC984) and control mic preamps remotely using a web browser. Install only one FC972 per frame and up to two SY983s (for redundant operation, differentiated by Master/Slave setting). A Module's system ID consists of the Frame ID + module CAN ID. The Frame ID is determined by the FC972’s IP Address/Subnet/Host Address. The FC972 must be assigned a unique IP Address based on the frame’s role within the system. A CAN ID must be set for each externally controllable module. Most modules have 32 CAN ID settings available but the AD914 Remote Mic Preamp has 16. The FC972 and SY983 have default module CAN IDs that do not interfere with those of other modules. The internal CAN bus must be terminated once per frame, either on the FC972 or SY983. Using the CAN Address switches on the FC972 or SY983 is an older method of setting the Frame ID. An explicit CAN Address must be set only when employing a hardware CAN-BUS remote controller to configure frames. In System 5, the Frame ID is set with the FC972’s IP Address for configuration using a web browser interface. To set the CAN ID in range 0–15: 1 Set SW1-4 to OFF. 2 Use the CAN Rotary Switch to set the CAN ID. To set the CAN ID in range 16–31: 1 Set SW1-4 to ON. 2 Use the CAN Rotary Switch to set the CAN ID. 114 Modular I/O Configuration Guide Setting BUS-EN The output configuration is taken from the non-volatile memory. • SW1-1 ON connects the outputs to the audio busses on power up. • SW1-1 OFF disconnects the module outputs from the audio busses on power up. To avoid audio bus conflicts when installing or replacing a module and the configuration is unknown, disable the output bus drivers by setting BUS-EN = OFF before inserting it. If all settings are done remotely and the unit fits into the frame’s bus assignment scheme, remove it and set BUS-EN = ON. Setting MASTER If this module will be the master sync source in a IO93 or IO94 Frame, it must be placed in a red reserved slot. Select the input to use as clock reference using the web browser interface. • SW1-2 ON sets this module as clock master for the frame. • SW1-2 OFF if this module is not clock master for the frame. Front Panel LEDs Green Status OK Green Flashing Module is under FC972 Remote control Red Status is bad, remote reading of the status with GUI is required. The FC972 Remote has probably issued a SNMP trap. MASTER LED Off The audio bus interface clock must be provided by the frame Red DD916 is clock master for the frame Chapter 10: AES I/O and HD Modules 115 Remote Configuration using a Web Browser The DD916 is configured using a web browser interface, which requires fitting an FC972 Remote in the frame. See “FC972 Remote” on page 35. OVERVIEW Page This page provides an overview of the frame’s modules. Click the wrench tool to open the configuration pages of that module. wrench tool DD916 Web Configuration Overview page with wrench tool 116 Modular I/O Configuration Guide DEVICE Page This page configures device-specific DD916 parameters. DD916 Web Configuration Device page Device Name This field displays the current name. Click CHANGE NAME to rename the device. Restart Module Clicking RESTART initiates a warm start. Initialize and restore factory defaults Clicking INITIALIZE restores factory default settings. Controller Version Displays the module’s firmware version. Backup all settings to File Clicking BACKUP stores all settings to file. Restore all settings from File Clicking RESTORE restores all settings from the selected file/destination. Chapter 10: AES I/O and HD Modules 117 SETUP/ROUTING Page This page configures setup and routing for the DD916. DD916 Web Configuration Setup/Routing page Relay Bypass The AES I/Os provide a bypass relay for all eight channels, which may be turned off. With Relay Bypass On, the I/Os are in Relay Bypass mode. Relay Wait Time After Power Up The Relay Bypass is active as long as the module has no power. If power is turned on, the module waits this amount of time before the relays are engaged to disable Relay Bypass. MASTER SELECT If the module is set to MASTER mode, select one of the four AES/EBU inputs to use as the clock reference. Sample Rate Converter Each AES/EBU input can be enabled/disabled for SRC. To C8000 Bus Output Mux The multiplex mode for audio signals routed to the audio bus can be set to 2ch or 8ch. Enable Bus Driver Selecting this option turns on all module bus drivers (from tri-state mode). From C8000 Bus Output Mux The multiplex mode for incoming audio signals from the audio bus can be set to 2ch or 8ch. 118 Modular I/O Configuration Guide AES Input Error Detection This option can be enabled to monitor the status of the AES/EBU inputs for signal presence and three detailed error types: Lock AES receiver lock status Validity AES3 validity bit detected Parity AES parity (data errors detection) Each AES input can be masked for error detection: Grey Error detection disabled Green No error detected/PCM audio Yellow No error detected/non audio (Dolby E, D) Red Indicates an error condition. The input status may be presented to external monitoring systems using SNMP. The frame controller summarizes such status information and generates SNMP traps for the frame as an entity or may activate GPOs (if GPIO module(s) are installed). The SNMP manager may afterwards poll the modules Status (see SNMP documentation for details). Bus Error Detection The serial audio data from the frame bus can be monitored for proper positioning of an Error-Flag. A bad Error-Flag indicates a disturbance upstream (i.e., input signal, input module, other DSP module). The Error Detection can be turned Off and On for each input from the bus. An LED denotes the status of the busses on the left side. Grey Error detection is disabled Green No error detected Yellow No error detected/non audio (Dolby E, D) Red Indicates an error condition. The bus status may also be presented to external monitoring systems using SNMP. Chapter 10: AES I/O and HD Modules 119 GPO Page This page configures GPO events for the DD916. DD916 Web Configuration GPO page Do not assign the same GPIO numbers to different functions because this incorrectly triggers multiple functions. AES Input Error 1/2, 3/4, 5/6, 7/8 Sets a GPO output to trigger when an AES/EBU input error is detected on the selected channel pair. Technical Specifications Audio Resolution 24-bit Sample Rate 32–48 kHz Format AES/EBU Input Impedance 75 unbalanced Output Impedance 75 balanced Input Level 0, 3–5 Vpp Output Level 1, 0 Vpp General Connector 75 BNC Backplane Connector DIN41612, 64-pin, a+b, male Power Supply +5 VDC Power Consumption ~1000 mA Dimension 3 RU, 8 HP (2 slots) Temperature 10–40°C Humidity 90%, non-condensing 120 Modular I/O Configuration Guide HD944 SDI-Demux (De-embedder) The HD944 is a 16-channel de-embedder. Features • BNC connectors: IN, THROUGH (active loop, re-clocked) • De-embedder: automatically detects HD/SD signal format; 16 channels out of 4 groups simultaneous; mono routing (8x2-ch) to audio busses. • Sample Rate Converter: for non-synchronized SDI signals (optional) • Remote control: using FC972 Remote • Standalone operation: uses locally set DIP switches • Master mode: HD944 can be the frame’s clock source HD944 front panel (left) and block diagram (right) Chapter 10: AES I/O and HD Modules 121 Installation Considerations MODE Switches Push the MODE switches to the right to turn them ON or to the left to turn them OFF. MODE-1 MODE-2 MODE-3 MODE-4 HD944 installation diagram Setting BUS-EN The output configuration is taken from the non-volatile memory. • MODE-3 ON connects the outputs to the audio busses on power up. • MODE-3 OFF disconnects the module outputs from the audio busses on power up. To avoid audio bus conflicts when installing or replacing a module and the configuration is unknown, disable the output bus drivers by setting BUS-EN = OFF before inserting it. If all settings are done remotely and the unit fits into the frame’s bus assignment scheme, remove it and set BUS-EN = ON. Setting MASTER If this module will be the master sync source in a IO93 or IO94 Frame, it must be placed in a red reserved slot. Select the input to use as clock reference using the web browser interface. • MODE-1 ON sets this module as clock master for the frame. • MODE-1 OFF if this module is not clock master for the frame. Setting REMOTE/LOCAL The MODE-2 switch must be set to ON (LOCAL). To avoid overheating, do not place the HD944 close to the power supplies or the frame’s side panel. 122 Modular I/O Configuration Guide Setting the CAN ID Each frame must be fitted with an FC972 Remote to externally configure all modules (except analog line in/out and WC984) and control mic preamps remotely using a web browser. Install only one FC972 per frame and up to two SY983s (for redundant operation, differentiated by Master/Slave setting). A Module's system ID consists of the Frame ID + module CAN ID. The Frame ID is determined by the FC972’s IP Address/Subnet/Host Address. The FC972 must be assigned a unique IP Address based on the frame’s role within the system. A CAN ID must be set for each externally controllable module. Most modules have 32 CAN ID settings available but the AD914 Remote Mic Preamp has 16. The FC972 and SY983 have default module CAN IDs that do not interfere with those of other modules. The internal CAN bus must be terminated once per frame, either on the FC972 or SY983. Using the CAN Address switches on the FC972 or SY983 is an older method of setting the Frame ID. An explicit CAN Address must be set only when employing a hardware CAN-BUS remote controller to configure frames. In System 5, the Frame ID is set with the FC972’s IP Address for configuration using a web browser interface. To set the CAN ID in range 0–15: 1 Set MODE-4 to OFF. 2 Use the CAN/BUS switches D0–D4 to set the CAN ID according to the table below. To set the CAN ID in range 16–31: 1 Set MODE-4 to ON. 2 Use the CAN/BUS switches D0–D4 to set the CAN ID according to the table below. D0 D1 D2 D3 Value Value + 16 OFF OFF OFF OFF 0x 0 (0) 0x 10 (16) ON OFF OFF OFF 0x 1 (1) 0x 11 (17) OFF ON OFF OFF 0x 2 (2) 0x 12 (18) ON ON OFF OFF 0x 3 (3) 0x 13 (19) OFF OFF ON OFF 0x 4 (4) 0x 14 (20) ON OFF ON OFF 0x 5 (5) 0x 15 (21) OFF ON ON OFF 0x 6 (6) 0x 16 (22) ON ON ON OFF 0x 7 (7) 0x 17 (23) OFF OFF OFF ON 0x 8 (8) 0x 18 (24) ON OFF OFF ON 0x 9 (9) 0x 19 (25) OFF ON OFF ON 0x A (10) 0x 1A (26) ON ON OFF ON 0x B (11) 0x 1B (27) OFF OFF ON ON 0x C (12) 0x 1C (28) ON OFF ON ON 0x D (13) 0x 1D (29) OFF ON ON ON 0x E (14) 0x 1E (30) ON ON ON ON 0x F (15) 0x 1F (31) Chapter 10: AES I/O and HD Modules 123 Remote Configuration using a Web Browser The HD944 is configured using a web browser interface, which requires fitting an FC972 Remote in the frame. See “FC972 Remote” on page 35. OVERVIEW Page This page provides an overview of the frame’s modules. Click the wrench tool to open the configuration pages of that module. wrench tool HD944 Web Configuration Overview page 124 Modular I/O Configuration Guide PRESETS Page The HD944 has eight Presets, named PRE1 to PRE8 by default. The status area on the left shows the name of the active preset. When a preset parameter is changed, modified appears to the left of the preset name until it is saved. HD944 Web Configuration Presets page Name This field displays the Preset’s name. Click the name to enter a new name (four letters or less). Load Selecting a Preset name from the Load menu and clicking LOAD NOW loads a new Preset. Save as # Selecting a Preset number from the Save as # menu and clicking SAVE NOW saves the current Preset. Preset Clipboard Clicking COPY TO CLIPBOARD copies the active Preset to the configuration computer’s clipboard. Backup Presets to File Clicking BACKUP saves the eight Presets to a file on the configuration computer. Restore Presets from File Clicking RESTORE restores the Presets from a file on the configuration computer. Chapter 10: AES I/O and HD Modules 125 DEVICE Page The status area on the left shows the name of the active preset. When a preset parameter is changed, modified appears to the left of the preset name until it is saved. HD944 Web Configuration Device page Device Name This field displays current name. Click CHANGE NAME to rename the device. Restart Module Clicking RESTART initiates a warm start. Initialize and restore factory defaults Clicking INITIALIZE restores factory default settings. The input bus assignment are set to S1–S4, the outputs are turned off and the bus drivers are disabled. FIRMWARE Controller: Displays the controller’s firmware version. SDI: Displays the SDI firmware version. Backup Settings and Presets to File Clicking BACKUP stores all settings and presets to file. Restore Settings and Presets from File Clicking RESTORE restores all settings and presets from the selected file/destination. 126 Modular I/O Configuration Guide DE-EMBEDDER Page This page sets de-embedding parameters for the HD944. HD944 Web Configuration Device page Routing Matrix Signals extracted from the SDI data stream can be routed to the audio frame bus. Any of 16 embedded audio channels can be selected in any combination. A Silence source is also provided. These signal pairs (Ch 1/2 to Ch 15/16) are routed to the frame’s audio busses. Routing is performed on the BUS ROUTING Page (see page 128). Sample Rate Conversion The SRC LED is lit if the optional sample rate converter option is installed and unlit otherwise. See “SETUP Page” on page 127. SETUP Page This page configures setup options for the HD944. HD944 Web Configuration Setup page Sample Rate Converters Select Active to enable SRCs if this option was installed. Sample rate converters must be used if the embedded audio is not synchronized with the frame. SNMP: Input Lost Select On to enable the module to generate an SNMP Trap upon loss of input signal. If the module is not being used, select Off to avoid generating false SNMP Traps. Chapter 10: AES I/O and HD Modules 127 BUS ROUTING Page This page routes de-embedded channels to the frame's audio busses. HD944 Web Configuration Bus Routing page MUX Format Audio signals can be multiplexed in 2ch or 8ch mode. In 8ch mode, only the upper bus assignment field is available Bus Assign The channel sources can be assigned to an audio bus (S1–32/Off). Enable C8000 Bus Driver This checkbox temporarily overrides the state of the BUS-EN hardware switch (see “Installation Considerations” on page 122). If the BUS-EN switch is Off, busses stay enabled until the next power cycle. 128 Modular I/O Configuration Guide GPIO Page If a GPI input is detected by a GPIO module in the system, it puts an associated GPI number on the CAN bus. Each module in a frame monitors for these GPI numbers and performs the programmed action if it reads that number on the CAN bus. HD944 Web Configuration GPIO page GPI Preset 1–8 A GPI input can be set to trigger a preset recall. GPO Preset 1–8 A GPO output can be set to trigger when a preset is recalled. Lock A GPO output can be set to trigger when the module is locked. Async A GPO output can be set to trigger when the input is asynchronous. HD A GPO output can be set to trigger when an HD video input is detected. Do not assign the same GPIO numbers to different functions because this incorrectly triggers multiple functions. Chapter 10: AES I/O and HD Modules 129 Technical Specifications Audio Standard SMPTE 292M: 1.485 GBit HD-SDI SMPTE 259: 270 Mbit SD-SDI Connector 75 BNC, coaxial (SDI through: active loop reclocked) Signal Level 800 mV 10% Equalization 130 m (Belden 1694A, 1.485 GHz) Return Loss >15 dB (1.485 GHz) Video Standards Supported HD 720/60 SMPTE 296M HD 1080/25 SMPTE 274M HD 720/50 SMPTE 296M HD 1080/24 SMPTE 274M HD 720/30 SMPTE 296M HD 1080/50 SMPTE 295M HD 720/25 SMPTE 296M HD 1035/60 SMPTE 260M HD 720/24 SMPTE 296M HD 1080/60 SMPTE 274M SD 525/59.94 SMPTE 125M HD 1080/50 SMPTE 274M SD 625/50 SMPTE 125M HD 1080/30 SMPTE 274M All HD standards are also supported with their 1/1001-frame-rates. Audio Standards SMPTE 272M (SD)/SMPTE 299M (HD) Audio Data Format 24-Bit, transparent for C-Bit and U-Bit according to AES3 Audio Sample Rate 48 kHz synchronous to video-carrier (SD and HD) 32–48 kHz asynchronous to video-carrier (HD only) De-embedder Latency HD: < 400 µs SD: < 1.4 ms Sample Rate Converter 24-bit, THD < 140 dB General Connector 75 BNC Backplane Connector DIN41612, 64-pin, a+b, male Power Supply +5 VDC Power Consumption ~600 mA Dimension 3 RU, 4 HP (1 slot) Temperature 10–40°C Humidity 90%, non-condensing 130 Modular I/O Configuration Guide Chapter 11: Dolby D/E Modules DE901 Dolby D/E Decoder The DE901 decodes Dolby D/E signals. Features • RS485 metadata output • Unbalanced, asynchronous AES input for Dolby encoded signals • 16-, 20-, 24-bit audio data format • Automatic format detection (Dolby E, Dolby D, PCM) • Unique metadata inserter into audio USER Bits • Decodes up to eight channels • Downmix and mono program monitoring • Program-specific metadata display DE901 front panel (left) and block diagram (right) Chapter 11: Dolby D/E Modules 131 Installation Considerations To initialize module parameters to their factory default values, press INIT during power up. To avoid damaging analog circuits, install a master sync source module in a red reserved slot before applying AC power. SW1-1 DE901 installation diagram SW1-1 Functions SW1-1 has four DIP switches that enable/disable BUS-EN and help set the CAN ID. SW1-1C and SW1-1D are unused. To set a switch ON, move it to the right position. Setting BUS-EN The output configuration is taken from the non-volatile memory. • SW1-1 ON connects the outputs to the audio busses on power up. • SW1-1 OFF disconnects the module outputs from the audio busses on power up. To avoid audio bus conflicts when installing or replacing a module and the configuration is unknown, disable the output bus drivers by setting BUS-EN = OFF before inserting it. If all settings are done remotely and the unit fits into the frame’s bus assignment scheme, remove it and set BUS-EN = ON. Setting the CAN ID Each frame must be fitted with an FC972 Remote to externally configure all modules (except analog line in/out and WC984) and control mic preamps remotely using a web browser. Install only one FC972 per frame and up to two SY983s (for redundant operation, differentiated by Master/Slave setting). A Module's system ID consists of the Frame ID + module CAN ID. The Frame ID is determined by the FC972’s IP Address/Subnet/Host Address. The FC972 must be assigned a unique IP Address based on the frame’s role within the system. A CAN ID must be set for each externally controllable module. Most modules have 32 CAN ID settings available but the AD914 Remote Mic Preamp has 16. The FC972 and SY983 have default module CAN IDs that do not interfere with those of other modules. The internal CAN bus must be terminated once per frame, either on the FC972 or SY983. 132 Modular I/O Configuration Guide Using the CAN Address switches on the FC972 or SY983 is an older method of setting the Frame ID. An explicit CAN Address must be set only when employing a hardware CAN-BUS remote controller to configure frames. In System 5, the Frame ID is set with the FC972’s IP Address for configuration using a web browser interface. To set the CAN ID in range 0–15: 1 Set SW1-B to OFF. 2 Use the CAN Rotary Switch to set the CAN ID. To set the CAN ID in range 16–31: 1 Set SW1-B to ON. 2 Use the CAN Rotary Switch to set the CAN ID. Status LEDs Green OK Red Bad Flashing The module is in focus of the frame controller Green Under GUI control Dolby D LEDs Red Off Reading a proper Dolby D signal Dolby D decoding error Dolby E LEDs Blue Reading a proper Dolby E signal Off Dolby E decoding error Chapter 11: Dolby D/E Modules 133 Remote Configuration using a Web Browser The DE901 is configured using a web browser interface, which requires fitting an FC972 Remote in the frame. See “FC972 Remote” on page 35. OVERVIEW Page This page provides an overview of the frame’s modules. Click the wrench tool to open the configuration pages of that module. wrench tool DE901 Web Configuration Overview page 134 Modular I/O Configuration Guide DEVICE Page This page configures and displays device-specific information about the DE901 DE901 Web Configuration Device page Device Name This field displays the current name. Click CHANGE NAME to rename the device. Restart Module Clicking RESTART initiates a warm start. Initialize and restore factory defaults Clicking INITIALIZE restores factory default settings. The input bus assignment are set to S1–S4, the outputs are turned off and the bus drivers are disabled. Controller Version This displays the module’s firmware version. Dolby Firmware Version This displays the version of the Dolby piggyback version. Backup all settings to File Clicking BACKUP stores all settings to file. Restore all settings from File Clicking RESTORE restores all settings from the selected file/destination. Chapter 11: Dolby D/E Modules 135 SETUP/ROUTING Page This page configures the module’s audio bus routing. DE901 Web Configuration Setup/Routing page Decoder Input The decoder input can be set to: external Input BNC – or – INT From C8000 System Bus. Decoder This displays the format of the incoming stream: Dolby E, Dolby D, PCM. The SETUP/ROUTING page above shows a Dolby E stream containing two programs (5.1 + 2). AUX Input An AUX input is provided for a PCM signal that may incur Dolby decoding delay. Delay A delay can be applied to an independent digital audio signal (PCM) to compensate for upstream processing or for decoding delay. To C8000 System Bus Select this option to assign the outputs of the decoder to the frame’s audio busses (S1–S32/Off). Output Mux The signals to the audio busses may be multiplexed in 2ch or 8ch mode. In 8ch mode, only one bus selector is available for each of the two eight-channel sections. 136 Modular I/O Configuration Guide Enable Bus Driver To disable the output drivers, de-select Enable Bus Driver. The bus selector labels show the signal configuration of the decoder output lines. Downstream equipment must be configured the same way. Monitor The decoder has a monitor output that depends on the stream being decoded. Select a monitor mode to suit the program. 5.1-channel signals can have the following modes: Mute, Mono, Lt/Rt, Lo/Ro. Error Detection The serial audio data from the frame bus can be monitored to properly position an Error-Flag. A bad Error-Flag indicates a disturbance upstream (i.e., input signal, input module, other DSP module). Error Detection is a global selection but the INT and AUX options can enable error detection for specific bus inputs. The status of the busses is displayed on LEDS on the left. Grey Error detection disabled Green No error detected Red Error condition Bus Status The bus status, as well as the external Input (BNC) status, may be presented to external monitoring systems using SNMP. The frame controller summarizes such status information and generates SNMP traps for the frame as an entity or may activate GPOs (if GPIO module(s) are installed). The SNMP manager may later poll the module’s Status for more detailed status information per input. See “SNMP Functions Setup” on page 62. Chapter 11: Dolby D/E Modules 137 DOLBY E Page Basic program data for Dolby E decoding is displayed on this page. Program-specific Metadata is displayed on the PROG. METADATA Page (see page 139). DE901 Web Configuration Dolby E page Program Config This field displays program mode. Bitstream Format This field displays the bitstream format read by the encoder at the input. Frame Rate This field displays the frame rate of the Dolby frames (boundaries of encoded data blocks). Program Description Text This is a description of the encoded program(s). A full explanation of the Dolby Metadata system is beyond the scope of this manual. We recommend studying the “Dolby Metadata Guide” and other publications available from Dolby (www.dolby.com). 138 Modular I/O Configuration Guide PROG. METADATA Page These metadata values are for display only. The fields are grey to show the content cannot be changed. DE901 Web Configuration Prog. Metadata page GPIO Page If a GPI input is detected by a GPIO module in the system, it puts an associated GPI number on the CAN bus. Each module in a frame monitors for these GPI numbers and performs the programmed action if it reads that number on the CAN bus. DE901 Web Configuration GPIO page GPI: External A GPI can be set to trigger the module's External mode. GPO: External, Dolby E, Dolby D, PCM, Input Error, Metadata Error A GPO output can be set to trigger when these conditions are detected. Do not assign the same GPIO numbers to different functions because this incorrectly triggers multiple functions. Chapter 11: Dolby D/E Modules 139 Technical Specifications External synchronization is possible using SY983 (PAL, NTSC, HD) if Dolby E decoding must be frame-accurate. External input Connector BNC Impedance 75 Signal Level 0, 1–2.5 Vpp Standard AES3, SMPTE 276M unbalanced Data Format 16-, 20-, 24-bit Sample Rate 32–48 kHz Input audio formats Dolby E 16-, 20-, 24-bit streams, 48 kHz Dolby Digital 16 or 32-bit streams, 32–48 kHz Latency Dolby E 1 video frame Dolby Digital 32 ms PCM < 10 ms Metadata Output Format Standard Dolby Metadata stream (RS485) according to SMPTE RDD 6-2008 Baud Rate 115.2 kbps Connector male 9-pin D-Sub General Connector 75 BNC Backplane Connector DIN41612, 64-pin, a+b, male Power Supply +5 VDC Power Consumption ~500 mA Dimension 3 RU, 4 HP (1 slot) Temperature 10–40°C Humidity 90%, non-condensing 140 Modular I/O Configuration Guide DE911 Dolby E Encoder The DE911 encodes Dolby E signals. Features • Dolby E compliant Encoder • Eight channels (up to eight programs) • Audio input resolution: 16-, 20-, or 24-bit; 32–48 kHz • RS485 metadata input • Metadata extractor reads metadata inserted into PCM audio User Bits • Metadata read from frame's internal audio bus, external RS485 input, or presets • Eight metadata presets • Dolby metadata display and editing • Encoded output stream available on frame's internal audio bus and unbalanced AES output • Remote control (web interface) using FC972 Remote DE911 front panel (left) and block diagram (right) Chapter 11: Dolby D/E Modules 141 Installation Considerations To initialize module parameters to their factory default values, press INIT during power up. SW1-1 DE911 installation diagram SW1-1 Functions SW1-1 has four DIP switches that enable/disable BUS-EN and help set the CAN ID. SW1-1C and SW1-1D are unused. To set a switch ON, move it to the right position. Setting BUS-EN The output configuration is taken from the non-volatile memory. • SW1-1 ON connects the outputs to the audio busses on power up. • SW1-1 OFF disconnects the module outputs from the audio busses on power up. To avoid audio bus conflicts when installing or replacing a module and the configuration is unknown, disable the output bus drivers by setting BUS-EN = OFF before inserting it. If all settings are done remotely and the unit fits into the frame’s bus assignment scheme, remove it and set BUS-EN = ON. Setting the CAN ID Each frame must be fitted with an FC972 Remote to externally configure all modules (except analog line in/out and WC984) and control mic preamps remotely using a web browser. Install only one FC972 per frame and up to two SY983s (for redundant operation, differentiated by Master/Slave setting). A Module's system ID consists of the Frame ID + module CAN ID. The Frame ID is determined by the FC972’s IP Address/Subnet/Host Address. The FC972 must be assigned a unique IP Address based on the frame’s role within the system. A CAN ID must be set for each externally controllable module. Most modules have 32 CAN ID settings available but the AD914 Remote Mic Preamp has 16. The FC972 and SY983 have default module CAN IDs that do not interfere with those of other modules. The internal CAN bus must be terminated once per frame, either on the FC972 or SY983. 142 Modular I/O Configuration Guide Using the CAN Address switches on the FC972 or SY983 is an older method of setting the Frame ID. An explicit CAN Address must be set only when employing a hardware CAN-BUS remote controller to configure frames. In System 5, the Frame ID is set with the FC972’s IP Address for configuration using a web browser interface. To set the CAN ID in range 0–15: 1 Set SW1-B to OFF. 2 Use the CAN Rotary Switch to set the CAN ID. To set the CAN ID in range 16–31: 1 Set SW1-B to ON. 2 Use the CAN Rotary Switch to set the CAN ID. Remote Configuration using a Web Browser The DE911 is configured using a web browser interface, which requires fitting an FC972 Remote in the frame. See “FC972 Remote” on page 35. OVERVIEW Page This page provides an overview of the frame’s modules. Click the wrench tool to open the configuration pages of that module. Click the switch tool to open the PRESETS Page directly. wrench tool switch tool DE911 Web Configuration Overview page Chapter 11: Dolby D/E Modules 143 PRESETS Page The DE911 has eight Presets, named PRE1 to PRE8 by default. The status area on the left shows the name of the active preset. When a preset parameter is changed, modified appears to the left of the preset name until it is saved. DE911 Web Configuration Presets page Name This field displays the Preset’s name. Click the name to enter a new name (four letters or less). Load Selecting a Preset name from the Load menu and clicking LOAD NOW loads a new Preset. Save as # Selecting a Preset number from the Save as # menu and clicking SAVE NOW saves the current Preset. Preset Clipboard Clicking COPY TO CLIPBOARD copies the active Preset to the configuration computer’s clipboard. Backup Presets to File Clicking BACKUP saves the eight Presets to a file on the configuration computer. Restore Presets from File Clicking RESTORE restores the Presets from a file on the configuration computer. Settings from the DOLBY E and PROG. METADATA pages are stored in Presets. 144 Modular I/O Configuration Guide DEVICE Page This page displays and configures device-specific parameters. The status area on the left shows the name of the active preset. When a preset parameter is changed, modified appears to the left of the preset name until it is saved. DE911 Web Configuration Device page Device Name This field displays current name. Click CHANGE NAME to rename the device. Restart Module Clicking RESTART initiates a warm start. Initialize and restore factory defaults Clicking INITIALIZE restores factory default settings. The input bus assignment are set to S1–S4, the outputs are turned off and the bus drivers are disabled. Controller Version This displays the module’s firmware version. Dolby Firmware Version This displays the Dolby firmware version. Backup Settings and Presets to File Clicking BACKUP stores all settings and presets to file. Restore Settings and Presets from File Clicking RESTORE restores all settings and presets from the selected file/destination. Chapter 11: Dolby D/E Modules 145 SETUP/ROUTING Page This page configures the module’s audio bus routing. DE911 Web Configuration Setup/Routing page From C8000 System Bus This assigns audio busses to the encoder for their respective signals. The labels at the encoder input show which signals the encoder expects due to its configuration determined by PROGRAM CONFIG (see page 138). If the eight input signals are multiplexed in 8ch mode, make sure the source module is also configured to output in 8ch mode. Input Mux The input signal format can be set to 8ch or 2ch. Metadata Metadata may be inserted in the USER bits of the PCM signal(s) on the frame’s audio busses. Select the audio bus from which metadata should be read. PCM A delay can be applied to an independent signal selected from the bus (PCM or encoded). Delay A two-channel delay (up to 4 frames) is provided to compensate for the Dolby E encoding delay. To C8000 System Bus This assigns the encoder output to the frame’s busses and to the external BNC output. 146 Modular I/O Configuration Guide Enable Bus Driver De-selecting Enable Bus Driver disables the output drivers. External Output BNC The Dolby E-encoded bit stream is sent out over an unbalanced AES3 output in parallel to the audio bus. Metadata Source Preset The program’s metadata and setup parameters for each encoder are defined manually and can be saved in a Preset. A Preset can be loaded, edited and saved. Bus Metadata for the Dolby E encoder is extracted from the USER bits in Metadata Subset format of one of the incoming PCM signals. External (RS485) Metadata for the Dolby E encoder is received by the 9-pin D-Sub connector at the front side of the module in Dolby E format. Error Detection The serial audio data from the frame bus can be monitored to properly position an Error-Flag. A bad Error-Flag indicates a disturbance upstream (i.e., input signal, input module, other DSP module). Error Detection is activated globally but specific bus inputs can be enabled for error detection (Ch 1/2, Ch 3/4, Ch 5/6, Ch 7/8, Ch 9/10). The status of the busses is displayed on LEDS on the left. Grey Error detection disabled Green No error detected Red Error condition Bus Status The bus status, as well as the external Input (BNC) status, may be presented to external monitoring systems using SNMP. The frame controller summarizes such status information and generates SNMP traps for the frame as an entity or may activate GPOs (if GPIO module(s) are installed). The SNMP manager may later poll the module’s Status for more detailed status information per input. See “SNMP Functions Setup” on page 62. Metadata Reversion Mode In case a metadata error occurs, select a method to continue reading metadata. LAST USED Encoding continues with the parameters last used. Stop Encoding The encoding process stops. Chapter 11: Dolby D/E Modules 147 DOLBY E Page This page displays basic program data for Dolby E encoding. DE911 Web Configuration Dolby E page The table below shows the Dolby E parameters and their possible values. Parameter Values Program Configuration 5.1+2, 5.1+2x1, 4+4, 4+2x2, 4+2+2x1, 4+4x1, 4x2, 3x2+2x1, 2x2+4x1, 2+6x1, 8x1, 5.1, 4+2, 4+2x1, 3x2, 2x2+2x1, 2+4x1, 6x1, 7.1, 7.1SCRN Dolby E Bitstream Format 16-, 20-bit Frame Rate None, 23.98 Hz, 24 Hz, 25 Hz (PAL), 29.97 Hz (NTSC), 30 Hz, 59.94 Hz, 60 Hz Latency Reduction (Dolby E alignment) 0–32 samples; moves the beginning of the Dolby E frame towards the start of the video frame Program Description Text 32-character text coded program A full explanation of the Dolby Metadata system is beyond the scope of this manual. We recommend studying the “Dolby Metadata Guide” and other publications available from Dolby (www.dolby.com). 148 Modular I/O Configuration Guide PROG. METADATA Page The PROG. METADATA page contains the Dolby E Encoder metadata parameters. DE911 Web Configuration Prog. Metadata page The table on the next page is an example for two programs. The Data Rate depends on the Channel Mode; some Channel Modes require a minimum Data Rate. A full explanation of the Dolby Metadata system is beyond the scope of this manual. We recommend studying the “Dolby Metadata Guide” and other publications available from Dolby (www.dolby.com). Chapter 11: Dolby D/E Modules 149 Dolby Digital Metadata For DE911 Encoders Parameter Values – Program 1 Values – Program 2 Data Rate (kbps) 32, 40, 48, 56, 64, 80,96, 112, 128, 160, 192, 224, 256, 320, 384, 448, 512, 576, 640, unspecified 32, 40, 48, 56, 64, 80, 96, 112, 128, 160, 192, 224, 256, 320, 384, 448, 512, 576, 640, unspecified Channel Mode 1+1, 1/0, 2/0, 3/0, 2/1, 3/1, 2/2, 3/2 1+1, 1/0, 2/0 LFE OFF, ON N/A Bit Stream Mode C, Main, Mus Eff, Vis. Imp., H. Imp., Dialog, Comment, Emerg., Karaoke C, Main, Mus Eff, Vis. Imp., H. Imp., Dialog, Comment, Emerg., Karaoke Original Bit Stream OFF, ON OFF, ON Copyright OFF, ON OFF, ON Dialog Normalization -1 dBFS to -31 dBFS -1 dBFS to -31 dBFS Profile Line Modes None, Film St., Film Lt., Mus. St., Mus. Lt., Speech None, Film St., Film Lt., Mus. St., Mus. Lt., Speech Profile RF Mode None, Film St., Film Lt., Mus. St., Mus. Lt., Speech None, Film St., Film Lt., Mus. St., Mus. Lt., Speech DC-Highpass OFF, ON OFF, ON Low Pass OFF, ON OFF, ON LFE Low Pass OFF, ON N/A RF Overmod. Prot. OFF, ON OFF, ON Surround -3dB OFF, ON N/A Surround Phase Shift OFF, ON N/A Nominal Center Mix Level -3 dB, -4.5 dB, -6 dB N/A Nominal Surr. Mix Level -3 dB, -6 dB, Off N/A Preferred Downmix Mode Not indicated, Lt/Rt, Lo/Ro N/A Lo/Ro Center Mix Level Off, -6 dB, -4.5 dB, -3 dB, -1.5 dB, 0 dB, 1.5 dB, 3 dB N/A Lo/Ro Surr. Mix Level Off, -6 dB, -4.5 dB, -3 dB, -1.5 dB, 0 dB, 1.5 dB, 3 dB N/A Lt/Rt Center Mix Level Off, -6 dB, -4.5 dB, -3 dB, -1.5 dB, 0 dB, 1.5 dB, 3 dB N/A Lt/Rt Surr. Mix Level Off, -6 dB, -4.5 dB, -3 dB, -1.5 dB, 0 dB, 1.5 dB, 3 dB N/A General Dynamic Range Control Filter Downmix 150 Modular I/O Configuration Guide GPIO Page If a GPI input is detected by a GPIO module in the system, it puts an associated GPI number on the CAN bus. Each module in a frame monitors for these GPI numbers and performs the programmed action upon reading that number on the CAN bus. DE911 Web Configuration GPIO page GPI: PRESET 1–8 A GPI can be set to trigger a module Preset. GPO: PRESET 1–8 A a GPO can be set to trigger when a module Preset is recalled. GPO: Videoref Error, Encoding Error, Metadata Error A GPO output can be set to trigger when these conditions are detected. Do not assign the same GPIO numbers to different functions because this incorrectly triggers multiple functions. Chapter 11: Dolby D/E Modules 151 Technical Specifications External input Connector BNC Impedance 75 Signal Level 0, 1–2.5 Vpp Standard AES3, SMPTE 276M unbalanced Data Format 16-, 20-, 24-bit Sample Rate 32–48 kHz Output audio formats Dolby E 16-, 20-bit, 48 kHz Latency 1 video frame Metadata Input Format Standard Dolby Metadata stream (RS485) Baud Rate 115.2 kbps Connector male 9-pin D-Sub General Connector 75 BNC Backplane Connector DIN41612, 64-pin, a+b, male Power Supply +5 VDC Power Consumption ~600 mA Dimension 3 RU, 4 HP (1 slot) Temperature 10–40°C Humidity 90%, non-condensing 152 Modular I/O Configuration Guide DE912 Dolby D/D+ Encoder The DE912 encodes Dolby D/D+ signals. Features • Fully compliant Dolby Digital (AC-3) or Dolby Digital+ Encoder • Independent 5.1- and 2.0-channel encoders • 5.1 transcoder from Dolby Digital (AC-3) to Dolby Digital+ • 16-, 20-, 24-bit audio input data format • RS485 metadata input • Metadata selectable from audio/external inputs or presets • Unique metadata extractor gathers metadata from frame’s audio busses • Eight metadata presets • Dolby metadata display and editing • Encoded output stream available on internal bus and BNC • Dolby encoded signals on unbalanced, AES output • Remote control (web interface) using FC972 Remote DE912 front panel (left) and block diagram (right) Chapter 11: Dolby D/E Modules 153 Installation Considerations To initialize module parameters to their factory default values, press INIT during power up. SW1-1 DE912 installation diagram SW1-1 Functions SW1-1 has four DIP switches that enable/disable BUS-EN and help set the CAN ID. SW1-1C is unused. To set a switch ON, move it to the right position. Setting BUS-EN The output configuration is taken from the non-volatile memory. • SW1-1 ON connects the outputs to the audio busses on power up. • SW1-1 OFF disconnects the module outputs from the audio busses on power up. To avoid audio bus conflicts when installing or replacing a module and the configuration is unknown, disable the output bus drivers by setting BUS-EN = OFF before inserting it. If all settings are done remotely and the unit fits into the frame’s bus assignment scheme, remove it and set BUS-EN = ON. 154 Modular I/O Configuration Guide Setting the CAN ID Each frame must be fitted with an FC972 Remote to externally configure all modules (except analog line in/out and WC984) and control mic preamps remotely using a web browser. Install only one FC972 per frame and up to two SY983s (for redundant operation, differentiated by Master/Slave setting). A Module's system ID consists of the Frame ID + module CAN ID. The Frame ID is determined by the FC972’s IP Address/Subnet/Host Address. The FC972 must be assigned a unique IP Address based on the frame’s role within the system. A CAN ID must be set for each externally controllable module. Most modules have 32 CAN ID settings available but the AD914 Remote Mic Preamp has 16. The FC972 and SY983 have default module CAN IDs that do not interfere with those of other modules. The internal CAN bus must be terminated once per frame, either on the FC972 or SY983. Using the CAN Address switches on the FC972 or SY983 is an older method of setting the Frame ID. An explicit CAN Address must be set only when employing a hardware CAN-BUS remote controller to configure frames. In System 5, the Frame ID is set with the FC972’s IP Address for configuration using a web browser interface. To set the CAN ID in range 0–15: 1 Set SW1-B to OFF. 2 Use the CAN Rotary Switch to set the CAN ID. To set the CAN ID in range 16–31: 1 Set SW1-B to ON. 2 Use the CAN Rotary Switch to set the CAN ID. Status LEDs Green OK Red Bad Flashing The module is in focus of the frame controller Green Under GUI control Dolby D LEDs Green Proper signal detected for Dolby D encoding Off Dolby D encoding error Dolby D+ LEDs Blue Encoding a proper Dolby D+ signal Off Dolby D+ encoding error Chapter 11: Dolby D/E Modules 155 Remote Configuration using a Web Browser The DE912 is configured using a web browser interface, which requires fitting an FC972 Remote in the frame. See “FC972 Remote” on page 35. OVERVIEW Page This page provides an overview of the frame’s modules. Click the wrench tool to open the configuration pages of that module. Click the switch tool to open the PRESETS Page directly. wrench tool switch tool DE912 Web Configuration Overview page 156 Modular I/O Configuration Guide PRESETS Page The DE912 has eight Presets, named PRE1 to PRE8 by default. The status area on the left shows the name of the active preset. When a preset parameter is changed, modified appears to the left of the preset name until it is saved. DE912 Web Configuration Presets page Name This field displays the Preset’s name. Click the name to enter a new name (four letters or less). Load Selecting a Preset name from the Load menu and clicking LOAD NOW loads a new Preset. Save as # Selecting a Preset number from the Save as # menu and clicking SAVE NOW saves the current Preset. Preset Clipboard Clicking COPY TO CLIPBOARD copies the active Preset to the configuration computer’s clipboard. Backup Presets to File Clicking BACKUP saves the eight Presets to a file on the configuration computer. Restore Presets from File Clicking RESTORE restores the Presets from a file on the configuration computer. Settings from the DOLBY E and PROG. METADATA pages are stored in Presets. Chapter 11: Dolby D/E Modules 157 DEVICE Page This page displays and configures device-specific parameters. The status area on the left shows the name of the active preset. When a preset parameter is changed, modified appears to the left of the preset name until it is saved. DE912 Web Configuration Device page Device Name This field displays current name. Click CHANGE NAME to rename the device. Restart Module Clicking RESTART initiates a warm start. Initialize and restore factory defaults Clicking INITIALIZE restores factory default settings. The input bus assignment are set to S1–S4, the outputs are turned off and the bus drivers are disabled. Controller Version This displays the module’s firmware version. Dolby Firmware Version This displays the Dolby firmware version. Backup Settings and Presets to File Clicking BACKUP stores all settings and presets to file. Restore Settings and Presets from File Clicking RESTORE restores all settings and presets from the selected file/destination. 158 Modular I/O Configuration Guide SETUP/ROUTING Page This page configures the module’s audio bus routing. DE912 Web Configuration Setup/Routing page From C8000 System Bus This assigns audio busses to the encoder for their respective signals. The encoder input labels show the configuration of signals the encoder expects. For example, if the eight input signals are multiplexed in 8ch mode, make sure the source module is also configured to output in 8ch mode. Metadata Metadata may be inserted in the USER bits of the PCM signal(s) on the frame’s audio busses. Select the audio bus from which metadata should be read. Input Mux The input signal format can be set to 8ch or 2ch. AC-3 An AC-3 signal may be provided on the Ch 9/10 source for D-to-D+ transcoding. Gain This field sets the gain to the encoders. Chapter 11: Dolby D/E Modules 159 To C8000 System Bus This assigns the encoder output to the frame’s busses and to the external BNC output. Enable Bus Driver De-selecting Enable Bus Driver disables the output drivers. Mode The Dolby module offers the following operating modes for both encoders: • PCM encoding to Dolby D or Dolby D+ • Dolby D-to-D+ transcoding. Metadata Source Preset The program’s metadata and setup parameters for each encoder are defined manually and can be saved in a Preset. A Preset can be loaded, edited and saved. Bus Metadata for the encoder is extracted from the USER bits in Metadata Subset format of one of the incoming PCM signals. External (RS485) Metadata for the encoder is received by the 9-pin D-Sub connector on the front of the module. Error Detection The serial audio data from the frame bus can be monitored to properly position an Error-Flag. A bad Error-Flag indicates a disturbance upstream (i.e., input signal, input module, other DSP module). Error Detection is activated globally but specific bus inputs can be enabled for error detection (Ch 1/2, Ch 3/4, Ch 5/6, Ch 7/8, Ch 9/10). The status of the busses is displayed on LEDS on the left. Grey Error detection disabled Green No error detected Red Error condition Bus Status The bus status, as well as the external Input (BNC) status, may be presented to external monitoring systems using SNMP. The frame controller summarizes such status information and generates SNMP traps for the frame as an entity or may activate GPOs (if GPIO modules are installed). The SNMP manager may later poll the module’s status for more detailed information per input. See “SNMP Functions Setup” on page 62. Channel Status Bits Select Professional or Consumer status bits for bus outputs OUT1 and OUT2 and the BNC output. METADATA ENC 1 Page The METADATA ENC 1 Page adjusts metadata parameters if the Metadata Source for the encoder is set to Preset on the SETUP/ROUTING Page. In Preset mode, Extended Bitstream Information is enabled. In this case the Nominal Center and Surround Mix Level are mapped from the Lo/Ro parameters. If the Metadata Source is set to Bus, it is possible to manually overwrite the Data Rate value. A full explanation of the Dolby Metadata system is beyond the scope of this manual. We recommend studying the “Dolby Metadata Guide” and other publications available from Dolby (www.dolby.com). 160 Modular I/O Configuration Guide DE912 Web Configuration METADATA ENC 1 page Chapter 11: Dolby D/E Modules 161 METADATA ENC 2 Page The METADATA ENC 2 Page supports adjustment of metadata parameters if the Metadata Source for the encoder is set to Preset on the SETUP/ROUTING Page. DE912 Web Configuration Metadata Enc 2 page The table on the next page is an example for two programs. The Data Rate depends on the Channel Mode; some Channel Modes require a minimum Data Rate. A full explanation of the Dolby Metadata system is beyond the scope of this manual. We recommend studying the “Dolby Metadata Guide” and other publications available from Dolby (www.dolby.com). 162 Modular I/O Configuration Guide Dolby Digital Metadata For DE912 Encoder Parameter Values – Program 1 Values – Program 2 General Channel Mode 1+1, 1/0, 2/0, 3/0, 2/1, 3/1, 2/2, 3/2 1+1, 1/0, 2/0 LFE OFF, ON N/A Bit Stream Mode C, Main, Mus Eff, Vis. Imp., H. Imp., Dialog, Comment, Emerg., Karaoke C, Main, Mus Eff, Vis. Imp., H. Imp., Dialog, Comment, Emerg., Karaoke Original Bit Stream OFF, ON OFF, ON Copyright OFF, ON OFF, ON Dialog Normalization -1 dBFS to -31 dBFS -1 dBFS to -31 dBFS Profile Line Modes None, Film St., Film Lt., Mus. St., Mus. Lt., Speech None, Film St., Film Lt., Mus. St., Mus. Lt., Speech Profile RF Mode None, Film St., Film Lt., Mus. St., Mus. Lt., Speech None, Film St., Film Lt., Mus. St., Mus. Lt., Speech DC-Highpass OFF, ON OFF, ON Low Pass OFF, ON OFF, ON LFE Low Pass OFF, ON N/A RF Overmod. Prot. OFF, ON OFF, ON Surround -3dB OFF, ON N/A Surround Phase Shift OFF, ON N/A Nominal Center Mix Level -3 dB, -4.5 dB, -6 dB N/A Nominal Surr. Mix Level -3 dB, -6 dB, Off N/A Preferred Downmix Mode Not indicated, Lt/Rt, Lo/Ro N/A Lo/Ro Center Mix Level Off, -6 dB, -4.5 dB, -3 dB, -1.5 dB, 0 dB, 1.5 dB, 3 dB N/A Lo/Ro Surr. Mix Level Off, -6 dB, -4.5 dB, -3 dB, -1.5 dB, 0 dB, 1.5 dB, 3 dB N/A Lt/Rt Center Mix Level Off, -6 dB, -4.5 dB, -3 dB, -1.5 dB, 0 dB, 1.5 dB, 3 dB N/A Lt/Rt Surr. Mix Level Off, -6 dB, -4.5 dB, -3 dB, -1.5 dB, 0 dB, 1.5 dB, 3 dB N/A Dynamic Range Control Filter Downmix Chapter 11: Dolby D/E Modules 163 GPIO Page If a GPI input is detected by a GPIO module in the system, it puts an associated GPI number on the CAN bus. Each frame module monitors for these GPI numbers and performs the programmed action upon reading that number on the CAN bus. DE912 Web Configuration GPIO page GPI: PRESET 1–16 A GPI can be set to trigger a module Preset. GPO: PRESET 1–16 A GPO can be set to trigger when a module Preset is recalled. GPO: Metadata Error Encoder 1, Metadata Error Encoder 2 A GPO can be set to trigger when these conditions are detected. Do not assign the same GPIO numbers to different functions because this incorrectly triggers multiple functions. 164 Modular I/O Configuration Guide Technical Specifications External output Connector BNC Impedance 75 Signal Level 1 Vpp Standard AES3, SMPTE 276M unbalanced Data Format 16-, 20-, 24-bit Sample Rate 48 kHz Output audio formats Dolby D (AC-3) 16--bit Dolby D+ (AC-3/E) 16- or 32-bit Latency Dolby D: 91 ms Dolby D+: 112 ms Metadata Input Format Standard Dolby metadata stream (RS485) Baud Rate 115.2 kbps Connector D-Sub, 9-pin, male General Connector 75 BNC Backplane Connector DIN41612, 64-pin, a+b, male Power Supply +5 VDC Power Consumption ~600 mA Dimension 3 RU, 4 HP (1 slot) Temperature 10–40°C Humidity 90%, non-condensing Chapter 11: Dolby D/E Modules 165 166 Modular I/O Configuration Guide Appendix A: Compliance Information Environmental Compliance Disposal of Waste Equipment by Users in the European Union EMC (Electromagnetic Compliance) Avid declares that this product complies with the following standards regulating emissions and immunity: • FCC Part 15 Class A • EN55103-1 E4 • EN55103-2 E4 • AS/NZS CISPR 22 Class A • CISPR 22 Class A FCC Compliance for United States Communication Statement This symbol on the product or its packaging indicates that this product must not be disposed of with other waste. Instead, it is your responsibility to dispose of your waste equipment by handing it over to a designated collection point for the recycling of waste electrical and electronic equipment. The separate collection and recycling of your waste equipment at the time of disposal will help conserve natural resources and ensure that it is recycled in a manner that protects human health and the environment. For more information about where you can drop off your waste equipment for recycling, please contact your local city recycling office or the dealer from whom you purchased the product. Proposition 65 Warning This product contains chemicals, including lead, known to the State of California to cause cancer and birth defects or other reproductive harm. Wash hands after handling. Perchlorate Notice Note: This equipment has been tested and found to comply with the limits for a Class A digital device, pursuant to part 15 of the FCC Rules. These limits are designed to provide reasonable protection against harmful interference when the equipment is operated in a commercial environment. This equipment generates, uses, and can radiate radio frequency energy and, if not installed and used in accordance with the instruction manual, may cause harmful interference to radio communications. Operation of this equipment in a residential area is likely to cause harmful interference in which case the user will be required to correct the interference at his own expense. Any modifications to the unit, unless expressly approved by Avid, could void the user's authority to operate the equipment. Australian Compliance N1709 This product may contain a lithium coin battery. The State of California requires the following disclosure statement: “Perchlorate Material – special handling may apply, See www.dtsc.ca.gov/hazardouswaste/perchlorate.” Canadian Compliance Recycling Notice This Class A digital apparatus meets all requirements of the Canadian Interference-Causing Equipment Regulations. Cet appareil numérique de la classe A respecte toutes les exigences du Règlement sur le material brouilleur du Canada. CE Compliance (EMC and Safety) Avid is authorized to apply the CE (Conformité Europénne) mark on this compliant equipment thereby declaring conformity to EMC Directive 2004/108/EC and Low Voltage Directive 2006/95/EC. Appendix A: Compliance Information 167 Safety Compliance Safety Statement This equipment has been tested to comply with USA and Canadian safety certification in accordance with the specifications of UL Standards: UL60950-1:2007, 2nd Ed and CAN/CSA C22.2 No. 60950-1-07, 2nd Ed. Avid Technology Inc., has been authorized to apply the appropriate NRTL mark on its compliant equipment. Warning 13) Unplug this equipment during lightning storms or when unused for long periods of time. 14) Refer all servicing to qualified service personnel. Servicing is required when the equipment has been damaged in any way, such as power-supply cord or plug is damaged, liquid has been spilled or objects have fallen into the equipment, the equipment has been exposed to rain or moisture, does not operate normally, or has been dropped. 15) For products that are a Mains powered device: The equipment shall not be exposed to dripping or splashing and no objects filled with liquids (such as vases) shall be placed on the equipment. Warning! To reduce the risk of fire or electric shock, do not expose this equipment to rain or moisture. 16) For products containing a lithium battery: CAUTION! Danger of explosion if battery is incorrectly replaced. Replace only with the same or equivalent type. 17) For products with a power switch: It should remain accessible after installation. 18) The equipment shall be used at a maximum ambient temperature of 40° C. Important Safety Instructions 1) Read these instructions. 19) This unit is provided with a power supply cord set suitable for 120V AC input only (for U.S.A.and Canada). For other than U.S.A. and Canada, a qualified person must provide for use with this unit, an appropriate, approved power supply cord set which is in compliance with the end use country requirements and has a minimum cross-sectional area of 1.0mm2. 2) Keep these instructions. 20) For products with more than one power cord: 3) Heed all warnings. CAUTION: This unit has more than one power supply cord. Disconnect two power supply cords before servicing to avoid electrical shock. 4) Follow all instructions. 5) Do not use this equipment near water. 6) Clean only with dry cloth. 7) Do not block any ventilation openings. Install in accordance with the manufacturer’s instructions. 8) Do not install near any heat sources such as radiators, heat registers, stoves, or other equipment (including amplifiers) that produce heat. 9) Do not defeat the safety purpose of the polarized or grounding-type plug. A polarized plug has two blades with one wider than the other. A grounding type plug has two blades and a third grounding prong. The wide blade or the third prong are provided for your safety. If the provided plug does not fit into your outlet, consult an electrician for replacement of the obsolete outlet. 10) Protect power cords from being walked on or pinched particularly at plugs, convenience receptacles, and the point where they exit from the equipment. 11) Only use attachments/accessories specified by the manufacturer. 12) For products that are not rack-mountable: Use only with a cart, stand, tripod, bracket, or table specified by the manufacturer, or sold with the equipment. When a cart is used, use caution when moving the cart/equipment combination to avoid injury from tip-over. 168 Modular I/O Configuration Guide ATTENTION: Cet appareil comporte plus d’un cordon d’alimentation. Afin de prévenir les chocs électriques, débrancher les deux cordons d’alimentation avant de faire le dépannage. 21) For products with an operator-accessible fuse: CAUTION: For continued protection against risk of fire, replace only with same type and rating of fuse. ATTENTION: Pour ne pas compromettre la protection contre les risques d’incendie, remplacer par un fusible de même type et de même caractéristiques nominales. Avid Technical Support (USA) Product Information 2001 Junipero Serra Boulevard Daly City, CA 94014-3886 USA Visit the Online Support Center at www.avid.com/support For company and product information, visit us on the web at www.avid.com