1
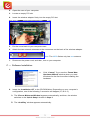
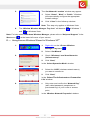
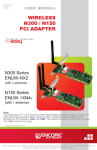
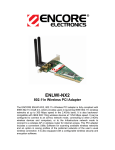
© 2010 Encore Electronics, Inc. Product specifications, size, and shape are subject to change without notice, and actual product appearance may differ from that depicted herein. All trademarks and brand names are the properties of their respective holders. TABLE OF CONTENTS A— OVERVIEW ....................................................................................... 2 A.1 PACKAGE CONTENTS ...................................................................... 2 A.2 SYSTEM REQUIREMENTS................................................................. 2 B— HARDWARE INSTALLATION .......................................................... 2 C— SOFTWARE INSTALLATION .......................................................... 3 D— USING WINDOWS WIRELESS MANAGER IN WINDOWS 7 AND ® ® WINDOWS VISTA ........................................................................... 5 ® E— USING ENCORE WIRELESS WIZARD IN WINDOWS XP ........... 6 F— TECHNICAL SUPPORT ................................................................... 7 Product specifications, size, and shape are subject to change without notice, and actual product appearance may differ from that depicted herein. All trademarks and brand names are the properties of their respective holders. © 2010 Encore Electronics, Inc. All rights reserved. 1 www.encore-usa.com A — Overview Thank you for choosing Encore Electronics‟ Wireless N300/N150 PCI Adapter (ENLWI-NX2 or ENLWI-1XN42). This pamphlet explains the essential steps to connect to your home or office wireless network. For more details and screenshots, please refer to the User Manual in the Installation CD. A.1 Package Contents Wireless N300/N150 PCI Adapter x1 Quick Installation Guide x1 Installation CD (User Manual on CD) x1 Detachable, External 2dBi Antennas* x 2 (for N300 series) x 1 (for N150 series) * Encore Electronics‟ Wireless N300/N150 PCI Adapter comes with different type of antennas. The antennas show on the front cover are 2dBi antennas. Other type of antennas, such as 3dBi and 5dBi antennas, are also available. A.2 System Requirements Available PCI slot Operating System: Windows® 7, Windows Vista®, or Windows® XP CD-ROM Drive A.3 Product Performance The two charts below indicate the RELATIVE performance among the Wireless N300/N150 PCI Adapters. The product name tells you the adapter‟s maximum theoretical speed. The type of antenna tells you an adapter‟s range. B — Hardware Installation 1. Shut down your computer, and then, disconnect your computer‟s power cord. 2 www.encore-usa.com 2. Open the case of your computer 3. Locate an empty PCI slot. 4. Insert the wireless adapter firmly into the empty PCI slot. 5. Put the cover back to your computer case. 6. Attach the two external antennas to the connectors on the back of the wireless adapter. Note: The N150 Series only has one antenna. 7. Reconnect the power cord, and then, turn on your computer. C — Software Installation 1. 2. Click “Cancel,” if you see the „Found New Hardware Wizard‟ window when you start Windows for the first time after installing the hardware. Insert the „Installation CD” to the CD-ROM drive. Depending on your computer‟s configuration, one of the following 3 scenarios will happen (A , B or C). A. The „Encore Welcome Window‟ appears automatically, and then, the window switches to the „Quick Setup‟ window in Step 3. B. The „AutoPlay‟ window appears automatically 3 www.encore-usa.com If you see the „AutoPlay‟ window instead, select “Run autorun.exe.” C. Use ‘Run Command‟ when A or B does not appear. If neither the „Encore Welcome Window nor the „AutoPlay‟ window appears, type “D:\autorun.exe” in the “Run Command” window in the Start menu ( ) („D‟ is the drive letter of your CD-ROM drive). Note: You can use “Browse” to find the CD-ROM drive letter. If the “Run command” window is not in the Start menu, go to the Start menu ( → type “run” in the “search box” → select “Run” in the list of results. 3. Quick Setup Window Click the “Software & Driver Installation )” icon. ( 4. ) Follow the on-screen instructions. Note: Click “Yes” to continue, if you see „Do you want to allow the following program to make changes to this computer?‟ in the „User Account Control‟ window in Windows 7 or Windows Vista. Click “Install this driver software anyway,” if you see „Windows can’t verify the publisher of this driver software‟ in the „Windows Security‟ window in Windows 7 or Windows Vista. 4 www.encore-usa.com Click “Continue Anyway,” if you see this warning message in the „Hardware Installation‟ window in Windows XP. ® D — Using Windows Wireless Manager in Windows 7 and Windows Vista 1. Windows 7 Tray Icon Left-click on the “Windows Wireless Manager Tray Icon” ( in Windows 7 and in Windows Vista). Windows Vista Tray Icon Note: If you cannot see the icon, click the “Show hidden icons ( 2. )” arrow in the system tray. Click “Connect to a network” (NOT “Network and Sharing center.”) Note: This step only applies to Windows Vista. 3. 1. Select the “Wireless Network Connection” of your choice. 2. Click “Connect.” 4. 1. Enter the “Security Key” (also called password, passphrase or pre-shared key). 2. Click “OK.” Note: If no wireless security is turned on, the warning message „Information sent over this network might be visible to others.‟ will appear. Select “Connect Anyway” if you want to proceed. 5 www.encore-usa.com ® The „Set Network Location‟ window may appear. 5. 1. Select “Home”, “Work” or “Public.” Windows will automatically configure the appropriate firewall settings. 2. Click “Close” in the follow-up window. Note: This step only applies to Windows Vista. 6. The “Window Wireless Manager Tray Icon” will become and in Windows 7 in Windows Vista Note: For help with the Windows Wireless Manager, please refer to “Help and Support” in the Start menu ( ) at the lower left corner of your screen. E — Using Encore Wireless Wizard in Windows XP 1. 1. ® Right-click on the “Encore Wireless Manager Tray Icon ( 2. ).” 2. Select “Set Wizard.” 1. Check “Wireless Local Area Networks (Infrastructure).” 2. Click “Next,” in the „Select Operation Mode‟ window. 3. 1. Select the „SSID’ (wireless network name) you want to connect to. 2. Click “Next,” in the „Select The Infrastructure Connection List‟ window. 4. Only enter and confirm the “Network Key” (also called password, passphrase or pre-shared key) of your router or access point, in the „Wireless Network Properties‟ window. 6 www.encore-usa.com 5. 1. Check “Obtain an IP address automatically” and “Obtain DNS server address automatically.” 2. Click “Finish,” in the “Setup TCP/IP” window. 6. The „Encore Wireless Manager Tray Icon‟ at the lower right corner of the screen will become green ( ) when connection is successful. F — Technical Support Before you contact our technical support, please read the User Manual in the Installation CD and visit the support section in our website at www.Encore-USA.com. You can submit your support request directly on our webpage. You can also reach us through one of the support hotlines or emails listed on the back of this pamphlet. 7 www.encore-usa.com –– * Local tech-support numbers are provided in selected countries. Service may change without prior notice. Please visit www.encore-usa.com for more details. 8 Product specifications, size, and shape are subject to change without notice, and actual product appearance may differ from that depicted herein. www.encore-usa.com All trademarks and brand names are the properties of their respective holders.