1
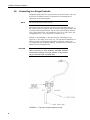
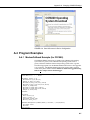
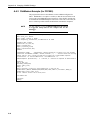
INSTRUCTION MANUAL COM220 Telephone Modem Revision: 3/15 C o p y r i g h t © 1 9 9 7 - 2 0 1 5 C a m p b e l l S c i e n t i f i c , I n c . Limited Warranty “Products manufactured by CSI are warranted by CSI to be free from defects in materials and workmanship under normal use and service for twelve months from the date of shipment unless otherwise specified in the corresponding product manual. (Product manuals are available for review online at www.campbellsci.com.) Products not manufactured by CSI, but that are resold by CSI, are warranted only to the limits extended by the original manufacturer. Batteries, fine-wire thermocouples, desiccant, and other consumables have no warranty. CSI’s obligation under this warranty is limited to repairing or replacing (at CSI’s option) defective Products, which shall be the sole and exclusive remedy under this warranty. The Customer assumes all costs of removing, reinstalling, and shipping defective Products to CSI. CSI will return such Products by surface carrier prepaid within the continental United States of America. To all other locations, CSI will return such Products best way CIP (port of entry) per Incoterms ® 2010. This warranty shall not apply to any Products which have been subjected to modification, misuse, neglect, improper service, accidents of nature, or shipping damage. This warranty is in lieu of all other warranties, expressed or implied. The warranty for installation services performed by CSI such as programming to customer specifications, electrical connections to Products manufactured by CSI, and Product specific training, is part of CSI's product warranty. CSI EXPRESSLY DISCLAIMS AND EXCLUDES ANY IMPLIED WARRANTIES OF MERCHANTABILITY OR FITNESS FOR A PARTICULAR PURPOSE. CSI hereby disclaims, to the fullest extent allowed by applicable law, any and all warranties and conditions with respect to the Products, whether express, implied or statutory, other than those expressly provided herein.” Assistance Products may not be returned without prior authorization. The following contact information is for US and international customers residing in countries served by Campbell Scientific, Inc. directly. Affiliate companies handle repairs for customers within their territories. Please visit www.campbellsci.com to determine which Campbell Scientific company serves your country. To obtain a Returned Materials Authorization (RMA), contact CAMPBELL SCIENTIFIC, INC., phone (435) 227-9000. After an application engineer determines the nature of the problem, an RMA number will be issued. Please write this number clearly on the outside of the shipping container. Campbell Scientific’s shipping address is: CAMPBELL SCIENTIFIC, INC. RMA#_____ 815 West 1800 North Logan, Utah 84321-1784 For all returns, the customer must fill out a “Statement of Product Cleanliness and Decontamination” form and comply with the requirements specified in it. The form is available from our web site at www.campbellsci.com/repair. A completed form must be either emailed to [email protected] or faxed to (435) 227-9106. Campbell Scientific is unable to process any returns until we receive this form. If the form is not received within three days of product receipt or is incomplete, the product will be returned to the customer at the customer’s expense. Campbell Scientific reserves the right to refuse service on products that were exposed to contaminants that may cause health or safety concerns for our employees. Precautions DANGER — MANY HAZARDS ARE ASSOCIATED WITH INSTALLING, USING, MAINTAINING, AND WORKING ON OR AROUND TRIPODS, TOWERS, AND ANY ATTACHMENTS TO TRIPODS AND TOWERS SUCH AS SENSORS, CROSSARMS, ENCLOSURES, ANTENNAS, ETC. FAILURE TO PROPERLY AND COMPLETELY ASSEMBLE, INSTALL, OPERATE, USE, AND MAINTAIN TRIPODS, TOWERS, AND ATTACHMENTS, AND FAILURE TO HEED WARNINGS, INCREASES THE RISK OF DEATH, ACCIDENT, SERIOUS INJURY, PROPERTY DAMAGE, AND PRODUCT FAILURE. TAKE ALL REASONABLE PRECAUTIONS TO AVOID THESE HAZARDS. CHECK WITH YOUR ORGANIZATION'S SAFETY COORDINATOR (OR POLICY) FOR PROCEDURES AND REQUIRED PROTECTIVE EQUIPMENT PRIOR TO PERFORMING ANY WORK. Use tripods, towers, and attachments to tripods and towers only for purposes for which they are designed. Do not exceed design limits. Be familiar and comply with all instructions provided in product manuals. Manuals are available at www.campbellsci.com or by telephoning (435) 227-9000 (USA). You are responsible for conformance with governing codes and regulations, including safety regulations, and the integrity and location of structures or land to which towers, tripods, and any attachments are attached. Installation sites should be evaluated and approved by a qualified engineer. If questions or concerns arise regarding installation, use, or maintenance of tripods, towers, attachments, or electrical connections, consult with a licensed and qualified engineer or electrician. General • Prior to performing site or installation work, obtain required approvals and permits. Comply with all governing structure-height regulations, such as those of the FAA in the USA. • Use only qualified personnel for installation, use, and maintenance of tripods and towers, and any attachments to tripods and towers. The use of licensed and qualified contractors is highly recommended. • Read all applicable instructions carefully and understand procedures thoroughly before beginning work. • Wear a hardhat and eye protection, and take other appropriate safety precautions while working on or around tripods and towers. • Do not climb tripods or towers at any time, and prohibit climbing by other persons. Take reasonable precautions to secure tripod and tower sites from trespassers. • Use only manufacturer recommended parts, materials, and tools. Utility and Electrical • You can be killed or sustain serious bodily injury if the tripod, tower, or attachments you are installing, constructing, using, or maintaining, or a tool, stake, or anchor, come in contact with overhead or underground utility lines. • Maintain a distance of at least one-and-one-half times structure height, 20 feet, or the distance required by applicable law, whichever is greater, between overhead utility lines and the structure (tripod, tower, attachments, or tools). • Prior to performing site or installation work, inform all utility companies and have all underground utilities marked. • Comply with all electrical codes. Electrical equipment and related grounding devices should be installed by a licensed and qualified electrician. Elevated Work and Weather • Exercise extreme caution when performing elevated work. • Use appropriate equipment and safety practices. • During installation and maintenance, keep tower and tripod sites clear of un-trained or nonessential personnel. Take precautions to prevent elevated tools and objects from dropping. • Do not perform any work in inclement weather, including wind, rain, snow, lightning, etc. Maintenance • Periodically (at least yearly) check for wear and damage, including corrosion, stress cracks, frayed cables, loose cable clamps, cable tightness, etc. and take necessary corrective actions. • Periodically (at least yearly) check electrical ground connections. WHILE EVERY ATTEMPT IS MADE TO EMBODY THE HIGHEST DEGREE OF SAFETY IN ALL CAMPBELL SCIENTIFIC PRODUCTS, THE CUSTOMER ASSUMES ALL RISK FROM ANY INJURY RESULTING FROM IMPROPER INSTALLATION, USE, OR MAINTENANCE OF TRIPODS, TOWERS, OR ATTACHMENTS TO TRIPODS AND TOWERS SUCH AS SENSORS, CROSSARMS, ENCLOSURES, ANTENNAS, ETC. Table of Contents PDF viewers: These page numbers refer to the printed version of this document. Use the PDF reader bookmarks tab for links to specific sections. 1. Introduction ................................................................. 1 1.1 1.2 General Description ............................................................................. 1 Computer Requirements ...................................................................... 3 2. Specifications ............................................................. 3 3. Installation ................................................................... 3 3.1 3.2 3.3 3.4 3.5 3.6 Connecting to Datalogger .................................................................... 3 Connecting to Earth Ground ................................................................ 5 LoggerNet Setup .................................................................................. 6 Telephone to MD485 or Telephone to RF Systems ............................. 7 Telephone Service ................................................................................ 7 Connecting to a Surge Protector .......................................................... 8 4. Modem Settings .......................................................... 9 5. Troubleshooting........................................................ 10 Appendices A. Changing COM220 Settings ................................... A-1 A.1 A.2 A.3 A.4 DIP Switch Settings ........................................................................ A-1 Hayes AT Commands ..................................................................... A-2 Downloading a New Operating System to the COM220 ................ A-6 Program Examples .......................................................................... A-7 A.4.1 ModemCallback Example (for CR1000) ................................. A-7 A.4.2 DialModem Example (for CR1000) ........................................ A-8 A.4.3 P97 Instruction (for CR10X) ................................................... A-9 A.4.4 Example Programs for Data Callbacks via a CR1000 Datalogger Router .............................................................. A-11 B. CS I/O Connection .................................................. B-1 B.1 CS I/O 9-Pin Connection ................................................................. B-1 C. Theory of Operation................................................ C-1 C.1 Theory of Operation ......................................................................... C-1 D. FCC Warning to Users of Class B Computing Devices .................................................................. D-1 E. IC Information ......................................................... E-1 i Table of Contents Figures 1-1. 3-3. 3-4. A-1. A-2. A-3. A-4. B-1. COM220 DIP switches. Five screws and outer cover must be removed for access to DIP switches. ............................................... 1 COM220 .............................................................................................. 2 CR1000 and COM220 using remote telephone line ............................ 4 CR10X with CR10 wiring panel and COM220 using RJ11C telephone jack .................................................................................. 5 Top view of surge-suppressor wiring .................................................. 8 Side view of surge-suppressor wiring ................................................. 9 COM220 to computer connection ................................................... A-3 Device Configuration screen ........................................................... A-4 Terminal Emulator screen in Device Configuration ........................ A-5 Send OS screen in Device Configuration ........................................ A-7 CS I/O pinout .................................................................................. B-1 1-1. 3-1. A-1. A-2. Default DIP Switch Settings................................................................ 2 Dataloggers that Require Direct 12-Vdc Connection to COM220 ...... 4 Selecting ME Baud Rates via DIP Switches 3 and 4....................... A-2 Maximum Datalogger ME Baud Rates ........................................... A-2 1-2. 3-1. 3-2. Tables ii COM220 Telephone Modem 1. Introduction 1.1 General Description The COM220 modem is a selectable-baud-rate modem employing the Hayes AT command set. Its primary use is as a remote-site phone modem connected to a CSI datalogger. The modem is powered and enabled by the batterypowered datalogger. When not active, the COM220 draws 100 to 120 µA from the datalogger’s 12-Vdc output. During a call, it draws about 30 mA. The COM220 is a replacement for the COM210. However, the COM220 supports both synchronous device communication (SDC) and modem enable (ME) communication, as well as various ME baud rates (9600 to 115200). The default setting for the COM220 at shipping is SDC7 (see Appendix A, Changing COM220 Settings (p. A-1), for details). IMPORTANT The default settings ARE NOT compatible with dataloggers that have non-PakBus operating systems (for example, CR510, CR10X, CR23X, CR7, CR5000). However, compatibility with non-PakBus dataloggers is easily achieved by changing DIP switch settings (FIGURE 1-1). If you want to use the COM220 as a drop-in replacement for the COM210, the COM220 settings should be changed to modem enable (DIP switch 1 open) and 9600 baud (DIP switches 3 and 4 open). Instructions for configuring the COM220 are described in Appendix A, Changing COM220 Settings (p. A-1). FIGURE 1-1. COM220 DIP switches. Five screws and outer cover must be removed for access to DIP switches. 1 COM220 Telephone Modem TABLE 1-1. Default DIP Switch Settings DIP Switch Default Setting 1 Closed 2 Open 3 Closed 4 Closed 5 Open 6 Open 7 Open 8 Open The COM220 is connected to a CSI datalogger by a 9-pin subminiature D cable. This is the same 9-pin CS I/O interface common to all Campbell Scientific dataloggers (except the CR200 series). This is not an RS-232 connection. Appendix B, CS I/O Connection (p. B-1), describes the CS I/O interface. The COM220 can be used as an originate modem at the datalogger site. For newer PakBus dataloggers (for example, CR800, CR1000, CR3000), use the ModemCallback instruction or the DialSequence and DialModem instructions to program the datalogger to originate a call to the computer. For non-PakBus dataloggers (for example, CR510, CR10X, CR23X) and older PakBus dataloggers (for example, CR10XPB, CR23XPB, CR510PB) use Instruction 97 to program the datalogger to originate a call to the computer. Refer to your datalogger manual and LoggerNet Help files for detailed descriptions of these instructions. In addition, Appendix A.4, Program Examples (p. A-7), includes sample programs for the ModemCallback, DialModem, and P97 instructions. The COM220 features a built-in speaker to allow monitoring of calling and connection. See Appendix A.2, Hayes AT Commands (p. A-2), for the Hayes AT commands that affect the speaker on/off and volume settings. FIGURE 1-2. COM220 2 COM220 Telephone Modem 1.2 Computer Requirements A Hayes-compatible modem is used at the computer site with Campbell Scientific computer software to call the datalogger attached to the COM220. The computer’s modem must be configured to the proper settings using a set of modem-initialization strings in the software program’s pick list. 2. Specifications Standards: V.92, K56Flex, V.90, V.34, V.32bis, V32, V23, V22bis, V22, V.21, B212, B103 Registration: FCC US: 3A4M508BSM2-T-W IC 2377 A-SM2TW TBR21 Operating voltage: 12 Vdc Current drain: 100 to 120 μA quiescent; 30 mA active Communication rate between datalogger and COM220: 3. 9600, 38400, 57600, 115200 bps (selected by user) Operation: Full-duplex over standard, analog phone lines Operating temperature: –25 to +50 °C std, –55 to +85 °C optional Dimensions: 16.5 x 2.5 x 6.6 cm (6.5 x 1.0 x 2.6 in) Weight: 0.16 kg (0.35 lb) Installation The COM220 is designed to be used with standard, analog telephone lines. It will not work with a digital telephone line. Connection to telephone companyprovided coin service (central office implemented systems) is prohibited. Connection to party-line service is subject to state tariffs. 3.1 Connecting to Datalogger Connect the cable from the telephone RJ11C jack to the modem as shown in FIGURE 3-2. If the telephone company has not installed surge protection in the telephone line (no RJ11C jack), one must install surge protection (pn 6362 or 4330) and connect both the ring and tip terminal blocks as shown in FIGURE 3-1. Current Campbell Scientific dataloggers provide 12 Vdc to the COM220 from the CS I/O port via the SC12 cable (FIGURE 3-1). Older dataloggers do not provide 12 Vdc on their CS I/O port. When used with the older dataloggers listed in TABLE 3-1, 12 Vdc and ground need to be connected via the green power connector on the side of the COM220 (see FIGURE 3-2). 3 COM220 Telephone Modem TABLE 3-1. Dataloggers that Require Direct 12-Vdc Connection to COM220 CR10(X) with silver wiring panel CR10(X) with black CR10 wiring panel (pn 8032) 21X(L) — serial number 13,442 or lower CR500 serial number 1764 or lower CR7, CR700X — serial number 2778 or lower 14-AWG Ground Wire (green with yellow stripe, if provided by CSI) FIGURE 3-1. CR1000 and COM220 using remote telephone line 4 COM220 Telephone Modem Red (+12V) 14-AWG Ground Wire 14-AWG Ground Wire (green with yellow stripe) FIGURE 3-2. CR10X with CR10 wiring panel and COM220 using RJ11C telephone jack 3.2 Connecting to Earth Ground Connect the 14-AWG grounding wire (green with yellow stripe, provided with the COM220) to the ground terminal (GND) on the COM220 and to the enclosure’s earth ground connection. If the site does not have a grounded enclosure, connect the ground wire directly to an earth ground connection. The datalogger ground should also be tied to the earth ground (see FIGURE 3-1 and FIGURE 3-2). CAUTION The modem must be grounded for its transient protection to work. 5 COM220 Telephone Modem 3.3 6 LoggerNet Setup • In the LoggerNet Setup Screen, press Add Root and choose ComPort. From the ComPort, select Communications, and Add a PhoneBase, a PhoneRemote, a PakBusPort (if your datalogger is a PakBus datalogger), and your datalogger. • Click on the ComPort in your network map, and select the correct ComPort Connection for your modem. • Click on the PhoneBase in your network map. Select your PC modem from the drop-down list or add it using the Edit Modem Database dialog box. Set the Maximum Baud Rate appropriate for your modem and datalogger. • Click on the PhoneModem in your network map. Enter the COM220’s analog phone number. • If your datalogger is a PakBus datalogger, click on the datalogger in your network map. Enter the PakBus Address of your datalogger. COM220 Telephone Modem • 3.4 Press Apply to save your changes. Telephone to MD485 or Telephone to RF Systems Telephone-to-MD485 or telephone-to-radio configurations can be utilized for communicating with multiple dataloggers through one telephone line. For telephone-to-MD485 or telephone-to-radio communications (with no datalogger router), the COM220 should be set for ME mode. The COM220 and MD485 should be set to the same baud rate. When using a PakBus network with a datalogger configured as a router, the COM220 can be set for SDC7 and the radio for SDC8, or vice versa. Contact a Campbell Scientific application engineer for more information. In addition, Appendix A.4.4, Example Programs for Data-Callbacks via a CR1000 Datalogger Router (p. A-11), includes example programs for both a router datalogger and a remote datalogger communicating by telephone to MD485 or telephone to radio. 3.5 Telephone Service If you have any questions about your telephone line, such as how many pieces of equipment you can connect to it, the telephone company will provide this information upon request. If the telephone company requests information concerning the equipment which you have connected to your telephone line, the FCC registration number and the ringer equivalence number (REN) of the COM220 are listed on its label. Additional technical information from the FCC and IC on the COM220 is available in Appendix D, FCC Warning to Users of Class B Computing Devices (p. D-1), and Appendix E, IC Information (p. E-1), respectively. NOTE If the telephone company does not provide phone-line surge protection, a Campbell Scientific surge suppressor should be used. Refer to Section 3.6, Connecting to a Surge Protector (p. 8), for more information. 7 COM220 Telephone Modem 3.6 Connecting to a Surge Protector Campbell Scientific offers two surge protectors (pn 4330 and 6362). The 4330 and 6362 are essentially the same, except that the 6362 has hardware for mounting to an enclosure backplate. NOTE The 4330 is also known as the 2374-01. The 4330 and 6362 have a protector element for each line that consists of a heavy-duty rated, two-element gas tube, an external, backup gap assembly, and a switch-grade shorting mechanism. The gas tubes (tip and ring) are sealed in a fire-resistant plastic body. DC breakdown at 100 V/sec is 300 to 500 V; DC extinguishing at 52 V, 135 V, and 150 V is less than 150 ms. FIGURE 3-3 and FIGURE 3-4 show the wiring for connecting the surge suppressor. Color coding of wires may vary. The important consideration is to follow tip all the way through and ring all the way through. Getting wires crossed typically does not damage anything. The phone line just will not work until the wires are straightened out. CAUTION Phone wires are live, typically with low voltage (24 Vdc). While not harmful in most situations, Campbell Scientific recommends installing the surge protector in dry weather only by technicians with a healthy heart. FIGURE 3-3. Top view of surge-suppressor wiring 8 COM220 Telephone Modem FIGURE 3-4. Side view of surge-suppressor wiring 4. Modem Settings The COM220 is shipped from the factory with default settings that support PakBus dataloggers (such as the CR800, CR1000, CR3000, and CR10XPB). The modem comes configured for synchronous device communication (SDC7), and, if using a PakBus datalogger, can answer a call as soon as a call is detected. Default settings must be changed if using a non-PakBus datalogger. IMPORTANT The default settings ARE NOT compatible with dataloggers that have non-PakBus operating systems (such as the CR510, CR10X, CR23X, CR7, and CR5000). However, compatibility with non-PakBus dataloggers is easily achieved by changing DIP-switch settings (FIGURE 1-1). If you want to use the COM220 as a drop-in replacement for the COM210, the COM220 settings should be changed to modem enable (DIP switch 1 open) and 9600 baud (DIP switches 3 and 4 open). Instructions for configuring the COM220 are described in Appendix A, Changing COM220 Settings (p. A-1). You can modify the following COM220 settings with DIP switches: 1) Communication mode (SDC or ME) 2) ME baud rate Additional changes (see examples below) may be modified with Hayes AT commands. Appendix A.2, Hayes AT Commands (p. A-2), describes the procedures and commands required to effect the changes described in this section. 9 COM220 Telephone Modem Some of the AT command settings that may be changed are: Disable auto-answer: This option is used only when the modem is not to answer a call. For example, the COM220 is connected to a telephone line that is to be used partly for voice communication. In this situation, it is best to have the datalogger call the computer. Speaker on/off and volume: Default settings have the speaker on only during call establishment and set to a low volume. The speaker may be turned completely off in order to limit the current drain during the connection or so you cannot/do not hear the speaker. It is also possible to set the speaker volume higher if you want to hear the speaker better than the default, lowvolume setting. Answer on Xth ring: This option is used when the modem is sharing a line and you only want it to answer after a specified number of rings. For example, the COM220 is sharing a line with people at an office. It can be programmed to only answer after the third ring. If the PC calls when the office is closed and no one answers the phone after three rings, the datalogger will pick it up. Change telephone system types: Change from the Bell 212A (U.S. and Canada) system to a CCITT V.32 (foreign, 9600 baud) or CCITT V.22 (foreign, 1200 baud) system. This does not mean that the COM220 is tested and approved for all foreign countries. CCITT is an international consultative committee that sets international communications-usage standards. V.32 and V.22 are CCITT standards that the COM220 meets. 5. Troubleshooting When the Campbell Scientific software cannot establish a link to a remote datalogger that is connected to a COM220, check the following: 1) Verify that the modem initialization settings on your computer are correct for your specific calling modem (that is, the modem attached to your computer). See the calling modem’s software manual and/or help screens for more information. 2) If using a non-PakBus datalogger (such as the CR510, CR10X, CR23X, CR7, and CR5000), verify that DIP switch 1 on the COM220 is in the open (modem enable) position. For PakBus dataloggers (such as the CR800, CR850, CR1000, CR3000, CR10XPB, 23XPB, etc.), DIP switch 1 can be in either position, but closed (SDC7) is preferred. See Appendix A.1, DIP Switch Settings (p. A-1), for details. 3) If the COM220 is set for modem enable (DIP switch 1 open), verify that the ME baud rate selected (DIP switches 3 and 4) agrees with related communication instructions in the datalogger program. Instructions for setting the COM220’s ME baud rate are found in Appendix A.1, DIP Switch Settings (p. A-1). 4) If the COM220 is set for modem enable (DIP switch 1 open) and you are unable to connect to the datalogger, try setting the datalogger ME baud rate, BaudrateME, to a negative number (for example, –9600) in order to 10 COM220 Telephone Modem enable auto-bauding in the datalogger. If the datalogger BaudrateME is positive (due to an earlier program instruction or Status table configuration), the datalogger will be unable to communicate with the COM220 unless baud rates happen to match. A good rule of thumb is to keep baud rates negative (–) in programs and when configuring the Status table to allow datalogger auto-bauding. 5) If unable to connect to a datalogger via the COM220, make sure that the datalogger is not beaconing to the same port for which the COM220 is configured (that is, if the COM220 is configured for SDC7 and the datalogger’s BeaconSDC7 is set to something other than 0, a connection cannot be established). 6) If the COM220 is in modem enable mode, verify that the COM220 is the only modem-enable device connected to the datalogger. Other common Campbell Scientific modem-enable devices are the SC32B, some RF modems, the MD485, the RF401, the SC932A, and the PDA-to-CS I/O connector. 7) If the COM220 is in SDC mode (the default is SDC7, with DIP switch 1 closed and DIP switch 2 open), verify that any other SDC devices attached to the datalogger are using a different SDC address (that is, if the COM220 is configured for SDC7, another SDC device attached to the datalogger must use SDC8). 8) Verify that no other software application is currently using the same COM port on the computer. Even if a program is minimized in windows, it may put a lock on a COM port. Some notebook computers do not automatically activate the COM ports. Verify that the COM port you are using is activated. 9) Use the Low Level Log in the Campbell Scientific software, LoggerNet, [Status Monitor | Tools | Log Tool | View | View I/O (Low Level Log)] to see connection progress while a link is being established. Assuming the above items are OK, the Low-Level Log will display “ATDT#######”, where ####### is the phone number entered in LoggerNet Setup’s Phone Remote device for the datalogger you are trying to call. The modem attached to the computer will respond back to the computer with result codes showing how the call is progressing. These responses should include “RING” and “CONNECT ####” where #### is the negotiated modem-to-modem connection baud rate. The maximum baud rate setting in Setup’s PakBusPort [LoggerNet | Setup | PakBusPort (in the device map)] device may limit the baud rate selected by the modems since it defaults to 9600. You can sometimes achieve a higher connection baud rate by raising the PakBusPort’s maximum baud rate. 10) Can you attach an analog telephone to the line and make a call out? If not, contact your local telephone company. If you can make a call out but the connection is poor or faint, contact your local telephone company. 11) Verify the COM220 is receiving 12 Vdc. If the COM220 is receiving 12 Vdc from a separate power supply instead of the datalogger, verify that the ground of the separate power supply is connected to the datalogger’s ground. 12) Verify the datalogger is turned on. 11 COM220 Telephone Modem To comply with FCC rules and regulations, all repairs on the COM220 modem must be performed by Campbell Scientific, Inc. or an authorized agent of Campbell Scientific, Inc. For assistance in installation or troubleshooting or for repairs, contact Campbell Scientific: Campbell Scientific, Inc. 815 West 1800 North Logan, Utah 84321-1784 Telephone: (435) 227-9000 Fax: (435) 227-9001 Website: www.campbellsci.com 12 Appendix A. Changing COM220 Settings CAUTION Changing any of the modem’s settings may result in communication problems. After changing the settings, try the modem locally before installing it at a remote location. To speed problem resolution when contacting Campbell Scientific for support, please inform us of any modemsettings changes that have been made. A.1 DIP Switch Settings The following COM220 settings are changed by opening or closing DIP switches: 1) Communication mode, either synchronous device communication (SDC) or modem enable (ME) 2) ME baud rate To change DIP switch settings, the outer cover must first be removed by unscrewing and removing the five Philips head screws on the cover. IMPORTANT It is necessary to cycle power to the COM220 for changes to the DIP switch settings to take effect. This is done by removing the 9-pin connector for about 5 s. As with other devices, if you leave the power off for too short a time, you may get unexpected results. DIP Switches 1 and 2: SDC or ME The COM220 supports synchronous device communication (SDC) and modem enable (ME) communication. Switch 1 selects between SDC and ME. If switch 1 is open, ME mode is selected. If switch 1 is closed and switch 2 is open (default), SDC7 is selected. If both switch 1 and 2 are closed, SDC8 is selected. SDC is not supported by non-PakBus operating systems (such as the CR10X, CR23X, CR7, and CR510). Hence, to connect with these older dataloggers, switch 1 must be open (that is, modem enable selected). DIP Switches 3 and 4: ME Baud Rates DIP switches 3 and 4 only have effect when the COM220 is in modem enable mode. If the COM220 is in ME mode, switches 3 and 4 select the baud-rate setting between the COM220 and the datalogger as follows: A-1 Appendix A. Changing COM220 Settings TABLE A-1. Selecting ME Baud Rates via DIP Switches 3 and 4 ME Baud Rate Switch 3 Switch 4 9600 Open Open 38400 Open Closed 57600 Closed Open 115200 Closed Closed Please note that older dataloggers (such as the CR10X, CR23X, and CR510) cannot support the highest COM220 ME baud rates. TABLE A-2 lists maximum datalogger baud rates. TABLE A-2. Maximum Datalogger ME Baud Rates Datalogger Max Baud Rate CR10X, CR510, CR7, CR21X 9600 CR23X 38400 CR5000 57600 CR800, CR1000, CR3000 115200 DIP Switches 5, 6, and 7: Not used DIP Switch 8: Configuration Mode Closing DIP switch 8 (and cycling power to the COM220) places the COM220 in configuration mode. The COM220 can be configured using an SC532 or SC532A with a 12-Vac adapter (pn 15966) and Device Configuration Utility version 1.6 or newer and Hayes AT commands (see below). A.2 Hayes AT Commands To configure the COM220 with Hayes AT commands, you will need the Campbell Scientific Device Configuration Utility version 1.6 or newer and an SC532 or SC532A device. An SC12 cable must be connected to the peripheral port on the SC532 or SC532A and the CS I/O port on the COM220. Another cable should connect the RS232 port (if using an SC532 device) or the PC port (if using an SC532A device) to one of your computer’s serial ports. If using an SC532A device, power will be provided to the modem by the SC532A with a 12-Vac adapter (FIGURE A-1). However, if using the older SC532, you must apply 12 V to the COM220 via the green connector. A-2 Appendix A. Changing COM220 Settings FIGURE A-1. COM220 to computer connection To configure the COM220 with Hayes AT commands, follow these steps: 1) Close DIP switch 8 on the COM220 (power to the COM220 must be cycled for about 5 sec before changes to DIP-switch settings are effective). 2) You must use an SC532A with a 12-Vac adapter or an SC532 interface to communicate with the modem. Connect the PC port (called RS232 on the SC532) to a serial port on your computer via an RS232 cable. Leave the COM220 modem disconnected for now. 3) Run Device Configuration Utility version 1.6 or newer. 4) Select COM220 from the Device Configuration Utility menu (FIGURE A-2). 5) Make sure the appropriate serial port is selected on the left panel of the Device Configuration Utility window and click on the connect button. 6) Once you have clicked on the connect button, connect the peripheral port on the SC532 or SC532A to the CS I/O port on the modem with an SC12 cable. If using an SC532, you will also have to apply 12 V to the COM220 via a green connector attached to a power supply. If using an SC532A device, power will be provided to the modem by the SC532A. A-3 Appendix A. Changing COM220 Settings NOTE You must click on the connect button BEFORE applying power to the COM220. 7) Follow the instructions that appear in the terminal emulator screen (FIGURE A-3). 8) Be sure to save all new commands before exiting (by entering 5 and pressing Enter). 9) When finished, return DIP switch 8 on the COM220 to its open position. FIGURE A-2. Device Configuration screen A-4 Appendix A. Changing COM220 Settings FIGURE A-3. Terminal Emulator screen in Device Configuration HAYES AT COMMAND SUMMARY: This manual does not attempt to be a primer on the Hayes AT command set. The commands are, therefore, only summarized below. For most applications, these commands will not need to be used. Except as noted, all commands should begin with an “AT” and end with a carriage return (press the Enter key). There are no “O” as in Oscar commands, only “0” as in Zero commands. For example, to change the default number of rings from 1 to 3, the command is: ATS0=2 (the default is 1 ring as the MPU sends ATS0=1 by default to the modem module). To turn the speaker off, the command is ATM0. NOTE For command changes to be effective, you MUST press Enter after typing the command and you MUST press 5 to save the new command before disconnecting or exiting set up. COMMANDS TO CHANGE DEFAULT MODES: B1 (default) B0 L0 L1 (default) L2 L3 CCITT V.32 (9600 baud), Bell 212A (1200 baud), and Bell 103 (300 baud) CCITT V.32 (9600 baud), CCITT V.22 (1200 baud), and CCITT V.21 (300 baud) Lowest speaker volume Low speaker volume Medium speaker volume High speaker volume A-5 Appendix A. Changing COM220 Settings CAUTION M0 M1 (default) M2 Speaker always off Speaker on during call establishment Speak on during entire call session S0=0 S0=1 (default) S0=2 S0=n Disable Auto Answer Answer on second ring Answer on third ring Answer on (n + 1) ring. When doing datalogger-to-datalogger communications with the COM220, if more than six rings are specified, the datalogger may time out before the modem answers; communication will never be established! Be sure to try the setup locally before installing at a remote location. A.3 Downloading a New Operating System to the COM220 To download a new operating system to the COM220, follow these steps: 1) You must use an SC532 or an SC532A interface to communicate with the modem. Connect the PC port (called RS232 on the SC532) to a serial port on your computer via an RS232 cable. Leave the modem disconnected for now. 2) Make sure that you have the appropriate serial port selected in the left panel of the Device Configuration Utility window. 3) Click the Start button. 4) In the resulting file-open dialogue box that appears, select the file that should be sent as the modem’s operating system. Do not attempt to load any operating system other than that designed for the COM220 modem. 5) Once you have pressed OK in the file-open dialogue box, connect the peripheral port on the SC532 or SC532A to the CS I/O port on the modem with an SC12 cable. If using an SC532, you will also have to apply 12 V to the COM220 via a green connector attached to a power supply. If using an SC532A device, power will be provided to the modem by the 12-V adapter connected to the SC532A. NOTE You must highlight/select the operating system file to be sent BEFORE applying power to the COM220. 6) The program should now send the operating system to the modem. Interrupting this process may corrupt the modem operating system. A-6 Appendix A. Changing COM220 Settings FIGURE A-4. Send OS screen in Device Configuration A.4 Program Examples A.4.1 ModemCallback Example (for CR1000) The ModemCallBack instruction is available in the CR1000 with operating system std.12 or greater, in the CR3000 with operating system std.05 or greater, and in the CR800 or CR850 with operating system std.03 or greater. The following program uses the ModemCallBack instruction to call LoggerNet every 2 minutes. The ModemCallBack instruction assumes that LoggerNet resides at the phone number and that callback is enabled in LoggerNet Setup, both for the comport and for the datalogger. Public PTemp, batt_volt, Count, Result as Long Const Abort = 0 ' False DataTable (Test5,1,-1) DataInterval (0,0,Sec,10) Sample (1,batt_volt,FP2) Minimum (1,batt_volt,FP2,0,False) Maximum (1,batt_volt,FP2,False,False) Sample (1,PTemp,FP2) Minimum (1,PTemp,FP2,0,False) Maximum (1,PTemp,FP2,False,False) Sample (1,Count,FP2) EndTable BeginProg Scan (2,Min,3,0) Count = Count + 1 PanelTemp (PTemp,250) Battery (Batt_volt) ModemCallBack(Result,ComSDC7,9600,0,"5551212","",40,60,Abort) CallTable Test5 NextScan End Program A-7 Appendix A. Changing COM220 Settings A.4.2 DialModem Example (for CR1000) The program below does 2-min callbacks via the COM220 configured for SDC7. DialModem is set equal to a variable, so that the success/failure result can be used by the EndDialSequence instruction. If the call fails, the link will be terminated at the EndDialSequence instruction. If the call is successful, the device will be kept online until the SendVariables command is completed. NOTE For data callbacks to occur, Callback Enable must be selected in LoggerNet Setup both for the comport and for the datalogger. 'Replace DialModem phone number with your PC's phone number Public batt_volt, Result Public PTemp, TCvalue_F, dummy Public RespStrng, DialSuccess, AccumDialFails as LONG DataTable (DC1,1,1000) DataInterval (0,0,Sec,10) Sample (1,PTemp,FP2) Sample (1,TCvalue_F,FP2) Sample (1,DialSuccess,FP2) EndTable DialSequence (4094) 'Establishes a phone connection if there isn't one already. DialSuccess =DialModem (ComSDC7,-115200,"5551212","") ' " Param 2 baud rate setting affects sdc bit rate." Param 4 allows OS to accept any listed modem response. If DialSuccess = 0 then AccumDialFails = AccumDialFails + 1 EndDialSequence (DialSuccess) ' -1 = success, 0 = failure of response to match Param 4 BeginProg Scan (2,Min,3,0) PanelTemp (PTemp,250) Battery (Batt_volt) dummy = 0 TCDiff (TCvalue_F,1,mV2_5C,1,TypeT,PTemp,True ,0,250,1.8,32) SendVariables (Result,ComSDC7,4094,4094,0000,3500,"Public","Callback",dummy,1) 'Establishes static route to LN '35 sec timeout allows time to dial/train CallTable DC1 NextScan EndProg A-8 Appendix A. Changing COM220 Settings CAUTION The COM220 can return several possible responses once connected (each terminating in a carriage return): “1” CONNECT “5” CONNECT1200 “10” CONNECT2400 “13” CONNECT9600 “18” CONNECT4800 “20” CONNECT7200 “21” CONNECT12000 “25” CONNECT14400 Hence, to work with the COM220, the user must put in a NULL string, or else the DialModem will fail unless, by chance, it returns the specific string the user entered. Therefore, it is highly recommended to use the “” string for the connect string, unless the user is using some other modem that he knows has a different response string than those listed above. A.4.3 P97 Instruction (for CR10X) Instruction 97 is a Program Control instruction that makes the following types of calls: • Datalogger calls a computer to send data. • Datalogger calls a voice phone using our voice-synthesized modem. • Datalogger calls a remote datalogger to retrieve its input locations. Instruction 97 has the following parameters: • Parameter 1 — Modem/Baud Rate Codes • Parameter 2 — Flag No. to Disable P97 • Parameter 3 — Call Time Limit (seconds) • Parameter 4 — Seconds Before Fast Attempts • Parameter 5 — Fast Attempts • Parameter 6 — Minutes Before Slow Attempts • Parameter 7 — Failure Location • Parameter 8 — Callback ID A-9 Appendix A. Changing COM220 Settings IMPORTANT Do not put Instruction 97 inside a loop or conditional statement; it must be executed each time the table is run. In the example below, the program does two minute data callbacks via the COM220 phone modem. Edit instruction 13 with your PC’s (LoggerNet’s) phone number. Remember to set switch 1 open for modem enable mode, and switches 3 and 4 open for 9600 baud. The callback ID in this example is 222. The callback ID is a user-specified number and must also be entered in LoggerNet Setup for callbacks to work. *Table 1 Program 01: 5 Execution Interval (seconds) ; Prevent callback when program Compiled 1: If Flag/Port (P91) 1: 28 Do if Flag 8 is Low 2: 30 Then Do 4: 2: Do (P86) 1: 15 Set Flag 5 High 3: Do (P86) 1: 18 Set Flag 8 High End (P95) 5: Batt Voltage (P10) 1: 1 Loc [ BatVolt ] 6: Internal Temperature (P17) 1: 2 Loc [ TEMP_PANL ] 7: If 1: 2: 3: ;measure battery voltage ;measure panel temperature time is (P92) ;final storage every 10 seconds 0 -- Minutes (Seconds --) into a 10 Interval (same units as above) 10 Set Output Flag High (Flag 0) 8: Real Time (P77) 1: 111 Day,Hour/Minute,Seconds (midnight = 0000) 9: Sample (P70) 1: 1 Reps 2: 1 Loc [ BatVolt 10: Sample (P70) 1: 1 Reps 2: 2 Loc [ Temp_PANL] ] ;place a time stamp ;sample battery voltage ;sample panel temperature 11: If time is (P92) 1: 0 Minutes (Seconds --) into a 2: 2 Interval (same units as above) 3: 25 Set Flag 5 Low 12: Initiate Telecommunications (P97) 1: 22 Phone Modem/9600 Baud ;set baud rate/modem 2: 5 Disabled when User Flag 5 is High 3: 45 Seconds Call Time Limit 4: 0 Seconds Before Fast Retry 5: 0 Fast Retries 6: 0 Minutes Before Slow Retry 7: 3 Failures Loc [ Failures ] 8: 222 Callback ID ;must also enter callback ID in LoggerNet Setup A-10 Appendix A. Changing COM220 Settings 13: Extended Parameters (P63) ;7-digit phone number 1: 5 Option 2: 5 Option 3: 5 Option 4: 1 Option 5: 2 Option 6: 1 Option 7: 2 Option 8: 13 Option ;13 is the termination character; always place after phone number End Program A.4.4 Example Programs for Data Callbacks via a CR1000 Datalogger Router To do data callbacks via a datalogger router with COM220 and RF401s or MD485s, they must all be configured to communicate with one another. In addition, two programs are necessary: one for the datalogger router and one for the remote datalogger. Below are example programs for a datalogger router and a remote datalogger. For these examples, the COM220 is configured for SDC7 and the router datalogger has the following settings (you can enter these settings via the datalogger keypad or from the LoggerNet status table): PakBusAddress = 2, IsRouter = 1 or True, and BeaconSDC8 = 30, enabling the router to discover the remote. The remote datalogger’s PakBusAddress = 1. In addition, the RF401s or MD485s are set for CSDC8 (see the RF401 or MD485 manual for directions on configuring these devices). Program for CR1000 Router: 'Router program for data callback via router w/ phone link to LoggerNet 'Phone to MD485 or RF401 w/ DL at Base 'Router PakBus Address = 2, IsRouter = 1, BeaconSDC8 = 30 to discover Remote DL which has PBA = 1 'Router COM220 = SDC7; Base RF401 CSDC8; Remote RF401 CSDC8. 'LoggerNet PakBusPort has PBA = 4094 ' PC-pcMODEM --------COM220sdc7-CR1000(2)-RF401sdc8~~~~~~~~~~~RF401sdc8-CR1000(1) Public PanelTemperature, BatteryVoltage, DialSuccess Public Flag(10) AS BOOLEAN SequentialMode DataTable (TestA,1,-1) DataInterval (0,2,Sec,10) Minimum (1,BatteryVoltage,FP2,0,False) Sample (1,PanelTemperature,FP2) EndTable DialSequence (4094) StaticRoute(ComSDC8,4094,4094) ' So router discovers LoggerNet server DialSuccess = DialModem (ComSDC8,9600,"5551212","") ' Param 4 = "" allows CR1000 to accept all possible COM220 responses ' DialSuccess: -1 means successful, 0 means failure. EndDialSequence (DialSuccess) BeginProg Scan (2,Sec,0,0) PanelTemp (PanelTemperature,250) Battery (BatteryVoltage) CallTable TestA NextScan EndProg A-11 Appendix A. Changing COM220 Settings Remote datalogger program for CR1000: 'Remote program for 2-min data callbacks via DL router with RF401 or MD485 link and COM220 link 'Datalogger router PakBusAdddress = 2 'LoggerNet server PakBusAddress = 4094 'Replace DialModem phone number with your PC's phone number Public batt_volt, Result Public PTemp, TCvalue_F, dummy Public RespStrng, DialSuccess DataTable (DC1,1,1000) DataInterval (0,0,Sec,10) Sample (1,PTemp,FP2) Sample (1,TCvalue_F,FP2) Sample (1,DialSuccess,FP2) EndTable BeginProg Scan (2,Min,3,0) PanelTemp (PTemp,250) Battery (Batt_volt) dummy = 0 TCDiff (TCvalue_F,1,mV2_5C,1,TypeT,PTemp,True ,0,250,1.8,32) SendVariables(Result,ComSDC7,2,4094,0000,3500,"Public","Callback",dummy,1) '35-s timeout allows time for phone modems to dial/train CallTable DC1 NextScan EndProg A-12 Appendix B. CS I/O Connection B.1 CS I/O 9-Pin Connection The pinout of the connector is shown in FIGURE B-1. The direction of the signal relative to the modem is shown in parentheses. Unless specified otherwise, all levels are 0 V for logic low, 5 V for logic high. FIGURE B-1. CS I/O pinout 1. (input) +5 Vdc supply. Used to power internal line drivers for ‘Ring’ and ‘RX Data’ output signals. 2. (input) Ground 3. (output) Ring — A logic high signifies a ring signal has been detected. 4. (output) RX Data — Serial data from COM220 5. (input) Modem Enable — A logic high internally switches power to the modem. A logic low internally shuts off power to the modem. 6. (input) Serial Device Enable — A logic high disables communication with the modem without removing power or changing the modem's mode. 7. (input) SDC clock 8. (input) +12 Vdc supply 9. (input) TX Data — Serial data to COM220 B-1 Appendix B. CS I/O Connection B-2 Appendix C. Theory of Operation C.1 Theory of Operation The COM220 modem is used to transmit data over bandwidth-limited channels such as telephone lines by modulating audio tones. The COM220 uses various modulation schemes including FSK (Frequency Shift Keying), TCM (Trellis Coded Modulation), QAM (Quadrature Amplitude Modulation), and DPSK (Differential Phase Shift Keying). The telephone company gives a 40- to 150-VRMS, 20-Hz signal on the telephone lines to signify a ring, which is typically on for two seconds and off for four seconds. The COM220 is supplied with 12 V from the datalogger’s CS I/O connector or from the COM220’s external power connector. The 12 V is then regulated to +5 V to give power to the ring detect circuitry. The ring detection circuitry is continuously powered but draws less than 2 µA. The ring signal is passed on to the datalogger through an opto-coupler. The datalogger responds to a “ring” by raising the modem-enable line, which internally switches the regulated +5 V supply to the rest of the modem’s circuitry. The modem then answers and remains off-hook until it loses the carrier or the datalogger lowers the modem-enable line. The datalogger lowers the modemenable line by remote command or after 40 s in the absence of a command. When the modem-enable line goes low, the COM220 internally removes the +5 V from the modem circuitry, dropping power to the off-hook relay and thus placing the telephone line on-hook. The COM220’s ring detect circuitry is still powered at this time. To reject noise common to telephone lines and to satisfy registration requirements, the modem circuitry is electrically isolated from the telephone lines by using an opto-isolator and a coupling transformer. C-1 Appendix C. Theory of Operation C-2 Appendix D. FCC Warning to Users of Class B Computing Devices WARNING This equipment generates, uses, and can radiate radio frequency energy and, if not installed and used in accordance with the instruction manual, may cause interference to radio communications. It has been tested and found to comply with the limits for a Class B computing device pursuant to Subpart J of Part 15 of FCC Rules, which are designed to provide reasonable protection against such interference when operated in a COMMERCIAL ENVIRONMENT. Operation of this equipment in a residential area may cause interference to radio and television reception. The operator must take whatever measures are necessary to correct the interference. D-1 Appendix D. FCC Warning to Users of Class B Computing Devices D-2 Appendix E. IC Information NOTE Industry Canada (IC) was formerly known as DOC. CP-01, Issue 8, Part I Section 14.1 “NOTICE: The Industry Canada label identifies certified equipment. This certification means that the equipment meets certain telecommunications network protective, operational and safety requirements as prescribed in the appropriate Terminal Equipment Technical Requirements document(s). The Department does not guarantee the equipment will operate to the user’s satisfaction. “Before installing this equipment, users should ensure that it is permissible to be connected to the facilities of the local telecommunications company. The equipment must also be installed using an acceptable method of connection. The customer should be aware that compliance with the above conditions may not prevent degradation of service in some situations. “Repairs to certified equipment should be coordinated by a representative designated by the supplier. Any repairs or alterations made by the user to this equipment, or equipment malfunctions, may give the telecommunications company cause to request the user to disconnect the equipment. “Users should ensure for their own protection that the electrical ground connections of the power utility, telephone lines and internal metallic water pipe system, if present, are connected together. This precaution may be particularly important in rural areas. “CAUTION: Users should not attempt to make such connections themselves, but should contact the appropriate electric-inspection authority, or electrician, as appropriate.” CP-01, Issue 8, Part I Section 14.2 “NOTICE: The Ringer Equivalence Number (REN) assigned to each terminal device provides an indication of the maximum number of terminals allowed to be connected to a telephone interface. The termination on an interface may consist of any combination of devices subject only to the requirement that the sum of the Ringer Equivalence Numbers of all the devices does not exceed 5.” E-1 Appendix E. IC Information E-2 Campbell Scientific Companies Campbell Scientific, Inc. (CSI) 815 West 1800 North Logan, Utah 84321 UNITED STATES www.campbellsci.com • [email protected] Campbell Scientific Centro Caribe S.A. (CSCC) 300 N Cementerio, Edificio Breller Santo Domingo, Heredia 40305 COSTA RICA www.campbellsci.cc • [email protected] Campbell Scientific Africa Pty. Ltd. (CSAf) PO Box 2450 Somerset West 7129 SOUTH AFRICA www.csafrica.co.za • [email protected] Campbell Scientific Ltd. (CSL) Campbell Park 80 Hathern Road Shepshed, Loughborough LE12 9GX UNITED KINGDOM www.campbellsci.co.uk • [email protected] Campbell Scientific Australia Pty. Ltd. (CSA) PO Box 8108 Garbutt Post Shop QLD 4814 AUSTRALIA www.campbellsci.com.au • [email protected] Campbell Scientific Ltd. (CSL France) 3 Avenue de la Division Leclerc 92160 ANTONY FRANCE www.campbellsci.fr • [email protected] Campbell Scientific (Beijing) Co., Ltd. 8B16, Floor 8 Tower B, Hanwei Plaza 7 Guanghua Road Chaoyang, Beijing 100004 P.R. CHINA www.campbellsci.com • [email protected] Campbell Scientific Ltd. (CSL Germany) Fahrenheitstraße 13 28359 Bremen GERMANY www.campbellsci.de • [email protected] Campbell Scientific do Brasil Ltda. (CSB) Rua Apinagés, nbr. 2018 ─ Perdizes CEP: 01258-00 ─ São Paulo ─ SP BRASIL www.campbellsci.com.br • [email protected] Campbell Scientific Spain, S. L. (CSL Spain) Avda. Pompeu Fabra 7-9, local 1 08024 Barcelona SPAIN www.campbellsci.es • [email protected] Campbell Scientific Canada Corp. (CSC) 14532 – 131 Avenue NW Edmonton AB T5L 4X4 CANADA www.campbellsci.ca • [email protected] Please visit www.campbellsci.com to obtain contact information for your local US or international representative.