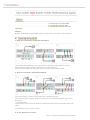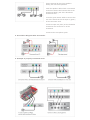
1
5.25" bay 1EA
Slot 1EA
Soundcard (analog Line Out, Line In essential)
20MB of hard drive space for program installation
Windows 98 or higher
The Plusdeck2 comes with the following components:
1.
2.
3.
4.
5.
6.
7.
8.
Plusdeck2 internal drive
20 pin cable
Connection card
Serial cable (RS232C cable)
Stereo Cable 3 EA
Plusdeck Manager CD
User manual (74pages)
Fixing screws
-To install Plusdeck2, a normal size “+” shaped screwdriver is needed
1.
2.
3.
4.
5.
6.
7.
Size (W*H*D): 145*40*215mm
Tape speed: 4.75Cm/sec
Wow & Flutter: 0.09%(WRMS)
Frequency response: 20 ~ 18,000Hz
Separation: 40dB
Signal to Noise Ratio : 55dB
Power: DC12V
Patent issue 0390012
International patent PCT/KR01/1567
Registration of design 30-2001-0034551
Registration of program 2001-01-23-4046
Best prize of the second Digital Innovation
Success Design of KIDP(Korea Institute of Design Promotion)
Procurement Success Designed Special Product chosen by Supply Administration
Best New Product chosen by The Handbook Ilbo
Hit Product chosen by Electronic Newspaper
Hit Product chosen by Computer Times
Emerging Success Technique Award chosen by The Seoul Economy, etc
FCC Information
This device complies with Part 15 of the FCC Results.
Operation is subject to the following two conditions:
(1) This Device may not cause harmful interface, and
(2) This Device must accept any interference received, including interference that may
cause undesired operation.
Note: This is equipment has been tested and found to comply with the limits for CLASS B
digital device, pursuant to Part 15 of FCC Rules. These limits are designed to provide
reasonable protection against harmful interference when the equipment is operated in a
commercial environment.
This equipment generates, uses and can radiate radio frequency energy and, if not
installed and used in accordance with the instructions, may cause harmful interference to
the radio communications. However, there is no guarantee that interference will not occur
in a particular installation. If this equipment does cause harmful interference to radio or
television reception, which can be determined by turning the equipment off and on, the
user is encouraged to try correct the interference by one or more of the following
measures :
1.1. Reorient or relocate the receiving antenna.
1.2. Increase the separation between the equipment and receiver.
1.3. Connect the equipment into an outlet on a circuit different from that to which receiver
is
connected.
1.4. Consult the dealer or experienced computer technician for help.
WARNING
Changes or modifications not expressly approved by the manufacturer could void the user's
authority to operate the equipment.
1. Make sure the computer is off during installation.
2. Pay attention to the sharp metal edges inside the computer casing, this might hurt you.
3. Do not insert things or touch other parts inside of computer during setting up.
4. Do not make the setup at unstable position, or in a direct exposure to sun shine or
intense
light, be sure to have a dry place and hands.
5. Be sure to have a dry place and hands.
6. Avoid dropping or other physical impact.
7. Keep small parts like screws out of a reach of children.
8. Do not insert or attempt to use damaged tapes.
9. Do not move or shock Plusdeck when running.
10. Be careful not to delete or damage important files.
11. Be careful not to insert you finger or different things into Plusdeck.
12. Do not disassemble, explore, or attempt to fix without permission at an appointed
service centers
13. Read user manual thoroughly.
1.
2.
3.
4.
5.
Wet tapes (It can get rusty inside deck)
Bent or damaged tapes
Cut tapes
Tapes not intended for playback (carpack, cleaning tapes, etc)
Extra longer tapes (i.e. 90 min or above): it's very thin, so it can get entangle
or is cut during operation.
6. Metal or crom tapes (for recording).
7. Separated lable on tape
........
........
........
........
........
........
Plusdeck2
........
.
.
.
.
.
.
.
.
.
.
.
.
.
.
.
.
.
.
.
.
.
.
.
.
.
.
.
.
.
.
.
.
.
.
.
.
.
.
.
.
.
.
.
.
.
.
.
.
.
.
.
.
.
.
.
.
.
.
.
.
.
.
.
.
.
.
.
.
.
.
.
.
.
.
.
.
.
.
.
.
.
.
.
.
.
.
.
.
.
.
.
.
.
.
.
.
.
.
.
.
.
.
.
.
.
.
.
.
.
.
.
.
.
.
.
.
.
.
.
.
.
.
.
.
.
.
.
.
.
.
.
.
.
.
.
.
.
.
.
.
.
.
.
.
.
.
.
.
.
.
.........................
1.
2.
3.
4.
5.
6.
Making space for the Plusdeck2
Installing Plusdeck2
Connecting the 20 Pin Cable
Connecting the Power Cable
Attaching the connection card
Attaching the connection card and
7. Completing the Installation
Caution
-Be sure to switch off power off and unplug the computer before installation.
Failure to do so can cause electrical shock.
1. Separate the computer mainframe from the case.
2. Be careful of sharp objects inside of the computer.
3. Remove the 5.25” bay place holder from the case.
Note
-Consult you computer manual on the proper method of opening your computer and
removing
the 5.25 inch bay faceplate. This will differ based on the manufacturer.
-If you are uncertain or not comfortable with this first step, please consult a professional.
1. Fully insert Plusdeck2 into the free bay
space.
2. Be sure there is enough space around the
Plusdeck2, so it is not touching any internal
parts.
3. If you need a horizontal holder to install at
5.25” bay, contact the computer
manufacturer. (A horizontal holder is not
included with Plusdeck2)
1. Connect one side of the included 20 pin
cable to the Plusdeck2’s backside.
2. 20 pin cable has an up and down side,
make sure you connect it properly.
1. The power cable is connected to the inside
power supply and looks like the figure on the
left.
2. Power cable is supplied 12V and 5V as 4
pins and has an up and down side.
3. Before connecting the power cable to the
Plusdeck2, make sure the connecting parts
and properly aligned.
4. Properly connected power cable should be
should have angled sides on the bottom with
the red line of 12V to the left, when facing it.
5. Be sure to check the connection head,
since the color of the wire may vary.
6. In case of reversed connection, +12V DC is connected instead of +5V DC and Plusdeck2
is
damaged. In this case, you can get free after-sale service.
7. If power cable is not enough, you should buy Y jack to connect.
8. Plusdeck2 does not work if there's no power supply to power cable which is power box in
computer (in case of a failed power)or insufficient power supply because power capacity
is not
sufficient.
1. Connect the other side of 20 pin cable
which is connected to the backside of
Plusdeck2 to the included connection card.
2. There is an up and down side, make sure
to plug in the cable properly.
1. Insert connection card into an empty PC
slot on the back of the computer.
2. It doesn't matter which slot you use, but
placing it near a soundcard, may cause
noise.
3. Secure the Plusdeck2 to the computer’s
mainframe with screw.
4. Be sure to secure the Plusdeck2 firmly
with the provided screws. A loose or
improper attachment may cause vibrations
and/or noise.
1. Reattach the cover to the mainframe.
2. The diagram above shows a properly installed Plusdeck2.
3. Congratulations, you have completed installing the Plusdeck2.
.................................
.................................
.................................
information
1. Connecting to the Soundcard
2. Connecting the Serial Cable
3. Soundcard and Connection card
Caution
Properly connecting the soundcard and connection card is essential to use Plusdeck2.
1. How to Connect with 2 Channel Soundcard
1.Soundcard and connection card figure before connecting stereo cable is like left .
2.Move speaker cable to speakerout(black) of connection card.
3.Connect soundcard and connection card with same colored stereo cable.
2. How to Connect 5.1 Channel Soundcard
1.The top of figure 1 shows a soundcard with 3 speakerout ports.
2.Pull out the front* speaker cable and connect it to the speakerout(black) jack of the
Plusdeck2
connection card.
3.Connect the rest of the 3 terminals of soundcard and connection card with same color
cable.
*Do Not move lines 2, 3(rear, center)
3. If it is difficult to connect
1.For 5.1 channel soundcards, find the front
lineout terminal for the front speakers
among the connected speakers.
2.Pull the speaker cable which is connected
to the front lineout and connect that to the
speakerout(black) jack of the Plusdeck2
connection card.
3.Use the green stereo cable to connect lineout of the sound card to the tape-in (green)
of the connection card.
4.Connect Tape-out (blue) of the Plusdeck2
connection card to the line-in of the
soundcard.
5.Connect the microphone jacks.
4. Sound Flow Diagram After Connection
5. Example of properly connected cards
*Sound blaster, Audiotrack Maya, Altec Lansing are their own trademark.
6. If you use a TV tuner
1.If you use other devices (i.e. TV tuners, etc) to the line-in jack of the soundcard, you
should
connect two line-in cables, one line-in to the soundcard.
2.In this case, split the cable and connect or use headphone/speaker converter, to connect
both
line-in cable.
3.A headphone/speaker distributor connects headphone and speaker to line-out of
soundcard
simultaneously and it can be heard through selectively headphone or speaker.
4.When you use headphone/speaker distributor, connect Plusdeck2 and TV tuner to the
jack
where the headphone and speaker is connected and connect soundcard connection
to the line-in jack.
In this case, you can choose input of Plusdeck2 and TV tuner with a simple switch.
5.Headphone/speaker distributor is not provided.
6.You can use Y jack but sound can be weaker or muted.
.................................
.................................
.................................
information
1. Connect with Soundcard
2. Connect Serial Cable
3. Soundcard and Connection card
1. Connect connection card serial port and computer serial port with provided serial cable
(RS-232C).(Serial port is also called COM port.)
2. Port on soundcard is midi connection port. It has different shape and usage, so it can't
be
connected to serial cable. Serial port is usually nearby printer port.
3. This cable is for communication between Plusdeck2 and software. If you don't connect
this,
Plusdeck2 doesn't work with software and if you run software, you can see a notice
about
connection error.
4. You must connect with provided cable. If you use shape-like cable like 9 pin, it doesn't
function normally because it has different pin arrangement.
5. Cable which alters serial port into USB can't be used because it can't transmit and
receive
signal normally. If pin around connection part is bent or damaged, it doesn't work
normally.
6. If pin around connection part is bent or damaged, it doesn't work normally.
7. Even though it is connected, it can't communicate program if serial port of computer is
set up
as unable to use at CMOS or if hardware is out of order. In this case, set up serial
port as
able to use at CMOS or get after-sale service from computer manufacturer. (You can reset
up in set screen when computer is turned on and should change Onboard Serial Port into
enable. If you want more detail, contact main board manufacturer.)
1. Understand about Soundcard
1.Soundcard converts digital data of computer into sound and delivers to speaker. Or it
inputs
external analogue sound or microphone sound into computer.
2.Soundcard consists of 3 parts: line-out(green), line-in(blue) and microphone terminal
(pink)
and number of line-outs decides soundcard channel. (Terminal order is different from
manufacturers.)
A. 2 Channel soundcard : output sound with right and left speaker.
B. Multi-channel soundcard : output sound with rear, center, etc except 2 channels.
3.In case of multi-channel, main(front) lineout is green, another lineout(rear or center) is
another color. In this case, there are one linein and microphone terminal.
4.Onboard soundcard means soundcard is combined with main board and function is same
5.Line-in terminal to get input external sound sources is used for Plusdeck2 or TV receiver
card.
Through this terminal, soundcard of computer gets input external sound signal and
outputs to speaker or converts into digital files.
6.Microphone to get input voice with mic is different input from line-in.
2. Understanding about Connection Card
1.Provided connection card of Plusdeck2 is 20 pin cable, consist of part A to connect with
inside
of computer, part B to connect with serial port of computer and part C to connect with
soundcard. D switch is to change electricity flaw in case of electronic noise of computer is
serious. In case of much electronic noise, change Open/Short.
2.Functions of connection card are following.
A. Terminal to be connected with speakers and output computer sound and tape
sound.
B. Terminal that Output sound of computer is input to Plusdeck2.
It is connected with lineout of soundcard. In case of multi-channel sound card,
main or
front lineout among several lineouts is connected.
C. Terminal to output sound of tapes in Plusdeck2. It is connected with linein of
soundcard.
D. Terminal to be connected with microphone of Plusdeck2 front side. It is connected
with
microphone of soundcard.
3.Speaker has to be connected with speaker out of connection card, not lineout of
computer.
4.Sound inputted to tape in is recorded onto tape.
5.Sound from tape out is inputted to soundcard linein and is outputted with speaker out or
converted into digital files inside of computer.
6.If you connect headphone in front of Plusdeck2, sound isn't inputted with speaker out.
Click next
If you agree, software
installation will continue.
Click “Next” to use the default
folder location. You can
choose to change the folder
location as well.
Click next
Installation will proceed.
Click “Finish” to complete the
installation.
If the dial is turned all the way to the left, there will be no sound.
See next.
If you connect a microphone to this terminal, sound goes to the soundcard input. If
you record onto a cassette tape, using Plusdeck’s mic jack, the sound is dubbed from
the computer and then recorded onto tape. This mic terminal supports stereo
microphones as well as mono.
You can hear all sound from the computer or a playing cassette tape with a headphone
connected to the Plusdeck headphone terminal. (If the soundcard is not connected with
connection card, the computer sound will not be heard.)
1. Insert tape as shown on the picture to the left.
2. If you insert tape about 2-3cm,
tape will automatically slide in.
3. Do not force or push tape in.
4. Insert tape with side A facing up.
5. It is normal for the flap to look slightly open when a
cassette is inside the Plusdeck2.
- Auto Reverse is supported when recording with Plusdeck. So, you can record onto both
sides
A and B without ejecting.
- Both sides are recordable, so you have to choose where to start. You can press the record
button and either A or B to choose the side to record on.
1.Insert a recordable blank tape and press button A of waiting record. Then, red LED and
green
LED of recordable side are flickered. (on the side without elimination revent tab is not
recordable and if both sides are recordable, green LED is flickered.)
2.When you start recording, if you press the direction button, with the record button, it
starts
recording in that direction.
3.If recording on side A is finished, it will either continue or stop recording depending on
the
mode Plusdeck is set to.
4.Plusdeck2 can record all sound from the computer onto the tape.
*When recording onto tape, all existing sound is eliminated.
*Plusdeck2 is optimized for normal tape, so it may not eliminate existing sound completely
for
metal or chrome tape.
1. This interface will show when a
tape is inserted into the
Plusdeck2.
2. If you press Convert, a window
will ask for the drive and file
location to save digital files.
3. Choose a location and name of
the file, then press save. Tape will
automatically play and digital files
will be saved.
Cautions to convert into digital file
1. The initial output file from the tape is saved as a wave file and then converted into
MP3s.
These files can take up a significant amount of space.
2. To convert a 60 minutes tape, you will need around of 1G of hard drive space.
Check to make sure you have enough space before starting.
3. If there is not enough space, files will not be generated.
4. Do not save to the Desktop or My Documents as system files, may have a capacity limit
and
may not be saved. Use a separate file to save.
5. Run virus scans and defragmenter regularly.
Edit converted digital files
1. You can edit converted digital files with various multimedia programs.
2. Digital files are easier to edit.
3. You can download sound editing programs from the internet.
4. You can save converted digital files onto CD, DVD or MP3 player.
.....
.....
.....
sound
.....
.....
.......................
.......................
.......................
1. Understanding about sound volume control
2. Optimize played tape sound
3. Optimize converted digital sound from tape
.......................
.......................
4. Optimize sound quality recorded onto tape
5. Others
1. Open control window
- Windows 98 : Start - Control Panel - Multi Media - Audio
- Windows XP(Classic View) : Start- Control Panel - Sound and Audio Devices
- Windows XP(Category View) : Start- Control Panel - Sound, Speech and Audio
DevicesSound and Audio Devices
2. Choose the Audio tab in the sound and audio devices panel.
- To open master volume control panel, click Audio-sound play back ?volume.
- To open record control panel, click Audio-Sound recording-volume.
3. If you do not see line input (line in) under master volume control panel or record control
panel, click Options-Properties(registered information for Windows 98) and set up to see
line
input.
out).
- Choose play under volume control and select items to be shown under volume (lineMaster volume control panel is opened to show selected items (line output).
- Choose record under volume control and select items to be shown under volume
(line-in). Record control panel is opened to show selected items (line input)
- This properties window changes shown items at control panel, not at set up.
4. If line input is shown as grayed out under the record control panel, something is set up
incorrectly. In this case, you should contact your soundcard manufacturer and re-install
the
soundcard driver. If the soundcard driver is improperly installed, you can only hear the
output, but the input will not function.
When you play a tape on Plusdeck2 the sound flows as follows:
1. It is normal for the output sound quality from the speaker out jack to be the same as
tape out
sound from a playing tape.
2. When you connect tape out terminal to a speaker directly, it is sound quality of
Plusdeck2.
3. Tape out terminal does not control the volume that goes in or out of the computer. You
can
control the volume of the line-in and line-out terminal through the Control Panel.
4. Each sound card has different volume levels, if sound is too low or high, set up 20% up
or
down from the middle.
5. If master volume or line input is mute you will not hear any sound from playing tape.
1. When a tape is playing, output sound is routed to the input line of the soundcard and a
digital
file is generated on the computer.
2. The converted digital sound will sound the same as the tape in normal playback. If you
experience a lot of noises or electrical sound with converted digital files, it could be a
malfunction in the line-in jack of the sound card.
3. The control panel’s line-in affects the recording and converting to digital files.
4. Each sound card has different volume levels, if sound is too low or high, set up 20% up
or
down from the middle.
5. The computer recognizes only one input device when recording. Plusdeck2 uses line-in,
make
sure line-in is chosen when recording.
6. If line-in part of volume control panel does not show or can not be chosen, the
soundcard
driver has been improperly installed. You should re-install soundcard driver following the
manufacturer’s instruction.
1. Output sound from lineout of soundcard is inputted to Tape in of Plusdeck2 connection
card
and recorded onto tape.
2. Lineout volume of soundcard is controlled by master volume of master volume control
panel.
3. Each sound card has different volume levels, if sound is too low or high, set up 20% up
or
down from the middle.
4. If master volume is mute, you cannot hear from speaker and mute sound is recorded.
5. Speaker volume doesn't affect record.
1. The volume of you sound card should be set somewhere in the middles. Setting the
volume to
one extreme of another can affect the quality of your recording.
2. Test out your volume settings, before making multiple recordings.
3. Muting other items except master volume or line-in from the items on your master
volume
control panel, it can help to improve sound quality.
4. It is normal that the output sound from the computer is same as output sound from the
tape.
5. If you choose to put the volume control icon on your system tray, it will make adjusting
your
volume a lot easier.