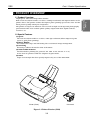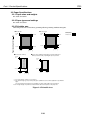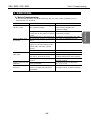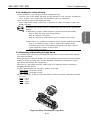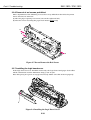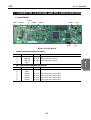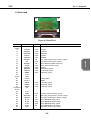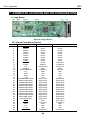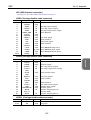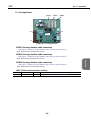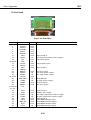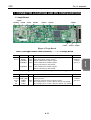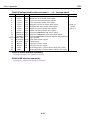
1
i9100, S520, S750, S820, S820D, S820MG, S830D, S900, S9000 SERVICE MANUAL Canon REVISION 0 DEC. 2001 QY8-1379-000 COPYRIGHT 2001 CANON INC. CANON S900/S820/S750/S520 1201 GR 0.30-0 PRINTED IN JAPAN (IMPRIME AU JAPON) 122001 GR 0.30-0 Application This manual has been issued by Canon Inc. for qualified persons to learn technical theory, installation, maintenance, and repair of products. This manual covers all localities where the products are sold. For this reason, there may be information in this manual that does not apply to your locality. Corrections This manual could include technical inaccuracies or typographical errors due to improvements or changes in the products. When changes occur in applicable products or in the content of this manual, Canon will release technical information as the need arises. In the event of major changes in the contents of this manual over a long or short period, Canon will issue a new edition of this manual The following paragraph does not apply to any countries where such provisions are inconsistent with local law. Trademarks The product names and company names described in this manual are the registered trademarks of the individual companies. Copyright This manual is copyrighted with all rights reserved. Under the copyright laws, this manual may not be copied, reproduced or translated into another language, in whole or in part, without the written consent of Canon Inc., except in the case of internal business use. Copyright 2001 by Canon Inc. CANON INC. i Printer Technical Support Dept. 11,21 16-1, Shimonoge 3-chome, Takatsu-ku, Kawasaki, Kanagawa 213-8512, Japan This manual has been produced on an Apple Power Macintosh Power Macintosh 7300/180 computer and Apple LaserWriter II NTX-J laser beam printer; printing films were printed on Agfa SelectSet Avantra 25. All page layout and illustration data was saved on a YANO 640MO drive system using NJ 640MO and Mitsubishi MR230MI discs. Logos and illustrations were created with MACROMEDIA FREEHAND 7.0J. All documents and page layouts were created with QuarkXPress 3.3 Japanese version. I. ABOUT THIS MANUAL This manual consists of four parts containing information for servicing the product. Product Specifications Part 1: Product Specifications Product overview and specifications. Technical Reference Part 3: Technical Reference Block diagrams and information on the hardware's new technologies. Troubleshooting Part 2: Troubleshooting A guide to troubleshooting the product and identifying parts needing replacement. Troubleshooting solutions are listed according to the error indications displayed by the status indicator and by problem descriptions. Appendix Part 4: Appendix Pin configurations. Disassembly and reassembly procedures are not fully covered in this manual. Refer to the illustrations in the separate Parts Catalog as well. I II. TABLE OF CONTENTS Page 111111111111111- 1 1 1 2 2 2 3 3 4 4 4 5 6 6 7 1- 9 1- 9 1- 9 1 -10 1 -10 1 -10 1 -11 1 -11 1 -12 1 -12 1 -12 1 -12 1 -13 1 -13 1 -14 1 -15 1 -15 1 -15 1 -16 1 -16 1 -16 1 -16 1 -17 1 -18 1 -18 1 -18 1 -18 1 -19 1 -19 1 -20 Part 1: PRODUCT SPECIFICATIONS (S900) 1. PRODUCT OVERVIEW 1.1 Product Overview 1.2 Special Features 2. SPECIFICATIONS 2.1 Printer Specifications 2.1.1 Printer specifications 2.1.2 Printer service life 2.1.3 Print head service life 2.2 Paper Specifications 2.2.1 Paper sizes and weights 2.2.2 Paper types and settings 2.2.3 Printable area 2.3 Print Head Specifications 2.4 Printer and Scanner Drivers 3. PRODUCT CODE LIST (S820) 1. PRODUCT OVERVIEW 1.1 Product Overview 1.2 Special Features 2. SPECIFICATIONS 2.1 Printer Specifications 2.1.1 Printer specifications 2.1.2 Printer service life 2.1.3 Print head service life 2.2 Paper Specifications 2.2.1 Paper sizes and weights 2.2.2 Paper types and settings 2.2.3 Printable area 2.3 Print Head Specifications 2.4 Printer and Scanner Drivers 3. PRODUCT CODE LIST (S750) 1. PRODUCT OVERVIEW 1.1 Product Overview 1.2 Special Features 2. SPECIFICATIONS 2.1 Printer Specifications 2.1.1 Printer specifications 2.1.2 Printer service life 2.1.3 Print head service life 2.2 Paper Specifications 2.2.1 Paper sizes and weights 2.2.2 Paper types and settings 2.2.3 Printable area 2.3 Print Head Specifications 2.4 Printer and Scanner Drivers 3. PRODUCT CODE LIST II Page 1 -21 1 -21 1 -21 1 -22 1 -22 1 -22 1 -22 1 -23 1 -23 1 -23 1 -23 1 -23 1 -23 1 -23 1 -24 (S520) 1. PRODUCT OVERVIEW 1.1 Product Overview 1.2 Special Features 2. SPECIFICATIONS 2.1 Printer Specifications 2.1.1 Printer specifications 2.1.2 Printer service life 2.1.3 Print head service life 2.2 Paper Specifications 2.2.1 Paper sizes and weights 2.2.2 Paper types and settings 2.2.3 Printable area 2.3 Print Head Specifications 2.4 Printer and Scanner Drivers 3. PRODUCT CODE LIST Part 2: TROUBLESHOOTING 2- 1 2- 1 2- 1 2- 2 2- 2 2- 2 2- 4 2- 5 2- 5 2- 6 2- 9 2 -10 2 -13 2 -13 2 -13 2 -13 2 -13 2 -14 2 -15 2 -15 2 -16 2 -16 2 -17 2 -17 2 -18 2 -18 2 -19 2 -20 2 -20 2 -20 2 -21 2 -22 2 -24 2 -25 1. PRINTER OPERATION 1.1 Printer Operation 1.2 Status Indicator 1.3 Simple Printer Operations 1.3.1 Cleaning operation 1.3.2 Printing the nozzle check pattern 1.3.3 Roller cleaning operation 2. SERVICING 2.1 Before Troubleshooting 2.2 Detectable Problems from System Start to Exit 2.3 Troubleshooting Problems 2.4 Troubleshooting Error Indications 3. DISASSEMBLY AND REASSEMBLY 3.1 Cautions for Disassembly and Reassembly 3.1.1 Cautions against ink stains (ink path/ink mist) 3.1.2 Damage due to static electricity 3.1.3 Deformation of spur tips 3.2 Exploded View 3.3 Disassembly and Reassembly 3.3.1 Carriage lock release 3.3.2 Removing and installing tap screws 3.3.3 Installing and removing the timing slit strip 3.3.4 Handling the encoder film 3.3.5 Removing and installing the logic board 3.3.6 Removal of red screws prohibited 3.3.7 Installing the logic board cover 3.3.8 Installing the control ROM cover 4. ADJUSTMENTS AND SETTINGS AFTER DISASSEMBLY AND REASSEMBLY, AND CONFIRMATION OF OPERATION 4.1 Adjustments and Settings after Disassembly and Reassembly 4.1.1 Items for adjustment (per necessity/locations/tools) 4.1.2 If EEPROM settings adjustment is necessary 4.1.3 Print head position adjustment 4.1.4 Print head seam stripe adjustment (S750) 4.1.5 Grease Application III Page 2 -26 2 -27 2 -27 2 -28 2 -28 2 -28 2 -28 2 -29 2 -29 2 -30 2 -32 2 -34 2 -34 4.2 Confirmation method 5. TRANSPORTING THE PRINTER 5.1 Procedure 6. PARTS REPLACEMENT, PERIODIC INSPECTIONS, & TOOLS 6.1 Periodic Parts Replacement 6.2 Periodic Inspections 6.3 Tool List 7. SERVICE-RELATED FEATURES 7.1 Service Mode Operations 7.2 Test Printout 7.3 Printing the EEPROM Information 7.4 Resetting the EEPROM 7.5 Waste Ink counter settings (S900/S820) Part 3: TECHNICAL REFERENCE 3- 1 3- 1 333333- 2 2 2 2 3 5 1. NEW TECHNOLOGY 1.1 Borderless printing 1.1.1 Borderless printing limitations 1.2 Quiet Mode 1.2.1 Quiet mode limitations 1.3 Remaining-ink amount detection (S900/S820) 1.3.1 Limitations when using the remaining-ink amount detection function 2. CLEANING MODES AND INK PURGE AMOUNTS 3. PRINT MODES Part 4: APPENDIX 4444- 1 1 4 5 4- 6 4- 6 4- 9 4 -10 4 -11 4 -11 4 -14 4 -15 4 -16 4 -16 4 -19 4 -20 4 -21 (S900) 1. CONNECTOR LOCATIONS AND PIN CONFIGURATIONS 1.1 Logic Board 1.2 Carriage Board 1.3 Print Head (S820) 1. CONNECTOR LOCATIONS AND PIN CONFIGURATIONS 1.1 Logic Board 1.2 Carriage Board 1.3 Print Head (S750) 1. CONNECTOR LOCATIONS AND PIN CONFIGURATIONS 1.1 Logic Board 1.2 Carriage Board 1.3 Print Head (S520) 1. CONNECTOR LOCATIONS AND PIN CONFIGURATIONS 1.1 Logic Board 1.2 Carriage Board 1.3 Print Head 2.PROBLEMS LEFT REMAINING IV III. ILLUSTRATION INDEX Page 1111- 1 3 3 5 1- 9 1 -12 1 -15 1 -18 1 -21 Part 1: PRODUCT SPECIFICATIONS (S900) Figure Figure Figure Figure (S820) Figure Figure (S750) Figure Figure (S520) Figure 1111- 1 2 3 4 Printer Exterior (S900) JEIDA Standard Pattern JIS SCID No. 5 Printable Area 1- 5 1- 6 Printer Exterior (S820) Printable Area 1- 7 1- 8 Printer Exterior (S750) Printable Area 1- 9 Printer Exterior (S520) Part 2: TROUBLESHOOTING 2- 1 2- 3 2 -14 2 -15 2 -16 2 -17 2 -18 2 -18 2 -19 2 -22 2 -24 2 -25 2 -30 2 -32 Figure Figure Figure Figure Figure Figure Figure Figure Figure Figure Figure Figure Figure Figure 2- 1 2- 2 2- 3 2- 4 2- 5 2- 6 2- 7 2- 8 2- 9 2 -10 2 -11 2 -12 2 -13 2 -14 Operation Panel Nozzle Check Pattern Printout Exploded View Carriage Lock Release Timing Slit Strip Short-Circuiting the Capacitors Do not Remove the Red Screws Installing the Logic Board Cover Installing the ROM Cover Print Position Alignment Pattern Seam Stripe Adjustment Pattern Grease application Service/Factory Test Printout (Sample) EEPROM Information Printout (Sample) Part 3: TECHNICAL REFERENCE 3- 2 Figure 3 - 1 Remaining Ink amount detection Part 4: APPENDIX 4- 1 4- 4 4- 6 4- 6 4- 9 4 -10 4 -11 4 -14 4 -15 4 -16 4 -19 4 -20 (S900) Figure Figure Figure (S820) Figure Figure Figure (S750) Figure Figure Figure (S520) Figure Figure Figure 4- 1 4- 2 4- 3 Logic Board Carriage Board Print Head 4- 4 4- 5 4- 6 Logic Board Carriage Board Print Head 4- 7 4- 8 4- 9 Logic Board Carriage Board Print Head 4 -10 4 -11 4 -12 Logic Board Carriage Board Print Head V IV. TABLE INDEX Page Part 1: PRODUCT SPECIFICATIONS 1 -24 (S900) Table (S820) Table (S750) Table (S520) Table 2 -10 2 -21 Table Table 1- 7 1 -14 1 -20 1- 1 PRODUCT CODE LIST 1- 2 PRODUCT CODE LIST 1- 3 PRODUCT CODE LIST 1- 4 PRODUCT CODE LIST Part 2: TROUBLESHOOTING 2- 1 2- 2 ERROR INDICATIONS EEPROM SETTINGS WHEN REPLACING THE INK ABSORBER Part 3: TECHNICAL REFERENCE 3- 3 3- 5 Table Table 3- 1 3- 2 CLEANING MODES PRINT MODES VI Part 1 PRODUCT SPECIFICATIONS Page Page 1 1 1 2 2 4 6 6 7 (S900) 1. PRODUCT OVERVIEW 1.1 Product Overview 1.2 Special Features 2. SPECIFICATIONS 2.1 Printer Specifications 2.2 Paper Specifications 2.3 Print Head Specifications 2.4 Printer and Scanner Drivers 3. PRODUCT CODE LIST 1 -15 1 -15 1 -15 1 -16 1 -16 1 -18 1 -19 1 -19 1 -20 (S750) 1. PRODUCT OVERVIEW 1.1 Product Overview 1.2 Special Features 2. SPECIFICATIONS 2.1 Printer Specifications 2.2 Paper Specifications 2.3 Print Head Specifications 2.4 Printer and Scanner Drivers 3. PRODUCT CODE LIST 1- 9 1- 9 1- 9 1 -10 1 -10 1 -12 1 -13 1 -13 1 -14 (S820) 1. PRODUCT OVERVIEW 1.1 Product Overview 1.2 Special Features 2. SPECIFICATIONS 2.1 Printer Specifications 2.2 Paper Specifications 2.3 Print Head Specifications 2.4 Printer and Scanner Drivers 3. PRODUCT CODE LIST 1 -21 1 -21 1 -21 1 -22 1 -22 1 -23 1 -23 1 -23 1 -24 (S520) 1. PRODUCT OVERVIEW 1.1 Product Overview 1.2 Special Features 2. SPECIFICATIONS 2.1 Printer Specifications 2.2 Paper Specifications 2.3 Print Head Specifications 2.4 Printer and Scanner Drivers 3. PRODUCT CODE LIST 111111111- Part 1: Product Specifications S900 I. PRODUCT OVERVIEW 1.1 Product Overview 1.2 Special Features (1) Speed The new head (512 nozzles x 6 colors, 1200 dpi resolution) allows improved print speed (1 ppm photo printing). (2) Image Quality Increased color range and half toning due to advanced image management. (3) Servicing Servicing is almost identical to that of the S600. (4) Value Added Features Total borderless printing (for postcard, A4, LTR, L-size, 2L-size, 4" x 6") A new level of quietness with the adoption of Quiet mode. (5) Other Paper feed strength has been greatly improved by use of the S600 ASF. Printer (Front) Print head Figure 1-1 Printer Exterior (S900) 1-1 Product Specifications "High Speed, Ultra-fine Image Photo Printer" With a new head (512 nozzles x 6 colors, 1200dpi resolution) and improvements to the printer driver, this printer realizes the highest photo printing speed in its class and the finest picture quality among its competitors. The printer is targeted at amateur users as well as high-end design and photography professionals who need realistic photo-quality output from their digital cameras, scanners, etc. Part 1: Product Specifications S900 2. SPECIFICATIONS 2.1 Printer Specifications 2.1.1 Printer specifications Type Paper Feed System Resolution Throughput Desktop serial printer Automatic feed only (No manual feed) 2400 × 1200 dpi (Max. resolution) HS HQ Bk (Fast Gear: J) 6.8-7.4 5.5-6.0 Color (Fast Gear: J) 6.9-7.3 4.4-4.8 Photo (ISO JIS-SCID NO.5) 0.94-1.07 0.49-0.55 Printing Direction Bi-directional / Uni-directional (See Part 3.3: PRINT MODE LIST for details) Max. Printing Width 203 mm (216 mm when borderless printing) Line Feed Speed 127 mm/s Interface USB (Rev.1.1) ASF Capacity Max. 10 mm (about 100 sheets of 75 g/m2 paper) Sensors Front cover-open sensor Print head sensor Ink-out and remaining ink sensors (optical type and dot count) Paper-out sensor Waste-ink full sensor Internal temperature sensor Print Head Available (even and odd nozzles of each color, bidirectional Alignment adjustment) Operating Noise 47/47/40 dB(A) Sound pressure level conforms to ISO9296 (draft, standard, high) Ambient Conditions During operation: Temperature 5C-35C Relative Humidity 10%-90% (No condensation) During non-operation:Temperature 0C-40C Relative Humidity 5%-95% (No condensation) Power Source Power voltage/frequency Power consumption During standby 100-127 VAC 50/60 Hz Max. approx. 22 W Approx. 6 W (2W*1) 220-240 VAC 50/60 Hz Max. approx. 21 W Approx. 6 W (2W*1) External Approx. 440 mm (W) × 300 mm (D) × 180 mm (H) Dimensions Weight 5.8 kg (Not including print head and options) Related Standards EMR interference: VCCI, FCC, IC, CE Mark, Taiwan / Korea EMC, CCIB (China EMC), C-tick Electrical safety: Dentori, UL, C-UL, CB Report, GS, CE Mark, FIMC, CCIB (electrical safety), AS, CCEE, PSB, Korean Dentori, SASO Environmental: Energy Star, Blue Angel, Environment label Serial No. Location Carriage ribbon cable holder (visible when the access cover is open) ✽1: In energy-saving mode 1-2 Part 1: Product Specifications S900 2.1.2 Printer service life Whichever comes first: (1) A total of 10,000 pages printed at 7.5% duty per color. (2) 5 years of use. (1) Service life 10,000 pages of color printing (7.5% duty pattern printing per color) (2) Ink tank service life (printable pages per tank) Monochrome (black) *1 BCI-6Bk: 640 pages (2.05%) Color *2 BCI-6Bk: 990 pages (print duty: 0.83%) BCI-6C: 860 pages (print duty: 1.01%) BCI-6M: 790 pages (print duty: 1.56%) BCI-6Y: 470 pages (print duty: 2.70%) BCI-6PC: 410 pages (print duty: 2.93%) BCI-6PM: 270 pages (print duty: 4.95%) ✽1: JEIDA Standard pattern (default driver setting) ✽2: JIS SCID NO. 5 Pattern (measured when driver set to HQ photo printing on plain paper) Figure 1-2 JEIDA Standard Pattern Figure 1-3 JIS SCID No. 5 1-3 Product Specifications 2.1.3 Print head service life Part 1: Product Specifications S900 2.2 Paper Specifications 2.2.1 Paper sizes and weights (1) Paper sizes See the table below. (2) Weight For automatic feeding, the paper's weight should be 64-105 g/m2. 2.2.2 Paper types and settings Type Paper Feed ASF Stacking Size ● Plain paper High-quality paper ● Photo glossy paper ● Professional Photo paper HR-101 GP-301 PR-101 PR-101L PR-101 2L PR-101 4x6 Glossy photo film HG-201 Transparency CF-102 Banner paper -T-shirt transfer TR-201 Mouse pad MK-101 ● Glossy postcard KH-201 Photo glossy postcard FM-101 ● Japan Post Office --postcard ● Japan Post Office --postcard for ink jet printing Professional photo PH-101 postcard Envelope COM#10 DL-size No. 4 No. 6 Professional photo PC-101 L card PC-101 2L PC-101 D PC-101 W PC101 S PC-101 C Method Auto Auto Auto Auto Capacity Less than 10 mm Approx. 80 sheets 10 sheets 1 sheet 89 mm × 127 mm 127 mm × 178 mm 101.6 mm × 152.4 mm A4/LTR A4/LTR A4/LTR A4/LTR --148 mm × 100 mm 119 mm × 216 mm 100 mm × 148 mm Auto Auto Auto Auto Auto Auto Auto Auto Auto Auto 20 sheets 10 sheets 20 sheets 1 sheet Less than 1 sheet 1 sheet 1 sheet Less than Less than Less than 100 mm × 148 mm Auto Less than 40 sheets 100 mm × 148 mm Auto Less than 20 sheets 105 mm × 241 mm 110 mm × 220 mm 105 mm × 235 mm 98 mm × 190 mm 101.6 mm × 190.5 mm 183 mm × 210 mm 210 mm × 310 mm 210 mm × 310 mm 119 mm × 216mm Perforated phonecard size Auto Auto Auto Auto Auto Auto Auto Auto Auto Auto Less Less Less Less Less Less Less Less Less Less A4/B5/A5/LTR/LGL A4/LTR A4/LTR A4/LTR than than than than than than than than than than 30 sheets 20 sheets 20 sheets 40 sheets 10 10 10 10 20 10 10 10 20 20 envelopes envelopes envelopes envelopes sheets sheets sheets sheets sheets sheets ●: Borderless printing is possible with this paper (plain paper, A4/LTR size only). 1-4 Part 1: Product Specifications S900 2.2.3 Printable area ■ A4, B5, A5 ■ Letter, legal 33.0 mm 3.0 mm ±1.5 24.0 mm 5.0 mm 33.0 mm 24.0 mm 5.0 mm ( 3.4 mm ±1.5*1 3.4 mm ±1.5 ■ Envelope (No. 4/No. 6) mm ( 6.4 ) ±1.5 6.4 mm ±1.5 ) ■ Glossy postcard/Japan Post Office postcard/ Japan Post Office postcard for ink jet printing/Pro photo postcard 3.0 mm ±3.0 3.0 mm ± 1.5 33.0 mm 24.0 mm 5.0 mm 24.0 mm 3.4 mm ±1.5 mm ( 3.4 ±1.5 ) 3.4 mm ± 1.5 mm ( 3.4 ± 1.5 ) *1 For recycled paper, 3.0 mm ±3 or 3.4 mm ±2. *2 If the bottom margin goes beyond the plain paper's printable area, the software application's specifications apply. The region inside the dotted lines is the printable area where print quality can be guaranteed. Note: The right margins in parentheses indicate that the dimension depends on the paper size. Figure 1-4 Printable Area 1-5 Recommended printing area: Printable area: Product Specifications Paper-feeding direction 3.0 mm ±1.5*1 Part 1: Product Specifications S900 2.3 Print Head Specifications Configuration Print Head Ink Colors Ink Tank Head Weight Ink Tank Weight (Net) Supply method Print Head 6 color integrated head, detachable ink tanks for each color 512 x 6 nozzles BCI-6Bk, C, M, Y, PC, PM 6 separate ink tanks by color Approx. 80 g (not including ink) 11 g Service parts (not including ink tanks) 2.4 Printer and Scanner Drivers 1. Windows drivers Windows 98/98 S.E./Millennium printer drivers Ver. 7.20 Windows 2000 printer driver Ver. 1.50 Windows XP printer driver Ver. 1.50 2. Macintosh driver Mac OS (inc. OS X) printer driver Ver. 3.90 1-6 Part 1: Product Specifications S900 3. PRODUCT CODE LIST The table below lists the product codes of the printer, consumables and optional items. The print head will be supplied only as a spare part for servicing. Item Printer Print head*1 Ink tank --- --- Black Cyan Magenta Yellow PC PM Designation Canon Bubble Jet Printer S900 Product Code 6873A0XXAA --Canon Ink Tank QY6-0039 BCI-6BK BCI-6C BCI-6M BCI-6Y BCI-6PC Photo BCI-6PM Photo 4705A00XAA 4706A00XAA 4707A00XAA 4708A00XAA 4709A00XAA 4710A00XAA Destination Substitute 'XX' with the following country codes 01: USA 02: CAN 03: Latin LV 04: Latin HV 05: EUR 06: GER 07: FRN 08: ASIA HV 09: AUST 10: KRN 11: UK 12: JPN 13: TW 14: HK 15: CHN Substitute 'X' with the following country codes 1: JPN 2: EUR 3: AMR 4: ASIA/OCN ✽1: Supplied strictly as a service part. Not supplied as a consumable or an optional item. 1-7 Product Specifications Table 1-1 PRODUCT CODE LIST Part 1: Product Specifications S900 This page intentionally left blank 1-8 Part 1: Product Specifications S820 I. PRODUCT OVERVIEW 1.1 Product Overview "Ultra-High Image Quality Photo Printer" (1) Image Quality Increased color range and half toning due to advanced image management. (2) Servicing Servicing is almost identical to that of the S600. (3) Value Added Features Total borderless printing (for postcard, A4, LTR, L-size, 2L-size, 4" x 6") A new level of quietness with the adoption of Quiet mode. (4) Other Paper feed strength has been greatly improved by use of the S600 ASF. Print head Printer (Front) Figure 1-5 Printer Exterior (S820) 1-9 Product Specifications 1.2 Special Features Part 1: Product Specifications S820 2. SPECIFICATIONS 2.1 Printer Specifications 2.1.1 Printer specifications Type Paper Feed System Resolution Throughput Desktop serial printer Automatic feed only (No manual feed) 2400 × 1200 dpi (Max. resolution) Draft Standard High Bk (Fast Gear: J) 4 3.4 1.1 Color (Fast Gear: J) 4 1.9 0.8 Photo (ISO JIS-SCID NO.5) 0.45 0.22 Printing Direction Bi-directional / Uni-directional (See Part 3:3. PRINT MODE LIST for details) Max. Printing Width 203 mm (216 mm when borderless printing) Line Feed Speed 90 mm/s Interface IEEE1394, USB (Rev.1.1) ASF Capacity Max. 10 mm (about 100 sheets of 75 g/m2 paper) Sensors Front cover-open sensor Print head sensor Ink-out and remaining ink sensors (optical type and dot count) Paper-out sensor Waste-ink full sensor Internal temperature sensor Print Head Available (even and odd nozzles of each color, bidirectional Alignment adjustment) Operating Noise 45/45/37 dB(A) Sound pressure level conforms to ISO9296 (draft, standard, high) Ambient Conditions During operation: Temperature 5C-35C Relative Humidity 10%-90% (No condensation) During non-operation:Temperature 0C-40C Relative Humidity 5%-95% (No condensation) Power Source Power voltage/frequency Power consumption During standby 100-127 VAC 50/60 Hz Max. approx. 22 W Approx. 5 W (2W*1) 220-240 VAC 50/60 Hz Max. approx. 21 W Approx. 5 W (2W*1) External Approx. 430 mm (W) x 294 mm (D) x 177 mm (H) Dimensions Weight 5.0 kg (Not including print head and options) Related Standards EMR interference: VCCI, FCC, IC, CE Mark, Taiwan / Korea EMC, CCIB (China EMC), C-tick, CCEE Electrical safety: Dentori, UL, C-UL, CB Report, GS, CE Mark, FIMC, CCIB (electrical safety), AS, CCEE, PSB, Korean Dentori, SASO Environmental: Energy Star, Blue Angel, Environment label Serial No. Location Carriage ribbon cable holder (visible when the access cover is open) ✽1: In energy-saving mode 1-10 Part 1: Product Specifications S820 2.1.2 Printer service life Whichever comes first: (1) A total of 10,000 pages printed at 7.5% duty per color. (2) 5 years of use. (1) Service life 5,000 pages of color printing (7.5% duty pattern printing per color) (2) Ink tank service life (printable pages per tank) Monochrome (black) *1 BCI-6Bk: 650 pages (2.05%) Color *2 BCI-6Bk: 1150 pages (print duty: 0.83%) BCI-6C: 980 pages (print duty: 1.01%) BCI-6M: 740 pages (print duty: 1.56%) BCI-6Y: 480 pages (print duty: 2.70%) BCI-6PC: 430 pages (print duty: 2.93%) BCI-6PM: 280 pages (print duty: 4.95%) ✽1: JEIDA Standard pattern (default driver setting) ✽2: JIS SCID NO. 5 Pattern (measured when driver set to HQ photo printing on plain paper). Refer to page 1-3 for this print pattern. 1-11 Product Specifications 2.1.3 Print head service life Part 1: Product Specifications S820 2.2 Paper Specifications 2.2.1 Paper sizes and weights See table for S900 2.2.2 Paper types and settings See table for S900 2.2.3 Printable area ■ A4, B5, A5 ■ Letter, legal Paper-feeding direction 3.0 mm ±1.5*1 30.5 mm 3.0 mm ±1.5 21.5 mm 5.0 mm 30.5 mm 21.5 mm 5.0 mm ■ Envelope (No. 4/No. 6) mm ( 6.4 ) ±1.5 6.4 mm ±1.5 mm ( 3.4 ) ±1.5 3.4 mm ±1.5*1 ■ Glossy postcard/Japan Post Office postcard/ Japan Post Office postcard for ink jet printing/Pro photo postcard 3.0 mm ±3.0 3.0 mm ± 1.5 30.5 mm 21.5 mm 5.0 mm 21.5 mm 3.4 mm ±1.5 mm ( 3.4 ±1.5 ) 3.4 mm ± 1.5 mm ( 3.4 ± 1.5 ) *1 For recycled paper, 3.0 mm ±3 or 3.4 mm ±2. *2 If the bottom margin goes beyond the plain paper's printable area, the software application's specifications apply. The region inside the dotted lines is the printable area where print quality can be guaranteed. Note: The right margins in parentheses indicate that the dimension depends on the paper size. Figure 1-6 Printable Area 1-12 Recommended printing area: Printable area: Part 1: Product Specifications S820 2.3 Print Head Specifications Print Head 6 color integrated head, detachable ink tanks for each color 256 x 6 nozzles BCI-6Bk, C, M, Y, PC, PM 6 separate ink tanks by color Approx. 80 g (not including ink) 11 g Service parts (not including ink tanks) 2.4 Printer and Scanner Drivers 1. Windows drivers Windows 95/98/98 S.E./Millennium printer drivers (IEEE1284/USB) *1 Ver. 7.20 Windows NT 4.0 (IEEE1284) Ver. 4.50 Windows 2000 printer driver (IEEE1284/USB) Ver. 1.50 Windows XP printer driver (IEEE1284/USB) Ver. 1.50 2. Macintosh driver Mac OS (inc. OS X) printer driver (USB) Ver. 3.90 ✽1: Windows 95 supports only IEEE1284 1-13 Product Specifications Configuration Print Head Ink Colors Ink Tank Head Weight Ink Tank Weight (Net) Supply method Part 1: Product Specifications S820 3. PRODUCT CODE LIST The table below lists the product codes of the printer, consumables and optional items. The print head will be supplied only as a spare part for servicing. Table 1-2 PRODUCT CODE LIST Item Printer Print head*1 Ink tank --- --- Black Cyan Magenta Yellow PC PM Designation Canon Bubble Jet Printer S820 Product Code 6859A0XXAA --Canon Ink Tank QY6-0040 BCI-6BK BCI-6C BCI-6M BCI-6Y BCI-6PC Photo BCI-6PM Photo 4705A00XAA 4706A00XAA 4707A00XAA 4708A00XAA 4709A00XAA 4710A00XAA Destination Substitute 'XX' with the following country codes 01: USA 02: CAN 03: Latin LV 04: Latin HV 05: EUR 06: GER 07: FRN 08: ASIA HV 09: AUST 10: KRN 11: UK 12: JPN 13: TW 14: HK 15: CHN Substitute 'X' with the following country codes 1: JPN 2: EUR 3: AMR 4: ASIA/OCN ✽1: Supplied strictly as a service part. Not supplied as a consumable or an optional item. 1-14 Part 1: Product Specifications S750 I. PRODUCT OVERVIEW 1.1 Product Overview 1.2 Special Features Speed Highest quality, highest speed with bidirectional 1200dpi nozzle pitch head. Monochrome text (HS): 20 ppm * Color DTP (HS): 13 ppm *2 Color full address: 1.5 ppm *3 Image quality Image quality improvements through use of new print head. Print head improvements (staggering of black & color nozzles) allow resolution of uneven density due to time lag in bidirectional printing. Service Servicing is almost identical to that of the S600, since major mechanical parts (sheet feeder unit, purge unit, carriage unit) and mechanical structure are very similar. Consumables (ink tanks) are same as for the S600/S630. Value Added Features The borderless printing feature has been added for supported paper types.*4 The Quiet mode feature has been added. Other Double-sided printing has been made possible.*5 ✽1: Measured using the FAST GEAR (Black) pattern introduced in 2000. ✽2: Measured using the FAST GEAR (Color) pattern introduced in 2000. ✽3: Measured using the A4 Full Pattern (A4 page, 1200 x 1200 dpi, dot-by-dot print pattern). ✽4: Paper types created specially to take advantage of the borderless printing feature. ✽5: With this double sided printing feature, the printer will feed the paper again after printing one side, in order to print the remaining surface. This feature has been added to comply with the Green Procurement Policy (Japan). 1 Printer (Front) Print head Figure 1-5 Printer Exterior (S750) 1-15 Product Specifications "High-Performance Next Generation Printer" This is a personal ink-jet printer to match the speed and features of printers for the business market, taking full advantage of speed technology developed for the S600/S630 series. Part 1: Product Specifications S750 2. SPECIFICATIONS 2.1 Printer Specifications 2.1.1 Printer specifications Type Paper Feed System Resolution Throughput Desktop serial printer Automatic feed only (No manual feed) 2400 × 1200 dpi (Max. resolution) HS HQ Bk (Fast Gear: J) 20 ppm 12 ppm Color (Fast Gear: J) 13 ppm 8 ppm Printing Direction Bi-directional (See Part 3:3. PRINT MODE LIST for details) Max. Printing Width 203 mm (8 inches). 216 mm when borderless printing. Interface IEEE1284 compatible 8-bit parallel, USB (no HUB function) ASF Capacity Max. 10 mm (about 100 sheets of 75 g/m2 paper or 110 sheets of 64 g/m2 paper) Sensors Front cover-open sensor, Print head sensor , Ink-out sensor Print position sensor, Paper-out sensor (paper rear edge sensor) Waste-ink quantity sensor, Internal temperature sensor Pickup roller sensor, Paper feed roller position sensor Carriage position sensor, Paper thickness lever sensor Operating Noise 51/51/45 dB(A) Sound pressure level conforms to ISO9296 (draft, standard, high) Ambient Conditions During operation: Temperature 5C-35C Relative Humidity 10%-90% (No condensation) During non-operation:Temperature 0C-40C Relative Humidity 5%-95% (No condensation) Power Source Power voltage/frequency Power consumption During standby off 100-127 VAC 50/60 Hz Max. approx. 33 W Approx. 3 W Approx. 1 W 220-240 VAC 50/60 Hz Max. approx. 33 W Approx. 3 W Approx. 1 W External Approx. 430 mm (W) x 294 mm (D) x 177 mm (H) Dimensions Weight 5.0 kg (Not including print head) Related Standards EMR interference: VCCI, FCC, IC, C-tick, Taiwan / Korea EMC, CCIB (EMC)/CCEE, Gost-R Electrical safety: Dentori, UL, C-UL, CE Mark, TUV, FIMKO, SASO, AS, PSB, Korean Dentori, CB/CCIB/CCEE Environmental: Energy Star, Blue Angel Serial No. Location Carriage ribbon cable holder (visible when the access cover is open) 2.1.2 Printer service life Whichever comes first: (1) A total of 30,000 pages (1500 standard characters in black ink) (2) A total of 10, 000 pages (printed at 7.5% duty per color) (3) 5 years of use 1-16 Part 1: Product Specifications S750 2.1.3 Print head service life ✽1: Print duty: ✽2: Print duty: : : 1.97% pattern equivalent 3.16% (cyan) equivalent 4.16% (magenta) equivalent 5.94% (yellow) equivalent Refer to page 1-3 for print patterns. 1-17 Product Specifications (1) Service life A total of 30,000 pages (1500 standard characters in black ink) A total of 10, 000 pages (printed at 7.5% duty per color) (2) Ink tank service life (printable pages per tank) Monochrome (black): 775 pages (JEIDA Standard pattern J1*1 / Standard quality Color (cyan): 600 pages (JIS SCID No. 5*2 / Standard quality) (magenta): 480 pages (as above) (yellow): 390 pages (as above) (black): 1200 pages (as above) Part 1: Product Specifications S750 2.2 Paper Specifications 2.2.1 Paper sizes and weights See table for S900 2.2.2 Paper types and settings See table for S900 2.2.3 Printable area Choosing total area borderless printing allows printing without margins. ■ A4, B5, A5 ■ Letter, legal Paper-feeding direction 3.0 mm ±1.5*1 33.0 mm 3.0 mm ±1.5 26.5 mm 5.0 mm 33.0 mm 26.5 mm 5.0 mm 6.4 mm ±1.5 mm ( 3.4 ) ±1.5 3.4 mm ±1.5*1 ■ Envelope (No. 4/No. 6) mm ( 6.4 ) ±1.5 ■ Glossy postcard/Japan Post Office postcard/ Japan Post Office postcard for ink jet printing/Pro photo postcard 3.0 mm ±3.0 3.0 mm ± 1.5 5.0 mm 24.0 mm 3.4 mm ±2.0 mm ( 3.4 ±2.0 ) 3.4 mm ± 1.5 mm (3.4 ± 1.5 ) *1 For recycled paper, 3.0 mm ±3 or 3.4 mm ±2. *2 If the bottom margin goes beyond the plain paper's printable area, the software application's specifications apply. The region inside the dotted lines is the printable area where print quality can be guaranteed. Note: The right margins in parentheses indicate that the dimension depends on the paper size. Figure 1-8 Printable Area 1-18 Recommended printing area: Printable area: Part 1: Product Specifications S750 2.3 Print Head Specifications Ink Colors Ink Tank Ink Tank Weight (Net) Supply method 2.4 Printer and Scanner Drivers 1 Windows drivers Windows 95/98/98 S.E./Millennium printer drivers (IEEE1284/USB) *1 Ver. 7.20 Windows NT 4.0 (IEEE1284) Ver. 4.50 Windows 2000 printer driver (IEEE1284/USB) Ver. 1.50 Windows XP printer driver (IEEE1284/USB) Ver. 1.50 4 Macintosh driver Mac OS (inc. OS X) printer driver (USB) Ver. 3.90 ✽1: Windows 95 supports only IEEE1284 1-19 Product Specifications Configuration Print Head Print Head Integrated head, detachable ink tanks for black and color (C, M, Y) Black: 320 nozzles in 2 vertical columns Color: 256 nozzles in 2 vertical columns per color Pigment Bk, Dye C, M, Y BC-3eBk, BCI-3eC, BCI-3eM, BCI-3eY Black: 32 g Color (C, M, Y): 11 g Service parts (not including ink tanks) Part 1: Product Specifications S750 3. PRODUCT CODE LIST The table below lists the product codes of the printer, consumables and optional items. The print head will be supplied only as a spare part for servicing. Table 1-3 PRODUCT CODE LIST Item Printer Print head*1 Ink tank --- --- Black Cyan Magenta Yellow Designation Canon Bubble Jet Printer S750 Product Code 7290A0XXAA --Canon Ink Tank QY6-0041 BCI-3eBK BCI-3eC BCI-3eM BCI-3eY 4479A00XAA 4480A00XAA 4481A00XAA 4482A00XAA Destination Substitute 'XX' with the following country codes 01: USA 02: CAN 03: Latin LV 04: Latin HV 05: EUR 06: GER 07: FRN 08: ASIA HV 09: AUST 10: KRN 11: UK 12: JPN 13: TW 14: HK 15: CHN Substitute 'X' with the following country codes 1: JPN 2: EUR 3: AMR 4: ASIA/OCN ✽1: Supplied strictly as a service part. Not supplied as a consumable or an optional item. 1-20 Part 1: Product Specifications S520 I. PRODUCT OVERVIEW 1.1 Product Overview 1.2 Special Features Speed Highest quality, highest speed with bidirectional 1200 dpi nozzle pitch head. Monochrome text (HS): 14 ppm *1 Color DTP (HS): 9 ppm *2 Color full address: 1.1 ppm *3 Image quality Same as that of the S600/S630. The print head is already in current use. Service Servicing is almost identical to that of the S600, since major mechanical parts (sheet feeder unit, purge unit, carriage unit) and mechanical structure are very similar. Consumables (ink tanks) are same as for the S600/S630. Value Added Features The borderless printing feature has been added for supported paper types.*4 The Quiet mode feature has been added. Other Double-sided printing has been made possible. *5 ✽1: Measured using the FAST GEAR (Black) pattern introduced in 2000. ✽2: Measured using the FAST GEAR (Color) pattern introduced in 2000. ✽3: Measured using the A4 Full Pattern (A4 page, 1200 x 1200 dpi, dot-by-dot print pattern). ✽4: Paper types created specially to take advantage of the borderless printing feature. ✽5: With this double sided printing feature, the printer will feed the paper again after printing one side, in order to print the remaining surface. This feature has been added to comply with the Green Procurement Policy (Japan). Printer (Front) Print head Figure 1-9 Printer Exterior (S520) 1-21 Product Specifications "Low-Cost, High-Performance Next Generation Printer" This is a less expensive version of the high-performance S750, incorporating its next generation standard engine for high image quality. Part 1: Product Specifications S520 2. SPECIFICATIONS 2.1 Printer Specifications 2.1.1 Printer specifications Type Paper Feed System Resolution Throughput Desktop serial printer Automatic feed only (No manual feed) 2400 × 1200 dpi (Max. resolution) HS HQ Bk (Fast Gear: J) 14 ppm 9 ppm Color (Fast Gear: J) 10 ppm 6 ppm Printing Direction Bi-directional (See Part 3:3. RINT MODE LIST for details) Max. Printing Width 203 mm (8 inches). 216 mm when borderless printing. Interface IIEEE1284 compatible 8-bit parallel, USB (no HUB function) ASF Capacity Max. 10 mm (about 100 sheets of 75 g/m2 paper or 110 sheets of 64 g/m2 paper) Sensors Front cover-open sensor, Print head sensor , Ink-out sensor Print position sensor, Paper-out sensor (paper rear edge sensor) Waste-ink quantity sensor, Internal temperature sensor Pickup roller sensor, Carriage position sensor Paper thickness lever sensor Operating Noise 51/51/45 dB(A) Sound pressure level conforms to ISO9296 (draft, standard, high) Ambient Conditions During operation: Temperature 5C-35C Relative Humidity 10%-90% (No condensation) During non-operation:Temperature 0C-40C Relative Humidity 5%-95% (No condensation) Power Source Power voltage/frequency Power consumption During standby off 100-127 VAC 50/60 Hz Max. approx. 33 W Approx. 3 W Approx. 1 W 220-240 VAC 50/60 Hz Max. approx. 33 W Approx. 3 W Approx. 1 W External Approx. 430 mm (W) x 294 mm (D) x 177 mm (H) Dimensions Weight 5.0 kg (Not including print head) Related Standards EMR interference: VCCI, FCC, IC, C-tick, Taiwan / Korea EMC, CCIB (EMC)/CCEE, Gost-R Electrical safety: Dentori, UL, C-UL, CE Mark, TUV, FIMKO, SASO, AS, PSB, Korean Dentori, CB/CCIB/CCEE Environmental: Energy Star, Blue Angel Serial No. Location Carriage ribbon cable holder (visible when access cover is open) Underlined figures indicate difference from the S750. 2.1.2 Printer service life Whichever comes first: (1) A total of 30,000 pages (1500 standard characters in black ink) (2) A total of 10, 000 pages (printed at 7.5% duty per color) (3) 5 years of use 1-22 Part 1: Product Specifications S520 2.1.3 Print head service life ✽1: Print duty: ✽2: Print duty: : : 1.97% pattern equivalent 3.16% (cyan) equivalent 4.16% (magenta) equivalent 5.94% (yellow) equivalent Refer to page 1-3 for print patterns. 2.2 Paper Specifications 2.2.1 Paper sizes and weights See table for S900 2.2.2 Paper types and settings See table for S900 2.2.3 Printable area See table for S750 2.3 Print Head Specifications See table for S750 2.4 Printer and Scanner Drivers See table for S750 1-23 Product Specifications (1) Service life A total of 30,000 pages (1500 standard characters in black ink) A total of 10, 000 pages (printed at 7.5% duty per color) (2) Ink tank service life (printable pages per tank) Monochrome (black): 775 pages (JEIDA Standard pattern J1*1 / Standard quality Color (cyan): 600 pages (JIS SCID No. 5*2 / Standard quality) (magenta): 480 pages (as above) (yellow): 390 pages (as above) (black): 1200 pages (as above) Part 1: Product Specifications S520 3. PRODUCT CODE LIST The table below lists the product codes of the printer, consumables and optional items. The print head will be supplied only as a spare part for servicing. Table 1-4 PRODUCT CODE LIST Item Printer Print head*1 Ink tank --- --- Black Cyan Magenta Yellow Designation Canon Bubble Jet Printer S520 Product Code 7100A0XXAA --Canon Ink Tank QY6-0034 BCI-3eBK BCI-3eC BCI-3eM BCI-3eY 4479A00XAA 4480A00XAA 4481A00XAA 4482A00XAA Destination Substitute 'XX' with the following country codes 01: USA 02: CAN 03: Latin LV 04: Latin HV 05: EUR 06: GER 07: FRN 08: ASIA HV 09: AUST 10: KRN 11: UK 12: JPN 13: TW 14: HK 15: CHN Substitute 'X' with the following country codes 1: JPN 2: EUR 3: AMR 4: ASIA/OCN ✽1: Supplied strictly as a service part. Not supplied as a consumable or an optional item. 1-24 Part 2 TROUBLESHOOTING Page 2- 1 2- 1 2- 1 2- 2 2- 5 2- 5 2- 6 2- 9 2 -10 2 -13 2 -13 2 -14 2 -15 2 -20 2 -20 2 -26 2 -27 2 -27 2 -28 2 -28 2 -28 2 -28 2 -29 2 -29 2 -30 2 -32 2 -34 2 -35 1. PRINTER OPERATION 1.1 Printer Operation 1.2 Status Indicator 1.3 Simple Printer Operations 2. SERVICING 2.1 Before Troubleshooting 2.2 Detectable Problems from System Start to Exit 2.3 Troubleshooting Problems 2.4 Troubleshooting Error Indications 3. DISASSEMBLY AND REASSEMBLY 3.1 Cautions for Disassembly and Reassembly 3.2 Exploded View 3.3 Disassembly and Reassembly 4. ADJUSTMENTS AND SETTINGS AFTER DISASSEMBLY AND REASSEMBLY, AND CONFIRMATION OF OPERATION 4.1 Adjustment and Settings after Disassembly and Reassembly 4.2 Confirmation method 5. TRANSPORTING THE PRINTER 5.1 Procedure 6. PARTS REPLACEMENT, PERIODIC INSPECTIONS, & TOOLS 6.1 Periodic Parts Replacement 6.2 Periodic Inspection 6.3 Tool List 7. SERVICE-RELATED FEATURES 7.1 Service Mode Operations 7.2 Test Printout 7.3 Printing the EEPROM Information 7.4 Resetting the EEPROM 7.5 Waste-ink counter settings (S900/S820) Part 2: Troubleshooting S900 / S820 / S750 / S520 1. PRINTER OPERATION You can operate the printer either by itself or with a computer. Both methods are explained below. 1.1 Printer Operation The printer's operation panel has a POWER button and a RESUME button to cancel printing operation or to cancel an error. With a computer, you can use the printer driver to adjust the print head's position and to change various settings. For details on using the printer driver with the computer, see page 3-2 Troubleshooting POWER button Turns the printer ON/OFF and cancels test printing. RESUME button Cancels printing operation or an error. Cleaning and the nozzle check pattern can be selected by the number of blinks of the indicator. Figure 2-1 Operation Panel 1.2 Status Indicator When you operate the printer by itself, you can find out the printer's status with the indicator. When an error occurs, the nature of the error can be determined by the number of times the indicator blinks. Normal Operation Indicator Display Green light Blinks green (Long/short) Light off Error Indicator Display Blinks orange Green/orange (Toggle blinking) Status Power ON Power ON in progress, power OFF in progress, resume operation in progress, cleaning in progress, test printing in progress, front cover open, printing in progress Power OFF Status The number of blinks differs depending on the error. See page 2-10 for details. The indicator blinks differently according to error. See page 2-11 for details. 2-1 Part 2: Troubleshooting S900 / S820 / S750 / S520 1.3 Simple Printer Operations The printer has an offline operation mode that works when the printer is not connected to a computer and the power is on. To conduct the operations below, with the power turned on, hold down the RESUME button until the green indicator blinks the specified number of times. Operation Cleaning operation Nozzle check pattern Roller cleaning operation --- Indicator Blink Count Once Twice 3 times 4 times Remarks --Load a sheet of paper A4 size or larger Load either no paper or A4 No function 1.3.1 Cleaning operation To start the cleaning operation, turn on the printer and hold down the RESUME button until the green indicator blinks once. Cleaning will start when you let go of the button. This is the same as using the printer driver utility to perform cleaning. (The cleaning operation conducted is the same as using the S750/S520 driver utilities to clean all of the ink nozzles). 1.3.2 Printing the nozzle check pattern With the printer turned on, hold down the RESUME button until the green indicator blinks twice. Let go and the printer will then start printing the nozzle check pattern. If any printing flaws show up in this test printout, perform print head cleaning. Use A4/LTR size paper when printing the nozzle check pattern. If the paper's width is narrower than the nozzle check pattern, the printer will print on the bare platen, dirtying it with ink. To stop printing of the test pattern midway, press the POWER button. Printing will stop and the paper will be ejected. The printer will remain on. If the problem persists even after conducting cleaning three times, perform Deep Cleaning from the driver utilities. If that still does not resolve the problem, replace the print head. 2-2 Part 2: Troubleshooting S900 / S820 / S750 / S520 Figure 2-2 Nozzle Check Pattern Printout (S820) Figure 2-2 Nozzle Check Pattern Printout (S750/S520) 2-3 Troubleshooting Figure 2-2 Nozzle Check Pattern Printout (S900) Part 2: Troubleshooting S900 / S820 / S750 / S520 1.3.3 Roller cleaning operation This is to remove the paper dust adhering to the auto sheet feeder's rollers. With the printer turned on, hold down the RESUME button until the green indicator blinks three times. The cleaning of the rollers will then start. There are two cleaning methods: (1) Using plain paper Place a sheet of plain paper on the auto sheet feeder and execute roller cleaning. Do this three times. (2) Rotating the rollers without paper Execute roller cleaning without placing any paper on the auto sheet feeder. (The rollers will perform ten rotations.) Do this three times. Do not execute the cleaning operation more times than necessary. Excessive cleaning will generate rubber dust which can affect the printer's operation. 2-4 Part 2: Troubleshooting S900 / S820 / S750 / S520 2. SERVICING 2.1 Before Troubleshooting Before troubleshooting, check the following and see if any of the problems you are experiencing can be fixed. Problem The printer does not operate at all. 2-5 Troubleshooting Solution Probable Cause The power outlet is not supplying Connect the AC cord to a power outlet which supplies the the required voltage. required voltage. Check that the power cord is The power cord is not properly connected to the printer or power connected properly. outlet. An internal plug is disconnected. Disconnect and reconnect the plug. Paper feeding does Recommended paper is not being Use only recommended paper. not work. used. Remove the foreign matter. There is foreign matter in the paper feed section (sheet feeder, pinch roller, LF roller, platen, spurs). Clean the Print Head. The Print Head needs cleaning. Printing does not Replace the ink cartridge. The ink cartridge is empty. take place Replace the cartridge, if the The Print Head has not been problem still persists after cleaning. used for a prolonged period. Make sure the ink tanks are The ink tanks are not properly properly seated. seated. Stripes appear in the Print head alignment has not Perform print head alignment. printout (See page 2-22) been performed. Color tones are Make sure the ink tanks are The ink tanks are not properly incorrect properly seated, perform cleaning seated, cleaning has not been performed. Part 2: Troubleshooting S900 / S820 / S750 / S520 2.2 Detectable Problems from System Start to Exit Errors unresolvable by the user can be checked before system startup is completed. AC power connection CPU & printer controller initialization DRAM check OK? No Yes Orange lamp lights RAM error EEPROM check Checksum S520/S750 only Power ON Power LED lights EEPROM error Error check ROM error Key input detection prohibited Sensor power ON RAM error VSEN ON S820/S900 only Cartridge error (a) Interrupt error detection starts Abnormal internal temperature error Head presence detection Paper feed encoder home position obtained Abnormal head temperature error Take the cartridge to the home position. To next page 2-6 Orange/green toggle blinking 9 times Orange/green toggle blinking 11 times Orange/green toggle blinking 10 times Orange blinks 7 times Orange/green toggle blinking 6 times Orange/green toggle blinking 8 times Part 2: Troubleshooting S900 / S820 / S750 / S520 From preceding page 1 No Head present? Yes Reading of head's EEPROM Yes Troubleshooting Procedure within dotted line executed? Head power ON No No OK? Yes 2nd time 1st time execution within dotted line Cartridge error (b) Orange blinks 7 times Purge unit initialization No OK? Yes Purge sensor error Cartridge home position obtained Orange/green toggle blinking 4 times No OK? Yes 1st time No head/2nd time CR error Orange/green toggle blinking 2 times Cap open Reserve discharge Paper feed roller initialization No OK? Yes LF error Paper discharge Orange/green toggle blinking 3 times To next page 2-7 Part 2: Troubleshooting S900 / S820 / S750 / S520 From preceding page OK? No Yes Paper jam error Paper feed roller turns slowly Encoder parameter obtained Cover sensor check Open or closed? Closed Head present? Present Ink-low detection Paper spacing lever position detection Waste ink error check I/F power ON Open Move carriage to home position Not present Back to 1 No-ink error No error indication If narrow : Right position from the left edge. If wide : Left edge position. Waste ink warning Orange blinks 7 times Waste ink full error Orange/green toggle blinking 7 times LED lights I/F busy canceled Switch detection prohibit canceled END 2-8 Orange blinks 3 times Part 2: Troubleshooting S900 / S820 / S750 / S520 Faulty Paper Feed Faulty Printout Problem Power does not turn on. After power ON, it immediately turns off again. The print head is not recognized. It does not return to the home position. Abnormal noise Probable Cause / Check Items 1. AC adapter, 2. Logic board Solution 1. Replace faulty parts. 1. Print head, 2. Print head contacts, 3. Carriage flex cable Printing stops midway. Multiple sheets are fed at a time. Paper is not fed. 1. Logic board 1. ASF (Return tab, faulty pressure roller operation) 1. Foreign matter, 3. PE sensor arm 1. Remove and reinstall print head / check the contacts, 2. Replace faulty parts. 1. Remove foreign matter, 2. Reinstall dislodged parts 1. Replace faulty parts. 1. Replace faulty parts. 1. Dislodged parts, 2. Dislodged pinch roller 1. Remove foreign matter, 2. Replace faulty parts, 3. Replace ASF unit Paper is fed skewed. 1. Paper guide, 2. Foreign matter 1. Adjust the paper guide adhering to paper feed rollers to the correct position, 2. Remove foreign matter. No printing. 1. Print head, 2. Ink tanks, 3. 1. Replace faulty parts. No color. Purge unit Scrape marks or white 1. Print head, 2. Ink tanks, 3. 1. Remove and reinstall stripes appear even after Purge unit, 4. Print head print head / check the cleaning. contacts, 5. Carriage flex cable contacts, 2. Replace faulty Lines not in the printing parts. data appear. The paper is stained. 1. Ink mist from the paper 1. Feed through several transport section in the printer, sheets of clean paper, 2. 2. The ink absorber (platen) is Replace the ink absorber dirty. (platen), 3. Purge unit. Spur marks appear. 1. Deformed spur tips. 1. Replace faulty parts. Lines are missing. 1. Ink tanks. 1. Replace ink tanks. Inappropriate color tones. 1. Print head. 1. Replace faulty parts. Overlapping printing. 1. Platen unit (eject roller) 1. Replace faulty parts. No black. 1. Ink tank. 1. Perform Deep Cleaning (3 times) Images / text appears 1. Timing slit strip. 1. Clean grease from stretched. timing slit strip, 2. Replace the carriage board. 2-9 Troubleshooting Faulty Operation 2.3 Troubleshooting Problems Part 2: Troubleshooting S900 / S820 / S750 / S520 2.4 Troubleshooting Error Indications 1) Error indication when an error recoverable by the user occurs, the indicator lights green, then blinks orange repeatedly. Check the number of orange blinks and proceed to correct the error. 2) Error indication when an error not resolvable by the user occurs The indicator toggles between orange and green repeatedly. Check the number of toggled blinks and proceed to correct the error. Table 2-1 ERROR INDICATIONS Indicator Error Status Blink Count Code User-Recoverable Errors Orange 1000 Paper feed error 2 blinks Orange 3 blinks 1300 Paper jam error Orange 4 blinks 1600 1601 1611 1612 1613 No No No No No ink ink ink ink ink error*3 error (Bk) error (Y) error (M) error (C) Probable Cause and Faulty Parts <Cause> 1. No paper was loaded. 2. During feeding, the paper did not reach the paper-end sensor. 3. During feeding, the paper's bottom edge missed the paper-end sensor. 4. The ASF sensor did not return to its initial position and the paper-end sensor concluded that there was no paper. (ASF motor may be out of sync.) <Suspect Parts> Paper feed section, sheet feeder unit, paper-end sensor, logic board <Cause> 1. The paper-end sensor still detects the presence of paper even after 23 inches of paper ejection operation. 2. The ASF sensor did not return to its initial position and the paper-end sensor concluded that there was no paper. (Out of sync.) 3. During paper feeding abnormal timing caused the paper-end sensor to still detect paper. <Suspect Part> Paper feed section, paper-end sensor, logic board <Cause> The respective ink tank has run out of ink (in both the tank and the sponge) <Suspect Part> Ink tank 2-10 Part 2: Troubleshooting S900 / S820 / S750 / S520 1401 Print head not properly installed <Cause> Printing, cleaning etc. attempted whilehead is not properly installed. <Suspect Part> Print head, carriage unit. Cartridge error <Cause> (a) The print head temperature (output of the diode sensor in the head) is close to the threshold (b) Print head internal EEPROM checksum error. <Suspect Part>Print head. Waste-ink warning <Cause> The total waste ink count recorded in the EEPROM exceeds 95% of the value stipulated as "Full". <Suspect Part> Ink absorber, logic board. Orange 7 Blinks 1402 1403 1405 1485 Orange 8 Blinks 1700 Unresolvable Errors by the User Orange / 5100 CR error Green 2 toggle blinks <Cause> Abnormal carriage encoder signal. <Suspect Part> Encoder film, carriage unit, logic board, flexible cable. 2 Orange / 6000 LF error* <Cause> Green Abnormal LF encoder signal. 3 toggle blinks <Suspect Part> Encoder film, paper feed sensor unit, logic board. Orange / 5C00 Purge sensor error <Cause> Green At the sensor's ON timing it turns OFF, Green or 4 toggle blinks vice versa. <Suspect Part> Purge unit, logic board. Orange / 5400 Abnormal internal <Cause> Green temperature error The temperature sensor on the logic board is 6 toggle blinks abnormal (disconnected etc.) <Suspect Part> Logic board. Orange / 5B00 Waste-ink full <Cause> Green error The waste-ink absorber has reached 100% capacity. 7 toggle blinks <Suspect Part> Ink absorber, logic board. Orange / 5200 Abnormal head <Cause> Green temperature error The head temperature (output of the diode sensor in the head) is close to the threshold 8 toggle blinks <Suspect Part> Print head, logic board. Orange / 6800 EEPROM error <Cause> Green An error occurred while writing to the EEPROM. 9 toggle blinks Checksum error (at soft power ON) <Suspect Part> Logic board. 3 Orange / 6100 ROM error* <Cause> Green ROM check error (at hard power ON). 10 toggle blinks Error is displayed at soft power ON. <Suspect Part> Logic board. 2-11 Troubleshooting Orange 6 blinks Part 2: Troubleshooting S900 / S820 / S750 / S520 Orange / 6300 RAM error Green S750/S520 11 toggle blinks S900/S820 Internal error No indication ... Ink sensor error <Cause> DRAM check error (at hard power ON). S900/S820 display the error at soft power ON. <Suspect Part> Logic board. <Cause> The no-ink indication is given while there is still ink. External noise (light) has affected the ink sensor. <Suspect Part> Logic board, ink sensor, ink tanks. ✽1 : S900 only. ✽2 : S750 only. ✽3 : S900/S820 only. Orange / Green S900/S820 12 toggle blinks 820D/S830 6500 error <Cause> When the CPU malfunctions due to an unknown cause, the CPU makes illegal access and runs aberrantly, resulting in a hardware error. In this case, as the printer cannot continue operations, the printer is powered off. When the printer is powered on the next time, the error is displayed. Eg. One cause of this error may be the head error. 403 error <Cause> When the communication between the engine ROM and Photo Direct Printing ROM are not properly conducted, this error will occur. Test the logic board. 2-12 Part 2: Troubleshooting S900 / S820 / S750 / S520 3. DISASSEMBLY AND REASSEMBLY 3.1 Cautions for Disassembly and Reassembly 3.1.1 Cautions against ink stains (ink path/ink mist) 3.1.2 Damage due to static electricity Friction with clothing can cause a build up of static electricity on the human body. Static electricity can destroy electrical components or alter the electrical characteristics of components. Be extra careful when handling the logic board. 3.1.3 Deformation of spur tips Be careful not to deform the spur tips. The spur tips contact the paper after printing has taken place. Since the spur tips' contact area is small, any ink adhering to the spur will be a minuscule amount which can be wiped off by the spur cleaner so as not to dirty the paper. However, if the spur tips are bent of out of shape, the size of the contact area with the paper increases, along with the quantity of ink which can adhere to the spurs. If the spur cleaner cannot completely wipe off such an amount, the spurs will stain the paper with a dotted line. 2-13 Troubleshooting During servicing, be careful not to touch the ink path and get ink stains on the printer, work surface, your hands or clothing. The ink path includes the print head's ink tank section supply inlet, the print head's ink filter, the ink nozzles, head cap, wiper, and waste-ink absorber. Also, in printers which have seen long-term or heavy-duty use, minute quantities of ink rebounding off the paper surface may have led to the buildup of ink mist, coating the platen, inside the front cover, and the purge section. Part 2: Troubleshooting S900 / S820 / S750 / S520 3.2 Exploded View The shapes of different models differ slightly. For details refer to the Parts Catalog. Figure 2-3 Exploded View 2-14 Part 2: Troubleshooting S900 / S820 / S750 / S520 3.3 Disassembly and Reassembly See below for supplemental information and cautions for disassembling and reassembling the printer. Refer to the Parts Catalog for the disassembly procedure. The illustrations in the Parts Catalog are numbered according to the order of disassembly. 3.3.1 Carriage lock release Purge Unit Figure 2-4 Carriage Lock Release 2-15 Troubleshooting NB: When releasing the carriage lock of the S900/S820, it is necessary to remove the printer unit from the bottom case unit. Normally, when a cartridge is installed on the carriage and the power is turned off, the printer moves the carriage to the capping position to lock it. When the power is turned on, the carriage lock is normally released. However, if the printer does not operate properly, you can release the carriage lock manually. On the front of the printer, rotate the gear as shown by the arrow in the illustration below to release the carriage lock. Part 2: Troubleshooting S900 / S820 / S750 / S520 3.3.2 Removing and installing tap screws The printer uses tap screws to fasten the printer unit and base. The removed tap screws will have residue from the mold in which the internal thread was made. Since the residue may crush the screw threads, clean off the residue from the tap screws before re-installing or use new tap screws. 3.3.3 Installing and removing the timing slit strip The timing slit strip is fixed in place and held taut by the torsion spring. When you install or remove the timing slit strip, you have to stretch the torsion spring. Be careful not to pull the torsion spring too much in the direction of the arrow or you will not be able to properly install the timing slit strip the next time. Therefore, when installing or removing the timing slit strip, take great care not to pull the torsion spring too much. Figure 2-5 Timing Slit Strip 2-16 Part 2: Troubleshooting S900 / S820 / S750 / S520 3.3.4 Handling the timing slit strip b) When there is a significant amount of grease (greater than 2 mm width) Step 1: In addition to Step 1 above, replace the carriage board assembly (since there is the danger that grease may have come in contact with the sensors on the board). Steps 2 and 3, as above. 3.3.5 Removing and installing the logic board Use caution when removing or installing the logic board to prevent possible damage from short circuiting. When the printer is turned off after use, the capacitor on the logic board will continue holding a charge for some time. In this condition, shorting the components on the logic board will damage the components. Therefore as a preventive measure, follow step (1) or (2) below before removing or installing the logic board. (1) After disconnecting the AC power, wait for some time S900/S820 : about 60 seconds S750/S520 : about 90 seconds (2) Use a resistance of about 100 to 500 ohms to short-circuit the capacitor terminals for 1 sec. S900 : C401 S820 : C411 S750 : C504 S520 : C582 Figure 2-6 Short-Circuiting the Capacitors 2-17 Troubleshooting (1) Be careful not to get any grease on the timing slit strip. If grease gets on the timing slit strip, its slits will not be read correctly, resulting in error. If grease gets on the strip, use alcohol to remove it completely. (2) Do not fold or scratch the timing slit strip. If the strip is folded and a white line is created or if a slit is scratched, replace the timing slit strip. If the timing slit strip is contaminated with grease: Determine the extent of grease contamination and choose the appropriate method: a) When there is only a small amount of grease (about 2 mm width) Step 1: Wipe the strip clean using alcohol. Step 2: Conduct a test print. Step 3: Check once again that no grease remains on the strip. Part 2: Troubleshooting S900 / S820 / S750 / S520 3.3.6 Removal of red screws prohibited Since adjustment of the following red screws is very difficult in the field, they must not be loosened or removed. (a) The two paper spacing red screws (one on the right and left). (b) The two screws securing the paper feed motor (S750 only) a b a Figure 2-7 Do not Remove the Red Screws 3.3.7 Installing the logic board cover If the logic board cover is installed incorrectly, the logic board and paper feed rollers will be obstructed and the ASF motor may go out of sync. Note that prong A is prone to engage incorrectly. Make sure that it fits in properly. A Figure 2-8 Installing the Logic Board Cover 2-18 Part 2: Troubleshooting S900 / S820 / S750 / S520 3.3.8 Installing the control ROM cover Make sure to install the ROM cover beneath the guide rail, before securing it in place. ROM Cover Guide Rail Troubleshooting Figure 2-9 Installing the ROM Cover 2-19 Part 2: Troubleshooting S900 / S820 / S750 / S520 4. ADJUSTMENTS AND SETTINGS AFTER DISASSEMBLY AND REASSEMBLY, AND CONFIRMATION OF OPERATION 4.1 Adjustments and Settings after Disassembly and Reassembly 4.1.1 Items for adjustments (per necessity/locations/tools) (1) User level Timing (after replacement of...) Adjustment Print head Print head printing position Time Tools 10 mins. 2 sheets of A4 paper alignment (2) Service person level Necessary units and adjustments are listed below. When using these headings, check 4.2 Confirmation Method at the same time. Timing (after replacement of...) Adjustment Time Tools Logic board EEPROM settings (see page 2-29) 2 mins. None (1) EEPROM initialization • to clear the EEPROM • to reset the waste-ink counter (2) Model settings • to establish the correct model Replace ink absorber according to need Bottom case unit or ink absorber Grease pad (S900/S820) Carriage guide frame Platen unit Retarding gear Carriage guide shaft Paper feed motor (3) Head alignment (see page 2-22) EEPROM settings 2 mins. None (1) Clear the waste-ink counter Grease application (see page 2-25) 2 mins. None Grease application (see page 2-25) 2 mins. Flat brush 2-20 Part 2: Troubleshooting S900 / S820 / S750 / S520 4.1.2 If EEPROM settings adjustment is necessary When replacing the logic board, depending on the waste-ink counter value, it may be necessary to replace the ink absorber at the same time. Refer to the table below. Table 2-2 EEPROM SETTINGS WHEN REPLACING THE INK ABSORBER 0~7 Waste-ink counter clear 7~25 Waste-ink counter set (25%) S750 / S520 Waste-ink counter clear Waste-ink counter clear and replace ink absorber 2-21 25~50 Waste-ink counter set (50%) 50~75 Waste-ink counter set (75%) 75~100 Waste-ink counter clear and replace ink absorber ← ← ← Troubleshooting Waste-ink counter value S900 / S820 Part 2: Troubleshooting S900 / S820 / S750 / S520 4.1.3 Print head position adjustment The print head has two nozzle arrays for each color. Therefore, it requires ink (dot) placement adjustment in addition to the usual bi-directional adjustment. If dot placement is inaccurate, the pattern will have overlapping printing or gaps, resulting in black or white stripes. Therefore, when conducting alignment, choose patterns free of stripes. Load one sheet of A4 paper in the auto sheet feeder, and use the printer driver to conduct alignment. 1) S900/S820 (1) Dot placement adjustment of the two arrays for each color. • Black (A) • Cyan (B) • Magenta (C) • Photo cyan (D) • Photo magenta (E) ✽ Since yellow is difficult to judge and has little effect on images, adjustment is not necessary and the same settings as for magenta are applied automatically. (2) Bi-directional placement adjustment • Black bi-directional (F) Figure 2-10 Print Position Adjustment Pattern (S900/S820) 2-22 Part 2: Troubleshooting S900 / S820 / S750 / S520 2) S750/S520 (1) Dot placement adjustment of the two arrays for each color. • Blackblack array (A) • Cyancyan array (B) • Magentamagenta array (C) (2) Dot placement adjustment of two different-color arrays. • Blackcyan/magenta/yellow (F) (3) Bi-directional placement adjustment (as per models to date) • Black bi-directional (D) • Color Bi-directional (E) Troubleshooting Figure 2-10 Printing Position Adjustment Pattern (S750/S520) 2-23 Part 2: Troubleshooting S900 / S820 / S750 / S520 4.1.4 Print head seam stripe adjustment (S750) Print head seam stripe adjustment is done to determine the degree of reduced dot printing in the high-duty image area (indicated by the arrows) comprising the seam (stripe) created between vertical bi-directional passes. After CMY printing by the first pass, CMY is printed again in the same way in the second pass. In the case of color printing, there are two feed methods for one pass: 64 and 128. Pattern G was made with 64 nozzles, and pattern H was made with 128 nozzles. When you execute printing with the printer driver, seven vertical patterns with a varying degree of reduced dot printing (indicated by the arrows) will be printed. Select the number of the pattern with the least noticeable seam stripe. This sets the optimum degree of reduced dot printing. Figure 2-11 Seam Stripe Adjustment Pattern 2-24 Part 2: Troubleshooting S900 / S820 / S750 / S520 4.1.5 Grease Application After disassembly and reassembly, apply the necessary grease to the places shown below. Use a flat brush to spread a thin coating of grease. 3 4 6 5 2 7 1 figure 2-12 Grease application 1. 2. 3. 4. 5. 6. 7. S900 Application point Carriage shaft (entire surface) Grease pad (2 places) Carriage guide frame Feed roller gear (teeth surface) Eject roller gear (teeth surface) Large retarding gear (teeth surface) Paper feed motor metal shaft section Grease/oil EU-1 EU-1 Floil KG107A MOLYKOTE PG641 MOLYKOTE PG641 MOLYKOTE PG641 MOLYKOTE PG641 Quantity 80±30mg 100±10mg 27.5±7.5mg 180mg +90,-45mg 180mg +90,-45mg 72mg +36,-18mg 12mg +6,-3mg 1. 2. 3. 4. 5. 6. 7. S820 Application point Carriage shaft (entire surface) Grease pad (2 places) Carriage guide frame Feed roller gear (teeth surface) Eject roller gear (teeth surface) Large retarding gear (teeth surface) Paper feed motor metal shaft section Grease/oil EU-1 EU-1 Floil KG107A MOLYKOTE PG641 MOLYKOTE PG641 MOLYKOTE PG641 MOLYKOTE PG641 Quantity 80±30mg 100±10mg 27.5±7.5mg 120mg +60,-30mg 120mg +60,-30mg 72mg +36,-18mg 12mg +6,-3mg 1. 3. 6. S750 Application point Carriage shaft (entire surface) Carriage guide frame Retarding gear spindle Grease/oil Floil KG107A Floil KG107A MOLYKOTE PG641 Quantity 250±50mg 27.5±7.5mg 12+6/-3mg 1. 3. 4. 5. S520 Application point Carriage shaft (entire surface) Carriage guide frame Feed roller gear (teeth surface) Eject roller gear (teeth surface) Grease/oil Floil KG107A Floil KG107A MOLYKOTE PG641 MOLYKOTE PG641 Quantity 250±50mg 27.5±7.5mg 120mg +60,-30mg 120mg +60,-30m 2-25 Troubleshooting 2 Part 2: Troubleshooting S900 / S820 / S750 / S520 4.2 Confirmation method After disassembly and reassembly, follow the procedures below to check the printer's operation. 1) Check visually for any grease or foreign matter contaminating the internal parts. Make sure that the timing slit strip is clean. If there is any grease on the strip, wipe it clean with alcohol. 2) Service/factory test printout with the standalone printer Check for the following: Missing print in the nozzle check pattern, off-position horizontal lines in the horizontal line pattern, and white stripes in any irregular printing. If any of these faults are present, clean the print head and adjust the print head position. Then make another test printout. The procedure is described in 7.1 Service Mode Operations on page 2-29. Be sure to visually check the timing slit strip for any grease, foreign matter, etc. If there is any grease, etc., on the strip, the printer may malfunction shortly after repair is completed. 2-26 Part 2: Troubleshooting S900 / S820 / S750 / S520 5. TRANSPORTING THE PRINTER The procedure for transporting the printer after completing repairs is described below. 5.1 Procedure (1) Mount the print head on the carriage. (2) Turn off the printer so that the carriage locks at the home position. If you especially wish to transport the head by itself: 1. Install all the ink tanks (to prevent the inside of the nozzles drying out). 2. Place orange protective tape over the print head section. (to prevent possible damage to the print head section by shock etc.) 2-27 Troubleshooting If the print head is not fitted on the carriage, the ink may dry and harden. For this reason, leave the head mounted on the carriage even while transporting the printer. Also, if the carriage is not locked at the home position, it will move while the printer is being transported, which may strain the paper feed encoder film. Part 2: Troubleshooting S900 / S820 / S750 / S520 6. PARTS REPLACEMENT, PERIODIC INSPECTIONS, & TOOLS 6.1 Periodic Parts Replacement Level User None Service Person None Periodic Replacement Parts Level User Black ink tank Color ink tank (Cyan) (Magenta) (Yellow) (Photo cyan) (Photo magenta) Service Person None Consumables S750/S520 BCI-3eBK BCI-3eC BCI-3eM BCI-3eY S900/S820 BCI-6BK BCI-6C BCI-6M BCI-6Y BCI-6PC BCI-6PM 6.2 Periodic Inspections Level User None Service Person None Periodic Inspections 6.3 Tool List Ordinary Tools Phillips screwdriver Blade screwdriver Needle-nosed pliers Tweezers Flat brush Multi-meter For For For For For For Remarks the removal and installation of screws. the removal of plastic parts. the removal and installation of springs. the disconnection and connection of flexible cables, etc applying grease. troubleshooting. Special Tools (Part No.) Grease MOLYKOTE PG-641 To be applied to (CK-0562) (see page 2-25) Grease FLOIL KG107A To be applied to (QY9-0057) (see page 2-25) Grease EU1 To be applied to (QY9-0037) (see page 2-25) Remarks the specified parts the specified parts the specified parts 2-28 S900/S820 S750/S520 Part 2: Troubleshooting S900 / S820 / S750 / S520 7. SERVICE-RELATED FEATURES The printer has a service mode for accessing service settings and executing test printouts. The service mode can be accessed via the operation panel. 7.1 Service Mode Operation 1) With the printer turned off, hold down the RESUME button and press the POWER button (the green indicator lights.). 2) While holding down the POWER button, let go of the RESUME button before pressing the RESUME button again twice in succession. Then let go of both RESUME and POWER buttons. (At each press of the RESUME button, the indicator toggles between orange and green.) 3) During printer initialization, the green indicator blinks. When the green indicator stops blinking and remains on, press the RESUME button the specified number of times to execute the desired service function, as listed below. (At each press of the RESUME button, the indicator toggles between orange and green.) Press 0 times Indicator Green Function Power off (Even if there is no print head mounted, the carriage will return to the home position and lock.) 1 2 3 4 time times times times Orange Green Orange Green Service/factory test printout (Including ink sensor check) 5 times Orange 6 times 6~9 times More than Green 10 times EEPROM information printout EEPROM initialization Clears the waste-ink counter (S750/S520) Waste-ink counter settings (S900/820) (See page 2-34) Destination (model) setting Press the POWER button to select this service function, press the RESUME button the number of times specified below to set the destination. Setting 0 times BJ F900 BJ F890 1 time S900 S820 S750 S520 2 times BJ F890PD BJ S700 BJ S500 3 times S820D Note: pressing more than 3 times has no effect. Returns to the function select stage (S750/520) Not used for servicing (S900/820) Returns to the function select stage (S900/820) 4) After selecting a service function, press the POWER button. The green indicator lights and the service function will be executed. (After each function is executed, the printer returns to the service function select stage.) To cancel printing which is in progress, press the POWER button. 2-29 Part 2: Troubleshooting S900 / S820 / S750 / S520 7.2 Test Printout (1) S900/S820 The header information shows the model, control ROM version etc. This sample belongs is from the S900, which differs somewhat from that of the S820. ROM Model name version USB serial number Bi-directional alignment Nozzle check pattern Figure 2-13 Service/Factory Test Printout (Sample) 2-30 Part 2: Troubleshooting S900 / S820 / S750 / S520 (2) S750/S520 The service/factory test printout header shows the control ROM version, model setting, total printed sheet count, total waste-ink absorption amount and other information. ROM version Total waste-ink amount (%) Dot count (mg) USB: Serial No. Irregular printing pattern Line pattern Internal temperature (°C) Bi-directional Bi-directional registration (Bk) registration (Cl) Ink tank present: 1 No ink tank: 0 Figure 2-13 Service/Factory Test Printout (Sample) 2-31 Troubleshooting Absorption count Print head temperature Print head temperature (Bk) (°C) (Color) (°C) Total printed Print head removal/ sheet count installation count Nozzle check pattern Model name Part 2: Troubleshooting S900 / S820 / S750 / S520 7.3 Printing the EEPROM Information This prints the contents of the printer's EEPROM and that of the print head. With the resulting printout allows you to see the settings and data saved in the printer. 1) S900/S820 Model name ROM version USB serial number S900 P=V0.16 PF=(01 FF FF) S/N=(0001F9) R=( 0) DI=053.15% CH=00010/00000 PC(A=0003 B0=0005 B1=0001 C=0007 D=0001) Waste-ink absorber amount *1 Cleaning Page=00267 ED=(00267/00000/00000) OE/(00000/00000)/00000 Total throughput *2 Print count SV=(0000/0000/0000) OP=(1441/1600/1401/1600/1000) WP=00227 User error history Sevice error history UR (Ke = 00 Ko = 00 Ce = 00 Co =-01 Me = 00 Mo =-01 Ye = 00 Yo=-01) (LCe= 00 LCo=-01 LMe= 00 LMo=-01 DIR=-02) PT=1004701655 ST=011599 LP=011628 PD=0 IF=10 AP=000 DC(K=019 C=003 M=003 Y=003 LC=003 LM=003) ICK =(0/2042634751/0016544792) ICC =(0/0530548948/0002866040) ICM =(0/0682486609/0002577425) ICY =(0/1105835164/0002539822) Days past since setup (0=1 January 1970. For calculation purposes 1 year = 366 days) ICLC =(0/1256383584/0002406504) ICLM =(0/1210952672/0002406504) HDEEPROM V00001 SN=01f40000 LN=11110411 ID=02 PTH(K=025 LC=025 LM=025 C=025 M=026 Y=026) PPO=000 CLR(C = 00 M = 00 Y = 00 LC = 00 LM = 00) DIR= 00 EOR(K = 00 C = 00 M = 00 Y = 00 LC = 00 LM = 00) NG (K =000 C =000 M =000 Y =000 LC =000 LM =000) DS (K =+03 C =+03 M =+03 Y =+03 LC =+03 LM =+03) ✽1: No. of times cleaning has been conducted. See page 3-3 for details on cleaning A to D. ✽2: Print count figures. ED: (normal paper/special paper/postcard) OE: (borderless postcard/other borderless) Figure 2-14 EEPROM Information Printout (Sample) 2-32 Part 2: Troubleshooting S900 / S820 / S750 / S520 2) S750/S520 Model name S750 ROM version Waste-ink absorber amount Total throughput P=V1.01 DI=000.95% Page=000147 CH=00002 Bk=(00) Cl=(00) Head TempBK=31.0 Head TempC=29.5 Env Temp=28.0 PF(01 00 80) PC(M=0001 R=0000 T=0003 D=0000 C=0001) Bk=10707 C=02377 M=02299 Y=02356 *1 Cleaning WP=0052 IC(BK=0 C=0 M=0 Y=0) USB=(000343) USB serial number Error history UR(C=000 BK=000 BK-C=000 Y=000 M=000 G=000 H=000) ST=2001/09/27-18:30 PWC(S=00015 H=00007) CN(USB=1 1284=1) PAGE(A11=00147 PP=00143 HR=00004 GP=00000 PC=00000 Other=00000) *2 Print count HDEEPROM V00001 SN=0000-00C5 LN(03 05 01 15 00 00 03) DI(BK=+001 CL=+001) IL(BK=-08 C=-08 M=-08 Y=-08) WLA=-08 WLB=-08 NGBK=000 NGC=000 NGM=000 NGY=000 ✽1: No. of times cleaning has been conducted. M : Manual cleaning R : Deep cleaning T : Timed cleaning D : Dot count cleaning C : Head replacement cleaning ✽2: Print count figures. All : Total of all paper types PP : Normal paper HR: High Resolution paper GP : Glossy paper PC : Postcard Other : Total of all paper types other than PP, HR, GP, PC For details about the different types of cleaning, see page 3-3. Figure 2-14 EEPROM Information Printout (Sample) The following error histories, from the most recent error, are kept. 4 errors (combined service and user errors) : S750/S520 3 service errors, 5 user errors : S900/S820 2-33 Troubleshooting ER(TIME=2001/10/15-16:22 ER0=1000 ER1=1000 ER2=1000 ER3=1000) Part 2: Troubleshooting S900 / S820 / S750 / S520 7.4 Resetting the EEPROM Resetting the EEPROM will erase all its contents, with the following exceptions: USB-S/N (all models) Model settings (S900/S820) are reset to overseas settings) 7.5 Waste-ink counter settings (S900/S820) After selection, pressing the POWER button will execute the function and return the printer to the selection state. Go to the waste-ink counter settings selection mode in 7.1 Service Mode Operation. By pressing the resume button the number of times specified below, you can set the ink counter. Presses 0 times 1 time 2 times 3 times More than 4 times Indicator Green Orange Green Orange Orange blinking Function Waste-ink counter Waste-ink counter Waste-ink counter Waste-ink counter No function 2-34 clear 25% setting 50% setting 75% setting Part 3 TECHNICAL REFERENCE Page 3- 1 3- 1 3- 2 3- 3 3- 5 1. NEW TECHNOLOGY 1.1 Borderless printing 1.2 Quiet mode 2. CLEANING MODES AND INK PURGE AMOUNTS 3. PRINT MODES Part 3: Technical Reference S900 / S820 / S750 / S520 1. NEW TECHNOLOGY 1.1 Borderless printing To allow printing of the entire paper surface, and an area exceeding the paper surface, borderless printing has been enabled. The difference from printers to date not capable of borderless printing is that the paper size may or may not need to be set in the application being used. 1. When borderless printing is selected in the driver, the driver instructs the application to send the entire data set for the paper size. At this point, the size of the requested data is finely adjusted according to the "Amount of Extension" setting. 2. The application sends data to the driver according to the specific request. 3. The driver sends the data to the printer. 4. The printer then prints the received data. 1.1.1 Borderless printing limitations 3-1 Technical Reference When printing the entire paper surface, or an area exceeding the surface, the following issues may arise. (1) Dirty platen ink absorber The platen ink absorber becomes dirty with ink. When cleaning the platen, be careful not to get this ink on the platen itself. (2) Friction with the head caused by curled paper Since there are no paper depressors, if curled paper is fed it can interfere with the print head and spoil the printout. Prevent paper curling by properly adjusting the paper thickness lever. (3) Lowered speed With the increase in vertical passes, the throughput speed of borderless printing is lower than ordinary printing. Part 3: Technical Reference S900 / S820 / S750 / S520 1.2 Quiet mode By feeding and ejecting paper gently and suppressing the sound from mechanical parts, printing noise can be suppressed. This setting (including specific operation hours) can be made from the driver when the printer is connected. 1.2.1 Quiet mode limitations (1) Lowered throughput Since the speed of paper feeding and ejection is slower, throughput is lower. (2) Settings reset at power OFF The Quiet mode setting is not stored within the printer itself (in the EEPROM), so that it will be reset (turned off) when the printer is powered OFF. 1.3 Remaining-ink amount detection (S900/S820) The remaining-ink function determines whether there is ink in the ink chamber (yes/no) and uses dot-count logic to display the amount of ink remaining in the ink chamber. 1.3.1 Limitations when using the remaining-ink amount detection function The amount of remaining ink may not be displayed accurately due to dot count error margins or ink tank replacement. Dot count Ink chamber Sensor detection Remaining-ink amount display (100/70/40%) Ink low warning(10%) Dot count Ink out error Figure 3-1 Remaining-ink amount detection 3-2 Part 3: Technical Reference S900 / S820 / S750 / S520 2. CLEANING MODES AND INK PURGE AMOUNTS Automatic print head cleaning is performed as effectively and efficiently as possible according to given conditions in order to eliminate and prevent printing imperfections due to bubbles, foreign matter, clogging etc. Except for the situations below, cleaning is timed to take place immediately before printing. * dot count cleaning: after paper has been ejected * manual cleaning/Deep Cleaning: user operation * delivery of the printer: when the access cover is closed (S750/S520) Table 3-1 CLEANING MODES (S900/S820) Conditions Details Purge amount in gms 120 hours timed cleaning Dot count cleaning (S900/S820)* 1.1/0.64 1.55/0.84 Cleaning mode*2*3 A B0 B1 2.8/1/45 C 2.8/1.65 D ✽1 The purge amount is a total of the 6 colors. ✽2 When several conditions are met, the priority order of cleaning modes is A<B0<B1<C<D. ✽3 The EEPROM information printout's figures for no. of times cleaning has been conducted indicate details on cleaning modes. 3-3 Technical Reference When between 120 and 480 hours have passed since the last cleaning operation When a specified dot count has been exceeded since the previous cleaning After hard power ON When a test print is performed from the (when the time has not standalone printer et been set) 480 hours timed When more than 480 hours have passed cleaning since the previous cleaning At ink tank replacement When the ink sensor status changes from NO to YES When manual cleaning Conducted either from the operation is performed panel or the driver When the heads are When proper capping did not take place uncapped at soft at the last power OFF power ON At head replacement When a print head is removed and installed When Deep Cleaning Driver operation is conducted On delivery of the The first cleaning which takes place after printer the printer has left the factory 1 Part 3: Technical Reference S900 / S820 / S750 / S520 Table 3-1 CLEANING MODES (S750/S520) Conditions Details Execution of manual cleaning Execution of Deep Cleaning Timed Cleaning Executed from the operation panel or the printer drive Executed from the printer driver BK/CL(g) 0.14/0.36 Cleaning mode M 1.58/1.18 R 0.14/0.36 T Purge amount in gms Between 24 and 336 hours have passed since the previous cleaning (Bk) Between 120 and 336 hours have passed since the previous cleaning (Cl) Long-duration timed More than 336 hours have passed since cleaning the previous cleaning Dot count cleaning When a specified dot count has been exceeded since the previous cleaning At head replacement When a print head is removed and installed Ink tank replacement When the ink sensor status changes from NO to YES On delivery of the printer Cleaning when a head is installed for (or at first print head the first time after the printer has left position adjustment) the factory. When the heads are When proper capping did not take place uncapped at soft power at the last power OFF ON 3-4 0.45/0.72 0.14/.036 D 0.45/1.18 C 0.30/0.72 0.45/1.18 0.30/0.72 --- Part 3: Technical Reference S900 / S820 / S750 / S520 3. PRINT MODES Table 3-2 PRINT MODES (S900/S820) Paper type Normal paper No. of passes / Print direction Color HR-101 PR-101 PC-101 PH-101 Inkjet postcard Postcard 4 colors (only Bk when printing greyscale) Resolution (dpi) 600 x 1200 Print quality Draft No. of passes / Print direction Color Resolution (dpi) Print quality No. of passes / Print direction Color Resolution (dpi) Print quality No. of passes / Print direction Color Resolution (dpi) Print quality No. of passes / Print direction Color Resolution (dpi) Print quality No. of passes / 1 pass / BiPrint direction directional Color HG-201 TR-10 CF-102 Envelope Quality setting 4 Quality setting 3 Quality setting 2 Quality setting 1 Bk: 1 pass / Bi-directional Cl: 2 pass / Uni-directional 4 colors 8 pass / Bidirectional 1200 x 1200 Standard 2400 x 1200 --8 pass / Bidirectional 6 colors 1200 x 1200 --8 pass / Bidirectional 6 colors 2400 x 1200 --8 pass / Bidirectional 6 colors 1200 x 1200 High (S900) 8 pass / Bidirectional 6 colors 2400 x 1200 --8 pass / Bidirectional 6 colors 4 pass / Bidirectional 6 colors 1200 x 1200 --- 4 pass / Bidirectional 6 colors 1200 x 1200 --4 pass / Bidirectional 6 colors 1200 x 1200 Standard Bk: 1 pass / Bi-directional Cl: 2 pass / Uni-directional 4 colors 4 colors (Only Bk when printing greyscale) Resolution (dpi) 600 x 1200 1200 x 1200 Print quality Draft Standard No. of passes / Print direction Color Resolution (dpi) Print quality No. of passes / Print direction Color Resolution (dpi) Print quality No. of passes / 4 pass / BiPrint direction directional Color 4 colors Resolution (dpi) 1200 x 1200 Print quality Draft No. of passes / 1 pass / BiBk: 1 pass / Print direction directional Bi-directional Cl: 2 pass / Uni-directional Color 4 colors 4 colors (Only Bk when printing greyscale) Resolution (dpi) 600 x 1200 1200 x 1200 Print quality Draft Standard 6 colors 2400 x 1200 --8 pass / Bidirectional 6 colors 1200 x 1200 High 8 pass / Bidirectional 4 colors 1200 x 1200 Standard 8 pass / Bidirectional 4 colors 1200 x 1200 Standard ✽1: An option only for the S820 Print quality is selectable in the driver properties. Shaded sections indicate default settings. 3-5 4 pass / Unidirectional 6 colors 1200 x 1200 High 4 pass / Bidirectional 6 colors 1200 x 1200 High 4 pass / Bidirectional 6 colors 1200 x 1200 High (S820)*1 4 pass / Unidirectional 6 colors 1200 x 1200 High 8 pass / Bidirectional 6 colors 2400 x 1200 --- Technical Reference GP-301 FM-101 KH-201 Quality setting 5 1 pass / Bidirectional Part 3: Technical Reference S900 / S820 / S750 / S520 Table 3-2 PRINT MODES (S750/S520) Paper type Normal paper No. of passes Pigment or CMY Resolution (dpi) Quality setting 5 1 pass Pigment 600 x 600 Print quality Draft HR-101 No. of passes Special high Pigment or CMY quality paper Resolution (dpi) Print quality PR-101 No. of passes PC-101 Pigment or CMY PH-101 Resolution (dpi) Pro photo Print quality paper GP-301 No. of passes FM-101 Pigment or CMY KH-201 Resolution (dpi) Glossy paper Print quality Inkjet No. of passes postcard Pigment or CMY Resolution (dpi) Postcard HG-201 Glossy film TR-10 T-shirt transfer CF-102 OHP film Envelope Print quality No. of passes Pigment or CMY Resolution (dpi) Print quality No. of passes Pigment or CMY Resolution (dpi) Print quality No. of passes Pigment or CMY Resolution (dpi) Print quality No. of passes Pigment or CMY Resolution (dpi) Print quality No. of passes Pigment or CMY Resolution (dpi) Print quality Quality setting 4 1 pass Pigment Bk: 600 x 600 C,M: 1200 x 1200 Y: 600 x 1200 Standard Quality setting 3 Quality setting 2 1/4 pass Pigment <--4 pass CMY C,M,Y:1200x1200 Standard 4 pass CMY C,M,Y:1200x1200 Standard 2 pass 4 pass CMY <C,M: 1200 x 1200 C,M,Y:1200x1200 Y: 600 x 1200 Standard High 3 pass 4 pass Pigment + CMY <Bk: 600 x 600 Bk: 600 x 600 C,M: 1200 x 1200 C,M,Y:1200x1200 Y: 600 x 1200 Standard High 6 pass CMY C,M,Y:1200x1200 High 4 pass Pigment + CMY C,M,Y:1200x1200 Standard 3 pass 4 pass Pigment + CMY <Bk: 600 x 600 Bk: 600 x 600 C,M: 1200 x 1200 C,M,Y:1200x1200 Y: 600 x 1200 Standard High NB: The printing direction in all cases is bi-directional 3-6 Quality setting 1 4 pass Pigment Bk: 600 x 600 C,M,Y:1200x1200 High 6 pass <<High 4 pass CMY C,M,Y:1200x1200 Standard 6 pass <<High 6 pass CMY C,M,Y:1200x1200 High 12 pass CMY C,M,Y:2400x1200 --- 4 pass CMY C,M,Y:1200x1200 Standard 6 pass <<High 6 pass <C,M,Y:1200x1200 High Part 4 APPENDIX Page 1 1 4 5 (S900) 1. CONNECTOR LOCATIONS AND PIN CONFIGURATIONS 1.1 Logic Board 1.2 Carriage Board 1.3 Print Head 4- 6 4- 6 4- 9 4 -10 (S820) 1. CONNECTOR LOCATIONS AND PIN CONFIGURATIONS 1.1 Logic Board 1.2 Carriage Board 1.3 Print Head 4 -11 4 -11 4 -14 4 -15 (S750) 1. CONNECTOR LOCATIONS AND PIN CONFIGURATIONS 1.1 Logic Board 1.2 Carriage Board 1.3 Print Head 4 -16 4 -16 4 -19 4 -20 (S520) 1. CONNECTOR LOCATIONS AND PIN CONFIGURATIONS 1.1 Logic Board 1.2 Carriage Board 1.3 Print Head 4 -21 2. PROBLEMS LEFT REMAINING 4444- Part 4: Appendix S900 1. CONNECTOR LOCATIONS AND PIN CONFIGURATIONS 1.1 Logic Board JPGS1 JCRM1 JPGM1 JUSB1 JIF3 JCR1 JCR2 JCR3 JASF1 JPOW1 JINK1 JLF1 Figure 4-1 Logic Board JUSB1 (USB interface connector) Signal USB_VBI USB_DN USB_DP GND IN/OUT OUT IN/OUT IN/OUT Function Cable power source Differential data signal Differential data signal Appendix Pin No. 1 2 3 4 JIF1 (IEEE1394 interface connector) Pin No. 1 2 3 4 5 6 Signal open GND TPB2N TPB2P TPA2N TPA2P IN/OUT Function IN/OUT IN/OUT IN/OUT IN/OUT Differential Differential Differential Differential 4-1 data data data data signal signal signal signal TPB TPB TPA TPA Part 4: Appendix S900 JCR1 (Carriage flexible cable connector) Pin No. 1,2 3~6 7~10 11 12 13 14 15 16 17 18 19 20 21 22 23 24 25 26 27 28 29 30 31 32 33 34 35 36 37 38 39 40 Signal VH HVDD GND CRENCB EVDD CRENCA GND HDSEN HEEP_SK HEEP_WD HEEP_CS SNSEN SNENA DHE TSOLMC DT7 DT6 DATAK DATALC DATALM DATAC DATAM DATAY HEKX HELCX HELMX HECX HEMX HEYX BG GND HCLK GND IN/OUT IN IN IN OUT IN/OUT OUT IN OUT OUT IN IN IN IN/OUT IN/OUT IN/OUT IN/OUT IN/OUT IN/OUT OUT OUT OUT OUT OUT OUT OUT OUT Function Encoder output phase B Encoder power source Encoder output phase A Head YES/NO Head EEPROM clock signal Head EEPROM data signal Head EEPROM chip select Scanner YES/NO Scanner enable Dummy driving signal LMC chip temperature status output DT7 DT6 KDATA/DT5 LCDATA/DT4 LMDATA/DT3 CDATA/DT2 MDATA/DT1 YDATA/DT0 K head driving signal LC head driving signal LM head driving signal C head driving signal M head driving signal Y head driving signal Data transfer synchronization signal Data transfer clock JCR2 (Carriage flexible cable connector) Pin No. 1~8 9 10 11~20 Signal VH TSOMY SNSET GND IN/OUT Function IN IN MY chip temperature status output Overseas/domestic sensor JCR3 (Carriage flexible cable connector) Pin No. 1~8 9 10 11~20 Signal VH TSOKLC VH GND IN/OUT Function IN KLC chip temperature status output 4-2 Part 4: Appendix S900 JPOW1 (DC power connector) Pin No. 1,2 3 4,5 6 7 8 Signal VH VM GND 5V GND VHREM IN/OUT Function Head voltage (+16V) Motor voltage (+28V) Logic board voltage OUT VH remote JPGS1 (Purge sensor connector) Pin No. 1 2 3 Signal POW GND SNS_PG IN/OUT Function Power GND PG sensor port JINK1 (Ink sensor connector) Pin No. 1 2 3 Signal POW GND AD_INK IN/OUT Function Power GND Ink sensor port JASF1 (ASF motor connector) Signal A B A B IN/OUT OUT OUT OUT OUT Function ASF motor ASF motor ASF motor ASF motor phase phase phase phase A B A B JPGM1 (Purge motor connector) PIN No. 1 2 3 4 Signal A B A B IN/OUT OUT OUT OUT OUT Function PG motor PG motor PG motor PG motor phase phase phase phase A B A B phase phase phase phase B A B A JLFM1 (Paper feed motor connector) PIN No. 1 2 3 4 Signal B A B A IN/OUT OUT OUT OUT OUT Function LF motor LF motor LF motor LF motor JCRM1 (Carriage motor connector) PIN No. 1 2 Signal + IN/OUT Function OUT CR motor - phase OUT CR motor + phase 4-3 Appendix Pin No. 1 2 3 4 Part 4: Appendix S900 1.2 Carriage Board JCRB1 50 JCRB2 JHD1 JCRB3 41 1 10 Figure 4-2 Carriage Board JCRB1 (Carriage flexible cable connector) See Page 4-2 (JCR1 Carriage flexible cable connector pin description) Note that Pin No.and IN/OUT reverse. JCRB2 (Carriage flexible cable connector) See Page 4-2 (JCR2 Carriage flexible cable connector pin description) Note that Pin No.and IN/OUT reverse. JCRB3 (Carriage flexible cable connector) See Page 4-2 (JCB3 Carriage flexible cable connector pin description) Note that Pin No.and IN/OUT reverse. JHD1 (Print head connector section) Pin No. 1~50 Signal IN/OUT Function See page 4-5 (Print head pin description) 4-4 Part 4: Appendix S900 1.3 Print Head 50 41 10 1 Figure 4-3 Print Head Signal GNDH DATAK DATALC DATALM DATAC DATAM TSOKLC BG HDSEN HCLK DATAY HELMX HELCX HEKX 3.3V GND VSS-A VDD-A HEYX HEMX HECX VH 3.3V DHE TSOLMC TSOMY E_CS E_SK E_DI E_DO VHT IN/OUT Function OUT OUT OUT OUT OUT IN OUT IN OUT OUT OUT OUT OUT KDATA LCDATA LMDATA CDATA MDATA KLC chip temperature status output Synchronized transfer signal Head YES/NO (GND for head) Head data transfer clock YDATA LM driving signal LC driving signal K driving signal OUT OUT OUT Analog GND OPEN Y driving signal M driving signal C driving signal OUT IN IN OUT OUT OUT IN Dummy nozzle driving signal LMC chip temperature status output MY chip temperature status output Head EEPROM chip select Head EEPROM clock signal Head EEPROM data signal Head EEPROM data signal VH short on the logic board 4-5 Appendix Pin No. 1,2,8~13 19,20 3 4 5 6 7 14 15 16 17 18 21 22 23 24 25,36 26 27 28 29 30 31~33,39~42 48~50 34 35 37 38 43 44 45 46 47 Part 4: Appendix S820 1. CONNECTOR LOCATIONS AND PIN CONFIGURATIONS 1.1 Logic Board JPGS1 JIF2 JLF1 Figure 4-4 Logic Board JIF1 (Parallel interface connector) Pin No. 1 2 3 4 5 6 7 8 9 10 11 12 13 14 15 16 17 18 19 20 21 22 23 24 25 26 27 28 29 30 31 32 33 34 35 36 JIF1 JCRB1 JPOW1 JCRB2 JASF1 JCRB3 JPG1 Compatible mode STROBE DATA1 DATA2 DATA3 DATA4 DATA5 DATA6 DATA7 DATA8 ACKNLG BUSY P.E. SELECT AUTO FEED XT N.C GND GND +5.0V STROBE-RET (GND) DATA1-RET (GND) DATA2-RET (GND) DATA3-RET (GND) DATA4-RET (GND) DATA5-RET (GND) DATA6-RET (GND) DATA7-RET (GND) DATA8-RET (GND) ACKNLG-RET (GND) BUSY-RET (GND) P.E.-RET (GND) INIT ERROR GND N.C +5.0V SELECT IN Nibble mode HostClk Data1 Data2 Data3 Data4 Data5 Data6 Data7 Data8 PrtClk PrtBusy AckDataReq Xflag HostBusy TBD Gnd Gnd Vcc Signal Gnd Signal Gnd Signal Gnd Signal Gnd Signal Gnd Signal Gnd Signal Gnd Signal Gnd Signal Gnd Signal Gnd Signal Gnd Signal Gnd INIT DataAvail TBD TBD TBD 1284Active 4-6 ECP mode HostClk Data1 Data2 Data3 Data4 Data5 Data6 Data7 Data8 PeriphClk PeriphAck AckReverse Xflag HostAck TBD Gnd Gnd Vcc Signal Gnd Signal Gnd Signal Gnd Signal Gnd Signal Gnd Signal Gnd Signal Gnd Signal Gnd Signal Gnd Signal Gnd Signal Gnd Signal Gnd ReverceReq PeriphReq TBD TBD TBD 1284Active JINK1 Part 4: Appendix S820 JIF2 (USB interface connector) See page 4-1 (BJ F900 JUSB1 USB interface connector) JCRB1 (Carriage flexible cable connector) Pin No. 1~3 4 5 6 7 8 9 10 11 12 13 14 15 16 17 18 19,20 Signal VHGND DATAM SOMY TOMLC TOMY HEAD_SEN DATAC DATAML HEKCL BE2 BG BE3 DATACL CSCR CRWD CRSK HVDD IN/OUT Function OUT IN IN IN IN OUT OUT OUT OUT OUT OUT OUT OUT IN/OUT OUT out MY chip status output MLC chip status output MY chip temperature output Head YES/NO KCL heat signal Block enable 2 Data latch signal Block enable 3 Head EEPROM chip select Head EEPROM data signal Head EEPROM block signal JCRB2 (Carriage flexible cable connector) Signal VHGND DATAY HEMY SOMLC TOKCL GND HCLK GND HEMLC BE1 DATAK BE0 SOKCL DHE SENSEPOW ENCB ENC_G ENCA IN/OUT Function OUT OUT IN IN MY heat signal MLC chip status output KCL chip temperature output OUT Data transfer block OUT OUT OUT OUT IN OUT OUT IN MLC heat signal Block enable 1 IN Block enable 0 KCL chip status output Dummy drive signal Encoder power Encoder output phase B Encoder GND Encoder output phase A JCRB3 (Carriage flexible cable connector) Pin No. 1~7 8~20 Signal VHGND VH IN/OUT Function VHGHN OUT VH power 4-7 Appendix Pin No. 1~3 4 5 6 7 8 9 10 11 12 13 14 15 16 17 18 19 20 Part 4: Appendix S820 JPOW1 (DC power connector) Pin No. 1 2 3 4,5 6 7 8 Signal VH VH VM GND 5V GND VHON IN/OUT Function Head voltage (+11V) Head voltage (+11V) Motor voltage (+28V) Logic voltage OUT VH remote JPGS1 (Purge sensor connector) Pin No. 1 2 3 Signal POW GND PGS IN/OUT Function Power GND IN PG sensor signal JINK1 (Ink sensor connector) Pin No. 1 2 3 Signal INK_S GND POW IN/OUT Function Ink sensor signal GND Power JASF1 (ASF motor connector) Pin No. 1 2 3 4 Signal B A B A IN/OUT OUT OUT OUT OUT Function ASF motor ASF motor ASF motor ASF motor phase phase phase phase B A B A JPG1 (Purge motor connector) Pin No. 1 2 3 4 Signal A B A B IN/OUT OUT OUT OUT OUT Function PG motor PG motor PG motor PG motor phase phase phase phase A B A B phase phase phase phase A B A B JLF1 (Paper feed motor connector) Pin No. 1 2 3 4 Signal A B A B IN/OUT OUT OUT OUT OUT Function LF motor LF motor LF motor LF motor JCR1 (Carriage motor connector) Pin No. 1 2 Signal A+ B IN/OUT Function OUT CR motor + phase OUT CR motor - phase 4-8 Part 4: Appendix S820 1.2 Carriage Board JCRB1 JCRB2 JCRB3 41 50 JHD1 1 10 Figure 4-5 Carriage Board JCRB1 (Carriage flexible cable connector) See page 4-7 (JCRB1 Carriage flexible cable connector pin description) Note that Pin No.and IN/OUT reverse. JCRB2 (Carriage flexible cable connector) See page 4-7 (JCRB2 Carriage flexible cable connector pin description) Note that Pin No.and IN/OUT reverse. See page 4-7 (JCRB3 Carriage flexible cable connector pin description) Note that Pin No.and IN/OUT reverse. JHD1 (Print head connector section) Pin No. 1~50 Signal IN/OUT Function See page 4-10 (Print head pin description) 4-9 Appendix JCRB3 (Carriage flexible cable connector) Part 4: Appendix S820 1.3 Print Head 50 41 10 1 Figure 4-6 Print Head Pin No. 1,2,8~12,20 3 4 5 6 7 13 14 15 16,26,36 17 18 19 20 21 22 23 24,27,34 25 28 29 30 31,32,40~42 47~50 33 35 37 38 39 43 44 45 46 Signal VHGND DATAK DATACL DATAML DATAC DATAM BE3 TOKCL BG VSS HCLK DATAY BE1 VHGND HEKCL SOKCL SOMLC HVDD HED_SEN SOMY HEMY HEMLC VH BE0 DHE TOMLC TOMY BE2 CSCR EEP_SK E_DI E_DO IN/OUT Function OUT OUT OUT OUT OUT OUT IN OUT IN OUT OUT OUT Block enable 3 KCL chip temperature status output Data latch signal Data transfer clock Block enable 1 OUT IN IN OUT IN IN OUT OUT KCL heat signal KCL chip status output MLC chip status output OUT OUT IN IN OUT OUT OUT OUT IN Block enable 0 Dummy drive signal MLC chip temperature status output MY chip temperature status output Block enable 2 Head EEPROM chip select Head EEPROM clock signal Head EEPROM data signal Head EEPROM data signal Head YES/NO MY chip status output MY heat signal MLC heat signal 4-10 Part 4: Appendix S750 1. CONNECTOR LOCATIONS AND PIN CONFIGURATIONS 1.1 Logic Board CN505 SW402 SW401 SW403 CN305 CN203 CN501 CN202 CN503 CN201 CN506 CN502 CN402 CN304 Figure 4-7 Logic Board CN201 (Carriage flexible cable connector) ←→ J1 : Carriage Board Pin No. 1~11 12~15 J1 Pin No. Same as CN201 pin no.s CN202 (Carriage flexible cable connector) ←→ J2 : Carriage board Pin No. Signal IN/OUT 1~10 H_GND … 11~15,18 LOGIC_GND … 16,17 VSEN OUT 19 DIA0 IN 20 DIK0 … Function J2 Pin No. HVH/HVDD GND Same a Logic ground CN202 Carriage encoder sensor power source pin no.s Head temperature sensor's (diode) anode side (black) Head temperature sensor's (diode) cathode side (black) 4-11 Appendix Signal IN/OUT Function HVH OUT Color and black heater driving voltage(19V) HVDD OUT Print head logic power source H_ENB0 OUT Black nozzle heat enable signal H_ENB1 OUT Color nozzle heat enable signal (Even/odd array's odd block) H_ENB2 OUT Color nozzle heat enable signal (Even/odd array's odd block) Part 4: Appendix S750 CN203 (Carriage flexible cable connector) ←→ J3 : Carriage board Pin No. Signal IN/OUT 1 H_D0 OUT 2 H_D1 OUT 3 H_D2 OUT 4 H_D3 OUT 5 H_D4 OUT 6 H_D5 OUT 7 H_D6 OUT 8 H_D7 OUT 9 H_EEPROM_CS OUT 10 H_EEPROM_SK OUT 11 H_EEPROM_D OUT 12,15,16 LOGIC_GND … 13 H_LATCH OUT 14 H_CLK OUT 17 ENCA IN 18 ENCB IN 19 DIA1 IN 20 DIK1 … Function J3 Pin No. Black even array nozzle data signal Black odd array nozzle data signal Cyan even array nozzle data signal Cyan odd array nozzle data signal Magenta even array nozzle data signal Same as Magenta odd array nozzle data signal CN203 Yellow even array nozzle data signal pin no.s Yellow odd array nozzle data signal Print head EEPROM chip select signal Print head EEPROM serial data clock signal Print head EEPROM serial data signal in the print head Logic ground Data latch enable signal Clock signal Carriage encoder signal Carriage encoder signal Head temperature sensor's (diode) anode side (color) Head temperature sensor's (diode) cathode side (color) CN304 (Parallel interface connector) See page 4-6 (S820 JIF1 interface connector) CN305 (USB interface connector) See page 4-1 (S900 JUSB1 interface connector) 4-12 Part 4: Appendix S750 CN402 (Ink sensor connector) Pin No. 1 2 3 Signal INK_PWM … INKS IN/OUT OUT … IN Function Ink sensor photo LED drive signal GND Voltage varies according to the degree of reflected light CN501 (DC power connector) Pin No. 1 2 3 4 5 6 7 Signal +5V +5V-GND VH VH-GND VM VM-GND PW_COT IN/OUT IN … IN … IN … OUT Function +5VDC GND +19V GND +27VDC GND Power output voltage (HVH,VM) control signal CN502 (Paper feed motor connector) Pin No. 1 2 3 4 5 6 Signal LFA LFB GND LFA VSEN LFB IN/OUT OUT OUT … OUT OUT OUT Function Paper-feed motor phase A Paper-feed motor phase B GND Paper-feed motor phase A LF encoder sensor power source Paper-feed motor phase B Pin No. 1 2 3 4 5 Signal VSEN … SNS_PG CRA CRB IN/OUT OUT … IN OUT OUT Function Ink sensor photo LED drive signal GND Pump sensor sense signal High (sense)/Low Carriage motor phase A Carriage motor phase B CN505 (ASF motor connector) Pin No. 1 2 3 4 Signal ASFA ASFB ASFA ASFB IN/OUT OUT OUT OUT OUT Function ASF motor ASF motor ASF motor ASF motor phase phase phase phase A B A B CN506 (Purge motor connector) Pin No. 1 2 3 4 Signal PGA PGA PGB PGB IN/OUT OUT OUT OUT OUT Function Purge motor Purge motor Purge motor Purge motor phase phase phase phase 4-13 A A B B Appendix CN503 (Pump sensor connector) / Carriage motor connector Part 4: Appendix S750 1.2 Carriage Board 1 1 21 21 1 21 33 40 1 8 Figure 4-8 Carriage Board J1 (Carriage flexible cable connector) See page 4-11 (CN201 Carriage flexible cable connector pin description) J2 (Carriage flexible cable connector) See page 4-11 (CN202 Carriage flexible cable connector pin description) J3 (Carriage flexible cable connector) See page 4-12 (CN203 Carriage flexible cable connector pin description) J4 (Print head) Pin No. 1~40 Signal IN/OUT Function See page 4-15 (Print head pin description) 4-14 Part 4: Appendix S750 1.3 Print Head 33 40 1 8 Figure 4-9 Print Head 4-15 Appendix Pin No Signal IN/OUT Function 1,2 A_GND … GND (for black heater driving voltage) 3 H_D2 IN Cyan even array nozzle data signal 4 H_D6 IN Yellow even array nozzle data signal 5, 14, 22 6, 7, 8 B_GND … GND (for color heater driving voltage) 9 DIK0 OUT Head temperature sensor's (diode) cathode side (black) 10 SUBH0 IN Black secondary heater driving voltage 11 H_D4 IN Magenta even array nozzle data signal Color nozzle heat enable signal (Even/odd array odd block) 12 H_ENB1 IN 13 N.C 15 H_D5 IN Magenta odd array nozzle data signal 16 DIK1 … Head temperature sensor's (diode) cathode side (color) 17 H_D0 IN Black even array nozzle data signal 18 H_ENB0 IN Black nozzle heat enable signal 19 N.C 20 H_LATCH IN Data latch enable signal 21 SUBH0 IN Color secondary heater driving signal 23 H_D7 IN Yellow odd array nozzle data signal 24 H_ENB2 IN Color nozzle heat enable signal (Even/odd array's even block) 25 H_D1 IN Black odd array nozzle data signal 26 DIA0 OUT Black 27, 35 HVDD IN Logic power source 28 H_EEPROM_CS IN Head EEPROM chip select signal 29 H_CLK IN Clock signal 30 E_D0 OUT Head EEPROM output data signal 31 H_D3 IN Cyan odd array nozzle data signal 32, 40 B_VH IN Color heater driving voltage 33, 34 A_VH IN Black heater driving voltage H_EEPROM_SK IN Head EEPROM serial data clock signal 36 37 E_DI IN Head EEPROM input data signal 38 DIA1 OUT Head temperature sensor's (diode) anode side (color) 39 VHT IN Head power transistor driving power source Part 4: Appendix S520 1. CONNECTOR LOCATIONS AND PIN CONFIGURATIONS 1.1 Logic Board CN503 CN505 SW401 SW403 CN305 CN304 CN203 CN202 SW402 CN201 CN506 CN511 CN402 Figure 4-10 Logic Board CN201 (Carriage flexible cable connector) ←→ J1 : Carriage board Pin No. 1 2~6 7~11 12~16 17~21 Signal VHT B_VH A_VH B_GND A_GND IN/OUT OUT OUT OUT … … Function Head power transistor driving power source (19V) Color heater driving voltage (19 V) Black heater driving voltage (19 V) GND (for color heater driving voltage) GND (for black heater driving voltage) J1 Pin No. Same as CN201 pin no.s CN202 (Carriage flexible cable connector) ←→ J2 : Carriage board Pin No. Signal IN/OUT Function J2 Pin No. 1, 2, SUBH0 OUT Black secondary heater driving signal 3, 7, 9, 11 14, 16, 19 GND … Logic ground 4 H_ENB1 OUT Color nozzle heat enable signal (Even/odd array's odd block) 5 H_ENB2 OUT Color nozzle heat enable signal (Even/odd array's even block) 6 H_ENB0 OUT Black nozzle heat enable signal 8 H_LATCH OUT Data latch enable signal Same as 10 H_CLK OUT Clock signal CN202 12 H_D0 OUT Black even array nozzle data signal pin no.s 13 H_D1 OUT Black odd array nozzle data signal 15 ENCA IN Carriage encoder signal 17 ENCB IN Carriage encoder signal 18 VSEN OUT Carriage encoder sensor power source 20 DIA0 IN Head temperature sensor's (diode) anode side (black) 21 DIK0 … Head temperature sensor's (diode) cathode side (black) 4-16 Part 4: Appendix S520 CN203 (Carriage flexible cable connector) ←→ J3 : Carriage board Pin No. Signal IN/OUT 1, 2 SUBHO OUT 3, 7, 11,19 GND … 4 H_D2 OUT 5 H_D3 OUT 6 H_D4 OUT 8 H_D5 OUT 9 H_D6 OUT 10 H_D7 OUT H_EEPROM_CS OUT 12 13 H_EEPROM_SK OUT 14 H_EEPROM_D OUT 15~18 20 21 HVDD DIA1 DIK1 OUT IN … Function Color secondary heater driving signal Logic ground Cyan even array nozzle data signal Cyan odd array nozzle data signal Magenta even array nozzle data signal Magenta odd array nozzle data signal Yellow even array nozzle data signal Yellow odd array nozzle data signal Print head EEPROM chip select signal Print head EEPROM serial data clock signal Print head EEPROM serial data signal in the print head Print head logic power source Head temperature sensor's (diode) anode side (color) Head temperature sensor's (diode) cathode side (color) CN304 (Parallel interface connector) See page 4-6 (S820 JIF1 parallel interface connector) CN305 (USB interface connector) See page 4-1 (S900 JUSB1 USB interface connector) 4-17 J3 Pin No. Same as CN203 pin no.s Part 4: Appendix S520 CN402 (Ink sensor connector) Pin No. 1 2 3 Signal INK_PWM … INKS IN/OUT OUT … IN Function Ink sensor photo LED drive signal GND Voltage varies according to the degree of reflected light CN501 (DC power connector) Pin No. 1 2 3 4 5 Signal +5V +5V-GND VH VH-GND VM IN/OUT IN … IN … IN Function +5VDC GND +19V GND +27VDC CN503 (Pump sensor connector) / Carriage motor connector Pin No. 1 2 3 4 5 Signal VSEN … SNS_PG CRA CRB IN/OUT OUT … IN OUT OUT Function Ink sensor photo LED drive signal GND Pump sensor sense signal High (sense)/Low Carriage motor phase A Carriage motor phase B CN505 (ASF motor connector) Pin No. 1 2 3 4 Signal ASFA ASFB ASFA ASFB IN/OUT OUT OUT OUT OUT Function ASF motor ASF motor ASF motor ASF motor phase phase phase phase A B A B CN506 (Purge motor connector) Pin No. 1 2 3 4 5 Signal COM PGA PGA PGB PGB IN/OUT … OUT OUT OUT OUT Function Common terminal Purge motor phase Purge motor phase Purge motor phase Purge motor phase A A B B CN511 (Paper feed motor connector) Pin No. 1 2 3 4 Signal LFA LFA LFB LFB IN/OUT OUT OUT OUT OUT Function Paper-feed Paper-feed Paper-feed Paper-feed motor motor motor motor 4-18 phase phase phase phase A A B B Part 4: Appendix S520 1.2 Carriage Board 1 1 21 21 1 21 33 40 1 8 Figure 4-11 Carriage Board J1 (Carriage flexible cable connector) See page 4-16 (CN201 Carriage flexible cable connector pin description) J2 (Carriage flexible cable connector) See page 4-16 (CN202 Carriage flexible cable connector pin description) See page 4-17 (CN203 Carriage flexible cable connector pin description) J4 (Print head) Pin No. 1~40 Signal IN/OUT Function See page 4-20 (Print head pin description) 4-19 Appendix J3 (Carriage flexible cable connector) Part 4: Appendix S520 1.3 Print Head 33 40 1 8 Figure 4-12 Print Head Pin No Signal IN/OUT Function 1,2 A_GND … GND (for black heater driving voltage) 3 H_D2 IN Cyan even array nozzle data signal 4 H_D6 IN Yellow even array nozzle data signal 5, 14, 22 6, 7, 8 B_GND … GND (for color heater driving voltage) 9 DIK0 OUT Head temperature sensor's (diode) cathode side (black) 10 SUBH0 IN Black secondary heater driving voltage 11 H_D4 IN Magenta even array nozzle data signal 12 H_ENB1 IN Color nozzle heat enable signal (Even/odd array odd block) 13 N.C 15 H_D5 IN Magenta odd array nozzle data signal 16 DIK1 … Head temperature sensor's (diode) cathode side (color) 17 H_D0 IN Black even array nozzle data signal 18 H_ENB0 IN Black nozzle heat enable signal 19 N.C 20 H_LATCH IN Data latch enable signal 21 SUBH0 IN Color secondary heater driving signal 23 H_D7 IN Yellow odd array nozzle data signal 24 H_ENB2 IN Color nozzle heat enable signal (Even/odd array's even block) 25 H_D1 IN Black odd array nozzle data signal 26 DIA0 OUT Black 27, 35 HVDD IN Logic power source 28 H_EEPROM_CS IN Head EEPROM chip select signal 29 H_CLK IN Clock signal 30 E_D0 OUT Head EEPROM chip select signal 31 H_D3 IN Cyan odd array nozzle data signal 32, 40 B_VH IN Color heater driving voltage 33, 34 A_VH IN Black heater driving voltage 36 H_EEPROM_SK IN Head EEPROM serial data clock signal 37 E_DI IN Head EEPROM input data signal 38 DIA1 OUT Head temperature sensor's (diode) anode side (color) 39 VHT IN Head power transistor driving power source 4-20 Cause Countermeasure All There is insufficient contact between the feed roller and the separation pad, and if self-cleaning is not performed to remove paper dust on the rubber of the roller, the friction coefficient is lowered. When feeding problems (including repeating failure) occur, perform feed roller cleaning 2 times. Occurs only in L/L environment. Extremely low occurrence rate. Edge of the page contacts head All (1) Due to the elimination of the paper depressor of models to date in order to allow borderless printing. (2) Paper curling (especially HG-201 after printing) All Quality settings 2 (4 pass, uni-directional) and 1 (8 pass, bi-directional) use the same color parameters. All Paper dust which absorbs ink particles accumulates on the platen ribs and causes staining. There are two causes: (1) Significant paper dust accumulates from factory sizing of Japanese postcards and KII201. (2) Ink mist attaches easily to paper edges. The leading or trailing edge of the paper contacts the head and leaves black traces. 1) Occurs with borderless paper Misaligned printing may affect postcards. 2) Occurs with non-borderless normal and HG-201 paper Problem occurs with HG-201 even when the paper lever is set to envelope thickness. Note that there is no problem printing within the recommended print area of non-borderless paper. 4-21 Inappropriate color hues at quality settings of 1 (highest quality) and 2 (high quality) Conspicuous with grey, barely noticable with other colors. Problem papers are GP301, HR101. In the borderless printing durability test, staining of the reverse side of the paper occurred. The right side ribs cannot be cleaned. Occurs at a low level when more than 3000 sheets (1000 borderless postcards) but, at an unacceptably high level when 6000 sheets (2000 borderless postcards) are fed. This problem will only begin to affect the average user (300 postcards per year) after 4 years or so, and so is not a major issue (Note that excessive cleaning will wear out the rollers) 1) Paper which supports borderless printing * Have the user understand that there is the possibility of ink stains at the leading and trailing edges when borderless printing. * Flatten curled paper. * Set the paper thickness lever to envelope thickness. Recommend non-borderless printing with the recommended print area. Have the user understand that although borderless printing is possible with normal paper, it is not recommended. As per specifications. Cleaning method for after borderless printing or the platen has been printed (purge side of the platen): 1. Power the printer ON and open the access cover. 2. With the head at replacement position, remove the power cord. 3. Clean the purge-side platen ribs with Qtips etc. Remarks Part 4: Appendix Appendix Repeating feed failure of all sizes of PC101 Model S900 / S820 Issue 2. PROBLEMS LEFT REMAINING S900/S9000/S820 issues All There is friction with the leading edge at the ASF separation pad when feeding. As such, when the address side is printed after the reverse has already been printed the leading edge tends to curl. When there are problems with leading edge curl, print the address side of the card first. All Based on the amount of curling due to printing, when printing the end of the trailing edge it falls into the platen channel. If the paper thickness lever is adjustment, dot placement is affected. As per specifications. All Possibility that this problem occurs due to digital camera (etc.) CCD noise. If this is a problem, advise against use of VIVID Photo. (VIVID Photo is default OFF). Uneven density due to sudden release of trailing edge from roller All When using VIVID Photo, uneven color can occur in areas of high density Part 4: Appendix Have the user understand that although borderless printing is possible with normal paper, it is not recommended. All Barely perceptible with normal images. Postcard leading edge curl Occurs when printing the address side of the card after borderless printing the other side. Conspicuous with IJ postcards, but also occurs with government issue postcards and KH201 although barely perceptible. When borderless printing, uneven print density occurs about 4mm from the trailing edge. Occurs with PR101 and the pattern for checking striping and uneven density. Barely perceptible with normal images. 4-22 The distance between the platen rib surface and the platen absorber is too narrow for paper curling during printing. As such, during borderless printing the trailing edge of the paper may fall into the channel and come in contact with the absorber. Uneven density due to feeding, when the paper is released by the pinch roller. When borderless printing on normal paper, the trailing edge of the paper contacts the platen absorber and stains the printout. As per specifications. Problem occurs almost solely with solid dark color, such as images of night sky. Other: 1) The occurrence rate of the following problems is very low, and they can be recovered by normal cleaning: * Color mixing (a issue mainly with yellow). * Non-ejection (one color of ink is suddenly not ejected) * Ink smearing (ink concentrations on the face results in long smears on the paper surface) 2) About throughput: * Throughput is lowered during borderless printing -> since the number of nozzles used to print the leading and trailing edges is limited. * Throughput is lowered during quiet mode -> since paper feeding operations are conducted slower. S900 / S820 Issue Model Cause Countermeasure The volume of operation noise in Draft mode is high. BJ S750 The movement of the pressure plate during normal feeding operation is noisy. Improvements in speed have increased the speed of pressure plate operation and related noise levels. When printing the address side of KH201, multiple sheets are fed simultaneously in Quiet mode. Conditions: High temperature, high humidity only. In areas of high density, the image is degraded BJ S750 When the address side of the paper is printed after having already printed the reverse, the moisture of that side increases its friction coefficient with other sheets and they are fed together. In order to improve color density, the ink ejection amount ink has been increased. (1) Change the print quality setting from Draft to Standard. The throughput is lowered. Bk: 20 -> 12 ppm, Cl: 13 -> 8 ppm (2) Use Quiet mode. Throughput is lowered. When this problem occurs, switch from Quiet to Standard mode. BJ 750 When cancelling a print job, printing continues even as “Printer not responding” is displayed. (Win2000/XP only) When printing on normal paper in High quality mode, bleeding of black ink is even worse than with the S500 model. Borderless printing on GP301 results in friction with the head. BJ 750 When printing the address side of postcards after having already printed the reverse, the trailing edge of the paper may hit the head. Conditions: Low temperature, low humidity only. Color areas lying next to sections of solid black ink lower the density of the black ink, causing this problem. When the density of black ink on the page is high, and the time before color ink is printed next to it is short, this problem is likely to occur. Paper type and image are also factors. Even though the printer receives the cancel signal, while a job is being cancelled the status cannot be freed up. In the driver properties, change the brightness in the color adjustment settings from Normal to Light. (1) Raise the print quality (this increases the number of passes and lengthens the time between ejection of color and black inks) Throughput is lowered. (2) Use a paper not conducive to bleeding. None. As to date, ROM version will be upgraded. S520 Due to the increase of the color ink ejection amount. None. See information for overseas. All (1) Curled paper cannot be depressed properly by the eject roller. (2) There is no paper depressor on the left side of the printer. Even if paper impacts against the head, the head will not suffer damage. All (1) The paper curls after printing the reverse of the address side. (2) There is no paper depressor on the left side of the printer. When there is friction with the head, move the paper thickness lever to the envelope position. A display will appear indicating that the lever is not set to the correct position. The accuracy of dot placement will be affected, lowering print quality (S750) Flatten out the postcard, or print the address side first. The S900/S820 do not have this problem due to differing ink ejection amounts meaning different degrees of paper curling. Part 4: Appendix BJ 750 Appendix 4-23 A whiteness appears where seams of color and black printing join Remarks S750 / S520 S750/S520 issues All Due to the increase of the color ink ejection amount for better color density. All Non-ejection of black ink All Lower throughput in Quiet Mode BJ S700 All SOTEC e-note M260TX3 (on sale since Sep. 2000) However connections are made, ECP communication errors occur. Issue (1) According to the communication error, the printer will display “Printer not responding”. Issue (2) Data corruption Conditions: * PC SOTEC e-note M260TX3 (chipset: SiS630, WindowsMe) * PC BIOS ECP Setting * Printer utility ECP setting If black ink tanks are left installed for a lengthy period of time, the contents settle and the density of the ink in the lower part of the tanks increases, causing clogging in the head. Bk: 20 -> 5 ppm, Cl: 13 -> 4.6 ppm As per specifications With PR101, 0.51 ppm -> 0.45 ppm As per specifications. Lowered throughput borderless printing when Set the mode to Draft and the problem can be avoided by the lower ink ejection amount. Print quality will be lowered. (1) Use USB rather than parallel interface to connect. (2) If problems occur, turn the ECP setting off. The throughput may be lowered. Affected models: Issue (1): S600/S630/S6300 (previous models only) Issue (2): S600/S630/S6300/S800 (previous models), and S750/S520 Part 4: Appendix 4-24 Ink may seep through when printing both sides of very thin paper. Specific problems with SOTEC PCs Perform Deep Cleaning (2 or 3 times may be necessary) S750 / 520 S900/S9000/S820 issues Issue Repeating feed failure of all sizes of PC101 Occurs only in L/L environment. Extremely low occurrence rate. Model All Cause There is insufficient contact between the feed roller and the separation pad, a nd if self-cleaning is not performed to remove paper dust on the rubber of the roller, the friction coefficient is lowered. Edge of the page contacts head The leading or trailing edge of the paper contacts the head and leaves black traces. 1) Occurs with borderless paper Misaligned printing may affect postcards. 2) Occurs with non-borderless normal and HG-201 paper Problem occurs with HG-201 even when the paper lever is set to envelope thickness. Note that there is no problem printing within the recommended print area of non-borderless paper. Inappropriate color hues at quality settings of 1 (highest quality) and 2 (high quality) All (1) Due to the elimination of the paper depressor of models to date in order to allow borderless printing. (2) Paper curling (especially HG-201 after printing) All Quality settings 2 (4 pass, uni-directional) and 1 (8 pass, bi-directional) use the same color parameters. All Paper dust which absorbs ink particles accumulates on the platen ribs and causes staining. There are two causes: (1) Significant paper dust accumulates from factory sizing of Japanese postcards and KII201. (2) Ink mist attaches easily to paper edges. Conspicuous with grey, barely noticeable with other colors. Problem papers are GP301, HR101. In the borderless printing durability test, staining of the reverse side of the paper occurred. The right side ribs cannot be cleaned. Occurs at a low level when more than 3000 sheets (1000 borderless postcards) but, at an unacceptably high level when 6000 sheets (2000 borderless postcards) are fed. This problem will only begin to affect the average user (300 postcards per year) after 4 years or so, and so is not a major issue Countermeasure When feeding problems (including repeating failure) occur, perform feed roller cleaning 2 times. (Note that excessive cleaning will wear out the rollers) 1) Paper which supports borderless printing * Have the user understand that there is the possibility of ink stains at the leading and trailing edges when borderless printing. * Flatten curled paper. * Set the paper thickness lever to envelope thickness. Recommend non-borderless printing with the recommended print area. Have the user understand that although borderless printing is possible with normal paper, it is not recommended. As per specifications. Cleaning method for after borderless printing or the platen has been printed (purge side of the platen): 1. Power the printer ON and open the access cover. 2. With the head at replacement position, remove the power cord. 3. Clean the purge-side platen ribs with Q-tips etc. Remarks The distance between the platen rib surface and the platen absorber is too narrow for paper curling during printing. As such, during borderless printing the trailing edge of the paper may fall into the channel and come in contact with the absorber. Uneven density due to feeding, when the paper is released by the pinch roller. Have the user understand that although borderless printing is possible with normal paper, it is not recommended. All There is friction with the leading edge at the ASF separation pad when feeding. As such, when the address side is printed after the reverse has already been printed the leading edge tends to curl. When there are problems with leading edge curl, print the address side of the card first. All Based on the amount of curling due to printing, when printing the end of the trailing edge it falls into the platen channel. If the paper thickness lever is adjustment, dot placement is affected. As per specifications. All Possibility that this problem occurs due to digital camera (etc.) CCD noise. If this is a problem, advise against use of VIVID Photo. (VIVID Photo is default OFF). All Compared with the BJC-8200, when ink is continuously ejected from the nozzles, the increase in the amount of ink ejected is large. Change the print mode to standard, if the smudge occurs in high quality mode. Use specialty paper. All When the new magenta and yellow dye inks, introduced to improve the color brilliance and light fastness, are printed on film, the dye migrates easily in high temperature and high humidity environments. Do not stack the printed sheets of HG-201. Put a sheet of paper between printed HG-201 films for storage. When borderless printing on normal paper, the trailing edge of the paper contacts the platen absorber and stains the printout. All Uneven density due to sudden release of trailing edge from roller Barely perceptible with normal images. Postcard leading edge curl Occurs when printing the address side of the card after borderless printing the other side. Conspicuous with IJ postcards, but also occurs with government issue postcards and KH201 although barely perceptible. When borderless printing, uneven print density occurs about 4mm from the trailing edge. Occurs with PR101 and the pattern for checking striping and uneven density. Barely perceptible with normal images. All When using VIVID Photo, uneven color can occur in areas of high density Problem occurs almost solely with solid dark color, such as images of night sky. Smudge on the plain paper is worse than that of the BJC-8200. The quality in high quality mode (4-pass printing) is worse than that in standard mode (2-pass / default settings). (Same problem on the address side of PH101) Color deterioration on HG-201 When the HG-201 is left in high temperature and high humidity environments for a few minutes, printed colors become subdued in appearance. Other: 1) The occurrence rate of the following problems is very low, and they can be recovered by normal cleaning: * Color mixing (a issue mainly with yellow). As per specifications. * Non-ejection (one color of ink is suddenly not ejected) * Ink smearing (ink concentrations on the face results in long smears on the paper surface) 2) About throughput: * Throughput is lowered during borderless printing -> since the number of nozzles used to print the leading and trailing edges is limited. * Throughput is lowered during quiet mode -> since paper feeding operations are conducted slower. S750/S520 issues Issue Model Cause Countermeasure The volume of operation noise in Draft mode is high. S750 (1) Change the print quality setting from Draft to Standard. The throughput is lowered. Bk: 20 -> 12 ppm, Cl: 13 -> 8 ppm (2) Use Quiet mode. Throughput is lowered. When printing the address side of KH201, multiple sheets are fed simultaneously in Quiet mode. Conditions: High temperature, high humidity only. In areas of high density, the image is degraded S750 The movement of the pressure plate during normal feeding operation is noisy. Improvements in speed have increased the speed of pressure plate operation and related noise levels. When the address side of the paper is printed after having already printed the reverse, the moisture of that side increases its friction coefficient with other sheets and they are fed together. In order to improve color density, the ink ejection amount ink has been increased. A whiteness appears where seams of color and black printing join S750 When cancelling a print job, printing continues even as “Printer not responding” is displayed. (Win2000/XP only) When printing on normal paper in High quality mode, bleeding of black ink is even worse than with the S500 model. Borderless printing on GP301 results in friction with the head. S750 S750 Color areas lying next to sections of solid black ink lower the density of the black ink, causing this problem. When the density of black ink on the page is high, and the time before color ink is printed next to it is short, this problem is likely to occur. Paper type and image are also factors. Even though the printer receives the cancel signal, while a job is being cancelled the status cannot be freed up. Remarks When this problem occurs, switch from Quiet to Standard mode. In the driver properties, change the brightness in the color adjustment settings from Normal to Light. (1) Raise the print quality (this increases the number of passes and lengthens the time between ejection of color and black inks) Throughput is lowered. (2) Use a paper not conducive to bleeding. None. As to date, ROM version will be upgraded. S520 Due to the increase of the color ink ejection amount. None. See information for overseas. All (1) Curled paper cannot be depressed properly by the eject roller. (2) There is no paper depressor on the left side of the printer. When there is friction with the head, move the paper thickness lever to the envelope position. A display will appear indicating that the lever is not set to the correct position. The accuracy of dot placement will be affected, lowering print quality (S750) Even if paper impacts against the head, the head will not suffer damage. When printing the address side of postcards after having already printed the reverse, the trailing edge of the paper may hit the head. Conditions: Low temperature, low humidity only. Ink may seep through when printing both sides of very thin paper. All (1) The paper curls after printing the reverse of the address side. (2) There is no paper depressor on the left side of the printer. Flatten out the postcard, or print the address side first. All Due to the increase of the color ink ejection amount for better color density. Specific problems with SOTEC PCs All Non-ejection of black ink All Lower throughput in Quiet Mode Lowered throughput when borderless printing S750 All SOTEC e-note M260TX3 (on sale since Sep. 2000).However connections are made, ECP communication errors occur. Issue (1) According to the communication error, the printer will display “Printer not responding”. Issue (2) Data corruption Conditions: * PC SOTEC e-note M260TX3 (chipset: SiS630, WindowsMe) * PC BIOS ECP Setting * Printer utility ECP setting If black ink tanks are left installed for a lengthy period of time, the contents settle and the density of the ink in the lower part of the tanks increases, causing clogging in the head. Bk: 20 -> 5 ppm, Cl: 13 -> 4.6 ppm With PR101, 0.51 ppm -> 0.45 ppm Set the mode to Draft and the problem can be avoided by the lower ink ejection amount. Print quality will be lowered. (1) Use USB rather than parallel interface to connect. (2) If problems occur, turn the ECP setting off. The throughput may be lowered. Perform Deep Cleaning (2 or 3 times may be necessary) As per specifications As per specifications. The S900/S820 do not have this problem d ue to differing ink ejection amounts meaning different degrees of paper curling. Affected models: Issue (1): S600/S630/S6300 (previous models only) Issue (2): S600/S630/S6300/S800 (previous models), and S750/S520 With GP301/HG-201 media, uneven print density due to carriage imbalance appears as vertical lines in the print. All Vibration from the motor causes off-target dot placement. As the off-target dot placement always occurs at the same locations during head alignment, it is considered uneven vertical density. If port settings are not ECP and a large file is printed, the print speed is extremely low. (cf. A3100-ECPSpeed.XLS) GP301 friction with head occurs when “Highest Quality” is selected in the driver’s Custom setting. All The data quantities sent are large. Because of this, the difference in transfer speed between ECP and other settings has a marked effect on print speed. Due to 12 pass printing, print speed is low and it becomes easy for cockling (buckling of the paper) to occur. In order to prevent printed sheets rubbing against each other, feeding pauses immediately before a sheet is ejected on top of a still-wet high density printout. All All Specifications. Intentionally raise alignment values by one step after head alignment. By slightly shifting the entire head alignment from the accurate position, uneven vertical density becomes unnoticeable. [Method] 1. Perform head alignment from the driver utility. 2. Perform the head alignment again. 3. Intentionally select one value higher for pattern E. [Note] Although uneven vertical density will disappear, there may be horizontal striping and a noticeable loss of sharpness. USB connection is recommended. In the case of parallel connections, change port settings to ECP. Adjust the paper thickness lever setting when the problem occurs [Note] The message “The paper thickness lever is not set correctly” will appear. Change the driver settings. [Method] 1. In the driver utility, while pressing down the shift key, select “Custom Settings .” 2. Uncheck the option “Prevent inter-sheet ink transfer.” [Note] When the setting above is turned off, ink smearing due to friction between output pages is likely to occur. The printing paper contains 100% waste paper. PRINTED IN JAPAN (IMPRIME AU JAPON) CANON INC.