1
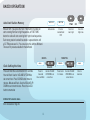
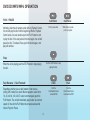
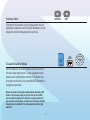
GT-2.0
Operation Manual
TM
AM/FM/CD/DVD/MP3/MP4
Digital 2.1 Surround Sound - Optical SPDIF Audio Input
Bluetooth®
Contents
Safety Guidlines
Important safety instructions
Safety compliance
Warnings
Warranty Information
At a glance
GT-2.0 Features
Radio Operation
DVD/CD/MP3/MP4 Operation
Bluetooth® Syncing
Placing a Call - GT-2.0
Placing a Call - Remote
Remote Control Guide
System Setup
Lanugage
Audio
Video
Digital
Wiring Diagram
Troubleshooting Accessories
GT-2.0 Specifications
FCC Compliance
Quick Start Guide
CAUTION
RISK
RISK OF
OF ELECTRICAL
ELECTRICAL SHOCK
SHOCK
DO
DO NOT
NOT OPEN
OPEN
CAUTION:
CAUTION: To
To reduce
reduce the
the risk
risk of
of electric
electric shock,
shock, do
do not
not
remove
remove cover
cover (or
(or back).
back). No
No User-serviceable
User-serviceable parts
parts
inside.
inside. Refer
Refer servicing
servicing to
to qualified
qualified service
service personnel.
personnel.
2
2
3
4
6
10
13
16
17
18
19
23
24
25
26
27
28
29
30
31
31
32
WARNING - To reduce the risk of electrical shock, do not
remove cover (or open unit). NO USER SERVICEABLE parts are
inside. Refer servicing to QUALIFIED SERVICE PERSONNEL.
The design and manufacture of this player takes personal safety
into consideration. However, any improper operation may result
in electric shock, fire, or other hazard.
DO NOT open the cabinet by yourself to prevent electric shock.
Please contact a professional technician to preform any service
needed. Please use only components recommended by factory
when replacement is necessary.
Please turn unit off when not in use. Use a dry, soft cloth to clean
face with the system turned off.
PRECAUTION - Moisture may cause the lens on loader in this
unit to malfunction. To remedy the problem, turn unit on, eject
disc and run 1-2 hours to vaporize moisture inside the unit. Do
not repeatedly turn unit off and on. After turning unit off wait 10
seconds before turning on again. Do not use broken, scratched,
or twisted discs in player. This could result in damage to the unit.
Use only 5”, 12cm discs in this unit.
2
WARRANTY
ONE (1) YEAR LIMITED WARRANTY
The Manufacture warrants to the original retail purchaser of this
unit that is or any part therein, under normal use and condition,
be proven defective in material or workmanship within 1 year
from the date of original purchase, such defect’s will be repaired
or replaced at the manufactures option without charge for parts
and repair labor.
This warranty extends only to the original purchaser of the unit
and is not transferable. Some states do not allow limitations on
how long an implied warranty lasts, and some states do not allow
the exclusion or limitation on incide tal or consequential damages, so the above limitation of exclusions may not apply to you.
This warranty gives you specific legal rights. To obtain repair
or replacement within the terms of this warranty, the radio is
to be delivered with proof of purchase and a discription of the
defect(s), freight prepaid to the original dealer or to:
This warranty does not extend to the elimination of externally
generated static or noise, to the correction as antenna generated noise or to the cost incurred to correct this noise. The warranty does not cover the removal or the reinstallation of this unit
or damage to any CD’s, Speakers, accessories, or the vehicle’s
electrical system.
QAV – Quest Audio Video
1930 W. Lusher Ave.
Elkhart, IN 46517
574-970-8349
This warranty does not the cabinet appearance or apply to
the unit or any part of the unit which, in the opinion of the
manufacture, has been damaged through alterations, improper
installation, mishandling, misuse, neglect, or accident, THE
EXTENT OF THE MANUFACTURE’S LIABILITY UNDER THIS
WARRANTY IS LIMITED TO THE REPAIR OR REPLACEMENT
PROVIDED ABOVE , AND IN NO EVENT SHALL THE MANUFACTURE’S LIABILITY EXCEED THE PURCHASE PRICE PAID
BY THE ORIGINAL BUYER FOR THE UNIT.
TM
3
CD/MP3/MP4/DVD Disc Player
Compatible with standard size CD, MP3, MP4 and DVD discs
(4.75” or 12cm). The GT-2.0 is designed to read standard
DVD, MP3, MP4, CD, CD-R, CD-RW, JPEG-CD Disc. Because
of variations in recording methods some discs may not play on
this unit. This unit will play region 1 DVD’s (USA and Canada).
TM
USB / SD Card
This unit allows users to play files stored on both USB and SD
cards including MP3 music, MP4 short video clips and JPEG
photo files.The USB port will also charge many devices like
iPods and MP3 players.
GT-2.0
Built-In AM/FM Tuner
27 preset FM stations and 18 AM stations available to select.
om
p li a
TM
nt
Amp
li
ard
wer Sta
r Po
nd
fie
CEA-2006 C
Bluetooth®
The Bluetooth® word mark and logos are registered trademarks owned by Bluetooth
SIG, Inc. and any use of such marks by Genesis Technologies is under license.
4
Bluetooth® Link
This unit contains Bluetooth® technology enabling secure,
wireless connections between portable and fixed devices. This
unit, when enabled can place and receive cellular phone calls
through the GT-2.0s remote keypad and built in microphone.
for iPods and MP3 Players. These sources must be connected
through the inputs on the unit or through additional accessory
wall plates. The Digital Optical input is used to enable digital
audio from A/V components with digital optical output.
Clock
This unit has a built in clock that can display the time when
any button is pressed and a sleep timer that turns off the radio
for you.
The GT-2.0 Bluetooth link also enables handheld control of
streaming music from users wireless device play list.
®
This unit supplies quality high power audio and video outputs
to three different rooms. Room A receives 2.1 digital surround
sound. Room B and C receive standard stereo audio.
Sound Equalization Control
Allows control of the Bass, Treble, Balance and four preset EQ
settings.
This unit has 1 Video Input, 3 Video outputs, 4 Audio inputs, 1
Digital Optical input and 1 Coaxial Input to allow users to enjoy
entertainment from other sources such as Satellite Radio,
Cable and Satellite TV, VCR’s, Digital Cameras, Video Game
players and a convenient 3.5mm Audio Input on the front panel
5
GT-2.0 FEATURES
B
SPEAKERS
TM
A
L
B
GT-2.0
C
C
D
E
F
G
IR
MIC
MODE
VIDEO / AUDIO
AM/FM
CLOCK /SLEEP
M
N
O
P
VOLUME
PLAY / PAUSE
STOP
MUTE
H
Q
R
I
EJECT
AM/FM/CD/DVD/MP3/MP4
Optical / SPDIF Audio Input
CHAPTER SEARCH
J
K
RWD
FWD
F RWD
AUXILIARY INPUT
AU 1
AUXILIARY INPUT
AU 1
U
V
F FWD
PREVIOUS
SD
USB
W
X
6
NEXT
T
USB
SD
S
B
POWER
Turns the power on and off.
H
PLAY / PAUSE
Press to play disc or pause playback of disc.
C
IR
Infrared remote sensor.
I
EJECT
Press to eject a Disc from your GT-2.0 built in player.
D
MODE
Select between AU1, AU2, AU3, AU4, AV1, BT, Radio
Note: Pressing and Holding the MODE button for 10 seconds
will re-boot the radio and reset all defaults. It will leave the radio
off. Press the on button to continue operation.
J
FWD and RWD buttons
Radio Mode: Press to select next frequency, higher or lower.
DVD Mode: Moves menu selection.
K
F. RWD
Radio Mode: Press to auto scan and memorize band preset
stations. Scan through all lower preset stations.
Disc Mode: Select different levels of fast reverse.
L
SPEAKERS A-B- C
Turns sound on or off in corresponding rooms A, B or C.
E
AM/FM
Allows you to select FM1, FM2, FM3, AM1, or AM2.Each band
can be auto programmed with 9 station presets. 27 total preset
stations for FM and 18 total preset stations for AM. (See FFWD
or FRWD Radio Mode for auto scan features.)
F
Bluetooth®
Press this to enable Bluetooth® connectivity.
M
MIC
Microphone for Bluetooth® cell phone communications.
G
VOLUME
Increase or decrease the volume in all rooms where sound is
being played.
N
CLOCK
Press this to see time. This function works in all modes and
even when the unit is turned off. Press to change to the clock
display. Press and hold to turn the display indication and button
illumination off or on.
7
GT-2.0 FEATURES
O
P
AUDIO SETUP
Controls under this menu include Volume, Bass, Treble,
Balance and EQ controls.
Volume: 39 different levels
Bass: 14 different levels
Treble: 14 different levels
Balance: 14 different levels
EQ: Pop, Class, Rock, Flat
MUTE/HOLD
Press to turn off the sound. To turn on the sound, press again.
While talking on the phone, press to put the call on hold.
Works on all rooms where the sound is being played.
STOP
Press to stop playback of disc. Press Play to continue the
playback
R CD/MP3/MP4/DVD Disc loading slot
Insert a disc to play. Compatible with standard size CD, MP3,
MP4 and DVD discs (4.75” or 12cm). The GT-2.0 is designed
to read standard CD, MP3, MP4, DVD, DVD+R, DVD-R Disc.
Because of variations in recording methods some discs may
not play on this unit. This unit will play region 1 DVD’s (USA
and Canada).
Q
8
S
PREVIOUS / NEXT Double Arrows
Radio Mode: Press these buttons for station seek.
Bluetooth® Mode: Press Previous to end a phone call.
Press Next to start a phone call.
T
F. FWD
Radio Mode: Press to auto scan and memorize band preset
stations. Scan through all higher preset stations.
Disc Mode: Select different levels of fast forward.
U
JTAG port
Used for firmware upgrades by authorized Genesis
Technologies technicians only.
V
AU1 Port
Audio Input from MP3 or iPod player. This is a 3.5 MM input.
W
SD Card slot
Reads media stored on SD cards. The GT-2.0 supports SD cards
with up to 8GB capacity. The SD card must be formatted to be
FAT or FAT32.
X
USB port
The USB port will also charge many devices like iPods,
MP3 players and cameras. Plus, allows users to play files stored
GT-2.0 DISPLAY SCREEN
on USB and USB attached media devices, including music, video and
photo files.The GT-2.0 supports USB flash drives with up to 8GB
capacity. The USB drive must be formatted to be FAT or FAT32.
H
B
C
D
E
B STEREO
C VOLUME
D BAND
E FREQUENCY
F PRESET
G EQ SETTINGS
H REMOVABLE MEDIA
9
F
G
RADIO OPERATION
C Frequency Indicator
FM1
89.9
CH
1
D Preset Numeral Indicator
B Band Indicator
POWER
Press for power “On or Off”
Turns the power on and off.
AM / FM
AM/FM/W
Radio Reception Mode
Activate radio
Press to access the radio, press to activate desired band: AM1,
AM2, FM1, FM2, FM3.
AM/FM/WB
AM / FM
Manual Tuning
Select Band
Select Band, Select single arrowed button to move the chanels
down or up.
10
AM/FM/WB
AM / FM
Press for
desired Band
RWD
FWD
Chanel Down
Chanel Up
AM / FM
AM/FM/WB
Auto Search Tuning
Select Band
Push to auto search for an available station at a higher or lower
frequency. When this function is selected the unit will stay at the
selected station untill another function
is selected.
PREVIOUS
NEXT
DISC
Auto Search
Down
RADIO
INPUT
CLOCK
RETURN
EJECT
BAND
SUB-T
Auto Search
Up
ENTER
FR
DISPLAY
MENU
FF
SETUP
NEXT
VOL +
SLOW
VOL-
AUDIO
ZOOM
PREVIOUS
SOUND
AM/FM/WB
AM / FM
Manual Frequency Presets (Remote Control Only)
Select Band
AM1, AM2, FM1,
FM2, FM3
Select Band, Select desired frequency, Hold desired numeral for
3 seconds. Frequency is set. Repeat to change. Frequency can
be preset for AM1, AM2, FM1, FM2, FM3.
RWD
DISC
RADIO
INPUT
CLOCK
RETURN
EJECT
BAND
SUB-T
Select
Frequency
DISPLAY
ENTER
MENU
FR
FF
SETUP
NEXT
VOL +
SLOW
ZOOM
PREVIOUS
Recall Frequency Presets (Remote Control Only)
AM/FM/WB
AM / FM
Select Band
AM1, AM2, FM1,
FM2, FM3
Select Band AM1, AM2, FM1, FM2, FM3, then select desired
numeral
11
VOL-
AUDIO
SOUND
REPEAT
PROG
PLAY/PAUSE
STOP
4
1
2
3
5
6
7
8
9
0
10+
SLEEP
Select
Numeral
A
B
C
BC
MUTE
PROG
PLAY/PAUSE
STOP
4
REPEAT
1
2
3
5
6
7
8
9
0
10+
SLEEP
Select
Numeral
A
B
C
and HOLD till
blinking
BC
MUTE
RADIO OPERATION
Auto Best Station Memory
While in FM1 if you press the FAST FWD button the radio will
start scanning from low to high frequencies.,or FAST RWD
button the radio will start scanning from high to low frequencies.
Each strong station found will be stored in a preset button until
all 27 FM presets are full. You can also do this with the AM band.
There are 18 presets available for the AM band.
AM / FM
AM/FM/WB
AM/FM/WB
AM / FM
F FWD
Activate radio
Press for
desired Band
FM1
Scan from
low to high
HOURS
Clock Setting the time
Press and hold the CLOCK button for 3 seconds.
Hour will flash. Use the VOLUME UP/DOWN to
set correct hour. Press SOUND button move to
minutes. Minutes will flash. Use the VOLUME UP/
DOWN to set correct minutes. Press the CLOCK
button to memorize
SOUND
VOLUME
Press for
Use the VOLUME
3 seconds
UP/DOWN to set
Hours will flash
correct hour
SEE Accessoiries Page 30.
12
F RWD
Scan from
high to low
MINUTES
CLOCK
SIRIUS/XM Satellite Radio
OR
CLOCK
VOLUME
Press button
for minutes.
Use the VOLUME
UP/DOWN to set
correct minute
Press to
memorize
DVD/CD/MP3/MP4 OPERATION
C Chapter on DVD / Tack on CD-MP3
01-02-05:15
B Title of DVD
D Elapsed Time on DVD-CD-MP3
LOAD
Load a Disc
There are several ways to select and load a disc in the GT-2.0.
If you have left a disc in the unit you can just press PLAY. If you are
using the remote, press the PLAY button. Either of these options will
start the disc playing. Another way to play a disc is to insert it into the
slot. The unit will switch to LOAD by it self.
Insert Disc into built-in
GT-2 Player loader,
label side facing up
LOAD will automatically
appear in the display
Eject a Disc
Regardless of which function is playing, if the eject button on the front panel
or the remote control is pushed, the unit will stop playing and eject the disc.
The unit will keep the disc in the slot with EJECT showing on the Digital
Display. If there is no disc inside the unit, a disc placed in the slot will be
taken inside automatically with LOADING showing on the Digital Display.
NOTE: When the unit ejects and the disc isn’t removed after 1 minute, the
unit will automatically reload the disc. This feature protects the disc from
being dropped and damaged.
13
Press EJECT
DVD/CD/MP3/MP4 OPERATION
PLAY / PAUSE
PLAY/PAUSE
Push to pause disc.
Normally, when the unit accepts a disc with no Playback Control,
the unit will play the disc from the beginning. When a Playback
Control exists, the user needs to push the PLAY button to start
to play the disc. If the user pushes this button again, the unit will
pause the disc. To release Pause, push this button again, and
play will continue.
Stop
PLAY/PAUSE
When disc is paused,
push to play disc.
STOP
Push the STOP button to stop
playing the disc.
When the unit is playing, push the STOP button to stop playing
the disc.
Fast Reverse / Fast Forward
F RWD
Push the
Fast Rewiind button
to rewind DVD
Regardless whether you use fast forward or fast reverse,
(during DVD mode) there are 6 different speeds to select from:
1X, 2X, 4X, 8X, 16X, 20X To select a normal speed, push the
PLAY button. The unit will immediately play the disc at a normal
speed. On the unit the PLAY button must be pressed second
time to Play from Pause.
14
F FWD
Push the
Fast Forward button
to advance the DVD
Previous / Next
PREVIOUS
NEXT
Pushing the Previous button, the unit will play the disc from the
beginning of the previous track. Pushing the Next button, the unit
will play the disc from the beginning of the next track.
SD
To Load USB and SD Media
Insert USB device or SD card into proper socket on the front of
the radio to begin playing media. To view, navigate and select
between music and video/photo media the TV or Monitor must
be on and set to AV mode. Use remote NAVIGATION buttons to
navigate on screen menu.
Because of variations in 3rd party recording methods some discs, USB
devices or SD cards may not play on this unit. Also, the SD and USB
ports are capable of playing short video clips. Long playing video files
may experience buffering delays and video freeze if viewing is attempted
through these ports. Bluetooth® is not video enabled and will not play
video files.
15
USB
ENTER
Bluetooth® PAIRING
0
Pairing the GT-2.0 with a Bluetooth® device
Press the
“Bluetooth®”
button to enter
setup
With the GT-2.0 powered on Press the button marked
“Bluetooth®” to enter Bluetooth® setup. The GT-2.0 screen will
report “NO LINK” until a Bluetooth® device is successfully paired
with the GT-2.0.
The GT-2.0 will send a password request to the Bluetooth®
device that reads “Enter a numeric PassKey for GENESIS
TECHNOLOGIES ****”. The factory default pass key is (0000).
Enter the 4 digit numeric code to unlock the Bluetooth® connection. The GT-2.0 will send a confirmation request to the device
that reads “Accept Connection Request from GENESIS TECHNOLOGIES?” Confirm GENESIS TECHNOLOGIES connection
to successfully pair device with the GT-2.0
Pairing the GT-2.0 to a cell phone will configure the GT-2.0 to
allow hands-free listening and talking. The built in microphone is
located on the face of the GT-2.0 with a range of 12 feet. Sound
is transmitted to any of the selected rooms A, B and or C.
The paired Bluetooth® connection also allows remotely controlled streaming stereo audio from the paired device from as far
away as 25 feet.
Bluetooth® paring is not video enabled.
16
0
0
Enter a numeric
PassKey
0
PLACING A CALL - GT-2.0
MODE
Placing a call with the GT-2.0
Using the Radio and Remote Control buttons
OR
1
Press the
“MODE” button
or press the
“Bluetooth®”
button
To place a call using the GT-2.0 with a paired Bluetooth®
enabled cell phone first enable the GT-2.0 Bluetooth® mode
by pressing the “MODE” button or by pressing the “Bluetooth®”
button until “BT” and “LINK OK” appears on the GT-2.0 display.
Using the GT-2.0 remote control’s keypad dial the desired phone
number. Press the button marked “NEXT” to initiate the call.
To end the call press the button marked “PREVIOUS”.
To redial the last call press the button marked “NEXT”.
Receiving a call with the GT-2.0
Using the Radio Buttons
To receive an incoming call while the GT-2.0 is paired with
Bluetooth® enabled cell phone press the button marked “NEXT”.
To end the call press the button marked “PREVIOUS”.
17
NEXT
Use remote
control keypad
dial the desired
phone number
Press the button
marked “NEXT”
to initiate the call.
NEXT
PREVIOUS
Press the button marked
“NEXT” to receive an
incoming call.
To end the call press
the button marked
“PREVIOUS”.
PREVIOUS
To end the
call press the
button marked
“PREVIOUS”.
PLACING A CALL - REMOTE
Placing a call with the GT-2.0
Using the Remote buttons
DISC
To place a call using the GT-2.0 with a paired Bluetooth
enabled cell phone press the remote button marked “INPUT”
until “BT” and “LINK OK” appear on the GT-2.0 display.
®
RADIO
INPUT
CLOCK
RETURN
EJECT
BAND
SUB-T
DISPLAY
ENTER
DISC
CLOCK
RADIO
INPUT
CLOCK
RETURN
EJECT
BAND
DISC
SUB-T
DISPLAY
ENTER
Using the remote numeric keys dial the desired phone number
then press the remote button marked “NEXT” to initiate the call.
To end the call press the remote button marked “PREVIOUS”.
MENU
FR
FF
SETUP
NEXT
VOL +
SLOW
ZOOM
PREVIOUS
VOL-
SOUND
1
PROG
PLAY/PAUSE
STOP
3
4
NEXT
REPEAT
2
DISC
RADIO
INPUT
5
6
RETURN
7
EJECT
9
0
10+
DISPLAY
B
FR
CLOCK
BAND
Receiving a call with the GT-2.0
Using Remote Buttons
AUDIO
A
SETUP
ENTER
SUB-T
C
8
SLEEP
MENU
BC
VOL +
SLOW
MUTE
ZOOM
PREVIOUS
VOL-
AUDIO
SOUND
REPEAT
1
2
5
CLOCK
BAND
9
Special dialing REMOTE keypad functions
PROG
PLAY/PAUSE
STOP
3
4
NEXT
DISC
6
0
RADIO
INPUT
RETURN
EJECT
7
SETUP
B
8
10+
C
FR
SUB-T
NEXT
DISPLAY
VOL +
ENTER
SLOW
SETUP
VOL-
AUDIO
SOUND
VOL
+
REPEAT
SLOW
VOL +
SLOW
ZOOM
VOL-
AUDIO
PROG
PLAY/PAUSE
1
VOL-
5
SOUND
2
SOUND
SETUP
18
PREVIOUS
PROG
4
PLAY/PAUSE
3
STOP
AUDIO
6
DISPLAY
SLEEP
STOP
NEXT
ZOOM
7
REPEAT
8
PREVIOUS
19
20
10+
3
4
SLEEP
INPUT
BC
DISC
RADIO
5A
6B
RETURN
7C
EJECT
MUTE
9
0
10+
DISPLAY
SLEEP
A
B
FR
C
FF
MUTE
VOL +
SLOW
ZOOM
CLOCK
BAND
ENTER
SETUP
8
SUB-T
MENU
BC
NEXT
PREVIOUS
VOL-
AUDIO
SOUND
REPEAT
PROG
PLAY/PAUSE
1
STOP
2
3
4
PREVIOUS
5
9
CLOCK
A
MENU
BC
6
7
DISC
0
RADIO
10+
RETURN
SUB-T
B
C
ENTER
8
INPUT
SLEEP
EJECT
BC
MUTE
FR
INPUT
RETURN
EJECT
BAND
DISC
SUB-T
DISPLAY
DISPLAY
ENTER
FF
SETUP
MENU
FR
VOL +
SLOW
ZOOM
VOL-
AUDIO
PROG
NEXT
VOL +
SLOW
VOL-
AUDIO
ZOOM
PREVIOUS
FF
PLAY/PAUSE
SOUND
FF
SETUP
NEXT
STOP
REPEAT
RADIO
CLOCK
MENU
MUTE
FF
PREVIOUS
PLAY/PAUSE
FF
PREVIOUS
PROG
NEXT
To clear an entry press the button marked SETUP
To type star (*) press the button marked FF
To type pound (#) press the button marked FR
MENU
ZOOM
FR
BAND
SUB-T
ENTER
A
MENU
INPUT
FF
EJECT
INPUT
FF
NEXT
To receive an incoming call while the GT-2.0 is paired with
Bluetooth® enabled cell phone press the remote button
marked “NEXT”.
To end the call press the remote button marked “PREVIOUS”.
SETUP
BAND
RADIO
FR
RETURN
PREVIOUS
STOP
SOUND
REPEAT
REPEAT
PROG
FR
PLAY/PAUSE
STOP
4
1
2
3
4
1
2
3
4
1
2
3
5
6
7
8
5
6
7
8
5
6
7
8
9
0
10+
SLEEP
9
0
10+
SLEEP
9
0
10+
SLEEP
A
B
C
MUTE
A
B
C
MUTE
A
B
C
MUTE
BC
BC
BC
REMOTE CONTROL Guide
B
F
G
H
C
D
E
DISC
RADIO
INPUT
CLOCK
RETURN
EJECT
BAND
SUB-T
DISPLAY
ENTER
I
J
K
L
M
N
O
P
Q
MENU
FR
SLOW
ZOOM
PREVIOUS
AUDIO
PROG
PLAY/PAUSE
STOP
SOUND
REPEAT
1
2
3
4
5
6
7
8
9
0
10+
SLEEP
A
R
S
T
B
V
W
X
Y
D
Radio
This function selects the Radio.
E
INPUT
Press to select AU1, AU2, AU3, AU4, AV1 and BT.
F
CLOCK
TO change clock settings press and hold CLOCK/Band key
for 3 seconds. Press Volume up or down to adjust Hours.
Press the Audio key then Volume up or down to adjust Minutes.
Z
C
BC
MUTE
Disc
Press to select Disc mode when a disc is already in the
unit.
Press Disc to select USB or SD.
To view, navigate and select between music and video/photo media the TV or Monitor must be on and set to AV mode.
Use NAVIGATION buttons to navigate on screen menu.
U
NEXT
VOL-
C
FF
SETUP
VOL +
Power
Turns the power on and off.
8
9
:
Refer to page 12 for clock setting adjustments.
19
REMOTE CONTROL Guide
G
BAND
Once the radio is selected, this button allows you to select
FM1, FM2, FM3, AM1, AM2. Push the “RADIO” button and
the unit switches to Radio immediately. During radio mode,
press “RADIO” again to switch receiving band.
H
NAVIGATION BUTTONS
Press the appropriate button to move around any menus that are
selected on screen. Center button is the “select / enter” button.
I
ENTER
Use to finalize selection.
J
SETUP
Press the “SETUP” button to activate the System Setup on
screen display Video Monitor menu . Use the NAVIGATION
buttons to navigate the OSD menu options.
K
SLOW
Pressing the SLOW button while in DVD mode turns on
slow motion play back in steps of 1/2, 1/3,1/4,1/5 and 1/6 of
standard play speed.
L
decrease the volume level respectively.
M
AUDIO - DVD Only
Adjusts the surround sound mode as well as selects the
language. Must be set before play.
N
SOUND
Radio Mode: Repeatedly pressing the “SOUND” button
moves you through 6 modes. VOLUME, BASS, TREBLE,
BALANCE, EQ and TIME. Adjustment in anyone of these
modes is done by pressing the “VOLUME” (+ or -) key.
Controls can be modified differently for each room.
O
REPEAT
DVD Mode: Press “REPEAT” to repeat
the current track being played. Press it twice to repeat playing all of the tracks.
CD, MP3, VCD Mode: Press “REPEAT” to repeat the current track being played. Press it twice to cancel the repeat
function.
P
VOLUME
Press the “VOLUME” (+ or -) button to increase or
20
0-9 NUMBERS
Radio Mode: You can select one of the 9 stored stations on
each band by pressing any one of the number buttons (1-9).
REMOTE CONTROL Guide
Disc Mode: You can select any track directly by using the
number buttons (0-10+). Example: If you want track
number 25. Consecutively press the number 2, then 5 and
track number 25 will begin to play.
Q
A, B and C Rooms
Turns sound on or off in the corresponding rooms A, B or C.
R
EJECT
When the unit is in Disc Play mode, pushing the “EJECT”
button will eject the disc. When the unit ejects a disc and the
disc is not removed after 1 minute, the unit will automatically
reload the disc.
S
T
GT-2.0 Display Screen and attached Video Monitor will
show single track elapsed time, single track remaining time
or entire disc time, It also shows the track being played and
the amount of the whole disc.
MP3 Mode: Press the “DISPLAY” button and the OSD will
show single track elapsed time only.
SUBTITLE (SUB-T) / RETURN
DVD only. Returns to previously selected tracks. Press to
select language or to turn off subtitles.Press and hold for 3
seconds to return to previous chapter.
MENU / DISPLAY
DISC only. Selects upper menu. Press the button for 3 seconds to display the status of the DVD or CD that is currently
playing.
U
FAST REVERSE / FORWARD
Press to select different levels of Fast Reverse or Fast
Forward. Press Play to resume selection.
V
ZOOM - DVD Only
DVD, VCD: Press the “ZOOM” button once to enable 2X zoom
mode. Pressing the “ZOOM” button repeatedly moves the zoom
mode through 3X, 4X, 1/2X, 1/3X, and 1/4X zoom levels. Press
“ZOOM” again to exit the zoom mode.
W
PREVIOUS / NEXT
Radio Mode: Press to select higher or lower stations.
Disc Mode: Press to select previous or Next track or chapter.
Pushing the Previous button, the unit will play the disc from
the beginning of the previous track. Pushing the Next button, the unit will play the disc from the beginning of the next
track.
CD/VCD/DVD Mode: Press the “DISPLAY” button and the
21
REMOTE CONTROL Guide
X
PROGRAM
CD/VCD: You can set the program order to play, by
following the steps below. Press “PROGRAM” button and
the LCD displays programming P00:00. You can set the
program order to play them by using (0-10+) number
button, and then press “PLAY/PAUSE” to play.
Note:
(1) Program does not function in playing MP3.
(2) CD Only- Allows you to re-arrange the play
back order of the individual tracks differently from the order on the original disc.
(3) If there are mistakes in programs, you can press “PROGRAM” button again then press “PROGRAM” button to play in order.
Y
STOP
DVD, VCD, CD: Press “STOP” to suspend playback mode.
STOP will display on the TV Screen. Pressing “STOP” a
second time will end all disc playback.
Z
PLAY / PAUSE
Press “PLAY/PAUSE” button to suspend the playback of
CD, MP3, MP4, VCD and DVD media. Press it again to
return to normal playback mode.
22
8
10+
Radio: N/A
Disc: Press the 10+ button to select tracks numbered higher
than 100 on MP3s.
9
SLEEP
Selects timing for delayed turn-off mode. Available
increments 90, 80, 70, 60, 50, 40, 30, 20 and 10 Minutes.
:
MUTE / BC
Press the “MUTE” button to turn off the sound in all rooms
A, B, and C. Press it again to resume the previous sound
levels. Pressing the BC button for 5 seconds returns the
system to default settings.
OS
SYSTEM SETUP
TV SYSTEM
VIDEO
RESOLUTION
TV TYPE
PASSWORD
RATING
DEFAULT
EXIT SETUP
NTSC
PAL
AUTO
OS
SYSTEM SETUP
TV SYSTEM
VIDEO
RESOLUTION
TV TYPE
PASSWORD
RATING
DEFAULT
EXIT SETUP
INTERLACE-YUV
TV-RGB
P-SCAN YPBPR
S-VIDEO
TV SYSTEM
VIDEO
RESOLUTION
TV TYPE
PASSWORD
RATING
DEFAULT
EXIT SETUP
480I / 576I
480P / 576P
720P
1080I
1080P
Press the “SETUP” button to activate the
System Setup on screen display Video
Monitor Only menu .
4 : 3PS
4 : 3LB
16 : 9
Use the NAVIGATION buttons to navigate the following OSD menu options.
OS
SYSTEM SETUP
OS
SYSTEM SETUP
TV SYSTEM
VIDEO
RESOLUTION
TV TYPE
PASSWORD
RATING
DEFAULT
EXIT SETUP
SYSTEM SETUP
TV SYSTEM
VIDEO
RESOLUTION
TV TYPE
PASSWORD
RATING
DEFAULT
EXIT SETUP
TV SYSTEM
VIDEO
RESOLUTION
TV TYPE
PASSWORD
RATING
DEFAULT
EXIT SETUP
OS
SYSTEM SETUP
SYSTEM SETUP
TV SYSTEM
VIDEO
RESOLUTION
TV TYPE
PASSWORD
RATING
DEFAULT
EXIT SETUP
SYSTEM SETUP
OS
1
2
3
4
5
6
7
8
23
KID SAFE
G
PG
PG-13
PG-R
R
NC-17
ADULT
OS
RESTORE
OS
SYSTEM SETUP
TV SYSTEM
VIDEO
RESOLUTION
TV TYPE
PASSWORD
RATING
DEFAULT
EXIT SETUP
LANGUAGE SETUP
LANGUAGE SETUP
OS
ENGLISH
CHINESE
GERMAN
SPANISH
FRENCH
PORTUGUESE
OSD LANGUAGE
AUDIO LANG
SUBTITLE LANG
MENU LANG
LANGUAGE SETUP
OSD LANGUAGE
AUDIO LANG
SUBTITLE LANG
MENU LANG
EXIT SETUP
EXIT SETUP
LANGUAGE SETUP
OS
ENGLISH
CHINESE
JAPAN
FRENCH
SPANISH
PORTUGUESE
LATIN
GERMAN
OSD LANGUAGE
AUDIO LANG
SUBTITLE LANG
MENU LANG
EXIT SETUP
LANGUAGE SETUP
ENGLISH
CHINESE
JAPAN
FRENCH
SPANISH
PORTUGUESE
GERMAN
OFF
OSD LANGUAGE
AUDIO LANG
SUBTITLE LANG
MENU LANG
EXIT SETUP
24
EXIT SETUP
OS
ENGLISH
CHINESE
JAPAN
FRENCH
SPANISH
PORTUGUESE
GERMAN
LATIN
LANGUAGE SETUP
OSD LANGUAGE
AUDIO LANG
SUBTITLE LANG
MENU LANG
OS
OS
OS
OS
AUDIO SETUP
AUDIO OUT
KEY
FRONT
CENTER
REAR
AUDIO SETUP
SPDIF / OFF
SPDIF / RAW
SPDIF / PCM
AUDIO OUT
KEY
FRONT
CENTER
REAR
EXIT SETUP
LARGE
SMALL
OFF
EXIT SETUP
OS
OS
AUDIO SETUP
AUDIO SETUP
#
+4
+2
0
-2
-4
AUDIO OUT
KEY
FRONT
CENTER
REAR
AUDIO OUT
KEY
FRONT
CENTER
REAR
EXIT SETUP
LARGE
SMALL
OFF
EXIT SETUP
OS
OS
AUDIO SETUP
AUDIO OUT
KEY
FRONT
CENTER
REAR
EXIT SETUP
LARGE
SMALL
OFF
AUDIO SETUP
AUDIO OUT
KEY
FRONT
CENTER
REAR
EXIT SETUP
25
AUDIO SETUP
VIDEO SETUP
OS
VIDEO SETUP
OS
VIDEO SETUP
12
10
8
6
4
2
0
BRIGHTNESS
CONTRAST
HUE
SATURATION
SHARPNESS
EXIT SETUP
BRIGHTNESS
CONTRAST
HUE
SATURATION
SHARPNESS
EXIT SETUP
OS
VIDEO SETUP
12
10
8
6
4
2
0
BRIGHTNESS
CONTRAST
HUE
SATURATION
SHARPNESS
EXIT SETUP
BRIGHTNESS
CONTRAST
HUE
SATURATION
SHARPNESS
EXIT SETUP
VIDEO SETUP
+6
+4
+2
0
-2
-4
-6
BRIGHTNESS
CONTRAST
HUE
SATURATION
SHARPNESS
EXIT SETUP
26
OS
VIDEO SETUP
OS
VIDEO SETUP
12
10
8
6
4
2
0
BRIGHTNESS
CONTRAST
HUE
SATURATION
SHARPNESS
EXIT SETUP
8
6
4
2
0
OS
OUTPUT SETUP
OP MODE
DYNAMIC RANGE
DUAL MONO
OS
LINE OUT
RF REMOD
OUTPUT SETUP
OP MODE
DYNAMIC RANGE
DUAL MONO
EXIT SETUP
EXIT SETUP
OUTPUT SETUP
OP MODE
DYNAMIC RANGE
DUAL MONO
OS
FULL
6/8
4/8
2/8
OFF
EXIT SETUP
OUTPUT SETUP
OP MODE
DYNAMIC RANGE
DUAL MONO
OS
STEREO
MONO L
MONO R
MIX MONO
EXIT SETUP
27
OS
OUTPUT SETUP
WIRING DIAGRAM
ANTENNA
L-OUT
R-OUT
AU4-L
AU4-R
V-OUT
V-OUT
OPTICAL
V-OUT
AV1-IN
COAX
AU2-L
AU2-R
AV1-L
AV1-R
15A
Ground
Red +12V
Yellow -A Room Right (+)
Green - A Room SUBwoofer (+)
Yellow / Black - A Room Left (-)
Green/Black - A Room SUBwoofer (-)
White - A Room Left (+)
Pink - C Room Left (+)
White/Black- A Room Left (-)
Pink/Black - C Room Left (-)
Blue - B Room Right (+)
Purple - C Room Right (+)
Blue/Black - B Room Right (-)
Purple/Black - C Room Right (-)
Orange - B Room Left (+)
Orange/Black- B Room Left (-)
28
TROUBLESHOOTING
No Power
• Check and make sure whether the fuse is blown, replace fuse with proper value if necessary.
Disc error appears.
• The disc may be damaged or dirty.
Clean disc and retry.
Some errors occur in the LCD or no function when
pressing the button.
• Turn off the unit and restart the unit again. Use
Factory Default Restart.
When there is no color on video.
• Turn off the unit and restart the unit again.
Use Factory Default Restart.
Poor radio reception or static.
• Antenna may not be the proper length. Make sure the antenna is fully extended. Antenna may be
broken. Replace antenna.
• The broadcast signal is too weak.
• The antenna is poorly grounded. Check and make sure the antenna is properly grounded at it’s
mounting location.
FACTORY DEFAULT RESTART
Press and hold MODE button for 10 seconds - Unit will shut off.
Restart unit by pressing the ON button. Factory defaults will be
reset with this type of restart.
NOTE:
If any of the problems persist after check list has been made,
consult your nearest service dealer.
Never attempt to disassemble your unit by yourself.
Disc cannot be loaded
• Disc is loaded in the machine. Clear the disc by
pressing eject
No Picture.
• The Video line from the main unit to the TV is not
connected properly. Check connections.
• Improper setting of the TV SYSTEM. Set the TV
SYSTEM to “PAL” or “NTSC”, according to the
connected television.
29
ACCESSORIES
onyX Wall Plate
onyX reciever installiation
1. Press the top of the spring loaded onyX wall plate cradel to release the cradel from the wall plate.
2. Insert the onyX reciever into the cradel.
3. Press and push the top of the onyX reciever into the wall plate to finish the installiation.
1.
2.
30
3.
GT-2.0 SPECIFICATIONS
Overall Dimensions 9-5/8” (W) x 8-1/2” (H) x 6” (D)
Mounting Dimensions 7-3/4” (W) x 7-1/2” (H) x 5” (D)
Net Weight 5lbs (2.3Kg)
Voltage Maximum Current Consumption 12V DC Negative Ground (11.0V - 15.0V allowable)
Total Continuous Power Output
50W
Load Impedance 4Ω (4-8Ω allowable)
Total harmonic distortion Typical 0.02% Maximum 0.3%
DVD Deck Section, Discs Played
15.19 Labeling requirements.
(a) In addition to the requirements in part 2 of this
chapter, a device subject to certification, or verification
shall be labeled as follows.
(1) Receivers associated with the operation of a
licensed radio service, e.g., FM broadcast under part
73 of this chapter, land mobile operation under part
90, etc., shall bear the following statement in a conspicuous location on the device: This device complies
with art 15 of the FCC Rules. Operation is subject to
the condition that this device does not cause harmful
interference.
(2) A stand-alone cable input selector switch, shall
bear the following statement in a conspicuous location
on the device: This device is verified to comply with
part 15 of the FCC Rules for use with cable television
service.
(3) All other devices shall bear the following statement
in a conspicuous location on the device:
This devise complies with part 15 of the FCC Rules.
Operation is subject to the following two conditions:
(1) This device may not cause harmful interference,
and (2) this device must accept any interference
received, including interference that may cause undesired operation.
9A
DVD, MP3, MP4, CD, CD-R, CD-RW, JPEG-CD
Video System AUTO / PAL / NTSC
Video Section 4:3 Letter Box and 4:3 Pan Scan, 16:9
Video Output level 1.0Vp-p +/-0.2V 75ohms
AM Tuner Section, Frequency Range 530 - 1710KHz (U.S.A.)
FM Tuner Section, Frequency Range 87.5-107.9MHz (U.S.A).
Bluetooth Version 2.0, Class ll
Advanced Audio Distribution OPP, OBEX, SPP, A2DP, AVRCP
®
FCC COMPLIANCE
31
GT-2.0 QUICK START
GUIDE
AM/FM/CD/DVD/MP3/MP4
Digital 2.1 Surround Sound - Optical SPDIF Audio Input
B POWER
SPEAKERS A-B- C
Turns sound on or off in rooms A, B or C.
M
MIC
Microphone for Bluetooth® cell phone
communications.
N
CLOCK
Displays users set time.
O
AUDIO SETUP
Selects audio setup menu.
MUTE/HOLD
Press to turn off and on the sound.
B
Turns the power on and off.
C IR
Infrared remote sensor.
SPEAKERS
D MODE
TM
A
Select: AU1, AU2, AU3, AU4, AV1, BT, Radio
L
B
GT-2.0
C
E AM/FM Allows you to select FM1, FM2, FM3,
AM1, or AM2.
®
F Bluetooth
L
P
Q
Press this to enable Bluetooth connectivity.
®
G VOLUME
Increase or decrease the volume in all rooms.
H PLAY / PAUSE
Press to play disc or pause playback of disc.
I EJECT
C
D
E
F
G
Radio Mode: Press to select next frequency, higher
or lower.
DVD Mode: Moves menu selection.
MIC
MODE
VIDEO / AUDIO
AM/FM
CLOCK /SLEEP
M
N
O
VOLUME
PLAY / PAUSE
STOP
MUTE
Q
R
I
EJECT
AM/FM/CD/DVD/MP3/MP4
CHAPTER SEARCH
J
K
RWD
FWD
F RWD
AUXILIARY INPUT
AU 1
AUXILIARY INPUT
AU 1
F FWD
PREVIOUS
Radio - Remote
1. Press the lighted red “POWER” button on the front panel to turn
PREVIOUS / NEXT
Selects previous and next chapter in DVD
T
F. FWD
Selects next frequency higher.
U
JTAG port
Used for firmware upgrades
V
AU1 Port
Audio Input from MP3 or iPod player.
W
SD Card slot
Reads media stored on SD cards.
X
USB port
Charges and reads USB devices.
NEXT
T
USB
SD
S
SD
USB
U
V
W
X
3. To listen to radio press “AM/FM”
to select bands AM1, AM2, FM1, FM2
or FM3.
on the unit.
4. RADIO: To tune up or down to the
next station press “FWD” or “RWD”
2. Select speakers “A” for living
room, “B” for bedroom and “C” for
outdoor speakers.
4. REMOTE: To tune up or down
to the next station press “NEXT” or
“PREVIOUS”
32
5. To auto program any available
stations into the (27 FM) and (18
AM) memory station presets enter
FM band and press “FFWD” and the
GT-2.0 will automatically scan available radio stations and load them
into station preset memory. Repeat
this auto scan function for both AM
and FM bands. Use the remote con-
STOP
Press to stop playback of disc.
CD/MP3/MP4/DVD Disc loading slot
S
Optical / SPDIF Audio Input
K F. RWD
Radio Mode: Auto scan and memorize band preset
stations.
Disc Mode: Select different levels of fast reverse.
R
P
H
Press to eject a Disc from your GT-2.0 built in player.
J FWD and RWD buttons
IR
trol numeric keypad 1-9 to recall the
memorized station presets.
6. To manually preset a station
tune radio to the desired station,
press and hold a number 1-9 on
remote keypad to commit the station
to memory. To recall that station
press the remote preset number you
selected.
GT-2.0 QUICK START
GUIDE
B
C
D
Power
Turns the power on and off.
M AUDIO - DVD Only
Selects audio setup menu.
C Disc
N SOUND
Radio Mode: 6 modes. VOLUME, BASS,
TREBLE, BALANCE, EQ and TIME.
Press to select Disc mode when a disc is already
in the unit. Press Disc to select USB or SD.
E
D Radio
O REPEAT
DVD Mode: Repeat current track or all tracks.
CD, MP3, VCD Mode: Repeat current trtack or
cancel function.
This function selects the Radio.
DISC
F
G
H
RADIO
INPUT
CLOCK
RETURN
EJECT
BAND
SUB-T
DISPLAY
ENTER
I
J
K
L
MENU
FR
SETUP
ZOOM
VOL-
AUDIO
PROG
N
O
SOUND
REPEAT
1
2
3
4
P
5
6
7
8
9
0
10+
SLEEP
PREVIOUS
PLAY/PAUSE
A
S
T
U
NEXT
SLOW
Q
R
FF
VOL +
M
E INPUT
B
STOP
V
W
X
Y
Z
C
BC
MUTE
Press to select AU1, AU2, AU3, AU4, AV1
and BT.
P 0-9 NUMBERS
Radio Mode: One of the 9 stored stations on
each band by pressing any one of the number
buttons (1-9).
Disc Mode: You can select any track directly by
using the number buttons (0-10+).
F CLOCK
Use to change clock settings.
G BAND
Select FM1, FM2, FM3, AM1, AM2.
Q A, B and C Rooms
H NAVIGATION BUTTONS
Turns sound on or off in the corresponding rooms
A, B or C.
Press the appropriate button to move around
menus.
R EJECT
I ENTER
Press to eject a Disc from your GT-2.0 built in
player.
Use to finalize selection.
J SETUP
S SUBTITLE (SUB-T) / RETURN
Use to activate the System Setup on screen
display Video Monitor menu .
8
9
:
DVD only. Returns to previously selected tracks.
Press to select language or to turn off subtitles.
K SLOW
T MENU / DISPLAY
Pressing SLOW enables slow motion play back
in steps of 1/2, 1/3,1/4,1/5 and 1/6 of standard
play speed.
Increase or decrease the volume.
1. Press lighted red “POWER” button on the front panel to turn on the
GT-2.0.
2. Press the “Bluetooth®” button.
3. On handheld go to setup and “Add
Device” then “Search for Device”.
Press to select different levels of Fast Reverse or
Fast Forward. Press Play to resume selection.
V ZOOM - DVD Only
Press to zoom 3X, 4X, 1/2X, 1/3X, and 1/4X.
W PREVIOUS / NEXT
Radio Mode: Press to select higher or lower
stations.
Disc Mode: Press to select previous or Next track
or chapter.
X PROGRAM
CD/VCD: You can set the program order to play.
Y STOP
Press to stop playback of disc.
Z PLAY / PAUSE
Press to play disc or pause playback of disc.
8 10+
Press the 10+ button to select tracks numbered
higher than 100 on MP3s.
9 SLEEP
Delayed turn-off in increments of 90, 80, 70, 60,
50, 40, 30, 20 and 10 Minutes.
: MUTE / BC
Press to turn off and on the sound.
DISC only. Press to display the status of the DVD
or CD that is currently playing.
MP3 Mode: Press the “DISPLAY” button and the
OSD will show single track elapsed time only.
L VOLUME
Bluetooth®
U FAST REVERSE / FORWARD
CD MP3 DVD
4. Select “GENESIS TECHNOLOGIES” and enter numeric passkey.
1. To load a disc (CD, MP3 or
DVD) insert disc into slot. Unit will
read the disc and begin play.
5. Default numeric passkey for GENESIS TECHNOLOGIES is 0000
6. Select “Yes” on handheld to pair
device to GT-2.0.
2. Press “Next” or “PREVIOIUS” to
select tracks on CD’s, MP3’s and
Chapters on DVD’s.
33
3. Press “EJECT” to remove disc.
NOTES
34
NOTES
35
TM
GT-2.0
GT-2.0
Operation Manual
TM
AM/FM/CD/DVD/MP3/MP4
Digital 2.1 Surround Sound - Optical SPDIF Audio Input
Bluetooth®