1
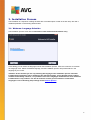
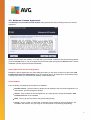
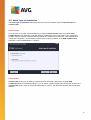
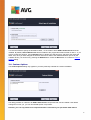
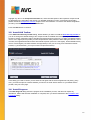
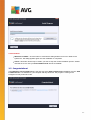
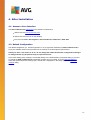
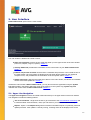
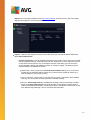
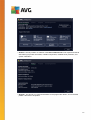
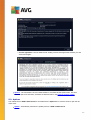
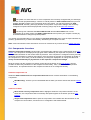
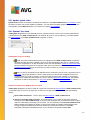
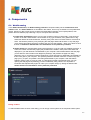
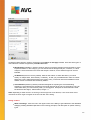
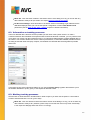
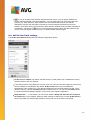
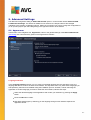
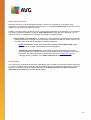
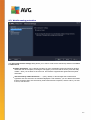
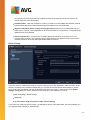
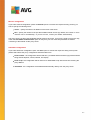
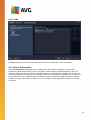
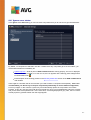
AVG LinkScanner
User Manual
Document revision 2013.11 (2.12.2013)
C opyright AVG Technologies C Z, s.r.o. All rights reserved.
All other trademarks are the property of their respective owners.
This product uses RSA Data Security, Inc. MD5 Message-Digest Algorithm, C opyright (C ) 1991-2, RSA Data
Security, Inc. C reated 1991.
This product uses code from C -SaC zech library, C opyright (c) 1996-2001 Jaromir Dolecek
([email protected]).
This product uses compression library zlib, C opyright (c) 1995-2002 Jean-loup Gailly and Mark Adler.
1
Contents
1. Introduction
2. Installation Requirements
5
2.1 Operation..........................................................................................................
Systems Supported
..........................................................................................................
5
2.2 Web Browsers
Supported
5
2.3 Hardware..........................................................................................................
Requirements
3. Installation Process
..........................................................................................................
6
3.1 Welcome:
Language Selection
..........................................................................................................
7
3.2 Welcome:
License Agreement
..........................................................................................................
8
3.3 Select Type
of Installation
.......................................................................................................... 9
3.4 Custom Options
..........................................................................................................
10
3.5 Install AVG
Toolbar
.......................................................................................................... 10
3.6 Install Progress
.......................................................................................................... 11
3.7 Congratulations!
4. After Installation
13
4.1 Access ..........................................................................................................
to User Interface
13
4.2 Default ..........................................................................................................
Configuration
5. User Interface
..........................................................................................................
14
5.1 Upper Line
Navigation
5.2 Options.......................................................................................................... 17
18
5.3 Security..........................................................................................................
Status Info
..........................................................................................................
19
5.4 Components
Overview
20
5.5 Update ..........................................................................................................
Quick Links
20
5.6 System..........................................................................................................
Tray Icon
6. Components
.......................................................................................................... 22
6.1 Web Browsing
7. AVG Security Toolbar
8. AVG Do Not Track
27
8.1 AVG Do ..........................................................................................................
Not Track interface
..........................................................................................................
29
8.2 Information
on tracking processes
29
8.3 Blocking..........................................................................................................
tracking processes
30
8.4 AVG Do ..........................................................................................................
Not Track settings
2
9. Advanced Settings
.......................................................................................................... 31
9.1 Appearance
..........................................................................................................
33
9.2 Temporarily
disable AVG LinkScanner® protection
..........................................................................................................
34
9.3 Web Browsing
protection
9.4 Update .......................................................................................................... 35
38
9.5 Privacy ..........................................................................................................
Preferences
..........................................................................................................
41
9.6 Ignore error
status
10. Updates
11. FAQ and Technical Support
3
1. Introduction
This user manual offers a general overview of the tasks and detection technologies provided by AVG
LinkScanner®. We will briefly talk about the program installation, initial startup, configuration and use.
AVG LinkScanner® is provided free-of-charge. It is up and running immediately from the moment of
installation. All basic settings have been pre-set by the manufacturer, so most of the time you will not have to
worry about anything – just let AVG LinkScanner® work in the background and protect you without any effort
on your part. However, there might be situations where you need to adjust the program settings, or decide
what to do with a virus infected file; this manual is here to provide detailed information and assist you with any
task.
4
2. Installation Requirements
2.1. Operation Systems Supported
AVG LinkScanner® is intended to protect computers with the following operating systems:
Windows XP Home Edition SP2
Windows XP Professional SP2
Windows XP Professional x64 Edition SP1
Windows Vista (x86 and x64, all editions)
Windows 7 (all editions)
Windows 8 (all editions)
(and possibly higher service packs for specific operating systems).
2.2. Web Browsers Supported
AVG LinkScanner® is fully compatible with the following Internet browsers:
Microsoft Internet Explorer 6.0 or higher
Mozilla Firefox 3.0 or higher
Google Chrome
2.3. Hardware Requirements
Minimum hardware requirements for AVG LinkScanner® are as follows:
Intel Pentium CPU 1.0 GHz or faster
750 MB of free hard drive space, for installation purposes
256 MB (Windows XP) / 1024 MB (Windows Vista, Windows 7, Windows 8) of RAM memory
Recommended hardware requirements for AVG LinkScanner® are as follows:
Intel Pentium CPU 1.5 GHz or faster
1,2 GB of free hard drive space, for installation purposes
512 MB (Windows XP) / 1024 MB (Windows Vista, Windows 7, Windows 8) of RAM memory
5
3. Installation Process
The installation is a sequence of dialog windows with a brief description of what do at each step. We offer a
detailed explanation of each dialog window below:
3.1. Welcome: Language Selection
The installation process starts with the Welcome to AVG LinkScanner® Installer dialog:
In this dialog you can select the language used for the installation process. Click the combo box to roll down
the language menu. Select the desired language, and the installation process will proceed further in the
language of your choice.
Attention: At the moment you are only selecting the language of the installation process. The AVG
LinkScanner® application will be installed in the selected language, and in English which is always
installed automatically. However, it is possible to have more languages installed and to work with AVG
LinkScanner® in any of these. You will be invited to confirm your full selection of alternative
languages in one of following setup dialogs named Custom Options.
6
3.2. Welcome: License Agreement
The Welcome to AVG LinkScanner® Installer dialog provides then the full wording of the AVG license
agreement:
Please read the entire text carefully. To confirm that you have read, understood, and accept the agreement
press the Accept button. If you do not agree with the license agreement press the Decline button, and the
installation process will be terminated immediately.
AVG LinkScanner® Fair Processing Notice
Besides the license agreement, this setup dialog also offers you the option to learn more about the AVG
LinkScanner® Fair Processing Notice. Click the respective link to get redirected to AVG website (http://
www.avg.com) where you can find the full wording of these statements.
Control buttons
From the dialog, the following control buttons are available:
Printable version - Click the button to display the full wording of the AVG license agreement in a
web interface, and well arranged for printing.
Decline - click to refuse the license agreement. The setup process will quit immediately. AVG
LinkScanner® will not be installed!
Back - click to go one step back to the previous setup dialog.
Accept - click to confirm you have read, understood, and accepted the license agreement. The
installation will continue, and you will go on one step further to the following setup dialog.
7
3.3. Select Type of Installation
The Select type of installation dialog offers the choice of two installation options: Express Install and
Custom Install:
Express Install
For most users, it is highly recommended that you keep the Express Install option that installs AVG
LinkScanner® in fully automatic mode with settings predefined by the program vendor. This configuration
provides maximum security combined with the optimal use of resources. In the future, if the need arises to
change the configuration, you will always have the option of doing so directly in the AVG LinkScanner®
application. Press the Next button to continue.
Custom Install
Custom Install should only be used by experienced users who have a valid reason to install AVG
LinkScanner® with non-standard settings, e.g. to fit specific system requirements! Should you decide for the
Custom Install option, mark the respective radio button to confirm. The dialog then appears with the following
interface:
8
You are now invited to specify the destination folder, i.e. the location where AVG LinkScanner® should be
installed. By default, AVG LinkScanner® will be installed to the program files folder located on drive C:. If you
want to change this location, use the Browse button to display the drive structure, and select the respective
folder. And, once you have changed the location and wish to revert to the default destination pre-set by the
software vendor, you can do so by pressing the Default button. Press the Next button to continue to Custom
Options dialog.
3.4. Custom Options
The Custom Options dialog only appears if you have previously selected the custom installation:
The dialog provides an overview of all AVG LinkScanner® components that can be installed. If the default
settings do not suit you, you can remove/add specific components.
However, you can only select from components that are included in your purchased AVG edition!
9
Highlight any item in the Component Selection list, and a brief description of the respective component will
be displayed on the right side of this section. For detailed information on each component's functionality
please consult the Components Overview chapter of this documentation. To revert to the default configuration
pre-set by the software vendor use the Default button.
Press the Next button to continue.
3.5. Install AVG Toolbar
In the Install AVG Security Toolbar dialog, decide whether you want to install the AVG Security Toolbar. If
you do not change the default settings, this component will be installed automatically into your default Internet
browser (currently supported browsers are Microsoft Internet Explorer version 6.0 or higher, and Mozilla Firefox
version 3.0 or higher) and to provide you with comprehensive online protection while surfing the Internet. At the
moment, the supported Internet browsers are Internet Explorer (version 6.0 and higher), and/or Mozilla Firefox (
version 3.0 and higher). No other browsers are supported (in case you are using some alternative Internet
browser, e.g Avant Browser, you may encounter unexpected behavior).
In the dialog you need to confirm you are aware of and agree with the license agreement and privacy policy.
Also, you have the options to decide whether you want to set AVG Secure Search as your default search
provider, and your home page.
3.6. Install Progress
The Install Progress dialog shows the progress of the installation process, and does not require any
intervention. Please wait until the installation is complete, then you will be redirected to the Installation was
successful dialog:
10
Control buttons
Minimize to taskbar - click the button to minimize the dialog window into an icon visible on the
system bar. The dialog appears again once the installation is completed.
Cancel - this button should only be used if you want to stop the current installation process. Please
mind that in such a case your AVG LinkScanner® will not be installed!
3.7. Congratulations!
The Installation was successful dialog is the last step of the AVG LinkScanner® installation process. AVG
LinkScanner® is now installed on your computer and fully functional. The program is running in the
background in fully automatic mode.
11
Product Improvement Program and Privacy Policy
Here you can decide whether you want to participate in the Product Improvement Program (for details see
the chapter AVG Advanced Settings / Product Improvement Program) that collects anonymous information on
detected threats in order to increase the overall Internet security level. All data are treated as confidential and
in compliance with AVG Privacy Policy; click the Privacy Policy link to get redirected to AVG website (http://
www.avg.com) where you can find the the full wording of AVG Privacy Policy. If you agree, please keep the
option checked (the option is confirmed, by default).
In case you would like to keep informed, mark the I would like to get news, special offers and security
alerts option. Please provide your email address so that you can receive all product related information and
news, special offers, improvements and upgrades, etc.
Before you finish the installation process of AVG LinkScanner®, let us ask you a question that helps us
improve our products and services: What is the main reason you choose AVG? Select the most fitting
answer from the drop-down menu. Your participation in this survey is voluntary, of course.
Control buttons
In the dialog, the only control button reads Finish: click it to finalize the installation process, and enjoy the
protection provided by AVG LinkScanner®.
12
4. After Installation
4.1. Access to User Interface
The AVG LinkScanner® main dialog is accessible in several ways:
double-click the AVG system tray icon
double-click the AVG icon on the desktop
from the menu Start / All Programs / AVG Standalone LinkScanner / AVG 2013
4.2. Default Configuration
The default configuration (i.e. how the application is set up right after installation) of AVG LinkScanner® is
set by the software vendor so that all functions are tuned up to achieve optimum performance.
Unless you have a real reason to do so, do not change the AVG LinkScanner® configuration! Changes
to settings should only be performed by an experienced user.
Some minor editing of the settings is accessible directly in the Web Browsing component dialog. If you want
to change the AVG LinkScanner® configuration to better suit your needs, go to the Advanced Settings:
select the Options/Advanced settings item, and edit the configuration in the newly opened the Advanced
Settings dialog.
13
5. User Interface
AVG LinkScanner® opens with the main window:
The main window is divided into several sections:
Upper line navigation consists of four active links lined up in the upper section of the main window
(Lik e AVG, Reports, Support, Options). Details >>
Security Status Info provides basic information on the current status of your AVG LinkScanner®.
Details >>
Installed components overview can be found in a horizontal strip of blocks in the central section of
the main window. The components are displayed as light green blocks labeled by the respective
component icon, and provided with the information on the component status. Details >>
Update quick link is placed in the lower line of blocks in the main window, and allows an immediate
access to the latest update file. Details >>
Outside the main window of AVG LinkScanner®, you may also access the application using the System
tray icon located in the bottom right-hand corner of the monitor (on the system tray). System tray icon
indicates the current status of AVG LinkScanner®. Details >>
5.1. Upper Line Navigation
The Upper line navigation consists of several active links lined up in the upper section of the main window.
The navigation includes the following buttons:
Join us on Facebook - Single click the link to get connected to the AVG Facebook community and
to share the latest AVG information, news, tips and tricks for your maximum internet security.
Reports - Opens a new Reports dialog with an overview of all relevant reports on previously launched
update processes. If the update is currently running, a rotating circle will be displayed next to the
14
Reports text in the upper navigation of the main user interface. Click this circle to get to the dialog
depicting the progress of the running process:
Support - Opens a new dialog structured into four tabs where you can find all relevant information
about AVG LinkScanner®:
o License and Support - The tab provides information on the product name, the license number,
and the expiration date (for AVG Link Scanner®, this information is not provided since there is
no time limit for free products use). In the bottom section of the dialog you can also find a
clearly arranged overview of all available contacts to customer support. The following active
links and buttons are available in the tab:
(Re)Activate - Click to open the new AVG Activate Software dialog. Fill in your license
number into the respective field to change your current license number for another (e.g.
when upgrading to a paid AVG product).
Copy to clipboard - Use this link to copy the license number, and paste it where needed.
This way you can be sure the license number is entered correctly.
Buy now - AVG LinkScanner® is provided free-of-charge, and its functionality is limited.
While using AVG LinkScanner® you might discover you would like to have access to
further and extended functionality of AVG paid products. Then please click this link to visit
AVG website (http://www.avg.com) for AVG purchase information.
15
o Product - The tab provides an overview of the AVG LinkScanner® most important technical
data referring to product information, installed components, installed email protection, and
system information:
o Program - On this tab you can find information on the program file version, and on the third
parties code used in the product:
16
o License Agreement - The tab offers the full wording of the license agreement between you and
AVG Technologies:
Options - The maintenance of AVG LinkScanner® is accessible via the Options item. This item
contains quite a few sub items, therefore we describe them in the following separate chapter.
5.2. Options
The maintenance of AVG LinkScanner® is accessible via the Options item. Click the arrow to open the rolldown menu:
Update - Automatically launches the update process of AVG LinkScanner®.
17
Update from folder ... - Runs the update process from the update files located in a specified folder
on your local disk. However, this option is only recommended as an emergency, e.g. insituations
where there is no connection to the Internet (for example, your computer is infected and disconnected
from the Internet; your computer is connected to a network with no access to the Internet, etc.). In
the newly opened window select the folder where you have previously placed the update file, and
launch the update process.
History is further divided into the following sub items:
o Blocked Websites - Displays the list of all potentially dangerous websites previously blocked
by AVG LinkScanner®. You can update this list by clicking Refresh list button.
o Prevented Exploits - Displays the list of all dangerous exploits prevented by AVG
LinkScanner®. You can update this list by clicking Refresh list button.
Advanced Settings … - Advanced settings - opens the AVG advanced settings dialog where you
can edit the AVG LinkScanner® configuration. Generally, it is recommended that you keep the
default settings of the application as defined by the software vendor.
Remove AVG Security Toolbar - Switches off the AVG Security Toolbar service that is currently
active in your web browser.
Help contents - Opens the AVG help files.
Get support - Opens the AVG Free web at the customer support center page.
About Web-based Threats - Opens the AVG Free web on the page referring to web-technologies
based threats, and describing details of the AVG LinkScanner® functionality.
My Account - Opens the MyAccount homepage where you can manage your subscription products,
purchase additional protection, download installation files, check your past orders and invoices, and
manage your personal information.
Get Comprehensive Protection - Opens the AVG website offering a comparative overview of the
protection level provided by free version versus full professional AVG application, and inviting you to
buy the required commercial AVG product.
Premium Support - Opens you browser and takes you to AVG Support Center page, where you can
select your product type to view all support options available for you.
About AVG LinkScanner® - Opens the AVG Information dialog with four tabs providing data on
your purchased license and accessible support, product and program information, and the full wording
of the license agreement.
5.3. Security Status Info
The Security Status Info section is located in the upper part of the main window. Within this section you will
always find information on the current security status of your AVG LinkScanner®. Please see an overview of
icons possibly depicted in this section, and their meaning:
The green icon indicates that your AVG LinkScanner® is fully functional. Your computer is
completely protected, up-to-date and all installed components are working properly.
18
The yellow icon warns that one or more components are incorrectly configured and you should pay
attention to their properties/settings. There is no critical problem in AVG LinkScanner® and you have
probably decided to switch some component off for some reason. You are still protected by AVG
LinkScanner®. However, please pay attention to the problem component's settings! The incorrectly
configured component will be displayed with a warning orange strip in the main user interface.
The orange icon indicates that AVG LinkScanner® is in a critical status! One or more
components do not work properly and AVG LinkScanner® cannot protect your computer. Please pay
immediate attention to fixing the reported problem!
It is strongly recommended that you pay attention to Security Status Info and in case the report indicates any
problem, go ahead and try to solve it immediately. Otherwise your computer is at risk!
Note: AVG Link Scanner® status information can also be obtained at any moment from the system tray icon.
5.4. Components Overview
Installed components overview can be found in a horizontal strip of blocks in the central section of the main
window. The components are displayed as light green blocks labeled by the respective component icon. Each
block provides information on the current status of protection. If the component is configured correctly and fully
functional, the information is stated in green letters. If the component is stopped, its functionality is limited, or
the component is in error state, you will be notified by a warning text displayed in an orange text field. It is
strictly recommended that you pay attention to the respective component's settings!
Move the mouse over the component to display a short text at the bottom of the main window. The text
provides an elementary introduction to the component's functionality. Also, it informs on the component's
current status, and specifies which of the component's services is not configured correctly.
Installed components' list
Within the AVG LinkScanner® the Components Overview section contains information on the following
components:
Web Browsing - Protects you from web-based attacks while you search and surf the Internet. Details
>>
Actions accessible
Move mouse over any component's icon to highlight it within the components overview. At the
same time, the component's basic functionality description appears in the bottom part of the user
interface.
Single-click component's icon to open the component's own interface with the information on the
component's current status, and access to its configuration and statistical data.
19
5.5. Update Quick Links
Update now quick link is located in the lower line of buttons in the AVG LinkScanner® user interface. Press
the button to launch the product update immediately. You can follow the update progress, and results, in the
automatically opened Reports window. (For details see chapter AVG Updates).
5.6. System Tray Icon
AVG System Tray Icon (on your Windows task bar, right-hand bottom corner of your monitor) indicates the
current status of your AVG LinkScanner®. It is visible at all times on your system tray, no matter whether
the user interface of your AVG LinkScanner® is opened or closed.
AVG System Tray Icon display
In full color with no added elements the icon indicates that all AVG LinkScanner® components
are active and fully functional. However, the icon can also be displayed this way in a situation when
one of the components is not fully functional but the user has decided to ignore the component state.
(Having confirmed the ignore the component state option you express you are aware of the
component's error state but for some reason you wish to k eep it so, and you do not want to be
warned about the situation.)
The icon with an exclamation mark indicates that a component (or even more components) are in
error state. Always pay attention to such a warning and try to remove the configuration issue of a
component that is not set up properly. In order to be able to perform the changes in component's
configuration, double-click the system tray icon to open the application user interface. For detailed
information on which components is in error state please consult the security status info section.
Actions accessible from AVG System Tray Icon
AVG System Tray Icon can also be used as a quick link to access the user interface of AVG LinkScanner®
, just double-click on the icon. By right-click on the icon you open a brief context menu with the following
options:
Open AVG LinkScanner® - Click to open the user interface of AVG LinkScanner®.
Temporarily disable AVG protection - The option allows you to switch off the entire protection
secured by your AVG LinkScanner® at once. Please remember that you should not use this option
unless it is absolutely necessary! In most cases, it is not necessary to disable AVG LinkScanner®
before installing new software or drivers, not even if the installer or software wizard suggests that
running programs and applications be shut down first to make sure there are no unwanted
interruptions during the installation process. If you do have to temporarily disable AVG
20
LinkScanner®, you should re-enable it as soon as you're done.
Update now - Launches an immediate update.
Help - Opens the help file on the start page.
21
6. Components
6.1. Web Browsing
In the AVG LinkScanner®, the Web browsing protection component offers just the LinkScanner SurfShield service. The Online Shield is not activated in this edition, and is only accessible in a full professional
version. Should you like to have access to further and extended functionality of AVG paid products; then
please visit AVG website (http://www.avg.com) for AVG purchase information.
LinkScanner Surf-Shield protects you from the increasing number of ‘here today, gone tomorrow’
threats on the web. These threats can be hidden on any type of website, from governments to big,
well-known brands to small businesses, and they rarely stick around on those sites for more than 24
hours. LinkScanner protects you by analyzing the web pages behind all the links on any web page
you’re viewing and making sure they’re safe at the only time that matters – when you’re about to click
that link. LinkScanner Surf-Shield is not intended for server platforms protection!
Online Shield (not activated within AVG Link Scanner®) is a type of a real time resident protection; it
scans the content of visited web pages (and possible files included in them) even before these are
displayed in your web browser or downloaded to your computer. Online Shield detects that the page
you are about to visit includes some dangerous javascript, and prevents the page from being
displayed. Also, it recognizes malware contained in a page and stops its downloading immediately so
that it never gets to your computer. This powerful protection will block malicious content of any web
page you try to open, and prevent it from being downloaded to your computer. With this feature
enabled, clicking a link or typing in a URL to a dangerous site will automatically block you from
opening the web page thus protecting you from inadvertently being infected. It is important to
remember that exploited web pages can infect your computer simply by visiting the affected site.
Online Shield is not intended for server platforms protection!
Dialog controls
To switch between both sections of the dialog, you can simply click anywhere in the respective service panel.
22
The panel then gets highlighted in a lighter shade of blue. In both sections of the dialog you can find the
following controls. Their functionality is the same whether they belong to one security service or another
(however, only Link Scanner Surf-Shield service is activated):
Enabled / Disabled - The button may remind you of a traffic light, both in appearance and in
functionality. Single click to switch between two positions. The green color stands for Enabled, which
means that the LinkScanner Surf-Shield / Online Shield security service is active and fully functional.
The red color represents the Disabled status, i.e. the service is deactivated. If you do not have a good
reason to deactivate the service, we strictly recommend that you keep the default settings for all
security configuration. The default settings guarantees the optimum performance of the application, and
your maximum security. If for some reason you wish to deactivate the service, you will be warned about
the possible risk immediately by the red Warning sign and the information that you are not fully
protected at the moment. Please mind, that you should activate the service again as soon as
possible!
Settings - Click the button to get redirected to advanced settings interface. Precisely, the
respective dialog opens and you will be able to configure the selected service, i.e. LinkScanner SurfShield. In the advanced settings interface you can edit all configuration of each security service within
AVG LinkScanner® but any configuration can be recommended to experienced users only!
Statistics - Click the button to get redirected to the dedicated page on the AVG website (http://
www.avg.com). On this page you can find a detailed statistical overview of all AVG LinkScanner®
activities performed on your computer within a specified period of time and in total.
Details - Click the button, and a brief description of the LinkScanner Surf-Shield service appears
in the bottom part of the dialog.
- Use the green arrow in the upper left section of the dialog to get back to the main user interface
with the components' overview.
Unfortunately, in AVG LinkScanner® the Online Shield service is not included. If you like to use this type of
protection, follow the Upgrade to Activate button to get redirected to the dedicated AVG website (http://www.
avg.com) for AVG purchase information.
23
7. AVG Security Toolbar
AVG Security Toolbar is a tool that closely cooperates with the LinkScanner Surf-Shield service, and guards
your maximum security while browsing the Internet. Within AVG LinkScanner®, the installation of AVG
Security Toolbar is optional; during the installation process you were invited to decide whether the
component should be installed. AVG Security Toolbar is available directly in your Internet browser. At the
moment, the supported Internet browsers are Internet Explorer (version 6.0 and higher), and/or Mozilla Firefox (
version 3.0 and higher). No other browsers are supported (in case you are using some alternative Internet
browser, e.g Avant Browser, you may encounter unexpected behavior).
AVG Security Toolbar consists of the following items:
AVG logo with the drop-down menu:
o Current Threat Level - opens the virus lab web page with a graphical display of the current
threat level on the web.
o AVG Threat Labs - opens the specific AVG Threat Lab website (at http://www.avgthreatlabs.
com) where you can find information on various websites security and the current threat level
online.
o Toolbar Help - opens the online help covering all AVG Security Toolbar functionality.
o Submit Product feedback - opens a web page with a form that you can fill in and tell us how
you feel about the AVG Security Toolbar.
o End User License Agreement - opens the AVG website at page providing the full wording of
the license agreement related to use of your AVG LinkScanner®.
o Privacy Policy - opens the AVG website at page where you can find the the full wording of
AVG Privacy Policy.
o Uninstall AVG Security Toolbar - opens a web page providing a detailed description of how to
deactivate the AVG Security Toolbar in each of the supported web browsers.
o About... - opens a new window with the information on the currently installed AVG Security
Toolbar version.
Search field - search the Internet using the AVG Security Toolbar to be absolutely secure and
comfortable since all displayed search results are hundred percent safe. Fill in the keyword or a
phrase into the search field, and press the Search button (or Enter).
Site Safety - this button opens a new dialog providing information on the current threat level (Currently
safe) of the page you are just visiting. This brief overview can be expanded, and displayed with full
details of all security activities related to the page right within the browser window (View complete
report):
24
Do Not Track - the DNT service helps you identify websites that are collecting data about your online
activities, and gives you the choice to allow or disallow it. Details >>
Delete - the 'trash bin' button offers a roll down the menu where you can select whether you want to
delete information on your browsing, downloads, online forms, or delete all of your search history at
once.
Weather - the button opens a new dialog providing information on the current weather in your location,
and the weather forecast for the next two days. This information is updated regularly, every 3-6 hours.
In the dialog, you can change the desired location manually, and to decide whether you want to see
the temperature info in Celsius or Fahrenheit.
Facebook - This buttons allows you connect to the Facebook social network directly from within the
25
AVG Security Toolbar.
Shortcut buttons for quick access to these applications: Calculator, Notepad, Windows Explorer.
26
8. AVG Do Not Track
AVG Do Not Track helps you identify websites that are collecting data about your online activities. The AVG
Do Not Track that is a part a AVG Security Toolbar shows the websites or advertisers collecting data about
your activity and gives you the choice to allow or disallow it.
AVG Do Not Track provides you with additional information about privacy policy of each respective
service as well as a direct link to Opt-out from the service, if that is available.
In addition, AVG Do Not Track supports the W3C DNT protocol to automatically notify sites that you
don’t want to be tracked. This notification is enabled by default, but can be changed at any time.
AVG Do Not Track is provided under these terms and conditions.
AVG Do Not Track is enabled by default, but can be easily disabled at any time. Instructions can be
found in the FAQ article Disabling the AVG Do Not Track feature.
For more information on AVG Do Not Track, please visit our website.
Currently, the AVG Do Not Track functionality is supported in Mozilla Firefox, Chrome, and Internet Explorer
browsers.
8.1. AVG Do Not Track interface
While online, AVG Do Not Track warns you as soon as any kind of data collection activity is detected. In
such a case, the AVG Do Not Track icon located at the AVG Security Toolbar changes its look; a small
number appears by the icon providing information on a number of detected data collection services:
the icon to see the following dialog:
Click
27
All detected data collection services are listed in the Trackers on this page overview. There are three types of
data collection activities recognized by AVG Do Not Track:
Web Analytics (allowed by default): Services used to improve the performance and experience of the
respective website. In this category you can find services as Google Analytics, Omniture, or Yahoo
Analytics. We recommend not to block web analytics services, as the website might not work as
intended.
Ad Networks (some block ed by default): Services that collect or share data about your online
activity on multiple sites, either directly or indirectly, to offer you personalized Ads unlike of contentbased Ads. This is determined based on the privacy policy of each Ad network as available on their
website. Some ad networks are blocked by default.
Social Buttons (allowed by default): Elements designed for improving the social-networking
experience. Social buttons are served from the social networks to the site you are visiting. They can
collect data about your online activity while you are logged-in. Examples of Social buttons include:
Facebook Social Plugins, Twitter Button, Google +1.
Note: Depending on what services are running in the back ground of the website, some of the three above
described sections might not appear in the AVG Do Not Track dialog.
Dialog controls
What is tracking? - Click this link in the upper section of the dialog to get redirected to the dedicated
webpage providing detailed explanation on the tracking principles, and description of specific tracking
types.
28
Block All - Click the button located in the bottom section of the dialog to to say you do not wish any
data collection activity at all (for details see chapter Block ing track ing processes).
Do Not Track settings - Click this button in the bottom section of the dialog to get redirected to the
dedicated webpage where you can set the specific configuration of various AVG Do Not Track
parameters (see the AVG Do Not Track settings chapter for detailed information)
8.2. Information on tracking processes
The list of detected data collection services provides just the name of the specific service. To make a
conversant decision about whether the respective service should be blocked or allowed, you may need to know
more. Move your mouse over the respective list item. An information bubble appears providing detailed data on
the service. You will learn whether the service collects personal data, or other data available; whether the data
are being shared with other third party subjects, and whether the collected data are being filed for possible
further use:
In the lower section of the information bubble you can see the Privacy Policy hyperlink that redirects you to
the website dedicated to privacy policy of the respective detected service.
8.3. Blocking tracking processes
With the lists of all Ad Networks / Social Buttons / Web Analytics you have now the option to control which
services should be blocked. You can go two ways:
Block All - Click this button located in the bottom section of the dialog to to say you do not wish any
data collection activity at all. (However, please k eep in mind that this action may break functionality
in the respective webpage where the service is running!)
29
- If you do not want to block all the detected services at once, you can specify whether the
service should be allowed or blocked individually. You may allow running of some of the detected
systems (e.g. Web Analytics): these systems use the collected data for their own website
optimization, and this way they help to improve the common Internet environment for all users.
However, at the same time you may block the data collection activities of all processes classified as
Ad Networks. Just click the
icon next to the respective service to block the data collection (the
process name will appear as crossed out), or to allow the data collection again.
8.4. AVG Do Not Track settings
The Do Not Track Options dialog offers the following configuration options:
Do Not Track is enabled - By default, the DNT service is active (switch ON). To disable the service,
move the switch to the OFF position.
In the central section of the dialog you can see a box with a list of known data collection services that
can be classified as Ad Networks. By default, Do Not Track blocks some of Ad Networks
automatically and it remains up to your decision whether the rest should be blocked as well, or left
allowed. To do so, just click the Block All button under the list. Or, you may use the Default button
to cancel all performed settings changes, and to return to the original configuration.
Notify web sites ... - In this section you can switch on/off the Notify web sites that I do not want to
be tracked option (on by default). Keep this option marked to confirm that you want Do Not Track to
inform the provider of a detected data collection service that you do not want to be tracked.
30
9. Advanced Settings
The advanced configuration dialog of AVG LinkScanner® opens in a new window named Advanced AVG
LinkScanner® Settings. The window is divided into two sections: the left part offers a tree-arranged
navigation to the program configuration options. Select the component you want to change the configuration of
(or its specific part) to open the editing dialog in the right-hand section of the window.
9.1. Appearance
The first item of the navigation tree, Appearance, refers to the general settings of the AVG LinkScanner®
main dialog and a few elementary options of the application's behavior:
Language selection
In the Language selection section you can chose your desired language from the drop-down menu; the
language will then be used for the entire user interface. The drop-down menu only offers those languages you
have previously selected to be installed during the installation process. However, to finish switching the
application to another language you have to restart the user interface; follow these steps:
Select the desired language of the application and confirm your selection by pressing the Apply
button.
Press the OK button confirm.
New dialog window pops-up informing you the language change of user interface requires the
application restart.
31
System tray notifications
Within this section you can allow/suppress display of system tray notifications on the status of the
application. The system tray notifications typically inform on some AVG LinkScanner® component's status
change, and you should pay attention to them!
However, if for some reason you decide you do not wish these notifications to be displayed, or you would like
only certain notifications (related to a specific AVG LinkScanner® component) to be displayed, you can
define and specify your preferences by checking/unchecking the following options:
Display system tray notifications - by default, this item is checked, and notifications are displayed.
Uncheck this item to completely turn off the display of all balloon notifications. When turned on, you
can further select what specific notifications should be displayed:
o Update notifications - decide whether information regarding AVG LinkScanner® update
process launch, progress, and finalization should be displayed;
o Component change notifications - decide whether information regarding component's
activity/inactivity or its possible problem should be displayed. When reporting a component's
fault status, this option equals to the informative function of the system tray icon (color
changing) reporting a problem in any AVG LinkScanner® component.
Gaming mode
This AVG function is designed for full-screen applications where possible AVG information ballons (displayed
e.g. when a scheduled scan is started) would be disturbing (they could minimize the application or corrupt its
graphics). To avoid this situation, keep the checkbox for the Enable gaming mode when a full-screen
application is executed option marked (default setting).
32
9.2. Temporarily disable AVG LinkScanner® protection
In the Temporarily disable AVG LinkScanner® protection dialog you have the option of switching off the
entire protection secured by your AVG LinkScanner® at once.
Please remember that you should not use this option unless it is absolutely necessary!
In most cases, it is not necessary to disable AVG LinkScanner® before installing new software or drivers,
not even if the installer or software wizard suggests that running programs and applications be shut down first
to make sure there are no unwanted interruptions during the installation process. If you do have to temporarily
disable AVG LinkScanner®, you should re-enable it as soon as you're done. If you are connected to the
Internet or a network during the time your antivirus software is disabled, your computer is vulnerable to
attacks.
33
9.3. Web Browsing protection
The AVG LinkScanner® settings dialog allows you to switch on/off the two elementary features of the AVG
LinkScanner®:
Enable Surf-Shield - (on by default): prevents you from accidentally becoming infected by drive-by
downloads and other exploits, ensuring the web pages you visit are safe at the only time that really
matters - when you are about to click the link. The browsers supported are again Internet Explorer
and Firefox.
Add 'Secured by AVG LinkScanner' ... - (off by default): to all messages that include active
hyperlinks and were sent from the Facebook/MySpace social networks, you can add the information
that the respective links were checked by AVG LinkScanner® component, and are safe. If you want
to do so, tick this item.
34
9.4. Update
The Update navigation item opens a new dialog where you can specify general parameters regarding the
update of AVG LinkScanner®:
When to update program files
If the update process requires your PC restart, you can specify the circumstances under which a possible
required restart should be performed:
Require user confirmation - You will be asked to approve a PC restart needed to finalize the update
process.
Restart immediately - The computer will be restarted automatically immediately after the update
process has finished, and your approval will not be required.
Complete update at next computer restart - The update process finalization will be postponed until
the next computer restart - again, please keep in mind that this option is only recommended if you
can be sure the computer gets restarted regularly, at least daily.
Additional update options
Build new system restore point during each program update - before each AVG program update
launch, a system restore point is created. In case the update process fails and your operating
system crashes you can always restore your OS in its original configuration from this point. This
option is accessible via Start / All Programs / Accessories / System tools / System Restore, but
35
any changes can be recommended to experienced users only! Keep this check-box ticked if you
want to make use of this functionality.
Use DNS update - mark this checkbox to confirm you want to use the update files detection method
that eliminates data amount transferred between the update server and AVG client;
Require confirmation before closing running applications (switched on by default) will help you
make sure no currently running applications will be closed without your permission - if required for the
update process to be finalized.
Check computer time - check this box to enable displaying notification of the time set on your
computer being incorrect. The notification will be displayed if the time differs from the correct time in
more hours than set in the box below (the default value is 24 hours).
9.4.1. Proxy
The proxy server is a stand-alone server or a service running on a PC that guarantees safer connection to the
Internet. According to the specified network rules you can then access the Internet either directly or via the
proxy server; both possibilities can also be allowed at the same time. Then, in the first item of the Update
settings - Proxy dialog you have to select from the combo box menu whether you want to:
Don´t use proxy - default settings
Use proxy
Try connection using proxy and if it fails, connect directly
If you select any option using proxy server, you will have to specify some further data. The server settings can
be configured either manually or automatically.
36
Manual configuration
If you select manual configuration (check the Manual option to activate the respective dialog section) you
have to specify the following items:
Server – specify the server’s IP address or the name of the server
Port – specify the number of the port that enables Internet access (by default, this number is set to
3128 but can be set differently – if you are not sure, contact your network administrator)
The proxy server can also have configured specific rules for each user. If your proxy server is set up this way,
check the Use PROXY authentication option to verify that your user name and password are valid for
connecting to the Internet via the proxy server.
Automatic configuration
If you select automatic configuration (mark the Auto option to activate the respective dialog section) then
please select where the proxy configuration should be taken from:
From browser - the configuration will be read from your default Internet browser (supported browsers
being Internet Explorer, Firefox, Mozilla, and Opera)
From script - the configuration will be read from a downloaded script with the function returning the
proxy address
Autodetect - the configuration will be detected automatically directly from the proxy server
37
9.4.2. URL
The URL dialog offers a list of Internet addresses from which the update files can be downloaded.
9.5. Privacy Preferences
The Privacy Preferences dialog invites you to participate in AVG product improvement, and to help us
increase the overall Internet security level. If you agree to enable reporting of detected threats to AVG, you
help us to collect up-to-date information on the latest threats from all participants worldwide, and in return we
can improve protection for everyone. The reporting is taken care of automatically, therefore does not cause you
any inconvenience, and no personal data is included in the reports. Reporting of detected threats is optional,
however, we do ask you to keep this feature on, too, as it helps us improve protection for both you and other
AVG users.
38
Within the dialog, the following setting options are available:
I'd like to help AVG LinkScanner® improve their products by participating in the AVG
LinkScanner® Product Improvement Program (on by default) - If you want to help us further
improve AVG LinkScanner®, keep the checkbox marked. This will enable all encountered threats to
be reported to AVG, so we will be able to collect up-to-date information on malware from all
participants worldwide, and in return improve protection for everyone. The report is made
automatically, and therefore does not cause you any inconvenience, and no personal data is included
in the reports.
o Allow to send anonymous data about identified or suspicious threats (on by default)
send information about any suspicious or positively dangerous code or behaviour pattern (can
be a virus, spyware, or malicious webpage your are trying to access) detected on your
computer.
o Allow to send anonymous data about product usage (on by default) – send basic statistics
about the application usage, such as number of detections, scans launched, successful or
unsuccessful updates etc.
Allow in the cloud verification of detections (on by default) – detected threats will be checked if
really infected, to sort out false positives.
I'd like AVG to personalize my experience by turning on AVG Personalization - this feature
anonymously analyzes behavior of programs and applications installed on your PC. Based on this
analysis AVG can offer you services targeted directly to your needs, to secure your maximum safety.
39
Most common threats
Nowadays, there are far more threats out there than plain viruses. Authors of malicious codes and dangerous
websites are very innovative, and new kinds of threats emerge quite often, the vast majority of which are on the
Internet. Here are some of the most common:
Virus is a malicious code that copies and spreads itself, often unnoticed until the damage is done.
Some viruses are a serious threat, deleting or deliberately changing files on their way, while some
viruses can do something seemingly harmless, like playing a piece of music. However, all viruses are
dangerous due to the basic ability of multiplying – even a simple virus can take up all the computer
memory in an instant, and cause a breakdown.
Worm is a subcategory of virus which, unlike a normal virus, does not need a "carrier" object to
attach to; it sends itself to other computers self-contained, usually via email, and as a result often
overloads email servers and network systems.
Spyware is usually defined as a malware category (malware = any malicious software, including
viruses) encompassing programs – typically Trojan horses – aimed at stealing personal information,
passwords, credit card numbers, or infiltrating a computer and allowing the attacker to control it
remotely; of course, all without the computer owner's knowledge or consent.
Potentially unwanted programs are a type of spyware that can but not necessarily be dangerous to
your computer. A specific example of a PUP is adware, software designed to distribute
advertisements, usually by displaying ad pop-ups; annoying, but not really harmful.
Tracking cookies can also be considered a kind of spyware, as these small files, stored in the web
browser and sent automatically to the "parent" website when you visit it again, can contain data such
as your browsing history and other similar information.
Exploit is a malicious code that takes advantage of a flaw or vulnerability in an operating system,
Internet browser, or other essential program.
Phishing is an attempt to acquire sensitive personal data by shamming a trustworthy and well-known
organization. Usually, the potential victims are contacted by a bulk email asking them to e.g. update
their bank account details. In order to do that, they are invited to follow the link provided which then
leads to a fake website of the bank.
Hoax is a bulk email containing dangerous, alarming or just bothering and useless information. Many
of the above threats use hoax email messages to spread.
Malicious websites are ones that deliberately install malicious software on your computer, and
hacked sites do just the same, only these are legitimate websites that have been compromised into
infecting visitors.
Unfortunately, using AVG LinkScanner® your protection is only limited. For complete professional
protection you may want to consider buying the full version of AVG, then please visit the AVG website
(http://www.avg.com) for information on AVG paid products purchase options.
40
9.6. Ignore error status
In the Ignore error status dialog you can tick those components that you do not want to get informed about:
By default, no component is selected in this list. It means that if any component get to an error status, you
will be informed about it immediately via:
system tray icon - while all parts of AVG LinkScanner® are working properly, the icon is displayed
in four AVG colors; however, if an error occurs, the icon appears with a warning yellow triangle with a
red exclamation mark
text description of the existing problem in the Security Status Info section of the AVG LinkScanner®
main window
There might be a situation that for some reason you need to switch a component off temporarily. This is not
recommended, you should try to keep all components permanently on and in default configuration,
but it may happen. In this case the system tray icon automatically reports the component's error status.
However, in this very case we cannot talk about an actual error since you have deliberately induced it yourself,
and you are aware of the potential risk. At the same time, once being displayed in grey color, the icon cannot
actually report any possible further error that might appear.
41
10. Updates
No security software can guarantee true protection from various types of threats unless it is regularly updated!
Virus writers are always looking for new flaws that they can exploit in both software and operating systems.
New viruses, new malware, new hacking attacks appear daily. For this reason, software vendors are
continually issuing updates and security patches, to fix any security holes that are discovered.
Considering all the newly-emerged computer threats, and the speed they spread, it is absolutely crucial
to update your AVG LinkScanner® regularly. Best solution is to stick to the program default settings
where the automatic update is configured.
Update Process
The update process can be launched immediately as the need arises by the Update now quick link. This link
is available from the AVG LinkScanner® main dialog.
Once you start the update, AVG LinkScanner® will first verify whether there are new update files available. If
so, AVG LinkScanner® starts their downloading and launches the update process itself. During the update
process you will get redirected to the Update interface where you can view the process progressing in its
graphical representation as well as in an overview of relevant statistic parameters (update file size, received
data, download speed, elapsed time, ...).
42
11. FAQ and Technical Support
Should you have any sales or technical trouble with your AVG LinkScanner® application, there are several
ways to look for help. Please chose from the following options:
Troubleshooting in help file: The help file included in AVG LinkScanner® provides a list of most
frequently occurring situations when a user desires to look up professional help to a technical issue.
Please select the situation that best describes your problem, and click it to open detailed instructions
leading to the problem solution.
AVG website Support Center: Alternatively, you can look up the solution to your problem on AVG
website (http://www.avg.com). In the Support Center section you can find a structured overview of
thematic groups dealing with both sales and technical issues.
Frequently asked questions: On the AVG website (http://www.avg.com) you can also find a separate
and elaborately structured section of frequently asked questions. This section is accessible via
Support Center / FAQ menu option. Again, all questions are divided in a well organized way into
sales, technical, and virus categories.
About viruses & threats: A specific chapter of the AVG website (http://www.avg.com) is dedicated to
virus issues. In the menu, select Support Center / About viruses & threats to enter a page providing
structured overview of information related to online threats. You can also find instructions on removing
viruses, spyware, and advice on how to stay protected.
Discussion forum: You can also use the AVG Free users discussion forum at http://forums.avg.com.
Unfortunately, using AVG LinkScanner® you are not entitled to technical support provided to full
versions of AVG products. You may want to consider buying the full version of AVG, then please visit
the AVG website (http://www.avg.com) for information on AVG paid products purchase options.
43