1
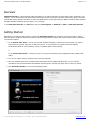
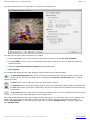
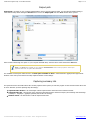
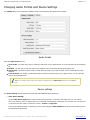
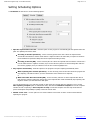
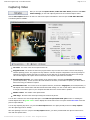
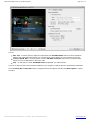
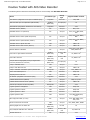
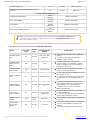
AVS4YOU Help - AVS Video Recorder AVS4YOU Programs Help AVS Video Recorder www.avs4you.com © Online Media Technologies, Ltd., UK. 2004 - 2010 All rights reserved AVS4YOU Programs Help Page 2 of 15 Contact Us If you have any comments, suggestions or questions regarding AVS4YOU programs or if you have a new feature that you feel can be added to improve our product, please feel free to contact us. When you register your product, you may be entitled to technical support. General information: [email protected] Technical support: [email protected] Sales: [email protected] Help and other documentation: [email protected] Technical Support AVS4YOU programs do not require any professional knowledge. If you experience any problem or have a question, please refer to the AVS4YOU Programs Help. If you cannot find the solution, please contact our support staff. Note: only registered users receive technical support. AVS4YOU staff provides several forms of automated customer support: AVS4YOU Support System You can use the Support Form on our site to ask your questions. E-mail Support You can also submit your technical questions and problems via e-mail to [email protected]. Note: for more effective and quick resolving of the difficulties we will need the following information: Name and e-mail address used for registration System parameters (CPU, hard drive space available, etc.) Operating System The information about the capture, video or audio devices, disc drives connected to your computer (manufacturer and model) Detailed step by step describing of your action Please do NOT attach any other files to your e-mail message unless specifically requested by AVS4YOU.com support staff. © Online Media Technologies Ltd., UK 2004 - 2010 All rights reserved. www.avs4you.com AVS4YOU Programs Help Page 3 of 15 Resources Documentation for your AVS4YOU software is available in a variety of formats: In-product (.chm-file) and Online Help To reduce the size of the downloaded software installation files the in-product help was excluded from the installation although you can always download it from our web-site for your convenience. Please, visit AVS4YOU web-site at http://onlinehelp.avs4you.com/index.aspx to download the latest available version of the help executable, run it and install into the AVS4YOU programs folder. After that you will be able to use it through the Help menu of the installed AVS4YOU software. Online Help include all the content from the In-product help file and updates and links to additional instructional content available on the web. You can find the Online Help at our web-site - http://onlinehelp.avs4you.com/index.aspx. Please note, that the most complete and up-to-date version of AVS4YOU programs help is always on the web. PDF Documentation The offline help is also available as a pdf-file that is optimized for printing. All PDF help files are available for download at the programs pages at AVS4YOU web-site (both http://www.avs4you.com/index.aspx and http://onlinehelp.avs4you.com/index.aspx). To be able to read and print AVS4YOU PDF help files you will need to have a PDF reading program installed. User Guides You have access to a wide variety of resources that help you make the most of your AVS4YOU software. The step-by-step user guides will be of help not only to the novice users but also to the users that face a certain task to be performed and look for a way to do it. Please, visit our User Guides section of AVS4YOU web-site at http://www.avs4you.com/Guides/index.aspx to read the detailed instructions for various software and tasks Technical Support Visit the AVS4YOU Support web-site at http://support.avs4you.com to ask your questions concerning AVS4YOU software installation, registration and use. Feel free to also use our e-mail address [email protected]. Downloads Visit the Downloads section - http://www.avs4you.com/downloads.aspx - of our web-site to find free updates, tryouts, and other useful software. We constantly update the software, new versions of the most popular programs and new software are also frequently released. © Online Media Technologies Ltd., UK 2004 - 2010 All rights reserved. www.avs4you.com AVS4YOU Programs Help - AVS Video Recorder Page 4 of 15 Overview AVS Video Recorder is a special separate utility that enables you to capture video from any video capture device connected to your computer. You can transfer video from DV and VHS cameras and recorders to hard drive and create movie DVDs, capture video from external video capture devices connected to TV tuners and WEB cameras, encode video directly to MPEG-2 instead of native hardware uncompressed video format and save free space on your computer. To start AVS Video Recorder go to Start menu and choose All Programs -> AVS4YOU -> Video -> AVS Video Recorder. Getting Started Although there are different capture devices, supported by AVS Video Recorder, the succession of actions necessary to capture video from them is always the same and is quite easy. Follow these guidelines to capture video from the capture device connected to your personal computer: 1. For an internal video device - turn off your personal computer and unplug it. Remove the case and insert your capture video device into a proper empty slot (usually it is a PCI slot, so you should see your capture device and computer motherboard manual for more instructions on how to install the capture device properly). or For an external video device - connect your device to your personal computer using an appropriate cable (usually a USB cable). 2. Turn on your capture device (if needed) and your personal computer. 3. After the operating system boots, install the device drivers from the disc supplied with the device or go to the device manufacturer web site and download and install the necessary drivers. After that you might need to restart your system. 4. Start AVS Video Recorder. You will see the following window: © Online Media Technologies Ltd., UK 2004 - 2010 All rights reserved. www.avs4you.com AVS4YOU Programs Help - AVS Video Recorder Page 5 of 15 if you have several capture devices connected to your computer or the following one: if you have only one capture device connected to your computer. 5. Select a video capture device (in case you have several) clicking it in the device list and set up its parameters. 6. Set the scheduler in case you plan to stop capturing automatically at a certain time or when the captured video file size exceeds some value. 7. Change the audio format and device settings using the provided options. 8. Start capturing. You can additionally manage the video while capturing it using the buttons below the preview window: The Show capturing history button is used to see the list of captured files and select the operation to proceed (edit, convert, trim etc). As soon as you click this button, it will turn into the Return to preview mode button to continue capturing your video. The Mute button is used to switch the sound of the captured video on and off. The Snapshot button is used to take snapshots from the video that is currently being captured. After you press this button the Save window will be opened and you will be able to save the current frame from the captured video into an image file in .bmp format. The Full Screen button is used to switch the program into full screen mode. You can also double-click the preview window to go into full screen. Double-click again to return to window mode. After you finish capturing the list of the captured video files will be displayed for you to watch them, edit, convert or upload to some mobile device. You can also go to the location of the file and watch the captured video using some software video player, for instance, AVS Media Player, or record the video onto a disc using, for instance, AVS Disc Creator, or edit your resulting video using AVS Video Editor. © Online Media Technologies Ltd., UK 2004 - 2010 All rights reserved. www.avs4you.com AVS4YOU Programs Help - AVS Video Recorder Page 6 of 15 Setting Capture Parameters Once the necessary capture device is selected from the list of available ones (this is only possible if you have several capture devices connected to your computer) or in case you have a single capture device in your system, you will need to configure the main capture parameters for the device. Note: you need to install all the device drivers supplied by the capture device manufacturer before you can start capturing from it. The drivers might be supplied on a disc or downloaded from the device manufacturer web site. Please, install the device drivers before you start AVS Video Recorder. You will need to use the Capture tab to set the parameters: The following parameters are available: Select output video format Use this option to set the video format that will be used to code the output video file. You can select among: Recommended format - lets the program decide what format will be optimal for the output video. In most cases it will be best to leave this option. AVS Video Recorder will see if the capture device is capable of saving video in compressed format or not. In case a format with compression is supported by the capture device this format will be used to save the captured video. If the capture device supports uncompressed formats only, one of the supported compressed formats will be used instead by default. Native - shows the list of all the video formats supported by the capture device. This list differs depending on the capture device used and you can select one of the listed formats for your output video. MPEG-2 - lets the user select one of the program presets. Currently the program lets you save your video into MPEG-2 compressed video format. You can select one of the profiles that suits your purposes best. Whichever format you choose the selected format parameters will be shown in the lower part of the Select output video format section - you can see the Video format and Audio format details under the MPEG-2 option. © Online Media Technologies Ltd., UK 2004 - 2010 All rights reserved. www.avs4you.com AVS4YOU Programs Help - AVS Video Recorder Page 7 of 15 Output path Output path - the folder on your computer hard disk drive used to store the captured video. You can leave the default setting or select the necessary folder clicking the Browse button next to the Output path field. The Save window will be opened: Select a folder with enough free space on your computer hard disk drive, video file future name and click the OK button. Note: you must select a folder on your computer hard disk drive even in case you plan to record your captured video onto an optical disc afterwards. The available free disk space will be shown in the Disk space available on drive... field measured in gigabytes and approximate duration of the video (hours:minutes:seconds) captured with the current settings. Capturing summary info This option shows the information about the currently captured videos (when you start the program for the first time all the values will be zeros and after you start capturing they will change): Captured video duration - the total length of all the captured video measured in hours:minutes:seconds. Captured video size - the total size of the video files with captured video measured in bytes (the measuring units will change to kilobytes - megabytes - gigabytes gradually with the file size change). Number of files - the total number of all the captured video files. © Online Media Technologies Ltd., UK 2004 - 2010 All rights reserved. www.avs4you.com AVS4YOU Programs Help - AVS Video Recorder Page 8 of 15 Changing Audio Format and Device Settings The Settings tab is used to change the additional audio format properties and capture device settings: Audio format Select the Audio format and set: Audio Codec - the audio codec used to encode the audio track of your captured video. It can be selected from the drop-down list. Bit Rate - the rate used to code the audio in your captured video. Can be selected from the drop-down list. Sample Rate - the audio frequency used to encode the audio track of your captured video. Can be selected from the dropdown list. Audio Channels - the number of channels that will be present in the audio track of your captured video. You can select the value from the drop-down list. Note: the available audio codec and its settings will depend on the video format selected in the Capture tab. Device settings The Device settings section comprises the video and audio additional device parameters. 1. Video Device Settings Use the Video Device Input field to select the video input jack used to connect the video input source to your capture device. For instance, when you capture video from a VHS tape-recorder/player connected to your TV-tuner card, you will need to select here the input used to connect the recorder - S-Video or Composite. If the image is black-and-white or distorted, you can try and change the Video Standard used by the device selecting it from the appropriate drop-down list. © Online Media Technologies Ltd., UK 2004 - 2010 All rights reserved. www.avs4you.com AVS4YOU Programs Help - AVS Video Recorder Page 9 of 15 2. Audio Device Settings To correctly record audio from your capture device you will need to set it up correctly. This can be done in the Audio Device section of the main program window. First you should select an audio device from the list of ones installed on your personal computer. To do that click the Pull Down button of the Audio Device drop-down list and select one of the available audio devices in case have more than one input device installed on your computer. Note: select your capture device from the Audio Device drop-down list if it is available. After that select the audio input jack - Audio Device Input - active on the device. The following audio input jacks might be available depending on your input device configuration (the list might differ on your personal computer): Mono Mix - allows you to record the sound from a program player or a hardware tuner connected to your personal computer in mono mode; Stereo Mix - allows you to record the sound from a program player or a hardware tuner connected to your personal computer in stereo mode; SPDIF - allows you to record the sound from any external device connected to the digital input jack of your computer sound card; Aux - allows you to record the sound from any external device connected to the Aux (auxiliary) input of your computer sound card; CD Player - allows you to record the sound from a laser audio disc in you computer CD/DVD-ROM drive; Line In - allows you to record the sound from any external device connected to the Line In input of your computer sound card; Microphone - allows you to record the sound from a microphone connected to the Microphone input of your computer sound card; Phone Line - allows you to record the sound from an external device connected to the Phone Line input of your computer sound card; Usually you should select either Mono Mix or Stereo Mix options. If the audio output from your device is connected using a cable to the line in of your sound card, then select the Line In option. If you would like to overlay your voice onto the video from the capture device, you should choose the Microphone option. Note: in case you would like to overlay your voice over the video from the capture device we recommend that you use AVS Video Editor for that purpose as it gives your more possibilities in video editing. © Online Media Technologies Ltd., UK 2004 - 2010 All rights reserved. www.avs4you.com AVS4YOU Programs Help - AVS Video Recorder Page 10 of 15 Setting Scheduling Options The Scheduler tab lets the user set the following options: 1. Split the captured video into files - mark this option for the program to automatically split the captured video into parts. The splitting can be done either According to duration (hh:mm:ss) - set the necessary period of time here. When the captured video exceeds the entered time a new file will be started - might be useful if the video that you capture is somehow can be divided into equal time stamps and can be captured according to them; or According to file size (MB) - set the necessary file size. When the captured video exceeds the entered size a new file will be started - might be necessary if you use the FAT file system as it cannot manage files with size more than 4 gigabytes, thus you will have to set the size of 4000 megabytes here. 2. Stop capture automatically - mark this option for the program to stop the capturing automatically either When capturing time exceeds (hh:mm:ss) - set the necessary period of time after which the program will stop capturing. This will be useful if you know the duration of the material to be captured; or When total video files size exceeds (MB) - set the necessary total size of all the captured video files so that when the program reaches this entered size of the captured video it will automatically stop capturing. This might be useful if you have limited free disk space. You can also decide here if you want the program to shut down the computer after the capturing is over. Use the After capturing complete option to activate this mode, and select the Shutdown computer to turn the computer off after the end of capturing or Send computer to sleep to make the computer enter the sleep mode with low power consumption and possibility to quickly resume the current state. 3. Disable screen saver - use this option to turn off the windows screen saver so that it would not start while the capturing is in progress. © Online Media Technologies Ltd., UK 2004 - 2010 All rights reserved. www.avs4you.com AVS4YOU Programs Help - AVS Video Recorder Page 11 of 15 Capturing Video After you set up all the capture device, audio and video device parameters and audio format settings, you can start capturing video from the connected capture device. Click the Start Capture button to do that. You will see the capture information in the lower part of AVS Video Recorder. The following data is available: File name - the name of the current captured video file. Dropped frames - the number of frames the program had to drop from the source video so that it could keep up with the capturing process. The program can drop frames in case the computer configuration is not strong enough for capturing in real time and the CPU load is too heavy or the free disk size on computer hard disk drive is not enough. This can also happen if the capture device connected to the computer experiences some troubles. Recorded video duration - the current duration of the captured video, measured in hours:minutes:seconds (current file/total files). In case you know the total duration of the video you would like to capture, you will be able to find out how long you still have to capture. Recorded video size - the current size of the captured video file, measured in megabytes (current file/total files). It will depend on the selected video and audio format and format settings. You can use this data to make sure that there is enough free disk drive space on your computer hard disk drive in the current folder or partition. Number of files - the number of the captured files. CPU usage - the load on the central processing unit measured in percent. You can also control the free and occupied disk space in the Disk free space/Disk used space section or watching the colored diagram where the green color is used to display the current value for the free space and the blue color shows the place occupied with files. You can stop capturing any time if you press the Start Capture button once again (actually it will turn to Stop Capture once the capturing process is started). After the capturing is over or if you press the Stop Capture button, you will be presented with the options of what can be done with the captured video: © Online Media Technologies Ltd., UK 2004 - 2010 All rights reserved. www.avs4you.com AVS4YOU Programs Help - AVS Video Recorder Page 12 of 15 You can: Edit, Trim - use these options to import the captured files into AVS Video Editor and insert various transitions between clips, apply audio/video effects, cut out unnecessary scenes, add text or voice comments to them etc. Convert, Upload, Burn - use these options to launch AVS Video Converter and convert your captured video, transfer it to your moblile device or burn onto a disc. Play - use this option to launch AVS Media Player and playback your captured video. If you do not have any of the above programs installed on your computer you will be offered to download and install them. Use the Previous file and Next file buttons to navigate between the captured video files and Start Capture to capture more files. © Online Media Technologies Ltd., UK 2004 - 2010 All rights reserved. www.avs4you.com AVS4YOU Programs Help - AVS Video Recorder Page 13 of 15 Devices Tested with AVS Video Recorder The following devices have been tested and proved to work correctly with AVS Video Recorder: Device Connection Type Device Type 1 Supported Video Formats integrated Web Cam I420, BGR FireWire (IEEE 1394) AV input (DV) DV integrated Web Cam YUY2 AVerMedia AVerTV (M168-U) PCI AV input BGR, YUY2 AVerMedia AVerTV 307 (M151A-B) PCI AV input YUY2, UYVY, BGR, BGRA, I420 AVerMedia AVerTV DVB-S Hybrid+FM (A700-B) PCI AV input YUY2, UYVY, YV12, BGRA, BGR AVerMedia AVerTV Hybrid+FM PCI (A16D-C) PCI AV input YUY2, UYVY, YV12, BGRA, BGR AVerMedia AverTV Hybrid Ultra USB USB AV input MPEG-2 PS AVerMedia AVerTV MCE 116 Plus (M116-D) PCI AV input MPEG-2 PS Beholder Behold TV M6 Extra PCI AV input YUY2, UYVY, YV12, BGRA, BGR, MPEG-2 PS Canon XH A1 High Definition Camcorder FireWire (IEEE 1394) DV Cam, HDV Cam DV, MPEG-2 TS2 Canon HDV HV20 PAL FireWire (IEEE 1394) DV Cam, HDV Cam DV, MPEG-2 TS2 Canopus ADVC-55 High-Quality Analog-to-Digital Video Converter (Advanced DV Converter) FireWire (IEEE 1394) AV input (DV) DV Compro VideoMate U2700 USB AV input UYVY Compro Video Mate Live PAL USB AV input MPEG-2 PS PCI-Express AV input YUY2, MPEG-2 PS Genius VideoCAM Express V2 USB Web Cam BGR, I420 Hauppauge WinTV-PVR-350 PCI AV input MPEG-2 PS integrated Web Cam YUY2 Leadtek WinFast DV2000 (LR6620) PCI AV input BGR, YUY2, I420 Leadtek WinFast PVR3000 Deluxe (LR6635) PCI AV input MPEG-2 PS LifeView FlyTV Express X1 MST-A2 (LR820) PCI-Express AV input YUY2 Logitech QuickCam Orbit/Sphere USB Web Cam BGR, I420 Logitech QuickCam Pro9000 USB Web Cam BGR, I420 Logitech QuickCam S 5500 USB Web Cam BGR, I420 Logitech QuickCam Web USB Web Cam YUY2, BGR, BGRA, I420, UYVY MSI TV@nywhere-Plus (TV-7131) PCI AV input UYVY, BGR, BGRA, YV12, I420, YUY2 Plextor ConvertX PVR PX-TV402U USB AV input DivX, MPG2, MPG1, MJPEG Samsung Digital Cam VP-D361i PAL FireWire (IEEE 1394) DV Cam DV Sony Handycam HDR-HC3 HDV 1080i PAL FireWire (IEEE 1394) DV Cam, HDV Cam DV, MPG2 TS3 PCI AV input YUY2 Acer OrbiCam (integrated in Acer Aspire 5102WLMi laptop) ADS Tech PYRO A/V Link w/Elements (API-557-EFS) ASUS webcam (integrated in ASUS Eee PC 900 netbook) Compro VideoMate Vista E800F Hybrid D/A HW2 PCIe HP Webcam (integrated in HP Pavilion laptop) Twinhan ATSC D+A © Online Media Technologies Ltd., UK 2004 - 2010 All rights reserved. www.avs4you.com AVS4YOU Programs Help - AVS Video Recorder Page 14 of 15 V-Stream (KW88X_LP) PCI AV input BGR, YUY2, I420 YUAN SmartVDO EZDVD MPG600 MPEG II Encoder (CX23416) PCI AV input MPEG-2 PS Devices added by AVS4YOU users JVC Digital VHS HMDH3000U FireWire (IEEE1394) added by Paul Noftell Sony TV KD34XBR960 FireWire (IEEE1394) added by Paul Noftell JVC GR-D370U FireWire (IEEE1394) added by Jesse Mulanax USB (AV input / YUY2, MPEG-2) added by Grant Smith V-Gear MyVideo AMVG1-002-024-G Note: if you tried your capture device and it successfully worked with AVS Video Recorder though you cannot find it in the above list, please feel free to email us at [email protected] and your device will be added to the list. Tested devices that have troubles working with AVS Video Recorder: Device AVerMedia AVerTV 505 Connection Type PCI Device Type 1 AV input Supported Video Formats Trouble status YUY2, UYVY, BGR, BGRA, I420 - the audio might playback in short fragments, jittering; - the video preview might be absent when 'Composite' input is selected. AVerMedia AverTV Hybrid Volar HX (A827) USB AV input YUY2 - a very big delay with preview/record; - after the change of the standard or program restart the playback stops as no video can be received from the device. AVerMedia AVerTV USB 2.0 M026 USB AV input YUY2, I420, BGR - the device might have problems with sound output due to the device drivers. MPEG-2 PS, UYVY - in case Input1 (S-Video) is selected, the UYVY format might not work; - in case Input2 (Composite) or Input3 (S-Video) is selected, the UYVY format always does not work. Compro VideoMate H900 Leadtek WinFast PVR2000 (LR6630) PCI PCI AV input - preview and record functions do not work when capturing in BGR and YUY2 formats with certain settings (errors -105 and 65747); - the device seems to work correctly with MPEG-2 PS format only. AV input BGR, YUY2, MPEG-2 PS - sometimes the device shows the YUY2 format as black and white only; - in case you switch the device on and off many times no video and audio is received. LifeView FlyTV Prime 34 (LR138) PCI AV input YUY2, UYVY, BGR, BGRA, I420 Microsoft LifeCam VX-6000 USB Web Cam BGR, I420 - after the device restart audio and video can fall out of sync. YUY2, I420 - some video standards cannot be remembered; - for some video standards no image can be displayed; - some video standards have video distortions. Pinnacle Dazzle DVC 100 DVD Recorder USB AV input © Online Media Technologies Ltd., UK 2004 - 2010 All rights reserved. www.avs4you.com AVS4YOU Programs Help - AVS Video Recorder Page 15 of 15 Pinnacle Dazzle DVC 130 Video Creator USB AV input MPEG-2, DIVX5, MPEG-1, MJPEG, DIVX, MPEG-2 PS Pinnacle GmbH Bendino PCI AV input YUY2, BGR Pinnacle PCTV MediaCenter 300i Plextor ConvertX PX-AV200U PCI USB AV input AV input - in case the preview is switched on and off quickly many times no video is seen; - for all DIVX and MPEG formats the video is captured with scalloping distortion due to interlacing; - when capturing in DIVX format the video is recorded with green squares; - the audio is captured with the crackling sound for all the formats except MPEG-2 PS; - the program can unexpectedly close when getting the device property page. - when converting into BGR format the image has a tint of green. YUY2, UYVY, BGRA, BGR - no audio can be captured from the device due to the device drivers and the device card structure; - the device works incorrectly with Gigabyte GAK8 motherboard with AMD Athlon 64 installed. YUY2 - the YUY2 format with 720x576, 352x576 and 480x576 resolutions is recorded with distortions due to the fact that the device sends the wrong data on the resolution value. The capture devices that failed to work with AVS Video Recorder: Connection Type Device Type 1 Supported Video Formats AVerMedia AverTV Hybrid+FM Volar (A828) USB AV input YUY2 - no video can be received from the device. LifeView (LR148) USB AV input BGR, UYVY, YUY2 - no video can be received from the device. LifeView (LR518) USB AV input UYVY - no video can be received from the device. Device Trouble status 1 - Device Type means that AVS Video Recorder can manage this device type capability with this device. For instance, if you use a TV-tuner, only the capturing from an external device (VHS-recorder/player, for example) connected to the AV-input of the TV-tuner card will be available not tuning of the TV-programs. 2,3 - currently the program does not always work correctly with the device © Online Media Technologies Ltd., UK 2004 - 2010 All rights reserved. www.avs4you.com