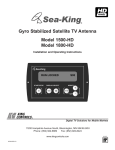
1
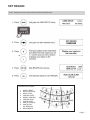
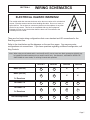
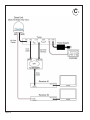
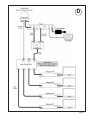
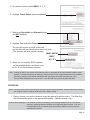
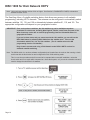
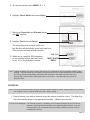
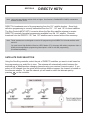
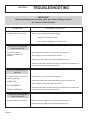
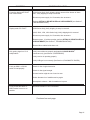
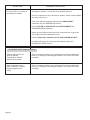
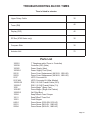
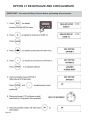
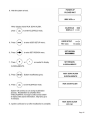
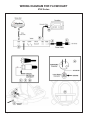
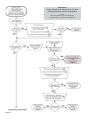
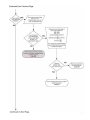
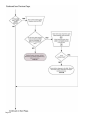
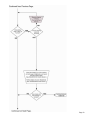
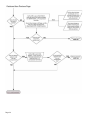
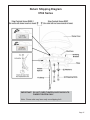
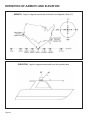
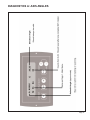
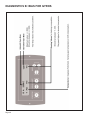
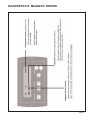
®
Troubleshooting Guide
Marine Series
®
Satellite Solutions for Mobile Markets
11200 Hampshire Avenue South, Bloomington, MN 55438-2453
Phone: (800) 982-9920
Fax: (952) 922-8424
www.kingcontrols.com
1305-SK REV H: MARINE SERIES TROUBLESHOOTING GUIDE
Member
IMPORTANT!
Before performing any warranty work,
you must call King Controls for a Service Order Number.
ELECTRICAL HAZARD WARNING!
The coaxial cable that connects the dome unit to the tuner carries a 24 volt electrical
current. Exercise extreme caution when handling this cable. Do not cut, break, or
splice this line. Do not insert or connect any devices such as splitters or any other
device for any reason. This line is not compatible with any other equipment.
Damage will occur to any device other than the dome unit if connected to the
antenna port on the tuner.
TABLE OF CONTENTS
Section
Contents
Page
1.
INTRODUCTION . . . . . . . . . . . . . . . . . . . . . . . . . . . . . . . . . . . . . . .2
2.
WARRANTY INFORMATION . . . . . . . . . . . . . . . . . . . . . . . . . . . . . .3
3.
OPERATION . . . . . . . . . . . . . . . . . . . . . . . . . . . . . . . . . . . . . . . . .4-6
4.
WIRING SCHEMATICS . . . . . . . . . . . . . . . . . . . . . . . . . . . . . . . .7-11
5.
AUTOMATIC SATELLITE SWITCHING . . . . . . . . . . . . . . . . . .12-17
6.
DIRECTV HDTV . . . . . . . . . . . . . . . . . . . . . . . . . . . . . . . . . . . .18-19
7.
TROUBLESHOOTING . . . . . . . . . . . . . . . . . . . . . . . . . . . . . . .20-35
8.
REFERENCE . . . . . . . . . . . . . . . . . . . . . . . . . . . . . . . . . . . . . .36-43
9.
DIAGNOSTIC PAGES . . . . . . . . . . . . . . . . . . . . . . . . . . . . . . . .44-51
10.
WARRANTY CONSIDERATION FORM . . . . . . . . . . . . . . . . . . . . .56
DIRECTV® is a registered trademark of DIRECTV, Inc.
Dish NetworkTM is an official trademark of Echostar Communications Corporation.
Bell ExpressVu is an official trademark of Bell Canada.
DVB® is a trademark of the DVB Digital Video Broadcast Project (1991-1996)
Page 1
SECTION 1
INTRODUCTION
®
The King Controls Service Department is dedicated
to providing its dealers and customers
with the highest possible level of satisfaction and service.
The satellite TV market is expanding and changing. The King Controls Service Department stays
up to date with the latest information to assist you in keeping troubleshooting and repair time to a
minimum.
When calling our service department, a Sea-King technician will issue a Customer ID Number
(or Case Number) and then clearly define the proper course of action to follow. If any work is to
be performed or parts replaced, a Service Order Number will also be issued. Additionally, the
Sea-King technician will create a call log to aid in properly documenting the warranty claim.
IMPORTANT!
For warranty reimbursement, you must call King Controls for a Service Order Number
BEFORE performing any work: (800) 982-9920.
(Please have serial number and model of unit available when calling.)
Page 2
SECTION 2
WARRANTY INFORMATION
Every King Controls Satellite System is covered by a TWO YEAR PARTS AND ONE YEAR LABOR limited
warranty from the date of original purchase. (Upgrade kits are one year parts only.)
This warranty does not cover installation and external wiring, or refurbished units. This warranty also does not apply
where:
• The product has been abused, misused, improperly installed or improperly maintained.
• Repairs have been made or attempted by others that are not certified by King Controls to do such repairs.
• Repairs are required because of normal wear and tear.
• Alterations have been made to the product.
PROCESSING A WARRANTY CLAIM
Note: Only King Controls certified dealers are authorized to perform warranty evaluations and repairs.
1) Technician must first determine if the unit is under warranty by verifying original owner and date of original
purchase. Dealer must provide one of the following when submitting a warranty claim:
• copy of original purchase receipt, or
• if unit was installed by an OEM, verification of in-service date
2) Technician must call King Controls to get a Service Order Number: (800) 982-9920 ext. 374
TECHNICIAN MUST NOT PROCEED WITHOUT A SERVICE ORDER NUMBER.
• A Sea-King technician will issue a Service Order Number and advise technician on how to proceed.
3) After repairs are completed, the following must be sent to King Controls:
•
•
•
•
Defective Part (Warranty Labor Claim will not be processed until part is returned.)
Warranty Consideration Form
Copy of Work Order
Proof of Purchase
KEY POINTS
1) For units in service longer than one year, the customer is responsible for labor time.
2) Installation parts (coax, power and data cables, etc.) are not covered.
3) Replacement parts (including domes) are sent directly from King Controls. DO NOT USE NEW PRODUCT
FOR WARRANTY REPLACEMENT WITHOUT WRITTEN AUTHORIZATION FROM KING CONTROLS.
4) Technician must call King Controls before performing any work for which warranty labor reimbursement will
be submitted to King Controls. A Sea-King technician will issue a Service Order Number and specify the
allotted time for the repair. If repairs will take longer than the allotted time, and the servicing dealer wishes
to receive proper reimbursement, the technician must receive prior authorization to exceed the allotted time.
5) Warranty claims must include: proof of purchase, Warranty Consideration Form with Service Order Number,
and copy of work order with labor time which matches that allotted by King Controls.
6) King Controls shall reimburse the servicing dealer for warranty work at their published labor rates.
7) Enclose paperwork with defective part. Clearly mark the Service Order Number on outside of box.
8) King Controls will pay 1/2 dealer labor rate for travel time up to 1 hour each way.
Page 3
SECTION 3
OPERATION
Note: This example is for the DTV 101 satellite in Region 2-North Central. The information on your controller will
vary depending on the satellite and region you have chosen.
BASIC OPERATION
Note: The Sea-King must remain powered on to
maintain a signal. If you are going to be
stationary and wish to continue watching TV,
DO NOT TURN THE SYSTEM OFF.
Instead, press START/STOP to put the unit
into Idle/Hold.
Page 4
SET REGION
Note: Setting the current region reduces satellite acquisition time.
REGION OPTIONS:
1
2
3
4
5
6
7
8
9
0
NORTH WEST
NORTH CENTRAL
NORTH EAST
CENTRAL WEST
MIDDLE CENTRAL
CENTRAL EAST
SOUTH WEST
SOUTH CENTRAL
SOUTH EAST
ALL REGIONS
RECALIBRATE
Page 5
SET SATELLITE SERVICE
SATELLITE LIBRARY
DISH 61
Dish Network at 61
EXPVU 91
Bell ExpressVu at 91
DISH 129
Dish Network at 129
DISH 148
Dish Network at 148
EXPVU 82
Bell ExpressVu at 82
DISH 110/119
Dish Network at 110 and 119
DISH 1000
Dish Network HDTV at 110, 119, and 129
DISH 1000a
Dish Network HDTV at 61, 110, and 119
DTV 101
DIRECTV at 101
Sat 110
Dish Network at 110
Sat 119
Dish Network at 119
DTV 101/110 hd
DIRECTV HDTV at 101 and 110
DTV 101/119
DIRECTV HDTV at 101 and 119
Note: Not all satellite options may be available with all units.
The King Controls HDTV Converter Box (#9747 or #9747-AM) is required to receive
HD programming from the DIRECTV satellite at 110° West.
Page 6
SECTION 4
WIRING SCHEMATICS
ELECTRICAL HAZARD WARNING!
The coaxial cable that connects the dome unit to the tuner carries a 24 volt electrical
current. Exercise extreme caution when handling this cable. Do not cut, break, or
splice this line. Do not insert or connect any devices such as splitters or any other
device for any reason. This line is not compatible with any other equipment.
Damage will occur to any device other than the dome unit if connected to the
antenna port on the tuner.
There are four basic wiring configurations that cover standard and HD connections for the
Sea-King product line.
Refer to the chart below and the diagrams on the next four pages. You may encounter
configurations not covered here. If you have questions regarding a different configuration, call
King Controls.
Note: When using a multi-switch and 3+ receivers (B and D), one or more tone block accessories (#1832) may
be installed to enable switching from a master receiver only. See Section 5, AUTOMATIC SATELLITE
SWITCHING for more details, or call King Controls with questions.
Basic (No HD)
Basic (No HD)
3+ Receivers
HD DIRECTV
HD DIRECTV
3+ Receivers
HD Dish/ExpressVu
9815-RJ
9818-RJ
1500-HD
1800-HD
A
A
X
X
B
B
X
X
C
C
C
C
D
D
D
D
A
A
A
A
Page 7
A
Page 8
B
Page 9
C
Page 10
D
Page 11
SECTION 5
AUTOMATIC SATELLITE SWITCHING
DIRECTV®
Note: Unit must have software revision 5.22c or higher. See Section 9, Diagnostic Pages, to determine software
revision of unit.
To receive programming from the DIRECTV 101 satellite only, your receiver must be set for
round dish-1 satellite (do this through the receiver’s satellite set-up menu screens).
To automatically switch between the 101 and 119 satellites for DIRECTV, choose the DTV
101/119 option (see SET SATELLITE SERVICE), and make sure your receiver is set for
oval dish-2 satellites (do this through the receiver’s satellite set-up menu screens).
For DIRECTV HD programming the Sea-King allows you to receive the specially formatted HD
signals from DIRECTV’s 110° satellite and automatically switch between satellites 101/110 and
101/119 when simply changing channels. With a properly installed HD converter accessory
#9747 or #9747-AM, the Sea-King will receive available HDTV programming from DIRECTV
Ku band satellites at 101°, 110° and 119°. It will not receive channels broadcast from
DIRECTV’s Ka band satellites at 99° and 103°. (See Section 6, HDTV.)
The automatic satellite switching feature can be active on 1 or more receivers depending on how
the system is installed. The two options for automatic satellite switching are as follows:
Automatic Switching from any receiver
To automatically switch satellites from any receiver location when the installation includes 2 or
more satellite receivers, the #1810 multi-switch must be installed in-line (see Section 4, WIRING
SCHEMATICS). This allows any of the receivers to provide the switching command to the
antenna when a channel from the alternate satellite is selected, provided that all other receivers
are tuned to a channel on an odd transponder on the 101 satellite such as channel 202. (At the
time of publication, channel 202 is broadcast on an odd transponder on satellite 101. This is
subject to change. If in doubt whether channel 202 is still on an odd transponder, contact
DIRECTV or call King Controls.)
Automatic switching for select receivers only
To selectively enable or disable automatic satellite switching when using multiple receivers, one
or more tone block accessories (#1832) may be required. Please contact King Controls for
configuration options.
Manual Switching
To disable automatic switching, manually select your desired satellite using the controller as
outlined in SET SATELLITE SERVICE.
Page 12
This page intentionally left blank.
Page 13
DISH 500 for DISH NETWORK
Note: Unit must have the following software: 9762 series: revision 5.23a or higher.
9815, 9818, 1500, 1800 series: revision 5.33a or higher.
See Section 9, DIAGNOSTIC PAGES, to determine software revision of unit.
The Sea-King will automatically switch between the 110 and 119 satellites for Dish Network by
using the receiver’s remote control, after the receiver has been properly configured.
IMPORTANT! In order for all receivers to work properly, each one must be configured separately while
connected to the MAIN port on the Sea-King.
King Controls recommends using a Dish Network model 311 receiver for automatic
satellite switching.
Note: The SW21 switch is a receiver software configuration that is loaded into the receiver after running a check
switch test with the dish locked on and configured for Dish 500 switching mode.
This is a one time procedure and will not need to be repeated after successful installation, unless the
check switch test is run again while connected to a home dish system.
Page 14
5. On receiver remote, press MENU 6 1 1.
6. Highlight Check Switch and press Select.
7. Make sure Superdish and Alternate boxes
are NOT checked.
8. Highlight Test and press Select.
The unit will perform a check switch test,
and the dish will periodically move back and forth.
(This process will take several minutes.)
MUST SHOW
“SW21”
NO “X”s
9. When test is complete, SW21 appears
as the installed device, and there must
be no “X”s in the indicated columns.
Screen graphics may vary.
Note: Loading the SW21 may require several attempts due to geographical area and available satellite signal
strength. If desired results are not obtained, verify there are no line of sight obstructions to the satellites.
(Do this by choosing each satellite individually and verifying the Sea-King locks onto each one.)
Choose DISH 500 again and re-run the test. If test fails call King Controls at (800) 982-9920.
OPERATION
Note: For better performance when using the automatic satellite switching feature, change channels by selecting
your program from the channel guide rather than channel surfing.
1. Simply choose your desired channel using the receiver’s remote control. The Sea-King
will automatically switch to the appropriate satellite. (Master receiver only.)
Note on Error Messages: It is common to receive a temporary error message displayed on the TV when the
antenna is switching between satellites or the signal has been blocked. If an error
message appears for an extended period, selecting CANCEL may help clear the
message more quickly.
Page 15
DISH 1000 for Dish Network HDTV
Note: Unit must have software revision 5.33c or higher. See Section 9, DIAGNOSTIC PAGES, to determine
software revision of unit.
The Sea-King offers a 3-satellite switching feature that allows easy access to all available
programming, including HDTV channels. The antenna can be configured to automatically switch
between satellites 110, 119, and 129 or alternatively between satellites 61, 110, and 119. The
appropriate configuration will depend on your geographic location.
IMPORTANT! Even under perfect conditions, the 129 satellite may not be available everywhere.
Customers in select areas, including New England, Florida, south Texas and parts of the
West Coast may not be able to view HD programming from the 129 satellite based on
geographical location.
If you are in these areas, and you cannot receive the 129 satellite, you can still use the
DISH 1000 feature by selecting DISH 1000a from the satellite menu. This runs the
checkswitch with the 61, 110, and 119 satellites. (The 61 satellite mirrors the HD
programming from the 129 satellite.)
King Controls recommends using a Dish Network model VIP211 HDTV receiver for
automatic satellite switching.
Note: The SW64 switch is a receiver software configuration that is loaded into the receiver after running a check
switch test with the dish locked on and configured for Dish 1000 switching mode.
This is a one time procedure and will not need to be repeated after successful installation, unless the
check switch test is run again while connected to a home dish system, or if you travel to another area and
need to change the selected trio of satellites.
Note: If using the 61° satellite, choose DISH 1000a.
Page 16
5. On receiver remote, press MENU 6 1 1
6. Highlight Check Switch and press Select.
7. Make sure Superdish and Alternate boxes
are NOT checked.
8. Highlight Test and press Select.
The unit will perform a check switch test,
and the dish will periodically move back and forth.
(This process will take several minutes.)
9. When test is complete, SW64 appears
as the installed device, and there must
be no “X”s in the indicated columns.
NO “X”s
MUST SHOW
“SW64”
Screen graphics may vary.
Note: Loading the SW64 may require several attempts due to geographical area and available satellite signal
strength. If desired results are not obtained, verify there are no line of sight obstructions to the satellites.
(Do this by choosing each satellite individually and verifying the Sea-King locks onto each one.)
Choose DISH 1000 (or DISH 1000a) again and re-run the test. If test fails call King Controls at
(800) 982-9920.
OPERATION
Note: For better performance when using the automatic satellite switching feature, change channels by selecting
your program from the channel guide rather than channel surfing.
1. Simply choose your desired channel using the receiver’s remote control. The Sea-King
will automatically switch to the appropriate satellite. (Master receiver only.)
Note on Error Messages: It is common to receive a temporary error message displayed on the TV when the
antenna is switching between satellites or the signal has been blocked. If an error
message appears for an extended period, selecting CANCEL may help clear the
message more quickly.
Page 17
SECTION 6
DIRECTV HDTV
Note: Unit must have software revision 5.22c or higher. See Section 9, DIAGNOSTIC PAGES, to determine
software revision of unit.
DIRECTV® broadcasts most of its programming from the 101° satellite location. Some high
definition programming is currently transmitted from the 101°, 110° and 119° Ku band satellites.
The King Controls #9747 HDTV converter allows the Sea-King satellite antenna to receive
DIRECTV’s specially formatted programming available from the 110° satellite. Channels
broadcast from the DIRECTV 101° and 119° satellites can be viewed without this accessory.
Note: These antennas are not designed to receive HD programming from DIRECTV’s Ka band satellites at 99°
and 103°.
You must have a High Definition Receiver, HDTV Monitor (TV), the proper HD cables (component video or
HDMI) and the appropriate programming subscription in order to view HD programming.
(Purchased separately.)
SATELLITE PAIR SELECTION
Using the Sea-King controller, select the pair of DIRECTV satellites you want to track based on
the programming you would like to view. The antenna will automatically switch between the
selected pair of satellites when changing channels using your receiver’s remote control. If you
select an HD channel from the guide and the picture does not appear, the channel is located on
the alternate satellite. To view this channel you will need to select the alternate pair by
pressing + on the controller.
Page 18
OPERATION
IMPORTANT! Select your current region first. Failure to select your current region may result in
extraordinary delays in channel acquisition. (See Section 3, OPERATION.)
Note: The Sea-King can only receive programming from one satellite at a time. If you change channels on your
main receiver, and the Sea-King has to change satellites, you may lose the current programming on your
second receiver.
1. Make sure your current region is selected. (See Section 3, OPERATION.)
2. Select your satellite pair.
Your channels are broadcast from 5 different satellite locations, and the antenna can be
set to automatically switch between two satellites (101/110) or (101/119). If you select the
(101/110) satellite pair on the controller, the antenna will automatically switch to the
appropriate satellite when a channel broadcast from the 101 or 110 satellite is selected.
In this example, if you select a channel that is broadcast from the 119 satellite, you will
need to select the (101/119) satellite pair on the controller and then the antenna will
automatically switch to the appropriate satellite when a channel broadcast from the 101 or
119 satellite is selected. (The Sea-King does not receive HD programming from
DIRECTV’s Ka band satellites at 99° and 103°.)
3. To change the selected satellite pair, simply press the
+
button on the controller.
Note: The program guide will show all channels available from the 101, 110, 119 satellites, however it may take
up to an hour for this information to be downloaded into the receiver after the satellite is acquired. If all
of your channels do not load in the guide within an hour, press the reset button on the front of your
DIRECTV receiver.
When switching between satellites, the TV picture may be disrupted for a brief period while the receiver
processes the signal from the satellite.
This HDTV converter accessory may only be used with Sea-King models with S/N 47891 or higher.
SATELLITE SWITCHING
When you select a channel on the 110 or 119 satellite, the receiver emits a tone telling the
antenna to switch satellites. If you have two receivers, the main receiver that is connected to the
antenna tuner box will control the satellite switching. If a multi-switch is installed for connecting 2
HD receivers or 3+ receivers, any receiver can control the antenna switching if the last channel
selected on all other receivers was on an odd transponder on the 101 satellite such as channel
202. (At the time of publication, channel 202 is broadcast on an odd transponder on satellite
101. This is subject to change. If in doubt whether channel 202 is still on an odd transponder,
contact DIRECTV or call King Controls.)
Page 19
SECTION 7
TROUBLESHOOTING
IMPORTANT!
Before performing any warranty work, you must call King Controls
for a Service Order Number.
SYMPTOM
Controller does not power up.
POSSIBLE SOLUTION
Check: tuner is connected to power supply.
controller is connected to tuner.
power supply is plugged into 110 VAC outlet.
Units that do not identify IDB
version on power up:
Controller remains in
“Power Up, Please Wait”
condition.
Disconnect power supply for 15 seconds, then reconnect.
Verify voltage on coax at dome unit is 24 VDC.
Inspect rotary joint cable, then reseat (inside dome unit).
Inspect all coax cables for kinks and verify connections are snug but not
overly tight (inside and outside dome unit).
Units that identify IDB version on
power up:.
Controller remains in one of the
following conditions:
POWER TRIP
ANT COM ERROR?
TUNER COM ERROR?
Unplug tuner for 10 seconds, then plug back in.
Check coax cables and connections between tuner and dome unit.
Verify voltage on coax at dome unit is 24 VDC.
Inspect all coax cables for kinks and verify connections are snug but not
overly tight (inside and outside dome unit).
Units that do not identify IDB
version on power up:
Controller displays “Load Error.”
Disconnect power supply for 15 seconds, then reconnect.
Inspect rotary joint cable, then reseat (inside dome unit).
Page 20
SYMPTOM
Controller displays AZ FAULT.
Dish cannot rotate.
POSSIBLE SOLUTION
(9762 Series Only) Verify shipping bolt(s) removed from bottom of dome
unit. Verify shipping tie strap is removed.
Disconnect power supply for 15 seconds, then reconnect.
Perform OPTION 21 RE-INITIALIZE and 0-RECALIBRATE (see Section 7,
TROUBLESHOOTING).
Display reads “EL FAULT.”
(9762 Series Only) Verify shipping tie strap is removed.
(9815, 9818, 1500, 1800 Series Only) Verify shipping bolt is removed.
Disconnect power supply for 15 seconds, then reconnect.
Restart system. If problem persists, perform OPTION 21 RE-INITIALIZE and
0-RECALIBRATE (See Section 7, TROUBLESHOOTING).
Reseat ribbon cables inside dome unit.
Only getting signal on 1/2 of
transponders.
Verify coax cables are properly terminated with SNAP-N-SEAL®
connectors only (see Section 8, REFERENCE).
Verify receiver is operating properly.
Verify LNB type is set correctly (See Section 9, DIAGNOSTIC PAGES).
Can’t get SW21 or SW 64
switch to load properly.
Check for line of sight obstruction.
Check for low signal strength.
Current location might be out of service area.
Select alternate trio of satellites and try again.
Atmospheric moisture. Wait for weather to improve.
Trying to load the SW21 or
SW64 results in error or no
satellite.
Disconnect DIRECTV HDTV Converter.
Continued on next page.
Page 21
SYMPTOM
Unit never locks on or locks on
and drifts off of satellite.
POSSIBLE SOLUTION
Atmospheric moisture. Unit will lock on as weather improves.
Check for obstruction in sky in direction of satellite. Select another satellite
and verify unit locks on.
Verify coax cables are properly terminated with SNAP-N-SEAL®
connectors only (see REFERENCE Section).
Perform OPTION 21 RE-INITIALIZE and 0-RECALIBRATE (see
TROUBLESHOOTING Section).
Inspect all coax cables for kinks and verify connections are snug but not
overly tight (inside and outside dome unit).
Perform Temperature Calibration (CALL KING CONTROLS FIRST).
Compass stick bad or not connected (See Diagnostic Page H in
DIAGNOSTIC PAGES Section).
For DIRECTV HDTV Programming only:
When a channel from the
guide is selected,
“Searching for Satellite”
appears on the screen.
The new channel selected is not found within the currently selected pair.
Press (+) to change the switching pair between 101/110 and 101/119 as
necessary.
When a channel from the
guide is selected, a different
program appears on the
screen.
The new channel selected is not found within the currently selected pair.
Press (+) to change the switching pair between 101/110 and 101/119 as
necessary.
Page 22
TROUBLESHOOTING BLOCK TIMES
Time is listed in minutes.
Upper Rotary Cable
30
Tuner (IDB)
45
Display (IDD)
45
RF Box (9762 Series only)
30
Compass Stick
30
Actuator Unit
75
Parts List
100291
100238
100365
100365-1
20212
20033
9747
9747-AM
100292-35
100292-7
1830
1830-SP
100062-3
10204
10211
10201
6405-1
20231
20094
7’ Telephone cable (Tuner to Controller)
Controller (IDD) (New)
Power Supply (New)
Power Supply Cord (New)
Dome Cover Replacement (9815-RJ, 1500-HD)
Dome Cover Replacement (9818-RJ, 1800-HD)
HDTV Converter Kit
HDTV Converter Kit (After Market)
RG6, 2.2 GHZ Coaxial Cable (35 ft)
RG6, 2.2 GHZ Coaxial Cable (7 ft)
Dome Magic® (Spray Can)
Dome Magic® (Single Use Packet)
Gel Filled Boot
Snap’N’Seal® Coax Crimper
Snap’N’Seal® Coax End
Coax Stripper
Dome Screw (9762-SW, 9762-LP)
Dome Screw (9815-RJ, 1500-HD)
Dome Screw (9818-RJ, 1800-HD)
Page 23
OPTION 21 RE-INITIALIZE AND 0-RECALIBRATE
IMPORTANT! You must call King Controls before performing this procedure.
Page 24
Page 25
TEMPERATURE CALIBRATION
IMPORTANT! You must call King Controls before performing this procedure.
Page 26
This page intentionally left blank.
Page 27
WIRING DIAGRAM FOR FLOWCHART
9762 Series
Page 28
WIRING DIAGRAM FOR FLOWCHART
9815, 9818, 1500, 1800 Series
Page 29
IMPORTANT!
Before performing any warranty work, you must
call King Controls for a Service Order Number.
Note:
Non-warrantable issues are indicated by,
but not limited to, grey boxes in flowcharts.
Page 30
Page 31
Page 32
Page 33
Page 34
This page intentionally left blank.
Page 35
SECTION 8
REFERENCE
RETURN SHIPPING
9762 Series
IMPORTANT! When returning a unit, you must package it in the box from the
replacement unit. Use all included internal packaging, and be sure to
attach outer feet removed from new unit.
If you are returning a unit and do not have a King Controls box, call
King Controls for a return shipping box and kit (800 982-9920).
1. Turn rotating bracket to align shipping bolt hole(s) with hole(s) in base.
(Some units may only have one shipping bolt.)
2. Insert shipping bolt(s) thru washer(s) and base and FINGER TIGHTEN into rotating
bracket.
3. Lower dish arm. (Gently push on dish and arm simultaneously. Lower until arm is just
about to touch mechanical stop.)
4. Insert tie strap thru plastic spacer and base, loop around dish arm for 15” models or
through P-clamp for 12” (LP) models, and back through base.
5. Terminate tie strap. (DO NOT OVER TIGHTEN TIE STRAP.)
6. Attach (4) outer feet from replacement unit with lock washers and nuts.
7. Fasten dome cover to base. MAKE SURE YOU ARE USING CORRECT SCREW TYPE.
DO NOT USE ANYTHING OTHER THAN THE KING CONTROLS FASTENER
SPECIFIED. CONTACT KING CONTROLS FOR ADDITIONAL FASTENERS IF
NECESSARY.
Tighten screws until washers deform slightly.
Page 36
Return Shipping Diagram
9762 Series
IMPORTANT! DO NOT OVER TIGHTEN SHIPPING BOLTS.
FINGER TIGHTEN ONLY.
Note: Some units may have only one shipping bolt.
Page 37
RETURN SHIPPING
9815, 9818, 1500, 1800 Series
IMPORTANT! When returning a unit, you must package it in the box from the
replacement unit. Use all included internal packaging.
If you are returning a unit and do not have a King Controls box, call
King Controls for a return shipping box and kit (800 982-9920).
1. Carefully lower dish assembly to align shipping bolt hole with hole in chassis.
IMPORTANT! DO NOT OVER TIGHTEN SHIPPING BOLT. FINGER TIGHTEN ONLY.
2. Insert shipping bolt thru dish assembly and FINGER TIGHTEN into chassis (see below).
3. Fasten dome cover to base (see next page).
MAKE SURE YOU ARE USING CORRECT SCREW TYPE.
Return Shipping Diagrams
9815, 1500, 1800 Series
Page 38
9818 Series
DOME COVER REPLACEMENT
9815, 9818, 1500, 1800 Series
When replacing the dome cover, you must use the same screw or an exact King Controls
replacement screw. These are the only approved fasteners for attaching the dome cover.
DO NOT USE ANYTHING ELSE. CONTACT KING CONTROLS FOR ADDITIONAL
FASTENERS IF NECESSARY.
1500-HD
9815-RJ
1800-HD
9818-RJ
Page 39
2 PART REMOVABLE DOME FEET
9762-SW & 9762-LP ONLY
Newer Sea-King models feature a two part foot. This enables the dome unit to be easily removed from the
roof of the vessel without compromising the surface seal.
IMPORTANT! Be sure to disconnect all cables from the back of dome unit before removing from
vessel surface.
Page 40
COAXIAL CABLE REQUIREMENTS
IMPORTANT! USE ONLY THE COAXIAL CABLES SUPPLIED WITH THE SEA-KING.
COIL AND STORE EXCESS CABLE IN THE CABINET WITH THE
COMPONENTS. DO NOT CUT COAX.
If coaxial cable other than that supplied with the Sea-King is used, the
following guide lines must be followed:
1) Ends must be terminated with SNAP-N-SEAL® connectors.
(DO NOT USE TWIST-ON OR HEX-CRIMPED CONNECTORS.)
2) Cable must be RG6 and rated at 2.2 GHz or higher.
Page 41
DEFINITION OF AZIMUTH AND ELEVATION
AZIMUTH: Angle in degrees measured clockwise from Magnetic North (0°).
ELEVATION: Angle in degrees measured from the ground plane.
Page 42
This page intentionally left blank.
Page 43
SECTION 9
DIAGNOSTIC PAGES
CONTROLLER NAVIGATION
Page 44
USER MAIN MENU
Serial Number and Software Revision Information
Page 45
DIAGNOSTICS: MAIN MENU
Page 46
DIAGNOSTICS A: AXIS ANGLES
Page 47
DIAGNOSTICS B: BIAS FOR GYROS
Page 48
DIAGNOSTICS C: TUNER DATA
Page 49
DIAGNOSTICS D: WIDE SCAN HITS
Page 50
DIAGNOSTICS H: MAGNETIC SENSOR
Page 51
NOTES:
Page 52
NOTES:
Page 53
NOTES:
Page 54
WARRANTY CONSIDERATION FORM
Service Center Name
Customer Name *
Address
Sea-King Serial Number * / Model Series
Date of Original Purchase or Installation *
Phone No.
Make, Model and Year of Vessel
Name and Title of person working on Sea-King
Customer I. D. Number
Service Order Number *
* REQUIRED
(RMA Number)
Repair Date(s)
Total Labor Time (Hours) _________
@ Hourly Rate of _______________
Return Shipping Charges
(Ground Only)
Travel Time (One way) ___________
Description of Failure and Work Performed _ _ _ _ _ _ _ _ _ _ _ _ _ _ _ _ _ _ _ _ _ _ _ _ _ _ _ _ _ _ _ _ _ _ _ _ _ _
_____________________________________________________________
_____________________________________________________________
_____________________________________________________________
_____________________________________________________________
_____________________________________________________________
The following paperwork must be sent to King Controls for warranty reimbursement
consideration:
1) Warranty Consideration Form with Service Order Number
2) Copy of Work Order
3) Proof of Purchase (Sales receipt or verification of in-service date)
Note: If returning defective part, please include with paperwork. Warranty Labor Claim will not be processed until
part is returned.
Page 58
®
11200 Hampshire Avenue South, Bloomington, MN 55438 (800) 982-9920
www.kingcontrols.com
®
®
11200 Hampshire Avenue South, Bloomington, MN 55438-2453
Phone: (800) 982-9920
Fax: (952) 922-8424
www.kingcontrols.com