1
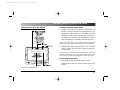
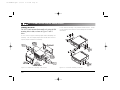
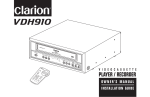
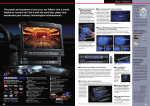
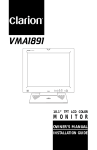
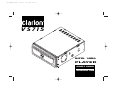
VS715OMRev0.qxd
1/25/01
4:19 PM
Page 1
VS715
DIGITAL
MEDIA
P L AY E R
OWNER’S MANUAL
INSTALLATION GUIDE
VS715OMRev0.qxd
1/25/01
4:19 PM
Page 1
OWNER’S MANUAL/INSTALLATION GUIDE
WARNING!
THE CLARION VS715 STAND-ALONE DIGITAL MEDIA PLAYER
DESIGNED FOR REAR SEAT VIEWING OF DVD OR CD-VIDEO
MEDIA RECORDINGS ONLY.
If you do not have the required knowledge and experience to
successfully complete the installation, we strongly recommend consulting an authorized Clarion Dealer about professional installation options.
DIGITAL VIDEO PRODUCTS ARE NOT INTENDED FOR VIEWING BY THE DRIVER WHILE THE VEHICLE IS IN MOTION
SINCE SUCH USE MAY DISTRACT THE DRIVER OR INTERFERE
WITH THE DRIVER’S SAFE OPERATION OF THE VEHICLE AND
MAY RESULT IN SERIOUS INJURY OR DEATH. SUCH USE
MAY ALSO VIOLATE STATE LAW.
TABLE OF CONTENTS
CLARION DISCLAIMS ANY LIABILITY FOR ANY BODILY
INJURY, INCLUDING FATALITIES, OR PROPERTY DAMAGE
THAT MAY RESULT FROM ANY IMPROPER OR UNINTENDED
USES OF THIS PRODUCT.
Description Of Front Controls .....................................7
Introduction...............................................................2
Care and Maintenance ..............................................4
DVD Playback Discs...................................................5
Description Of Rear Connectors..................................6
Description Of IR Remote Control ...............................8
Description of DVD Main Menu and Sub-Menus .......11
Description of VS715 Display Status Screen .............12
ABOUT INSTALLATION
Installation of mobile audio and video components requires
experience with a variety of mechanical and electrical procedures. Even though this manual provides general installation
and operation instructions for your new Clarion VS715 Standalone Digital Media Player, it does not show the exact installation methods for your particular vehicle.
DVD Operations With The VS715 .............................13
CD Operations With The VS715 ...............................17
Installation And Wiring............................................19
Troubleshooting ......................................................23
Specifications ..........................................................24
FCC Statement .........................................................24
1
VS715OMRev0.qxd
1/25/01
4:19 PM
Page 2
VS715 STAND ALONE DIGITAL MEDIA PLAYER
INTRODUCTION
DVD video is a high-quality digital video source that provides crisp and clear images. One 12 cm disc contains either
one film or up to four hours of music content.
MP3 technology is a world recognized standard for digital
video and audio compression, thus enabling more data to be
squeezed onto a Compact Disc. MP3 technology is becoming more common with cable, internet and satellite transmission. The compression offered by MP3 technology makes it
easier to transmit and record high quality video and audio
signals from your computer than in the past. The VS715
allows playback of MP3 recorded media.
The Clarion VS715 is a full-featured Digital Media Player
specifically created for the mobile environment. It is
designed to work with Clarion Multimedia devices and
Clarion Video Monitors for a complete video solution.
NOTE: The Functions described in this section may differ with the
DVD video disc used. Refer to the instructions provided with the
DVD video. Some disc functions may also differ from the
descriptions in this manual.
The VS715 DVD functions includes the following features:
2
• Multi-language function DVD video can store up to
eight languages for one film; select the language of preference. The languages stored on the disc can be selected
from the DVD’s Main Menu settings while in the onscreen menu (see page 11).
• Subtitles function: A DVD video can record subtitles for
up to 32 languages and allows selection of the subtitles
seen.
• Multi-story function: When a DVD video contains more
than one story for a film, select the story you wish to
enjoy. The operation procedures vary with the disc;
observe the instructions for selecting a story provided
during playback.
• Special Effect Playback: Controls over DVD playback
include Slow Motion as well as Rapid Search forward or
backwards. Multiple-speed forward or reverse picture
search operates at 2, 4, 8, 20 times normal playback for
quick location of a desired video segment. Multiplespeed slow forward or slow reverse search operates at
1/7, 1/6, 1/5, 1/4, 1/3, or 1/2 times normal playback
speed.
VS715OMRev0.qxd
1/25/01
4:19 PM
Page 3
OWNER’S MANUAL/INSTALLATION GUIDE
• Chapter/Track Playback: Skip backwards on a DVD to
start the current chapter over or skip back to the previous
chapter played. Skip forward on a DVD to advance to
the next chapter or advance multiple chapters ahead.
• Repeat Function allows for an individual chapter to
repeat over and over or the entire disc can be repeated.
• Still Frame: During the Pause function a DVD will display a single frame with perfect clarity without jitters
normally exhibited by typical VCRs while in pause.
The VS715 includes the capability of CD-Audio, CDVideo, and MP3 recording playback:
• Digital playback including rapid search forward and
backwards. Multiple-speed forward or reverse audio
search operates at 2, 4, 8 times normal playback for quick
location of any audio segment.
• Track Playback: Skip backwards on a CD or MP3
recording to start the current track over or skip back to
the previous track played. Skip forward on the disc to
advance to the next track or advance multiple tracks
ahead.
• Repeat Function allows for an individual track repeat
over and over or entire disc can be repeated.
•
•
•
•
•
The VS715 has standard features which includes:
Built-in Remote Sensor standard in the front panel for
in-dash operation of the unit without the need of an external IR Sensor.
Infrared Remote Control standard for convenient wireless operation. IR Remote Control has “Glow In The
Dark” buttons for easier night operation.
Optional IR Sensor Input standard for convenient connection to Clarion Monitors when operating the VS715
from a remote location.
Built-in 12 Vdc operation which eliminates the need to
use power supply converters for mobile use.
Auxiliary A/V Inputs mounted RCA input jacks that
allow easy connection to additional Clarion A/V devices.
About The Manual And Warranty
To start enjoying your new Clarion VS715, please read the
remaining instructions listed in this manual. Keep all
instructions for future reference. This product is covered by
a limited warranty (see the enclosed warranty card). Save
the sales receipt to protect your purchase and aid in warranty service.
3
VS715OMRev0.qxd
1/25/01
4:19 PM
Page 4
VS715 STAND ALONE DIGITAL MEDIA PLAYER
CARE AND MAINTENANCE
DVD Care
• Always handle the disc by the edges. Never touch the
surface. To remove fingerprints and dust, use a soft cloth
and wipe in a straight line from the center of the disc to
the outside edge.
• Take care of IR Remote Control. Keep the remote with
your DVD cases, where it is unlikely to be lost or damaged.
• Keep liquids away from the DVD player, including beverages and cleaning liquids. Spilling any liquid on the
VS715 can damage the electronics, resulting in an electrical shock or fire.
• If the unit or remote control should become wet, turn off
all power and let an authorized Clarion Dealer clean or service the equipment.
DO NOT ATTEMPT TO OPEN OR SERVICE THE
UNIT OR REMOTE CONTROL. THE INTERNAL
PARTS ARE NOT USER-SERVICEABLE. DOING
SO WILL VOID THE WARRANTY.
4
• Do not use any liquid or aerosol cleaners, anti-static spray,
or thinner to clean the disc surface.
• Do not allow coins, cleaning cloths, papers and other
objects to be pushed into the DVD slot. These objects
could connect with a voltage point inside the VS715 and
cause an electrical shock, or may short out parts causing
unit failure or fire.
Temperature and Moisture
When the inside of the vehicle is very cold and the player is
used immediately, moisture may form on the disc or the optical parts and proper playback may not be possible. If moisture forms on the disc, wipe it off with a soft cloth.
If moisture forms on the optical parts of the player, allow the
player to sit for about one hour with power on. The condensation will disappear naturally allowing for normal operation.
Please consult your nearest Clarion Dealer for recommendations and service.
Operation Precautions
• Do not subject the unit to direct sunlight or an extremely
VS715OMRev0.qxd
1/25/01
4:19 PM
Page 5
OWNER’S MANUAL/INSTALLATION GUIDE
hot environment (e.g., closed windows on a hot summer
day, direct path of heater vent, etc.).
• Avoid using the unit under the following conditions:
– After extended parking on an extremely hot or cold day.
– Near strong magnetic fields.
– In an environment with excessive humidity, dust, or
vibration (e.g., off-road travel, etc.).
• Do not directly touch the disc surface. Never stick labels
on the surface of the disc or mark the surface with a pen.
• Always place a DVD disc back into its case after use.
Discs that cannot be played back.
It may not be possible to playback some CDs recorded on a
CD-R units. CD discs recorded on a CD-RW units cannot be
played back. The DVD video player cannot playback DVDR, DVD-RAM, or Photo CDs.
Regional Numbers
Playable discs
The DVD video system assigns a region number to DVD
video players and DVD disc by sales area. DVD video players sold in the United States can playback DVD disc with the
region number “ALL”, “1”, or any combination of numbers
that also incorporate a “1”. DVD video region numbers may
be marked on the disc jackets of the DVD case.
This DVD player can play the following discs:
TV color system
DVD PLAYBACK DISCS
This DVD player plays NTSC discs only and cannot be used
for playback of PAL or SECAM discs.
5
VS715OMRev0.qxd
1/25/01
4:19 PM
Page 6
VS715 STAND ALONE DIGITAL MEDIA PLAYER
DESCRIPTION OF REAR CONNECTORS
3 REMOTE SENSOR INPUT (3.5 mm Plug)
Connect the IR Sensor lead from any Clarion monitor to
the back of the VS715 to use the supplied IR Remote
Control.
NOTE: The IR sensor mounted in all Clarion monitors, such as
the VMA7191, can be connected directly to the remote sensor input to function as the remote eye for the player.
4 DIGITAL OUTPUT CONNECTOR (Toslink)
Figure 1. The VS715’s rear connections.
1 A/V OUTPUT (3 RCA Jacks)
Use an A/V Cable to connect the video and stereo L/R RCA
cables to external video monitors and audio components.
2 A/V INPUT (3 RCA Jacks)
Use an RCA video cable to connect an external video
source (eg., VDH910 VCR, or TTX001 TV Tuner) into
the VS715. When a DVD is not playing the video and
audio signals are passed to the output connectors.
6
Use to connect direct digital signal to optional DSP processors
and DTS decoder units.
5 DC IN 12V (4-Pin Molex)
Use the supplied DC power cord to connect the VS715 to
the vehicle’s 12-volt electrical system.
VS715OMRev0.qxd
1/25/01
4:19 PM
Page 7
OWNER’S MANUAL/INSTALLATION GUIDE
DESCRIPTION OF FRONT CONTROLS
Figure 2. The VS715’s front control and slot.
6 DVD INSERTION SLOT
Insert a DVD disc directly into the loading slot. The unit
will automatically load the disc and start playback.
7 EJECT BUTTON
Press the eject button to remove the DVD disc. If eject is
pressed but the DVD is not removed within 15 seconds,
the mechanism will reload the disc back into the player
for disc protection.
8 IR SENSOR
Built-in IR Remote Sensor standard in the front panel for
in-dash operation of the unit without the need of an
external IR Sensor.
9 RESET BUTTON
Gently insert a slender pin into the opening to reset the
microprocessor if a voltage drop or spike inhibits proper
microprocessor operation.
7
VS715OMRev0.qxd
1/25/01
4:19 PM
Page 8
VS715 STAND ALONE DIGITAL MEDIA PLAYER
DESCRIPTION OF IR REMOTE CONTROL
1 POWER Button
Press to power the unit ON or OFF.
2
1
2 EJECT Button
Press the EJ button to eject DVD/CD disc media from the
player.
8
3
0
q
4
6
p
w
y
r
u
i
5
9
7
a
e
t
o
3 AUX Button
Changes audio and video input source selection to the
auxiliary inputs.
4 ENTER Button
Toggles the selection of the on-screen menu choices.
5 MENU Button
Press this button to display the DVD’s Main Menu and
sub-menu screens.
6 MUTE Button
Pressing this button mutes the audio output during playback.
7 DISP Button
Pressing this button to display the Status Display Screen
information on screen continuously during playback.
Figure 3. VS715’s Remote Control.
8
VS715OMRev0.qxd
1/25/01
4:19 PM
Page 9
OWNER’S MANUAL/INSTALLATION GUIDE
8 9 JOG UP/DN Buttons
Scrolls UP or DN through screen options while in the onscreen main menu.
0 q JOG LEFT/RIGHT Buttons
Scrolls LEFT or RIGHT through screen options while in
the on-screen main menu.
w CHAPTER/TRACK BACK Button
Skips back to start of Chapter/Track. Press multiple
times within one second to advance backwards to the previous chapters.
e CHAPTER/TRACK AHEAD Button
Skips forward to start of the next Chapter/Track. Press
multiple times within one second to advance forward
through multiple chapters.
r RAPID REVIEW Button
Press to start review of the disc media (Search Backward)
at 2X normal playback. Press rapid review multiple
times to advance to 4X, 8X, 20X. Press PLAY to cancel
Rapid Review to view a desired video segment.
t RAPID PREVIEW Button
Press to start preview of the disc media (Search Forward)
at 2X normal playback. Press rapid preview multiple
times to advance to 4X, 8X, 20X. Press PLAY to cancel
Rapid Preview to view a desired video segment.
y PLAY/PAUSE Button
Press to start playback of DVD disc media. While in play
mode, press once to pause playback and display a STILL
frame picture. Press again to resume normal playback.
u STOP Button
Press to stop playback or cancel other functions.
i SLOW REVIEW Button
Press to start slow review of the disc media (Slow
Backward) at 1/2 normal playback speed. Press PLAY to
cancel slow backward search to start viewing a desired
video segment.
o SLOW PREVIEW Button
Press to start preview of the disc media (Slow Forward)
at 1/2 normal playback speed. Press PLAY to cancel
slow forward search to view a desired video segment.
p REPEAT Button
Toggles REPEAT mode between Repeat One(Chapter),
Repeat All (Chapters), and Repeat Off modes.
9
VS715OMRev0.qxd
1/25/01
4:19 PM
Page 10
VS715 STAND ALONE DIGITAL MEDIA PLAYER
a TITLE Button
Press TITLE button to display the DVD’s Main Menu and
Sub-Menus.
2
Using The IR Remote Control
IR Remote Control has “Glow In The Dark” buttons for easier night operation. Inside the vehicle, simply aim the IR
Remote Control directly at the Clarion monitor or the front of
the VS715 and press any desired button. For best results, also
note the following:
• Aim the IR Remote Control from no further than 7 feet
away and no more than 3 feet on either side of the sensor.
• Direct sunlight or very bright light will reduce sensitivity
to IR remote signal commands. Be sure the monitor is not
located in direct sunlight.
• Objects between the VS715 faceplate or the Clarion monitor will interfere or block IR remote signal commands.
Inserting Batteries Into The IR Remote Control
1. Locate the battery compartment on the back of the IR
Remote Control.
10
1
3
Figure 4. Battery Installation for the VS715’s Remote Control.
2. Remove the battery holder and insert two AAA alkaline
batteries, matching polarity as shown inside the battery
holder.
3. Slide the battery holder back into the remote until it locks
with a “click”.
1/25/01
4:19 PM
Page 11
OWNER’S MANUAL/INSTALLATION GUIDE
DESCRIPTION OF DVD MAIN MENU & SUB-MENUS
IR REMOTE
CONTROL
IR REMOTE
CONTROL
PWR
PWR
AU
EJ
AU
EJ
X
X
TE
R
NU
EN
EN
TE
R
NU
VS715OMRev0.qxd
E
M
E
M
MUTE
MUTE
DISP
DISP
Figure 5. Main Menu for optional selections.
Figure 6. Sub-Menu for Chapter List.
Scrolling through the DVD’s Menus
3. Select items from sub-menus using the JOG LEFT/RIGHT
or JOG UP/DN buttons then press the ENTER button.
1. Press the MENU button on the IR Remote Control during
playback, and the DVD’s Main Menu will appear on the
screen.
2. Select the desired item using the JOG UP/DN buttons then
press the ENTER button on the IR Remote Control.
4. Press the MENU button again on the IR Remote Control,
to exit any of the DVD menus. Playback resumes at the
exact point before the MENU button was pressed
• JOG Button operations and type of menus may vary
depending on the DVD video disc.
11
VS715OMRev0.qxd
1/25/01
4:19 PM
Page 12
VS715 STAND ALONE DIGITAL MEDIA PLAYER
DESCRIPTION OF VS715 DISPLAY STATUS SCREEN
Turning on the Display Status Screen
1. Press the DISP button on the IR Remote Control during
playback, and the Display Status Menu will appear on the
screen.
• Pressing the button once only displays the Playback status
symbol, Playback time, and Remaining time. Playback is
unaffected while the status display is overlayed.
Remaining Time
DVD
00:00:00 00:00:00
CHAPTER:13
TOTAL:
TITLE:
TOTAL:
1
28
3
6CH]
AUDIO: [1 ENG
SUBTITLE:
[OFF]
AUDIO:
[NONE]
2. Press the DISP button again on the IR Remote Control
and the Display Status Menu appears in its entirety on the
screen.
• Pressing any function button will change the Playback status symbol momentarily, then change back to display the
inserted media.
• The Chapter and Title display numbers change after the
start of the new chapter or track.
• The status display will continue to appear on-screen until
the function is canceled.
3. Press the DISP button again on the IR Remote Control, to
exit the Display Status Menu.
Figure 7. VS715 Display Status Screen.
12
VS715OMRev0.qxd
1/25/01
4:19 PM
Page 13
OWNER’S MANUAL/INSTALLATION GUIDE
DVD OPERATIONS WITH THE VS715
Turning on or off the power
NOTE: Do not use the Mutimedia system for long periods of time
with the engine off. The car’s battery can be drained and reduce
the service life of the battery.
1. Press the PWR button on the IR Remote Control and the
DVD video display will appear on-screen.
2. Press the PWR button on the IR Remote Control to turn the
unit power off.
Switching Input A/V Source
Remaining Time
DVD
00:00:00 00:00:00
NOTE: Power must be ON for the Auxiliary inputs to feed signal
through.
1. Press the AUX button on the IR Remote Control and the
DVD’s input mode changes to the auxiliary inputs.
2. Each time the AUX button is pressed, the input changes to
the alternate input source.
Inserting and Ejecting DVD Disc Media
Figure 8. DVD Display Status Screen.
1. Insert the DVD video disc in the slot with the label side
upward. When the disc is inserted halfway, it is automatically pulled into the unit. The display will show READING, DVD, then PLAY in the upper left corner.
13
VS715OMRev0.qxd
1/25/01
4:19 PM
Page 14
VS715 STAND ALONE DIGITAL MEDIA PLAYER
• Most DVD video disc will automatically start playback by
displaying the DVD’s Main Menu on-screen. Some DVD
discs may automatically start playback from the first
chapter.
• When playing back a double-sided DVD video disc, insert
the disc with the top side up. Play it back in its entirety,
then take out the disc and turn it over to play the second
side. (The top and back side of a DVD video disc are
marked differently on different discs.)
• Dirt or dust on the data surface may generate read errors.
Wipe the disc with a soft cloth before insertion. If errors
still occur, remove the disc.
2. Press the EJECT button on the front of the VS715 faceplate
or the EJ button on the IR Remote Control.
NOTE: If the disc is ejected and not removed, the VS715 will
automatically retract the disc back into the player after 15 seconds. (8-cm disc media are not retracked back into the player.)
Playing Back DVD Disc Media
1. Press the PLAY button on the IR Remote Control.
• If the DVD’s Main Menu is displayed, select Play in the
14
DVD’s Main Menu using the JOG buttons then press
ENTER on the IR Remote Control.
NOTE: If the power button or the ignition is shut off, the DVD will
resume play at the exact spot where playback was interrupted.
Stopping DVD Playback
1. Press the STOP button on the IR Remote Control.
• Once the STOP button is pressed, playback will resume
from the first chapter of the DVD when the PLAY button
is pressed again.
Pausing Playback
1. Press the PAUSE button on the IR Remote Control. Press
the PAUSE button again or PLAY button to resume normal playback.
Slow Preview and Slow Review
1. Press the SLOW PREVIEW button on the IR Remote
Control to advance frames at 1/7th normal speed forward.
Press the button multiple times to choose 1/6, 1/5, 1/4.
1/3 or 1/2 normal playback mode.
• The sound is muted during Slow Preview.
• Some buttons are not available depending on the DVD.
VS715OMRev0.qxd
1/25/01
4:19 PM
Page 15
OWNER’S MANUAL/INSTALLATION GUIDE
• While in Slow Preview the Display Status Screen is activated along the top of the screen.
2. Press the PLAY button to resume normal playback.
Slow Review
1. Press the SLOW REVIEW button on the IR Remote
Control to playback frames at 1/7th normal speed backwards. Press the button multiple times to choose 1/6, 1/5,
1/4. 1/3 or 1/2 normal playback mode.
• The sound is muted during Slow Review.
• Some buttons are not available depending on the DVD.
• While in Slow Preview or Slow Review the Display
Status screen is activated along the top of the screen.
2. Press the PLAY button again to resume normal playback.
Rapid Preview/Rapid Review
1. Press the RAPID PREVIEW or RAPID REVIEW button
during normal playback to advance forward or backwards
at 2X normal speed. Press either button multiple times to
choose 4X, 8X or 20X normal speed.
• The sound is muted during Rapid Preview or Rapid
Review.
• Some buttons are not available depending on the DVD
video disc used. The speed of the search also depends on
the DVD video disc used.
• While in Rapid Preview or Rapid Review the Display
Status Screen is activated along the top of the screen.
2. Press PLAY to cancel Rapid Preview or Rapid Review
and resume normal playback.
Chapter Ahead/Chapter Back
This function is used to locate the beginning of the current
chapter or the start of the next chapter.
1. Press the CHAPTER/TRACK AHEAD button during
playback to advance to the start of the next chapter.
NOTE: Press the Chapter/Track Ahead button multiple times to
advance multiple chapters ahead.
2. Press the CHAPTER/TRACK BACK button during playback to find the starting of the current chapter.
NOTE: When the Chapter/Track Back button is held for more
than one second, the previous chapter is selected.
• The sound is muted during Chapter Ahead or Chapter
Back.
15
VS715OMRev0.qxd
1/25/01
4:19 PM
Page 16
VS715 STAND ALONE DIGITAL MEDIA PLAYER
• Some buttons may not be available depending on the
DVD video used.
• While in Chapter Ahead or Chapter Back the Display
Status screen is activated along the top of the screen.
When the chapter is found, the display disappears and
normal playback resumes.
Repeat One or Repeat All (Chapters)
The RPT button is used to choose a single chapter to repeat
over and over, or if all chapters are repeated after the last
chapter on the DVD disc is played back.
1. Press the RPT button during playback to activate the
Repeat function. “REPEAT [OFF]” is shown in the
upper left corner of the screen. Press the RPT button
again to play the current chapter over and over.
• When the Repeat One Chapter function is chosen, the display will momentarily display “REPEAT [ONE]” in the
upper left corner of the screen. The display will return to
normal after one second if the RPT button is not pressed
again.
2. Press the RPT button again to activate the Repeat All
16
Chapters function. At the end of the last chapter on the
DVD disc, play will automatically resume from the first
chapter.
• When the Repeat All function is chosen, the display will
momentarily display “REPEAT [ALL]” in the upper left
corner of the screen. The display will return to normal
after one second if the RPT button is not pressed again.
3. Press the RPT button a third time to deactivate the Repeat
function. The current chapter will continue to playing but
will not repeat the current chapter or restart from the first
chapter at the end of the disc.
• When the Repeat Off function is chosen, the display will
momentarily display “REPEAT [OFF]” in the upper left
corner of the screen. The display will return to normal
after one second.
VS715OMRev0.qxd
1/25/01
4:19 PM
Page 17
OWNER’S MANUAL/INSTALLATION GUIDE
CD OPERATIONS WITH THE VS715
Inserting and Ejecting CD Disc Media
1. Insert the CD audio disc in the slot with the label side
upward. When the disc has been inserted halfway, it is
automatically pulled in the unit. The display will show
READING, CD-DA, then PLAY in the upper left corner.
• An inserted CD audio disc will automatically start playback by displaying the CD Display Status on the screen.
NOTE: If the power button or the ignition is shut off, the CD will
resume play at the exact spot where playback was interrupted.
CD-DA
TRACK:
00:00:00 00:00:00
1
TOTAL: 20
2. Press the EJECT button on the front of the VS715 faceplate
or the EJ button on the IR remote Control to remove the
CD disc media.
NOTE: If the disc is left as is and not removed, the VS715 will
automatically retract the disc back into the player after 15 seconds. (8-cm disc media are not retracked back into the player.)
Playing Back CD Disc Media
1. Press the PLAY button on the IR Remote Control.
• During playback the CD’s Display Status screen is displayed.
Figure 9. CD Display Screen.
17
VS715OMRev0.qxd
1/25/01
4:19 PM
Page 18
VS715 STAND ALONE DIGITAL MEDIA PLAYER
Stopping CD Playback
1. Press the STOP button on the IR Remote Control.
1. Press the CHAPTER/TRACK AHEAD button during
playback to advance to the start of the next track.
NOTE: When the STOP is pressed the CD will start playback
from the beginning when PLAY is pressed again.
NOTE: Press the Chapter/Track Ahead button multiple times to
advance multiple tracks ahead.
Pausing CD Playback
2. Press the CHAPTER/TRACK BACK button during playback to find the starting of the current track.
1. Press the PLAY/PAUSE button on the IR Remote Control.
Press the PLAY/PAUSE button again to resume normal
CD playback.
NOTE: When the Chapter/Track Back button is held for more
than one second, the previous track is selected.
Fast Forward/Fast Backwards
• The sound is muted during Track Ahead or Track Back.
1. Press the RAPID PREVIEW or RAPID REVIEW button
during normal audio playback at 2X normal speed. Press
either button multiple times to choose 4X or 8X normal
speed.
• While in Chapter Track or Track Back the Display Status
screen is activated along the top of the screen. When the
track is found, the display disappears and normal playback
resumes.
• The sound is partially muted during Rapid Preview or
Rapid Review.
Repeat One or Repeat All (Chapters)
2. Press PLAY to cancel Rapid Preview or Rapid Review
and resume normal audio playback.
Track Ahead/Track Back
This function is used to locate the beginning of a track or the
start of the next track.
18
The RPT button is used to choose a single track to repeat over
and over, or if all tracks are repeated after played back.
1. Press the RPT button during playback to activate the
Repeat function. “REPEAT [OFF]” is shown in the the
upper left corner of the screen. Press the RPT button
again to repeat the current track playing.
VS715OMRev0.qxd
1/25/01
4:19 PM
Page 19
OWNER’S MANUAL/INSTALLATION GUIDE
• When the Repeat One function is chosen, the display will
momentarily display “REPEAT [ONE]” in the upper left
corner of the screen. The display will return to normal
after one second if the RPT button is not pressed again.
2. Press the RPT button again to activate the Repeat All
tracks function. At the end of the last track on the CD
disc, playback will automatically resume from the first
track.
• When the Repeat All function is chosen, the display will
momentarily display “REPEAT [ALL]” in the upper left
corner of the screen. The display will return to normal
after one second if the RPT button is not pressed again.
3. Press the RPT button a third time to deactivate the Repeat
function. The current chapter will continue to playing but
will not repeat the current chapter or restart from the first
chapter at the end of the disc.
• When the Repeat Off function is chosen, the display will
momentarily display “REPEAT [OFF]” in the upper left
corner of the screen. The display will return to normal
after one second.
INSTALLATION AND WIRING
VS715 Wiring for the 3-Pin Power Harness
Yellow
Fuse (Not Supplied)
+
Battery
Ignition Switch
Red
Black
To Ground
To Vehicle
Circuits
3 4
1
None
2
3
Ground (Black)
4
Battery (Yellow)
Ignition (Red)
1 2
Figure 10. Wiring and pin outs for the 3-pin power harness.
19
VS715OMRev0.qxd
1/25/01
4:19 PM
Page 20
VS715 STAND ALONE DIGITAL MEDIA PLAYER
Installing The VS715
The VS715 can be mounted horizontally or by using the ISO
mounting holes in-dash, as shown in Figures 11 and 12
below.
NOTE: Vertical mounting is not possible with the VS715. Doing
so may damage disc media or cause damage to the internal
mechanism.
NOTE: Check for proper mounting depth before attempting ISO
mounting. The unit is slightly deeper than normal DIN units and
requires proper clearance for mounting.
Figure 11. In-dash ISO mounting of the VS715.
20
Figure 12. Horizontal mounting of VS715.
VS715OMRev0.qxd
1/25/01
4:19 PM
Page 21
OWNER’S MANUAL/INSTALLATION GUIDE
Wiring The VS715 DVD Player
Figure 13. Wiring diagram for VS715.
21
VS715OMRev0.qxd
1/25/01
4:19 PM
Page 22
VS715 STAND ALONE DIGITAL MEDIA PLAYER
Wiring The VS715 DVD Player
Figure 14. TTX001 Wiring diagram for VS715.
22
VS715OMRev0.qxd
1/25/01
4:19 PM
Page 23
OWNER’S MANUAL/INSTALLATION GUIDE
TROUBLESHOOTING
Symptom
Cause
Solution
Symptom
Cause
Power does not
turn on.
Fuse is blown.
Replace with a fuse
3A. If the fuse blows
again, consult your
dealer.
Sound is bad
after power is
turned on.
IR Remote not
functioning.
Check the IR Remote
for a good battery.
Condensation may Let dry for about one
have formed on the hour with the power
internal lens when turned on.
the car is parked in
a humid place.
Error 2
Another disc
is already in unit.
Eject first DVD discand insert another
into unit.
A DVD/CD is
caught inside the .
deck and will not
eject.
DVD Disc
does not insert
Solution
Consult your Clarion
Dealer at the store
of purchase.
The disc is eject- The disc has been
ed as soon as it
inserted upside
is inserted.
down.
Insert the disc with
the label side up.
Error 3
A DVD/CD cannot Replace with a nonbe played due to
scratched, nonscratches, etc.
warped disc.
Sound skips or
noisy.
Disc is dirty.
Clean the disc with a
soft cloth.
Error 6
A DVD/CD is
loaded upsidedown.
Disc is heavily
scratched or
warped.
Replace the disc with
no scratches.
Eject the disc and
reload it properly.
23
VS715OMRev0.qxd
1/25/01
4:19 PM
Page 24
VS715 STAND ALONE DIGITAL MEDIA PLAYER
SPECIFICATIONS
General Specifications
Frequency Response:
20 to 20 kHz
Power Requirement:
14.4 V DC (10.8 to 15.6 allow.)
S/N Ratio (A-wtd):
Separation:
100 dB
80 dB
Current Consumption:
less than 3.0 A
Supplied Accessories:
VS715 disc unit, IR Remote Control, (2) AAA
Alkaline Batteries, 4-pin Power Supply
Harness, Trim Bazel, DIN Mounting Sleeve,
Backstrap, (4) M5x6 Counter Sunk Machine
Screws, (4) M5x10 Phillips Head Self-tapping
Screws, (2) Installation Brackets, 5 Meter RCA
A/V Cable, Owner’s/Installation Manual,
Warranty Card.
Weight:
3.5 lbs. (1.6 kg)
Dimensions (w x h x d):
7.0 x 2.0 x 6-5/8 in.
(178 x 50 x 165 mm)
DVD Deck Specifications
Format:
DVD-Video Disc (2 Layer, 2 side)
Compact Disc
Video System:
Standard NTSC
Audio System:
MP3 I, MP3 II
Loading System:
8 cm or 12cm Disc Direct Loading
Mounting Angle:
0 to +/- 30°
Video Specifications
Video System
4:3 Letter Box and 4:3 Pan Scan
Video Output level:
1.0 Vp-p 75 Ohms
Horizontal Resolution:
500
Video Input terminal:
0.5 to 2.0 Vp-p 75 ohms
Audio Specifications
Maximum Output:
24
308 mV rms (+/- 3dB)
FCC STATEMENT
This equipment has been tested and found to comply with the limits for a Class
B digital device, pursuant to Part 15 of the FCC Rules. These limits are
designed to provide reasonable protection against harmful interference in a residential installation. This equipment generates, uses, and can radiate radio frequency energy and, if not installed and used in accordance with the instructions,
may cause harmful interference to radio communications. However, there is no
guarantee that interference will not occur in a particular installation.
If this equipment does cause harmful interference to radio or television reception, which can be verified by turning the unit off and on, the user is encouraged
to consult the dealer or an experienced radio/television technician for help.
VS715OMRev0.qxd
1/25/01
4:19 PM
Page 26
Clarion Corporation of America
©2001 Clarion Corporation, Gardena, CA
661 West Redondo Beach Blvd
Gardena, CA 90247
800-Go-Clarion
www.clarion-usa.com
2001-VS715-10 Rev. 0 (01/01)