1
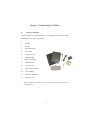
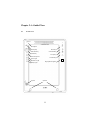
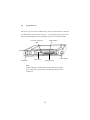
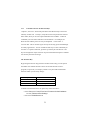
R USER'S MANUAL Electrovaya R SC 300/ SC500/ SC800 Contents SAFETY INFORMATION 4 PREFACE 6 CHAPTER 1: INTRODUCING THE SCRIBBLER 7 Inventory Checklist Scribbler Features CHAPTER 2: A GUIDED TOUR 11 Front View Back View Top Panel View Right-Side Panel View Bottom Panel View CHAPTER 3: GETTING STARTED Connect the AC Adapter Turn on the Power Plug in the Keyboard First-Time Windows Setup The Stylus The Joystick Determine the Remaining Battery Power Adjust the Screen Brightness Select Screen Orientation Get to Know the Operating System Customize and Use the Shortcut Keys Save Your Work Put the Scribbler in Standby Mode Turn Off the Power 2 21 CHAPTER 4: EXPLORING 34 Connecting Accessories Backing Up Your Work Connecting to a Telephone Line Connecting to a Wired Ethernet 10/100T Network Connecting to a WiFi Wireless Network Using External Display Devices Inserting a PC Card Inserting a Compact Flash Card Creating User Accounts Using the Audio Features Installing Software – Applications and Drivers Biometrics – Fingerprint Recognition CHAPTER 5: MAINTENANCE 45 Cleaning the Scribbler Changing Stylus Tips The Battery Software Recovery CHAPTER 6: TROUBLESHOOTING 49 REGULATORY INFORMATION 56 WARRANTY 57 3 Important Information Special highlighted messages are used in this manual to bring important information to your attention. Be aware of the following two formats used in this user manual. Each format indicates important and helpful information. But in any particular situation, the general text of the manual may be as important as, or more important than, a warning or note, so do read the full text carefully. We’ve tried to keep it short. Warning A warning such as this informs you that improper use of equipment or failure to follow instructions may cause property damage or bodily injury. Note A note like this offers advice that helps you to take full advantage of the Scribbler. Safety Information Warning Never remove the rear cover of the Scribbler. Some internal parts are at very high voltages. To remove or replace the battery pack, add RAM or service the circuitry always contact an authorized Electrovaya service provider or a trained service technician. Warning Never attempt to disassemble, tamper with or repair the Scribbler. This may cause smoke, fire, electric shock, serious physical injury, or death. Always contact an authorized Electrovaya service provider or a trained service technician for appropriate assistance. 4 Warning Don’t leave the plastic bags used for packaging the Scribbler or any of its components in places where children or infants may play with them. They can cause suffocation. Warning Never allow any liquids to spill onto the Scribbler and don’t expose it to rain, water, or seawater. Liquid that gets inside the Scribbler can cause electric shock, fire or damage to the unit. If you think the Scribbler may be wet inside, unplug the AC adapter (if any) and turn off the Scribbler. Leave the Scribbler turned off overnight to give it time to dry out before you use it again. If there are further problems call an Electrovaya service provider or dial our help center for assistance. Warning If you detect the emission of smoke, unusual odor or excessive heat from the Scribbler, immediately unplug the AC adapter (if any) and shut off the Scribbler. Move it to an area where it cannot cause harm to people or other objects. Contact an authorized Electrovaya service provider for appropriate assistance. Warning The battery contains energy and, as with all batteries, a malfunction can cause heat, smoke, or fire, release toxic materials or cause burns. Do not disassemble, puncture, drop, crush, bend, deform, submerge or modify. Do not charge on airplanes. Do not incinerate or expose to heat above 60°C (140°F). Warning Never pile books, papers, or other objects on the Scribbler, pack it in an overstuffed suitcase, drop it, or subject it to pressure in any other way. The glass screen can break, internal circuits can be damaged, the battery may be crushed or punctured. Besides irreparable damage to the Scribbler, the result could be dangerous heat and even fire. 5 Preface Congratulations on your purchase of the Scribbler. Pens, pencils and brushes are the very best tools for walk-around computer input, for notes, for sketching, painting and calligraphy, for editing, for music writing, for mathematics, and for a myriad of other uses. This powerful tablet combines the versatility of pen and paper with the functionality of a laptop computer to bring you a truly mobile tool for your work and personal use. Its design allows you to easily enter and retrieve information using the latest pen-based applications. You get true portability with long battery run time – an Electrovaya SuperPolymer™ Battery exclusive feature. Copyright 2003 by Electrovaya 6 Chapter 1: Introducing the Scribbler 1.1 Inventory Checklist Carefully unpack your Scribbler. Below is a checklist of the items you should find packaged with your new computer. 1 Scribbler 2 Stylus* 3 Mini VGA Cable 4 AC Adapter 5 AC Power Cord 6 USB Keyboard 7 Recovery CDs (2) 7 Cleaning Cloth 8 Carrying Case 9 Quick (Set-Up) Guide 10 User’s Manual 11 Windows O/S Manual 12 Warranty Card * Also included (not shown) is a box with extra Stylus tips and a tip extracting tool 7 1.2 Scribbler Features Models of Scribbler Electrovaya offers 3 different models of the Scribbler: Basic Model SC-300; Standard Model SC-500; Premium Model SC-800 Processor The Scribbler SC-300 model is equipped with an Intel Celeron processor with a speed of 733MHz while the SC-500 and SC-800 models are equipped with 866MHz Intel® Pentium® III mobile processors. Memory Three memory sizes are available: 256 MB is built into the SC-300 model 512 MB is built into the SC-500 and SC-800 models Memory can be expanded to768 MB on all three models Battery Power The Scribbler is powered by Electrovaya’s patented rechargeable lithium-ion SuperPolymer™ battery pack. This battery has the highest energy density in the world. It will give you between 8 and 16 hours of run time depending on your use pattern. Display The Scribbler’s exceptional XGA LCD panel supports extra-high-resolution video graphics of up to 123 dpi (dots per inch) - a resolution of 768 x 1024 pixels. 8 Note Avoid putting objects on the screen. The plastic writing surface may become scratched. Under the writing surface is the glass LCD display panel which may crack. Note For comfortable viewing and glare reduction, keep the PC screen out of direct sunlight and very bright lights. Subdued lighting is best. Note Avoid getting the screen greasy; some oils are quite hard to remove. Hard Drive The SC-300 model has a 20GB HDD. The SC-500 and SC-800 models have 30GB HDDs. These can be readily replaced, by a trained service technician, with standard-sized portable hard drives of various capacities. The hard drive is ruggedized and suspended with special shock absorbing mounts for enhanced reliability. Video The internal video processor chip, an Intel 830MG with 48MB of video memory, provides enhanced video display. A video processor translates video information into a form that the monitor can display, and, with the monitor, determines the quality of the image you see. The Scribbler’s high resolution panel and excellent video processor give superb graphics support. Wireless LAN The Scribbler has a built -in WiFi LAN 802.llb mini-PCI module that is compatible with other LAN systems based on Direct Sequence Spread Spectrum radio technology. This wireless standard is by far the most common, worldwide. 9 It supports data transfer rates of up to 11 Mbits/s. It has Frequency Channel Selection at 2.4GHz and allows roaming over multiple channels. Use this feature for wireless networking and high speed internet access. Software The Scribbler comes with a Windows™ XP Professional Tablet PC Edition operating system. This supports note taking, ink annotation, ink & handwriting recognition, speech recognition and an on-screen keyboard. It has the ability to support software that is designed to work under Windows™ XP Professional. A suite of very useful applications software is also included with your purchase of the Scribbler. 10 Chapter 2: A Guided Tour 2.1 Front View Ventilation holes Microphone Security Key Power Key Start Menu Key Screen Rotation Journal Key Escape Key Screen Keyboard Power Light Hard Drive Light Battery Light Joystick Function Key Fingerprint Recognition Speakers 11 Shortcut Keys Power Key turns power on and off Window Security Key launches the Window Task Manager. It performs Ctrl + Alt + Del. Start Menu Key activates the Start Menu. Screen Rotational Key rotates the screen view by 90° Escape Key cancels the current operation Screen Keyboard launches the Tablet PC Input Panel. Journal Key launches the Windows Journal Function Key expands the function of the other keys Indicator Lights Steady Green Light Flashing Green Light No Light Tablet PC is ON Tablet PC is in standby Mode Tablet PC is OFF Flashing Green Light Hard Drive is currently in use Red Light Flashing Red Light Battery is charging Low battery Joystick Used to scroll up/down and left/right and for Enter 12 2.2 Back View Warning Never open the back. High voltage (screen flourescent backlight power) can cause shock and possible serious personal injury. If you need to get inside the Scribbler, see a trained computer service technician or contact Electrovaya Customer Support. 13 2.3 Top Panel View This is the top view of the Scribbler after you have peeled back and removed the rubber panel used to protect the ports. To peel back a panel, press at the pattern of small bumps near one end and pull up on one corner of the rubber. Universal Serial Bus USB PCMCIA Slot Ventilation holes Lock Hole IEEE 1394 Stylus Holder Compact Flash Note Keep the protective rubber panels in place when not using the ports. They help to protect the ports and help to keep dirt and liquids out. 14 Lock Hole This hole serves as a security option. Standard external locks, available from your local computer retailer, can be used to secure the Scribbler to discourage theft. Ventilation Holes Air cooling holes provide ventilation to keep the computer’s processor from overheating. This cooling vent, like the others around the Scribbler, lets the processor continue performing at its maximum speed at all times. IEEE 1394 The IEEE 1394 (Firewire) is a high-speed serial bus which supports fast data connections for consumer electronics, audio/video (A/V) appliances, storage peripherals, other PCs, and portable devices. Universal Serial Bus There are two Universal Serial Bus (USB) 1.1 ports which can be used interchangeably, one here and another on the top panel. The USB gives you a single, standardized, easy-to-use way to connect a large number of devices to the Scribbler. You can connect such devices as external drives, keyboards, mice, USB storage drives, printers, scanners and joysticks. Note Keep staples, paper clips, pins and other metal objects out of the USB connectors. A staple or similar object can damage the Scribbler’s circuitry. PCMCIA This slot is for type II PC cards, useful for plugging in additional high-speed interfaces and adapters, auxiliary hard drives and communication devices such 15 as external wireless cards, GPS modules, etc. Compact Flash This slot is for plug-in devices with a Compact Flash form factor. These devices include external flash memory, removable micro-hard-drives, special wireless modules and adapters for camera -memory-sticks of many types. Note Keep pens, pencils, paperclips and other objects out of the PCMCIA and Compact Flash Card Slots. A paper clip or similar object can damage the Scribbler’s circuitry; other foreign objects can bend the connector pins. Stylus Holder This convenient slot allows you to store the stylus when it is not in use to prevent it from getting misplaced. Put the stylus back in the slot when not in use. The stylus contains special circuitry which works with the Scribbler digitizer. The replacement for a lost stylus is expensive. 16 2.4 Right-Side Panel View This is the right side view of the Scribbler after you have removed the rubber panel used to protect the ports. Universal Serial Bus USB Modem LAN Ventilation Holes Headphone Jack (Green) mini VGA port Microphone Jack (Pink) 17 LAN Ethernet Port RJ-45 The Scribbler is equipped with a LAN Ethernet port. Use this port to connect to hard-wired networks and for high-speed internet access. The modular RJ -45 jack looks like a telephone jack, but wider. It takes CAT-5 plugs and cable. Modem (56K) RJ-11 An internal modem operating at up to 56Kbps provides capability for data and FAX communication over the telephone. It supports V.90. The speed of data transfer and FAX depends on telephone line conditions. The modular RJ -11 jack, and modem circuitry, is approved in most countries for connection to the telephone line. Microphone Jack The 3.5mm pink microphone jack enables the connection of a three-conductor audio plug for a stereo or mono microphone or for an audio line input. Inserting a plug into this jack automatically disables the internal Scribbler microphone. Headphone Jack The 3.5mm green headphone jack lets you connect stereo headphones or other audio output devices. Inserting a plug into this jack automatically disables the internal speakers. Universal Serial Bus There are two Universal Serial Bus (USB) 1.1 ports, one here and another on the side panel. The USB gives you a single, standardized, easy-to-use way to 18 connect a large number of devices to the Scribbler. Note Keep staples, pins, etc. out of the USB connectors. A staple or other metal object can damage the Scribbler’s circuitry, get jammed, and become difficult to remove. VGA Port (External Monitor) The analog VGA port supports an external CRT or flat-screen computer monitor and most video projectors. Use the small adapter wire (supplied) to convert from the Scribbler’s mini-VGA jack to the larger 15-pin D-sub jack when needed. 19 2.5 Bottom Panel View Serial Number Certificate of Authenticity AC Adapter Jack AC Adapter Jack This jack allows you to power the Scribbler and recharge its battery from the AC power line using the AC adapter and power cord supplied. Certificate of Authenticity This original and non-removable certificate is your guarantee that the operating system supplied with the Scribbler is an authentic and original Microsoft product. Serial Number Sticker This number uniquely identifies your Scribbler. Have the number at hand whenever contacting Electrovaya customer service. 20 Chapter 3: Getting Started 3.1 Connect the AC Adapter An AC Adapter is included in the box with your Scribbler. Use this adapter whenever you want to charge the battery or when you want to operate from AC power. The Scribbler must be charged before you can operate it solely on its battery pack. The AC adapter can be connected to any power source supplying 100 to 240 volts at 50 to 60 Hz (cycles). Its power cord can be unplugged and replaced with a different standard cord, available in local computer shops, to accommodate the different types of plugs used in different countries. • • Connect the power cord to the AC adapter and plug it into an AC outlet Connect the AC adapter’s DC plug to the AC Adapter port on the bottom panel of the Scribbler. Warning Using the wrong adapter could damage your Scribbler, and even be dangerous. There are many different sizes of DC plugs, different DC voltages and different polarities in use in electronics equipment. While AC adapters look very similar to one another, plugging in the wrong adapter can break the AC adapter jack or its pin, can damage the Scribbler circuitry, and might cause smoke or fire. Do not use airplane power accessories. Electrovaya assumes no liability for any damage in such an event. 3.2 Turn on the Power • • • Make sure all external devices (such as the AC adapter, if you plan to use AC power rather than battery power) are properly connected and ready. If an optional external disk drive is connected, check that the drive is empty. In the upper right hand corner of the Scribbler is a power-key hole. Press your stylus into the power-key hole for a moment. The power 21 • indicator light will glow green showing that the Scribbler is on. The pre-installed operating system will load automatically. The first time you turn the Scribbler on, the operating system will present a Welcome screen. Note When you turn on the Scribbler for the very first time, don’t turn off the power again until the operating system has loaded completely. 3.2 Plug in the Keyboard A lightweight USB keyboard is included with the Scribbler. For the first-time start-up, use it (and a USB mouse if you have one) to enter initial sign-in information. The Stylus (Scribbler pen) is not fully functional until the firsttime startup is complete. • • • • 3.3 Peel back the rubber panel on the side or top of the Scribbler. Locate a USB port (there is one on the top and another on the side). Plug the keyboard in. The Scribbler will recognize it. If you have a USB mouse, plug it into the other USB port. First-Time Windows Setup On first power-up the Windows XP Tablet Operating System will present a Welcome screen. It will be followed by a series of setup and sign-up screens. To make selections, and to move from screen to screen, click in the appropriate box with the mouse (if attached) or use the keyboard ALT key as follows: • • • • In the box you wish to select there is a word such as Next. Notice that one letter of the word, the N in this example, is underlined. Case (upper-case or lower-case) makes no difference here. Press the keyboard ALT key and while holding it down press the key for the underlined letter (ALT+n in this example). The appropriate box will be selected and the Operating System will respond (by bringing the next page in this example). 22 If you have not already done so, move from the Welcome screen to the Systems Settings screen by selecting Next as described above. The Systems Settings of Region, Language, and Keyboard have been set to Microsoft defaults. They can easily be changed to reflect your location and language preference, either at this time, or whenever you wish at a later time. To change them: • • • For Region click the box that says I live closest to this region or press ALT+v and move the selector to your region using the Up or the Down key (or click on it with the mouse). For Language click the box that says I type mostly in this language or press ALT+t and move the selector to your language, as above. For Keyboard click the box that says I use this type of keyboard or press ALT+u and move the selector to your preferred keyboard format (for both on-screen and plug-in keyboards). The keyboard selection will take effect later, after sign-up is complete. When you are satisfied with your selections, select Next (press ALT+n) to move to the Time Zone screen. Change the default setting to the correct time zone for your location: click on the box that says I use my computer in this time zone or press ALT+u and move the selector to your time zone, as above. Then select Next (press ALT+n) to move to the End User License Agreement screen. Read the Agreement Terms. To accept them (Do you accept the terms?) click the Yes box or press ALT+y. Then, move to the Computer Name screen by selecting Next (pressing ALT+n). On the Computer Name screen, type in a name for the computer (the box is Computer name, selected with ALT+c) and include a short description of its use (the box is Computer description, selected with ALT+o) if you wish. Select Next (press ALT+n) to move to the Internet Connection screen. We suggest you select Skip (press ALT+s) and Next (press ALT+n) to move on to the Microsoft Registration screen. Here we suggest you select No, not at this 23 time (press ALT+o) and Next (press ALT+n) to move to the User Name screen. On the User Name screen, type in the user name of your choice. It must be different from the computer name you chose on the Computer Name screen. If you will have more than one user on this Scribbler and you wish to add their names now, insert extra User Name lines by pressing ALT+2, ALT+3, etc. and typing in the names. You can easily add more User Names later. Then select Next (press ALT+n) to move to the Finish screen. Select Finish (press ALT+f) to complete the setup procedure. The stylus will now be active. 3.5 The Stylus The stylus, or pen, is both a computer pointing device and a writing implement. Use it as you would a mouse to control the computer (left -click, right-click, double-click) and also to write, sketch, highlight, paint and erase. It is a powerful tool. Inside the stylus is special circuitry that allows the Scribbler to track the location of the stylus whenever the stylus is near the face of the screen. The Scribbler can also tell how high the stylus is above the screen, whether the stylus is touching the screen, and how hard it is pressing against the screen. When the stylus is not near the screen, the Scribbler looses track of its location. As soon as it comes close, the Scribbler quickly locates it again. As you bring the stylus close, pause momentarily to give the Scribbler a chance to locate it, and then continue to write or tap. When tapping or writing, try to get in the habit of looking at the point (dot, arrowhead, etc.) on the screen and not at the actual tip of the stylus – this will improve your speed and especially your 24 accuracy. The Stylus as a pointing device The stylus is a pointing device. Use it as you would a mouse. With the stylus, you can move, delete, open folders on the screen, etc. The action is much like that of a mouse, but easier: Selecting an Object • • place your stylus over the icon gently tap the screen Dragging and Dropping an Object • • place your stylus on the icon drag the stylus across the screen to the desired area and lift the stylus to drop it The stylus has a button on the body of the pen. When you are using the stylus as a pointing device, holding this button down tells the Scribbler that stylus taps should be interpreted as “right-clicks”. These are often used to get pop-up menus and occasionally for other functions, depending on the application software. Release the button to go back to normal “left-click” operation. 25 Follow the methods below to accomplish the three typical mouse functions with your stylus. Mouse Functions Stylus Functions Double-left click Double Tap Single -left click Single Tap Right-click Hold button on stylus and tap on screen If you place the tip of the stylus against the screen for a few seconds and hold it still, you will accomplish a right-click, an alternative to the button on the stylus. Note that this is quite similar to the action for drag-and-drop. So for drag-anddrop, touch the object you want to move and begin to move it right away. For a right-click, touch the screen and keep the tip of the stylus in the same place for a couple of seconds. Some operations, such as the automatic copying of a file by drag-and-drop, require the use of the keyboard Ctrl key (or Shift key) in conjunction with the left-click. If you have an external keyboard attached, you can touch Ctrl (or Shift) and hold it while you touch the tip of the stylus to the screen – just as you would with a mouse. Otherwise, the Scribbler has a software on-screen keyboard you can use for this function. Bring up the on-screen keyboard by touching the stylus tip into the screen-keyboard hole on the face of the Scribbler. Then tap the Ctrl key and do the drag-and-drop. The Scribbler will remember the Ctrl and act accordingly. Other combinations of Shift or Ctrl with the pointing stylus work similarly. 26 Calibrate the screen for stylus accuracy People hold and move pens a little differently from one another, and this affects the stylus accuracy. You can make your Scribbler respond better to your stylus grip by calibrating the screen – a simple job: • • • • • • • • • • Select Start on the lower left corner of the screen. Select Control Panel on the menu which appears. Select Printers and Other Hardware Select the Tablet and Pen Settings item. Select the Settings tab. Select a screen orientation to calibrate: landscape or portrait (go back and do the other one later) and hold the Scribbler in that orientation. Tap the Calibrate… box. A screen with four cross-hairs will appear. Hold the stylus as you normally do and carefully touch the exact center of each cross-hair. As you touch each one, it disappears. When you touch the last one, the calibration completes. Go back and calibrate the other orientation. Go back and set the speed, double tap interval and spatial tolerance to your liking. These settings can be re-set at any time, of course. Re-calibrate whenever you feel that the stylus pointer is not following your motion of the stylus very well. Note You can quickly access Tablet and Pen Settings by tapping on the pen-and-paper icon found on the system toolbar in the lower right hand corner of the screen. The Stylus as a writing device The stylus is also a writing and drawing device. It can be a pen, a pencil, a brush, a highlighter or an eraser, as you wish. These writing functions can now be found in many software applications, several of which are bundled with the Scribbler. To try writing, open the Microsoft Journal application by pressing the tip of the stylus into the Journal hole on the face of the Scribbler. This will 27 bring up Journal. The opening page is a sheet of notepaper. Write on it with the stylus. You can activate the pressure sensitivity of the stylus if you wish – the width of the line will depend on how hard you press. Write a sentence or two, pick the selection-tool (lasso) icon on the toolbar, circle the words you wrote to select them and click Tools, then Actions, then Convert handwriting to text. The Operating System will do its best to read your handwriting and convert the words to text. Journal and the sketching programs included with the Scribbler are powerful applications with hundreds of useful features – worth exploring. 3.6 The Joystick The joystick is a small moveable rubber button near the bottom left-hand corner of the Scribbler’s face. With it you can scroll a document or a list, or move up/down and left/right. It can also be used to indicate ENTER. Its behavior depends somewhat on the application, but in general: • • • • • 3.7 To move the cursor up, push the joystick away from you. To move the cursor down, pull the joystick towards you. To move the cursor left, push the joystick to the left. To move the cursor right, push the joystick to the right. To signify ENTER push the joystick down as you would a normal button. Determine the Remaining Battery Power The Scribbler is equipped with an Electrovaya SuperPolymer Battery. It is because of this superior battery that the Scribbler can be used for many hours on a single battery charge. The battery indicator light on the face of the Scribbler gives you a quick indication of the battery’s current state: 28 • • Red means the battery is charging from the AC adapter. Flashing red means the battery charge is low and it is time to recharge the battery by plugging in the AC adapter. When the battery indicator light flashes, less than half an hour of battery power remains. Plug the AC adapter into the Scribbler to charge the battery. It will take approximately 5 hours to fully charge your battery from empty if the Scribbler is turned off or in standby and about 6 to 8 hours if the Scribbler is on and running. You can get a more precise measure of the battery remaining capacity by selecting the power icon on the system taskbar (lower right on the screen) and then selecting the Power Meter tab on the window that appears. If the icon is not present, use the Start menu (lower left), then Control Panel, then Performance and maintenance, and finally Power Options. The battery status and precise charge level present themselves. This charge level indication (fuel gage) is equipped with automatic recalibration – a Scribbler exclusive feature. This recalibration occurs when the Scribbler is not running (off or in standby) and the battery is not charging. If you leave the Scribbler off and unplugged for a while, the fuel gage will automatically recalibrate. 3.8 Adjust the Screen Brightness You can adjust the screen brightness of your Scribbler if you wish. You can set brightness levels for when the Scribbler is operating under battery power and for when the AC adapter is plugged in. This is a power-saving feature – the screen backlight can use quite a bit of power. These two levels can be reset easily to accommodate different ambient light conditions: • Select Tablet and Pen Settings from the Start menu / Control Panel / Printers and other hardware or from the pen-and-paper icon on the 29 • 3.9 system taskbar. Select the Display tab and adjust the brightness settings. Select Screen Orientation You can rotate the screen of the Scribbler into all four orientations for best use in any application. For writ ing a letter or taking notes you may find the portrait orientation best, but for working with a spreadsheet ledger you may prefer the landscape orientation. You may want to use the Scribbler upside down when wires are plugged into it. Screen orientation is easily changed. Press the tip of the stylus into the Rotate Screen hole on the face of the Scribbler. Wait a moment for the Operating System to recalculate the screen, and the screen will rotate a quarter-turn. Each time you press, the screen will rotate another quarterturn. 3.10 Get to Know the Operating System Microsoft’s XP Tablet Operating System, installed in the Scribbler, is similar in most ways with older versions of Windows operating systems. It is an upgrade version of XP Professional supporting the use of the pen, the storing and transmitting of handwritten data and the recognition of handwriting for conversion into text. If you have used Windows before, you should find XP Tablet familiar and intuitive. The Start menu, Taskbar, Desktop, Explorer and other functions are nearly all in their familiar forms. A short Microsoft introduction to the operating system is supplied with the Scribbler; the Help menus document the features of the operating system (and the other associated Microsoft applications) more completely. An informative tutorial presents itself on the initial startup, and is available anytime from the Help tab of the Start menu. 30 3.11 Customize and Use the Shortcut Keys Chapter 2, section 2.1 showed the placement of the Shortcut keys and a brief summary of their uses. The keys, really holes in the front panel with switches below them, allow you to issue rapid commands to the Scribbler – useful for commands you issue often. Some have a fixed function. For example, the Shortcut hole with the picture of a key accomplishes – in one stroke – a Ctrl+Alt+Del. This is used for logon security and to bring up the Task Manager for unruly applications. You can customize other keys to issue commands you use often. To operate a Shortcut, press the tip of the stylus into the hole. The keys are designed for stylus activation to protect them from disruptive accidental activation by the touch of a finger. The Function Key By pressing the function key just before another shortcut key you can expand the number of available shortcuts. These can include shortcuts to start a program, to open a file, or to display a folder. They have Microsoft default functions which you can easily change: Internet Explorer Microsoft Outlook Increase Volume Decrease Volume Function + Start Function + Rotate Function + Journal Function + Keyboard To define customized shortcuts to replace any of the ones above: • Select Start then Control Panel then Printers and other Hardware and then Tablet and Pen Settings • Select the Tablet Buttons tab 31 • Of the four Tablet Button options available in the box, select the action you wish to use as your key assignment. You should see the four choices labeled as: § Fn + Hotl Button § Fn + Journal Button § Fn + lnput Panel Button § Fn + Rotate Button • Tap on the Change… option. • Select the desired secondary function from the Action scroll bar. There are 54 different choices in that list. • Confirm your selection by tapping OK Note Hotl Button is the Operating System name for the Start Menu button and Input Panel Button is the Operating System name for the Screen Keyboard button. Note Of the 54 possible secondary functions you can select (seen in the change tablet button actions tab), Application 1 launches My Computer and Application 2 launches the Calculator. 3.12 Save Your Work Before you turn off the computer, go away from it, or put it in standby mode, save your work to the hard disk drive. The settings and adjustments you have made will be automatically saved, but any notes, sketches and other files you produced must be saved in the application where you created them. Saving data frequently is a good practice! Many applications have automatic save features which save your work at regular intervals. Check your applications and activate automatic save where it is available. 3.13 Put the Scribbler in Standby Mode Power consumption in Standby mode is very low. You can use this feature to 32 suspend operation for several hours and get “instant on” without the boot-up delay. To go to Standby mode, momentarily press the ON/OFF key. Pressing this key for four seconds will force a power-off, but a momentary pressing will bring up the Turn Off Computer box. You can also easily get this box from the Start menu, then Turn off. Select Standby to put the Scribbler in Standby mode A tap anywhere on the screen face or another momentary pressing of the ON/OFF key will return the Scribbler to Operate mode. 3.14 Turn Off the Power Generally, it’s a good idea to turn off your Scribbler when you are not planning to use it for a while. Turn off power just the way you would go to Standby mode, (eg. Start /Turn off Computer) but select Turn Off instead of Standby. If this is the Scribbler’s first use, leave the Scribbler plugged into a power source (AC adapter) after you turn it off. This will allow the battery to charge. When the red battery light turns off, the battery is fully charged. You can also turn off the Scribbler by pressing the Power Key and holding it a few seconds until power goes off. Use this, second, method only when “frozen” programs prevent you from getting to the Start menu. Warning When the hard disk drive light on the system indicator panel is on, the hard drive is active, and needs power. Wait a moment for it to finish. Turning off power while the hard disk drive is active could damage it. Note Even when powered off, some of the Scribbler circuits are still running at very low power - so you should charge the Scribbler’s battery about once a month to keep it in good shape. 33 Chapter 4: EXPLORING 4.1 Connecting Accessories The Scribbler’s ports allow you to connect almost any up-to-date accessory, including memory devices and drives, cameras, printers and scanners, global positioning devices, networking devices, and interface adapters for less common or out-of-date accessories. Connection of some of the more common accessories is described below. USB Connections By far the most common port for the connection of accessories is the Universal Serial Bus (USB). It replaces the older Parallel, Serial/Com/RS-232 and PS2 ports with much higher speed and more universal functionality. USB hubs are available for expanding the number of ports, and many USB devices allow for connecting additional devices in a cascade. To connect a USB device, first power it up and turn it on (if it has its own power source) and then plug it into the operating Scribbler. The Scribbler will detect it and look for a “driver” for it (a piece of operating software). The XP Tablet operating system has drivers for a great many of the more common accessories. If a suitable driver is found, the connection is complete and the device will function without further ado. If not, you will be asked to install a driver that came with the accessory. To dis connect a USB device, first look on the taskbar for the Unplug Hardware icon 34 (a stick with a green arrow over it). If the icon is there, click it and select, from the list presented, the accessory you wish to disconnect (if it is on the list). The operating system will respond with a Safe-to-Remove box. If there is no Unplug Hardware icon on the taskbar, or if the accessory is not on the list, you can just unplug the accessory. Memory and drive devices often need notification before unplugging – a mouse or a keyboard seldom does. USB Mouse You may want to use a mouse in addition to, or instead of, the stylus. You can attach an external USB mouse to either of the Scribbler’s two USB ports. Windows XP Tablet should automatically detect the mouse. The mouse and stylus can be used alternately. USB Keyboard You can attach an external standard keyboard to one of the USB ports on the Scribbler, provided that the keyboard is USB-compatible. USB Memory Key A USB memory key is a useful device for transfering files from one computer to another and for quick file backup. Just plug it into one of the Scribbler’s USB ports and, after the operating system has installed its driver the first time, look for Removable Drive on the list of drives under My Computer in the Start menu. Be sure to click on the Unplug Hardware icon on the taskbar before unplugging it. USB diskette or CD ROM or CD R/W drive An optional external USB drive allows you to use diskettes, CDs or data DVDs with the Scribbler. This is useful for installing software, exchanging information 35 with other systems, making backup copies of files stored on your hard disk, etc. To attach an external USB drive to a USB port on the Scribbler, power it up from its own AC adapter, turn it on, and then plug it into a USB port on the Scribbler. The computer will automatically recognize the disk drive and look for a driver. Most USB disk drives will operate from one of the internal drivers supplied with the operating system. If yours will not, you will need to install the driver supplied with the drive. See the section on installing software. USB Printer You can connect a local USB printer to the Scribbler. Most printers have suitable drivers pre-installed with the operating system, but a few require you to install a driver before they will work correctly. If you do need to install a driver, and if you have an external CD drive, use it to install the driver. If not, see the section below on Installing Software. Supply power to the printer and turn it on. Plug its USB cable into the Scribbler. Follow the installation instructions. The name of the newly installed printer will appear on the list of available printers (Control Panel) and in the Print dialog box in your installed applications. It will be available for printing your work from any installed application. IEEE 1394 (Firewire) Connections The IEEE 1394 (firewire) port is a very fast serial port, faster than the USB port. You can buy IEEE 1394 compatible accessories and plug them into the IEEE 1394 port on the top edge of the Scribbler. Operation is similar to the USB port, but faster. Follow the instructions that come with the accessory. 36 4.2 Backing Up Your Work Backup devices of various types allow you to copy large sections of the hard disk drive to a second secure location. Devices are available with connections to a USB port, to an IEEE 1394 port, to a PC card slot, etc. Following the device manufacturer’s instructions connect the backup device to the Scribbler. To back up several files at one time, use the Backup or Restore Wizard. • • • • • • • 4.3 Click Start Then All Programs Then Accessories Then System Tools Then Backup The Backup or Restore Wizard window appears. Follow the on-screen instructions. Connecting to a Telephone Line The Scribbler comes with a built -in modem that can be connected to a standard voice-grade telephone line. The 56K modem allows you to: • Access the Internet • Communicate with a Local Area Network (LAN), or a larger Wide Area Network (WAN). • Send faxes directly from the Scribbler. The Scribbler’s built-in modem provides a standard Modular RJ -11 telephone jack. Plug one end of a telephone connecting cable into the RJ -11 jack on the Scribbler and the other end into an analog telephone wall jack. Warning Modems, like FAX machines, are designed for use with standard analog telephone lines, not with complex digital multiline office telephone (PBX) systems. Digital telephone lines are nonstandard and some can damage a modem. If you are unsure, 37 check before you plug in. If the phone that was plugged into the line says “complies with part 68, FCC Rules” or has a Ringer Equivalence Number (REN) the line is analog. Once the Scribbler is connected to the telephone line you can connect to a network or to the internet. You must, of course, have an arrangement for this (an account or network permission) and a telephone number to dial for the dialup connection. Use the Scribbler’s Dial-Up Networking to make the call for you and set the connection up: • • • 4.4 Select Start and tap All Programs. Select Accessories, then Communications, then Network Setup Wizard or Network Connections. Enter the phone number of your network connection and let the Scribbler dial the number. Connecting to a Wired Ethernet 10/100T Network The Scribbler is equipped with an internal Ethernet LAN network connetion, a Modular RJ -45 network jack (wider than the telephone jack). To make the connection, connect a LAN cable (CAT5) from the network to the Scribbler. On some networks, the software interface is automatic and the connection will be complete. On others, you will need an address and a password. Check with the administrator of the network. 4.5 Connecting to a WiFi Wireless Network The Scribbler is equipped with an internal 802.11b (WiFi) circuit. Many offices, schools, airports, hotels and coffee shops have wireless networks running. A wireless network can be a great convenience, even at home. The Scribbler will look for wireless networks and connect to them for you. To find a wireless network connection, double-click the Wireless Network Connection icon on the taskbar. (Alternatively, use Start / Control Panel / Network and Internet 38 Connections / Network Connections and double-click on Wireless Network Connections.) A dialog box will list currently active and available wireless networks, if any, at your location. Select the connection of your choice, and you will be connected. 4.6 Using External Display Devices The Scribbler can easily be attached to an external monitor or to a projector if a larger screen is required. You can have the same picture displayed on both the Scribbler’s screen and on the external screen at the same time, or on the external display only, leaving the Scribbler display blank. In addition, you can split the picture, displaying part of it on the Scribbler and another part on the external display. The external video signal comes from the mini-VGA port on the right side of the Scribbler. Some newer display devices are equipped with mini-VGA input plugs, but for displays with a 15-pin D connector input, use the miniVGA-to-15-pin D adapter cable provided with the Scribbler. • • • • • • Connect the mini-VGA cable to the scribbler Connect the external monitor’s or projector’s video cable to the 15-pin D connector on the other end of the mini-VGA cable. Power up the external monitor or projector, and turn it on. Hold the button on the stylus (for right-click) and tap on the desktop to get a pop-up menu. Select Graphics Option Select Output to: and choose Notebook (Scribbler only); Monitor (external display only, Scribbler blank); lntel® Dual Display Clone (both Scribbler and external display); Extended Desktop (shared display). 39 4.7 Using a PC Card PC cards (PCMCIA) make a direct connection to a computer’s high speed input/output buss. They can be designed to serve many functions – external hard drives, GPS locating devices, wireless cellular connection devices, and input/output interfaces and adapters of all types. The PC card is often the best route for connection to older interfaces, such as RS-232 and RS-485 serial ports. Before inserting a PC Card, read the documentation that came with the card to see if it has any special requirements, and, if needed, prepare to install the software drivers that come with the card. To insert a PC card: • • • Locate the PC Card slot on top edge of the Scribbler. Insert the PC Card When the card is almost all the way into the slot, push firmly, but gently, to ensure a firm connection with the scribbler has been made. Avoid forcing the card into position. To remove a PC card: • • • • 4.8 Locate the black PC card eject button next to the PC card slot. Push the eject button. It pops out from the slot. Push the eject button again, and the card will pop out. Grip the PC card by the edges and pull it out of the slot. Using a Compact Flash (CF) Card CF cards, like PC cards, make direct connection to a computer’s high speed input/output buss. Besides Compact Flash memory cards, used in many digital cameras and for general file transfer and storage, other functions, such as external micro hard drives, are available in the CF card format. Before inserting a CF Card, read the documentation that came with the card to see if it has any special requirements. For most CF format devices the drivers are already in the Scribbler and the card will work as soon as it is plugged in. If your card is not 40 supported, you will have to install the drivers that came with the card. To insert a CF card: • • • • Locate the CF Card slot on top edge of the Scribbler. Insert the CF Card When the card is almost all the way into the slot, push firmly, but gently, to ensure a firm connection with the scribbler has been made. Avoid forcing the card into position. The CF card eject button will pop up To remove a CF Card • Locate the black CF Card eject button next to the slot. • Push the eject button smartly and the card will pop out. • Grip the CF card by the edges and pull it out of the slot. 4.9 Creating User Accounts The Microsoft XP Tablet operating system is a multi-user environment. Each user has a separate User Account. Use the Setup program, to configure these accounts and to set passwords. • • • • • • • • Go to Start Then to Control Panel Then to User Account. Now you can choose from several actions: Change an Account, Create a New Account, etc. If you wish to create a new account, for example, Select Create a new Account Type in the desired name of the new account. Proceed by tapping on the Next button on your screen. Select the account type. Create the account. Similarly, use the other setup choices to change the way you log on and off, establish passwords, etc. 41 4.10 Using the Audio Features The Scribbler is equipped with a sound system with internal speakers and an internal microphone. Instead of using the internal speakers, you can connect headphones or a pair of external stereo speakers to the green audio output jack on the right side of the Scribbler. The headphones or external speaker will replace the internal speakers, which will remain silent as long as the audio output jack is in use. Use the volume control in the Control Panel. The Scribbler can play audio files. Use Windows Media ™ Player, or other software, do this. The external microphone may be used to record monaural audio sounds and save them as digital audio .wav files on disk. You may also record sounds as .wav files by connecting an external microphone or other sound source, such as a mini-disk recorder, to the microphone jack. The Media ™ Player software, supplied with the operating system, will record up to 60 seconds of sound, and software can be purchased which can record and process files of any length. Adjust the sound levels on the external device and in the Scribbler to get the best quality sound. The Scribbler can record high quality sound if the levels are properly set. Connect the external sound source to the pink audio input jack in the right side of the Scribbler, next to the audio output jack. Both input and output jacks are designed to accept standard 3.5mm stereo plugs. 4.11 Installing Software - Applications and Drivers Applications software can be obtained from many sources. Most applications are available for the use under the Windows XP operating system. Likewise, driver software for accessories is normally available for XP as well. Most 42 software is supplied on CDs or as an internet download, but the Scribbler can accept software from a variety of other media. With CDs: • • • • Close any opened programs that are running on the Scribbler. Plug in a USB CD ROM Drive into one of the Scribbler’s USB Ports. Insert the CD(s) with the software(s) you wish to install. The CD should automatically run. Follow the on-screen instructions to install the software. If the CD does not automatically run, search for the software’s setup file under the CD ROM Drive in My Computer . When you find it, double click on it and follow the on-screen instructions to install the software. With Floppy Disks: • • • • Close any opened programs that are running on the Scribbler. Plug in a USB Floppy Disk Drive into one of the Scribbler’s USB Ports. Insert the floppy disk with the software you wish to install. Double click on the Floppy Disk Drive in My Computer and search for the setup file for the software. Follow the on-screen instructions to install the software. With a USB Key • • • Close any opened programs that are running on the Scribbler. Insert the USB Key containing the software to install into one of the Scribbler’s USB Ports. Double Click on the setup file for the software under My Computer / Removable Disk Drive, then follow the on-screen instructions to install the software. From the Internet: • • • Download the setup file from the internet website. Check to see that the file is not compressed. If the file is compressed, then extract (decompress) it. Find and double-click the setup file and follow the on-screen instructions to install the software. 43 4.12 Biometrics — Fingerprint Recognition With the biometrics option (available with the SC800 model ) you can have the Scribbler recognize you by your fingerprint. You can use this fingerprint recognition as a password to control access to files and folders, and for rapid logon. You must “enroll” your fingerprint before you can use this biometrics option on the Scribbler. The enrolling process stores your fingerprint pattern in the Scribbler’s memory. To enroll your fingerprint: • Tap on Start • Tap on All Programs • Tap on Softex and then on OmniPass Enrollment Wizard • Once the Wizard appears tap Enroll • Enter a password and keep it in a safe place • Click on Next • Choose a finger by choosing the button of finger you wish to enroll • Place that finger on the sensor and remove it • Do this again for a total of 7 times • You will have to verify your finger for the last time • Tap on Finish Enrollment To administer fingerprints and passwords: • • • • • Tap on Start Tap on All Programs Tap on Softex Tap on OmniPass Control Center Use the selections available to set up access control. 44 Chapter 5: Scribbler Maintenance 5.1 Cleaning the Scribbler To help ensure long, trouble-free operation of the Scribbler, keep it free from dust and use caution when consuming drinks around the Scribbler. Note Keep liquids, including cleaning fluids, out of the Scribbler’s openings. Never spray cleaner directly onto the computer. Never use harsh or toxic chemical products to clean the Scribbler. To keep the Scribbler clean, wipe the sides and back with a slightly damp cloth. Gently wipe the screen with the cleaning cloth provided. Protection of the Scribbler Be careful not to spill liquids onto the Scribbler. If the Scribbler does get wet, turn the power off immediately and let it dry completely before you turn it on again. A few precautions should be taken when handling the Scribbler to help ensure trouble-free operation. Use the carrying case provided when transporting the Scribbler. Avoid using or storing the Scribbler in extreme temperatures (above 60 degrees Celsius); keep it out of hot parked cars. Warning Never pile books, papers, or other objects on the Scribbler, pack it in an overstuffed suitcase, drop it, or subject it to pressure in any other way. The glass screen can break, internal circuits can be damaged, the battery may be crushed or punctured. Besides irreparable damage to the Scribbler, the result could be dangerous heat and even fire. 45 5.2 Changing the Stylus Tips All Scribblers are shipped with a stylus box. The box contains the following items: • • • One Stylus Five Stylus tips One silver ring When the current tip of the stylus needs replacing (it lasts a very long time), use the silver ring to extract the tip from the stylus. The silver ring has a cut through it. In that cut is a small hole. This small hole is where you place the worn-out tip of the pen. Squeeze the ring gently, and pull the tip out. (Try to get to this before the tip becomes too short to grip with the silver ring.) Then push a new tip into the stylus, flat end first, so the rounded tip is exposed. 5.3 The Battery The Scribbler will recharge the battery from AC adapter power as needed. A steady red “Battery” light is an indication that the battery is charging. The battery stores a lot of power and may take five or more hours to fully charge. A battery may not start charging immediately under the following conditions: • • • The battery is extremely hot or cold. If so, wait until it reaches room temperature. The battery is completely discharged. Leave the power connected and the battery should begin charging after ten or twenty minutes. The battery has been left much too long (months) without any charge, is fully depleted and cannot be recharged. To extend battery life, it is recommended that you recharge your battery only when needed, not at frequent intervals. The battery has no “memory” but a 46 gradual degradation occurs every time you charge it. When possible, leave the charger plugged in for a few hours after charge is complete, as happens naturally if you charge the battery overnight. To ensure that the battery maintains its chargeability, avoid leaving the Scribbler totally uncharged for extended periods of time. AC Adapter The AC adapter converts AC power to DC power and reduces the voltage to a controlled 12V for the Scribbler. It can automatically adjust to any input voltage from 100 to 240 volts and to a frequency of either 50 or 60 hertz (cycles), enabling you to use the computer in almost any country. Warning Using the wrong adapter could damage your Scribbler, and even be dangerous. There are many different sizes of DC plugs, different DC voltages and different polarities in use in electronics equipment. While AC adapters look very similar to one another, plugging in the wrong adapter can break the AC adapter jack or its pin, can damage the Scribbler circuitry, and might cause smoke or fire. Do not use airplane power accessories. 5.4 Software Recovery The operating system can be so badly damaged by “viruses,” incompatible application software, etc., that it must be replaced (re-written into the hard disk drive). Two operating-system recovery CD’s come with each Scribbler. They store a backup copy of the operating system and the software needed to install it. If the operating system damage is relatively minor, you may be able to get away with a Standard (partial) recovery that leaves your applications software and stored data intact. A full recovery will erase everything. Steps are as follows: 47 Steps 1 Procedures Insert a USB Keyboard and a USB CD Drive into the USB ports, either on the side or at the top of the Scribbler and power the CD drive. 2 Insert CD #1 in the CD drive. 3 Turn on the Scribbler - the system will boot up from it. 4 Press “R” to display system recovery options Three options will be displayed: 1. “R” for Standard Systems Recovery 2. “F” to format drive and perform a full system recovery 3. “Q” to quit and to boot the OS from the hard disk (Select R or F depending on the level of recovery you wish) A System Recovery Partition will be created. Please wait until it is completed Scribbler System Recovery – step by step, will finish the installation. No intervention is needed here. 5 6 7 8 9 10 11 12 13 14 When you are asked for CD #2, insert it into the drive and press ENTER The system will ask you to take out the CD. Do so. Then unplug the CD Drive and reboot the Scribbler The “Welcome to Microsoft Windows” screen will appear. Press Alt+n Select your Systems settings with relevant region-language-type of keyboard (See Chapter 3: Getting Started). Select your time zone. The End User Licensing Agreement screen will appear, as for a new Scribbler (See Chapter 3: Getting Started). What’s your Computer’s Name will appear. Fill in the relevant information if you wish. (You have the option of skipping the following screens.) 15 The system will check your internet connectivity. 16 Register with Microsoft will appear – skip this. 17 The Who will use this computer screen will appear. 18 CONGRATULATIONS will appear. Select Finish (ALT+f) 19 The system will reboot once again, and start working 48 Chapter 6: Troubleshooting 6.1 Software Failure Problem: Your program stops responding. Solution: If the current program fails to respond, the program is probably “frozen.” It may be possible to exit this program without shutting down the entire system. There are two ways of closing the program: 1. • • • Using the stylus, press the Security Key. The Windows Task Manager window will appear. Click the Applications tab. If a program has stopped responding, the words “not responding” appear beside its name in the list. Select the not-responding program, and click End Task. 2. If the Task Manager is not successful, you will need to power-down. Press the stylus into the Power Key and hold for several seconds until the power goes off. Then turn on power to begin work again. Problem: Your program performs an “illegal operation.” Solution: When you receive the message, Your program has performed an illegal operation you may wish to record the details to help you in any discussion you may have with the vendor of the offending program. To record the details of the error message: • • • Click the Details button to view the text that the operating system displays. The Details button displays information that the software manufacturer might need to help you solve the problem. Highlight the message completely using your stylus: Touch your stylus to the screen at the beginning of the message and guide the stylus along the entire message, making sure the message is highlighted. Bring up the Input Panel by pressing the stylus into the Screen 49 • • • • • • Keyboard key. On the Input Panel, select the Keyboard tab. On the keyboard panel, tap Ctrl and then c. This will copy the highlighted text to the clipboard. Open Notepad (Start / All Programs / Accessories / Notepad). On the keyboard panel tap Ctrl and then v. This will paste the highlighted text from the clipboard. Write some notes describing what you were doing when you received the message. Save the file and refer to it when you contact the software vendor. Then click OK and return to your work, if possible. It may be advisable, after an Illegal Operation message, to save and close any open programs and then re-start the Scribbler. 6.2 Power-on Problems Problem: The Scribbler will not start. Solution: Make sure you attached the AC adapter and power cable correctly and that the battery is not dead. Check that the AC power outlet is working (plug in a light, for example). Press and hold the power key for a few seconds. Problem: The Scribbler starts, but when you tap on the screen with the stylus or press a front-panel key, nothing happens. Solution: Turn off the Scribbler, unplug any external devices, and restart. If external devices seem to be a part of the problem, refer to the resource conflict documentation of any external devices that were in use. Problem: The Scribbler cannot access the hard disk drive. Since the Scribbler loads the operating system from the hard drive, it will not be able to start. Solution: If the hard drive has not been physically damaged, this problem should be repairable by doing a system recovery. Follow the procedure in Chapter 5: Maintenance. 50 Problem: The Scribbler displays the WARNING, RESUME FAILURE message. Power was lost during while the Scribbler was in standby. Solution: Allow the battery to charge. Any unsaved data will be lost. Problem: The computer displays a Non-system disk or disk error message when a USB disk drive is installed. Solution: Make sure there is no disk in the USB disk drive during power-up. 6.3 Windows™ Operating System Problems Problem: The operating system fails to start after the Starting Windows XP message appears; or the operating system takes a long time to start, responds peculiarly, or presents a desktop screen that isn’t right. Note Unless a hardware device has failed, operating-system problems usually occur when you change the system in some way such as installing a new program or changing settings or configurations. Solution: If Windows fails to start properly, you may have to change your systems configuration or modify the startup procedure to correct the problem. Use the options in the Startup menu to do this. To open the Startup menu, first attach the external USB keyboard, then restart the Scribbler. As the Scribbler starts up, press F8 on the external USB keyboard. This starts the operating system in a minimal “safe mode” and presents a startup screen. Refer to the Windows Operating System Guide for Startup menu and reconfiguration help. 51 6.4 Windows XP Operating System Assistance Problem: The operating system has started, but you still have an operating-system related problem using your computer. Solution: The Microsoft help and online support can assist you in troubleshooting. To access Windows XP Help and Support, tap Start, then Help and Support. The Help and Support window appears. Then do one or both of the following: • ln the search field, type in the topic on which you need help and follow the screen instructions. • Select a problem you would like help with from the listings and follow the on-screen instructions. You can also connect to Support Online by selecting Support from the menu. 6.5 Resolving a Hardware Conflict Problem: An error message tells you there is a device driver conflict or a general hardware problem. Solution: First, use Windows Help and Support, as above, to troubleshoot the problem. For particular help on hardware conflicts, tap the Hardware link in the Help and Support window (see above). Then tap Fixing a hardware problem. A collection of specific hardware-related topics is presented. 6.6 Using the Device Manager Note Device Manager provides a way to check and change the configuration of a device. Caution: changing the default settings using Device Manager can cause other conflicts that make one or more devices unusable. 52 Problem: How to disable (or enable) a device. Solution: Tap Start / Control Panel / Administrative Tools / Computer Management. Select the device you wish to disable. In the toolbar, select the disable icon (a monitor with a strike mark through it), and in the dialog box select yes to disable the device. You can similarly re -enable a device that has been disabled. Problem: To check the properties of a Device. Solution: Device Manager provides a way to view the properties of a device. Properties usually include the name of the manufacturer, the type of device, the drivers installed, and the system resources assigned to the device. To check a device’s properties: • Select Start / Control Panel / Administrative Tools. • Select the Computer Management icon. • Tap the Device Manager button. • To view the devices installed, double-tap the device type. • To view Properties, double-tap the device name. 6.7 Getting Help and Support You can learn more about your Tablet PC and seek answers to your questions from the Electrovaya Technical Support. But before you contact Electrovaya Technical Support regarding any technical issues, please conduct the following initial checks first: • Remove all external devices • Make sure the power cord is completely plugged into the power outlet and 53 into the Scribbler • Check the power light indicator to see if it’s on • Contact the product’s manufacturer first for problems related to a USB CD-ROM drive, scanner, printer, or other external device. The product manufacturer will be much better equipped to help with these external devices. • Contact the software vendor first for software-related questions. Software vendors have up-to-date information on commonly occurring problems. • Load the Default Setting from the BIOS Setup if you have made any BIOS updates. After you have done the above, contact Electrovaya Technical Support. Have the following 3 items ready when you call: Product Model & Serial Number BIOS Revision (Rev) EC Revis ion (Rev) You can find the BIOS Rev and EC Rev information in the Setting Panel, as follows: • • • • • • Plug the external USB keyboard into the Scribbler Turn on the Scribbler Press the Esc key when the Electrovaya logo appears on the screen. A Boot Menu appears on the screen. Use the arrow key to select the Setup Menu Record the BIOS & EC Rev information Turn off the Scribbler. 54 CONTACT INFORMATION Head Office Electrovaya 2645 Royal Windsor Drive Mississauga, Ontario L5J 1K9 Tel: fax: 905-855-4610 905-822-7953 Tech Support Number 1 -800-388-2865 Customer Service 1 -800-388-2865 55 Regulatory Information Federal Communication Commission Interference Statement - This equipment has been tested and found to comply with the limits for a Class B digital device, pursuant to Part 15 of the FCC Rules. These limits are designed to provide reasonable protection against harmful interference in a residential installation. This equipment generates, uses and can radiate radio frequency energy and, if not installed and used in accordance with the instructions, may cause harmful interference to radio communications. However, there is no guarantee that interference will not occur in any particular installation. FCC Caution: Any changes or modifications not expressly approved by the party responsible for compliance could void the user’s authority to operate this equipment. FCC Radiation Exposure Statement: This equipment complies with FCC radiation exposure limits set forth for an uncontrolled environment. This transmitter must not be co-located or operating in conjunction with any other antenna or transmitter. UL Compliance This device complies with EN55022 Class B/EN55024. 56 Limited Warranty Electrovaya warrants to the original purchaser (“You” or “Customer”) this Tablet PC product (“Scribbler”) to be in good working order under normal use and maintenance for a period (“Warranty Period”) of twelve (12) months from the date of purchase. Electrovaya also warrants the Customer battery used in the Scribbler (“Battery”) to be in good working order under normal use for a period (“Battery Warranty Period”) of six (6) months from the date of purchase. Scribbler/Battery run time between charging events may vary and is not guaranteed. During the Warranty Period/Battery Warranty Period, should the Scribbler/Battery, in Electrovaya’s sole opinion, malfunction due to any defect in material or workmanship, the Customer’s sole remedy and Electrovaya’s sole liability shall be, at Electrovaya’s option, to either repair or replace the malfunctioning Scribbler/Battery with a similar product at no charge or reimburse the purchase payment, provided that the malfunctioning Scribbler/Battery is returned, with proof of purchase in the form of the Customer’s original copy of the sales receipt, within the Warranty Period/Battery Warranty Period to the address specified hereon. (This is the “Limited Warranty.”) If a replacement product is issued, the Limited Warranty will apply to the replacement Scribbler/Battery dating from the original date of purchase. The Limited Warranty shall only be available to the Customer and not for any product that has been transferred and no longer owned by the Customer. This Limited Warranty is void if Electrovaya determines that the Scrbbler/Battery has been serviced by anyone other than Electrovaya, or one of its authorized service centers, damaged from accident, misuse, misapplication, abusive operation, improper use and/or insufficient care or has been operated outside the parameters of the Operating Manual. THERE ARE NO EXPRESS OR IMPLIED WARRANTIES, REPPRESENTATIONS OR CONDITIONS OTHER THAN THOSE STATED IN THIS LIMITED WARRANTY. This Limited Warranty is made in lieu of all other warranties, representations or conditions, whether expressed or implied, including without limitation, merchantability or fitness for a specific purpose. Some jurisdictions do not allow limitations on implied warranties, representations or conditions, so the above limitations may not apply to you. The remedy set forth herein shall be the sole, exclusive remedy with respect to the Scribbler/Battery. No person is authorized to make any other warranty or representation concerning the performance of the Scribbler/Battery or extend, or enlarge the Limited Warranty contained herein. Under no circumstances will Electrovaya be liable for any direct, indirect, special incidental or consequential damages (even if Electrovaya is notified of the possibility of such damages) including, but not limited to, any loss of 57 revenue, loss of profit, or loss of data whether based upon any alleged breach of warranty, representation or condition, contract, or any other conduct including negligence (intentional or otherwise), giving rise to such claim. Some jurisdictions do not allow the exclusion or limitation of incidental or consequential damages, so the above exclusion may not apply to you. Electrovaya shall not be liable for any claims made by a third party or made by you for a third party. This Limited Warranty is not transferable. No suit or action shall be brought against Electrovaya more than one year after the accrual of the cause of action. This Limited Warranty gives you specific legal rights and you may also have other rights, which vary from jurisdiction to jurisdiction. 58