1
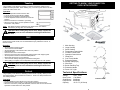
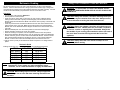
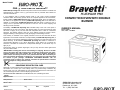
Model TO292H
ONE (1) YEAR LIMITED WARRANTY
EURO-PRO Operating LLC warrants this product to be free from defects in material and
workmanship for a period of one (1) year from the date of purchase when utilized for
normal household use.
If your appliance fails to operate properly while in use under normal household
conditions within the warranty period, return the complete appliance and accessories,
freight prepaid to EURO-PRO Operating LLC, 94 Main Mill Street, Door 16, Plattsburgh,
NY 12901. If the appliance is found by EURO-PRO Operating LLC to be defective in
material or workmanship, EURO-PRO Operating LLC will repair or replace it free of
charge. Proof of purchase date and $18.95 to cover the cost of return shipping and
handling must be included.*
The liability of EURO-PRO Operating LLC is limited solely to the cost of the repair or
replacement of the unit at our option. This warranty does not cover normal wear of parts
and does not apply to any unit that has been tampered with or used for commercial
purposes. This limited warranty does not cover damage caused by misuse, abuse,
negligent handling or damage due to faulty packaging or mishandling in transit.
CONVECTION OVEN WITH DOUBLE
BURNER
OWNER’S MANUAL
Model TO292H
120V., 60Hz., 1700 Watts
This warranty is extended to the original purchaser of the unit and excludes all other
legal and/or conventional warranties. The responsibility of EURO-PRO Operating LLC, if
any, is limited to the specific obligations expressly assumed by it under the terms of the
limited warranty. In no event is EURO-PRO Operating LLC liable for incidental or
consequential damages of any nature whatsoever. Some states do not permit the
exclusion or limitation of incidental or consequential damages, so the above may not
apply to you.
This warranty gives you specific legal rights, and you may also have other rights which
vary from state to state.
*IMPORTANT: Carefully pack item to avoid damage in shipping. Be sure to include
proof of purchase date and to attach tag to item before packing with your name,
complete address and phone number with a note giving purchase information,
model number and what you believe is the problem with item. We recommend you
insure the package (as damage in shipping is not covered by your warranty). Mark
the outside of your package “ATTENTION CUSTOMER SERVICE”. We are
constantly trying to improve our products, therefore the specifications contained
herein are subject to change without notice.
yyyyyyyyyyyyyyyyyyyyyyyyyyyyyyyyyyyyyyyyyyyyyyyyyy
OWNERSHIP REGISTRATION CARD
Please fill out and mail the product registration card within ten (10) days. The registration
will enable us to contact you in the unlikely event of a product safety notification. By
returning this card you acknowledge to have read and understood the instructions for
use, and warnings set forth in the accompanying instructions.
RETURN TO EURO-PRO OPERATING LLC, 94 Main Mill Street, Door 16, Plattsburgh, NY 12901
TO292H
______________________________________________________________________
Appliance model
______________________________________________________________________
Date purchased
Name of store
______________________________________________________________________
Owner’s name
______________________________________________________________________
Address
Printed in China
City
State
11
Zip Code
EURO-PRO Operating LLC
94 Main Mill Street, Door 16
Plattsburgh, NY 12901
Tel. : 1 (800) 798-7398
Using the Cook Tops
IMPORTANT SAFETY INSTRUCTIONS
When using your Bravetti Platinum Pro Convection Toaster Oven, basic
safety precautions should always be observed, including the following:
1.
2.
3.
4.
5.
6.
7.
8.
9.
10.
11.
12.
13.
14.
15.
16.
17.
18.
Read all instructions before using your Convection
Oven with Burners.
Do not touch hot surfaces. Always use handles or
knobs.
Close supervision is necessary when any appliance
is used by or near children.
To protect against electric shock, do not immerse
cord, plug or any parts of the oven in water or any
other liquids.
Do not let cord hang over edge of table or counter,
or touch hot surfaces.
Do not operate appliance with damaged cord or
plug or after the appliance malfunctions or has
been damage in any manner. Return appliance to
EURO-PRO Operating LLC for examination, repair
or adjustment.
NEVER use your appliance for heating the room.
Your oven and cook top are not designed to heat
your kitchen. The top burners should NOT be
operated without cookware.
NEVER leave any items on the top of the oven.
The use of accessory attachments not
recommended by the appliance manufacturer may
cause hazard or injury.
Do not place on or near a hot gas or electric burner.
NEVER place the convection oven with burners
underneath a cupboard when in use. When
operating the convection oven only, keep at least
four inches of free space on all sides of the oven to
allow for adequate air circulation.
Unplug the appliance from outlet when not in use
and before cleaning. Allow to cool before putting
on or taking off parts, and before cleaning.
To disconnect, turn the “Operation” control button
to OFF, then remove the plug. Always hold
the plug, and never pull the cord.
Extreme caution must be used when moving a drip
pan containing hot oil or other hot liquids.
Do not cover any part of the oven with metal foil.
This may cause the oven to overheat.
Use extreme caution when removing the broiler
pan/drip tray, rack or disposing of hot grease or
other hot liquids.
NEVER pick up a flaming pan. Turn all the controls
Off and then unplug the convection oven.
To smother a flaming pan that is on the burners,
cover the pan completely with a well fitting lid.
NEVER use water on a grease fire. A fire in the
convection oven can be extinguished by closing the
oven door and turning the oven off.
19. When using the burners, turn all cookware handles
toward the side or the back of the oven. Do NOT let
them extend over the other burner.
20. When using glass cookware, make sure that it is
approved for use on a burner.
21. Oversized foods or metal utensils must not be
inserted in a toaster oven as they may create a fire or
risk of electric shock.
22. A fire may occur if the oven is covered or touching
flammable material, including curtains, draperies,
walls and the like when in operation. Do not place
any items on the oven during operation.
23. Extreme caution should be exercised when using
cooking or baking containers constructed of anything
other than metal or ovenproof glass.
24. Be sure that nothing touches the top or bottom
elements of the oven.
25. Do not place any of the following materials in the
oven: cardboard, plastic, paper, or anything similar.
26. Do not store any materials other than manufacturer’s
recommended accessories in this oven when not in
use.
27. This appliance is OFF when the Operation Control
button is in the “OFF” position.
28. Always wear protective, insulated oven gloves when
inserting or removing items from the hot oven.
29. This appliance has a tempered, safety glass door.
The glass is stronger than ordinary glass and more
resistant to breakage. Tempered glass can still break
around the edges. Avoid scratching door surface or
nicking edges.
30. Do not use outdoors.
31. Do not use appliance for other than intended use.
32. Do not clean the inside of the oven with metal
scouring pads. Pieces can break off the pad and
touch electrical parts, creating a risk of electric shock.
This unit has a short power supply cord to reduce the risk
resulting from becoming entangled in or tripping over a
long cord. An extension cord may be used if you are
careful in its use:
1. The electrical rating of the extension cord should be
at least as great as the electrical rating of the
appliance.
2. An extension cord with the power cord must be
arranged so that it will not drape over the countertop
or tabletop where they can be pulled on by children
or tripped over accidentally.
SAVE THESE INSTRUCTIONS
For Household Use Only
WARNING: To reduce the risk of electric shock, this appliance has a polarized
plug (one blade is wider than the other). This plug will fit in a polarized outlet
only one way. If the plug does not fit fully in the outlet, reverse the plug. If it still
does not fit, contact a qualified electrician to install the proper outlet. Do not
modify the plug in any way.
1
Rev. 05/04A
The Convection Oven is equipped with two cook tops on the top of the unit. These
can be used either separately or both at the same time. For more efficient use of
these cook tops, we recommend using the correct size pot with the appropriate size
cook top; i.e. use a large pot on the larger cook top and a small one on the smaller
cook top.
Operation
• To use the small cooktop only, set the Operation
Control Knob to the “Small Cooktop” position.
• To use the large cooktop, set the Operation
Control Knob to the “Large Cooktop” position.
• To use both cooktops, set the Operation Control
Knob to the “Both” position.
• To turn the cooktops off, set the Operation
Control Knob to the “Off” position.
= Small Cooktop
= Large Cooktop
= Both Cooktops
Note: The cooktops cannot be used at the same time as the convection oven.
CAUTION: Always use extreme care when using the burners on
the convection oven. NEVER place the oven under a cupboard
or close to curtains or anything that is flammable. Always turn
the handles of your cooking pots towards the side or the back of
the oven. Never leave them facing towards the front of the
appliance.
CAUTION: Always allow the oven and the cooktops to cool
completely before storing.
Care & Cleaning
WARNING: Be sure to unplug the oven and allow it to cool
before cleaning.
Your oven features a continuous clean coating that automatically cleans itself during
normal operation. Any spattering that occurs while cooking and comes into contact with
the continuous coating is oxidized while the oven is in operation. If desired, wipe the
walls with a damp sponge, cloth or nylon scouring pad and mild detergent. DO NOT
USE STEEL WOOL SCOURING PADS, ABRASIVE CLEANERS OR SCRAPE THE
WALLS WITH A METAL UTENSIL, AS ALL OF THESE METHODS MAY DAMAGE
THE CONTINUOUS CLEAN COATING.
All accessories should be washed in hot soapy water or can be cleaned in a dishwasher.
The door can be wiped with a damp sponge and wiped dry with a paper or cloth towel.
Clean the outside with a damp sponge. DO NOT USE AN ABRASIVE CLEANER AS IT
MAY DAMAGE THE EXTERIOR FINISH.
DO NOT USE AN ABRASIVE CLEANER OR STEEL WOOL SCOURING PAD ON THE
BROILER PAN AS IT MAY DAMAGE THE PORCELAIN ENAMEL FINISH.
Use a damp sponge, cloth or nylon scouring pad to clean the cooktops. DO NOT
USE STEEL WOOL SCOURING PADS, ABRASIVE CLEANERS OR SCRAPE THE
WALLS WITH A METAL UTENSIL, AS ALL OF THESE METHODS MAY DAMAGE
THE UNIT.
LET ALL PARTS AND SURFACES DRY THOROUGHLY PRIOR TO PLUGGING
OVEN IN AND USING.
10
Toasting
GETTING TO KNOW YOUR CONVECTION
OVEN WITH BURNERS
Large capacity oven allows for toasting 4 to 6 slices of bread, 6 muffins, frozen
waffles or frozen pancakes. When toasting only 1 or 2 items, place food on the wire
rack in the center of the oven.
Operation
•
•
•
•
Set the Temperature Control Knob to 450°.
Turn the Function Control Knob to Toast.
Place food to be toasted on the Wire Rack.
Turn the Operation Control Knob to the “Oven On”
position.
• Remove food when it is toasted to your liking.
• When the food is done, turn the Operation Control
Knob to the “Off” position.
Note: Wire Rack should be positioned in the middle of the oven with the
indentations pointing down. See illustration.
CAUTION: When sliding trays out of oven, always support the
rack. Always use an oven mitt when removing hot items from
the oven.
Grill
Please note that the Grill function is the same as broiling but only the bottom elements
will be used. For best results, it is recommended that you preheat the oven for 15
minutes on 450°.
Operation
•
•
•
•
•
•
•
•
•
•
Set Temperature Control to 450°.
Turn Function Control to Grill.
Set the Operation Control Knob to the “Oven On” position.
Preheat the oven.
Place the wire rack on the broil pan.
Place the food on the wire rack and slide into the bottom rack support guide.
Set Temperature Control to the desired temperature.
Brush food with sauces or oil, as desired.
Turn food over midway through the prescribed cooking time.
When grilling is complete, turn the Operation Control Knob to the “Off” position.
CAUTION: When sliding trays out of oven, always support the
rack. Always use an oven mitt when removing hot items from
the oven.
Defrost
Large capacity oven allows for defrosting of frozen meat or poultry. When you use
the Defrost feature, the convection fan comes on. There is no heat produced from
the heating elements.
Operation
• Set the Operation Control Knob to the “Oven On” position.
• Place the frozen meat or poultry on the broil pan and insert into the oven.
• When the meat or the poultry has defrosted, remove it from the oven and set the
Operation Control Knob to the “Off” position.
9
1.
2.
3.
4.
5.
6.
7.
8.
9.
10.
11.
12.
13.
14.
Main Housing
Large Cooktop
Small Cooktop
Temperature Control Knob
Function Control Knob
Operation Control Knob
Glass Door
Cool Touch Handle
Rotisserie Skewer
Skewer Clamps (x2)
Wire Rack
Broiler Pan/Drip Tray
Rotisserie Handle
Power “On” Light
Technical Specifications
Voltage:
Oven Power:
Small Burner:
Large Burner:
Capacity:
120V., 60Hz.
1700 Watts
540 Watts
900 Watts
.91 Cu. Ft. (26 Liters)
CONTROL PANEL
2
Read all the sections of this booklet and follow all the instructions carefully.
Before Using Your Convection Oven with Burners
1.
2.
3.
4.
5.
6.
Read all of the instructions included in this manual.
Make sure that the oven is unplugged and the Operation Control Knob is in the
“OFF” position.
Wash all the accessories in hot, soapy water or in the dishwasher.
Thoroughly dry all accessories and re-assemble in oven. Plug oven into outlet
and you are ready to use your new Convection Oven with Burners.
After re-assembling your oven, we recommend that you run it at the highest
temperature (450° F.) on the Toast Function for approximately 15 minutes to
eliminate any packing residue that may remain after shipping. This will also
remove all traces of odor initially present.
We recommend that you also turn the burners on for about 10 minutes to
eliminate any packing residue that may remain after shipping.
Please Note:
Initial start-up operation may result in minimal smell and smoke
(about 15 minutes). This is normal and harmless. It is due to
burning of the protective substance applied to the heating
elements in the factory.
Convection Cooking
Convection cooking combines hot air movement by means of a fan with the regular
features (broil, bake and toast). Convection cooking provides faster cooking in many
cases than regular radiant types toaster ovens. The fan gently circulates air to every
area of the food, quickly browning, crisping and sealing in moisture and flavor. It
produces more even temperature all around the food by air movement, so that food
cooks/bakes/broils evenly versus the normal ovens hot and cold spots. The convection
feature allows cooking/baking at lower temperatures, which saves energy and helps
keep the kitchen cooler. With the Convection Oven you will see about a 25 to 30%
decrease in cooking temperature and a 20 to 25% decrease in cooking time when
compared to a conventional oven.
Roasting In Your Oven
Roast your favorite cut of meat to perfection. The oven can cook up to an 6-lb.
chicken or turkey and up to a 4-lb. roast. A guide has been provided to assist you with
roasting times. However, we suggest that you periodically check the cooking progress
with a meat thermometer. For best results we recommend that you preheat the oven
for 15 minutes on 450°. We do not recommend the use of oven roasting bags or glass
containers in the oven. Never use plastic cardboard, paper or anything similar in the
oven.
Operation
• Place the wire rack in the oven at the lowest position.
• Place food to be cooked in any roasting pan. If you wish to use the broil pan, then
you do not need to insert the wire rack because the broil pan supports itself on the
oven support guides.
• Set the Temperature Control Knob to the desired temperature.
• Turn the Function Control Knob to Convection Baking.
• Set the Operation Control to the “Oven On” position.
• Always use oven mitts to help you slide the roast in and out of the oven is wish to
check on the cooking progress.
• When cooking is complete, turn the Operation Control Knob to the “Off” position.
Roasting Guide
Cooking results may vary, adjust these times to your individual requirements.
MEAT
OVEN TEMP
BEEF ROAST
325
PORK ROAST
325
HAM
325
CHICKEN
350
TURKEY
350
TIME PER LB.
25-30 min.
40-45 min.
35-40 min.
20-25 min.
20-25 min.
Using Your Convection Oven with Burners
Please familiarize yourself with the following oven functions and accessories prior to
first use:
• Temperature Control - Choose the desired temperature from 150° to 450° F for
baking, broiling, toasting or grilling.
• Function Control - This oven is equipped with six positions for a variety of cooking
needs:
Bake w/Convection - Cakes, pies, cookies, poultry, beef, pork, etc.
Toast - Bread, muffins, frozen waffles, etc.
Rotisserie w/Convection - Cook up to a 3-lb roast or chicken.
Broil - For broiling fish, steak, poultry, pork chops, etc
Defrost w/Convection - Fan circulates air for defrosting meats or poultry.
Grill w/Convection - For grilling fish, steak, sandwiches, bacon, etc.
• Operation Control – You can select either the oven or the cooktops. You can either
use one or both of the cooktops at the same time but not together with the oven.
• Convection Fan - The convection fan works automatically on Bake, Grill, Rotisserie
and Defrost settings.
• Power “On” Light – It is illuminated whenever the appliance is in use.
• Broiler Pan/Drip Tray – For use when broiling and roasting meat, poultry, fish and
various other foods. Also to be used when using the Rotisserie to catch the
drippings.
3
Note: All roasting times are based on meats at refrigerator temperature.
Frozen meats may take considerably longer. Therefore, use of a
meat thermometer is highly recommended.
CAUTION: When sliding trays out of oven, always support the
rack. Always use an oven mitt when removing hot items from
the oven.
8
Rotisserie Cooking
We recommend that you do not cook a roast larger than 3-4 lbs. on the Rotisserie
Skewer. Chicken should be bound in string to prevent the chicken legs or wings from
unraveling during roasting and so that rotisserie assembly will rotate smoothly. For best
results we recommend that you preheat the oven for 15 minutes on 450°.
Operation
• Turn Function Control Knob to Rotisserie.
• Set temperature control to 450°F.
• Insert the meat or poultry that you are going to cook onto the rotisserie skewer
making sure that the meat or poultry is secured tightly onto the skewer with the
skewer clamps and thumbscrews. Make sure that the meat or poultry is centered onto
the skewer.
• Insert the pointed end of the Rotisserie Skewer into the drive socket located on the
right hand side of the oven wall. Make sure that the square end of the Rotisserie
Skewer rests on the Rotisserie Skewer Support located on the left hand side of the
oven wall.
• Slide the Broil/Drip Pan onto the lowest position to catch the food drippings.
• Set the Operation Control to the “Oven On” position.
• When the cooking is completed, turn the Operation Control to the “Off” position.
• Remove the Rotisserie Skewer from the oven by placing the hooks of the Rotisserie
Handle under the grooves on either side of the Rotisserie Skewer. Remove the left
side of the Rotisserie Skewer first by lifting up and out. Then pull the Rotisserie
Skewer out of the drive socket and carefully remove the roast from the oven.
• Take the meat or poultry off the Rotisserie Skewer and place on a cutting board or
platter.
Using Your Convection Oven with Burners
WARNING: TO AVOID RISK OF INJURY OR BURNS, DO NOT
TOUCH HOT SURFACES WHEN OVEN IS IN USE. ALWAYS USE
OVEN MITTS.
CAUTION: Always use extreme care when removing broiler pan,
wire rack or any hot container from a hot oven. Always use the
an oven mitt when removing hot items from the oven.
CAUTION: Always use extreme care when using the burners on
the convection oven. NEVER place the oven under a cupboard
or close to curtains or anything that is flammable. Always turn
the handles of your cooking pots towards the side or the back of
the oven. Never leave them facing towards the front of the
appliance.
CAUTION: Always allow the oven and the cooktops to cool
completely before storing.
Rotisserie Guide
Cooking results may vary, adjust these times to your individual requirements.
MEAT
OVEN TEMP
BEEF ROAST
325
PORK ROAST
325
HAM
325
CHICKEN
350
TURKEY
350
Note:
TIME PER LB.
30-35 min.
45-50 min.
45-50 min.
25-30 min.
25-30 min.
All roasting times are based on meats at refrigerator
temperature. Frozen meats may take considerably longer.
Therefore, use of a meat thermometer is highly recommended.
CAUTION: When sliding trays out of oven, always support the
rack. Always use an oven mitt when removing hot items from
the oven.
7
4
Broiling
Convection Baking
The top heating elements cycle on and off to maintain maximum temperature in
the oven. For best results, the oven should be preheated for 20 minutes at 450°
before adding the food to be broiled.
Operation
•
•
•
•
•
•
•
•
•
•
•
Set Temperature Control Knob to 450°.
Turn Function Control Knob to Broil.
Set Operation Control Knob to the “Oven On” position.
Preheat the oven .
Place the wire rack on the broiler pan
Place the food on the wire rack.
Place the broil pan on the Top Rack Support Guide or Middle Rack Support Guide
depending on the thickness of the food that you are cooking.
Food should be placed as close as possible to the Top Heating Element without
touching it.
Set temperature control to the appropriate temperature.
Brush food with sauces or oil, as desired.
When broiling is complete, turn the Operation Control Knob to the “OFF” position.
Broiling Guide
Cooking results may vary, adjust these times to your individual requirements. Also,
check often during broiling to avoid overcooking.
MEAT
OVEN TEMP
RIB STEAK
400
T-BONE STEAK
400
HAMBURGER
400
PORK CHOPS
400
LAMB CHOPS
400
CHICKEN LEGS
400
FISH FILETS
350
SALMON STEAKS
350
COOKING TIME
25-30 min.
25-30 min.
25-28 min.
40-45 min.
30-40 min.
30-35 min.
20-25 min.
20-25 min.
Convection baking is very consistent and even. The oven heats quickly, so preheating
is not necessary or desirable. The fan circulates the hot air around the food making
baked goods rise quickly and evenly.
Bake your favorite cookies, cakes, pies, brownies, etc. The bakeware that will fit in
your oven are up to 10 inches in length. We do not recommend the use of oven
roasting bags or glass containers in the oven. Never use plastic, cardboard, paper or
anything similar in the oven.
Operation
•
•
•
•
•
•
Place the wire rack in the lowest or middle Rack Support Guide depending on the
height of the pan or according to the recipe.
Place pan with item(s) to be baked on the wire rack.
Turn the Function Control to Bake/Convection.
Set the Operation Control to the “Oven On” position
Set the Temperature Control to the desired temperature.
When baking is complete, turn Operation Control to the “Off” position.
Positioning of the Wire Rack
Cookies - Use bottom and middle Support Guides.
Layer Cakes - Use bottom Support Guide only (bake one at a time).
Pies - Use bottom Support Guide.
Baking Cookies
For baking cookies, we suggest adjusting baking temperature and using a cookie
sheet placed on the wire rack. Also, using parchment paper on a cookie sheet might
prove helpful when baking certain types of cookies.
1. Use parchment paper on cookie sheet so cookies will not stick.
2. Cookie sheets, baking times and temperatures may differ from those necessary
when using other baking materials.
Note: Convection air is superheated and it circulates around the food, so it cooks food
up to 30% faster. When baking your favorite recipes or packaged goods, follow recipe
instructions remembering not to preheat. Check the baked goods a few minutes before
the shortest recommended baking time.
Baking Guide
Note: All broiling times are based on meats at refrigerator temperature.
Frozen meats may take considerably longer. Therefore, use of a
meat thermometer is highly recommended.
CAUTION: Always use extreme care when removing broiler pan,
wire rack or any hot container from a hot oven. Always use an
oven mitt when removing hot items from the oven.
5
Follow the package or recipe instructions for baking times and temperature.
CAUTION: When sliding trays out of oven, always support the
rack. Always use an oven mitt when removing hot items from
the oven.
6