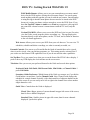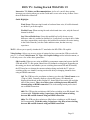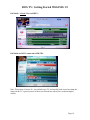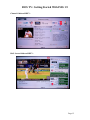
1
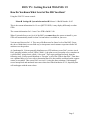
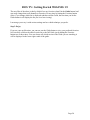
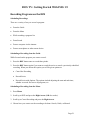
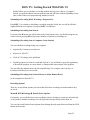
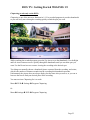
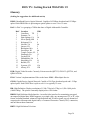
FiOS TV: Getting Started With Interactive Media Guide 1.9 Justin @ Verizon Forums Last Update: February 11, 2012 FiOS TV: Getting Started With IMG 1.9 Contents Purpose of This Document.............................................................................................................. 3 What’s New in 1.9 .......................................................................................................................... 4 How Do You Know What Level of the IMG You Have? .............................................................. 5 STBs Supported by 1.9 ................................................................................................................... 6 Initial Setup ..................................................................................................................................... 7 Additional Settings.......................................................................................................................... 8 The New Guide ............................................................................................................................. 13 Exploiting FiOS TV Favorites ...................................................................................................... 17 Recording Programs on the DVR ................................................................................................. 21 Common Verizon FiOS Remote Controls .................................................................................... 24 Using the Verizon Remote Control............................................................................................... 25 With the Guide .......................................................................................................................... 25 For Watching Live TV .............................................................................................................. 26 For Controlling the DVR .......................................................................................................... 27 Using Remote DVR from Smart Phone or Tablet(?) .................................................................... 28 Using Video on Demand............................................................................................................... 29 Some Additional Hints and Tips for FiOS TV ............................................................................. 30 A Few Final Comments ................................................................................................................ 35 Glossary ........................................................................................................................................ 36 Page 2 FiOS TV: Getting Started With IMG 1.9 Purpose of This Document Over the six years plus that FiOS TV has been available there have been many changes in the software used to control the set top boxes. With the new 1.9 release of the Interactive Media Guide (IMG), many new capabilities have been introduced. This document is my attempt to provide hopefully useful advice on customizing and using the new release. It is intended for both new FiOS TV customers as well as existing customers who have gotten the upgrade from the 1.8 release to the 1.9 release. Information and suggestions about setting up and using existing features and options in 1.8 as well as the new capabilities in 1.9 are included. Please, when you read this, remember: It is not a complete tutorial on FiOS TV. If you are new to FiOS TV, I suggest you initially focus on the following sections: Initial Setup, The New Guide, and Exploiting FiOS TV Favorites. Once you are more comfortable with how the software works, you might want to explore other areas. And if you experience difficulties with some functions, you might find some help in the Some Additional Hints and Tips for FiOS TV section. Some of it (maybe a lot) is my opinion I am located in the Dallas-Ft. Worth area (DAC 1 VHO 1), so some things may be local for me and different for you. It is not an official document from Verizon. I have only Motorola HD boxes, one QIP7232 and two QIP7100-P2s, so all of the recommended settings assume Motorola HD STBs. But I do have SD TVs attached to the two QIP7100-P2 STBs. Some of the results of key presses, etc., may depend on settings that I have made, so if you choose different settings what you see may be different. If any of you see what you think are errors, or have suggestions for additional topics, please do let me know via a Private Message (PM) on the Verizon Forums. Note: You will find a number of acronyms in this document. If you don’t know what they mean, there is a Glossary at the end. Page 3 FiOS TV: Getting Started With IMG 1.9 What’s New in 1.9 Here is a partial list of the new capabilities included in 1.9 (this list is from Joe Ambeault’s Release Notes on the Verizon at Home blog: http://forums.verizon.com/t5/Verizon-atHome/FiOS-TV-Interactive-Media-Guide-1-9-Release-Notes/ba-p/301355): New look and feel with higher resolution graphics and smooth animations Re-design of search and better integration throughout the guide Expansion of guide data to include complete cast information and air date New Channel Guide view providing another option for navigating live TV content Recommendations for live TV content Ability to select the Widgets that are displayed in the carousel More parental control tools and a configuration wizard Overhaul of Message Center Improved 3DTV support Support for Descriptive Video Service, native pass through, 1080p, and MP3 and MPEG4 decoding on select devices. A long list of DVR and multi-room DVR enhancements Even more ways to customize the guide to your personal preferences Not all of these topics will be covered here. Two DVR functions not specifically listed above that are really big steps forward: Multi-Room feature (not new but enhanced): You can now not only view programs recorded on a DVR from any STB, you can also schedule and delete recordings from the STB. Multi-Hub feature (new): If you have multiple DVRs, each DVR can see the other(s), and view each other’s content. You can also view, schedule, and delete recordings on any DVR in the home from any non-DVR STB. Note: One current limitation is the DVRs cannot currently add or delete content from each other, so from one DVR you cannot schedule or delete recordings on another DVR. Page 4 FiOS TV: Getting Started With IMG 1.9 How Do You Know What Level of the IMG You Have? Using the FiOS TV remote control: Menu Settings System Information Release 1.9 Build Number 10.95 This is the current information for 1.9 on a QIP7232 DVR; it may display differently on other STBs. The current information for 1.9 on a Cisco STB is Build 12.40. When Verizon delivers a new level of the IMG you cannot force the system to install it, your STBs will automatically install it when Verizon makes it available in your area. Verizon ran a Beta test for 1.9. They may offer Beta tests for future levels of the IMG. I hope they do as I think that is an excellent way to incorporate actual customer experience before all customers see the product. As I understand it, Verizon generally distributes new STB software to one DAC at a time (each DAC generally includes several VHOs). With 1.9, the plan was to first update a few customers in a selected DAC using what is called a “slow spin.” If no major problems surfaced, then the following week Verizon would distribute a “fast spin” to all of the STBs in that DAC. Then there was a planned delay of a few weeks to determine that all is okay and the workload on the support centers is acceptable. Then a new DAC received 1.9 using the same technique. Unfortunately several unexpected and unrelated issues arose that slowed the distribution of 1.9; hopefully that will not happen with the next release. Page 5 FiOS TV: Getting Started With IMG 1.9 STBs Supported by 1.9 High Definition DVRs: Motorola: QIP7232-P2, QIP7216, QIP6416* Cisco: CHS 435 High Definition non-DVR STBs: Motorola: QIP7100-P2, QIP7100-P1, QIP6200 Cisco: CHS 335 Standard Definition STBs: Motorola: QIP2500-P3** Not Supported: Motorola: QIP2500-P1, QIP2500-P2, DCT-700 * Limited support for QIP6416 - no HD Guide, reportedly slow performance, possibly other issues ** Reportedly very slow performance Keep in mind that all HD DVRs and STBs will work with SD TVs, so if you have a QIP2500 box you can replace it and continue to use the same SD TV. One advantage is that you can view HD-only channels (such as HDNet and HDNet Movies), HD recordings, and HD VOD programs on the SD TV. And if you are not aware of it, Verizon does offer some package “deals” for customers with a Multi-Room DVR and two or more HD STBs that may minimize the upgrade cost. Page 6 FiOS TV: Getting Started With IMG 1.9 Initial Setup Note: I think a number of the options available are different between the HD boxes and the SD boxes; since I don’t have any SD boxes I have no way to verify what options are available on them. Probably the most important settings in the HD STB are the type of TV that is attached, the Video Format you want to use, and the Graphic Settings which control how the Guide and Menu are displayed, so I am covering them here first. Menu Settings Video Settings setting option Video Format 480i 4:3 – Use for all SD TVs 720p 16:9 – Optional setting for an HD TV 1080i 16:9 – Recommended for an HD TV (this is the setting I prefer and use) Suggestion: For an HD TV, try both 1080i and 720p and see which looks better on your TV. TV Type 16:9 – Use this option for all HD TVs 4:3 LETTERBOX – This is the option I use for my SD TVs on HD STBs (I did try the alternative 4:3 PAN SCAN option, it did not look good to me) Graphic Settings HD: Use this if an HD TV is attached to the STB. SD: Use this setting if an SD TV is attached to the STB. Note: This setting appears to me to be very important. In my experience the readability of the Guide and Menu is dramatically improved on an SD TV with this setting. Page 7 FiOS TV: Getting Started With IMG 1.9 Additional Settings Below are some key settings in the Menu that I think you should review and decide how you want the IMG to work. I am not covering all settings and options, just the ones I think are particularly important or new; I highly recommend that you take the time to look through the entire Menu on your set top box, you may find some great capability you didn’t know existed. Menu Settings setting option Accessibility: You can now set a number of values for Closed Captions directly in the Menu. Previously these settings were hidden and only accessible using a Power-Off - OK - Menu sequence. Audio: Volume Control: Fixed or Variable. Allows you to control the volume through the STB or through the TV. I prefer to control the volume through the TV, so I set Volume Control to Fixed and then set the volume control for the STB to the maximum (see below). I prefer to adjust the volume using the TV because I occasionally connect the TV to an antenna and if I have the TV volume set to maximum the sound is deafening. If you use your smart phone to control the DVR you will want the phone to be able to control the volume so you should use the Variable setting. Set-Top Box Volume: Sets the default volume on the STB. If you used Fixed for Volume Control then you should adjust the STB volume to the maximum here. Caller ID: If you have Caller ID service on your phone and want that information displayed on the TV, you can enable it on each STB, set Alert Display to Enable. DVR: Skip: 10 seconds, 30 seconds, 1 minute, or 5 minutes. I prefer to skip forward 30 seconds at a time, this way 4 or 6 quick button presses get me past most commercials, but I can still advance shorter amounts if needed. Replay: 10 seconds, 30 seconds, or 1 minute. I prefer to skip backwards 10 seconds because I rarely need to go back more than that, and if I do I can use multiple presses or the rewind function. Program Chaptering: Enable or Disable. This is a new function. It provides a very nice way to quickly move forward or backward within a recording by providing thumbnails at intervals throughout the recording. The actual time interval is variable, depending on the length of the recording. I have seen the interval as low as 3 minutes for a 30 minute Page 8 FiOS TV: Getting Started With IMG 1.9 recording and as high as 10 minutes for a three hour recording. You cannot set the interval yourself. Chaptering only works directly on the DVR, it does not work from an STB using the multi-room feature. Note: Verizon is apparently having difficulties in some areas getting the thumbnails to consistently display. However, even when the thumbnails are not visible the chaptering function itself still works and the time intervals are displayed, at least for me. Use of the Program Chaptering feature is covered in the Using the DVR section below. Multi-Room DVR Settings: You can give the DVR a meaningful name. There are a number of provided names, unfortunately for me “Office” is not among them, so I had to use the option to create my own name, which works just fine. Default Series Options: This is not a new set of options, but if you plan to use your DVR a lot you should take the time to go through all of the options and set them so you get the recordings you want. Favorite Channels: There are a number of settings here to set up and control the Favorites capabilities of the STB. I think everyone should take the time to set up at least one Favorites list. I know that some think they should not need to do this, that somehow Verizon should automatically know what channels they want to watch, but I feel that is unrealistic. There are so many channels available in each package, and even if you use the new Subscribed option to eliminate the channels not included in your package, there are probably still many channels that you will never watch, and it is pointless and annoying to see those channels when surfing, especially now that Verizon has started imbedding VOD channels throughout the channel list (really unfriendly for customers). Just my opinion of course…. One thing I think is missing is the ability to save and restore Favorites definitions, and to port them to other STBs; hopefully that will come in the future. But for now, if you want to use Favorites on multiple STBs, they must be set up on each STB separately. There is much more discussion of setting up and using Favorites in the Exploiting FiOS TV Favorites section later. FiOS TV Remote DVR: You can enable smart-phone and web access to your DVR here. Note: both of these options require you to first set up a Parental Control pin, see Parental Controls below. Mobile Phone Access: There are a couple of Verizon apps available for a wide selection of smart-phones: FiOS Mobile Remote and Verizon FiOS DVR. To use either app, your phone must be activated here by entering the phone number of the smart-phone. Page 9 FiOS TV: Getting Started With IMG 1.9 FiOS Mobile Remote: Allows you to use your smart-phone as a remote control device for the DVR in place of using the real remote control. You can do pretty much anything with this app that you can do with the real remote. One advantage to using this app is that the smart-phone does not need to be aimed at the DVR because it is using your home wireless network to access the DVR. Note: If you have Set-Top Box Volume in Audio set to Fixed my experience is this app will not control the volume because it cannot interact with the TV itself, only the DVR. Verizon FiOS DVR: Allows you to access the DVR and view/set your Favorites, view the Guide, record programs, delete recordings, etc. This app displays the functions directly on the smart-phone, not the TV itself, and is similar in function to the web-based application. Web Access: Allows you to access your DVR from your web browser. You can view TV schedules, schedule and delete recordings, see what is currently recorded, etc. Parental Controls: You can set up a Pin and define the kinds of material that can be viewed, when it can be viewed, who can purchase programs, etc. This setting must be activated first if you wish to use the Remote DVR capabilities even if you do not need the other capabilities. Set-Top Box: Gives you control over what you see on the front of the STB if it has a display. I prefer to have my DVR display the clock and not use the screen saver. Television: Here you can set your preferred format for the Guide and several other options. Preferred Guide: Full Guide, Half Screen Guide, Mini Guide, or Channel Guide. I prefer Full Guide. Secondary Guide Preference: Which format of the Guide you want to see if you hit the Guide button a second time. I prefer Channel Guide. Note: Chanel Guide displays the schedule for a single channel vertically, with a horizontal list of adjacent channels at the top of the screen so you can easily move left or right in the channel list to select another single channel to view. Guide View: Controls how the Guide is displayed. Classic View: Bigger picture of current channel in upper left corner of the screen, data for fewer channels displayed. Standard View: Smaller picture in upper left corner, data for more channels displayed. I prefer this option. Page 10 FiOS TV: Getting Started With IMG 1.9 Interactive TV, Modes, and Recommendations: As far as I can tell, these options interrupt your viewing when you use the Guide and I see no value in any of them. I have them all disabled or turned off. Guide Highlight: Fixed Focus: When moving forward or backward time-wise, all visible channels are shifted. I prefer this option. Flexible Focus: When moving forward or backward time -wise, only the focused channel is shifted. Last Viewed Guide State: I have this enabled but I really do not see any difference when it is enabled or disabled (ie, I really don’t see what it does). Other users have reported they need to have this enabled to retain their Favorites setting in the Guide when they exit the Guide and then return, but that is not my experience. 3D TV: Allows you to specify whether the TV attached to the HD STB is 3D capable. Video Settings: Allows you to set a variety of options for how you want the STB to work with your TV. I covered Video Format, TV Type, and Graphic Settings earlier in this document, so I will only cover a few of the other options here. SD Override: When you are using an HDMI or component connection between the HD STB and an HD TV, this option controls how SD channels are displayed. Depending on the setting you choose and whether you are switching between an HD and SD channel, the STB may have to change the current resolution being used with the TV prior to switching to the new channel, causing a noticeable delay in changing channels when using an HDMI connection. Off: The STB leaves the resolution at whatever you have the Video Format set to (720p or 1080i). Generally displays a decent SD picture, SD channels are displayed letterboxed in their original 4:3 format (black bars on the left and right sides of the picture). There is no delay when switching between HD and SD channels using an HDMI connection. This is the setting I much prefer since I use an HDMI connection. 480i: The STB sets the resolution to 480i before switching to an SD channel. Not recommended. With this setting I experience a big delay when switching between HD and SD channels using an HDMI connection. 480p: The STB sets the resolution to 480p before switching to an SD channel. Not recommended. With this setting I experience a big delay when switching between HD and SD channels using an HDMI connection. Page 11 FiOS TV: Getting Started With IMG 1.9 Stretch: The STB leaves the resolution at whatever you have the Video Format set to (720p or 1080i). SD channels are displayed full screen. Picture quality is usually somewhat degraded. With this setting I experience a big delay when switching between HD and SD channels using an HDMI connection. Video Sharpness: Allows you to set the sharpness of the displayed SD picture. It offers a range from 1 (softer) to 5 (sharper). The default is 3. I am using 5 based on the recommendation of a Verizon Forums user and it did seem to improve the SD picture slightly over the default . Page 12 FiOS TV: Getting Started With IMG 1.9 The New Guide With 1.9 the Guide offers many new features. Additional display options for the Guide include: New option to jump forward two hours at a time (great enhancement) 2 ½ hours displayed when using an HD TV An option to go directly to Search from the Guide Brighter, more modern appearance (some people do not like the new colors and format, I very much like them) A new Subscribed option to include only the channels included in whatever package you have, thus reducing the number of channels you see when scrolling through the Guide (I do not use this option because it still includes many channels I have no interest in, but some people apparently like it. In my opinion using Favorites list(s) is a far better solution) Following are some pictures of various views of the new Guide (Note: I am a lousy photographer and I don’t have any sophisticated photo editing tools, plus my digital camera is very old, so please cut me some slack): Full Guide – Standard View on HDTV: Page 13 FiOS TV: Getting Started With IMG 1.9 Full Guide – Classic View on HDTV: Full Guide on SDTV connected to HD STB: Note: This picture is from a 10+ year old tube-type TV and actually looks worse here than the image on the TV, I guess because of the screen refresh rate and my low resolution digital camera. Page 14 FiOS TV: Getting Started With IMG 1.9 Channel Guide on HDTV: Half Screen Guide on HDTV: Page 15 FiOS TV: Getting Started With IMG 1.9 Mini Guide on HDTV: Guide Legend on HDTV: I find the new Guide format to be very readable and a big improvement over the Guide in 1.8. Other people’s opinions vary. After looking at these different Guide options, you may want to go back and change which guide format is set for the Default Guide setting: Menu ==> Settings ==> Television ==> Default Guide option The options are: Full Guide, Half Screen Guide, Mini Guide, or Channel Guide Page 16 FiOS TV: Getting Started With IMG 1.9 Exploiting FiOS TV Favorites When Verizon introduced the original Interactive Media Guide (IMG) to replace the Interactive Programming Guide (IPG), many people, including me, were disappointed that it was no longer possible to remove channels from the Guide to create a customized list of channels to view when using the Guide button on the remote. Verizon did add the ability to define a Favorites list, but you had to use the Favorites button to access that list; hitting the Guide button always displayed the complete list of channels, including all the ones you had no interest in. Starting with the 1.6 level of the IMG, you could create up to two Favorites lists, and you could set up the remote so that the Guide button will display one of the Favorites lists instead of the complete guide (something that I think has been missed by a lot of users). You could also easily change to whatever list you wanted whenever you wanted – big steps forward. And along the way Verizon has added the ability to manage your Favorites via the web (for a DVR only). 1.9 continues with the Favorites concept, with some new features thrown in. Note: If you have multiple STBs and want to use Favorites on each, you will need to create the list individually on each STB. Hopefully in the future Verizon will provide some facility to transfer Favorites between STBs. Getting Started It really is very easy to set up one or two Favorites lists and control which key on the remote does what: 1) Create a Favorites list (and create a second one if you want, so that you have separate channel lists for him/her, parents/kids, sports/movies, normal use/free previews, etc., really whatever division you want). There are multiple ways to create your initial list, and there are multiple ways to maintain the list once it has been created. 2) Set up how you want the Guide and Favorites keys on the remote to work. 3) Enjoy. Step 1: Create a Favorites List The first step is to create at least one Favorites list, either Favorites 1 or Favorites 2. Note: you can choose to create (and then manage if you want) your Favorites lists directly on a DVR or via the web. I find the web process too slow and cumbersome; I much prefer to do my work directly on the DVR. But you should probably try both methods to see which you prefer. For non-DVR STBs, the setup must be done directly on the STB, there is no web interface. Page 17 FiOS TV: Getting Started With IMG 1.9 On the STB: Menu ==> Settings ==> Favorite Channels ==> Favorites 1 ==> Add All Channels or Menu ==> Settings ==> Favorite Channels ==> Favorites 1 ==> Add or Remove Channels You can choose to simply add all of the channels immediately and remove unwanted channels from the list later, you can go through the entire list of channels right at the beginning adding only the ones you want (you can easily modify the list at any time), or you can even create a list of just one or a few channels and add more later, your choice. And if none of these choices appeal, you can just not bother to create a Favorites list at all and dynamically begin creating one later using the Options button on the remote. I highly recommend that you invest the time up front to go through the Add or Remove Channels right up front, make some (educated) guesses on which channels you want in the list, and make sure you don’t include those you know you have no interest in. Doing this up front will make your initial experience with FiOS TV much more enjoyable, and make later customizations of the list much easier. If you chose to use Add All Channels, then I recommend you at least go through immediately and remove those you know you do not subscribe to or want in the list. To do this, after using Add All Channels, go to Add or Remove Channels, find a channel you want to remove, and press the OK button, the little heart will disappear. Repeat this for each channel you want to remove. If you chose to use Add or Remove Channels, once you are positioned at the channel you want to add to your favorites list, just press the OK button and a little heart will appear (if you make a mistake or change your mind, press OK again to remove the channel from the list). Repeat this for each channel you want to add. Use the Up Arrow and Down Arrow buttons to move through the channel list one channel at a time as you make your selections. There are some keys you can use to make this process easier and faster: Use the Channel + and Channel - buttons to move forward or backward in the list about 12 channels at a time. Press any combination of number buttons to jump forward or backward from your current position in the list. Some examples: Press 0 to get to the top of the channel list Page 18 FiOS TV: Getting Started With IMG 1.9 Press 500 to go to the first HD channel in the list (in my case, it will actually jump to 504, my first channel after the non-existent channel 500) Press 9999 to go to the bottom of the list Step 2: Set up how you want the Guide and Favorites buttons to work This step must be done from the remote directly on the STB. Two buttons on the remote control work together to display the Program Guide: the Guide button and the Favorites button. There are two settings in the Menu to control how these buttons work together: Favorites Button and Flip by Favorites. Menu ==> Settings ==> Favorite Channels ==> Favorites Button option The Favorites Button options control what you see when you hit the Favorites button on the remote control: Show Favorite Listings: When you hit the Favorites button, you see only your Favorites 1 (or 2 if it exists) list of channels in the Guide, and when you hit the Guide button you always see the full list of all channels. This is the default setup when you receive your FiOS TV equipment, with both favorites lists empty. Toggle Flip by Favorites: When you hit the Favorites button you do not see a Guide with your Favorites listed; instead, you see a small display in the lower right part of the screen showing what list will be displayed when you hit the Guide button: one of your Favorites or the full Guide. Repeatedly hitting the Favorites button will rotate through the options: Favorite 1 (if the list exists), Favorite 2 (if the list exists), and All Channels, back to Favorite 1, etc. Menu ==> Settings ==> Favorite Channels ==> Flip by Favorites option The Flip by Favorites option determines which list is displayed by default when you press the Favorites button: All Channels Favorites 1 Favorites 2 My preference is to set Favorites Button to Toggle Flip by Favorites and set Flip by Favorites to Favorites 1; this way, hitting the Guide button causes my Favorites 1 list to appear, and hitting the Favorites button allows me to quickly change which list is displayed in the Guide. Page 19 FiOS TV: Getting Started With IMG 1.9 The net effect of the above is that by default I see my favorites when I hit the Guide button, but I can easily change that to all channels or Favorites 2 at any time by hitting the Favorites button (Note: if you change which list is displayed and then exit the Guide, the next time you hit the Guide button it will display the list you were last viewing). I encourage you to try it with various settings and see which technique you prefer. Step 3: Enjoy If you set yours up like mine, you can now use the Guide button to view your preferred favorites list, but easily switch to the other favorite list or the full Guide just by hitting the Favorites button two or three times. You can always tell which version of the Guide you are watching, it will be displayed in the lower right corner of the guide. Page 20 FiOS TV: Getting Started With IMG 1.9 Recording Programs on the DVR Scheduling Recordings There are a variety of ways to record a program: From the Guide From the Menu While watching a program live From Search From a computer via the internet From a smart phone or other remote device Scheduling a Recording from the Guide While focused on the program you want to record: 1. Press the REC button once to record that episode. 2. Press the REC button again if you want to record the series or cancel a previously scheduled recording. When you choose this option you will be given options to: Cancel the Recording Record Series Record Series with Options. The options include adjusting the start and end times, whether to record first run or all programs, etc. Scheduling a Recording from the Menu 1. Press Menu. 2. Scroll up to DVR and press the Right Arrow (OK also works). 3. Scroll up to Create Recording and press the Right Arrow. 4. Choose how you want to set the recording to be done: Search, Guide, or Manual. Page 21 FiOS TV: Getting Started With IMG 1.9 Manual allows you to schedule a recording without forcing you to choose a “program”; instead, you pick the channel and you pick the start and end times without depending on any entry in the Guide or the program being found in a search. Scheduling a Recording While Watching a Program Live Press REC. Very similar to scheduling a recording using the Guide, but you will be offered a slightly different set of options if you press REC a second time. Scheduling a Recording from Search If you press the B button you will be taken to the Search menu. Once you find the program you want to record, pressing OK will present a number of options for recording, etc. Scheduling a Recording from a Computer via the Internet You can schedule recordings using your computer. Log into My Verizon in your browser. Mouse over FiOS TV Click on TV Listings in the pull-down Find the program you want to record and click on it. You will then be given the opportunity to Record the program, see more details, or find possible future airings of the program. You can filter the channels shown by selecting HD Only, for example, and if you have a Favorites list defined you can use that. Scheduling a Recording from a Smart Phone or Other Remote Device (to be completed or deleted????) Recording Options There are several Menu options you can set that affect how recordings are made and how they are saved: Menu DVR Settings Default Series Options For instance, you can define how many recordings to keep, whether to record new episodes only or all episodes, whether recordings are to be kept until you specifically delete them, etc. You can also reach Default Series Options from Settings directly under Menu and from the DVR button on the remote. Page 22 FiOS TV: Getting Started With IMG 1.9 Chaptering (works only on the DVR) Chaptering is one of the nice new functions in 1.9. For recorded programs it provides thumbnails so you can easily move through a recording quickly to find the spot you want. While watching the recorded program, press the Up Arrow to see the thumbnails. Use the Right and Left Arrow buttons to move quickly through the thumbnails until you reach the spot you want. Use the Down Arrow to resume viewing the recording at the desired spot. Two things are normally shown: a thumbnail picture extracted from the recording, and a time, which is the number of minutes:seconds into the recording this thumbnail represents. Unfortunately the picture does not always display, but the times always seem to, so you can at least use the time to find your desired place in the recording. You must activate Chaptering for it to work: Menu DVR Settings Program Chaptering Or Menu Settings DVR Program Chaptering Page 23 FiOS TV: Getting Started With IMG 1.9 Common Verizon FiOS Remote Controls Page 24 FiOS TV: Getting Started With IMG 1.9 Using the Verizon Remote Control With the Guide Using the Full Guide Button Guide Up Arrow Down Arrow Right Arrow Left Arrow Ch + (page) Ch – (page) Next Previous Forward Rewind Numbers Info Favorites Options BB Record Exit Action Start the Full Guide. Pressing it a second time displays the Channel Guide. Move to next lower numbered channel. Move to next higher numbered channel. Move the Guide forward 30 minutes. Move the Guide backward 30 minutes. Unfortunately you cannot go back any further than the current day and time. Move the channel currently displayed at the top to the bottom of the Guide display. Move the channel currently displayed at the bottom to the top of the Guide display. Move the Guide forward two hours. Move the Guide backward two hours. Unfortunately you cannot go back any further than the current day and time. Move the Guide forward one day. Move the Guide backward one day. Unfortunately you cannot go back any further than the current day and time. Move the Guide immediately to the entered channel. Enter 1 to 4 digits. If the channel number entered does not exist in the current Guide display it moves to the next higher channel. 0 goes to the lowest channel. 9999 goes to the highest channel. (appears to not work quite right when displaying All Channels) See additional program information on the in-focus channel in the Guide. Cycle through All Channels, Favorite 1, etc. Note that the operation of this button is dependent on your Favorites settings and may not work this way. View a selection list where you can change the list of channels displayed; for example, change to a different favorites list, view the full guide, see only HD channels, etc. Down near the bottom of the list is a Guide Legend which will show you explanations for the various icons you might see (like the yellow triangle with an exclamation point) as well as a color chart for the guide (movies, series, kids, sports, etc.). Go to the Search function. DVR and any STB with Multi-Room feature activated. Set program to be recorded. Press Record a second time to record a series. End the Guide. Page 25 FiOS TV: Getting Started With IMG 1.9 For Watching Live TV Note: While watching live TV on the DVR or on an STB if the Multi-Room feature of the DVR is active, you can also use various buttons relating to recording programs and playing back recordings. Using these buttons will be covered in the next section. Watching Live TV Exit Return to live TV from any of the IMG screens. OK Generally selects an option from one of the IMG screens displayed by using one of the buttons described below. View the Half Screen Guide. Press Exit to leave the half screen Guide. Up Arrow Down Arrow Right Arrow Favorites Info Options Last View the Mini-Guide, showing the current channel and the next three programs on the same channel. Many of the buttons available in the Full Guide will work for the Mini-guide. Press Exit to leave the mini-Guide. Display TV Modes (if turned on in Settings) where you can make a selection that will display only selected channels, like Movies or Sports. Press Exit, OK, or Left Arrow to close Modes. Cycle through All Channels and any Favorites lists defined (works this way only if you have the settings as I have suggested). View more information on the current channel. Hit Info again for possibly more information (available for some programs but not all). Opens the Live TV Options where you can add the current channel to one of your favorites, delete the channel from a favorites, turn On or Off Closed Captions, etc. Switch to the last previously viewed channel. Ch + (Page) Scroll to the next higher channel number in the currently active Mode (All Channels, Favorites 1, Favorites 2). Ch – (Page) Scroll to the next lower channel number in the currently active Mode (All Channels, Favorites 1, Favorites 2). # (Aspect) * (CC) With an HDMI connection (works with component? I don’t know) cycles through the zoom of the picture in several stages: wider, wider still, higher and widest, normal. Works on HD channels (and SD channels if SD Override is set Off). HD STB/DVR only. Change Closed Captions settings. A Start Widgets (also can use the Widgets button). B Go to the Search function. Page 26 FiOS TV: Getting Started With IMG 1.9 For Controlling the DVR Note: The Next, Prev, Fwd, and Rew buttons also work while watching live TV on the DVR as long as you have first gone backward toward the beginning of the program (ie, used the Prev or Rew buttons). Recording a Program, Watching a Recorded Program, Watching a Live Program Next Prev Fwd Rew REC FiOS TV Normally skips forward “n” seconds where “n” is defined in the Menu. However, if recording has been paused, advance one frame at a time. May be disabled on some programs. Normally skips backward “n” seconds where “n” is defined in the Menu. However, if recording has been paused, rewind one frame at a time. May be disabled on some programs. Normally Fast Forward. Repeated presses increase the speed. However, if recording has been paused, forward in slow motion. May be disabled on some programs. Normally Rewind. Repeated presses increase the speed. However, if recording has been paused, rewind in slow motion. May be disabled on some programs. Begin Recording. Pressing a second time will define a series recording. Also works while viewing the Guide. DVR only. Takes you to the live location in the current program. Useful if you have rewound the live program and now want to get back to the current position. Page 27 FiOS TV: Getting Started With IMG 1.9 Using Remote DVR from Smart Phone or Tablet(?) (I think this topic might be appropriate, but I use Remote DVR only from My Verizon on the web, so I have no experience to base any comments or suggestions on. If someone can provide some information I will be happy to include it here, and credit them.) Page 28 FiOS TV: Getting Started With IMG 1.9 Using Video on Demand VOD offers free and fee access to a large number of programs, including: Free broadcast and cable channel TV programs from ABC, NBC, CBS, FOX, FX, HDNet, TBS, and others. Movies for a fee. Premium channels – free if you subscribe to that service. A variety of other free content, include some movies. Flexview You access VOD by pressing the On Demand button on the remote. I rarely use VOD so I really have no advice regarding using the service. (If someone has some suggestions for additional content here, hints and tips for using, things to watch out for, etc., I will be happy to add it here, and credit them) Page 29 FiOS TV: Getting Started With IMG 1.9 Some Additional Hints and Tips for FiOS TV (Any suggestions for other topics?) Connections Between the STB and the TV There are several different connection methods that can be used to connect your STB to your TV. The installer will have made the connection, but he might not make the best connection available, you may have some problems with the initial setup, or you may change your TV or STB and need to re-do your own connections. So here are some simple suggestions. HD STB/DVR to HD TV HDMI or Component. HDMI is simpler because it is only one cable, but some TVs have interface issues and may not work correctly with HDMI. If so, use Component + audio cables. You should be able to get the same picture quality using either connection. Any other connection will not provide an HD signal to the HD TV. HD STB/DVR to SD TV Component + audio if connection available on the TV, otherwise Composite + audio, then S-Video + audio, then finally coax. SD STB to HD TV Don’t do it, not worth it, get an HD STB. SD STB to SD TV S-Video + audio if connection available on the TV, otherwise Composite + audio, then finally coax. Using an External Hard Drive on the DVR The older Verizon DVRs, the QIP6416 and QIP 7216, have only 160 GB hard drives which is inadequate for some people. The newer DVRs all have 500 GB hard drives, which may be fine for most people. But if you need more space to store recordings you can buy and attach an external hard drive. If you buy an external hard drive to attach to your DVR, please be aware of the following: An external hard drive cannot be attached to a QIP6416. Verizon recommends specific Western Digital external hard drives: Page 30 FiOS TV: Getting Started With IMG 1.9 However, other drives can be used, although Verizon will not help if you experience performance or compatibility issues. You can find more information in the eSATA external hard drives section of the FiOS FAQs: https://www22.verizon.com/fiostv/web/unprotected/HelpFAQ.aspx Any drive must connect to the DVR using an eSATA connection (not USB). The drive will be formatted when attached to the DVR (any data on the drive will be erased). Recordings are encrypted; they cannot be accessed by attachment to a PC, for example. When recording with an external hard drive attached, all recordings will be on the external hard drive until it is full, then recording will switch to the internal hard drive in the DVR. The hard drive is “married” to that particular DVR; it cannot be moved to another DVR without being reformatted (and all recordings will be lost). If your DVR breaks and must be replaced, or you decide to replace it to get a newer one, all recordings on the external hard drive will be lost. Plus keep in mind that there is no facility for copying any recordings from the internal hard drive either. Multi-Room DVR and STBs No Longer See Each Other Occasionally my Multi-Room DVR and the other STBs seem to lose each other, so when I am on an STB and want to view, schedule, delete a recording, etc, I see an error message that the DVR cannot be found. When this happens it can easily be fixed: Menu DVR Refresh Devices It runs very quickly and has always fixed this problem for me. Native Pass Through and Sound Settings Verizon offers an option to pass the TV signal directly to your TV without changing the resolution. That is, if the channel you want to watch is broadcast at 720p and you have the resolution set in your STB to 1080i, normally the STB will change the resolution of the signal to Page 31 FiOS TV: Getting Started With IMG 1.9 1080i before sending it to the TV. If you want, you can change the STB setting so the original resolution is passed directly to the TV and not changed by the STB. Why might you want to use native pass through? Some people feel that the picture they see on their TV is better if it is viewed at its “native” resolution, and they want the best possible picture. Other people, like me, cannot see any difference. You might want to try setting this option to see if it makes any difference for you. One caution: with some TVs, using this setting results in a long transition time of maybe 3-4 seconds when changing channels (all channels when the resolution is different, not just HD to SD or SD to HD). My Sony does experience that delay, and I find it objectionable, and the improved picture quality, if any, was invisible to me. If you use an HDMI connection between the Motorola STB and the TV, there are also sound settings available in this menu that can possibly improve the sound performance you get. Specifically, if you occasionally experience loss of sound, changing the sound setting here may fix the problem. Note: there are no settings in the Cisco STBs to control the audio setting. The Cisco boxes can provide AC3 or LPCM digital audio on the HDMI output, but the audio may default to AC3, for example, and there is no way to force the setting to LPCM like there is with the Motorola STBs. The Cisco boxes automatically provide the proper HDMI audio output required, either AC3 or LPCM, depending on data received from the TV during the HDMI handshake, and may only have issues with certain TVs, such as some Vizio TVs. If you experience audio problems using a Cisco STB, using component and stereo cables is probably the best option. Unfortunately the pass through and audio settings are not in the IMG Menu for Motorola STBs (Pass through is for the Cisco STBs). Instead you must access the User Settings menu as follows: With the TV turned on: 1) Turn off the STB (if you have your remote set to turn on and off the TV and STB at the same time you may need to do this on the STB itself). 2) On the remote quickly press OK, then Menu, and the User Settings menu will appear. 3) To set the STB for Native Pass Through, scroll down to the HDMI/YPbPr Output line. Press OK to (slowly) scroll through the various output options: 1080i, 720p, 480p, and Native. While Native is displayed, you can then scroll down and set the specific resolutions your TV will accept. 4) To change the audio setting, scroll down to Additional HDMI settings and press OK. On this menu there is an Audio Output setting; scroll up to it and press OK to scroll through the various options: Auto, L-PCM, and Pass Through (for whatever it’s worth, Auto, which I believe is the default, has always worked correctly for me). When you are finished, scroll down to Return to Main Page and press OK. Page 32 FiOS TV: Getting Started With IMG 1.9 5) Once all options have been set the way you want, press the Power button to save your settings. 6) Press the Power button to turn the STB on to resume normal operation. There are other settings available in the User Settings menu, but most or all can be set much more conveniently using the IMG. Caller ID on TV I have had Caller ID on TV for more than two years. I have found it to be very reliable, but it has stopped working maybe 4 or 5 times in that time. Other people seem to have it fail much more frequently, so maybe the procedure I have used will help some of you get it working again. 1) Go into the Menu on the STB and turn Caller ID off. Do this for all STBs where Caller ID is not working. 2) Reboot your router. 3) Reboot the STBs, one at a time. 4) Go into the Menu on each STB and turn Caller ID on. 5) Wait maybe 25-20 minutes and see if it is working. If so, good. If not, I have no other suggestions…. Troubleshooting Options If your STB is not operating correctly, there are several things you can try that might fix the problem. In my experience, the very first thing to try is to reboot the STB by removing the electrical power from the STB for 15-20 seconds. Just pull the power cord out, turn off the surge protector, whatever is convenient. Then plug it back in and see if the problem is gone; amazingly, it frequently is. The next step is to try the built-in tools. Verizon STBs have two problem determination and resolution tools included in the IMG that may help if you are experiencing problems receiving a clear picture on some or all channels, slow channel changing or Guide operation, invalid available disk space calculations, etc. These tools are available under the Customer Support option of the IMG Menu. In-Home Agent: This tool contains a variety of options, such as: Page 33 FiOS TV: Getting Started With IMG 1.9 Reboot STB Set Top Box Auto Correction Network Diagnostics Auto-fix Common DVR Issues plus others. If you are having connection issues, picture quality issues, missing channels, etc, running one or more of these tools may fix your problem. Self Diagnostics: This tool will test various STB connectivity conditions and your service options and provide a report. If Failed is reported anywhere you have an issue that needs to be addressed. For example, here is what I see on my DVR: (picture here) Beyond the two tools above, there is also a very detailed display of information about the operation of the STB from the hardware Diagnostics menu. To access this menu on the Motorola QIP7232: With the TV and STB turned on: 1) Turn off the STB (if you have your remote set to turn on and off the TV and STB at the same time you may need to do this on the STB itself). 2) On the remote quickly press OK, then OK again, and the Diagnostics menu will appear. I believe the procedure is the same on the other Motorola STBs. For Cisco STBs the procedure to access the Diagnostics menu is to press Left Arrow and OK at the same time. The menu contains a series of “dxx” entries, each of which will display some detailed information about the status or operation of the STB. Entries d03 and d04 display some particularly useful information on the signal strength and errors detected on the specific channel the STB was tuned to at the time the Diagnostics menu was invoked. To exit the Diagnostics menu scroll down to the E entry and press OK on the remote. You will then need to turn the STB back on to resume normal operation. Page 34 FiOS TV: Getting Started With IMG 1.9 A Few Final Comments I hope you have found this document useful. It is certainly not a complete explanation of all of the capabilities of FiOS TV. I encourage you to explore the various settings and options so you get maximum benefit and enjoyment from the service. If you are interested in more information on FiOS TV, here are some possible sources: Channel 131 on your TV shows short videos on using various features. What’s New in the STB Menu: Menu Customer Support What’s New. Brief highlights of various new features in 1.9. FiOS TV Frequently Asked Questions: https://www22.verizon.com/fiostv/web/unprotected/HelpFAQ.aspx Verizon Forums: http://forums.verizon.com/. DSLReports Forums: http://www.dslreports.com/forums/. (I need more sources, anybody have any suggestions?) And finally, I would like to give credit to a number of people at the Verizon Forums who have helped me with this document: prisaz – encouragement, suggestions for topics, info on the Cisco STBs AnnJ – encouragement, extensive proof-reading, suggestions for topics The numerous people who provided feedback on my original Exploiting FiOS TV Favorites document from several years ago, which was the starting point for this document. Thanks to all for their help. Justin Page 35 FiOS TV: Getting Started With IMG 1.9 Glossary (looking for suggestions for additional entries) BPON: Broadband Passive Optical Network. Capable of 622 Mbps download and 155 Mbps upload. Each BPON fiber is split using an optical splitter to serve 16 or 32 users. DAC: A DAC is a grouping of VHOs that share a Digital Addressable Controller. DAC 1 1 1 3 3 3 5 5 5 7 7 9 9 13 13 13 13 Location Carrollton, TX Pomona, CA Palm Springs, CA Silver Spring, MD Richmond, VA Norfolk, VA Queens, NY Burlington, MA Providence, RI Temple Terrace, FL Pittsburgh, PA Freehold, NJ Philadelphia, PA Harrisburg, PA Buffalo, NY Syracuse, NY Albany, NY VHO 1 3 3A 4 9 9A 5 6 6A 2 11 7 8 14 15 15A 15B DVR: Digital Video Recorder. Currently Verizon uses the QIP7232, CHS 435, QIP7216, and QIP6416 DVRs. FiOS: Verizon’s implementation of fiber to the home. FiOS = Fiber Optic Service. GPON: Gigabit Passive Optical Network. Capable of 2.4 Gbps download speed and 1.2 Gbps upload speed. Each GPON fiber is split to serve 16 or typically 32 users. HD: High Definition. Display resolutions of 1,280×720 pixels (720p) or 1,920×1,080 pixels (1080i/1080p). The picture is normally displayed in a 16:9 format. HDMI: High Definition Media Interface. An audio/video interface for transmitting encrypted uncompressed digital data. HDMI supports, on a single cable, any uncompressed TV or PC video format, including standard, enhanced, high definition and 3D video signals; up to 8 channels of compressed or uncompressed digital audio; a Consumer Electronics Control (CEC) connection; and an Ethernet data connection. HDTV: High Definition Television. Page 36 FiOS TV: Getting Started With IMG 1.9 IMG: Interactive Media Guide. The Verizon software that controls the STB. Pixel: Picture Element. The smallest addressable screen element. It is the smallest unit of a picture that can be represented or controlled. SD: Standard Definition. Display resolution at something lower than a High Definition resolution (seriously, there are multiple Standard Definition formats). The picture is normally displayed in a 4:3 format. SDTV: Standard Definition Television. STB: Set Top Box. A generic term referring to both DVR and non-DVR boxes. VHO: Video Hub Office. A location where from which Verizon distributes the video signals to the local Central Office and ultimately to the customer. Local channels are inserted into the data streams at the VHO. VOD: Video on Demand. Page 37